

U-Line Echelon 2115WCOL, Echelon 2175WCOL, 2175BEVOL, 30139 Installation Instructions Manual
Page 1

Overlay Door Panel
Installation Instructions for
Wine Captain Models
2175WCOL and 2115WCOL
Phone (414) 354-0300 • FAX (414) 354-7905
Service & Parts Tech Lines Phone (800) 779-2547 • FAX (414) 354-5696
www.U-LineService.com
OnlineService@U-Line.com
©2006 U-Line Corporation
04/2006
Page 2
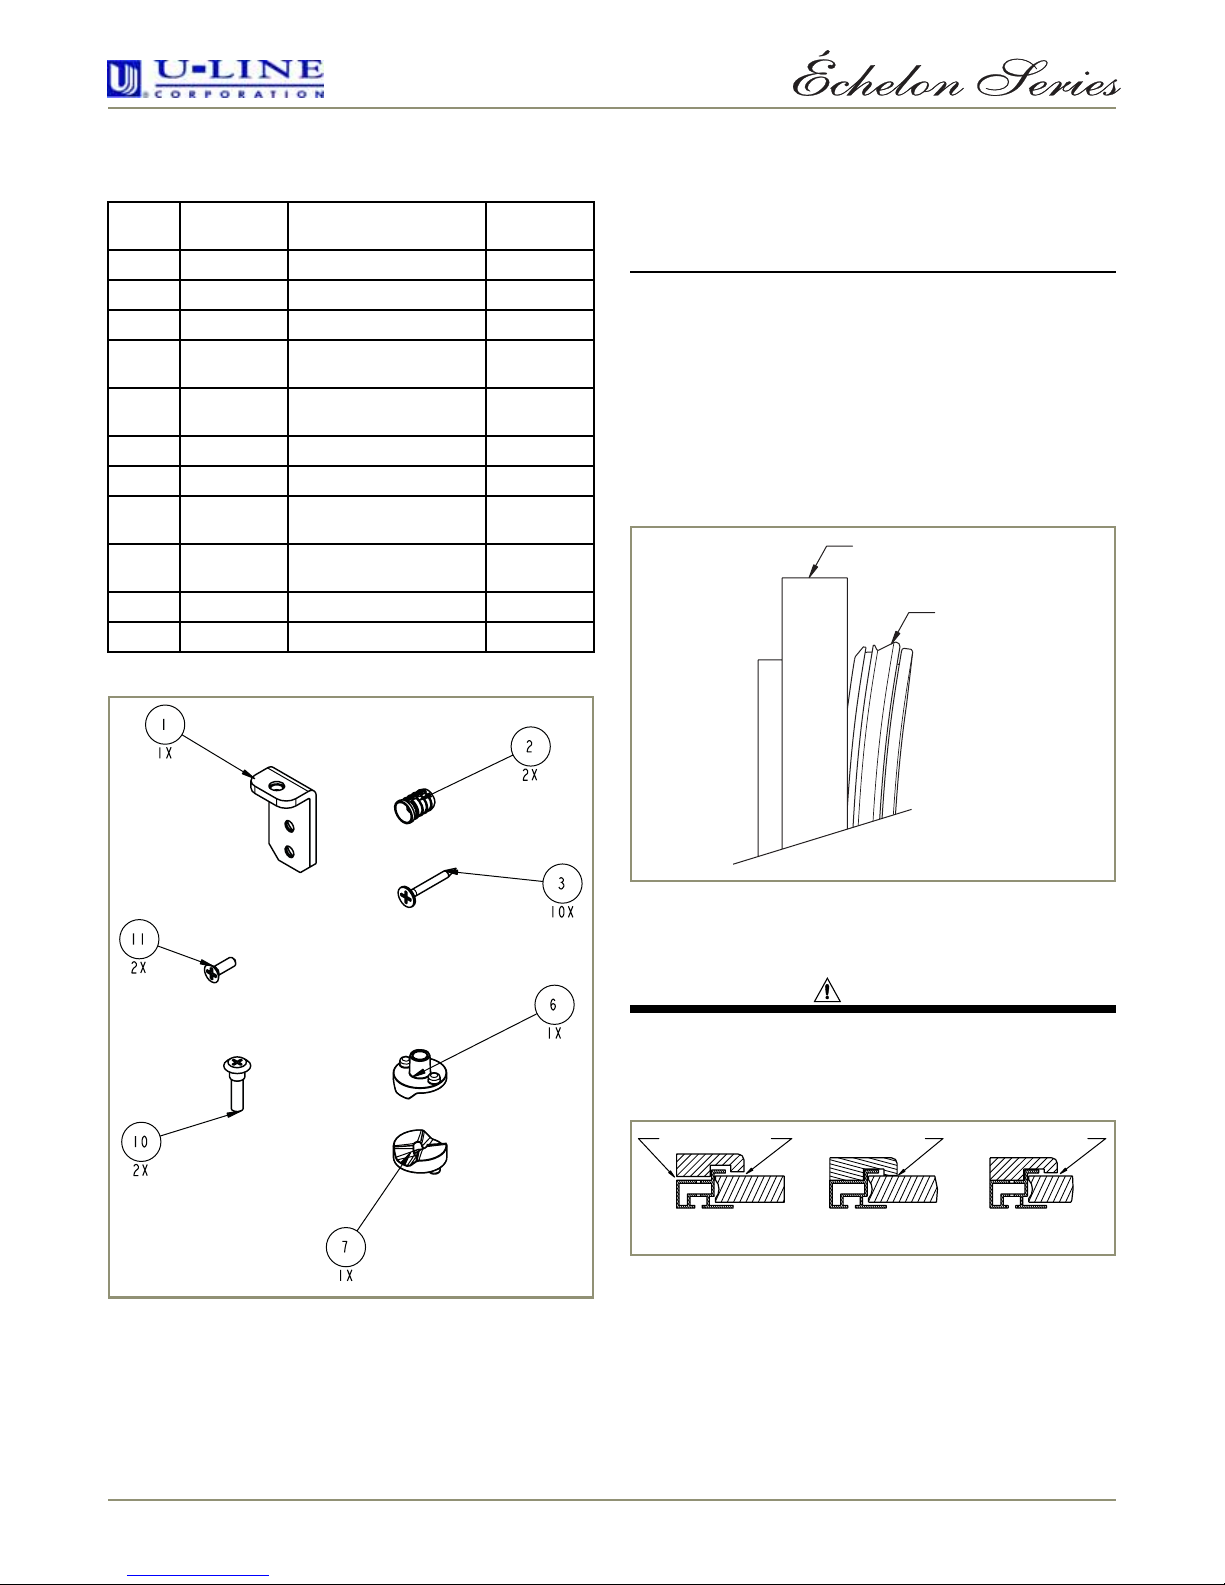
Overlay Panel Kit Parts Supplied Prepare the New Overlay Panel
Refer to the Overlay Panel Preparation instruction sheet,
Item Part
Number
1 12029-BLK Top Pivot Plate - Black 1
2 12041 Insert 8mm Plug 2
3 20002 Screw #6 x 1.0 Pan HD 10
4 30138
5 30139
6 31672 Door Closer - Male 1
7 31673 Door Closer - Female 1
8 35003
9 35003
10 42096 Pivot Post 2
11 42122 Screw #6 x .50 Lg Flat HD 2
Description Quantity
Mounting Instructions,
21XX (not shown)
WC Overlay Prep Sheet,
21XX (not shown)
Foam Tape .093 x .375 x
8’ (not shown)
Zipper Bag (holding
closer ASM) (not shown)
1
1
1
1
part number 30139.
IMPORTANT
The overlay door panel must not weigh more than
20 lbs. The thickness of the door panel must be 3/4".
Remove Gasket from Door
1. Remove door from shipping box.
2. Turn door over so gasket is facing up. Pull door gasket
out of the groove completely. Start in the middle and
pull outward, moving toward the edge
(Figure 2)
may take some force, but be careful.
DOOR
GASKET
. This
Figure 1
ULIN_0412_A
Figure 2
ULIN_0414_A
3. Place gasket on a flat, clean surface.
Checking Overlay Fit
CAUTION
If panel does not seat properly, determine the cause
of the problem by reviewing the Preparation
Instructions P/N 30139.
NOT FULLY SEATED LITTLE OR NO GAP OBJECTIONABLE GAP
Figure 3
1. Lay overlay panel on front side of door. Make sure
panel is fully seated on all four sides.
2. Visually check for gap between panel and glass. If there
is an objectionable gap, continue to
Tape t o Ove r l a y
.
Applying Foam
3. If there is little or no gap between panel and glass,
continue to
Attaching the Overlay Panel
ULIN_0415_A
.
www.U-LineService.com 2 04/2006
Page 3

Applying Foam Tape to Overlay
A
(If Required)
INSIDE
EDGE
Attaching the Overlay to the Door
1. Secure existing door with the front of the door to the
back of the overlay using tape, on all four corners as
shown (Figure 6). Make sure all four edges are
aligned.
DOOR FRAME
TA PE
Figure 4
ULIN_0417_A
1. Cut the foam tape into four pieces, two pieces the
width of the overlay and two pieces the height of the
overlay.
2. Remove the adhesive protection strip from one piece of
the cut foam tape and align the edge of the foam tape
to the inside edge of the overlay as shown, adhering
the foam tape to the overlay.
3. Trim each piece of tape immediately after applying it to
the overlay. Do not allow any overlapping of the foam
tape. Damage to the overlay can occur if the foam tape
is not trimmed correctly.
Attaching the Overlay Panel
1. Tap nylon inserts into the top holes drilled in the wood
panel. Use two #6 screws (P/N 42122) to attach top
pivot bracket (P/N 12029) to the wood door panel
(Figure 5).
NOTE: Carefully insert 8mm plugs into wood.
Cracking can occur if holes are not drilled to correct
size, or if plugs are inserted crooked.
TOP PIVOT PLATE
TYPICAL WOOD PANEL
#6 X 5/8" FLAT HEAD SCREW
TWO REQUIRED
TOP O F
OVERLAY
Figure 6
BOTTOM OF
OVERLAY
ULIN_0418_A
2. Place door and overlay on a clean, flat, protective
surface. Use the door frame holes as a guide to lightly
punch pilot holes for the #6 x 1" pan-head screws
(Figure 7)
.
#6x1" PAN-HEAD
SCREW (10 TOTAL)
8MM PLUG INSERT
TWO REQUIRED
Figure 5
2. If required, attach optional cabinet handle hardware to
the wood door panel at this time. If an optional cabinet
handle is installed, make sure the mounting screw
heads are below (countersunk) the back surface of the
overlay.
04/2006 3 www.U-LineService.com
Figure 7
ULIN_0419_A
3. Attach the door to the overlay using the #6 x 1" wood
screws (model 2175 shown).
IMPORTANT
ULIN_0416_
If you decide to drill the pilot holes, remove the
door and do not use a drill bit larger than 7/64", and
do not drill deeper than 3/8". Frame and door
overlay must be aligned properly or the door will
not operate correctly.
NOTE: The door frame is designed with a slight amount of
“play” to square the frame to the overlay panel.
Page 4

Assembling the Door
Starting at the corners and working toward the center,
push the door gasket back into place. Make sure gasket is
fully seated on all four sides.
NOTE: Door hinges are attached to unit for right-hand
swing. Refer to your user manual for instructions to
reverse. (Be sure to also move the spacers with the
hinges.)
Installing the Door
IMPORTANT
Pivot posts must be clean. Closers must also be
clean and greased with petroleum jelly to ensure
proper operation.
DOOR
CLOSER
INSERTS
1. Install one of the pivot posts (P/N 42096) into bottom
hinge (using Phillips screwdriver), making sure post is
seated fully.
2. Remove pre-greased closure assembly (male closer P/N
31672 and female closer P/N 31673) from poly bag (P/N
37015) and slide over bottom pivot post, making sure
that bosses align with holes in hinge and that assembly
is fully seated
(Figure 8)
.
For more than four decades, U-Line has distinguished itself as the leader in built-in
undercounter ice making, refrigeration and wine storage appliances.
Figure 8
BOSS
ULIN_0420_A
3. Position door over door closer. Be sure the door hinge
plate holes align with the bosses on the closer
8)
. Failure to do this will result in the door not aligning
(Figure
properly.
4. Holding the door in the closed position, install the other
pivot post (P/N 42096) through the top hinge (using a
Phillips screwdriver) into the top pivot plate, making
sure post is seated fully.
5. Adjust door as needed for proper closure. Refer to user
manual for door adjustment procedures.
U-Line Corporation, located in Milwaukee, WI, is a family operated manufacturer of built-in
undercounter icemakers, Combo® icemaker/refrigerators, Wine Captain® wine storage units,
refrigerators, refrigerated drawers and refrigerator/freezers.
©2006 U-Line Corporation
Publication No. 30138
04/2006 Rev. A
 Loading...