

U-Line 3024RGLS00 User Manual
®
USE & CARE GUIDE
MODULAR 3000 SERIES
WINE CAPTAIN®
MODELS
U-3018WCOL-00
U-3018WCOL-01
U-3018WCS-00
U-3018WCS-01
U-3018WCS-13
BEVERAGE
CENTERS
U-3024BEVOL-00
U-3024BEVOL-01
U-3024BEVS-00
U-3024BEVS-01
U-3036BVWCOL-00
GLASS DOOR
REFRIGERATORS
U-3018RGLOL-00
U-3018RGLOL-01
U-3018RGLS-00
U-3018RGLS-01
U-3018RGLS-13
REFRIGERATORS
U-3018RFOL-00
U-3018RFOL-01
U-3018RFS-00
U-3018RFS-01
U-3024RFOL-00
U-3018WCS-15
U-3024WCOL-00
U-3024WCOL-01
U-3024WCS-00
U-3024WCS-01
U-3036WCWCOL-00
U-3036WCWCS-00
U-3036WCWCS-13
THE MODULAR 3000 SERIES ARE INTENDED FOR BUILT IN INSTALLATIONS ONLY
U-3036BVWCS-00
U-3036BVWCS-13
U-3018RGLS-15
U-3024RGLOL-00
U-3024RGLOL-01
U-3024RGLS-00
U-3024RGLS-01
U-3036RRGLOL-00
U-3036RRGLS-00
U-3036RRGLS-13
U-3024RFOL-01
U-3024RFS-00
U-3024RFS-01
U-3036RROL-00
U-3036RRS-00
The Built-In Undercounter Leader Since 1962 U-LINE.COM
FOR PRODUCT ASSISTANCE, CALL 1-800-779-2547
MILWAUKEE, WI U.S.A.
Serial/Serie:Model/Modele:
HIGH SIDE DESIGN PRESSURE 300 PSI
LOW SIDE DESIGN PRESSURE 140 PSI
REFRIGERATOR AND/
BTL
LISTED 674R
OR FREEZER
HOUSEHOLD
U
C
L
R
US
www.u-line.com
1
2
Introduction
IMPORTANTIMPORTANT
Congratulations on your purchase of a U-Line refrigerator.
For nearly five decades and three generations, U-Line continues to
be the leader in innovation, quality and value in the premium
built-in undercounter ice making, refrigeration and wine
preservation market. U-Line has captivated those with an
appreciation for the finer things with exceptional functionality,
style, inspired innovation and attention to even the smallest details.
We are known and respected for our unwavering dedication to
product design, quality and selection.
In 1962, Henry Uihlein founded U-Line Corporation as an
outgrowth of Ben-Hur Freezer Company and was the first to
develop and patent an automatic stand-alone undercounter
residential ice maker. His foresight and determination to develop
new ideas and to succeed when there were no clear guidelines or
solutions are evident today. The newest Uihlein generation
continues to build upon the family’s innovative legacy at the
Milwaukee, Wisconsin based business by providing continuity and
vision from which new designs and technology continue to be
born.
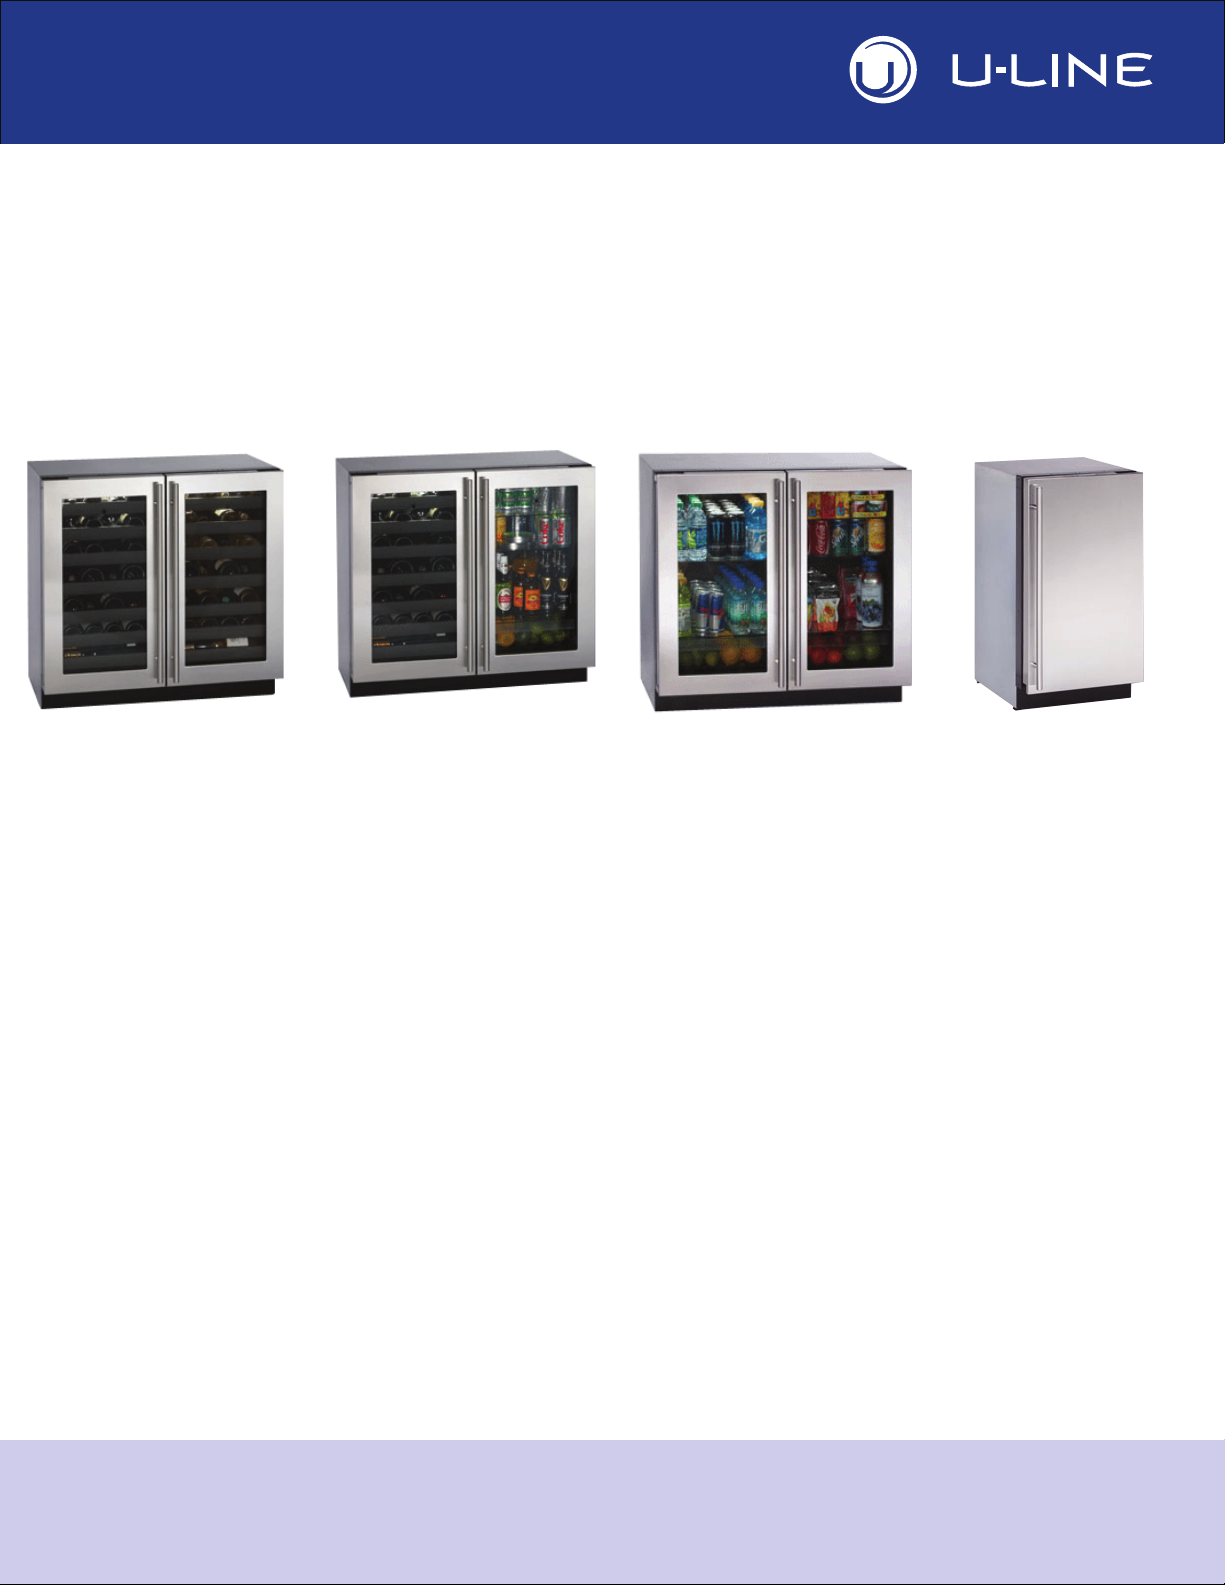
Today the complete U-Line product collection includes Ice Makers,
Wine Captain® Models, Combo® Models, a Refrigerator /
Freezer, Refrigerators, Drawers and Beverage Centers. The U-Line
brand offers products in the 1000 Series, 2000 Series and the
Modular 3000 Series. The 1000 Series offers a more targeted
priced product with appropriate features, while the 2000 Series
offers upscale features, advanced technology and specialized
product families. U-Line’s approach to its breadth of products,
multiple price points and features allows a choice and product that
will fit any lifestyle.
Please Record Your Model Information
You will need your product model and serial number when you
request additional information or services. You can find this
information on the serial plate located on the upper right or back
wall in the interior of your product. This information also appears
on the warranty registration card. Please complete and mail your
warranty registration card. You may also register online at
www.u-line.com
Please record the model number (1), serial number (2), date of
purchase, and dealer contact information for your U-Line product
below:
Model Number:
________________________________________________
Serial Number:
________________________________________________
Purchase Date:
Read and save this Use and Care Guide.
READ all instructions in this guide completely before
using the appliance for the first time.
For future reference, keep this guide in a safe, accessible location. If
you need additional information or assistance, please contact ULine Corporation direct. Contact information appears on the back
cover of this guide.
Before Calling Service. If you think your U-Line product is
malfunctioning, read the OPERATION section of this guide to
understand clearly the function of the control. If the problem
persists, read the TROUBLESHOOTING GUIDE section of this
guide to help you quickly identify common problems, and provide
information on possible causes and remedies.
________________________________________________
Dealer Name:
________________________________________________
Dealer Address:
________________________________________________
Dealer Telephone:
________________________________________________
Introduction to U-Line

1 Table of Contents
Safety Precautions
Safety Alert Definitions.........................................................................................................................................1
General Precautions..............................................................................................................................................1
3000 Series Product Features
3000 Series Features: ............................................................................................................................................2
Air Flow....................................................................................................................................................................3
Initial Startup ...........................................................................................................................................................3
U-Select® Control.................................................................................................................................................3
Adjusting Temperature Settings .........................................................................................................................3
Product Operation
Interior Lighting......................................................................................................................................................4
Error Notification ..................................................................................................................................................5
U-Line Wine Guide
Looking Behind the Label.....................................................................................................................................7
Wine Selections Suggestions...............................................................................................................................7
3000 Series Maintenance
Leveling...................................................................................................................................................................10
Adjusting Interior Shelves ..................................................................................................................................11
Wine Rack Removal and Installation...............................................................................................................11
Refrigerator Bin Installation & Removal .........................................................................................................12
3000 Series Doors
Door Alignment and Adjustment.....................................................................................................................13
Cleaning
Exterior Cleaning .................................................................................................................................................14
Interior Cleaning ..................................................................................................................................................14
Defrosting ..............................................................................................................................................................14
Product Disposal..................................................................................................................................................15
Service
Before Calling for Service ..................................................................................................................................16
If Service is Required...........................................................................................................................................16
Replacement Parts ...............................................................................................................................................16
Normal Operating Sounds.................................................................................................................................16
Troubleshooting Guide.......................................................................................................................................16
IMPORTANTIMPORTANT
DANGER
WARNING
CAUTION
2 Safety Precautions
DANGER
WARNING
WARNING
CAUTION
IMPORTANTIMPORTANT
• PLEASE READ all instructions before installing,
operating, or servicing the appliance.
General Precautions
Use this appliance for its intended purpose only. The 3000 model
series is intended for BUILT IN
brackets MUST be installed. Follow these general precautions
with those listed throughout this guide:
installation only. Anti tip
• Proper installation procedures must be followed when
completing an installation or relocation of a unit.
Consult the installation guide before any installation
begins. U-Line contact information appears on the rear
cover of this guide.
• This unit requires connection to a dedicated 15 Amp
grounded (three-prong), polarized receptacle.
Receptacle should be installed by a qualified electrician,
compliant with applicable electrical codes.
Safety Alert Definitions
Throughout this guide are safety items labeled with a Danger,
Warning or Caution based on the risk type:
Danger means that failure to follow this safety statement will
result in severe personal injury or death.
RISK OF CHILD ENTRAPMENT. Before you throw away your
old refrigerator or freezer, take off the doors and leave shelves
in place so children may not easily climb inside.
SHOCK HAZARD - Electrical Grounding Required.
• Never attempt to repair or perform maintenance on
the unit until the electricity has been disconnected.
• Never remove the round grounding prong from the
plug and never use a two-prong grounding adaptor.
• Altering, cutting of power cord, removal of power
cord, removal of power plug, or direct wiring can
cause serious injury, fire and or loss of property and
or life, and will void the warranty.
• Never use an extension cord to connect power to the
unit.
• Always keep your working area dry.
Install provided Anti-Tip kit on all models. Units
may NOT
be installed as free standing. Serious
personal injury could occur.
Warning means that failure to follow this safety
statement could result in serious personal injury,
property or equipment damage.
Caution means that failure to follow this safety statement
may result in minor or moderate personal injury, property
or equipment damage.
• Use care when moving and handling the unit. Use gloves
to prevent personal injury from sharp edges.
• If your model requires defrosting, DO NOT use an ice
pick or other sharp instrument to help speed up
defrosting. These instruments can puncture the inner
lining or damage the cooling unit. DO NOT use any type
of heater to defrost. Using a heater to speed up
defrosting can cause personal injury and damage to the
inner lining.
• Do not lift unit by door handle.
• Never install or operate the unit behind closed doors.
Be sure front grille is free of obstruction. Obstructing
free airflow can cause the unit to malfunction and will
void the warranty.
• Failure to clean the condenser every six months can
cause the unit to malfunction. This could void the
warranty.
• Allow unit temperature to stabilize for 24 hours before
use.
• Do not Block any internal Fans
Use only genuine U-Line replacement parts. Imitation
parts can damage the unit, affect its operation or
performance and may void the warranty.
1 U-Line 3000 Series Product Features

3 3000 Series Product Features
3000 Series Features:
Advanced OLED control system: State of the art OLED
control system display.
Fully Integrated Design: Units are designed to blend seamlessly
with surrounding decor.
Stainless Steel: Stainless steel models offer a commercial
stainless steel handle and door wrap.
Overlay Models: Overlay models accept a custom overlay panel
or frame to achieve perfect symmetry with surrounding cabinetry.
Fully Adjustable Toe-Kick / Grille: Grille is fully adjustable and
can be lined up with surrounding cabinetry toe kick height and
depth for a truly built in look.
Adjustable Leg Levelers: Heavy Duty leg levelers help dial in
the perfect fit. Rear leg levelers are adjusted from the front of the
unit for ease of installation.
Advanced diagnostic system: Advanced diagnostic systems
accessible through front grille mounted USB port, an industry first.
Advanced LED lighting system: Energy efficient and low heat
LED lighting provides an elegant illumination system. Theater style
lights build to fully on and dim to fully off over a 3 second window.
Fully programmable / adjustable.
Convection Cooling: Units are equipped with a convection
cooling system. Convection systems cool items faster and maintain
entire cabinet temperature precisely to user set-point.
3036 Model Features:
Dual Zone: Two independently controlled zones allow precise
storage of a wide range of perishable and temperature sensitive
goods.
Multiple Cabinet Configuration: The 3036 models are
available in a large range of cabinet configurations. From Wine
storage to bin style refrigeration, also in a wide range of
combinations.
Refrigeration Centers (Solid Door)
Solid Door: Available in thermally insulated ultra energy efficient
solid door design. Doors are available in both stainless steel and
overlay.
Slide out bins: 3 full extension slide-out bins on 3018/3024
models and 6 full extension slide-out bins on 3036 models. Bins are
easily removed for cleaning.
3018 Capacity: 3.4 cubic feet.
3024 Capacity: 4.78 cubic feet.
3036 Capacity: 6.8 cubic feet.
Refrigeration Centers (Glass Door)
Glass Door: Standard with energy efficient, triple pane, Low-E
coated, argon filled glass doors. Door(s) are available in stainless
steel wrap or overlay.
Adjustable Shelving:
3018/3024: 3 removable/adjustable tempered glass shelves,
1 fixed lower shelf.
3036: 6 removable/adjustable tempered glass shelves,
3 per zone, and 2 fixed lower shelves, 1 per zone.
Crisper Drawer: Includes “true” crisper drawer, 3036 units
include 1 per zone.
3018 Capacity: 3.6 cubic feet
12 oz Bottle = 60 (with two glass shelves)
12 oz Cans = 127 (with four glass shelves)
3024 Capacity:
3024RGLOL Capacity: 4.66 cubic feet
3024RGLSS Capacity: 4.87 cubic feet
12 oz Bottle = 84 (with two glass shelves)
12 oz Cans = 168 (with four glass shelves)
3036 Capacity: 7.1 cubic feet
12 oz Bottle = 120 (with two glass shelves)
12 oz Cans = 254 (with four glass shelves)
Wine Captain®
Glass Door: Standard with energy efficient, Low-E coated, argon
filled glass doors.
Full extension wine racks: 6 fully extendable wine racks per
zone safely store your wine at the perfect humidity and
temperature. 2 of the 6 extendable wine racks in each zone have
been designed to carry both standard or large diameter bottles,
including champagne. An additional wine rack per zone on the
bottom carries two additional bottles.
3018 Capacity: 3.6 cubic feet. Wine Bottles: Up to 31 (.75L)
3024 Capacity: 3024WCOL Capacity: 4.80 cubic feet.
3024WCS Capacity: 5.03 cubic feet. Wine Bottles: Up to 43 (.75L)
3036 Capacity: 7.1 cubic feet. Wine Bottles: Up to 62 (.75L)
Beverage / Wine Combination Model (3036)
Glass Door: Standard with energy efficient, triple pane, Low-E
coated, argon filled glass doors. Doors are available in stainless
steel wrap or overlay.
Adjustable Shelving: 3 removable/adjustable tempered glass
shelves, 1 fixed lower shelf.
Full extension wine racks: 6 fully extendable wine racks. 2 of
the 6 extendable wine racks have been designed to carry both
standard or large diameter bottles. An additional wine rack on the
bottom carries two additional bottles.
Capacity: 7.1 cubic feet total. Wine bottles 31. 12 oz cans 127.
Beverage Centers (3024)
Glass Door: Standard with energy efficient, triple pane, Low-E
coated, argon filled glass doors. Doors are available in stainless
steel wrap or overlay.
Adjustable Shelving: 3 removable/adjustable tempered glass
shelves, 1 fixed lower shelf.
Capacity: 3024BEVOL Capacity: 4.66 cubic feet.
3024BEVLS Capacity: 4.87 cubic feet. 12 oz Cans = 126
U-Line 3000 Series Product Features 2
WHITE WINE WHITE WINE
4499 FF 5500 FF
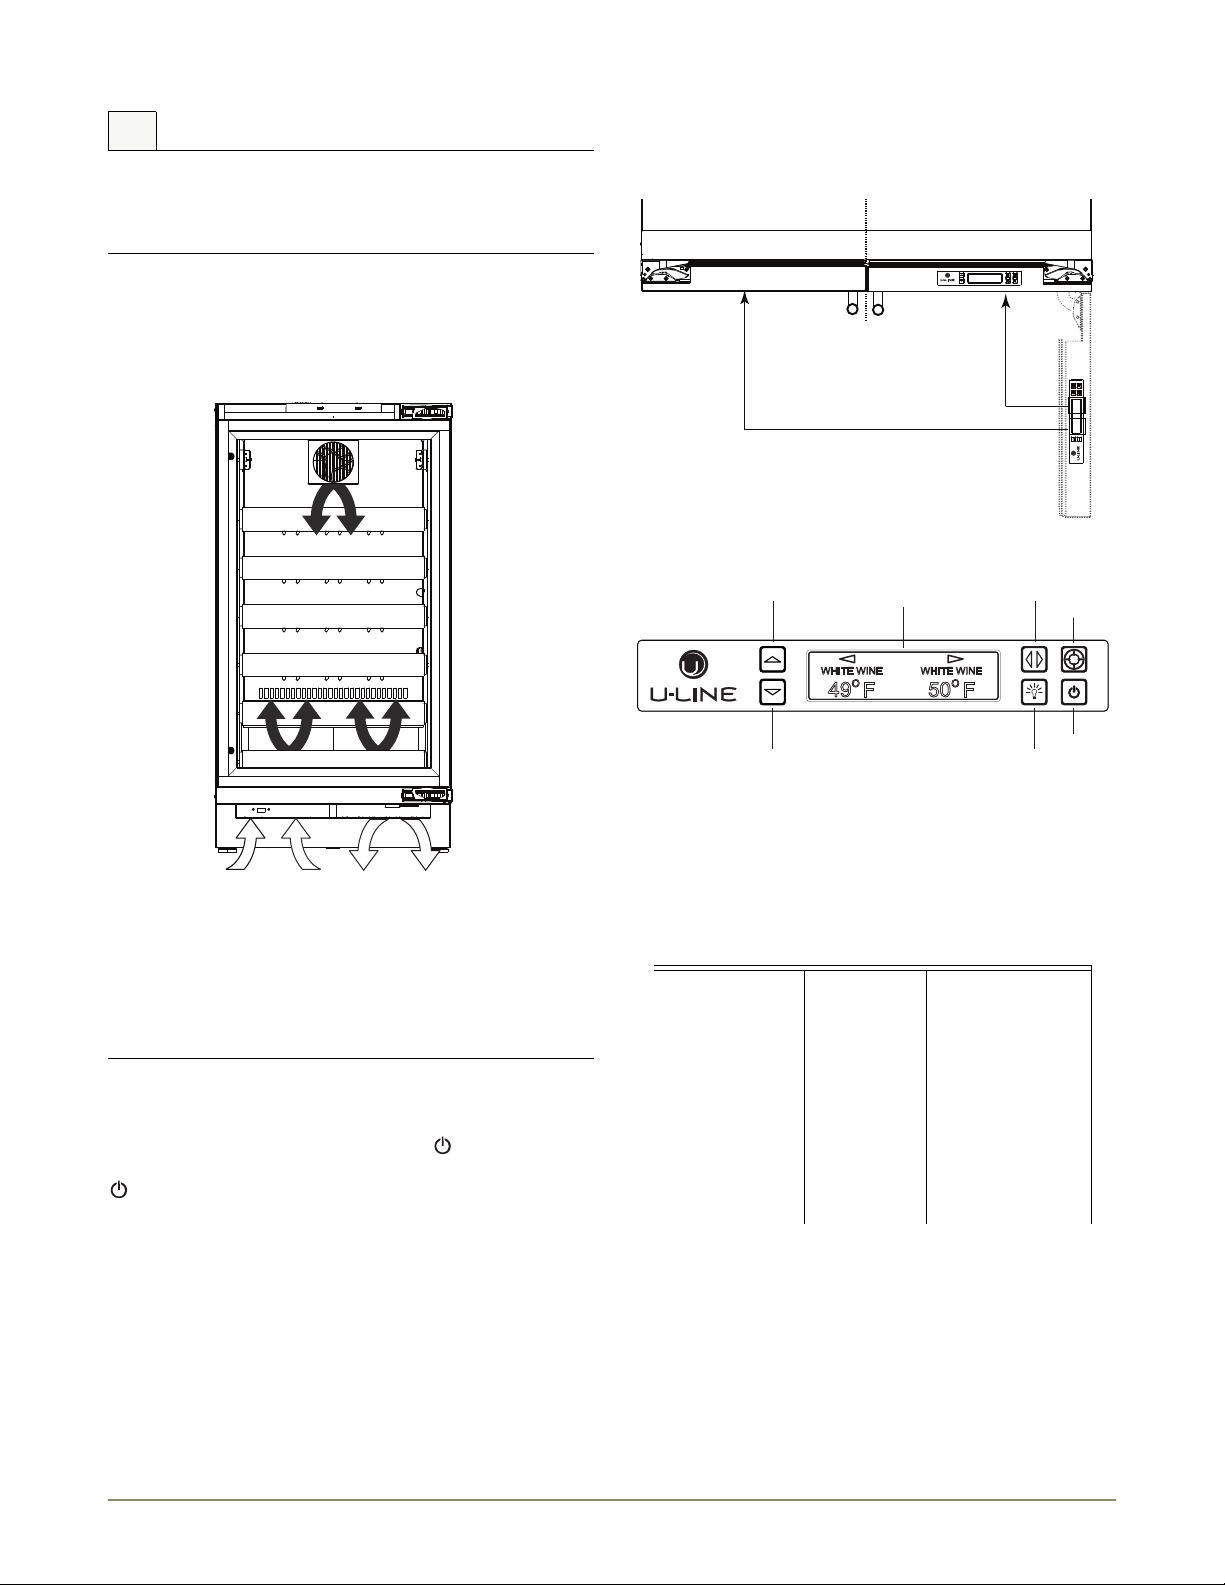
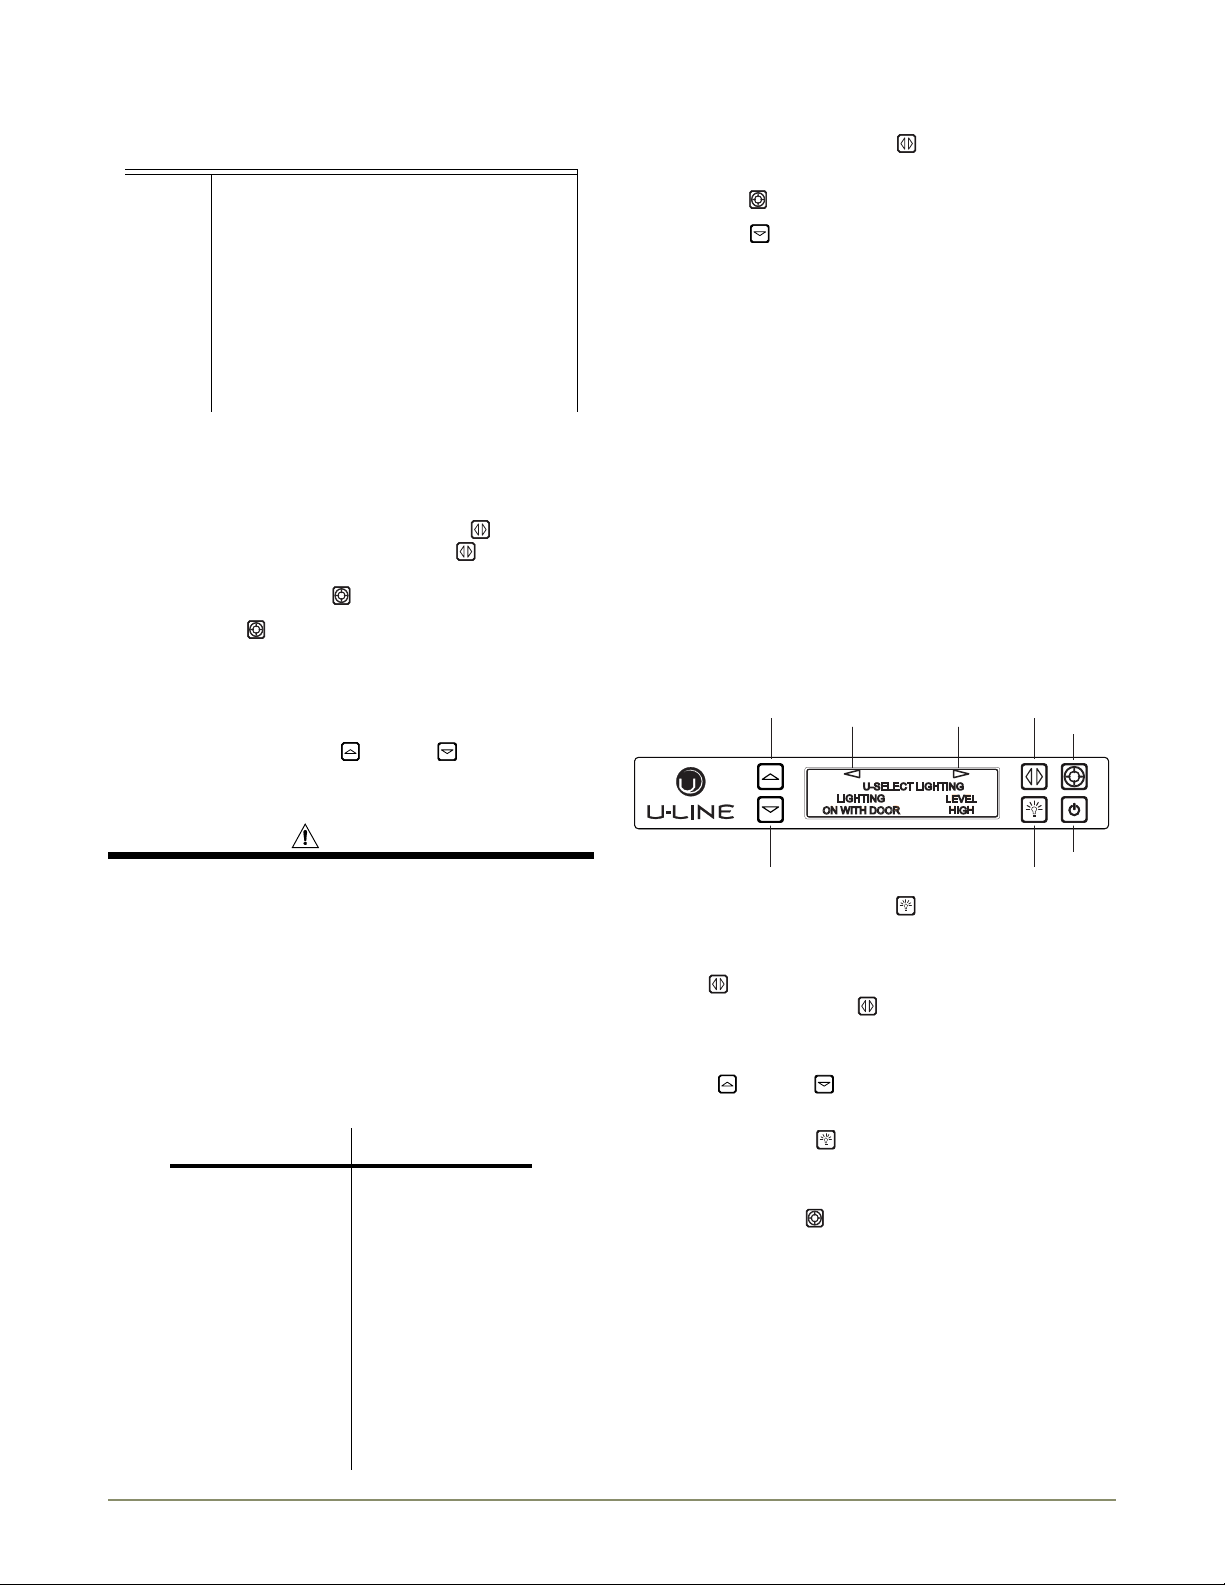
OO OO
Up
Display
Zone Toggle
Select
Down
U-Select Lighting
Power
3036 Model Display Shown
IMPORTANTIMPORTANT
IMPORTANTIMPORTANT
4 Product Operation
Display Zone Control Configuration
Left Zone
Left Zone
Right Zone
Right Zone
38°
38°
Door Removed For Illustration Purposes
Internal Air Flow And Unit Ventilation Diagram
Air Flow
The unit requires proper air flow to perform at its highest
efficiency. Do not block the front grille, internal fans or
vents at any time, or the unit will not perform as
expected. Do not install the unit behind a door.
Zone Control 3036 Models
3036 Models have a single control module for both zones. Each side
of the control refers to a specific zone. See Below.
Adjusting Temperature Settings
Initial Startup
All U-Line controls are preset at the factory. Initial startup requires
no adjustments.
U-Line recommends allowing the unit to run overnight
before loading refrigerator with product.
To power your unit on simply press POWER and the unit will
immediately switch on. To turn the unit off, press and hold POWER
for 5 seconds and release. The display will show a countdown to
switching the unit off.
U-Select® Control
Digital Display.
The 3000 Series units are controlled by a feature rich, advanced
OLED display control unit. The control panel allows adjustment to
temperature set point, access to Energy Saver Mode, internal
temperature readings, and many other features.
Each Zone has a Series of Mode Settings with a default value for
each setting. Each Mode Setting can be further customized by fine
tuning the temperature set point. See the table below for a
description of each Mode and Mode temperature ranges. Mode
selection will vary by model.
Mode Setting Chart
Setting Default (°F) Range (°F)
Red Wine 55° 55° - 65°
White Wine 50° 45° - 55°
Sparkling Wine 45° 38° - 50°
Beverage 38° 34° - 65°
Market 38° 34° - 40°
Root 50° 45° - 55°
Pantry 42° 34° - 70°
Deli 36° 34° - 40°
Many food types have an optimum storage temperature. Storing
your food properly will help maintain its freshness and flavor. The
chart on page 4 contains food types and their respective optimum
storage temperatures.
3 U-Line Product Operation
Food Storage Chart
CAUTION
Up
Zone Indicator Zone Indicator
Zone Toggle
Select
Down
U-Select Lighting
Power
3036 Model Display Shown
U-SELECT LIGHTING
ON WITH DOOR
LIGHTING
HIGH
LEVEL
Mode Food Types
Deli
Market Fruits, Vegetables, Berries, Lettuce
Pantry
Root
The 3036 Models have two independently controlled zones. Each
zone may have its own mode and set point. The 3018 models have a
single zone. Available Mode Settings will vary with model.
1. In order to adjust temperatures in the 3036 you must first select
a Zone to adjust. To select, press Zone Toggle . The left side
Mode Setting will flash. Pressing Zone Toggle again will select
the right side and the right side Mode Setting will flash. For 3018
Models simply press Select to alter Mode Settings.
2. Pressing Select will cycle through the available modes for
your model. Reference the Mode Settings Chart on
each Setting’s default set point and range.
3. Once your have selected your desired Mode the default set
temperature will display. You may further fine tune the
temperature by pressing Up or Down .
Meats, Fish, Cheeses, Dairy, Butter, Garlic, Oils,
Nuts, Condiments
Dry Goods, Breads, Baking Items, Spices,
Seasonings
Root Vegetables, Potatoes, Onions, Lemon, Lime,
Melon, Peppers, Beans, Cucumber, Cut
Ve ge ta b le s
pg 3
for
To Initiate quick chill.
1. In 3036 models use Zone Select
to select the desired zone,
left or right.
2. Press Select to select the desired mode setting.
3. Press Down until the temperature set point reads “Quick”
The quick chill feature will then begin for the period of time
dictated by the mode type. To cancel quick chill, simply select a set
point other then “quick”.
Note: There may be a delay before quick chill is activated in 3036
models. If the opposite zone is currently in a cooling cycle while
quick chill is selected, the cooling cycle on the opposite zone will
first be completed.
Note: Please note, that when quick chill is activated in a 3036, the
zone opposite the active quick chill zone will not return to a
cooling cycle until quick chill is complete. If storing product in the
opposite zone it is important to limit the number of times the
door is opened in the zone not currently under quick chill.
Interior Lighting
Your U-Line 3000 Series unit uses a state of the art LED lighting
system. The 3036 model dual zone’s lighting can be independently
controlled or set as a group.
3036 Model
Quick Chill
A number of zones include a quick chill feature. Quick
chill is designed to quickly pull warm beverages and foods
down to optimum storage temperature. It is important to
only initiate quick chill modes when the Refrigerator or
Wine Captain® have been fully loaded with warm
product. Failure to follow this notice could result in food
or beverages that are cooled to a point below optimum or
frozen.
The following table lists modes which include the quick chill feature
and the time which quick chill will run.
Mode Run Time
Beverage 4 Hours
Deli 5 Hours
Market 4 Hours
Pantry 4 Hours
Red Wine Not Available
1. To begin, press U-Select Lighting to enter the lighting menu.
2. In 3036 Models the unit initially defaults to control the lighting in
both Zones simultaneously. To select a single zone press Zone
Toggle . Notice the arrows on top of the display changing
state. Pressing Zone Toggle once will select the left side
zone, pressing it again will select the right side zone, pressing it a
third time will select both zones again.
3. Use Up or Down to cycle through each available
brightness setting; Low, Medium, or High.
4. Use U-Select Lighting
to cycle through each available timer
setting. Selections include “On With Door”, “On 3 Hours”, “On
6 Hours”, or “On 24 Hours”.
5. To exit, press Select
or simply wait for the menu to time out.
Root 1 Hour
Sparkling 1 Hour
White Wine 1 Hour
U-Line Product Operation 4

3018/3024 Model
Up
Select
Down
U-Select Lighting
Power
Up
Select
Down
WELCOME TO THE
CUSTOMER MENU. USE
UP/DOWN ARROWS TO
SCROLL SETTINGS.
Up
Select
Down
3036 Model Display Shown
RETURN TO MENU
ACTUAL TEMPS
LEFT ZONE = 38°F
RIGHT ZONE = 38°F
WHITE WINE WHITE WINE
4499 FF 5500 FF
OO OO
Up
Select
Down
Power
3036 Model Display Shown
Energy Saver Mode
Indicator
1. To begin, press U-Select Lighting to enter the lighting menu.
2. Use Up or Down to cycle through each available
brightness setting; Low, Medium, or High.
3. Use U-Select Lighting
to cycle through each available timer
setting. Selections include “On With Door”, “On 3 Hours”, “On
6 Hours”, or “On 24 Hours”.
4. To exit, press Select
or simply wait for the menu to time out
Error Notification
The 3000 model series continuously monitors a series of inputs and
parameters to ensure proper and efficient operation of your unit.
Should the system detect a fault, an error notification will be
displayed on the user interface. See below for a list of errors
Note: Singe zone models will not use (L) left or (R) right zone
indicators in error notification.
Customer Menu
The 3000 Series of U-Line undercounter refrigeration appliances
contain a feature rich customer menu. The Customer Menu allows
access to a Series of advanced features including Energy Saver Mode,
Sabbath mode, actual temperature readings as well a method to
restore factory defaults.
3000 Series - Customer Menu
1. To access the Customer Menu hold Select for 5 seconds.
2. Use Up or Down to scroll through available selections.
3. Use Select to enter selected sub-menu.
4. To exit Customer menu, Use Down to scroll to the bottom
of the display and use Select to Select “Exit.”
Actual Temps
ID Description Solution
No Comm Unit lost
communication to the
display.
(L) (R) Zone T
Open
Left or right zone
thermistor circuit
open.
Amb Thrm Open Ambient thermistor
circuit open.
(L) (R) Zone T
Short
Left or right zone
thermistor circuit
shorted.
Amb Thrm Short Ambient thermistor
circuit shorted.
(L) (R) Temp Hi
6H+
Left or right Zone
temperature +10°
over set point for over
6 hours.
(L) (R) Temp Hi
12H+
Zone temperature
+10° over set point for
over 12 hours.
(L) (R) Temp Lo
6H+
Zone temperature
-10° under set point
for over 6 hours.
(L) (R) Temp Lo
12H+
Zone temperature
-10° under set point
for over 12 hours.
(L) (R) Door
Open 5M
Door switch open for
more then 5 minutes.
Disconnect and reconnect
power to unit. Contact
customer care if
persistent.
Contact Customer Care.
Contact Customer Care.
Contact Customer Care.
Contact Customer Care.
Verify door is closed and
sealing. Contact customer
care if persistent.
Verify door is closed and
sealing. Contact customer
care if persistent.
Verify door is closed and
sealing. Contact customer
care if persistent.
Verify door is closed and
sealing. Contact customer
care if persistent.
Verify door is closed and
sealing. Contact customer
care if persistent.
The Actual Temps option displays the actual temperature of each
zone, evaporator, as well as ambient temperature.
1. To view actual temperature, Select Actual Temps from the
customer menu.
2. Use Up or Down to scroll through available information.
3. To return to the customer menu, Select
Energy Saver Mode
Energy Saver mode reduces overall energy consumption by altering
user set point, differential, lighting and tone settings. When in
Energy Saver mode a small leaf icon will be displayed on the main
screen.
1. To enter Energy Saver first select Energy Saver from the
Customer Menu.
5 U-Line Product Operation
Return to Menu.
 Loading...