

Page 1
User Guide
Ulead Systems, Inc.
December 2003
Page 2

Second English edition for Ulead DVD Workshop version 2.0, December 2003.
Copyright © 2000-2004 Ulead Systems, Inc.
All rights reserved. No part of this publication may be reproduced or transmitted in any form or by any
means, electronic or mechanical, including photocopying, recording or storing in a retrieval system, or
translated into any language in any form without prior written permission of Ulead Systems, Inc.
Software license
The software described in this document is furnished under a License Agreement which is included with
the product. This Agreement specifies the permitted and prohibited uses of the product.
Licenses and trademarks
©2002-2004 Ulead Systems, Inc. All rights reserved. Ulead, the Ulead logo, and Ulead DVD Workshop are
registered trademarks and/or trademarks of Ulead Systems, Inc. Intel, Pentium MMX are registered
trademark of Intel Corporation. Microsoft, Windows, Windows NT, XP Microsoft Office, Dire ctX, DirectX
Media, and other Microsoft products referenced herein are either trademarks or registered trademarks of
Microsoft corporation in the United States and/or other countries. Apple, QuickTime and the QuickTime
logo are trademarks of Apple Computer, Inc., registered in the United States and other countries.
QuickTime and the QuickTime logo are trademarks used under license. Dolby and Double-D Symbol are
trademarks of Dolby Laboratories. All other product names and any registered and unregistered
trademarks mentioned are used for identification purpose only and remain the exclusive property of their
respective owners. Protected by U.S. Patent 6,121,976 and Taiwan Patents 079758 and 147957..
North & South America
Ulead Systems Inc.
http://www.ulead.com
Support: http://www.ulead.com/tech
Japan
Ulead Systems Inc.
http://www.ulead.co.jp
Support: http://www.ulead.co.jp/tech
Germany
Ulead Systems GmbH
http://www.ulead.de
Support: http://www.ulead.de/tech
United Kingdom
http://www.ulead.co.uk
Support: http://www.ulead.co.uk/tech
International
Ulead Systems, Inc.
http://www.ulead.com
http://www.asiapac.ulead.com
http://www.ulead.com.tw
Support:
http://www.ulead.com/tech
http://www.asiapac.ulead.com/tech
http://www.ulead.com.tw/tech
China
Ulead Systems, Inc.
http://www.ulead.com.cn
Support: http://www.ulead.com.cn/tech
France
http://www.ulead.fr
Support: http://www.ulead.fr/tech
Page 3

ULEAD DVD WORKSHOP USER GUIDE 3
Introduction ...........................................................................9
What’s new ...............................................................................9
Key features ............................................................................ 10
System requirements ............................................................... 11
Supported file formats .............................................................. 11
Supported input/output devices ................................................. 11
Installation and removal ........................................................... 12
Registration ............................................................................. 12
Getting started .....................................................................15
The Step Panel ........................................................................ 15
The User Interface ................................................................... 16
The Global Commands Bar ........................................................ 17
Global Settings .................................................................... 17
The Options Panel .................................................................... 18
The Navigation Panel ................................................................ 19
Navigation Panel - Capture Step............................................. 20
Navigation Panel - Edit Step .................................................. 20
The Preview Window ................................................................. 21
The Preview Window context menu......................................... 22
The Content Window ................................................................ 23
The Title List............................................................. ........... 23
The Menu List...................................................................... 25
The Chapter List ...................................................................... 26
The Chapter List context menu............................................... 26
The Library .............................................................................. 27
The Library Manager......................................... .................... 28
The Library context menu................................................... ... 29
Setting Preferences .................................................................. 29
General............................................................................... 30
Default Settings................................................................... 30
Capture .......................................... .................................... 31
Saving your projects ................................................................. 31
Start ......................................................................................35
Creating a new project .............................................................. 35
Opening an existing project ........................................ ............... 36
Page 4

4 ULEAD DVD WORKSHOP USER GUIDE
Capture ................................................................................. 39
The Capture Step Options Panel ..................................................39
Capturing Digital Video (DV) .......................................................40
Capturing analog video ..............................................................41
Capturing still images ................................................................43
Capturing from a TV Tuner .........................................................44
Capturing using Split by Scene ...................................................45
Direct video capturing to MPEG format .........................................45
Capturing MICROMV format ........................................................46
Direct video capturing to Windows Media format ...........................47
Selecting a profile .....................................................................47
Editing and customizing a profile............................................. 48
Video and Audio Capture Property Settings ...................................50
Edit ....................................................................................... 53
The Edit Step Options Panel .......................................................53
Video tab............................................................................. 53
Image tab............................................................................ 54
Audio Panel........................................................... ............... 55
Audio tab (DVD) ........................................... ........................ 56
Subtitle tab (DVD) ................................................................ 56
Titles and Chapters ...................................................................57
Working with titles ....................................................................57
Adding titles to your project ................................................... 57
Creating a slideshow ............................................................. 58
Setting a First Play Video ....................................................... 61
Playing back titles and audio clips ........................................... 61
Using Split by Scene.............................................................. 62
Rearranging titles in the Title List............................................ 63
Trimming titles or audio clips .................................................. 64
Cutting titles .................................................................... .... 65
Deleting titles....................................................................... 66
Renaming titles..................................................................... 66
Replacing the audio track of a title .......................................... 66
Title properties ..................................................................... 67
Output Display Options.......................................................... 68
Working with chapters ...............................................................70
Inserting chapters to the Chapter List...................................... 70
Automatically inserting scenes to the Chapter List ..................... 71
Deleting chapters from the Chapter List ................................... 71
Setting chapter thumbnails..................................................... 72
Page 5

ULEAD DVD WORKSHOP USER GUIDE 5
Setting chapters for slideshows.............................................. 72
Audio and Subtitles .................................................................. 72
Working with audio tracks ......................................................... 73
Specifying Language Settings and Characteristics..................... 73
Working with subtitles .................................................. ............ 74
Adding subtitles ................................................................... 74
Adding additional subtitle tracks ............................................. 76
Specifying Language Settings and Characteristics..................... 76
Saving to a text file.............................................................. 77
Changing text attributes........................................................ 77
Adding subtitles from metadata.............................................. 78
Menu .....................................................................................81
What are menus? ..................................................................... 81
Creating menus ....................................................................... 82
Create Menu - Blank............................................................. 82
Create Menu - Template ........................................................ 82
Create Menu - Wizard ........................................................... 83
Objects and buttons in the menu ................................................ 83
Objects................................................... ............................ 83
Buttons............................................................................... 84
The Preview Window ................................................................. 84
The Menu Step Options Panel .................................................... 85
Menu tab ............................................................................ 85
Button tab........................................................................... 86
Text tab............................................. ................................. 90
Editing your menus .................................................................. 90
Editing the Playlist .................................................................... 93
Real-time preview for Motion Menus ........................................... 94
Finish ....................................................................................97
The Preview Window ................................................................. 97
The Remote Control .................................................................. 98
Remote Control buttons .................................. ...................... 98
Previewing a project ....................................... .......................... 99
Disc templates ......................................................................... 99
Disc Template Manager......................................................... 99
Burn Project to Disc .................................................................100
The Burn tab ................................................................. ..... 100
The Advanced Settings tab ................................................... 102
Page 6

6 ULEAD DVD WORKSHOP USER GUIDE
Burn Disc Image or DVD Folder .................................................104
Writing to a Digital Linear Tape .................................................105
The Ulead DLT Writer options ............................................... 105
Appendix A: DVD Region Codes ......................................... 111
Appendix B: Capture checkup ............................................ 112
Before you capture .................................................................. 112
System Tweaks ......................................................................112
Appendix C: Glossary ......................................................... 114
Shortcuts ............................................................................ 119
Capture Step ..........................................................................119
Edit Step ...............................................................................119
Add/Edit Subtitles dialog box ....................................................120
Menu Step .............................................................................120
Finish Step (Remote Control) ....................................................121
Global Settings .......................................................................122
Index .................................................................................. 125
Page 7

Page 8

Page 9

ULEAD DVD WORKSHOP USER GUIDE 9
Introduction
Thank you for choosing Ulead DVD Workshop, your complete DVD/VCD/SVCD
authoring program.
With the rapid advance of multimedia technology and the widespread a vailability of
video equipment, creating and viewing home movies are fast becoming a favorite
hobby all over the globe.
DVD Workshop breaks down the DVD authoring process into simple step-by-step
operations. This gives you the freedom to concentrate on creating the movie and
not on using the software.
DVD Workshop has all the necessary tools to create your VCD, SVCD, and DVD
projects to share with your family and friends.
What’s new
Multiple subtitles
Create discs with up to the DVD maximum of 32 selectable subtitle tracks. These
can feature different languages, subtitles for the hearing-impaired, training guides,
and more.
Multiple audio tracks
Add multiple audio tracks with different languages, commentaries, programming
for the visually-impaired, or different levels of instruction. Use up to DVD’s
standard maximum of 8 audio tracks with control of over all audio levels and fadein/fade–out behavior.
Copy protection
Protect your intellectual property rights with CSS encryption which can be burned
on a domestic DVD recorder. The popular Macrovision® encoding is also available
when authoring to DVD.
Region coding
Further protect your work by specifying the DVD regions where it can be played.
Real-time preview
Preview the exact behavior of your DVD in real-time with the unique DVD
simulator. Ensure motion menus, buttons, videos, slideshows, subtitles, and audio
tracks all behave and interact as they should before burning to disc.
Page 10

10 ULEAD DVD WORKSHOP USER GUIDE
Playlist control
Easily specify the relationships between menus, videos, subtitles, and audio tracks
by clicking a few straightforward buttons. Determine the sequence of play items to
loop at specified times or certain actions to trigger multiple choices.
Import audio from audio CDs
Create soundtracks, or background music for menus and slideshows by copying
audio directly from audio CDs.
Key features
Guided workflow
DVD Workshop breaks down the VCD, SVCD, and DVD authoring process into five
steps: Start, Capture, Edit, Menu, and Finish. All these steps are accessible in
the Step Panel.
Ready-to-use menu templates and content
Abundant preset menu templates and objects are available in the Library. You can
also visit the Ulead DVD Workshop Web site and download additional menu
templates.
Motion menu
Add animated backgrounds and buttons giving you more options for enhancing
your menus.
PowerMenus™
Choose from three levels for designing scene selection menus: use a preset
template for the fastest results, modify a template, or create your original design.
MPEG-Direct™
Save both disk space and time by capturing directly from DV to MPEG.
SmartRender™
Multiple formats can be mixed in the same project and some elements can be
selected to be burned on the disc without conversion (if required). These can
include MPEG-1, MICROMV, 16:9 widescreen/standard 4:3, as well as various
audio codecs or formats. This way, reconversions which would reduce quality can
be avoided.
Page 11

ULEAD DVD WORKSHOP USER GUIDE 11
System requirements
• Microsoft® Window® 2000 or XP
• Microsoft DirectX® 9
• Intel® Pentium® III 800 MHz or higher (Pentium IV 2GHz or higher
recommended)
• 128MB RAM (256MB or above recommended)
• 500MB of available hard disk space for program installation
• 4GB+ hard disk space for video capturing and converting
Note: 1 hour of DV video requires 13GB of hard disk space.
• Real-time preview requires at least Pentium IV 2GHz or equivalent and 512MB
DDR RAM
• 16-bit color display using 1024x768 or higher resolution
•DVD-ROM drive
Supported file formats
Import
• Video: MPEG-1, MPEG-2, MICROMV, WMV, AVI, QuickTime
• Image: BMP, GIF, JPG, JP2, JPC, PNG, TGA, TIF, UFO, PSD
• Audio: MPEG audio (MPA), WAV, MP3, WMA, Dolby® Digital
Export
• Disc: DVD-5, DVD-9, miniDVD, VCD, and SVCD
• Audio: LPCM audio, MPEG audio, Dolby® Digital
• Tape: Digital Linear Tape (DLT)
Supported input/output devices
• IEEE-1394 FireWire interface cards (OHCI compliant) for digital camcorders
• Analog capture cards and other devices (VFW and WDM support)
• USB capture devices/PC cameras
• Windows-compatible DVD-R/RW, DVD+R/RW, CD-R/RW drives
Page 12
12 ULEAD DVD WORKSHOP USER GUIDE
Installation and removal
Installation or removal of DVD Workshop is easy. Just follow the instructions that
come with your product CD.
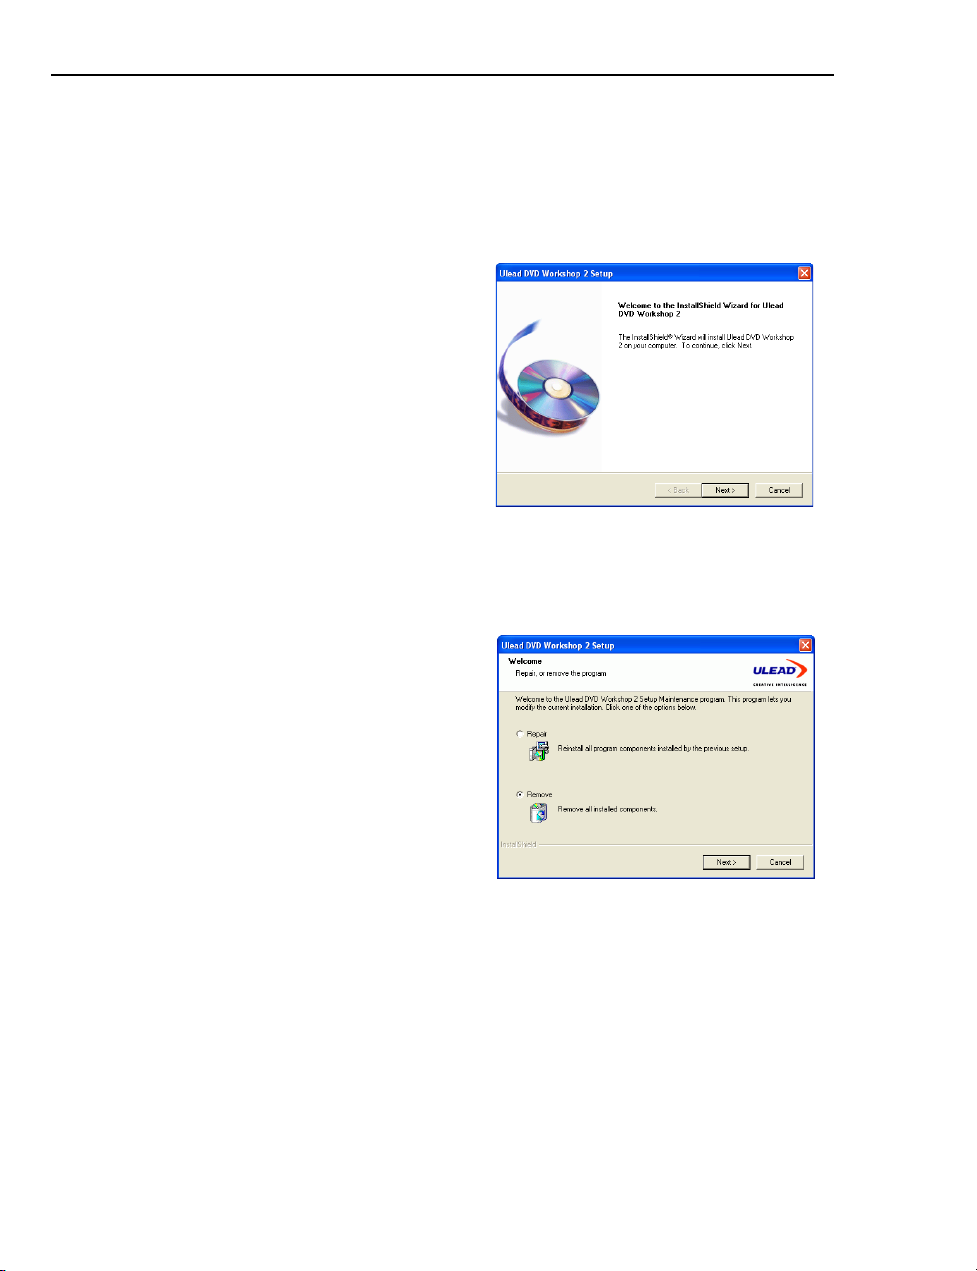
To install DVD Workshop in your computer:
1. Insert the DVD Workshop CD onto your
computer's disc drive.
2. If AutoRun is enabled, the DVD
Workshop Setup screen automatically
appears. Follow the step-by-step
instructions to complete the installation
process.
Note: The TV system option will
determine the disc templates that will
be included in the installation. Select
the TV system for the country you are
in or the TV system you intend to play
back your movie.
To uninstall DVD Workshop from your computer:
1. Go to Control Panel then select Add/
Remove Programs.
2. Select DVD Workshop from the list of
applications for removal then click
Change/Remove.
3. Select Remove in the Ulead DVD
Workshop 2 Setup dialog box then
click Next. All components will be
removed from your system.
4. Click Finish to complete the
unsinstallation process.
Registration
Register your copy online when prompted during installation, or at a later time by
selecting Global Settings: Online Registration. By registering, you gain access
to Ulead's product and information updates on DVD Workshop and other great
software products. This also entitles you to free technical support if you encounter
problems with the software.
Page 13

Page 14

Page 15

ULEAD DVD WORKSHOP USER GUIDE 15
Getting started
DVD Workshop offers plenty of features to help you turn raw footage into CD- or
DVD-based videos complete with titles, effects, and menus.
This section introduces you to the basics of DVD Workshop. With proper
understanding and use of the software’s features, working with your projects
becomes simple and fun.
The Step Panel
DVD Workshop simplifies what used to be a complex task of DVD authoring into a
simple five-step workflow. Although the default order of steps is normally followed,
you can switch from one step to another by clicking the desired step. A currently
active step is highlighted in blue, and the contents of the Options Panel change
accordingly.
Start Create a new project or open an existing one for burning or further editing.
Capture Capture footage from a video source to your computer. You can capture
video from analog or digital video sources as well as TV footage.
Edit Arrange, edit, and trim video clips. You can also set chapters for your menus
and add extra audio tracks and subtitles to your project.
Menu Create the menu for your project. Menus allow your viewers to instantly
access specific points in your movie. Use available preset menu templates or
create a custom menu.
Finish Burn your movie onto a disc, burn and create a disc image file, or create a
master copy in a Digital Linear Tape which you can send to a DVD replication
facility for mass production.
Page 16
16 ULEAD DVD WORKSHOP USER GUIDE
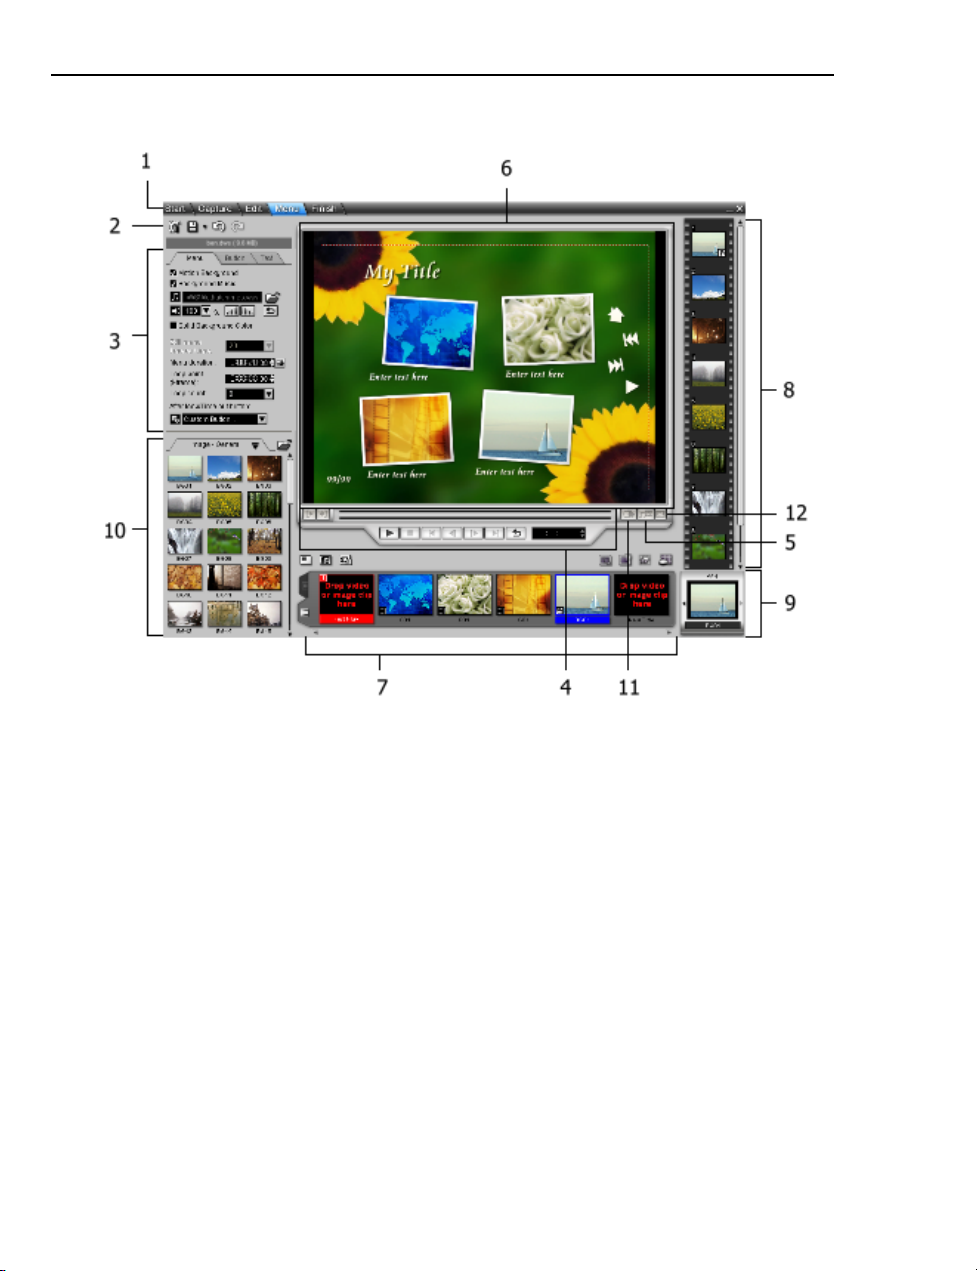
The User Interface
1 Step Panel Displays the buttons that you can use to go to the different steps to
complete your project.
2 Global Commands Bar Contains a set of buttons for saving, redoing, and
undoing actions as well as quick access to Global Settings.
3 Options Panel Contains options and other information about the selected
project, clip, menu, or button. The contents of this panel vary depending on the
step you are in. You can adjust settings and customize objects in this panel.
Above the Options Panel, the project name and total project file size are displayed.
4 Navigation Panel Contains buttons that can be used to go through a clip. In
the Capture Step, this also acts as the device control for the DV device if the
device control is properly set up.
5 Subtitle and Audio Track Allows you to switch to a different audio and/or sub-
title track when previewing your project.
6 Preview Window Displays titles, acts as workspace for creating menus, or pre-
views your projects depending on the step you are in.
7 Content Window Displays the Title List in the Capture and Edit steps. When
in the Menu Step, the Menu List is also displayed along with the Title List.
Page 17
ULEAD DVD WORKSHOP USER GUIDE 17
8 Chapter List Displays the chapters of a selected title. When creating a slide-
show, you can view the images that are included in the slideshow title.
9 Title Selector A part of the Chapter List that displays the active title.
10 Library Contains all media clips that were either captured or imported from
other file sources. It also contains ready-to-use buttons, menu templates, and
frame presets you can use for your projects.
11 Add Chapter Inserts the currently displayed frame to the Chapter List.
12 4:3/16:9 Switches the Preview Window’s aspect ratio between 4:3
(standard TV) and 16:9 (widescreen).
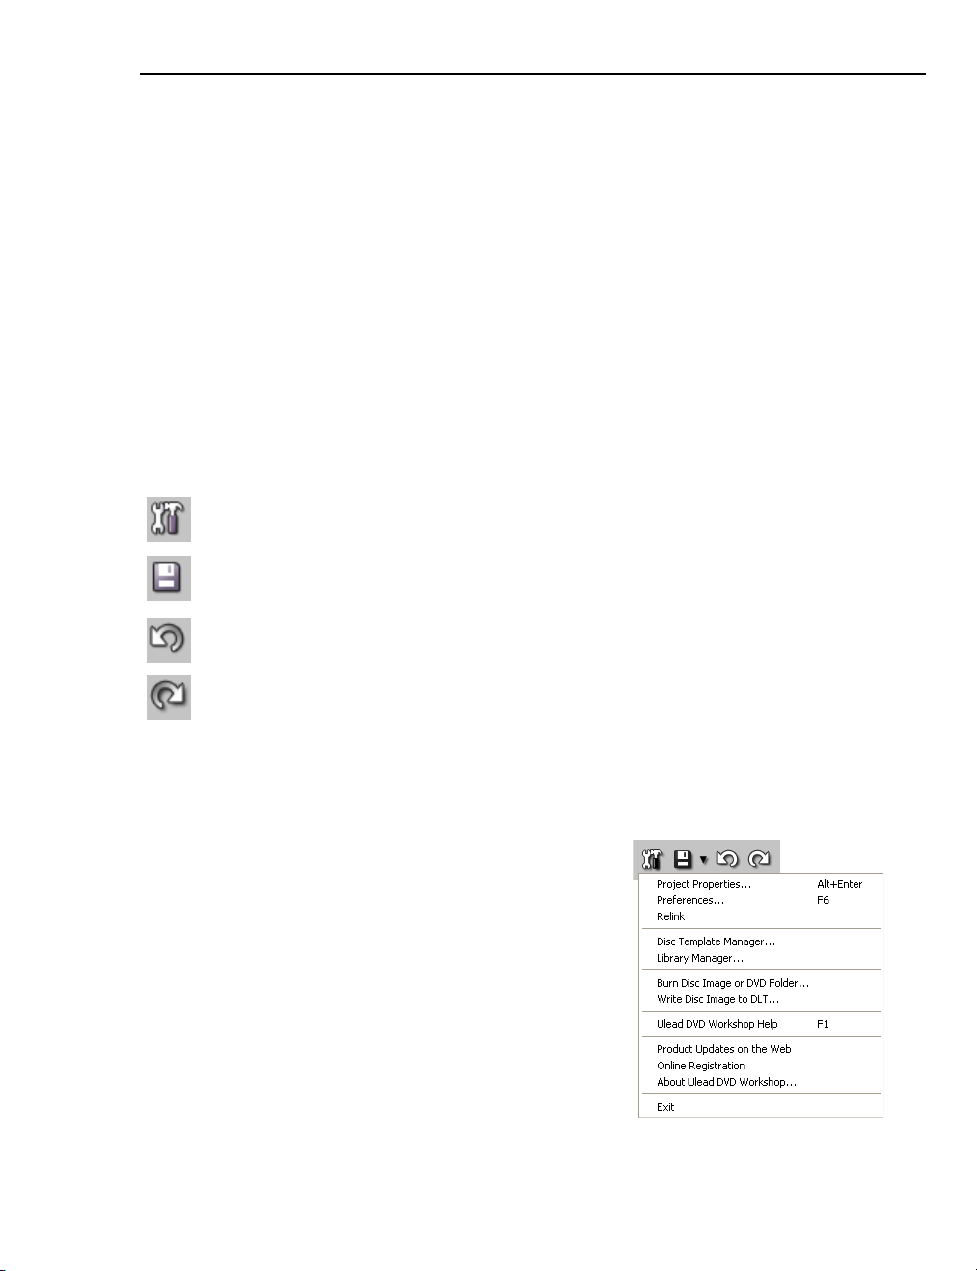
The Global Commands Bar
The Global Commands Bar consists of various commands such as Global
Settings, Save, Undo, and Redo. More buttons are displayed in the Menu Step.
Global Settings Opens a menu where you can access options for changing
program settings.
Save or Save As/Package Lets you save the changes made in the project
or opens a dialog box where you can save the same project using a different
file name.
Undo Reverses past actions performed. This command can be disabled in
the Preferences dialog box.
Redo Reverses the undo commands performed. This command can be
disabled in the Preferences dialog box.
Global Settings
The following commands are accessible through the Global Settings menu:
• Project Properties Opens a dialog box that
displays attributes and information about the
current project. You can also modify the settings
you have set in the New dialog box.
• Preferences Opens a dialog box where you can
determine various settings while working in DVD
Workshop. (see “Setting Preferences” on page 29)
• Relink Prompts you to browse your computer to
re-establish links for missing clips used in the
project.
• Disc Template Manager Opens a dialog box
where you can create a new template or
customize available disc templates. (see “Disc
templates” on page 99)
Page 18
18 ULEAD DVD WORKSHOP USER GUIDE
• Library Manager Opens a dialog box where you can create subfolders for the
different main libraries. Creating subfolders helps to organize and manage the
different clips in your project.
• Burn Disc Image or DVD Folder Opens a dialog box where you can burn a
disc image file or DVD folder onto a disc.
• Write Disc Image to DLT Opens a dialog box where you can create a master
copy of your DVD in a Digital Linear Tape.
• Ulead DVD Workshop Help Opens the DVD Workshop online help.
• Product Updates on the Web Launches your Web browser then takes you to
a page on the Ulead Web site where you can check for product updates,
promotions, and free items related to DVD Workshop.
• Online Registration Launches your Web browser then takes you to the page
on the Ulead Web site where you can register your copy of DVD Workshop.
• About Ulead DVD Workshop Displays product and copyright information
about DVD Workshop.
• Exit Closes the program.
The Options Panel
The Options Panel is located at the left-hand side of the program window. It
contains various tools you can use to create and edit the different elements of your
project. The set of available commands in the Options Panel vary depending on
the step you are in.
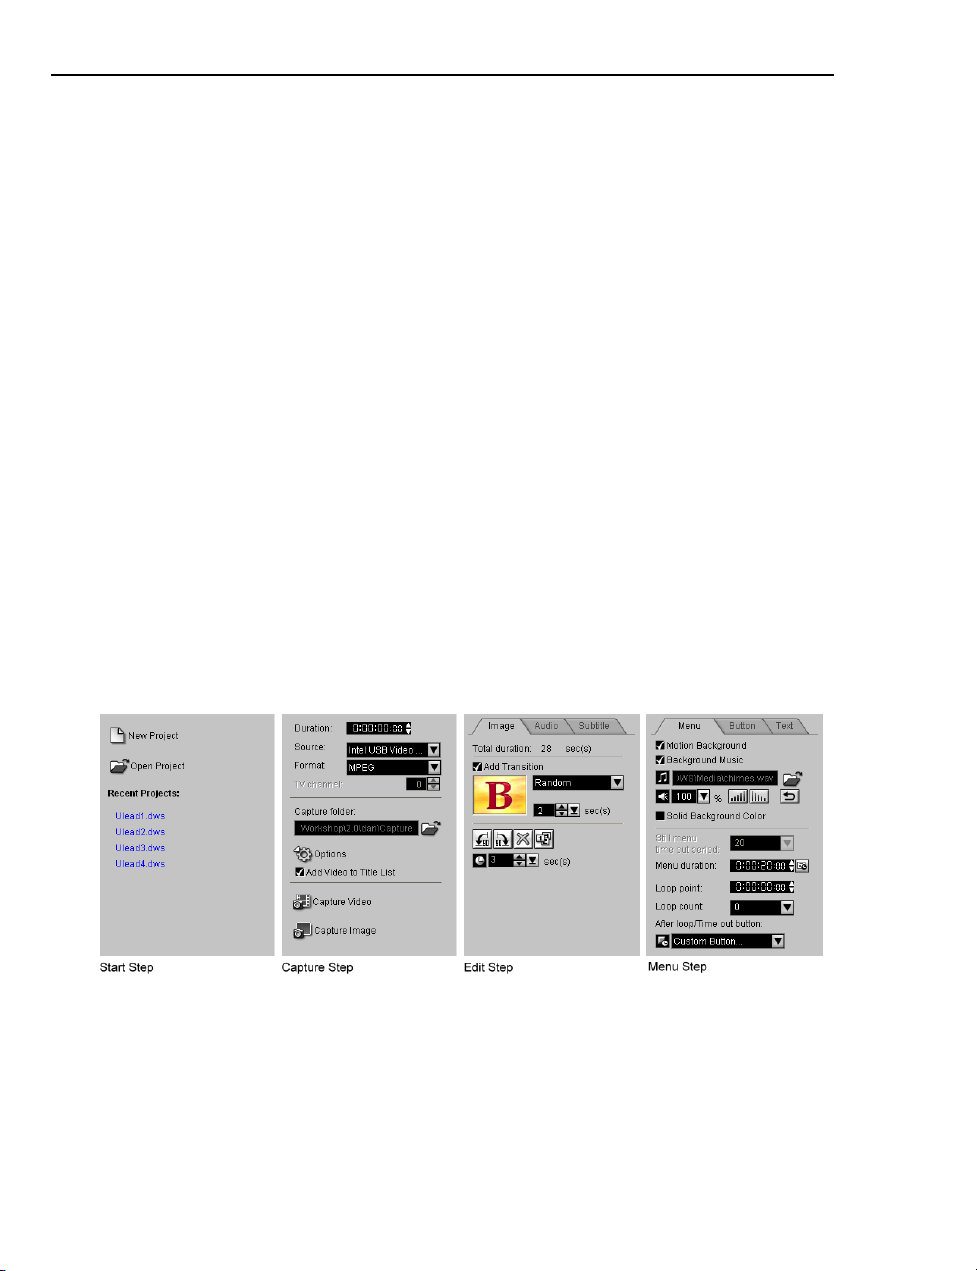
Start Step Options Panel Contains command buttons that allow you to create a
new or open an existing project file (*.DWS). A list of the four most recently used
projects is displayed in the lower portion of the panel.
Capture Step Options Panel Allows you to capture videos and images from a
video source. Click Options to access more capture options.
Page 19

ULEAD DVD WORKSHOP USER GUIDE 19
Edit Step Options Panel Consists of three tabs: the Video/Image tab, Audio
tab and Subtitle tab. Use the Video/Image tab and the Audio Panel to arrange,
trim, and edit video/image/audio clips. Use the Audio/Subtitle tab to add or edit
audio tracks and subtitles. Options on the Video/Image tab vary depending on the
selected clip.
• Video Displays various options that you can use to edit your video clips and add
chapters for your menu.
• Image Displays various options that you can use to edit your image clips and
create your slideshows.
• Audio (DVD) Displays various options that you can use to add or remov e audio
tracks.
• Subtitle (DVD) Displays various options that you can use to add and edit
subtitle tracks.
• Audio Panel Displays various options that you can use to adjust the volume
level of your audio clip and view its properties.
Menu Step Options Panel Contains the commands and settings needed to create
and modify the components of your menu. Switch between tabs to select the menu
component you want to edit.
• Menu Allows you to set menu properties. You can set your menu to have
motion attributes and background music.
• Button Allows you to adjust the button properties. You can add frames,
shadows and more. This is also where you can create a playlist for your buttons.
There are five panels available in this tab: Attributes, Style, Frame, Shadow,
and Playlist.
• Text Allows you to create and edit text on your menus. This is also where you
can create a playlist for your text objects. There are four panels available in this
tab: Attributes, Style, Shadow, and Playlist.
Items of each Options Panel will be discussed further in their corresponding
chapters.
The Navigation Panel
The Navigation Panel is used to preview and edit the titles of your project. Use
the Navigation Controls to go through your videos. Use the Trim Bars and Jog
Bar to edit your titles.
When capturing videos, the set of buttons will differ. Instead of playback buttons,
device control buttons is shown. Use these buttons to control your DV device.
Note: To be ab le to control your DV device within DVD Workshop, the device
control must be properly set up.
Page 20
20 ULEAD DVD WORKSHOP USER GUIDE
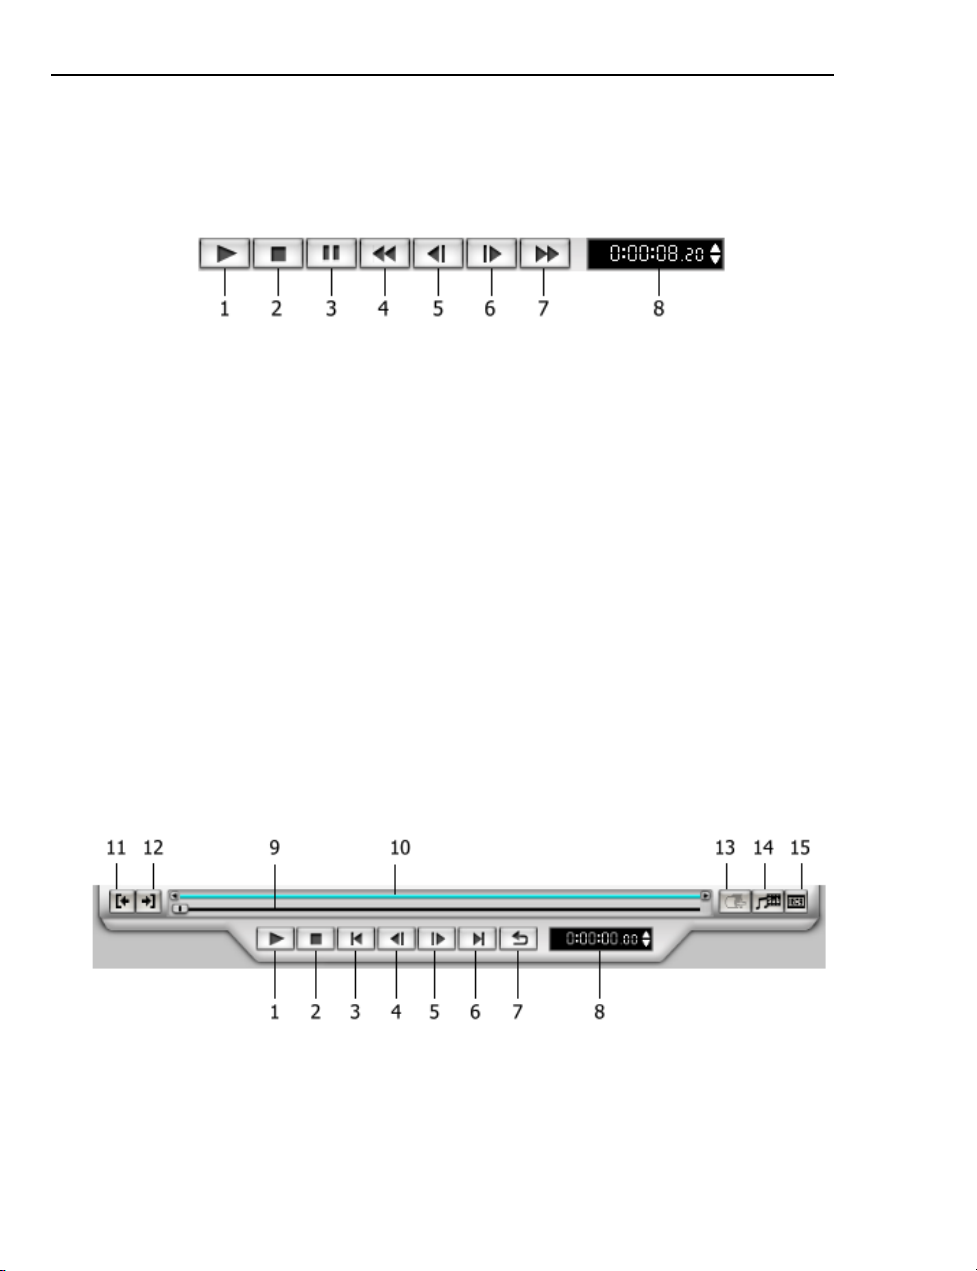
Navigation Panel - Capture Step
The Navigation Panel is enabled when a DV camcorder is connected to your
computer via an IEEE-1394 interface card. You can control your DV camcorder, if
the device control is properly set up, using the following navigation buttons:
1 Play Plays the video.
2 Stop Stops playing the video.
3 Pause Plays, pauses or resumes playing the video from the position of the Jog
Bar.
4 Rewind Goes back through the video.
5 Previous Frame Goes to the previous frame of the video.
6 Next Frame Goes to the next frame of the video.
7 Fast Forward Goes forward through the video at a faster rate.
8 Timecode Displays how many minutes/seconds into the video the current frame
in the Preview Window appears.
Navigation Panel - Edit Step
When you double-click a clip in the Capture Step or switch to the Edit Step, the
Navigation Panel will display a different set of buttons. These buttons will allow you
to play back, edit, and trim your clips.
1 Play/Pause Plays, pauses or resumes playing the clip from the position of the
Jog Bar.
2 Stop Stops playing the clip.
3 Go to previous edit point Goes to the previous edit point before the current
one.
Page 21

ULEAD DVD WORKSHOP USER GUIDE 21
4 Previous frame Goes to the previous frame of the video.
5 Next frame Goes to the next frame of the video.
6 Go to next edit point Goes to the next edit point after the current one.
7 Repeat Loops the selected clip after it ends play.
8 Timecode Displays how many minutes/seconds into the clip the current frame
in the Preview Window appears.
9 Jog Bar Indicates the range between mark-in and mark -out frames o f a video or
audio clip. You can dr ag the slider to navigate through the currently selected clip.
10 Trim Bar Drag the Mark-in/Mark-out sliders to trim the currently selected
clip.
11 Set Mark-in Click to mark the beginning point where the clip will be trimmed.
12 Set Mark-out Click to mark the end point where the clip will be trimmed.
13 Add Chapter Click to add the currently displayed frame to the Chapter List.
14 Audio/Subtitle Allows you to switch to a different audio and/or subtitle track
when previewing your project.
15 4:3/16:9 Click to switch the Preview Window’s aspect ratio between 4:3
(standard TV) and 16:9 (widescreen).
The Preview Window
The Preview Window serves as an area where you can preview videos you want to
capture, create your menus, and preview your projects. The function of the
Preview Window depends on which step you are in.
Page 22
22 ULEAD DVD WORKSHOP USER GUIDE
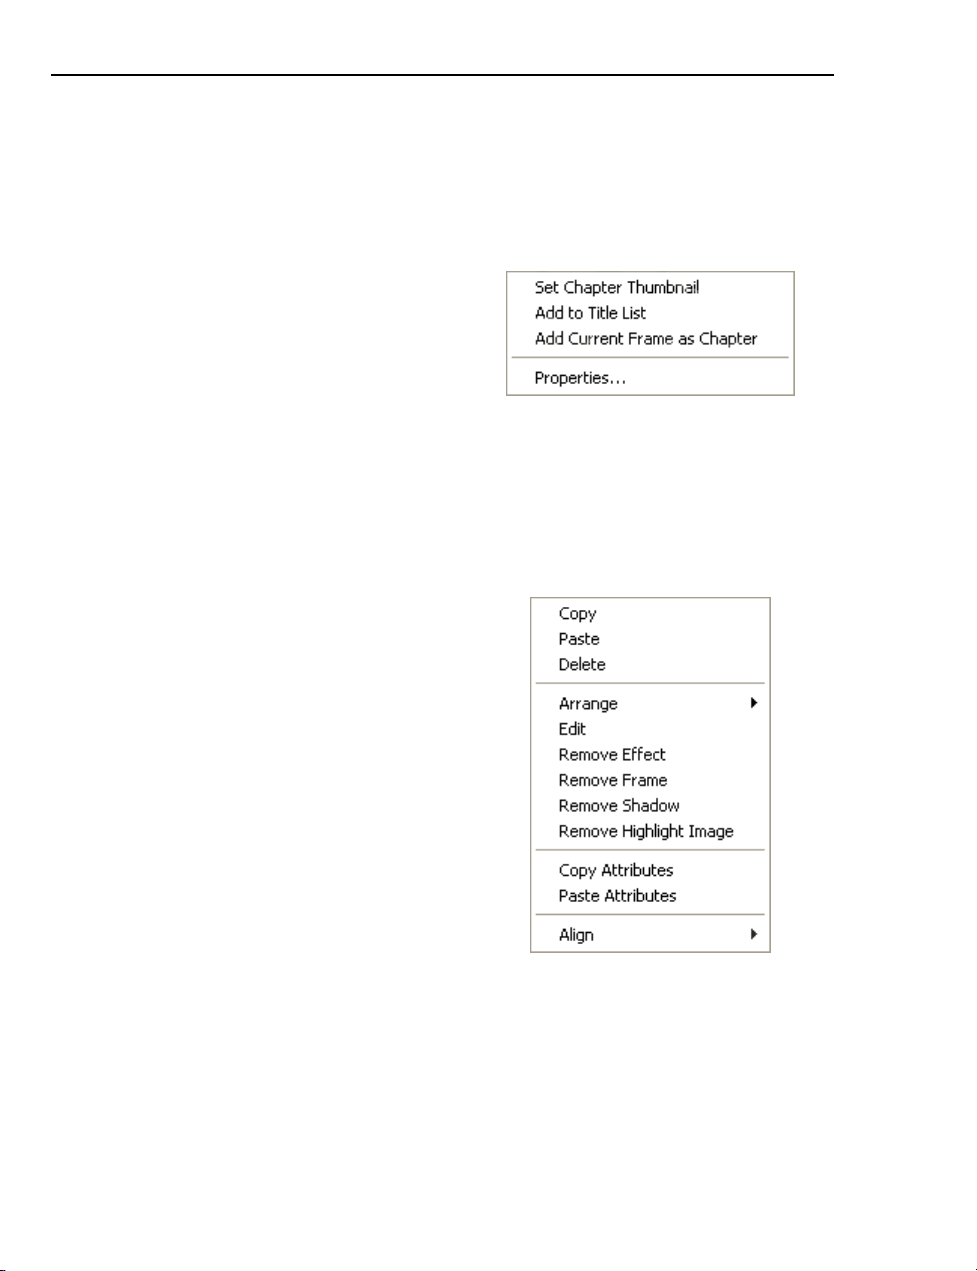
The Preview Window context menu
Right-click the Preview Window in the Edit Step and the Menu Step to access
the context menu. These two steps have different context menus that contain
options for specific tasks in each step.
Edit Step
• Set Chapter Thumbnail Uses the
currently displayed frame in the
Preview Window as the thumbnail for
the selected chapter in the Chapter
List.
• Add to Title List Adds the currently
displayed clip to the Title List.
• Add Current Frame as Chapter Adds the currently displayed frame to the
Chapter List.
• Properties Opens a dialog box where you can view specific attributes of the
currently displayed clip.
Menu Step
• Copy Copies the selected item to the
clipboard.
• Paste Adds the item on the clipboard
to the menu.
• Delete Removes the selected item
from the menu.
• Arrange Allows you to rearrange the
stacking order of the selected item(s).
• Edit Allows you to edit the content of
the selected text object.
• Remove Effect Removes the applied
effect on the selected text object.
• Remove Frame Removes the frame
from the selected object or button.
• Remove Shadow Removes the
shadow effect of the selected object or
button.
• Remove Highlight Image Removes the highlight image applied to the
selected button.
Page 23
ULEAD DVD WORKSHOP USER GUIDE 23
• Copy Attributes Copies the selected item’s (e.g. size, shadow, and frame)
settings to the clipboard.
• Paste Attributes Applies the settings in the clipboard to the selected object or
button.
• Align Allows you to set the position and dimensions of the items (in relation to
each other) in the menu.
The Content Window
The Content Window displays all titles and menus used in your project. There
are two tabs in the Content Window: the Title List and the Menu List.
The Title List
The Title List displays all titles (video and slideshow) used in a project. The titles
are arranged sequentially according to their position in the project. You can add
titles to your project by dragging a selected clip from the Library to the Title List
or using the buttons above the Title List. (see “Working with titles” on page 57)
The buttons above the Title List are:
Add Video Opens a dialog box where you can browse and select a video file
to add to your project.
Import from DVD Opens a dialog box where you can browse and select a
VIDEO_TS or DVD_RTAV folder from a DVD to add to your project.
Add Image Opens a dialog box where you can browse and select image
files to add to your project as a slideshow title.
The Title List context menu
Right-click a thumbnail in the Title List to access the context menu. This menu
contains options that allow you to add, remove, or rename a title. You can also
control how the title will be displayed on a TV screen.
• Edit Displays the selected title in the Preview Window for further editing.
Page 24

24 ULEAD DVD WORKSHOP USER GUIDE
• Cut Title Splits a title into two based on the position of the Jog Bar. Two new
clips are created in the Title List.
• Copy Copies the selected title to the clipboard.
• Paste Adds the copied title to the Title List.
• Delete Removes the selected title from the Title List.
• Rename Allows you to assign
another name to the selected title.
• Properties Opens a dialog box where
you can view the attributes of the
selected title.
• Output Display Options Opens a
dialog box where you can specify how
your video will be displayed on the TV
screen. (see “Output Display Options”
on page 68)
• Set as First Play Video Assigns the
selected title as the First Play Video.
(see “Setting a First Play Video” on
page 61)
The First Play Video context menu
• Edit Displays the selected title in the
Preview Window for further editing.
• Remove First Play Video Removes
the clip in the First Play placeholder.
• Properties Opens a dialog box
where you can view the attributes of
the selected title.
Page 25
ULEAD DVD WORKSHOP USER GUIDE 25
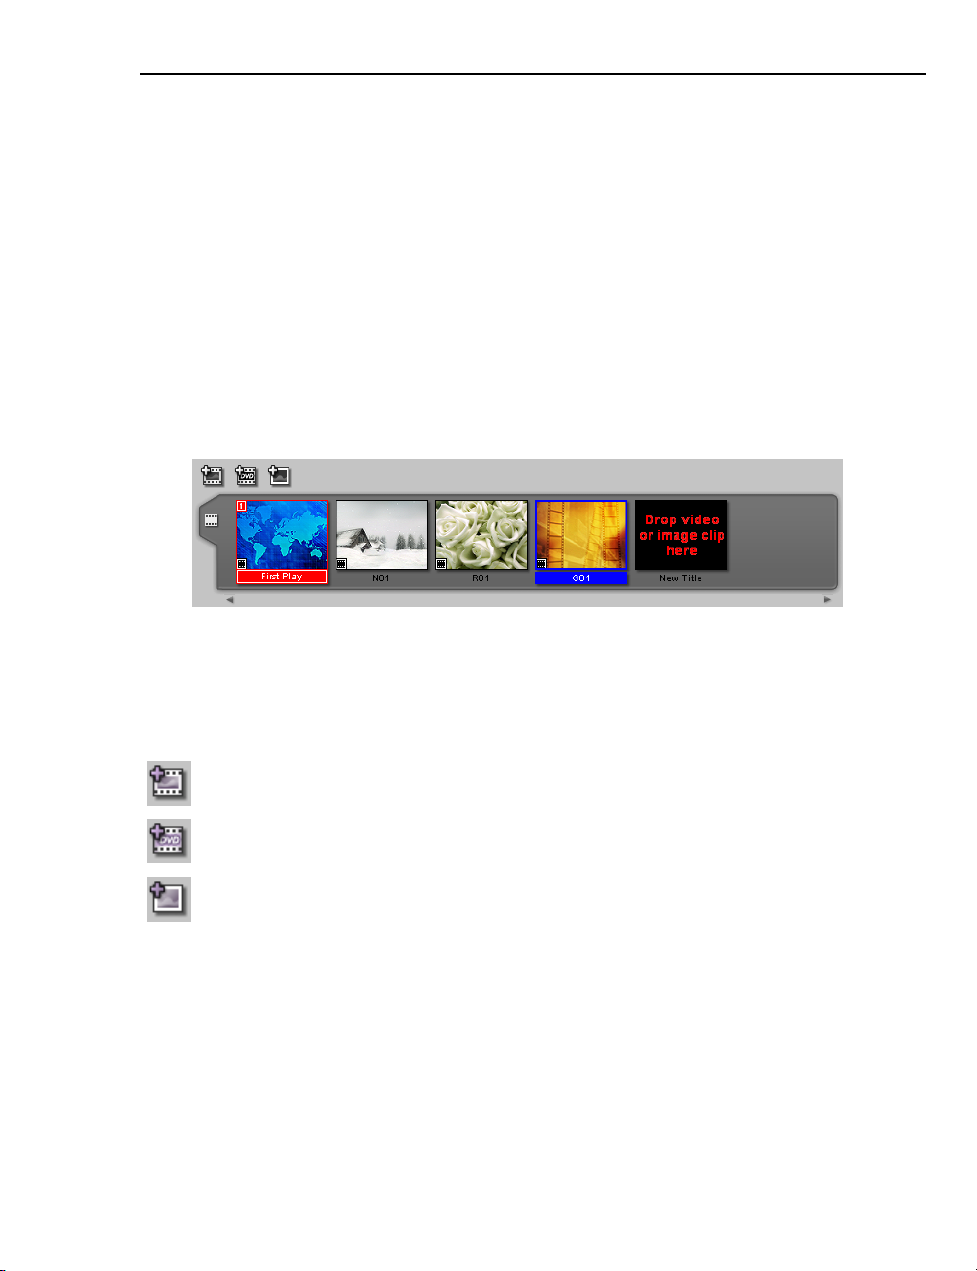
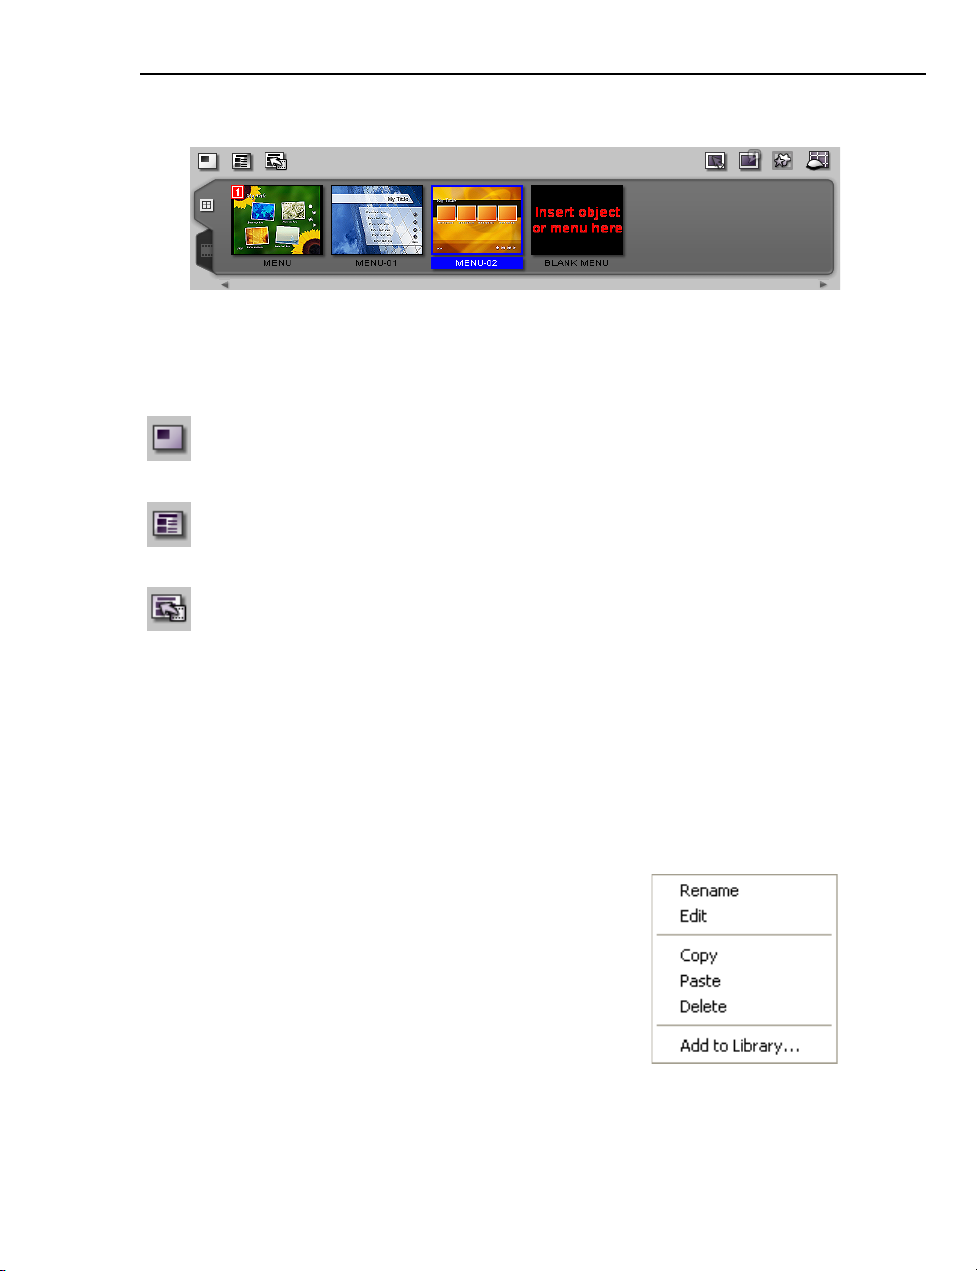
The Menu List
The Menu List displays all the menus currently used in your project. You can add
menus to your project by dragging a menu template from the Library to the Menu
List or using the buttons above the Menu List. (see “Creating menus” on page 82)
The buttons above the Menu List are:
Create Menu - Blank Creates a custom menu. All the elements in this
menu, such as buttons, text, and background image, must be manually
added.
Create Menu - Template Opens the Select Menu Template dialog box.
This is where you select preset menu templates that you can use for your
project.
Create Menu - Wizard Automatically creates menus based on the titles
and chapters used in your project.
On the upper-right corner above the Menu List are four buttons that y ou can use in
editing your menu. (see “Editing your menus” on page 90)
The Menu List context menu
Right-click a thumbnail in the Menu List to access the context menu. This allows
you to add, remove, or rename your menus as well as add a custom menu to the
Library as a menu template.
• Rename Allows you to assign another name
to the selected menu.
• Edit Displays the selected menu in the
Preview Window for further editing.
• Copy Copies the selected menu to the
clipboard.
• Paste Adds the menu on the clipboard to the
Menu List.
• Delete Removes the selected menu from the Menu List.
Page 26
26 ULEAD DVD WORKSHOP USER GUIDE
• Add to Library Adds the selected menu to the Menu Template Library.
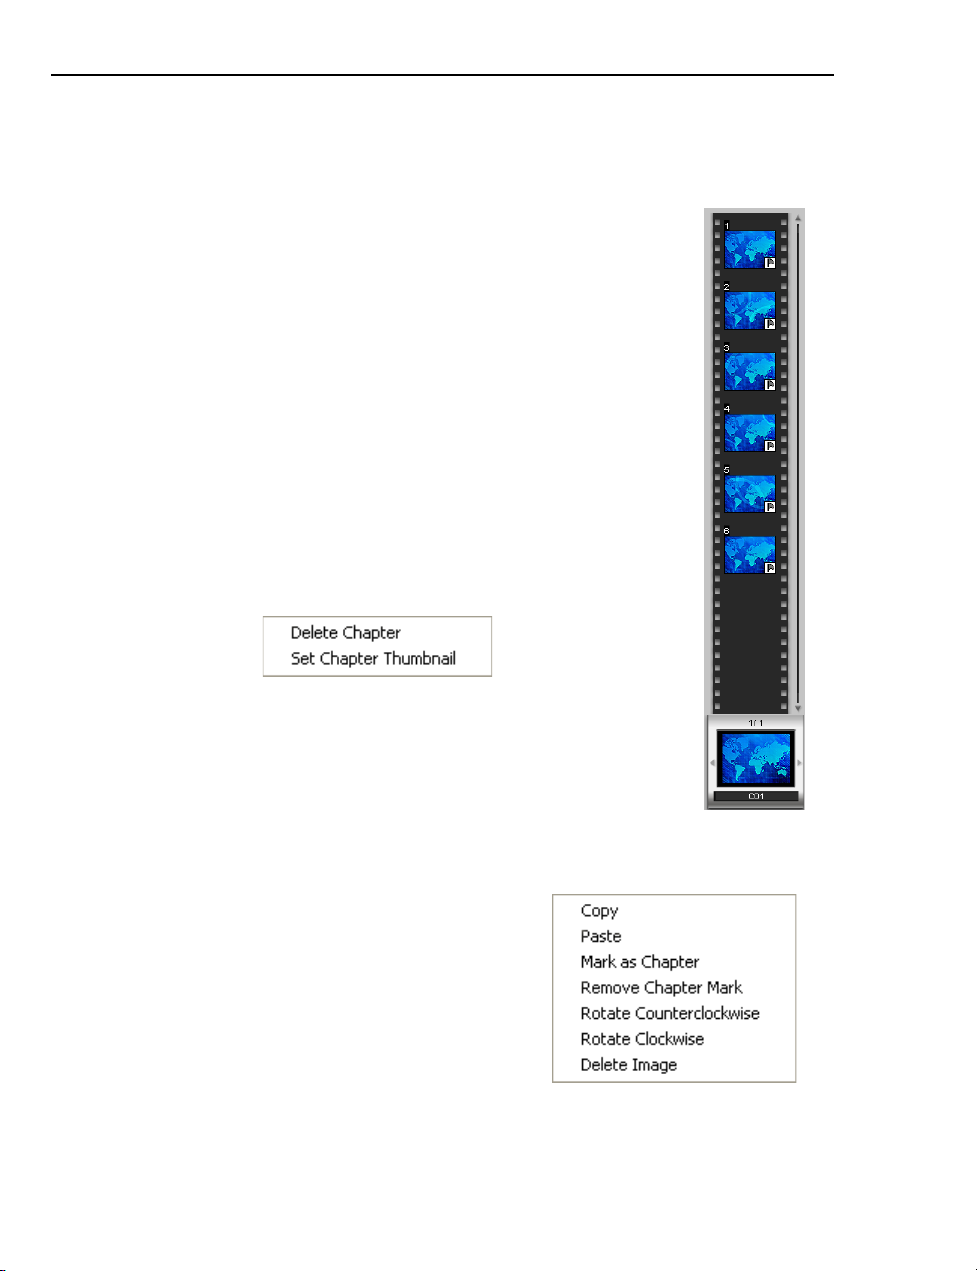
The Chapter List
The Chapter List displays the chapters inserted from the
selected title. Chapters are specific points in your video that
can be added to your menus. They allow the viewer to instantly
go to that point in the movie when selected.
When the selected title is a slideshow, the Chapter List displays
the images included in the slideshow. You can rearrange and
delete images in the Chapter List.
Below the Chapter List is the Title Selector. This displays the
thumbnail of the title you are currently working on. If you have
more than one title on your project, use the arrows to go
through them.
The Chapter List context menu
Right-click a thumbnail in the Chapter List to access the context
menu which allows you to add or remove chapters to your
menu.
• Delete Chapter Removes the selected chapter from the
Chapter List.
• Set Chapter Thumbnail Assigns the currently displayed
frame in the Preview Window as the thumbnail for the
selected chapter in the Chapter List.
When a slideshow is selected, a different set of options is displayed in the context
menu.
• Copy Copies the selected image to the
clipboard.
• Paste Adds the image in the clipboard to
the Title List.
• Mark as Chapter Assigns the selected
images as a chapter for the slideshow.
• Remove Chapter Mark Removes the
chapter mark from the selected image.
• Rotate Counterclockwise Rotates the selected image 90 degrees to the left.
Page 27
ULEAD DVD WORKSHOP USER GUIDE 27
• Rotate Clockwise Rotates the selected image 90 degrees to the right.
• Delete Image Removes the selected image from the Chapter List.
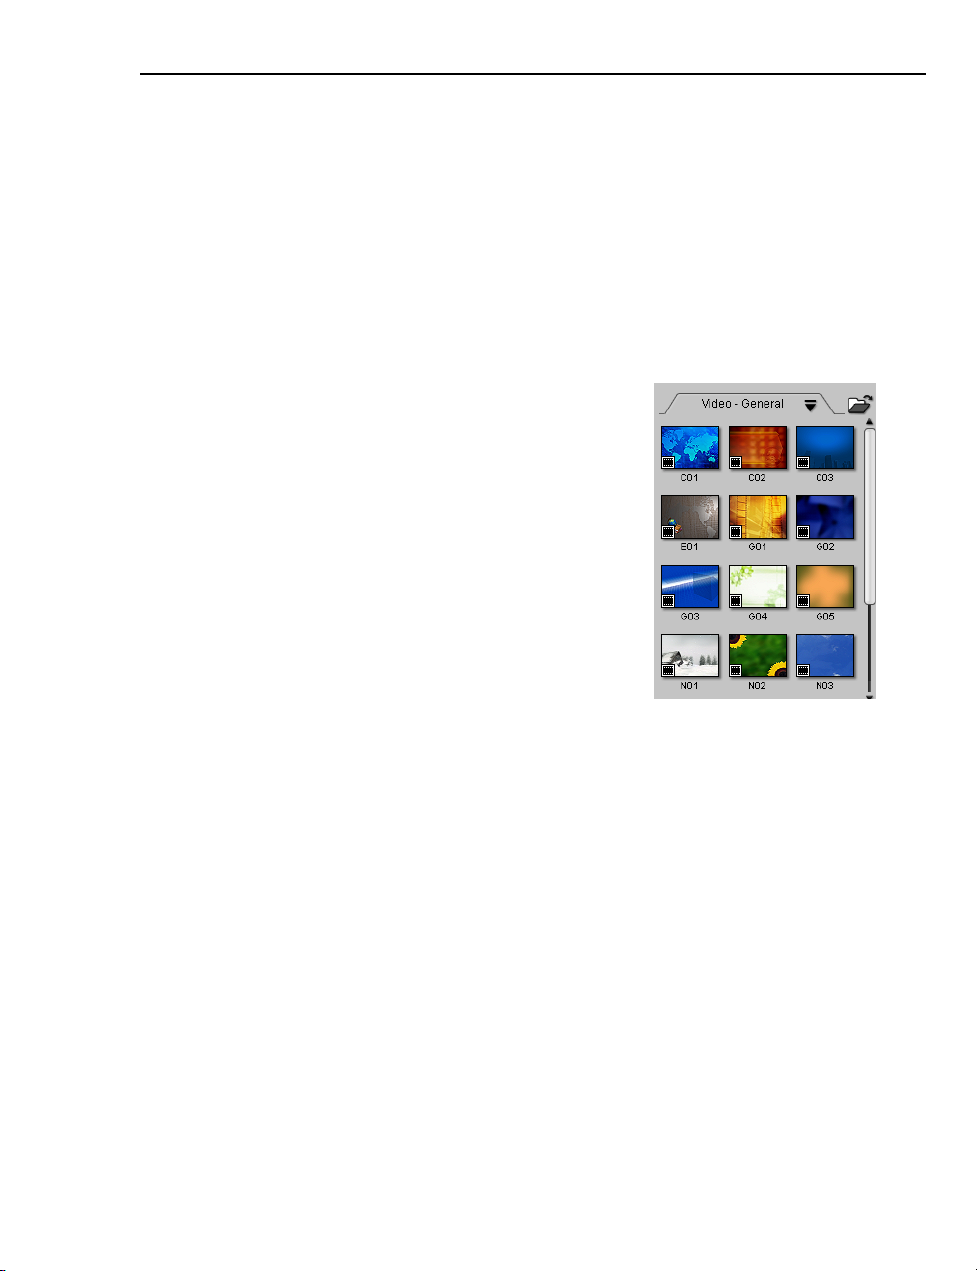
The Library
The Library functions as a storage place for all the elements essential in creating
your projects. It organizes all your media clips, button templates, and text effects
in separate categories. Thus, making it easier for you to find what you need. The
contents of the Library vary depending on the step you are working in.
Here is a list of libraries available in DVD Workshop:
• Video Library Contains captured or imported
videos that can be used as titles and menu
backgrounds/objects.
• Image Library Contains captured or imported
images that can be used as components for
creating a slideshow and menu backgrounds/
objects.
• Audio Library Contains audio clips that serve as
background audio for slideshows, videos, or menus.
• Thumbnail and Text Menu Library Contains
menu templates that you can use for your project.
These templates contain all the necessary elements
for a menu such as backgrounds, placeholder
buttons, and text objects. All elements can be
edited.
• Button Library Contains images that can be used as navigation menu buttons
(e.g. Play all). These buttons are used to go through the different menus,
chapters, or titles in your movies.
• Frame Library Contains placeholders with frames which you can use to hold
links (e.g. chapters) in the menus. These frames can also be used as borders
for your menu objects but not for text objects.
• Object Library Contains various images that you can use to enhance your
menu. You can also use these objects to create links for your menus, chapters,
or titles.
• Highlight Image Library Contains images that can be used to indicate that a
button is focused or selected.
• Text Effect Library Contains numerous text effects that can be used to
enhance your menu’s text.
Page 28

28 ULEAD DVD WORKSHOP USER GUIDE
To import media clips into the Library:
1. Select the library that contains the
media you want to import from the
Library list.
2. Click to open the Load Video/
Image/Audio File dialog box.
3. Select the file then click OK.
You can import audio tracks from a CD by
selecting the disc drive containing the CD
in the Load Audio File dialog box then
choosing the CD track you want to import.
The chosen track will be copied into your
project folder.
Tip: Drag and drop edited titles or
menu pages back to the Library so you
can use them in the future.
The Library Manager
Organize your libraries through the Library Manager. The Library Manager
dialog box allows you to create subfolders below the main libraries making it easier
for you to organize your menu templates, objects, and clips.
To add custom folders in the Library:
1. Click Global Settings: Library Manager
to open the Library Manager dialog box.
2. Select the library where you want to create
the custom folder in Available custom
folder.
3. Click New to open the New Custom
Folder dialog box.
4. Enter a name for the new folder then add a
description for reference in Properties.
5. Click OK. The custom folder will appear
under the library where it was created.
Page 29
ULEAD DVD WORKSHOP USER GUIDE 29
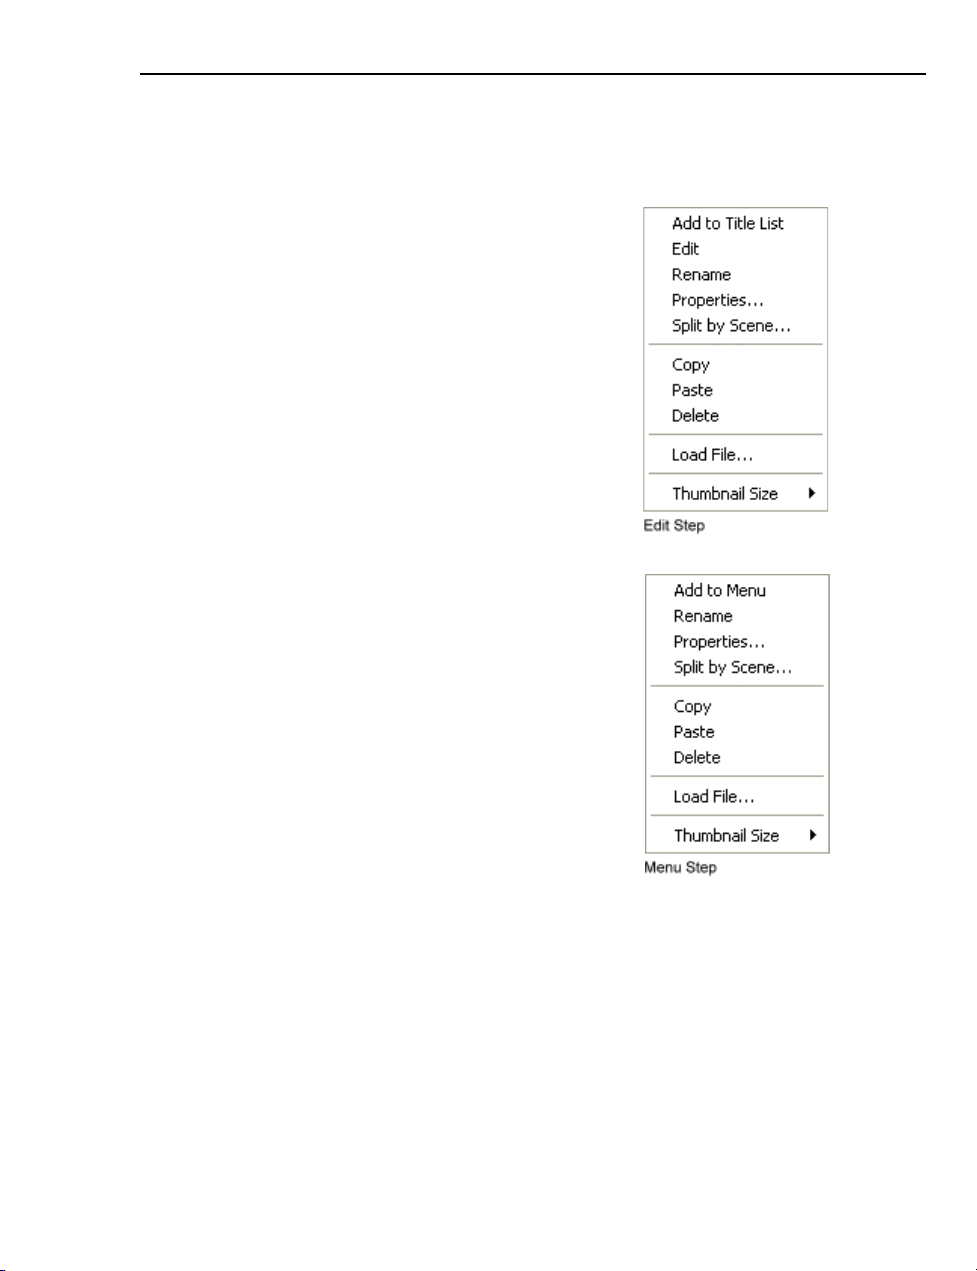
The Library context menu
Right-click a thumbnail in the library to access the context menu. You can import
clips, add clips to the Title List, as well as add menu templates to the Menu List.
• Add to Title List (Edit Step) Adds the
selected clip to the Title List.
• Add to Menu (Menu Step) Adds the selected
clip as objects to the currently active menu.
• Edit (Edit Step) Displays the currently
selected clip in the Preview Window for
editing.
• Rename Allows you to assign another name
to the selected clip.
• Properties Opens a dialog box where you
can view specific attributes of the selected
clip.
• Split by Scene Opens a dialog box where
you can create new clips based on the
different scenes of the selected clip in the
Library.
• Copy Copies the selected clip to the
clipboard.
• Paste Adds the copied clip to the Library.
• Delete Removes the selected clip from the
Library.
• Load File Opens a dialog box where you can
import video, image, or audio files to the
Library.
• Thumbnail Size Allows you to change the
size of the thumbnail in the Library.
Setting Preferences
Customize the program's working environment through the Preferences dialog
box. Assign default settings when working on projects, capturing and editing
videos, and creating menus and slideshows. T o open the Preferences dialog bo x,
click Global Settings on the Global Commands Bar then select Preferences.
You can also press [F6] to open this dialog box.
Page 30
30 ULEAD DVD WORKSHOP USER GUIDE
General
Undo Select to define the maximum number of
times you can reverse an action. Values range
from 1-25. To undo an action, press [Ctrl+Z] or
click Undo on the Global Commands Bar.
Smart link Select to automatically perform a
cross-check between the clips in the project and
their associated source files, allowing you to
relink the source files to the clips. This is
important when the file in the library is moved to
another location.
Always show relink message Select to display
the Relink dialog box when you click an unlinked
clip in the Library .
Check Ulead Web site every Select to specify how often the program checks the
Ulead Web site for news and updates.
Apply anti-flickering filter Select to apply the anti-flickering filter to your
slideshows. This reduces the blinking effect when viewing slideshows on a
television set.
Title safe area margin Set the viewable area of the text in the Preview
Window. This acts as a guide to ensure that the text is not truncated when
viewed on a TV screen. Recommended values are 12% for NTSC and 10% for PAL.
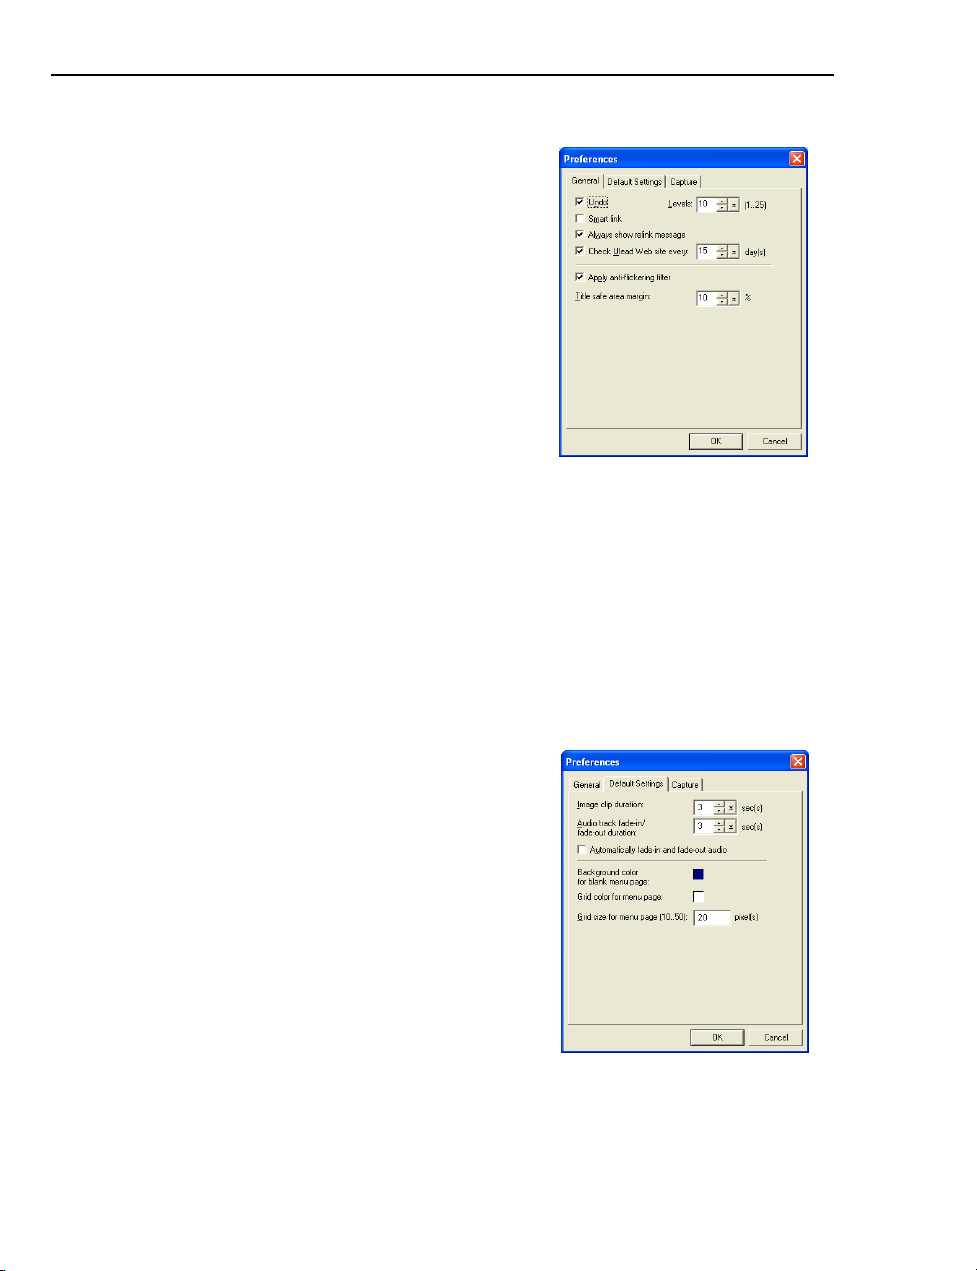
Default Settings
Image clip duration Specify the default
duration of image clips when they are added to
your project.
Audio track fade-in/fade-out duration
Specify the default duration for fading-in and
fading-out of an audio track. The value entered
here will be the amount of time it will take for the
volume to reach normal levels when fading-in or
the lowest level when fading-out.
Automatically fade-in and fade-out audio
Select to gradually increase/decrease the volume
of the selected track as it starts/ends playing.
Note: The above settings will be applied to
new clips added to the project. Click OK for
these settings to take effect.
Page 31

ULEAD DVD WORKSHOP USER GUIDE 31
Background color for blank menu page Click the color box then select a color
to use as default background when creating a blank menu.
Grid color for menu page Click the color box then select a color to use as default
grid color when creating a menu.
Grid size for menu page Enter the default size of the grid that appears on the
Preview Window. The grid serves as a guide when aligning objects and buttons
on your menu.
Capture
Press OK to capture Select to display a
message box that confirms if you want to start
the capturing process.
Image capture deinterlace Select to enable
constant image resolution when downloading
files, as opposed to progressive image resolution
available with interlaced images.
Stop tape when capturing stops Select to
have the tape in your capturing device also stop
when you are done capturing.
Captured still image save format Select from
a list of available image file formats. Still
captures will be saved in the selected format.
Image quality Specify the image quality when saving images as JPEG files. The
higher the quality, the bigger the file size.
Saving your projects
Saving your projects allows you to modify them at a later date. Once you have
opened a new or an existing file, click Save to automatically store recent changes
made in the project into the same file. Save As, on the other hand, will prompt a
dialog box where you can save the same project version using a different file
name.
Note: Save and Save As/Package are not available in the Finish Step.
Page 32

32 ULEAD DVD WORKSHOP USER GUIDE
To save your project as a new file:
1. Click the arrow beside Save and select
Save As/Package to open the Save As
dialog box.
2. Enter a location where your new project
version will be saved in Save in.
3. Type in a new file name.
4. Enter a subject and description for your new
project.
5. Click Save.
Tip: If you are planning to share your
project to others or work on it on another
computer, select Package all files. DVD
Workshop will save all th e files that you
used in your project (e.g. video, audio, and
subtitle text) including the project file in the
project folder. The files will be saved in
different subfolders.
Page 33

Page 34

Page 35

ULEAD DVD WORKSHOP USER GUIDE 35
Start
Start is where you can either choose to create a new project or open an existing
one for editing or burning onto a disc.
Creating a new project
To create a new project:
1. Click New Project in the Options Panel. The New Project dialog box opens.
2. Enter a Project name.
3. Specify the path for your project folder in Location.
4. Select the Media type you want to use for your project.
Note: Be sure of the media type and TV system to use before you start your
project as this cannot be changed afterwards.
5. Enter a Subject and Description for your project.
6. Click OK.
Page 36

36 ULEAD DVD WORKSHOP USER GUIDE
Opening an existing project
To open an existing project:
1. Click Open Project in the Options Panel. The Open dialog box opens.
2. Browse for your project (*.DWS) then click Open.
Tip: The Options Panel displays up to four recent project files you created or
modified. Click a project file to open it.
Page 37

Page 38

Page 39

ULEAD DVD WORKSHOP USER GUIDE 39
Capture
The bulk of video work involves working with raw footage. Transferring footage
from a source device to the computer involves a process called capturing.
When capturing, video data is transferred from a source (usually a video camera)
through a capture card to the computer’s hard drive.
The Capture Step Options Panel
The Options Panel in the Capture Step contains tools for capturing video. The
Capture Step Options Panel contains the following:
Duration Specify the length of video to
capture. The capturing process automatically
stops after the duration is reached.
Source Select a video source from the list.
Format Select a file format for the captured
video.
TV channel Use the up and down arrows to
browse for the TV channel from which you
want to capture footage. A TV tuner card must
be installed to use this function.
Capture folder Specify the folder where your
captured videos will be saved.
Options Opens a menu where you can customize settings for capturing video.
• Select Device Control Opens a dialog box where you can set up device
control. This will allow you to control your DV device using the Navigation
Panel.
• Change Capture Plug-in Opens a dialog box where you can specify what plugin to use for capturing video.
Page 40

40 ULEAD DVD WORKSHOP USER GUIDE
• Change Field Order Opens a dialog box where you can set the field order to
use when capturing videos. There is also an option where you can let DVD
Workshop automatically detect the field order used by the video source.
• Capture Options Opens a dialog box where you can set DVD Workshop to
capture the audio, detect scenes, and preview the video while being captured.
This is also where you specify the capture frame rate.
• Video and Audio Capture Property Settings Opens a dialog box where you
can specify the video and audio input source, TV system, and settings for your
TV tuner. You can also customize the video format of the captured video.
Add Video to Title List Select to automatically add the captured video clip to the
Title List.
Capture Video/Stop Capture Starts/ends the capturing process.
Capture Image Captures the currently displayed frame in the Preview Window
and save it as an image file.
Capturing Digital Video (DV)
Digital Video (DV) combines a movie’s audio and video aspects into a single
binary language that can be broken down by computers. This gives DV the
capability of getting digitally enhanced, edited, and adjusted.
To connect a DV camcorder to your computer:
1. Connect the DV camcorder to the IEEE-1394 interface card.
2. Insert your video tape into the camcorder and turn it on. Make sure it is in Play
(VCR/VTR) mode. (Check your camcorder’s manual for instructions.)
3. Click Capture Step and check that your device is displayed in the Options
Panel under Source.
To capture Digital Video:
1. Turn on your camcorder and set it to Play
(VCR/VTR) mode.
2. Create a new project or open an existing
one and go to Capture Step.
3. Select the format you want to capture in
Format.
4. Enter or locate the path where you want to
save your captured video in Capture
Folder.
Page 41

ULEAD DVD WORKSHOP USER GUIDE 41
5. Click Options in the Options Panel then
select Select Device Control to open the
Device Control dialog box.
6. Select the appropriate device control plug in then click OK. This allows you to navigate
through your video source using the
Navigation Panel.
7. Use the Navigation Panel to go to the
start of the section you want to capture.
Note: To capture live video, just set the
camcorder to Camera mode. You don’t
have to insert a blank tape.
8. Click Capture Video to start capturing.
9. Click Stop Capture or press [Esc] to stop capturing.
Capturing analog video
Although Digital Video has been with us for quite some time now, the bulk of
movies made since the invention of motion pictures remains in analog format. Y our
personal library may consist of a number of VCRs, VHS, Video 8s and 8-mm films.
However, they do not have to be left out in the DV revolution. All you need to do is
convert these tapes and reels to DV by capturing them into your computer.
To connect an analog device to your computer:
1. Connect your camcorder, VCR, or other video source to your analog capture
card. (Check your capture card’s manual for specific instructions.)
Note: Also check if connecting the audio cables to the sound card is necessary.
2. Insert your videotape into the video source and turn it on. Make sure it is in
Play (VCR/VTR) mode. (Check the machine’s manual for specific instructions.)
3. Go to the Capture Step and check if your device is displayed in the Options
Panel under Source.
Note: If your capture device supports multiple video sources, click Options in
the Options Panel then select Video and Audio Capture Property Settings.
This allows you to select your desired video source such as Composite, Tuner, or
S-Video. Likewise, if you have multiple audio sources, this dialog box allows you
to specify an audio source.
Page 42

42 ULEAD DVD WORKSHOP USER GUIDE
To capture analog video:
1. Turn on your camcorder and set it to VCR/
Play mode.
2. Create a new project or open an existing
one and go to the Capture Step.
3. Select the capture file format in Format
and locate the path where you want to save
your captured videos in Capture Folder.
4. Click Options then select Video and Audio
Capture Property Settings.
5. In the Video and audio Capture Property Settings dialog box, select the
Input Source (S-video or composite).
6. Use your device’s controls to go to the part that you want to capture.
7. Click Capture Video to start capturing.
8. Click Stop Capture or press [Esc] to stop capturing.
Page 43

ULEAD DVD WORKSHOP USER GUIDE 43
Capturing still images
DVD Workshop, in addition to capturing videos, lets you capture still images from
video clips. These captured images can be used as components when creating
slideshows and menus. The captured image can be saved in either BMP or JPEG
format.
To choose your image format:
1. Click Global Settings: Preferences on the Global Commands Bar.
2. In the Preferences dialog box, click the Capture tab.
3. Select a format in Captured still image save format.
4. Click OK.
To capture still images:
1. Connect your DV or analog device to your computer. Turn it on and set it to
Play (VCR/VTR) mode.
2. Create a new project or open an existing one and go to the Capture Step.
3. Use the Navigation Panel or your device’s playback controls to search for the
part you want to capture.
4. Click Capture Image in the Options Panel. The captured frame will be added
to the Image Library.
Page 44

44 ULEAD DVD WORKSHOP USER GUIDE
Capturing from a TV Tuner
DVD Workshop allows you to capture TV footage using a TV tuner. Capture a
segment of your favorite television show from a regular TV or cable network then
save it in your hard drive in AVI, MPEG, or Windows Media Format.
To capture TV footage using a TV tuner:
1. Create a new project or open an existing
one, then go to Capture Step.
2. Select a capture file format in Format and
locate the path where you want to save
your captured videos in Capture Folder.
3. Enter the channel of the TV show where you
want to capture footage in TV channel.
4. Click Options then select Video and Audio
Capture Property Settings.
5. In the Video and Audio Capture Property Settings dialog box, check that
the Video Input, Video format, and Audio input source are correct.
Notes:
• T he available settings vary, based on the video format you choose.
• You should be able to hear and see your selected program in the Preview
Window.
6. Click Capture Video to start capturing.
7. Click Stop Capture or press [Esc] to stop capturing.
Page 45

ULEAD DVD WORKSHOP USER GUIDE 45
Capturing using Split by Scene
Most of the time, a DV tape may contain sequences of footage recorded at
different times. DVD Workshop’s Split by Scene feature saves you the trouble of
capturing these sequences one by one. It breaks the DV down into multiple files or
clips based on recording dates and times
To use the Split by Scene option in the Capture Step:
1. Click Options in the Options Panel
then select Capture Options.
2. In the Capture Options dialog box,
select Scene detection.
3. Click OK.
Direct video capturing to MPEG format
DVD Workshop supports real-time capturing from DV to MPEG format. Capturing
straight to MPEG saves hard drive space as its file size is smaller compared with
DV AVI.
To capture video in MPEG format:
1. Connect your camcorder or VCR to
your capture card. Turn it on then set
it to Play (VTR/VCR) mode.
2. Go to Capture Step then select
MPEG from the Format list.
3. Ulead DSW MPEG Capture Plug-in
will be detected automatically. Use
this capture plug-in when capturing
as MPEG from a DV camcorder.
4. Click Options then select Video and
Audio Capture Property Settings.
Page 46

46 ULEAD DVD WORKSHOP USER GUIDE
5. In the Video and Audio Capture
Property Settings dialog box, click
Advanced. Choose the type of MPEG
you would like to apply for your
captured video in the MPEG Settings
dialog box then set other attributes.
Note: If you are capturing from a
USB device or analog source, select
Video and Audio Capture
Property Settings from the
Options menu to specify the desired
frame size.
6. Click Capture Video to start
capturing.
7. Click Stop Capture or press [Esc] to stop capturing.
Capturing MICROMV format
DVD Workshop supports capturing footages from Sony® MICROMV camcorders.
MICROMV tapes are 70% smaller than MiniDV tapes and provide up to 60 minutes
of high quality digital video footage.
To capture MICROMV format:
1. Connect your Sony MICROMV camcorder to
the IEEE-1394 interface card.
2. Insert your video tape into the camcorder
and turn it on. Make sure it is in Play (VCR/
VTR) mode.
3. Create a new project or open an existing
one and go to Capture Step.
4. Select the format you want to capture in
Format.
5. Enter or locate the path where you want to
save your captured video in Capture
Folder.
6. Click Options in the Options Panel then
select Change Capture Plug-in.
Page 47

ULEAD DVD WORKSHOP USER GUIDE 47
7. Select MICROMV MPEG Capture Plug-in
then click OK.
8. Use the Navigation Panel to go to the
start of the section you want to capture.
Tip: To capture live video, just set the
camcorder to Camera mode. You don’t
have to insert a blank tape.
9. Click Capture Video to start capturing.
10.Click Stop Capture or press [Esc] to stop
capturing.
Direct video capturing to Windows Media format
You can capture directly from an analog source or DV camcorder straight to
Windows Media Video (WMV). WMV is an extensible file format that handles
synchronized multimedia data and supports live content transmission over a wide
array of networks. Selecting this will automatically convert your video to a WMV
file.
To directly capture to WMV format:
1. Connect your camcorder or VCR to your capture
card. Turn it on then set it to Play (VCR/VTR)
mode.
Note: When acquiring video from an analog
source, be sure that the analog capture card you
are using supports RGB or YUV capture.
2. In the Capture Step, select WMV from the
Format list.
3. Enter or locate the path where you want to save
your captured videos in Capture Folder.
4. Use the Navigation Panel to go to the start of
the section you want to capture.
5. Click Capture Video to start capturing.
6. Click Stop Capture or press [Esc] to stop capturing.
Selecting a profile
Page 48

48 ULEAD DVD WORKSHOP USER GUIDE
The quality of a WMV file depends on the profile it is using. A Profile covers
various attributes for a Windows Media Format file such as bit rate, number and
type of streams, compression quality, frame size, and so on. When capturing a
video directly to WMV format, DVD Workshop uses the default profile to complete
the capturing process.
To select a profile:
1. Connect your camcorder or VCR to
your capture card. Turn it on then set
it to Play (VCR/VTR) mode.
2. In the Capture Step, select WMV
from the Format list.
3. Click Options then select Video and
Audio Capture Property Settings.
4. In the Video and Audio Capture
Property Settings dialog box, click
Select to open the Select Profile
dialog box.
5. Select from the list of available
profiles then click OK.
Editing and customizing a profile
The Select Profile dialog box lists all the profiles available in your system. You
can use the Manage Profiles dialog box to edit, create, remove, and duplicate a
profile. There are two types of profiles:
System-defined profiles
System-defined profiles are preset profiles that cannot be edited. However, you
can create custom profiles based on them.
Custom profiles
Create a custom profile by modifying the settings of a system-defined profile then
saving it with a different name.
Tip: You can also create a new profile by clicking New in the Manage Profiles
dialog box. This will open a task wizard that will guide you in creating a profile.
Page 49

To edit and customize a profile:
1. Connect your camcorder or VCR to
your capture card. Turn it on then set
it to Play (VCR/VTR) mode.
2. In the Capture Step, select WMV
from the Format list.
3. Click Options then select Video and
Audio Capture Property Settings.
4. In the Video and Audio Cap tu re
Property Settings dialog box, click
Select.
5. In the Select Profile dialog box, click
Customize.
6. Manage Profiles lists all the
available profiles installed in your
computer. There are two types of
profiles: System-defined profiles
and Custom profiles. Click Edit to
modify the attributes of a custom
profile.
7. Under General Information, specify
a name for the edited profile in Name
of Profile.
8. Select the media types supported by
the profile in Media types.
9. Select a video format then click OK.
The edited profile is added to the list
of available profiles in the Select
Profile dialog box.
ULEAD DVD WORKSHOP USER GUIDE 49
Page 50

50 ULEAD DVD WORKSHOP USER GUIDE
Video and Audio Capture Property Settings
TV system Select the regional format (NTSC or PAL) of the television you are
using. NTSC is predominant in North America and many Asian countries. PAL is the
television standard in Europe and South Pacific.
Input source Select the appropriate capture card where your analog device is
connected. Choose Video Composite if you have a video input jack and one
(Mono) or two (Stereo) audio input jacks. Otherwise, choose TV tuner for TV
input or Video S-video for S-video input.
Video format Select the capture video format to use (DVD/VCD/SVCD). Select
Customize to set up your own video format.
Frame size Select the dimensions of images in the video or animation sequences.
Speed/Quality Set the percentage level of video quality to be created after
capturing.
Advanced Opens a dialog box that contains advanced options for capturing.
TV tuner Displays various options for capturing video using a TV tuner.
Country/Region Select the location where the TV signal is taken. This
determines the available channels.
Input type Select the source to which the TV tuner is connected.
Channel Select the TV channel from which you want to capture footage.
Audio input source Select the audio driver to be used in capturing your video.
Page 51

Page 52

Page 53

ULEAD DVD WORKSHOP USER GUIDE 53
Edit
Edit is where you will be working primarily with titles, chapters, audio tracks, and
subtitles. Arrange, trim, and edit your titles and set chapters to use for your
menus. You can also add extr a audio tr acks and create multiple subtitle tracks just
like what you see in DVD movies.
The Edit Step Options Panel
Video tab
The Video tab displays various options that you can use to edit your video clips
and add chapters for your menu.
• Duration Displays the length of the
selected video clip.
• Mark-in Displays the starting point of the
video clip.
• Mark-out Displays the end point of the
video clip.
• Auto Add Chapters Opens a dialog box
that automatically detect scenes in the
current video. You can then select the
scenes and insert them as chapters in your
project.
• Add/Delete Chapter Adds the current
frame of the video in the Preview Window
to the Chapter List. These chapters will be
used when you create your menus. These
chapters act as anchor points to your video
which the viewer can directly access using
the menu.
• Cut Title Splits the selected title into two
based on the position of the Jog Bar. This
option then adds the portions to the Title
List as two separate titles.
• Add Current Frame to Library Click to
save the currently displayed frame as an
image file in your project folder and add it
to the Image Library.
Page 54

54 ULEAD DVD WORKSHOP USER GUIDE
• Locate I-frame Select to locate the I-frames (Intra frames) in the selected
clip. I-frames are frames in an MPEG video file coded without any reference to
any other frames. A single second of video is composed of a number of frames.
This sequence of frames (represented by I, P, or B frames) is called Group of
Pictures (GOP).
• Convert to Disc Template Select to re-render the video file to the output
format specified in the Finish Step. This is disabled when the file is not DVD
compliant, DVD Workshop will automatically render it. (see “Disc Template
Manager” on page 99)
• Replace background music (VCD/SVCD) Select to browse for an audio file as
a replacement for the original background audio.
• Volume (VCD/SVCD) Drag the slider or enter a val ue to increase or decrease
the audio volume.
• Fade-in/Fade-out (VCD/SVCD) Click to gradually increase/decrease the
volume of the selected track as it starts/ends playing.
• Loop audio (VCD/SVCD) Repeats the audio track to match the duration of the
video during playback.
Image tab
The Image tab displays various options that you can use to edit your image clips
and create your slideshows.
• Total duration Displays the length of the
slideshow.
• Match to Audio Duration (VCD/SVCD)
Select to match the length of the slideshow
to the total duration of the background audio.
• Background Music (VCD/SVCD) Select to
browse for an audio file and use it as
background audio for the selected slideshow.
• Add Transition Select to apply a transition
effect to your slideshow. You can only use
one per slideshow. Clear to remove transition
effects.
• Transition effect Select a transition effect in
the drop-down list. You can preview the
transition effect on the box below Add
Transition.
Page 55

ULEAD DVD WORKSHOP USER GUIDE 55
• Transition effect duration Enter a value
or drag the slider to specify the duration of
the transition effect in the slideshow.
• Volume (VCD/SVCD) Drag the slider or
enter a value to increase or decrease the
audio volume.
• Fade-in/Fade-out (VCD/SVCD) Select to
gradually increase/decrease the volume of
the background audio as it starts/ends
playing.
• Loop audio (VCD/SVCD) Repeats the
background audio to match the duration of
the slideshow during playback.
• Rotate Rotates the selected image in the
slideshow 90 degrees to the left/right.
• Delete Image Removes an image from the slideshow.
• Arrange Images Click to open a dialog box where you can rearrange the order
of the images in a slideshow.
• Clip duration Enter a value or drag the slider to specify how long each image
will be displayed.
Audio Panel
Double-click an audio file in the Library to access the Audio Panel. This displays
various options that you can use to adjust the volume level of your audio clip and
view its properties.
• Duration Displays the length of the audio
file.
• Mark-in Displays the starting point of the
audio file.
• Mark-out Displays the end point of the audio
file.
• Volume Drag the slider or enter a value to
increase or decrease the audio’s volume.
• Fade-in/Fade-out Select to gradually
increase/decrease the volume of the
background audio as it starts/ends playing.
• Properties Opens a dialog box that displays
detailed information about the audio file.
Page 56

56 ULEAD DVD WORKSHOP USER GUIDE
Audio tab (DVD)
The Audio tab is where you can add and/or edit additional audio tracks to your
titles.
• Add audio track Opens a dialog box where
you can select an audio file that you can add to
the Audio tracks list.
• Remove audio track Removes the selected
audio track from the Audio tracks list.
• Audio tracks Contains all the audio tracks
associated with the title. You can add up to
eight audio tracks to each of your titles.
• Volume Drag the slider or enter a value to
increase or decrease the audio volume.
• Fade-in/Fade-out Select to gradually
increase/decrease the volume of the audio
track as it starts/ends playing.
• Loop audio Repeats the audio track to match the duration of the video/
slideshow during playback
• Convert to Disc Template Select to re-render the audio file to the output
format specified in the Finish Step. This is disabled when the file is not DVD
compliant, DVD Workshop will automatically render it. (see “Disc Template
Manager” on page 99)
• Surround Sound Emulation Select if the original audio track of your title used
more than two channels (e.g. Dolby® Digital AC-3) but was converted to a 2channel audio track (e.g. Dolby® Digital 2-channel) before importing to DVD
Workshop. Selecting this option will simulate the audio track's original audio
format when playing back your video on a DVD player.
• Match to Audio Duration (slideshow only)
Select to match the length of the slideshow to
the total duration of the background audio.
• Language Settings Opens a dialog box where
you can specify the language and
characteristics of the selected audio track.
Subtitle tab (DVD)
The Subtitle tab is where you can add and/or edit
additional subtitle tracks to your titles.
• Add/Edit Subtitles Opens a dialog box where
you can create and edit subtitle tracks for your
titles.
Page 57

ULEAD DVD WORKSHOP USER GUIDE 57
Titles and Chapters
Titles and chapters are the two fundamental elements in both Edit and Menu
steps.
Titles are video/image clips and slideshows used in your project. Although audio
clips cannot be used as titles, they can be edited in this step.
Chapters are the different scenes in a single title that you want to use when you
create your project’s menus. These chapters will then serve as your movie’s entry
points, which the viewers can instantly access using the menu you created.
Working with titles
Please read through the following sections to learn about the various operations
associated with titles:
Adding titles to your project
There are several ways to add titles to your project. You can drag and drop, or
browse and select, depending on where the titles are located.
To add titles from the Library:
1. Select the title in the Library that you want to add to your project.
2. Drag the selected title to a placeholder in the Title List.
To add titles from a DVD
1. Click Import from DVD located
above the Title List.
2. In the Browse for Folder dialog
box, locate your DVD drive and
search for the VIDEO_TS or
DVD_RTAV folder.
3. Select the title that you want to add
then click Open.
4. The selected title is added to the
Title List and at the same time, the
title is saved to your hard drive.
Page 58

58 ULEAD DVD WORKSHOP USER GUIDE
To add titles using Add Video and Add Image:
1. Click Add Video/Image above the
Content Window to open the Load
Video/Image File dialog box.
2. Locate the video or image file(s) you want
to import then click Open.
Tip: To select multiple images, hold down
[Ctrl] then select the video or image files
you want to import. Images imported this
way will be added to the Title List as a
slideshow title.
Creating a slideshow
A slideshow is a way of exhibiting your images by displaying them sequentially.
Compile and arrange your images in DVD Workshop to create slideshow titles. You
can also add a background audio to your slideshow.
To create a slideshow:
1. Import the images that you want to
include in the slideshow into the
Library.
2. Drag an image to a placeholder in the
Title List then drag the rest of the
images you want to include in your
slideshow into the same placeholder.
All the images in the slideshow are
displayed in the Chapter List.
Tip: To add multiple images, hold
down [Ctrl] and select the images
you want to add then drag them to
the placeholder.
3. Click Arrange Images to rearrange
the order of the images in the
slideshow.
Tip: Y ou can also drag the thumbnail
of the image to its new position in
the Chapter List to rearrange the
order of the images.
Page 59

ULEAD DVD WORKSHOP USER GUIDE 59
4. Set how long each image will appear on
the screen in Image Duration.
5. Select Add transition then choose a
transition effect from the list. The
selected effect will be applied to all the
images in the slideshow.
6. Drag the slider or enter a value in
Transition Duration to set how long
the transition will take.
7. To assign a chapter in your slideshow ,
right-click any of the images to be
assigned as chapter then select Mark
as Chapter. (see “Setting chapters for
slideshows” on page 72)
Tip: You can also assign chapters for your slideshow in the Arrange Images
dialog box. To assign an image as a chapter, right-click an image and select Mark
as Chapter. Only images that are assigned as chapters can be added to your
menus.
Page 60

60 ULEAD DVD WORKSHOP USER GUIDE
To add a background audio to your slideshow (DVD):
1. Select the slideshow where you want
to add background audio in the Title
List.
2. Click the Audio tab in the Options
Panel.
3. Select an audio track field from the
Audio tracks list and click Add
audio track.
4. Select the audio file you want to add
and click Open.
Tip: Select the audio track in the
Options Panel then click Remove
audio track to remove the
background audio.
To add a background audio to your slideshow (VCD/SVCD):
1. Select the slideshow where you want
to add background audio in the Title
List.
2. In the Options Panel, click Browse
and select the audio file you want to
add in the Open dialog box.
3. Click Open.
Tip: Clear Background Music in
the Options Panel to remove the
background audio.
Page 61

ULEAD DVD WORKSHOP USER GUIDE 61
Setting a First Play Video
Assign a video or image as First Play Video to your DVD. The First Play Video is
the initial clip played before the project’s menu appears.
The First Play Video Options Panel
• Duration Displays the length of the First Play
Video.
• Mark-in/Mark-out Displays the start/end
point of the First Play Video.
• Force First Play (DVD) Select to prevent the
user from skipping the First Play Video.
• Replace background music Select to browse
for an audio file as a replacement to the
original background audio.
• Volume Drag the slider or enter a value to
increase or decrease the audio volume.
• Fade-in/Fade-out Select to gradually
increase/decrease the volume of the audio
track as it starts/ends playing.
• Loop audio Repeats the audio track to match the duration of the video/
slideshow during playback.
• Convert to Disc Template Select to convert the selected video file to the
output format specified in the Finish Step. (see “Disc Template Manager” on
page 99)
There are two ways to set a title as First Play Video:
•In the Library, select the video or image that you want to use as First Play
Video then drag the selected clip to the First Play placeholder in the Title List.
• In the Title List, right-click on the title then select Set as First Play Video.
Playing back titles and audio clips
Play back your titles or audio clips in the Preview Window using the Navigation
Panel. There are several ways to select a clip for playback:
• Drag a clip from the Library to the Title List.
• Double-click a thumbnail in the Library or the Title List.
• Right-click a thumbnail in the Library or the Title List then select Edit.
• Drag a clip from the Library to the Preview Window.
Page 62

62 ULEAD DVD WORKSHOP USER GUIDE
Using Split by Scene
Split by Scene divides DV into multiple files or clips based on recording date and
time or frame content. This feature is useful when you have several video sessions
recorded on the same DV tape at different times and you want to separate them
into different clips.
To use Split by Scene on DV files:
1. Load the DV AVI or MPEG file into the Video Library.
2. Right-click its thumbnail then select Split by Scene to open the Scenes dialog
box.
3. Select the scan method from the Scan Method list. MPEG files can only be
scanned using the differences in the frame content.
4. Click Scan to start detecting scenes in the video. All detected scenes are
displayed in the Detected scenes list.
Tip: Click Reset to remove all the detected scenes from the Detected scenes
list.
5. Select the scenes you want to add to the Library.
6. Click OK. All selected scenes will be automatically added to the Video Library.
Page 63

ULEAD DVD WORKSHOP USER GUIDE 63
Join and Split Options
The Scenes dialog box allows you to merge adjoining clips as one, and/or split
joined scenes. This dialog box displays the various scenes in your video clip with a
numerical label assigned to each detected scene. This label represents the
sequence of appearance of the scenes in your video clip.
To join two scenes:
1. Select two consecutive scenes (1 and 2) from the list of detected scenes.
2. Between the two selected clips, highlight the second selection.
3. Click Join.
These two scenes will now be merged as one. Notice that scene #2 is not in the list
of scenes anymore. Scene #1 is now composed of two scenes and its duration is
longer. Repeat the process to join other scenes.
Tip: To split scenes, select the merged scene then click Split.
Rearranging titles in the Title List
The order of the titles in the Title List will be your project's default playback
sequence. To change the order of your titles, drag the title to where you want to
position them.
Page 64

64 ULEAD DVD WORKSHOP USER GUIDE
Trimming titles or audio clips
Your captured videos may have ex cess footage at the beginning or at the end that
you may want to remove. The Navigation Panel allows you to trim your videos as
accurately as possible.
To trim using the Jog Bar and Mark-in/Mark-out buttons:
1. Drag the Jog Bar or click Previous or Next on the Navigation Panel to mov e
to the frame where you want the clip to start. This will be your mark-in point.
2. Click Mark-in or press [F3] to set the mark-in point.
3. Move to the frame where you want the clip to end. This will be your mark-out
point.
4. Click Mark-out or press [F4] to set the mark-out point.
To trim using the Trim Bar:
1. Select the video clip you want to trim.
2. To set the mark-in time, drag the left Trim Bar slider to the desired position.
The Mark-in time is displayed in the Options Panel.
3. To set th e mark -out time, dr ag the right Trim Ba r slider to the desired position.
The Mark-out time is displayed in the Options Panel.
Note: To preview the trimmed clips, hold down [Shift] and click Play on the
Navigation Panel at the same time.
Page 65

ULEAD DVD WORKSHOP USER GUIDE 65
Cutting titles
You can split a single video clip into two separate titles with different starting and
ending points. The mark-in and mark -out points of each new title is determined by
the position of the Jog Bar in the Navigation Panel.
Refer to the example below for the process of cutting titles. We have labeled the
original mark-in of the title as point A, its mark-out point as point B, and the Jog
Bar position as point C.
Using the Jog Bar, go to the frame where you want to split your title then click Cut
Title in the Options Panel.
Two new titles with different mark-in and mark-out points are displayed in the
Title List.
Check the mark-in and mark-out fields in the Options Panel. You will see that the
mark-in of the first new title is A and its mark-out C, while the mark-in of the
second new title is C, and its mark-out is B.
You can split these two new titles further by selecting one, moving the Jog Bar to
another position, and repeating the whole process.
Note: Cut Title is only applicable to video clips. Displayed above are the mark-in
and mark-out times of the first (left) and second new t itle (right). Notice that the
mark-out time on the left is the same as the mark-in time on the right.
Page 66

66 ULEAD DVD WORKSHOP USER GUIDE
Deleting titles
Delete titles in the Title List that you do not want to include in your project. There
are two ways of deleting a title in the Title List:
• Right-click a title in the Title List then select Delete.
• Select a title in the Title List then press [Delete].
Renaming titles
Rename your titles for easy identification. This is convenient when working with
several titles.
To rename a title:
1. Select a thumbnail from either the Library or Title List.
2. Right-click the thumbnail and select Rename.
3. Type a new name for the thumbnail and press [Enter].
Replacing the audio track of a title
DVD Workshop allows you to replace a title's audio tr ack. You can either replace it
with a voice dub or a background music.
To replace the audio track of a
title (DVD):
1. Select the video or slideshow in the
Title List.
2. Click the Audio tab in the Options
Panel.
3. In the Audio tracks list, select the
track you want to replace then click
Remove audio track.
4. Click Add audio track then select a
replacement for the original audio
track. Click OK.
Page 67

ULEAD DVD WORKSHOP USER GUIDE 67
To replace the audio track of a title (VCD/SVCD):
1. Select the video or slideshow in the Title List.
2. In the Options Panel, click Browse and
select the audio file you want to use to replace
the original audio track in the Open dialog
box.
3. Click Open.
Tip: Once you have selected a replacement,
adjust the volume of the title's audio track by
moving the slider up or down or enter a value
for the volume level. You can also click Fade-
in/Fade-out to gradually increase/decrease
the volume as the audio track starts/ends.
Notes:
• Setting the volume to the highest level may
produce distortion or audio clipping. Adjust
your volume to a lower setting if this
happens.
•Click Global Settings: Preferences and go
to Default Settings tab to specify the
default duration of the audio track’s fade-in/
fade-out effect.
Title properties
You can view information about a clip in the
Properties dialog box. This displays the file
size, format, compression type, and other
attributes of the selected clip.
To open the Properties dialog box:
• Right-click a thumbnail in the Title List or
the Library, then select Properties.
• Right-click the Preview Window then
select Properties to view the attributes of
a currently displayed clip.
Page 68

68 ULEAD DVD WORKSHOP USER GUIDE
Output Display Options
When creating DVD projects, you can assign settings to your titles to specify how
they should be displayed on TV screens. To change the display setting, right-click a
thumbnail in the Title List then select Output Display Options.
The Output Display Options dialog box contains the following:
Display aspect ratio Displays the aspect ratio of the selected title.
On standard TV Displays different options on how titles that have display aspect
ratios of 16:9 will be displayed on a standard TV.
• Letterbox only Select if you want the DVD player to recognize the letterbox
properties of the video. The letterbox process preserves the entire frame and
proportionally reduces the size so that the whole picture fits on the TV screen.
Proportional display reduction will result in mattes (black bands) above and
below the image.
• Pan & Scan only Select if you want the DVD player to recognize the pan &
scan properties of the video.
• Both letterbox and pan & scan Select if you want the DVD player to
recognize both the letterbox and pan & scan properties of the video. Usually, to
preserve the entire picture of a 16:9 video on a standard TV, the mattes are
used to cover up the unused areas on the screen.
Page 69

ULEAD DVD WORKSHOP USER GUIDE 69
On widescreen TV Displays different options on how titles that have display
aspect ratios of 4:3 will be displayed on a widescreen TV.
• As Is Select if you want the DVD player to play the video using 4:3 aspect ratio.
• Source is letterboxed Select if your source video or image already supports
widescreen displays. Your video should have used the letterbo x process wherein
mattes are visible above and below the display.
• Stretch Select to stretch the video and fill out the screen without maintaining
the aspect ratio. By selecting this, the DVD player can play back the video with
the correct stretch properties.
• Keep aspect ratio Select to proportionally resize a 4:3 video to fit a
widescreen TV. This option preserves the entire picture and adds vertical mattes
on each side of the display.
• Keep aspect ratio (no pillarbox) Select to proportionally resize a 4:3 video
to fit a widescreen TV. This option fits the entire picture to fill out the screen by
cropping some parts of the picture.
Note: Selecting either Keep aspect ratio or Keep aspect ratio (no pillarbox)
will encode the 4:3 format video to 16:9 format when you burn the file onto a
disc.
Retain Film mode is only enabled when the active title is in a PAL-compliant
format. Selecting this option indicates that the video is in 24 fps progressive scan
and will be flagged to 25 fps to comply with PAL specifications. Note that the
video's frame rate is not accelerated to 25 fps but only "flagged" as 25 fps.
Page 70

70 ULEAD DVD WORKSHOP USER GUIDE
Working with chapters
The menus of your movie are mostly based on chapters. Chapters function as
entry points in the video. The video will play back starting from the selected
chapter.
Inserting chapters to the Chapter List
You can insert up to 99 scenes from a single video title to the Chapter List.
• The first frame of every video title is automatically placed in the Chapter List.
• Select Locate I-frame in the Options Panel to search for the I-frames within
a GOP using the Navigation Panel.
I-frames are frames in an MPEG video file that are coded without any
reference to any other frames. A single second of video is composed of a
number of frames. This sequence of frames (I, P, or B frames) is called Group
of Pictures (GOP).
To add chapters to the Chapter List:
1. Select a video title from the Title List.
2. Use the Navigation Panel to scan the video title.
3. For each scene you want to use as a chapter, click
Add Chapter in the Options Panel. The
displayed frame will be added to the Chapter
List.
To add a video title’s I-frames to the Chapter List:
1. Select a video title from the Title List.
2. Select Locate I-frame in the Options Panel.
3. Use the Navigation Panel (Go to next I-frame and Go to previous I-
frame) to search for I-frames.
4. Click Add Chapter in the Options Panel or press [A] for each I-frame you
want to use as a chapter. The displayed frame will be added to the Chapter
List.
Note: If a video is trimmed after chapters have been inserted, chapters outside
the trimmed portion of the video will be discarded.
Page 71

ULEAD DVD WORKSHOP USER GUIDE 71
Automatically inserting scenes to the Chapter List
Automatically add chapters to the Chapter List based on different scenes in the
video. DVD Workshop automatically detects scene changes based on recording
dates and times as well as content changes. It then scans and breaks down the file
into several clips based on the scan method used. Afterwards, clips can now be
added as chapters to your Chapter List.
To automatically insert scenes to Chapter List:
1. Go to Edit Step and select a video clip in the
Title List.
2. Click Auto Add Chapters in the Options Panel
to open the Scenes dialog box.
3. Select your preferred Scan Method (DV
Recording Time or Frame Content).
Note: If a video is trimmed after the chapters
have been inserted, chapters outside the
trimmed portion of the video will be discarded.
4. Click Scan. The scanned scenes are displayed on
the list.
5. Click OK. The scenes are now added as chapters
to the Chapter List.
Note: Scanned scenes can be combined and treated as one before they ar e
added as chapters. To join scenes, select two consecutive scenes then click Join.
To undo this action, select the combined scene then click Split.
Deleting chapters from the Chapter List
To remove chapters from the Chapter List, select the chapter either by doubleclicking the thumbnail or using one of the following methods:
• Click Delete Chapter in the Options Panel.
• Right-click the Preview Window then select Delete Chapter.
• Select the chapter you want to remove from the Chapter List then press
[Delete].
Page 72

72 ULEAD DVD WORKSHOP USER GUIDE
Setting chapter thumbnails
You can use a different frame from your video to use as the chapter thumbnail
image.
To change the chapter thumbnail image:
1. select the thumbnail that you want to
change in the Chapter List.
2. Use the Navigation Panel to search for the
frame you want to use as a chapter.
3. Right-click the chapter thumbnail in the
Chapter List and select Set Chapter
Thumbnail. The displayed frame in the
Preview Window will replace the selected
thumbnail in the Chapter List.
Setting chapters for slideshows
Set an image in your slideshow as a chapter to allow viewers to directly access
that image using the menu.
To set chapters for a slideshow:
1. Select the slideshow title in the Title List.
2. Right-click the image you want to set as
chapter in the Chapter List then select
Mark as Chapter.
Note: Y ou can only use images that are set
as chapters for your menus.
Tip: You can add or delete a chapter mark
using the Arrange Images dialog box.
Audio and Subtitles
DVD Workshop allows you to add multiple audio and subtitle tracks with different
languages to your project. This feature is only available in DVD projects.
Page 73

ULEAD DVD WORKSHOP USER GUIDE 73
Working with audio tracks
Add up to eight additional audio tracks for your titles such as language
translations, captions, director’s comments, or aid to the visually-impaired.
To add extra audio tracks:
1. In the Title List, select the title where you want to add an audio track.
2. In the Options Panel, click the Audio tab.
Note: If the current file already has an audio track, it is automatically listed in
the Audio tracks list.
3. Click Add audio track and select the audio file you want to add.
4. Click Open.
Note: If there is an audio file in the selected field, the existing audio file in the
field will be moved down to the next field in the Audio tracks list.
5. Set other options for the added audio track. (see “Audio tab (DVD)” on page 56)
Specifying Language Settings and Characteristics
The Language Settings dialog box allows you to specify the audio track’s
language as well as its characteristics. Characteristics classify audio tracks into
categories that can be displayed in some DVD players that support this feature.
To specify Language Settings and Characteristics:
1. In the Options Panel, click the Audio
tab.
2. Click Language Settings to open the
Language Settings dialog box.
3. In the Audio tracks list, select the
audio track.
4. Select the Language and
Characteristics for the selected audio
track in the Language Settings dialog
box.
5. Click OK.
Tip: Select Apply to all titles to apply
the settings to all titles in your project.
Page 74

74 ULEAD DVD WORKSHOP USER GUIDE
Working with subtitles
Subtitles are textual representations of the spoken audio in the title. Add up to 32
subtitle tracks to your titles such as language translations, captions, director’s
comments, or aid the hearing-impaired.
Adding subtitles
A Subtitle Track is a compilation of subtitles that will appear on the video at
specific times. The Add/Edit Subtitles dialog box provides tools and options to
create your subtitles.
To add subtitles:
1. In the Title List, select the title where you want to add a subtitle.
2. In the Options Panel, click the Subtitle tab.
3. Click Add/Edit Subtitles to open the Add/Edit Subtitles dialog box.
Page 75

ULEAD DVD WORKSHOP USER GUIDE 75
4. In the Subtitle Segment List, double-click the subtitle field and type text. A
subtitle segment is a part of the subtitle track that appears in a certain time
that you specify.
Tips:
• You can directly type your subtitle text in the Preview Window by clicking it.
• You can also load text files to add as segments to the subtitle tracks by clicking
Add from file.
5. Double-click the Start field and enter the timecode where you want the
segment to start. Do the same process for the End field to specify where you
want the segment to end.
Tips: You can modify the start and end points of the subtitle segment by:
•Using the Jog Bar and the Set start/end time buttons in the Navigation
Panel of the Preview Window.
• Pressing [F3] for start time and [F4] for end time while playing back the video.
6. To add a new subtitle segment, select a new subtitle segment field and repeat
steps 4 and 5.
Tip: Check Overlapping segment(s) to see if you have subtitle segments that
are overlapping. Overlapping segments are highlighted in green.
7. Click OK to apply the subtitle track to your title.
Page 76

76 ULEAD DVD WORKSHOP USER GUIDE
Adding additional subtitle tracks
DVD Workshop allows you to add up to 32 subtitle tracks to your titles.
To add an additional subtitle track:
1. Select the title where you want to add additional subtitle tracks in the Title
List.
2. Click the Subtitle tab in the Options Panel then click Add/Edit Subtitles.
3. Click Add new track in the Add/Edit Subtitles dialog box. You can then add
new subtitle segments to your subtitle track. (see “Adding subtitles” on page
74)
4. Click OK to apply the subtitle track to your title
Tip: To delete a subtitle track, select a subtitle track in Current track then click
Delete current track.
Specifying Language Settings and Characteristics
Just like audio tracks, you can specify a subtitle track’s language and its
characteristics. Characteristics can be displayed in some DVD play ers that support
this feature.
To set a subtitle’s language and
characteristics:
1. In the Add/Edit Subtitles dialog
box, click Language settings to
open the Language Settings dialog
box.
2. Select a subtitle stream from the
Subtitle tracks list.
3. Choose the Language and
Characteristics for the subtitle.
4. Click OK.
Tip: Select Apply to all titles to
apply the settings to all titles in your
project.
Page 77

ULEAD DVD WORKSHOP USER GUIDE 77
Saving to a text file
DVD Workshop allows you to save your subtitles as text files so that you can
retrieve and use them again.
To save a subtitle to a text file:
1. In the Add/Edit Subtitles dialog
box, click Save to a text file to
open the Save dialog box.
2. Enter a name and browse for a folder
where you want to save the text file
in File name.
3. Select the subtitle properties you
want to include in the text file under
Options.
4. Click OK.
Changing text attributes
The Add/Edit Subtitles dialog box provides a variety of tools that you can use to
customize your subtitle text.
• Text format Allows you to change
the type, size and style of the text as
well as add borders and change the
alignment.
• Text color and transparency
Allows you to assign colors for the
text face, border, and background
using the Color Palette. Drag the
sliders to control the transparency of
the text and its other attributes. Click
Colors to open a dialog box where
you can set custom colors using the
Color Picker.
• Text position Allows you to specify
the location of the subtitle text on the
screen. Enter a value or drag the
slider in the X and Y fields. Select
Fixed to choose a preset position.
Page 78

78 ULEAD DVD WORKSHOP USER GUIDE
Adding subtitles from metadata
Digital Videos and images have embedded information that you can use as
subtitles.
To add subtitles using DV
information:
1. Select the title where you want to add
additional subtitle tracks in the Title
List.
2. Click the Subtitle tab in the Options
Panel then click Add/Edit
Subtitles.
3. Click Add subtitle from metadata
in the Add/Edit Subtitles dialog
box.
4. In the Add Subtitle - DV/EXIF
Information dialog box, select the
information you want to include in the
subtitle.
5. Specify how long the subtitle is
displayed in Duration then click OK.
6. Click OK to apply the subtitle track to
your title.
Page 79

Page 80

Page 81

ULEAD DVD WORKSHOP USER GUIDE 81
Menu
Create menus like the ones you see on DVDs. DVD Workshop provides all the
necessary tools to help you easily create menus for your DVD, VCD, or SVCD
projects.
This chapter will teach you how to create, add and edit the necessary menu
elements to complete your project.
What are menus?
Think of menus as the video equivalent of a book’s table of contents. They are
divided into sections called chapters. Like books, DVDs feature menus based on
titles and chapters. These menus allow users to instantly access specific portions
of the video.
In DVD Workshop, you can create your own menu or choose from a selection of
ready-to-use templates. Add flair to your menus by adding background music and
motion attributes to your background and buttons (DVD).
Page 82

82 ULEAD DVD WORKSHOP USER GUIDE
Creating menus
There are three ways to create menus in DVD Workshop:
• Drag a video or an image clip from the Library to a placeholder in the Menu
List. This serves as background for your menu. Other elements, such as
buttons, need to be manually added.
• Click any of the three buttons above the Menu List. The options are described
below.
• Double-click on an empty placeholder to create a blank menu.
Create Menu - Blank
Create Menu - Blank is similar to drawing on a blank piece of paper. All menu
elements need to be added manually. You can add buttons, titles, and objects by
dragging them from the Library, Title List, or Chapter List to the Preview
Window.
Create Menu - Template
Create Menu - Template allows you to
choose from a list of preset menu
templates that you can use for creating
menus. The menu background,
thumbnail placeholders, and buttons are
already set up. The remaining thing to
do is to drag the titles and chapters
either from the Title List or Chapter List
to the placeholders in your menu.
Tip: You can also create a menu
based on a template. Drag a menu
template from the Library to a
placeholder in the Menu List.
Page 83

ULEAD DVD WORKSHOP USER GUIDE 83
Create Menu - Wizard
Create Menu - Wizard helps you create a menu complete with links. This option
guides you throughout the menu creation process.
To create a menu using the Menu Wizard:
1. Click Create menu from wizard above the
Menu List.
2. In the Select Title dialog box, select the
title in the Titles in current project list
then click Add. Click Next.
Tip: Click Add all to automatically add all
the titles to the Selected titles list.
3. In the Select Menu Template dialog box,
select the title that you want to create a
menu for in Select title/track.
4. Select a menu template in Project
template.
Tips:
•Click Background image to change the
background image of the menu.
•Click Background music to add a
background audio for the menu.
5. Click Finish to apply the template for the
menu page.
Note: Each page in your menu will be
placed in a separate placeholder in the
Menu List.
Objects and buttons in the menu
Objects
Images, videos, text, or placeholders are classified as menu objects. These objects
don’t have links and only serve as decorations on your menu.
• Image Images can be pictures or clip art. Alpha channels on an RGB 32-bit
image and transparency on a GIF image are recognized when you use them in
your menus.
Page 84

84 ULEAD DVD WORKSHOP USER GUIDE
• Video These are objects taken from a video file. Although these come from
videos, only the first frame is displayed in the menu and is note animated.
Video object can only be animated when they are used as buttons.
• Text These are text strings represented by characters.
• Placeholder These are containers in menu templates where you can place
titles, chapters, or other menus. Frames from the library and buttons can also
act as placeholders.
Buttons
Buttons are menu objects that have associated links. Through these buttons,
viewers can play back a video, navigate within the menus, or access chapters in
the video.
The Preview Window
The Preview Window acts as your workspace for creating your menu. You can
drag items from the Library or Content Window to the Preview Window.
Additional commands are also available when you right-click the Preview Window.
Note: The bounding box in the Preview Window is the Title-safe Area. This
indicates if your buttons and objects are still within the viewable area of a TV
screen. You can set this in the Preferences dialog box.
Preferences” on page 29)
(see “Setting
Page 85

ULEAD DVD WORKSHOP USER GUIDE 85
The Menu Step Options Panel
There are three tabs in the Options Panel of the Menu Step. Each tab has
different options that allow you to edit your menu components.
The Options Panel of the Menu Step contains the following:
Menu tab
This tab displays various options you can use to edit the attributes of your menu.
• Motion Background (DVD) Select to enable
the motion attributes of the menu background.
• Background Music Select to add an audio file
to serve as background music for your menu.
Click Browse to locate the audio file.
• Volume Drag the slider or enter a value to
increase or decrease the audio volume.
• Fade-in/Fade-out Select to gradually
increase/decrease the volume of the audio
track as it starts/ends playing.
• Loop audio Repeats the audio track to match
the duration of the video/slideshow during
playback.
• Still menu time out period (DVD) Enter how
much idle time must pass before the specified
button in After loop/Time out button
automatically plays. This option is only
available if the menu does not contain a motion
background, motion buttons and background
audio. Select Infinite if you don’t want to
activate a button when the menu becomes idle.
• Menu duration (DVD) Specify how long the
menu will play before it loops.
• Loop point (DVD) Set the time where you
want to start looping the motion menu. For
example, if 00:00:06.00 is entered, the motion
menu will start looping from the sixth second
after playing the duration of the motion menu.
The button in your menu assigned as the
Default Highlight Button will only be
highlighted when the menu starts looping.
Page 86

86 ULEAD DVD WORKSHOP USER GUIDE
• Loop count (DVD) Enter the number of times you want the motion menu to
loop. The loop will start from the point entered in Loop Point. After the loop
count is reached, the specified button in After loop/Time out button is
activated.
• After loop/Time out button (DVD) Select which button to activate when the
time specified in Still menu time out period elapses or the number of loops in
Loop count is reached. This option is only available if Still menu time out
period/Loop count is not set to Infinite.
Tip: Select Custom Button to open a dialog box where you can specify a button
to activate.
• Menu time out period (VCD/SVCD) Enter how much idle time must pass
before the specified button in Time out button automatically plays.
• Time out button (VCD/SVCD) Select which button to activate when the time
specified in Menu time out period elapses.
Button tab
This tab displays various options that you can use to edit the attributes of your
buttons.
Style (DVD)
• Motion Button Select to activate the
motion attributes of the menu button.
• Invisible button Select to hide the display
attributes of the selected button making it
invisible. An invisible button is usually used
as an Easter Egg to make your DVD video
more interesting.
An Easter Egg is a hidden button in a
menu. It may contain a hidden video,
menu, message or list of credits for the
DVD’s author.
• Color mapping Select a color for the
selection and action state of the button.
• Apply color mapping Select whether to apply the state colors to either the
frame, placeholder, or to both objects. This option is only available when a
frame is applied to the button.
• Remove Highlight Image Click to remove the highlight image of the selected
button.
Page 87

Attributes
• Brightness Set the luminance of the
button. A higher value means a brighter
color for the button.
• Contrast Set the difference between the
dark and light colors of the button. A higher
contrast means sharper images.
• Transparency Set the opaqueness of the
button. The button becomes more
transparent when you enter a higher value.
• Rotation Drag the slider or enter a value to
rotate a button.
Shadow
• Add Shadow Select to apply a shadow to
the button. Clear to remove the shadow.
• Shadow color Select from eight predefined shadow colors and apply them on a
button. Click the large color box to select
from a wider color range.
• Soft edge Set the smoothness of the
shadow’s edges. A higher value specified
means softer edges.
• Transparency Set the opaqueness of the
shadow. The shadow will become more
transparent when you enter a higher value.
• X/Y offset Enter a value or drag the sliders
to fine-tune the position of the shadow.
ULEAD DVD WORKSHOP USER GUIDE 87
Page 88

88 ULEAD DVD WORKSHOP USER GUIDE
Frame
There are various frame presets that you can
add to your buttons. To add a frame, drag a
frame from the Library to the object in your
menu. You can only apply a single frame to an
object.
To add a frame:
• Drag a frame preset from the Options
Panel or the Library to an object in your
menu.
• Select the object you want to add a frame
to then double-click a frame preset from the
Options Panel or the Library.
Tip: To remove the frame, click Remove frame.
Playlist
A Playlist is a sequence of play items linked to a menu button. When a menu
button is selected, its playlist is activated. T o add a play item to the pla ylist, simply
drag a title, menu, or chapter to the Playlist Window . The options in the Playlist
tab are described below.
• Link Select to enable the Playlist of the selected button.
• Default Highlight Button Select to assign the button as the default whenever
the menu is displayed.
Page 89

ULEAD DVD WORKSHOP USER GUIDE 89
• Auto Activate Select to automatically play the items assigned to the button
when it is focused.
• Remove item Removes the selected play item from the Playlist.
• Remove all items Removes all play items from the Playlist.
• Move up Moves the selected play item one step up in the Playlist.
• Move down Moves the selected play item one step down in the Playlist.
• Assign tracks (DVD) Assigns a different subtitle and/or audio track to the
selected play item.
• Add Play all titles Adds all titles in the Title List to the Playlist.
• Add start and end loop points (DVD) Automatically repeats the sequence of
play items. The loop start point can be inserted anywhere in the Playlist
Window as long as it has at least one play item to repeat.
• Playlist Window Displays the play items included in the Playlist.
• Button number (VCD/SVCD) Assign a remote control number to the button.
• Renumber all buttons (VCD/SVCD) Re-assigns the numbers of the buttons in
your menu. Numbering starts from left to right, top to bottom.
Page 90

90 ULEAD DVD WORKSHOP USER GUIDE
Text tab
This tab displays attributes that you can apply
to the text in your menu. The options are
described below.
Note: The options under the Attributes,
Shadow and Playlist Options Panel in
the Text tab are the same with the options
of the Button tab. Please check the
previous section.
Style
• Font Allows you to set the font type, size,
style, alignment and color of the text.
• Color Mapping (DVD) Select a color for the
selection and action state of the text.
• Invisible button (DVD) Select to hide the display attributes of the selected
button making it invisible.
Editing your menus
Below is a list of common tasks to create and edit your menu:
• Adding an object Drag an object from the Library to the Preview Window.
If you are adding a video file, the thumbnail shows the first frame of the video
file.
Tip: Drag a title, chapter or menu to an object to assign it as a link.
• Adding a button Drag titles, chapters, or menus from the Title List, Chapter
List, or Menu List to the Preview Window. If a new title or chapter is assigned
to an existing button, the previous link is overwritten. You can only drag a
single title, chapter, or menu onto an object or a button. You can also drag
buttons from the Library to the Preview Window.
• Replacing an existing button object Drag an image or button template from
the Library to an existing button to replace the button image. The button link is
unchanged with the replacement.
• Replacing an existing button’s link Drag a title or menu from the Content
Window to an existing button in the menu.
• Adding a text object Double-click the menu background in the Preview
Window to add text.
Page 91

ULEAD DVD WORKSHOP USER GUIDE 91
• Selecting objects Click an object to select it. To select multiple objects, hold
down [Ctrl] while selecting objects.
• Deleting selected objects Select an object then press [Delete] to remove
the selected object from the menu. T o delete multiple objects, hold down [Ctrl]
while selecting the objects then press [Delete].
• Moving objects/buttons Drag a selected object or use the arrow keys to
move it into position. To move multiple objects, select the objects you want to
move while holding down [Ctrl] then drag them to the desired location or use
the arrow keys.
• Resizing objects/buttons Select an object to display its resize handles in the
Preview Window then drag the handles to change the size. To keep the aspect
ratio of the object when resizing, drag the corner handles of the object. Take
note that the top-right handle is used for rotating objects and not for resizing
them.
• Rotating objects/buttons Select an object then drag the rotate (top-right)
handle to rotate the object. You can also enter a value or use the slider in the
Button tab in the Options Panel under Attributes.
• Aligning objects/buttons Select the objects that you want to align then
right-click one of them. Choose Align and select the alignment that you want to
use. The objects will be aligned based on the position of the objects and the
alignment selected.
• Arranging objects/buttons (layer order) Right-click an object then select
Arrange. You can send the object one layer forward/backw ard or send it to the
front/back.
• Enabling motion attributes for menu backgrounds Click the Menu tab in
the Options Panel then select Motion Background. This option is only available
when your menu background is a video or slideshow title. You can specify how
long the motion background will play before it loops in Menu duration.
Page 92

92 ULEAD DVD WORKSHOP USER GUIDE
• Enabling motion attributes for menu buttons Select the button where you
want to apply motion attributes in the Preview Window. Select Motion Button
in the Options Panel. This option is only available when your menu button is a
video or slideshow title.
• Showing information and guides Click any of the four buttons on the upperright corner section above the Menu List to help guide you and show link
information when editing you menus.
Show/Hide Highlight Images Toggles between showing and hiding
inserted highlight images in the Preview Window.
Show/Hide Button Information T oggles between showing and hiding link
information for each button.
Note: The information found on the top-left of the Preview Window
indicates the number of buttons used on your menu.
Page 93

ULEAD DVD WORKSHOP USER GUIDE 93
Show/Hide Object Boundary Toggles between showing and hiding the
bounding box around the objects in your menu. The object boundary acts as
an indicator to avoid overlapping objects that can cause errors when
burning onto a disc.
Show/Hide Grid Lines Toggles between showing and hiding grid lines in
the Preview Window. You can modify the grid size and color in the
Preferences dialog box. (see “Setting Preferences” on page 29)
Editing the Playlist
A Playlist contains a series of play items (titles, menus, chapters, and tracks) that
play when a menu button is activated. Below is a list of tasks to create or edit a
button playlist:
• Inserting play items Select a title or menu from the Content Window or a
chapter from the Chapter List then drag it to the Playlist Window. Click Add
Play all titles above the Playlist Window to play all the titles in the Title
List.
When you add a menu as a play item, you can link the Playlist item to the menu
or a button in the menu.
• Removing play items Select a play item in the Playlist then click Remove
item. Click Remove all items to delete all play items from the Playlist.
• Rearranging play items Select a play item in the Playlist Window then click
Move up/Move down to rearrange the sequence of play items.
• Looping the playlist Select a play item in the Playlist Window then click Start
and end loop points. The loop will start from the play item you selected.
Select Loop start point in the Playlist Window then click Move up/Move
down to move the loop start point to another position.
• Assigning tracks Select a play item in the Playlist Window then click Assign
tracks. This opens a dialog box where you can specify the audio and/or subtitle
tracks to use for the selected title. (see “Audio and Subtitles” on page 72)
Page 94

94 ULEAD DVD WORKSHOP USER GUIDE
Real-time preview for Motion Menus
DVD Workshop allows you to preview your motion menu and buttons in real-time
by clicking Play in the Navigation Panel. To create motion menus, drag video
files from the Library to the Preview Window then select Motion Background
and Motion Button in the Menu and Button tabs. (see “Editing your menus” on
page 90)
Page 95

Page 96

Page 97

ULEAD DVD WORKSHOP USER GUIDE 97
Finish
Finish is where you can preview your project before outputting it. DVD Workshop
offers a variety of output options including burning your project onto a disc,
creating a disc image file, and creating a master copy to write onto a Digital Linear
Tape for mass reproduction.
The Preview Window
The Preview Window displays the title, menu, or chapter you select using the
Remote Control. The default aspect ratio of the Preview Window is 16:9
(widescreen TV). Your titles will be displayed according to the preferences you set
in the Output Display Options dialog box. (see “Output Display Options” on page
68)
Page 98

98 ULEAD DVD WORKSHOP USER GUIDE
The Remote Control
The Remote Control allows you to simulate the behavior of your project's titles
and menus. Use the buttons available on the Remote Control to preview your
menus, titles, and subtitle and audio tracks (DVD). The available buttons on the
Remote Control will depend on the type of media (DVD, VCD, or SVCD) you are
working on.
Remote Control buttons
1 Title number (DVD) Displays the title number of the currently selected title.
2 Chapter/Track number Shows the chapter number of the currently selected
title.
3 Timecode Displays how many hours/minutes/seconds into the clip the current
frame in the Preview Window appears.
4 Play/Pause T og g l es betwe e n playing back your project and temporarily stop-
ping the playback of your title.
5 Stop Ends project playback.
6 Go to Previous Menu Goes to the previous menu.
7 Go to Next Menu Goes to the next menu.
8 Direction buttons (DVD) Use it to navigate through a menu page in your DVD
project.
9 Enter (DVD) Activates the selected button.
10 Go to Menu (DVD) Goes to the last visited menu of your DVD project.
11 Go to Top Menu (DVD) Goes to the first menu of your DVD project.
12 Digit buttons and Return (VCD/SVCD) Click a number to play a title assigned
to that number. Click Return to go back to the last visited menu page.
Page 99

ULEAD DVD WORKSHOP USER GUIDE 99
13 Audio (DVD) Selects an audio track in the current title.
14 Subtitle (DVD) Selects a subtitle track in the current title.
15 Burn Project to Disc Allows you to burn your project onto a disc, create a disc
image file, and/or create DVD folders for your DVD projects.
16 Burn Disc Image or DVD Folder Allows you to burn an existing disc image or
DVD folder onto a disc.
17 Write Disc Image to DLT Allows you to output your work to a Digital Linear
Tape (DLT).
Previewing a project
Preview your project using the Remote Control to see exactly how your project
will look when viewed on a TV screen. (see “The Remote Control” on page 98) By
previewing your project, you can make sure that it is error-free before outputting
it.
To preview a project:
• Click Play on the Remote Control to preview your menu and your video.
• Use the different buttons available on the Remote Control to preview your
project.
Disc templates
Disc templates are preset output settings for your projects. Based on
preferences when creating a new project, DVD Workshop provides preset
templates that you can use. You can also create sever al versions of a single project
just by modifying the template of the original project file. Aside from the default
templates in DVD Workshop, you can also create custom templates that you can
store and reuse in future projects.
Disc Template Manager
The Disc Template Manager allows you to create custom disc templates.
To create a custom disc template:
1. Click Global Settings: Disc Template Manager. The Disc Templates
Manager dialog box opens.
2. Select the desired template (DVD, VCD, or SVCD).
3. If you want to use a new template name, click New then enter a template
name in the text box
Page 100

100 ULEAD DVD WORKSHOP USER GUIDE
4. Select a template in Available disc templates, then click Edit.
5. Click OK after making the adjustments.
Burn Project to Disc
Burn Project to Disc allows you to select general and advanced options for
outputting your project. You can burn your project directly onto a disc and/or
create DVD folders and a disc image file. You can also u se this option to adjust the
settings of your burner.
The Burn tab
The Burn tab allows you to do three things with your project:
• Burn your project directly onto a disc, if you have a disc burner installed.
• Create DVD folders where you can organize your DVD files. This allows you to
view your DVD using a DVD player in your computer.
• Create disc image file, which is the best and safest source file to burn with
minimal risk of error.
Disc templates Select a template format for your project.
 Loading...