

Page 1
1 CF-Kartenschacht
CF card slot
2 Anzeige für Auf-
zeichnung
Record LED
3 Löschen
Clear
4 Display
5 Aufnahme
Record
6 Rücklauf
Rewind
7 Wiedergabe/Stop
Play/Stop
8 PC-Interface
PC interface
9 Anschlußext. Microfon
Connection to ext.
microphone
10 Ladekontakte/
PC-Interface
Charging contacts/
PC interface
11 Mikrofon
Microphone
12 Lautstärke
Volume
13 On/Off/Mode
14 Vorlauf
Forward
15 Auswurf CF-Card
Eject CF card
16 Markierung
Marking
3
5
8
9
10
2
4
1
7
6
16
15
13
11
12
14
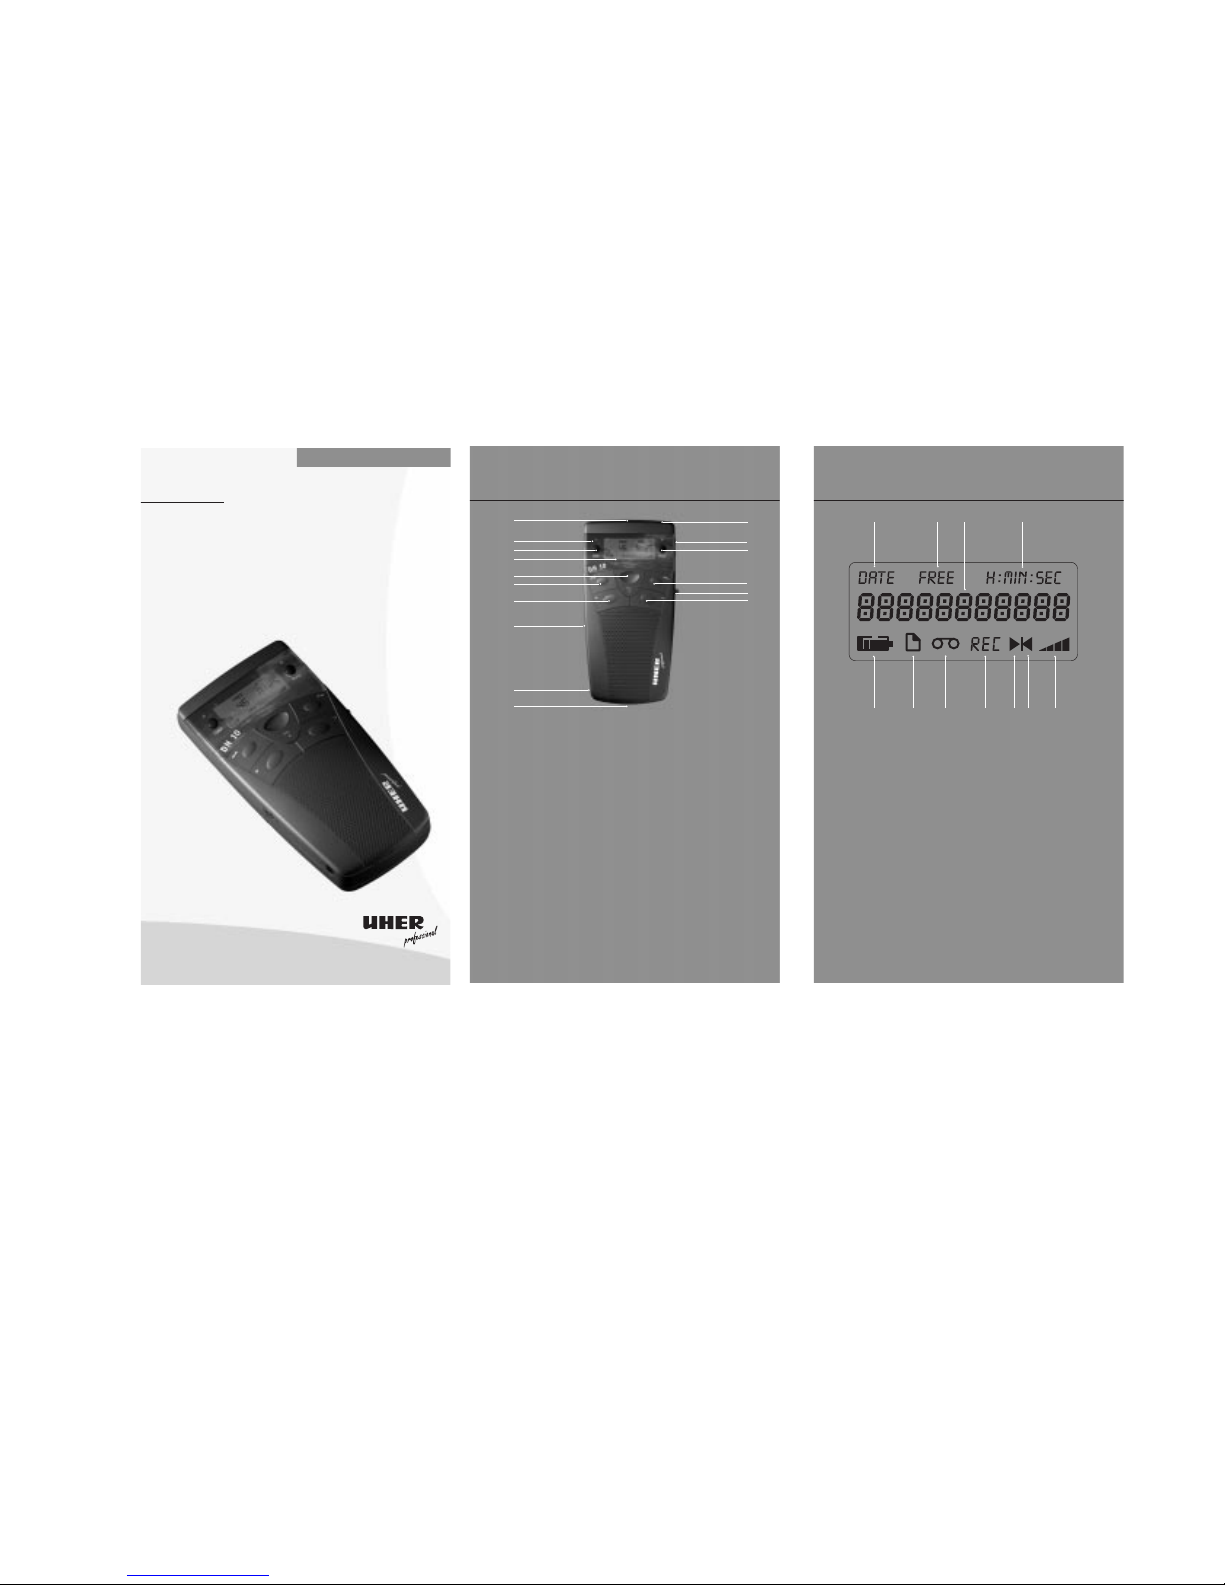
Die Bedienelemente
The Controls
1 Datum
Date
2 Freier Speicher
Available memory
3 11 stellige Multifunk-
tionsanzeige (MFA)
11 position multifunction display
4 Anzeige von
Stunde:Minute oder
Minute:Sekunde
Display of hour:minute
or minute:second
5 Batterie Füllstand
Battery level
6 Manage-Mode
7 Aufnahme-Modus
Record-Mode
8 Aufnahme
Record
9 Wiedergabe
Play
10 Markierung
Marking
11 Lautstärke
Volume
1
2
7
10
9
865 11
43
Die Display-Symbole
The Display Symbols
DH 10
Zur mobilen Sprachaufzeichnung
For Mobile Speech Recording
Gebrauchsanleitung
Operating Instructions
Digital Voice Management System
Page 2
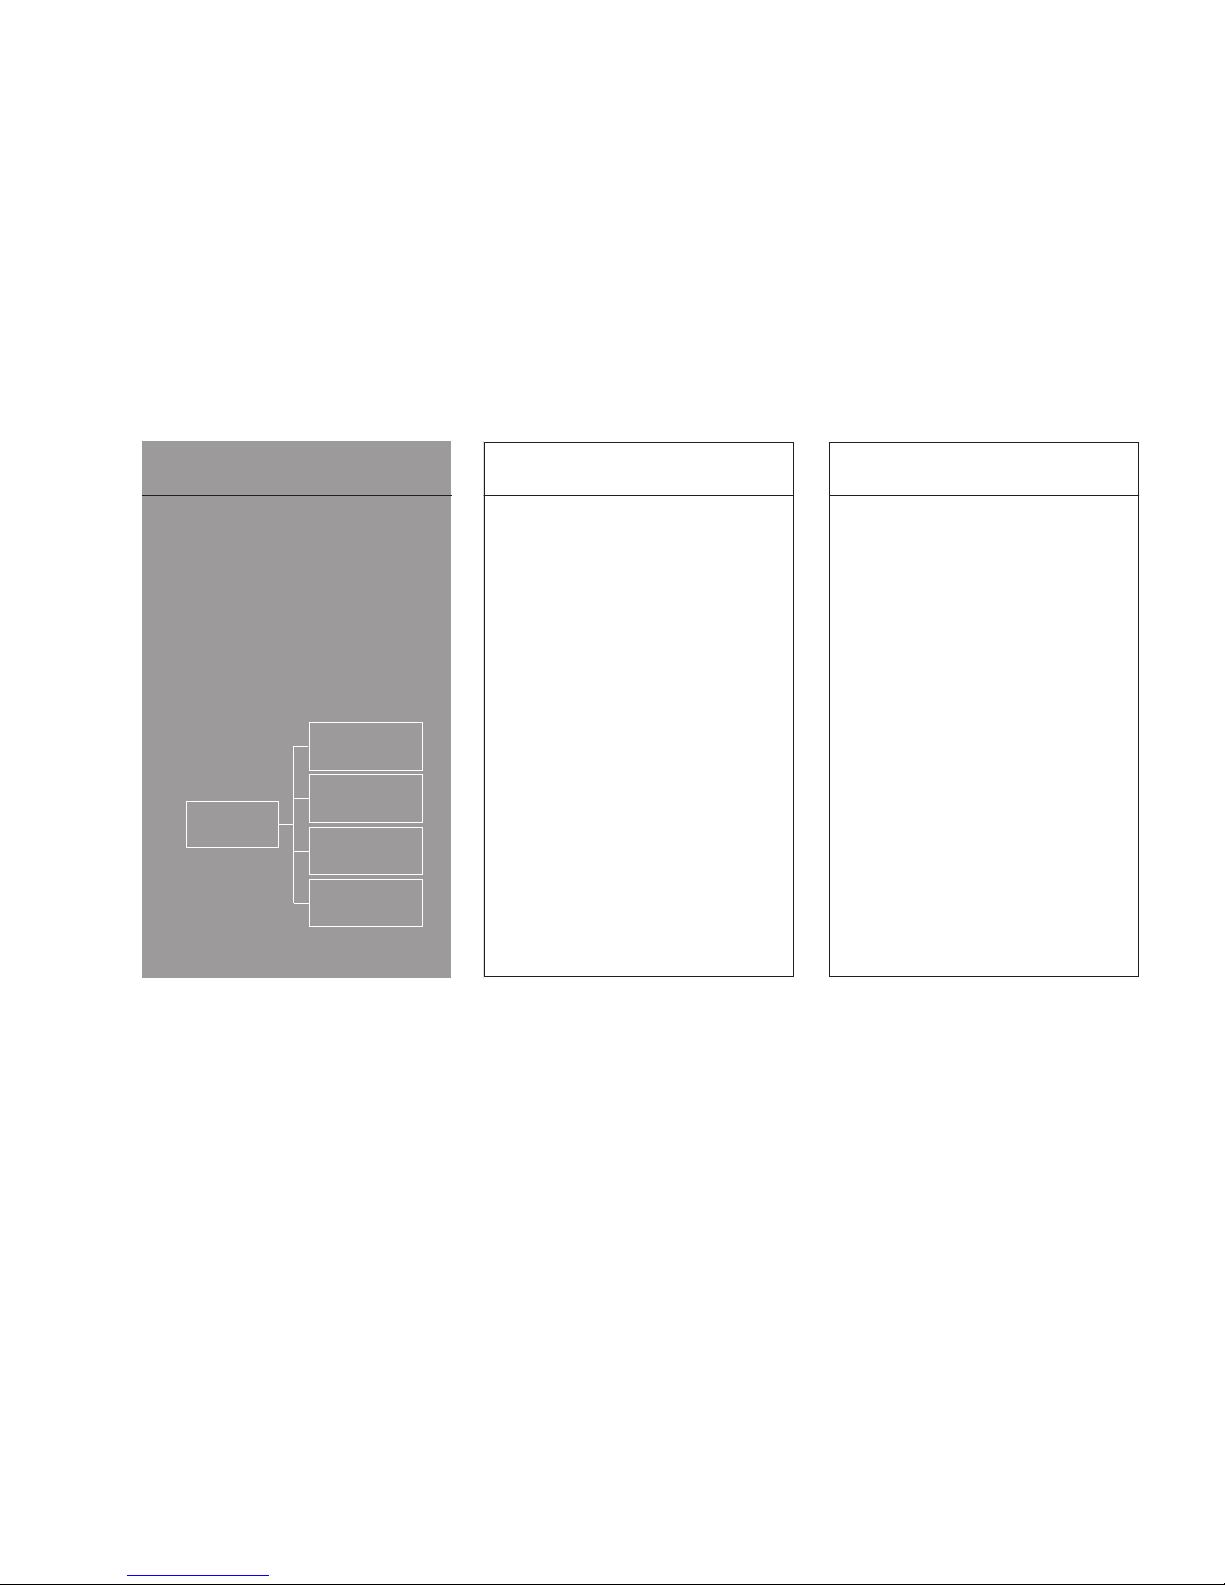
ComDict
PC Software for
WINDOWS 95/NT
Single/LAN
DH 10
Handheld Digital
Recorder with
Compact Flash Memory
DT 10
Transcribing Station for
the Playback of Compact
Flash Memory Cards
LS 10
Battery Charger with
Intelligent Power
Management
DPI
PC-Connecting Cable for
downloading of dictation
files to your PC
19 Introduction
UHER - DH 10
A Portable Voice Recording System
You have made the right choice!
Choosing the UHER DH 10 handheld voice
recorder is the foundation of a complete
digital dictation and word processing system
using state-of-the-art technology.
This new technology is based on the CF-card
(CompactFlash), the latest international
industrial standard flash memory card, which
assures you will be able to use this digital
professional word processing system for a
long time.
Upgrading the system and incorporating the
latest extras is no problem. Your UHER
Dealer will assist.
The System at a glance:
Contents 20
Table of contents
2 German text
21
Preparing
22 Your first text
23 Basic Settings
28 Record mode
32 Manage mode
34 Summary
21 Preparing
Preparing your DH 10
When unpacking your machine, check that you
have received all of the following items:
DH 10, CF card, Soft Case, Operating Instructions.
Fit the batteries (Alkaline type AAA) into the
battery compartment as illustrated first.
If using rechargeable batteries, charge them in
the machine for approximately 4 hours with the
table-top charging station ’LS 10’ before use.
Then place the CF card into the slot in the top
of the machine according to the arrow on the
label. To remove the CF card lift it up with the
lever on the side (15).
Switch on
To start using the machine, press the ‘On/Off/
Mode’ button (13) for at least 1 second and
your DH 10 is ready for dictation.
The buttons and display functions are shown in
the fold-out illustrations.
If the word DATE in the display is flashing,
check and adjust the time and date if necessary
(see Basic Settings of time and date, p.25).
Please protect your machine from:
-direct sunlight
-dust
-moisture
-extremes of cold and heat.
Page 3
Your first text 22
The quick way to record your first item
of dictation
The display has to show ‘ ‘(Record), otherwise
press the ‘On/Off/Mode’ button (13). Press and
hold down the ‘Record’ button ‘Rec ‘ (5) and
dictate. During recording the LED will flash.
Recording will stop as soon as you release the
button. By renewed pressing and releasing of the
‘Rec ‘ button, your dictation will be recorded
continuously.
Pressing the ‘Rewind ‘ button (6) will allow
you to go back through your dictation in steps
of one second at a time. By releasing the
‘Rewind’ button, the DH 10 switches automatically to playback. While the ‘Rewind’ button is
depressed the machine runs backwards through
the dictation at increasing speed.
The ‘Forward ‘ button (13) works correspondingly. By holding it down, you will advance at
increasing speed towards the end of the dictation.
Pressing the ‘Play/Stop ‘ button (7) the playback will stop. Your dictation will be stored
automatically on the card as dictation no.1.
If you wish to delete your dictation completely :
Go back to the beginning of the dictation by
pressing the ‘Rewind ‘ button, so that the
H:Min:Sec display indicates: 0:00 and stop. Hold
down the ‘Clear’ button (3) until the display
asks: SUrE CLEAr.
By pressing the ‘Clear’ button again, the entire
dictation is deleted.
23 Basic Settings
Basic Settings
Your DH 10 as a Digital Voice Recording System
offers you a lot of variable functions for speech
processing. Different operating modes support
the processing and recording of the dictations
(Record mode) as well as the administration of
the dictations (Manage mode).
To be able to benefit from all the advantages
which this digital recording machine offers to
the user, please go through the basic settings
explained below step by step and familiarise
yourself with the various text processing functions which are possible with your DH 10.
To be able to make use of all the functions, we
recommend that all the Basic Settings be carried
out first. To start these Basic Settings press the
‘On/Off/Mode’ button (13) until trANSFEr will
appear in the window of the display. Pressing the
‘Forward ’ or ‘Rewind ’ button you will
achieve the different Basic Settings.
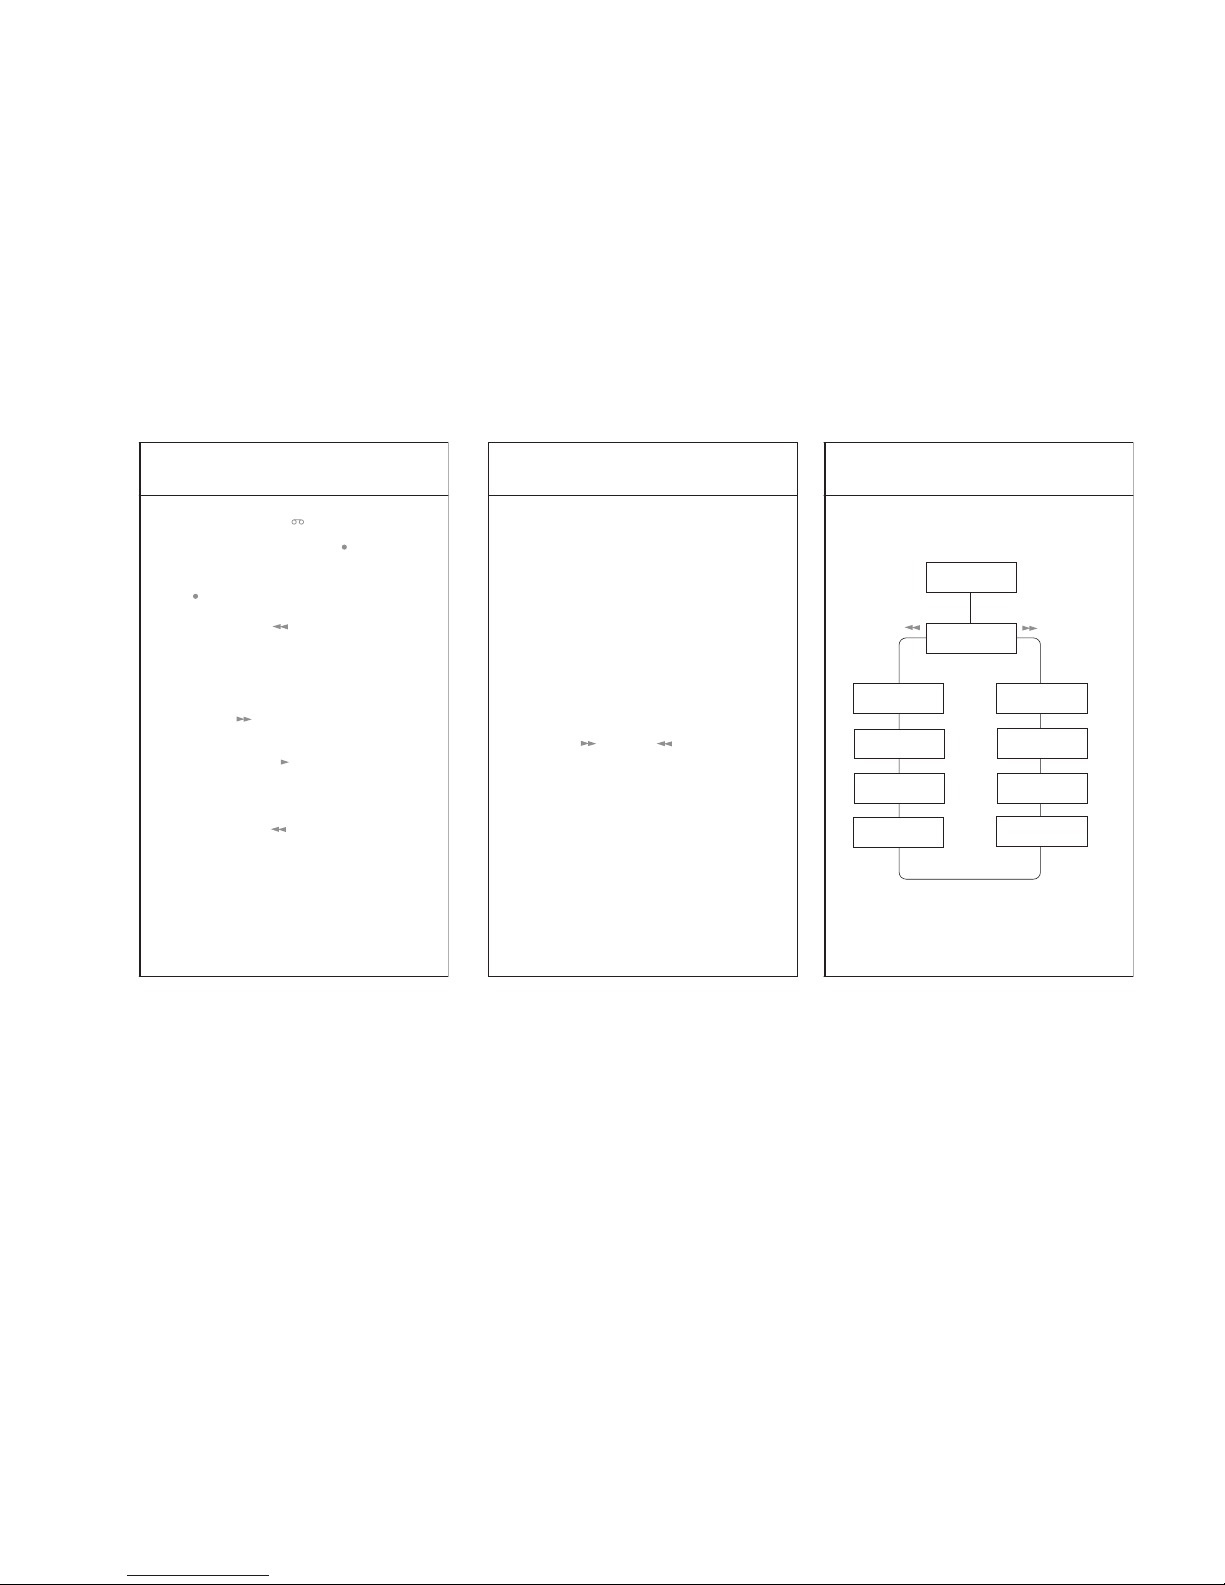
The following diagram illustrates all the Basic
Settings in the sequence described.
Basic Settings 24
Diagram of the Basic Settings
VAC
bEEP
LIGHt
SEt ClOCk
FOrMAt CArd
VErS.
OFF
PrOtECt
trANSFEr
Press On/Off/Mode
for a few seconds
Page 4

25 Basic Settings
Time and date (SEt CLOCk)
By pressing the ‘Play/Stop ’ button, the display
will indicate: H:MIN:SEC. Select hour, minute,
second, day, month and year by means of the
‘Forward ’ or ‘Rewind ’ buttons.
By pressing the ‘Play/Stop ’ button or ‘Marking ‘ button select the relevant number.
The number marked is flashing. By pressing the
‘Rec ‘ button programming will be completed
or you can start again (display: SEt CLOCk).
Voice activated control (VAC ...)
If the display indicates SEt CLOCk, press the
‘Forward ’ button. The display will indicate
VAC OFF. By means of the ‘Play/Stop ’ button
or ‘Marking ’ button, the voice activated control can be switched ON or OFF. In order to use
this function you have to switch on the function
Continuous recording.
When the voice activated control is on, your
DH 10 records automatically as soon as you begin
to speak. Recording stops when you stop speaking. In this way no capacity is lost and you will
be able to record dictation without having to
operate any controls on the machine.
Confirmation tone signal (bEEP ...)
If the display indicates VAC OFF or ON, press
the ‘Forward ’ button and the display will
then indicate bEEP ....
Using the ‘Play/Stop ’ button or ‘Marking ’
button allows you to set the desired volume of
the confirmation tone signal to one of 3 different levels or to switch it to OFF if you wish
Basic Settings 26
to work without a confirmation signal.
Control of the display illumination (LIGHt ...)
If the display indicates bEEP ..., press the
‘Forward ’ button. The display will indicate
LIGHt ...
Using the ‘Play/Stop ’ button or ‘Marking ’
button you will be able to choose one of 3 options:
ON = The illuminated display comes on when
any button is pressed.
NIGHt = It comes on only in the dark.
OFF = No display illumination.
Switching to OFF automatically (OFF ...MIN)
If the display indicates LIGHt ..., press the
‘Forward ’ button. The display will indicate:
OFF 1 MIN.
Using the ‘Play/Stop ’ button or ‘Marking ’
button set the period of time after which your
DH 10 should switch off automatically if you interrupt your dictation, between 1 and 30 minutes.
Display of the software version (VErS ...)
If the display indicates OFF ...MIN, press the
‘Forward ’ button. The display will indicate
the Software version which your DH 10 is using.
This information does not allow any alterations
to be made.
Formatting of the CF card (ForMAt CArd)
If the display indicates VErS ..., press the ‘Forward
’ button. The display will indicate
ForMAt
CArd
. With this setting, your CF card will be formatted and all data on the card deleted. This
will not alter any Basic Settings of the machine.
27 Basic Settings
Press the ‘Play/Stop ‘ button and the display
will indicate SUrE:PLAY. By pressing the
‘Play/Stop ‘ button again, the card will be formatted. The display will briefly indicate FOrMAt
and then rEAdY. This indicates that formatting
has been completed.
Card protection (PrOtECt ...)
If the display indicates FOrMAt CArd, press the
‘Forward ‘ button. The display will indicate
PrOtECt OFF. Using the ‘Play/Stop ‘ button or
‘Marking ‘ button switch between ON and OFF.
If you dictate while the card is write-protected,
your CF card cannot be run on any other DH 10
or used elsewhere.
PC Transfer (trANSFEr)
If the display indicates PrOtECt OFF or ON,
press the ‘Forward ‘ button and the display
will indicate trANSFEr. Choose this setting if
you wish data to be transferred from your
CF card to a PC. Please take note of the description of the PC interface (see fold-out page).
While these Basic Settings are in operation, your
DH 10 may switch off, e.g. as a result of a
lengthy pause in dictation. If this happens, check
the adjusted period of time for switching OFF
automatically.
To leave Basic Settings Menu press ‘On/Off/Mode’
button (13).
Page 5

Record mode 28
Record mode
Your DH 10 offers two options for recording
your dictation.
-The quick start function
By pressing and holding down the ‘Rec ‘ button your machine will record your dictation.
When you release the button, recording stops.
By pressing the button again, your dictation will
be recorded continuously.
-Continuous recording
Press the ‘Marking ‘ button followed immediately by the ‘Rec ‘ button. The machine will
now record without a button being pressed
again until you stop the recording process by
pressing down the ‘Play/Stop ‘ button.
In the Continuous recording mode, the voice
activated control (VAC ...) is operational, depending on the basic setting.
Processing methods
Insertion/over-recording existing dictation
The digital technology allows you to record
insertions at any desired point in your dictation.
Whether you are working in the insertion or the
over-recording mode, will be indicated by the
first digit on the left hand side in the display:
Display: I = Insertion mode
Display: O = Over-recording mode
You can switch over from one mode to the other
by briefly depressing the ‘Clear’ button (3).
29 Record mode
Inserting dictation
Using the ‘Forward ‘ button or ‘Rewind ‘
button go to the point in your dictation where
the insertion is to be made. Stop with the ‘Clear ’
button (3). Hold down the ‘Rec ‘ button and
speak. Release the ‘Rec ‘ button at the end of
the insertion; you will have inserted a piece of
new dictation at exactly the correct location.
Over-recording dictation
The first digit in the display indicates O. Using
the ‘Forward ‘ or ‘Rewind ‘ button go to
the point in the text where over-recording is to
begin. Use the Record mode (by pressing the
‘Rec ‘button) and dictate the new text over the
old one. The previous dictation will be completely
erased irrespective of the length of the overrecorded dictation. This ensures that a subsequent
separate item of dictation will not be erased.
Playing back dictation
Use the ‘Play/Stop ‘ button to start and stop
playback. The volume can be adjusted in 4 stages using the button on the side (12). Your
DH 10 is able to playback at different speeds.
The playback speed – faster or slower – can be
adjusted only with the ‘Play/Stop ‘ button.
Press and hold down this button for no longer
than one second and the playback speed will be
increased step-by-step (up to 200%).
By pressing the ‘Play/Stop ‘ button during
playback for more than a second, the speed of
playback becomes alternately faster (up to
200%) or slower (up to 50%).
Record mode 30
Erasing dictation
If you wish to erase dictation from a certain point
up to the end of the dictation, press the ‘Clear’
button (3) at this point for more than 1 second.
This triggers the safety warning: You will hear a
double tone signal and the display will indicate:
SUrE CLEAr. Press ‘Clear’ (3) again until a longer
tone signal confirms the completed deletion.
If you wish to delete exactly one word or a section in the dictation, press and hold down the
‘Clear’ button (3) while playing back the dictation. You will erase exactly what you hear.
When you have reached the end of the passage
to be deleted, release the ‘Clear’ button (3).
There is a slight delay in this function to allow
for the response time.
Additional options available in Record mode
Since your DH 10 has been developed as a
machine for the specific demands of the professional user, it is equipped with a number of useful additional functions which will make your
work easier.
Marking push-button
When used in conjunction with other buttons,
the ‘Marking ‘ button allows the following
functions to be carried out:
-Pressing the ‘Marking ‘ button followed by
the ‘Rewind ‘ button jumps to the beginning
of dictation.
-Pressing the ‘Marking ‘ button followed by
the ‘Forward ‘ button jumps to the end of
the dictation.
Page 6

Manage mode 32
Manage mode
The Manage mode is used to manage and subsequently revise dictation. By briefly pressing the
‘On/Off/Mode’ button (13) you will gain access to
this area.
Searching for dictation
The ‘Play/Stop ‘ button is used to start or stop
the Scan-function. The beginning (10 seconds)
of the existing and all subsequent dictation is
reproduced.
Using the ‘Forward ‘ or ‘Rewind ‘ button
leaf-through the dictation in both directions.
The dictation number and the length in minutes
and seconds will be displayed.
If you wish to search for an item of dictation on
the basis of the date and time, press the
‘Marking ‘ button to change over to this display.
By pressing the ‘Marking ‘ button again, the
number and length are again indicated.
Deletion of dictation
The Manage mode will also allow you to delete
dictation accurately. The item of dictation indicated in the display (e.g. ‘L 3’) can be deleted by
pressing the ‘Clear’ button (3) with the safety
warning described earlier. The freed space (‘L3’)
can then be reused.
Subsequent alteration to dictation
You are able to switch back from the Manage
mode directly into Record mode. When you
have found the dictation that you wish to alter
(e.g. correct) switch back to record by briefly
pressing the ‘On/Off/Mode’ button (13).
31 Record mode
-Pressing the ‘Marking ‘ button followed by
the ‘Play/Stop ‘ button determines the beginning of a new item of dictation.
A consecutive dictation number (1-999) will be
allocated during this process and the date and
time of the beginning of dictation will be saved.
Pressing the ‘Marking ‘ button followed by the
‘Clear’ button (3) slightly longer causes the existing dictation to be deleted completely as well
as all subsequent dictation.
In this case also, the safety warning as described
above will appear.
33 Manage mode
You are at the beginning of the dictation, indicated in the display with 0:00. Do you want to
hear the text, press ‘Play/Stop ‘ button.
Do you want to record, then press the ‘Rec ‘
button. You will jump to the end of the text and
start recording. You are now working in Record
mode as usual.
You will also be able to begin a new item of dictation directly in Manage mode. Simply press
the ‘Rec ‘ button and dictate. The next number
will automatically be allocated to this new item
of dictation.
CF card Identification
When several CF cards are in use or in an organisation where several DH 10 are being used, it is
advisable to give the cards a spoken identification. The first dictation number is identified by ‘Id’.
Using the ‘Rewind ‘ button, go back in the
Manage mode until the display ‘Id’ is indicated.
Now press the ‘On/Off/Mode’ button (13) which
will enable you to go into Record mode, press
the ‘Rec ‘ button and speak your identification
(e.g. name, section, cost code, date etc.). This is
the information which the typist will hear first
when processing your card.
Switch off
The unit will switch off automatically or by pressing the ‘On/Off/Mode’ button (13) by double
click.
Page 7

Summary 34
Summary
You are now acquainted with all the options for
professional dictation provided by your DH10.
To conclude, we should like to give you details
of the possible error messages which may be
indicated in the display.
Messages regarding the CF card
Insert card = Card not inserted or inserted
incorrectly.
Protected = This card has been placed under
protection in a different machine.
Format = You must format this card before use.
No CF card/card changed = This card was remo-
ved during a process (e.g. recording, playback).
CF ERR num = Incorrect operation, card needs
to be formatted. If formatting does not cure the
problem, please contact your Customer Service.
Only alkaline batteries or the following nickel
metal hydride (NiMH) rechargeable batteries
should be used:
-Panasonic HHR-50AAAB5 (500mAh)
-SAFT NiMH VH AAA HR 10/43 (550mAh)
Alkaline and NiMH batteries must not be
mixed.
External connections
Microphone connection: Mono 2.5 mm jack
plug.
Serial interface: Stereo 2.5 mm jack plug plus
2 contacts on the underside when data is transferred via the charging station.
Charging contacts: 2 contacts on the underside
(for use in the table-top charging station).
35 Summary
Cleaning the DH 10
To clean your DH 10, simply wipe the plastic
parts on the outside with a damp cloth. Never
rub your DH 10 with a dry cloth as the resulting
electrostatic charge will attract dust.
Background noise
Even if all of the requirements regarding the elimination of electromagnetic interference are
complied with, interference may still be caused
during dictation by other electrical equipment in
the vicinity (e.g. computers, fax machines, televisions, energy saving lamps etc.)
Undesirable secondary noise may be caused in
particular in the immediate vicinity of a mobile
telephone as a result of the high transmission
power.
Quality of reproduction
The quality of reproduction may change slightly,
depending on the extent to which the batteries
are charged.
Important information concerning the batteries
Use only the batteries specified, otherwise the
machine may be damaged and you will forfeit
your right to claim under the guarantee.
Do not attempt to charge Alkaline, Lithium and
other non-rechargeable batteries.
Never mix old and new batteries or batteries of
different types and makes.
Please observe the correct polarity of the batteries
and do not use damaged batteries.
Summary 36
If you do not intend to use your DH 10 for some
considerable time, please remove the batteries.
Original accessories
Please use only original UHER accessories to
ensure trouble-free operation of your DH10.
Charging Station LS10 Best.nr.: 03621
CF Card 2 MB Best.nr.: 06701
CF Card 4 MB Best.nr.: 06702
External Microphone Best.nr.: 04018
Telemic 2 Best.nr.: 04027
Rechargeable batteries Best.nr.: 02877
For further information please contact your
UHER dealer or
UHER informatik Gmbh
Braunschweig
Tel.: 0531/ 28 190-10
Fax: 0531/28 190-19
 Loading...