

Page 1
!
USER GUIDE
version 1.1.4"
28. Feb 2019#
U-HE • HECKMANN AUDIO GMBH • BERLIN
Page 2

Table of Contents
Introduction 3
Installation 3 ....................................................................
Resources 3 ....................................................................
Control Bar 6 ...................................................................
Knobs and Buttons 7 .......................................................
Preset Browser 8
Overview 8 .......................................................................
Directory Panel 9 .............................................................
Directory context menu 11 ...............................................
Presets Panel 11 .............................................................
Preset Tagging 12 ............................................................
Search by Tags 13 ...........................................................
Search by Text 14 ............................................................
Global Parameters 15
Detection 15 ....................................................................
Operation Modes 17 ........................................................
Channel Parameters 18
Levels and Meters 18 ......................................................
Compression Curve 19 ....................................................
Envelope 20 .....................................................................
Sidechain 21 ....................................................................
Saturation 22 ...................................................................
Mix 25 ..............................................................................
Special Views 26
Easy Compressor 26 .......................................................
Vocal Compressor 27 ......................................................
Drum Compressor 28 ......................................................
Bus Compressor 29 .........................................................
M/S Program Compressor 30 ..........................................
Limiter 31 .........................................................................
Configuration 32
MIDI Remote Control 32 ..................................................
Preferences 34 ................................................................
NKS 36
Specifications 37
2
Page 3

INTRODUCTION
Introduction
Installation
Go to the Presswerk page, download the latest installer (Mac or PC) and unzip the compressed
file. Open the Presswerk10 folder and start the installer app. The only demo restriction is a mild
crackling sound at irregular intervals after about two minutes of use, which will disappear after
you have entered a serial number. By default, Presswerk uses the following directories:"
Win presets (local)! ...\VstPlugins\u-he\Presswerk.data\Presets\Presswerk\
Win presets (user)$ ...\VstPlugins\u-he\Presswerk.data\UserPresets\Presswerk\
Win preferences$ ...\VstPlugins\u-he\Presswerk.data\Support\ (*.txt files)
Mac presets (local)$ MacHD/Library/Audio/Presets/u-he/Presswerk/
Mac presets (user)$ ~/Library/Audio/Presets/u-he/Presswerk/
Mac preferences$ ~/Library/Application Support/u-he/com.u-he.Presswerk... (*.* files)
Mac other resources$ MacHD/Library/Application Support/u-he/Presswerk/
To uninstall, delete the plugin files then Presswerk.data (PC) or the two Presswerk folders (Mac).!
Please read all relevant texts included with the installer, especially license.txt.
Resources
u-he online
-
For downloads, news articles and support, go to the u-he website"
-
For lively discussions about u-he products, go to the u-he forum at KVR"
-
For friendship and informal news updates, go to the u-he facebook page"
-
For u-he presets (commercial and free), go to u-he preset library"
-
For video tutorials and more, go to the u-he youtube channel"
u-he team 2019
-
Urs Heckmann (boss, concepts)"
-
Sascha Eversmeier (code, bad puns, most of this manual)"
-
Sebastian Greger (GUI design, 3D stuff)"
-
Viktor Weimer (support, presets, the voice)"
-
Thomas Binek (QA, bug-hunting, presets)"
-
Rob Clifton-Harvey (IT admin, backend development)"
-
Jan Storm (framework, more code)"
-
Howard Scarr (user guides, synth presets, grump)"
-
William Rodewald (student life-support code)"
-
Frank Hoffmann (more framework, new browser)"
-
Alexandre Bique (all things Linux)"
-
Henna Gramentz (office supervision)"
-
Jayney Klimek (office management)"
-
Alf Klimek (tagging & repairs)"
-
Dario Lupo (marketing, web design)"
-
Melina Garbisch (studio attendant)"
-
Oddvar Manlig (everything else!)"
with special thanks to Brian Rzycki for maintaining ‘PatchLib’, the preset library"
terms of use
Please read the document license.txt included with the Presswerk installer."
TOC intro presets global chan views config | resources control bar 3
Page 4
INTRODUCTION
The Presswerk Story"
Presswerk is a powerful but easy-to-use dynamics processor which can deliver excellent results
in any computer-based audio workplace (OSX or Windows). With its rich feature set, Presswerk is
suitable for a wide range of sound-shaping tasks – as you will soon discover.
Presswerk grew out of an in-house codebase we have been using for various kinds of dynamics
signal processing. Whenever we need something 'compressorish', we can load existing modules
and immediately try them out.
A few years ago, out of sheer curiosity, we stuck some of those modules together to form a simple compressor with an M/S matrix and saturation stage. Then we tested several hardware compressors, paying attention to every minuscule detail. It soon became clear that we had no alternative: we would have to develop a full-blown compressor plug-in!"
The reactions of testers to an early alpha version were encouraging, but it wasn't quite 'there' yet.
We decided to redesign parts of the core architecture from scratch – after studying the classic
hardware more thoroughly. We wanted Presswerk to sound even more ‘analogue’, we were determined to give it as much musical soul as possible..."
We hope you agree that the result was worth all the extra effort!
– Sascha Eversmeier
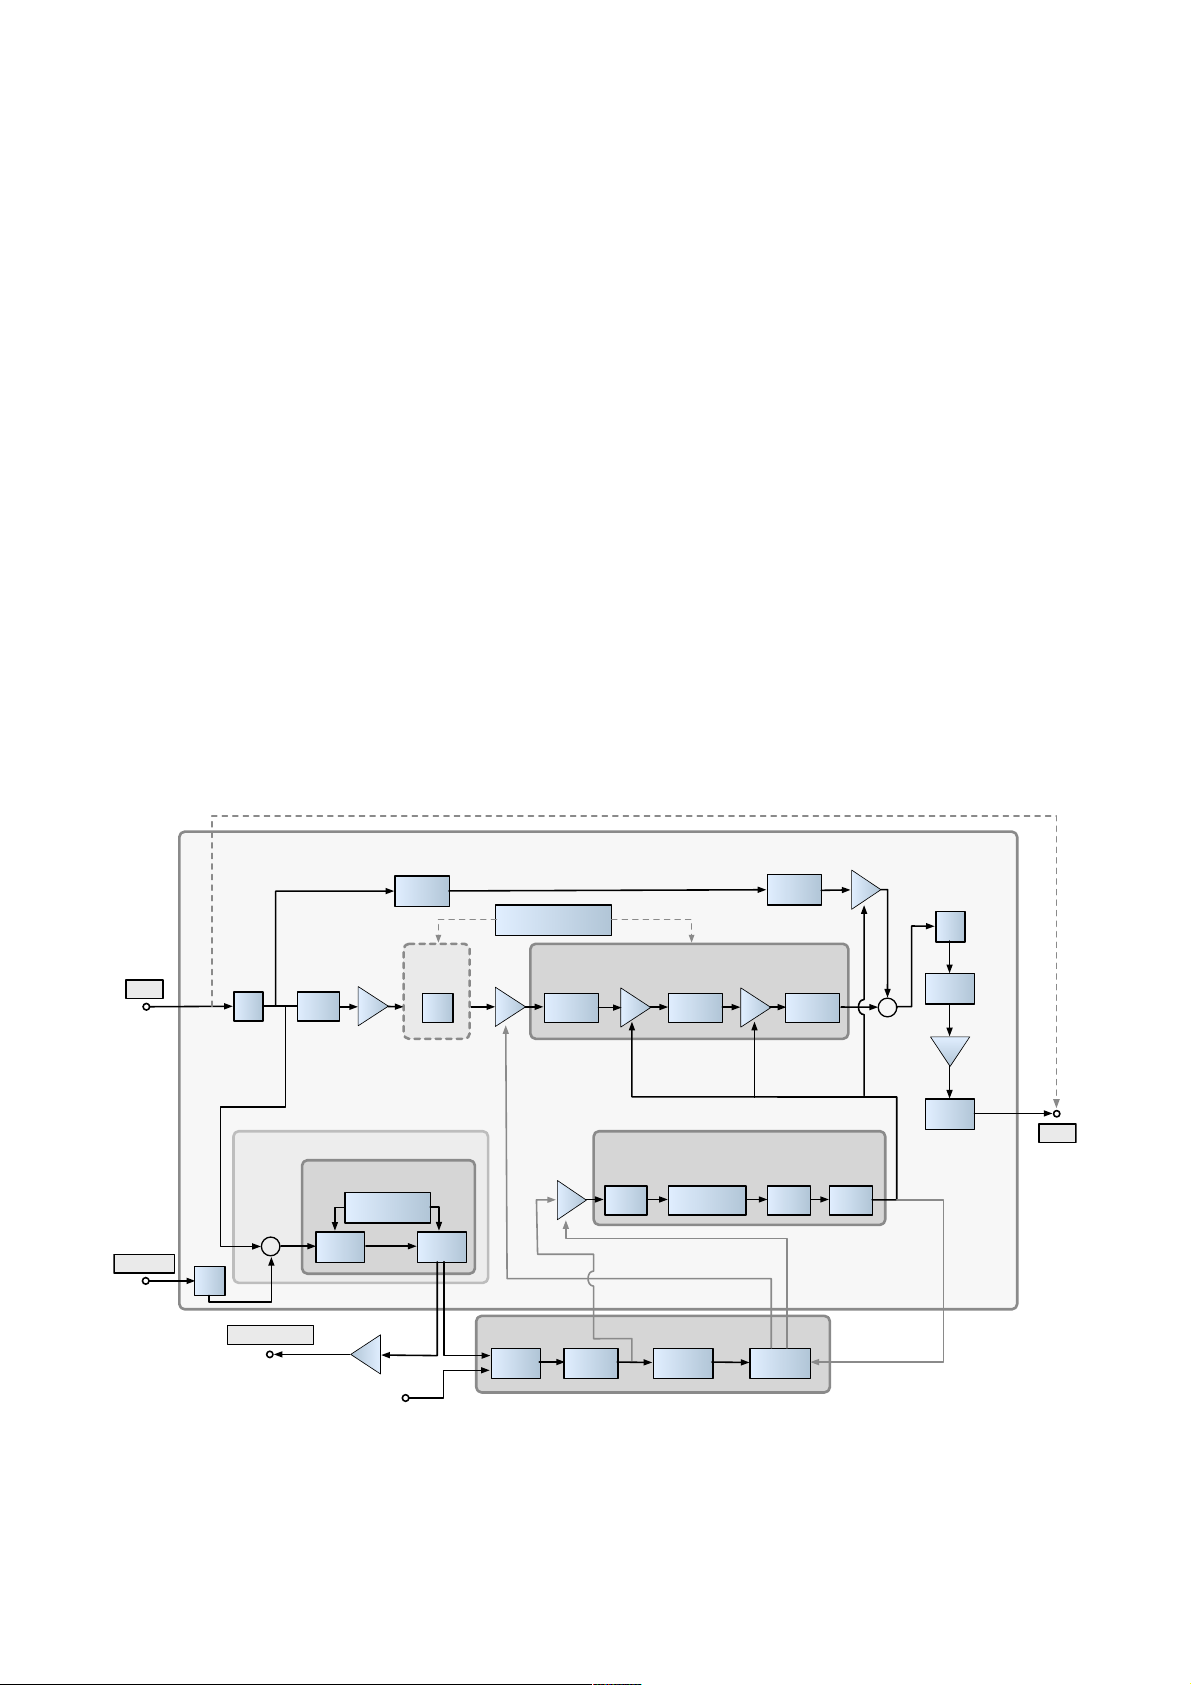
Signal flow (simplified)
TOC intro presets global chan views config | resources control bar 4
Input
M/S
…
M/S
M/S
Allpass
Allpass
Pre Filter Saturation Post Filter
Soft Clip
Ext. Input
Output
HP Filter
lin→dB dB→linGain Calculation CV
Highpass Lowpass
Pre | Post Compression
Ch. Link Peak/RMS Crest Factor FF | FB | INT
Slope (6dB | 12dB
SC Monitor Out
VCA
VCA VCA
VCA
Encoder Phase Rotation
Pre Gain Post Gain
Phase Rotation Expand
Decoder
Phase
Rotation
Output
Gain
Input Gain
FF Amount
Mix Int:Ext
Encoder
Ext
Level
Detector Signal
FB Amount
Feedback Control Signal
Mix
Dry Signal
SC 1
SC 2
Bypass Signal
Allpass
Saturation / Warmth Processor (Post-Comp)
Gain ComputerGain Computer
Filter
Sidechain
+
+
Detection
Channel 1 (of 2)
Int
Sat./Warmth
(Pre-Comp)
Page 5
INTRODUCTION
Preview of the Special Views
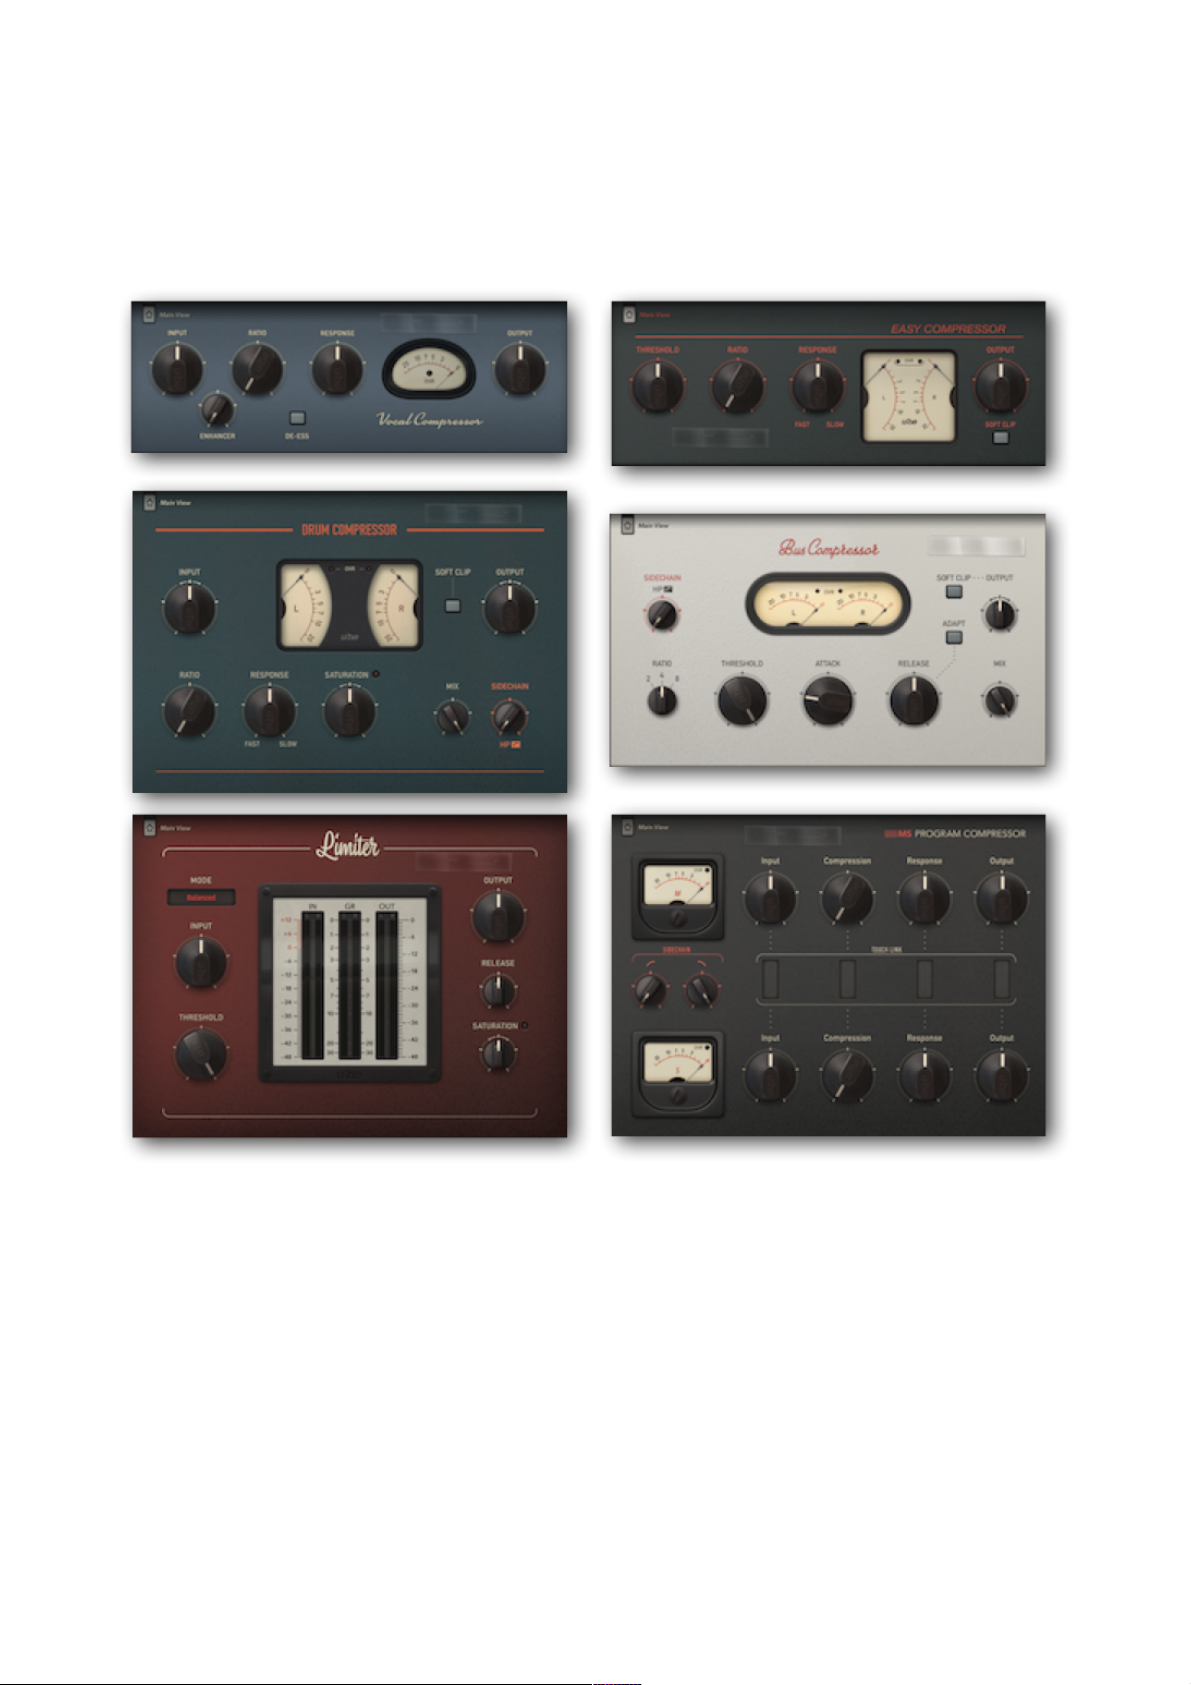
While browsing through the presets you may have noticed these ‘special views’: Simpler panels
with fewer controls, some of which are ‘macros’ combining several parameters. It's like having a
bundle of specialist plugins, except that you don’t have to load them seperately."
For a full description of each of these options, please refer to the Special Views chapter."
UI Size
The size of Presswerk’s window is adjustable in 10% steps from 70% to 200%. Simply right-click
in the background and select from the list. This setting is temporary, but you can change the default size in the global Preferences.#
TOC intro presets global chan views config | resources control bar 5
Page 6
INTRODUCTION
Control Bar
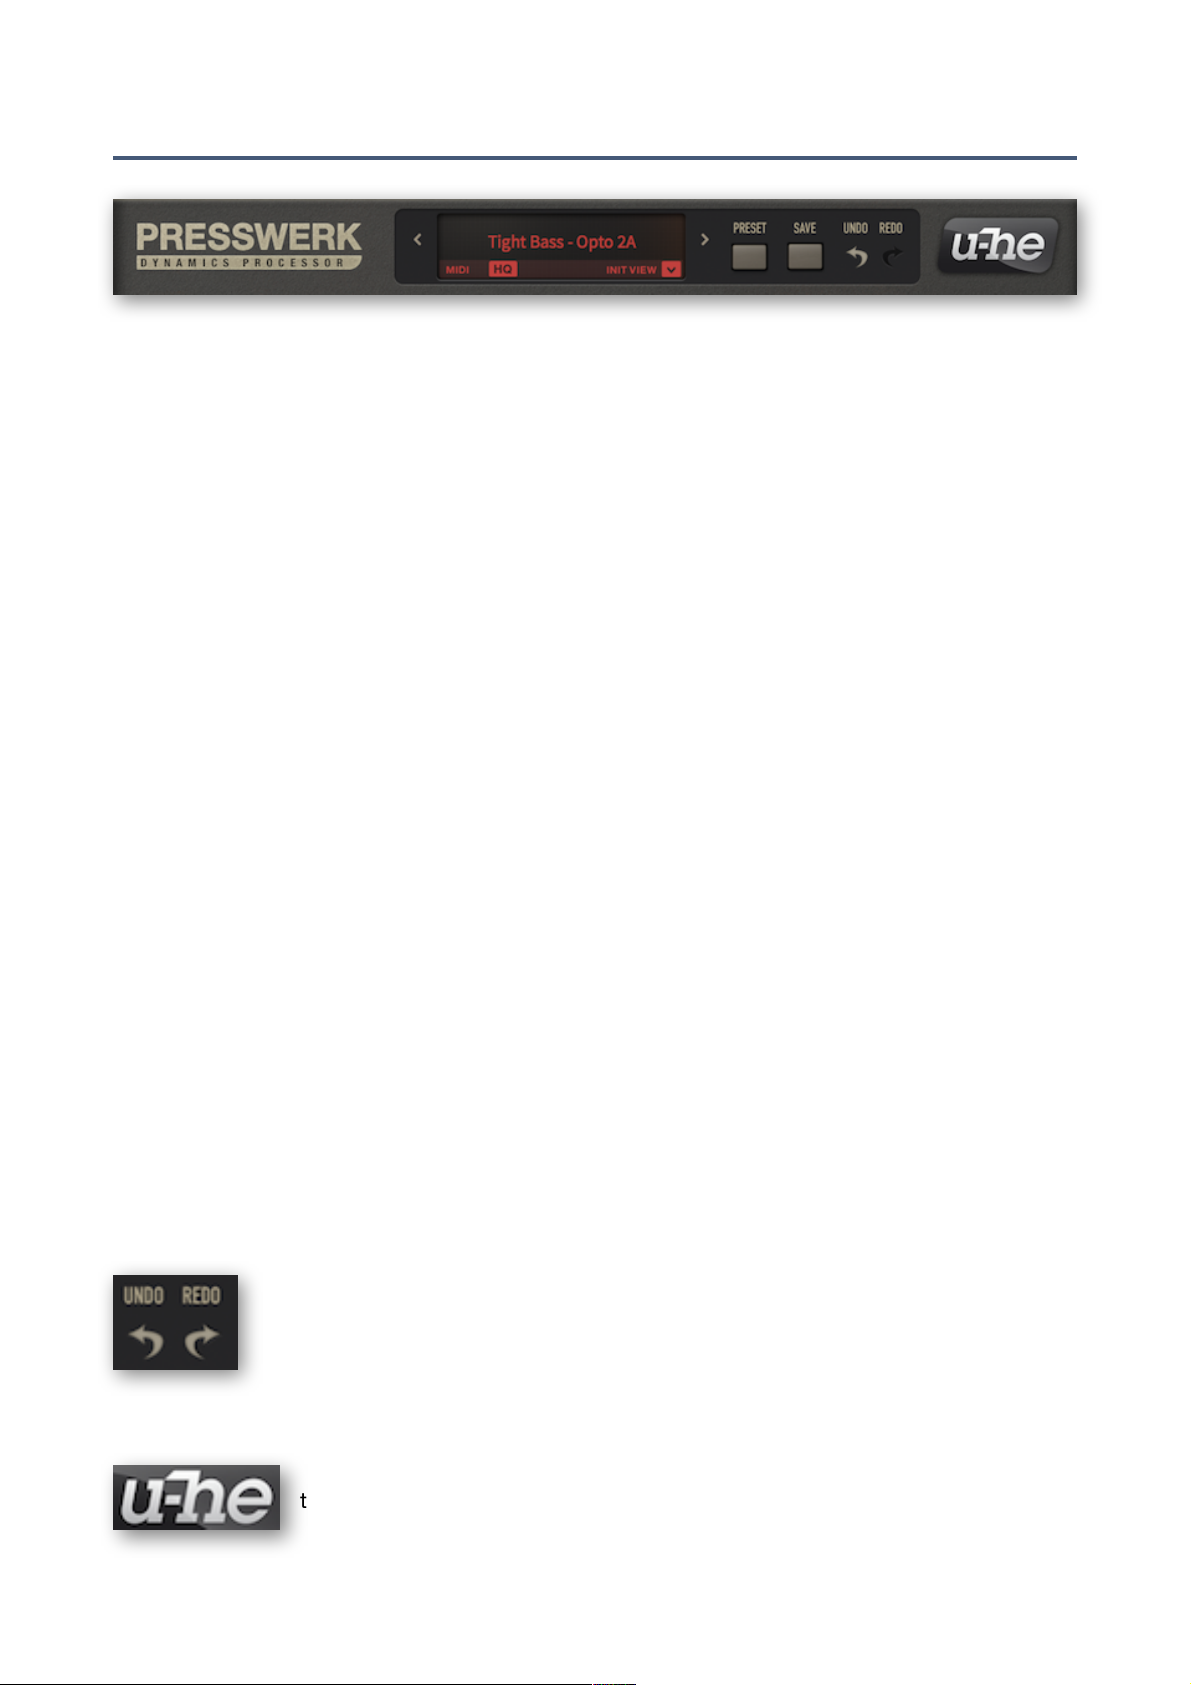
Data Display
This normally shows the name of the selected preset. While a parameter is being edited, however,
it shows the value of that parameter. After a few seconds, it reverts to showing the preset name."
You don’t have to open the browser to select presets: clicking on the arrows steps forwards and
backwards, and clicking on the data display opens a drop-down list of all presets in the current
directory. Of course Presswerk also has a regular browser (see the Preset Browser chapter a few
pages down)."
At the bottom left of the data display is a normally dark MIDI activity indicator, which flashes
whenever Presswerk receives MIDI messages. For information about how to route MIDI into effect
plug-ins (such as Presswerk), please refer to the documentation of your host application."
Next to this is an HQ (high quality) button. Although barely audible, Presswerk can cause aliasing,
especially if the envelope is relatively short. Oversampling helps: At 44.1kHz or 48kHz, activating
HQ sets the internal sample rate to 4 times the original (only two times at 88kHz or 96kHz). HQ
also minimizes aliasing generated in the saturation stage, and the improvement in audio quality is
greater than from gain-riding the stages. We recommend that you switch HQ on when rendering
your project. Note: Although it is a global parameter independent of the loaded preset, the HQ
status of each instance in the project is saved."
The dropdown symbol labelled INIT VIEW opens a menu containing templates for the various alternative views, which are described in detail in the SPECIAL VIEWS chapter."
Preset / Save
PRESET opens the browser (see the next page). SAVE opens a dialog box in which you can enter
information before finally storing via the ‘Apply’ button. If you can’t see your newly saved preset in
the currently selected folder, check the Save Presets To preference. "
Right-clicking on the SAVE button lets you select the preset format you will be using. Standard
is .h2p, which has the great advantage of being cross-platform compatible. The .h2p extended
format is similar but also allows per-line comments (the files are therefore a bit larger). If you have
loaded Presswerk as VST2, you will also see the option .nksfx – see the final chapter, NKS."
Undo / Redo
The curved arrows let you step backwards and forwards through your editing ‘history’. The Undo and Redo functions even work if you select a new preset before
saving your edits!"
u-he badge
Click on this badge to open a popup menu containing links to this user guide,
to our website, to our user support forum at KVR as well as to our address in
various social networks.#
TOC intro presets global chan views config | resources control bar 6
Page 7
INTRODUCTION
Bypass
The button at the top left needs little explanation – activating it simply connects the
audio input directly to the output, so the signal is not processed. The button flashes as
a constant reminder that this particular instance of Presswerk is currently bypassed."
Note: Even while bypassed, Presswerk continues to run so you can still check how
your adjustments would affect the compression."
Configuration
The cogwheel button at the top of the righthand side-panel opens the configuration
pages, which offer MIDI remote control assignments as well as GUI preferences. For
details, see the Configuration chapter."
Knobs and Buttons
Buttons bracketed together with a line above the labels are ‘radio buttons’: activating one switches the other (or others) off. All other buttons in Presswerk
are simple on/off switches."
Buttons that flash when active (Bypass, sidechain monitor channel selectors)
do this as a constant reminder to switch them off again!"
All knobs are adjusted by clicking and dragging vertically. To fine tune, hold
down a SHIFT key before moving the knob. "
In the standard Link mode (see Edit a few pages down), values can be adjusted
in opposite directions by holding down [Cmd] (Mac) or [Ctrl] (Windows)."
The values/status of parameters in the other channel are indicated by red arcs
for knobs and underlines for buttons. In the image here, the ‘Amount’ in this
channel is set lower than in the other channel. See Edit mode."
To reset a knob to its default value you can either double-click on the knob or
hold down Alt (Mac) or Ctrl (Windows) then single-click.#
TOC intro presets global chan views config | resources control bar 7
Page 8
PRESETS
Preset Browser
Overview
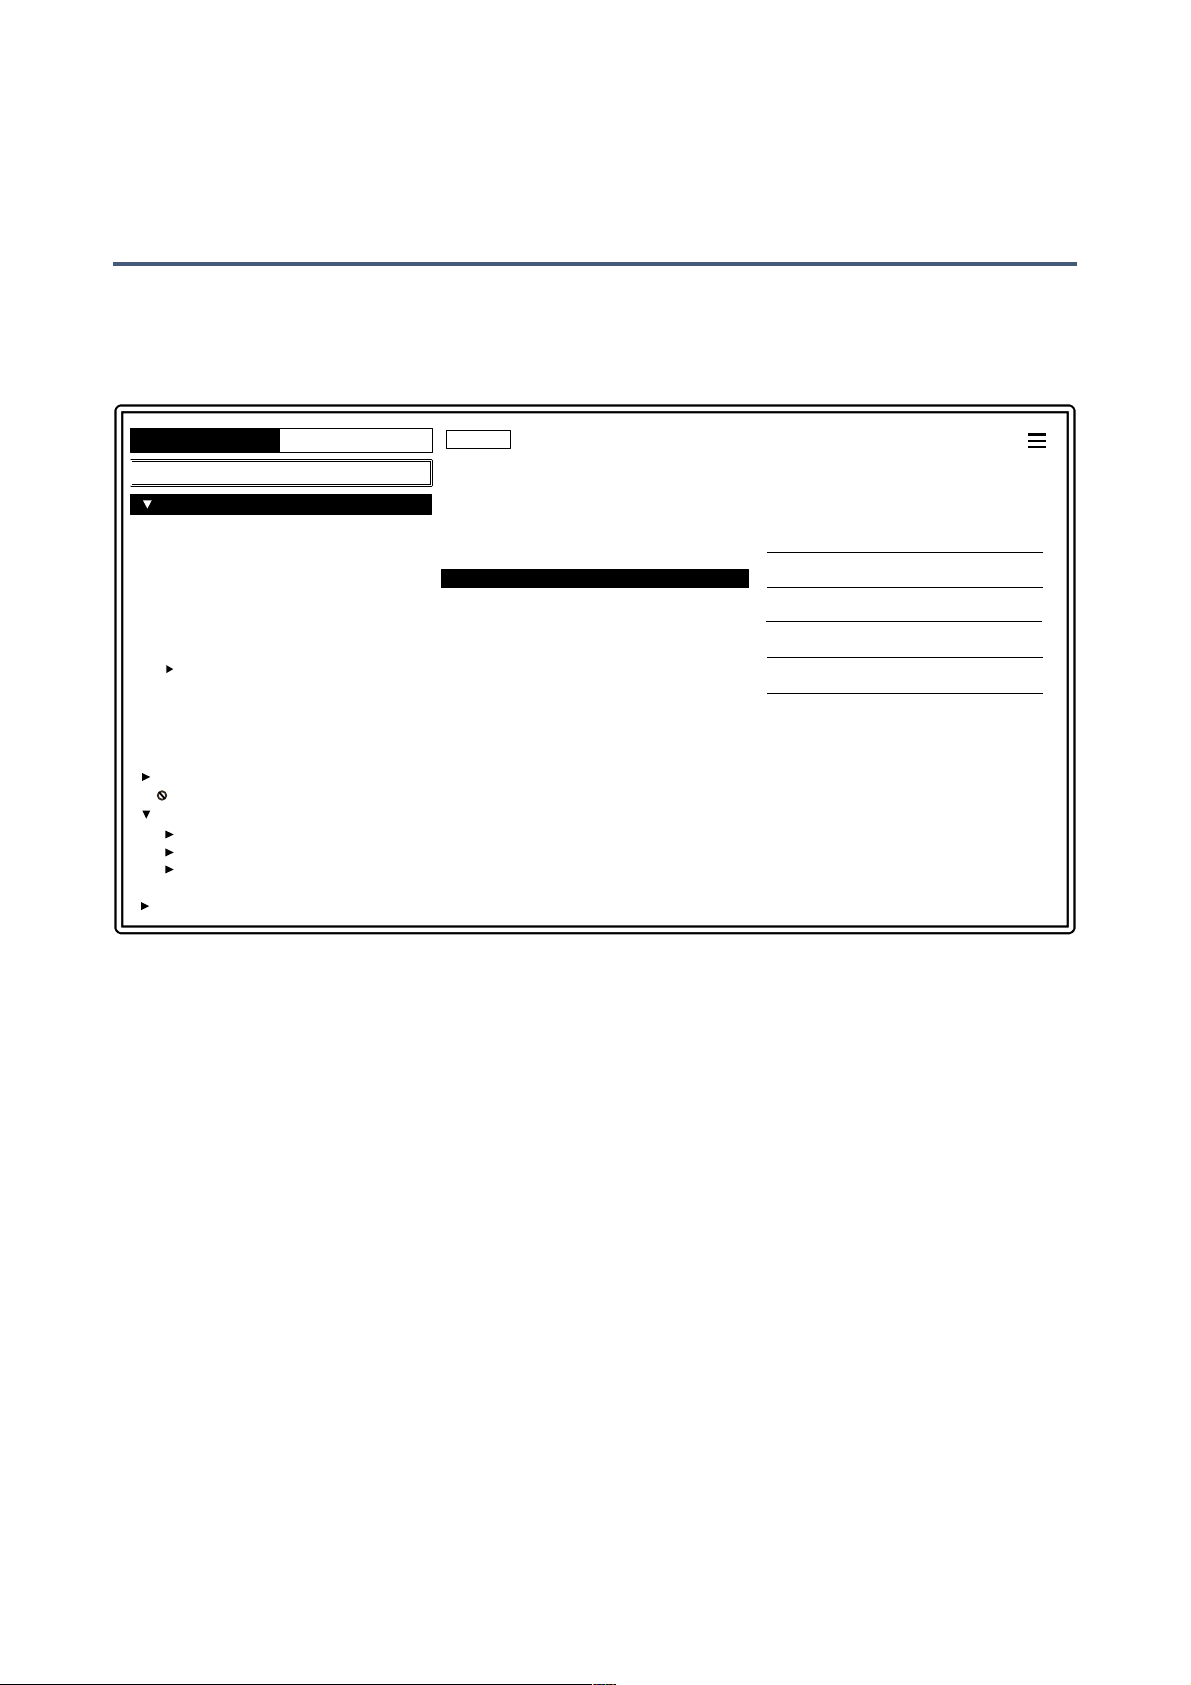
You can load any preset in the current folder by clicking on the data display, or step through presets by clicking on the arrow symbols either side of the data display. Of course Presswerk also
includes a preset browser – click on the PRESETS button:"
Folders are on the left, presets in the centre and information about the current preset on the right.
If you can’t see any presets at all in the central area, click on Local. If you can’t see the PRESET
INFO panel, click on the button in the top right and select Show Preset Info."
The Local root directory contains a few presets copied from the subfolders. The View Presets
subfolder contains only presets that use the alternative views. After loading a preset by clicking
on its name, you can step through all the others using your computer’s cursor keys."
That’s all you really need to know for now
For users who want to dig deeper, however, Presswerk’s browser offers many interesting features,
including a powerful search engine. For details, please read the rest of this chapter."
Default preset
When Presswerk starts it checks whether the Local root directory contains a preset called default,
which is then loaded instead of the generic settings. Note that if you name a preset default, it will
not appear in the browser.#
TOC intro presets global chan views config | directory search 8
DIRECTORY TAGS
Search
RESTORE
initialize
GL Pillow Yum
Init Clean
Init Limiter
Init Natural
Init Pump
Init Stereo Bus
PRESET INFO
initialize
initialize
DESCRIPTION
USAGE
CATEGORIES
APPLICATION
CHARACTER
/Local
by [unknown]
Local
2-Track Mixdown
Bass
Buss Groups
Drums
Experimental
Guitar
MIDI Programs
Synth
View Presets
Vintage
Vox
User
Search History
Saved Searches
Favourites
Categories
Application
Character
Untagged (0)
Author
Mojo Silky Color
Mojo Snap Opto
Mojo Spank Hard
Mojo Vari-Mu Bump
Mojo Werk Density
SubbassDominantorFatten
Junk (0)
Tags
Page 9
PRESETS
Directory Panel
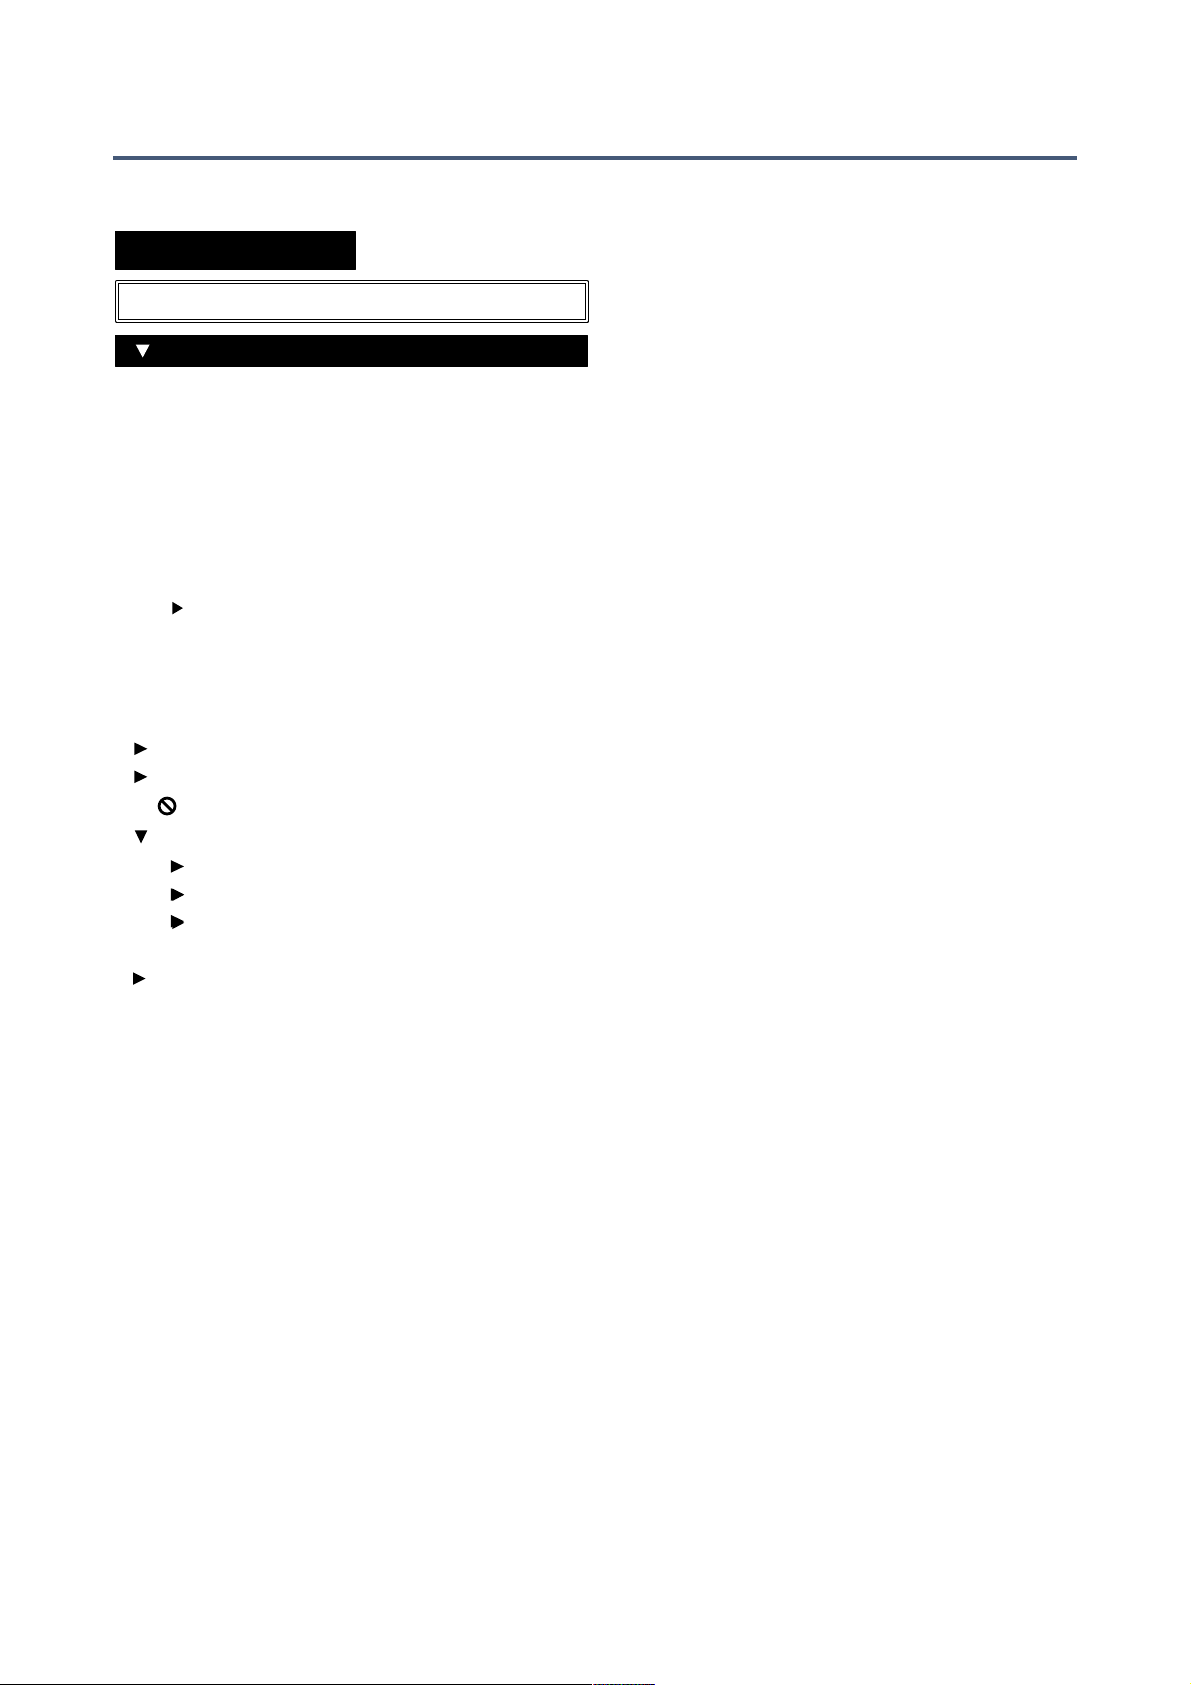
If you don’t see this panel on the left of the browser, click on the DIRECTORY tab."
Local
Satin’s factory presets are sorted into folders. We recommend that you do not add or remove any
presets here, but save all your own creations as well as soundsets from third parties in the ‘User’
folder (see the next page)."
MIDI Programs
‘Local’ also contains a special folder called ‘MIDI Programs’ which is normally empty. When the
first instance of Presswerk starts, up to 128 presets from that folder are loaded into memory, to be
selected via MIDI Program Change messages. Certain DAWs automatically route MIDI into effect
plug-ins while others achieve the same via more complicated methods. You might have to spend
some time looking through the appropriate documentation for information on how to do this!"
As the patches in MIDI Programs are accessed in alphabetical order, it makes sense to prefix
each name with an index ‘000 rest-of-name’ to ‘127 rest-of-name’ or similar. IMPORTANT: Unlike
regular presets, MIDI Programs can’t be added, removed or renamed on the fly. Changes will only
take effect after the host software is restarted."
The MIDI Programs folder can contain up to 127 sub-folders of 128 presets, switched via MIDI
‘Bank Select’ messages (CC#0) preceding the Program Change message. The MIDI Programs
folder itself is bank 0, sub-folders are addressed in alphabetical order starting with bank 1."
TOC intro presets global chan views config | directory search 9
DIRECTORY
Search
Local
2-Track Mixdown
Bass
Buss Groups
Drums
Experimental
Guitar
MIDI Programs
Synth
View Presets
Vintage
Vox
User
Search History
Saved Searches
Favourites
Author
Categories
Application
Character
Untagged (n)
Tags
Junk (n)
Page 10

PRESETS
When Presswerk receives a program change, it will display the bank and program numbers to the
left of the preset name e.g. “0:0” for the first preset in the first bank. In certain hosts, however, the
first bank / preset is designated “1” instead of the correct “0”. "
To avoid another possible source of confusion, make sure that there are no junked presets in the
MIDI Programs folder. All files there are adressed, even if they are hidden."
User
The best address for your own creations as well as presets from other sources. You can either select User immediately before saving the preset, or set a global preference which ensures that it
will always be saved to this folder – see the preference Save Presets To."
Tip: It’s worth finding out where the User folder actually resides on your computer. Right-click on
the User folder and select reveal in Finder (Mac) or open in Explorer (Windows)."
Smart Folders
These folders do not contain files, but display the results of querying a database of presets. The
content is therefore dynamic i.e. it will change whenever the underlying data changes:"
Search History
Click on this folder to display the results of past searches (maximum 10). Whenever you need to
make the results of a search more permanent, right-click and select save Search... The entry will
be moved to the Saved Searches folder – see below. To remove all searches from the list, rightclick on the Search History folder and select clear."
Saved Searches
This folder contains searches that have been saved via right click from Search History. To remove
individual saved searches, right-click on the search and select delete."
Tip: Entries dragged from Saved Searches and dropped onto real folders within Local or User will
create a folder containing copies of all found presets!"
Favourites
8 smart folders, one for each Favourite colour. See Presets context menu on the next page. Presets dropped onto one of the Favourites folders will be marked as such."
Junk
A smart folder pointing to all junked presets. See Presets context menu on the next page. Presets
dropped onto this folder will be junked, and will therefore disappear from the rest of the browser
unless made visible (see show junk in the Presets context menu)."
Tags
Smart folders for each Category/Subcategory, Application and Character tag. Presets dropped
onto these folders will adopt the corresponding tag. Presets dropped onto the Untagged folder
will have all Category/Subcategory, Application and Character tags removed."
Author
Smart folders for each Author. Tip: Instead of signing each of your creations individually, you
could sign just one of them, then select them all and drag them onto Author/(You)/. As the
process cannot be undone, please use this feature with caution.#
TOC intro presets global chan views config | directory search 10
Page 11
PRESETS
Directory context menu
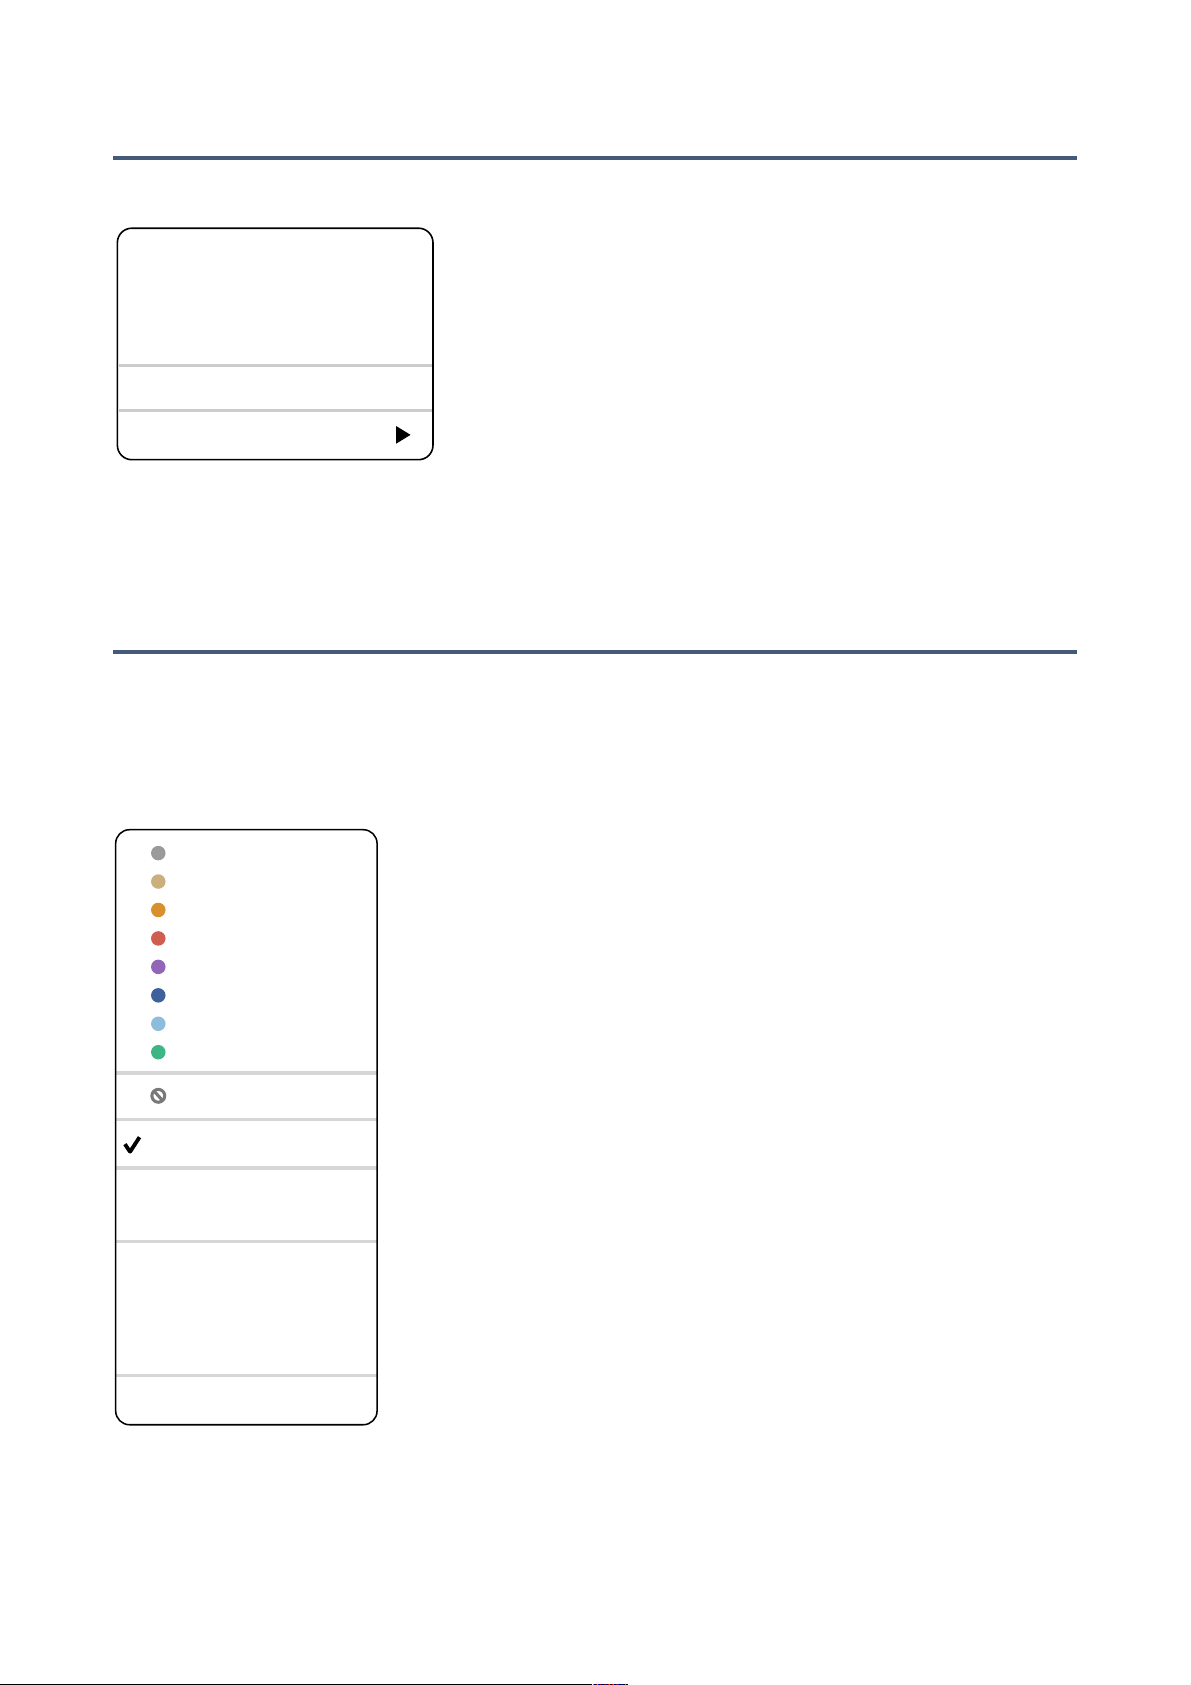
Right-clicking on any folder within Local or User will open this menu:"
refresh: Update the contents of the browser. This is necessary
after you have moved, added, removed or renamed any folders
or presets using Explorer / Finder."
create new: Insert an empty subdirectory."
rename: Edit the folder name."
reveal in Finder / open in Explorer: Opens a system window for
the clicked folder. After adding, removing or renaming preset
files or folders outside of Presswerk’s own browser, remember
to refresh the directory (see refresh above)."
on open expand to: These options determine how deeply the browser will open subdirectories
whenever the GUI is opened again or the refresh function is called. The first option (none) collapses all folders, while the final option (all levels) reveals all nested folders."
Presets Panel
The central, unlabelled area of the browser is where you click to load presets..."
Presets context menu
Right-click to open a menu containing functions that can be applied to individual presets."
mark as favourite: Choose one of eight ‘favourite’ marks. The selected entry will be replaced with unmark as favourite."
mark as junk: Instead of deleting any unloved presets, you can mark
them as ‘junk’ so that they disappear from the browser…"
show junk: Activate this option to display junked files (see above)
instead, but mark them with a STOP symbol."
select all, deselect: See Multiple selection below."
rename: You can change the names of presets using this function.
Note that only the most recently selected preset can be renamed i.e.
you can’t rename multiple files at once."
duplicate / copy to User Folder: The entry here depends on the status
of the preference Save Presets To as well as on the location of the
source preset(s) – whether they are in the Local or the User folder.
Selected presets are copied with a number appended to the name,
which increments (just like the ‘Auto Versioning’ option) so that no
preset can be overwritten by mistake."
reveal in Finder / open in Explorer: Opens a system window for the
selected preset. After adding, removing or renaming any of the preset files there, please remember to refresh the directory!"
convert to native / h2p / h2p extended / nksfx: Converts the selected
preset(s) to the format previously selected via right-click on the
SAVE button."
move to Trash / Recycle Bin: Moves all selected preset(s) to the system trash (so please be careful
with this feature)."
TOC intro presets global chan views config | directory search 11
refresh
create new…
rename…
reveal in Finder *
move to Trash
on open expand to
mark as favourite
select all
deselect
show junk
rename…
duplicate *
reveal in Finder *
convert to h2p
move to Trash
mark as junk
mark as favourite
mark as favourite
mark as favourite
mark as favourite
mark as favourite
mark as favourite
mark as favourite
Page 12
PRESETS
Restore
While in the browser you can audition presets for as long as you like without losing track of the
one that was previously loaded: Clicking the Restore button gets you back to where you started."
Multiple selection, drag & drop
A block of adjacent presets can be selected via shift+click, and individual presets can be added
to the selection via cmd-click (Mac) / ctrl+click (Win). Presets can be moved to a different folder
via drag & drop. Use SHIFT etc. on your computer keyboard to highlight the files you want to
move, drag them from the files area and drop them onto a target folder. To deselect, either click
on an unselected preset or choose deselect from the context menu."
Preset Tagging
“Tags” are elements of metadata, information that you can add to presets so that they can be
found according to certain attributes."
IMPORTANT: Clicking on SAVE isn’t required, as tags are updated automatically. The obvious advantage is that presets don’t have to be saved every time you edit tags. The main drawback is
that you should only edit tags after saving your preset. If you edit tags while in the process of creating a new version of something, you would also be changing the tags in the original preset!"
The Tagging Window
Right-click on the [SAVE] button and select Tag this preset:"
Category describes a preset by analogy to instrument types or classic synth genres. Each one has
its own set of subcategories. Application offers technical classifications, and Character tags are
pairs of opposites from which you can choose only one."
Tagging via PRESET INFO
In the PRESET INFO, right-click on CATEGORIES, APPLICATION or CHARACTER and select or
unselect tags from the context menu. Note that this method only works for individual presets. Tip:
If you right- click on an existing tag, the first option in the menu becomes remove tag..."
The function create Search from Tags searches for presets with ALL the same tags. "
TOC intro presets global chan views config | directory search 12
Category
Drums
Application
Neutral
Character
Subtle
Coloured
Limiter
Expander
Gate
Initialize
Bass
Guitar
Vocal
Synth
Pad
FX
Slow
Phat
Wide
Modern
Extreme
Fast
Thin
Narrow
Orchestra
Mix Bus
Compressor
Keys
Vintage
De-Esser
Saturation
Mastering
Page 13
PRESETS
Tagging via the Tags smart folder
You can tag presets by drag & drop onto one of the Tags smart folders. To remove all tags, drag
presets onto the Tags/Untagged/ smart folder."
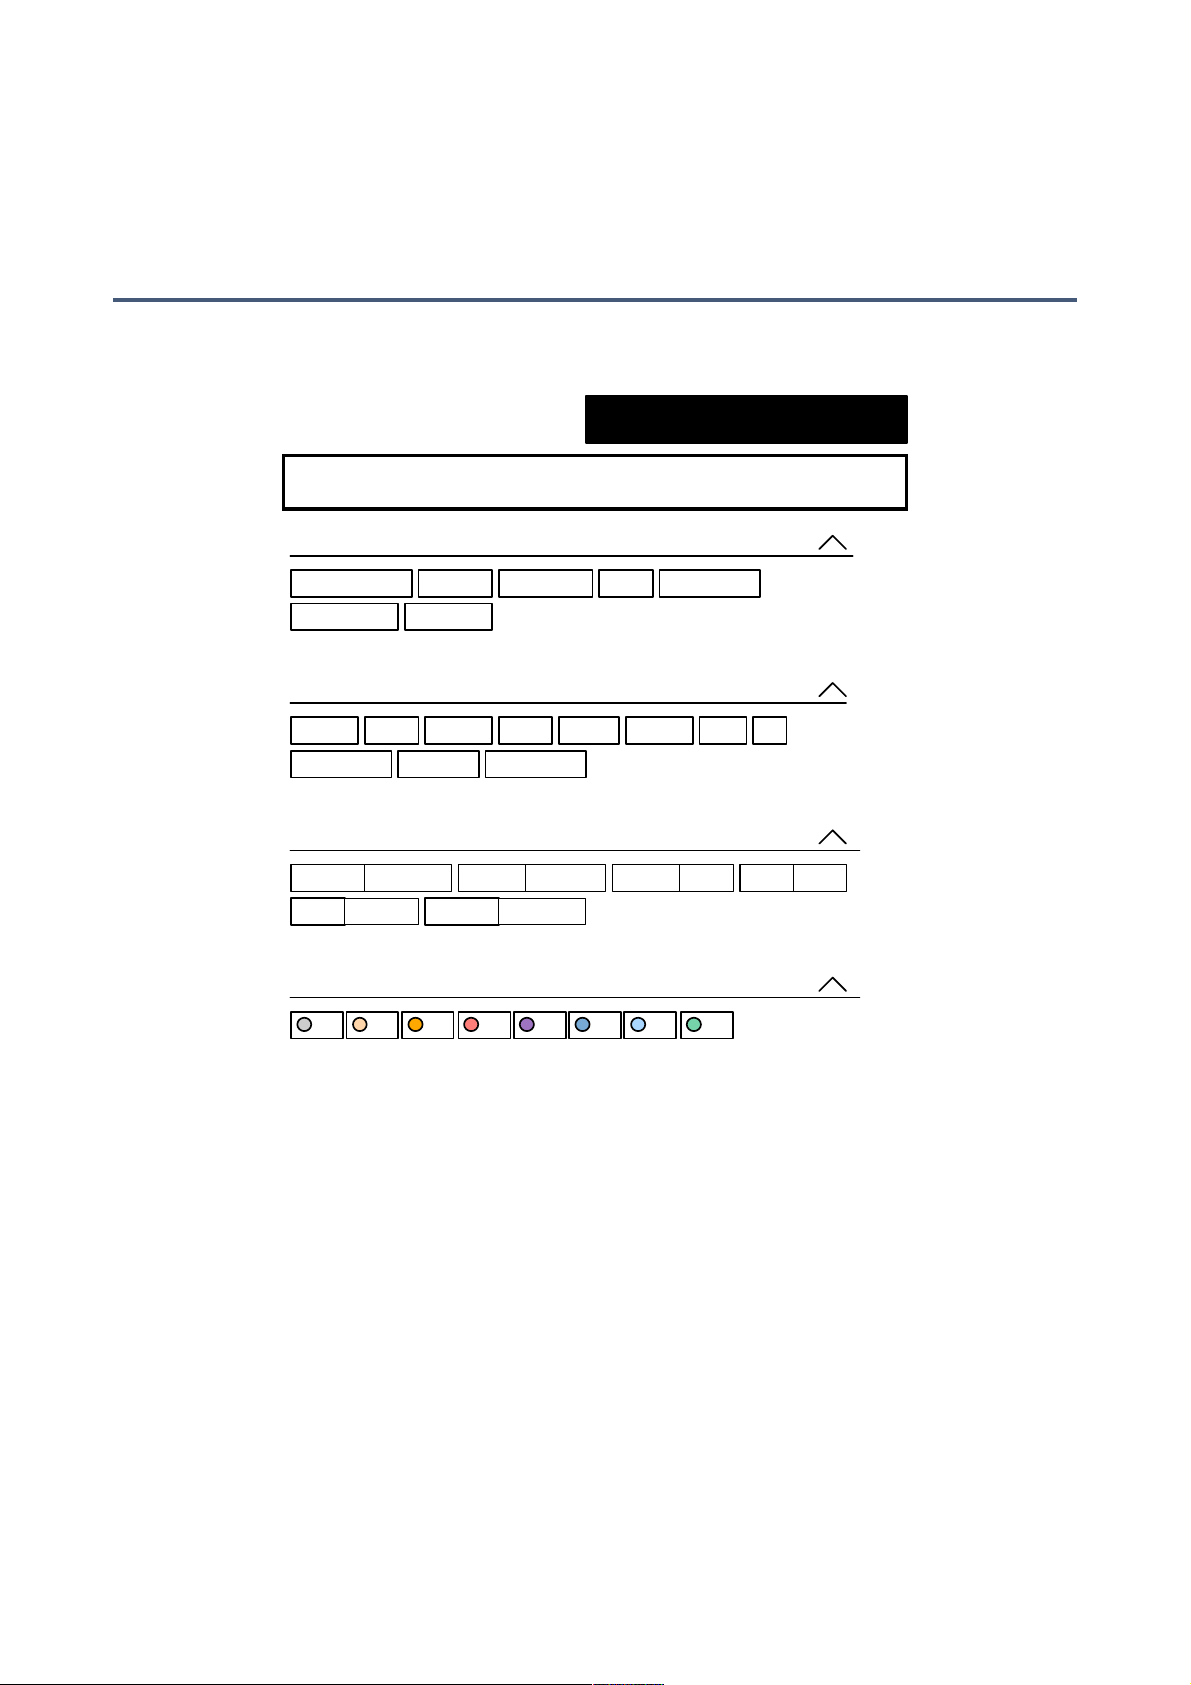
Search by Tags
Click on the TAGS tab to open this view. The buttons here let you set up search criteria according
to existing tags with just a few mouseclicks:"
There are four sets of buttons. The first three correspond to the tags in the tagging window (see
the previous page), and the bottom row lets you find any presets tagged as a Favourite. Clicking
on the [^] icon to the right of each heading hides the options for that set of tags."
Practically…
Click on the DIRECTORY tab, right-click on the Search History smart folder and select clear. Double-click on Local to restrict the scope of the search to that folder (presets in the User folder will
not appear in the search results now). The selected path appears immediately below the Search
field. To exit the “restriction” folder again, click on the ‘up’ [^] symbol to the left."
Click on the TAGS tab and select the Categories [Limiter] and [Saturation]. Presets tagged with
either of those categories will appear in the presets panel. Click on the DIRECTORY tab again:
The text string “#Dynamics:Limiter #Distortion:Saturation” appears in the Search field and in the
Search History smart folder, which also shows the number of found presets. If you are feeling adventurous, try editing the contents of the Search field – the results will be updated."
Unlike selecting several Category tags, which will expand the scope of the search, selecting Ap-
plication, Character or Favourites tags will restrict the scope i.e. you will get fewer hits."
TOC intro presets global chan views config | directory search 13
Search
TAGS
CATEGORIES
APPLICATION
CHARACTER
Compressor
Neutral Coloured
Limiter Expander Gate De-Esser
Saturation Initialize
Drums Guitar Vocal SynthBass FXKeys
Mix Bus
Pad
Orchestra
Subtle Extreme Slow Fast Phat Thin
Modern VintageWide Narrow
FAVOURITES
1 2 3 4 5 6 7 8
Mastering
Page 14

PRESETS
Search by Text
The Search field lets you find presets according to a string of characters i.e. text. Here’s an easy
example: If you remember that the preset you’re looking for has the word “heavy” in either its
name or its description, simply enter “heavy” into the Search field and hit Return…"
The search normally looks into the preset name, author, the DESCRIPTION and USAGE (see the
PRESET INFO panel). Searches are not case-sensitive, and quotes are not required unless you
need to include spaces."
To restrict the search to a particular path, double click the folder. This path will appear beneath
the Search field. The [^] button to the left moves the Search path up one level, while the [X] button
to the right sets the search path to the default (all Presswerk presets)."
Try a text search: Enter three or four letters then hit Return. For instance, star will find all files containing the text string star (e.g. mustard or starters). Entering "star wars" (with the quotes) would
find e.g. Battlestar Warship, if such existed in the presets."
The Search by Text features are still “work in progress”. We hope to remove the remaining inconsistencies and improve the functionality in future versions."
Syntax
Scope
You can limit the scope of the search to just the preset name or specific parts of PRESET INFO by
using name (preset name), author, desc (description) or use (usage) followed by a colon. For instance, author:the finds all presets by authors containing ‘the’. Similarly, desc:space will find all
presets with the word space in the description."
Logic
IMPORTANT: The following logical operators can only be used between text elements."
AND requires that presets contain both words. It can be written explicitly, but is not necessary.
For example, star AND wars (or simply star wars) will find presets that contain both star and wars."
OR means that presets can contain just one of the words or both. For example, star OR wars will
find presets that contain star as well as presets that contain wars."
NOT excludes presets containing the word. To find all presets that contain star but don’t contain
wars, enter star NOT wars."
Including Tags
In the current version of the browser, tags must appear after any text items. For technical reasons,
tags appear in the Search field in the form #type:category (the type is otherwise invisible)."
Regular tags can also be manually entered into the Search field if preceded with a ‘#’. For example, name:ojo #Filter:EQ will find all presets with ‘ojo’ as part of the name that are tagged with the
EQ category."
TOC intro presets global chan views config | directory search 14
Page 15
GLOBAL PARAMETERS
Global Parameters
Detection
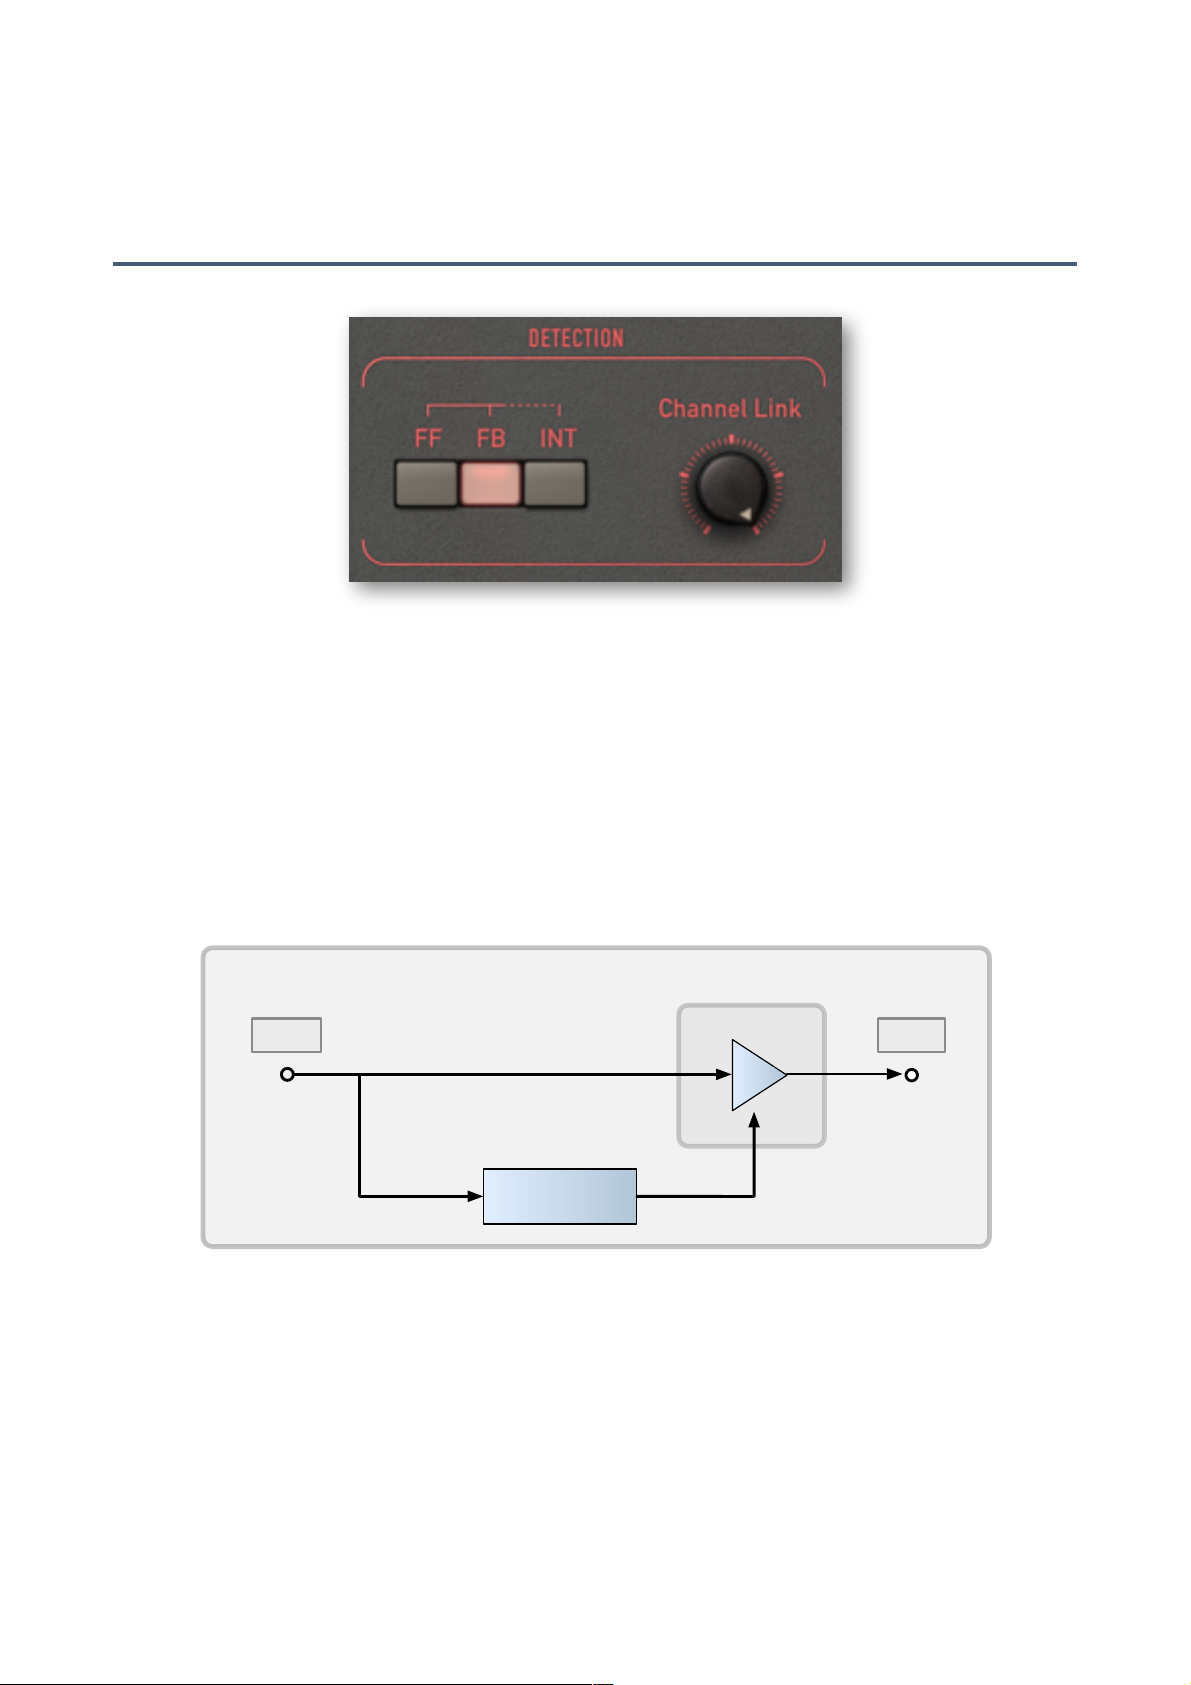
Most dynamics compressor-limiters have a fixed topology, so the origin of the signal feeding the
detector circuit and gain-computing device (VCA, voltage divider etc.) is also fixed. In modern
units this is usually the input, and the method is called feed-forward (FF) detection…"
Feed Forward (FF)
Feed-forward detection tracks the input very precisely. The resulting sound could be described as
‘predictable’ and ‘direct’, as the effect strictly follows threshold and ratio settings etc.."
Feed forward detection isn’t particularly forgiving – it requires careful adjustment, especially when
applied to complex audio material.#
TOC intro presets global chan views config | detection edit 15
Input
Gain Computer
Output
VCA
Feed-Forward Compression
Page 16
GLOBAL PARAMETERS
Feed Back (FB)
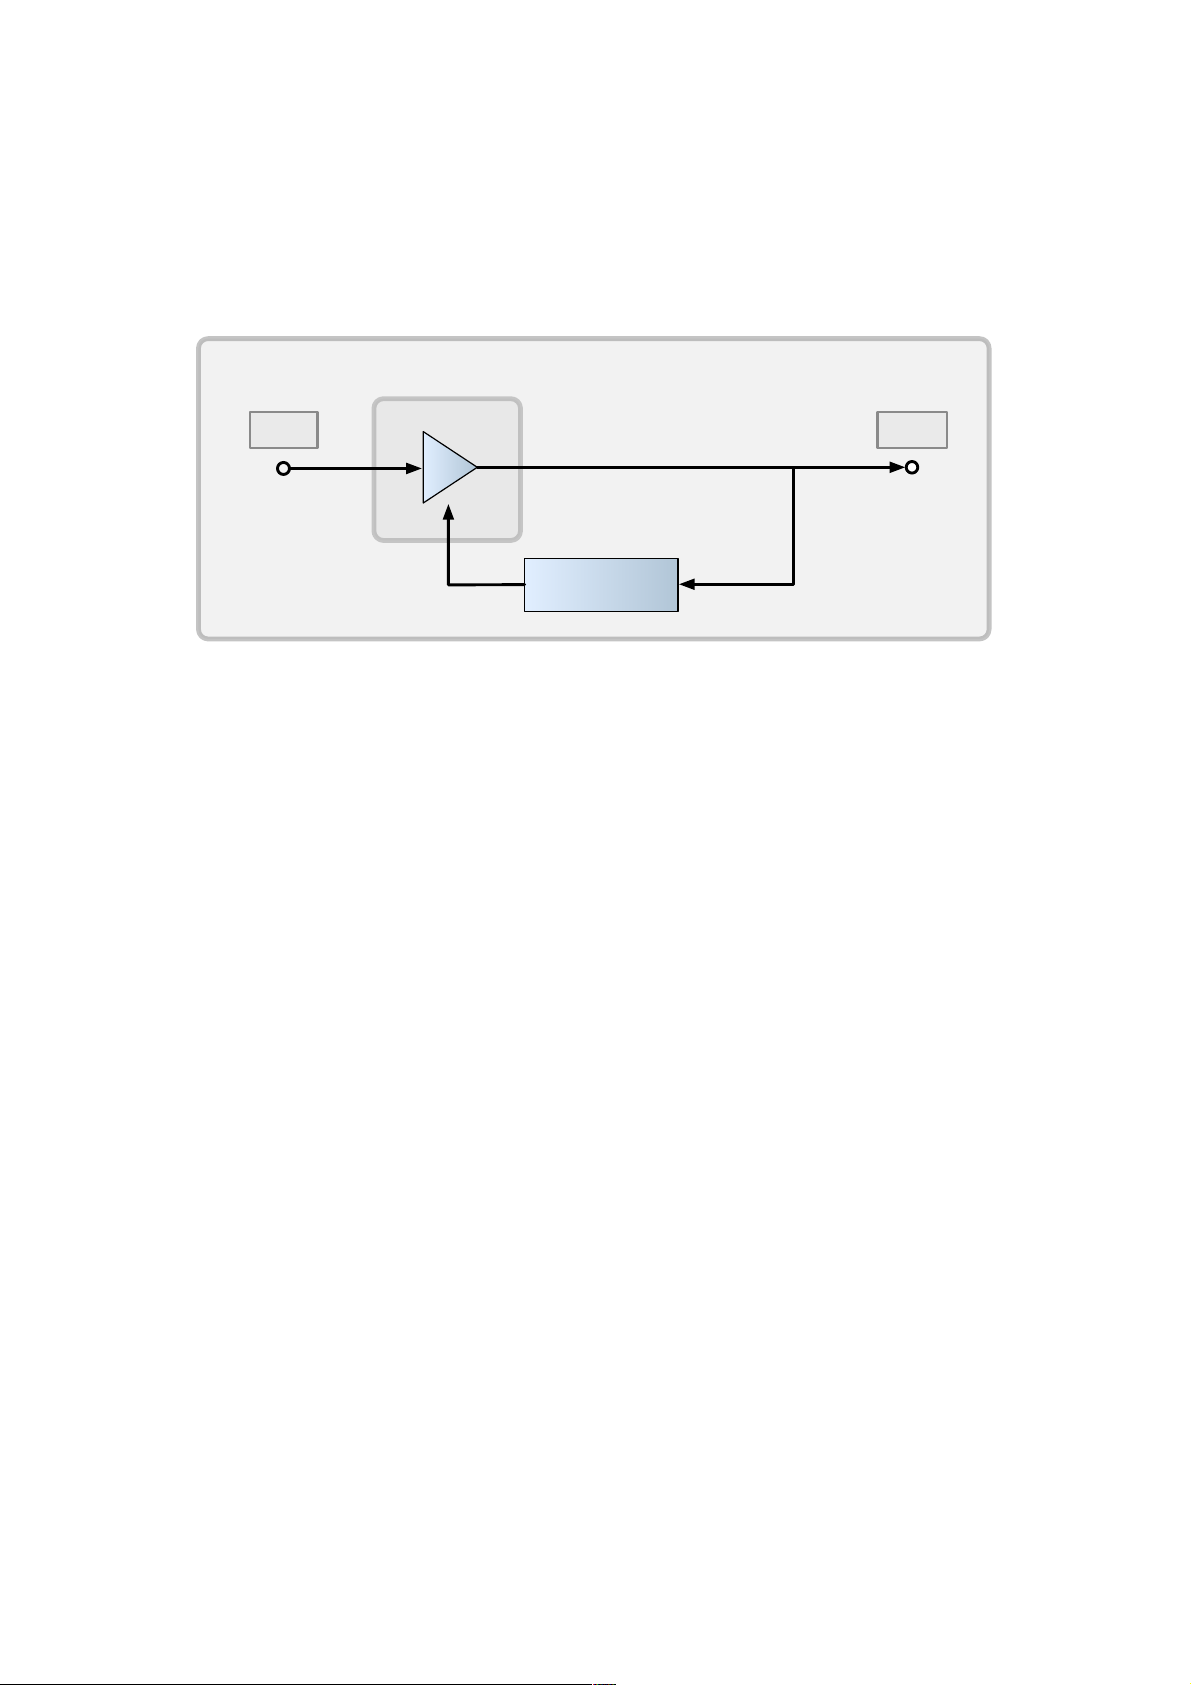
In contrast, the feed-back (FB) design found in classic hardware is less obtrusive, more ‘musical’.
The FB principle, greatly simplified for audio circuits, is standard in control engineering devices
e.g. domestic heating and aircraft flight automation. The principle specifies: Look at the output,
and as soon as there’s 'a bit too much', adjust the input to compensate. So with FB detection,
everything tends to adjust itself automatically, and the system requires little attention.
Feedback detection does have its drawbacks: Not only are the threshold and ratio settings quite
arbitrary and program-dependent (they are governed by characteristics of the material being processed), but the compression ratio is also limited to values between 2:1 and 3:1. To limit the input
signal, the feedback loop would need masses of extra gain. In fact the gain should be infinite, and
we all know that working with infinity can be “rather problematic”!"
Some designs offer a huge amount of gain anyway, which is released as soon as saturation happens. For Presswerk, we chose not to allow more than about 2.5:1 ratio in FB mode, and ensure a
more linear response within the headroom range."
Interactive (INT)
Can we have the best of both worlds? When the interactive detection (INT) mode is active, the
signal is continuously analyzed, and the two internal gain multipliers are blended accordingly. This
is achieved using the crest factor (peak-to-RMS ratio) of the signal. A high crest factor means that
the signal has lots of transients but little steady-state energy."
With transient-rich material, detection in INT mode leans more heavily toward FF, while smoother
material will keep it more in FB mode. The result is almost as unobtrusive as FB gain-riding, but
INT mode allows for higher ratios (up to about 5:1)."
Channel Link"
By default, the two channels are linked together 100%. The detector derives its control signal
from the maximum of the two audio signals (the loudest channel ‘wins'), ensuring that the spatial
integrity required for most stereo-source processing is retained. Linked setups usually work best
with coherent material at moderate to high compression ratios."
The opposite effect is brickwall limiting, where maximum loudness and overshoot protection is
required and where linking the channels would result in giving up valuable headroom. When 0.0%
linked (i.e. unlinked), sudden gain reduction can lead to a momentary ‘tilt’ of the audio to one side."
Tip: If your audio material is difficult, it’s worth spending some time and effort on finding the best
intermediate settings."
TOC intro presets global chan views config | detection edit 16
Input Output
VCA
Feed-Back Compression
Gain Computer
Page 17
GLOBAL PARAMETERS
Operation Modes
EDIT
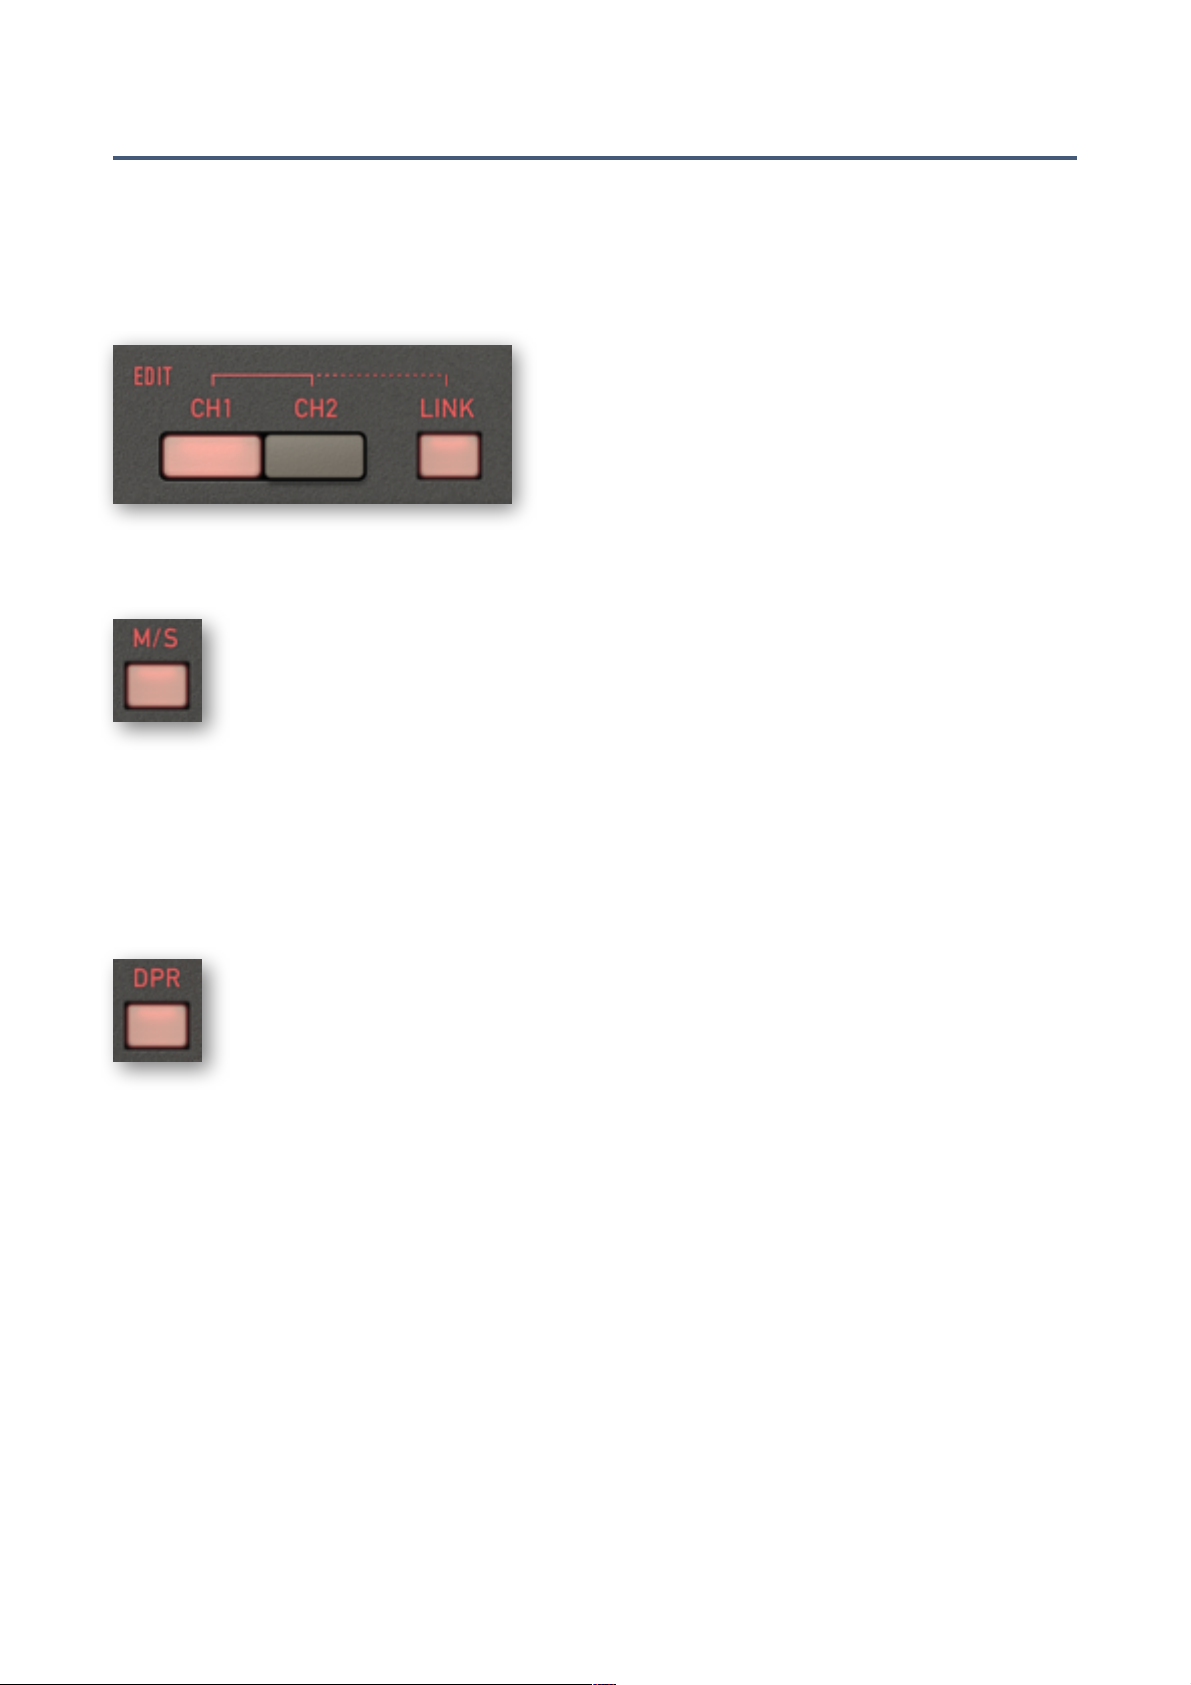
Presswerk can operate on two channels independently. However, the standard mode is Link: the
stereo or dual-channel signal is then controlled by a single set of parameters consisting of all sections on the user interface except those with red borders."
Link is the best choice for most jobs, as it ensures
spatial coherence with a minimum of tweaks. If indepth adjustments are necessary, however, you can
disable LINK and activate CH1 and CH2 to adjust the
individual channels independently. Remember that
Channel Link (see the previous page) ultimately determines how independent the channels really are."
M/S"
Traditionally, M/S was the standard dynamic treatment applied before cutting acetates.
As groove size is limited, strong signal peaks are usually placed dead-center."
M/S (mid-side) mode gives you more opportunity for detailed stereo signal processing.
Channel 1 acts on the mid (L+R), while channel 2 is the side-chain (L-R)."
Dynamics processing in M/S mode is independent of the selected EDIT mode. Even with Link, the
channels will still operate independently unless you set Channel Link to maximum. "
M/S encoding happens after the input controls (like on certain popular hardware compressors) so
the stereo remains intact. If you really need to change the M/S balance, use Threshold or Output."
DPR"
DPR (Dual Phase Rotator) emulates a trick often used by radio broadcasters to tame
vocal transients. Originally designed to increase headroom by reducing asymmetries in
the human voice, it can also be used as a general-purpose ‘phase smearing’ option."
Note: Digital compressors tend to leave the phases and frequency response intact,
whereas the components in analogue equipment have capacitances and inductivities
that can significantly smear phases within the signal."
How DPR works: The phase of low mids (around 200 Hz) in the input stage is shifted, as are bass
frequencies in the output stage. The former can e.g. keep kick drums under control (achieving a
more snappy, slightly coloured attack) while the latter compensates for the drop in low frequency
impact caused by momentary gain reduction."
However, there’s “no free lunch”. In case you have been wondering why insanely hot-mastered
music sounds harsh and wimpy on the radio, here’s why: Phase rotation exaggerates symmetrical
distortion, making the sound worse. It can only work its magic when applied to intact material."
While the taming of transients via phase rotation is usually inaudible, it can change our perception
of low frequencies. The effect manifests itself as more 'oomph' (for lack of a better word). The altered attack can also make the sound more focused and fresh, as well as a little brighter."
In the end, your decision about whether to enable DPR will depend as much on your personal
preference as on the job at hand. Please keep in mind, however, that rotating phases can cause
problems if Presswerk is running in parallel with another track carrying the same signal!#
TOC intro presets global chan views config | detection edit 17
Page 18
CHANNEL PARAMETERS
Channel Parameters
Levels and Meters
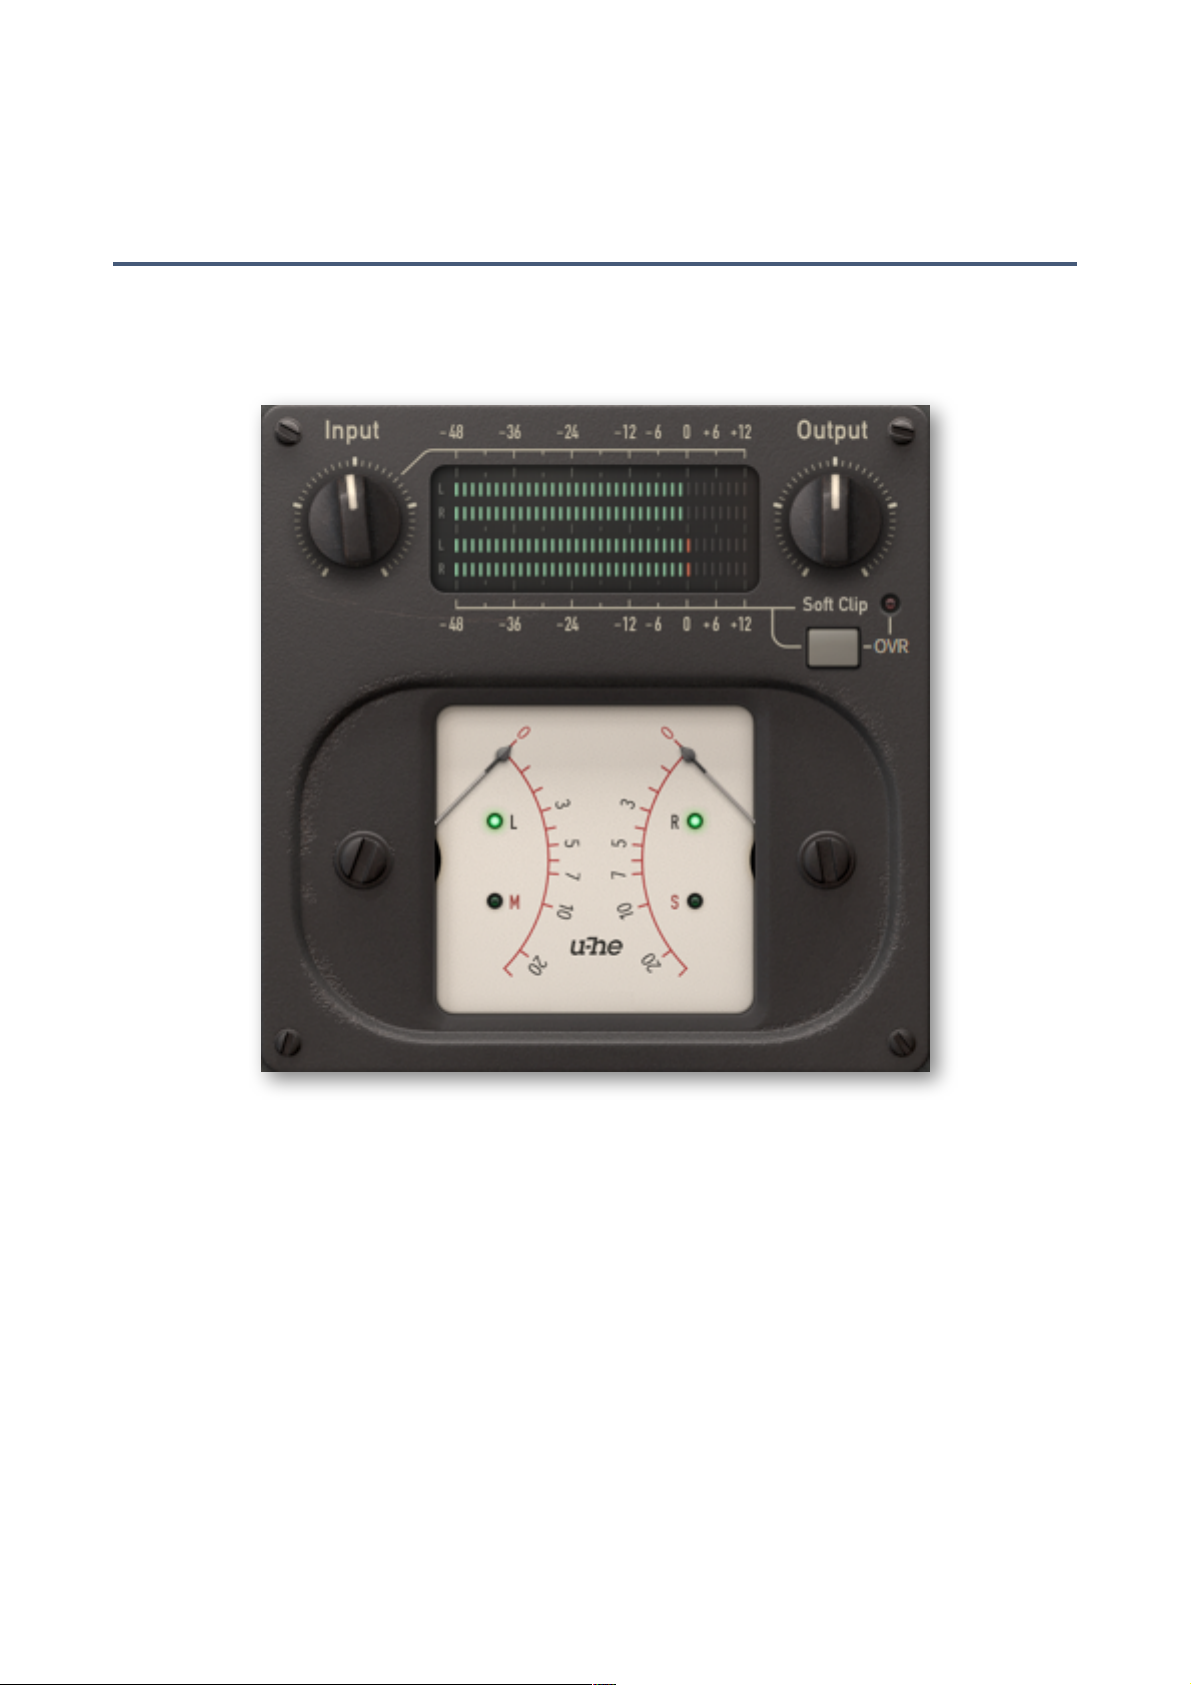
In the centre of the window is an analogue-style VU meter which measures the gain reduction (in
decibels) for the two channels. Gain reduction results from the compression process itself as well
as from saturation ('warmth').
Each channel has its own Input and Output stage. The levels are indicated by four ‘LED strip’
type peak meters – the green bars in the above image. The upper two bars show input levels,
while the lower two show output levels."
The Input knob adjusts the gain of the incoming signal to a level suitable for compression. It can
also fine-tune compression response because, once the available headroom is exhausted, the
detector amplifies non-linearly. Detector saturation, an interesting effect in its own right, prevents
any further gain reduction.
The Output knob adjusts the output gain so you can match the level of the processed signal to
the level of the bypassed signal."
The Output setting drives the optional Soft Clip stage, ensuring that the level stays below 0dBFS
and that the transition between ‘clean’ and ‘clipped’ peaks is relatively smooth. If the signal gets
hot, the indicator lights up, meaning there is some soft clipping. With Soft Clip disabled, however,
the same indicator lighting up means digital clipping – which you should generally avoid!#
TOC intro presets global chan views config | env s-chain sat mix 18
Page 19
CHANNEL PARAMETERS
Compression Curve
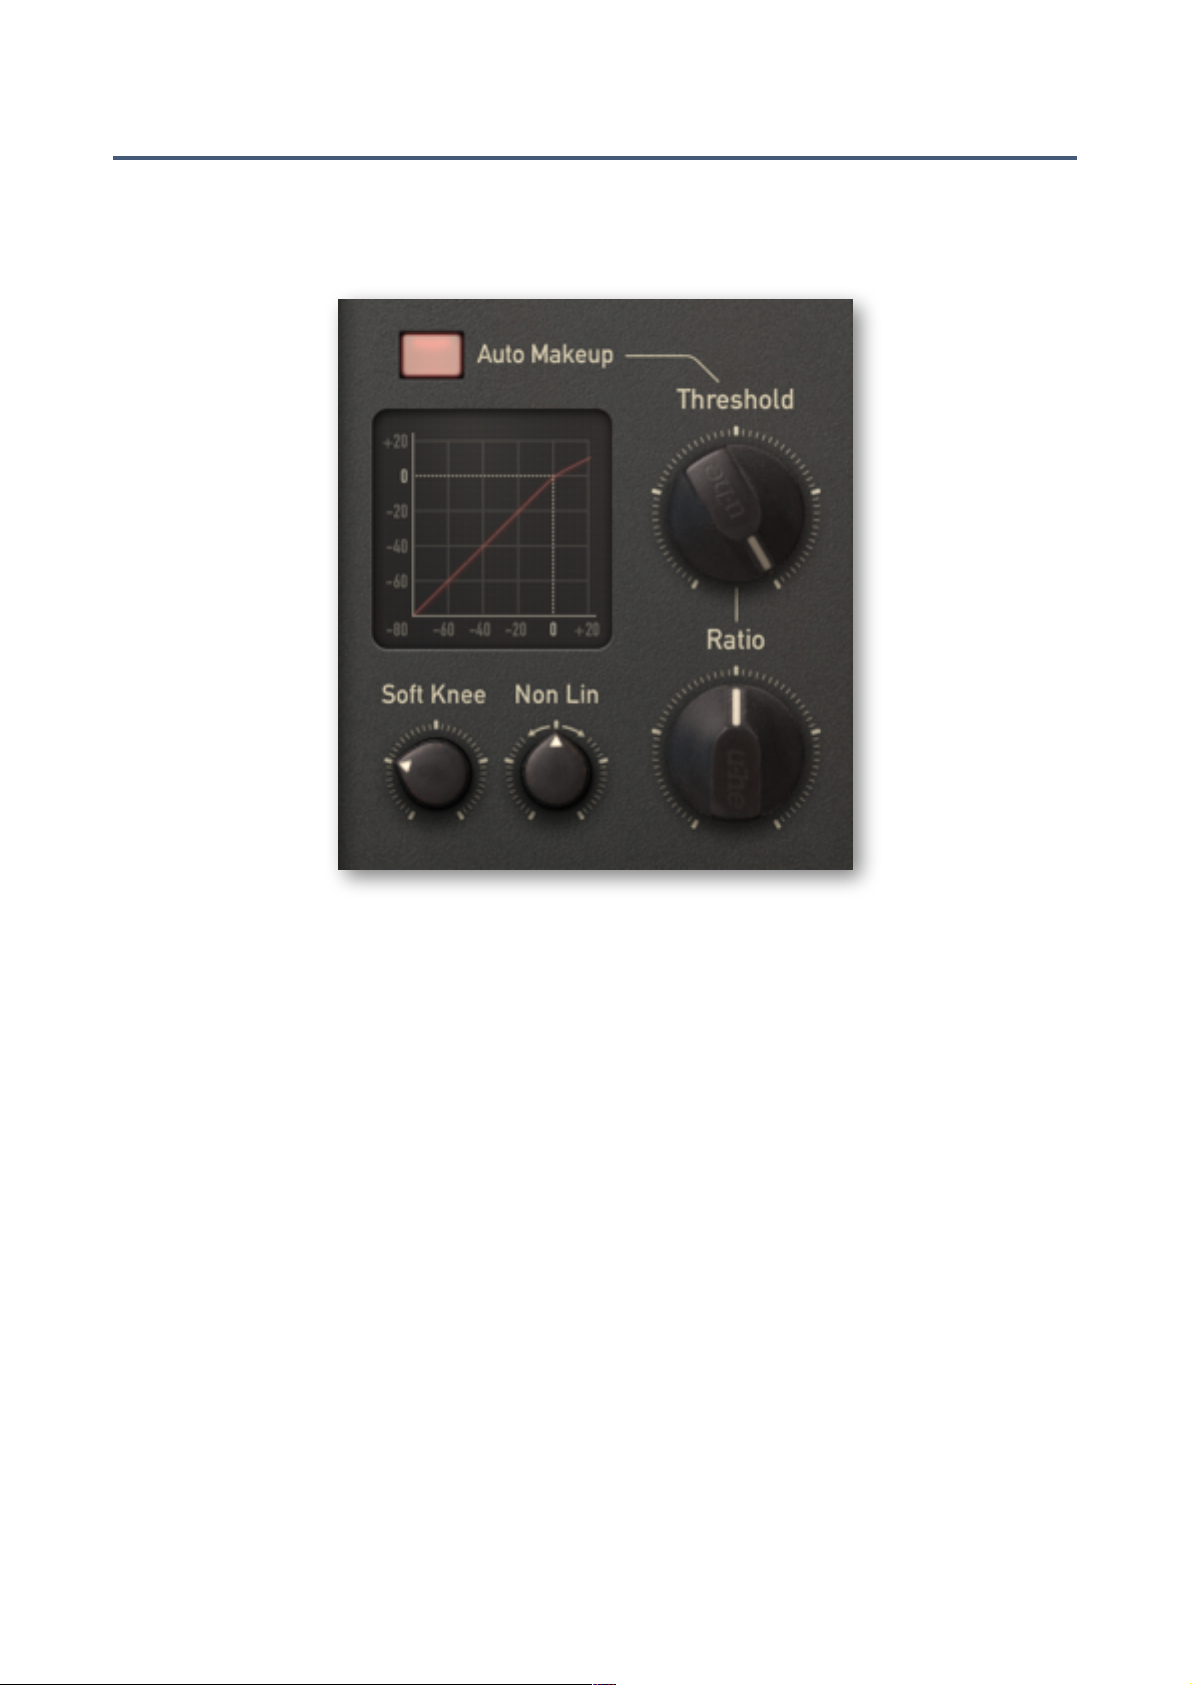
On the left is a panel used for setting up the compression curve. The graphic display shows the
resulting input (x) versus output (y) curve. The detector signal is updated in realtime, so it is fairly
easy to set up a suitable threshold and ratio.
The compression parameters are:
-
Threshold: the level (in dB) at which all processes start to kick in. "
-
Ratio: the gain reduction above the threshold. For instance, ‘4’ here means 4:1. For instance, if
the incoming audio in this case is 8dB above the threshold, the output will be only 2dB above
the threshold."
-
Soft Knee: increases the range within which compression is gradually applied. The maximum
setting here means the smoothest transition from 1:1 up to the specified ratio, while the minimum setting makes the transition 'razor sharp'. The more complex the material and the more
transparent you want your compression to sound, the softer the knee should be. Low ‘hard
knee’ settings are more suitable for limiting or special effects e.g. ‘squashed’ drums."
-
Non Lin: in the central position, gain reduction above the threshold follows a straight line. Positive values bend the curve downwards, while negative values bend it upwards. The NonLin
control helps simulate the behaviour of specific compressors or gain-reduction circuits."
-
Auto Makeup: compensates for the drop in output level caused by gain reduction. It determines the theoretical compensation at a given threshold / ratio setting – for instance -20dB and
4:1 gives 5dB – and applies half of that value (2.5dB) to achieve the same perceived loudness."
Such precise ratios only apply in feed forward (FF) mode. In FB and INT modes, the ratio is
program-dependent – the input-output curve displayed in FB and INT modes is only an ap-
proximation. The same applies to the visible effects of Soft Knee and NonLin settings."
TOC intro presets global chan views config | env s-chain sat mix 19
Page 20
CHANNEL PARAMETERS
!
Envelope
Audio-range compression is a time-variant process, it uses a response-time envelope. Otherwise
we would simply be doing non-linear amplification... better known as ‘distortion’! The envelope
determines how fast the device reacts to audio input, and how it recovers."
Of course manually finding the best settings is important, but we tried to make Presswerk sound
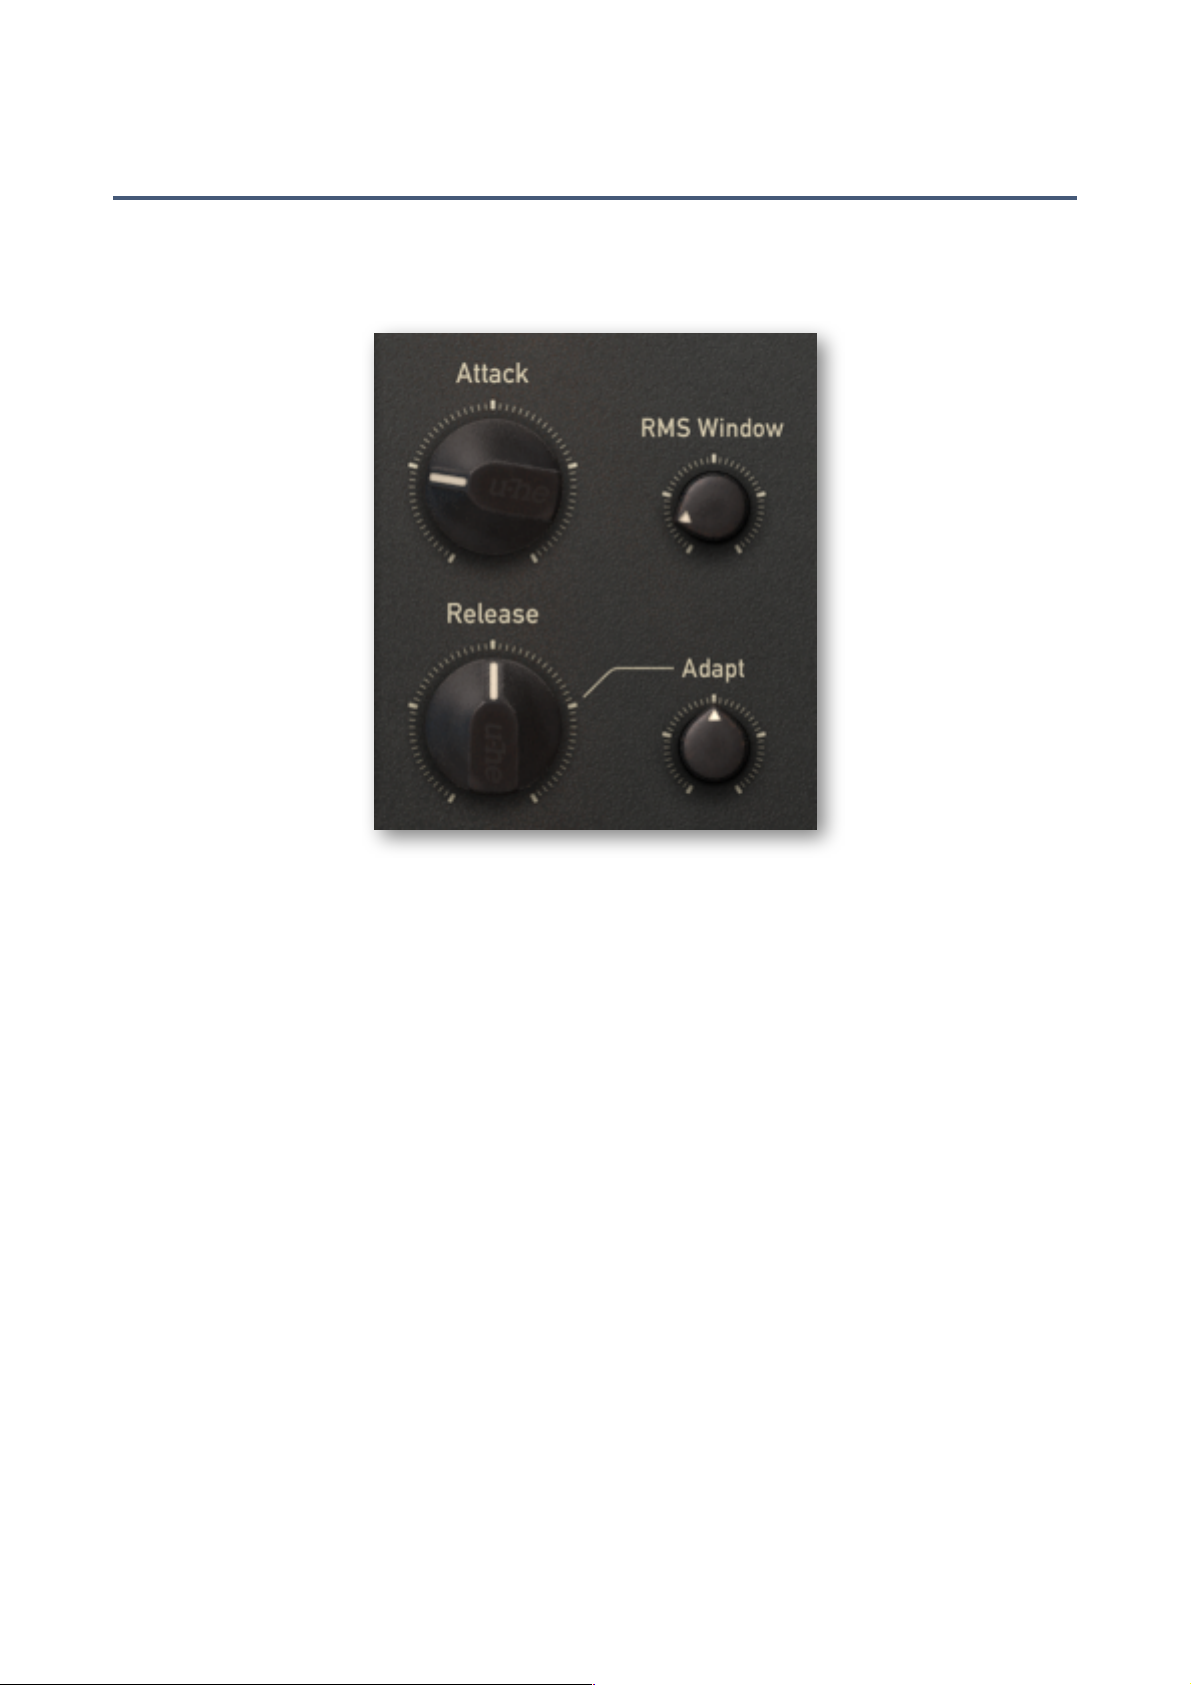
great with any settings by including algorithms that automatically ‘ride’ the audio and adjust various parameters. We didn’t take the idea too far, though – you can still control the following:
-
Attack: the time it takes for gain reduction to take ‘full’ effect (typically 90%). Short attack
times make compression kick in almost instantaneously, but to keep the sound natural, longer
times are allowed. Do you notice the smack of drums (or vocal plosives) when you increase the
attack just a little? With longer attack times, we recommend enabling DPR, as this usually delivers the most natural results."
-
Release: the time it takes to recover from compression, to about 63%. This is often a critical
setting when the audio material is complex. If Release is set too short, bass-heavy material will
distort. If set too long you will hear the famous/infamous pumping effect. "
-
Adapt: as finding the optimal release time can be tedious, allowing automatic adjustment is
often your best choice. This saves time while delivering pretty good results. Higher Adapt val-
ues mean a wider 'window' around the nominal release time. Short, percussive signals will lead
to shorter release times, while smooth passages will make recovery much slower."
-
RMS Window: RMS (Root Mean Square) is a common mathematical method for approximating how our ears perceive loudness. RMS Window adjusts the time allowed for sensing the incoming audio: At minimum RMS Window the behavior approaches ‘peak’ detection, since only
very few consecutive samples will fit into such a small window. The longer the window, the
more the ‘steady’ portion of the signal will be used."
For most material, values between 1 and 5 ms should be fine. Extremely short settings or instantaneous peak response can be used for limiting or for more ‘creative’ purposes. RMS Win-
dow greater than 10 ms can be used to emulate the lag of opto-electronic compression units,
and can help treat difficult material such as vocals or piano as naturally as possible."
TOC intro presets global chan views config | env s-chain sat mix 20
Page 21
CHANNEL PARAMETERS
Sidechain
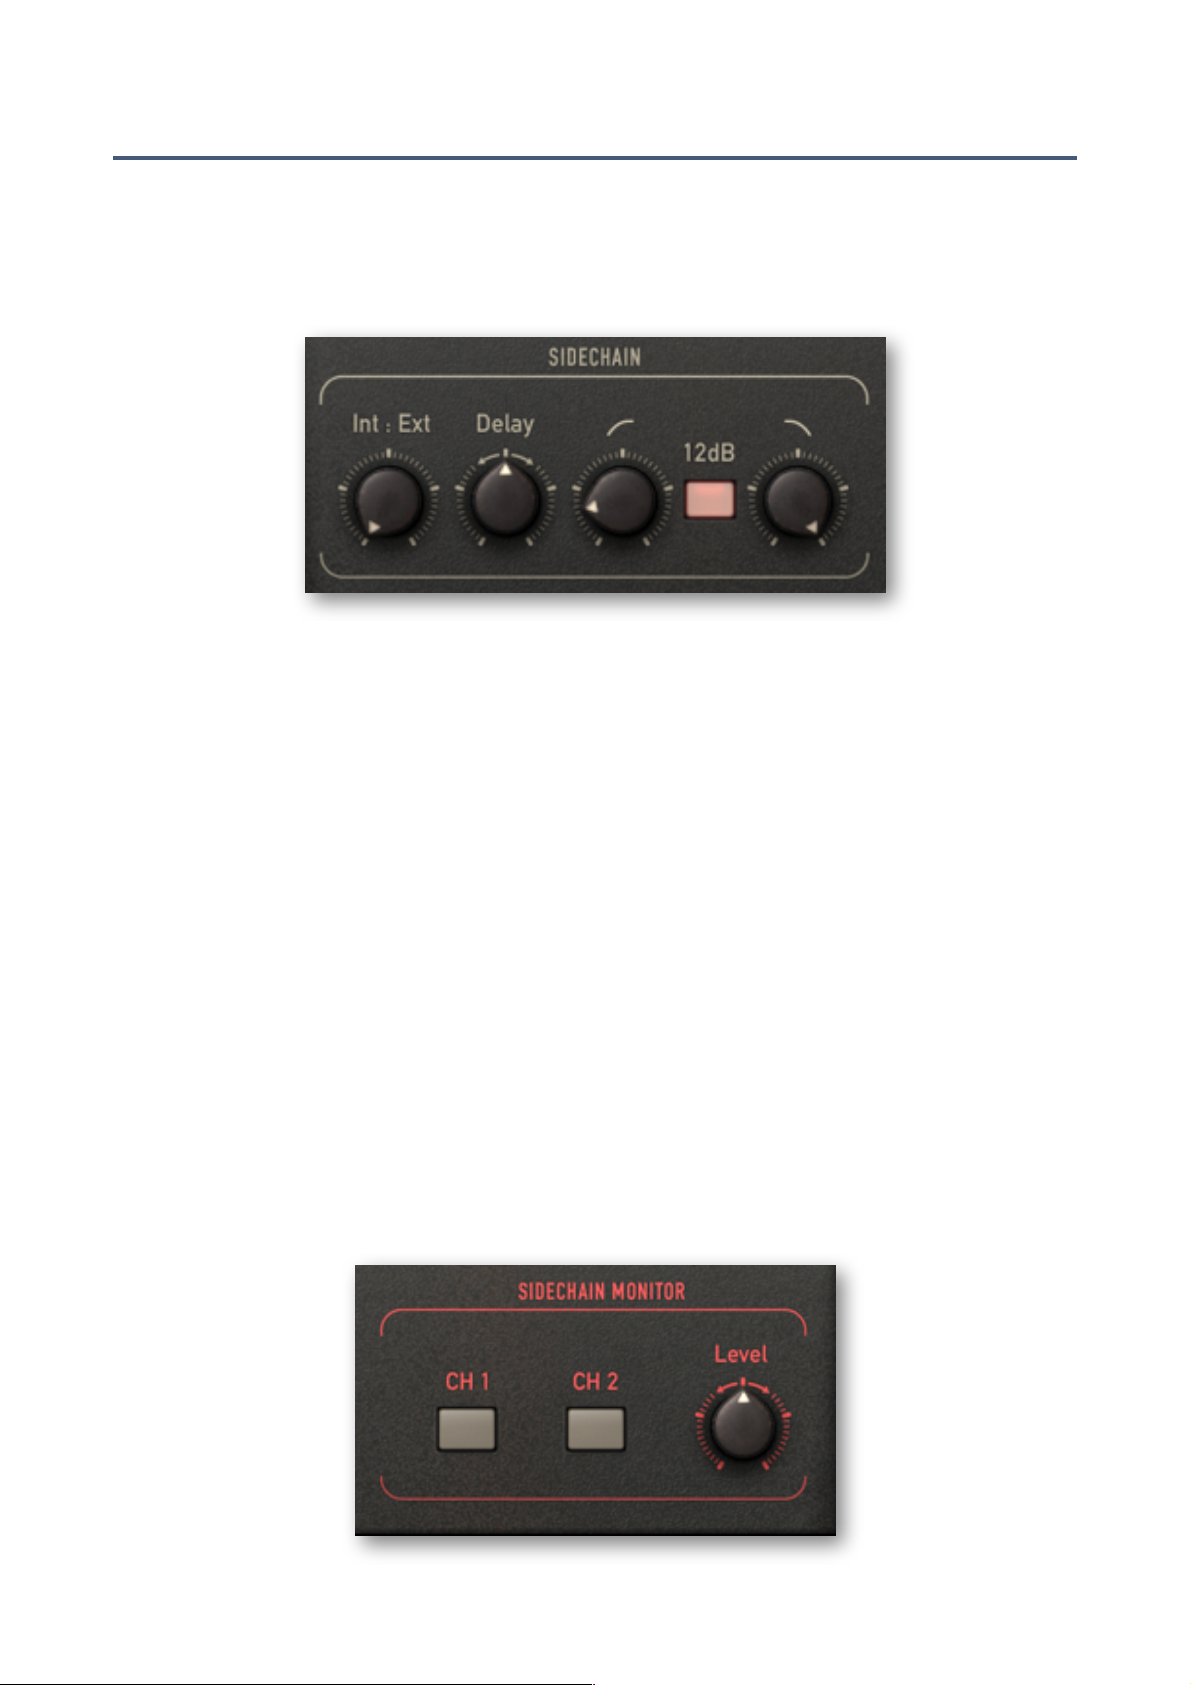
The Sidechain panel governs what the detector ‘sees’. The term ‘sidechain’ often refers to an external input on a compressor device: the external signal effectively takes control of the compression. Typical uses are 'ducking' the music whenever a DJ speaks, or having a drum track add
rhythm to a synth pad. Presswerk’s normal signal (internal = ‘Int’) as well as an external signal
(‘Ext’) can be balanced before sending the sum to the detector."
Important: Routing a sidechain signal into Presswerk requires that the host application actively
supports sidechaining – please consult the documentation that came with your DAW."
-
Int:Ext: this bipolar knob adjusts the balance between internal and external audio."
-
Delay: bidirectional time shift. Use negative values for traditional look-ahead sidechaining with
few transients, or positive values to delay the sidechain (usually results in more transients)."
Important: In most host applications, such adjustments are handled dynamically i.e. latency
compensation is updated in realtime. However, in certain hosts this only works when the transport status is switched. If you notice that your playback is misaligned after adjusting Presswerk's sidechain Delay, simply hit STOP or PAUSE, then PLAY."
-
Low Cut: gently cutting out the lower frequencies from the detection signal can add punch to
rhythmic material. It can make mixes louder and less prone to unwanted triggers."
-
12dB: the default slope of both filters is 6dB per octave – activating the 12dB button doubles
that value. A shallow slope is often better for a wide frequency transition / natural compression.
Steeper slopes isolate signals more ‘surgically’ and therefore require more careful adjustment."
-
High Cut: cutting mid to high-frequencies from the detection signal prevents spurious clicks
and other transients from triggering the compression."
A combination of low and high cut can narrow the sidechain down to a certain frequency range
e.g. in a de-esser, compression is only applied in the upper mids / treble."
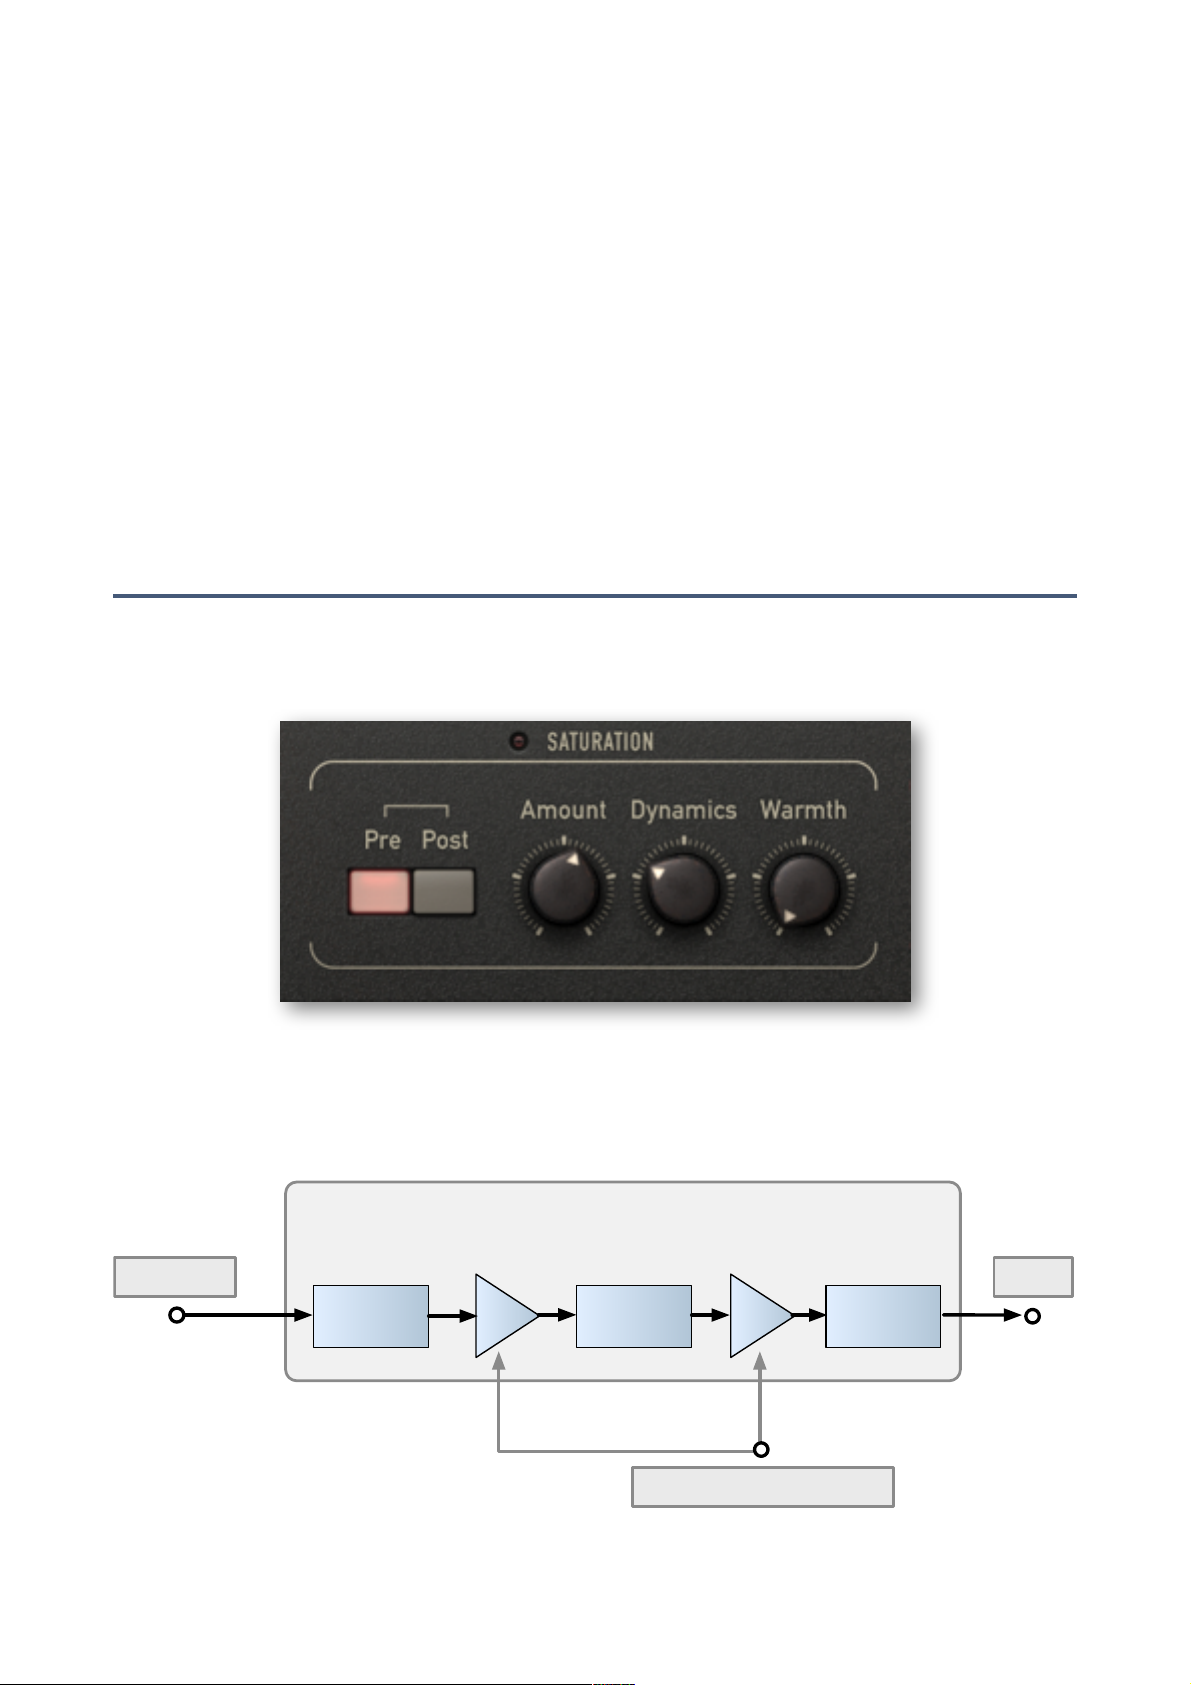
Sidechain Monitor
The controls in the sidechain monitor are used for auditioning the sidechain signal:"
TOC intro presets global chan views config | env s-chain sat mix 21
Page 22
CHANNEL PARAMETERS
Sidechain monitoring is useful in the following scenarios (for instance):"
-
The bass drum is used to slightly duck a sub-group of rhythm guitars, making them ‘breathe’ a
bit. Finding the optimum balance between the contribution of the internal and external signal to
the compression effect is easier if you can audition them separately."
-
The snare drum track contains too much bleed from the kick and cymbals to be compressed
cleanly, so the filters need to be adjusted with special care."
-
In M/S mode, precise adjustments need to be made independently for each channel."
Soloing a channel makes the signal appear as a mono sum in both outputs. The volume can be
adjusted using the Level knob. Like on most mixing desks, however, the solo buttons are additive
i.e. switching one on doesn’t automatically switch the other off. When both buttons are active, the
monitoring is practically 'solo in place', retaining the stereo position."
Active buttons flash as a constant reminder that you are only listening to the sidechain.
Saturation
We are leaving the realm of pure, transparent compression, and are now entering some serious
‘colouration’ territory here..."
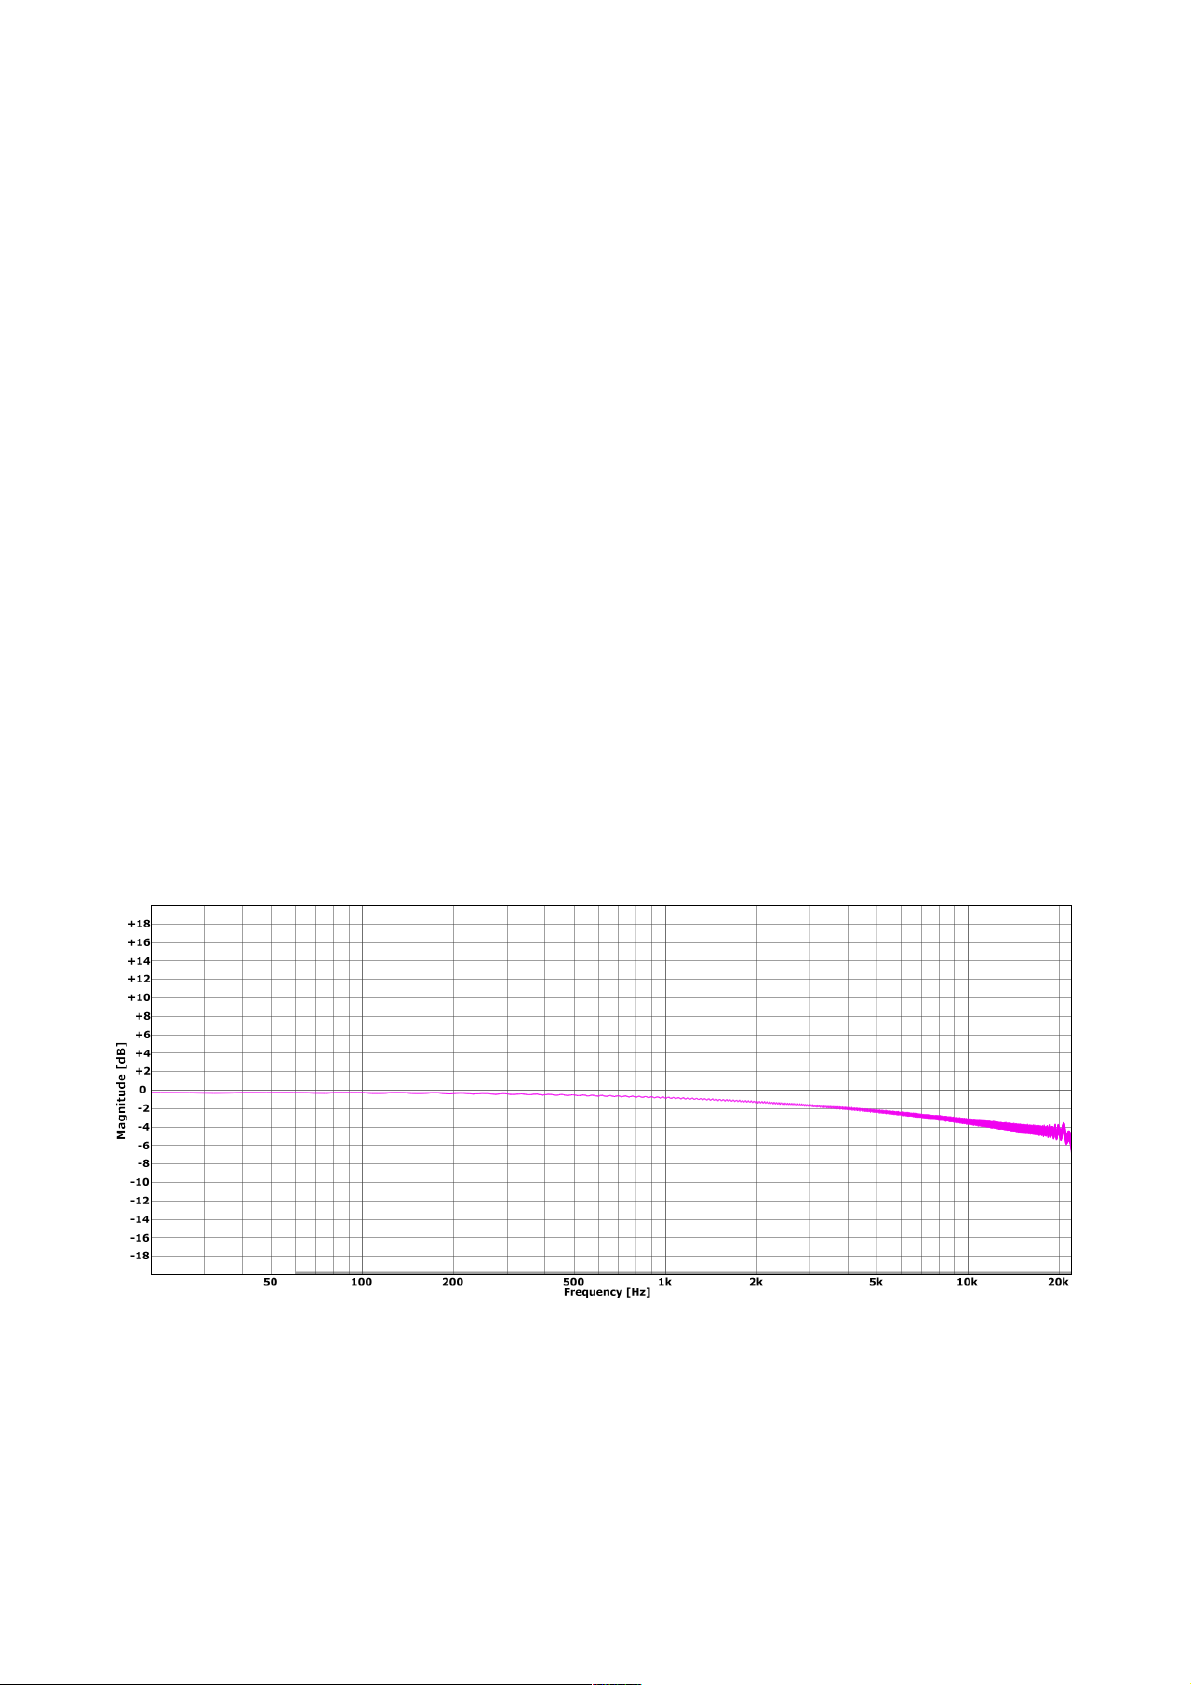
The saturation stage consists of a pre filter, a non-linear amplifier with distortion, and a post filter:"
TOC intro presets global chan views config | env s-chain sat mix 22
From VCA
Pre Filter Saturation Post Filter
To Mix
VCA VCA
Pre Gain Post Gain
Saturation / Warmth Processor (Post-Comp)
CV (from Gain Computer)
Page 23
CHANNEL PARAMETERS
In moderation, saturation can help tame any harsh transients or artifacts from the compression
process. It should also warm things up. We have control over the two most important factors
here: amplitude and frequency. Amplitude comes into play as non-linear amplification, either as a
static gain factor or as a user-definable amount of dynamic movement. Frequency comes into
play as the ability to saturate (i.e. distort) certain parts of the audio spectrum more than others."
-
LED: a small lamp to the left of the label indicates the amount of saturation."
-
Pre / Post: selects whether saturation happens before (pre) or after (post) compression."
-
Amount: a master gain control for the saturation stage. Turning Amount up overdrives the non-
linear amplifier, adding odd-numbered harmonics. This sounds similar to an overdriven ‘class
AB’ tube stage or an amp that uses FETs as its input transistors."
-
Dynamics: if set to minimum, amplification remains constant. When turned all the way up, the
Amount is multiplied by the inverse of the compressor's gain reduction – so extra saturation is
only generated if compression is actually happening."
-
Warmth: Shifts the energy towards the treble end of the spectrum – but this does not mean a
brighter sound. On the contrary, Warmth causes lower frequencies to be removed from the
saturation, so the treble will be saturated more strongly."
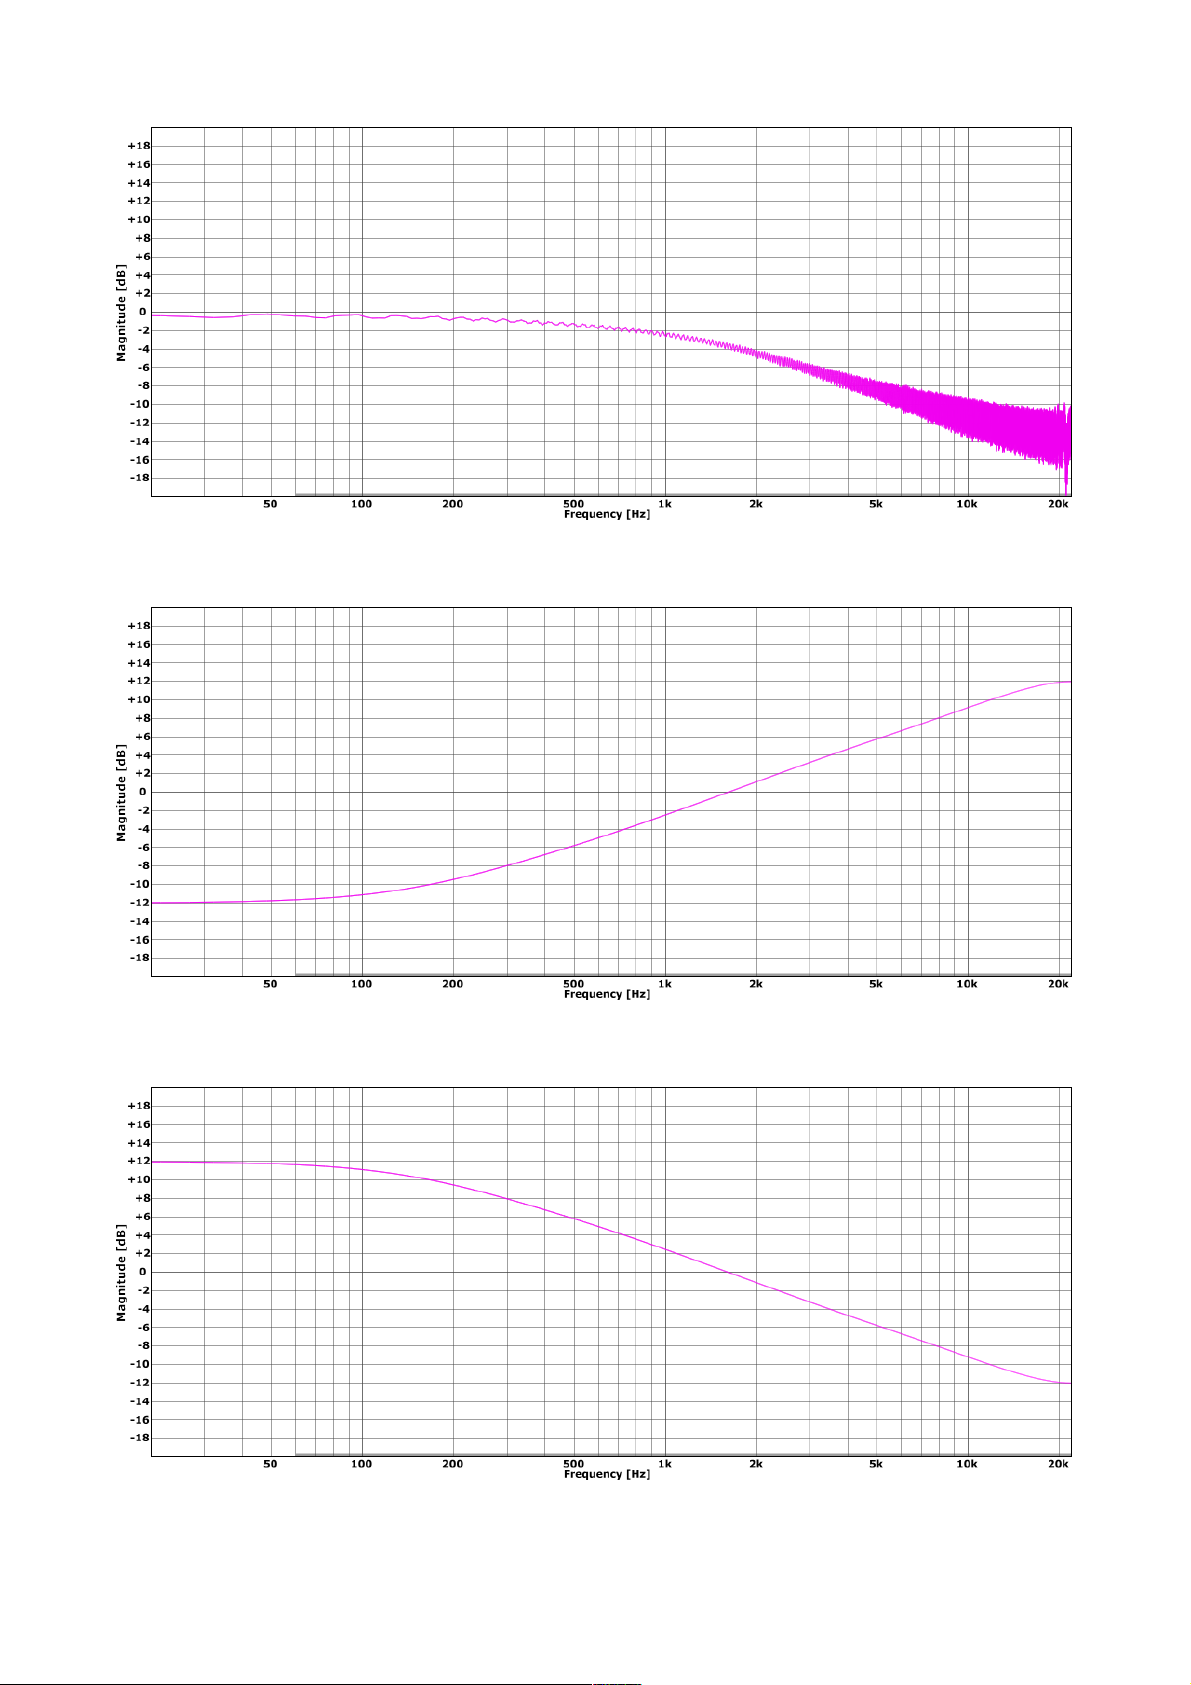
Warmth is a kind of tilt filter: After saturation, the inverse filter curve is applied so that the frequency response remains flat when Amount is at minimum. With Warmth turned up, the higher
the Amount (i.e. gain / distortion), the more the treble is squashed while low frequencies remain
intact. The result is like tape overdrive in that it removes harshness in a similar way."
Note: Adjusting saturation via Amount and Dynamics makes the compression effect more lively,
more organic. It’s actually quite easy to mimic the distortion behaviour of the FET-based voltage
dividers found in popular studio gear of the late 1960s."
Saturation amount +5dB combined frequency response
More plots on the next page...#
TOC intro presets global chan views config | env s-chain sat mix 23
Page 24
CHANNEL PARAMETERS
Saturation amount +15dB combined frequency response
Saturation pre-filter warmth +12dB
Saturation post-filter warmth +12dB"
TOC intro presets global chan views config | env s-chain sat mix 24
Page 25
CHANNEL PARAMETERS
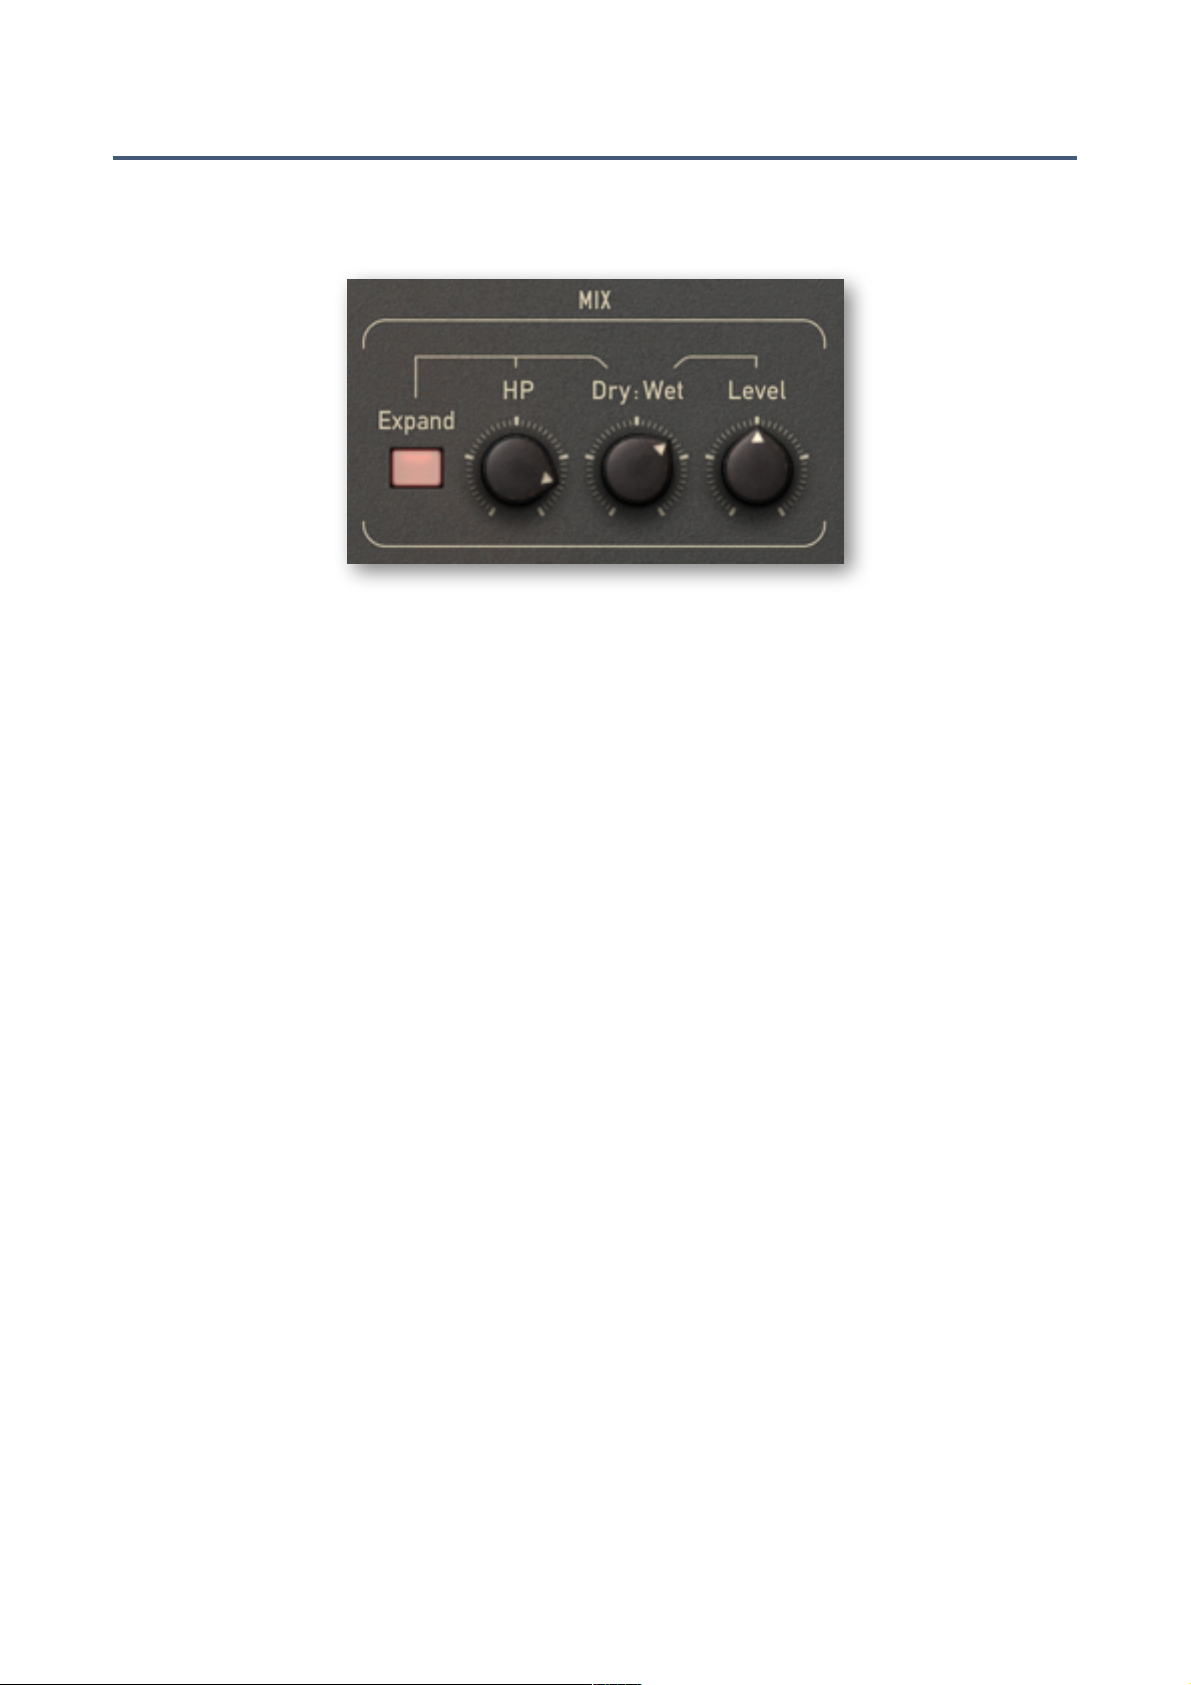
Mix
Presswerk is capable of parallel compression internally. Although it is generally used as an insert
effect, some of the untreated (dry) signal can be mixed in with the compressed signal..."
At first glance, mixing dry signal back in seems counterproductive. However, this is quite a popular trick as it keeps the dynamics fairly intact and makes the overall effect more transparent. Especially with ‘difficult’ audio material, parallel compression is often the key to achieving the most
natural-sounding result. As long as the untreated signal keeps everything pretty much in shape,
tracks can be compressed quite a lot."
Note: Some engineers compare parallel compression to upward compression – instead of attenuating everything above the threshold, everything below it is boosted."
The MIX controls are:"
-
Dry:Wet: cross-fade between untreated (dry) and compressed (wet) signal."
-
Level: a makeup control for the wet signal only."
-
HP: a high-pass filter applied to the dry signal. This adds a ‘freshener’ to the concept of parallel compression, and is great for signals that tend to lose clarity when heavily compressed. Try
this on vocals: Turn HP up quite high and use Dry:Wet to mix a bit of the high-pass filtered dry
signal back in. The voice should now sound more 'airy', as if it were processed with an ‘enhancer’."
-
Expand: when this is switched on, the dry signal is multiplied with the inverse gain reduction,
creating downward expansion and, at higher ratios, gating effects. In conjunction with the HP
filter, Expand can make the sound a lot more lively.#
TOC intro presets global chan views config | env s-chain sat mix 25
Page 26
VIEWS
Special Views
Presswerk is a typical u-he product in that it sounds great and is super-flexible. But now and
again you might prefer to have fewer ‘distractions’: Simpler panels with fewer controls, faster
workflow, signature sounds… that’s what Presswerk’s special views are all about."
It’s like having a bundle of different compressor plug-ins, except that you never need to swap
them out. You can check out the various compressor types by browsing the presets, or you can
initialize one of the special views and quickly dial in the settings to suit your track. And should you
ever need more detailed control, simply exit to the Main View by clicking on the ‘house’ icon."
IMPORTANT: While the Main View easily adopts all Special View settings when you exit, the other
way round i.e. switching from Main to Special wouldn’t work: Many of the parameter settings from
the Main View would get lost in the process. That’s why we decided to implement the special
views as initialization options… which makes switching back and forth conveniently impossible!"
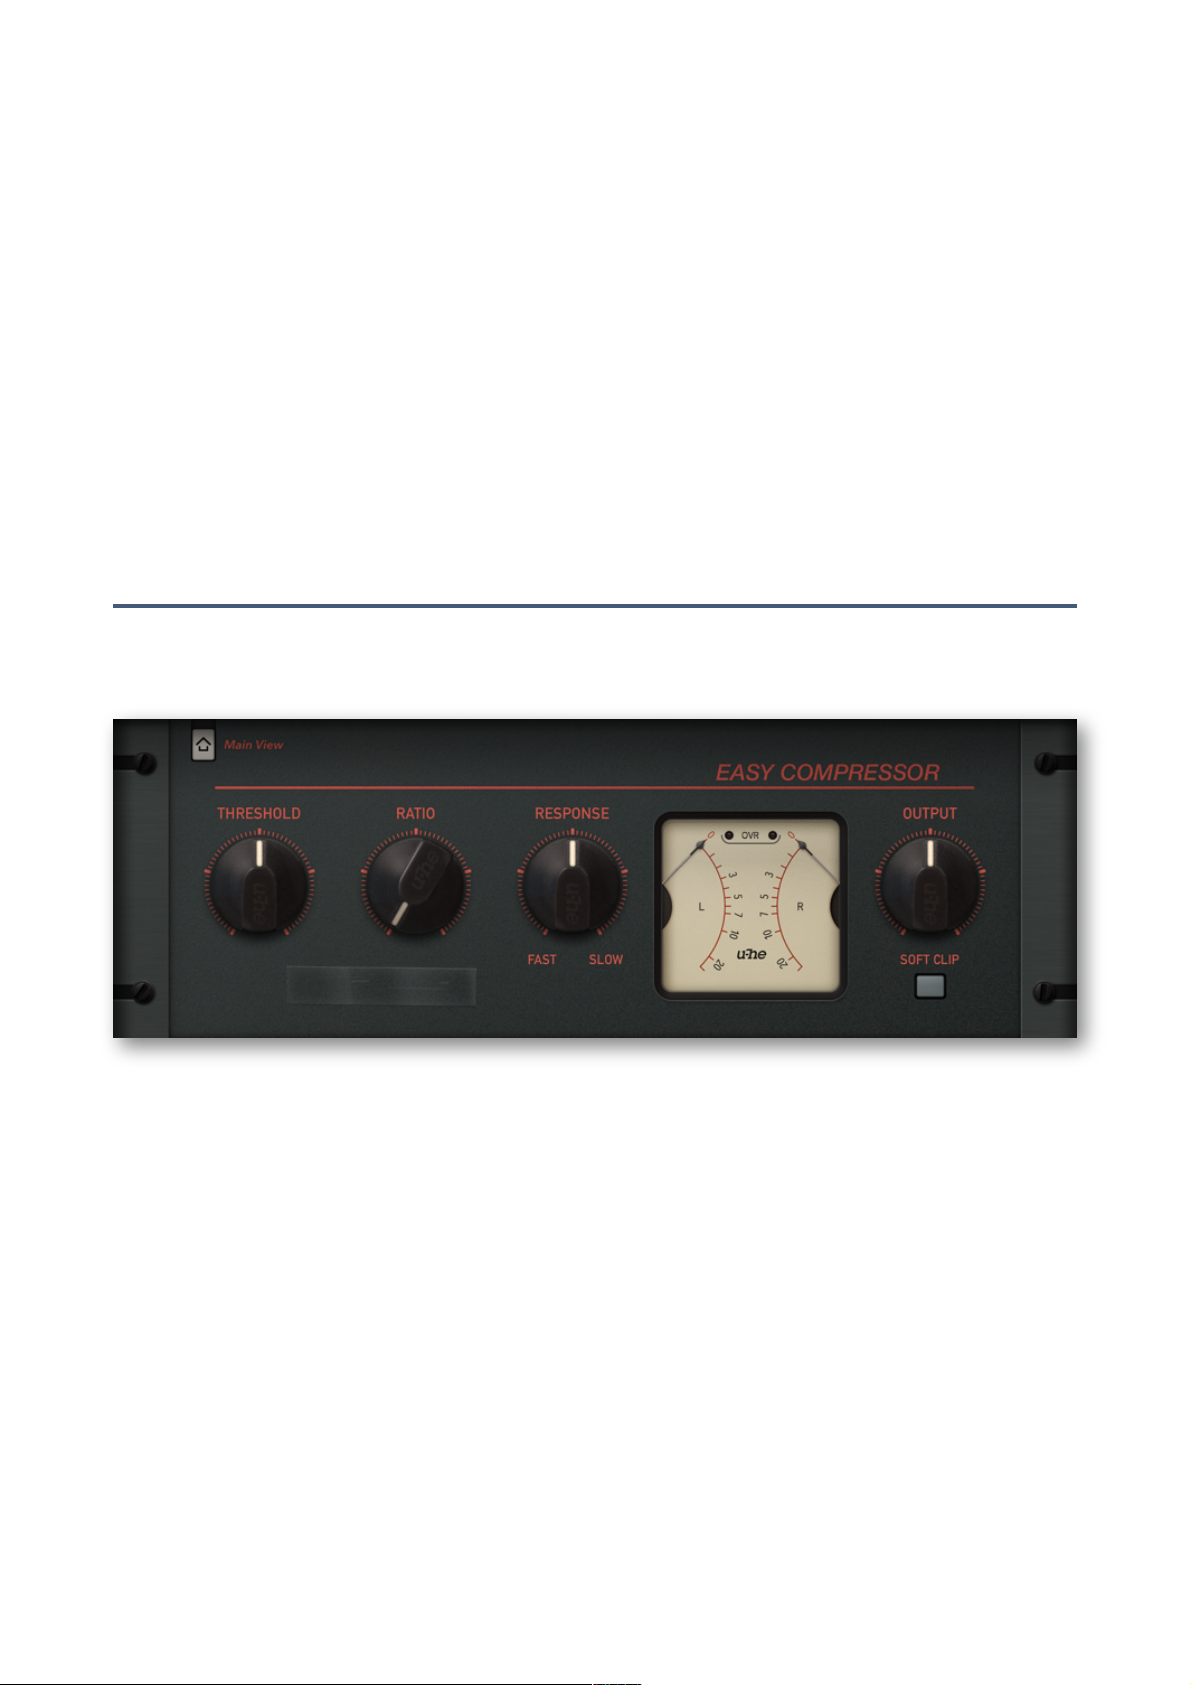
Easy Compressor
As the name suggests, this general-purpose option is probably the best choice if you just want to
even out the dynamics of an instrumental track for a more compact sound…"
While THRESHOLD and RATIO are also available in this view, a RESPONSE knob replaces the
more common pair of Attack and Release knobs, which can be difficult to balance."
A fast Response means that the plugin not only catches up quickly with transients, but also recovers quickly. Conversely, a slow Response setting allows for more time to pass before anything
happens, and recovery is also relatively slow. The Easy Compressor comes with a fairly short detection window and a good portion of 'adaptive release', which minimizes unwanted amplitude
ripple and/or intermodulation artifacts when the Response is set very fast."
An optional SOFT CLIP gently limits strong output signals, thus avoiding digital clipping."
Although the Easy Compressor is suitable for any kind of audio material, we found it particularly
good on electric guitars and basses!#
TOC intro presets global chan views config | easy voc drm bus m/s lim 26
Page 27
VIEWS
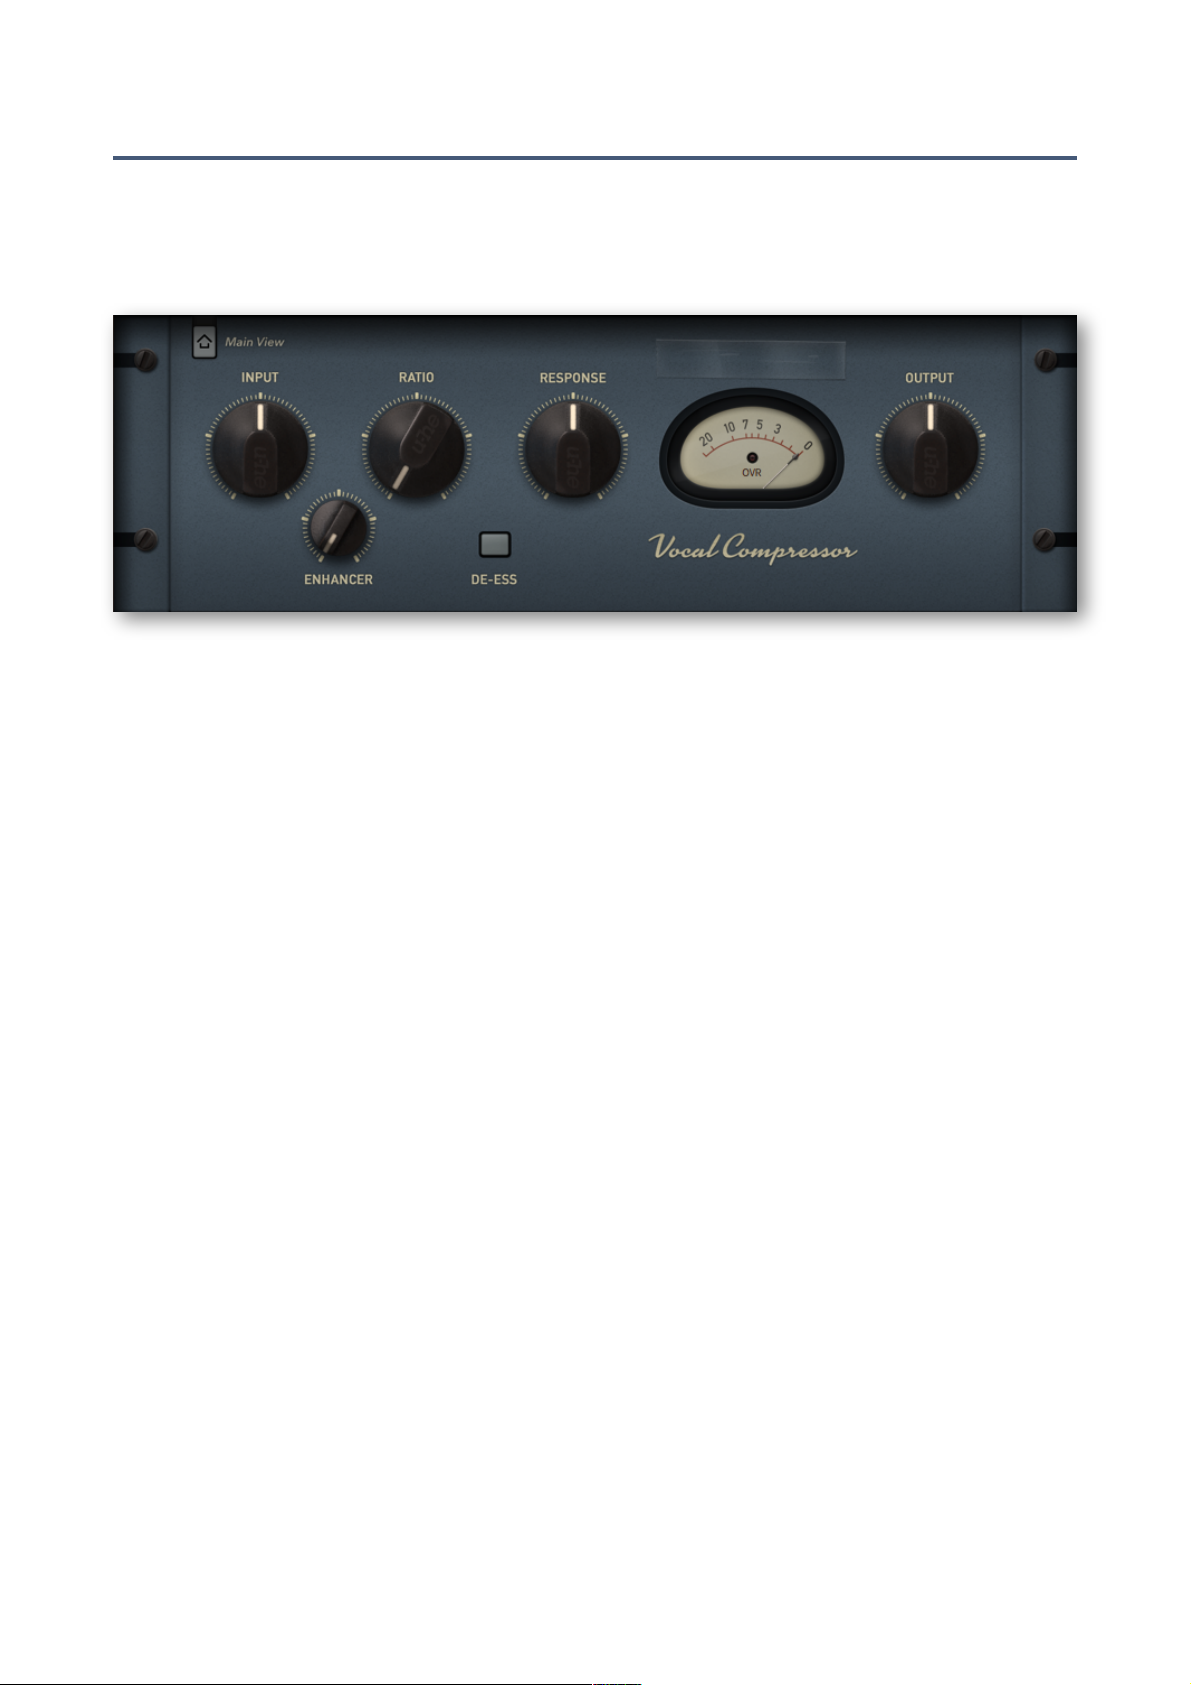
Vocal Compressor
The ideal compressor for even, powerful vocal dynamics should have as few controls as possible
and plenty of automatic behaviour. Adjusting a voice manually is a delicate task, it is often a game
of hit-and-miss. So, like in the Easy Compressor, we simplified attack and release by combining
them in a single ‘musical’ RESPONSE control aimed chiefly towards vocal compression."
The compression threshold is internally fixed so the INPUT knob is used to drive the compression
process directly as well as for easily setting up operation levels. Unlike the Easy Compressor, the
compression RATIO can be adjusted manually."
We also added an ENHANCER control. This blends in a highpass filtered version of the dry input
signal with the processed part, so that even highly-compressed vocals will stay clear and 'airy'."
The whole compressor can be switched into a DE-ESS mode at the push of a button: The detection circuit then reacts mainly to sibilant frequencies (‘s’ sounds, upper mids / treble).#
TOC intro presets global chan views config | easy voc drm bus m/s lim 27
Page 28
VIEWS
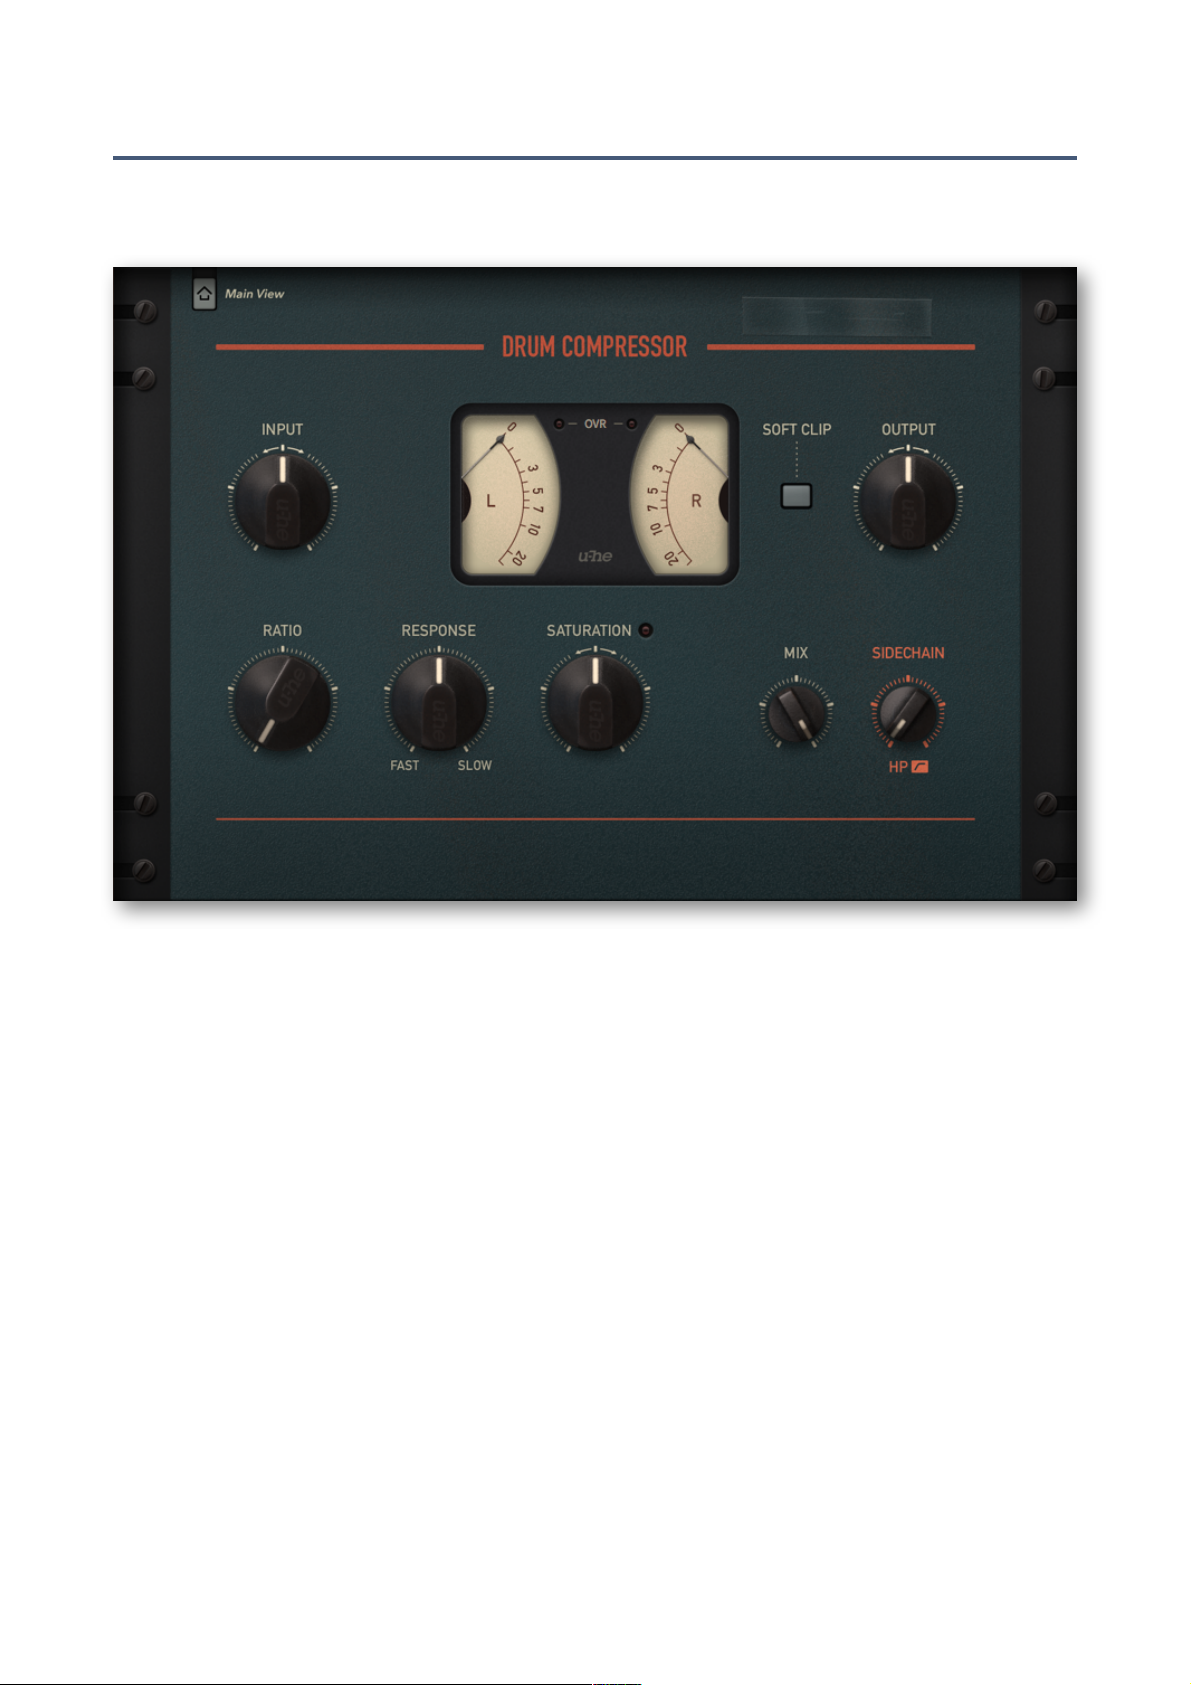
Drum Compressor
A good drum compressor always needs two characteristics: First, it must be lively and responsive. Second, it must be able to give you lots of coloration, and fatness as fast as you want it!"
Set at a fixed threshold, the Drum Compressor view’s INPUT knob governs the overall signal level
as well as the point where compression starts to kick in. "
Use the RATIO control to dial in ‘how much’. Notice how the audio is slammed way down, with
the gain reduction meters bouncing all the way but without causing any break up."
The RESPONSE and SATURATION can be adjusted to seriously thicken up your drums, making
them ‘smack’ and ‘bite’."
Using the SIDECHAIN filter control to take the low end out of the detection creates some extra
oomph for e.g. kicks and overhead or room microphones."
An optional SOFT CLIP gently limits strong output signals, thus avoiding digital clipping."
For some of that New York flavour, try bringing a bit of the direct signal back in by backing off the
MIX value: The transients should stay mostly intact while all that lovely ambience, rumble and
noise are greatly accentuated.#
TOC intro presets global chan views config | easy voc drm bus m/s lim 28
Page 29
VIEWS
Bus Compressor
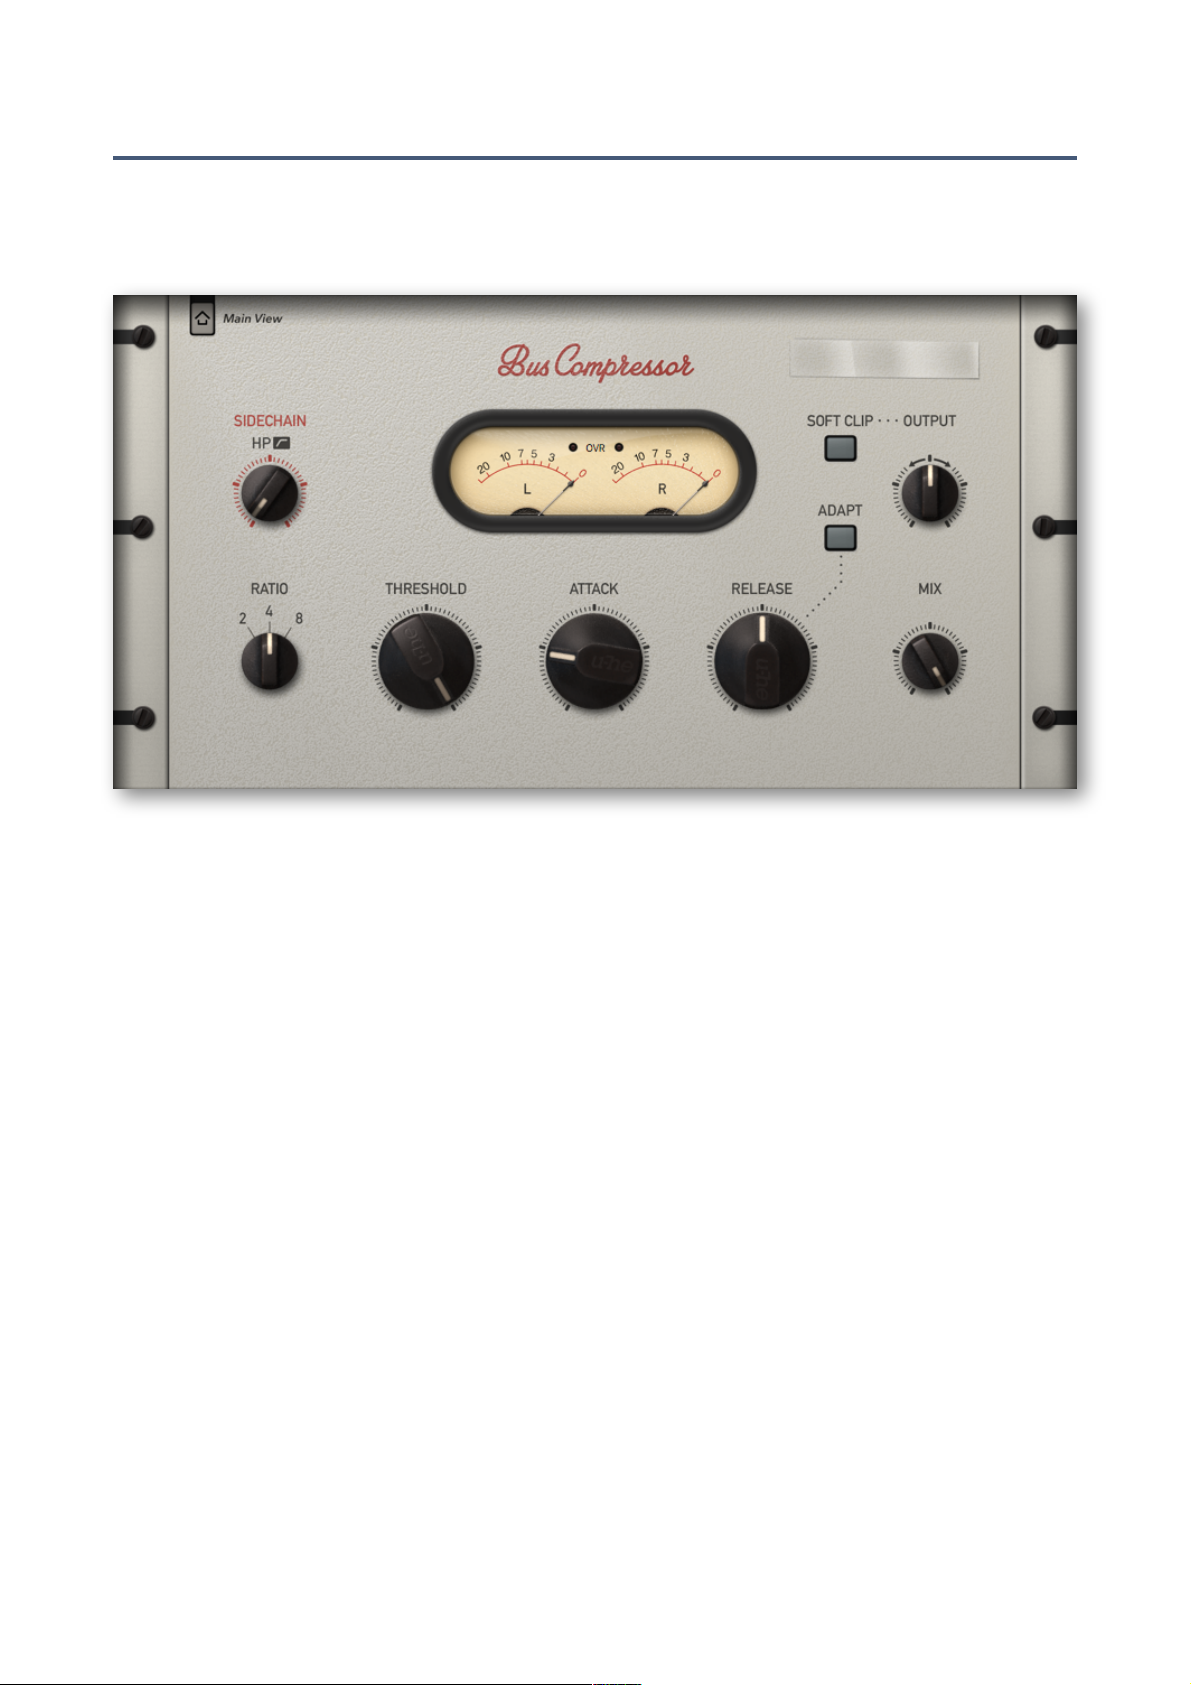
The Bus Compressor offers a similar feature set to the Drum Compressor. Possible applications
also include drums, but this View was tailored to suit complex bus or group material – to deliver
that oft sought-after 'glue'!"
However, the Bus Compressor sounds less aggressive, more neutral than the Drum Compressor.
This view gives you regular access to the ATTACK and RELEASE parameters, which are often
necessary for more complex signals."
An optional SOFT CLIP gently limits strong output signals, thus avoiding digital clipping."
The ADAPT button switches adaptive release on. When active, a modicum of automatic behaviour
helps you get even difficult material sitting well, while still giving you enough manual control over
the envelope."
The RATIO is selectable in three steps, which covers all practical settings for this model and gets
you ‘on track’ very quickly."
TOC intro presets global chan views config | easy voc drm bus m/s lim 29
Page 30
VIEWS
M/S Program Compressor
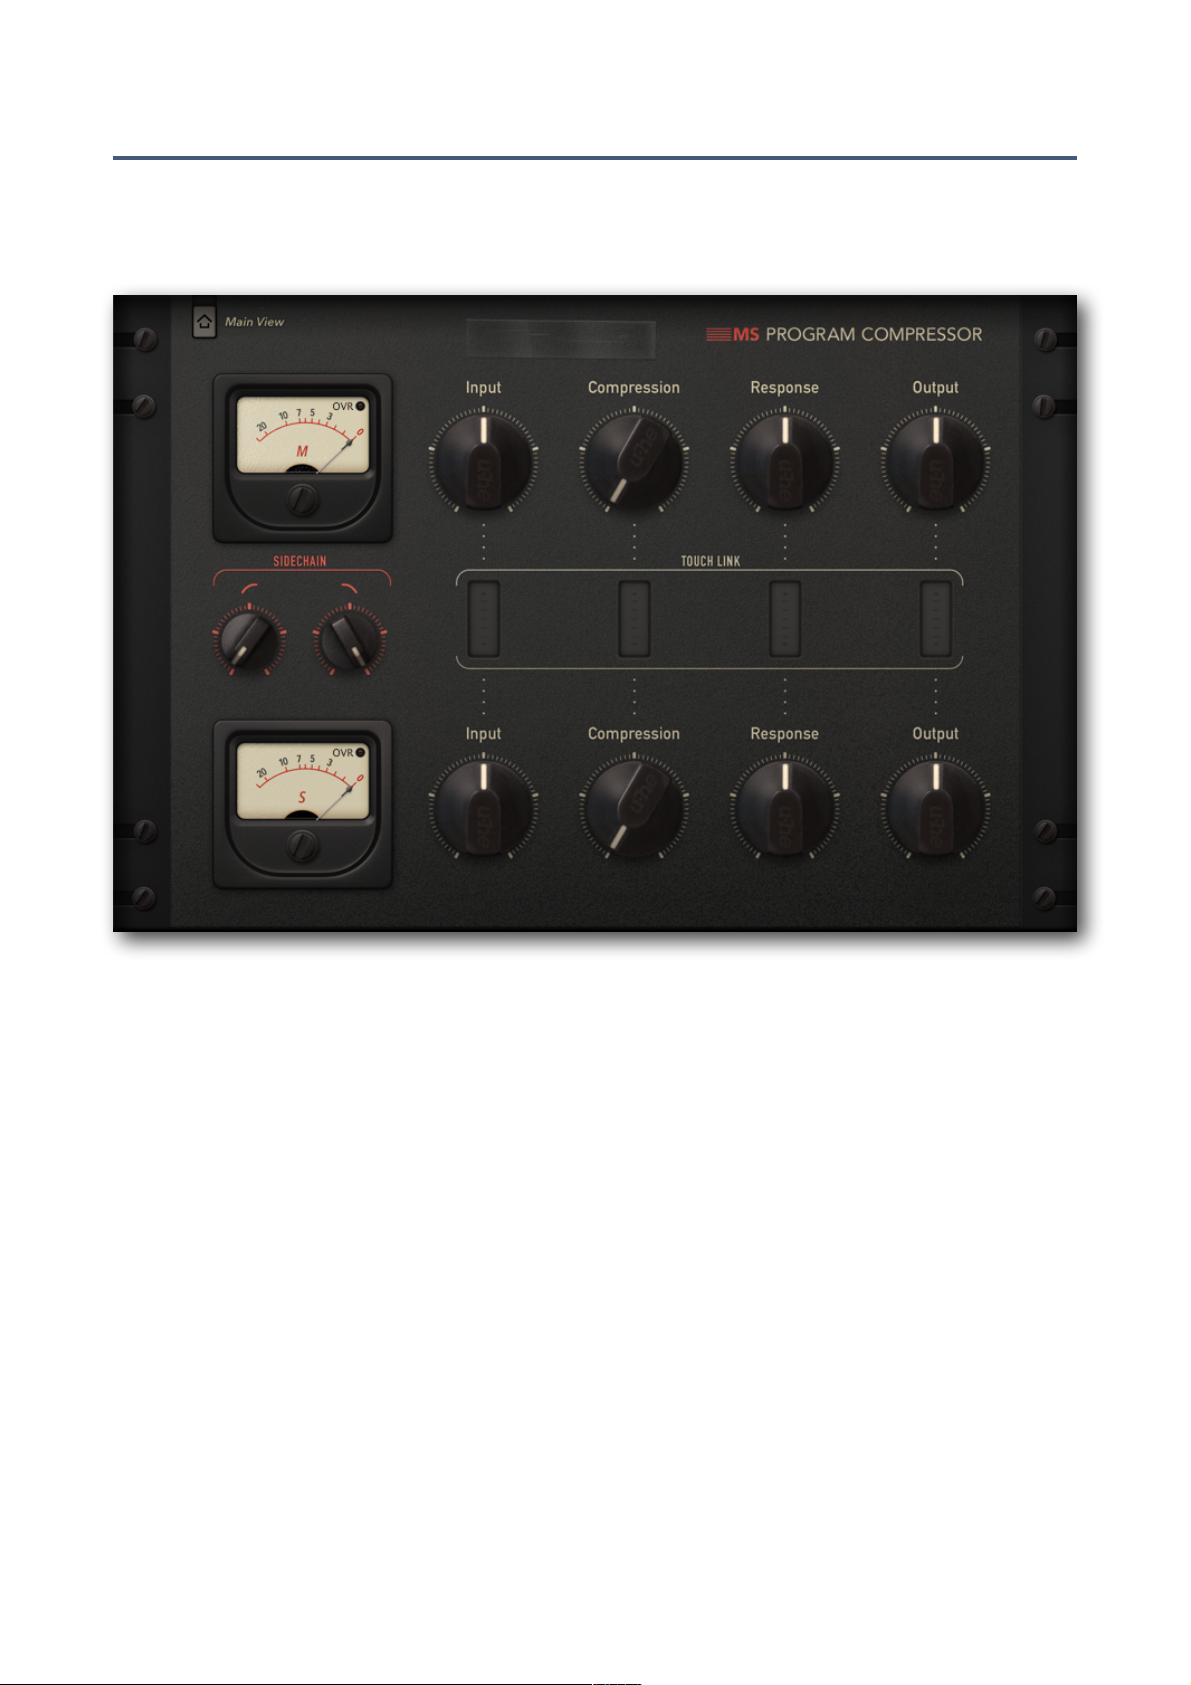
While all the other special views offer a single set of parameters for both channels, the M/S view
provides two sets of controls. It is aimed at independent manipulation of mid- and side-signal information of a stereo source."
In the hands of a skilled audio engineer, M/S processing is a powerful tool. It requires a certain
degree of background knowledge and practice. With Presswerk's M/S Program Compressor view,
however, it all becomes so much easier…"
There are no Threshold or Ratio controls here. Use the Input knobs to set up a basic level, then
tweak the Compression (which adjusts both traditional parameters at once)."
Once again, Response combines Attack and Release in a single control, making adjustments to
the envelope a breeze."
The Sidechain filter control actual processes the two channels independently, although you only
see a combined set of knobs."
The rectangular TOUCH LINK pads between the upper and lower row of knobs are for controlling
both channels at the same time. The knobs above and below are ganged together while the difference between the two values is retained. To move in opposite directions, hold [Cmd] (Mac) or
[Ctrl] (Windows) before clicking on the pad.#
TOC intro presets global chan views config | easy voc drm bus m/s lim 30
Page 31
VIEWS
Limiter
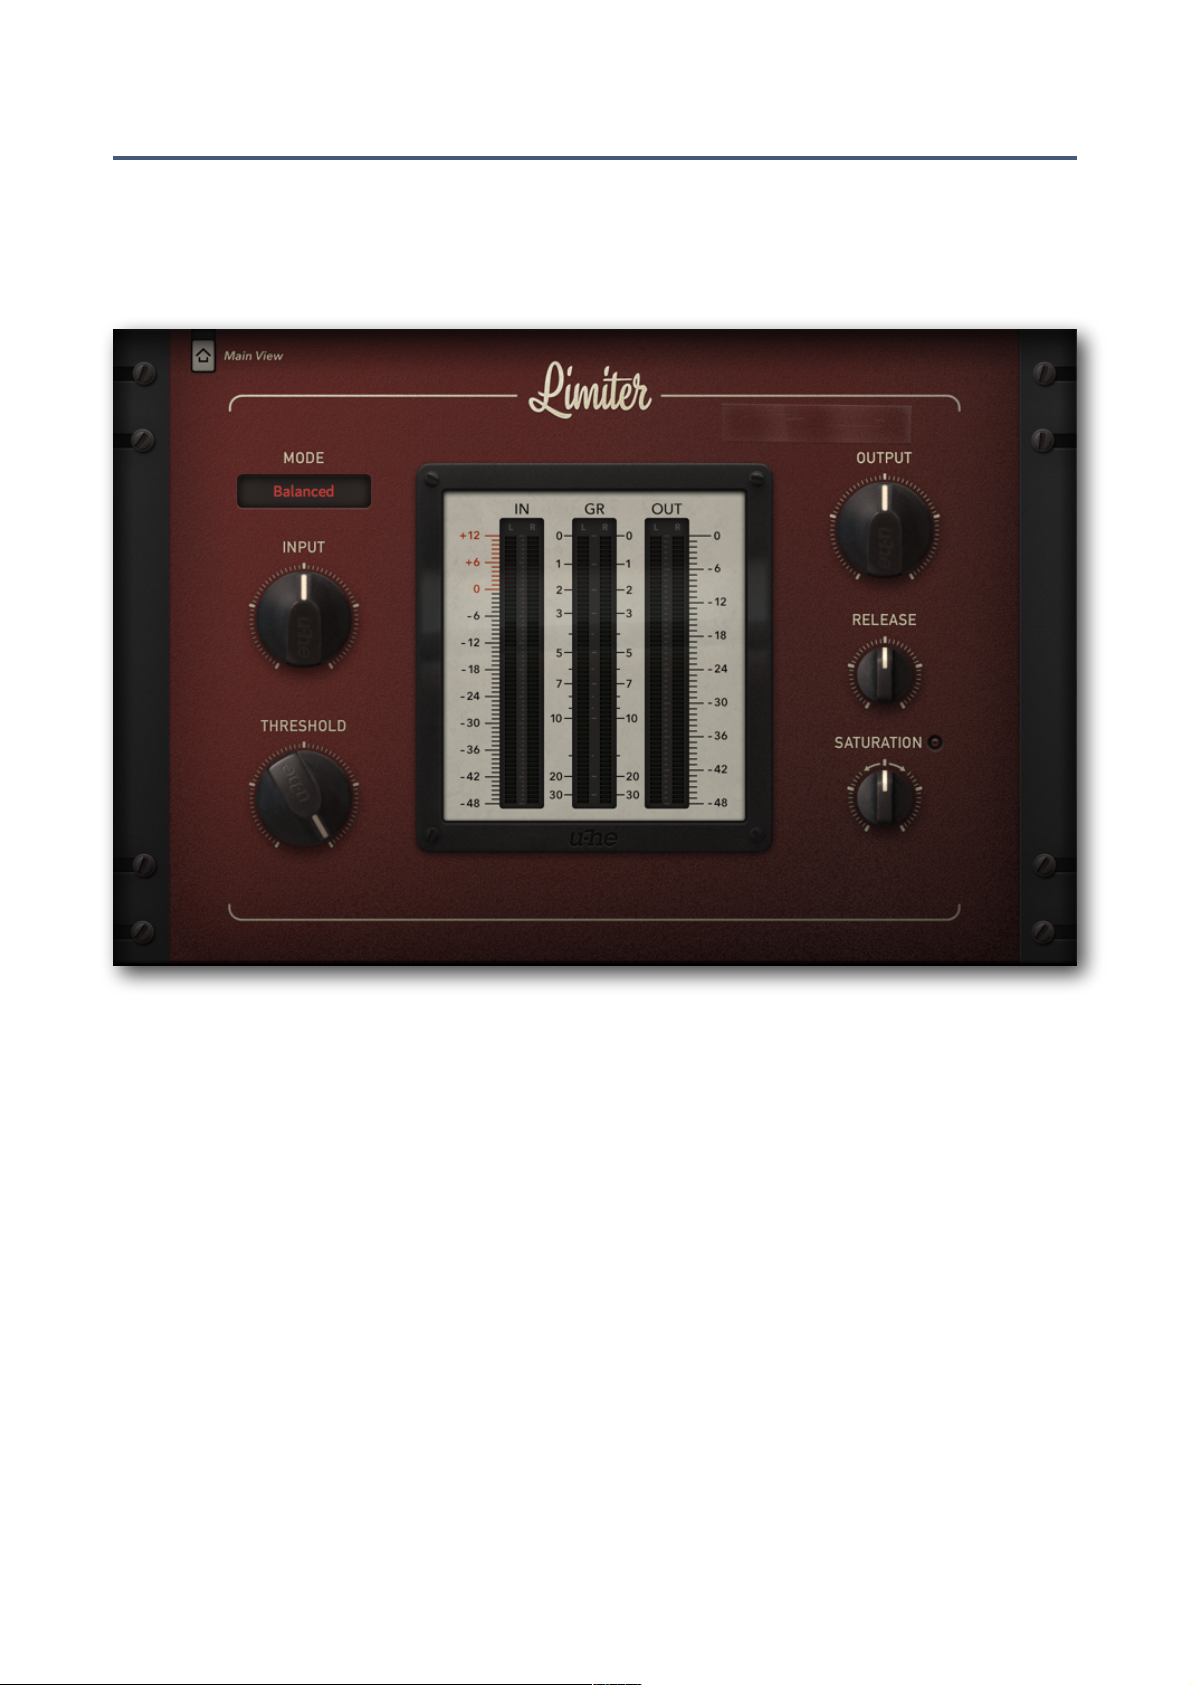
Setting up Presswerk as a sum / master brickwall limiter is not the easiest of jobs. Such a process
is very delicate in terms of transient control, audible distortion as well as envelope smoothness.
But with the dedicated Limiter view, we think we nailed it. Use this one just like any brickwall limiter unit: Kick it, make it loud!"
Three modes give you access to three distinct flavours: "
'Smooth' uses enough look-ahead (1.25 ms) to catch up with fast transients, and an overall
smooth release envelope behaviour. Distortion is minimum with this mode."
'Punchy' is quite the opposite with a very short (0.35 ms) look-ahead, longer attack (0.2ms) and
DPR switched on. It lets some transients slip through the limiting process (to be fed to the clipping stage) and recovers much faster than Smooth mode. Bass frequencies are pronounced."
'Balanced' is a healthy compromise between these two, and is probably the best mode to start
with for most sources. No DPR."
Tip: Use THRESHOLD to set the point where you want limiting to start. Notice how the output
volume rises by the same amount. Also note how the gain-reduction meters drop accordingly:
The meter action is a function of limiting, but also shows any additional SATURATION."
Watch out that you don’t overdo brickwall limiting. Although it creates minimum artifacts, this view
can easily push things into ‘insanely loud’ territory!#
TOC intro presets global chan views config | easy voc drm bus m/s lim 31
Page 32
CONFIGURATION
Configuration
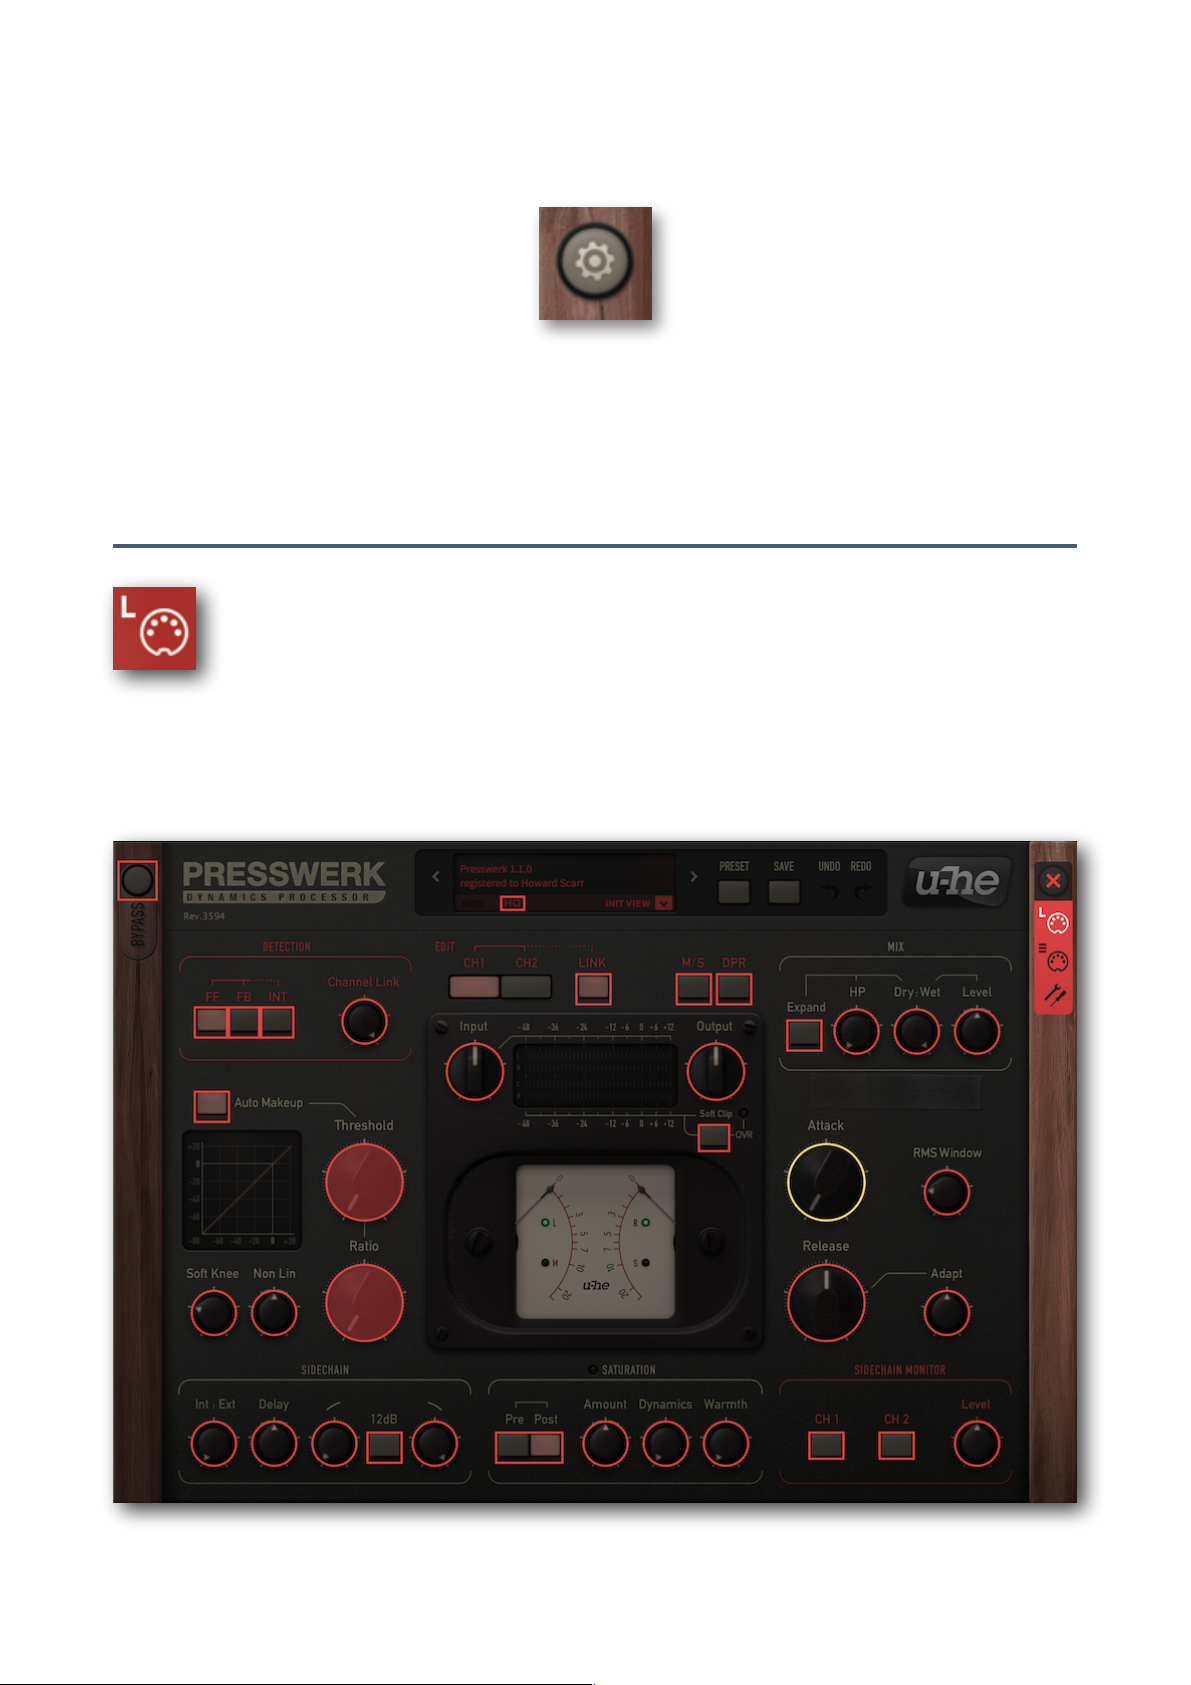
The cogwheel button at the top of the righthand side-panel is your entrance to the global configuration pages, which let you adjust the window size and brightness as well as almost all of Presswerk’s parameters via MIDI remote control. A row of selectors appears for MIDI Learn [L], MIDI
Table [≣], Preferences [tools] and Close [X]."
MIDI Remote Control
MIDI Learn
This page lets you assign MIDI CC (‘control change’) to individual parameters. The CC data can
be generated by hardware knobs / sliders, or from tracks in the host application. For how to route
MIDI data into effect plug-ins, please refer to the documentation of your host application. "
To open the MIDI Learn page, click on the [L] button. The Main view should look like this:"
the Configuration / MIDI Learn page of the Main view"
TOC intro presets global chan views config | MIDI-control preferences 32
Page 33
CONFIGURATION
The window is a dark translucent overlay with all MIDI-learnable elements appearing as selectable
outlines. Those that are already connected are filled (like two of the knobs in the above image),
and the currently active control i.e. the one ready to be MIDI-learned is highlighted."
Try it: Click on the Attack knob so that it becomes highlighted, then send Presswerk some MIDI
CC data – wiggle a knob or slider on your MIDI controller to make the assignment. If you don’t
want to keep the new CC connection, double-click on the knob to remove it."
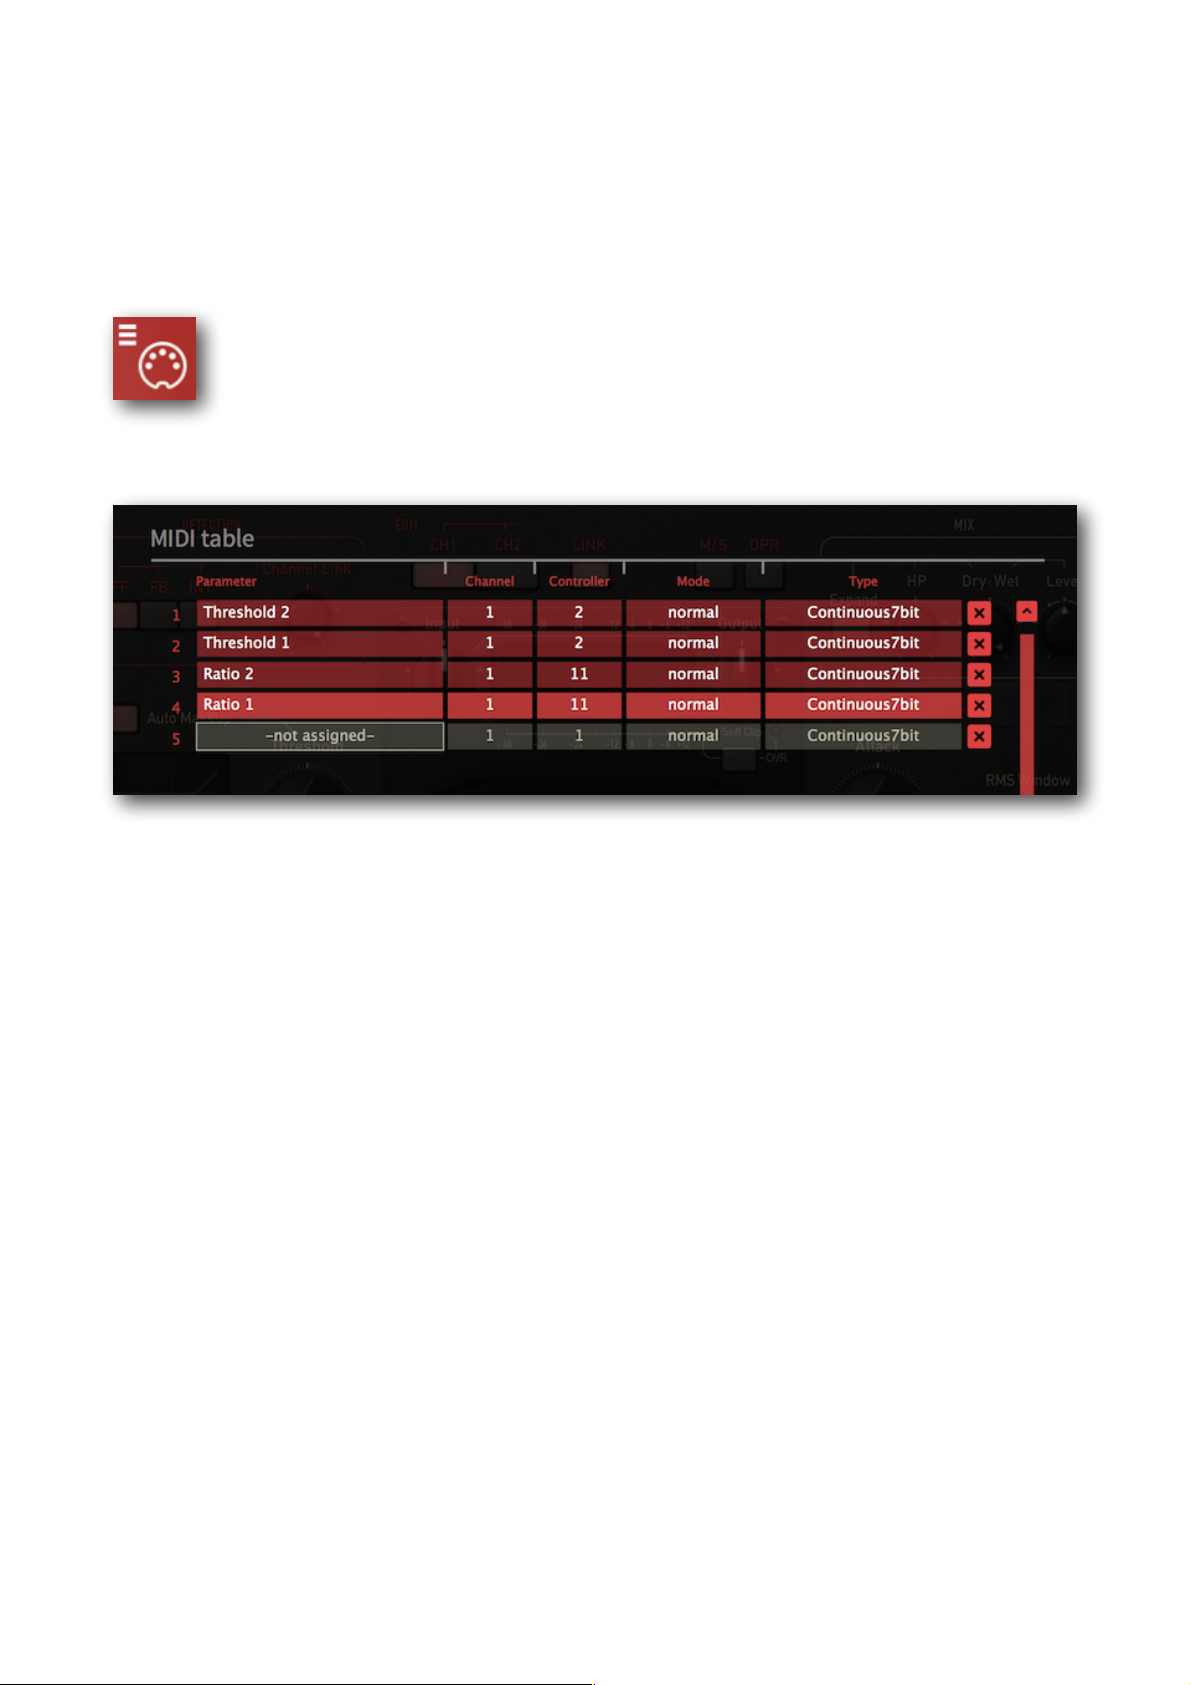
MIDI Table
This page not only lets you define MIDI CC assignments ‘manually’, but also lets you specify a
few details about the type of hardware control Presswerk should expect:"
The Parameter field shows the assigned parameter. Click to select a different one. "
At the bottom of the list is an experimental feature you should try: Select Last Clicked Control, enter the number of an unused controller your hardware can send and exit the configuration pages.
The most recently clicked knob or switch will now respond to that CC. The Fine option is similar,
but with a significantly reduced range."
The Channel and Controller fields specify the MIDI channel (1 to 16) and CC number (0-127)."
The Mode setting specifies the range and/or resolution of values… "
-
normal$ full range, continuous"..........................
-
integer$ full range, whole numbers only"..........................
-
fine$ 0.01 steps between the two integers closest to the current value"................................
… and Type specifies the type of hardware (by far the most common is Continuous 7-bit)"
-
Encoder127$ unipolar encoder"...............
-
Encoder64$ bipolar encoder"..................
-
Continuous7bit$ 7-bit MIDI CC (normal resolution, common)".........
-
Continuous14bit$ 14-bit MIDI CC (high resolution, rare)".......
Adding more assignments
Either MIDI-learn them as described above, or click on the Add button at the bottom of the window then select the Parameter, Channel etc. from the options lists."
Removing assignments
Individual assignments can be removed by clicking on the small [x] to the right of each line. To
remove all assignments at once, click on the Delete All button at the bottom of the window.#
TOC intro presets global chan views config | MIDI-control preferences 33
Page 34
CONFIGURATION
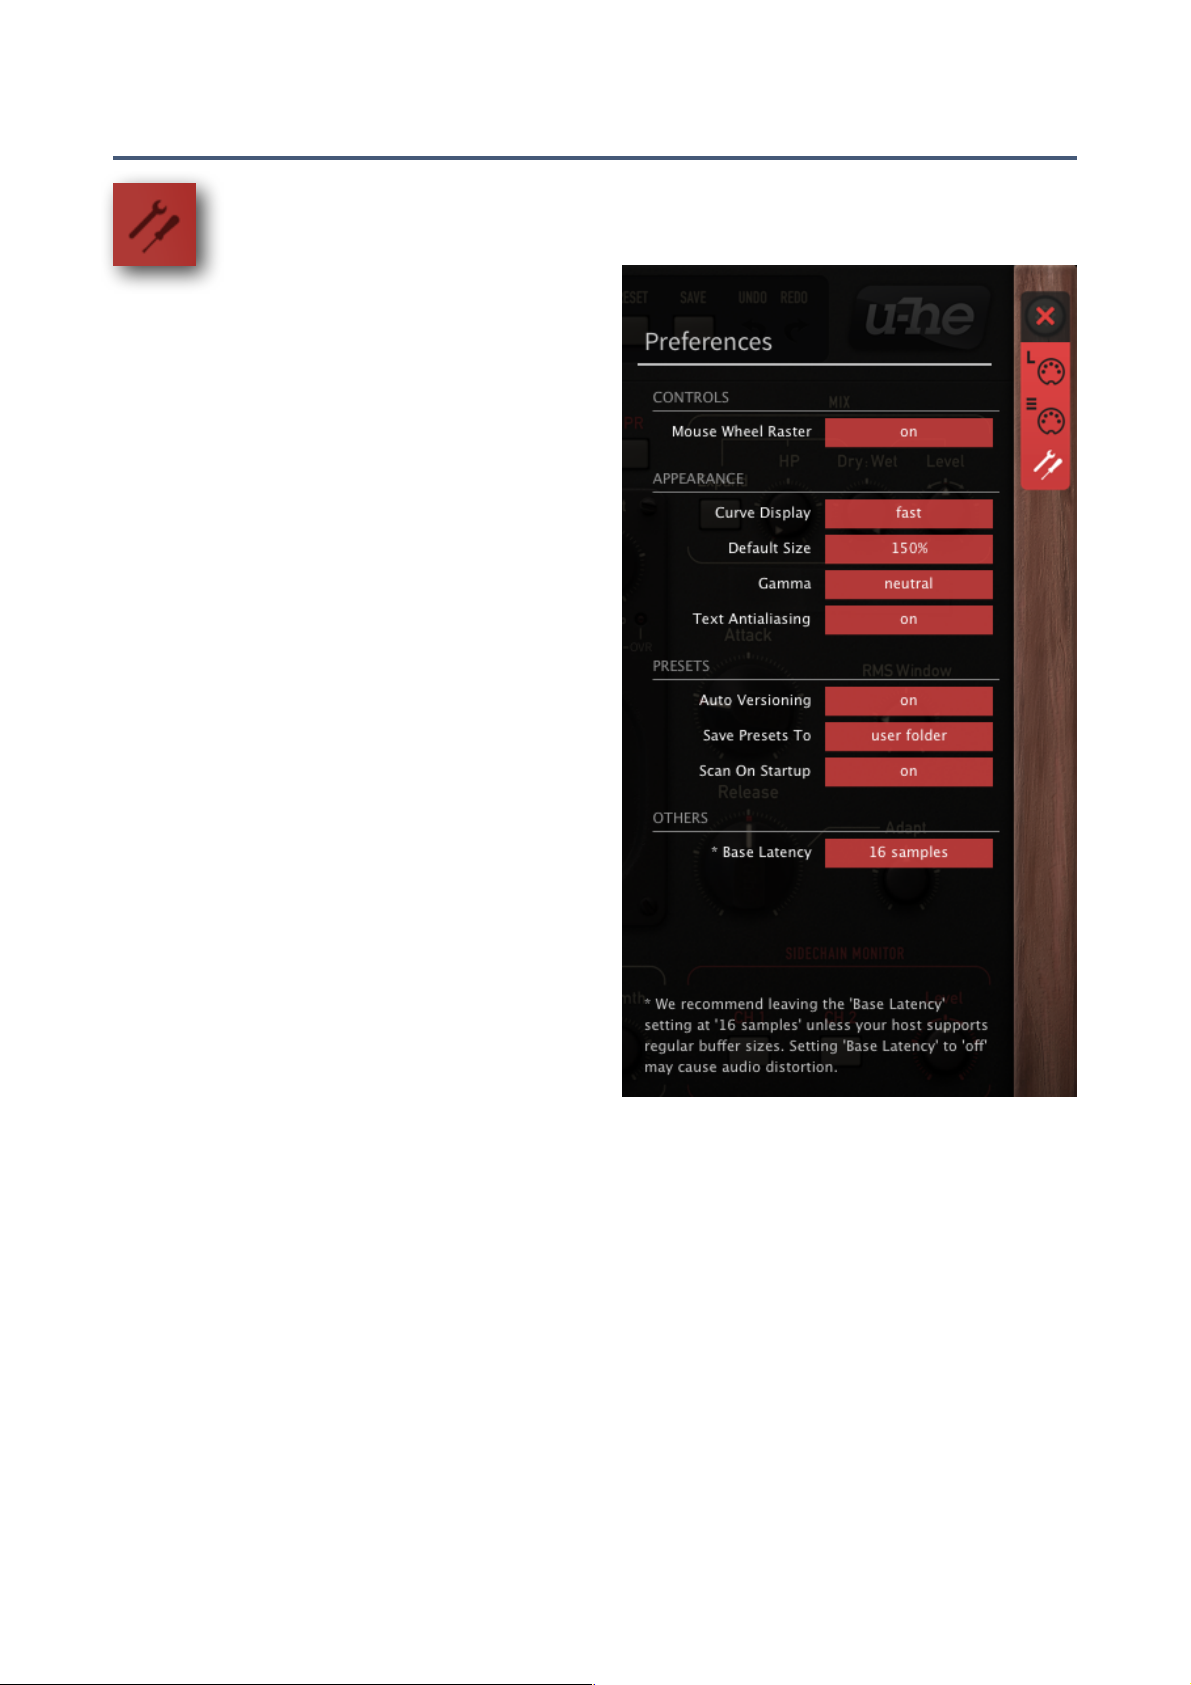
Preferences
Click on the ‘tools’ icon to open the Preferences page, where you can set several global defaults to suit your computer mouse and monitor:"
Controls
Mouse Wheel Raster
If your mouse wheel is rastered (you can feel it
clicking slightly as you roll the wheel), set YES so
that each little click increments / decrements in
sensible value steps."
Appearance
Curve Display
This affects the appearance of the compression
curve: eco, fast or glow (in order of CPU usage)."
Default Size
Sets the default GUI size for each new instance.
You can temporarily change the GUI size without
entering the Preferences – simply right-click in
the background."
Gamma
Determines GUI brightness."
Text Antialiasing
Switches the smoothing of labels and values on /
off. Only in certain cases will switching it off improve readability."
Presets
Auto-Versioning
If ‘on’, an index is automatically appended to the preset name and incremented each time it is
saved. Saving ‘Space’ three times in a row would give you three files: ‘Space’, ‘Space 2’ and
‘Space 3."
Save Presets To
Choose the user folder option if you want all saved presets to land in the User folder instead of
the currently selected one."
Scan On Startup
Determines whether the preset library should be scanned and the database recreated when the
first instance of Presswerk is started, e.g. when you reopen a project.#
TOC intro presets global chan views config | MIDI-control preferences 34
Page 35

CONFIGURATION
Others
Base Latency: If you are certain that your audio system – hardware as well as software – uses
buffers that are a multiple of 16 samples in size (please refer to the respective documentation),
you can safely disable Presswerk’s base latency. Otherwise leave it set to the default ‘16 samples’
to prevent crackles."
Note that the new Base Latency only takes effect when the host allows, e.g. on playback or after
the sample rate is switched. Reloading Presswerk will always update the Base Latency."
"
TOC intro presets global chan views config | MIDI-control preferences 35
MORE ABOUT BUFFERS
Internally, Presswerk processes audio in chunks of n x 16 samples. The ‘block processing’
method significantly reduces the CPU load and memory usage of all our plug-ins."
For example. if the number of samples to be processed is 41, Presswerk will process the
first 32 and keep the remaining 9 in a small buffer (16 samples is big enough). Those 9
samples are then processed at the start of the next call… and so on."
The extra buffer is only necessary if the host application or audio driver processes ‘unusual’
audio buffer sizes. Many hosts process buffers of 64, 128, 256 or 512 samples (all multiples
of 16), in which case you can try switching it off so that Presswerk can work latency-free.
Page 36

NKS
NKS
Presswerk supports Native Instruments “NKS extensions” format so that it can be integrated into
the Komplete Kontrol software or Maschine environments. Presswerk’s factory presets are optionally installed as tagged .nksfx files. A few pages of performance controls mapped to common
parameters are automatically generated and saved together with each .nksfx preset."
Saving in NKS format
While the native, h2p and h2p extended options cause Presswerk to save presets into the currently selected preset directory, .nksfx files go directly into the preset location used for Komplete Kontrol or Maschine (so they do not appear in Presswerk’s preset browser). To make them visible in
Komplete Kontrol, open its preferences and rescan the preset locations."
Batch conversion
First, right-click the [save] button and set the target format to nksfx. Via cmd-click (Mac) or altclick (Win), select all presets in the current folder you want to convert, then right-click any of the
selected presets and choose convert to nksfx. Note: The original files are not affected."
What to do if Presswerk doesn't show up in Komplete Kontrol / Maschine.
First of all, make sure your NKS software is up to date: Komplete Kontrol V1.5+ or Maschine V2.4
are the minimum requirements for u-he."
In Windows, Komplete Kontrol must know the Vstplugins folder containing Presswerk: Open
Komplete Kontrol preferences, go to Locations and add your Vstplugins directory if necessary, hit
Rescan and check whether Presswerk appears."
Maybe the NKS preset folder is empty? If so, please reinstall Presswerk with the correct VST path
and the NKS-option checked. Here are the preset folder locations: "
Mac:$ Macintosh HD/Library/Application Support/u-he/Presswerk/NKS/Presswerk/"
Win:$ …\Vstplugins\Presswerk.data\NKS\Presswerk\"
Perhaps the XML-File is missing from this location:"
Mac:$ Macintosh HD/Library/Application Support/Native Instruments/"
Service Center/u-he-Presswerk.xml
Win:$ C:\Program Files\Common Files\Native Instruments\"
Service Center\u-he-Presswerk.xml
A re-install with the NKS-option checked should also remedy this issue."
What to do if Komplete Kontrol / Maschine is unable to load Presswerk
Either Presswerk wasn't installed as VST2, or it wasn’t installed with the correct path. The default
VST path is fixed in MacOSX, but in Windows it can be freely assigned during installation:"
Mac:$ Macintosh HD/Library/Audio/Plug-Ins/VST/u-he/
Win:$ <User VST Folder> / (path for the VST plug-in set during installation)
If Presswerk’s VST plug-in cannot be found in one of these locations, run the installer again making sure that you set the correct path and have activated ‘VST’ as installation option.#
TOC intro presets global chan views config 36
Saving as .nksfx is only possible in the VST2 version
Mac owners can use – temporarily if necessary – any host application that supports VST2
Page 37

Specifications
Main compression parameters
-
Threshold: -60dB – 0dB "
-
Ratio: 1:1 – 20:1"
-
Attack Time: 0.1ms – 150ms "
-
Release Time: 15ms – 2500ms (with 'Adapt' set to 0%) "
-
Detector integration time (RMS Window): 0.1ms – 30ms "
-
Look-ahead delay: 0 – 5ms"
-
Sidechain delay: 0 – 5ms "
Sidechain filter
-
High-pass corner frequency: 10Hz – 10kHz "
-
Low-pass corner frequency: 100Hz – 20kHz "
-
Filter slope (selectable): 6dB or 12dB per octave"
Saturation stage
-
Saturation amount: -40…+40dB (gain factor) "
-
'Warmth' corner frequencies: 500Hz and 5kHz, 'Tilt'-type filter (pre- and de-emphasis)"
Sample rates
44.1kHz – 192kHz (HQ mode off), 176.4kHz – 192kHz (HQ mode on)"
DPR frequencies
70Hz (input stage), 450Hz (output stage)"
Latency
17 samples (typical, using Base Latency = 16 samples + look-ahead delay)
TOC intro presets global chan views config 37
 Loading...