

Page 1
Delice 5L UL
OPERATOR’S MANUAL
CARNET D’INSTRUCTIONS
MANUAL DE INSTRUCCIONES
Page 2
Delice UL
1 TECHNICAL CHARACTERISTICS
Delice
Transparent removable bowls n 1
Capacity of each bowl, approx. l 5
Dimensions:
width cm 24
depth cm 32
height cm 49
Net weight, approx. kg 7
Gross weight, approx. kg 8
Adjustable thermostats n 1
Noise level lower than 70 dB (A)
IMPORTANT
Electric specifications: read the information on the data plate of each single
dispenser, situated on the underside. The
serial number of the units is preceded by #
The manufacturer reserves the right to make
changes without any prior notification.
2 INTRODUCTION
2 Check the dispenser has not been damaged
during transport. The forwarding agent must be
notified immediately of any claim.
3 Install the dispenser on a counter top that will
support its weight, even with a full load.
4 Before connecting the dispenser electrically
check that the voltage (in the network) is as
shown on the data plate. Plug the unit into a
grounded, protected single phase electrical supply according to the applicable electrical codes
and the specifications of your machine. If you
want to make a fixed connection to the network,
connect the cord to a bipolar wall breaker with a
contact gap of at least 3mm. not use extension
cords to connect the unit electrically.
ATTENTION
Ensure that the unit is grounded correctly;
if not it may cause electric shock to persons or damage the dispenser.
5 The dispenser does not leave the factory
presanitized and sanitized. Prior to use it must be
disassembled, cleaned and sanitized according
to the instructions in chapter 7 CLEANING AND
SANITIZING PROCEDURES.
Read this instruction manual carefully to know the
specifications of the dispenser. As all mechanical
products, this unit requires cleaning and maintenance. Its working order can be compromised by
possible errors made by the operator during disassembly and cleaning. For this reason it is important that the staff in charge of the dispenser is
qualified to carry out the day to day operations,
which are dismantling, cleaning, sterilisation and
reassembly.
3 INSTALLATION
1
Remove the dispenser from the packaging.
(This should be kept for any future requirement)
4 TO OPERATE SAFELY
1
Read the instruction booklet before using the
dispenser.
2 Use the dispenser only if it is grounded cor-
rectly.
3 Do not use extension cords to connect the
dispenser electrically.
4 Do not operate the dispenser if it is not clo-
sed and blocked with screws.
5 Do not place fingers or objects in the cooling
fissures and faucet outlet panels louvers.
6 Do not remove the container when the unit is
in operation.
7 This unit is not meant to be used outside.
2
Page 3
8 This unit is not to be installed in areas
subject to water-spouts.
9 Do not use water-jets to clean the unit.
10 This unit can work in a room temperature
range between +5° and +50°C.
5. 1 DESCRIPTION OF CONTROLS
The dispenser is equipped with a general switch
whose functions are:
Position 0 : power is turned off
Position I : mixer and heating device in wor-
king order
ATTENTION
Do not remove the container until the hot
plate is cold.
ATTENTION
Do not remove the container from the
dispenser when it contains hot products.
IMPORTANT
Place the unit on an horizontal surface.
ATTENTION
In case of damages, the power cord must
be replaced by qualified personnel only in
order to prevent any shock hazard.
5 OPERATING PROCEDURES
1 Clean and sanitized the dispenser prior to
use following the instructions in chapter 7 CLEANING AND SANITIZING PROCEDURES.
2 Fill the bowl with the product, prepared
according to the instructions of the manufacturer.
3 Install the cover above the container making
sure that it is placed correctly.
4 Set the control switch (see charter 5.1. COM-
MAND DESCRIPTIONS)
5 The dispenser should always operate with
the cover installed in order to prevent possible
contamination of the product.
6 The dispenser must run uninterruptedly; hea-
ting will stop automatically when the product is
ready for dispensing. The mixing device will continue to operate.
7 The dispenser is supplied with a container
with a closed removable bottom to facilitate cleaning and sterilisation.
The dispenser is equipped with a thermostat, on
the right side, to adjust the temperature of the
product.
(ELECTRONIC VERSION)
The dispenser is equipped with a general switch
whose functions are:
Position 0 : power is turned off.
Position I : mixing and hating on.
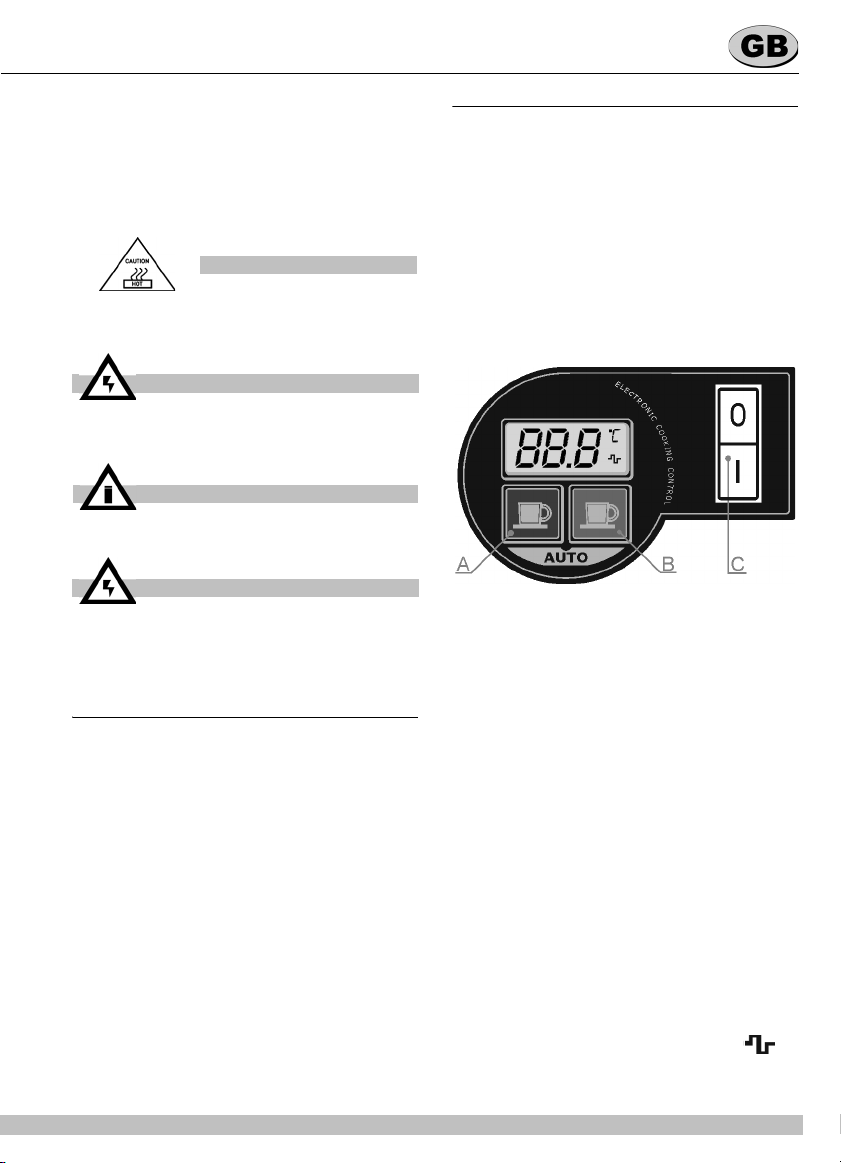
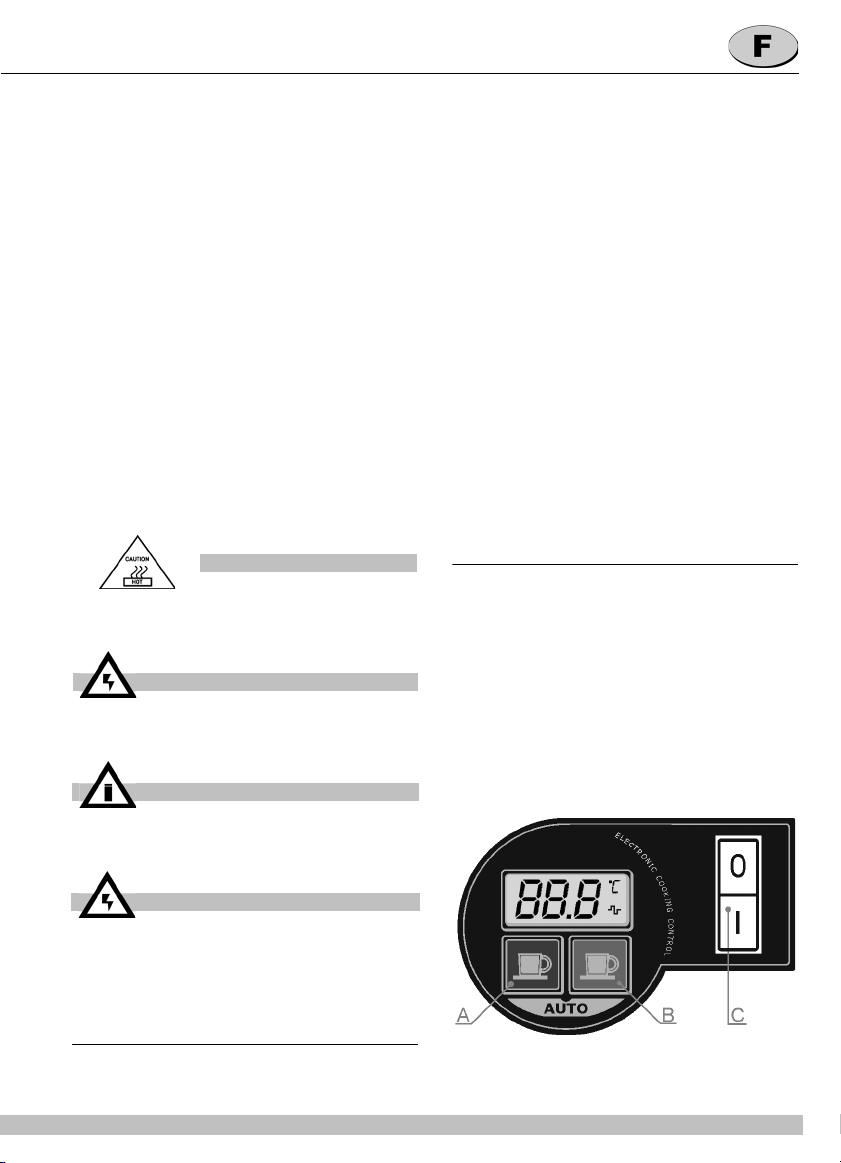
The dispenser is also equipped with an electronic
device, located on the right side, to control the
temperature of the product. This device has one
display, to show the set temperature and two keys
whose functions are the following:
Key A : to decrease the desired temperature
Key B : to increase the desired temperature
On the display, the symbols °C or °F indicates the
current temperature unit and the symbol indicates the turning on of the heating element.
one degree by one; by keeping it
pressed for more than two seconds it
is possible to quickly decrease the
temperature.
one degree by one; by keeping it
pressed for more than two seconds it
is possible to quickly increase the
temperature.
3
Page 4
Delice UL
When the dispenser is turned on, both the mixing
and the heating are turned on and on the display
the set temperature is shown. The set temperature value blinks until when the product has reached the desired temperature.
When the dispenser is turned OFF all the current
settings are saved into memory to be effective at
the following power on.
6 OPERATION HELPFUL HINTS
hot chocolate: preparation following the traditional artisan method, mix the cocoa with milk or water well in a pan before pouring it into the bowl.
Follow the instructions of the manufacturer if
using packaged instantaneous products. It is possible to mix these directly in the container.
Activate the dispenser turning the switch to position 1. Turn the thermostat knob to 90°C to obtain
the cooking temperature of the product. When the
hot chocolate is ready lower the temperature to
the value required for dispensing turning the ther-
mostat knob.
IMPORTANT
Before switching off the dispenser completely (switch at position 0), bring the thermostat to the lowest temperature and wait for
the product to cool down. This stops the
product (if not agitated) from sticking to the
hot plate.
7 CLEANING AND SANITIZING
PROCEDURES
Cleaning and sanitizing are essential to maintain
perfect taste and maximum efficiency from your
dispenser. The procedures described below are
general and can vary due to the sanitary
regulations of the local health authorized.
The product must be taken out of the dispenser
before it is disassembled for cleaning.
7. 1 DISASSEMBLY
ATTENTION
Before proceeding to disassemble any
component always disconnect the unit
from the electricity removing the plug or
switching off the 2 pole wall breaker.
1 Empty the bowl and remove the lid
2 Remove the mixer from the central shaft
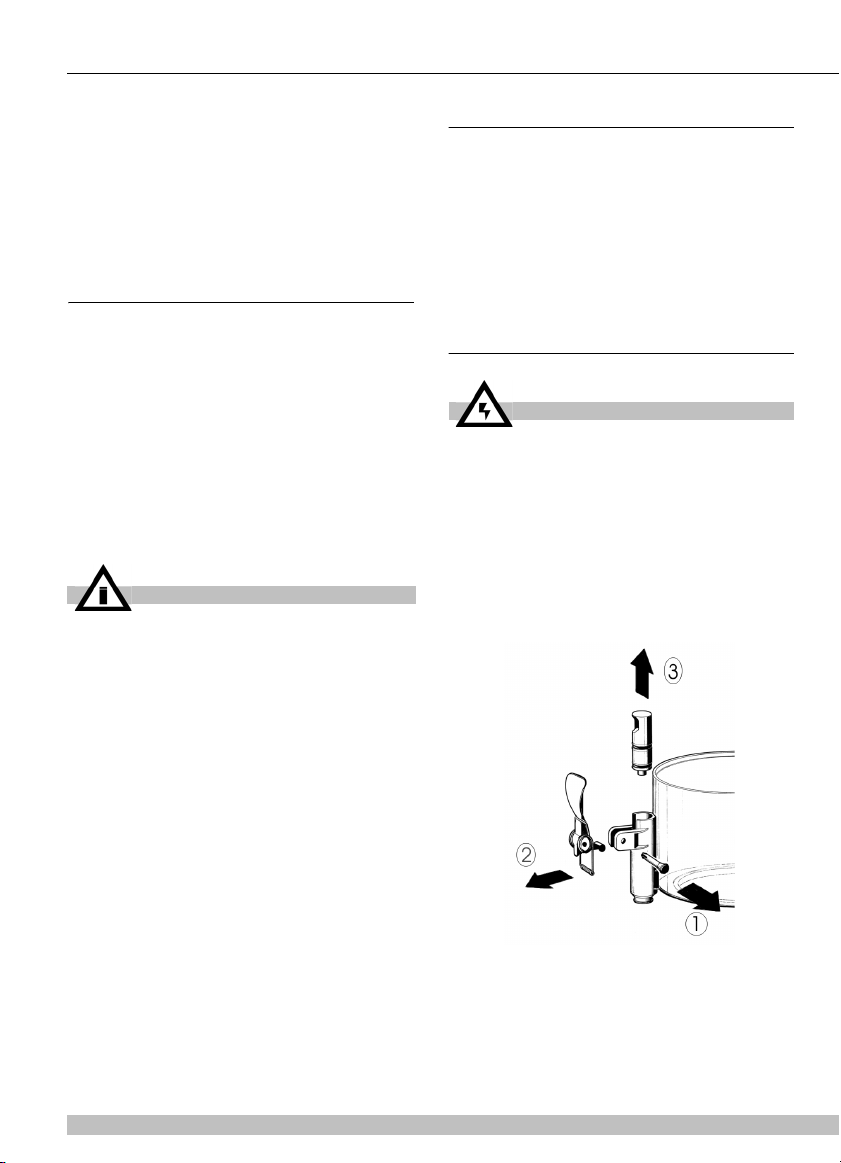
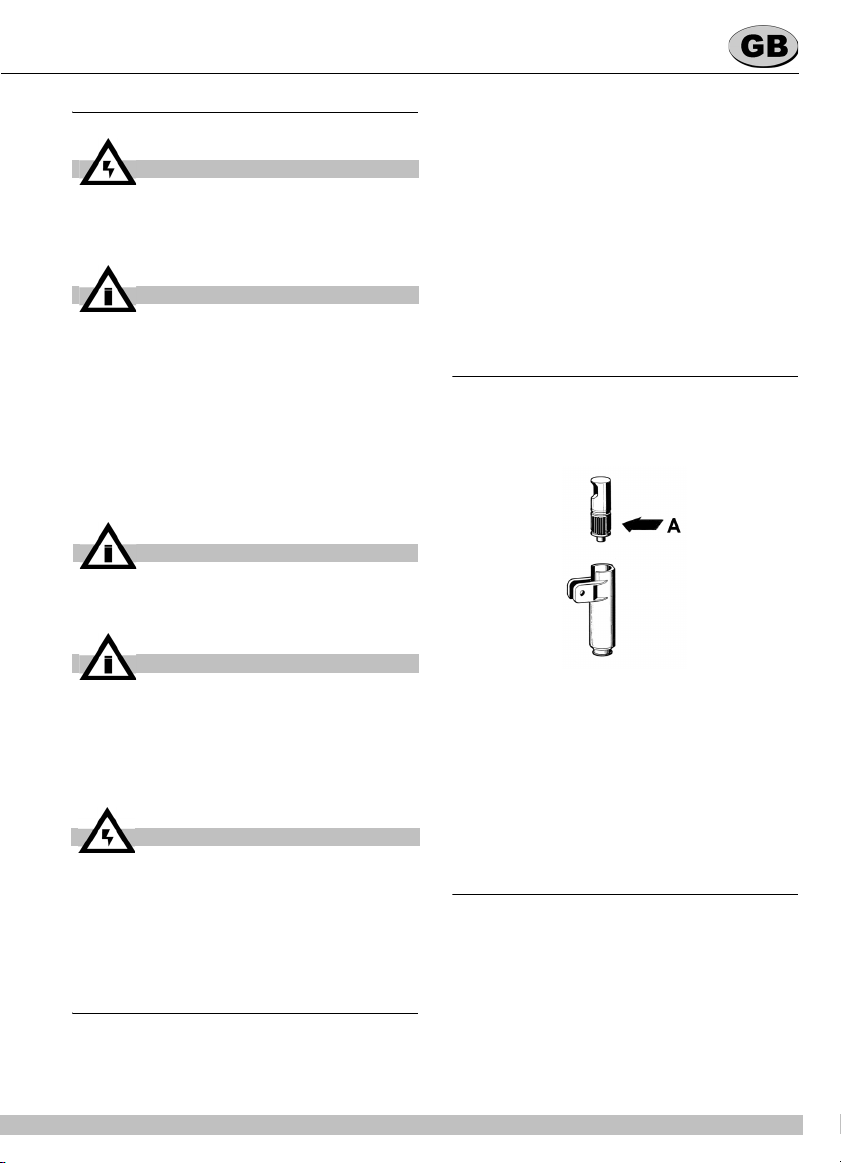
3 Dismantle the faucet following the sequence
shown (see fig. 1).
AUTOMATING COOKING CYCLE
electronic version
By pressing together key A and B the dispenser
performs an Automatic Cooking Cycle. This means that the product is heated up to 95 °C and
maintained at this temperature for 15 minutes.
After the expiration of the Automatic Cooking
Cycle the product is maintained at the desired
temperature set before the cycle.
The temperature and the length of the Automatic
Cooking Cycle are factory preset. To reset them
turn the dispenser off and then turn it on keeping
key A pressed. On the display the Cooking Temperature is shown and it is possible to decease or
increase it using keys A or B and to confirm it
pressing both keys together. Then the length of
the Cooking Cycle is shown and it is possible to
decease or increase it using keys A or B and to
confirm it pressing both keys together.
figure 1
4 Remove the container, lifting it upwards.
5 Remove the drip-tray and empty it. lavaggio.
4
Page 5
7. 2 CLEANING
ATTENTION
Before cleaning disconnect the dispenser
from the electricity taking out the plug or
turning off the outside switch on the wall.
IMPORTANT
Do not attempt to wash any machine components in a dish washer.
Prepare approx. four litres (2 gallons) of hot
1
water (45-60° C) and specific detergent in a bowl
according to the instructions of the manufacturer;
a solution, which is too concentrated, may cause
damage to the parts to be washed, one that is
too diluted will not clean adequately. Do not use
abrasive detergents.
IMPORTANT
Do not wash any component of the
machine in the dishwasher.
1 Before starting the procedure described
below wash hands with an anti-bacterial soap.
2 Prepare at least. four litres of hot water (45-
60°C) and sterilising product legally approved in
your Country, following the instructions of the
manufacturer. If there is no specific sterilising
product prepare a solution of water and bleach in
the following ratio: 1 tbsp: 2 litres of water.
3 Immerse all the parts to be sterilised in the
solution for time indicated by the manufacturer.
4 Allow the sterilised parts to air dry on a clean
surface.
5 Use non-abrasive cloths to dry the external
parts.
7. 4 ASSEMBLY
1
Put the drip-tray and grill in place.
2 Lubricate the faucet piston (in the area A
shown in fig. 2) using food grade approved lubricant.
IMPORTANT
Use detergents compatible with the plastic
parts to avoid damaging the dispenser.
2 Use a suitable brush and carefully clean all
the parts in contact with the drink.
ATTENTION
Do not use excessive amounts of water
near the electric components of the dispenser when washing it as this can cause
electric shock or damage the dispenser.
3 Rinse all the washed parts in running water.
7. 3 SANITIZING
The dispenser must be sanitized prior to starting
the machine. Do not allow the unit to sit for extended periods of the time after sanitization.
figure 2
3 Reassemble the faucet assembly on the con-
tainer in the opposite way to which it was
dismantled (see fig. 1).
4 Install the container putting the central shaft
in place.
5 Insert the mixer in the central shaft.
6 Position the cover on the container.
8 MAINTENANCE
1
Daily: check the dispenser for any loss of
product from the gaskets. If there is, first check
the dispenser is assembled correctly making
sure that the gaskets need no lubricating and
they are not faulty or worn. In this case they must
be replaced with original parts.
2 To avoid damage to the dispenser the plastic
parts must be lubricated only with the grease
supplied by the manufacturer or other grease
compatible with polycarbonate.
5
Page 6

Delice UL
TROUBLESHOOTING
PROBLEM CAUSE SOLUTION
Mixer doesn't turn Drive shaft coupling not cor-
rect
Drive shaft coupling broken Replace mixer and/or drive
Check that it's in the correct operating position
shaft
Gear motor not working See “Gear motor doesn't
Electrical wires disconnected
or interrupted
Product too dense Dilute the product
Gear motor doesn't turn Motor overheated: “Thermal
Beverage leaks from the
container
Protection” tripped
Stator winding burned out or
interrupted
Rotor shifted Check the alignment of the
Gears in the reducer box
damaged or worn
Container gasket seal broken
or worn
Tap piston o-ring broken or
worn
Tap piston not in closed position
turn”
Connect or replace
electrical wires
Check the voltage of the
outlet. Check the
ventilation (fins on the side
panels obstructed or lower
part of the distributor
obstructed). Check the
viscosity of the product
Replace the motor
rotor bearings
Replace the motor
Replace gasket seal
Replace the piston o-ring
Check the tap lever or
spring and replace the
worn part
6
Page 7

PROBLEM CAUSE SOLUTION
Heating element not hot Heating element burned out Replace the heating
Thermal fuse burned out Adjust it to a suitable
Thermal fuse burned out Thermal fuse defective Replace with a good one
I'm not getting a sufficiently dense product
I'm not getting a sufficiently hot product
The temperature of the
service thermostat (located on
the side of the distributor) is
set too low
Product excessively diluted Increase the concentration
The temperature of the
service thermostat (located on
the side of the distributor) is
set too low
The bottom of the tub is not
touching the heating element
element
temperature
Adjust it to a suitable
temperature
of the product
Adjust it to a suitable
temperature
Position the tub on the
heating element correctly
7
Page 8

Delice UL
1 CARACTERISTIQUES
TECHNIQUES
Delice
Réservoirs transparents démontables n 1
Capacité chaque réservoir, environ l 5
Dimensions:
largeur cm 24
profondeur cm 32
hauteur cm 49
Poids net, environ kg 6
Poids brut, environ kg 7
Thermostats réglables n 1
Niveau de bruit inférieur à 70 dB (A)
IMPORTANT
Caractéristiques électriques : lire les données qui figurent sur la plaquette de chaque distributeur. Cette plaquette se trouve
sous le distributeur. Les numéros d'immatriculation des appareils sont précédés du
symbole #. Les données figurant sur la plaquette sont toujours celles auxquelles vous
devez faire référence.
Nous nous réservons le droit d'apporter des
modifications sans avertissement préalable.
3 INSTALLATION
1 Retirez le distributeur de l'emballage. Nous
vous conseillons de conserver l'emballage, vous
pourriez en avoir besoin plus tard.
2 Assurez-vous que le distributeur n'a pas subi
de dommages au cours du transport. Si c'est le
cas, présentez immédiatement une réclamation
auprès du transporteur.
3 Posez le distributeur sur un comptoir qui
supporte son poids lorsqu'il est plein.
4 Avant d'effectuer les branchements électriq-
ues, vérifiez que la tension du réseau est la
même que celle indiquée sur la plaquette. Branchez le distributeur à un réseau monophasé à
l'aide d'une prise comprenant la mise à la terre,
conformément aux normes en vigueur. Si vous
voulez réaliser un branchement fixe au réseau,
branchez le câble à un dispositif bipolaire de
coupure fixé au mur dont les ouvertures de contact sont d'au moins 3 mm. N'utilisez pas de rallonge pour brancher l'appareil au réseau
électrique.
ATTENTION
Vérifiez que l'appareil est correctement
relié à la terre. S'il ne l'est pas, les personnes pourraient subir des chocs électriques
et le distributeur pourrait être endommagé.
2 INTRODUCTION
Nous vous recommandons de lire attentivement
ce carnet d’istructions, de façon à connaître
toutes les caractéristiques du distributeur.
Comme tous les produits mécaniques, ce
distributeur nécessite hygiène et soin. Son bon
fonctionnement peut être compromis par
d'éventuelles erreurs de l'opérateur au cours des
phases de montage et de nettoyage. C'est la
raison pour laquelle il est important que les
procédures quotidiennes de démontage et
remontage soient connues par tout le personnel
responsable du distributeur sans courir le risque
de commettre des erreurs.
5 Le distributeur n'est ni lavé ni désinfecté
avant de sortir de la fabrique. Avant de l'utiliser, il
vous faut le démonter, le laver et le désinfecter
suivant les indications du chapitre 7 NETTOYAGE.
4 POUR UN FONCTIONNEMENT
SANS DANGER
1 N'utilisez pas le distributeur avant d'avoir lu
ce carnet d’istructions.
2 N'utilisez pas le distributeur s'il n'est pas cor-
rectement relié à la terre.
3 N'utilisez pas de rallonge pour le branche-
8
Page 9
ment électrique du distributeur.
4 Ne mettez pas le distributeur en fonction si
les panneaux ne sont pas en place et fixés par
des vis.
5 N'introduisez pas les doigts ou des objets
dans les fentes des panneaux ou dans l'ouverture du robinet.
6 Ne retirez pas le conteneur lorsque la
machine est en route.
7 L'appareil n'est pas indiqué pour l'installation
à l'extérieur.
8 N'installez pas l'appareil en zones sujets à
jets d'eau.
9 Ne pas employer des jets d'eau pour le net-
toyage de l'appareil.
10 La température ambiante adapte pour le bon
fonctionnement de l'appareil est entre +5° et
+50°C.
ATTENTION
Ne retirez par le conteneur tant que la plaque chauffante est chaude.
ATTENTION
Ne retirez pas le conteneur du distributeur
lorsque celui-ci contient du produit chaud.
IMPORTANT
L’appareil doit être installé sur une surface
horizontale.
désinfectez-le suivant les indications du chapitre
7 NETTOYAGE.
2 Remplissez le conteneur du produit voulu
préparé selon les indications du producteur.
3 Montez le couvercle sur le conteneur en veil-
lant à le positionner correctement.
4 Agissez sur les commandes (voir chapitre
5.1 DESCRIPTION DES COMMANDES).
5 Le distributeur doit toujours fonctionner à
couvercle fermé, afin d'éviter une éventuelle contamination du produit.
6 Le distributeur doit fonctionner sans interrup-
tion. Le chauffage s'arrêtera automatiquement
lorsque le produit sera prêt à la distribution. Le
dispositif d'agitation continuera à fonctionner.
7 Le distributeur est équipé d'un conteneur à
fond clos amovible afin de faciliter les opérations
de nettoyage et désinfection.
5. 1 DESCRIPTION DES COMMANDES
Le distributeur est doté d'un interrupteur général
dont les fonctions sont :
Position 0 : le distributeur est éteint.
Position I : l'agitateur et le ventilateur sont
Le distributeur est équipé d'un thermostat, placé
sur le côté droit, pour le réglage de la température
du produit.
en fonction.
(VERSION ELECTRONIQUE)
ATTENTION
Si le câble est endommagé, il doit être remplacé par le fabricant ou par son service
technique ou de toute façon par du personnel qualifié pour éviter tout risque.
5 MODE D'EMPLOI
Avant d'utiliser le distributeur, lavez-le et
1
L'interrupteur C de l'appareil a les fonctions les
9
Page 10

Delice UL
suivantes:
Position 0 : l'appareil est éteint.
Position I : mélangeur et chauffage sont en
L'appareil a un système électronique qui permet
de régler la température de la boisson dans la
cuve.
Le système a deux boutons dont les fonctions
sont les suivantes :
Bouton A : chaque poussée permet de
Bouton B : chaque poussée permet d'aug-
Le système est doté d'un écran montrant la
température désirée pour le produit, l'indication
de l'échelle utilisée pour la visualisation de la
température, graduée en °C ou °F et le
symbole qui indique l'allumage de l'élément
réchauffant.
A la mise en marche de l'appareil, le mélangeur
et le chauffage sont mis en route et l'écran montre
la température fixée. L'indication de température
clignote jusqu'à ce que celle-ci soit atteinte.
Lorsque l'on éteint l'appareil, la température est
mémorisée pour l'utilisation future.
fonction
baisser la température d'1
degré. En restant appuyé plus
de 2 secondes, le degré de
température pourra être baissé
plus rapidement.
menter la température d'1 degré.
En restant appuyé plus de 2 secondes, le degré de température
pourra être augmenté plus rapidement.
6 SUGGESTIONS
Préparation du chocolat chaud : conformez-vous
à la production artisanale. Diluez bien le cacao
dans une casserole avant de le verser dans le
conteneur du distributeur. Si vous utilisez des
produits instantanés emballés, suivez les
indications du fabricant. Avec ce genre de
produits le mélange peut être effectué
directement dans le conteneur.
Actionnez ensuite le distributeur en plaçant
l'interrupteur en position I. Tournez le bouton du
thermostat jusqu'à la position 90°C de façon à
obtenir la température de cuisson du produit.
Lorsque le chocolat est prêt, baissez la
température à la valeur désirée pour la
distribution en tournant le bouton du thermostat.
IMPORTANT
Avant d'éteindre complètement le distributeur (interrupteur en position 0), placez le
thermostat sur la température minimum et
attendez que le produit refroidisse. Cela
évite que le produit, s'il n'est pas agité, ne
se colle à la plaque chauffante.
CUISSON AUTOMATIQUE
version electronique
L'appareil peut effectuer un cycle de cuisson automatique.
Pour mettre en marche le cycle de cuisson automatique, appuyer simultanément sur les boutons
A et B : le produit est alors chauffé jusqu'à 95°C
et cette température est maintenue pendant 15
minutes. Une fois le cycle de cuisson automatique terminé, le produit est maintenu à la température mémorisée.
Les paramètres de température et de durée du
cycle de cuisson automatique (réglé par défaut à
95°C et 15 min.) peuvent être changés.
Pour cela, éteindre l'appareil à l'aide de
l'interrupteur C et rallumer le en appuyant en
même temps sur le bouton A. Sur l'écran apparaît
le temps de cuisson, exprimé en minutes ; il
s'augmente ou se baisse à l'aide des boutons A
et B et s'enregistre en appuyant sur ces 2
boutons simultanément. Puis le temps de cuisson
du cycle de cuisson automatique apparaît ;
comme pour la température, il se règle à l'aide
des boutons A et B et s'enregistre en appuyant
sur ces 2 boutons simultanément.
7 NETTOYAGE
Laver et nettoyer le distributeur sont des
opérations fondamentales pour une parfaite
conservation du goût de la boisson et la meilleure
efficacité de votre distributeur. Les procédures
décrites ci-après doivent être considérées
comme des opérations de caractère général et
peuvent varier selon les normes sanitaires en
10
Page 11

vigueur.
Videz le produit avant de démonter le distributeur
pour le nettoyer.
8 DEMONTAGE
ATTENTION
Avant de procéder à toute intervention de
démontage, débranchez toujours le distributeur en sortant la fiche de la prise
électrique ou en arrêtant le dispositif bipolaire de coupure fixé au mur.
1 Videz le conteneur et retirez le couvercle.
2 Faites glisser le mélangeur de l'arbre central.
3 Démontez le robinet selon la séquence indi-
quée (voir figure 1).
8. 1 LAVAGE
ATTENTION
Avant de procéder à toute intervention de
nettoyage, débranchez toujours le distributeur en sortant la fiche de la prise
électrique ou en arrêtant le dispositif de
coupure fixé au mur.
IMPORTANT
Ne lavez aucun des éléments de l'appareil
au lave-vaisselle.
1
Dans une bassine, préparez environ quatre
litres d'eau chaude (45-60°C) et du produit lavant
spécial en vous conformant aux prescriptions du
fabricant. Une solution trop concentrée peut
endommager les pièces à laver et une solution
trop diluée peut ne pas nettoyer correctement.
N'utilisez pas de produits abrasifs.
IMPORTANT
Pour ne pas endommager le distributeur,
utilisez uniquement des produits lavant
adaptés aux pièces en plastique.
figure 1
4
Retirez le conteneur en le soulevant vers le
haut.
5 Faites glisser vers l'extérieur le tiroir qui
recueille les gouttes et videz-le.
2 Utilisez une brosse adaptée et lavez soi-
gneusement à l'aide de la solution nettoyante
toutes les pièces qui sont en contact avec la
boisson.
ATTENTION
Durant le lavage du distributeur, veillez à
ne pas utiliser trop d'eau à proximité des
composants électriques : vous pourriez
provoquer des chocs électriques ou
endommager le distributeur.
3 Rincez toutes les pièces lavées à l'eau cou-
rante.
8. 2 DESINFECTION
La désinfection doit être effectuée avant de
mettre en marche le distributeur. Evitez que celuici reste trop longtemps inactif après avoir été
11
Page 12

Delice UL
désinfecté.
1 Avant de commencer les procédures
décrites ci-après, lavez-vous les mains avec du
savon antibactérien.
2 Dans une bassine, préparez environ quatre
litres d'eau chaude (45-60°C) et de produit désinfectant approuvé par les autorités de votre
pays en respectant les doses indiquées par le
fabricant. En l'absence de produit désinfectant
spécifique, préparez une solution d'eau et
d'hypochlorite de sodium (eau de javel) dans les
proportions suivantes : 1 cuiller pour deux litres
d'eau.
3 Immergez toutes les pièces à désinfecter
dans la solution pendant la durée indiquée par le
fabricant.
4 Laissez sécher les pièces désinfectées à
l'air, sur une surface propre.
5 Séchez les parties extérieures du distribu-
teur sans utiliser de linges abrasifs.
8. 3 REMONTAGE
1
Mettez le tiroir qui recueille les gouttes et la
grille en place.
2 Lubrifiez le piston robinet (dans la zone A
indiquée sur la figure 2) uniquement avec la
graisse à usage alimentaire.
enfin qu'aucune pièce n'est défectueuse ou
abîmée. Dans ce cas, remplacez-la avec une
pièce de rechange originale du fabricant.
2 Pour éviter d'endommager le distributeur,
lubrifiez les pièces en plastique uniquement avec
de la graisse fournie par le fabricant ou une autre
graisse compatible avec le polycarbonate.
figure 2
Ré assemblez le robinet sur le conteneur,
3
dans le sens inverse des indications de démontage (voir figure 1).
4 Montez le conteneur en enfilant l'arbre cen-
tral à sa place.
5 Insérez le mélangeur dans l'arbre central.
6 Mettez en place le couvercle sur le conte-
neur.
9 ENTRETIEN
1
Quotidien : vérifiez le distributeur et vérifiez
qu'il n'y a pas de fuite de produit par les joints. Si
vous remarquez des fuites, contrôlez avant tout
le montage du distributeur. Assurez-vous ensuite
que les joints n'ont pas besoin d'être lubrifiés et
12
Page 13

INCONVENIENTS EVENTUELS ET SOLUTIONS
PROBLEME CAUSE SOLUTION
Le mélangeur ne tourne
pas
Le branchement sur l'arbre de
transmission n'est pas
effectué correctement
Le branchement sur l'arbre de
transmission est cassé
Vérifier la bonne position
de fonctionnement
Remplacer le mélangeur
et/ou l'arbre de transmission
Le motoréducteur ne
tourne pas
La boisson fuit du conteneur
Le motoréducteur ne fonctionne pas
Les conducteurs électriques
sont débranchés ou interrompus
La densité du produit est
excessive
Le moteur est surchauffé :
intervention du “protecteur
thermique”
La bobine de l'inducteur est
brûlée ou interrompue
Le rotor est désaxé Contrôler l’alignement des
Les engrenages de la boîte
du réducteur sont endommagés ou usés
Le joint du conteneur est
détérioré ou usé
L'O-Ring du piston robinet est
détérioré ou usé
Le piston robinet n'est pas
fermé
Voir “le motoréducteur ne
tourne pas”
Relier ou remplacer les
conducteurs électriques
Diluer davantage le produit
Contrôler le voltage de la
prise de courant. Contrôler
la ventilation (ailettes des
panneaux latéraux
obstruées ou partie
inférieure du distributeur
obstruée). Contrôler la
viscosité du produit
Remplacer le moteur
coussinets du rotor
Remplacer le moteur
Remplacer le joint
Remplacer l'O-Ring du piston
Contrôler le levier ou le
ressort du robinet et remplacer la partie usée
13
Page 14

Delice UL
PROBLEME CAUSE SOLUTION
La résistance ne chauffe
pas
Le thermolimitateur de
sécurité est brûlé
Je n'arrive pas à obtenir
un produit suffisamment
dense
Je n'arrive pas à obtenir
un produit suffisamment
chaud
La résistance est brûlée Remplacer la résistance
Le thermolimitateur de
sécurité est brûlé
Le thermolimitateur est
défectueux
Le thermostat de service
(placé sur le côté du
distributeur) est réglé sur une
température trop basse
Le produit est trop dilué Augmenter la
Le thermostat de service
(placé sur le côté du
distributeur) est réglé sur une
température trop basse
Il n'y a pas ce contact entre le
fond du réservoir et la
résistance
Voir “le thermolimitateur
de sécurité est brûlé”
Le remplacer par un neuf
Le régler à la bonne
température
concentration du produit
Le régler à la bonne
température
Placer correctement le
réservoir sur la résistance
14
Page 15

1 CARACTERÍSTICAS TÉCNICAS
conozcan bien sin posibilidad de error por parte
de todo el personal responsable del distribuidor.
Delice
Contenedores transparentes desmontables
Capacidad de cada contenedor,
aproximada
Dimensiones:
ancho cm 24
largo cm 32
alto cm 49
Peso neto, aproximado kg 6
Peso bruto, aproximado kg 7
Termostatos regulables n 1
Nivel de ruido inferior a 70dB (A)
IMPORTANTE
Características eléctricas: leer los datos
indicados en la placa de cada distribuidor;
ésta se encuentra bajo el mismo distribuidor. Los números de matrícula de los aparatos están precedidos por el símbolo #.
Los datos indicados en la placa son los
únicos datos de referencia.
Se reserva el derecho de aportar modificaciones
sin previo aviso.
n1
l5
2 INTRODUCCIÓN
Es aconsejable leer atentamente este manual de
instrucciones a fin de conocer todas las
características del distribuidor.
Al igual que todos los productos mecánicos, este
distribuidor necesita ciertos cuidados y limpieza.
Su buen funcionamiento podría depender
además de posibles errores cometidos por el
operario en las fases de desmontaje y de
limpieza. Por este motivo es importante que las
operaciones de desmontaje, lavado,
saneamiento y montaje, siendo éstas diarias, se
3 INSTALACIÓN
Extraer el distribuidor del embalaje; se
1
aconseja su conservación en caso de futura
necesidad.
2 Comprobar que el distribuidor no haya
sufrido daños en el transporte. En caso
contrario, proceder inmediatamente a hacer las
reclamaciones pertinentes al transportista.
3 Apoyar el distribuidor sobre una mesa para
descansar el peso, incluso a carga completa.
4 Antes de proceder a la instalación eléctrica
del distribuidor, comprobar que la tensión de la
red sea la indicada en la placa. Conectar el
distribuidor en una red monofase, ayudándose
de una toma a tierra en conformidad con las
normas vigentes. Si se quisiera realizar una
conexión fija a la red, conectar el cable a un
interruptor de pared bipolar con una apertura
para los contactos de al menos 3 mm. No utilizar
alargos para realizar la conexión eléctrica del
aparato.
ATTENCION
Comprobar que el aparato esté conectado
a tierra correctamente; en caso contrario
se corre el peligro de electrocución de las
personas o de causar daños en el distribuidor.
5 El distribuidor no viene lavado y saneado de
fábrica. Antes de usarlo, es necesario
desmontarlo, lavarlo y sanearlo siguiendo las
instrucciones del capítulo 7 LIMPIEZA.
4 PARA UN FUNCIONAMIENTO
SEGURO
1
No usar el distribuidor antes de haber leído
el presente manual de instrucciones.
15
Page 16

Delice UL
2 No usar el distribuidor si la conexión a tierra
no es correcta.
3 No usar alargos para la conexión eléctrica
del distribuidor.
4 No poner en funcionamiento el distribuidor si
no está cerrado y debidamente fijado con
tornillos.
5 No introducir los dedos ni objetos en las
fisuras de refrigeración y en la apertura del grifo.
6 No extraer el contenedor cuando la máquina
está en funcionamiento.
7 Aparato no apto para uso exterior.
8 Aparato no apto en instalaciones donde
haya cercano fuentes de agua .
9 Para la limpieza no utilizar chorros de agua.
10 Para el correcto funcionamiento, coma la
temperatura ambiente debe estar comprendida
ientre 5°C y 50°C.
ATTENCION
No extraer el contenedor hasta que la placa
calefactora esté fría.
IMPORTANTE
El aparato debe ser instalado sobre un
plano horizontal.
ATTENCION
No extraer el contenedor del distribuidor si
éste contiene producto caliente.
ATTENCION
Si el cable de alimentación está dañado,
debe ser substituito por el fabricante o
desde su servicio de asistencia técnica o,
en cualquier caso, por una persona cualificada con el fin de evitar cualquier tipo de
riesgo.
5 INSTRUCCIONES DE EMPLEO
1
Lavar y sanear el distribuidor antes de
utilizarlo siguiendo las instrucciones del capítulo
7 LIMPIEZA.
2 Llenar el contenedor con el producto
deseado, preparado según las instrucciones del
fabricante.
3 Montar la tapa encima del contenedor
comprobando que quede colocada
correctamente.
4 Utilizar los mandos (véase el capítulo 5.1
DESCRIPCIÓN DE LOS MANDOS).
5 El distribuidor debe funcionar siempre con la
tapa montada para evitar que el producto se
contamine.
6 El distribuidor debe funcionar
ininterrumpidamente: el calentamiento se parará
automáticamente cuando el producto esté listo
para la distribución. El dispositivo de agitación
seguirá funcionando.
7 El distribuidor dispone de contenedor con
fondo cerrado extraíble para facilitar las
operaciones de limpieza y saneamiento.
5. 1 DESCRIPCIÓN DE LOS
MANDOS
El distribuidor dispone de un interruptor general
cuyas funciones son:
Posición 0 : el distribuidor está apagado
Posición I : funcionan tanto el dispositivo
El distribuidor también dispone de un termostato
situado en el lado derecho para regular la
temperatura del producto.
de agitación como el
dispositivo de calentamiento.
16
Page 17

(VERSIÓN ELECTRÓNICA)
El distribuidor està provisto de un interruptor
general C cuyas funciones son :
Posición 0 : el distribuidor està apagado.
Posición I : funcionan sea el dispositivo de
El distribuidor està ademàs dotado de un sistema
de regulaciòn de la temperatura del producto.
Tal sistema està dotado de dos teclas cuyas
funciones son las siguientes :
Tecla A : permite disminuir la
Tecla B : permite aumentar la
El sistema està dotado de un display en el cual
vienen visualizadas la temperatura deseada para
el producto, grados centrigrados (°C) o
Fahrenheit (°F) y el simbolo que indica el
ascenso del "elemento de calentamiento"
Con el encendido se inicia sea el calentamiento
que el dispositivo de mezcla y en el display viene
mostrada la temperatura seleccionada ( deseada
para el producto).
Dicha visualizaciòn parpadearà hasta que el
producto no haya alcanzado dicha temperatura.
mezcla,como el de
calentamiento.
temperatura grado a grado;
teniendolo pulsado durante
màs de dos segundos serà
posible disminuir ràpidamente
la temperatura.
temperatura grado a grado;
teniendolo pulsado durante
màs de dos segundos serà
posible aumentar rapidamente
la temperatura.
Con el apagado, la selecciòn de la temperatura
deseada viene memorizada y se mantiene hasta
el encendido sucesivo.
6 SUGERENCIAS
Preparación del chocolate: siguiendo el método
artesanal, disolver bien el cacao en una cazuela
antes de verterlo en el contenedor del
distribuidor. En caso de utilizar productos
instantáneos envasados, seguir las instrucciones
del fabricante. Con este tipo de productos, la
mezcla puede efectuarse directamente en el
contenedor.
A continuación, accionar el distribuidor colocando
el interruptor en posición I. Girar el mando del
termostato hasta la posición de 90°C para
obtener la temperatura de cocción del producto.
Cuando el chocolate esté listo, bajar la
temperatura al valor deseado para la distribución
mediante el mando del termostato.
IMPORTANTE
Antes de apagar por completo el distribuidor (posición 0), poner el termostato a la
posición de temperatura mínima y esperar
a que el producto se enfríe. Así se evitará
que el producto (si no se agita) se pegue a
la placa calefactora.
CICLO DE COCCION AUTOMATICA
versión electrónica
El distribuidor dispone de un ciclo de cocciòn automatica. Dicho ciclo conlleva al calentamiento
del producto a una temperatura de 95° C. y lo
mantiene a esta temperatura durante 15 minutos.
Al final del ciclo de cocciòn el producto alcanzarà
la temperatura seleccionada anteriormente, antes delinicio del ciclo de cocciòn.
Es posible iniciar el ciclo de cocciòn automàtica
del producto pulsando a la vez las teclas A y B.
La temperatura y duraciòn del ciclo de cocciòn
automàtica vienen preseleccionadas de fabrica a
95° y 15 minutosrespectivamente. Pueden ser
17
Page 18

Delice UL
sempre modificadas. Para ello es sufficiente
apagar el distribuidor actuando en el interruptor
general C y reencendiendolo teniendo pulsada la
tecla A. En el display viene mostrado el tempo de
cocciòn, en minutosm, el cual podrà ser
disminuido o aumentado utilizando las teclas A y
B, ademàs se confirmarà spretando a la vez las
dos teclas. Serà asi visualizada la temperatura de
cocciòn, la cual a su vez podrà ser disminuida o
aumentada utilizando las teclas A y B, y
confirmada pulsando a la vez las dos teclas.
7 LIMPIEZA
Limpieza y lavado son fundamentales para
garantizar la perfecta conservación del gusto de
la bebida y la máxima eficacia del distribuidor.
Los procedimientos descritos a continuación
deben considerarse de carácter general y
pueden variar por efecto de la reglamentación
sanitaria vigente.
3 Desmontar el grifo siguiendo la secuencia
indicada (véase figura 1).
figura 1
Levantar el contenedor para extraerlo.
4
5 Extraer el cajón recogegotas y vaciarlo.
7. 2 LAVADO
ATTENCION
Antes de proceder a las operaciones de
limpieza, desconectar siempre el aparato
de la corriente extrayendo la clavija de la
toma de corriente o apagando el interruptor
exterior de pared.
Antes de desmontar el distribuidor para su
lavado, es necesario vaciar el producto.
7. 1 DESMONTAJE
ATTENCION
Antes de desmontar cualquier componente
desconectar siempre el aparato de la corriente extrayendo la clavija de la toma de
corriente o apagando el interruptor exterior
de pared.
Vaciar el contenedor y quitar la tapa.
1
2 Extraer el mezclador del eje central.
IMPORTANTE
No lavar ningún componente de la máquina
en el lavavajillas.
1 Llenar un barreño con aproximadamente
cuatro litros de agua caliente (45-60°C) y
detergente específico respetando rigurosamente
las instrucciones del fabricante; una solución
demasiado concentrada puede causar daños en
las partes a lavar, mientras que una solución
demasiado diluida puede no limpiar lo suficiente.
No usar detergentes abrasivos.
IMPORTANTE
A fin de prevenir daños en el distribuidor,
utilizar solamente detergentes compatibles con las piezas de plástico.
18
Page 19

2 Usar un cepillo adecuado y lavar con
cuidado con la solución detergente todas las
piezas en contacto con la bebida.
ATTENCION
Durante el lavado del distribuidor, no utilizar excesiva cantidad de agua cerca de los
componentes eléctricos; en caso contrario
se podría correr el riesgo de electrocución
o de daños en el distribuidor.
3 Enjuagar con agua corriente todas las piezas
lavadas.
2 Lubricar el pistón del grifo (en la zona A
indicada en la Figura 2) utilizando
exclusivamente la grasa adecuada para uso
alimentario.
7. 3 HIGIENIZACION
El saneamiento debe efectuarse usto antes de
poner en funcionamiento el distribuidor; evitar
que éste permanezca inactivo durante mucho
tiempo después del saneamiento.
1 Antes de iniciar los procedimientos descritos
a continuación, lavarse las manos con un jabón
antibacterias
2 Llenar un barreño con aproximadamente
cuatro litros de solución de agua caliente (4560°C) y producto saneador aprobado por las
autoridades del país de utilización en
conformidad con las especificaciones del
fabricante. Si no se dispone de un producto
saneador específico, preparar una solución de
agua e hipoclorito de sodio (lejía) a razón de 1
cuchara por cada 2 litros de agua.
3 Sumergir en la solución todas las piezas que
deban sanearse durante el tiempo indicado por
el fabricante del producto.
4 Dejar secar al aire, sobre una superficie
limpia, las piezas saneadas.
5 Secar las piezas externas del distribuidor sin
utilizar trapos abrasivos.
7. 4 REMONTAJE
1
Montar el cajón recogegotas y la rejilla en
sus alojamientos correspondientes.
figura 2
3
Volver a montar el grifo en el contenedor
siguiendo el orden inverso de las operaciones de
desmontaje (véase Figura 1).
4 Montar el contenedor colocando el eje
central en su alojamiento.
5 Montar el mezclador en el eje central.
6 Colocar la tapa en el contenedor.
8 MANUTENCION
1
Todos los días: comprobar el estado del
distribuidor y verificar que no haya pérdidas de
producto en las juntas. Si se detectan pérdidas,
controlar en primer lugar que el distribuidor esté
correctamente montado; a continuación,
comprobar que las juntas no precisen
lubricación, así como que no estén defectuosas
o desgastadas. En este caso, sustituirlas por
recambios originales del fabricante.
2 A fin de prevenir daños en el distribuidor, las
piezas de plástico deben lubricarse únicamente
con la grasa proporcionada por el fabricante o
con otra grasa compatible con policarbonato.
19
Page 20

Delice UL
POSIBLES PROBLEMAS Y CÓMO SOLUCIONARLOS
PROBLEMA CAUSA SOLUCIÓN
La mezcladora no gira La introducción en el eje de
remolque no se ha efectuado
correctamente
Introducción en eje de remolque roto
Comprobar que la posición
de funcionamiento sea
correcta
Sustituir la mezcladora y/o
el eje de remolque
El motorreductor no funciona Véase "El motorreductor
Los conductores eléctricos
están desconectados o interrumpidos
La densidad del producto es
excesiva
El motorreductor no gira El motor está sobrecalen-
Hay pérdidas de bebida
en el contenedor
tado: intervención del “Protector térmico”
El arrollado del estator se ha
quemado o se ha interrumpido
El rotor está desalineado Comprobar la alineación
Los engranajes de la caja del
reductor están dañados o
desgastados
La junta del contenedor está
rota o desgastada
El anillo O-Ring del pistón de
la llave está roto o
desgastado
El pistón de la llave no está en
posición de cierre
no gira"
Conectar o sustituir los
conductores eléctricos
Diluir más el producto
Comprobar el voltaje de la
toma de corriente.
Comprobar la ventilación
(aletas de los paneles
laterales o parte inferior del
distribuidor obstruidas).
Comprobar la viscosidad
del producto
Sustituir el motor
de los cojinetes del rotor
Sustituir el motor
Sustituir la junta
Sustituir los O-Ring del pistón
Comprobar la palanca o el
resorte de la llave y sustituir la pieza desgastada
20
Page 21

PROBLEMA CAUSA SOLUCIÓN
La resistencia no calienta La resistencia está quemada Sustituir la resistencia
El limitador de temperatura de seguridad está
quemado
El limitador de temperatura de
seguridad está quemado
El limitador de temperatura
está defectuoso
Véase "limitador de
temperatura de seguridad
quemado"
Sustituirlo por otro que se
encuentre en perfecto
estado
No consigo obtener un
producto suficientemente denso
No consigo obtener un
producto suficientemente caliente
El termostato de servicio
(situado al lado del
distribuidor) está regulado a
una temperatura demasiado
baja
El producto está demasiado
diluido
El termostato de servicio
(situado al lado del
distribuidor) está regulado a
una temperatura demasiado
baja
El fondo de la cuba y la
resistencia no se tocan
Regularlo a la temperatura
adecuada
Aumentar la concentración
del producto
Regularlo a la temperatura
adecuada
Colocar la cuba encima de
la resistencia de manera
correcta
21
Page 22

Delice UL
SPARE PARTS LIST
LISTE DES PIECES DE RECHANGE
DESCRIPCION PIEZAS DE REPUESTO
1 33800-09800 Driving shaft Arbre de trainement Eje transmisión
2 22800-26408 Heating plate holder Support plaque chauffante Soporte para plancha calentadora
2 22800-26427 Golden heating plate holde Support doré plaque chauffante Soporte para plancha calentadora oro
3 10554-44000 M4 Clip Clip M4 Clip M4
4 22800-26415 Thermostat bulb holder Support boule du thermostat Guia-sensor termóstato
5 22800-26420 Spring for bulb holder Ressort pour support boule Muelle para guia-sensor termós tato
6 33800-09701 Heating plate 115V60Hz Plaque chauffante Plancha calentadora
7 22800-26426 Limit switch Thermolimiteur Fusible de seguridad
22
Page 23

2449_29 V 1.1 14M14
8 22092-00014 Complete gear motor 115V 60 Hz Motoréducteur complet Motorreductor completo
9 22800-26445 Side panel Panneau latéral Panel lateral
9 22800-26433 Golden side panel Panneau latéral doré Panel lateral oro
9 22800-26438 Side panel -”silver” Panneau latéral -”argent” Panel lateral -”plata”
10 22800-26443 Machine body Carrosserie Cuerpo maquina
10 22800-26431 Golden machine body Carrosserie doré Cuerpo maqu ina oro
10 22800-26436 Machine body -”silver” Carrosserie -”argent” Cuerpo maquina -”plata”
11 22800-26444 Side panel for controls Panneau latéral pour contrôles Panel lateral completo
11 22800-26432 Golden side panel for controls Panneau latéral pour contrôles doré Panel lateral completo
11 22800-26437 Side panel for controls -”silver” Panneau latéral pour contrôles -”argent” Panel late ral completo de mandos -”plata”
12 22800-24301 Switch Interrupteur Interruptor
13 22037-00000 0-90°C thermostat Thermostat 0-90°C Termóstato 0-90°C
14 22037-00001 0-120°C thermostat Thermostat 0-120°C Termóstato 0-120°C
15 22800-26445 Base Base Base
15 22800-26430 Golden base Base doré Base oro
15 22800-26435 Base -”silver” Base -”argent” Base -”plata”
16 22800-26417 Rubber leg Petit pied Piede de goma
17 22500-01900 Drip tray cover Couvercle tiroir égouttoir Rejilla cajón recoge-gotas
18 22800-26404 Drip tray Tiroir égouttoir Bandeja goteo
18 22800-26434 Golden drip tray Tiroir égouttoir doré Bandeja goteo oro
18 22800-26439 Drip tray -”silver” Tiroir égouttoir -”argent” Bandeja goteo -”plata”
19 22800-05500 Cable clamp Borne Pasacable
20 22500-02000 Cover knob Pommeau du couvercle Pomo para tapa
21 22800-26409 Bowl cover Couvercle du réservoir Tapa contenedor
21 22800-26429 Golden bowl cover Couvercle du réservoir doré Tapa contenedor oro
22 22800-26414 Mixer Mélangeur Mezclador
23 22800-26412 Bowl shaft Arbre du réservoir Arbol del contenedor
24 22800-26419 Bowl shaft O-ring OR de l’arbre du réservoir OR para àrbol central
25 22800-26407 Bowl bottom plate Fond du réservoir Fondo del contenedor
26 10533-03005 Central shaft nut Ecru arbre du réservoir Dado para eje central
27 22800-26410 Bowl gasket Joint du réservoir Junta contenedor
28 22800-14801 Faucet piston Piston du robinet Pistón del grifo
29 22800-15100 Faucet piston O-ring Joint OR du robinet Junta OR de l grifo
30 22700-01800 Red faucet handle Levier de débit rou ge Palanca grifo rossa
30 22700-01801 Black Faucet handle Levier de débit noir Palanca grifo
31 22800-26424 Faucet spring Ressort du robinet Muelle del grifo
32 22800-22100 Red faucet handle pin Pivot rouge pour levier de débit Pivote rojo de la palanca
32 22800-22160 Black faucet handle pin Pivot noir pour levier de débit Pivote negro de l a palanca grifo
33 22800-26405 Bowl Réservoir Contenedor
34 22800-26418 Bowl O-ring OR du réservoir OR del contenedor
35 33800-09901 Bowl assembly Réservoir complet avec fond Contenedor completo
36 22001-00001 Gear motor flange Bride pour motoréducteur Brida para motorreductor
38 22800-26413 Central shaft Arbre central Eje central
39 22800-26466 Tap ring Mancon Pomo para termostato
40 22800-26456 Thermostat knob 32-194F Pommeau du thermostat 32-194F Pomo para termostato 32-194F
41 22800-26457 Thermostat knob 32-248 F Pommea u du thermostat 32-248 F Pomo para termostato 32-248 F
42 22800-26455 Base protection
de mandos
de mandos oro
WIRING DIAGRAM / SCHEMA ELECTRIQUE / ESQUEMA ELECTRICO
1 Switch Interrupteur Interruptor
2 0-120°C Thermostat Thermostat 0-120°C Termóstato 0-120°C
3 Limit switch 152°C Thermolimiteur 152°C Fusibile de seguridad
4 Resistance Resistance Resistencia
5 0-90°C Thermostat Thermostat 0-90°C Termóstato 0-90°C
6 Gear motor Motoréducteur Motoreductor
23
Page 24

Delice UL
WIRING DIAGRAM
SCHEMA ELECTRIQUE
ESQUEMA ELECTRICO
NORMAL VERSION
1 Switch Interrupteur Interruptor
2 125°C Thermostat Thermostat 12 5°C Termóstato 125°C
3 Limit switch 152°C T hermolimiteur 152°C Fusibile de seguridad
4 Resistance Resistance Resistencia
5 5-95°C Thermostat Thermostat 5-95° C Termóstato 5-95°C
6 Gear motor Motoréducteur Motoreductor
ELECTRONIC VERSION
2449_29 V 0.1 09I29
1 Switch Interrupteur Interruptor
2 Termic fuse
3 Gear motor Motoréducteur Motoreductor
4 Resistance Resistance Resistencia
5 Electronic device Circiut imprimé de contrôle Circuito electronico
6 Product temperature s ensor Sonde de température de produit Sensor de temperatura del producto
7 Resistance temperature sensor Sonde de température de résistance Sensor de temperatura de la resistencia
24
Page 25

NOTES - NOTES - NOTAS:
25
Page 26

DELICE UL
NOTES - NOTES - NOTAS:
26
Page 27

NOTES - NOTES - NOTAS:
27
Page 28

• Via dei Pioppi, 33 • 20090 Opera (MI) • Tel. 02.5300591 • www.ugolinispa.com
02449-00029
R3.6 15E13
Ugolini spa
 Loading...