

Ugolini arctic deluxe ul Operator's Manual
OPERATOR’S MANUAL
CARNET D’INSTRUCTIONS
MANUAL DE INSTRUCCIONES
ARCTIC DELUXE UL

ARCTIC DELUXE UL
2

3
4
8
12
4
ARCTIC DELUXE UL
1 TECHNICAL CHARACTERISTICS
Specifications are subject to change without notice.
2 INTRODUCTION
Please read all sections of this manual thoroughly to familiarize
yourself with all aspects of the unit.
Like all mechanical products, this machine will require cleaning
and maintenance. Besides, dispenser working can be
compromised by operator’s mistakes during disassembly and
cleaning. It is strongly recommended that personnel responsible
for the equipment’s daily operations, disassembly, cleaning,
sanitizing and assembly, go through these procedures in order
to be properly trained and to make sure that no
misunderstandings exist.
3 INSTALLATION
1 Remove the corrugate container and packing materials and
keep them for possible future use.
2 Inspect the uncrated unit for any possible damage. If
damage is found, call the delivering carrier immediately to file a
claim.
3 Install the unit on a counter top that will support the combined weight of dispenser and product bearing in mind what is
stated in the preceding point 1 IMPORTANT warning.
4 A minimum of 15 cm (6”) of free air space all around the unit
should be allowed to guarantee adequate ventilation.
5 Ensure that the legs are screwed tightly into the base of the
machine.
Replace the standard legs originally installed with the 100 mm
(4”) legs whenever they are provided with the unit.
6 Before plugging the unit in, check if the voltage is the same
as that indicated on the data plate. Plug the unit into a grounded, protected single phase electrical supply according to the
applicable electrical codes and the specifications of your
machine. When the unit has no plug, install a proper ground ed
plug, in compliance with electrical codes in force in your area,
suitable to at least 10 Amp 250 Volt (220-230 Volts 50-60 Hz
areas) and 20 Amp 250 Volt (100-115 Volts 50-60 Hz areas)
applications. Should you prefer to connect the u nit directly to
the mains, connect the supply cord to a 2-pole wall breaker,
whose contact opening is at least 3 mm. Do not use extension
cords.
7 The unit doesn’t come presanitized from the factory. Before
serving products, the dispenser must be disassembled, cleaned and sanitized according to this handbook instructions
(chapter 5.3 CLEANING AND SANITAZING PROCEDURES).
4 TO OPERATE SAFELY
1 Do not operate the dispenser without reading this opera-
tor’s manual.
2 Do not operate the dispenser unless it is properly groun-
ded.
3 Do not use extension cords to connect the dispenser.
4 Do not operate the dispenser unless all panels are restrai-
ned with screws.
5 Do not obstruct air intake and discharge openings: 15 cm
(6”) minimum air space all around the dispenser.
6 Do not put objects or fingers in panels louvers and faucet
outlet.
7 Do not remove bowls, augers and panels for cleaning or
routine maintenance unless the dispenser is disconnected from
1/12
1/20
2/12
2/20
3/12
3/20
4/12
4/20
Transparent removable bowls
n 1 2 3 4
Capacity of each bowl, approx.
l 12201220122012
20
Dimensions:
width
cm 18 36 54 72
depth
cm 47 47 47 47
height
12 lt
20 lt
cm 57675767576757
67
Net weight, approx.
12 lt
20 lt
kg 20222432364244
55
Gross weight, approx.
12 lt
20 lt
kg 22252836404649
59
Adjustable thermostats
n 1 2 3 4
Hermetic compressor
Air-cooled condenser
Overload protector
Noise level lower than 70 dB (A)
IMPORTANT
Read electrical ratings written on the data plate of the
individual units; the data plate is adhered on the dispensing side panel of the unit, just behind the drip tray (the
right side drip tray in multiple bowl models). The serial
number of the unit (preceded by the symbol #) is adhered
just below the right bowl. Data plate specifications will
always supersede the information in this manual.
IMPORTANT
When handling the machine never grasp it by the bowls
or by the evaporator cylinders. The manufacturer refuses
all responsibilities for possible damages which may
occur through incorrect handling.
ATTENTION
Failure to provide proper electrical ground according to
applicable electrical codes could result in serious shock
hazard.
IMPORTANT
Install the dispenser so that the plug is easily acces sible.
5
its power source.
5 OPERATING PROCEDURES
1 Clean and sanitize the unit according to the instructions in
this manual. See chapter 5.3 CLEANING AND SANITIZING
PROCEDURES.
2 Fill the bowls with product to the maximum level mark. Do
not overfill.
The exact quantity of product (expressed as liters and gallons)
is shown by marks on the bowl.
3 In case of products to be diluted with water, potabl e water,
pour water into bowl first, then add correct quantity of product.
In case of natural squashes, it is advisable to strain them, in
order to prevent pulps from obstructing the faucet outlet.
4 Install the covers and check that they are correctly placed
over the bowls.
5 Set the control switches as shown in chapter
5.1 DESCRIPTION OF CONTROLS.
6 The dispenser must always run with the covers installed to
prevent a possible contamination of the product.
7 Always leave the dispenser on, as the refrigeration stops
automatically when the beverage reaches the dispensing temperature. The mixing devices will continue to turn.
8 To maintain a high standard of flavour, keep refrigeration
and mixing devices on during the night when beverage is in the
bowl.
5. 1 DESCRIPTION OF CONTROLS
The dispenser is equipped with a power switch and each bowl is
operated by a mixing device switch.
Their functions are as follows:
Power switch
Mixing device switch
To operate the dispenser
1 Set power switch to I position.
2 Set mixing device switch(es) to I position.
5. 2 OPERATION HELPFUL HINTS
1 The length of time for cooling down the product is governed
by many variables, such as ambient temperature and beverage
initial temperature.
2 To shorten product cooling down time and increase productivity, it is advisable to pre-chill the product to be used in the
dispenser.
3 To shorten product cooling down time and increase productivity, the bowl should be refilled after the product level drops
lower than half and at the start of each day.
4 The dispenser must be able to emit heat.
In case it seems excessive, check that no heating source is
close to the unit and air flow through the slotted panels is not
obstructed by wall or boxes. Allow at least 15 cm (6”) of free
clearance all around the dispenser.
In any case if the product in the bowls is cold the unit is running
properly.
5 How to reset beverage temperature:to reset beverage temperature please apply to a technician.
The proper temperature is preset at the factory.
5. 3 CLEANING AND SANITIZING
PROCEDURES
Cleaning and sanitizing of the dispenser are recommended to
guarantee the conservation of the best product taste and the
highest unit efficiency. This section is a procedural guideline
only and is subject to the requirements of the local Health
Authorities.
Prior to the disassembly and cleaning, the machine must be
emptied of product.
5. 3. 1 DISASSEMBLY
1 Remove cover from the bowl.
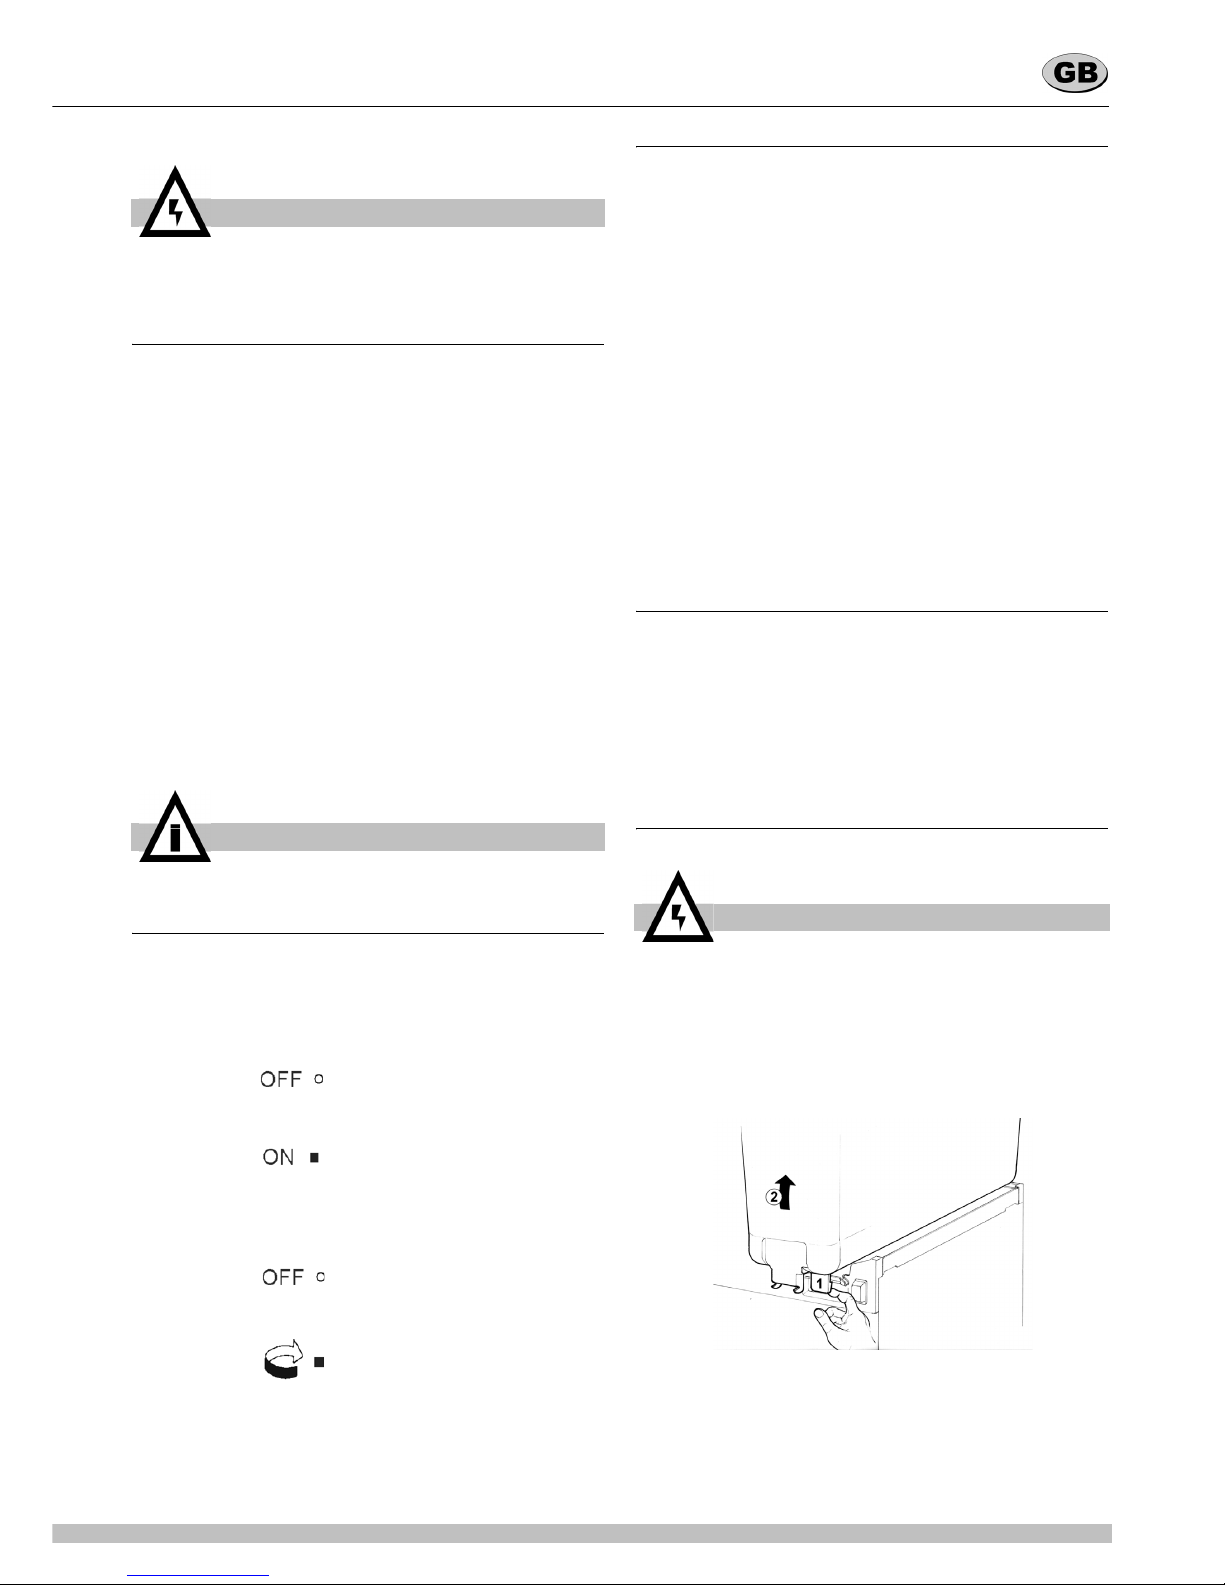
2 Remove the empty bowl by lifting first its front side (faucet
side) up and off bowl gasket (see figure 1).
figure 1
3 Remove the bowl gasket.
4 Remove the pump impeller from its location.
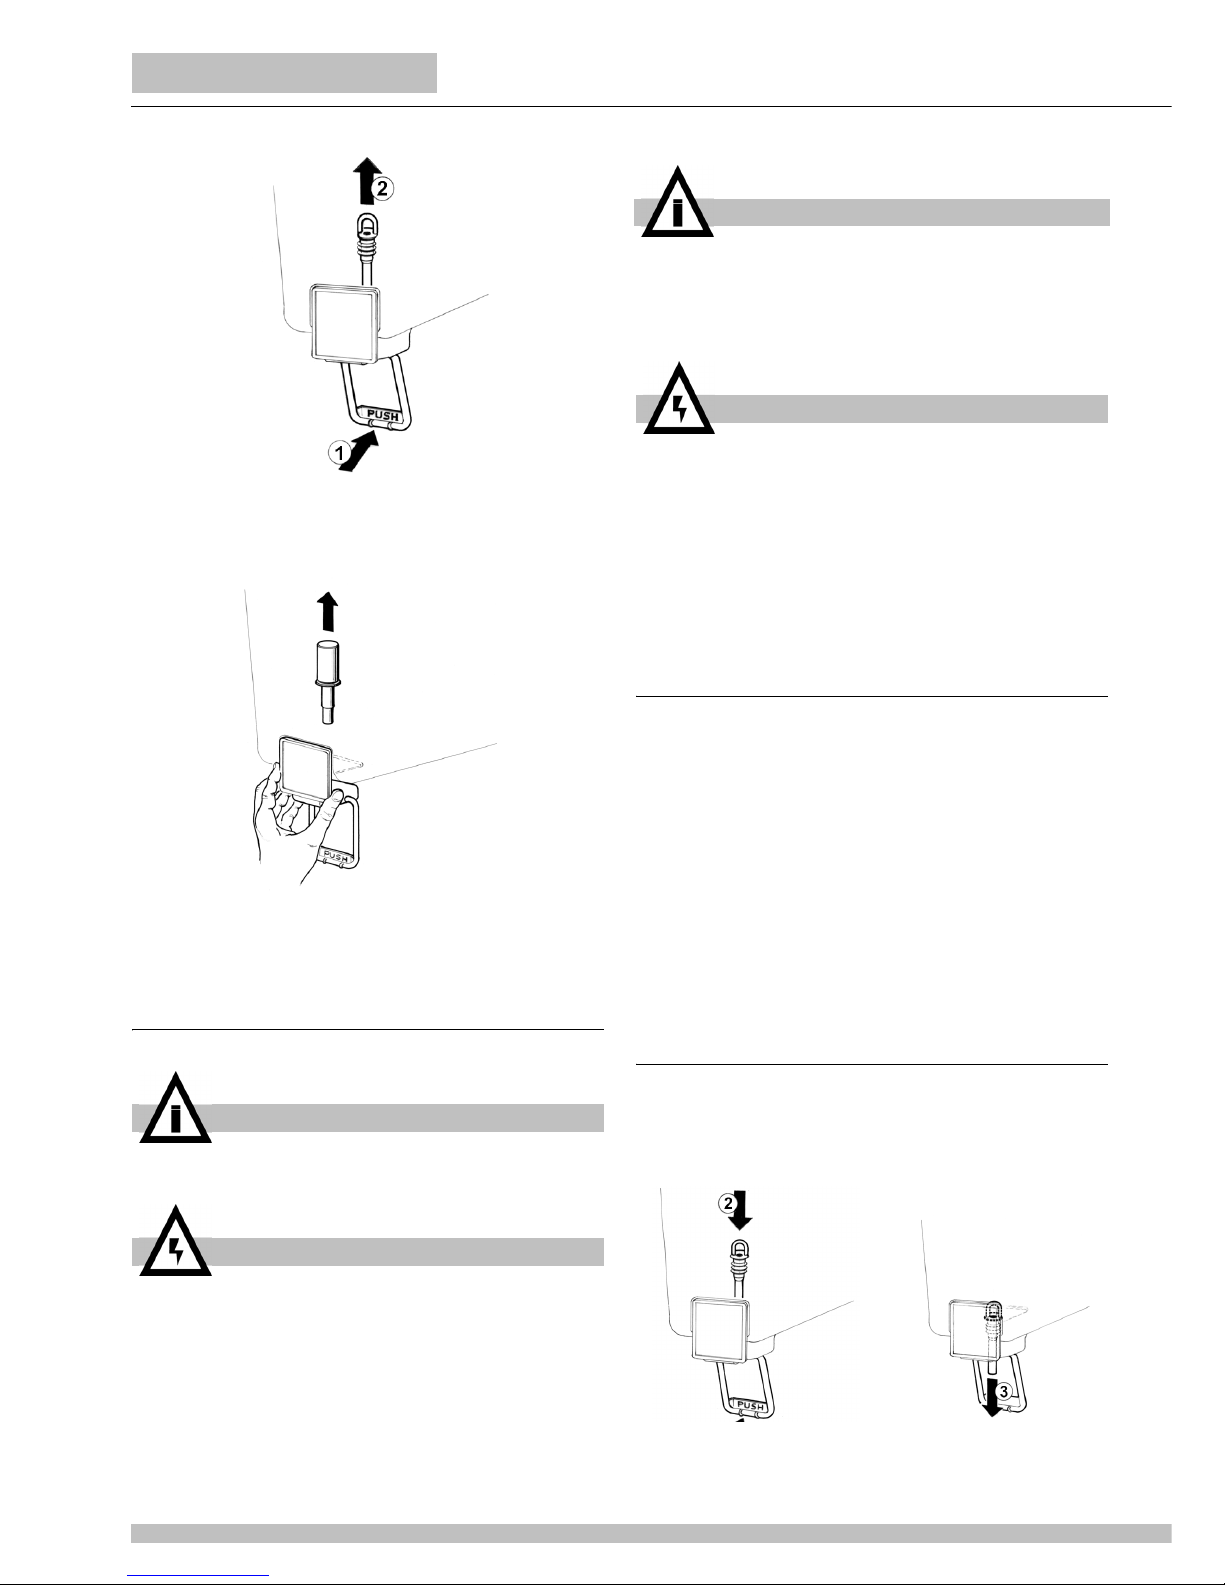
5 Pinch tube faucet: push the dispensing handle (1) and
ATTENTION
In case of damages, the power cord must be replaced by
qualified personnel only in order to prevent any shock
hazard.
IMPORTANT
Operate the dispenser with food products only.
0 position : Power is turned OFF to all
functions.
I position :
This position operates the fan
motor and makes the mixing
devices suitable to be turned
on by relevant switches.
0 position : OFF.
I position : Mixing device runs.
ATTENTION
Before any disassembly and/or cleaning proced ure m ake
sure that the dispenser is disconnected from its power
source by unplugging it or switching off the 2-pole wall
breaker.
6
ARCTIC DELUXE UL
take the pinch tube off from its seat (2) (see figure 2).
figure 2
6 Gravity faucet: extract the piston and then remove the
dispensing handle (see figure 3).
figure 3
7 Slide drip tray out and empty it.
5. 3. 2 CLEANING
1 Prepare at least two gallons of a mild cleaning solution of
warm (45-60 °C 120-140 °F) potable water and dishwashing
detergent. Do not use abrasive detergent.
Important: if present, follow label directions, as too strong a
solution can cause parts damage, while too mild a solution will
not provide adequate cleaning.
2 Using a brush, suitable for the purpose, thoroughly clean all
disassembled parts in the cleaning solution.
3 Do not immerse the lighted top covers in liquid. Wash them
apart with the cleaning solution. Carefully clean their undersides.
4 In the same manner clean the evaporator cylinder(s) using
a soft bristle brush.
5 Rinse all cleaned parts with cool clean water.
5. 3. 3 SANITIZING
Sanitizing should be performed immediately prior to
starting the machine. Do not allow the unit to sit for
extended periods of time after sanitization.
1 Wash hands with a suitable antibacterial soap.
2 Prepare at least two gallons of a warm (45-60 °C 120-
140 °F) sanitizing solution (100 PPM available chlorine concentration or 1 spoon of sodium hypoclorite diluted with two litres of
water) according to your local Health Codes and manufacturer’s specifications.
3 Place the parts in the sanitizing solution for five minutes.
4 Do not immerse the lighted top covers in liquid. Carefully
wash their undersides with the sanitizing solution.
5 Place the sanitized parts on a clean dry surface to air dry.
6 Wipe clean all exterior surfaces of the unit. Do not use abra-
sive cleaner.
5. 3. 4 ASSEMBLY
1 Slide the drip tray into place.
2 Pinch tube faucet: push the dispensing handle (1) and
insert the pinch tube into its vertical seat in the bowl bottom(2).
Lightly pull the pinch tube end downwards til itl is well arranged
(3) (see figure 4).
figure 4
3 Gravity faucet: install the faucet handle and the piston with
IMPORTANT
Do not attempt to wash any machine components in a
dishwasher.
ATTENTION
Before any disassembly and/or cleaning procedure make
sure that the dispenser is disconnected from its power
source.
IMPORTANT
In order to prevent any damages to the dispenser use
only a detergent suitable with plastic parts.
ATTENTION
When cleaning the machine, do not allow excessive
amounts of water around the electrically op erated components of the unit. Electrical shock or damage to the
machine may result.
 Loading...