

UFESA BS4795 Operating Instructions Manual
INSTRUCCIONES DE USO
ES
OPERATING INSTRUCTIONS
GB
MODE D'EMPLOI
FR
INSTRUÇõES DE USO
PT
GEBRAUCHSANLEITUNG
DE
HASZN LATI UTASĺTS
HU
PУKОBОДCTBО ПО ЭΚСПЛУАΤΑЦИИ
RU
N VOD K POUŽITĺ
CZ
УKA3AHИЯ 3A У
ПOTPЕБА
BU
INSTRUCTIUNI DE FOLOSIRE
RO
ﻞﻴﻐﺸﺘﻟﺍ ﺕﺍﺩﺎﺷﺭﺇ
AR
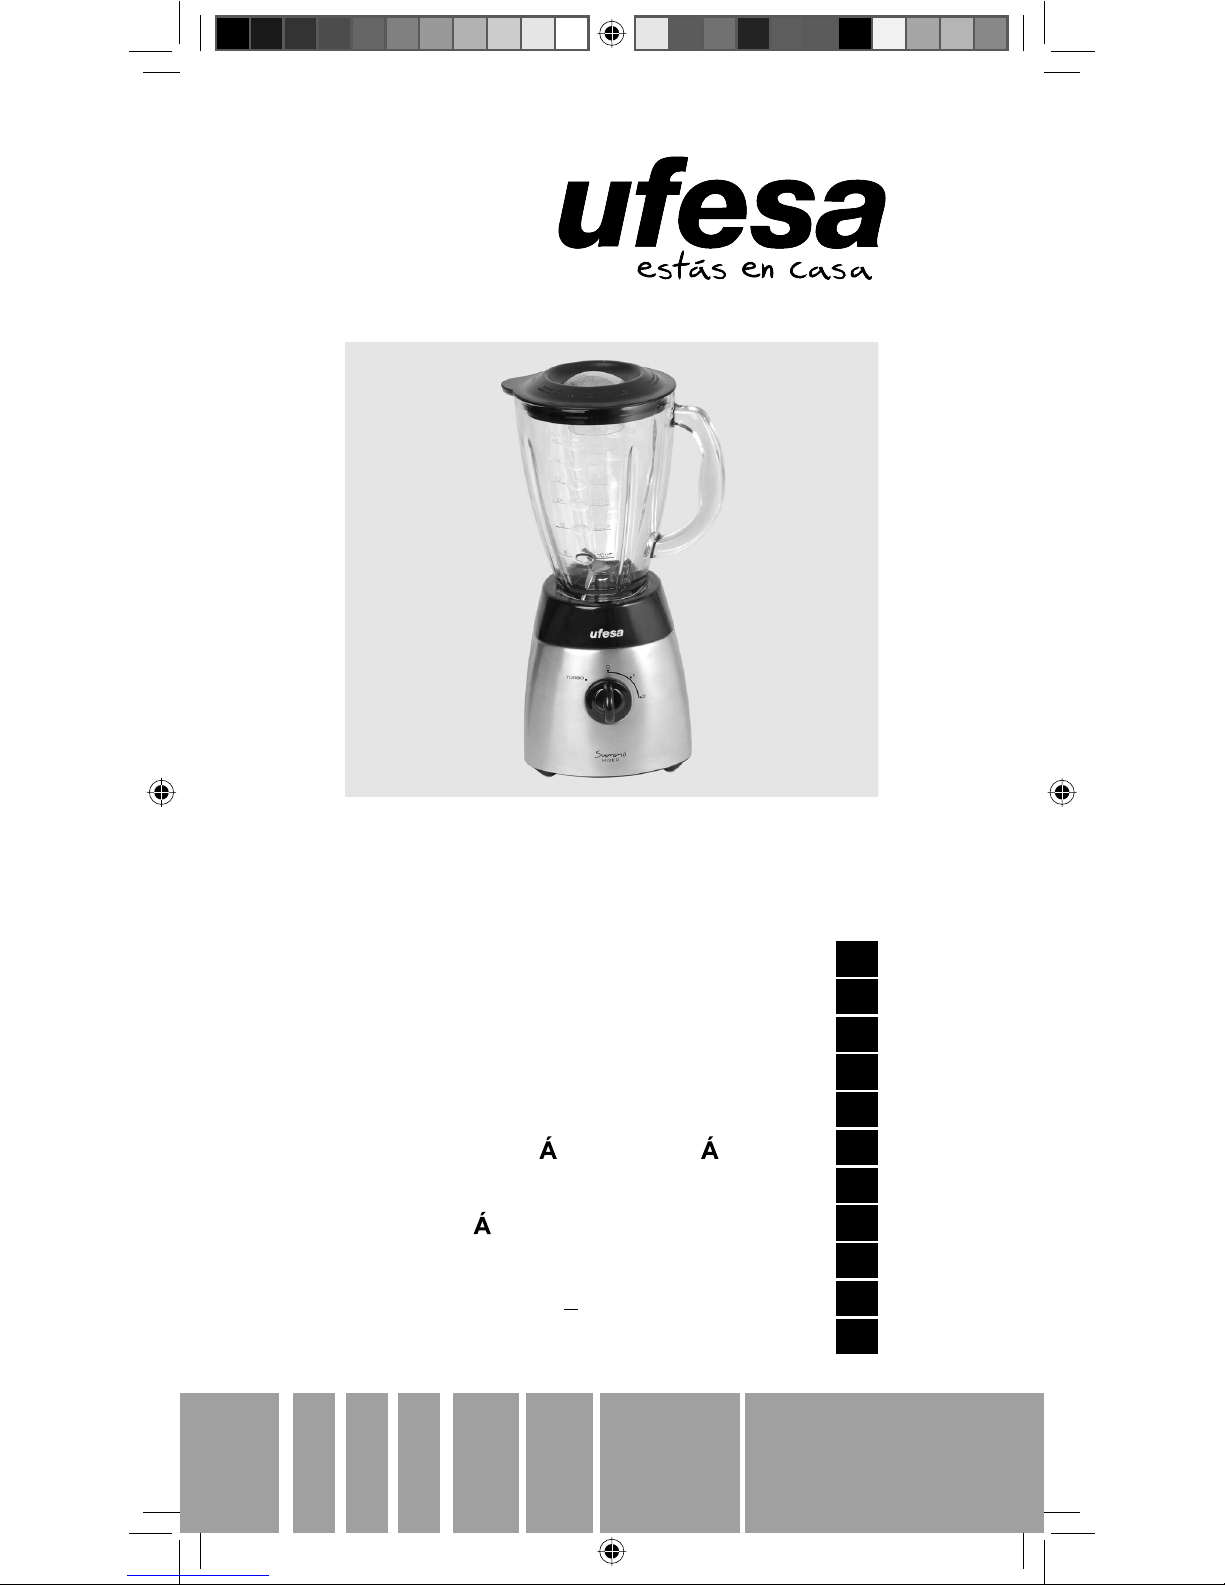
BS4795
21
3
4
5
6
Fig. 1
Fig. 2
Fig. 3 Fig. 4
60ml
30ml
ES
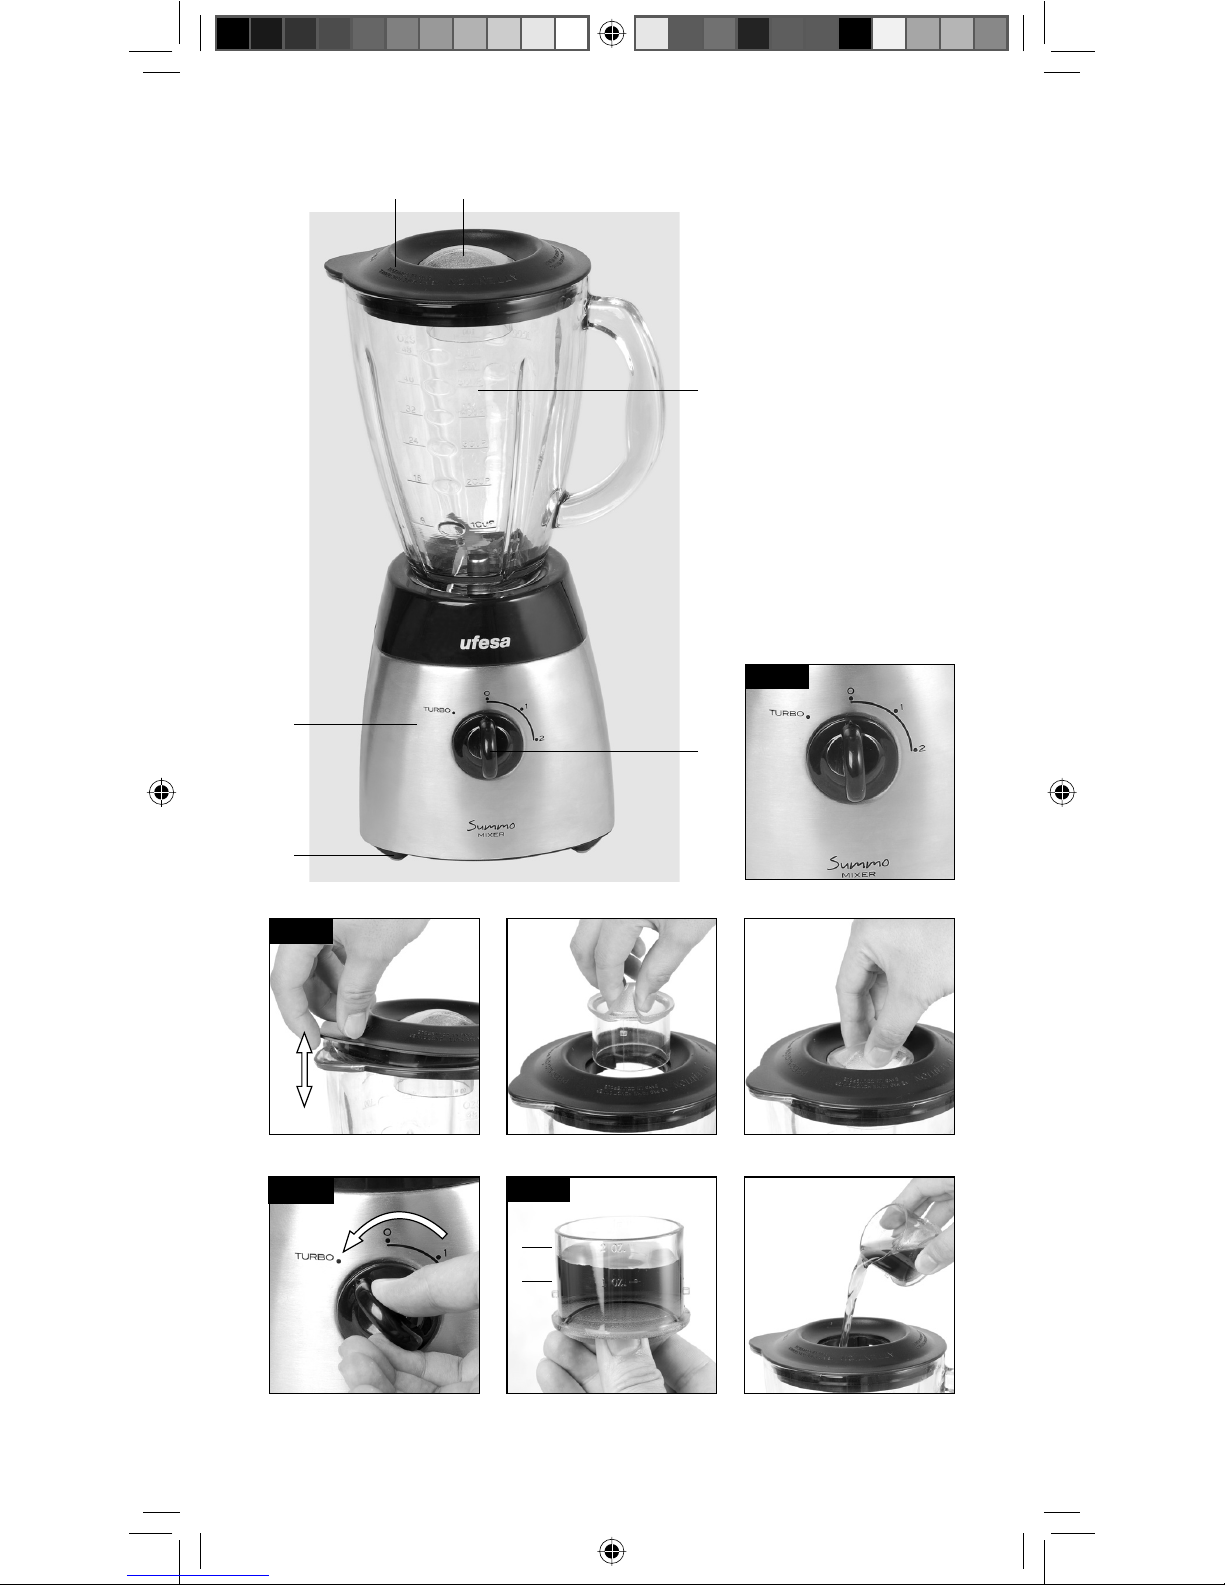
1. Tapa
2. Accesorio medidor
3. Jarra de vidrio con indicador de nivel
4. Cuerpo del motor
5. Selector de velocidad
6. Pies de goma antideslizantes
GB
1. Lid
2. Measuring cup
3. Glass jug with level indicator
4. Motor unit
5. Speed selector
6. Non-slip rubber feet
FR
1. Couvercle
2. Tasse graduée
3. Cruche en verre avec indicateur de niveau
4. Bloc-moteur
5. Sélecteur de vitesse
6. Pieds en caoutchouc antidérapant
PT
1. Tampa
2. Copo de medida
3. Jarro de vidro com indicador de nível
4. Motor
5. Selector de Velocidade
6. Suporte de borracha antiderrapante
DE
1. Deckel
2. Messbecher
3. Glaskrug mit Füllstandsanzeige
4. Motoreneinheit
5. Geschwindigkeitswahlschalter
6. Rutschfeste Gummifüße
HU
1. Fedél
2. Adagolócsésze
3. Üvegbögre szintjelzővel
4. Motoregység
5. Sebességválasztó kapcsoló
6. Csúszásmentes gumiláb
RU
1. Крышка
2. Мерная чаша
3. Стеклянная емкость с индикатором уровня
4. Блок мотора
5. Регулятор скорости
6. Резиновые ножки с противоскользящим
покрытием
CZ
1. Víko
2. Měrný pohár
3. Skleněná konvice s ukazatelem úrovně
4. Motorová jednotka
5. Volič rychlosti
6. Neklouzavá pryžová noha
BU
1. Капак
2. Мерителна чашка
3. Стъклена кана с обозначение на ниво
4. Моторен корпус
5. Регулатор на скоростта
6. Неплъзгащи се гумени
крачета
RO
1. Capac
2. Recipient de măsurare
3. Vas din sticlă cu indicator de nivel
4. Unitate motor
5. Selector de viteză
6. Picior din cauciuc anti-alunecare
AR
ءﺎﻄﻐﻟﺍ .
1
ﺱﺎﻴﻘﻟﺍ ﺏﻮﻛ .
2
ﻯﻮﺘﺴﻤﻠﻟ ﺮﺷﺆﻤﺑ ﺩﻭﺰﻤﻟﺍ ﻲﺟﺎﺟﺰﻟﺍ ءﺎﻋﻮﻟﺍ .
3
ﻙﺮﺤﻤﻟﺍ ﺓﺪﺣﻭ .
4
ﺔﻋﺮﺴﻟﺍ ﺩﺪﺤﻣ .
5
ﻕﻻﺰﻧﻼﻟ ﺔﻠﺑﺎﻘﻟﺍ ﺮﻴﻏ ﺔﻴﻃﺎﻄﻤﻟﺍ ﻡﺍﺪﻗﻷﺍ .
6

ESPAÑOL
INSTRUCCIONES DE SEGURIDAD:
• Lea con atención estas instrucciones de
uso antes de utilizar la batidora por primera
vez. Guárdelas para futuras consultas. Su
inobservancia puede provocar accidentes.
• Conéctese únicamente a la tensión indicada
en la placa de características.
• Este aparato no está diseñado para ser usado
por personas (incluyendo niños) con capacidades
físicas, sensoriales o mentales disminuidas, o
que tengan poca experiencia y conocimiento,
a menos que se les supervise o que les sean
otorgadas instrucciones concernientes al uso
del aparato por una persona responsable de la
seguridad de los mismos.
• Es necesario vigilar a los niños para garantizar
que no jueguen con el aparato.
• Utilice la batidora siempre sobre una superficie
nivelada.
• No introduzca utensilios en la jarra mientras el
aparato esté en funcionamiento.
• El filo de las cuchillas está muy afilado.
Manipule con cuidado las cuchillas durante su
limpieza para evitar cualquier lesión.
• No haga funcionar el aparato con el cable
enrollado.
• No desconecte tirando del cable ni con las
manos mojadas.
• No deje el cable de conexión colgando.
• No sitúe el aparato cerca de una fuente de
calor ni permita que el cable toque superficies
calientes.
• No utilice el aparato si la jarra presenta alguna
raja o está rota.
• Desenchufe el aparato de la toma de corriente
cuando no esté en uso y antes de proceder a su
limpieza.
• NO INTRODUZCA EL CUERPO DEL MOTOR,
EL CABLE O LA CLAVIJA EN AGUA O EN
CUALQUIER OTRO LÍQUIDO.
• No haga uso del aparato en el cuarto de
baño o cerca de agua. Tampoco lo utilice en el
exterior.
• No ponga en marcha la batidora con el cable
o el enchufe dañados, si ha observado que no
funciona correctamente o si ha sufrido daños de
algún tipo.
• No deje el electrodoméstico desatendido
cuando esté enchufado.
• No permita que la jarra se desborde. Si el
líquido entra en contacto con la base del motor,
el aparato puede resultar dañado.
• Este aparato ha sido diseñado exclusivamente
para uso doméstico.
• El cable de alimentación no debe ser sustituido
por el usuario. Las reparaciones y cambios de
cable deben ser realizadas exclusivamente por
un Servicio Técnico Autorizado.
• Este aparato es apto para uso alimentario.
FUNCIONAMIENTO Y USO
- Antes de usar el aparato por primera vez,
lave todos los accesorios que van a entrar en
contacto con los alimentos y séquelos (Ver
apartado
«
Limpieza y mantenimiento
»
).
- Trocee los ingredientes en trozos pequeños e
introdúzcalos en la jarra. Tenga cuidado de no
tocar las cuchillas con las manos. No ponga en
funcionamiento la jarra vacía, ya que el aparato
podría sobrecalentarse, y nunca exceda la
cantidad máxima de 1250 ml.
- Añada algo de líquido cuando vaya a batir
o mezclar alimentos secos o picar hielo. No
introduzca en la jarra líquidos que estén
hirviendo o demasiado calientes.
- Compruebe que el selector de velocidad esté
en la posición 0 (Fig. 1) y conecte la clavija de la
batidora en la toma de corriente.
- Coloque la jarra sobre el cuerpo del motor.
Quizás tenga que mover la jarra ligeramente para
alinearla hasta que ésta encaje correctamente
sobre el cuerpo del motor. La batidora cuenta
con un dispositivo de seguridad que evita que
el motor pueda funcionar si la jarra no está
colocada en su lugar apropiado.
- No utilice la batidora sin su tapa. Coloque de
forma adecuada tanto la tapa como el accesorio
medidor integrado en ésta antes de poner en
funcionamiento la batidora (Fig. 2).
- El selector de velocidad de la batidota tiene
4 posiciones (Fig. 1):
0 - El aparato está apagado.
1 - Velocidad baja, se utiliza principalmente
para líquidos y para mezclas ligeras.
2 - Velocidad alta, apropiada para ingredientes
sólidos y para triturar alimentos más duros.
Turbo - Velocidad programada de impulso
(Fig. 3). Es adecuada para picar hielo. Esta
función aporta un golpe de velocidad corto
pero con la máxima potencia y velocidad;
permite a la batidora funcionar mediante
impulsos instantáneos para obtener unos
resultados de más calidad. En esta posición,
el interruptor funciona con resorte en lugar
de hacerlo en posición fija, y para volver de
nuevo a la posición inicial 0 simplemente hay
que dejar de accionar el interruptor y éste
volverá directamente a la posición 0.
- Para poner en funcionamiento el aparato,
seleccione la velocidad apropiada según los
alimentos a procesar. No utilice la batidora sin
interrupción durante más de 2 minutos seguidos
para evitar que el aparato se sobrecaliente.
Después de 2 minutos de funcionamiento
continuo, apague el aparato durante algunos
minutos para permitir que éste se enfríe.

- A altas temperaturas, la tapa puede ablandarse
ligeramente y no ser hermética, permitiendo
que los alimentos de la jarra se puedan salir.
Por ello, cuando se mezclen líquidos templados
o calientes, es necesario seleccionar la
velocidad baja 1 y poner la mano sobre la
tapa para mantenerla en su lugar durante el
funcionamiento, evitando así que el contenido
del interior pueda derramarse. Cuando utilice
la batidora con líquidos calientes, llene la jarra
sólo hasta la mitad de su capacidad.
- No es necesario que detenga el funcionamiento
de la batidora si desea añadir más ingredientes.
Simplemente debe desenroscar el accesorio
medidor integrado en la tapa, retirarlo e
introducir los nuevos ingredientes a través
del orificio (Fig. 4). A continuación, vuelva a
colocar el accesorio medidor en la tapa y gírelo.
Recuerde que no debe exceder en ningún caso
la cantidad máxima de 1250 ml.
- Si algún trozo de alimento se ha quedado
atascado en los laterales de la jarra, apague la
batidora. Las cuchillas continuarán moviéndose
durante unos segundos hasta parar totalmente.
Levante la tapa y retire el trozo del lugar en
el que ha quedado obstruido. Si utiliza algún
cubierto para ello, manténgalo alejado de las
cuchillas a una distancia prudente para evitar
posibles accidentes. Una vez realizada esta
operación, reanude el funcionamiento de la
batidora.
- Cuando termine de utilizar el aparato, gire el
interruptor hasta la posición 0 y espere hasta
que las cuchillas dejen de moverse antes de
proceder a retirar la tapa de la jarra o retirar la
jarra de la base del motor. No intente retirar la
jarra de la base del motor si el motor todavía
está en funcionamiento. Por último, desenchufe
el aparato de la toma eléctrica y disfrute de los
resultados.
LIMPIEZA Y MANTENIMIENTO
Limpie la jarra de la batidora después de cada
uso para evitar que los residuos se depositen en
el interior de la jarra. En primer lugar, compruebe
que el aparato esté apagado y desconectado de
la toma de corriente.
Para prolongar considerablemente la vida útil
de su batidora, le recomendamos lavar a mano
la jarra en lugar de hacerlo en el lavavajillas. Si
el agua entrara en contacto con el mecanismo
de unión de la jarra con las cuchillas, este
mecanismo podría perder el lubricante especial
que lleva en su interior para poder girar y la vida
útil del aparato se iría reduciendo gradualmente
con cada lavado.
La forma más rápida y más adecuada para
limpiar la jarra de la batidora es hacer uso de la
función de autolimpieza:
- Llene la jarra de la batidora hasta la mitad con
agua caliente y añada una pequeña cantidad de
detergente lavavajillas líquido.
- Coloque la tapa y el accesorio medidor
adecuadamente.
- Mantenga la velocidad intermitente
«
Turbo»
(Fig. 3) pulsada durante varios segundos. El
agua caliente con detergente lavavajillas líquido
diluido desprenderá los residuos adheridos en
el interior de la jarra.
- Retire la jarra de la base del motor y tire el
agua sucia. Si todavía quedara algún resto en el
interior de la jarra, utilice un paño mojado o una
esponja con estropajo no-raya para quitarlo.
Recuerde tener mucho cuidado siempre y
mantener sus manos lejos de las cuchillas para
evitar accidentes, ya que están muy afiladas.
- Utilice agua jabonosa y un paño húmedo para
limpiar la parte exterior de la jarra, la tapa y el
accesorio medidor. A continuación, aclárelos
y séquelos bien antes de volver a colocarlos.
Si introduce estas partes en el lavavajillas,
los acabados de las superficies pueden verse
alterados.
- Si no limpia la jarra inmediatamente después
de utilizarla, los residuos que se queden
pegados serán difíciles de eliminar. En este
caso, puede probar a utilizar un cepillo de nylon
para limpiar la parte interior de la jarra. Si esto
no funcionara, pique varios cubitos de hielo en la
jarra de la batidora a velocidad máxima, esto le
ayudará a despegar las sustancias adheridas.
- Limpie la parte exterior del motor con un paño
húmedo y limpio.
- No introduzca nunca la base del motor en
agua o en cualquier otro líquido.
- No utilice productos de limpieza fuertes ni
disolventes abrasivos.
ADVERTENCIAS DE DEPOSICIÓN /
ELIMINACIÓN:
Nuestras mercancías cuentan con un
embalaje optimizado para su transporte.
Éste consiste – por principio- en materiales no
contaminantes que deberán ser entregados
como materia prima secundaria al servicio local
de eliminación de basuras y reciclaje.
Antes de eliminar el aparato, usted debe en
primer lugar hacer notar de manera visible que
el mismo no funciona y asegurarse de eliminarlo
en conformidad con las leyes nacionales
vigentes. Su Minorista, Ayuntamiento o
Municipio le puede suministrar información
detallada acerca de esto.
Este aparato tiene una etiqueta en
conformidad con la Directriz Europea
2002/96/EC – concerniente a los
aparatos eléctricos y electrónicos
usados (equipos eléctricos y electrónicos de
desecho – WEEE). Este producto no deberá
eliminarse junto con la basura doméstica.
Este producto deberá eliminarse en un lugar
autorizado para reciclar aparatos eléctricos y
electrónicos. La directriz determina el marco
para devolver y reciclar aparatos y es de
aplicación en toda la Unión Europea. Por favor,
pregunte a su distribuidor acerca de las medidas
de deposición / eliminación actuales.

ENGLISH
SAFETY INSTRUCTIONS:
• Read through the instructions carefully before
using this blender for the first time. Keep them
for future reference. Inobservance of these
instructions may lead to an accident.
• Only connect it to the voltage stated on the
rating plate.
• This appliance is not intended for use by
persons (including children) with reduced
physical, sensory or mental capabilities, or lack
of experience and knowledge, unless they have
been given supervision or instruction concerning
use of the appliance by a person responsible for
their safety.
• Children should be supervised to ensure that
they do not play with the appliance.
• Always use the blender on a level surface.
• Never insert utensils inside the jug while the
appliance is operating.
• The edge of the blade is very sharp. To avoid
injuries handle the blades with extreme care
when cleaning them.
• Do not operate the appliance with the cable
still coiled.
• Do not unplug it by pulling on the cable or with
wet hands.
• Do not leave the plug hanging freely.
• Do not leave the appliance close to heat
sources or allow the cable to come into contact
with hot surfaces.
• Do not use the appliance if the jug is cracked
or broken.
• Always unplug it from the wall socket when it is
not in use and before cleaning it.
• DO NOT IMMERSE THE MOTOR HOUSING,
CABLE OR PLUG IN WATER OR ANY OTHER
LIQUID.
• Do not use the appliance in the bathroom
or near any source of water. Do not use it
outdoors.
• Do not switch the blender on if either the cable
or plug are damaged, if it can be detected that it
is not operating correctly or if it has suffered any
type of damage.
• Do not leave it unattended while plugged in.
• Do not let the jug overflow. If liquid gets into the
motor unit, it may damage it.
• This appliance has been designed for domestic
use only.
• The mains cable must not be replaced by the
user. Cable repairs and replacements must
be carried out exclusively by an Authorized
Technical Service Centre.
• This appliance is suitable for use with
foodstuffs.
OPERATION AND USE
- Before using it for the first time, wash the
parts which are going to come into contact with
foodstuffs and dry them (see section “Cleaning
and maintenance”).
- Add the ingredients into the jug after having
first chopped them into small pieces. Always
keep your hands away from the blades. Do not
run the appliance empty, as it may overheat,
and never exceed the maximum quantity of
1250 ml.
- Add some liquid when mixing dry ingredients
or crushing ice. Do not pour very hot or boiling
liquids into the jug.
- Check that the speed selector is set to
0 position (Fig. 1) and put the plug into the power
socket.
- Place the jug onto the motor housing. You may
have to turn it slightly to align the lugs in the base
of the jug with the lugs on the top of the motor
unit. The blender is fitted with a safety switch to
prevent the motor from operating unless the jug
is on its place.
- Do not use the blender without the lid. Place
both the lid and the measuring cup properly
before starting (Fig. 2).
- The blender speed selector has 4 positions
(Fig. 1):
0 - The appliance is switched off.
1 - Low speed, used mainly for liquids and
light applications.
2 - High speed, suitable for solid ingredients
and heavy applications.
Turbo - Programmed impulse speed (Fig. 3).
Appropriate for ice crushing. This function
will give you a short burst at high speed; it
allows the blender to work using pulses which
permits higher quality results. In this position
the knob is spring-loaded and to come back
to 0 position you just have to release the
knob, which will come directly back to this
0 position.
- Select the suitable speed with the selector
to start the blender up. Do not run the motor
continuously for more than 2 minutes in order
to avoid overheating. After 2 minutes, switch off
the appliance for a few minutes to let the blender
cool down.
- At high temperatures, the lid may soften
enough to lose its seal, allowing the contents of
the jug to escape, so when mixing warm or hot
liquids, select the slowest speed on the speed
selector and put a hand on the lid to hold it in
its place while blending. Do not fill the jug more
than a half.
- If you want to add more ingredients while the
blender is working, you don’t need to stop it.
Just turn the measuring cup anti-clockwise from
the lid, lift it out and pour the new ingredients
through the hole (Fig. 4). After this, replace the
measuring cup and turn clockwise to lock it
again. Remember that the maximum quantity of
1250 ml should not be exceeded.
- If you have to stir in food that is stuck to the
sides of the jug, switch the appliance off first.
The blades may continue to rotate for a moment
longer. Keep spoons or spatulas a good distance
away from the blades to avoid accidents.
- When you finish using the blender, turn the
knob to 0 position and wait until the blades stop
moving before removing the lid from the jug or
removing the jug from the motor unit. Do not try
to take the jug off the motor unit if the motor is
still running. Finally, unplug the appliance from
the mains and enjoy the results.
CLEANING AND MAINTENANCE
Clean the blender jug after each use to prevent
residues from setting inside the jug. First of all,
check that the appliance is switched off and
unplugged from the mains.
To guarantee a long service life of the blender,
we recommend hand-washing for the jug instead
of washing it into the dishwasher. If water made
in contact with the mechanism that joins the jug
with the blades, this mechanism would lose the
lubricant that helps it to turn and the service life
time of the blender would decrease gradually
with every washing.
The best and faster way to clean the jug is using
the self-cleaning function:
- Fill the jug up to a half with hot water and add
a small amount of washing-up liquid.
- Fit the lid and the measuring cup properly.
- Select the intermittent function “Turbo” (Fig. 3)
for several seconds. The hot water with washing-up
liquid will remove the stuck residues inside the
jug.
- Extract the jug from the motor base and throw
out the dirty water. If there were still any small
amount of residues inside the jug, you can use
a wet cloth or a non-scratch sponge scourer to
remove them. Always keep your hands away
from the blades to avoid accidents, they are
sharp.
- Use soapy water and a damp cloth to clean the
outside part of the jug, the lid and the measuring
cup. After this, rinse and dry them carefully
before reassembling them. If you insert these
parts into the dishwasher, the surface finishes
may be affected.
- If you don’t clean the jug immediately after
having used it, removing the glued residues
won’t be so easy. Then, you can use a nylon
brush to clean the inside part of the jug. If that
doesn’t work, crush some ice cubes in it, this will
shift the particles.
- Wipe the outside of the motor unit with a clean
damp cloth.
- Don’t immerse the motor unit in water or any
other liquid.
- Don’t use harsh or abrasive cleaning agents or
solvents.
ADVICE ON DISPOSAL:
Our goods come in optimized packaging.
This basically consists in using
non-contaminating materials which should be
handed over to the local waste disposal service
as secondary raw materials.
Before throwing a used appliance away, you
should first make it noticeably inoperable and
be certain to dispose of it in accordance with
current national laws. Your Retailer, Town Hall or
Local Council can give you detailed information
about this.
This appliance is labeled in accordance
with European Directive 2002/96/EC
– concerning used electrical and
electronic appliances (waste electrical
and electronic equipment – WEEE). This product
must not be disposed together with the domestic
waste. This product has to be disposed at an
authorized place for recycling of electrical and
electronic appliances. The guideline determines
the framework for the return and recycling
of used appliances as applicable throughout
the EU. Please ask your dealer about current
means of disposal.
FRANÇAIS
INSTRUCTIONS DE SÉCURITÉ :
• Lisez les instructions avec précaution avant
d’utiliser ce mixeur pour la première fois.
Conservez-les pour référence future. Le non
respect de ces instructions peut causer un
accident.
•
Connectez-le uniquement à la tension indiquée
sur la plaque signalétique.
• Cet appareil n’est pas destiné à l’utilisation
par des personnes (y compris les enfants)
avec des capacités physiques, sensorielles ou
mentales, ou un manque d’expérience ou de
connaissance, sauf s’ils sont sous supervision
ou ont reçu des instructions concernant
l’utilisation de l’appareil par une personne
responsable de leur sécurité.
• Les enfants doivent être supervisés pour
assurer qu’ils ne jouent pas avec l’appareil.
• Utilisez toujours le mixeur sur une surface
plane.
• N’insérez jamais d’ustensiles à l’intérieur de
la cruche lorsque l’appareil est en marche.
• Les lames sont très tranchantes, pour éviter
toute blessure, manipulez ces lames avec
précaution au cours du nettoyage.
• N’utilisez pas l’appareil avec le câble encore
enroulé.
• Ne le débranchez pas en tirant sur le câble
ou avec des mains mouillées.
• Ne laissez pas la prise suspendue librement.
• Ne laissez pas l’appareil à proximité de
sources de chaleur ou le câble d’entrer en
contact avec des surfaces chaudes.
•
N’utilisez pas l’appareil si la cruche est fissurée
ou cassée.
• Débranchez-le toujours de la prise murale
lorsqu’il n’est pas utilisé ou avant de le
nettoyer.
•
N’IMMERGEZ PAS LE BOÎTIER DU MOTEUR,
LE CÂBLE OU LA PRISE DANS DE L’EAU OU
TOUT AUTRE LIQUIDE.
• N’utilisez pas l’appareil dans la salle de bain
ou à proximité de source d’eau. Ne l’utilisez
pas en extérieur.
• N’allumez pas le mixeur si le câble ou la fiche
sont endommagés, si vous constatez qu’il ne
fonctionne pas correctement ou s’il a souffert
de n’importe quel type de dégât.
• Ne le laissez pas sans surveillance lorsqu’il
est branché.
• Ne laissez pas la cruche déborder. Si du
liquide entre dans l’unité motorisée, il peut
l’endommager.
• Cet appareil a été conçu pour l’utilisation
domestique uniquement.
•
Le câble secteur ne doit pas être remplacé par
l’utilisateur. Les réparations et remplacements
de câble doivent être réalisés exclusivement
par un Centre de réparation agréé.
• Cet appareil convient pour l’utilisation avec
les denrées alimentaires.
FONCTIONNEMENT ET
UTILISATION
- Avant de l’utiliser pour la première fois, lavez
les pièces qui entreront en contact avec les
denrées alimentaires puis séchez-les (voir la
section “ Nettoyage et maintenance ”).
- Ajoutez les ingrédients dans la cruche après
les avoir coupé en petits morceaux. Éloignez
toujours vos mains des lames. N’utilisez pas
l’appareil vide, car il peut surchauffer, et ne
dépassez jamais la quantité maximale de 1250 ml.
- Ajoutez du liquide lorsque vous mélangez des
ingrédients secs ou pilez de la glace. Ne versez
pas de liquides très chaud ou bouillants dans
la cruche.
- Vérifiez que le sélecteur de vitesse est réglé
sur la position 0 (Fig. 1) et placez la fiche dans
la prise d’alimentation.
- Placez la cruche dans le boîtier du moteur.
Vous devez peut-être la tourner légèrement
pour aligner les languettes à la base de la
cruche avec celles en haut de l’unité motorisée.
Le mixeur dispose d’un commutateur de sécurité
pour empêcher que le moteur fonctionne sans
la cruche en place.
- N’utilisez pas le mixeur sans le couvercle.
Placez le couvercle et la tasse graduée
correctement avant de démarrer (Fig. 2).
-
Le sélecteur de vitesse du mixeur a 4 positions
(Fig. 1):
0 - L’appareil est éteint.
1 - Basse vitesse, utilisé principalement
pour les liquides et applications légères.
2 - Haute vitesse, convient pour les
ingrédients solides et applications lourdes.
Turbo - Vitesse à impulsions programmées
(Fig. 3). Appropriée pour piler la glace. Cette
fonction vous donnera une courte pointe
à haute vitesse ; elle permet au mixeur
de fonctionner en utilisant des impulsions
qui permettent des résultats de meilleure
qualité. Dans cette position le bouton est à
ressort et pour revenir à la position 0 vous
devez juste relâcher le bouton, qui reviendra
automatiquement à cette position 0.
- Sélectionnez la vitesse appropriée avec le
sélecteur pour démarrer le mixeur. Ne faites
pas fonctionner le moteur en continu pendant
plus de 2 minutes afin d’éviter la surchauffe.
Après 2 minutes, éteignez l’appareil pendant
quelques minutes pour laisser le mixeur
refroidir.
 Loading...