

Page 1

BS4790
ES INSTRUCCIONES DE USO
GB OPERATING INSTRUCTIONS
FR MODE D'EMPLOI
PT INSTRUÇÕES DE USO
DE
GEBRAUCHSANLEITUNG
HU HASZNÁLATI UTASÍTÁS
RU
РУKОВОДСТВО ПО ЭКСПЛУАТАЦИИ
CZ NÁVOD K POUÎITÍ
BU
УКАЗАНИЯ ЗА УПОТРЕБА
RO INSTRUCTIUNI DE FOLOSIRE
AR ﻞﻴﻐﺸﺘﻟا تادﺎﺷرإ
BS4790.indd 1BS4790.indd 1 17/4/07 09:42:3517/4/07 09:42:35
Page 2
1
2
3
4
5
a b c g
7
8
6
d e f h
11
9
10
Fig. 1 Fig. 2 Fig. 3
i
BS4790.indd 2BS4790.indd 2 17/4/07 09:42:3717/4/07 09:42:37
Page 3
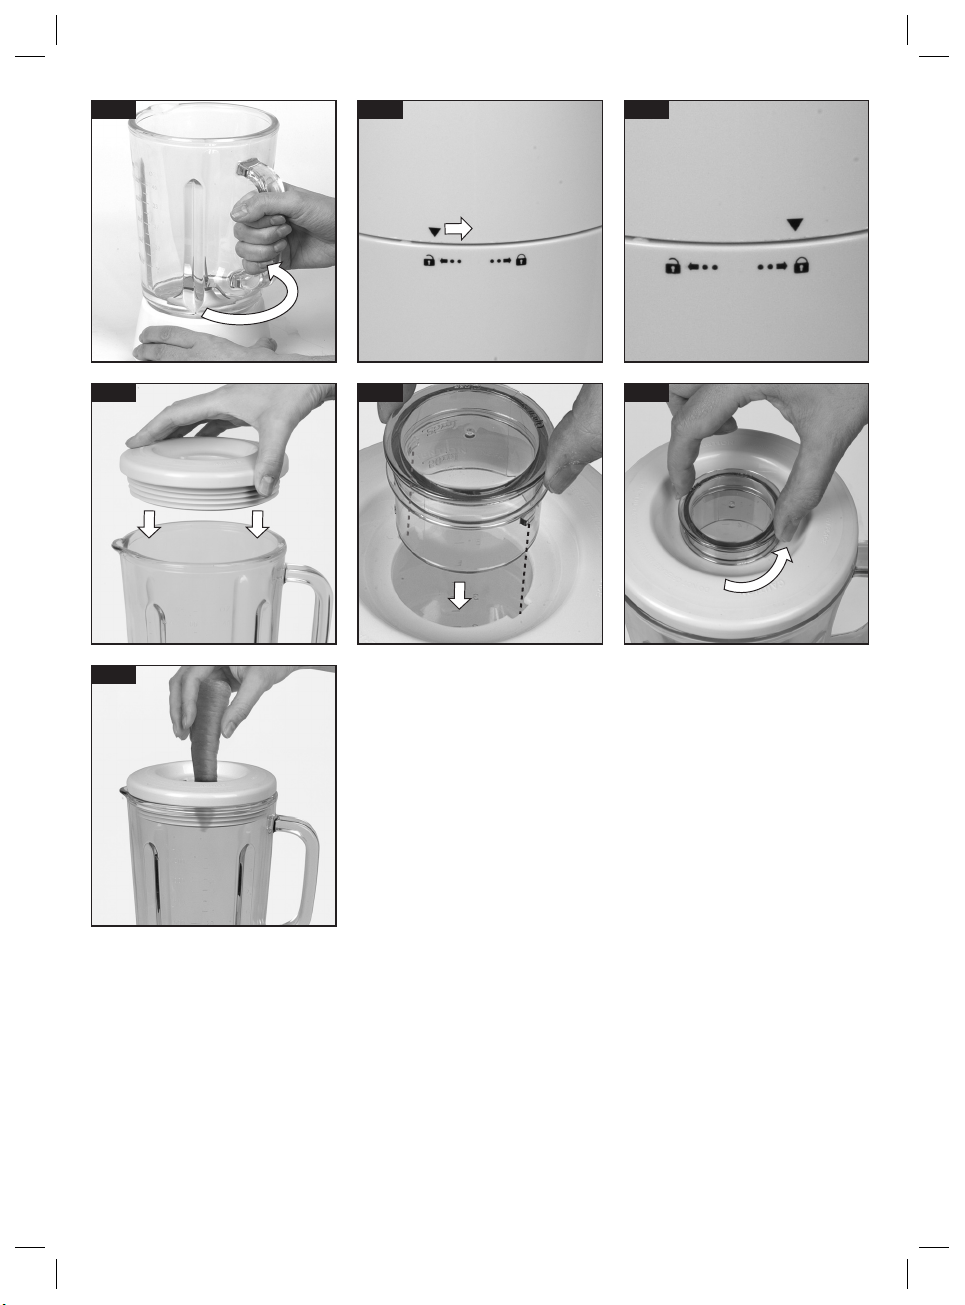
Fig. 4 Fig. 5 Fig. 6
Fig. 7 Fig. 8 Fig. 9
Fig. 10
BS4790.indd 3BS4790.indd 3 17/4/07 09:42:3717/4/07 09:42:37
Page 4
ESPAÑOL
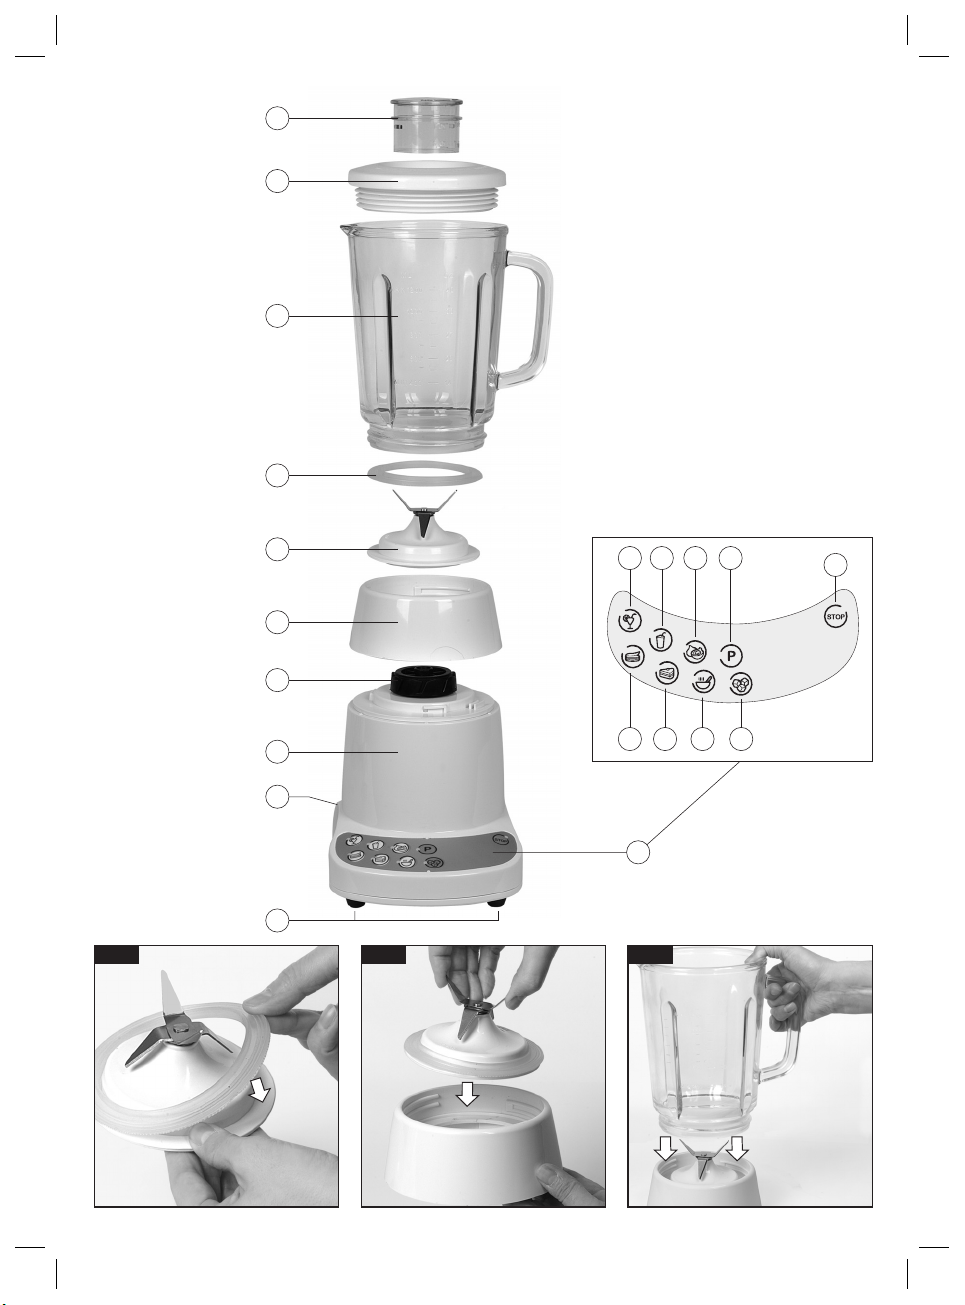
1. Tapón
2. Tapa
3. Jarra
4. Junta de estanqueidad
5. Cono de cuchillas
6. Cuerpo motor
7 Pieza de anclaje sobre cuerpo motor
8. Embrage del motor
9. Mandos de control
a) Velocidad 1 [
b) Velocidad 2 [
c) Velocidad 3 [
d) Velocidad 4 [
e) Velocidad 5 [
f) Velocidad 6 [
g) Conversor de las velocidades fijas en
velocidades por pulsos [
h) Función picar hielo [
i) Botón de parada [
10. Pies antideslizantes
11. R eco gec abl e s
NOTAS IMPORTANTES
• Lea atentamente estas instrucciones antes de usar el aparato por
primera vez. Guárdelas para futuras consultas.
• Conéctese únicamente a las tensiones indicadas en la placa de
características.
• Este aparato es apto para uso alimentario.
• Este aparato está diseñado exclusivamente para uso doméstico.
• Utilice siempre la batidora sobre una superficie nivelada y
estable.
• Este aparato no debe ser utilizado por personas (incluyendo
niños) con capacidades físicas, sensoriales o mentales disminuidas
o falta de experiencia y conocimiento a menos que hayan sido
instruidas respecto a su uso por una persona responsable.
• No manipule el aparato con las manos mojadas.
• Evite el contacto con las partes móviles.
• El filo de las cuchillas es muy afilado. Manipule con cuidado las
cuchillas durante su limpieza para evitar cualquier lesión.
• No introduzca utensilios como cuchillos o tenedores en el interior
de la jarra mientras el aparato está en funcionamiento.
• El uso de accesorios no suministrados por el fabricante puede
originar accidentes.
• No haga funcionar el aparato en vacío.
• No ponga el aparato cerca de fuentes de calor y evite que el cable
roce superficies calientes.
• No haga funcionar el aparato con el cable enrollado.
• No monte o desmonte la jarra de la batidora mientras el aparato
está en marcha.
• Desconecte el aparato antes de cambiar los accesorios o partes
que puedan moverse durante el funcionamiento de la licuadora.
• No abra la tapa de la batidora hasta que se haya parado el motor.
• No deje el aparato en funcionamiento sin vigilancia, especialmente
cerca de los niños.
• Desconecte el aparato cuando no lo use.
• No desconecte nunca tirando del cable ni deje la conexión
colgando.
• Antes de su limpieza, compruebe que el aparato está
desconectado.
• NO DEBE SUMERGIR EL CUERPO MOTOR EN AGUA O CUALQUIER
OTRO LIQUIDO.
]
]
]
]
]
]
]
]
]
• No utilice la batidora si la cuchilla está dañada.
• No lo ponga en funcionamiento si el cordón o el enchufe están
dañados o si observa que el aparato no funciona correctamente.
• No utilice el aparato al aire libre.
• ATENCION : Para reducir riesgos de incendio o desca rgas eléctricas,
no retire ninguna de las tapas. No hay en el interior piezas que
puedan ser manipuladas por el usuario. Las reparaciones y cambios
de cable deben ser realizadas exclusivamente por un Servicio
Técnico Autorizado.
MONTAJE
Antes del primer uso lave con agua jabonosa las piezas que vayan a
estar en contacto con los alimentos.
El filo de las cuchillas es muy afilado.
Manipule con cuidado las cuchillas durante su limpieza para evitar
cualquier lesión.
Monte la junta de estanqueidad (4) sobre el cono de cuchillas (5).
Asegúrese de la correcta colocación de la Junta con el labio hacia
arriba.(Figura 1)
Asiente el cono de cuchillas sobre la pieza de anclaje sobre el
cuerpo motor (7) (Figura 2)
Encaje la Jarra (3) sobre la pieza de anclaje al cuerpo motor (7)
(Figura 3) y gire la Jarra en sentido anti-horario hasta que quede
correctamente ensamblada. (Figura-4)
Asiente la jarra montada sobre el cuerpo motor (6). Los iconos le
indicarán tanto la zona de ensamblaje como el sentido de giro para
la correcta fijación del conjunto. (Figuras 5 y 6)
Desmontar.
Montar.
Pa ra mo nta r l a t ap a de la ba tid or a (2 ), e nc áj ela so br e la pa rt e su pe ri or
de la jarra y presiones sobre ella hasta que quede totalmente
encajada. (Figura 7)
Para montar el tapón (1) haga coincidir las patillas de éste con los
orificios de la boca de la tapa (Figura 8) y gírelo en sentido antihorario hasta que quede correctamente ensamblado. (Figura 9)
Importante: Esta batidora cuenta con un dispositivo de seguridad
que impide que el cuerpo motor entre en funcionamiento si la Jarra
no se encuentra correctamente colocada.
PREPARACIÓN DE LAS FRUTAS O VERDURAS
Lave o pele las frutas o verduras que desea batir.
Para procesar las frutas con semillas (del tipo de manzanas o peras)
se debe retirar la piel y el corazón de las mismas.
Las frutas y verduras con piel (por ejemplo, cítricos, melones, kiwis,
etc.) deben pelarse previamente.
Las uvas se pueden licuar sólo después de separarlas del racimo.
Corte las frutas y verduras en trozos que puedan pasar por el orificio
de llenado.
No utilice frutas y verduras con hebras (por ejemplo, pasas) en esta
batidora.
Utilice frutas y verduras tan frescas como sea posible.
Las frutas y verduras contienen vitaminas y minerales que se
deterioran cuando entran en contacto con el oxígeno o la luz. Beba
el zumo justamente después de su elaboración.
Si es necesario guardarlo unas horas, póngalo en el frigorífico en
recipientes de cerámica o vidrio. Añada el zumo de un limón para
prolongar su conservación.
FUNCIONAMIENTO
Coloque la batidora sobre una superficie nivelada y estable.
La batidora sólo funcionará cuando la jarra se haya colocado
correctamente.
Conecte el aparo a la red, el indicador luminoso “Stop” parpadeará
para indicar el estado de reposo.
BS4790.indd 4BS4790.indd 4 17/4/07 09:42:3717/4/07 09:42:37
Page 5
Ponga todos los ingredientes en el recipiente sin sobrepasar la señal
de máximo llenado de la jarra de 1’2 litros. Para obtener los mejores
resultados, ponga todos los líquidos en primer lugar, conecte el
aparato un momento y añada los ingredientes sólidos.
Si desea añadir mayor cantidad de alimentos durante el proceso,
hágalo a través de la boca de la tapa. (Figura-10)
Para detener el funcionamiento, pulse el botón de parada. No
intente nunca desmontar la jarra del cuerpo del aparato con el
motor en marcha.
Seleccione la velocidad más adecuada para la función que se desea
realizar.
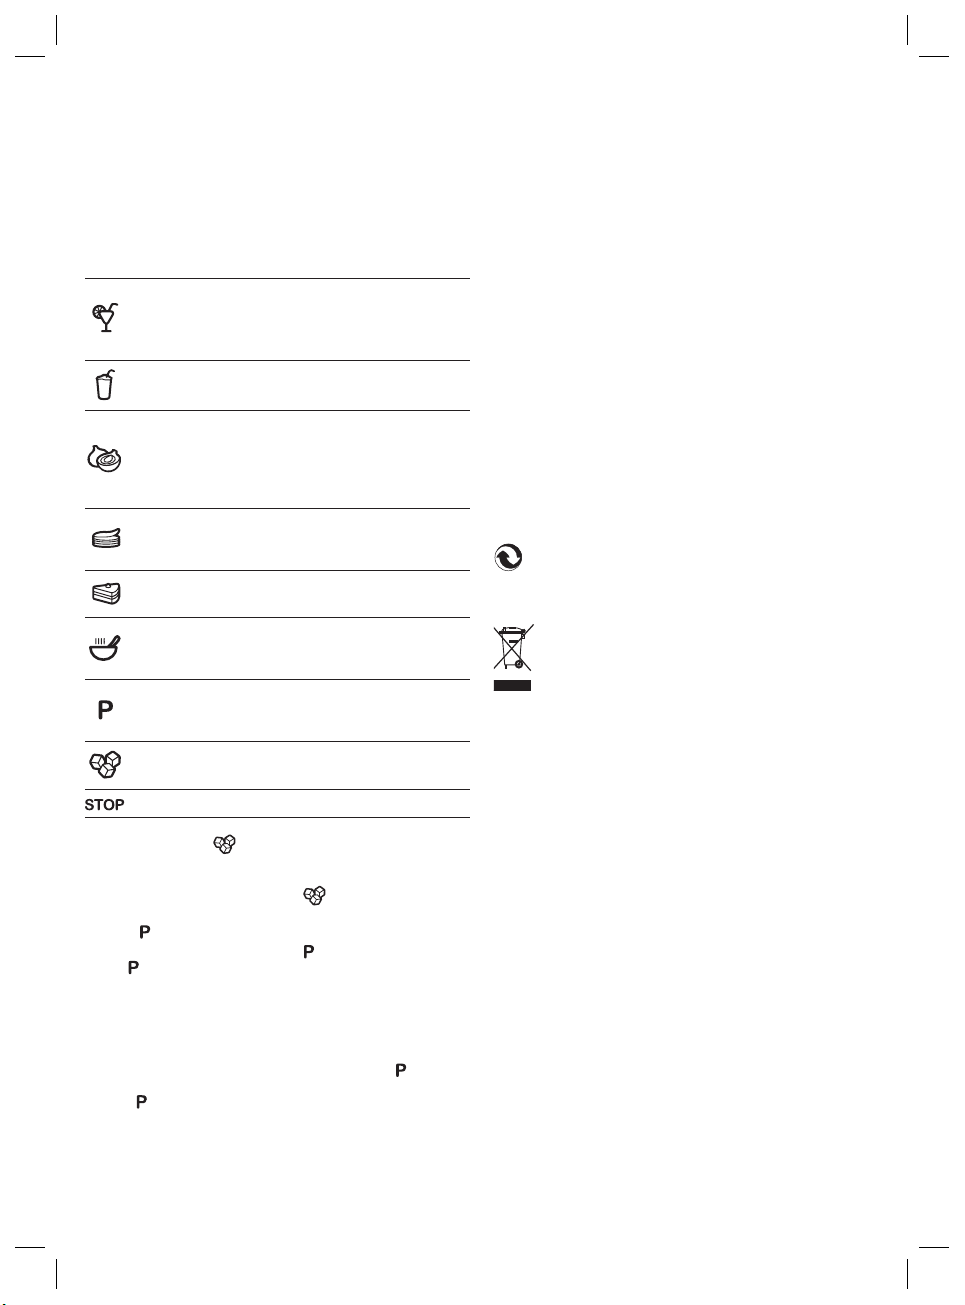
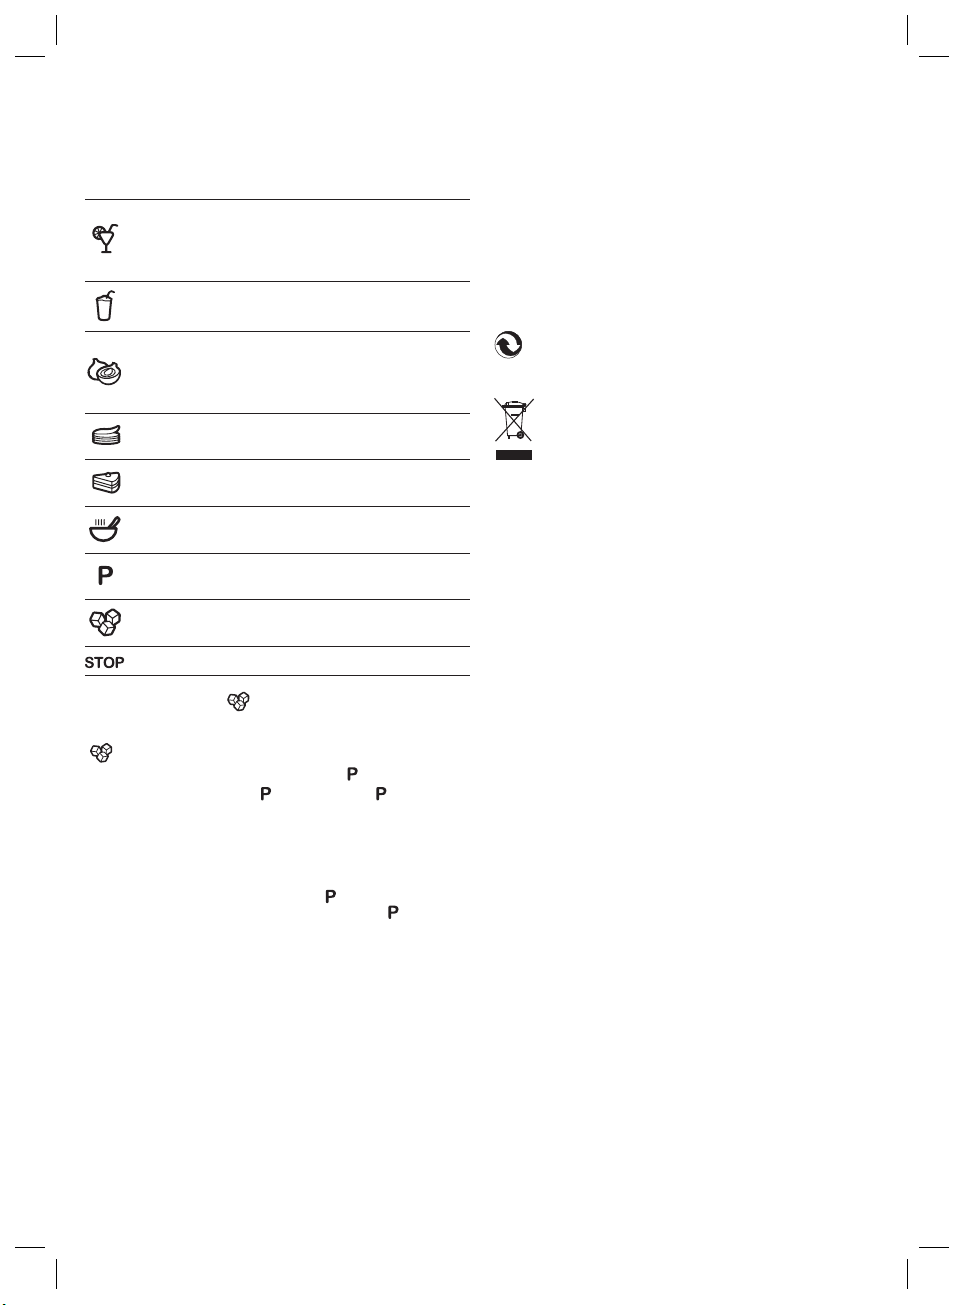
Velocidad 1 (Lenta) Velocidad Fija
Para agitar preparados instantáneos, etc.
Para hacer zumos de frutas peladas, como manzana,
pera, etc.
Velocidad 2 Velo cidad Fi ja
Adecuada para elaborar batidos con café o vainilla.
Velocidad 3 Velocidad por Pulsos prog ramados
Adecuada para la preparación de alimentos como
cebollas y ajos.
La función por pulsos programados facilita que el
alimento sea procesado con rapidez.
Velocidad 4 (Media) Velocidad Fija
Adecuada para elaborar pancakes, pastas de crêpes,
salsas, etc.
Velocidad 5 Velocidad Fija
Para triturar vegetales, cócteles, compotas, etc.
Velocidad 6 (Rápida) Velocidad Fija
Adecuada para elaborar cocktails con alcohol o con
frutas.
Conversor de las velocidades fijas en velocidades
por pulsos.
Velocidad instantánea.
Función picar hielo (Rápida)
Velocidad por Pulsos programados
Botón de Parada
Función picar hielo [
Para picar cubitos de hielo, colóquelos en el interior de la Jarra y
ponga la tapa. No es necesario añadir ningún líquido. Ponga en
marcha el aparato pulsando el botón [
Conversor de las velocidades fijas en velocidades por
pulsos. [
Para utilizar la función momentánea [
botón [
Pulse entonces el botón de velocidad de función deseado. La
batidora sólo funcionará mientras se mantenga pulsado el botón de
función y se parará cuando se deje de pulsar. Esta función hace más
sencillo juzgar el resultado obtenido y se puede utilizar para evitar la
producción de un exceso de espuma.
Para finalizar la función momentánea, pulse el botón [
y se apagará el indicador luminoso, es decir, para indicar que la
función [
]
]. Parpadeará el indicador luminoso correspondiente.
] ya no está activa.
].
].
], pulse en primer lugar el
] de nuevo
Advertencias:
- No utilice nunca la batidora en vacío.
- Si es necesario remover los alimentos adheridos a las paredes
de la jarra, interrumpa el funcionamiento del aparato. Las cuchillas
pueden seguir girando todavía unos instantes. Mantenga la cuchara
o espátula a una distancia prudente de las cuchillas para evitar
accidentes.
- Es aconsejable no rebasar un funcionamiento superior a 3 minutos
seguidos. Después de ese tiempo deje descansar el motor durante
unos minutos antes de volver a poner en marcha la batidora.
- Para obtener mejores resultados al triturar alimentos sólidos,
córtelos primero en porciones pequeñas.
- En los alimentos sin agua, añada una taza de líquido para facilitar la
función.
- No vierta líquidos muy calientes en la jarra.
LIMPIEZA Y MANTENIMIENTO
Antes de limpiar cualquiera de las partes de la batidora, pulse el
botón de parada y desconecte el aparato de la red eléctrica.
Después de cada uso, lave todos los elementos que hayan estado
en contacto con los alimentos en agua templada con jabón. Tenga
precaución al limpiar las cuchillas.
Limpie el cuerpo del motor solamente con un paño húmedo. Las
partes plásticas puede quedar manchadas cuando se trabaja con
alimentos que tienen elevados contenidos de pigmentos; (por
ejemplo: zanahorias). Utilice aceite vegetal para su limpieza.
Aviso: No limpie ninguna de las partes de la licuadora en el
lavavajillas. Para guardar el aparato, introduzca el cable en el
recogecables situado en la parte inferior del cuerpo motor.
ADVERTENCIAS DE DEPOSICION/ELIMINACION
Para su transporte, nuestras mercancías cuentan con un
embalaje optimizado. Este consiste –por principio- en
materiales no contaminantes que deberían ser entregados como
materia prima secundaria al servicio local de eliminación de
basuras.
Este producto cumple la Directiva de la UE 2002/96/CE.
El símbolo del cubo de basura tachado sobre el aparato
indica que el producto, cuando finalice su vida útil,
deberá desecharse separado de los residuos domésticos,
llevándolo a un centro de desecho de residuos separado
para aparatos eléctricos o electrónicos o devolviéndolo a su
distribuidor cuando compre otro aparato similar. El usuario es
el responsable de llevar el aparato a un centro de desecho de
residuos especiales al finalizar su vida útil. De lo contrario, podrá ser
sancionado en virtud de los reglamentos de desecho de residuos
vigentes. Si el aparato inutilizado es recogido correctamente como
residuo separado, podrá ser reciclado, tratado y desechado de
forma ecológica; esto evita un impacto negativo sobre el medio
ambiente y la salud, y contribuye al reciclaje de los materiales
del producto. Para obtener más información sobre los servicios
de desecho de residuos disponibles, contacte con su agencia
de desecho de residuos local o con la tienda donde compró el
aparato. Los fabricantes e importadores se hacen responsables del
reciclaje, tratamiento y desecho ecológico, sea directamente o a
través de un sistema público.
Su Ayuntamiento o Municipio le informará sobre posibilidades de
deposición/eliminación para los aparatos en desuso.
BS4790.indd 5BS4790.indd 5 17/4/07 09:42:3817/4/07 09:42:38
Page 6
ENGLISH
1. Stopper
2. Cover
3. Jug
4. Seal
5. Blade cone
6. Motor housing
7 Motor body retaining collar
8. Motor clutch.
9. Controls
a) Speed 1 [
b) Speed 2 [
c) Speed 3 [
d) Speed 4 [
e) Speed 5 [
f) Speed 6 [
g) Fixed speed to impulse speed converter [
h) Ice crushing function [
i) Stop button [
10. Non-slip feet
11. Cable tidy
IMPORTANT NOTES
• Read these instructions carefully before using the appliance for the
first time. Safeguard them for future reference.
• Only connect it to the voltages stated on the characteristics plate.
• This appliance is suitable for use with foodstuffs.
• This appliance has been designed exclusively for domestic use.
• Always use the blender on a flat, level work surface.
• This appliance must not be used by persons (including children)
with physical, sensory or mental impairments unless they have been
instructed in its correct use by a responsible adult.
• Do not handle the appliance with wet hands.
• Avoid contact with the moving parts
• The edge of the blade is very sharp. To avoid injuries handle the
blades with extreme care when cleaning them.
• Never insert metal utensils, such as knives or forks, into the inside
of the jug while the appliance is operating.
• The use of accessories not supplied by the manufacturer may
cause accidents.
• Do not operate the appliance without a workload.
• Do not leave the appliance close to heat sources nor allow the
cable to come into contact with hot surfaces.
• Do not operate the appliance with the cable still coiled.
• Neve r try to fit or remove the jug on th e blander while the appliance
is still running.
• Unplug the appliance before attempting to change any accessory
or accessing any part of the liquidiser that might move during
operation.
• Do not open the lid on the blender until the motor has stopped.
• Do not leave the appliance operating unattended, especially with
children about.
• Unplug the appliance from the mains when it is not in use
• Do not unplug it by pulling on the cable, nor leave the plug hanging
freely..
• Make sure that the appliance is unplugged before cleaning it.
• DO NOT IMMERSE THE MOTOR HOUSING INTO WATER OR ANY
OTHER LIQUID.
• Do not use the blender if the blade is damaged.
]
]
]
]
]
]
]
]
]
• Do not switch the appliance on if the cable or the plug are
damaged or if it can be detected that the appliance is not working
correctly
• Never use the appliance outdoors
• ATTENTION: To reduce the risk of fire or electric shock, never
remove any of the covers. There are no user serviceable parts on
the inside. Cable repairs and replacements must be carried out
exclusively by an Authorised Technical Service Centre.
ASSEMBLY
Before using it for the first time, use soapy water to wash all the
pieces that are going to come into contact with foodstuffs.
The edge of the blade is very sharp.
To avoid injuries handle the blades with extreme care when cleaning
them.
Fit the seal (4) over the blade cone (5).
Make sure the seal is fitted correctly, with the lip facing upward
(Figure 1).
Seat the blade cone on the motor body retaining collar (7)
(Figure 2).
Slot the jar (3) into the motor body retaining collar (7) (Figure 3) and
twist the jar anticlockwise so that it locks on. (Figure 4)
Place the jug assembly onto motor body (6). The icons indicate the
locked position as well as the correct direction to turn it. (Figures
5 & 6)
Dismantle
Attach
To fit the lid onto the blender (2), inser t it into the top of the jug and
press down on it so that it locks into position. (Figure 7)
To fit the stopper, line up the clips on the stopper with the holes in
the lid opening (figure 8) insert and turn it clockwise until it locks.
(Figure 9)
Important: This blender is fitted with a safety device that stops the
motor from starting if the jug is not correctly positioned.
PREPARING FRUITS OR VEGETABLES
Wash or peel the fruits or vegetables that you want to liquidise.
To process fruits with seeds (such as apples or pears), remove the
skin and the core.
Fruits or vegetables with skin (e.g. citrus fruit, melons, kiwi fruit, etc)
must be peeled beforehand.
Grapes must be removed from the stems before being liquidised.
Cut the fruit or vegetables into pieces that can be pushed through
the filling spout.
Do not use fibrous fruits or vegetables (e.g. raisins) with this
blender.
Fruits and vegetables used should be as fresh as possible.
Fruits and vegetables contain vitamins and minerals that lose their
properties when they come into contact with oxygen or light. Drink
the juice just after making it.
If you want to store it for a few hours, put it in glass or ceramic
containers in the refrigerator. Add lemon juice to help preserve it.
USE
Always place the blender on a flat, stable surface.
The blender will only work if the jug has been correctly fitted.
Plug the appliance into the mains supply, the luminous “Stop”
indicator will flash to indicate standby mode.
Place all of the ingredients into the container without exceeding the
1.2 litre maximum mark on th e jug. For best results, pour in any liqu ids
first and switch the appliance on, adding th e solid ingredients as you
liquidise.
BS4790.indd 6BS4790.indd 6 17/4/07 09:42:3817/4/07 09:42:38
Page 7
Should you wis h to ad d more food during t he pro cess, then do i t via
the mouth on the lid. (Figure-10)
Press the stop button to switch it off. Do not tr y to take the jug off the
main body if the motor is still running.
Select a suitable speed for the function you intend to carry out.
Speed 1 (Slow) Set speed
For mixing ready-made ingredients, etc.
For making juice from peeled fruit, such as apple, pear,
etc.
Speed 2 Se t speed
Suitable for making milkshakes with coffee or vanilla.
Speed 3 Programm ed impulse speed
Suitable for preparing foods such as onions, garlic, etc.
The programmed impulse function allows the food to be
processed quickly.
Speed 4 (Medium) Set speed
Suitable for preparing pancake batter, sauces, etc.
Speed 5 Se t speed
For shredding vegetables, cocktails, compotes, etc
Speed 6 (Fast) Set speed
Suitable for making cocktails with alcohol or fruits.
Fixed speed to impulse speed converter
Instant pulse speed
Ice crushing function (Fast)
Programmed impulse speed
Stop button
Ice crushing function [
To crush ice-cubes, place them inside the jug and fit the lid on.
There is no need to add any liquid. Switch on by pressing the
[
] button.
Fixed speed to impulse speed converter [
To use the impulse function [
corresponding luminous indicator will flash.
Then press the desired speed setting button. The blender will only
operate while you keep this button pressed down, stopping as soon
as you release it. This function makes it easier to judge the obtained
results and can be used to avoid producing too much froth.
To end the impulse function, press the [
luminous indicator will go out, indicating that the [
now deactivated.
]
]
], first press the [ ] button. The
] button again and the
] function is
Warnings:
• Do not operate the blender if it is empty.
• If you have to stir in food that is stuck to the sides of the jug,
switch the appliance off first. The blades may continue to rotate for
a moment longer. Keep spoons or spatulas a good distance away
from the blades to avoid accidents.
• Continuous operation of the appliance for more than 3 minutes is
not recommended. After this amount of time let motor rest for a few
minutes before switching the blender back on.
• For better results when shredding solid foods, cut it up into small
pieces beforehand.
• When mixing dr y ingredients add a cup of liquid to help the
process.
• Do not pour ver y hot liquids into the jug.
CLEANING & MAINTENANCE
Before cleaning any part on the blender press the stop button and
unplug the appliance from the mains supply.
After each use, use warm soapy water to wash all of the elements
which have been in contact with the food. Take great care when
cleaning the blades.
Use a damp cloth to wipe down the motor housing. Plastic parts
may become stained when used with foods that contain strong
pigments (e.g. Carrots). Use vegetable oil to clean this.
Warning: None of the liquidiser parts are dishwasher safe. When
storing the appliance, insert the cable into the cable tidy at the
bottom of the motor housing.
ADVICE ON DISPOSAL:
Our goods come in optimised packaging. This basically
consists in using non-contaminating materials which should
be handed over to the local waste disposal ser vice as secondar y
raw materials.
This product complies with EU Directive 2002/96/CE.
The crossed wheelie bin symbol shown on the appliance
indicates that when it comes to dispose of the product it
must not be included in with household refuse. It must be
taken to a special refuse collection point for electric and
ele ctro nic a ppli ance s or r etur ned to t he di stri buto r whe n purch asin g
a similar appliance. Under current refuse disposal regulations, users
who fail to take discarded appliances to special refuse collection
points may be penalised. Correct disposal of discarded appliances
means that th ey can be recycled and processed ecologically, helping
the environment and allowing materials used in the product to be
reused. For more information on available waste disposal schemes
contact your local refuse service or the shop where the product
was purchased. Manufacturers and importers are responsible for
ecological recycling, processing and disposal of products, whether
directly or via a public system.
Your local town council can provide you with information about
how to dispose of obsolete appliances.
BS4790.indd 7BS4790.indd 7 17/4/07 09:42:3917/4/07 09:42:39
Page 8
FRANÇAIS
1. Bouchon
2. Couvercle
3. Bol
4. Joint d’étanchéité
5. Cône des lames
6. Corps moteur
7 Pièce de fixation sur le corps moteur
8. Embrayage moteur
9. Boutons de commande
a) Vitesse 1 [
b) Vitesse 2 [
c) Vitesse 3 [
d) Vitesse 4 [
e) Vitesse 5 [
f) Vitesse 6 [
g) Convertisseur des vitesses fixes en vitesses par impulsions [
h) Fonction piler glace [
i) Bouton arrêt [
10. Pieds antidérapants
11. Enrouleur cordon
REMARQUES IMPORTANTES
• Lire attentivement ces instructions avant d’utiliser l’appareil.
Conservez-les pour de futures consultations.
• Avant de brancher l’appareil vérifiez si votre voltage correspond à
celui indiqué sur la plaque des caractéristiques.
• Appareil apte pour utilisation alimentaire.
• Cet appareil a été conçu pour un usage domestique
exclusivement.
• Le bol mixeur doit être utilisé sur une surface lisse et stable.
• Cet appareil ne doit pas être utilisé par des personnes (y compris
les enfants) handicapées physiques, sensorielles ou mentales ou qui
ne possèdent pas l’expérience et la connaissance requises à moins
d’avoir qu’une personne responsable leur ait montré la bonne façon
d’utiliser l’appareil et qu’elle se soit assurée que les consignes ont
bien été comprises.
• Ne pas manipuler l’appareil avec les mains mouillées.
• Evitez de toucher les parties amovibles.
• Les lames sont très tranchantes, pour éviter toute blessure,
manipulez ces lames avec précaution au cours du nettoyage.
• Ne pas introduire d’ustensiles : couteaux ou fourchettes dans le
bol en fonctionnement.
• L’utilisation d’accessoires non fournis par le fabricant peut entraîner
des accidents.
• Ne pas faire fonctionner l’appareil à vide.
• Tenir l’appareil à l’écart de sources de chaleur et éviter que le
cordon touche des surfaces chaudes.
• Ne pas faire fonctionner l’appareil avec le cordon enroulé.
• Ne pas monter ni démonter le bol du mixer quand celui-ci est en
cours de fonctionnement.
• Déconnecter l’appareil avant de remplacer les accessoires ou
avant d’accéder aux parties susceptibles de tourner durant le
fonctionnement.
• Ne pas ouvrir le couvercle du mixer avant l’arrêt du moteur.
• Ne pas faire fonctionner le mixer sans surveillance surtout en
présence d’enfants.
• Si vous n’utilisez pas l’appareil débranchez-le.
• Ne jamais débrancher en tirant du cordon. Ne pas le laisser
pendre.
• Avant de le nettoyer, vérifiez si l’appareil est bien débranché.
]
]
]
]
]
]
]
]
]
• NE PAS IMMERGER LE CORPS MOTEUR DANS L’EAU NI TOUT AUTR E
LIQUIDE.
• Ne pas utiliser l’appareil si le couteau est endommagé.
• Ne pas faire fonctionner l’appareil si le cordon ou la fiche sont
abîmés ou si vous remarquez que l’appareil ne fonctionne pas
correctement.
• Ne pas faire fonctionner l’appareil à l’extérieur.
• ATTENTION: Afin de faire diminuer au maximum, les risques
d’incendie ou de décharges électriques, ne jamais enlever les
plaques. Aucune des pièces qui sont à l’intérieur, ne peuvent être
manipulées par l’utilisateur.
• Les réparations et remplacements de cordon doivent être réalisés
par un Service Technique Agréé, exclusivement.
MONTAGE
Avant d’utiliser l’appareil pour la première fois, les pièces qui vont
être en contact avec les aliments doivent être nettoyées à l’eau
savonneuse.
Le tranchant du couteau est très aiguisé,
il faudra donc le manipuler avec précaution pendant le nettoyage
afin d’éviter de se blesser.
Poser le joint d’étanchéité (4) sur le cône des couteaux (5).
Vérifier la bonne mise en place du joint dont la lèvre doit se trouver
vers le haut (Figure 1)
Fixer le cône des couteaux sur la pièce de fixation sur le corps
moteur (7) (Figure 2).
Emboîter le bol (3) sur la pièce de fixation au corps moteur (7)
(Figura 3) et le faire tourner dans le sens contraire à celui des aiguilles
d’une montre jusqu’à ce qu’il soit parfaitement emboîté. (Figure -4)
Placer le bol monté sur le corps moteur (6). Les icônes indiquent la
partie de l’assemblage ainsi que le sens de rotation requis pour la
bonne fixation de l’ensemble. (Figures 5 et 6)
Démonter.
Monter.
Pour monter le couvercle du mixer (2), emboîtez-le sur la partie
supérieure du b ol et appuyer dessu s jusqu’à ce qu’il soit parf aitement
emboîté. (Figure 7)
Pour placer le bouchon (1) faire concorder les languettes avec les
trous de l’ouverture du couvercle (Figure 8) et le faire tourner dans
le sens contraire à celui des aiguilles d’une montre jusqu’à ce qu’il
soit parfaitement placé. (Figure 9)
Remarque importante: Ce mixer est équipé d’un dispositif de
sécurité qui empêche le corps moteur de fonctionner si le bol n’est
pas placé correctement.
PRÉPARATION DES FRUITS OU DES LÉGUMES
Laver ou peler les fruits ou légumes à préparer.
Pour la préparation de fruits à pépins (pommes ou poires) il faudra
d’abord les peler puis retirer le trognon des fruits.
Les fruits et légumes à peau (agrumes, melon, kiwis, etc) doivent
d’abord être épluchés.
Pour centrifuger le raisin il faut d’abord détacher les grains de la
grappe.
Couper les fruits et les légumes en petits morceaux afin qu’ils
puissent passer par le trou de remplissage.
Ne pas préparer de fruits et légumes fibreux (raisins secs par
exemple) dans cet appareil.
Les fruits et légumes à préparer doivent être le plus frais possible.
Les fruits et légumes contiennent des vitamines et des minéraux qui
se détériorent quand ils entrent en contact avec l’oxygène ou avec la
lumière. Le jus doit être bu fraîchement préparé.
S’il faut le ga rder plus ieurs heure s, le mettre au réfrigérateur d ans des
récipients en céramique ou en verre. Pour prolonger la conservation
des préparations, ajouter le jus d’un citron.
BS4790.indd 8BS4790.indd 8 17/4/07 09:42:3917/4/07 09:42:39
Page 9

FONCTIONNEMENT
Poser le mixeur sur une surface bien nivelée et stable.
L e m i x e u r f o n c t i o n n e r a q u e s i l e b o l e s t c o r r e c t e m e n t m i s e n p l a c e .
Br an che r l’a pp are il a u co ur ant , l’ ind ica teu r lu mi neu x “S to p” cl ign ote ra
pour indiquer la position repos.
Remplir le bol des ing rédients sans dépas ser l’indication du maximum
de remplissage du bol de 1’2 litres. Pour de meilleurs résultats, verser
d’abord les liquides, faire fonctionner quelques second es l’appareil,
puis ajouter les ingrédients solides.
Possibilité d’ajouter d’autres aliments en cours de préparation à
travers l’ouverture du couvercle. (Figure -10)
Pour arrêter le fonctionnement, appuyer sur le bouton arrêt.
N’essayer surtout pas de démonter le bol du corps de l’appareil
avec le moteur en marche.
Sélectionner la vitesse adaptée à la préparation à réaliser.
Vitesse 1 (Lente) Vitesse Fixe
Pour mixer des préparations instantanées, etc.
Pour préparer des jus de fruits épluchés comme des
pommes, des poires, etc.
Vitesse 2 Vitesse fixe
Pour préparer des milk-shakes au café ou à la vanille.
Vitesse 3 Vitesse par Impulsions programmées
P o u r p r é p a r e r d e s a l i m e n t s c o m m e l e s a i l s e t l e s o i g n o n s .
La fonction par impulsions programmées traite plus
rapidement les aliments.
Vitesse 4 (Moyenne) Vitesse Fixe
Pour la préparation des pâtes à pain, à crêpes, des sauces,
etc.
Vitesse 5 Vitesse fixe
Pour hacher des légumes, préparer des cocktails, des
compotes, etc.
Vitesse 6 (Rapide) Vitesse Fixe
Pour préparer des cocktails avec de l’alcool ou des fruits.
Convertisseur des vitesses fixes en vitesses par
impulsions
Vitesse instantanée.
Fonction piler glace (Rapide)
Vitesse par Impulsions programmées.
Bouton Arrêt.
Fonction piler glace [
Pour piler des glaçons, placez-les dans le bol et poser le couvercle.
Il n’est pas nécessaire d’ajouter de liquide. Mettre l’appareil en
marche en appuyant sur le bouton [
].
].
Convertisseur des vitesses fixes en vitesses par impulsions [
Pour utiliser la fonction momentanée [
bouton [
Appuyer alors sur le bouton de la vitesse de la fonction à utiliser.
L’appareil ne fonctionnera que tant que le bouton de fonction sera
appuyé e t d’arrête ra dès qu e ce bouto n sera relâché. Cette fonctio n
pe rme t de m ieux voir les r ésul tat s et e lle p eut ê tre u tili sée p our év iter
qu’il se produise trop de mousse.
Pour arrêter la fonction momentanée, appuyer à nouveau sur le
bouton [
fonction [
]. L’indicateur lumineux correspondant clignotera.
], l’indicateur lumineux s’éteindra pour indiquer que la
] n’est plus activée.
], appuyer d’abord sur le
Avertissements:
Ne jamais utiliser le mixer à vide.
Pour mélanger les aliments collés sur les parois du bol, arrêtez le
fonctionnement de l’appareil. Il est possible que les lames tournent
encore quelques instants après. Tenir la cuillère ou la spatule à une
certaine distance des lames pour éviter tout accident.
Il est conseillé de ne pas dépasser un fonctionnement ininterrompu
supérieur à 3. Passé ce délai, laissez reposer le moteur quelques
minutes avant de remettre en marche le mixer.
Pour obtenir de meilleurs résultats dans le hachage des aliments
solides, coupez-les d’abord en petits morceaux.
- Pour préparer les aliments secs, ajouter une tasse de liquide pour
faciliter le travail.
Ne jamais verser de liquides trop chauds dans le bol.
NETTOYAGE ET ENTRETIEN
Avant le nettoyage d’une partie quelconque du mixer, appuyez sur
le bouton d’arrêt et débranchez l’appareil du réseau électrique.
Après chaque utilisation, nettoyez à l’eau tiède savonneuse, tous
les éléments qui ont touché les aliments. Les lames doivent être
manipulées avec précaution.
Nettoyer le corps moteur avec un chiffon humide. Les aliments
à la teneur élevée en pigments comme les carottes par exemple,
peuvent tacher les parties en plastique de l’appareil. Pour les
détacher, utiliser de l’huile végétale.
Mise en garde: Aucune pièce de l’appareil ne doit aller au lavevaisselle. Pour ranger l’appareil, enrouler le cordon dans l’enrouleur
placé en bas du corps moteur.
REMARQUES CONCERNANT LE DÉPÔT/ÉLIMINATION
DES DÉCHETS
Toutes nos marchandises sont conditionnées dans un
emballage optimisé pour le transport. En principe, ces
emballages sont composés de matériaux non polluants qui devront
être déposés comme matière première secondaire au Service Local
d’élimination des déchets.
Produit aux normes de la Directive de l’UE 2002/96/CE.
Le logo “poubelle” apposé sur l’appareil indique que tout
appareil électroménager hors d’usage ne doit pas être
jeté dans les déchets ménagers mais être déposé dans un
centre de collecte de déchets d’appareils électriques ou
électroniques ou qu’il doit être remis à votre vendeur à l’occasion
de l’achat d’un nouvel appareil. Il incombe à l’utilisateur de déposer
lui-même l’appareil hors d’usage dans un centre de collecte
spécialement prévu à cet effet, faute de quoi, celui-ci risque de
se voir sanctionné pour manquement au règlement en vigueur
concernant les déchets. Si l’appareil hors d’usage est correctement
collecté comme déchet trié, il pourra être recyclé, traité et éliminé
écologiquement évitant ainsi tout impact négatif sur l’environnement
tout en contribuant au recyclage des matériaux qui composent le
produit. Pour toutes informations relatives aux Services d’élimination
des déchets, adressez-vous à la déchetterie de votre ville ou à
votre vendeur habituel. Les fabricants et les importateurs réalisent le
]
recyclage, le traitement et l’élimination écologique, soit directement
soit par l’intermédiaire d’un système public.
Pour toute information concernant le dépôt et l’élimination des
appareils usagés, renseignez-vous auprès de la Mairie de votre
Commune ou de la Préfecture de votre Département.
BS4790.indd 9BS4790.indd 9 17/4/07 09:42:4017/4/07 09:42:40
Page 10
PORTUGUES
1. Tampão
2. Tampa
3. Jarro
4. Junta estanque
5. Cone de lâminas
6. Corpo motor
7 Peça de encaixe sobre o corpo do motor
8. Embreagem do motor
9. Comandos de controlo
a) Velocidade 1 [
b) Velo cidade 2[
c) Vel ocida d e 3 [
d) Velocidade 4 [
e) Velocida de 5[
f) Velocidade 6[
g) Conversor das velocidades fixas em velocidades por
impulsos [
h) Função de picar gelo [
i) Botão de paragem [
10. Pés anti-deslizantes
11. Sistema de recolha do cabo
NOTAS IMPORTANTES
• Leia atentamente estas instruções antes de usar o aparelho pela
primeira vez. Guarde-as para futuras consultas.
• Ligue-o unicamente à tensão indicada na placa de características.
• Este aparelho está capacitado para uso alimentar.
• Este aparelho foi desenhado exclusivamente para uso doméstico.
• Utilize sempre a batedeira sobre uma superfície nivelada e
estável.
• Este aparelho não deve ser utilizado por pessoas (incluindo
crianças) com capacidades físicas, sensoriais ou mentais diminuídas
ou falta de experiência e conhecimento, a menos que tenham sido
instruídas relativamente ao seu uso por uma pessoa responsável.
• Não utilize o aparelho com as mãos molhadas.
• Evite o contacto com as partes móveis.
• O gume das lâminas está muito afiado. Durante a limpeza das
lâminas deverá movê-las com cuidado para evitar qualquer tipo de
lesão.
• Enquanto o aparelho estiver em funcionamento não introduza
utensílios como facas ou garfos no interior do jarro.
• O uso de acessó rios não fornecidos pelo fabrica nte poderá causar
acidentes.
• Não ponha o aparelho em funcionamento quando este estiver
vazio.
• Não ponha o aparelho per to de fontes de calor e evite que o cabo
toque em superfícies quentes.
• Não ponha o aparelho em funcionamento estando o cabo enrolado.
• Não monte nem desmonte o jarro da batedeira enquanto o
aparelho estiver em funcionamento.
• Desconecte o aparelho antes de mudar os acessórios ou aceder
a partes que se possam mover durante o funcionamento da
liquidificadora.
• Não abra a tampa da batedeira até que o motor tenha parado.
• Não deixe o aparelho em funcionamento sem o vigiar,
principalmente se existirem crianças por perto.
• Desligue o aparelho da rede quando não estiver a utilizá-lo.
• Nunca desligue o aparelho puxando pelo cabo nem deixe este
ultimo pendurado.
• Antes de efectuar a sua limpeza comprove que o aparelho está
desligado.
]
]
]
]
]
]
]
]
]
• NÃO DEVERÁ MERGULHAR O CORPO MOTOR EM ÁGUA NEM EM
NENHUM OUTRO LIQUIDO.
• Não utilize a batedeira se a lâmina estiver danificada.
• Não o ponha em funcionamento se o cabo ou a ficha estiverem
estragados ou se observar que o aparelho não funciona
correctamente.
• Não utilize o aparelho ao ar livre.
• ATENÇÃO: Para diminuir o perigo de incêndios ou de descargas
eléctricas, não retire nenhuma das tampas. No interior não existem
peças que possam ser manipuladas pelo usuário. As reparações e
mudanças de cabo deverão ser realizadas exclusivamente por um
Serviço Técnico Autorizado.
Para evitar o risco de incendio ou descarga eléctrica, não desmonte
nunca nenhuma das coberturas do aparelho, pois não há par tes que
possam ser reparadas directamente pelo utilizador. Se o cabo de
rede se encontra danificado, deve ser reparado ou substituido por
um Serviço Técnico autorizado.
MONTAGEM
Antes do primeiro uso, lave com água e sabão as peças que vão
estar em contacto com os alimentos.
O fio das lâminas é muito afiado.
Manipule com cuidado as lâminas durante a sua limpeza, para evitar
qualquer lesão.
Monte a junta de estanqueidade (4) sobre o cone de lâminas (5).
Assegure-se de que a Junta é colocada correctamente, com a borda
para cima. (Figura 1)
Assente o cone de lâminas na peça de encaixe sobre o corpo do
motor (7) (Figura 2)
Encaixe a Jarra (3) na peça de encaixe sobre o corpo do motor (7)
(Figura 3) e gire a Jarra no sentido contrário ao dos ponteiros do
relógio, até que fique correctamente montada. (Figura -4)
Assente a jarra montada sobre o corpo do motor (6). Os ícones
indicar-lhe-ão tanto a zona de encaixe como o sentido em que deve
girar para a correcta fixação do conjunto. (Figuras 5 e 6)
Desmontar.
Montar.
Para montar a tampa da batedeira (2), encaixe-a sobre a parte
superior da jarra e pressione até que esta fique totalmente
encaixada. (Figura 7)
Para montar o tampão (1), faça coincidir as suas patilhas com os
orifícios da boca da tampa (Figura 8) e gire-o no sentido contrário
ao dos ponteiros do relógio, até que fique correctamente montado.
(Figura 9)
Importante: Esta batedora possui um dispositivo de segurança que
impede que o corpo do motor entre em funcionamento se a Jarra
não se encontrar correctamente colocada.
PREPARAÇÃO DAS FRUTAS OU VERDURAS
Lave ou descasque as frutas ou verduras que deseja bater.
Para processar as frutas com sementes (como maçãs ou pêras), deve
retirar a pele e o caroço das mesmas.
As frutas e verduras com pele (por exemplo: citrinos, melões, kiwis,
etc.) devem ser previamente descascadas.
As uvas podem ser batidas apenas depois de retiradas do cacho.
Corte as frutas e verduras em pedaços que possam passar pelo
orifício de enchimento.
Não utilize frutas e verduras com filamentos (por exemplo: passas)
nesta batedeira.
Utilize frutas e verduras com a máxima frescura possível.
As frutas e verduras contêm vitaminas e minerais que se deterioram
quando entram em contacto com o oxigénio ou a luz. Beba o sumo
imediatamente a seguir à sua elaboração.
BS4790.indd 10BS4790.indd 10 17/4/07 09:42:4017/4/07 09:42:40
Page 11

Se for necessário guardá-lo umas horas, ponha o sumo no frigorífico
em recipientes de cerâmica ou vidro. Acrescente o sumo de um
limão para prolongar a sua conservação.
FUNCIONAMENTO
Coloque a batedeira sobre uma superfície nivelada e estável.
A batedeira só funcionará quando a jarra estiver correctamente
colocada.
Ligue o aparelho à electricidade; o indicador luminoso “Stop”
piscará para indicar o estado de repouso.
Ponha todos os ingredientes no recipiente sem ultrapassar o sinal
de enchimento máximo da jarra de 1’2 litros. Para obter os melhores
resultados, ponha todos os líquidos em primeiro lugar, ligue o
aparelho por um momento e acrescente os ingredientes sólidos.
Se desejar acrescentar maior quantidade de alimentos durante o
processo, faça-o através da boca da tampa. (Figura -10)
Para parar o funcionamento, carregue no botão de paragem. Nunca
tente desmontar a jarra do corpo do aparelho com o motor em
funcionamento.
Seleccione a velocidade mais adequada para a função que se
deseja realizar.
Velocidade 1 (Lenta) Velocidade Fixa
Para mexer preparados instantâneos, etc.
Para fazer sumos de frutas descascadas, como maçã,
pêra, etc.
Velocidade 2 Velocidade Fixa
Adequada para elaborar batidos com café ou baunilha.
Velocidade 3 Velocidade por Impulsos programados
Adequada para a preparação de alimentos como
cebolas e alhos.
A função por impulsos programados facilita o
processamento rápido do alimento.
Velocidade 4 (Média) Velocidade Fixa
Adequada para elaborar panquecas, pastas de crepes,
molhos, etc.
Velocidade 5 Velocidade Fixa
Para triturar vegetais, cocktails, compotas, etc.
Velocidade 6 (Rápida) Velocidade Fixa
Adequada para elaborar cocktails com álcool ou com
frutas.
Conversor das velocidades fixas em velocidades por
impulsos
Velocidade instantânea.
Função de picar gelo (Rápida)
Velocidade por Impulsos programados
Botão de Paragem
Função de picar gelo[
Para picar cubos de gelo, coloque-os no interior da Jarra e coloque
a tampa. Não é necessário acrescentar qualquer líquido. Ponha em
funcionamento o aparelho carregando no botão [
Conversor das velocidades fixas em velocidades por
impulsos [
Para utilizar a função momentânea [
no botão [
Carregue então no botão de velocidade de função desejado. A
batedora só funcionará enquanto se mantiver premido o botão de
função e parará quando se deixar de carregar. Esta função torna
]
]. Piscará o indicador luminoso correspondente.
].
].
], carregue em primeiro lugar
mais simples avaliar o resultado obtido e pode utilizar-se para evitar
a produção de excesso de espuma.
Para finalizar a função momentânea, carregue no botão [
novo e apagar-se-á o indicador luminoso, para indicar que a
função [
] já não está activa.
] de
Advertências
Nunca utilize a batedeira estando esta vazia.
Se for necessário mexer os alimentos aderidos às paredes do jarro,
interrompa o funcionamento do aparelho. As lâminas podem
continuar a rodar durante uns momentos. Mantenha a colher
ou a espátula a uma distância prudente das lâminas para evitar
acidentes.
É aconselhável não ter o aparelho em funcionamento durante mais
de 3 minutos seguidos. Depois desse tempo deixe descansar o
motor durante uns minutos antes de voltar a pôr em funcionamento
a batedeira.
Para conseguir melhores resultados ao triturar os alimentos sólidos,
corte-os primeiro em pedaços pequenos.
Nos alimentos sem água, acrescenta uma taça de líquido para
facilitar a função.
Não introduza líquidos muito quentes no jarro.
LIMPEZA E MANUTENÇÃO
Antes de limpar qualquer uma das partes da batedeira, carregue no
botão de paragem e desligue o aparelho da rede eléctrica.
Depois de cada uso, lave todos os elementos que tenham estado
em contacto com os alimentos com água morna com detergente.
Tenha cuidado ao limpar as lâminas.
Limpe o corpo do motor apenas com um pano húmido. As partes
plásticas podem f icar manchadas quand o se trabalha com alimentos
que têm elevados conteúdos de pigmentos; (por exemplo:
cenouras). Utilize óleo vegetal para a sua limpeza.
Aviso: Não limpe ne nhuma das partes da liquidificadora na má quina
de lavar loiça. Para guardar o aparelho, introduza o cabo no sistema
de recolha de cabos situado na parte inferior do corpo do motor.
ADVERTÊNCIAS DE DEPOSIÇÃO / ELIMINAÇÃO
Para o seu transporte, as nossas mercadorias contam com
uma embalagem optimizada. Esta consiste - em principioem materiais não contaminantes que deveriam ser entregues como
matéria prima secundaria ao serviço local de eliminação de lixos.
Este produto cumpre a Directiva da UE 2002/96/CE.
O símbolo de um caixote de lixo riscado sobre o aparelho
indica que o produto, quando finalize a sua vida útil, deverá
deitar-se fora separado dos resíduos domésticos, levando-
o a um centro de materiais residuais com separação de
aparelhos eléctricos e electrónicos ou devolvendo-o ao seu
fornecedor ao comprar outro aparelho similar. É ao usuário que lhe
corresponde a responsabilidade de levar o aparelho a um centro
de materiais residuais especiais ao finalizar a sua vida útil. Caso
contrário, poderá ser sancionado em virtude dos regulamentos de
materiais residuais vigentes. Se o aparelho inutilizado for recolhido
correctame nte como resíduo separado, pod erá ser reciclado, tratado
e eliminado de forma ecológica; isto evita um impacto negativo
sobre o meio ambiente e a saúde, e contribui á reciclagem dos
materiais do produto. Para obter mais informação sobre os serviços
de materiais residuais disponíveis, contacte com a sua agência de
materiais residuais local ou com a loja onde comprou o aparelho.
Os fabricantes e os importadores tornam-se responsáveis pela
reciclagem, tratamento e eliminação ecológica, seja directamente ou
através de um sistema público.
A sua Câmara ou Município informar-lhe-á sobre as possibilidades
de deposição/eliminação para os aparelhos que já não se usam.
BS4790.indd 11BS4790.indd 11 17/4/07 09:42:4117/4/07 09:42:41
Page 12

DEUTSCH
1. Stopfen
2. Deckel
3. Mixbecher
4. Dichtung
5. Messerkegel
6. Motorgehäuse
7 Verankerungsteil auf dem Motorkörper
8. Motorkupplung
9. Kontrollschalter
a) Geschwindigkeit 1- [
b) Geschwindigkeit 2- [
c) Geschwindigkeit 3- [
d) Geschwindigkeit 4- [
e) Geschwindigkeit 5- [
f) Geschwindigkeit 6- [
g) Umwandler von festen Geschwindigkeiten in
Geschwindigkeiten je nach Druck. [
h) Funktion Eis zerkleinern [
i) Taste zum Anhalten. [
10. Antirutschfüßchen
11. K a bel aufwi ckl ung
WICHTIGE HINWEISE
• Bevor Sie das Gerät zum ersten Mal benutzen, lesen Sie bitte
diese Anleitungen aufmerksam und bewahren Sie sie zum späteren
Nachschlagen auf.
• Die Netzspannung muss unbedingt mit den Werten auf dem
Typenschild übereinstimmen.
• Dieses Gerät ist lebensmittelgeeignet.
• Dieses Gerät ist nur für den häuslichen Gebrauch vorgesehen.
• Verwenden Sie den Mixer immer auf einer ebenen und stabilen
Oberfläche.
• Dieses Gerät darf nicht von Personen mit eingeschränkten
physischen, sensorischen oder geistigen Fähigkeiten oder
mangelnder Erfahrung und Kenntnis (einschließlich Kindern) benutzt
werden, außer sie wurden von einer verantwortlichen Person in der
Handhabung des Gerätes unterrichtet.
• Das Gerät darf nicht mit feuchten Händen gehandhabt werden.
• Vermeiden Sie den Kontakt mit beweglichen Teilen.
• Die Schneide d er Messer ist sehr schar f. Handhab en Sie die Messer
daher bei der Reinigung mit großer Vorsicht, um Schnitt verletzungen
zu vermeiden.
• Während das Gerät in Betrieb ist, dürfen keine Gegenstände wie
Messer oder Gabeln in den Mixbecher eingeführt werden.
• Die Verwendung von Zubehör, das nicht vom Gerätehersteller
stammt, kann Unfälle verursachen.
• Lassen Sie das Gerät nie leer laufen.
• Das Gerät darf nicht in der Nähe von Wärmequellen aufgestellt
werden und es ist zu vermeiden, dass das Kabel mit heißen Flächen
in Berührung kommt.
• Das Gerät darf nicht mit aufgerolltem Kabel in Betrieb genommen
werden.
• Solange das Gerät in Betrieb ist, darf der Mixbecher nicht
eingesetzt oder herausgenommen werden.
• Stellen Sie den Apparat aus, bevor Sie Zubehör auswechseln oder
Teile, die sich während des Betriebs des Mixers bewegen können.
• Öffnen Sie nicht den Deckel des Mixers, bis der Motor still steht.
• Lassen Sie das Gerät nie unbeaufsichtigt laufen, vor allem, wenn
Kinder in der Nähe sind.
]
]
]
]
]
]
]
]
]
• Wenn Sie das Gerät nicht benutzen, unterbrechen Sie bitte den
Netzanschluss.
• Ziehen Sie den Stecker niemals am Kabel aus der Steckdose und
lassen Sie den Anschluss nicht herunterhängen.
• Vor der Reinigung muss der Netzanschluss unterbrochen werden.
• DAS MOTORGEHÄUSE DARF NICHT IN WASSER ODER EINE
ANDERE FLÜSSIGKEIT GETAUCHT WERDEN.
• Verwenden Sie den Mixer nicht, wenn das Messer beschädigt ist.
• Sollten Kabel oder Stecker Beschädigungen auf weisen oder
Unregelmäßigkeiten im Betrieb festgestellt werden, darf das Gerät
nicht benutzt werden.
• Verwenden Sie das Gerät nicht im Freien.
• ACHTUN G: Um Brandge fahr oder elektr ische Schläge zu vermeiden,
darf keine der Abdeckungen abgenommen werden. Keines der Teile
im Innern des Geräts darf von dem Bediener manipuliert werden.
Reparaturen oder der Austausch des Kabels dürfen nur von einem
zugelassenen Technischen Kundendienst vorgenommen werden.
MONTAGE.
Spülen Sie vor dem ersten Gebrauch die Teile, die mit den
Lebensmitteln in Kontakt sein werden, mit Seifenwasser.
Die Messerschneide ist sehr scharf.
Manipulieren Sie das Messer während der Reinigung vorsichtig, um
Verletzungen zu vermeiden.
Setzen Sie den Dichtungsring (4) auf den Messerzapfen (5).
Versichern Sie sich, dass die Dichtung richtig mit der Lippe nach
oben montiert wird (Figur 1).
Setzen Sie den Messerzapfen auf das Verankerungsteil auf dem
Motorkörper (7) (Figur 2).
Setzen Sie den Krug (3) auf das Verankerungsteil des Motorkörpers
(7) (Figur 3) und drehen Sie den Krug gegen den Uhrzeigersinn, bis
er fest sitzt. (Figur -4)
Setzen Sie den zusammengebauten Krug auf den Motorkörper (6).
Die Icons zeigen Ihnen den Bereich des Zusammenbaus sowie die
Drehrichtung zum korrekten Befestigen. (Figuren 5 und 6)
Demontage
Montage
Zum Montieren des Deckels des Mixers (2), setzen Sie ihn auf den
oberen Teil des Krugs und drücken solange, bis er vollständig fest
sitzt. (Figur 7)
Um den Stopfen (1) zu montieren, setzen Sie dessen Laschen in die
Öffnungen der Deckelöffnung (Figur 8) und drehen Sie gegen den
Uhrzeigersinn, bis er fest sitzt. (Figur 9)
Wichtig: Dieser Mixer verfügt über eine Sicherheitsvorrichtung, die
verhindert, dass der Motorkörper funktioniert, wenn der Krug nicht
korrekt montiert ist.
ZUBEREITUNG VON OBST ODER GEMÜSE
Waschen oder schälen Sie das zu mixende Obst oder Gemüse.
Um Obst mit Kernen zu verarbeiten (wie Äpfel oder Birnen) müssen
Schale und Kern derselben entfernt werden.
Das Obst und Gemüse mit Schale (wie Zitrusfrüchte, Melonen, Kiwis
etc.) müssen vorher geschält werden.
Die Weintrauben müssen vor der Verarbeitung von den Ästchen
befreit werden.
Schneiden Sie das Obst und Gemüse in Stücke, die durch die
Füllöffnung passen.
Verwenden Sie kein Obst und Gemüse mit Fädchen (wie Rosinen).
Verwenden Sie das Obst und Gemüse so frisch wie möglich.
Obst und Gemüse enthalten Vitamine und Mineralien, die beim
Kontakt mit Sauerstoff und Licht Schaden nehmen. Trinken Sie den
Saft gleich nach der Zubereitung.
BS4790.indd 12BS4790.indd 12 17/4/07 09:42:4117/4/07 09:42:41
Page 13

Wenn er einige Stunden aufgehoben werden muss, stellen Sie ihn in
den Kühlschrank in Keramik- oder Glasbehältern. Fügen Sie den Saft
einer Zitrone zur besseren Konser vierung hinzu.
BETRIEB
Verwenden Sie den Mixer immer auf einer ebenen und stabilen
Oberfläche.
Der Mixer funktioniert nur, wenn der Krug korrekt aufgesetzt ist.
Stecken Sie den Stecker ins Netz und die Anzeige „Stop“ blinkt, um
den Ruhezustand anzuzeigen.
Geben Sie alle Zutaten in das Gefäß und füllen Sie nur bis zu
der maximalen Anzeige des Krugs von 1,2 Litern. Um die besten
Ergebnisse zu erzielen, geben Sie die Flüssigkeit zuerste hinein,
stellen Sie den Apparat einen Moment an und fügen Sie die festen
Zutaten hinzu.
Wenn Sie während der Verarbeitung mehr Lebensmittel hinzufügen
möchten, tun Sie dies durch die Deckelöffnung. (Figur -10)
Um den Betrieb anzuhalten drücken Sie die Stop-Taste. Versuchen
Sie nie, den Krug vom Apparat zu nehmen, wenn der Motor in
Betrieb ist.
Wählen Sie die angemessene Geschwindigkeit für die gewünschte
Funktion.
Geschwindigkeit 1 (langsam)
gleichbleibende Geschwindigkeit
Zum Mixen von Fertigprodukten etc.
Für geschältes Obst wie Apfel, Birne etc.
Geschwindigkeit 2 gleichbleibende Geschwindigkeit
Für Shakes mit Kaffee oder Vainille.
Geschwindigkeit 3
Geschwindigkeit mit programmiertem D ruck
Für die Zubereitung von Lebensmitteln wie Zwiebeln,
Knoblauch
Die Funktion auf Druck vereinfacht die schnelle Verarbeitung
Geschwindigkeit 4 (Mittel)
gleichbleibende Geschwindigkeit
Für Pfannkuchen, Crepes, Saucen etc.
Geschwindigkeit 5 gleichbleibende Geschwindigkeit
Zum Zerkleinern von Gemüse, Cocktails, Kompott etc.
Geschwindigkeit 6 (schnell)
gleichbleibende Geschwindigkeit
Für Cocktails mit Alkohol oder Früchten.
Umwandler von festen Geschwindigkeiten in
Geschwindigkeiten je nach Druck.
Sofortige Geschwindigkeit-
Funktion Eis zerkleinern (schnell)
Geschwindigkeit mit programmiertem Druck
Taste zum Anhalten.
Funktion Eis zerkleinern [
Um Eiswürfel zu zerkleinern, geben Sie diese in den Krug und
schließen Sie den Deckel. Es ist keine weitere Flüssigkeit notwendig.
Stellen Sie den Apparat an, indem Sie den Knopf [
Umwandler von festen Geschwindigkeiten in
Geschwindigkeiten je nach Druck. [
Um die Momentanfunktion [
die Taste [
Drücken Sie dann die Taste mit der gewünschten Funktion. Der
Mixer funktioniert nur, wenn Sie die Funktionstaste gedrückt halten
und geht aus, wenn Sie die Taste loslassen. Durch diese Funktion
]. Der entsprechende Lichtanzeiger blinkt.
].
] drücken.
]
] zu verwenden, drücken Sie zuerst
kann man das Ergebnis besser beurteilen und die Schaumbildung
verhindern.
Um die Momentanfunktion zu beenden, drücken Sie die Taste [
erneut und die Anzeige geht aus, das heißt, es wird angezeigt, dass
die Funktion nicht mehr aktiv ist.
Sicherheitshinweise:
Lassen Sie den Mixer niemals leer laufen.Sollte es notwendig sein, an
der Becherwand haftende Lebensmittelreste umzurühren, halten Sie
bitte das Gerät an. Die Messer können noch eine Weile nachdrehen.
Halten Sie den Löffel oder die Küchenspachtel stets so weit von den
Messern entfernt, dass Unfälle vermieden werden können.
Es ist ratsam, das Gerät nicht länger als 3 Minuten durchgängig laufen
zu lassen. Bevor Sie das Gerät dann erneut in Betrieb nehmen, lassen
Sie bitte den Motor einige Minuten ruhen.
Um beim Zerkleinern fester Lebensmittel bessere Ergebnisse zu
erzielen, schneiden Sie diese zuvor bitte in kleine Stücke.
Bei Lebensmitteln ohne Wasser fügen Sie eine Tasse Flüssigkeit zur
besseren Verarbeitung hinzu.
Geben Sie keine heißen Flüssigkeiten in den Mixbecher.
REINIGUNG UND INSTANDHALTUNG
Bevor Sie eines der Teile des Mixers reinigen, betätigen Sie bitte den
Aus-Schalter und unterbrechen Sie den Netzanschluss.
Nach jeder Benutzung reinigen Sie bitte alle Teile, die mit den
Lebensmitteln in Berührung gekommen sind, mit lauwarmem
Seifenwasser. Reinigen Sie die Messer bitte mit großer Vorsicht.
Säubern Sie das Gehäuse mit einem feuchten Tuch. Die Plastikteile
können bei der Verarbeitung von pigmentreichen Lebensmitteln
(zum Beispiel Möhren) verschmutzt werden. Verwenden Sie
Pflanzenöl zur Reinigung.
Hinweis Stecken Sie keine Teile in den Geschirrspüler. Um den
Apparat au fzubewahren wickeln Sie das K abel mit dem Kabelwickler
auf, der sich im Unterteil des Motorkörpers befindet.
ANMERKUNG ZUR ENTSORGUNG/BESEITIGUNG
Unsere Waren sind für den Transport mit einer optimierten
Verpackung versehen. Diese besteht prinzipiell aus
umweltfreundlichen Materialien, die als sekundäre Rohstoffe b ei den
örtlichen Entsorgungsunternehmen abzugeben sind.
Dieses Produkt entspricht den Vorschriften der EU-Richtlinie
2002/96/CE.
Das Symbol der durchgestrichenen Mülltonne auf dem
Gerät weist darauf hin, dass das Produkt nicht im Hausmüll
sondern getrennt entsorgt werden muss. Gebe n Sie es zum Entsorgen
in einem Zentrum zur Entsorgung elektrischer oder elektronischer
Haushaltsgeräte ab oder geben Sie es bei Ihrem Vertriebshändler ab,
wenn Sie ein ähnliches Gerät erwerben. Der Benutzer haftet für die
Entsorgung des Geräts in einem Zentrum für Sondermüll. Anderenfalls
kann er gemäß der geltenden Vorschriften zur Abfallbeseitigung
bestraft werden. Wird das nicht mehr benutzte Gerät korrekt der
getrennten Entsorgung zugeführt, kann es recycled, behandelt und
ökologisch entsorgt werden. Damit werden negative Auswirkungen
auf Umwelt und Gesundheit vermieden und das Recycling der
Materialien des Produktes gefördert. Nähere Informationen zu den
bestehenden Entsorgungssystemen erhalten Sie bei Ihren örtlichen
Entsorgungsunternehmen oder in dem Geschäft, in dem Sie das
Gerät erworben haben. Hersteller und Importeure übernehmen die
Verantwor tung für das Recycling, die Beha ndlung und die ökologische
Entsorgung, entweder direkt oder über öffentliche Einrichtungen.
Ihre Stadt- oder Gemeindeverwaltung wird Sie gern über die
Möglichkeiten der Entsorgung nicht mehr benutzter Geräte
informieren.
]
BS4790.indd 13BS4790.indd 13 17/4/07 09:42:4217/4/07 09:42:42
Page 14
MAGYAR
1. Dugó
2. Fedél
3. Tál
4. Zárótömítés
5. A kések tartókúpja
6. Motor blokk
7 Motorház tartónyak
8. Motor tokmány
9. VezérlŒk
a) 1 sebesség [
b) 2 sebesség [
c) 3 sebesség [
d) 4 sebesség [
e) 5 sebesség [
f) 6 sebesség [
g) Rögzített sebesség a sebességváltó indítására [
h) Jégzúzó funkció [
i) Leállító gomb [
10. Csúszásmentes talp
11. Kábeltároló rekesz
FONTOS ADATOK
• Olvassa el figyelmesen ezt az útmutatót, és tartsa meg késŒbbi
problémák tisztázása érdekében.
• A készülék használata elŒtt ellenŒrizze az adattáblán, hogy
a készülék megadott feszültsége megegyezik-e a hálózati
feszültséggel.
• Ez a készülék csak élelmezési célra alkalmas.
• Ez a készülék csak háztartási célra készült.
• A turmixgépet használja mindig sima, egyenletes munkafelületen.
• A készüléket ne használjá k olyan személyek (beleér tve a gyereke ket),
akik fizikai, érzékszervi vagy mentális sérüléseket szenvedtek, hacsak
nem tanította meg Œket egy felelŒs felnŒtt a helyes használatára.
• Ne használja a készüléket vizes kézzel.
• Ne érintse a mozgó alkatrészeket.
• Ne érintse meg a kést a használat alatt, mivel ez nagyon éles. A
kések tisztítása során járjon el óvatosan, a balesetek elkerülése
végett.
• Ne helyezzen a tálba fém részeket, mint késeket vagy villákat,
mialatt a készülék mŒködŒ állapotban van.
• A nem a gyártó által ajánlott alkatrészek használata balesethez
vezethet.
• Ne kapcsolja be a készüléket üres állapotban.
• Ne helyezze a készüléket forró felületek mellé, és ügyeljen arra,
hogy a kábel ne érintsen meleg felületeket.
• Ne használja a készüléket feltekert kábellel.
• Ne szerelje le, vagy fel a turmixgép tálját mialatt a készülék
mŒködésben van.
• Csatlakoztassa le a hálózatról a készüléket, mielŒtt egy tartozékot
vagy a mixer bármely részét kicserélné, vagy hozzáérne, amely
mıködés közben mozgásban van.
• Ne vegye le a turmixgép fedelét, mielŒtt a motor le nem állt.
• Ne hagyja a készüléket mŒködése során magára. Ügyeljen rá, ha
gyerekek is a közelben tartózkodnak.
• Kapcsolja ki a készüléket a használat után.
• Ne húzza ki a vezetéket rángatva a konnektorból, és ne hagyja a
kábelt lógatott helyzetben.
• GyŒzŒdjön meg tisztítás elŒtt arról, hogy a készülék kikapcsolt
állapotban van-e.
• NE MERÍTSE A MOTORBLOKKOT VÍZBE, VAGY MÁS EGYÉB
FOLYADÉKBA.
]
]
]
]
]
]
]
]
]
• Ne alkalmazza a turmixgépet, ha a penge meghibásodott.
• Ne használja a készüléket, ha a csatlakozó kábel vagy a dugó
bármilyen károsodást szenvedett, vagy ha a készülék nem mŒködik
megfelelŒen, illetve ha megrongálódott.
• Ne használja a készüléket a szabadban.
FIGYELEM: A tŒzveszély illetve elektromos kisülés elkerülése végett
ne vegye le egyik fedelet sem. A készülék belsejében nincs olyan
alkatrész, amelyet a használó kicserélhet. Meghibásodás esetén
forduljon a jótállási javításokkal megbízott szerviz szakembereihez.
ÖSSZESZERELÉS
Az elsŒ használat elŒtt szappanos vízzel mosson meg minden
tartozékot, amely kapcsolatba kerül élelmiszerrel.
A penge széle nagyon éles.
A sérülés elkerülésére a penge tisztításakor bánjon nagyon óvatosan
velük tisztításukkor.
Illessze a tömítést (4) a penge tölcsérére (5).
EllenŒrizze, hogy a tömítést helyesen helyezte be a szegéllyel felfelé
(1 ábra).
Helyezze a penge tölcsérét a motorház tartónyakára (7) (2 ábra).
Csavarja be az edényt (3) a motorház tartónyakára (7) (3 ábra), és
fordítsa az edényt az óramutató járásával ellentétes irányba, hogy
záruljon. (4 ábra)
Helyezze a kancsós szerelvényt a motorházra (6). Az ikonok jelzik a
zárt pozíciót, valamint a helyes elfordítási irányt. (5. és 6. ábra)
Szétsze relés
Hozzákapcsol
A fedél turmixgépre (2) való illesztés éhez helyezze a kancsó tetejére,
és nyomja le, hogy kattanjon be a helyére. (7 ábra)
Az üvegdugó beillesztéséhez találtassa az üvegdugó tölténykarimáit
a fedél nyílásaival (8. ábra), illessze be és fordítsa el az óramutató
járásával megegyezŒ irányban, amíg bekattan. (9 ábra)
Fontos: A turmixgépet ellátták egy biztonsági szerkezettel, amely
leállítja a motort induláskor, ha a kancsó nincs helyesen elhelyezve.
GYÜMÖLCSÖK VAGY ZÖLDSÉGEK ELKÉSZÍTÉSE
Az összekeverendŒ gyümölcsöket vagy zöldségeket mossa, vagy
hámozza meg.
Magházzal rendelkezŒ gyümölcsök esetén (mint az alma vagy körte)
távolítsa el a héjat és a magházat.
A héjas gyümölcsöket vagy zöldségeket (pl. citrusfélék, dinnye, kivi
stb.) elŒzŒleg hámozza meg.
A szŒlŒ turmixolása elŒtt távolítsa el a magokat. Vágja össze a
gyümölcsöket vagy zöldségeket, amelyeket át lehet nyomni a
töltŒcsövön.
Ezt a turmixgépet ne használja rostos gyümölcsökhöz vagy
zöldségekhez (pl. mazsola).
Használjon minél frissebb gyümölcsöt és zöldséget.
A gyümölcsök és a zöldségek által tartalmazott vitaminok és ásványi
anyagok veszítenek értékükbŒl érintkezve a levegŒvel vagy fénnyel.
Az italt fogyassza rögtön elkészítés után.
Ha néhány órára tárolni szeretni, tegye üveg vagy cserépedényben
a hıtŒszekrénybe. Adjon hozzá citromlevet a tartósításának
érdekében.
HASZNÁLAT
A turmixgépet mindig helyezze sima, stabil felületre.
A turmixgép csak akkor fog mıködni, ha a kancsó helyesen van
ráhelyezve.
Csatlakoztassa a hálózatra a készüléket, a fényes „ STOP” kijelzŒ kigyúl,
jelezvén a készenléti üzemmódot.
Helyezzen minden hozzávalót a tartályba, viszont ne lépje túl a
kancsón lévŒ 1,2 l maximum jelt. A legjobb eredmény érdekében
BS4790.indd 14BS4790.indd 14 17/4/07 09:42:4217/4/07 09:42:42
Page 15

elŒbb öntse bele elŒbb a folyadékokat és kapcsolja be a készüléket
fokozatosan hozzáadván a kemény hozzávalókat
Ha a folyamat alatt szeretne még hozzáadni valamit, akkor tegye ezt
a fedél száján keresztül. (10 ábra)
Nyomja meg a leállító gombot a kikapcsoláshoz. Ne próbálja levenni
a motorházról a kancsót, ha a motor még mıködésben van.
Válassza ki az elvégzendŒ funkcióhoz megfelelŒ sebességet.
1 sebesség (lassú) Sebesség beállítása
A mixeléshez kész összetevŒkhöz stb.
A hámozott gyümölcsök turmixolásához, mint az alma,
körte stb.
2 sebesség Sebesség beál lítása
MegfelelŒ kávé- vagy vanilia-turmix készítéséhez.
3 sebesség Beprogramozott hajtási sebesség
MegfelelŒ ételek készítéséhez mint a hagyma, fokhagyma
stb.
A beprogramozott hajtási sebesség funkció lehetŒvé teszi
a gyors elkészítést.
4 sebesség (közép) Sebesség beállítása
MegfelelŒ palacsintatészta, szószok stb. készítéséhez.
5 sebesség Sebesség beál lítása
Zöldségek, koktélok, kompotok stb. zúzásához.
6 sebesség (gyors) Sebesség beállítása
MegfelelŒ alkoholos vagy gyümölcskoktélok készítésére.
Rögzített sebesség a sebesség váltó indít ására
Instant indítósebesség
Jégzúzó funkció (Gyors)
Beprogramozott indítósebesség
Leállító gomb
Jégzúzó funkció [
Jégkockák összezúzásához helyezze Œket a kancsóba, és tegye
rá a fedelet. Nem szükséges folyadék hozzáadása. Kapcsolja be,
megnyomván a [
Rögzített sebesség a sebesség váltó indít ására [
Az indító funkció használatára [
gombot. A megfelelŒ fényes kijelzŒ kigyúl.
Majd nyomja meg a kívánt sebességbeállító gombot. A turmixgép
csak a gomb lenyomásakor fog mıködni leáll, amint elengedi a
gombot. Ez a fu nkció megkönnyíti a kapott e redmény megtekintését,
és alkalmazhatja a túl sok hab keletkezésének megelŒzésére.
Az indítófunkció kikapcsolására nyomja meg újra a [
fog aludni a fényes kijelzŒ jelezvén, hogy a [
kapcsolva.
]
] gombot.
], elŒször nyomja meg a [ ]
]
] gombot, ki
] funkció most ki van
Figyelmeztetések:
- Soha ne használja a készüléket üresen.
- Ha a mŒködés közben le kell venni az edény oldalára tapadt
élelmiszereket, állítsa le a készüléket. A kések még egy kis ideig
tovább foroghatnak. Tartsa a kanalat, vagy a kenŒlapátot egy
biztonságos távolságra a késektŒl, a balesetek elkerülése végett.
- LehetŒleg ne lépje túl az 3 perces megállás nélküli mŒködési
idŒt. Ezután pihentesse a készülék motorját pár percig az újabb
mŒködtetés elŒtt.
- Ajánlatos a száraz élelmiszerek felszeletelése mielŒtt
összeturmixolná ezeket, a jobb minŒségŒ turmix eléréséhez.
- Száraz anyagok keverésekor adjon hozzá egy csésze folyadékot a
folyamat gyorsításához.
- Ne öntsön nagyon meleg folyadékokat az edénybe.
TISZTÍTÁS ÉS KARBANTARTÁS
MielŒtt a készülék bármely alkatrészét tisztítaná, kapcsolja ki a
készüléket és húzza ki az elektromos vezetéket.
Azokat az alkatrészeket, amelyek az élelmiszerrel kapcsolatba
kerültek, mossa el minden használat után langyos mosószeres vízzel.
Legyen óvatos a kések tisztításánál.
A motorház megtörléséhez, használjon egy nedves rongyot. A
mıanyag részek foltossá válhatnak az ételekbŒl származó erŒs
színezŒanyagok által (pl. sárgarépa). Alkalmazzon nŒvényi eredetı
olajat a tisztításukra.
Vigyázat: Egyetlen keverŒrész sem helyezhetŒ mosogatógépbe.
A készülék tárolásakor a kábelt helyezze be a motorház alján lévŒ
kábeltároló rekeszbe.
FIGYELMEZTETÉS A KÉSZÜLÉK MEGSEMMISÍTÉSÉT
ILLETÃEN
A z árucikkeink optimalizált csomagolásban kerülnek
kiszállításra. Ez alapjában a nem szennyezŒ anyagok
használatában nyilvánul meg, amelyek leadhatók a helyi hulladékŒrlŒ
központban másodlagos nyersanyagként.
Ez a termék megfelel a 2002/96/CE EU elŒírásoknak. A
készüléken lévŒ áthúzott szemetes szimbólum jelzi, hogy,
amikor a termék hulladékrendelkezésre kerül, nem szabad
a háztartási hulladékok közé számítani. El kell szállítania
egy különleges, elektronikai és elektromos készülékeknek
szánt hulladékgyıjtŒ ponthoz, vagy vissza kell küldenie a
forgalmazóhoz egy hasonló készülék beszerzésekor. Az érvényben
lévŒ hulladékgyıjtŒ rendelkezések szerint, azok a felhasználók, akik
kiselejtezett készülékeket nem adják le egy speciális gyıjtŒpontnál,
büntetendŒk. A kiselejtezett készülékek helyes hulladékrendelkezése
az t jel enti, hog y újr aha szno síth atóa k és ö koló giai lag f eldo lgozh ató ak,
vigyázva a környezetre és lehetŒvé téve a termékhez felhasznált
anyagok újra használhatóságát. További információkért az elérhetŒ
hulladékgyıjtŒ pontokról forduljon a helyi hulladék központjához,
vagy az üzlethez, ahol a terméket vásárolta. A gyártók és importŒrök
felelŒsek a termékek ökológiai újra hasznosításáért, feldolgozásáért
és hulladékrendelkezéséért, akár közvetlenül vagy egy nyilvános
rendszeren keresztül.
A helyi városi tanácsa információkkal szolgál az elavult készülékekkel
kapcsolatos rendelkezésrŒl.
BS4790.indd 15BS4790.indd 15 17/4/07 09:42:4317/4/07 09:42:43
Page 16

РУССКИЙ
1. Верхняя крышка
2. Крышка
3. Кувшин
4. Герметическая прокладка
5. Конус для ножей
6. Корпус двигателя
7 Деталь крепления на корпусе мотора
8. Сцепление мотора
9. Панель управления
a) Скорость 1
b) Скорость 2
c) Скорость 3
d) Скорость 4
e) Скорость 5
f) Скорость 6
g) Конвертер установленных скоростей в скорости,
программируемы нажатием [
h) Функция «колоть лед» [
i) Кнопка остановки [
10. Предохраняющие от скольжения ножки
11. Проводособиратель
ВАЖНЫЕ ПРИМЕЧАНИЯ
• Перед тем как использовать аппарат в первый раз, внимательно
прочтите настоящую инструкцию по эксплуатации. Сохраняйте ее
до конца срока службы прибора.
• Следует включать аппарат только в сеть с напряжением,
указанным на аппарате.
• Данный аппарат пригоден для пищевых продуктов.
• Настоящий аппарат предназначен только для домашнero
использования.
• Всегда используйте миксер на ровной и устойчивой поверхности.
• Этот аппарат не должен использоваться людьми (включая
детей) с физическими, сенсорными и умственными недостатками
или при отсутствии опыта и знаний, за исключением тех случаев,
когда они были проинструктированны компетентным лицом об
использовании.
• Не трогайте аппарат мокрыми руками.
• Запрещается трогать подвижные части аппарата.
• Ножи очень острые. При проведении чистки аппарата будьте
осторожны с ножами, чтобы не порезаться.
• Запрещается помещать ножи или вилки в стакан во время работы
аппарата.
• Использование каких-либо приспособлений, не поставляемых
изготовителем, может стать причиной несчастных случаев.
• Не включайте пустой аппарат.
• Не располагайте аппарат вблизи источников тепла и не
допускайте касания электрошнуром горячих поверхностей.
• Не вк лючайте аппарат в работу с неразмотанным
электрошнуром.
• Запрещается снимать или устанавливать стакан миксера во
время работы аппарата.
• Отсоединяйте устройство от сети перед тем, как менять
аксессуары или части, которые могут двигаться во время
функционирования миксера.
• Не открывайте крышку миксера до тех пор, пока не остановится
двигатель.
• Не оставляйте включенный аппарат без присмотра, особенно в
присутствии детей.
• При неиспользовании аппарата следует отключать его от сети.
• При отключении аппарата из сети не дергайте за электрошнур и
не оставляйте его свисающим.
[ ]
[ ]
[ ]
[ ]
[ ]
[ ]
]
]
]
• Перед тем, как приступить к чистке аппарата убедитесь, что
аппарат отключен от сети.
• ЗАПРЕЩАЕТСЯ ПОГРУЖАТЬ КОРПУС ДВИГАТЕЛЯ В ВОДУ ИЛИ
ЛЮБУЮ ДРУГУЮ ЖИДКОСТЬ.
• Не используйте миксер, если резак поврежден.
• Не включайте аппарат в сеть с поврежденным электрошнуром
или вилкой, а также в случае, если вы заметили отклонения в
работе аппарата.
• Данный аппарат предназначен для использования только в
домашних условиях.
• ВНИМАНИЕ: В целях предотвращения опасности возникновения
пожара или поражения электрическим током, не снимайте ни
одну из крышек. Запрещается пытаться починить неисправную
кофева рку само стоятельн о. Ремонт и замен у электро шнура должен
осуществлять исключительно авторизированный сервисный
центр.
СБОРКА
Перед первым использованием помойте с мыльной водой предметы,
которые будут контактировать с продуктами питания.
Лезвие резаков очень острое.
Осторожно обращайтесь с резаками во время их чистки, чтобы
предотвратить любую травму.
Установите резиновое кольцо (4) на конус резаков (5).
Убедитесь в прави льном разме щении резин ового кольца ( рельевом
вверх). (Рис. 1)
Поместите конус резаков на деталь крепления корпуса мотора (7)
(рис. 2)
Вставьте чашу (3) на деталь крепления корпуса мотора (7) (рис. 3)
и поверните чашу против часовой стрелки до тех пор, пока она не
будет правильно вставлена. (Рис.4)
Поместите собранную чашу на корпусе мотора (6). Изображения
укажут вам как на область сборки так и на направление вращения
для правильного установления набора. (Рис. 5 и 6)
Разобрать.
Собрать.
Чтобы установить крышку миксера (2), поместите ее на верхней
части чаши и нажмите на нее, пока она не будет полностью
вставлена. (Рис. 7)
Чтобы установить пробку (1), вставьте ее так, чтобы боковые усики
совпали с отверстиями основания крышки (рис. 8) и вращайте ее в
направлении против часовой стрелки до тех пор, пока она не будет
правильно установлена. (Рис. 9)
Внимание: Этот миксер обладает функцией предохранения,
которая препятствует работе мотора, если чаша размещена
неправильно.
ПРИГОТОВЛЕНИЕ ФРУКТОВ ИЛИ ОВОЩЕЙ
Помойте или почистите фрукты или овощи, которые вы хотите
обработать.
Чтобы обрабатывать фрукты с зернами (из типа яблок или груш),
нужно удалить у них кожуру и сердцевину.
Фрукты и овощи с кожурой (например, цитрусовые, дыни, киви, и
т.д.) нужно почистить предварительно.
Ягоды винограда могут быть превращенными в жидкость только,
отделив их от грозди.
Нарезайте фрукты и овощи на кусочки, которые могли бы пройти
через отверстие наполнения.
Не используйте волокнистые фрукты и овощи (например, изюм) в
этом миксере.
Используйте как можно более свежие фрукты и овощи .
Фрукты и овощи с одержат витамины и минералы, которые портятся
при контакте с кислородом или светом. Пейте сок сразу после его
приготовления.
Если необходимо хранить сок в течение нескольких часов,
поместите эго в холодильник в керамической или стеклянной
BS4790.indd 16BS4790.indd 16 17/4/07 09:42:4317/4/07 09:42:43
Page 17

посуде. Добавьте сок лимона, чтобы продлить его хранение.
ФУНКЦИОНИРОВАНИЕ
Поместите миксер на ровной и устойчивой поверхности.
Миксер будет функционировать только, когда чаша правильно
размещена.
Подсоедините аппарат к сети, световой индикатор “Stop” начнет
мигать, указывая на то, что аппарат находится в состоянии покоя.
Помес тите ингр едиенты в р езервуар т ак, чтобы не п ревыси т отметк у
максима льного напо лнения чаши 1 ’2 ли тра. Чтобы пол учить лучши й
результат, поместите сначала жидкие ингридиенты, включите
аппарат на некоторое время и добавьте твердые ингредиенты.
Если во время процесса вы хотите добавить большее количество
ингридиентов, делайте это через отверстие крышки. (Рис. 10)
Чтобы остановить функционирование, нажмите кнопку остановки.
Никогда не старайтесь снять чашу с корпуса мотора во время его
работы.
Выбирите наиболее подходящую скорость желаемого
функционирования.
Скорость 1( Медленная) Установленная скорость
Чтобы перемешать моментальные приготовленные, и т.д.
Чтобы приготовить сок очищенных фруктов, таких как
яблоко, груша, и т.д.
Скорость 2 Установленная скорость
Подходит для приготовления коктелей с кофе или
ванилью.
Скорость 3 Скорость, программируемая нажатием
Подходит для использования продуктов, таких как
луковица и чеснок.
Функция, программируемая нажатием, позволяет более
быстро обработать продукт.
Скорость 4 (Средняя) Установленная скорость
Подходящая для приготовления теста для пирогов,
блинов, соусов, и т.д.
Скорость 5 Установленная скорость
Чтобы перетирать овощи, готовить коктейли, компоты, и т.д.
Скорость 6 (Быстрая) Установленная скорость
Подходит для приготовления алкогольных или фруктовых
коктелей.
Конвертер установленных скоростей в скорости,
программируемые нажатием.
Моментальная скорость.
Функция колоть лед (Быстрая)
Скорость,программируемая нажатием
Кнопка остановки
Функция «колоть» лед [
Чтобы колоть кусочки льда, поместите их внутри чаши и закройте
крышку. Не нужно добавлять никакую жидкость. Запустите
устройство, нажав на кнопку [
Конвертер установленных скоростей в скорости,
программируемые нажатием. [
Чтобы использовать мгновенную функцию [
кнопку [
]. Замигает соответствующий световой индикатор.
Тогда нажмите кнопку желаемой скорости функционирования.
Миксер будет функционировать только, пока будет нажата кнопка,
и остан овится, когда вы отпус тите кнопку. С помощью это й функции
проще оценить полученный результат и избежать образования
излишка пены.
].
].
]
], сначала нажмите
Для прекращения использования мгновенного функционирования,
снова нажмите кнопку [
чтобы указать на то, что функция [
] световой индикатор погаснет, а именно,
] уже не является активной.
Меры предосторожности:
- Запрещается запускать в работу пустой блендер.
- Если необходимо необходимо перемешать продукты, прилипшие
к стенкам стакана, выключите аппарат. После отключения
аппарата ножи могут вращаться еще в течение некоторого
времени. Не подносите близко ложку или лопатку к ножам, чтобы
не порезаться.
- Рекомендуется не превышать продолжительность непрерывной
работы аппарата в 3 минут. По прошествии этого времени дайте
отдохнуть двигателю несколько минут, прежде чем вновь привести
в действие блендер
- Для получения лучших результатов при размельчении твердых
продуктов, рекомендуется предварительно порезать их на
маленькие кусочки.
- Для ингридиентов без жидкости, добавьте чашку воды, чтобы
облегчить функционирование.
- Не наливайте слишком горячие жидкости в стакан.
УХОД И ЧИСТКА
Прежде ч ем приступ ить к чистке люб ой из частей микс ера, нажмит е
кнопку остановки аппарата и выключите его из сети.
После каждого использования аппарата вымойте все элементы,
которые находились в контакте с пищевыми продуктами в теплой
воде с мылом. Будьте осторожны при мытье ножей.
Чистите корпус мотора только влажной тряпочкой. Пластмассовые
части могут оставаться запятнанными после использования
ингридиентов с высоким содержание пигментов; (например:
морковки). Используйте растительное масло для их чистки.
Внимание: не мойте ни одну из частей миксера в посудомоечной
машине. Для хранения устройства, соберите кабель в
проводособиратель, расположенный в нижней части корпуса
мотора.
РЕКОМЕНДАЦИИ ПО СДАЧЕ/ВЫБРОСУ УПАКОВКИ И
СТАРЫХ АППАРАТОВ
Наши товары поставляются в оптимизированной упаковке.
В ней в основном использованы экологически чистые
материалы, которые должны сдаваться в местную службу
утилизации отходов в качестве вторичного сырья.
Данное изделие соответствует нормам директивы
ЕС 2002/96/CE. Символ перечеркнутого контейнера для
мусора на колесиках, имеющийся на приборе, означает,
что, когда наступит время избавиться от ненужного
прибора, он не должен помещаться вместе с бытовыми
отходами. Он должен быть доставлен в специальное место
утилизации отходов электрических и электронных приборов или
возвращен продавцу при покупке нового подобного прибора.
В соответствии с действующими нормами утилизации отходов
пользователи, не доставившие ненужные приборы в специальные
места утилизации отходов, могут быть оштрафованы. Правильная
отдельная утилизация выброшенных приборов означает, что
они могут быть рецик лированы, переработаны или уничтожены
экологически чистым способом, не загрязняющим окружающую
среду, не оказывающим негативное воздействие на здоровье
людей и позволяющим повторно использовать материалы, из
которых был изготовлен прибор. Для получения более подробной
информации об имеющихся программах утилизации отходов
обращайтесь в местную службу утилизации отходов или в магазин,
в котором был приобретен прибор. Производители и импортеры
несут ответственность за экологически чистую утилизацию,
переработку и уничтожение выброшенных приборов напрямую или
посредством государственной системы.
Местные муниципальные власти могут предоставить информацию
о порядке сдачи/уничтожения ненужных приборов.
BS4790.indd 17BS4790.indd 17 17/4/07 09:42:4417/4/07 09:42:44
Page 18

âESKY
1. Uzávûr
2. Kryt
3. Mixovací nádoba
4. Hermetické tûsnûní
5. KuÏel s noÏi
6. Motorová ãást
7. Úchytn˘ límec tûla motoru
8. Motorová spojka.
9. Ovládání
a) Rychlost 1 [
b) Rychlost 2 [
c) Rychlost 3 [
d) Rychlost 4 [
e) Rychlost 5 [
f) Rychlost 6 [
g) Pfievodník pevné rychlosti na impulzní rychlost [
h) Funkce pro drcení ledu [
i) Tlaãítko Stop [
10. Protiskluzové nohy
11. Prostor pro kabel
DÒLEÎITÁ UPOZORNùNÍ
• Pfied prvním pouÏitím spotfiebiãe si peãlivû pfieãtûte návod k
obsluze a uschovejte ho pro pfiípadné konzultace.
• Spotfiebiã zapojujte v ˘hradnû na napûtí, uvedené na ‰títku s
technick˘mi parametry.
• Spotfiebiã je urãen pro pfiípravu jídel.
• Je navrÏen v ˘hradnû pro pouÏití v domácnosti.
• Mixér vÏdy pokládejte na rovn˘, stabilní povrch.
• Tento pfiístroj nesmí b˘t pouÏíván osobami (vãetnû dûtí)
s fyzick˘m, smyslov˘m nebo mentálním handicapem, pokud nebyly
pouãeny o správném pouÏívání zodpovûdnou dospûlou osobou.•
Nedot˘kejte se spotfiebiãe vlhk ˘ma rukama.
• Nesahejte na volné pohyblivé ãásti pfiístroje.
• Mûjte na pamûti, Ïe bfiitv y noÏÛ jsou velmi ostré. Pfii ãi‰tûní s nimi
zacházejte se zv ˘‰enou opatrností, aby jste se neporanili.
• Je-li spotfiebiã zapnut˘, nevkládejte do mixovací nádoby kovové
pfiedmûty, napfi. noÏe nebo vidliãky.
• NepouÏívejte pfiíslu‰enství od jin˘ch v˘robcÛ, neboÈ by jste mohli
zapfiíãinit závady chodu spotfiebiãe.
• Neuvádûjte spotfiebiã do chodu naprázdno.
• Nestavte spotfiebiã do blízkos ti zdrojÛ tepla a dbejte, aby pfi ívodní
kabel nepfii‰el do styku s hork˘mi povrchy.
• NepouÏívejte spotfiebiã se svinut˘m pfiívodním kabelem.
• Je-li spotfiebiã v provozu, nenasazujte ani nesundávejte mixovací
nádobu.
• Pfied v˘mûnou pfiíslu‰enství nebo pfiístupem k jakékoli ãásti mixéru,
která se mÛÏe pfii provozu pohybovat, odpojte pfiístroj od napájení.
• Neotevírejte víko mixéru, dokud se motor nezastaví.
• Zapnut˘ spotfiebiã nenechávejte bez dozoru, zejména v
pfiítomnosti dûtí.
• Po pouÏití odpojte pfiístroj ze sítû elektrického proudu.
• Neodpojujte spotfiebiã trhnutím pfiívodního kabelu. Nenechávejte
kabel volnû viset.
• Dfiíve, neÏ spotfiebiã zaãnete m˘t, se pfiesvûdãte, zda je odpojen˘
ze sítû.
• NIKDY NEVKL ÁDEJTE MOTOROVOU âÁST SPOT¤EBIâE DO VODY
ANI DO JINÉ KAPALINY.
• NepouÏívejte mixér, pokud je po‰kozena ãepel.
]
]
]
]
]
]
]
]
]
• Neuvádûjte mixér do chodu, zjistíte-li, Ïe síÈov˘ kabel nebo
zástrãka jsou po‰kozeny nebo Ïe na spotfiebiãi vznikla závada.
• NepouÏívejte spotfiebiã ve volném prostoru.
• POZOR: Nesnímejte Ïádné víko spotfiebiãe, aby jste nezv˘‰ili
riziko vzniku poÏáru nebo elektrick˘ch v˘bojÛ. UÏivatel není
oprávnûn manipulovat s Ïádnou souãástkou uvnitfi spotfiebiãe.
Opravy a v˘mûny kabelu jsou oprávnûni provádût pouze pracovníci
autorizované technické sluÏby.
SESTAVENÍ
Pfied prvním pouÏitím v‰echny díly, které budou v kontaktu
s potravinami, omyjte m˘dlovou vodou.
âepel je velmi ostrá.
Abyste zabránili zranûní, manipulujte s ãepelí pfii mytí velmi
opatrnû.
Nasaìte tûsnûní (4) pfies kuÏel ãepele (5).
Zkontrolujte, zda je tûsnûní správnû nasazeno s jaz ˘ãkem smûfiujícím
nahoru (obrázek 1).
Usaìte kuÏel ãepele na úchytn˘ límec tûla motoru (7), obrázek 2.
ZasuÀte nádobu (3) do úchytného límce tûla motoru (7), obrázek
3, a zajistûte nádobu otoãením proti smûru hodinov˘ch ruãiãek.
(Obrázek 4)
PoloÏte komplet s nádobou na tûlo motoru (6). Ikony oznaãují
zaji‰tûnou polohu a také správn˘ smûr otoãení. (Obrázky 5 a 6)
Rozdûlat
Pfiipojit
Víko na mixér (2) nasadíte tak, Ïe jej vloÏíte do nádoby a zatlaãíte na
nûj, aby se zajistilo na místû. (Obrázek 7)
Uzávûr nasadíte tak, Ïe zarovnáte jaz˘ãky na uzávûru s otvory ve víku
(obrázek 8), zasunete jej a otoãíte ve smûru hodinov˘ch ruãiãek,
dokud se nezajistí. (Obrázek 9)
DÛleÏité: Tento mixér je opatfien bezpeãnostním zafiízením, které
zabraÀuje spu‰tûní motoru, kdyÏ není nádoba správnû umístûna.
P¤ÍPRAVA OVOCE A ZELENINY
Omyjte nebo oloupejte ovoce nebo zeleninu, kterou chcete
rozmixovat.
Pfii pfiípravû ovo ce s jadérky (napfií klad jablka nebo hru‰k y) oloupejte
slupku a odstraÀte jadérka.
Ovoce a zeleninu se slupkou (napfi. citrusové ovoce, melouny, kiwi
atd.) je nutné pfiedem oloupat.
Hroznové víno musí b˘t pfied mixováním oddûleno od vûtviãek.
Nakrájejte ovoce a zeleninu na kousky, které lze protlaãit pfies plnicí
otvor.
Tímto mixérem nezpracovávejte vláknité ovoce nebo zeleninu (napfi.
rozinky).
Zpracovávané ovoce a zelenina by mûly b˘t co nejãerstvûj‰í.
Ovoce a zelenina obsahuje vitamíny a minerály, které ztrácejí své
vlastnosti pfii kontaktu s kyslíkem nebo svûtlem. DÏus vypijte
okamÏitû po jeho pfiípravû.
KdyÏ jej chcete nûkolik hodin uchovat, nalijte jej do sklenûné nebo
keramické nádoby a uloÏte do chladniãky. Jeho stálost lze vylep‰it
pfiidáním citronové ‰Èávy.
POUÎITÍ
Mixér vÏdy pokládejte na rovn˘, stabilní povrch.
Mixér funguje jen po správném umístûní nádoby.
Pfiipojte pfiístroj k zásuvce, indikátor Stop bude blikáním oznamovat
pohotovostní reÏim.
VloÏte v‰echny pfiísady do nádoby a pfiitom nepfiekroãte oznaãení
maximální kapacity – 1,2 litru. Nejlep‰ích v ˘sledkÛ dosáhnete tak, Ïe
dovnitfi nejdfiíve nalijete tekutiny, zapnete pfiístroj a potom pfiidáte
tuhé pfiísady pfii mixování.
BS4790.indd 18BS4790.indd 18 17/4/07 09:42:4417/4/07 09:42:44
Page 19

KdyÏ budete chtít v prÛbûhu mixování pfiidat dal‰í potraviny,
pfiidejte je pfies otvor ve víku. (Obrázek 10)
Pfiístroj vypnete stisknutím tlaãítka Stop. Nesundávejte nádobu
z hlavního tûla, kdyÏ je motor spu‰tûn.
Vyberte vhodnou rychlost pro poÏadovanou funkci.
Rychlost 1 (Pom alá) Nastavená rychlost
Pro mixování pfiipraven˘ch pfiísad atd.
Pro pfiípravu dÏusu z oloupaného ovoce, napfiíklad jablka,
hru‰ky atd.
Rychlost 2 Nastavená r ychlost
Vhodné pro pfiípravu mléãn˘ch koktejlÛ s kávou nebo
vanilkou.
Rychlost 3 Programovaná impulzní rychlost
Vhodné pro pfiípravu potravin, jako jsou cibule, ãesnek atd.
Funkce programovaného impulzu umoÏÀuje rychlé
zpracování potravin.
Rychlost 4 (Stfiední) Nastavená rychlost
Vhodné pro pfiípravu tûsta na palaãinky, omáãek atd.
Rychlost 5 Nastavená r ychlost
Pro mixování zeleniny, koktejlÛ, kompotÛ atd.
Rychlost 6 (Rychlá) Nastavená rychlost
Vhodné pro pfiípravu koktejlÛ s alkoholem nebo ovocem.
Pfievodn ík pevné rychlosti na impulzní r ychlost
OkamÏitá impulzní r ychlost
Funkce pro drcení ledu (rych le)
Programovaná impulzní rychlost
Tlaãítko Stop
Funkce pro drcení ledu [
KdyÏ chcete rozdrtit ledové kostky, vloÏte je do nádoby a nasaìte
víko. Nemusíte pfiidávat Ïádnou tekutinu. Zapnûte pfiístroj stisknutím
tlaãítka [
].
Pfievodn ík pevné rychlosti na impulzní r ychlost [
KdyÏ chcete pouÏít funkci impulzu [
[
]. Rozsvítí se pfiíslu‰n˘ indikátor.
Potom stisknûte tlaãítko pro nastavení poÏadované r ychlosti. Mixér
bude mixovat jen po d obu, po kterou budete dr Ïet tlaãítko stisknuté,
zastaví se po jeho uvolnûní. S touto funkcí je snaz‰í odhadnout
v˘sledek a je pomocí ní moÏné vyhnout se vytvofiení pfiíli‰ velkého
mnoÏství pûny.
KdyÏ chcete funkci impulzu zastavit, stisknûte znovu tlaãítko [
Indikátor zhasne a oznámí tak vypnutí funkce [
]
], stisknûte nejdfiíve tlaãítko
]
].
].
Upozornûní:
- Nikdy nepouÏívejte mixér naprázdno.
- Chcete-li odstranit kousk y potravin, které zÛstaly nalepeny na stûnû
nádoby, spotfiebiã nejdfiíve vypnûte. Mûjte na pamûti, Ïe noÏe se
po vypnutí je‰tû urãitou dobu toãí. Pfiíslu‰nou lÏíci nebo stûrku drÏte
v dostateãné vzdálenosti od noÏÛ, aby jste si nezpÛsobili úraz.
- Není vhodné nechávat motor v nepfietrÏitém chodu více neÏ 3
minut. Po uply nutí této doby nechte motor nûkolik minu t odpoãinout
a potom v mixování opût pokraãujte.
- Mixujete-li kusové potraviny, rozkrájejte je nejdfiíve na malé
kousky.
- Pfii mixování such˘ch pfiísad pomÛÏete zpracování pfiidáním hrnku
tekutiny.
- Nenalévejte do nádoby pfiíli‰ horké tekutiny.
âI·TùNÍ A ÚDR ÎBA
Dfiíve, neÏ zaãnete ãistit kteroukoli ãást spotfiebiãe, stisknûte vypínaã
a odpojte pfiístroj ze sítû elektrického proudu.
Díly, které pfiicházejí do styku s potravinami, omyjte po kaÏdém
pouÏití ve vlaÏné vodû se saponátem. NoÏe om˘vejte se zv˘‰enou
opatrností.
Kryt motoru otírejte vlhk˘m hadfiíkem. Na plastov˘ch dílech mohou
po zpr aco ván í po tr avi n se sil n˘m i ba rv iv y (n apfi. mr kev) zÛs ta t sk vr ny.
Ty lze odstranit pomocí rostlinného oleje.
Upozornûní: Îádn˘ díl mixéru nesmí b˘t myt v myãce. Pfii skladování
pfiístroje vloÏte kabel do urãeného místa v dolní ãásti krytu motoru.
UPOZORNùNÍ PRO UÎIVATELE
Na‰e v˘robky jsou baleny do optimalizovaného obalu,
urãeného pro pfiepravu. Tento obal je tvofien pfieváÏnû
ekologicky nezávadn˘mi materiály, které by mûly b˘t odloÏeny jako
druhotná surovina do pfiíslu‰né sbûrny odpadÛ.
Tento v˘robek splÀuje poÏadavky Normy EU 2002/96/CE.
Na spotfiebiãi je umístûn symbol pfie‰krtnuté popelnice.
Tento symbol upozorÀuje spotfiebitele na povinnost odloÏit
pfii likvidaci tento v˘robek mimo domácí odpad. K tomuto
slouÏí sbûrny elektrick˘ch a elektronick˘ spotfiebiãÛ ãi je
moÏnost vrátit jej do prodejny pfii koupi nového spotfiebiãe.
Spotfiebitel je povinen pfii likvidaci odloÏit tento spotfiebiã do
sbûrny. V pfiípadû neplnûní tohoto nafiízení mÛÏe podle platn˘ch
nafiízení dojít k postihu spotfiebitele. Spotfiebiã urãen˘ k likvidaci,
kter˘ byl odevzdán jako tfiídûn˘ odpad, mÛÏe b˘t recyklován
ãi odstranûn ekologick˘m zpÛsobem. Tato aktivita zabraÀuje
negativnímu dopadu na Ïivotní prostfiedí a podporuje recyklaci
pouÏit˘ch materiálÛ.
Informace o místech, které poskytují tyto sluÏby vám poskytnou
místní organizace ãi obchod, ve kterém byl spotfiebiã zakoupen.
V˘robci a dovozci tûchto v˘robkÛ jsou zodpovûdûni za jejich
recyklaci a ekologickou likvidaci (pfiímo ãi prostfiednictvím místních
sluÏeb).
Informace o moÏnostech odloÏení /odstranûní spotfiebiãÛ urãen˘ch
k likvidaci do vhodn˘ch sbûren obdrÏíte na radnici ãi na mûstském
úfiadû.
BS4790.indd 19BS4790.indd 19 17/4/07 09:42:4517/4/07 09:42:45
Page 20

БЪЛГАРИЯ
1. Стопер
2. Капак
3. Кана
4. Уплътнение
5. Конус на ножовете
6. Двигателна кутия
7 Пръстен за задържане на двигателното тялото
8. Двигателна муфа
9. Бутони за управление
a) Скорост 1 [
b) Скорост 2 [
c) Скорост 3 [
d) Скорост 4 [
e) Скорост 5 [
f) Скорост 6 [
g) Преобразовател на постоянна скорост в импулсна
скорост [
h) Функция за разбиване на лед [
i) Бутон за спиране [
10. Неплъзгащи се крачета
11. Макара за кабел
ВАЖНИ СЪВЕТИ
• Преди да използвате уреда за първи път прочетете внимателно
тези инструкции. Запазете ги за бъдеща справка.
• Свързвайте уреда само към напрежението, посочено на
табелката с характеристиките на уреда.
• Този уред е подходящ за използване с хранителни продукти.
• Този уред е предназначен изключително и само за домашна
употреба.
• Винаги използвайте блендера върху равна, твърда повърхност.
• Този у ред не трябва да се използва от лица (вк лючително деца) с
понижени физически, психически и сетивни способности освен ако
са инструктирани от отговорно възрастно лице как да използват
уреда правилно .
• Никога не работете с уреда с мокри ръце.
• Избягвайте контакт с движещите се части.
• Ръбът на ножа е много остър. Внимавайте много, когато
почиствате ножовете, за да не се нараните.
• Никога не пъхайте метални прибори като ножове или вилици
вътре в каната, докато уредът работи.
• Използването на аксесоари, които не са доставени от
производителя, може да доведе до инциденти.
• Не използвайте уреда на сухо.
• Не оставяйте уреда близо до източници на топлина и не
позволявайте на кабела да се допира до горещи повърхности.
• Не включвайте уреда, ако кабелът е все още навит.
• Никога не се опитвайте да слагате или отстранявате каната от
пасатора, докато уредът все още работи.
• Извадете щепсела от контакта, преди да преминете към смяна
на приставка и преди да докоснете някоя част, която може да се
движи по време на работа.
• Не отваряйте капака на блендера, докато не спре двигателят.
• Не оставяйте уреда включен без наблюдения, особено ако има
деца наблизо.
• Винаги изключвайте уреда от електрическата мрежа, когато не
го използвате.
• Никога не дърпайте електрическия кабел, когато го изва ждате
от контакта, и не оставяйте щепсела да виси свободно.
• Уверете се, че уредът е изключен от електрическата мрежа
преди да започнете да го почиствате.
]
]
]
]
]
]
]
]
]
• НЕ ПОТАПЯЙТЕ ДВИГАТЕЛНАТА КУТИЯ ВЪВ ВОДА ИЛИ ДРУГА
ТЕЧНОСТ.
• Не използвайте блендерът, ако ножът е повреден.
• Не включвайте уреда, ако захранващият кабел или щепселът са
повредени или ако забележите, че уредът не работи правилно.
• Никога не използвайте уреда на открито.
• ВНИМАНИЕ: За да намалите риска от пожар или токов удар,
никога не отстранявайте капаците. Няма вътрешни части, които
могат да се обслужват от потребителя. Поправките и смяната на
кабел трябва да се извършват изключително и само от лицензиран
технически сервизен център.
За да намалите риска от пожар или токов удар, никога не
отстранявайте капаците. Няма вътрешни части, които могат да се
обслужват от потребителя. Ако кабелът е повреден, трябва да се
поправи и смени от лицензиран технически сервизен център.
МОНТАЖ
Преди да използвате уреда за първи път, измийте със сапунена
вода всички части, които ще влязат в допир с храна.
Ръбът на ножа е много остър.
Внимавайте много, когато почиствате ножовете, за да не се
нараните.
Поставете уплътнителя (4) върху конуса на ножа (5).
Убедете се, че уплътнителят е сложен правилно; ръбът трябва да
гледа нагоре (фигура 1).
Поставете конуса с ножа върху пръстена за задържане на
двигателното тяло (7) (фиг ура 2).
Пъхнете каната (3) в пръстена за задържане на двигателното тяло
(7) (фигура 3) и я завъртете по посока обратна на часовниковата
стрелка, за да застане на позиция. (фигура 4).
Поставете каната с пръстена за стягане на двигателното тяло към
двигателното тяло (6). Иконите показват заключената позиция и
правилната посока за завъртане. (Фигури 5 и 6)
Разглобяване
Прикрепяне
За да поставите капака върху блендера (2), го вкарайте в каната и
го натиснете надолу, така че да застане на позиция. (фигура 7).
За да наместите стопера, изравнете скобите върху стопера с
отворите върху капака, (фигура 8), пъхнете го и го завъртете по
посока на часовниковата стрелка, докато застане на позиция.
(фигура 9).
Важно: Блендерът има защитно устройство, което не позволява
на двигателя да започне работа, ако каната не е поставена
правилно.
ПРИГОТВЯНЕ НА ПЛОДОВЕ И ЗЕЛЕНЧУЦИ
Измийте и обелете плодовете или зеленчуците, които искате да
пасирате.
При обработка на плодове със семки (като ябълки и круши),
отстранете кората и сърцевината.
Плодове и зеленчуци с кора (напр. цитрусови плодове, дини, киви и
т.н.) трябва да се обелят предварително.
Гроздовите зърна трябва да се отделят от дръжките преди да се
пасират.
Нарежете плодовете или зеленчуците на парчета, така че да могат
да се пъхнат през гърлото за пълнене.
Не използвайте плодове или зеленчуци с високо съдържание на
фибри (напр. стафиди) с блендера.
Плодовете и зеленчуците, които използвате, трябва да са
възможно най-свежи.
Плодовете и зеленчуците съдържат витамини и минерали, които
губят качествата си при контакт с кислород или светлина. .
Консумирайте сока веднага след приготвянето му.
Ако желаете да го съхраните за няколко часа, го сложете в чаша
или керамичен съд в хладилника. Добавете лимонов сок, за да го
запазите.
BS4790.indd 20BS4790.indd 20 17/4/07 09:42:4517/4/07 09:42:45
Page 21

ИЗПОЛЗВАНЕ
Винаги слагайте блендера на равна, твърда повърхност.
Блендерът ще работи само ако каната е сложена правилно.
Свържете уреда към електрическата мрежа, светлинният
индикатор “Стоп” ще започне да мига, указвайки режим на
изчакване.
Сложете всички съставки в каната, но без да превишавате
маркировката за 1,2 л върху каната. За максимално добър
резултат, налейте първо течностите и включете уреда, добавяйки
постепенно твърдите съставки.
Ако желаете да добавите още храна по време на работа, го
направете през гърлото върху капака. (фигура -10).
Натиснете бутона за спиране, за да изключите уреда. Не се
опитвайте да изваждате каната от основното тяло, ако двигателят
все още работи.
Изберете подходяща скорост за функцията, която възнамерявате
да извършите.
Скорост 1 (Бавно) Зададена скорост
За разбъркване на готови съставки и т.н.
За приготвяне на сокове от белени плодове като ябълки,
круши и т.н.
Скорост 2 Зададена скорост
Подходяща за приготвяне на млечни шейкове с кафе и
ванилия.
Скорост 3 Програмирана импулсна скорост
Подходяща за приготвяне на храни като лук, чесън и
други подобни.
Програмираната импулсна скорост позволява бързото
обработване на храната.
Скорост 4 (Средно) Зададена скорост
Подходяща за приготвяне на тесто за палачинки, сосове
и т.н.
Скорост 5 Зададена скорост
За нарязване на зеленчуци, коктейли, компоти и т.н.
Скорост 6 (Бързо) Зададена скорост
Подходяща за приготвяне на коктейли с алкохол или
плодове.
Преобразовател на постоянна скорост в импулсна
скорост
Мигновена импулсна скорост:
Функция за разбиване на лед (Бързо)
Програмирана импулсна скорост
Бутон СТОП
Функция за разбиване на лед [
За да натрошите ледени кубчета, ги поставете в каната и сложете
капака отгоре. Няма нужда да добавяте течност. Включете, като
натиснете бутона [
Преобразовател на постоянна скорост в импулсна
скорост [
За да използвате импулсната функция [
[
]. Съответният светлинен индикатор ще започне да мига.
След това натиснете бутона на желаната скорост. Блендерът
ще работи само, докато държите натиснат този бутон и ще спре
веднага щом го отпуснете. Тази функция улеснява преценката на
получения резултат и може да се използва за предотвратяване
образуването на твърде много пяна.
].
]
]
], първо натиснете бутон
За да спрете импулсната функция, натиснете отново бутон [
Светлинният индикатор ще изгасне, указвайки че функцията [
е деактивирана.
].
]
Предупреждения:
• Не включвайте пасатора, ако е празен.
• Ако трябва да разбъркате храна, залепнала за страните на
каната, първо изключете уреда. Ножовете може да продължат
да се въртят известно време след изключване на уреда. Дръжте
лъжиците и шпатулите на достатъчно разстояние от ножовете, за
да избегнете инциденти.
• Не е препоръчително да използвате уреда без спиране за по-дълго
от 3 минути. След изтичане на това време оставете двигателя да си
почине няколко минути, преди да вк лючите пасатора отново.
• За по-добри резултати, когато настъргвате твърди храни,
нарежете ги предварително на малки парченца.
• При пасиране на сухи съставки, прибавете чаша течност за
улесняване на обработката.
• Не наливайте много горещи течности в каната.
ЧИСТЕНЕ И ПОДДРЪЖКА
Преди да почиствате която и да е част на пасатора, натиснете
бутона за спиране и изключете уреда от електрическата мрежа.
След всяка употреба, измивайте със сапунена вода всички части,
които са били в контакт с хранителните продукти. Внимавайте
много при почистване на ножовете.
Използвайте влажна кърпа, за да забършете двигателната кутия.
Пластмасовите части може да се оцветят, когато се използват с
храни, съдържащи силни пигменти (напр. моркови). Използвайте
растително масло, за да ги почистите.
Внимание: Нито една част на уреда не може да се мие в
съдомиялна машина. Когато прибирате уреда, пъхнете кабела в
предназначеното за него отделение, което се намира в долната
част на двигателната кутия.
ПРЕДУПРЕЖДЕНИЕ ЗА СКЛАДИРАНЕ / ИЗХВЪРЛЯНЕ
Опаковките на нашите продукти са висококачествени.
Това по-същество означава, че се използват безвредни за
околната с реда материа ли, които е препоръчително да се предад ат
на пункт за вторични суровини.
Този продукт отговаря на директивата на ЕС 2002/96/CE.
Зачеркнатият символ, изобразяващ кофа за боклук на
колелца, означава, че този продукт не трябва да се изхвърля
заедно с отпадъците от домакинството. Трябва да се предаде
на специален пункт за събиране на изхвърлени от употреба
електрически и електронни уреди или да се върне на дистрибутора,
когато купувате подобен уред. Според сега действащите разпоредби
за изхвърляне на отпадъци, потребителите, които не предадат
изхвърлени от употреба уреди на някой от специалните пунктове
за събиране на отпадъци, могат да бъдат глобени. Правилното
изхвърляне на излезли от употреба уреди означава, че те могат
да бъдат рециклирани и преработени екологично. Това помага за
опазването на околната среда и позволява повторната употреба
на материали, използвани в уреда. За повече информация относно
съществуващите програми за изхвърляне на отпадъци се свържете с
местната служба по отпадъци или с магазина, откъдето сте закупили
продукта. Производителите и вносителите отговарят за екологичното
рециклиране, преработване и изхвърляне на продуктите, пряко или
посредством обществената система.
Информация за това, как да изхвърлите уред, излязъл вече от
употреба, можете да получите от местния Градски съвет.
BS4790.indd 21BS4790.indd 21 17/4/07 09:42:4617/4/07 09:42:46
Page 22

ROMÂN
1. Dop
2. Capac
3. Recipient
4. Gumã pentru etanseitate
5. Conul cutitului
6. Corpul motorului
7. Bridã de fixare a corpului motorului
8. Cuplaj motor
9. Comenzi
a) Turatia 1 [
b) Turatia 2 [
c) Turatia 3 [
d) Turatia 4 [
e) Turatia 5 [
f) Turatia 6 [
g) Convertor turatie fixã - turatie în impulsuri [
h) Functia de mãruntire a ghetii [
i) Butonul de oprire [
10. Picioare antialunecare
11. Locas pentru cabluri
FOARTE IMPORTANT
• Cititi cu atentie aceste inst ructiuni înainte de a folosi aparat ul pentru
prima oarã. Pãstrati-le pentru viitoare consultatii.
• Conectati doar la tensiunile indicate pe placa cu caracteristici.
• Acest aparat este apt pentru uz alimentar.
• Acest aparat este conceput în mod exclusiv pentru uzul casnic.
• Întotdeauna folositi blenderul pe o suprafatã de lucru planã si
orizontalã.
• Acest aparat poate fi utilizat de cãtre persoane (inclusiv copii) cu
dizabilitãti fizice, senzoriale sau mentale numai dacã au fost instruite
în ceea ce priveste utilizarea corectã de cãtre un adult responsabil.
• Nu manipulati aparatul cu mâinile ude.
• Evitati contactul cu pãrtile mobile.
• Muchia cutitului este foarte ascutitã. Manipulati cu grijã cutitul în
timpul curãtirii pentru a evita orice fel de leziune.
• Nu introduceti ustensile ca de exemplu cutite sau furculite în
interiorul recipientului când aparatul functioneazã.
• Folosirea de accesorii nefurnizate d e cãtre fabricant poate provoca
accidente.
• Nu puneti aparatul sã functioneze în gol.
• Nu-l asezati în apropierea surselor de cãldurã si cablul nu trebuie
sã atingã suprafetele calde.
• Nu puneti în functiune aparatul cu cablul încolãcit.
• Nu montati sau demontati recipientul de pe aparat atâta timp cât
acesta functioneazã.
• Deconectati aparatul înainte de schimbarea oricãrui accesoriu sau
de atingerea oricãrei piese a blenderului care se poate roti în timpul
functionãrii.
• Nu deschideti capacul blenderului înainte de oprirea motorului.
• Nu lãsati neobservat aparatul, mai ales când se aflã în apropierea
copiilor.
• Deconectati aparatul când nu se foloseste.
Nu deconectati niciodatã trãgând de cablu si nu lãsati conexiunea
sã atârne.
• Înainte de a-l curãti verificati cã aparatul este deconectat.
• NU TREBUIE SÃ SCUFUNDATI APARATUL ÎN APÃ SAU ORICE ALT
LICHID.
• Nu folositi blenderul dacã lama este deterioratã.
]
]
]
]
]
]
]
]
]
• Nu-l puneti în functiune cu cablul sau priza stricate sau dacã
observati cã aparatul nu functioneazã corect.
• Nu folositi aparatul în aer liber.
• ATENTIE : Pentru a redu ce pericolele de incendiu s au de descãrcãri
electrice, nu scoateti niciunul din capace. Nu existã în interior piese
care ar putea fi manipulate de cãtre uzufructuar. Reparatiile si
schimbãrile de cablu trebuie realizate în mod exclusiv de cãtre un
Serviciu Tehnic Autorizat.
ASAMBLAREA
Înainte de prima folosire, folositi apã cu sãpun pentru spãlarea
tuturor pieselor care vor intra în contact cu alimentele.
Marginea lamei este foarte ascutitã.
Pentru a evita accidentãrile, manevrati lamele cu grijã extremã atunci
când le curãtati.
Montati etansarea (4) peste conului lamei (5).
Asigurati-vã cã etansarea este montatã corect, cu buza orientatã în
sus (Figura 1).
Asezati conul lamei pe brida de fixare a corpului motorului (7)
(Figura 2).
Introduceti recipientul de colectare (3) în brida de fixare a corpului
motorului (7) (Figura 3) si rotiti recipientul de colectare în sens
antiorar, pânã când se blocheazã. (Figura 4)
Asezati ansamblul cãnii pe corpul motorului (6). Pictogramele indicã
pozitia blocatã si directia corectã de rotire. (Figurile 5 si 6)
Demontarea
Prinderea
Pentru a monta capacul pe blender (2), introduceti-l în partea de sus
a cãnii si apãsati-l pânã când se blocheazã în pozitie. (Figura 7)
Pentru montarea opritorului, aliniati clipsurile de pe dop cu orificiile
din deschizãtura capacului (figura 8), introduceti si rotiti opritorul în
sens orar, pânã când se blocheazã. (Figura 9)
Important: Acest blender este echipat cu un dispozitiv de sigurantã
care împiedicã pornirea motorului atunci când cana nu este
pozitionatã corect.
PREPARAREA FRUCTELOR SAU LEGUMELOR
Spãlati sau cojiti fructele sau legumele din care doriti sã faceti suc.
Pentru a putea stoarce fructele cu sâmburi (ca de ex. merele sau
perele), îndepãrtati coaja si cãsuta sâmburilor.
Fructele sau legumele cu coajã (de ex. citricele, pepenii, kiwi, etc)
trebuie decojite înainte de stoarcere.
Boabele de struguri trebuie îndepãrtate de pe ciorchine înainte de
a fi stoarse.
Tãiati fructele sau legumele în bucãti care pot fi introduse prin
orificiul de umplere.
Nu folositi fructe sau legume fibroase (de ex. stafide) cu acest
blender.
Fructele si legumele trebuie sã fie cât de proaspete posibil.
Fructele si legumele contin vitamine si minerale care-si pierd
proprietãtile dacã intrã în contact cu oxigenul sau cu lumina. Beti
sucul imediat dupã preparare.
Dacã doriti sã-l pãstrati pentru câteva ore, introduceti-l, într-o sticlã
sau într-un vas ceramic, în frigider. Adãugati suc de lãmâie pentru
a ajuta la conservarea lui.
UTILIZAREA
Întotdeauna asezati blenderul pe o suprafatã planã, stabilã.
Blenderul functioneazã doar în cazul în care cana a fost corect
montatã.
Conectati aparatul la retea, indicatorul luminos „Stop” va clipi pentru
a indica modul de asteptare.
BS4790.indd 22BS4790.indd 22 17/4/07 09:42:4617/4/07 09:42:46
Page 23

Introduceti toate ingredientele în vas fãrã a depãsi marcajul de max.
1,2 litri de pe vas. Pentru cele mai bune rezultate, introduceti mai
întâi toate lichidele si porniti aparatul, adãugând ingredientele solide
în timpul stoarcerii.
Dacã doriti sã adãugati mai multe alimente în timpul procesului,
atunci realizati aceasta prin deschizãtura de pe capac. (Figura -10)
Apãsati butonul de oprire pentru oprirea aparatului. Nu încercati sã
scoateti cana de la corpul principal dacã motorul este încã pornit.
Alegeti turatia potrivitã pentru functia pe care doriti s-o realizati.
Turatia 1 (încet) Turatia reglatã
Pentru amestecarea ingredientelor gata preparate etc.
Pentru a prepara suc din fructele decojite, precum mere,
pere etc.
Turatia 2 Turatia reglatã
Potrivitã pentru a prepara shake-uri din lapte cu cafea sau
vanilie.
Turatia 3 Turat ia de impulsuri programatã
Potrivitã pentru prepararea alimentelor precum ceapã,
usturoi etc.
Aceastã functie de impulsuri programatã permite
procesarea rapidã a alimentelor.
Turatia 4 (medie) Turatia reglatã
Potrivitã pentru prepararea aluatului de clãtite, sosurilor etc.
Turatia 5 Turatia reglatã
Pentru mãruntirea legumelor, cocktailuri, compoturi etc.
Turatia 6 (rapidã) Turatia reglatã
Potrivitã pentru prepararea cocktailurilor cu alcool sau fructe.
Convertor turatie fixã - turatie în impulsuri
Turatie cu impulsuri instantanee
Functia de mãruntire a ghet ii (rapid)
Turatia în impulsuri programatã
Butonul de oprire
Functia de mãruntire a ghet ii [
Pentru mãruntirea cuburilor de gheatã, introduceti-le înãuntrul cãnii
si montati capacul deasupra. Nu este nevoie sã se adauge niciun
lichid. Porniti aparatul apãsând butonul [
Convertor turatie fixã - turatie în impulsuri [
Pentru a folosi functia de impulsuri [
[
]. Ledul corespunzãtor va clipi.
Apoi apãsati butonul pentru setarea turatiei dorite. Blenderul va
functiona numai cât timp tineti acest buton apãsat si se va opri
imediat ce-l eliberati. Acest buton vã ajutã sã evaluati mai bine
rezultatele obtinute si poate fi folosit pentru a evita crearea de prea
multã spumã.
Pentru a încheia functia de impulsuri, apãsati din nou butonul
[], iar ledul se va stinge, indicând faptul cã functia [
dezactivatã.
]
].
]
], apãsati mai întâi butonul
] este acum
Avertizãri :
- Nu folositi niciodatã aparatul gol.
- Dacã este necesar sã se amestece alimentele care s-au lipit de
peretii recipientului, întrerupeti functionarea aparatului. Cutitele pot
sã continuie sã se învâr teascã încã cãteva clipe. Mentineti spatula sau
lingura la o distantã prudentã fatã de cutit pentru a evita accidente.
- Este recomandabil sã nu se depãseascã 3 minute de functionare
continuã. Dupã acest timp lãsati motorul sã se odihneascã câteva
minute înainte de a pune din nou în functiune aparatul.
- Pentru a obtine rezultate mai bune la tãierea alimentelor solide,
tãiati-le mai înainte în bucãti mai mici.
- Când amestecati ingrediente uscate, adãugati o canã de lichid
pentru înlesnirea procesului.
Nu vãrsati lichide calde în recipient.
CURÃTIREA SI PÃSTRAREA
Înainte de a curãta o ricare dintre pãrtile aparatului, ap ãsati pe butonul
de oprire si deconectati aparatul de la reteaua electricã.
Dupã fiecare folosintã, spãlati toate elementele care au fost în
contact cu alimentele cu apã cãldutã si sãpun. Aveti grijã când
curãtati cutitele.
Pentru stergerea carcasei motorului folositi o cârpã umedã. Piesele
din plastic se pãteazã atunci când se folosesc fructe cu pigmenti
puternici (de ex. morcovi). Pentru curãtarea lor folositi ulei vegetal.
Atentie:Nici o piesã a blenderului nu prezintã sigurantã pentru
spãlarea cu masina de spãlat vase. Atunci când depozitati aparatul,
introduceti cablul în locasul pentru cablu din partea inferioarã a
carcasei motorului.
SFATURI PENTRU DEPOZITARE/ELIMINARE
Produsele noastre se livreazã în ambalaje optimizate. Acest
lucru înseamnã practic cã ambalajul este fabricat numai
din materiale care nu contamineazã si care trebuie predate
serviciului local de gestionare a deseurilor pentru a fi utilizate ca
materie primã secundarã.
Acest produs respectã Directiva UE 2002/96/CE. Simbolul
pubelei tãiate cu un X de pe aparat indicã faptul cã atunci
când aparatul nu mai este util, acesta nu trebuie aruncat
împreunã cu deseurile casnice. Aparatul trebuie dus la
un centru special de colectare a deseurilor electrice si
electronice sau returnat distribuitorului atunci când cumpãrati un
aparat similar. Conform reglementãrilor în vigoare privind deseurile,
utilizatorii care nu duc aparatele uzate la centrele speciale de
colectare pot fi sanctionati. Dezafectarea corectã a aparatelor
electrocasnice uzate înseamnã cã acestea pot fi reciclate si
procesate ecologic, ajutând la protejarea mediului si permitând
reutilizarea materialelor. Pentru mai multe informatii contactati
serviciul local de gestionare a deseurilor sau magazinul de la care ati
cu mpãra t apa rat ul. Fab rica ntii si im por tat orii s unt r esp onsab ili pen tru
reciclarea, procesarea si dezafectarea în mod ecologic a produselor,
fie direct, fie prin intermediul unui sistem public.
Consiliul dvs. local vã poate furniza informatii despre modul în care
puteti dezafecta aparatele de care nu mai aveti nevoie.
BS4790.indd 23BS4790.indd 23 17/4/07 09:42:4717/4/07 09:42:47
Page 24

.ﺔﻏرﺎﻓ ﺔﻃﻼﳋا اﺪﺑأ ﻞﻤﻌﺘﺴﺗﻻ -
لﺎﻐﺘﺷإ ﻒﻴﻗﻮﺘﺑ ﻢﻗ ةﺮﳉا ﺐﻧاﻮﺠﺑ ﺔﻘﺻﻼﻟا ﺔﻤﻌﻃﻷا ﻚﻳﺮﲢ موﺰﻟ ﺔﻟﺎﺣ ﻲﻓ ﺔﺤﻄﻠﻔﳌا ﺔﻘﻌﻠﳌا وأ ﺔﻘﻌﻠﳌا ﻰﻠﻋ ﻆﻓﺎﺣ.ﺖﻗﻮﻟا ﺾﻌﺒﻟ روﺪﺗ ﻞﻈﺗ تاﺮﻔﺸﻟا .زﺎﻬﳉا
ﺐﺠﻳ ﺖﻗﻮﻟا اﺬﻫ روﺮﻣ ﺪﻌﺑ .ﺔﻌﺑﺎﺘﺘﻣ ﻖﺋﺎﻗد 3 قﻮﻔﻳ ﻞﻴﻐﺸﺗ زوﺎﲡ مﺪﻌﺑ ﺢﺼﻨﻧ -
.ﺔﻃﻼﳋا ﻞﻴﻐﺸﺗ ﻰﻟإ ةدﻮﻌﻟا ﻞﺒﻗ ﻖﺋﺎﻗد ﻊﻀﺒﻟ ﺢﻳﺮﺘﺴﻳ كﺮﶈا كﺮﺗ
ﻰﻟإ ﻻوأ ﺎﻬﻌﻴﻄﻘﺘﺑ ﻢﻗ ﺔﺒﻠﺼﻟا ﺔﻤﻌﻃﻷا مﺮﻓ ﺪﻨﻋ ﺔﻨﺴﺣ ﺞﺋﺎﺘﻧ ﻰﻠﻋ لﻮﺼﺤﻠﻟ -
.ﺔﻴﻠﻤﻌﻟا ﻞﻴﻬﺴﺘﻟ ﻞﺋﺎﺴﻟا ﻦﻣ ﺎﻧﺎﺠﻨﻓ ﻒﺿأ ,ءﺎﻣ نوﺪﺑ ﺔﻤﻌﻃﻸﻟ ﺔﺒﺴﻨﻟﺎﺑ -
.ثداﻮﺤﻠﻟ ﺎﺒﻨﲡ تاﺮﻔﺸﻟا ﻦﻣ ﺔﻴﻃﺎﻴﺘﺣإ ﺔﻓﺎﺴﻣ ﻰﻠﻋ
.ةﺮﻴﻐﺻ ﻊﻄﻗ
.ةﺮﳉا ﻲﻓ اﺪﺟ ﺔﻨﺧﺎﺳ ﻞﺋاﻮﺳ ﺐﺼﺑ ﻢﻘﺗﻻ -
ﻒﻴﻈﻨﺘﻟاو ﺔﻈﻓﺎﶈا
ﻞﺼﻔﺑ ﻢﻗ ﻢﺛ ﻒﻴﻗﻮﺘﻟا رز ﻰﻠﻋ ﻂﻐﻀﻟﺎﺑ ﻢﻗ ﺔﻃﻼﳋا ﻦﻣ ءﺰﺟ يأ ﻒﻴﻈﻨﺗ ﻞﺒﻗ
ءﺎﳌا ﻲﻓ ﺔﻤﻌﻃﻷﺎﺑ لﺎﺼﺗإ ﻰﻠﻋ ﺖﻧﺎﻛ ﻲﺘﻟا ءاﺰﺟﻷا ﻞﻛ ﻞﺴﻐﺑ ﻢﻗ لﺎﻤﻌﺘﺳإ ﻞﻛ ﺪﻌﺑ
ﺪﻨﻋ ﻊﻘﺒﻠﻟ ضﺮﻌﺘﺗ ﺪﻗ ﺔﻴﻜﻴﺘﺳﻼﺒﻟا ءاﺰﺟﻷا .ﻂﻘﻓ ﻞﻠﺒﻣ بﻮﺜﺑ كﺮﶈا
ﻞﻤﻌﺘﺳإ .(ﻼﺜﻣ رﺰﳉﺎﻛ) ﺔﻏﺎﺒﺼﻟا ﻦﻣ ﺔﻴﻟﺎﻋ ﺔﺒﺴﻧ ﻰﻠﻋ ﺮﻓﻮﺘﺗ ﺔﻤﻌﻃأ لﺎﻤﻌﺘﺳإ
,زﺎﻬﳉﺎﺑ ظﺎﻔﺘﺣﻺﻟ .ﻲﻧاوﻷا ﺔﻟﺎﺴﻏ ﻲﻓ ﺔﻃﻼﳋا ﻦﻣ ءﺰﺟ يأ ﻒﻈﻨﺗ ﻻ :ﻪﻴﺒﻨﺗ
ﻦﻣ ﻞﻔﺳﻷا ءﺰﳉا ﻲﻓ دﻮﺟﻮﻜﻟا ﻂﻴﳋا ﻊﻣﺎﺟ ﻲﻓ ﻲﺋﺎﺑﺮﻬﻜﻟا ﻂﺑﺮﻟا ﻂﻴﺧ ﻞﺧدأ
.ﻲﺋﺎﺑﺮﻬﻜﻟا ﻂﺑﺮﻟا ةﺪﻋﺎﻗ ﻦﻋ ﻲﺋﺎﺑﺮﻬﻜﻟا ﻂﻴﳋا
.تاﺮﻔﺸﻟا ﻒﻴﻈﻨﺗ ءﺎﻨﺛأ سﺮﺘﺣإ .نﻮﺑﺎﺼﻟاو ﻦﺧﺎﺴﻟا
ةﺪﺣو ﻒﻈﻧ
.ﺎﻬﻔﻴﻈﻨﺘﻟ ﺎﻴﺗﺎﺒﻧ ﺎﺘﻳز
.كﺮﶈا ةﺪﺣو
زﺎﻬﳉا ﻦﻣ ﺺﻠﺨﺘﻟاو عاﺪﻳﻹا لﻮﺣ تﺎﻬﻴﺒﻨﺗ
ﺔﺌﺒﻌﺘﻟاو ﻒﻴﻠﻐﺘﻟا .ﺎﻬﻠﻘﻧ ءﺎﻨﺛأ ﺔﺌﺒﻌﺗو ﻒﻴﻠﻐﺗ ﻦﺴﺣأ ﻰﻠﻋ ﺮﻓﻮﺘﺗ ﺎﻨﻌﺋﺎﻀﺑ
ﺺﻠﺨﺘﻠﻟ ﺔﻳﺪﻠﺒﻟا ﺔﺤﻠﺼﻤﻠﻟ ﺎﻬﻤﻴﻠﺴﺗ ﺐﺠﻳ ﺔﺛﻮﻠﻣ ﺮﻴﻏ داﻮﻣ ﻦﻣ ﲔﻋﻮﻨﺼﻣ
.CE/96/2002 ﻲﺑورﻷا دﺎﲢﻹا ﺔﻤﻴﻠﻌﺗ ﻖﺒﻄﻳ جﻮﺘﻨﳌا اﺬﻫ
جﻮﺘﻨﳌا نأ ﻰﻟإ ﺮﻴﺸﻳ زﺎﻬﳉا ﻰﻠﻋ مﻮﺷﻮﳌا لﺎــﺑزﻷا قوﺪﻨﺻ ﺰﻣر
لﺎﺑزﻷا ﻦﻋ ﻻﻮﺼﻔﻣ ،ﺔﻴﻠﻤﻌﻟا ﻪﺗﺎﻴﺣ ءﺎﻬﺘﻧإ ﺪﻌﺑ ،ﻪﻨﻣ ﺺﻠﺨﺘﻟا ﺐﺠﻳ
وأ ﺔﻴﺋﺎﺑﺮﻬﻜﻟا ةﺰﻬﺟﻷﺎﺑ صﺎﳋا تﺎﻳﺎﻔﻨﻟا ﺰﻛﺮﻣ ﻰﻟإ ﻪﻠﻴﺻﻮﺘﺑ ﺔﻴﻟﺰﻨﳌا
لوﺆﺴﳌا ﻮﻫ ﻞﻤﻌﺘﺴﳌا .ﻞﺛﺎﳑ زﺎﻬﺟ ءاﺮﺷ ﺪﻨﻋ عزﻮﳌا ﻰﻟإ ﻪﺗدﺎﻋﺈﺑ وأ ﺔﻴﻧوﺮﺘﻜﻟﻹا
ﻲﻓ .ﺔﻴﻠﻤﻌﻟا ﻪﺗﺎﻴﺣ ءﺎﻬﺘﻧإ ﺪﻌﺑ ﺔﺻﺎﳋا تﺎﻳﺎﻔﻨﻟا ﺰﻛﺮﻣ ﻰﻟإ زﺎﻬﳉا ﻞﻴﺻﻮﺗ ﻦﻋ
تﺎﻳﺎﻔﻨﻟا ﻦﻣ ﺺﻠﺨﺘﻟا ﲔﻧاﻮﻗ ﻰﻠﻋ اءﺎﻨﺑ ﺔﺑﻮﻘﻌﻟ ضﺮﻌﺘﻳ ﺪﻗ اﺬﻬﺑ مﺎﻴﻘﻟا مﺪﻋ ﺔﻟﺎﺣ
ﺔﻳﺎﻔﻨﻛ ﺔﻃﻮﺒﻀﻣ ﺔﻘﻳﺮﻄﺑ ﻞﻤﻌﺘﺴﳌا زﺎﻬﳉا ﻦﻣ ﺺﻠﺨﺘﻟا ﰎ اذإ .ﻞﻤﻌﻟا ﺎﻬﺑ يرﺎﳉا
ﻰﻠﻋ ﻲﺒﻠﺳ ﻊﻗو يدﺎﻔﺗ ﻢﺘﻳ ﺚﻴﺤﺑ ،ﺔﻴﺌﻴﺑ ﺔﻘﻳﺮﻄﺑ ﻪﻟﻼﻐﺘﺳإ دﺎﻌﻳ ﺪﻘﻓ ،ﺔﻟﻮﺼﻔﻣ
ﺔﻴﻓﺎﺿإ تﺎﻣﻮﻠﻌﻣ ﻰﻠﻋ لﻮﺼﺤﻠﻟ .زﺎﻬﳉا ءاﺰﺟأ لﻼﻐﺘﺳإ دﺎﻌﻳو ﺔﺤﺼﻟاو ﺔﺌﻴﺒﻟا
تﺎﻳﺎﻔﻨﻟا ﻦﻣ ﺺﻠﺨﺘﻟا ﺰﻛﺮﲟ لﺎﺼﺗﻹﺎﺑ ﻢﻗ تﺎﻳﺎﻔﻨﻟا ﻦﻣ ﺺﻠﺨﺘﻟا ﺰﻛاﺮﻣ لﻮﺣ
نﻮﻠﻤﺤﺘﻳ ﻦﻳدرﻮﺘﺴﳌاو ﲔﻌﻧﺎﺼﻟا .زﺎﻬﳉا ﻪﻨﻣ ﺖﻳﺮﺘﺷإ يﺬﻟا ﻞﶈﺎﺑ وأ ﻲﻠﶈا
ةﺮﺷﺎﺒﻣ ﺔﻘﻳﺮﻄﺑ ءاﻮﺳ زﺎﻬﺠﻠﻟ ﻲﺌﻴﺒﻟا ﺺﻠﺨﺘﻟاو لﻼﻐﺘﺳﻹا ةدﺎﻋإ ﻦﻋ ﺔﻴﻟوﺆﺴﳌا
.ﺔﻠﻤﻌﺘﺴﳌا ةﺰﻬﺟﻷا ﻦﻣ ﺺﻠﺨﺘﻟاو عاﺪﻳإ تﺎﻴﻧﺎﻜﻣإ ﻦﻋ كﺮﺒﺨﺘﺳ ﻚﺘﻳﺪﻠﺑ
.لﺎﺑزﻷا ﻦﻣ
.ﻲﻣﻮﻤﻋ ﻖﻓﺮﻣ لﻼﺧ ﻦﻣ وأ
ﺔﻃﻼﳋا ﻞﻴﻐﺸﺗ
.ةرﺎﻗو ﺔﻳﻮﺘﺴﻣ ةﺪﻋﺎﻗ قﻮﻓ ﺔﻃﻼﳋا ﻊﺿ
.مﺎﻜﺣﺈﺑ ﺔﺒﻛﺮﻣ ةﺮﳉا نﻮﻜﺗ ﲔﺣ ﻂﻘﻓ ﻞﻐﺘﺸﺗ ﺔﻃﻼﳋا
ﻰﻟإ اﺮﻴﺸﻣ ﺾﻣﻮﻳ "Stop" ﻲﺋﻮﻀﻟا ﻞﻴﻟﺪﻟا ,ﻲﺋﺎﺑﺮﻬﻜﻟا رﺎﻴﺘﻟﺎﺑ زﺎﻬﳉا ﻂﺑرإ
ةﺮﳉا ءﻼﺘﻣﻹ ﻰﺼﻗﻷا ﺪﳊا ﺔﻣﻼﻋ زوﺎﲡ نود ءﺎﻋﻮﻟا ﻲﻓ تﺎﻣﻮﻘﳌا ﻊﻴﻤﺟ ﻊﺿ
رﺎﻴﺘﻟﺎﺑ زﺎﻬﳉا ﻂﺑرإ ,ﻻوأ ﻞﺋاﻮﺴﻟا ﻊﺿ ,ﺞﺋﺎﺘﻨﻟا ﻦﺴﺣأ ﻰﻠﻋ لﻮﺼﺤﻠﻟ .ﺮﺘﻟ 1,2
ﻦﻣ ﻚﻟﺬﺑ ﻢﻗ ,ﻂﻴﻠﺨﺘﻟا ﺔﻴﻠﻤﻋ ءﺎﻨﺛأ ﺔﻤﻌﻃﻷا ﻦﻣ ﺮﻴﺒﻛ رﺪﻗ ﺔﻓﺎﺿإ ﻲﻓ ﺐﻏﺮﺗ ﺖﻛ اذإ
ﻰﻠﻋ ﻦﻣ ةﺮﳉا ﺔﻟازإ اﺪﺑأ لوﺎﲢ ﻻ .ﻒﻴﻗﻮﺘﻟا رز ﻰﻠﻋ ﻂﻐﺿإ ,ﻞﻴﻐﺸﺘﻟا ﻒﻴﻗﻮﺘﻟ
.ﺎﻬﺑ مﺎﻴﻘﻟا دﻮﺗ ﻲﺘﻟا ﺔﻴﻠﻤﻌﻠﻟ ﺔﻤﺋﻼﳌا ﺔﻋﺮﺴﻟا رﺎﻴﺘﺧﺈﺑ ﻢﻗ
ﺔﺘﺑﺎﺛ ﺔﻋﺮﺳ (ﺔﺌﻴﻄﺑ) 1 ﺔﻋﺮﺳ
ﺦﻟإ ,صﺎﺟﻹا ,حﺎﻔﺘﻟﺎﻛ ,ةﺮﺸﻘﳌا ﻪﻛاﻮﻔﻟا ﺮﻴﺼﻋ داﺪﻋﻹ
ﺔﺘﺑﺎﺛ ﺔﻋﺮﺳ 2 ﺔﻋﺮﺳ
ﺔﺠﻣﺮﺒﻣ تﺎﻀﺒﻨﺑ ﺔﻋﺮﺳ 3 ﺔﻋﺮﺳ
.مﻮﺜﻟا وأ ﻞﺼﺒﻟﺎﻛ ﺔﻤﻌﻃأ داﺪﻋﻹ ﺔﻤﺋﻼﻣ
.ﺔﻤﻌﻃﻷا ﻂﻴﻠﺨﺗ ﻊﻳﺮﺴﺗ ﻞﻬﺴﺗ ﺔﺠﻣﺮﺒﳌا تﺎﻀﺒﻨﻟﺎﺑ ﺔﻔﻴﻇﻮﻟا
ﺔﺘﺑﺎﺛ ﺔﻋﺮﺳ (ﺔﻄﺳﻮﺘﻣ) 4 ﺔﻋﺮﺳ
.ﺦﻟإ ,ﺔﺼﻠﺼﻟا ,ﻒﺋﺎﻏﺮﻟا ﲔﺠﻋ ,ﻚﻌﻜﻟا ﺰﺒﺧ داﺪﻋﻹ ﺔﻤﺋﻼﻣ
ﺔﺘﺑﺎﺛ ﺔﻋﺮﺳ (ﺔﻌﻳﺮﺳ) 5 ﺔﻋﺮﺳ
.ﺦﻟإ ,ﻪﻛاﻮﻔﻟاو تاوﺮﻀﳋا ﻖﺤﺴﻟ ﺔﻤﺋﻼﻣ
ﺔﺘﺑﺎﺛ ﺔﻋﺮﺳ (ﺔﻌﻳﺮﺳ) 6 ﺔﻋﺮﺳ
.ﻪﻛاﻮﻔﻟﺎﺑ وأ لﻮﺤﻜﻟﺎﺑ تﺎﺑوﺮﺸﻣ داﺪﻋﻹ ﺔﻤﺋﻼﻣ
تﺎﻀﺒﻨﻟﺎﺑ تﺎﻋﺮﺳ ﻰﻟإ ﺔﺘﺑﺎﺜﻟا تﺎﻋﺮﺴﻟا لﻮﺤﻣ
.
ﺔﺒﻠﺼﻟا تﺎﻣﻮﻘﳌا ﻒﺿأ ﻢﺛ تﺎﻈﺤﻠﻟ
(10 ةرﻮﺼﻟا) .ءﺎﻄﻐﻟا ﺔﻫﻮﻓ لﻼﺧ
.كﺮﶈا لﺎﻐﺘﺷإ ءﺎﻨﺛأ كﺮﶈا ةﺪﺣو
.ﺦﻟإ ,ﺔﻳرﻮﻓ تاداﺪﻋإ ﻂﻴﻠﺨﺘﻟ
.ةﻮﻬﻘﻟا ﻂﻴﻠﺧ داﺪﻋﻹ ﺔﻤﺋﻼﻣ
(ﺔﻌﻳﺮﺳ) ﺪﻴﻠﳉا ﻢﻴﺸﻬﺗ ﺔﻔﻴﻇو
ﺔﺠﻣﺮﺒﻣ تﺎﻀﺒﻨﺑ ﺔﻋﺮﺳ
.[ ] ﺪﻴﻠﳉا ﻢﻴﺸﻬﺗ ﺔﻔﻴﻇو
يروﺮﻀﻟا ﻦﻣ ﺲﻴﻟ .ءﺎﻄﻐﻟا ﻊﺿ ﻢﺛ ةﺮﳉا ﻞﺧاﺪﺑ ﺎﻬﻌﺿ,ﺪﻴﻠﳉا تﺎﺒﻌﻜﻣ ﻢﻴﺸﻬﺘﻟ
.[ ] رز ﻰﻠﻋ ﻂﻐﻀﻟﺎﺑ زﺎﻬﳉا ﻞﻐﺷ .ﻞﺋﺎﺳ يأ ﺔﻓﺎﺿإ
.ﻒﻴﻗﻮﺘﻟا ﻊﺿو
.ﺔﻳرﻮﻓ ﺔﻋﺮﺳ
ﻒﻴﻗﻮﺘﻟا رز
[ ] .تﺎﻀﺒﻨﺑ تﺎﻋﺮﺳ ﻰﻟإ ﺔﺘﺑﺎﺜﻟا تﺎﻋﺮﺴﻟا لﻮﺤﻣ
ﻲﺋﻮﻀﻟا ﻞﻴﻟﺪﻟا ﺾﻣﻮﻳ .[ ] رز ﻰﻠﻋ ﻻوأ ﻂﻐﺿإ [ ] ﺔﻳرﻮﻔﻟا ﺔﻔﻴﻇﻮﻟا ﻞﻴﻐﺸﺘﻟ
ﻲﻓ راﺮﻤﺘﺳﻹﺎﺑ ﻂﻘﻓ ﻞﻐﺘﺸﺗ ﺔﻃﻼﳋا .ﺔﺑﻮﻏﺮﳌا ﺔﻋﺮﺴﻟا رز ﻰﻠﻋ ﻚﻟذ ﺪﻌﺑ ﻂﻐﺿإ
ﺔﻔﻴﻇﻮﻟا هﺬﻫ .رﺰﻟا ﻰﻠﻋ ﻂﻐﻀﻟا ﻦﻋ ﻲﻠﺨﺘﻟا ﺪﻨﻋ ﻒﻗﻮﺗو ﺔﻔﻴﻇﻮﻟا رز ﻰﻠﻋ ﻂﻐﻀﻟا
ةﻮﻏر ﺪﻴﻟﻮﺗ ﺐﻨﲡ ﻚﻟﺬﺑ ﻦﻜﳝو ,ﺎﻬﻴﻠﻋ ﻞﺼﶈا ﺔﺠﻴﺘﻨﻟا ﺔﻨﻳﺎﻌﻣ ﻞﻬﺴﻟا ﻦﻣ ﻞﻌﲡ
ﻲﻟﺪﻟا ﺊﻔﻄﻨﻴﺳو ﺪﻳﺪﺟ ﻦﻣ [
.لﺎﻐﺘﺷﻹا ﻦﻋ ﺖﻔﻗﻮﺗ ﺪﻗ [
BS4790.indd 24BS4790.indd 24 17/4/07 09:42:4717/4/07 09:42:47
] رز ﻰﻠﻋ ﻂﻐﺿإ ,ﺔﻳرﻮﻔﻟا ﺔﻔﻴﻇﻮﻟا ﻦﻣ ءﺎﻬﺘﻧﻺﻟ
] ﺔﻔﻴﻇﻮﻟا نأ ﻰﻟإ ﺮﻴﺸﻳ ﺚﻴﺤﺑ ,ﻲﺋﻮﻀﻟا
.ﺺﺼﺨﳌا
.ﺪﳊا ﻦﻋ ةﺪﺋاز
تﺎﻬﻴﺒﻨﺗ
Page 25

ﻲﺋﺎﺑﺮﻬﻜﻟا ﻂﻴﳋا ﺮﺟ ﻖﻳﺮﻃ ﻦﻋ ﻲﺋﺎﺑﺮﻬﻜﻟا ﻂﺑﺮﻟا ةﺪﻋﺎﻗ ﻦﻋ زﺎﻬﳉا ﻞﺼﻔﺗﻻ •
.ﻲﺋﺎﺑﺮﻬﻜﻟا رﺎﻴﺘﻟا ﻦﻋ لﻮﺼﻔﻣ ﻪﻧأ ﻦﻣ ﺪﻛﺄﺗ زﺎﻬﳉا ﻒﻴﻈﻨﺗ ﻲﻓ عوﺮﺸﻟا ﻞﺒﻗ •
.ﺮﺧآ ﻞﺋﺎﺳ يأ ﻲﻓ وأ ءﺎﳌا ﻲﻓ زﺎﻬﳉا لﺎﺧدإ ﺐﺠﻳﻻ •
.ةروﺮﻀﻣ ﲔﻜﺴﻟا ﺖﻧﺎﻛ اذإ ﺔﻃﻼﳋا ﻞﻤﻌﺘﺴﺗ ﻻ •
ﻦﻳروﺮﻀﻣ ﺔﻴﺋﺎﺑﺮﻬﻜﻟا ﺔﻠﺻﻮﻟا وأ
ﺔﻟازﺈﺑ اﺪﺑأ ﻢﻘﺗﻻ ،ﺔﻴﺋﺎﺑﺮﻬﻜﻟا تﺎﻐﻳﺮﻔﺘﻟا وأ ﻖﻳﺮﳊا رﺎﻄﺧأ ﻦﻣ ﺺﻘﻨﻠﻟ :ﻪﻴﺒﻨﺗ •
.ﻞﻤﻌﺘﺴﳌا فﺮﻃ ﻦﻣ ﺔﳉﺎﻌﻤﻠﻟ ﺔﻠﺑﺎﻗ تاﺪﻌﻣ زﺎﻬﳉا ﻞﺧاﺪﺑ ﺪﺟﻮﺗﻻ .تاداﺪﺴﻟا
ﺔﺤﻠﺼﳌا صﻮﺼﳋﺎﺑ ﺎﻤﻬﺑ مﻮﻘﺗ نأ ﺐﺠﻳ ﻲﺋﺎﺑﺮﻬﻜﻟا ﻂﻴﳋا
ﻲﺋﺎﺑﺮﻬﻜﻟا ﻂﻴﳋا نﺎﻛ اذإ زﺎﻬﳉا ﻞﻴﻐﺸﺘﺑ ﻢﻘﺗﻻ •
.ﺔﻃﻮﺒﻀﻣ ﺔﻔﺼﺑ ﻞﻐﺘﺸﻳﻻ زﺎﻬﳉا نأ ﺖﻈﺣﻻ اذإ وأ
.ﺎﻘﻠﻌﻣ ﺮﻴﺧﻷا اﺬﻫ كﺮﺘﺗﻻو
.ﻖﻠﻄﻟا ءاﻮﻬﻟا ﻲﻓ زﺎﻬﳉا ﻞﻤﻌﺘﺴﺗﻻ •
ﺮﻴﻴﻐﺗو تﺎﺣﻼﺻﻹا
.ﺔﺼﺧﺮﳌا ﺔﻴﻨﻘﺘﻟا
زﺎﻬﳉا ﺐﻴﻛﺮﺗ
ﻲﻓ نﻮﻜﺘﺳ ﻲﺘﻟا تاﺪﻌﳌا نﻮﺑﺎﺼﻟاو ءﺎﳌﺎﺑ ﻞﺴﻏإ زﺎﻬﺠﻠﻟ لﺎﻤﻌﺘﺳإ لوأ ﻞﺒﻗ
.حوﺮﺟ ﺔﻳأ ﺐﻨﺠﺘﺗ ﻰﺘﺣ ﺎﻬﻔﻴﻈﻨﺗ ءﺎﻨﺛأ تاﺮﻔﺸﻟا ساﺮﺘﺣﺈﺑ ﻚﺴﻣإ
.(5) تاﺮﻔﺸﻟا طوﺮﺨﻣ قﻮﻓ (4) لزﺎﻌﻟا ﻞﺼﻔﳌا ﺐﻛر
.ﻰﻠﻋﻷا ﻮﺤﻧ ﺔﻔﺸﻟا نﻮﻜﺗ ﺚﻴﺤﺑ لزﺎﻌﻟا ﻞﺼﻔﻤﻠﻟ طﻮﺒﻀﳌا ﺐﻴﻛﺮﺘﻟا ﻦﻣ ﺪﻛﺄﺗ
(2 ةرﻮﺼﻟا) (7
ةﺮﳉا ردأ ﻢﺛ (3 ةرﻮﺼﻟا) (7) كﺮﶈا ةﺪﺣو قﻮﻓ ﺖﻴﺒﺜﺘﻟا ﺔﻌﻄﻗ قﻮﻓ (3) ةﺮﳉا ﺐﻛر
ﺐﻴﻛﺮﺘﻟا ﺔﻘﻄﻨﻣ ﻰﻟإ ﺮﻴﺸﺘﺳ تﺎﻣﻼﻌﻟا .(6) كﺮﶈا ةﺪﺣو قﻮﻓ ﺔﺒﻛﺮﳌا ةﺮﳉا ﻊﺿ
ﻪﻴﻠﻋ ﻂﻐﺿإ ﻢﺛ ةﺮﺠﻠﻟ ﻰﻠﻋﻷا ءﺰﳉا قﻮﻓ ﻪﺘﻴﺒﺜﺘﺑ ﻢﻗ ,(2) ﺔﻃﻼﳋا ءﺎﻄﻏ ﺐﻴﻛﺮﺘﻟ
ﻢﺛ (8 ةرﻮﺼﻟا) ءﺎﻄﻐﻟا ﺔﻫﻮﻓ بﻮﻘﺛ ﻊﻣ ﺎﻬﻴﻜﺒﺸﻣ ﺔﻘﺑﺎﻄﲟ ﻢﻗ ,(1) ةداﺪﺴﻟا ﺐﻴﻛﺮﺘﻟ
(9 ةرﻮﺼﻟا) .مﺎﻜﺣﺈﺑ ﺐﻛﺮﺘﺗ ﻰﺘﺣ ﺔﻋﺎﺴﻟا برﺎﻘﻌﻟ ﺲﻛﺎﻌﳌا هﺎﲡﻹا ﻲﻓ ﺎﻫردأ
ﺔﻟﺎﺣ ﻲﻓ كﺮﶈا لﺎﻐﺘﺷإ ﻦﻣ ﻊﻨﳝ ﺔﻣﻼﺴﻠﻟ مﺎﻈﻧ ﻰﻠﻋ ﺔﻃﻼﳋا هﺬﻫ ﺮﻓﻮﺘﺗ :مﺎﻫ
) كﺮﶈا ةﺪﺣو قﻮﻓ ﺖﻴﺒﺜﺘﻟا ﺔﻌﻄﻗ قﻮﻓ تاﺮﻔﺸﻟا طوﺮﺨﻣ ﻊﺿ
(4 ةرﻮﺼﻟا) .مﺎﻜﺣﺈﺑ ﺐﻛﺮﺘﺗ ﻰﺘﺣ ﺔﻋﺎﺴﻟا برﺎﻘﻌﻟ ﺲﻛﺎﻌﳌا هﺎﲡﻹا ﻲﻓ
(6 و 5 رﻮﺼﻟا) .
عﻮﻤﺠﻤﻠﻟ طﻮﺒﻀﳌا ﺖﻴﺒﺜﺘﻠﻟ ناروﺪﻟا هﺎﲡإ ﻚﻟﺬﻛو
(7 ةرﻮﺼﻟا) .مﺎﻜﺣﺈﺑ ﺐﻛﺮﺘﺗ ﻰﺘﺣ
.ﺔﻤﻌﻃﻷا ﻊﻣ لﺎﺼﺗإ
.اﺪﺟ ةدﺎﺣ تاﺮﻔﺸﻟا
(1 ةرﻮﺼﻟا)
.ﻚﻴﻜﻔﺗ
.ﺐﻴﻛﺮﺗ
.ةﺮﺠﻠﻟ طﻮﺒﻀﻣ ﺐﻴﻛﺮﺗ مﺪﻋ
تاوﺮﻀﳋاو ﻪﻛاﻮﻔﻟا داﺪﻋإ
.ﺎﻬﻄﻴﻠﺨﺗ ﻲﻓ ﺐﻏﺮﺗ ﻲﺘﻟا تاوﺮﻀﳋا وأ ﻪﻛاﻮﻔﻟا ﺮﺸﻗ وأ ﻞﺴﻏإ
ﺎﻬﺗﺮﺸﻗ ﺔﻟازإ ﺐﺠﻳ (صﺎﺟﻹا وأ حﺎﻔﺘﻟﺎﻛ) روﺬﺑ ﻰﻠﻋ يﻮﺘﲢ ﻲﺘﻟا ﻪﻛاﻮﻔﻟا داﺪﻋﻹ
ﺎﻬﺗﺮﺸﻗ ﺔﻟازإ ﺐﺠﻳ (ﺦﻟإ ,يﻮﻴﻛ ,ﺦﻴﻄﺑ ,ﺾﻣاﻮﺣ) ةﺮﺸﻘﻟﺎﺑ تاوﺮﻀﳋاو ﻪﻛاﻮﻔﻟا
.دﻮﻘﻨﻌﻟا ﻦﻣ ﻪﻟﺰﻋ ﺪﻌﺑ ﻪﻄﻴﻠﺨﺗ ﻢﺘﻳ ﺐﻨﻌﻟا
.ءﻼﺘﻣﻹا ﺔﻫﻮﻓ لﻼﺧ ﻦﻣ ﺮﻤﺘﻟ ةﺮﻴﻐﺻ ﺎﻌﻄﻗ تاوﺮﻀﳋاو ﻪﻛاﻮﻔﻟا
.ﻦﻜﻤﳌا رﺪﻗ ﺔﺟزﺎﻃ تاوﺮﻀﺧ و ﻪﻛاﻮﻓ ﻞﻤﻌﺘﺳإ
ﺎﻬﻟﺎﺼﺗإ ﺪﻨﻋ رﺮﻀﺘﺗ ندﺎﻌﻣو تﺎﻨﻴﻣﺎﺘﻴﻓ ﻰﻠﻋ ﺮﻓﻮﺘﺗ ةﺮﺸﻘﳌا تاوﺮﻀﳋاو ﻪﻛاﻮﻔﻟا
.هداﺪﻋإ ﺪﻌﺑ ةﺮﺷﺎﺒﻣ ﻂﻴﻠﳋا وأ ﺮﻴﺼﻌﻟا بﺮﺷأ .ءﻮﻀﻟا وأ ﲔﺠﺴﻛﻷﺎﺑ
ﻦﻣ ءﺎﻋو ﻲﻓ ﺔﺟﻼﺜﻟا ﻲﻓ ﻪﻌﺿ ,تﺎﻋﺎﺳ ﻊﻀﺒﻟ ﻪﺑ ظﺎﻔﺘﺣﻹ مزﻼﻟا ﻦﻣ نﺎﻛ اذإ
ﺔﻟﺎﻃﻹ ﺾﻣﺎﳊا ﻦﻣ ﻞﻴﻠﻗ ﻂﻴﻠﳋا وأ ﺮﻴﺼﻌﻟا ﻰﻟإ ﻒﺿأ .جﺎﺟﺰﻟا وأ فﺰﳋا
.ﺎﻬﺒﻠﻗو
.ﺎﻘﺒﺴﻣ
ﻊﻄﻗ
.ﻪﺑ ﻆﻔﺘﺣﻹا ةﺪﻣ
ﺔﻴﺑﺮﻌﻟا
ةداﺪﺳ .1
ءﺎﻄﻏ .2
ةﺮﺟ .3
لزﺎﻋ ﻞﺼﻔﻣ .4
تاﺮﻔﺸﻟا طوﺮﺨﻣ .5
ﺔﻛﺮﶈا ةﺪﺣﻮﻟا .6
كﺮﶈا ةﺪﺣو قﻮﻓ ﺖﻴﺒﺜﺘﻟا ﺔﻌﻄﻗ .7
كﺮﶈا ﻞﺻاو .8
ﻂﺒﻀﻟا دوﺎﻘﻣ .9
[
] 1 ﺔﻋﺮﺳ (أ
[ ] 2 ﺔﻋﺮﺳ (ب
[ ] 3 ﺔﻋﺮﺳ (ج
[ ] 4 ﺔﻋﺮﺳ (ح
[ ] 5 ﺔﻋﺮﺳ (خ
[ ] 6 ﺔﻋﺮﺳ (د
[ ] تﺎﻀﺒﻨﺑ تﺎﻋﺮﺳ ﻰﻟإ ﺔﺘﺑﺎﺜﻟا تﺎﻋﺮﺴﻟا لﻮﺤﻣ (ر
[ ] ﺪﻴﻠﳉا ﻢﻴﺸﻬﺗ ﺔﻔﻴﻇو (ز
[ ] ﻒﻴﻗﻮﺘﻟا رز (س
قﻻﺰﻧﻺﻟ ﺔﻣوﺎﻘﻣ ﻞﺟرأ .10
ﻲﺋﺎﺑﺮﻬﻜﻟا ﻂﺑﺮﻟا ﻂﻴﺧ ﻊﻣﺎﺟ .11
ﺔﻣﺎﻫ تﺎﻈﺣﻼﻣ
ﺎﻬﻴﻠﻋ ﻆﻓﺎﺣ .ةﺮﻣ لوﻷ زﺎﻬﳉا لﺎﻤﻌﺘﺳإ ﻞﺒﻗ لﺎﻤﻌﺘﺳﻹا تﺎﻤﻴﻠﻌﺗ ﻦﻌﻤﺘﺑ أﺮﻗإ •
.تﺎﻔﺻاﻮﳌا ﺔﺤﻴﻔﺻ ﻲﻓ ﻪﻴﻟإ رﺎﺸﳌا ﻂﻐﻀﻟﺎﺑ ﻂﻘﻓ زﺎﻬﳊا ﻂﺑﺮﺑ ﻢﻗ •
.ﻲﺋاﺬﻐﻟا لﺎﻤﻌﺘﺳﻺﻟ ﻞﺑﺎﻗ زﺎﻬﳉا اﺬﻫ •
.ﻲﻟﺰﻨﳌا لﺎﻤﻌﺘﺳﻺﻟ صﻮﺼﳋﺎﺑ ﻢﻤﺼﻣ زﺎﻬﳉا اﺬﻫ •
.ةرﺎﻗو ﺔﻳﻮﺘﺴﻣ ةﺪﻋﺎﻗ قﻮﻓ ﺔﻃﻼﳋا ﺎﻤﺋاد ﻞﻤﻌﺘﺳإ •
ﻢﻬﺗارﺪﻗ (لﺎﻔﻃﻷ ﺔﻓﺎﺿإ) صﺎﺨﺷأ فﺮﻃ ﻦﻣ
ﻻإ ﺔﻓﺮﻌﳌا وأ ةﺮﺒﳋا ﻰﻠﻋ نوﺮﻓﻮﺘﻳ ﻻ وأ ﺔﺼﻗﺎﻧ ﺔﻴﻠﻘﻌﻟا وأ ﺔﻴﺴﳊا وأ ﺔﻴﻤﺴﳉا
ﺐﻨﺠﺘﻟ ﺎﻬﻔﻴﻈﻨﺗ ءﺎﻨﺛأ طﺎﻴﺘﺣﺈﺑ تاﺮﻔﺸﻟا ﻚﺴﻣإ .اﺪﺟ ذﻮﺤﺸﻣ تاﺮﻔﺸﻟا ﺪﺣ •
لﺎﻐﺘﺷإ ءﺎﻨﺛأ بﻮﻜﻟا ﻞﺧاﺪﺑ تﺎﻛﻮﺸﻟاو ﲔﻛﺎﻜﺴﻟﺎﻛ ﺔﻳﺪﻳﺪﺣ تاودأ ﻞﺧﺪﺗﻻ •
ﺮﻄﳋ ضﺮﻌﺗ ﺪﻗ ﻊﻧﺎﺼﻟا فﺮﻃ ﻦﻣ ﺔﻤﻠﺴﻣ ﺮﻴﻏ ﺔﻴﻓﺎﺿإ مزاﻮــﻟ لﺎﻤﻌﺘﺳإ •
ﻲﺋﺎﺑﺮﻬﻜﻟا ﻂﻴﳋا ﺲﳌ ﺐﻨﲡو ةراﺮﺤﻠﻟ ردﺎﺼﻣ ﻦﻣ بﺮﻘﻟﺎﺑ زﺎﻬﳉا ﻊﺿﻮﺑ ﻢﻘﺗﻻ •
ﻲﺘﻟا ءاﺰــﺟﻷا وأ تﻼﻤﻜﳌا ﺮﻴﻴﻐﺗ ﻞﺒﻗ ﻲﺋﺎﺑﺮﻬﻜﻟا رﺎﻴﺘﻟا ﻦﻋ ﺔﻃﻼﳋا ﻞﺼﻓإ •
ﻼﻐﺘﺸﻣ زﺎﻬﳉا كﺮﺘﺗﻻ • .ﺎﻣﺎﲤ كﺮﶈا ﻒﻗﻮﺘﻳ ﻰﺘﺣ زﺎﻬﳉا ءﺎﻄﻏ ﺢﺘﻔﺗ ﻻ •
.لوﺆﺴﻣ ﺺﺨﺷ فﺮﻃ ﻦﻣ زﺎﻬﳉا لﺎﻤﻌﺘﺳإ ﻰﻟإ ﻢﻫدﺎﺷرإ ﰎ اذإ
.ﺎﻓﻮﻔﻠﻣ ﻲﺋﺎﺑﺮﻬﻜﻟا ﻂﻴﳋاو زﺎﻬﳉا ﻞﻐﺸﺗﻻ •
.زﺎﻬﳉا لﺎﻤﻌﺘﺳإ ءﺎﻨﺛأ
.ﻪﻟﺎﻤﻌﺘﺳإ مﺪﻋ ﺪﻨﻋ ﻲﺋﺎﺑﺮﻬﻜﻟا رﺎﻴﺘﻟا ﻦﻋ زﺎﻬﳉا ﻞﺼﻔﺑ ﻢﻗ •
ﺔﻃﻼﳋا ةﺮﺟ ﺔﻟازإ وأ ﺐﻴﻛﺮﺘﺑ ﻢﻘﺗﻻ •
.لﺎﻔﻃﻷا ﻦﻣ بﺮﻘﻟﺎﺑ ﺔﺻﺎﺧو ﺔﺒﻗاﺮﻣ نوﺪﺑ
.ﻞﺒﻘﺘﺴﳌا ﻲﻓ تﺎﻌﺟاﺮﳌ
زﺎﻬﳉا اﺬﻫ ماﺪﺨﺘﺳإ ﺐﺠﻳ ﻻ •
.ﺔﻠﻠﺒﻣ يﺪﻳﻷﺎﺑ زﺎﻬﳉا مﺪﺨﺘﺴﺗﻻ •
.ﺔﻛﺮﺤﺘﳌا ﺮﺻﺎﻨﻌﻟا ﺲﳌ ﺐﻨﲡ •
.حوﺮﺟ ثوﺪﺣ
.زﺎﻬﳉا
.ثداﻮﳊا
.ﺎﻏرﺎﻓ زﺎﻬﳉا ﻞﻴﻐﺸﺘﺑ ﻢﻘﺗﻻ •
.ﺔﻨﺧﺎﺳ تﺎﺣﺎﺴﳌ
.ﺔﻃﻼﳋا لﺎﻐﺘﺷإ ءﺎﻨﺛأ كﺮﺤﺘﺗ
BS4790.indd 25BS4790.indd 25 17/4/07 09:42:4917/4/07 09:42:49
Page 26

BSH PAE, S.L.
NIF B-01272368
Parque Tecnologico de Alava
C/ Albert Einstein, 44
Edifício E-6, Oficina 312
01510 Miñano Mayor (ALAVA)
Spain
100% recycled paper
BS4790.indd 26BS4790.indd 26 17/4/07 09:42:5117/4/07 09:42:51
16-07
 Loading...