

Page 1

V2.22
Page 2

Page 3
INTRODUCTION
The TYPHOON Wizard™ is a mini GPS tracking device that
gives you full one-handed flight control over the TYPHOON
aircraft. Features such as 'Follow Me' and 'Watch Me'
ensure that you are in frame in every shot. The ‘point to fly’
function allows you to point and click to reposition your
TYPHOON in a very intuitive way.
SPECIFICATIONS
Dimensions: 5.47 X 1.46 X 0.98 in (139 X 37 X 25 mm)
Weight (with LiPo Battery): 2.52 oz ( 71.5 g )
Compatible Aircfraft: TYPHOON series
Water Resistant: Yes
Working Hours: 3.5 h
Built-In LiPo Battery Voltage / Capacity: 3.7V 500mAh
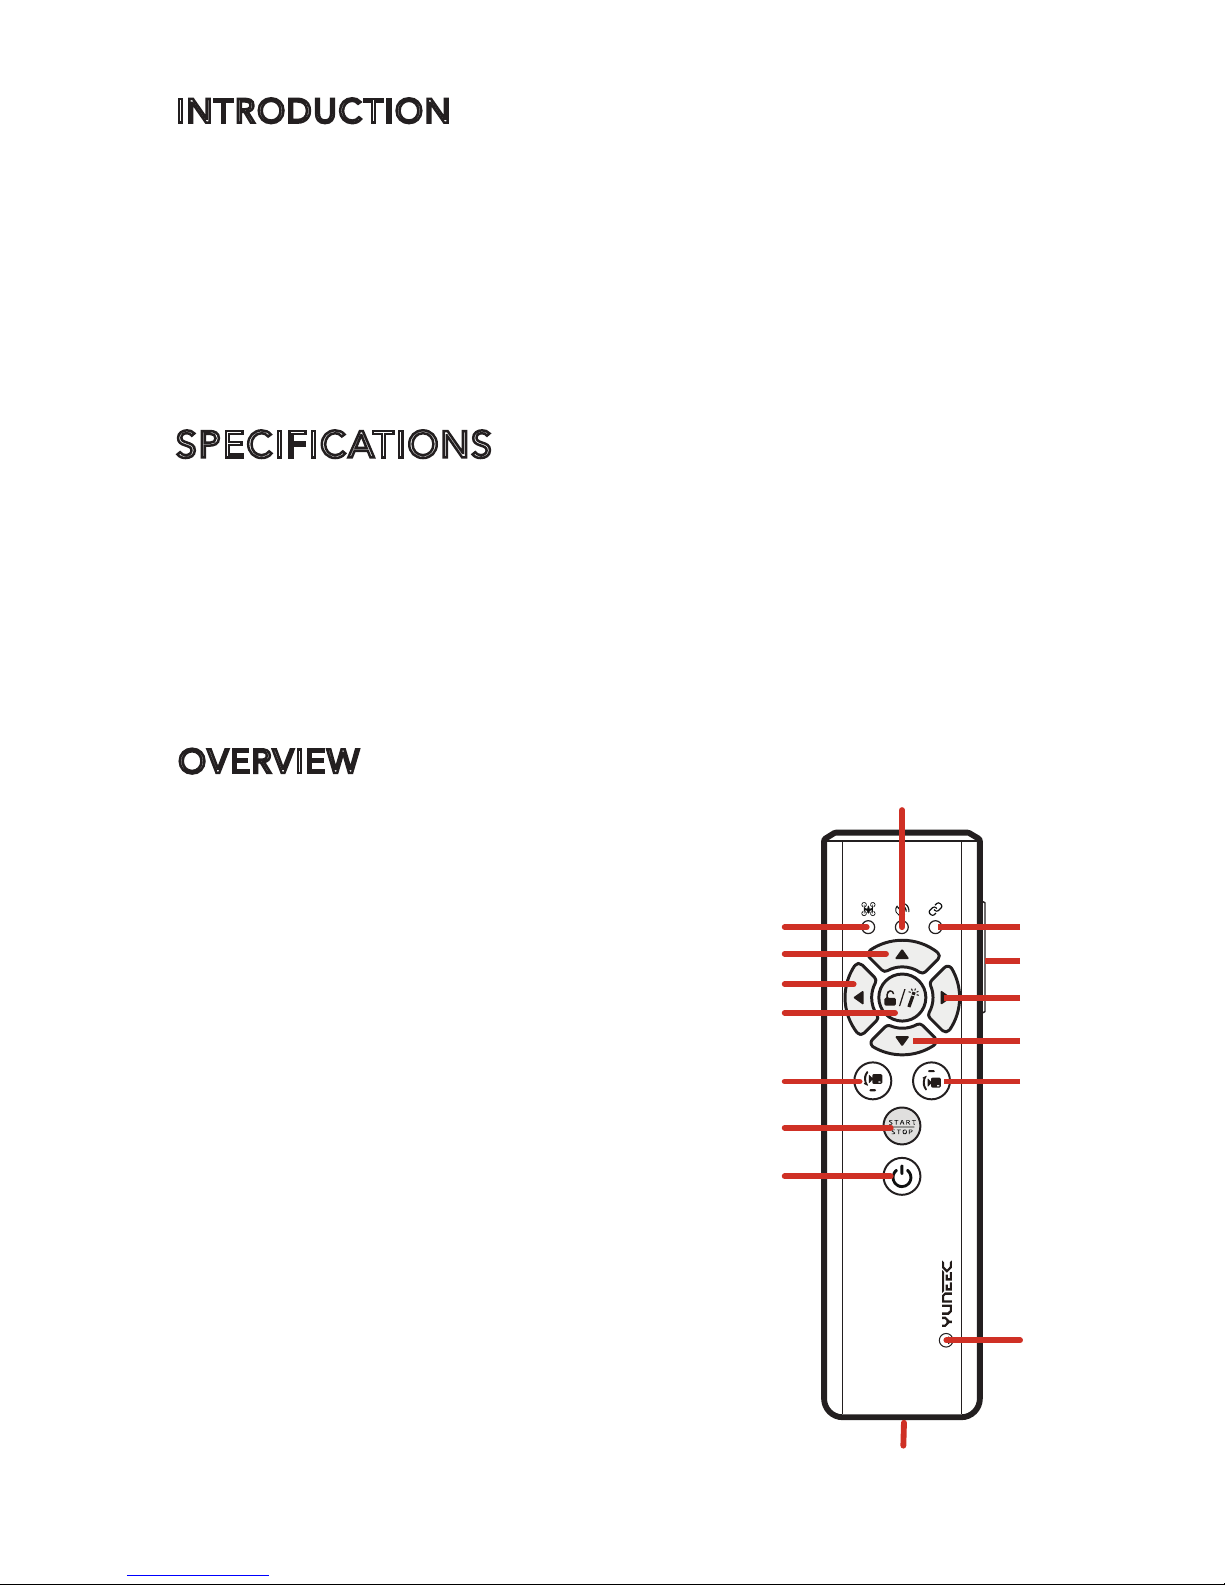
OVERVIEW
1. Aircraft Mode LED
2. Wizard™ GPS LED
3. Aircraft Status LED
4. Ascend / Forward Button
5. Mode Switch
6. Turn / Fly to the Left Side Button
7. Turn / Fly to the Right Side Button
8. Descend / Backward Button
9. Magic Button
10. Pitch Control Button-down
11. Pitch Control Button-up
12. Start / Stop Motors Button
13. Wizard™ Power Button
14. Wizard™ Power LED
15. Micro USB Port
1
2
3
5
4
7
6
9
8
1110
12
13
14
15
Page 4
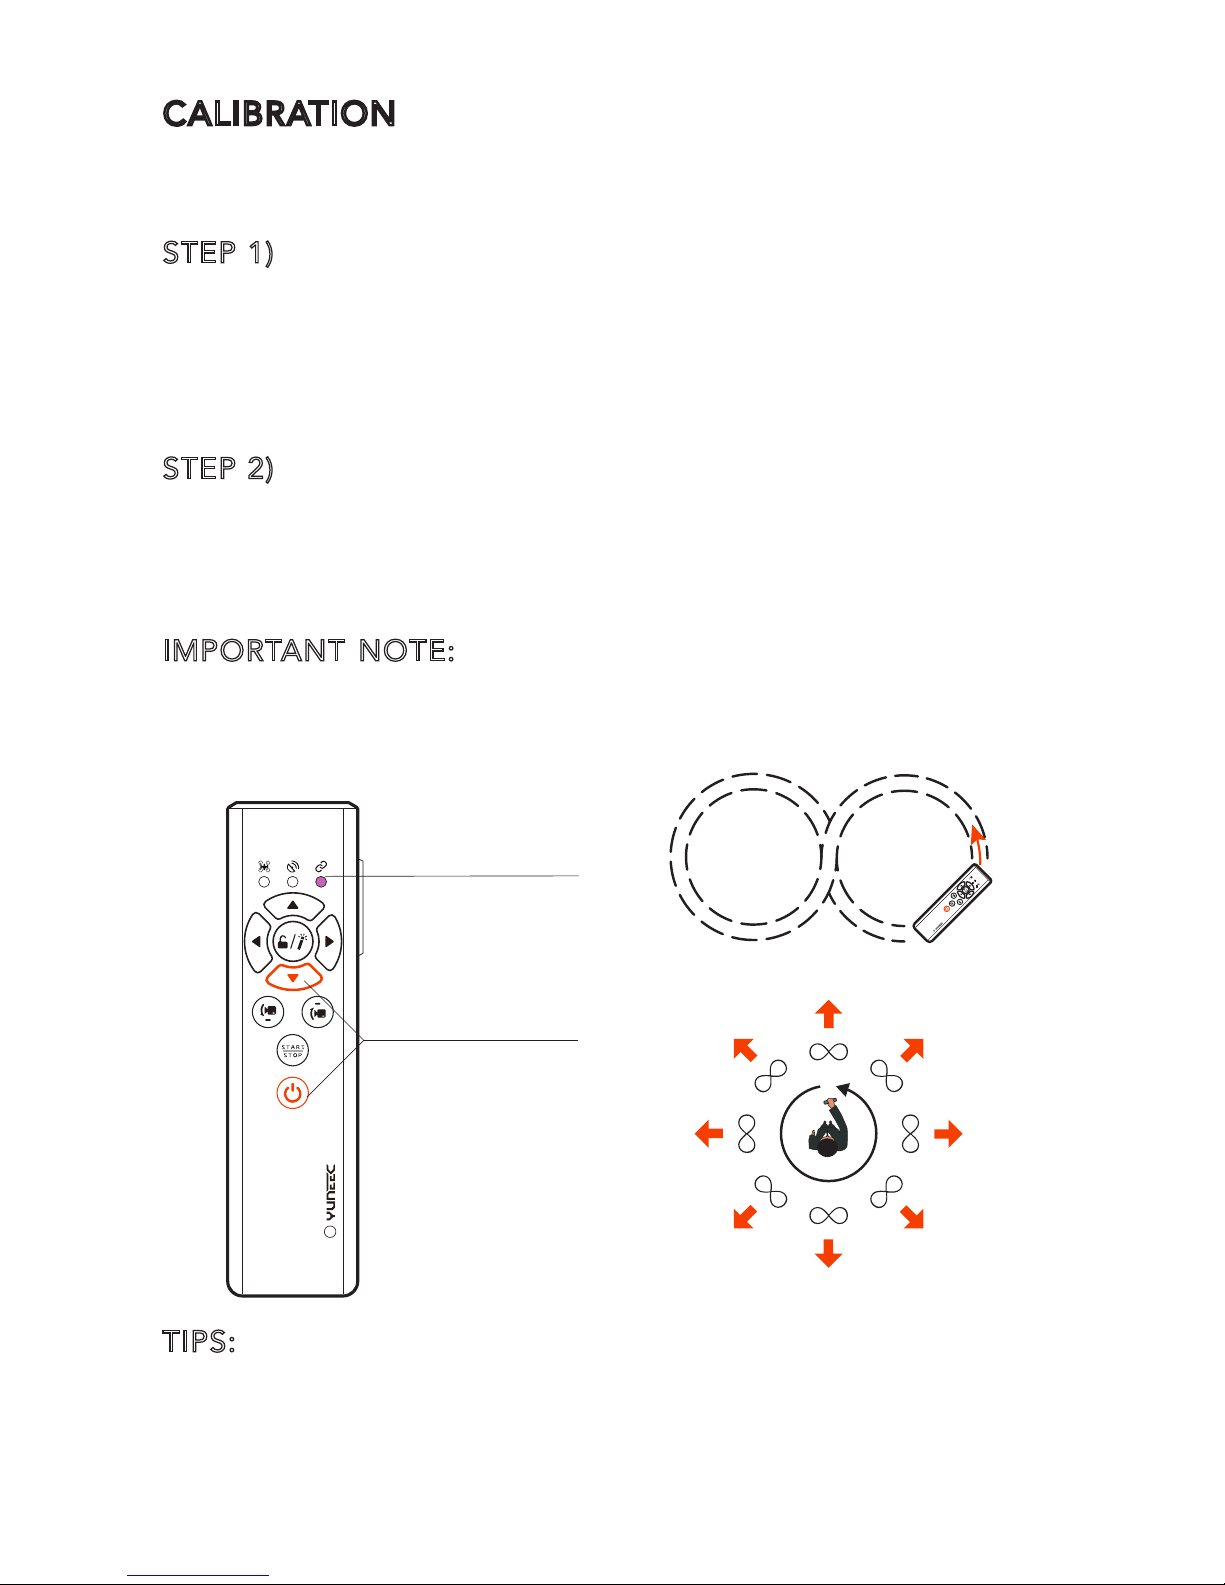
CALIBRATION
When the 'Point to fly' function does not work properly,
please calibrate the TYPHOON Wizard as follows:
STEP 1) Entering the TYPHOON Wizard calibration mode
Press and hold both the Descend/ Backward Button and the
Power Button at the same time for around 2 seconds till the
top right Aircraft Status LED is solid pink. After that you can
release both buttons. If entering the calibration mode fails,
turn off the TYPHOON Wizard and try again.
STEP 2) Wizard Calibration
Immediately move the TYPHOON Wizard in the “∞“ form
while slowly spinning in a circle. When the calibration is
done, Wizard will turn off automatically. The process will
take around 30 seconds.
IMPORTANT NOTE: If calibration fails, the top left Aircraft
Mode LED will be solid red and the power LED will blink red
rapidly. You should turn off the Wizard and repeat the
process from Step1.
TIPS:
Keep distance from magnetic interference during the
calibration. We recommend calibrating Wizard outdoors.
You can find the TYPHOON Wizard calibration tutorial video
at www.yuneec.com/wiz-info.html
Press and hold both
together for around
2 seconds
Aircraft Status LED
turns to solid pink
The “∞“ form
Slowly spinning in a circle
Page 5
NOTICES AND WARNINGS
1. The Wizard™ CAN'T replace the Personal Ground
Station/Remote Controller because it has no Wifi.
2. The Wizard™ is water resistant but NOT waterproof, Do
not submerge the Wizard™ in water even if it is in the
waterproof carrying pouch. This will cause the aircraft to
lose signal.
3. Do not use Home Mode when flying near bodies of water.
4. Be sure to turn off the Wizard™ when you do not use it.
5. Be sure to operate the Wizard™ in open areas that are
free from people, vehicles and other obstructions. Never fly
near or above crowds, airports or buildings.
6.When swimming or diving with the waterproof carrying
strap, to keep the stability of the aircraft, pilots MUST press
and hold the Ascend / Forward Button and the Descend /
Backward Button at the same time to turn off the height
following function. The TYPHOON Wizard will vibrate once
and the Aircraft Mode LED will blink the current color.
Otherwise the aircraft may crash!
When getting out of water, press the Ascend / Forward Button
and the Descend / Backward Button at the same time. The
TYPHOON Wizard will vibrate twice and the Aircraft Mode
LED will be solid again.
GENERAL SAFETY PRECAUTIONS AND WARNINGS
· Failure to use this product in the intended manner as
described in instruction manual can result in damage to the
product, property and/or cause serious injury. This product
is not a toy! If misused it can cause serious body harm and
damage to property.
· As the user of this product you are solely and wholly
responsible for operating it in a manner that does not
endanger yourself and others or result in damage to the
product or the property of others.
· Do not attempt to operate your equipment in areas with
potential magnetic and/or radio interference including
areas nearby broadcast towers, power transmission stations,
high voltage power lines, etc.
Page 6
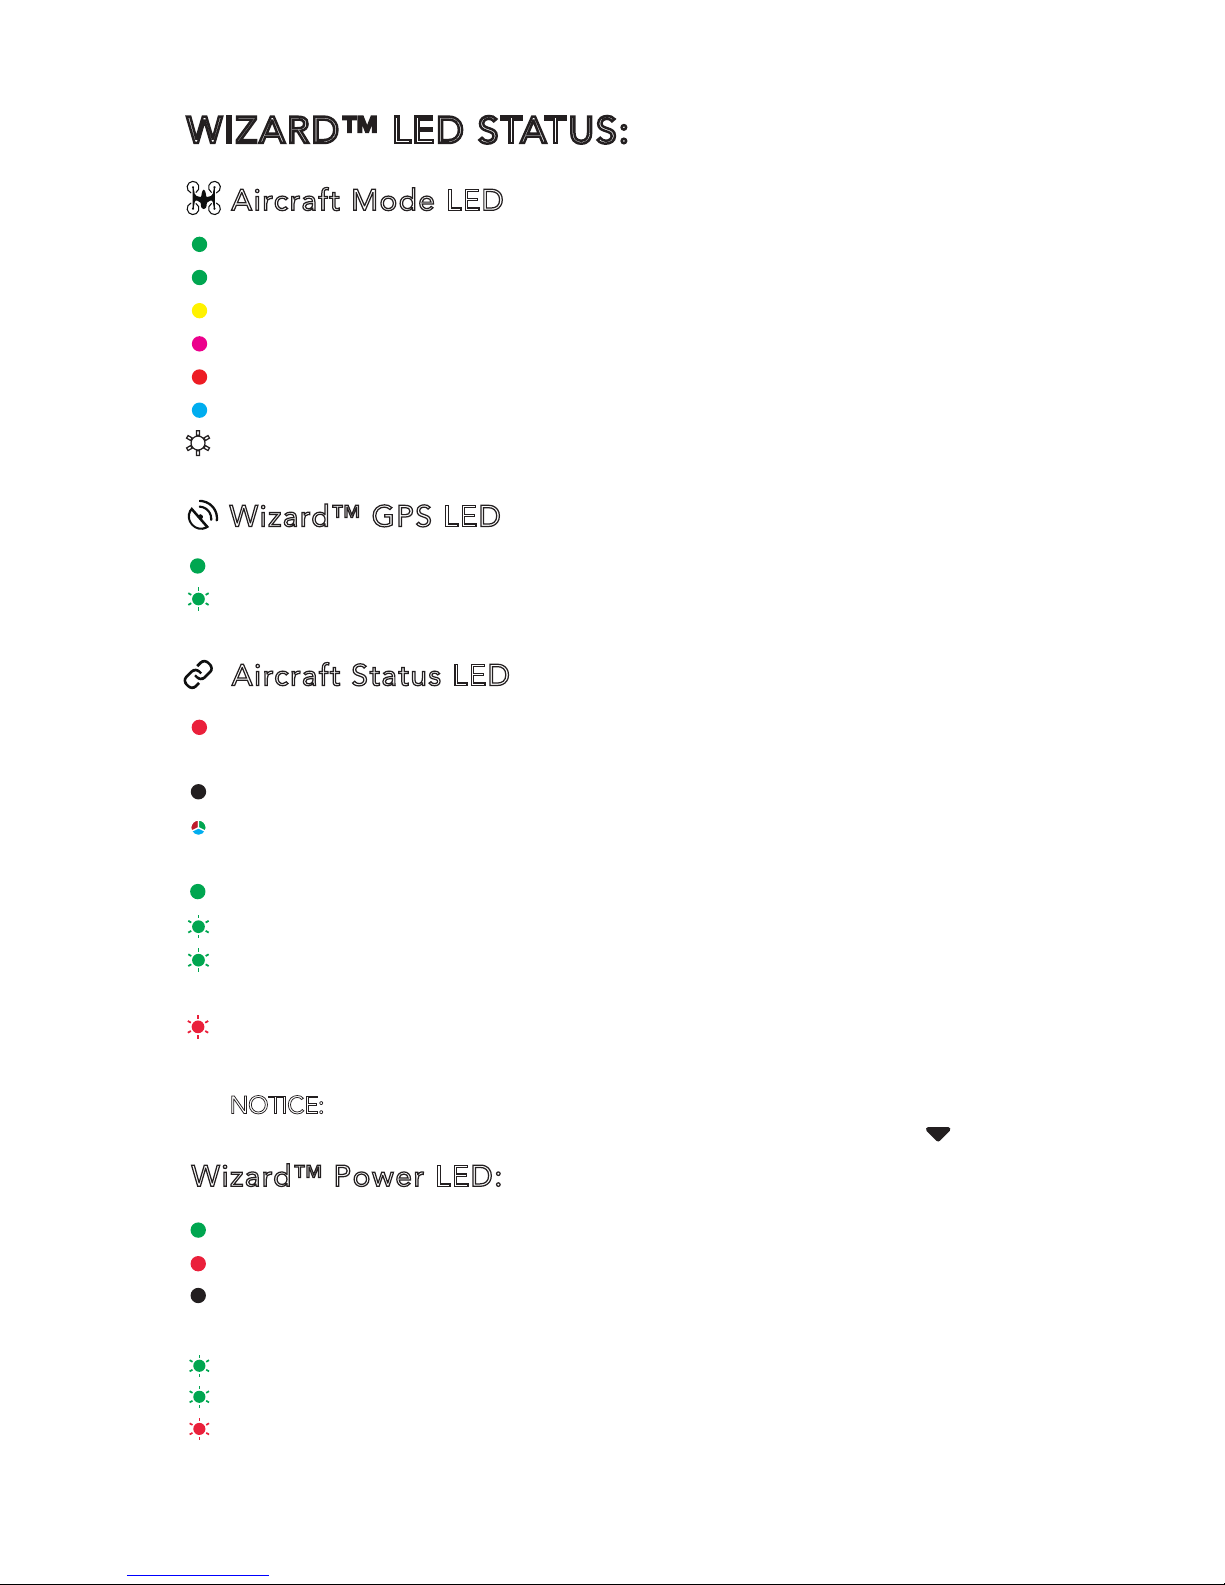
WIZARD™ LED STATUS:
Aircraft Mode LED
Wizard™ GPS LED
Aircraft Status LED
Wizard™ Power LED:
GPS Locked: LED solid green.
Recording video: LED blinking green once every second
(with the Wizard GPS locked)
The Communication Mal-function Between the Wizard™
and the Aircraft : LED solid red
GPS Loss of Aircraft: LED off
Aircraft in No-Fly Zone: LED blinking red, green and
blue alternately
Battery full:LED solid green
Battery 50%:LED blinking green twice every 2 seconds
Battery 25%:LED blinking green once every 2 seconds
Low Voltage Warning of the Aircraft:
LED blinking red quickly, the Wizard™ vibrating for 2
seconds once continuously
Powered On: LED solid green
During Charging: LED solid red
Charging Completed: Red LED off
Low Voltage Warning of the Wizard™:
Battery 50% --- LED blinking green twice every 2 seconds
Battery 25%--- LED blinking green once every 2 seconds
Power Cut-off---LED blinking red quickly, the Wizard™
vibrating for 2 seconds once continuously.
Smart Mode: LED solid green
Watch Me Function: LED solid green
Follow Me Function: LED solid yellow
Angle Mode: LED solid purple
Home Mode: LED solid red
‘Point To Fly’ Function Activated: LED solid blue
Obs. Avoidance On: LED blink white and purple
NOTICE: When using the Wizard, the landing speed of the aircraft will decrease.
The pilot can hold up the wizard and press and hold the [ ] button.
Page 7

BATTERY WARNINGS AND USAGE GUIDELINES
WARNING: Lithium Polymer (LiPo) batteries are significantly
more volatile than alkaline, NiCd or NiMH batteries. All
instructions and warnings must be followed exactly to
prevent property damage and/or serious injury as the
mishandling of LiPo batteries can result in fire. By handling,
charging or using the included LiPo battery you assume all
risks associated with LiPo batteries. If you do not agree with
these conditions please return the complete product in new,
unused condition to the place of purchase immediately.
• You must always charge the LiPo battery in a safe,
well-ventilated area away from flammable materials.
• Never charge the LiPo battery unattended at any time.
When charging the battery you must always remain in
constant observation to monitor the charging process and
react immediately to any potential problems that may occur.
• After flying/discharging the LiPo battery you must allow it
to cool to ambient/room temperature before recharging.
•To charge the LiPo battery you must use a suitable compatible LiPo battery charger. Failure to do so may result in a fire
causing property damage and/or serious injury.
• Store the LiPo battery at room temperature and in a dry
area for best results.
• When charging, transporting or temporarily storing the
LiPo battery the temperature range should be from approximately 40–120° F (5–49°C). Do not store the battery or
aircraft in a hot garage, car or direct sunlight. If stored in a
hot garage or car the battery can be damaged or even catch fire.
• Never leave batteries, chargers and power supplies
unattended during use.
• Never attempt to charge low voltage, ballooned/swollen,
damaged or wet batteries.
• Never allow children under 14 years of age to charge
batteries.
• Never drop batteries, chargers or power supplies.
• Always inspect the battery, charger and power supply
before charging.
• Always ensure correct polarity before connecting batteries,
chargers and power supplies.
• Always disconnect the battery after charging.
• Always terminate all processes if the battery, charger or
power supply malfunctions.
IMPORTANT NOTE: It’s safer and better for the longevity of
the battery to store it only partially charged for any length
of time. Storing the battery approximately 50% charged is
typically best, be sure not to store the battery fully charged
whenever possible. In fact, as long as the battery will be
stored at approximately room
temperature and for no more than a few weeks before the
next use, it may be best to store the battery in the
discharged state after the last flight (as long as the battery
was not over-discharged on the last flight).
Page 8

• Always ensure correct polarity before connecting batteries,
chargers and power supplies.
• Always disconnect the battery after charging.
• Always terminate all processes if the battery, charger or
power supply malfunctions.
IMPORTANT NOTE: It’s safer and better for the longevity of
the battery to store it only partially charged for any length
of time. Storing the battery approximately 50% charged is
typically best, be sure not to store the battery fully charged
whenever possible. In fact, as long as the battery will be
stored at approximately room
temperature and for no more than a few weeks before the
next use, it may be best to store the battery in the
discharged state after the last flight (as long as the battery
was not over-discharged on the last flight).
Page 9

CHARGING THE BATTERIES
You can charge the LiPo battery in the TYPHOON Wizard™
by using supplied USB cable and inserting it into the USB
port on your computer. Make sure the TYPHOON Wizard™
is OFF and connect cable into open USB port on your
computer. The Power LED will show solid RED while battery
is charging, when charging is completed the red LED light
will turn off. It will take approximately 2 hours to charge a
fully discharged battery. A fully charged battery will give an
operating time of 3.5 hours per charge.
POWERING ON/OFF:
Press and hold the Power Button . When all LEDs blink
once and the TYPHOON Wizard™ vibrates once, release the
Power button . The Power LED glows solid green, and the
Aircraft Mode LED is on, then the TYPHOON Wizard™ is
powered on successfully.
NOTICE: IMU Mal-function: If the TYPHOON Wizard™ keeps
vibrating when powering on and fails to power on, please
return it to the service center for maintenance.
WARNING:
Do not take out the LiPo battery installed in the
TYPHOON Wizard™, otherwise the TYPHOON Wizard™
may be damaged.
Page 10

BINDING TYPHOON WIZARD™ TO TYPHOON H
STEP 1) Switch on the ST16 Ground Station first, and then
power on Typhoon H. Do not touch it until the initialization
completes. Wait a few seconds for the camera to align and
connected.
STEP 2) Tap the settings icon [ ] on the ST16 and then
switch from single mode to team mode.
STEP 3) When the Typhoon H Main LED Status Indicator
starts to blink orange, the aircraft enters binding mode.
STEP 4) Press and hold the Power Button of the Wizard until
the Aircraft Mode LED glows solid blue. Do not release the
Power Button until hearing two beeps from the aircraft, then
release it.
NOTICE:
When Typhoon
H is in team mode
(Wizard and ST16), the
Wizard must be bound to
the aircraft and the ST16
Ground Station must be
bound to the camera.
IF YO
U NEED TO SWITCH BACK TO SINGLE MODE, THE
OPERATION STEPS ARE AS FOLLOWS:
STEP 1: Tap the settings icon [ ] on the ST16 and then
switch from team mode to single mode.
STEP 2: When the Typhoon H Main LED Status Indicator
starts to blink orange, the aircraft enters binding mode.
STEP 3: Wait for a few seconds, as the remote control will
automatically bind to the camera and aircraft. You will hear
two beeps from the aircraft when the binding is successful.
Page 11

FLIGHT CONTROLS
NOTICE: The safe distance between the TYPHOON Wizard™
and the aircraft is 39 ft (12m). The TYPHOON Wizard™ can
be controlled in different positions. Direction Control
Buttons function differently according to the positions of
the Wizard™.
1) When the TYPHOON Wizard™ is tilted upwards between
50° and 90°, the functions of the Direction Control Buttons are
as followed:
0°
50°
90°
2) When the TYPHOON Wizard™ is tilted upwards
between 0° and 40°, the functions of the Direction Control
Buttons are as followed:
0°
40°
90°
NOTICE: When the aircraft flies to the left or right side, the
nose of aircraft doesn't change its direction when the
TYPHOON Wizard™ is tilted upwards between 0° and 40°.
Page 12

‘POINT TO FLY’ FUNCTION
Press and hold the Magic Button on the TYPHOON Wizard
™, and the aircraft will fly in the direction the TYPHOON
Wizard™ is pointed to in the sky.
To Enter ‘Point To Fly’ Function
When the aircraft is flying, point the TYPHOON Wizard™ to
a direction, press and hold the Magic Button. Release the
Magic Button when Aircraft Mode LED glows solid blue and
TYPHOON Wizard™ vibrates once. Then the aircraft will fly
to the direction the TYPHOON Wizard™ points. The closer
the TYPHOON Wizard™ is tilted towards 0°, the further the
aircraft will fly away from the pilot. The closer the
TYPHOON Wizard™ is tilted towards 0°, the further the
aircraft will fly away from the pilot (refer to the orange
flight track below). The closer the TYPHOON Wizard™ is
tilted towards 90°, the closer the aircraft will fly to the pilot
(refer to the blue flight track below). When the Wizard™ is
tilted at 90°, the aircraft will fly close to you straightly and
stop at a safe distance(refer to the black flight track
below).
NOTICE: The recommended flying height is 33-66 ft (10-20
m). The operating distance range of the TYPHOON Wizard
™ is 33-164 ft (10-50 m).
Smart Circle
Wizard™ Pointing Direction
To Exit ‘Point To Fly’ Function
When in the ‘Point To Fly’ Function, press any Direction Control
Button to exit this function. The aircraft will stop moving and
automatically hold its position (with a suitable GPS signal/lock)
and maintain a level attitude then.
Page 13

WIZARD BUTTON COMBINATION FUNCTIONS
Turn off/on altitude
follow function
-Short press
-Blink slowly: Turn off
PRESS
LED
Switch between Watch Me/
Follow Me function
-Short press
-Watch Me
Follow Me
*All vibrate once when any of the combination function is activated(
rthe Wizard will vibrate twice when turning on the altitude
follow function).
*For the last four functions, press the orange marked button
first, and then the green one. Release both buttons at the
same time after the function is activated.
•
•
Turn on Obstacle
Avoidance function
-
Turn off by default
-Short press
-Blink white and purple
PRESS
LED
Turn off Obstacle Avoidance
function
-Short press
Landing gear up/down
-Short press
Activate point-to-fly function
-Long press
-Solid blue
Take still photos
-Short press
Start/stop video record
(withthewizardGPSlocked)
-Short press
-Blink-record start
Activate compass
calibration
-Long press
*Turn off WIZARD before pressing this combination buttons.
- Solid pink
Enter into binding mode
-Long press
*Turn off WIZARD before pressing
this button.
-Solid blue
PRESS
LED
PRESS
PRESS
LED
PRESS
LED
PRESS
LED
PRESS
PRESS
PRESS
LED
Page 14

FLIGHT MODES
SMART MODE
When the Flight Mode Selection Switch is in the top
position, the aircraft will be in the Smart Mode. The Aircraft
Mode LED will glow solid green.
1) Watch Me Function Under Smart Mode
Watch Me function enables the camera to keep tracking the
TYPHOON Wizard™ no matter where and how it moves as
the camera can automatically tilt its angle according to the
controller. It is "watch me" mode if both the LEDs for
Aircraft Mode and Wizard™ GPS are green.
Usually, the default function under the Smart Mode is Watch Me.
The Turn Left [ ] and Turn
Right [ ] are disabled in
this mode (Fly to the Left
Direction and Fly to the
Right Direction can be
controlled). The pilot will
always be kept in the frame
wherever he/she moves.
NOTICE:
In the Smart Mode, the geo-fence will keep the
aircraft from traveling further than 295 ft (90 m). The
geo-fence is a virtual 'barrier'.
CAUTION:
You can operate the camera on mobile APPs.
The APP can be downloaded from Google Play Store or APP
Store. You also can use the Wizard™ to take photos or
record videos.
IMPORTANT NOTE: The ‘Point To Fly’ Function can only be
activated in Smart Mode.
2) Follow Me Function Under Smart Mode
The Follow Me function allows the aircraft to follow the
pilot, adjusting its location to the location of the TYPHOON
Wizard™. All buttons are controllable in this mode. When in
Follow Me function, the aircraft will follow the movement of
the TYPHOON Wizard™ if there is no extra operation on the
TYPHOON Wizard™.
Page 15

Follow Me function can be switched to by the following steps:
When in Watch Me Mode, press the [ ] and [ ] once at the
same time, it is "follow me" model if Aircraft Mode LED is
yellow and Wizard™ GPS LED is green
WARNING: When swimming or diving with the waterproof
carrying strap, to keep the stability of the aircraft, pilots MUST
press and hold the Ascend / Forward Button and the Descend
/ Backward Button at the same time to turn off the height
following function. The TYPHOON Wizard will vibrate once
and the Aircraft Mode LED will blink the current color.
Otherwise the aircraft may crash!
IMPORTANT NOTE:
Crash is NOT covered under warranty.
ANGLE MODE
When the Flight Mode Selection Switch is in the middle
position the aircraft will be in Angle Mode. The Aircraft
Mode LED will be solid purple.
In this mode, the aircraft will move in the direction the TYPHOON
Wizard™ is controlled relative to the front/nose of the aircraft.
The aircraft has no function of Follow Me or Watch Me.
NOTICE:
In this mode, the ‘Point To Fly’ Function can't be
activated.
IMPORTANT NOTICE: In the Angle mode, the aircraft is not
suggested travelling further than 656 ft (200 m). The Wizard
™ will keep vibrating when the aircraft travels further than
656 ft (200 m).
Page 16

HOME MODE
When the Flight Mode Selection Switch is in the bottom
position, the aircraft will be in the Home Mode. The Aircraft
Mode LED will be solid red. To exit the Home Mode, switch
the Mode Switch to Angle/Smart Mode, then the aircraft will
stop moving and automatically hold its position (with a
suitable GPS signal/lock) and maintain a level attitude then.
In Home Mode the aircraft will fly in a straight line in the
direction of the pilots' current location, and automatically
land within 13-26 ft (4-8 m) of the pilot.
NOTICE: In this mode, the ‘Point To Fly’ Function can’t be activated.
CAUTION: Don’t switch to Home Mode when you are near
bodies of water.
NOTICE: When using Go Home function, the speed of the
aircraft will descent to 1.57MPH (0.7m/s). The pilot can
accelerate the landing speed by holding up the Wizard and
pressing and hold the [ ] button.
CAMERA CONTROLS
Any camera control including photo taking or video
recording either be operated on Wizard or on Mobile Apps,
which can be downloaded from Google Play Store or APP
Store. The detailed information can be referred to relevant
User Manuals on the official website: www. yuneec.com
NOTICE: The control radius range of camera control is
within 295 ft (90 m).
CAUTION: When using the Wizard™, if it keeps vibrating
continuously, it indicates the hardware in the Wizard™
malfunction. Please send it to the official service center for
maintenance.
PILOT LOCATION
13-26 (4-8m)
LANDING
LOCATION
Page 17

FCC STATEMENT:
This equipment has been tested and found to comply with
the limits for Part 15 of the FCC rules. These limits are
designed to provide reasonable protection against harmful
interference in a residential installation. This equipment
generates, uses and can radiate radio frequency energy
and, if not installed and used in accordance with the
instructions, may cause harmful interference to radio
communications.
However, there is no guarantee that interference will not
occur in a particular installation. If this equipment does
cause harmful interference to radio or television reception,
which can be determined by turning the equipment off and
on, the user is encouraged to try to correct the interference
by one or more of the following measures:
• Reorient or relocate the receiving antenna.
• Increase the separation between the equipment and
receiver.
• Connect the equipment to an outlet on a circuit different
from that to which the receiver is connected.
This device complies with part 15 of the FCC rules.
Operation is subject to the following two conditions:
(1) This device may not cause harmful interference, and (2)
this device must accept any interference received, including
interference that may cause undesired operation.
NOTE: This equipment has been tested and found to
comply with the limits for a Class B digital device, pursuant
to part 15 of the FCC Rules. These limits are designed to
provide reasonable protection against harmful interference
in a residential installation. This equipment generates, uses
and can radiate radio frequency energy and, if not installed
and used in accordance with the instructions, may cause
harmful interference to radio communications. However,
there is no guarantee that interference will not occur in a
particular installation. If this equipment does cause harmful
interference to radio or television reception, which can be
determined by turning the equipment off and on, the user is
encouraged to try to correct the interference by one or
more
of the following measures:
—Reorient or relocate the receiving antenna.
—Increase the separation between the equipment and
receiver.
—Connect the equipment into an outlet on a circuit
different from that to which the receiver is connected.
—Consult the dealer or an experienced radio/TV technician
for help.
CAUTION: Any changes or modifications not expressly
approved by the party responsible for compliance could
void the user's authority to operate this equipment.
IC RADIATION EXPOSURE STATEMENT FOR CANADA
This device complies with Industry Canada licence-exempt
RSS standard(s).
Operation is subject to the following two conditions: (1) this
device may not cause interference, and (2) this device must
accept any interference, including interference that may
cause undesired operation of the device.
Le présent appareil est conforme aux CNR d'Industrie
Canada applicables aux appareils radio exempts de licence.
L'exploitation est autorisée aux deux conditions suivantes :
(1) l'appareil ne doit pas produire de brouillage, et (2)
l'utilisateur de l'appareil doit accepter tout brouillage
radioélectrique subi, même si le brouillage est susceptible
d'en compromettre le fonctionnement.
This equipment complies with IC RSS-102 radiation
exposure limit set forth for an uncontrolled environment.
Cet équipement respecte les limites d'exposition aux
rayonnements IC définies pour un environnement non
contrôlé
Page 18

of the following measures:
—Reorient or relocate the receiving antenna.
—Increase the separation between the equipment and
receiver.
—Connect the equipment into an outlet on a circuit
different from that to which the receiver is connected.
—Consult the dealer or an experienced radio/TV technician
for help.
CAUTION: Any changes or modifications not expressly
approved by the party responsible for compliance could
void the user's authority to operate this equipment.
IC RADIATION EXPOSURE STATEMENT FOR CANADA
This device complies with Industry Canada licence-exempt
RSS standard(s).
Operation is subject to the following two conditions: (1) this
device may not cause interference, and (2) this device must
accept any interference, including interference that may
cause undesired operation of the device.
Le présent appareil est conforme aux CNR d'Industrie
Canada applicables aux appareils radio exempts de licence.
L'exploitation est autorisée aux deux conditions suivantes :
(1) l'appareil ne doit pas produire de brouillage, et (2)
l'utilisateur de l'appareil doit accepter tout brouillage
radioélectrique subi, même si le brouillage est susceptible
d'en compromettre le fonctionnement.
This equipment complies with IC RSS-102 radiation
exposure limit set forth for an uncontrolled environment.
Cet équipement respecte les limites d'exposition aux
rayonnements IC définies pour un environnement non
contrôlé
Page 19

When the Aircraft Status LED is solid yellow or blinking
yellow frequently, it indicates calibration is needed. The
operation can be referred to the video of calibration from
our official website: www.yuneec.com
If there is no proper calibration, the Point to Fly function
won't work even when pressing the magic button, the
Wizard™ will vibrate twice as a warning signal(it only
vibrates once in the normal condition).
Any information above might be changed due to the
software update. For the latest documents, please check
the official website
This device complies with part 15 of the FCC Rules.
Operation is subject to the following two conditions: (1)
This device may not cause harmful interference, and (2) this
device must accept any interference received, including
interference that may cause undesired operation.
Page 20

 Loading...