

Page 1
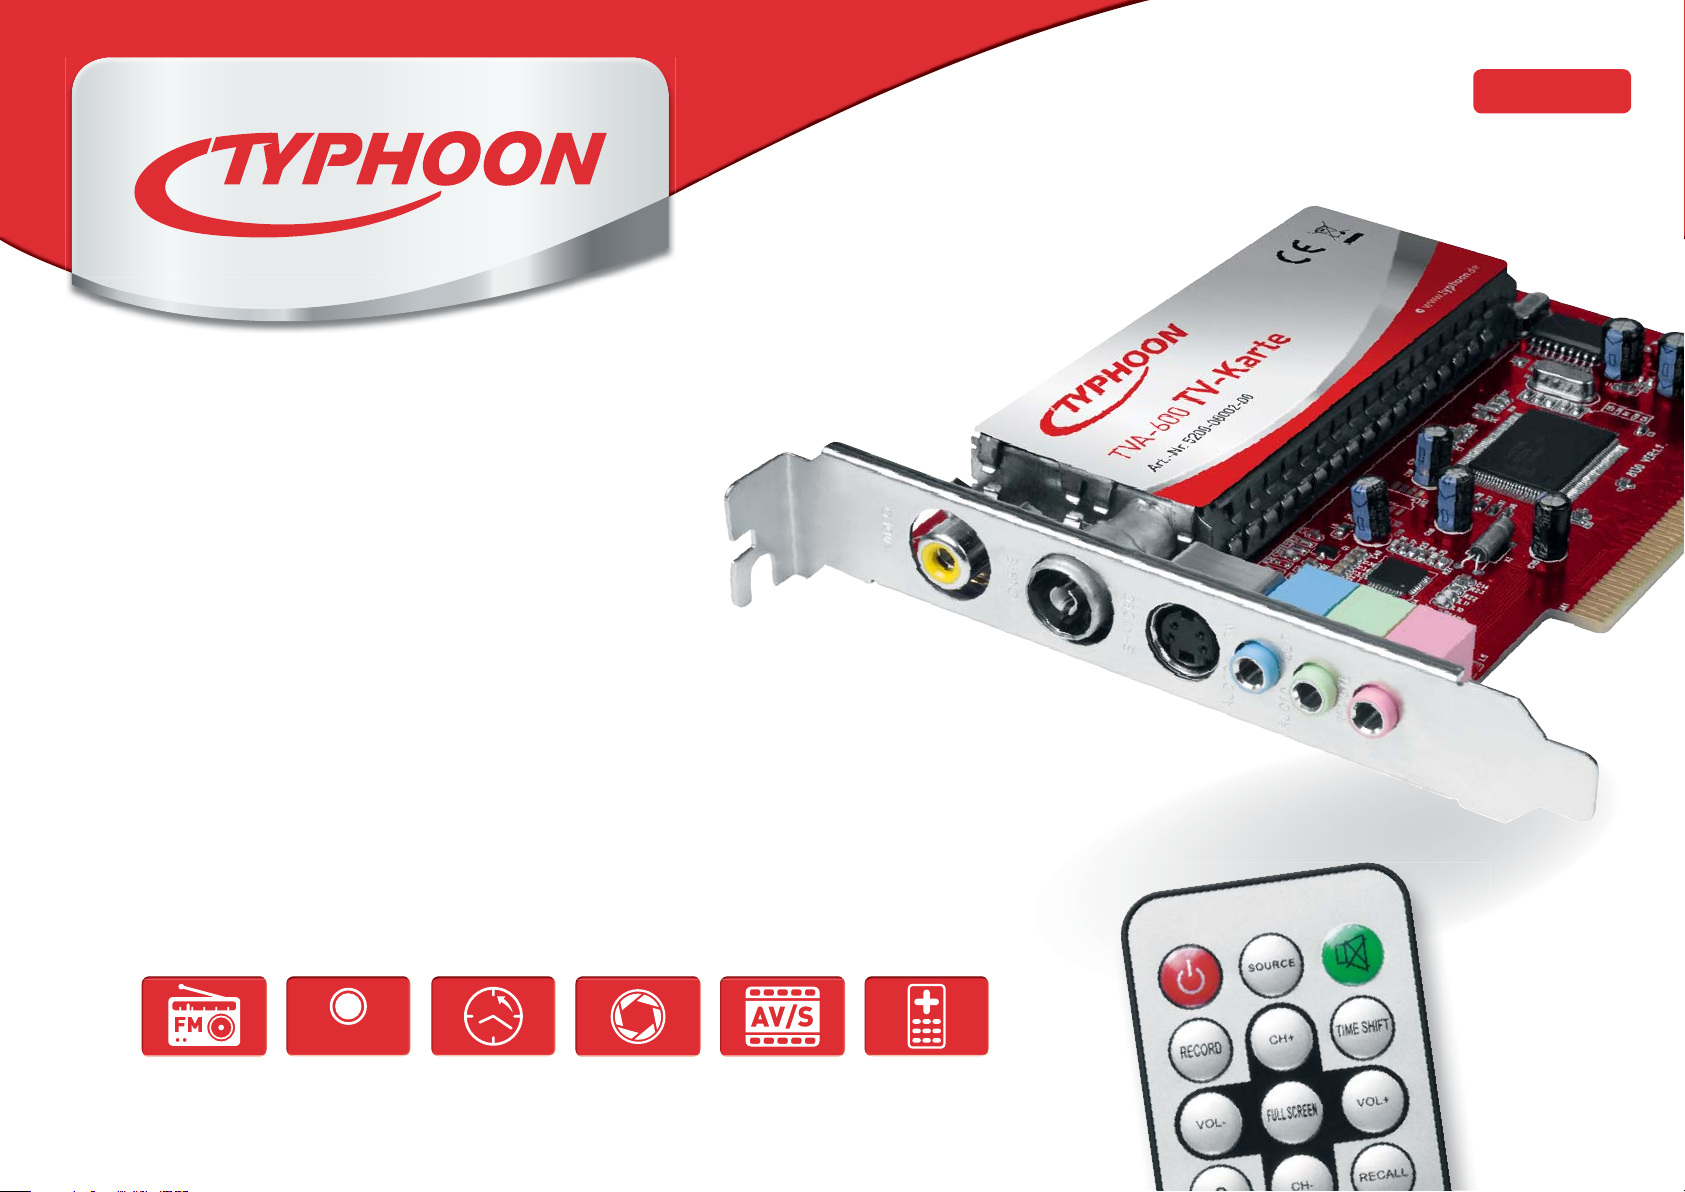
TVA-600
TV Card
Instruction Manual
ENGLISH
Article No. 5200-00002-00
REC
Digital
Video recorder
Time
Shifting
Snapshot
Function
S-VideoFM radio
incl. Remote
Control
Page 2
Thank you for deciding
on purchasing this
ENGLISH
quality product
from TYPHOON.
Page 3

Table of Contents
5 Chapter 1 Intended use
5 1.1 Before use
5 1.2 Explanation of symbols
6 Chapter 2 Safety information
8 2.1 Copyright information
9 Chapter 3 Features
9 Chapter 4 The device
10 4.1 Remote control
10 4.2 Batteries
11 4.3 Inserting/Changing batteries
11 4.4 Information on handing batteries/
rechargeable batteries
12 Chapter 5 Setup & Installation
12 5.1 Card installation
12 5.2 Connection diagram
14 5.3 Driver CD
14 5.4 Driver installation
17 5.5 Installing Honestech TVR 2.5
24 6.3 Television
25 6.4 Recording
26 6.5 TimeShift function
26 6.6 Channel surfing
27 6.7 Radio
27 6.8 Snapshot
28 6.9 Volume regulation
28 6.10 The gallery
29 6.11 External sources
30 Chapter 7 Information on CDs und DVDs
31 Chapter 8 Troubleshooting
33 Chapter 9 Maintenance, handling and cleaning
35 Chapter 10 System requirements
35 Chapter 11 Technical data
35 Chapter 12 Delivery contents
ENGLISH
20 Chapter 6 TVR software
20 6.1 User interface
22 6.2 Settings
TYPHOON TVA-600 Table of Contents
3
Page 4

Dear Customer:
This instruction manual will give you a general idea of how this device
operates, as well as provide you with information on cleaning and safety
procedures. Please take a few minutes to read and follow all safety and op-
Note
All company and product
names mentioned in this
document are registered
trademarks of their respective owners. All rights
reserved.
ENGLISH
erating instructions found in this manual carefully, in order to maintain this
products condition and ensure safe operation. Retain this manual for future
reference and pass on to third parties where applicable.
Should you have any additional questions regarding this device or should
any suggestions arise, please contract a specialized dealer or our service
team for further information.
We look forward to you recommending us to others and hope you enjoy using this device from TYPHOON.
Your TYPHOON Team
Please adhere to all of the safety information/instructions found in this instruction
manual!
We assume no liability
for damage occurred as a
result of improper use or
damage resulting from the
failure to comply with the
safety instructions found
in this manual, improper
operation or handling! Under such circumstances, all
claims under warranty will
become void. We assume
no liability for consequential damage!
The information contained
in this instruction manual
is subject to change without
notice.
A declaration of CE conformity has been established
for this product. Certification has been documented
and entrusted to the manufacturer.
Introduction General information
4
Page 5

1 Intended use
The TVA-600 TV Card from Typhoon can be used to watch, listen to and record television programs and FM radio on your personal computer. You can
transfer and store videos from a video recorder, camcorder, PC camera or
other video source to your computer’s hard disk. Use the included remote
control for even more TV enjoyment.
1.1 Before use
Please read this instruction manual thoroughly before operating this device and retain it for
further reference, questions and use. Following and heeding all information found in this
instruction manual shall maintain this products condition and ensure safe operation.
This instruction manual contains information on how to operate and maintain this device.
Should a component require maintenance, servicing or repairs, then please consult a qualified dealer or service technician.
1.2 Explanation of symbols
An exclamation mark is intended to inform the user of important information, operation or maintenance instructions or that special attention is required.
ENGLISH
Note
When connecting other
devices, please refer to
the safety and operating
instructions found in the
literature accompanying
these devices.
This symbol is intended to alert you to the presence of unprotected, live parts or com-
ponents found within the product’s enclosure or of dangerous connections that upon
contact may be of sufficient magnitude to constitute a risk of electric shock. Cables intended
for such connections should only be connected by qualified personnel or you should only use
ready to connect cables.
Note
There are no user-serviceable parts found inside the
device. Therefore the device
is never to be opened.
Chapter 1 Intended use
5
Page 6

2 Safety information
The following safety and hazard warnings are not only for the protection of
your device, but also serve as a protection against potential health hazards.
Please take time to read the following instructions carefully.
We assume no liability for personal or property damage resulting from the failure to
comply with the safety instructions, improper operation and handling. Under such
circumstances, all claims under warranty will become void.
For safety and licensing (CE) reasons any unauthorized modification and/or change
on the device is prohibited and will void the warranty and all warranty claims.
Any person operating, installing, setting up, or servicing this device must be trained and
qualified accordingly and must also observe these operating instructions.
Ensure that the device has been set up accordingly by following all instructions found in the
instruction manual.
Should any evident damage be seen on the device, do not come in contact with or touch these. Switch off the corresponding circuit breaker in the power distribution panel first before
carefully unplugging the power plug from the wall outlet. Do not operate this device further!
Please contact or take it to a qualified service technician/specialty workshop.
ENGLISH
Note
For safety reasons always
unplug the device from the
power outlet during thunderstorms.
Eliminate potential tripping
hazards by routing cables
so that no one can trip or
stumble over them.
Never use the device if it is
damaged.
Chapter 2 Safety information
6
Page 7

2 Safety information Part 2
This device is not suitable for children under 3 years of age.
Small children are unaware of the serious and immediate dangers involved when
exposing themselves to or handling electronic devices.
Furthermore, this product contains small parts that could be swallowed. Never leave packaging material lying around unsupervised. For children it could become a hazardous toy
and lead to serious injury. Keep packaging and protective foil away from children at all times
to a void the danger of suffocation.
The device should never come in contact with water or moisture.
To prevent the risk of fire or electric shock make sure that liquids, such as dripping or splashing water, rain or moisture, do not come in contact with the device and power supply plug.
Operate this device in a moderate climate and never expose to extreme temperatures, such
as high humidity.
Condensation can build up suddenly when this device is brought from a colder into a warmer
ENGLISH
area (e.g. when transporting). Should this happen, allow the device to warm up to room
temperature first before using.
Care should be taken that liquids do not come in contact with the interior; this is why containers containing liquids, e.g. bucket, vase or plants should never be placed anywhere near or
on this device. This can not only damage the device, but also become a fire hazard.
It is imperative to avoid contact with moisture, e.g. in the bathroom.
Note
Never touch the power plug
with damp or wet hands.
There is the risk of electric
shock!
Chapter 2 Safety information
7
Page 8

2 Safety information Part 3
Ensure proper ventilation during operation.
Never block ventilation openings with magazines, tablecloths, curtains or similar.
Never place any sources of fire on top of or near the device and power supply plug (e.g. lighted candle).
Please adhere to the additional safety information found in the individual chapters of this
instruction manual.
When connecting other devices, please refer to the safety and operating instructions found
in the literature accompanying these devices.
Please contact our technical hotline or a service technician for further information, should you be in doubt about device operation, safety or when making
connections or if any questions arise that are not explained within this manual.
2.1 Copyright information
Note
Contribute to a better
environment by using a
designated disposal system
(e.g. Dual System in Germany) or recycling site for
the disposal of packaging
material.
ENGLISH
The reproduction, duplication and copying of copyright protected material, as well as the
distribution, circulation, public access to or even the rental of these, without explicit authorization of the copyright holder, is strictly prohibited.
Chapter 2 Safety information
8
Page 9
3 Features
4 The device
· A/V and S-Video connection for viewing and recording
from an external video source
· Infrared remote control for a more comfortable TV
experience
· FM radio reception and recording
· Full channel and automatic scan
· Free zoom in/out or full screen options
· Scheduled recordings and TimeShift function
· Resolution up to 720 x 576 for PAL
or up to 720 x 480 for NTSC
· Encodes MPEG-1, MPEG-2 and MPEG-4
· Supports video playback
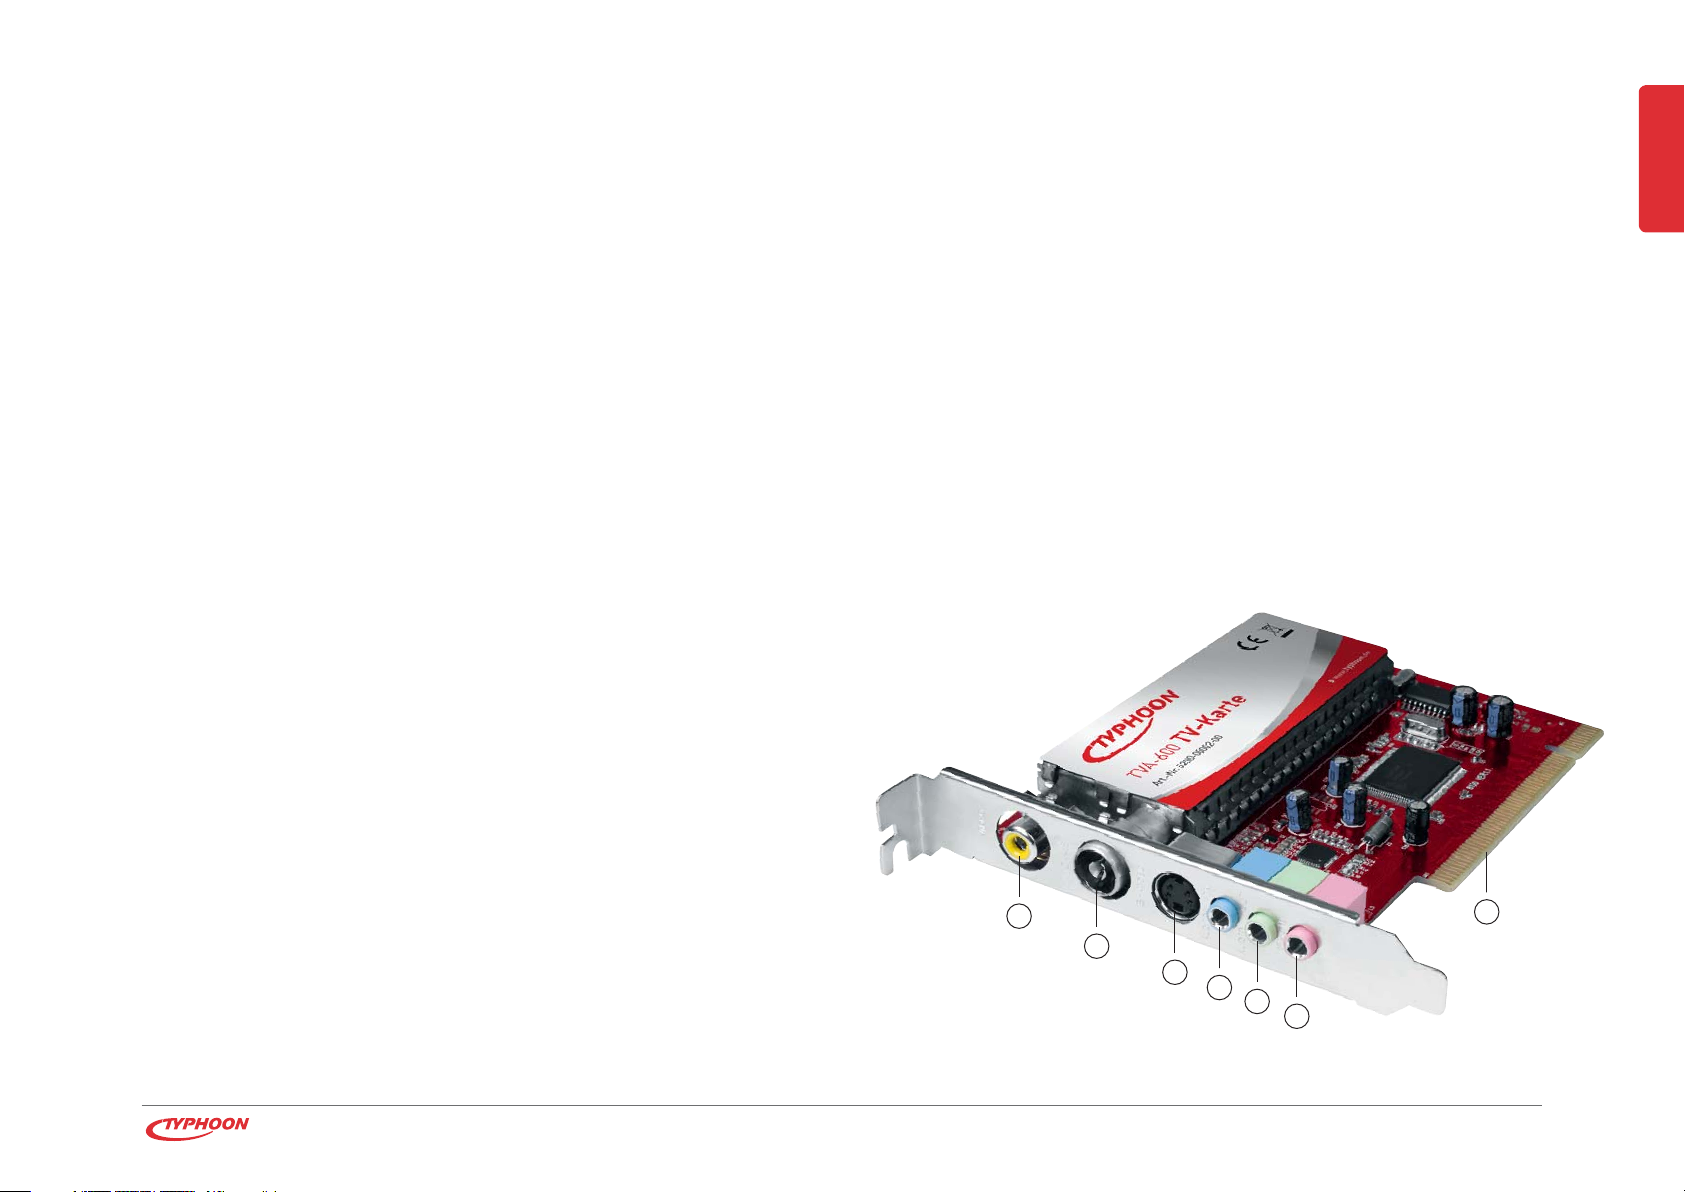
1 Video/FM radio jack
2 TV antenna jack (CABLE)
3 S-Video output for external devices such as a video
camera or DVD player
4 Audio input for external audio sources
5 Audio output for sound card connection with the
included cable
6 Remote input for the remote control’s infrared receiver
7 PCI connector
ENGLISH
· Image browse function
· Creates and stores snapshots as JPG, PNG, GIF or BMP
files
· Compatible with a Windows® XP, Windows Vista® and
Windows® 7 operating system
1
2
3
4
5
6
Chapter 3/4 Features / The device
7
9
Page 10
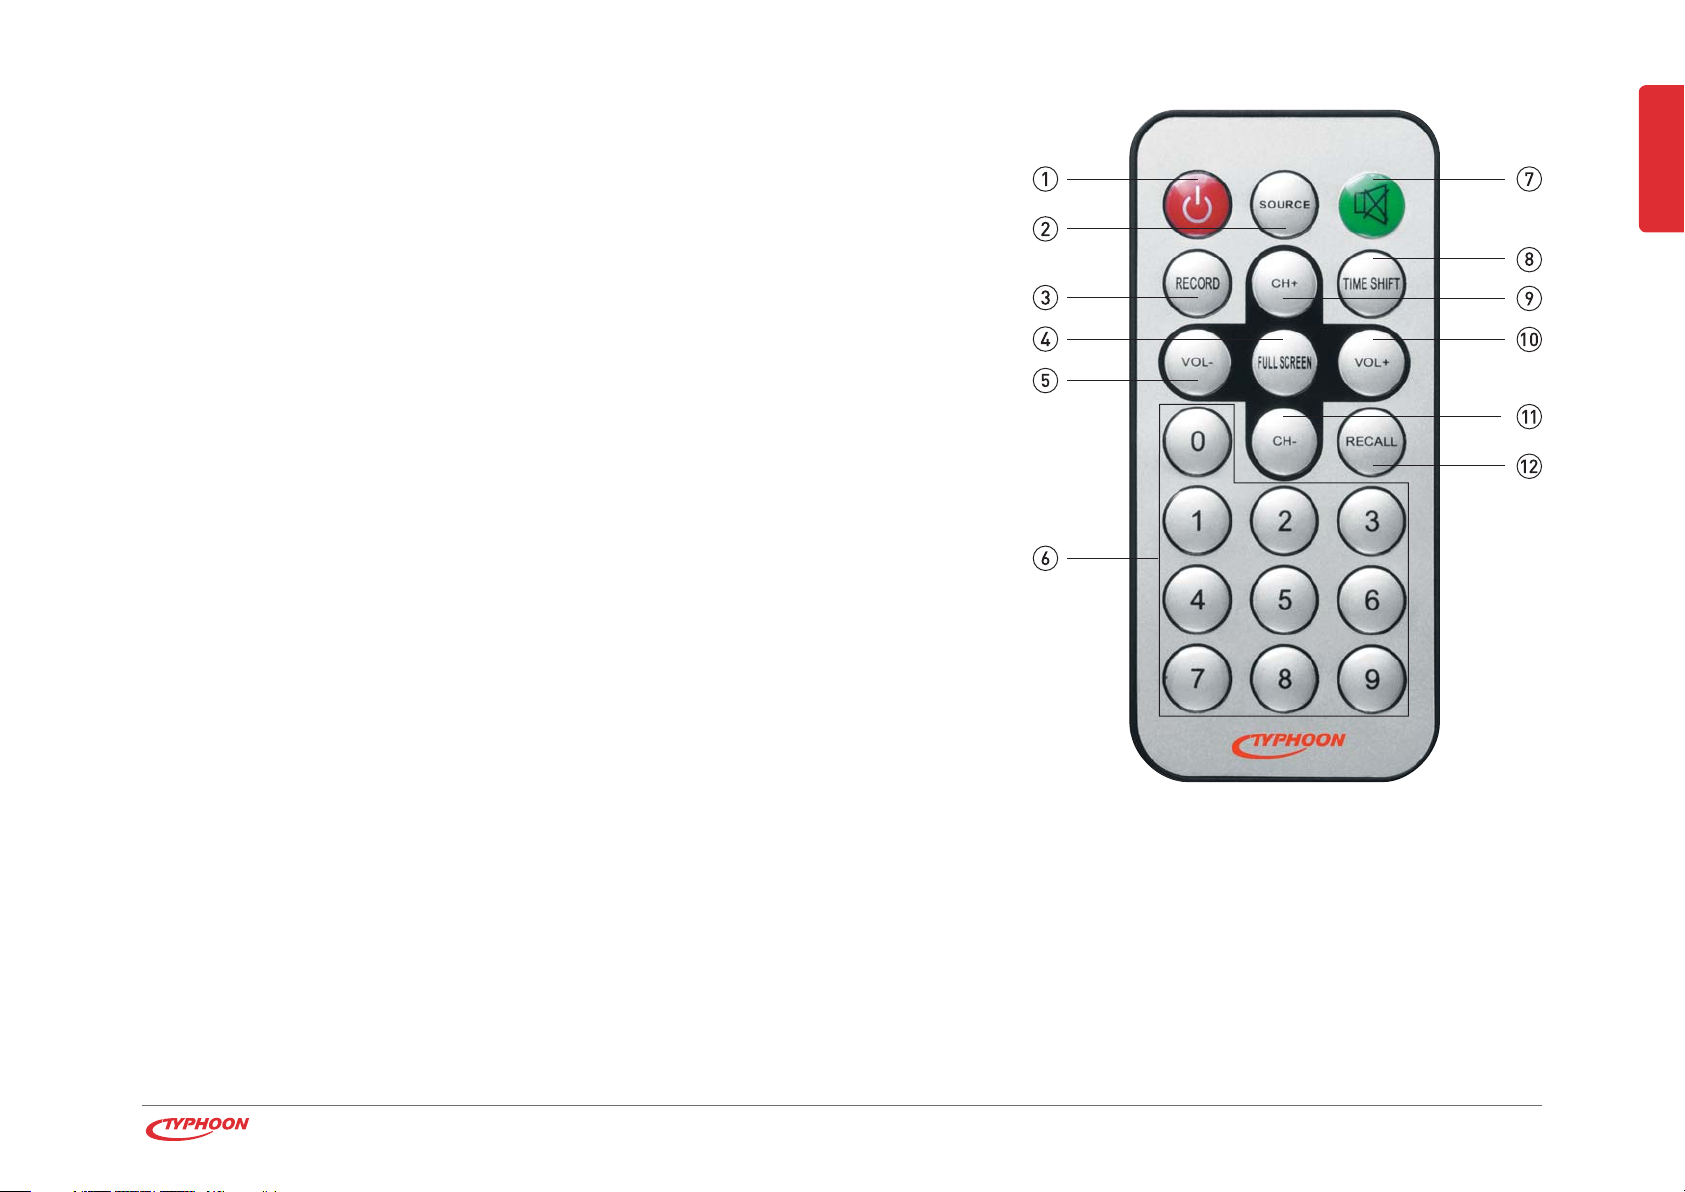
4.1 Remote control
1 Power — Starts/Ends TVR software
2 SOURCE — Source selection (TV, cable, external source or radio)
3 RECORD — Starts/Stops recording
4 FULLSCREEN — Activates/Deactivates a full screen mode
5 VOL– — Decreases the volume
6 Number pad — For direct program input
7 Mute — Activates/Deactivates the sound
8 TIMESHIFT — Time-delayed television
9 CH + — Next channel
10 VOL+ — Increases the volume
11 CH – — Previous channel
12 RECALL — Return to the previously-viewed channel
ENGLISH
4.2 Batteries
This remote control requires one CR2025 battery for operation.
Chapter 4 The device
10
Page 11

4.3 Inserting/Changing batteries
Carefully remove the battery compartment lid. Remove the battery and dispose of accordingly. Remove a new battery from its packaging and insert into the battery compartment.
Ensure correct polarity as indicated on the back of the remote control.
For best possible results, point the remote control directly at the device. Ensure that there
ENGLISH
is not more than a distance of 5 meters between the remote control and device and that the
remote control is not used at an angle of over 60 degrees.
4.4 Information on handling batteries/rechargeable batteries
Please adhere to the following information when handling batteries and rechargeable batteries:
Keep batteries out of children’s reach. Batteries are hazardous waste and do not belong in household
waste. Ensure that batteries are always inserted according to the correct polarity. Always remove batteries when not in use for longer periods of time. Never leave batteries lying around unsupervised. These could
pose a choking hazard to children and pets if swallowed. Seek emergency medical care immediately, should this
happen. Never expose batteries to extreme temperatures, such as for example resulting from sunlight, fire or
ovens. There is the risk of explosion! Make sure that batteries are not dismantled, short-circuited or are thrown
into fire. Never recharge non-rechargeable batteries. There is a risk of explosion! Please follow manufacturer
instructions when charging rechargeable batteries. Touching leaking or damaged batteries could cause skin
burns. Use suitable protective gloves when handling such batteries. Always ensure that the device has been
turned off after use. Replace all batteries at the same time. Clean battery and device contacts before inserting,
where necessary. Try to avoid deep discharges when using rechargeable batteries.
Note
Always remove the battery
when storing or if the
device it is not in use for
longer periods of time.
Chapter 4 The device
11
Page 12

5 Setup & Installation
Perform the following setup in the stated order
5.2 Connection diagram
to ensure and guarantee proper use and performance.
5.1 Card installation
Ensure that your computer and all other connected
devices have been turned off and that power cables
have been disconnected from power supply sources.
Make sure that you take precautions in preventing static
discharge between you and the computer. Touch an
unpainted, metal ground briefly (e.g. radiator/heater) to
discharge yourself or wear an anti-static wrist strap to
prevent damage to components.
· Remove the panel from your computer’s case. Refer
to the instructions found in the literature accompany-
ing your computer on how to open the case.
· Carefully insert the TVA-600 into an available PCI 2.1
ENGLISH
FM/Video
Antenna
Video
Audio Output
slot. Ensure that it locks into place firmly.
· Secure the TVA-600 as intended for your computer into
place (quick release, screw…).
· Replace the case panel on your computer to close.
· Carry out all further connections, e.g. connecting the
antenna cable and IR sensor cable.
· Connect your computer to a power source again.
Remote control
Chapter 5 Setup & Installation
12
Page 13

Destructive static charge can be easily collected by just moving your feet on the floor,
by shifting the position in your chair or even while sitting at a work bench. That is why
it is important to discharge yourself frequently while working if you do not have an anti-static
wrist strap.
The audio output on the TVA-600 is solely intended for connection to the audio input
on your computer’s sound card. On no account should any other type of sound reproduction device be connected to this jack (e.g. earphones). If the TVA-600 audio output is
not connected to your sound cards audio input, no sound can be established through your
computer.
Before using any external devices with the TVA-600, read the instruction manuals
accompanying these devices thoroughly first.
Note
The sensor should be attached in such a way that
visual contact between the
sensor and remote control
exists.
ENGLISH
Chapter 5 Setup & Installation
13
Page 14

5.3 Driver CD
Take the included CD and insert it into your disk drive and
follow the step-by-step instructions on screen.
If an automatic setup does not start after insertion, carry
out the following steps as explained below.
Note
It is highly recommended to close all background programs before installing the driver.
5.4 Driver installation
A dialogue box for newly found hardware will appear on
ENGLISH
screen shortly after starting your computer.
Make a selection and click on „Next“ to continue.
Chapter 5 Setup & Installation
14
Page 15

Select „Install from a list or specific location“ and click
on „Next“.
Insert the Driver CD into your CD disk drive. Click on the
checkbox „Include this location in the search”. Select
ENGLISH
your CD disk drive via „Browse”. In this picture „E:\” is
displayed as the drive with the driver CD.
Click on „Next” to continue.
Searching for driver software will begin. This can take a
few minutes to complete.
Chapter 5 Setup & Installation
15
Page 16

Click on „Continue Anyway”.
Windows „New Hardware Wizard” will guide you step-bystep through the entire installation process.
Driver installation will begin. This can take a few moments to complete.
Click on „Finish“ to complete the installation. The card
has now been successfully installed.
ENGLISH
Chapter 5 Setup & Installation
16
Page 17

5.5 Installing Honestech TVR
Insert the driver CD into your disk drive.
Double-click on: „My Computer” › Disk drive with the
installation CD › „APP” › Setup.exe
Preparation for installation will begin. This can take a few
minutes to complete.
Click on „Next”.
ENGLISH
Chapter 5 Setup & Installation
17
Page 18

You will have to accept the terms of the license agreement in to continue with software installation.
After reading through terms thoroughly, select „I accept
the terms in the license agreement” und click on „Next”
to continue with the installation process.
Click on „I do not accept the terms of the license agreement” if you do not want to accept these terms.
In this case the installation will be aborted.
Select a target directory via „Browse” or agree to the
standard directory and click on „Next”.
ENGLISH
Chapter 5 Setup & Installation
18
Page 19

Select a folder for the start menu or agree to the standard
directory and click on „Next”
Software will now be installed.
This can take a few moments to complete.
Click on „Finish” after a successful installation has been
completed.
ENGLISH
Chapter 5 Setup & Installation
19
Page 20

6 TVR software
Use the start menu to help start the television software „Honestech TVR”.
Select: Start › Program › Honestech TVR › Honestech TVR
(or the name or location of installation changed during installation)
When running the application for the first time, you will be required to enter a registration
number. This number is located on the CD cover.
6.1 User interface
Display
1 Display
2 Options menu — Right-click on the display
window to open this menu.
3 Exit Honestech TVR
4 Minimize display
5 Activate a full screen mode (or double-click
on the display window to maximize)
Double-click on the display window again to
exit a full screen mode.
Note
You will be asked to select
the country in which you
are located in when starting
for the first time. After
selecting a country and
confirming with „OK”, the
software will carry out an
automatic channel scan.
ENGLISH
Chapter 6 TVR software
20
Page 21

Control panel
15
16 17
1 Links to the website http://www.honestech.com/main/index.asp
2 Progress bar: displays the elapsed playing time and the remaining time of a file
3 Starts/Stops a recording
4 Starts the TimeShift function (time-delayed television)
5 Displays the actual recording file size
6 Starts playback
7 Pauses/Resumes playback
8 Stops playback/the TimeShift function
9 Return to the beginning of the file
10 Skip to the end of the file
11 Displays the recording time already elapsed
12 Minimizes the control panel
13 Exit Honestech TVR
14 Opens the help file
15 Select input source
· TV (Cable) › TV (Cable) reception via antenna
· Composite › Video input
· S-Video › Controls the S-Video input
· FM radio › For FM radio reception
16 Opens the video folder
19
18
20
21
22
23
24
25
26
9
27
28
17 Channel/Frequency upwards/downwards
18 Channel number
19 Number pad
20 Add/Delete the current station to/from the channel list
21 Opens the menu for scheduling programs
22 Opens the settings menu
23 Opens the channel scan menu
24 Opens the change skin colour menu
25 Stores a snapshot of the current program
26 Activates the channel surfing function
27 Audio mode: changes to a different sound mode
28 Opens the teletext function (where available)
29 Displays the time
30 Icon displays whether the sound is activated/deactivated
31 Volume bar: displays the selected volume level
32 Decreases the volume
33 Mute ON/OFF
34 Increases the volume
10
29
11
121314
31
30
ENGLISH
34
33
32
Chapter 6 TVR software
21
Page 22

Gallery folder
ENGLISH
9
1 File
2 File size
3 Displays the recording date
4 Displays the complete file name, including the path name
5 Browse upwards/downwards
6 Slide to the left/right
7 Send the file with your standard e-mail program
8 List view: browse through different file display options
9 Exit the gallery folder mode
6.2 Settings
Select the settings options icon (icon 22 on the control panel). Now you can select between one of the four tabs at the
top of the panel.
TV Settings
Choose this tab to select between different television setting options.
Country: Auto Detect › automatically selects the country or Select your country › to manually select a country
Category: TV › for antenna reception or CATV › for cable television reception
Search mode: Search for frequencies (Radio) or stations (TV)
Auto Scan: Starts/Stops an automatic channel scan
Mode: Changes the sort order
Change channel order: Relocate channels/change the channel order
Add/Delete: Add/Delete channels
OK: Confirms entries
Chapter 6 TVR software
22
Page 23

Video Settings
Choose this tab to select between different picture display, graphic card and sound card
settings.
Fine adjustment: Use the sliders to adjust picture brightness, contrast, hue and
saturation settings. Select „Reset” to return adjustments to a default setting.
Video capture device: Select the TV card
Video source: Select the video decoder
Playback device: Select the sound card
Audio input: Volume adjustment
(select either a „Playback Volume“ or „Recording Volume” mode for adjustments)
OK: Confirms entries
Record Settings
Choose this tab to select the recording quality.
MPEG-1: compresses audio and video files
MPEG-2: compresses high quality audio and video files
MPEG-4: compresses audio and video files; a further developed MPEG-2 format
If you would like to create a VCD, SVCD or DVD directly after a file has been recorded, select
ENGLISH
Note
VCD-NTSC, SVCD-NTSC or
DVD-NTSC formats are only
for use in North America!
either a VCD-PAL, SVCD-PAL or DVD-PAL format.
Furthermore, the size, frame, quality, bitrate and speed should be selected for your recordings. It is recommended to leave standard settings the way they have been set.
Please take into consideration that a higher bitrate and quality will require a larger memory
capacity for your recording.
Chapter 6 TVR software
23
Page 24

Click on „Browse“ to choose the folder, where your recordings and pictures are to be stored.
Click on„OK” to confirm entries.
Etc Dialogue Setting
Select this tab to adjust the following options:
Channel surfing: Select this option to set the length of time that a channel is to be dis played and the number of channels to be displayed.
Still capture image type: Select the snapshot type (JPG, PNG, GIF or BMP).
Automatic scan: Select the auto scan mode.
TimeShift: Select this option to determine if the temp file is to be stored/removed after a
TimeShift recording.
Disk driver information: Select to view hard disk information.
6.3 Television
Select „TV“ or „CABLE“ as input source within the selection field (15). The current channel
number will be displayed beside the letters CH (18).
The arrow icons (17) for upwards and downwards can be used to switch to different channels. You can also input a channel number directly by using the number pad (19). Please wait
for a moment after selecting directly.
ENGLISH
Note
The numbers in brackets
refer to the icons on the
control panel as displayed
in chapter 6.1.
Click on the „T“ icon (28) to activate the teletext function, if available (please note that this
service is not offered by all stations). Use the arrow icons (17) to browse through pages or
input a page number directly by using the number pad (19).
If you click and hold on the top border of the window with the left mouse button, you will be
able to move the window around freely.
Chapter 6 TVR software
24
Page 25

If you click and hold on one of the other borders or on the window with the left mouse button, you will be able to enlarge the window freely.
Right-click on the display to view the following options:
Screen: set the screen size
Aspect ratio: select a screen format
Channel up/down: switch through channels
Auto scan: starts an automatic channel scan
Channel surfing: select to activate this function
Property setting: opens this menu option
Schedule recording: opens the menu for scheduling recordings
Mute: activate/deactivate the sound
Always on top: select if a program is to be constantly featured in the foreground
Show control panel: select to display the control panel
Exit: select to exit the menu
6.4 Recording
Click on the „RECORD“ icon (3) to start recording. Click on this icon again to stop recording.
Under the icon „FILE SIZE“ (5) you will be able to see the amount of storage space that has
already been consumed for the recording.
ENGLISH
Note
The numbers in brackets
refer to the icons on the
control panel as displayed
in chapter 6.1.
To schedule a recording, click on the „SCHEDULE FUNCTION“ icon (21) to open a dialogue
box with diverse scheduling options.
Click on the option „ADD“ to schedule a program. Select the source, how often, mode, start
time, duration and what is to happen after a scheduled recording.
Click on „ADD“ to finish scheduling.
Click on the option „EDIT“ to edit a selected item.
Chapter 6 TVR software
25
Page 26

Click on „DELETE“ to delete a selected item. The option „DELETE ALL“ deletes all
added items.
Select „OK“ to confirm your scheduled program.
Recordings will be stored in the folder previously defined for television programs under the
setting option „RECORD SETTING“.
6.5 TimeShift function
The „TIMESHIFT“ function lets you watch and record a television program simultaneously.
You will not only be able to pause and resume an ongoing program, but will even be able
to watch different recorded segments, while recording the rest of the program in the background. Your recordings will be stored in the folder previously defined under the setting
option „RECORD SETTING“. The option „ETC-DIALOG“ lets you select if the temp file after a
TimeShift recording is to be stored or deleted.
Click on the red arrow icon (4) to start the time shifting function.
ENGLISH
Note
The numbers in brackets
refer to the icons on the
control panel as displayed
in chapter 6.1.
Use the progress bar (2) to move to a desired program segment.
Click on the „STOP“ icon (8) to stop the time shifting function.
6.6 Channel surfing
Click on the channel surfing icon (26) to activate this function.
Your screen will change over to a different display window. Now you will be able to see a preview of channels, previously selected under the setting option „ETC-DIALOG“, on screen.
Chapter 6 TVR software
26
Page 27

The following diverse options can be seen at the top of the window:
· Stop channel surfing
· View active thumbnail
· Pause channel surfing
· Resume channel surfing
· Move to next/previous active thumbnail
Double-click on the desired thumbnail to view its program.
6.7 Radio
Click on „FM RADIO“ (15) to active a radio mode.
Use the arrow icons (17) or the number pad (19) to select and set a frequency. The frequency
(18) will be displayed between the arrow icons.
You also have the opportunity to record radio programs. Click on the „RECORD“ icon (3) to
start recording. Click on this icon again to stop recording.
Recordings will be stored in the folder previously defined for radio recordings under the setting option „RECORD SETTING“.
ENGLISH
Note
The numbers in brackets
refer to the icons on the
control panel as displayed
in chapter 6.1.
6.8 Snapshot
Click on the camera icon (25) on the control panel to capture a snapshot of the current television picture.
Recordings will be stored in the folder previously defined under the setting option „RECORD
SETTING“.
Chapter 6 TVR software
27
Page 28

6.9 Volume regulation
You can use the „VOLUME“ icons (32 and 34) to either increase or decrease the volume. The
current set volume can be seen on the volume bar (31).
Click on the „M“ icon (33) to deactivate and reactivate the sound. The „SPEAKER“ icon (30)
displays whether this function has been activated/deactivated.
Click on the „SOUND“ icon (27) to select between available audio options.
Try to maintain a safe volume level with this device and avoid excessive noise. Over a
certain amount of time your hearing will become accustomed to the adjusted volume
level.
Please note that excessive sound pressure levels created when listening to loud volu-
me levels with earphones or headphones can lead to permanent hearing damage or
loss.
6.10 The gallery
ENGLISH
Note
Regulate the volume to a
minimum before exiting the
program. Clicking on the
„MUTE“ icon to deactivate
the sound is insufficient, as
this is no longer active when
the system is restarted.
Click on the arrow icon (16) located underneath the signal source option field (15) on the
control panel to open the gallery and display recordings that have been previously defined
under „RECORD SETTING“.
To display a picture in a standard format, double-click on the picture you would like to view.
Listen to recorded radio programs by double-clicking on them in an FM mode.
Double-click on recorded television programs to view them (not during an FM mode).
You can send a recorded file as an e-mail attachment via your e-mail program. Select a file
and click on the @ icon (7) located within the gallery folder.
Chapter 6 TVR software
28
Page 29

Click on the „LIST VIEW“ icon (8) located within the gallery folder to switch between a
thumbnail, file name and detailed description view. The files displayed in the gallery will vary
in information according to the selected viewing option.
The gallery can be closed again by clicking on the small arrow icon located at the bottom of
the gallery folder (9).
6.11 External sources
The „COMPOSITE“ and „S-VIDEO“ (15) source options on the control panel respond to the
devices connected to these inputs connections, which allow video signals (e.g. from a DVD
player or video camera) to be transmitted to and displayed on your computer.
Composite › connection via adapter (S-Video to RCA)
S-Video › direct connection to the S-Video jack
The S-Video input only transmits the picture signal.
ENGLISH
Please refer to the information on TVA-600 and sound card connections regarding audio
transmission. If the TVA-600 audio output is not connected to your sound cards audio input,
no sound can be established through your computer.
Note
Before using any external
devices with the TVA-600,
read the instruction manuals accompanying these
devices thoroughly first.
Chapter 6 TVR software
29
Page 30

7 Information on CDs and DVDs
Handling CDs and DVDs
Do not touch the playback side of discs. Hold by the edges without touching the recording
surface, so that finger prints do not come in contact with discs. Never stick paper or use
tape on discs.
Storing CDs
After you are finished playing a CD, please replace and store it in its respective cover. Never
expose discs to direct sunlight, sources of heat or high temperatures. Never leave discs in a
car exposed to direct sunlight.
Cleaning CDs
Finger prints and dust found on a CD may be the reason for poor picture or sound quality.
Before playing a CD, carefully wipe off finger prints and dust with a clean cloth. Please clean
in an inwards to outwards motion.
Never use any solvents or chemicals, such as alcohol, benzine, thinners, any commercially
available cleaners or antistatic sprays for records to clean discs.
Never attach any seals, adhesive labels or stickers to discs (either on the labelled or recorded side).
Never use irregularly shaped CDs (e.g. orthogonal or heart-shaped). Such types can lead to
ENGLISH
Note
Depending on the drive
used or on the CD-R/RW
(or DVD-R, DVD+R, DVDRW, DVD+RW) itself, there
is the possibility that some
discs may not be playback
compatible with this device.
Never attach any seals, adhesive labels or stickers to
discs (either on the labelled
or recorded side).
Manufacturers may have
already intentionally
programmed playback
functions on some DVD and
Video CDs. Therefore, it is
possible that some playback
functions may not be available or additional functions
may be available for use.
or cause malfunctions.
Chapter 7 Information on CDs and DVDs
30
Page 31

8 Troubleshooting
The device you have just purchased is equipped with state-of-the-art technology and is safe to operate. Nevertheless, problems or malfunctions may
occur.
Before contacting a service technician, refer to the following possible solutions:
Program start does not take place or playback is not possible
Update or install software again.
Distorted sound or no sound is audible
Check if everything has been connected properly. Open the sound card’s settings menu.
Increase the recording volume and set the playback volume to the lowest line-in option
available. Check if the TVA-600 is connected to your sound card.
The remote control is not working
Check if the batteries have been inserted correctly.
If batteries are empty, replace them with new ones.
Point the remote control to the remote sensor and press to operate.
Remove any objects found between the remote control and the remote sensor.
ENGLISH
Note
As an alternative you might
be able to see with the help
of the software if there’s a
possible way to solve your
problem. Click on the question mark icon for help.
Make sure the distance between the remote control and the device does not exceed 5 m.
Buttons do not function (on the device and/or remote control)
Turn the device off and then on again. As an alternative, turn the device off, unplug it from
the power outlet and plug in again. (The device may also not be functioning due to a stroke of
lightning, static electricity or other external factors.).
Chapter 8 Troubleshooting
31
Page 32

8 Troubleshooting Part 2
Distorted/Noisy reception or poor picture quality
The reception frequency has not been set properly.
The antenna is not adjusted properly.
Try positioning the antenna somewhere else.
Start an automatic channel scan.
Check graphic card settings.
Use an amplified indoor antenna.
The distance between the junction box and your computer could be to long for the cable connection. Please consult your local dealer for details on suitable amplifiers.
Why does video quality worsen during time shifting or why are pictures lost during video
recording?
This all depends on the performance of the operating system. A probable solution may be a
new and faster personal computer.
A CD/DVD is not recognized/supported
Check if
· the disc is deformed.
ENGLISH
· the disc is damaged, scratched or has become dirty.
Any repairs other
than those mentioned above are to be
carried out solely by an
authorized technician.
Chapter 8 Troubleshooting
32
Page 33

9 Maintenance, handling and cleaning
Never operate the device in places with extreme high or low temperatures.
Carry out a technical safety inspection on a regular basis, e.g. check if the power cable or
housing may have become damaged. If there is reason to believe that the device can no longer be operated safely, then disconnect it immediately from the power supply and secure it
against any unintentional operation.
It can be assumed that safe operation is no longer possible, if:
· there is visible damage to the device,
· the device no longer works,
· it has been stored for a longer period of time under unfavourable conditions
· or exposed to rigorous transport conditions.
Always adhere to the following safety instructions before cleaning or servicing the
device: Live parts may be exposed, if the covering is opened or parts are removed.
The device must be disconnected from the power supply source prior to service, maintenance or repairs. Capacitors within the device may still carry voltage even though they have
been disconnected from all power supply sources.
ENGLISH
Note
Repairs are only to be
carried out by qualified
personnel, who are familiar
with the hazards involved
and the relevant regulations.
Please retain the original box and the packaging material in case you need to transport or
send the device out for maintenance at a later date. Please note that the device should be
repacked in the original packaging. The box and packaging have been especially developed for this device in order to protect it during transport and against damage. Retain this
instruction manual for future reference and where required pass it along with the device if
handed over to a third party, as it contains important setup and handling information.
Chapter 9 Maintenance, handling and cleaning
33
Page 34

9 Maintenance, handling and cleaning Part 2
Cleaning the device
Blow lightly on the device. Always use an anti-static, dry, fuzz-free and soft cloth to clean
the device. Never use any abrasive or harsh cleaning agents (e.g. alcohol, benzine) or fluids
(e.g. water) as these could damage the device.
ENGLISH
Note
Contribute to a better
environment by using a
designated disposal system
(e.g. Dual System in Germany) or recycling site for
the disposal of packaging
material.
Chapter 9 Maintenance, handling and cleaning
34
Page 35

10 System requirements
· Intel® Pentium® 4 with 1.8 GHz or equivalent AMD®
®
Athlon
· Windows® XP/ Windows Vista® 1 GB RAM
· Requires DirectX® 9.0 or higher
· Free space on your hard disk to record movies
and music
XP
Connections: TV antenna 75 Ω (UHF/VHF)
FM antenna (RCA)
S-Video 4-pin mini-DIP
Composite video (adapter)
Audio IN (3.5 mm)
Audio OUT (3.5 mm)
IR receiver (3.5 mm)
ENGLISH
· CD-ROM drive
· AC97 compatible sound card
· PCI slot (Version 2.1)
· Requires a Windows® XP, Windows Vista® or
Windows® 7 operating system
11 Technical data
Dimensions: 122 (W) x 22 (H) x 96 (D) mm
Weight: 130 g
Resolution: 720 x 576 PAL; 720 x 480 NTSC
Operating temperature: 0° – 50°C
Power consumption: under 3 W
Supports: PAL-B
Delivery contents
12
· TYPHOON TVA-600 TV Card
· CD with user manual, drivers and TVR software
· Quick Start Guide
· FM antenna cable
· Stereo audio cable (3.5 mm/to connect the
TVA-600 with your sound card)
· Infrared receiver
· Remote control with battery
Chapter 10/11/12 System requirements/Technical data/Delivery contents
35
Page 36

Service
Should questions arise then please contact a specialist
or our service hotline.
Service-Hotline*:
Telefon +49 (0) 1 80/5 72 54 83
*14 cent/minute using the German fixed network
(Max. price for mobile phones: 42 cents/min.)
Contact:
E-mail
support@typhoon.eu
Internet
www.typhoon.eu
Information and updates
http://www.typhoon.eu
ENGLISH
www.typhoon.eu
We reserve the right to alter specifications and information contained in this
manual without notice.
Manufacturer
PC live Distribution Basse and Prüße GbR
Raiffeisenstraße 2D
38159 Vechelde (Germany)
All brands mentioned are property of PC live or of their respective owners.
PC live assumes no responsibility or liability for any errors or inaccuracies that
may appear in this instruction manual.
Version 1.0 – 02.2010
© 2010 TYPHOON
All Rights Reserved.
 Loading...