

Page 1
QUICK START
GUIDE
V1.0
QUICK START
GUIDE
V1.0
Page 2

Page 3

EN : Quick Start Guide
DE : Schnellstartanleitung
ES : Guía de inicio rápido
FR : Guide de démarrage rapide
IT : Guida Rapida
PL: Prewodnik Szybkiego Uruchomienia
Page 4

Page 5

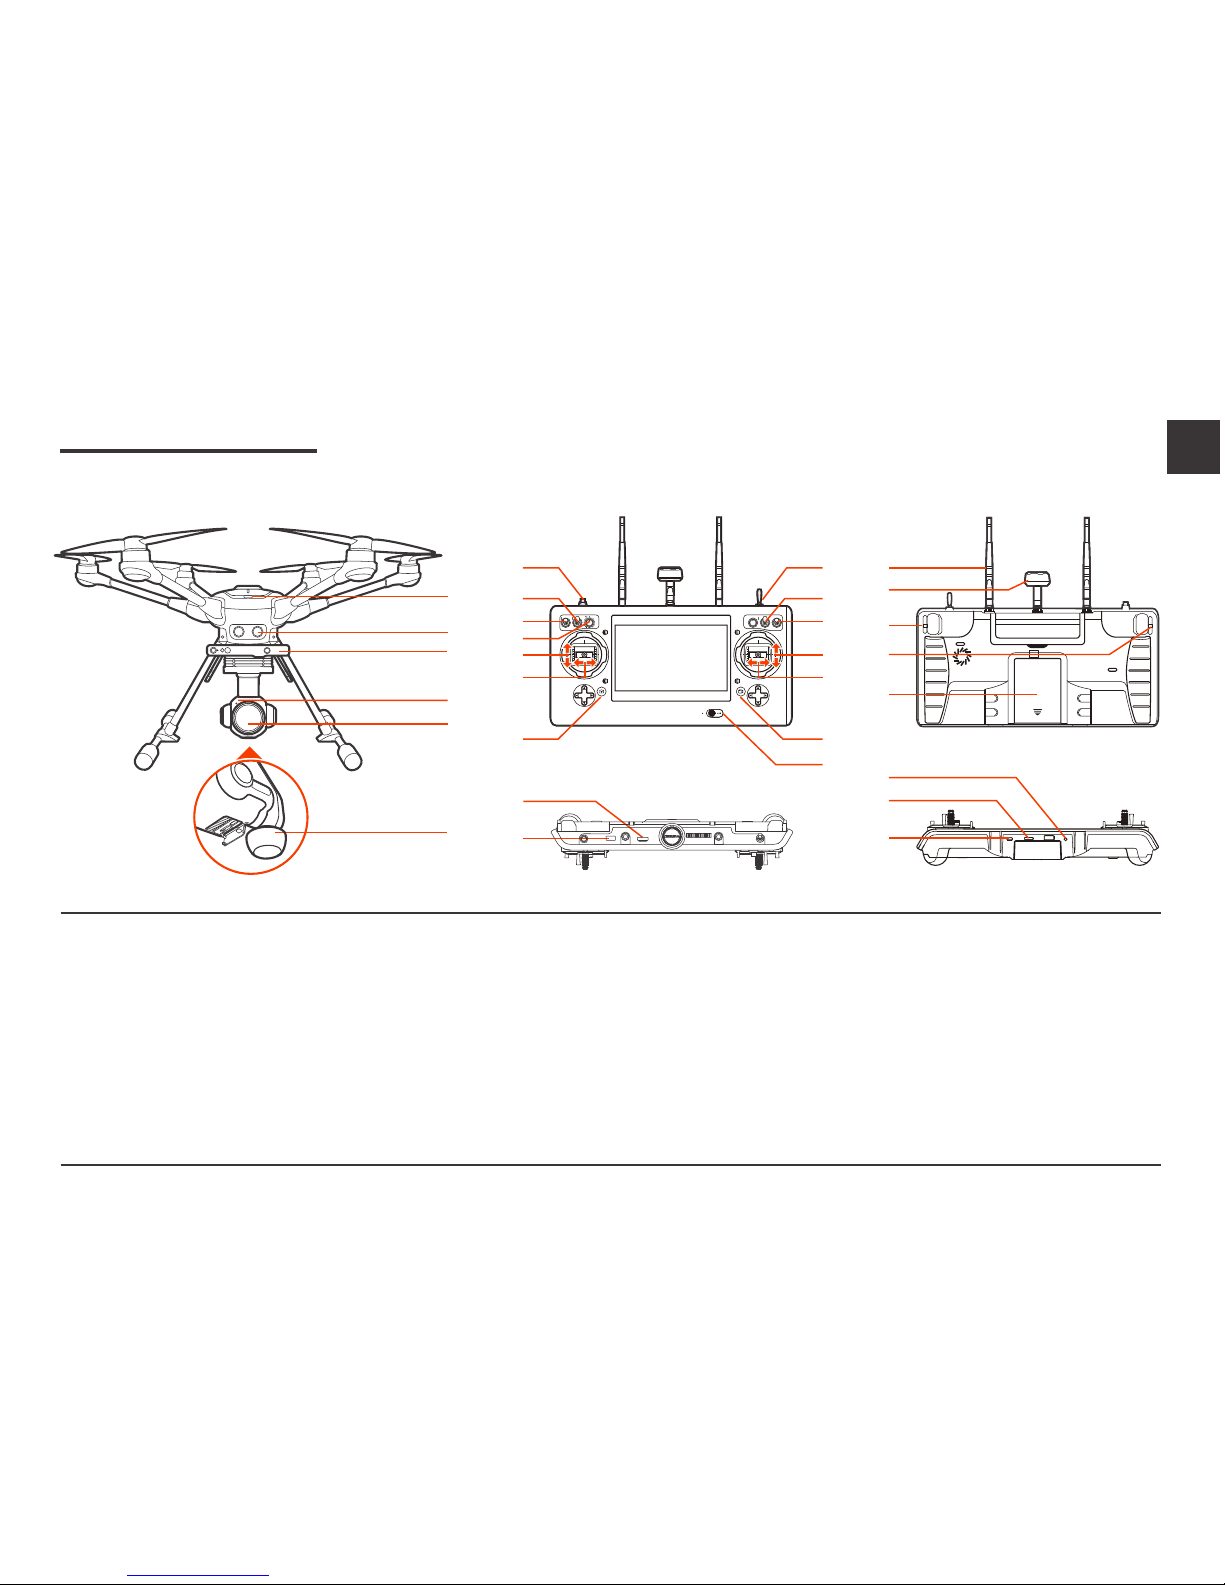
TYPHOON H PLUS
01 Power Switch
02 Sonar
03 RealSense™
C23
01 Camera LED Status Indicator
02 Camera Lens
03 5GHz Antenna
ST16S
01 Start/Stop Motor Button
02 Gimbal Pan Mode Switch
(Follow Mode/ Follow Pan
Controllable Mode/ Global Mode)
03 Gimbal Tilt Mode Switch
(Angle Mode/ Velocity Mode)
04 Gimbal Pan Control Knob
05 Throttle/ Altitude Control (Mode 2)
Elevator/pitch control (Mode 1)
06 Rudder/ Yaw Control
(Mode 2 and Mode 1)
07 Take Still Photo Button
08 Landing Gear Switch
09 Obstacle Avoidance Switch
10 Flight Mode Selection Switch
11 Elevator/ Pitch Control (Mode2)/
Throttle/Altitude Control (Mode 1)
12 Aileron/Roll Control
(Mode 2 and Mode 1)
13 Start/Stop Video Recording Button
14 Power Switch
15 2.4GHz Antenna
16 5GHz Antenna
17 Proportional Control Rate Slider
18 Gimbal Tilt Control Slider
19 Battery
20 HDMI
21 USB Port
22 Headset Port
23 Micro SD Slot
24 Micro USB Port
Overview
01
02
03
01
02
03
22
23
24
15
18
19
16
17
01
02
03
04
05
06
07
08
09
10
14
11
12
13
20
21
Aircraft
Product Name:APV System
Model Name: TYPHOON H PLUS
Controller
Product Name:Personal Ground Station
Model Name: ST16S
Gimbal Camera
Product Name:3-Axis Gimbal Camera
Model Name: C23
EN
Page 6
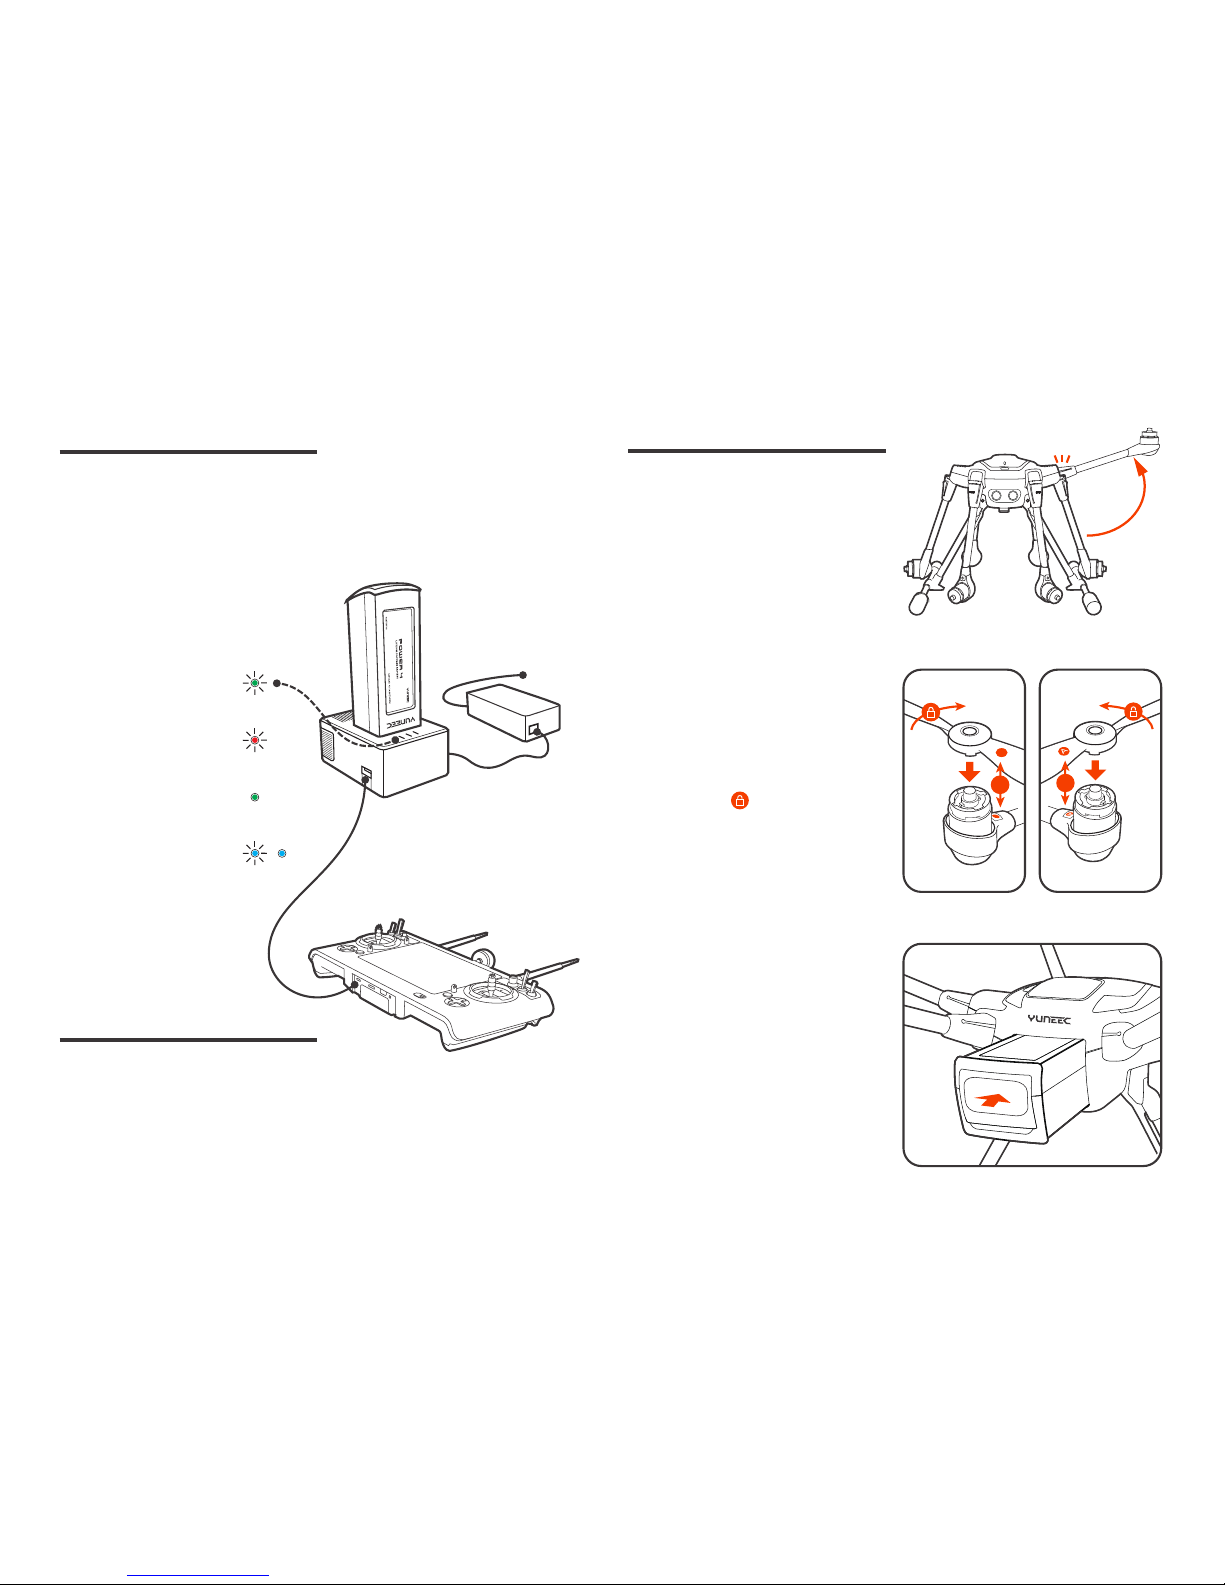
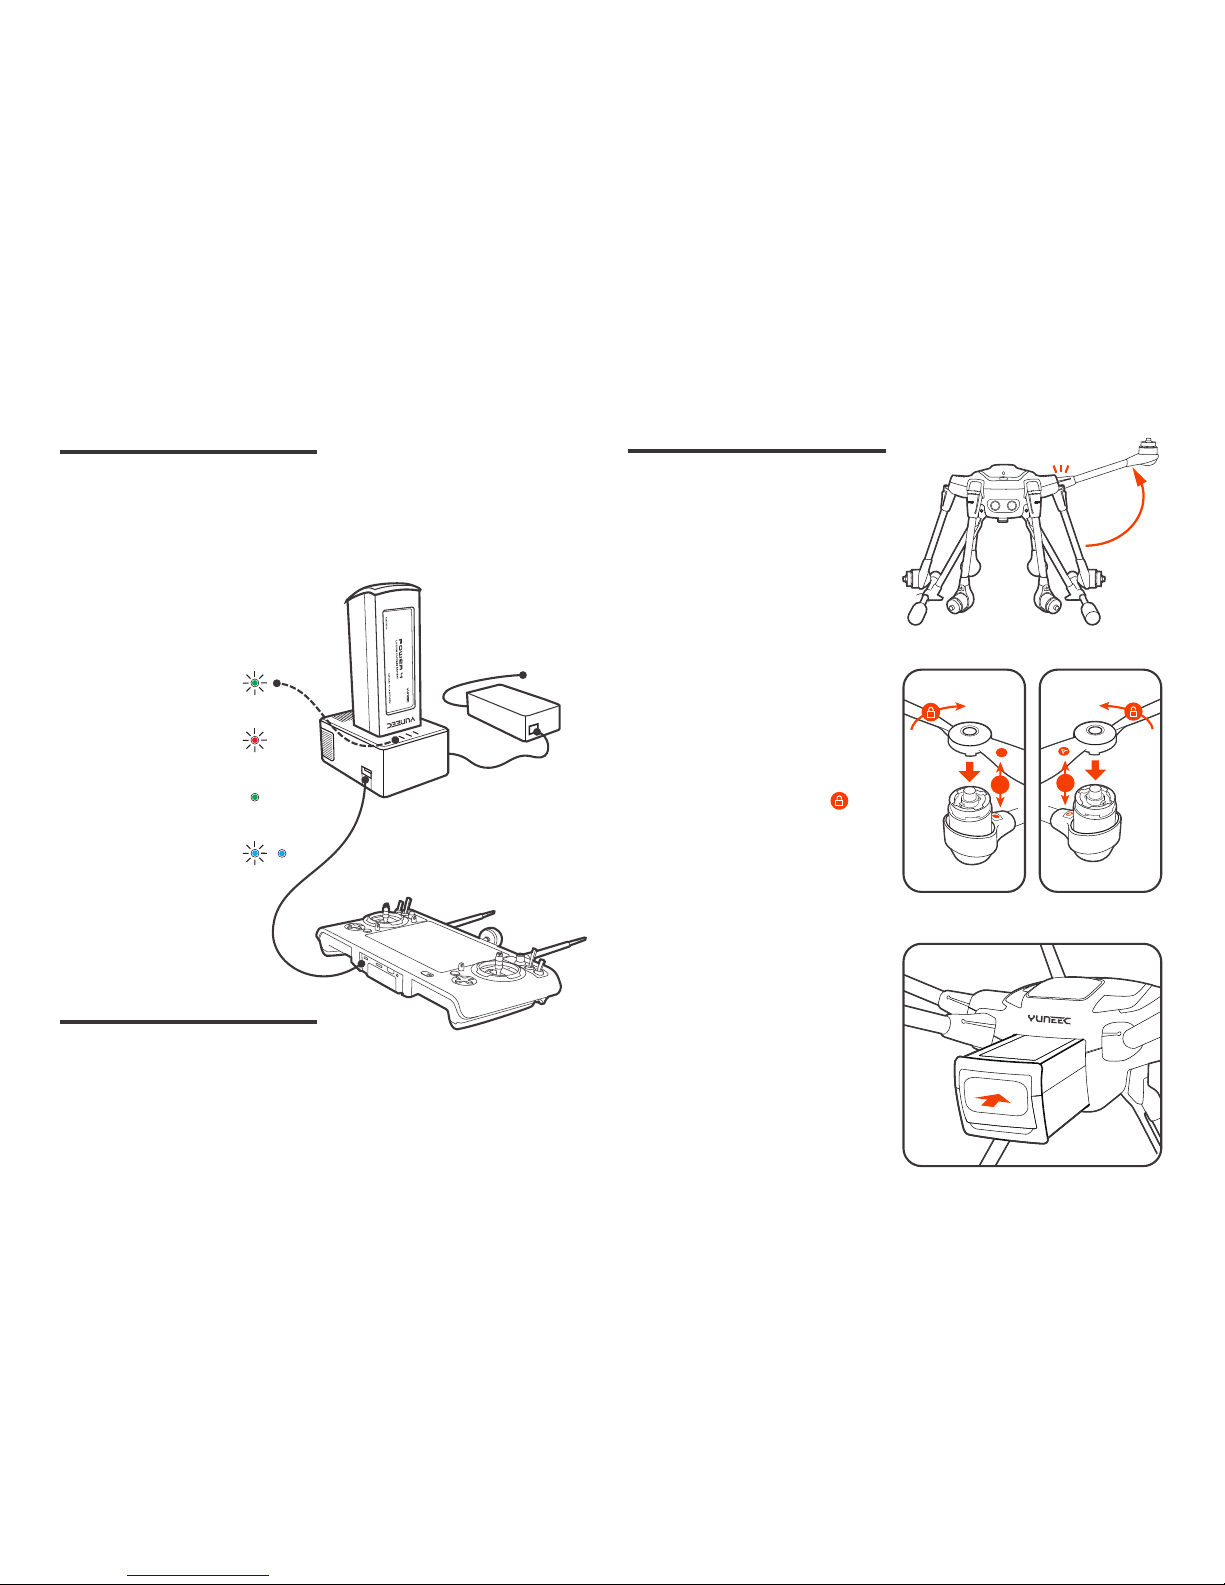
Assembling the Arms
Unfold the motor arms and secure
them until hearing a 'click'.
Installing the Propellers
Mount propeller 'A' on motor 'A' and
propeller 'B' on motor 'B'.
Press and rotate propellers in the
direction the [ ] points to until the
propellers lock.
Cross-check to be sure propellers are
properly locked in place.
Charge the Batteries
ST16S Ground Station
Assembly
A
B
B
B
unfold & click
push & click
Power the desktop charger from a
100-240V AC outlet using the AC adapter/power supply, or from a 12V-17.4V
DC accessory socket/cigarette lighter
receptacle in an automobile using the
included adapter. Plug the aircraft battery into the charger port as illustrated.
Charge the ST16S battery by using
supplied USB cable and inserting
it into the Micro USB port on the
charger. It will take approximately
five hours to charge a fully discharge
battery.
Installing the Flight Batteries
Push the battery into the battery compartment until hearing a 'click'.
power
Green Blinking:
Ready to charge
Red Blinking:
Charging
Solid Green:
Charge Completed
Blue Blinking / Solid:
Error
/
Page 7
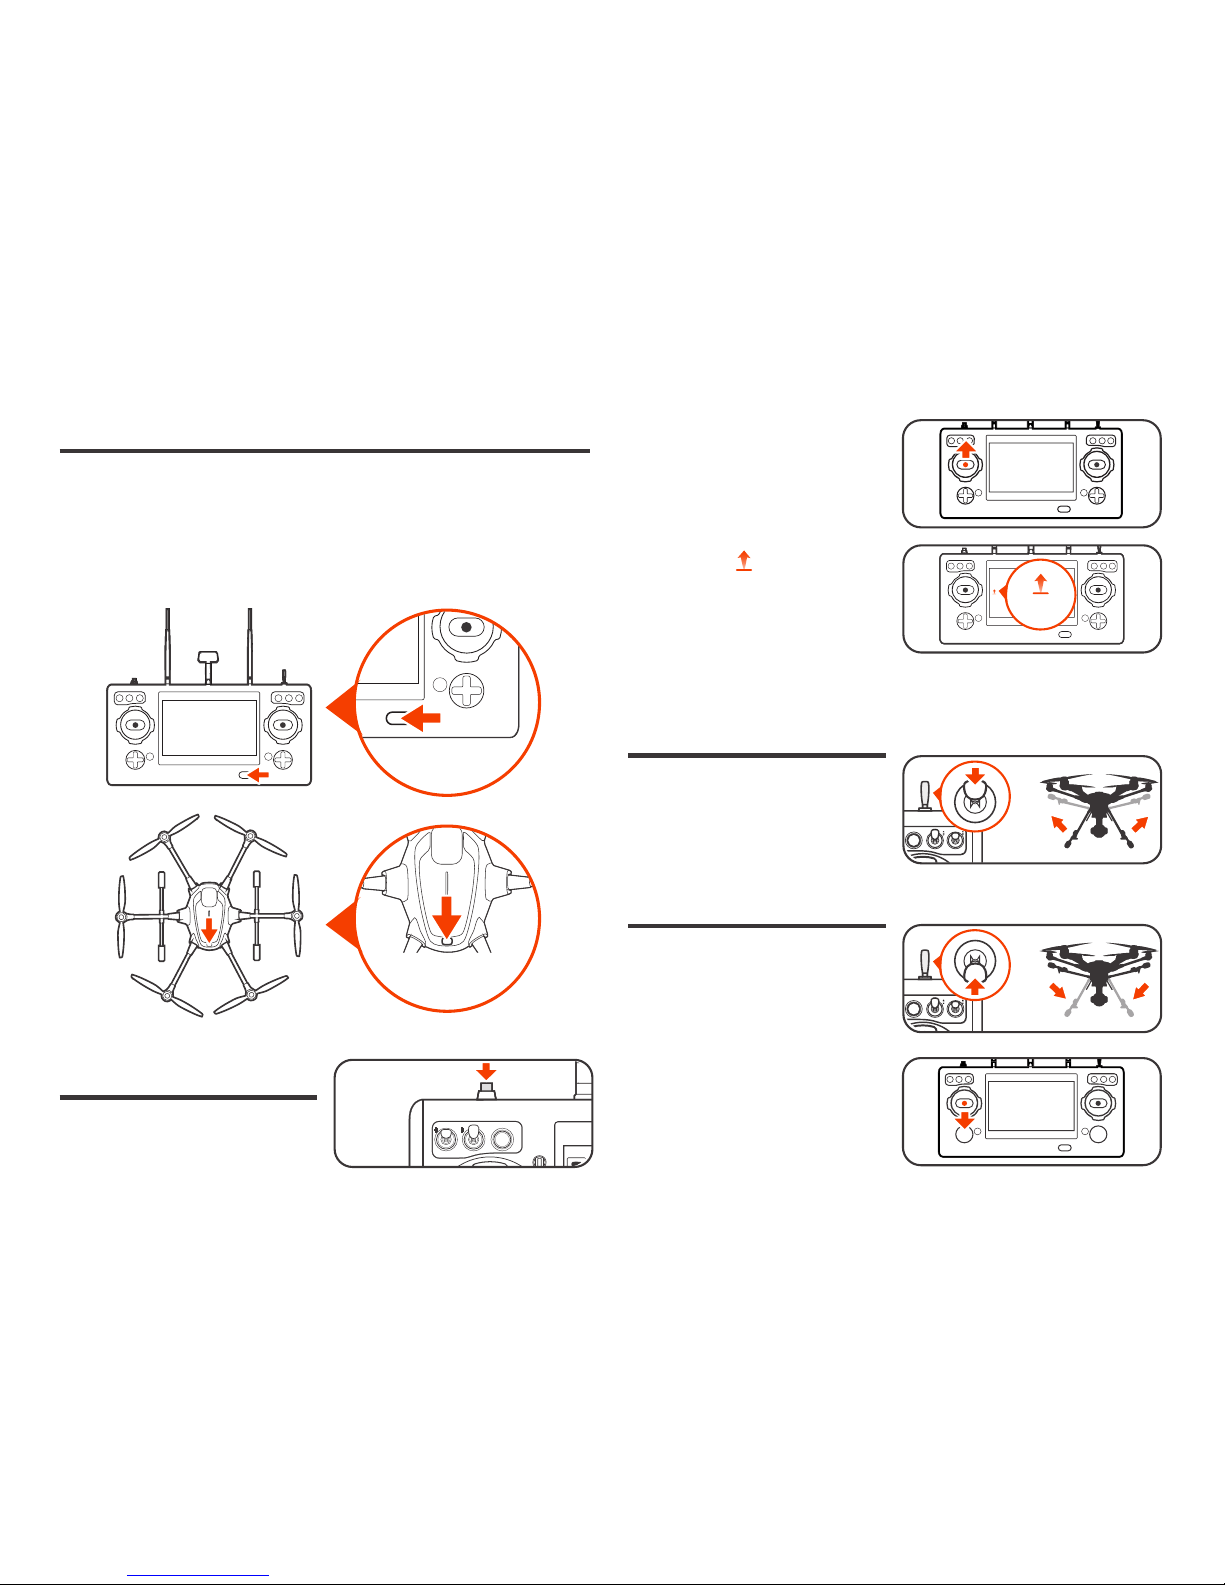
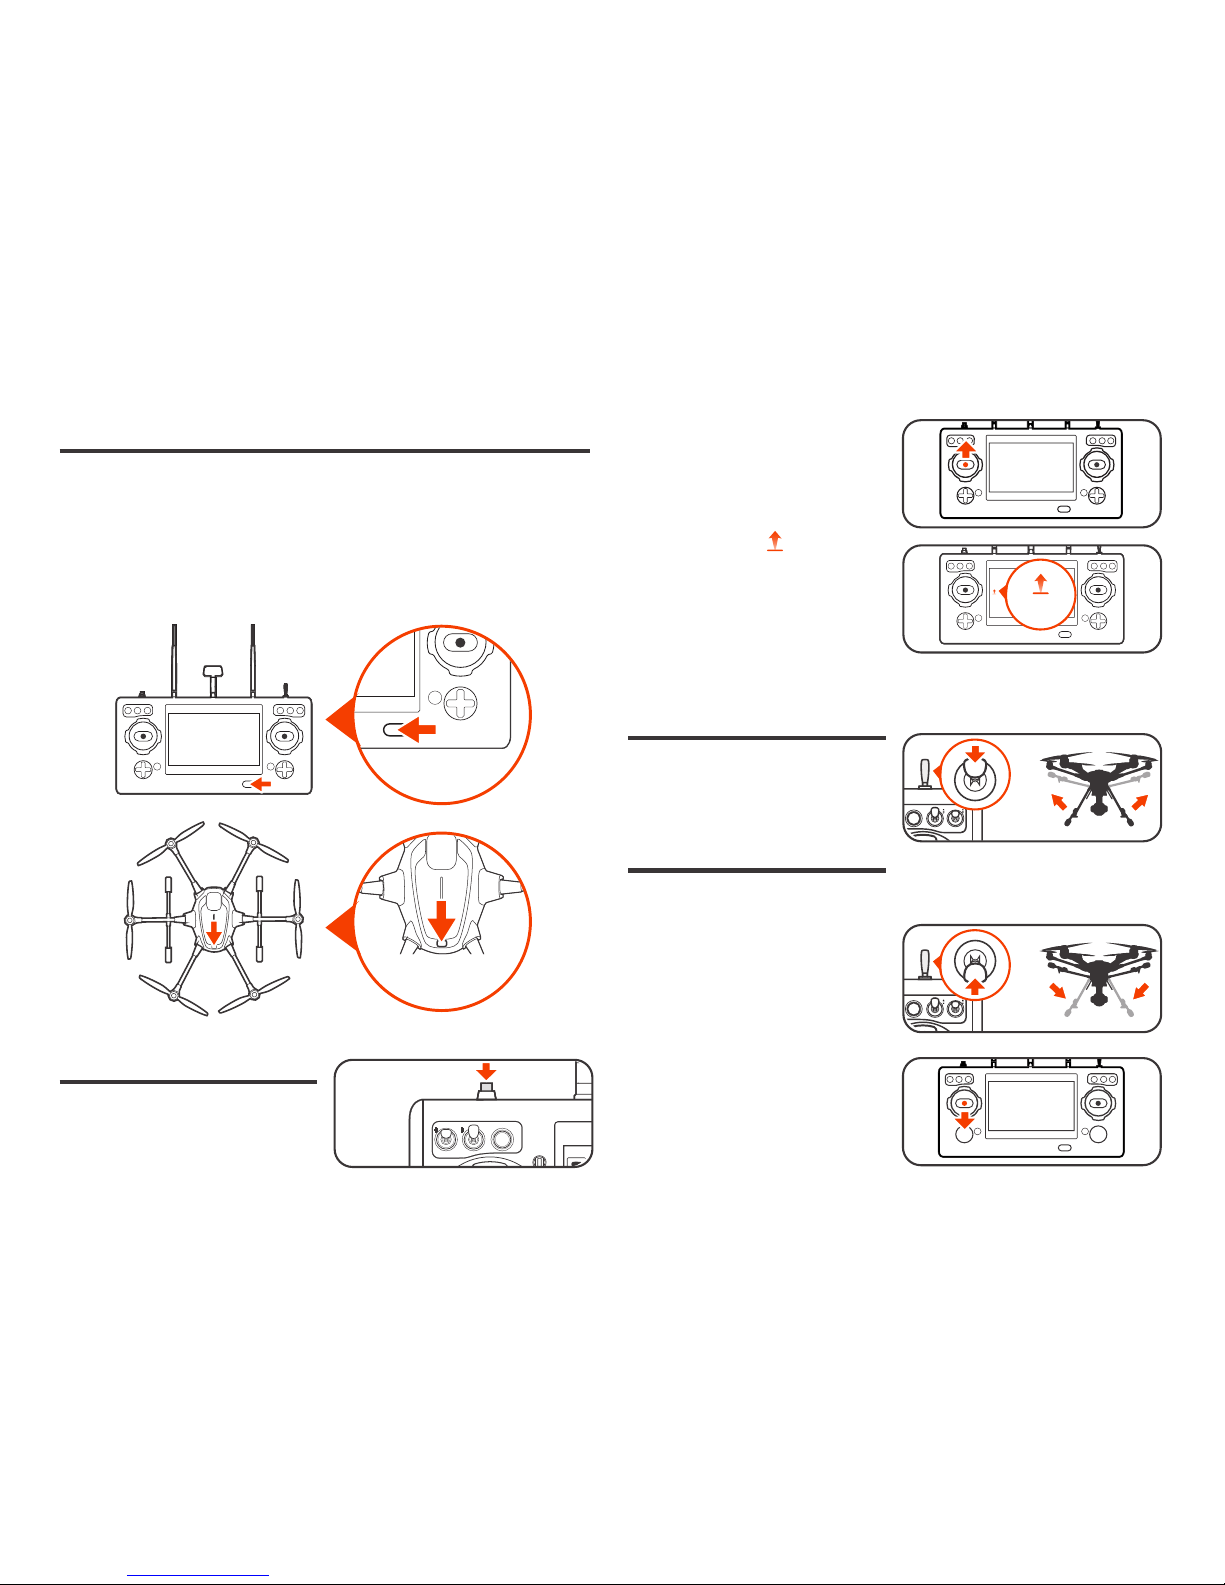
Power ON / OFF
NOTICE: Please make sure all firmware is the latest version. Firmware and
the user manual may be downloaded from web site: www.yuneec.com. The
quick start guide does not replace the user manual.
Turn on the ST16S, and then press the power button on TYPHOON H Plus.
Release the button when the aircraft emits a rising tone. Power on the ST16S
before powering on the UAS.
Retract Landing Gears
Raise the landing gear control using
the landing gear control switch on the
ST16S.
Landing
Step 1) Lower the landing gear
using the same control as used for
retracting landing gear.
NOTICE: Lower the landing gear at
least 12’ above the landing area.
Step 2) Slowly lower the left-hand
stick below the center position,
TYPHOON H PLUS will descend
slowly and land. After TYPHOON H
PLUS lands, the motors will stop after
2 seconds without any operation.
Take Off
Press and hold the START/STOP
button for about 3 seconds to start
the motors in angle mode.
POWERING
ON ST16S
POWERING ON
TYPHOON H
PLUS
Take Off
OPTION 1:
Slowly raise the left-hand stick to take
off.
OPTION 2:
Tap the icon [ ] and slide on the
screen to take off.
Page 8

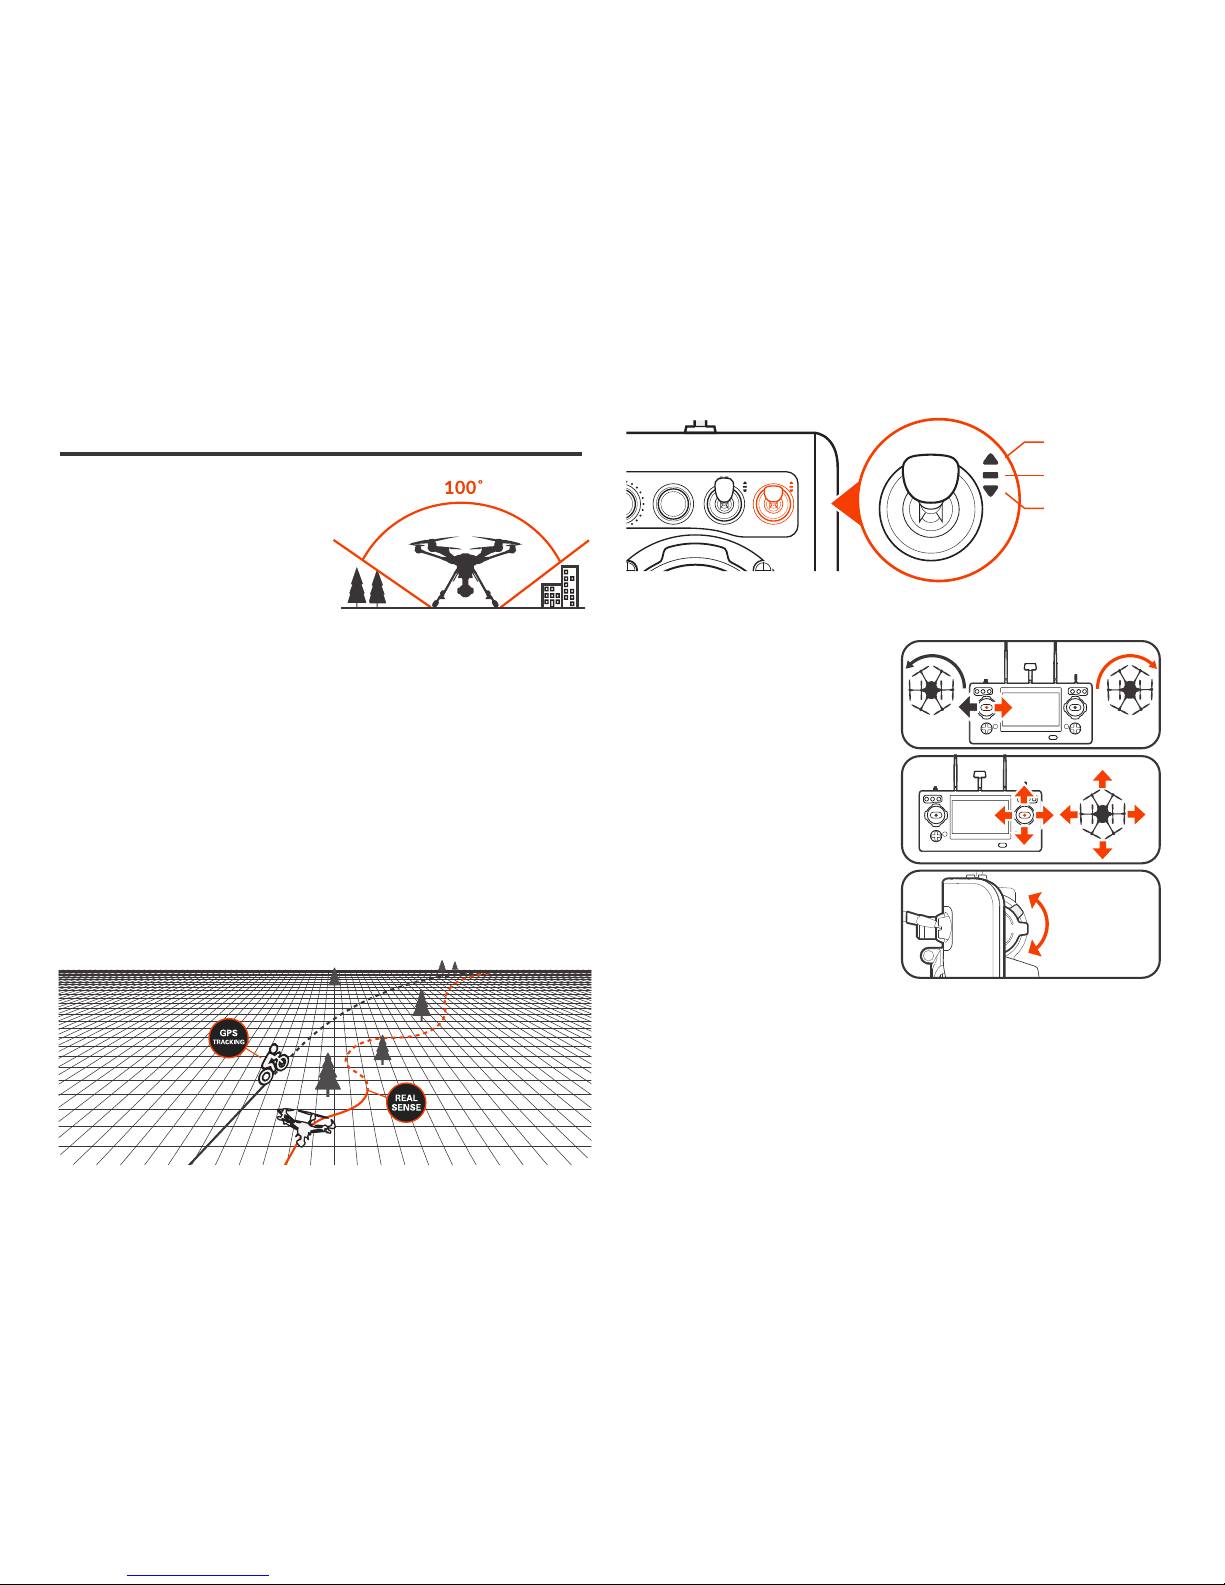
Flight Control
RealSense™ Module
Capable of detecting obstacles and intelligently navigating around them,
TYPHOON H PLUS with RealSense™ Technology builds a 3D model of the
world, allowing pilots to focus on the subject without worrying about flying
into obstacles in follow me mode.
SPORT MODE
ANGLE MODE
RTL MODE
Never attempt to operate the
TYPHOON H PLUS near tall buildings /obstructions that do not over a
clear view of the sky (a minimum
clearance of 100°).
OPTICAL FLOW MODE
Optical Flow Mode is most suitable when powering on the aircraft without
GPS locked. When using Optical Flow to lock the position of the aircraft,
TYPHOON H PLUS can hover at its current altitude automatically and the max
flight speed will be limited to 8.9 mph (4 m/s).
ANGLE MODE
When in Angle Mode and GPS is
available, the TYPHOON H PLUS
will respond according to the ST16S
remote controller.
Tips: Fly low and slow initially.
Slow(Lo Speed) position is ideal
for precision flight. High-speed
(Hi Speed) position is used when
transiting broad areas.
Hi Speed
Lo Speed
SPORT MODE
The TYPHOON H PLUS has high reaction sensitivity in Sport Mode. The maximum flight speed of the aircraft is increased to 45mph (20 m/s).
RTL MODE
When in RTL Mode, TYPHOON H PLUS will return to the home point and
automatically lower the retractable gear to land.
Page 9
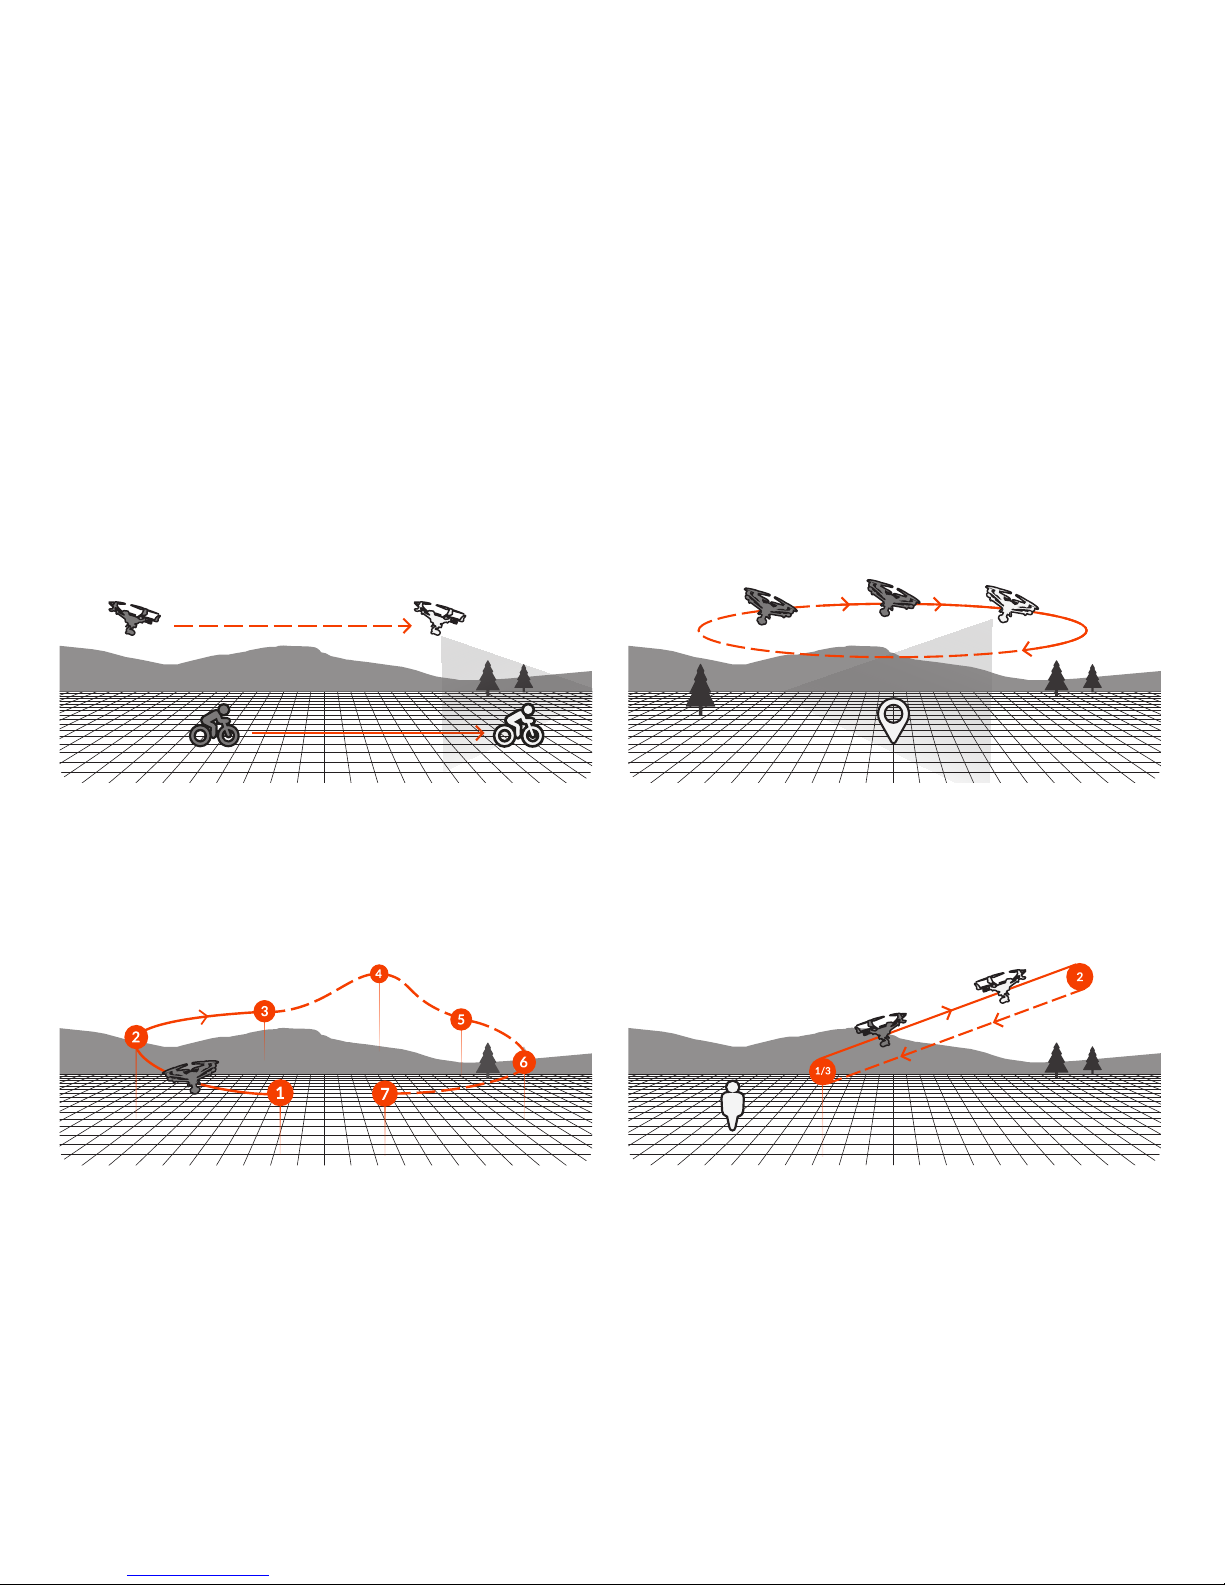
TASK MODE
POI (Point of Interest)
Point of Interest allows the pilot to select a subject they would like to orbit and
have TYPHOON H PLUS orbit that subject autonomously.
Follow Me
The Follow Me function allows the TYPHOON H PLUS to follow the pilot,
adjusting its location to the location of the ST16S Ground Station.
JOUR
Journey function enables TYPHOON H PLUS to capture the perfect aerial selfie
easier and faster. Depending on the pilot's desired setting, TYPHOON H PLUS
will go up, out and return.
CCC (Curve Cable Cam)
Curve Cable Cam allows you to create an invisible route for TYPHOON H PLUS
to fly along. Once the pilot sets the points, the TYPHOON H PLUS will fly the
set coordinates while remembering the heading.
Page 10
STATUS
Accelerometer/
Gyro Calibration Completed
The Aircraft is in Angle Mode
(without GPS lock)
The Aircraft is in Angle Mode
(with GPS lock)
First / Second Level Low Voltage
Battery Warning
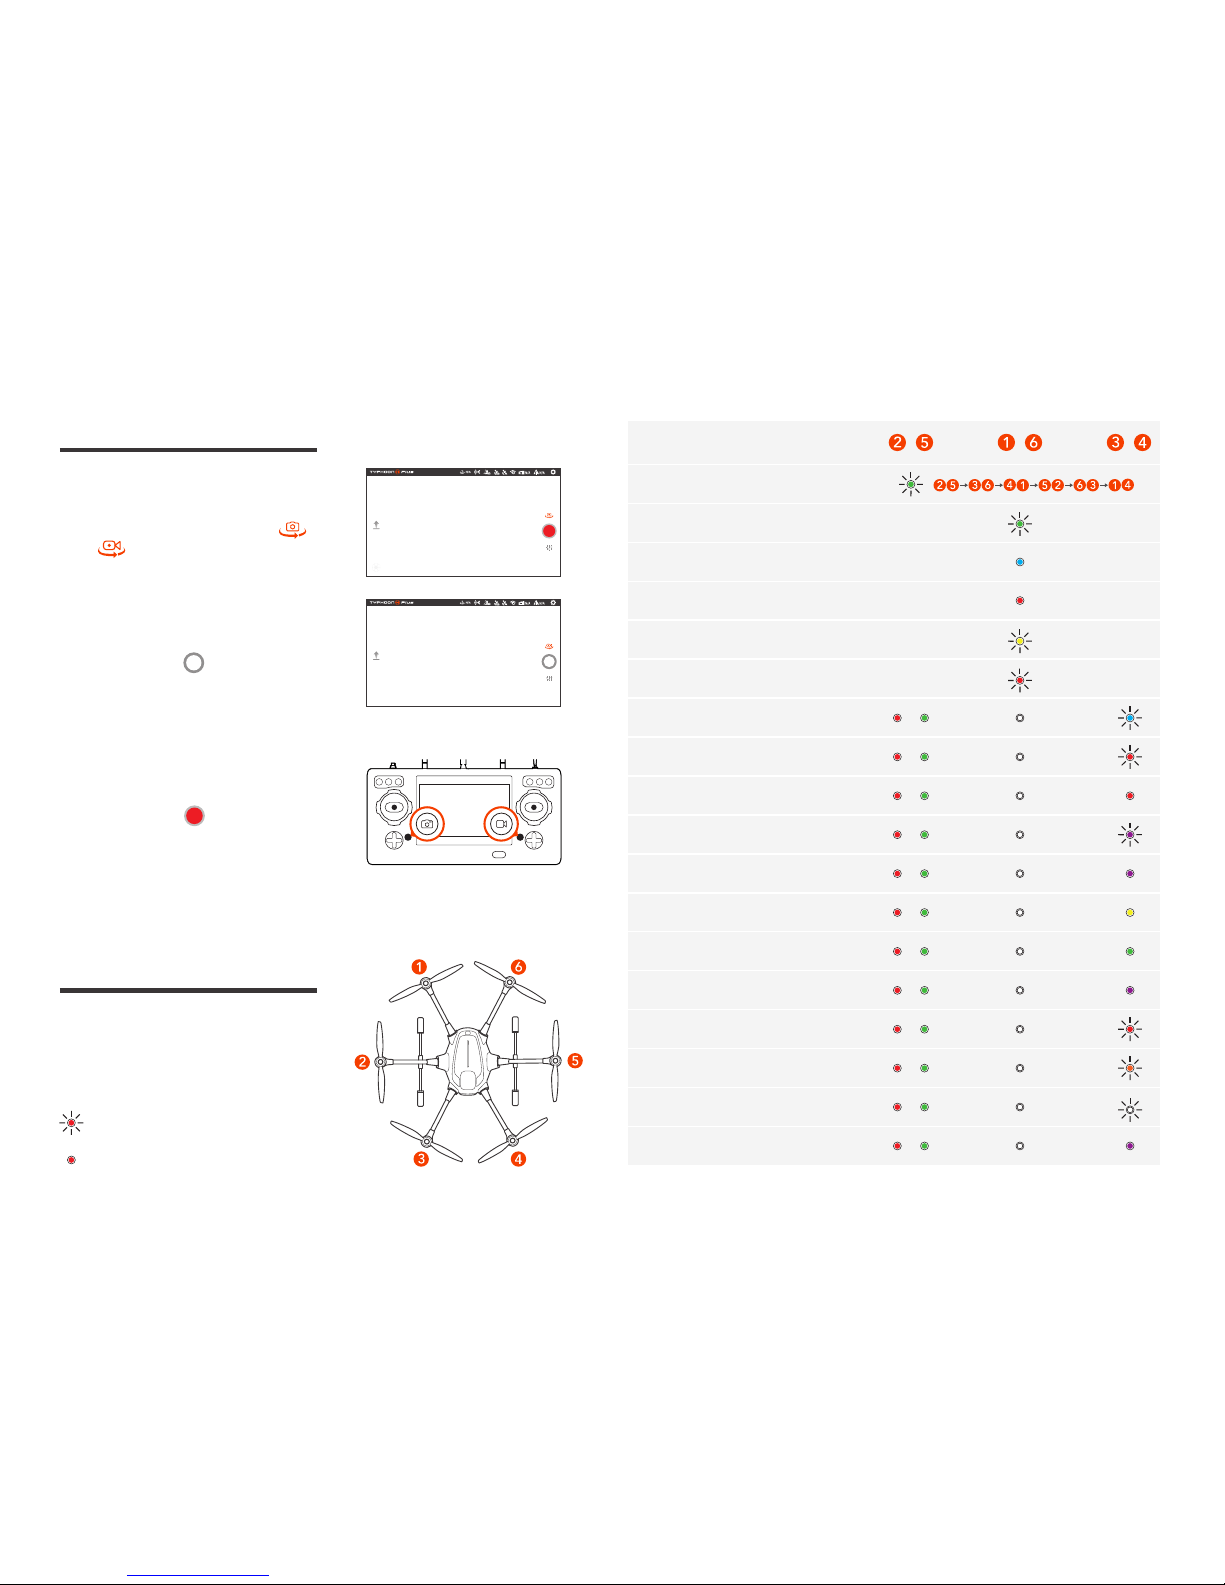
Camera Control
Taking Photos and Recording
Video
Taking photos and recording video
can be switched by tapping [ ]
and [ ] icons.
To Take A Still Photo
Press the icon [ ], or press the
button located near the bottom left
corner of the ST16S.
To START/STOP Recording Video
Press the icon [ ], or press the
button located near the bottom on
the right corner of the ST16S.
Initiate Compass Calibration
During Initialization
Rotor Abnormal Alarming
The Aircraft is in Binding Mode
Binding Failed
Calibration Failed
The Aircraft is in Sport Mode
The Aircraft is in RTL Mode
The Aircraft is in Task Mode
The Aircraft is in IPS Mode
Low Voltage Battery Warning
Compass Alarming
The Aircraft is in No-Fly Zone
OBS. Function Activated
LED Status Indications
All the LEDs mentioned are numbered as shown.
The color of the icon indicates the color of the LED.
Indicates the LED flashing.
Indicates the LED solid on.
Page 11
TYPHOON H PLUS
01 Ein/Aus-Schalter
02 Sonar
03 RealSense™
C23
01 Kamera-LED-Statusanzeige
02 Kameralinse
03 5-GHz-Antenne
ST16S
01 Start/Stopp-Taste für die Motoren
02 Gimbal-Schwenkmodus-Schalter
(Follow Mode/Follow Pan
Controllable Mode/Global Mode)
03 Gimbal-Neigungsmodusschalter
(Angle Mode/Velocity Mode)
04 Gimbal-Schwenksteuerung-Knopf
05 Beschleunigungs-/Höhensteuerung (Mode 2)
Höhenruder-/Steigungssteuerung (Mode 1)
06 Ruder/Giersteuerung(Mode 2 und Mode 1)
07 Auslöser für Fotos
08 Landegestellschalter
09 Hindernisvermeidungsschalter
10 Flugmodus-Auswahlschalter
11 Höhenruder-/Steigungssteuerung (Mode 2)/
Beschleunigungs-/Höhensteuerung (Mode 1)
12 Querruder-/Rollsteuerung (Mode 2 und Mode 1)
13 Start/Stopp-Taste für Videoaufnahmen
14 Ein/Aus-Schalter
15 2,4-GHz-Antenne
16 5-GHz-Antenne
17 Proportionaler Geschwin-
digkeitsschieberegler
18 Gimbal-Neigungssteueru-
ngsschieberegler
19 Akku
20 HDMI
21 USB-Port
22 Headset-Port
23 Micro-SD-Steckplatz
24 Micro-USB-Port
Überblick
01
02
03
01
02
03
22
23
24
15
18
19
16
17
01
02
03
04
05
06
07
08
09
10
14
11
12
13
20
21
Fluggerät
Produktname: APV System
Modellname: TYPHOON H PLUS
Fernbedienung
Produktname: Personal Ground Station
Modellname: ST16S
Gimbal-Kamera
Produktname: 3-Achsen-Gimbal-Kamera
Modellname: C23
DE
Page 12
Montage der Arme
Die Motorarme ausklappen und fixieren, bis ein Klicken zu hören ist.
Installation der Propeller
Propeller „A “ auf Motor „A “ und Propeller „B“ auf Motor „B“ montieren.
Die Propeller in Richtung der Kennzeichnung drücken und drehen[ ], bis
sie einrasten.
Es ist zu prüfen, ob die Propeller
korrekt eingerastet sind.
Akkus aufladen
ST16S GROUND STATION
Montage
A
B
B
B
Ausklappen &
Klickgeräus
Drücken &
Klickgeräusch
Das Desktop-Ladegerät ist mithilfe
des AC-Adapters/-Netzteils an eine
Steckdose mit 100 bis 240 Volt AC
oder mit dem mitgelieferten Adapter
an eine Steckdose mit 12 bis 17,4 Volt
DC oder an den Zigarettenanzünder
Auto anzuschließen. Der Akku des
Fluggeräts ist, wie abgebildet, in den
Ladegerätanschluss zu stecken.
Der Akku der ST16S-Funkfernbedienung wird geladen, indem man das
mitgelieferte USB-Kabel an den
Micro-USB-Anschluss am Ladegerät
anschließt. Bei vollständig entladenem
Akku nimmt das vollständige Aufladen
etwa fünf Stunden in Anspruch.
Installation der Flugakkus
Der Akku ist in das Batteriefach zu
drücken, bis ein Klicken zu hören ist.
Stromversorgung
Grünes Blinken:
Bereit für Ladevorgang
Rotes Blinken:
Ladevorgang
Konstant grünes Leuchten:
Ladevorgang beendet
Blaues Blinken/
Konstant blaues Leuchten:
Fehler
/
Page 13
Ein-/Ausschalten
HINWEIS: Es ist sicherzustellen, dass gesamte Firmware die neueste Version
hat. Firmware und Bedienungsanleitung können von folgender Website
heruntergeladen werden: www.yuneec.com Die Kurzanleitung ist kein Ersatz
für die Bedienungsanleitung.
Sie ST16S einschalten und dann die Ein/Aus-Taste am TYPHOON H Plus
drücken. Die Taste loslassen, sobald das Fluggerät einen ansteigenden Ton
ausgibt. Vor dem Einschalten der Drohne erst die ST16S einschalten.
Landegestell einziehen
Das Landegestell mithilfe des
Landegestellschalters auf der ST16S
einfahren.
Landen
Schritt 1) Das Landegestell mithilfe
des gleichen Schalters wie für dessen
Einfahren ausfahren.
HINWEIS: Das Landegestell bei
mindestens etwa 3,5 m Höhe über
dem Landebereich auszufahren.
Schritt 2) Den linken Hebel
langsam von der Grundposition aus
nach unten bewegen, sodass die
TYPHOON H PLUS langsam absinkt
und landet. Nach dem Landen der
TYPHOON H PLUS stoppen die
Motoren nach 2 Sekunden ohne
Benutzereingaben.
Abheben
Die START/STOPP-Taste ist ungefähr
3 Sekunden gedrückt zu halten, um
die Motoren im Angle-Modus zu
starten.
EINSCHALTEN DER
ST16S
EINSCHALTEN DES
TYPHOON H
PLUS
Abheben
MÖGLICHKEIT 1:
Zum Abheben den linken Hebel
langsam nach oben bewegen.
MÖGLICHKEIT 2:
Auf das Symbol [ ] tippen und
es auf dem Bildschirm ziehen, um
abzuheben.
Page 14
Flugsteuerung
ANGLE-MODUS
Im Angle-Modus und bei GPS
-Empfang reagiert die TYPHOON H
PLUS entsprechend der ST16S
-Fernbedienung.
Tipps: Zu Beginn niedrig und
langsam fliegen. Die langsame
Position (Lo Speed) ist ideal für
Präzisionsflüge. Die schnelle Position
(Hi Speed) wird zum Überqueren
großer Flächen verwendet.
RealSense™ Modul
Mit seiner Fähigkeit Hindernisse zu erkennen und diese intelligent zu umfliegen, baut sich der TYPHOON H PLUS mit RealSense™ ein 3D-Modell von der
Welt und erlaubt es so Piloten, sich im Follow-me-Mode auf das Motiv zu
konzentrieren ohne sich darüber Sorgen machen zu müssen, in ein Hindernis
zu fliegen.
Optical-Flow-Modul
Das Optical Flow-Modul ist immer dann gefragt, wenn Sie die Drohne ohne
GPS starten. Bei der Benutzung von Optical Flow zur Positionsbestimmung,
kann der TYPHOON H PLUS in seiner aktuellen Höhe auf der Stelle schweben
oder mit einer Geschwindigkeit von bis zu 14 km/h fliegen.
Hohe
Geschwindigkeit
Niedrige
Geschwindigkeit
Den TYPHOON H PLUS niemals in der
Nähe großer Gebäude oder Objekte
verwenden, welche die freie Sicht
beeinträchtigen können (mindestens
100° freie Sicht benötigt).
SPORT-MODUS
Der TYPHOON H PLUS hat im Sport-Modus eine hohe Ansprechempfindlichkeit. Die maximale Fluggeschwindigkeit des Fluggeräts ist auf 20 m/s erhöht.
RTL-MODUS
Im RTL-Modus fliegt der TYPHOON H PLUS zum Ausgangspunkt zurück und fährt
automatisch das Landegestell zur Landung aus.
SPORT-MODUS
ANGLE-MODUS
RTL-MODUS
Page 15

TASK-MODUS
POI (Point of Interest)
„Point of Interest “ erlaubt es dem Piloten, ein Objekt auszuwählen, das er umkreisen möchte, wodurch der TYPHOON H PLUS dieses Objekt selbstständig
umfliegt.
Follow Me
Die „Follow Me “-Funktion ermöglicht es dem TYPHOON H PLUS, dem Piloten
anhand der Position der ST16S Ground Station zu folgen.
JOUR (Reise)
Die „Journey “-Funktion ermöglicht es dem TYPHOON H PLUS, das perfekte
Selfie aus der Luft einfacher und schneller zu erfassen. Je nach der vom
Piloten gewünschten Einstellung steigt der TYPHOON H PLUS auf, fliegt fort
und kommt zurück.
CCC (Curve Cable Cam)
Mit Curve Cable Cam kann man eine unsichtbare Route erstellen, die der
TYPHOON H PLUS abfliegen soll. Wenn der Pilot die Punkte festlegt, fliegt der
TYPHOON H PLUS die festgelegten Koordinaten ab und hält dabei den Kurs.
Page 16

STATUS
Beschleunigungsmesser-/
Gyroskop-Kalibrierung abgeschlossen
Das Fluggerät befindet sich im Angle
-Modus (ohne GPS-Unterstützung)
Das Fluggerät befindet sich im Angle
-Modus (mit GPS-Unterstützung)
Erste/zweite Akkustand-Warnung
Kamerasteuerung
Fotografieren und Videos
aufnehmen
Foto- und Videoaufnahme kann durch
Tippen auf die Symbole [ ] und
[ ] eingeschaltet werden.
Standbilder aufnehmen
Auf das Symbol [ ] tippen oder
die Taste in der unteren linken Ecke
der ST16S drücken.
Videoaufnahme
STARTEN/STOPPEN
Auf das Symbol [ ] tippen oder
die Taste in der unteren rechten Ecke
der ST16S drücken.
Kompass-Kalibrierung veranlassen
Während der Initialisierung
Rotorfehler-Warnung
Das Fluggerät befindet sich im
„Bind“-Modus
Verbinden fehlgeschlagen
Kalibrierung fehlgeschlagen
Das Fluggerät befindet sich im
Sport-Modus
Das Fluggerät befindet sich
im RTL-Modus
Das Fluggerät befindet sich
im Task-Modus
Das Fluggerät befindet sich
im IPS-Modus
Akkustand-Warnung
„Niedrige Spannung“
Kompass-Warnung
Das Fluggerät befindet sich in
einer Flugverbotszone
OBS. Funktion aktiviert
LED-Statusanzeigen
Alle erwähnten LEDs sind wie in der Abbildung
dargestellt nummeriert.
Die Farbe des Symbols entspricht der Farbe der LED.
Bedeutet, dass die LED blinkt.
Bedeutet, dass die LED konstant leuchtet.
Page 17

TYPHOON H PLUS
01 Interruptor de encendido
02 Sónar
03 RealSense™
C23
01 Indicador LED del estado
de la cámara
02 Lente de la cámara
03 Antena de 5 GHz
ST16S
01 Botón de arranque/parada de los motores
02 Interruptor del modo panorámico del
gimbal (modo Follow/modo Pan modo
Controllable/modo Global)
03 Interruptor del modo de inclinación del
gimbal (modo Angle/modo Velocity)
04 Botón de control panorámico del gimbal
05 Control de aceleración/altitud (modo 2)
Control de elevación/cabeceo (modo 1)
06 Control del timón/guiñada(modo 2 y modo 1)
07 Botón para fotos estáticas
08 Interruptor del tren de aterrizaje
09 Interruptor Evitar obstáculos
10 Interruptor de selección del
modo de vuelo
11 Control de elevación/cabeceo (modo 2)/
Control de aceleración/altitud (modo 1)
12 Control del alerón/alabeo
(modo 2 y modo 1)
13 Botón de inicio/parada de la grabación
en vídeo
14 Interruptor de encendido
15 Antena de 2,4 GHz
16 Antena de 5 GHz
17 Control deslizante proporci-
onal de la velocidad
18 Control deslizante de la
inclinación del gimbal
19 Batería
20 HDMI
21 Puerto USB
22 Puerto para gafas
23 Ranura para tarjeta micro SD
24 Puerto micro USB
Resumen
01
02
03
01
02
03
22
23
24
15
18
19
16
17
01
02
03
04
05
06
07
08
09
10
14
11
12
13
20
21
Aeronave
Nombre del producto:
Sistema APV (fotografía y vídeo aéreos)
Modelo: TYPHOON H PLUS
Controlador
Nombre del producto:
Estación personal de tierra
Modelo: ST16S
Cámara del gimbal
Nombre del producto:
Cámara del gimbal de 3 ejes
Modelo: C23
ES
Page 18

Montaje de los brazos
Despliega los brazos de los motores
hasta oír un clic.
Instalación de las hélices
Monta la hélice A en el motor A y la
hélice B en el motor B.
Presiona y haz rotar las hélices en la
dirección de los puntos [ ] hasta
fijarlas.
Realiza una comprobación cruzada
para asegurarte de que las hélicesestán correctamente bloqueadas en
su sitio.
Cargar las baterías
Estación de tierra ST16S
Montaje
A
B
B
B
desplegar y clic
introducir y clic
Conecta el cargador de escritorio a la
toma de 100-240 V de CA usando una
fuente de alimentación o un adaptador
de CA, o a un enchufe accesorio o a la
toma del encendedor de un vehículo
de 12-17,4 V de CC usando el adaptador que se incluye. Conecta la batería
de la aeronave al puerto del cargador
como aparece en la ilustración.
Carga la batería de la ST16S usando el
cable USB que se incluye y conectándolo al puerto micro USB del cargador.
Una batería totalmente descargada
tardará aproximadamente 5 horas en
cargarse.
Instalación de la batería de vuelo
Introduce la batería en su compartimento hasta oír un clic.
alimentación
Verde parpadeante:
listo para cargar
Rojo parpadeante:
cargando
Verde fijo:
carga completada
Azul parpadeante/fijo:
error
/
Page 19

Encendido/apagado
ATENCIÓN: Asegúrate de utilizar las últimas versiones del firmware. El firmware y
el manual del usuario pueden descargase del siguiente sitio web: www.yuneec.com.
La guía de inicio rápido no sustituye al manual del usuario.
Enciende la ST16S y pulsa el botón de encendido del TYPHOON H Plus. Suelta el
botón cuando la aeronave emita un sonido en aumento. Enciende la ST16S antes de
encender el sistema de aeronave no tripulada (UAS).
Retracción del tren de
aterrizaje
Sube el control del tren de aterrizaje
con el interruptor de control del tren
de aterrizaje de la ST16S.
Aterrizaje
Paso 1) Baja el tren de aterrizaje con
el mismo control que se utiliza para
retraerlo.
ATENCIÓN: Baja el tren de aterrizaje
al menos 12’ por encima de la zona
de aterrizaje.
Paso 2) Baja lentamente el joystick
izquierdo por debajo de la posición
central para que el TYPHOON H PLUS
descienda lentamente y aterrice.
Después de que el TYPHOON H PLUS
aterrice, los motores se detendrán al
cabo de 2 segundos sin necesidad de
efectuar ninguna operación.
Despegue
Pulsa el botón START/STOP y
mantenlo pulsado durante unos 3
segundos para arrancar los motores
en modo Angle.
ENCENDER LA
ST16S
ENCENDER EL
TYPHOON H
PLUS
Despegue
OPCIÓN 1:
Sube lentamente el joystick izquierdo
para despegar.
OPCIÓN 2:
Pulsa el icono [ ] y deslízalo por
la pantalla para despegar.
Page 20

Controles de vuelo
No manejes el TYPHOON H PLUS
cerca de edificios altos u otros
obstáculos que no permitan ver
claramente el cielo (distancia mínima
de 100°).
Módulo RealSense™
Con su capacidad para detectar obstáculos y volar alrededor de ellos inteligentemente, el TYPHOON H PLUS construye un modelo 3D del mundo con
RealSense ™, permitiendo a los pilotos enfocarse en el sujeto en el modo
Sígueme sin preocuparse por ello. tener que volar en un obstáculo.
Módulo de flujo óptico
El módulo de flujo óptico siempre se necesita cuando enciende el dron sin
GPS. Al utilizar el Flujo óptico para determinar la posición, el TYPHOON H
PLUS puede desplazarse en su altura actual sobre el terreno o volar a una
velocidad de hasta 14 km/h.
MODO ANGLE
En modo Angle y con el GPS
disponible, el TYPHOON H PLUS
responderá al control remoto de la
ST16S.
Consejos: Al principio, vuela bajo y
lentamente. La posición para volar
lentamente (Lo Speed) es ideal para
vuelos de precisión. La posición de
alta velocidad (Hi Speed) se utiliza
para transitar zonas extensas.
Hi Speed
Lo Speed
MODO SPORT
MODO ANGLE
MODO RTL
MODO SPORT
El TYPHOON H PLUS tiene una gran capacidad de reacción en modo Sport. La
velocidad de vuelo máxima de la aeronave es de 20 m/s (45 mph).
MODO RTL
En modo RTL, el TYPHOON H PLUS regresará al punto de partida y desplegaráautomáticamente el tren retráctil para aterrizar.
Page 21

MODO TASK
POI (Point of Interest)
El POI («punto de interés») permite al piloto seleccionar un objeto alrededor
del cual le gustaría orbitar para que el TYPHOON H PLUS orbite alrededor de
ese objeto de forma autónoma.
Sígueme
La función «Sígueme» hace que el TYPHOON H PLUS siga al piloto ajustando
su posición con respecto a la posición de la estación de tierra ST16S.
JOUR
La función Journey («trayecto») permite al TYPHOON H PLUS captar el selfie
aéreo perfecto con mayor facilidad y velocidad. En función del ajuste que el
piloto seleccione, el TYPHOON H PLUS subirá, partirá y volverá.
CCC (Curve Cable Cam)
La CCC («cámara cable curvada») permite crear una ruta invisible para que
el TYPHOON H PLUS la recorra. Una vez que el piloto fije los puntos, el
TYPHOON H PLUS volará en dirección a las coordenadas fijadas y recordará
hacia dónde se dirige.
Page 22

ESTADO
Calibración del acelerómetro/
giroscopio finalizada
La aeronave está en modo Angle
(sin posición del GPS)
La aeronave está en modo Angle
(con bloqueo de GPS)
Primera/segunda advertencia de
nivel de batería bajo
Control de la cámara
Fotografías y vídeos
Se pueden hacer fotografías y grabar
vídeos tocando los iconos [ ] y
[ ].
Fotos estáticas
Pulsar el icono [ ] o el botón
situado cerca de la esquina inferior
izquierda de la ST16S.
INICIAR/PARAR la grabación en
vídeo
Pulsar el icono [ ] o el botón
situado cerca de la esquina inferior
derecha de la ST16S.
Iniciar calibración de la brújula
Durante la inicialización
Alarma de anomalía en los rotores
La aeronave está en modo Binding
Error de vinculación
Calibración fallida
La aeronave está en modo Sport
La aeronave está en modo RTL
La aeronave está en modo Task
La aeronave está en modo IPS
Advertencia de batería baja
Alarma de la brújula
La aeronave está en una zona de
exclusión aérea
OBS. Función activada
Indicaciones del LED de
estado
Todos los LED mencionados aparecen numerados
como se muestra en la ilustración.
El color del icono es el mismo que el color del LED.
Indica que el LED parpadea.
Indica que el LED está fijo.
Page 23

TYPHOON H PLUS
01 Interrupteur
02 Sonar
03 RealSense™
C23
01 Indicateur du statut LED de la
caméra
02 Objectif de la caméra
03 Antenne 5 GHz
ST16S
01 Bouton de marche/arrêt des moteurs
02 Interrupteur de mode d’orientation du support
(Modes Suivi / Suivi contrôlable
de l’orientation / Global)
03 Interrupteur de mode d’inclinaison du support
(Modes Angle/Vélocité)
04 Bouton de commande de l’orientation du support
05 Commande accélération/altitude (mode 2)
Commande élévation/tangage (mode 1)
06 Commande gouvernail/lacet (Modes 2 et 1)
07 Bouton de prise de photo
08 Commande d’atterrissage
09 Interrupteur du sonar anticollision
10 Interrupteur de sélection du mode de vol
11 Commande élévation/tangage (mode 2)
/ Commande d’accélération/altitude
(mode 1)
12 Commande aileron/roulis
(Modes 2 et 1)
13 Bouton marche/arrêt de
l’enregistrement vidéo
14 Interrupteur
15 Antenne de 2,4 GHz
16 Antenne 5 GHz
17 Curseur de contrôle
proportionnel
18 Curseur de commande
d’inclinaison du support
19 Batterie
20 HDMI
21 Port USB
22 Port du casque
23 Compartiment micro-SD
24 Port micro-USB
Aperçu
01
02
03
01
02
03
22
23
24
15
18
19
16
17
01
02
03
04
05
06
07
08
09
10
14
11
12
13
20
21
Avion
Nom du Produit : système APV (« aerial photography
and video », photos et vidéos aériennes)
Nom du modèle : TYPHOON H PLUS
Commande
Nom du produit :
poste personnel au sol
Nom du modèle : ST16S
Caméra sur support
Nom du produit :
Caméra sur support à 3 axes
Nom du modèle : C23
FR
Page 24

Assemblage des bras
Déplie les bras du moteur et fixe-les
jusqu’à ce que tu entendes un clic.
Installer les hélices
Monte l’ hélice « A » et l’ hélice « B »
sur le moteur « B ».
Pousse et fais tourner les hélices dans
le sens des [ ] points jusqu’ à ce
qu’elles soient fixées.
Vérifie que les hélices ont été correctement fixées.
Chargement des batteries
Poste au sol ST16S
Assemblage
A
B
B
B
Déplie jusqu’au clic.
Appuie
jusqu’au clic
Alimente le chargeur de bureau sur
une prise AC de 100 à 240 V à l’ aide de
l’ adaptateur/alimentation AC ou d’ une
prise accessoire/allume-cigare DC de
12 à 17,4 V dans un véhicule à l’ aide de
l’ adaptateur inclus. Branche la batterie
du drone au port de charge comme sur
l’illustration.
Recharge la batterie ST16 en utilisant
le câble USB fourni, que tu inséreras
dans le port USB du chargeur. Il faudra
environ 5 h pour charger une batterie
entièrement.
Installation des batteries de vol
Insère la batterie dans le compartiment correspondant jusqu’ à entendre
un clic.
alimentation
Clignotement vert :
prêt à charger
Clignotement rouge :
chargement en cours
Lumière verte :
chargement terminé
Lumière/
clignotement bleu :
erreur
/
Page 25

Interrupteur ON / OFF
AVERTISSEMENT : Assure-toi d’ avoir la dernière version du firmware.
Le firmware et le manuel utilisateur sont téléchargeables sur le site Internet :
www.yuneec.com. Le guide de démarrage rapide ne remplace pas le manuel
utilisateur.
Démarre le ST16S, puis appuie sur l’ interrupteur du TYPHOON H Plus. Relâche le
bouton dès que le drone émet un signal de plus en plus fort. Démarre le ST16S avant
l’UAS.
Train d’atterrissage
rétractable
Relève les commandes d’atterrissage à
l’ aide de l’ interrupteur de commandes
d’atterrissage sur le ST16S.
Atterrissage
Étape 1) Fais descendre le train
d’ atterrissage avec les mêmes
commandes que pour la rétractation
des supports.
AVERTISSEMENT : Procède à cette
opération à au moins 12 pouces (30
centimètres) au-dessus de la zone
d’atterrissage.
Étape 2) Descends lentement la
manette de gauche plus bas que sa
position centrale. Le TYPHOON H Plus
va redescendre doucement et atterrir.
Après l’ atterrissage, les moteurs
du TYPHOON H PLUS se stoppent
au bout de 2 secondes sans aucune
manipulation.
Décollage
Appuie et maintiens enfoncé le
bouton MARCHE/ARRÊT pendant
environ 3 secondes pour démarrer
les moteurs en mode Angle.
MISE EN MARCHE
DU ST16S
MISE EN MARCHE DU
TYPHOON H
PLUS
Décollage
OPTION 1 :
relève lentement la manette de
gauche pour décoller.
OPTION 2 :
appuie sur [ ] et glisse sur l’écran
pour décoller.
Page 26

Commandes de vol
N’ essaie jamais de faire fonctionner
le TYPHOON H PLUS près de hauts
bâtiments/obstacles qui n’ offrent pas
une vue dégagée du ciel (dégagement
minimum de 100°).
Module RealSense™
Avec sa capacité à détecter les obstacles et à voler intelligemment autour d'eux,
le TYPHOON H PLUS construit un modèle 3D du monde avec RealSense ™,
permettant aux pilotes de se concentrer sur le sujet en mode follow-me sans
s'en soucier devoir voler dans un obstacle.
Module de flux optique
Le module Optical Flow est toujours nécessaire lorsque vous démarrez
le drone sans GPS. Lorsque vous utilisez Optical Flow pour déterminer la
position, le TYPHOON H PLUS peut stationner à sa hauteur actuelle sur place
ou voler à une vitesse pouvant atteindre 14 km/h.
MODE ANGLE
En mode Angle avec GPS disponible,
le TYPHOON H PLUS va obéir aux
commandes à distance du ST16S.
Conseils : commence à faible vitesse.
La position Slow (Lo Speed) est
idéale pour un vol de précision. La
position High-speed (Hi Speed) sert à
traverser de grandes zones.
MODE SPORT
MODE ANGLE
MODE RTL
Hi Speed
Lo Speed
MODE SPORT
Le TYPHOON H PLUS a une très grande sensibilité en mode Sport. La vitesse
maximale de vol du drone est augmentée à 45 MPH (7 m/s).
MODE RTL
En mode RTL, le TYPHOON H PLUS retourne automatiquement à son point de
départ et descend son train d’atterrissage pour se poser.
Page 27

MODE TÂCHES
Point d’intérêt (POI)
Le Point d’ intérêt te permet de sélectionner un sujet à mettre en orbite et
faire en sorte que le TYPHOON H PLUS tourne autour de ce sujet de façon
autonome.
Follow me
La fonction Follow Me (Suivi) permet au TYPHOON H Plus de suivre le pilote
en adaptant sa position à la position de la station au sol ST16S.
VOY
La fonction Voyage permet au TYPHOON H PLUS de prendre plus facilement
et plus rapidement le selfie parfais. En fonction des paramètres désirés par le
pilote, le TYPHOON H PLUS montera, descendra et reviendra.
CCC (« Curve Cable Cam », caméra à trajectoire courbée)
La fonction de caméra à trajectoire courbée te permet de créer un trajet
invisible pour que le TYPHOON H PLUS le suive. Une fois que tu as défini les
points, le TYPHOON H PLUS volera selon les coordonnées réglées tout en se
rappelant de la direction.
Page 28

STATUT
Calibrage de l’accéléromètre/
gyroscope terminé
Le drone est en mode Angle
(sans verrouillage GPS).
Le drone est en mode Angle
(avec verrouillage GPS)
Premier/Deuxième avertissement
de niveau de batterie faible
Commande de la caméra
Prendre des photos et enregistrer
des vidéos
Tu peux prendre des photos ou
enregistrer des vidéos en appuyant
sur les icônes [ ] et [ ].
Pour prendre une photo
Appuie sur le bouton [ ] ou sur
le bouton se trouvant près du coin en
haut à gauche du ST16S.
Pour COMMENCER/ARRÊTER
un enregistrement vidéo
Appuie sur l’ icône [ ], ou sur
le bouton se trouvant près du coin en
haut à droite du ST16S.
Calibrer la boussole
Durant l’initialisation
Alarme anormale du rotor
Le drone est en mode Appariement.
Échec d’appariement
L'étalonnage a échoué
Le drone est en mode Sport.
Le drone est en mode RTL.
Le drone est en mode Tâches.
Le drone est en mode IPS.
Avertissement Batterie Faible
Alarme boussole
Le drone est dans une zone
d’exclusion aérienne.
OBS. Fonction activée
Indications de Statut LED
Toutes les LED mentionnées sont numérotées
telles que sur l’illustration.
La couleur de l’icône indique la couleur de la LED.
Indique une LED clignotante.
Indique une LED non clignotante.
Page 29

TYPHOON H PLUS
01 Interruttore di alimentazione
02 Sonar
03 RealSense™
C23
01 Indicatore LED dello stato
della videocamera
02 Obiettivi della videocamera
03 Antenna da 5 GHz
ST16S
01 Pulsante avvio/arresto motore
02 ICommutatore modalità Pan della gimbal
(Modalità Follow/Modalità Follow Pan
Controllable/Modalità Global)
03 Commutatore modalità Tilt della gimbal
(Modalità Angle/Modalità Velocity)
04 Pomello di comando Pan della gimbal
05 Comando Throttle (gas)/Altitude
(altitudine) (modalità 2) Comando
elevatore /pitch (beccheggio)
(modalità 1)
06 Comando timone/imbardata
(modalità 2 e modalità 1)
07 Pulsante per scatto fotografico
(immagine fissa)
08 Interruttore del carrello di atterraggio
09 Interruttore elusione ostacolo
10 Interruttore di selezione modalità di volo
11 Comando elevatore/pitch (beccheggio) (modalità
2)/Comando Throttle/Altitude (modalità 1)
12 Comando alettoni/rollio(modalità 2 e modalità 1)
13 Pulsante Start/Stop della registrazione video
14 Interruttore di alimentazione
15 Antenna da 2,4GHz
16 Antenna da 5GHz
17 Cursore velocità del
comando proporzionale
18 Cursore di comando dell'-
inclinazione della gimbal
19 Batteria
20 HDMI
21 Porta USB
22 Porta cuffie
23 Slot Micro SD
24 Porta Micro USB
Panoramica
01
02
03
01
02
03
22
23
24
15
18
19
16
17
01
02
03
04
05
06
07
08
09
10
14
11
12
13
20
21
Velivolo
Nome prodotto:
APV (sistema per fotografie e video aerei)
Nome modello: TYPHOON H PLUS
Controller
Nome del prodotto:
Stazione personale di terra
Nome modello: ST16S
Fotocamera gimbal
Nome del prodotto:
Videocamera gimbal a 3 assi
Nome modello: C23
I T
Page 30

Assemblaggio dei bracci
Estendere i bracci del motore e fissarli
finché non si sente un "clic".
Installazione delle eliche
Montare l’ elica ‘A’ sul motore ‘A’ e
l’elica ‘B’ sul motore 'B'.
Premere e fare ruotare le eliche nella
direzione indicata da [ ] fino al
bloccarsi delle eliche stesse.
Eseguire un controllo incrociato per
accertarsi che le eliche siano correttamente bloccate nella loro sede.
Caricare le batterie
Stazione di terra ST16S
Assemblaggio
A
B
B
B
estensione e clic
inserimento
e clic
Alimentare la stazione di carica da una
presa CA 100-240V, utilizzando l'adattatore/l'alimentatore CA, o da una presa
ausiliaria 12V-17.4V CC/presa dell'accendisigari di un veicolo, utilizzando
l'adattatore in dotazione. Inserire la
batteria del velivolo nella porta del
caricabatterie come illustrato.
Caricare la batteria ST16S, utilizzando
il cavo USB in dotazione e inserendolo
nella porta Micro UBS del caricabatterie. Servono circa cinque ore per
caricare una batteria completamente
scarica.
Installazione delle batterie di volo
Inserire la batteria nel vano batteria
fino a quando non si sente un "clic".
alimentazione
Verde lampeggiante:
pronto per caricare
Rosso lampeggiante:
carica
Verde fisso:
carica completata
Blu lampeggiante / fisso:
errore
/
Page 31

Accensione / spegnimento (ON/OFF)
AVVISO: accertarsi che tutti i firmware siano della versione più aggiornata.
I firmware e il manuale d’ uso possono essere scaricati dal sito web:
www.yuneec.com. Questa guida rapida non sostituisce il manuale d’uso.
Accendere il ST16S quindi premere il pulsante di accensione sul TYPHOON H Plus.
Rilasciare il pulsante quando il velivolo emette un segnale di intensità crescente.
Accendere il ST16S prima di accendere l’UAS.
Ritirare i carrelli di
atterraggio
Portare verso l’ alto il comando del
carrello di atterraggio, azionando
l'interruttore del carrello di
atterraggio sullo ST16S.
Atterraggio
Passo 1) Abbassare il carrello di
atterraggio con lo stesso comando
utilizzato per ritrarre il carrello di
atterraggio.
AVVISO: abbassare il carrello di
atterraggio almeno di 12' al di sopra
della superficie di atterraggio.
Passo 2) Abbassare leggermente
la leva di sinistra spingendola più in
basso rispetto alla posizione centrale.
Il TYPHOON H PLUS inizia lentamente
la discesa per l'atterraggio. Eseguito
l’ atterraggio del TYPHOON H PLUS.
dopo 2 secondi il motore si arresta
senza alcun intervento.
Decollo
Premere e tenere premuto il pulsante
AvVIARE/INTERRROMPERE per circa
3 secondi per avviare i motori in
modalità angle.
ACCENDERE
ST16S
ACCENDERE
TYPHOON H
PLUS
Decollo
OPZIONE 1:
sollevare lentamente la leva di
sinistra per decollare.
OPZIONE 2:
toccare l’icona [ ] e farla scorrere
sullo schermo per decollare.
Page 32

Comando di volo
Non cercare mai di utilizzare il
TYPHOON H PLUS vicino a
edifici/ostacoli alti che non consentano
una vista sgombra dello spazio aereo
(vista libera minima di 100°).
Modulo RealSense™
Con la sua capacità di rilevare ostacoli e volare intelligentemente intorno a loro,
il TYPHOON H PLUS costruisce un modello 3D del mondo con RealSense ™,
permettendo ai piloti di concentrarsi sul soggetto in modalità follow-me senza
preoccuparsi di questo dover volare in un ostacolo.
Modulo di flusso ottico
Il modulo flusso ottico è sempre necessario quando si avvia il drone senza
GPS. Quando si utilizza il flusso ottico per determinare la posizione, il
TYPHOON H PLUS può librarsi nella sua altezza attuale sul posto o volare ad
una velocità fino a 14 km/h.
MODALITÀ ANGLE
In modalità Angle e in presenza di
GPS, il TYPHOON H PLUS risponderà
ai comandi del telecomando ST16S.
Consigli: Inizialmente volare basso e
lentamente. La posizione a velocità
lenta (Lo Speed) è ideale per il volo di
precisione. La posizione alta velocità
(Hi Speed) si utilizza persorvolare
aree estese.
MODALITÀ SPORT
MODALITÀ ANGLE
MODALITÀ RTL
Alta
velocità
Velocità
lenta
MODALITÀ SPORT
In modalità Sport il TYPHOON H PLUS ha una sensibilità di reazione elevata.
La massima velocità di volo del velivolo corrisponde a 45 mph (20 m/s).
MODALITÀ RTL
In modalità RTL, il TYPHOON H PLUS tornerà automaticamente al punto home e
abbasserà automaticamente il carrello retrattile per atterrare.
Page 33

MODALITÀ TASK
POI (Punto di interesse)
Il punto di interesse consente al pilota di selezionare un soggetto intorno al
quale far orbitare il TYPHOON H PLUS in modo autonomo.
Follow me
La funzione Follow Me consente al TYPHOON H PLUS di seguire il pilota,
adeguando la propria posizione alla posizione della stazione di terra ST16S.
JOUR
La funzione Journey consente al TYPHOON PLUS H di acquisire l'autoscatto
aereo perfetto in modo più semplice e più veloce. In base all'impostazione
desiderata del pilota, il TYPHOON PLUS H sale, va avanti e torna.
CCC (Curva, cavo, fotocamera)
Curva, cavo, fotocamera permette di creare un tragitto invisibile che il
TYPHOON PLUS H può seguire durante il volo. Una volta stabiliti i punti, il
TYPHOON PLUS H volerà in base alle coordinate stabilite, ricordando la rotta.
Page 34

STATO
Calibrazione accelerometro /
giroscopio completata
Il velivolo è in modalità Angle
(senza aggancio GPS)
Il velivolo è in modalità Angle
(con blocco GPS)
Primo/secondo avviso di
batteria scarica
Scattare foto e registrare video
È possibile commutare tra lo scatto
di foto e la registrazione di video
taccando le icone [ ] e [ ].
Scattare una foto (immagine
ferma)
Premere l’ icona [ ] oppure
premere il pulsante posizionato
vicino all'angolo inferiore sinistro
dell'ST16S.
AVVIARE/INTERROMPERE la
registrazione video
Premere l’ icona [ ] oppure
premere il pulsante posizionato
vicino all'angolo inferiore destro
dell'ST16S.
Iniziare calibrazione della bussola
Durante l’inizializzazione
Allarme anomalia rotore
Il velivolo è in modalità "Binding"
Errori di binding
Calibrazione fallita
Il velivolo è in modalità Sport
Il velivolo è in modalità RTL
Il velivolo è in modalità Task
Il velivolo è in modalità IPS
Segnale di basso voltaggio della
batteria
Allarme bussola
Il velivolo è in una zona
interdetta al volo
OBS. Funzione attivata
Indicazioni di stato LED
Tutti i LED menzionati sono numerati come
mostrato.
Il colore dell’icona indica il colore del LED.
Indica che il LED sta lampeggiando.
Indica che il LED è acceso in modo fisso.
Comando della fotocamera
Page 35

TYPHOON H PLUS
1. Włącznik zasilania
2. Sonar
3. Chowane podwozie
C23
1. Wskaźnik statusu kamery LED
2. Obiektyw kamery
3. Antena 5GHz
ST16S
1. Przycisk uruchamiania/zatrzymania silników
2. Przełącznik trybów osi pan gimbala
(tryb Follow/ kontrolowany tryb Follow
osi pan/ tryb Global)
3. Przełącznik trybów osi tilt gimbala (tryb
Angle/ tryb Velocity)
4. Pokrętło kontrolne osi pan gimbala
5. Kontrola prędkości/ pułapu (tryb 2) Kontrola
przechylenia w przód/tył (tryb 1)
6. Kontrola obrotu w lewo/
prawo (tryb 2 i tryb 1)
7. Przycisk wykonywania zdjęć
8. Przełącznik podwozia
9. Przełącznik systemu antykolizyjnego
10. Przełącznik zmiany trybu lotu
11. Kontrola przechylenia w przód/tył (tryb
2)/ Kontrola prędkości/ pułapu (tryb 1)
12. Kontrola przechylenia na lewo/prawo
(tryb 2 i tryb 1)
13. Przycisk rozpoczęcia/zatrzymania
nagrywania
14. Włącznik zasilania
15. 2.4 GHz Antena
16. Antena 5GHz
17. Suwak proporcjonalnej kontroli szybkości
18. Suwak kontroli obrotu w osi tilt gimbala
19. Akumulator
20. HDMI
21. Port USB
22. Port zestawu słuchawkowego
23. Wejście Micro SD
24. Port Micro USB
Opis ogólny
01
02
03
01
02
03
22
23
24
19
01
02
03
04
05
06
07
08 15
09
16
10
14
17
11 18
12
13
20
21
Dron
Nazwa produktu: System APV
Nazwa modelu: TYPHOON H PLUS
Kontroler
Nazwa produktu: Osobista stacja naziemna
Nazwa modelu: ST16S
Gimbal do kamery
Nazwa produktu: Trójosiowy gimbal kamery
Nazwa modelu: C23
PL
Page 36

Rozkładanie ramion
Rozłóż ramiona silnika i zamocuj je, aż
usłyszysz „kliknięcie”.
Mocowanie śmigieł
Zamocuj śmigło „A” na silniku „A”, a
śmigło „B" na silniku „B”.
Dociśnij i obróć śmigła w kierunku
punktów [ ], aż śmigła
zostaną wpięte.
Sprawdź ponownie, by mieć pewność,
że śmigła są prawidłowo wpięte.
Ładowanie akumulatorów
Montaż
A
B
rozłóż aż kliknie
włóż aż kliknie
Podłącz ładowarkę biurkową do
gniazdka sieciowego o napięciu
100-240V AC za pomocą zasilacza/
źródła zasilania AC lub do gniazda
zapalniczki samochodowej o napięciu
12V-17.4V DC za pomocą dołączonego
zasilacza. Podłącz akumulator drona do
portu ładowarki jak na rysunku.
Naładuj akumulator ST16S, używając
dostarczonego kabla USB i wkładając
go do portu Micro USB w ładowarce.
Ładowanie całkowicie rozładowanego
akumulatora potrwa około pięciu godzin.
Instalowanie akumulatora w dronie
Włóż akumulator do komory
akumulatora, aż usłyszysz „kliknięcie”.
włącz
zasilan
ie
Migająca zielona dioda:
Gotowy do ładowania
Migająca czerwona
dioda: Ładowanie
Świecąca zielona dioda:
Ładowanie ukończone
Migająca / świecąca
niebieska dioda: Błąd
/
Stacja naziemna ST16S
Page 37

Włączanie/wyłączanie zasilania
UWAGA: Upewnij się, że całe oprogramowanie firmware ma najnowszą wersję.
Oprogramowanie firmware i instrukcję obsługi można pobrać ze strony
internetowej: www.yuneec.com. Przewodnik szybkiego uruchamiania nie
zastępuje instrukcji użytkownika.
Włącz ST16S, a następnie naciśnij przycisk zasilania na TYPHOON H Plus.
Zwolnij przycisk, gdy dron wyda dźwięk o narastającej częstotliwości. Włącz
zasilanie ST16S przed włączeniem zasilania w UAS.
Chowanie podwozia
Podnieś podwozie za pomocą
przełącznika podwozia na ST16S.
Lądowanie
Krok 1) Opuść podwozie używając
tego samego przełącznika, co w
przypadku chowania podwozia.
UWAGA: Opuścić podwozie co
najmniej 12’ ponad powierzchnią
lądowania.
Krok 2) Przesuń powoli w dół lewy
drążek, by znalazł się poniżej pozycji
centralnej. TYPHOON H PLUS powoli
zniży swój lot i wyląduje. Po
wylądowaniu TYPHOON H PLUS,
silniki zatrzymają się po 2 sekundach
bez podjęcia działania.
Latanie
Naciśnij i przytrzymaj przycisk START/
STOP przez około 3 sekundy, aby
uruchomić silniki w trybie Angle.
WŁĄCZENI
E ST16S
WŁĄCZENIE
TYPHOON H
PLUS
Latanie
OPCJA 1:
Powoli przesuwaj w górę lewy drążek,
aby wystartować.
OPCJA 2:
Stuknij palcem ikonę [ ], a następnie
przesuń nim po ekranie, aby
wystartować.
WŁĄCZANIE
TYPHOON H
PLUS
Page 38

Kontrola lotu
TRYB ANGLE
Jeśli dostępny jest tryb Angle i GPS,
TYPHOON H PLUS zareaguje zgodnie
z pilotem zdalnego sterowania ST16S.
Wskazówki: Na początku leć nisko i
powoli. Pozycja niskiej prędkości (Lo
Speed) jest idealna do lotu
precyzyjnego. Pozycja wysokiej
prędkości (Hi Speed) jest używana
podczas pokonywania dużych
obszarów.
Wysoka prędkość
Niska prędkość
TRYB SPORT
TRYB ANGLE
TRYB RTL
Nigdy nie próbuj uruchamiać TYPHOON H PLUS w pobliżu
wysokich budynków/przeszkód, które nie dają wyraźnej
widoczności nieba (minimalna widoczność 100°).
TRYB SPORT
TYPHOON H PLUS w trybie Sport ma wysoką czułość reakcji. Maksymalna
prędkość lotu drona jest zwiększona do 45 mph (20 m/s).
TRYB RTL
W trybie RTL, TYPHOON H PLUS powraca do punktu startowego i automatycznie
opuszcza podwozie do lądowania.
Page 39

TRYB TASK
POI (Point of Interest)
Funkcja Point of interest umożliwia pilotowi wybranie obiektu, który chciałby
okrążyć i wokół którego TYPHOON H PLUS będzie krążył samodzielnie.
Follow Me
Funkcja Follow Me pozwala dronowi TYPHOON H PLUS podążać za pilotem,
dostosowując jego położenie do lokalizacji stacji naziemnej ST16S.
JOURNEY
Funkcja Journey pozwala TYPHOON H PLUS na łatwiejsze i szybsze
wykonywanie idealnych zdjęć lotniczych. W zależności od żądanego przez pilota
ustawienia, TYPHOON H PLUS wzniesie się, wyleci i powróci.
CCC (Curve Cable Cam)
Funkcja Curve Cable Cam pozwala stworzyć niewidzialną trasę lotu dla
TYPHOON H PLUS. Gdy pilot ustali punkty, TYPHOON H PLUS będzie leciał po
ustalonych współrzędnych do ustalonego miejsca.
Page 40

STATUS
Przyspieszeniomierz/
Kalibracja żyroskopu zakończona
Dron jest w trybie Angle
(bez blokady GPS)
Sterowanie kamerą
Robienie zdjęć i nagrywanie filmów
Robienie zdjęć i nagrywanie filmów
można przełączać, stukając palcem na
oraz ikony.
Wykonywanie zdjęć
Naciśnij ikonę [ ] lub naciśnij przycisk
znajdujący się obok lewego dolnego rogu
ST16S.
Rozpoczęcie/zakończenie
nagrywania
Naciśnij ikonę [ ] lub naciśnij przycisk
znajdujący się obok prawego dolnego rogu
ST16S.
Rozpocznij kalibrację kompasu
W trakcie inicjalizacji
Alarm o nieprawidłowym działaniu wirnika
Dron jest w trybie Binding
Parowanie nie powiodło się
Kalibracja nie powiodła się
Dron jest w trybie Sport
Dron jest w trybie Angle
(z blokadą GPS)
Dron jest w trybie RTL
Dron jest w trybie Task
Dron jest w trybie IPS
Poziom pierwszy / drugi Niskie napięcie
Ostrzeżenie o niskim poziomie naładowania
akumulatora
Niskie napięcie Ostrzeżenie o niskim poziomie
naładowania akumulatora
Alarm kompasu
Dron jest w strefie zakazu lotów
Funkcja OBS (antykolizyjna)
aktywowana
Wskaźniki statusu LED
Wszystkie wspomniane diody LED są
ponumerowane jak na rysunku.
Kolor ikony wskazuje kolor diody LED.
Wskazuje miganie diody
LED.
Wskazuje świecenie diody
LED.
Page 41

Page 42

Page 43

Page 44

Page 45

Page 46

Any information might be changed due to the software update. For the latest documents, please check the official website:www.yuneec.com
 Loading...