

Page 1

TYPHOON EASY CAM
Instruction manual
Article number: 50946
Version 5.00
http://www.typhoon.de
Page 2
CE
Declaration of Conformity
EMC Directive 89/336/EEC
We, the manufacturer/importer
ANUBIS Electronic GmbH
Am Langfeld 38
66130 Saarbrücken
Germany
Declare that the product
Brand: Typhoon
Model NO: 50946
Model: Easy Cam
herewith confirmed to comply with the requirements set out in the Council Directive on the Approximation of the
Laws of the Member States relating to Electromagnetic Compatibility Directive (89/336/EEC, Amended by
92/31/EEC, 93/68/EEC & 98/13/EC), For the evaluation regarding the Electromagnetic Compatibility (89/336/EEC,
Amended by 92/31/EEC, 93/68/EEC & 98/13/EC), the following standards are applied:
For EMC
EN 55022: 1998 +A1:2000 +A2:2003
EN 61000-3-2: 2000
EN 61000-3-3: 1995+A1:2001
EN 55024: 1998+A1:2001+A2:2003
IEC 61000-4-2 : 1995+A1:1998+A2:2000;
IEC 61000-4-3 : 1995+A1:2002;
IEC 61000-4-4 : 1995+A1:2000+A2:2001;
IEC 61000-4-5 : 1995+A1:2000;
IEC 61000-4-6 : 1996+A1:2000;
IEC 61000-4-8 : 1993+A1:2000;
IEC 61000-4-11: 1994+A1:2000
˔ˡ˨˕˜˦ʳ˘˿˸˶˼˶ʳ˚˵˛ˁʳ˔ʳ˟˴˺˹˸˿˷ʳˆˋˁˉˉ˄ˆ˃ʳ˦˴˴˵Ώ˶˾˸ˁʳ˚˸˴ʳ
TYPHOON EASY CAM
Article No: 50946
All specifications and information are subject to changes without further notices
2
Page 3

Installing the Driver and Software:
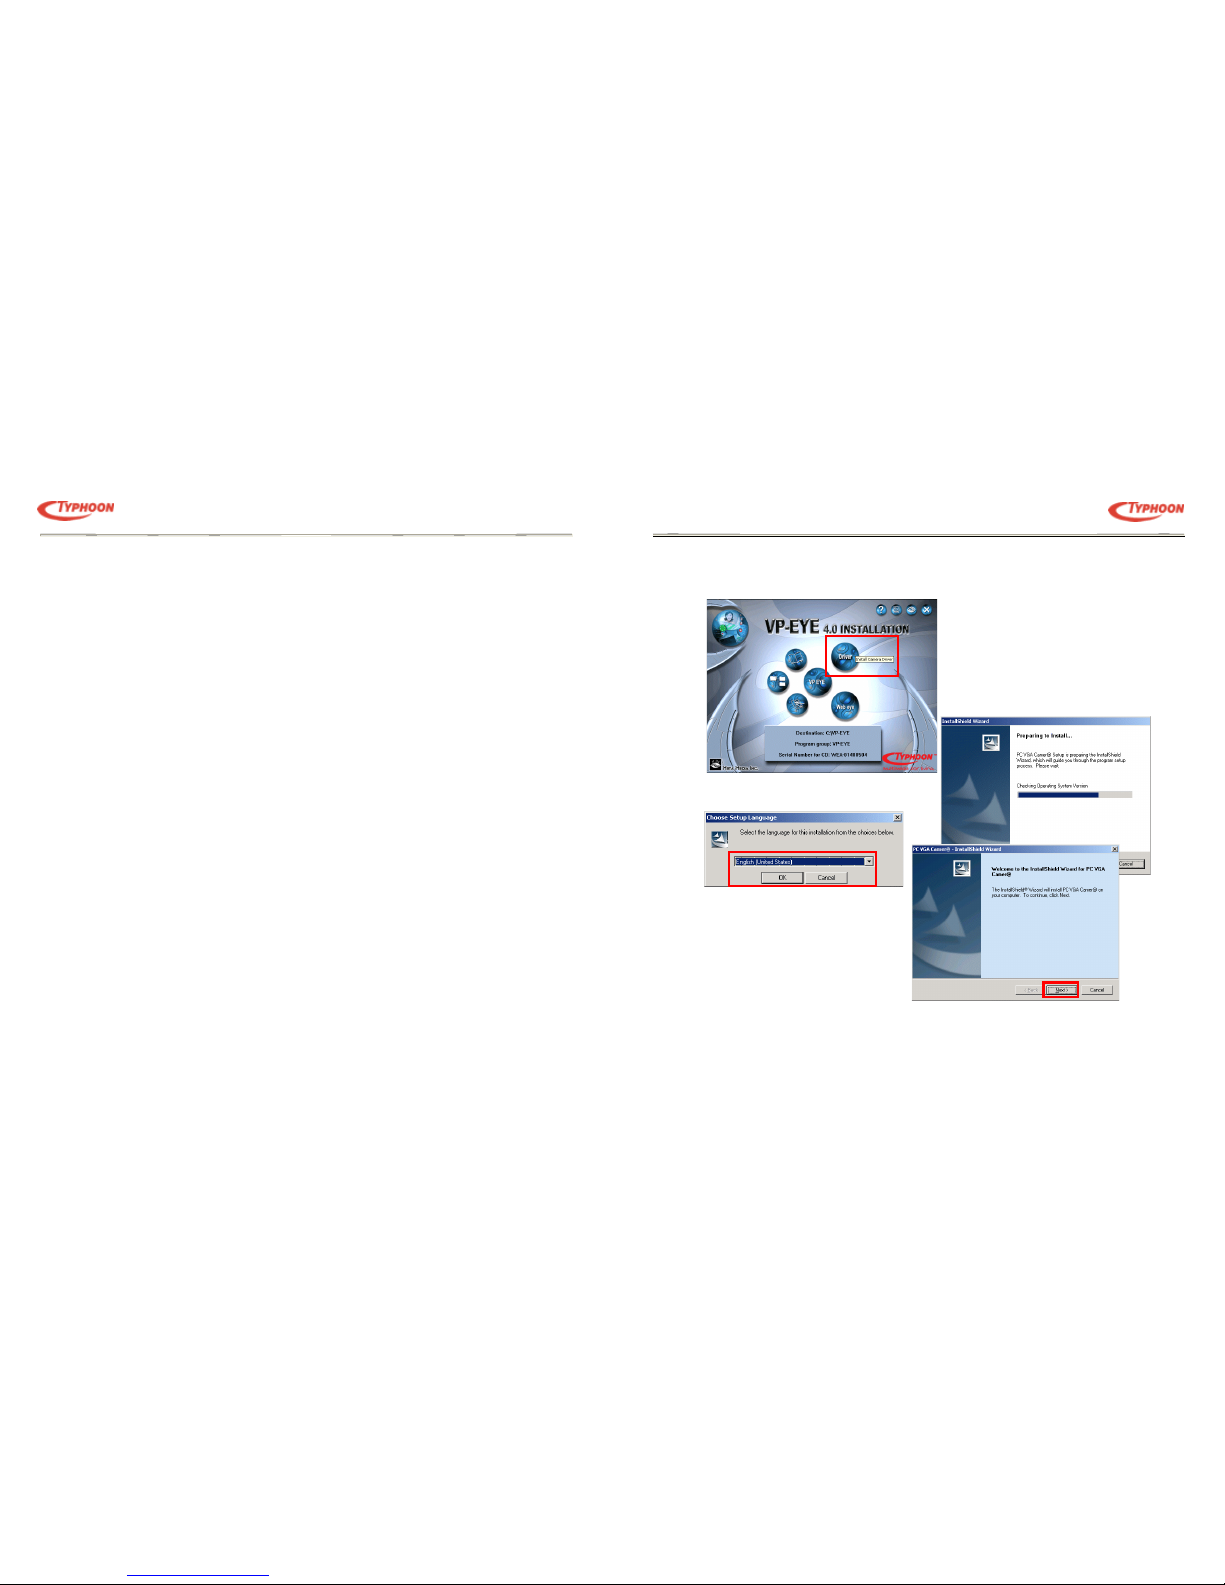
1. Place the Typhoon Easy Cam CD-ROM disc into the CD-ROM drive.
2. Do not plug in the camera first. Click on the Driver menu to install the drivers first.
3. Select the installation language and click on OK. The
installation process begins.
4. Click on “Next” button to proceed.
TYPHOON EASY CAM
Article No: 50946
All specifications and information are subject to changes without further notices
4
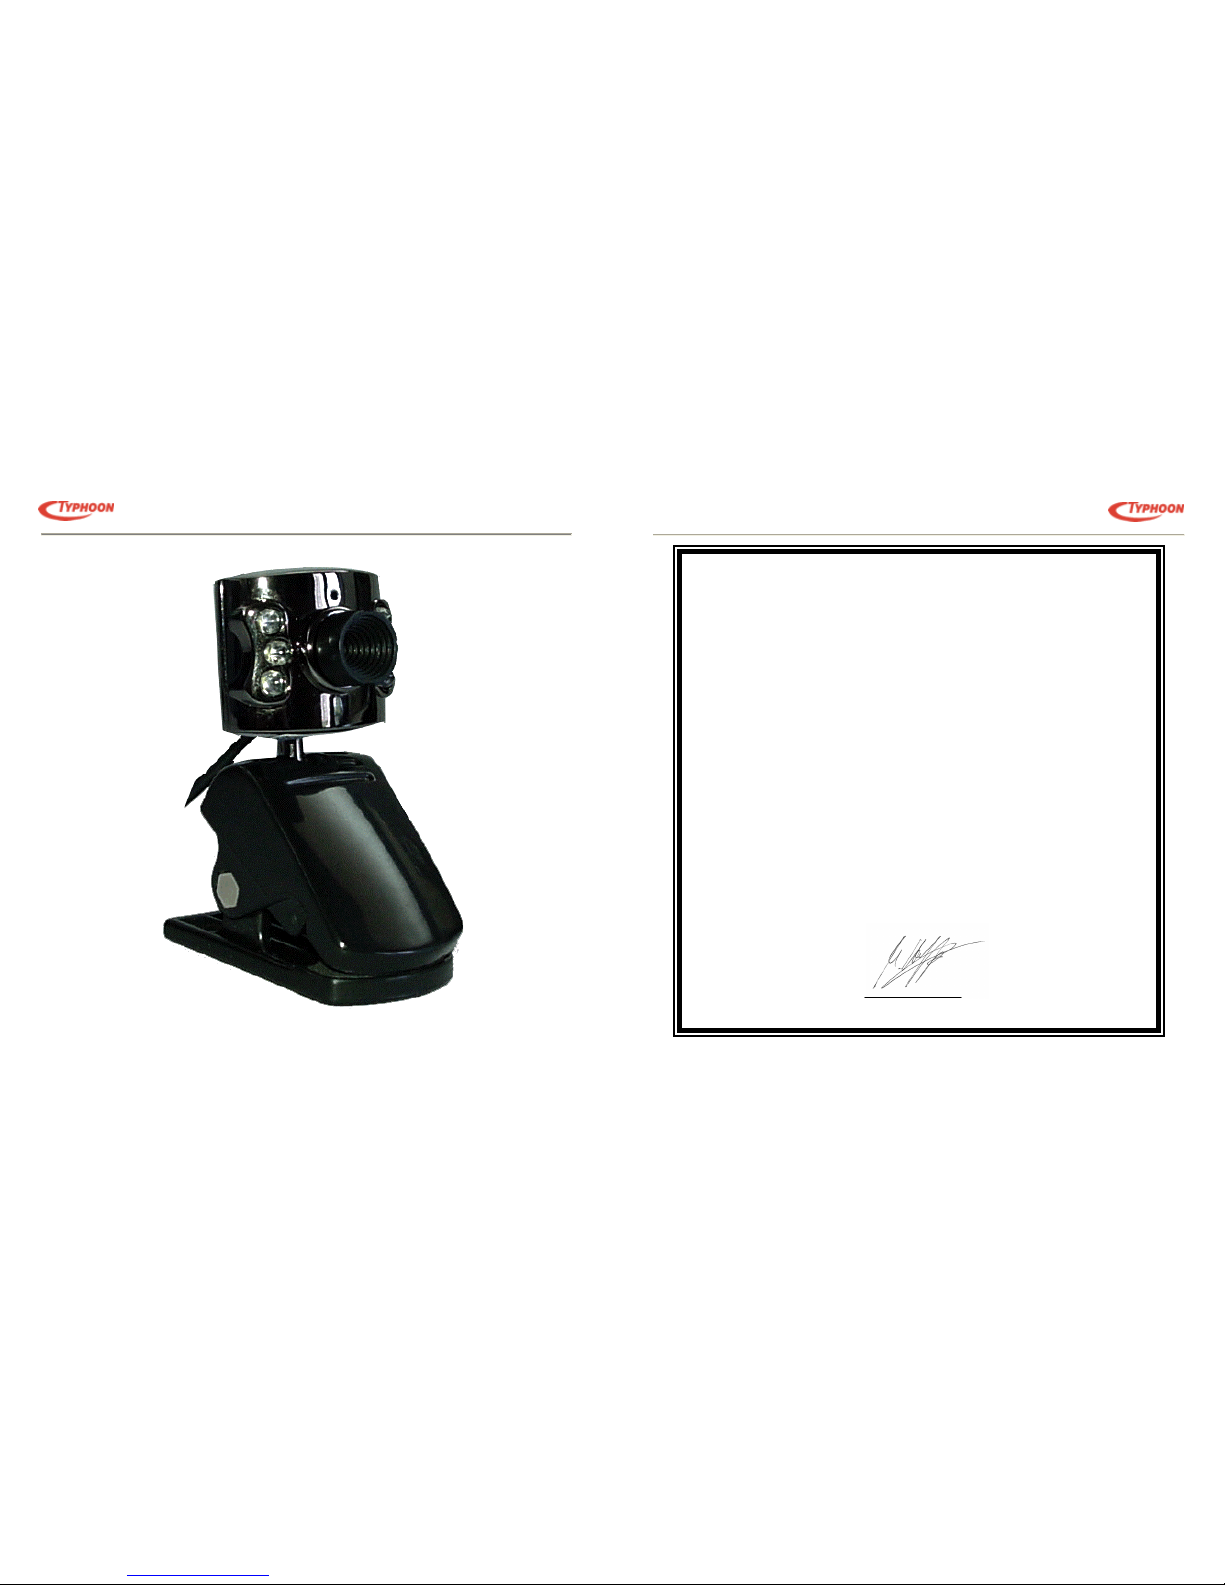
Introduction
The Typhoon Easy Cam is designed with a CIF resolution of 300,000 pixels for optimized usage with Internet Chat and Live
viewing applications. Designed with a USB 2.0 interface for easy installation and use. The USB 2.0 interface also ensures higher
bandwidth for your video applications. Use the Easy Cam in various applications such as video surveillance, video conferencing,
and webcasting over the Internet, etc.
Getting Started
Package Contents:
• Easy Cam
• Software CD-ROM
• User manual
System Requirements:
• Intel® Pentium® III 2000MHz processor or higher
• System RAM of 128MB or higher recommended
• Minimum 20MB free hard disk space for software installation
• One available USB2.0 port
• Microsoft® Windows XP, 2000
• CD-ROM drive for software installation
• VGA card with support for DIRECTX and Overlay functions
Before installation note:
Do not connect the Camera to the computer system first. Install the driver and applications first.
Insert the VP-Eye CD-ROM to the system and you can change the target group name, target directory and folder,
and run the installation options first before the driver and VP-Eye installation.
Page 4
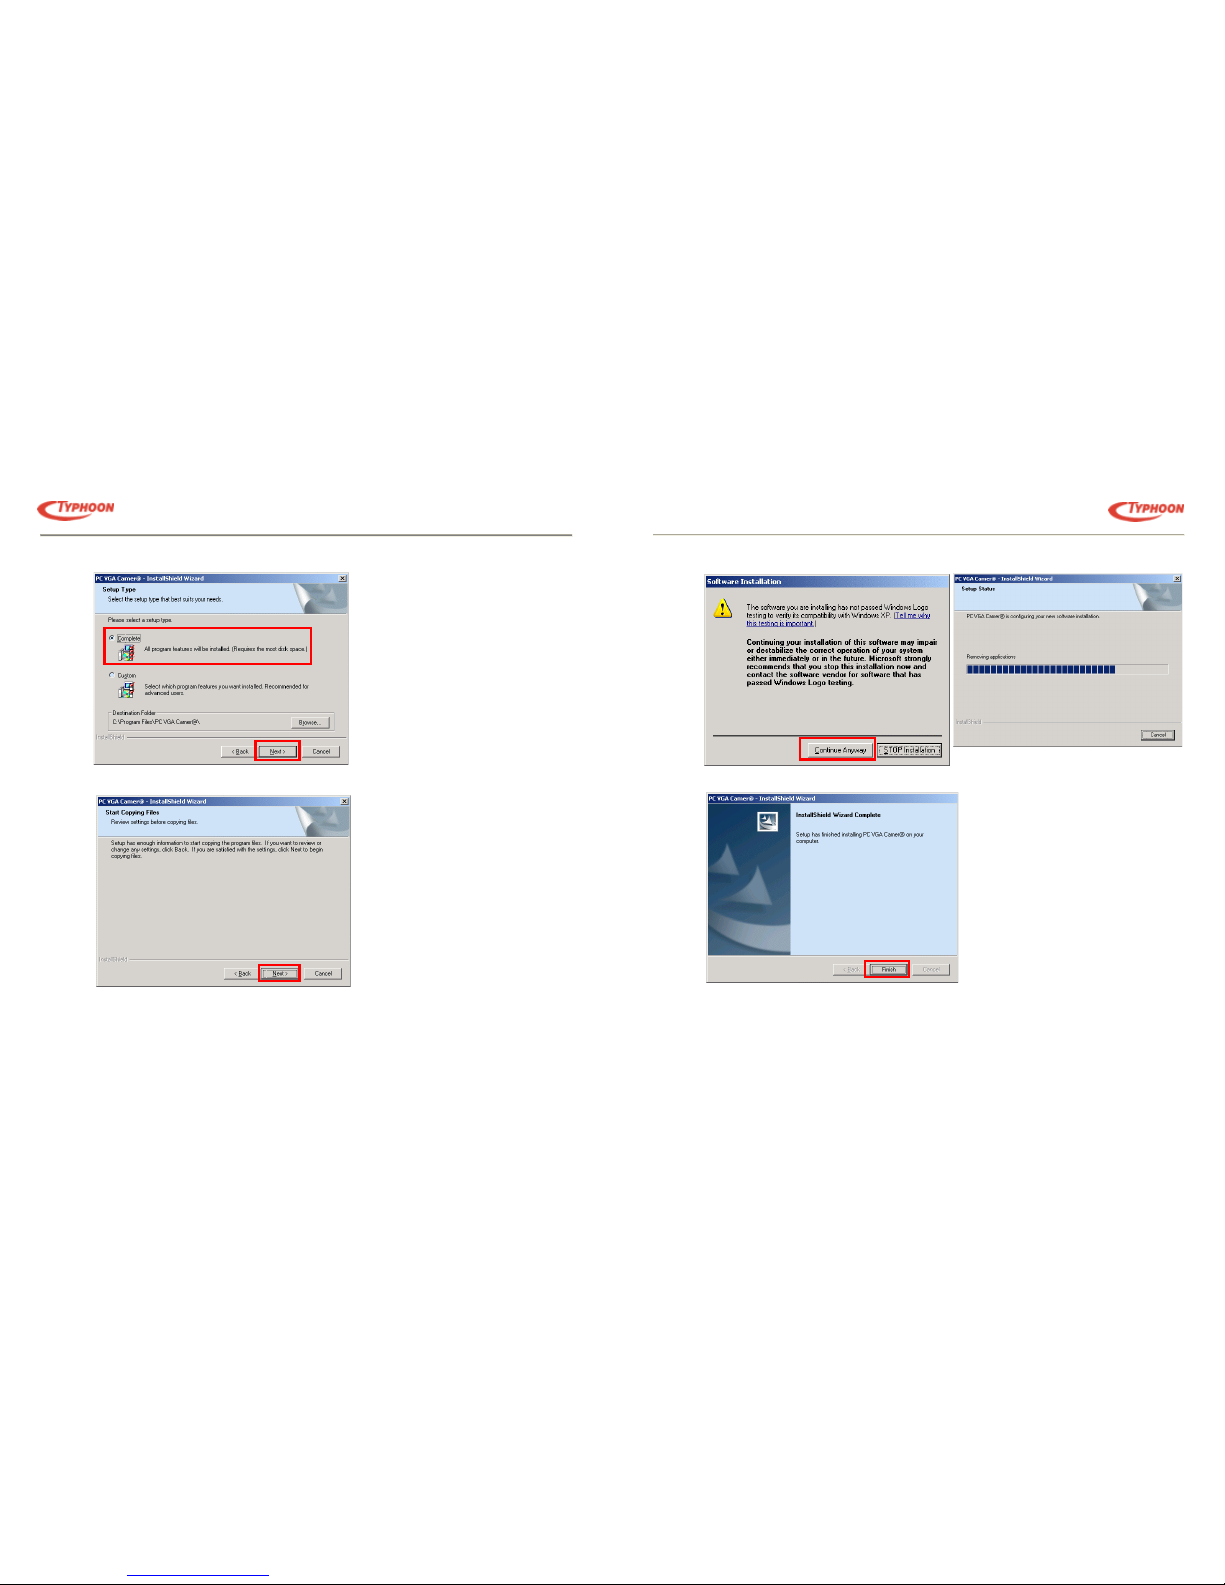
7. Windows will prompt again for another Logo testing message, do likewise as the first, click on “Continue Anyway” to
proceed. The following screen shows the installation in progress.
8. Once completed click on “Finish” button to end the installation.
TYPHOON EASY CAM
Article No: 50946
All specifications and information are subject to changes without further notices
6
5. Next select the “Complete” option to install all the drivers into the hard disk and click on “Next” to begin.
6. Click on “Next” again to begin the driver installation.
Page 5

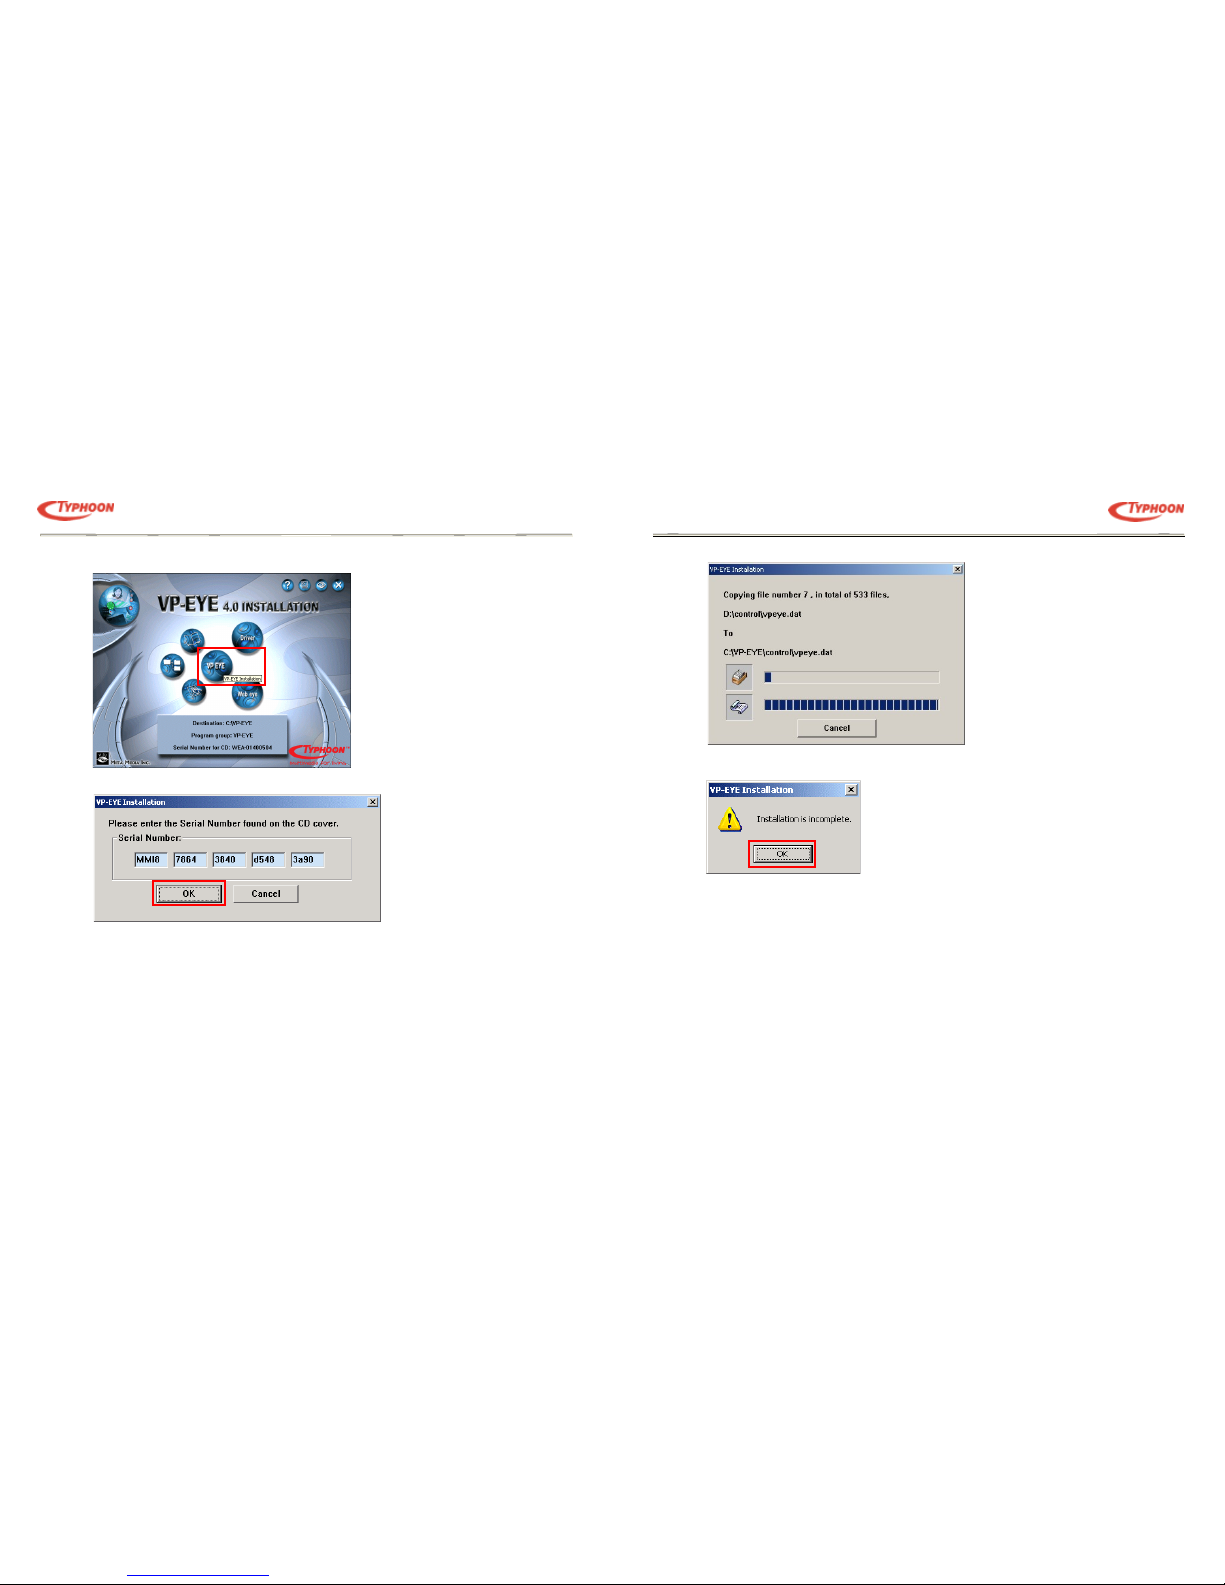
12. The VP-Eye installation begins.
13. Once completed, it will automatically end the installation process and return to the main menu again.
14. Restart the computer to have driver files loaded.
TYPHOON EASY CAM
Article No: 50946
All specifications and information are subject to changes without further notices
8
9. Go back to the opening menu and click on “Install VP-Eye”
10. Next, select the “Install” icon located under the left bottom of the opening screen.
11. Key in the serial number found on the CD sleeve and press “OK” to proceed.
Page 6
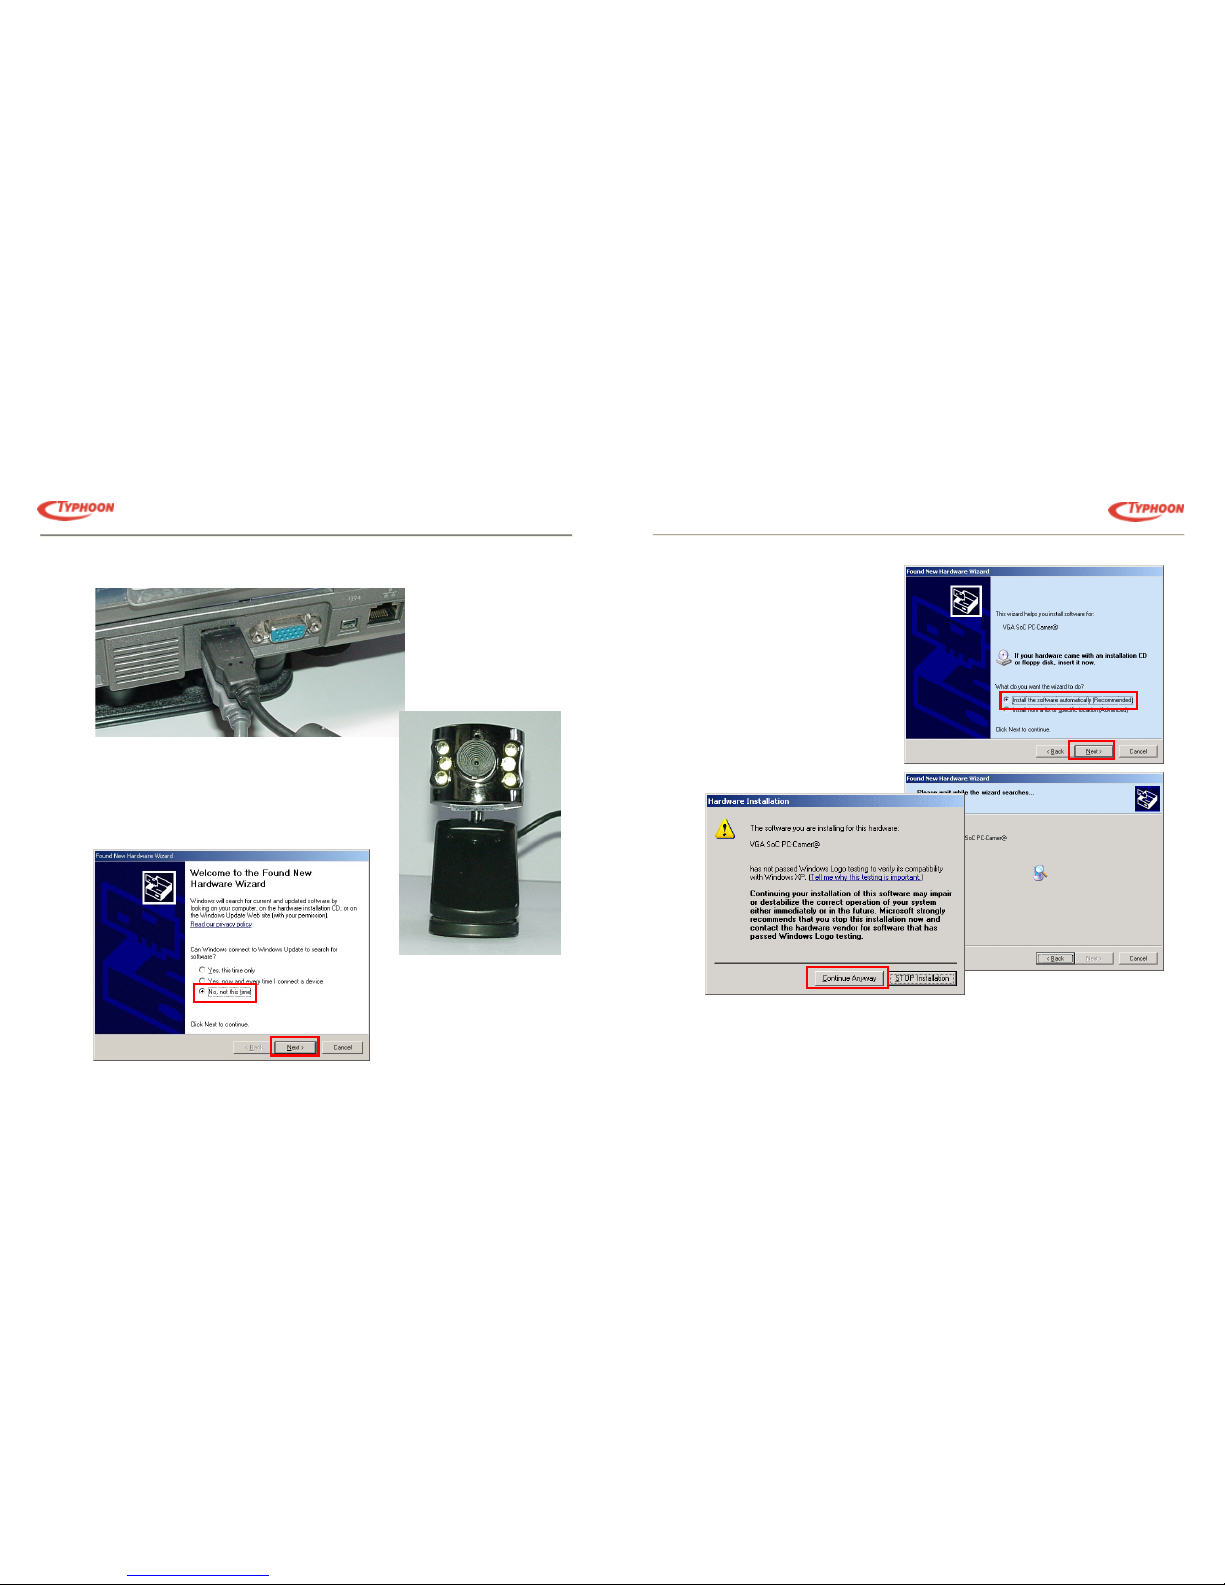
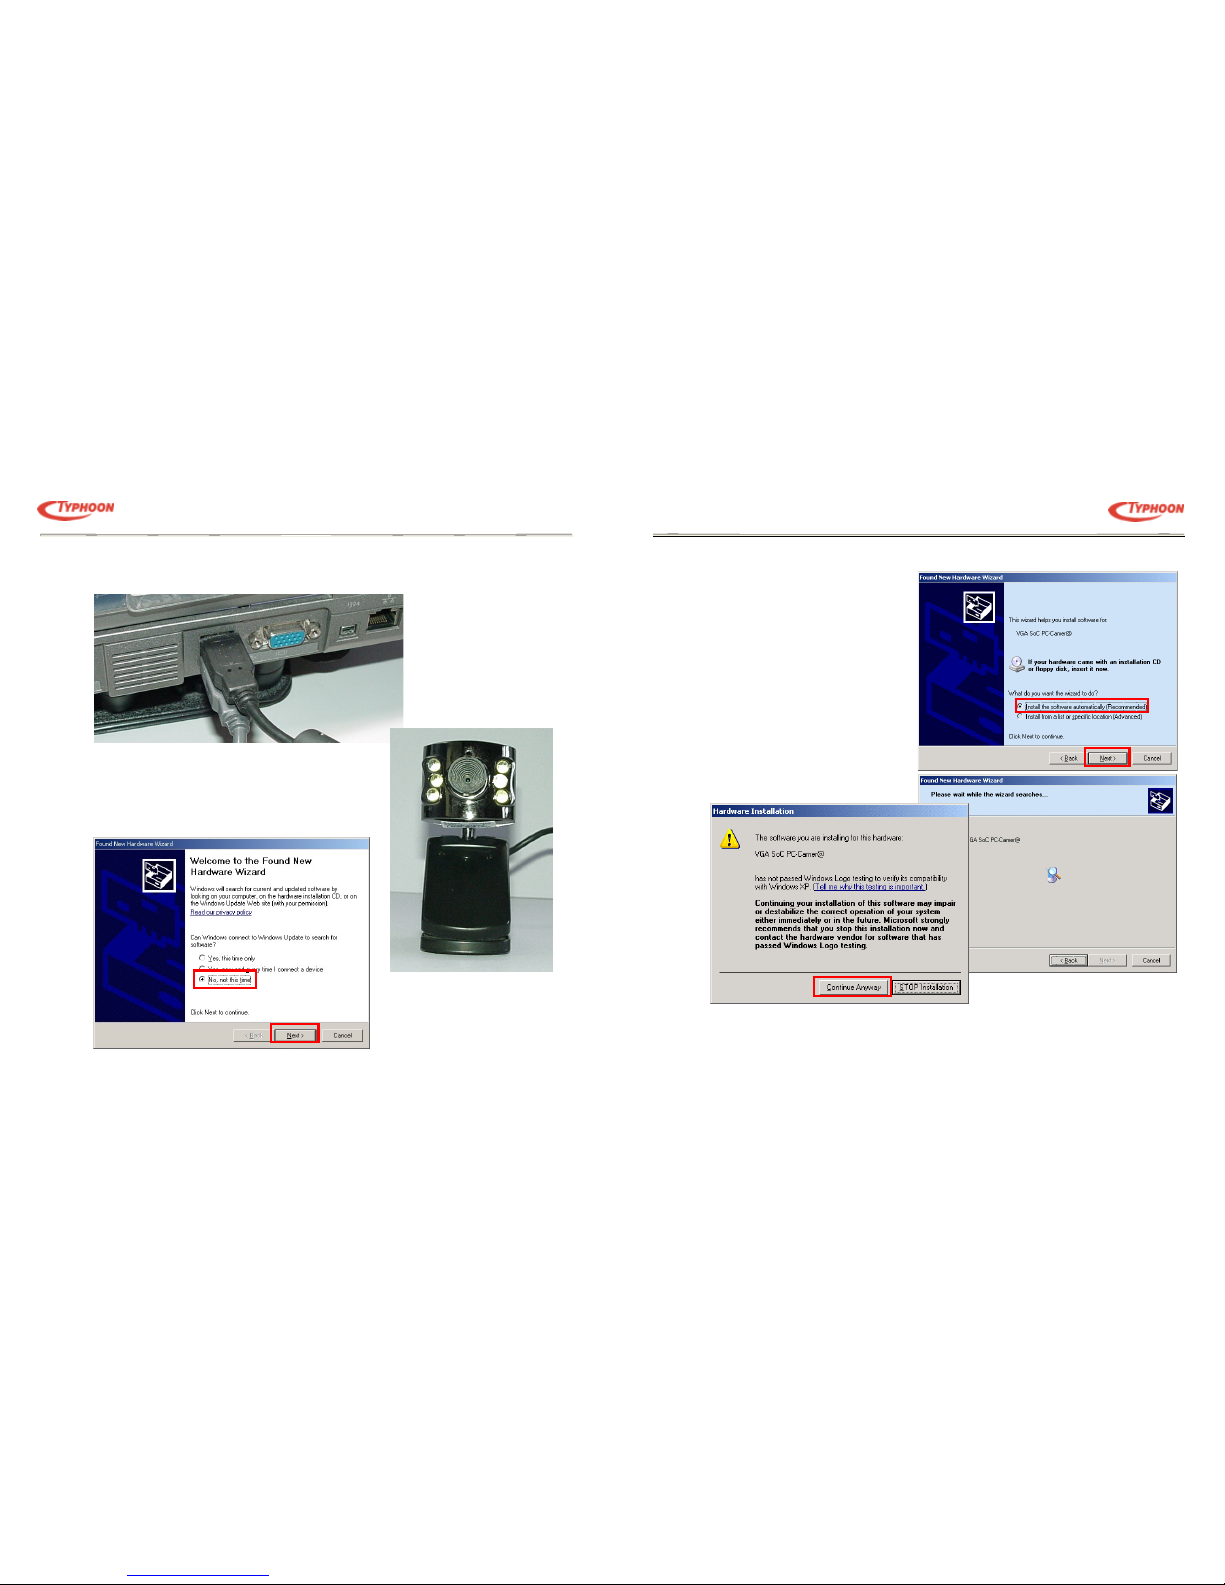
5. Select “No, not this time” since we had already installed the driver before.
6. Click on “Next” to continue.
7. The Wizard will then prompt for automatic
installation or specify a source location.
Select the first option “Install the software
automatically”. Click on “Next” button to
proceed.
8. Windows will next alert the Logo testing
option, select “Continue Anyway” and the
installation will begin.
TYPHOON EASY CAM
Article No: 50946
All specifications and information are subject to changes without further notices
10
Installing the Hardware
1. When Windows has completely loaded, insert the USB type A plug of the camera to your USB 2.0 port.
2. The camera comes with 6 white lamps, 3 on each side of the lens to
assist in lighting the subject. These will light up if the subject or area is
too dark.
3. Clamp the camera to your Notebook LCD panel or use the clamp as a
stand to upright the camera.
4. Once Windows detect the USB insertion, it will prompt for a driver
source search.
Page 7
Notes: please check followings for correct installation:
1. Confirm USB interface in PC;
2. Check the USB interface and see if it is working well;
3. Check method: Click onϘControl panelϙШϘSystemϙШϘ Hardwareϙbutton ШϘDevice managerϙtab, check the
“Universal serial bus controllers” list if it exist, and whether it works normal.
4. Ensure there are no red or yellow icons in front of each USB controller list.
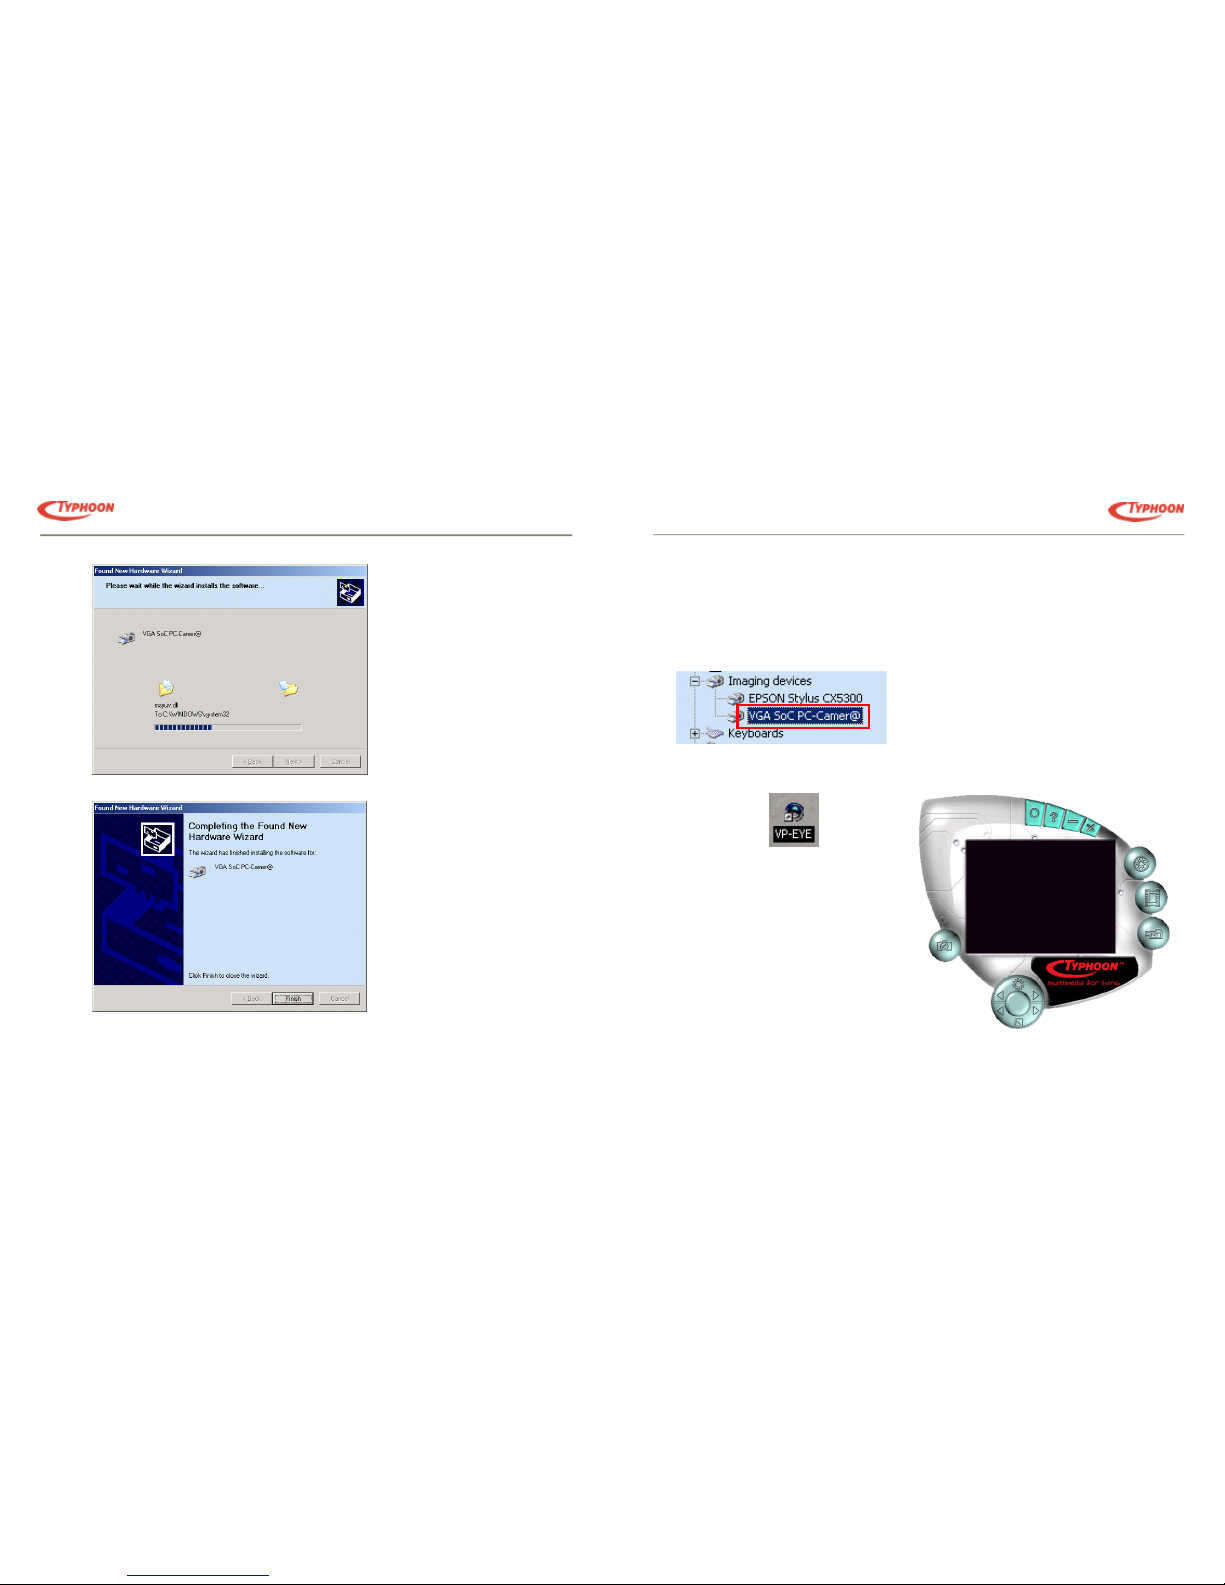
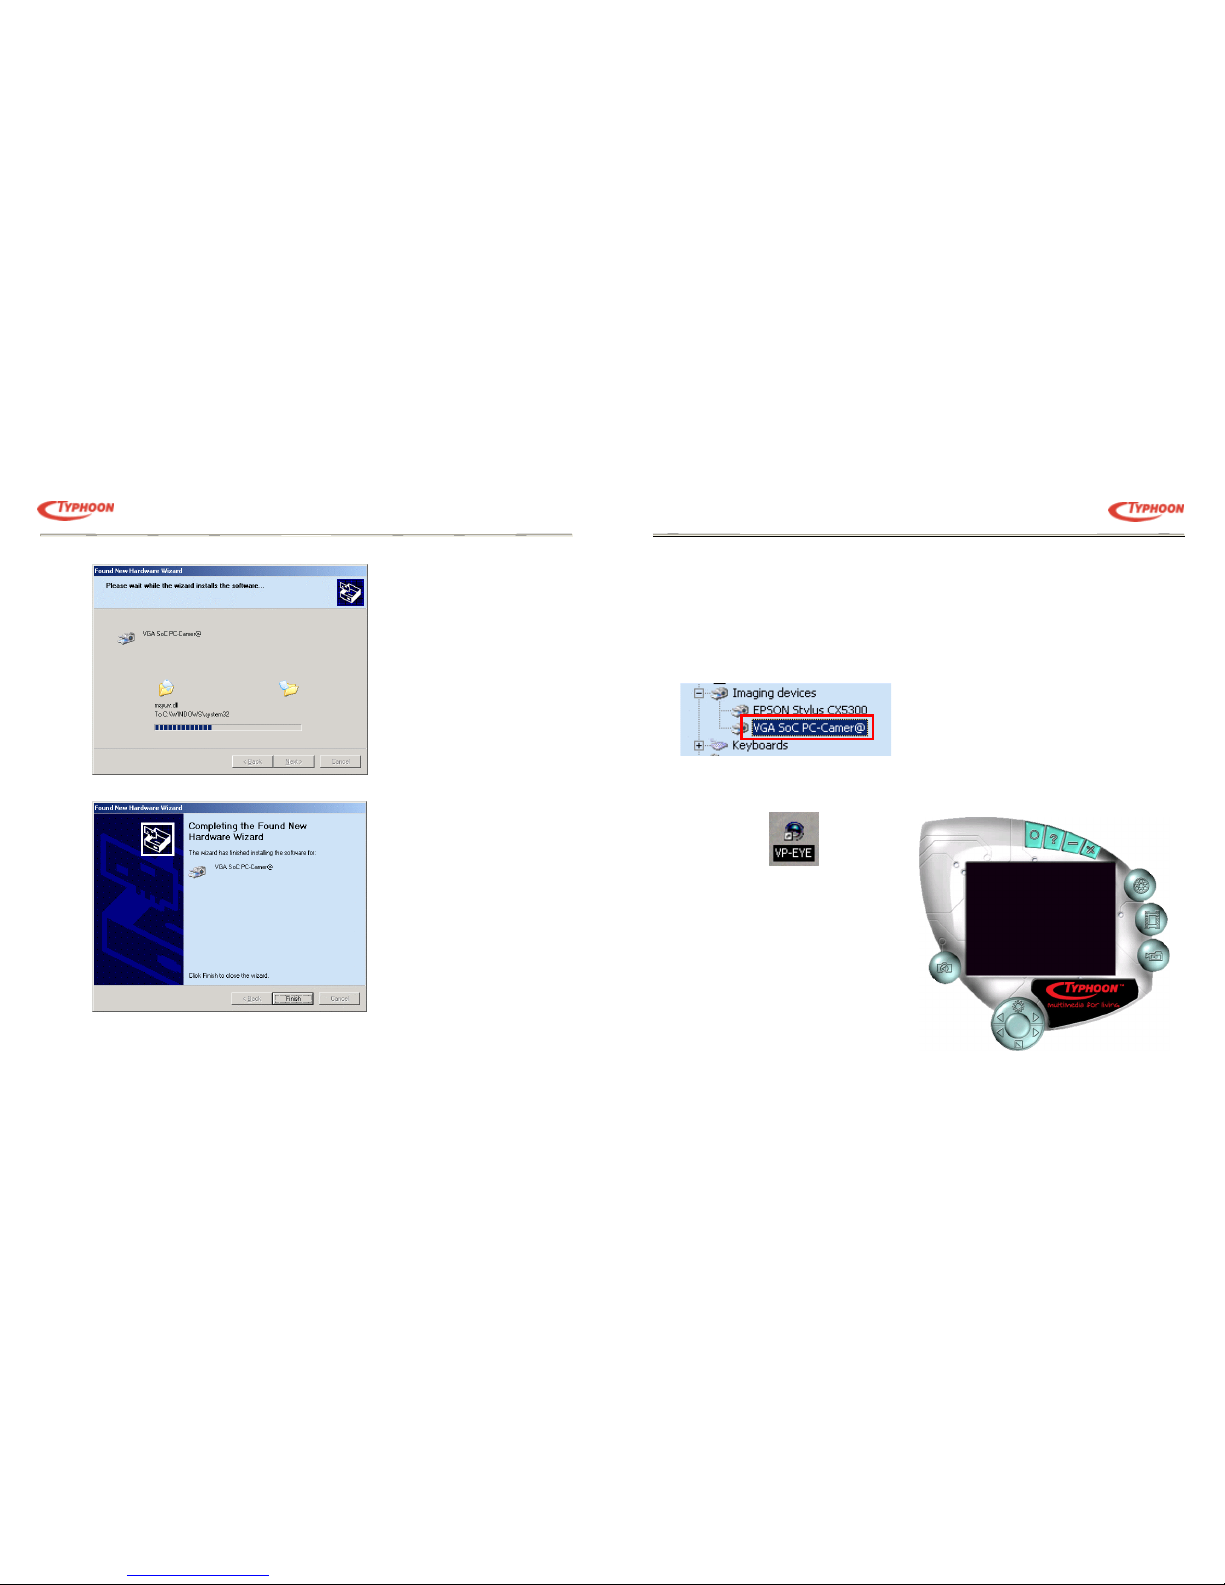
5. Next, check if Windows have detected and install the camera correctly. Go to the Imaging Device list and see if “VGA SoC
PC-Camer@” line appears in it. If it does then installation is successful.
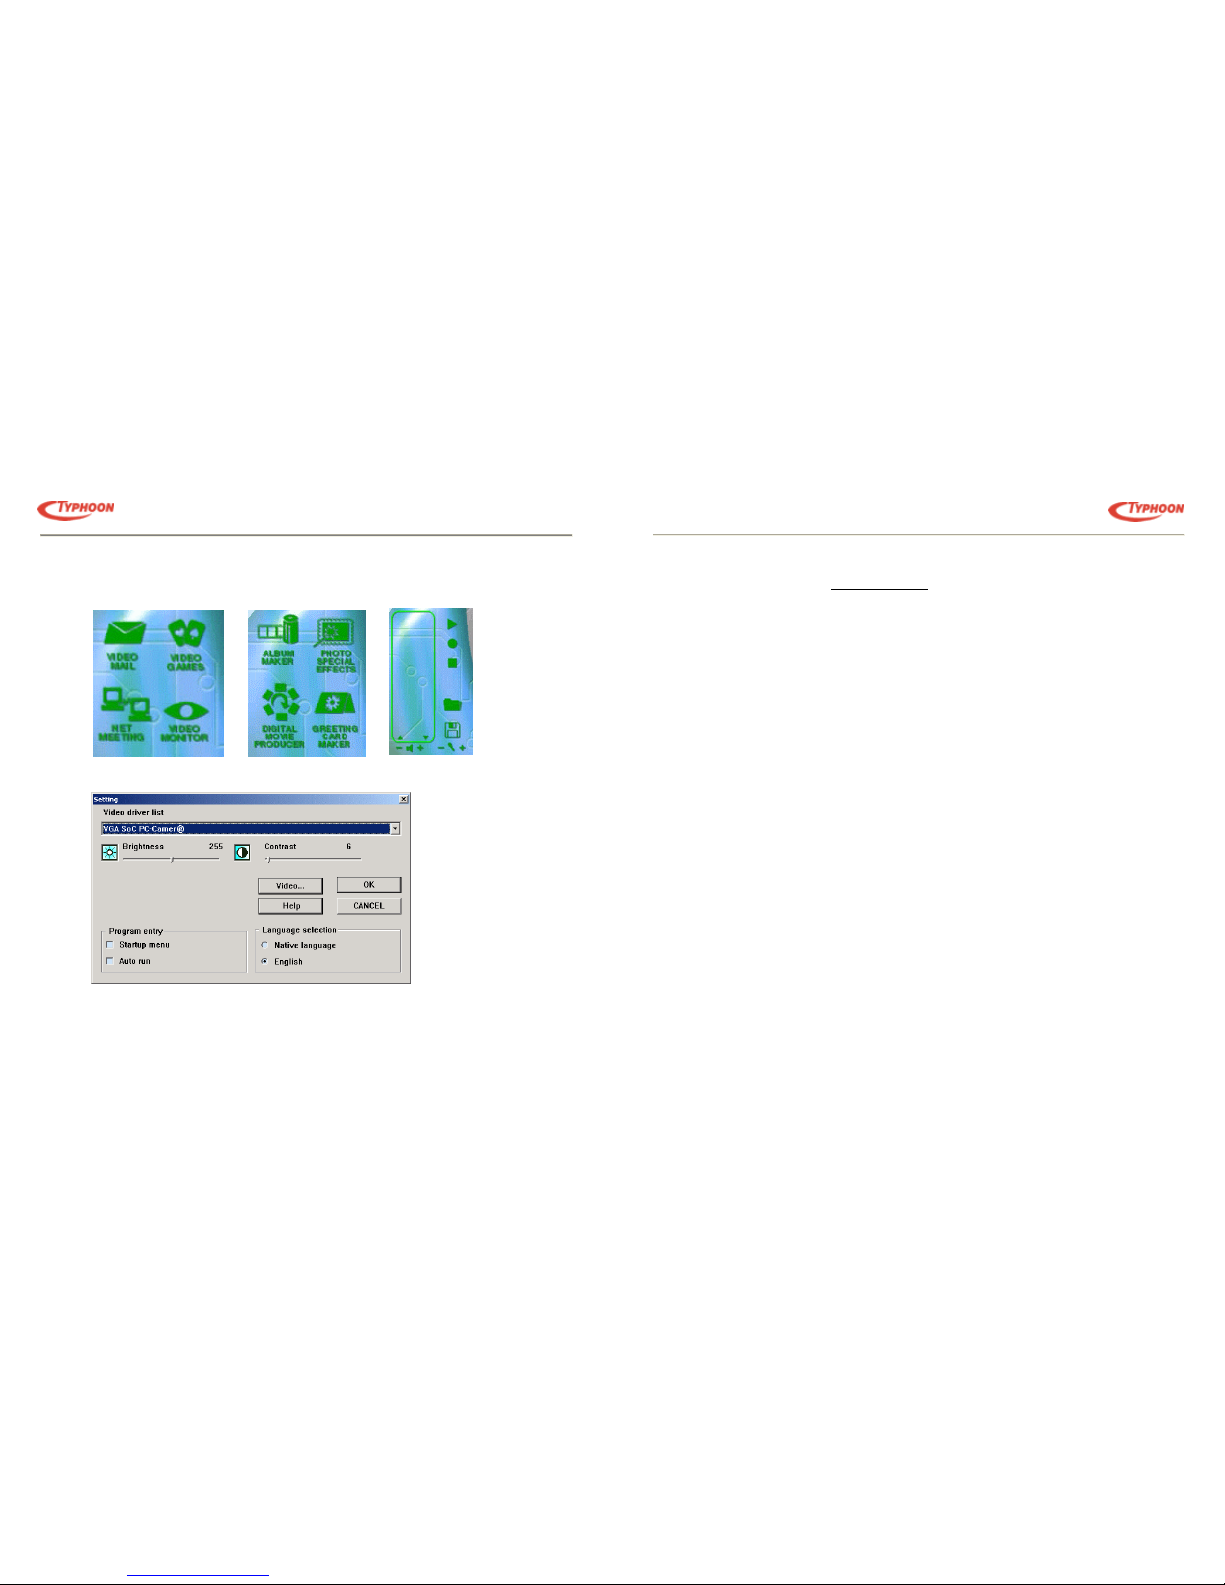
Using the Camera:
Note: The driver and software must be installed first, and then connect as following.
1. Double click on VP-Eye icon on the desktop, and the preview image will appear in the main Window.
2. The VP-Eye software contains many functions
and these are available from the main VP-Eye
screen.
TYPHOON EASY CAM
Article No: 50946
All specifications and information are subject to changes without further notices
12
9. The installation will then assign the drivers to the newly inserted camera.
10. Next and last, click on the “Finish” button to end the installation.
Page 8
Technical Support:
Please fill in the Technical Support Form at http://www.typhoon.de/
, and let us know if you have any problems using the Typhoon
Easy Cam.
Specifications:
• I/O Interface: USB2.0
• Color Arrangement: 1280 x 960 (VGA)
• Speed: 640 x 480 (VGA) 30 Frames
• Sensor specification: 1/4” CMOS 350K pixel
• Lens Specification: 3.6mm / 6mm
• Range: Up 3CM
• Focus: 30mm - infinity
• Data format: 24bit, True Colour
• S/N: >45dB
• Auto exposure and B/W balance adjustment
• Power consumption: DC5V / 65mA
• DimensionΚ37 x 75 x 51mm
TYPHOON EASY CAM
Article No: 50946
All specifications and information are subject to changes without further notices
14
3. Adjust the lens to focus the subject till it is sharp.
4. The camera is ready for use.
5. The VP-Eye have many built-in imaging applications such as Video-Mail, Netmeeting, Card Maker, Video Monitor,
Album Maker, Special effects, Image manager, and Video Games.
6. To Setup the camera features, select the Circle icon at the top right menu bar.
Video
playback
Page 9

TYPHOON EASY CAM
Benutzerhandbuch
Artikelnummer: 50946
Version 5.00
http://www.typhoon.de
Page 10

CE
Konformitätserklärung
EMV-Richtlinie 89/336/EWG
Wir, der Hersteller/Importeur,
ANUBIS Electronic GmbH
Am Langfeld 38
66130 Saarbrücken
Deutschland
erklären hiermit, dass das Produkt
Marke: Typhoon
Modellnr.: 50946
Modell: Easy Cam
die Anforderungen der Richtlinien des Rates zur Angleichung der Rechtsvorschriften der Mitgliedsstaaten über die
elektromagnetische Verträglichkeit (89/336/EWG, Änd. 92/31/EWG, 93/68/EWG & 98/13/EG) erfüllt. Zur
Beurteilung der elektromagnetischen Verträglichkeit (89/336/EWG, Änd. 92/31/EWG, 93/68/EWG & 98/13/EG)
wurden die folgenden Normen angewendet:
Für EMV
EN 55022: 1998 +A1:2000 +A2:2003
EN 61000-3-2: 2000
EN 61000-3-3: 1995+A1:2001
EN 55024: 1998+A1:2001+A2:2003
IEC 61000-4-2 : 1995+A1:1998+A2:2000;
IEC 61000-4-3 : 1995+A1:2002;
IEC 61000-4-4 : 1995+A1:2000+A2:2001;
IEC 61000-4-5 : 1995+A1:2000;
IEC 61000-4-6 : 1996+A1:2000;
IEC 61000-4-8 : 1993+A1:2000;
IEC 61000-4-11: 1994+A1:2000
˔ˡ˨˕˜˦ʳ˘˿˸˶˼˶ʳ˚˵˛ˁʳ˔ʳ˟˴˺˹˸˿˷ʳˆˋˁˉˉ˄ˆ˃ʳ˦˴˴˵ü˶˾˸ˁʳ˗˸˶˻˿˴˷ʳ
YPHOON EASY CAM
Artikelnr.: 50946
Alle technischen Daten und Informationen können ohne Ankündigung geändert werden.
2
Page 11
Installieren des Treibers und der Software:
1. Legen Sie die Typhoon Easy Cam CD-ROM in das optische Laufwerk Ihres Computers ein.
2. Schließen Sie jetzt die Kamera noch nicht an. Klicken Sie auf "Driver" (Treiber), um zuerst den Treiber zu installieren.
3. Wählen Sie die Installationssprache aus und klicken
dann auf "OK". Der Installationsvorgang beginnt.
4. Klicken Sie zum Fortfahren auf "Weiter"
(Next).
YPHOON EASY CAM
Artikelnr.: 50946
Alle technischen Daten und Informationen können ohne Ankündigung geändert werden.
4
Einführung
Die Typhoon Easy Cam mit einer CIF-Auflösung von 300.000 Pixel ist für eine optimale Verwendung mit Internet Chat- und
Livebild-Anwendungsprogrammen konzipiert. Sie ist mit einer USB 2.0-Schnittstelle für eine einfache Installation und
Verwendung ausgestattet. Die USB 2.0-Schnittstelle bietet auch eine höhere Bandbreite für Videoanwendungen. Sie können die
Easy Cam für verschiedene Anwendungen wie z.B. Videoüberwachung, Videokonferenzsitzung und Webcasting über das Internet
usw. verwenden.
Inbetriebnahme
Paketinhalt:
• Easy Cam
• Software CD-ROM
• Benutzerhandbuch
Systemanforderungen:
• Intel® Pentium® III 2000MHz-Prozessor oder höhere Klasse
• System RAM von 128MB oder am besten noch mehr
• Mindestens 20MB freier Speicherplatz auf der Festplatte für die Softwareinstallation
• Ein freier USB2.0-Anschluss
• Microsoft® Windows XP, 2000
• CD-ROM-Laufwerk für Softwareinstallation
• VGA-Karte mit Unterstützung für DIRECTX- und Overlay-Funktionen
Hinweis zur Installation:
Verbinden Sie die Kamera nicht vor der Installation mit dem Computer. Installieren Sie zuerst den Treiber und die
Applikationen.
Legen Sie die VP-Eye CD-ROM in Ihren Computer ein. Sie können den Namen der Programmgruppe, den
Zielordner und die Installationsoptionen ändern, bevor Sie die Installation des Treiber und der VP-EyeApplikationen starten.
Page 12

7. Windows öffnet ein Dialogfenster über den Logo-Test. Klicken Sie zum Fortfahren auf "Installation fortsetzen". Das
nächste Fenster zeigt den Installationsprozess an.
8. Klicken Sie nach dem Abschluss des Vorgangs auf "Fertig stellen", um die Installation zu beenden.
YPHOON EASY CAM
Artikelnr.: 50946
Alle technischen Daten und Informationen können ohne Ankündigung geändert werden.
6
5. Wählen Sie die Option "Vollständig" (Complete), um alle Treiberfunktionen zu installieren. Klicken Sie anschließend
auf "Weiter" (Next), um fortzufahren.
6. Klicken Sie noch einmal auf "Weiter" (Next), um die Treiberinstallation zu starten.
Page 13
12. Der VP-Eye-Installationsvorgang beginnt.
13. Der Installationsvorgang wird automatisch fertig gestellt. Anschließend wird das Anfangsmenü wieder angezeigt.
14. Starten Sie den Computer neu, um die Treiberdateien zu laden.
YPHOON EASY CAM
Artikelnr.: 50946
Alle technischen Daten und Informationen können ohne Ankündigung geändert werden.
8
9. Kehren Sie zum Anfangsmenü zurück und klicken auf "Install VP-Eye" (VP-Eye installieren).
10. Klicken Sie anschließend auf das "Install" (Installieren)-Symbol unten links auf dem Anfangsmenü.
11. Geben Sie die Seriennummer, die Sie auf der CD-Hülle finden, ein und klicken dann zum Fortfahren auf "OK".
Page 14
5. Wählen Sie "Nein, dieses Mal nicht", da Sie zuvor bereits den Treiber installiert haben.
6. Klicken Sie zum Fortfahren auf "Weiter" (Next).
7. Der Assistent fragt, ob die Installation
automatisch ausgeführt werden sollte oder
Sie die Quelle angegeben möchten. Wählen
Sie die erste Option "Software automatisch
installieren". Klicken Sie zum Fortfahren auf
"Weiter" (Next).
8. Windows öffnet ein Dialogfenster über den
Logo-Test. Klicken Sie zum Fortfahren auf
"Installation fortsetzen".
YPHOON EASY CAM
Artikelnr.: 50946
Alle technischen Daten und Informationen können ohne Ankündigung geändert werden.
10
Installieren der Hardware
1. Nachdem Windows hochgefahren ist, stecken Sie bitte den USB-Stecker Typ A von der Kamera in einen USB 2.0-
Anschluss am Computer ein.
2. Die Kamera ist mit 6 weißen Lampen, jeweils 3 auf jeder Seite des
Objektivs zur besseren Belichtung des Objekts, ausgestattet. Dies ist
nützlich, wenn das Objekt oder die Umgebung zu dunkel ist.
3. Befestigen Sie die Kamera an dem LCD-Bildschirm des Notebooks.
Oder verwenden Sie die Klammer als Ständer, um die Kamera
aufrecht hinzustellen.
4. Wenn Windows das USB-Gerät erkennt, sucht es nach dem Treiber.
Page 15
Hinweis: Nehmen Sie bitte folgende Überprüfungen vor, ob die Installation erfolgreich war:
1. Überprüfen Sie die USB-Schnittstelle Ihres PCs.
2. Prüfen Sie, ob die USB-Schnittstelle richtig funktioniert.
3. Prüfmethode: Klicken Sie auf "Systemsteuerung" Ш "System" Ш die "Hardware"-Schaltfläche Ш den "Geräte-Manager"-
Registerreiter und prüfen, ob das Element "Universal serial bus controllers" existiert und richtig funktioniert.
4. Stellen Sie sicher, dass kein rotes oder gelbes Symbol vor einem USB-Controller-Element erscheint.
5. Prüfen Sie anschließend, ob Windows die Kamera erkannt und richtig installiert hat. Gehen Sie zu dem Element
"Bildbearbeitungsgerät" und prüfen, ob "VGA SoC PC-Camer@" aufgeführt ist. Wenn ja, dann war die Installation
erfolgreich.
Verwenden der Kamera:
Hinweis: Der Treiber und die Software müssen zuerst installiert werden, bevor Sie die Verbindung vornehmen können.
1. Klicken Sie doppelt auf das VP-Eye-Symbol auf dem Desktop. Das Vorschaufeld wird in dem Hauptfenster
erscheinen.
2. Die VP-Eye Software enthält viele Funktionen,
die auf dem VP-Eye-Hauptfenster zugänglich
sind.
YPHOON EASY CAM
Artikelnr.: 50946
Alle technischen Daten und Informationen können ohne Ankündigung geändert werden.
12
9. Die Installation weist dann den Treiber der neulich angeschlossenen Kamera zu.
10. Klicken Sie zum Schluss auf "Fertig stellen", um die Installation zu beenden.
Page 16

Technische Unterstützung:
Bitte füllen Sie das Formular für die technische Anfrage auf der Website http://www.typhoon.de/
aus, wenn Sie Probleme bei der
Verwendung der Typhoon Easy Cam haben.
Technische Daten:
• E/A-Schnittstelle: USB2.0
• Farbeinstellung: 1280 x 960 (VGA)
• Geschwindigkeit: 640 x 480 (VGA) 30 Bilder
• Sensorspezifikation: 1/4" CMOS 350K Pixel
• Objektivspezifikation: 3,6mm / 6mm
• Bereich: Ab 3 cm
• Fokus: 30mm bis unendlich
• Dateiformat: 24Bit, TrueColor
• Signal/Rausch-Verhältnis: >45dB
• Automatische Belichtung und Weißabgleicheinstellung
• Stromversorgung: DC5V / 65mA
• Abmessungen: 37 x 75 x 51mm
YPHOON EASY CAM
Artikelnr.: 50946
Alle technischen Daten und Informationen können ohne Ankündigung geändert werden.
14
3. Passen Sie das Objektiv an, um Ihr Objekt scharf zu stellen.
4. Die Kamera ist betriebsbereit.
5. Im VP-Eye sind viele integrierte Bildbearbeitungsapplikationen wie z.B. Video-Mail, Netmeeting, Card Maker, Video
Monitor, Album Maker, Special effects, Image manager und Video Games integriert.
6. Klicken Sie auf das runde Symbol rechts oben auf dem Menü, um die Kamerafunktionen einzustellen.
Videowiedergabe
Page 17

TYPHOON EASY CAM
Manuel d’instructions
Numéro d’article : 50946
Version 5.00
http://www.typhoon.de
Page 18

CE
Déclaration de conformité
Directive EMC 89/336/EEC
Nous, fabricant ou importateur
ANUBIS Electronic GmbH
Am Langfeld 38
66130 Saarbrücken
Allemagne
Déclarons que le produit
Marque : Typhoon
No. de modèle : 50946
Modèle : Easy Cam
concerné par les présentes respecte les exigences contenues dans la Directive du Conseil concernant l’approximation
des Etats membres se rapportant à la Directive de compatibilité électromagnétique (89/336/EEC, amendée par
92/31/EEC, 93/68/EEC et 98/13/EC). Pour l’évaluation de la compatibilité électromagnétique (89/336/EEC,
amendée par 92/31/EEC, 93/68/EEC et 98/13/EC), les normes suivantes s’appliquent :
Pour la compatibilité électromagnétique
EN 55022: 1998 +A1:2000 +A2:2003
EN 61000-3-2: 2000
EN 61000-3-3: 1995+A1:2001
EN 55024: 1998+A1:2001+A2:2003
IEC 61000-4-2 : 1995+A1:1998+A2:2000;
IEC 61000-4-3 : 1995+A1:2002;
IEC 61000-4-4 : 1995+A1:2000+A2:2001;
IEC 61000-4-5 : 1995+A1:2000;
IEC 61000-4-6 : 1996+A1:2000;
IEC 61000-4-8 : 1993+A1:2000;
IEC 61000-4-11: 1994+A1:2000
˔ˡ˨˕˜˦ʳ˘˿˸˶˼˶ʳ˚˵˛ˁʳ˔ʳ˟˴˺˹˸˿˷ʳˆˋˁˉˉ˄ˆ˃ʳ˦˴˴˵Ώ˶˾˸ˁʳ˔˿˿˸˴˺˸ʳ
TYPHOON EASY CAM
No. d’article : 50946
Toutes les spécifications et informations sont susceptibles de modification sans autre avis
2
Page 19

Installation des pilotes et logiciels :
1. Placez le CD-ROM Typhoon Easy Cam dans l’unité CD-ROM.
2. Ne commencez pas par brancher la caméra. Cliquez d’abord sur le menu Driver pour les installer.
3. Sélectionnez la langue d’installation puis cliquez sur
OK. Le processus d’installation commence.
4. Cliquez sur le bouton “Suivant” (Next) pour
continuer.
TYPHOON EASY CAM
No. d’article : 50946
Toutes les spécifications et informations sont susceptibles de modification sans autre avis
4
Introduction
La Typhoon Easy Cam a été conçue avec une résolution CIF de 300.000 pixels pour une utilisation optimisée avec la messagerie
instantanée sur Internet et les applications avec visualisation en direct. Conçue avec une interface USB 2.0 pour une installation et
une utilisation faciles. L’interface USB 2.0 permet également de disposer d’une bande passante plus large pour vos applications.
Utilisez l’Easy Cam dans diverses applications telles que la vidéosurveillance, la visioconférence ou la diffusion web sur Internet,
etc.
Mise en route
Contenu du paquet :
• Easy Cam
• CD-ROM logiciels
• Manuel de l’utilisateur
Configuration requise :
• Processeur Intel® Pentium® III 2000MHz ou plus
• RAM système de 128 Mo ou plus recommandée
• Au moins 20 Mo d’espace disponible sur le disque dur pour l’installation des logiciels
• Un port USB2.0 disponible
• Microsoft® Windows XP, 2000
• Unité CD-ROM pour l’installation des logiciels
• Carte VGA avec prise en charge de DIRECTX et la fonction incrustation
Remarque avant l’installation :
Ne commencez pas par connecter la caméra à votre système informatique. Installez d’abord les pilotes et les
applications.
Insérez le CD-ROM VP-Eye dans le système, et vous pouvez changer le nom du groupe cible, le répertoire cible et
le dossier, puis exécutez les options d’installation avant de procéder à l’installation du pilote et de VP-Eye.
Page 20

7. Windows affiche de nouveau le message test Logo, faites comme pour le premier message et cliquez sur “Continuer”
(Continue Anyway) pour continuer. L’écran suivant indique que l’installation est en cours.
8. Une fois que c’est terminé, cliquez sur le bouton “Terminer” (Finish) pour terminer l’installation.
TYPHOON EASY CAM
No. d’article : 50946
Toutes les spécifications et informations sont susceptibles de modification sans autre avis
6
5. Sélectionnez ensuite l’option “Complète” (Complete) pour installer tous les pilotes sur le disque dur, puis cliquez sur
“Suivant” (Next) pour commencer.
6. Cliquez de nouveau sur “Suivant” (Next) pour lancer l’installation des pilotes.
Page 21

12. L’installation de VP-Eye commence.
13. Une fois l’installation terminée, le processus d’installation s’interrompt automatiquement et vous retournez sur le
menu principal.
14. Redémarrez l’ordinateur pour charger les fichiers de pilotage.
TYPHOON EASY CAM
No. d’article : 50946
Toutes les spécifications et informations sont susceptibles de modification sans autre avis
8
9. Retournez sur le menu initial et cliquez sur “Installer VP-Eye” (Install VP-Eye)
10. Ensuite, sélectionnez l’icône “Installer” (Install) située en bas à gauche de l’écran initial.
11. Tapez le numéro de série qui se trouve sur l’enveloppe du CD et appuyez sur “OK” pour continuer.
Page 22

5. Sélectionnez “Non, pas cette fois” (No, not this time) étant donné que vous avez déjà installé les pilotes.
6. Cliquez sur “Suivant” (Next) pour continuer.
7. L’Assistant vous demande si vous voulez
procéder à une installation automatique ou si
vous voulez spécifier un emplacement source.
Sélectionnez l’option “Installer les logiciels
automatiquement” (Install the software
automatically). Cliquez sur le bouton
“Suivant” (Next) pour continuer.
8. Windows affiche ensuite l’option test Logo,
sélectionnez “Continuer” (Continue Anyway) et l’installation commence.
TYPHOON EASY CAM
No. d’article : 50946
Toutes les spécifications et informations sont susceptibles de modification sans autre avis
10
Installation du matériel
1. Lorsque Windows a fini de se charger, insérez la fiche USB de type A de la caméra sur votre port USB 2.0.
2. La caméra possède six voyants blancs, trois de chaque côté de l’objectif,
qui aident à éclairer le sujet. Ces voyants sont utiles si le sujet ou la zone
est trop sombre.
3. Accrochez la caméra sur le panneau LCD de votre ordinateur notebook
ou bien servez-vous de la pince comme d’un support pour placer la
caméra debout.
4. Une fois que Windows a détecté l’insertion de la fiche USB, il demande
à rechercher la source du pilote.
Page 23

Remarques : Pour garantir une installation correcte, veuillez procéder aux vérifications
suivantes :
1. Vérifiez que le PC a bien une interface USB ;
2. Contrôlez l’interface USB pour vous assurer qu’elle fonctionne bien ;
3. Méthode de contrôle : ϘCliquez sur Panneau de configurationϙ (Control panel) ШϘSystèmeϙ (System) Ш bouton
ϘMatérielϙ ( Hardware) ШϘonglet Gestionnaire de périphériquesϙ (Device manager), vérifiez queϘContrôleurs bus
série universel ϙ(Universal serial bus controllers) est bien dans la liste et que cet élément fonctionne bien normalement.
4. Assurez-vous que la liste des contrôleurs USB ne comporte pas d’icône rouge ou jaune.
5. Ensuite, vérifiez que Windows a bien détecté et installé la caméra correctement. Allez dans la liste Périphériques graphiques
et voyez si une ligne “VGA SoC PC-Camer@” est bien mentionnée. Si c’est le cas, cela signifie que l’installation est réussie.
Utilisation de la caméra :
Remarque : Il faut procéder d’abord à l’installation des pilotes et des logiciels avant de procéder à la connexion, qui se fait de la
façon suivante.
1. Double-cliquez sur l’icône VP-Eye sur le bureau, et l’image d’aperçu s’affiche dans la fenêtre principale.
2. Le logiciel VP-Eye contient de nombreuses
fonctions qui sont disponibles à partir de l’écran
principal de VP-Eye.
TYPHOON EASY CAM
No. d’article : 50946
Toutes les spécifications et informations sont susceptibles de modification sans autre avis
12
9. L’installation attribue alors les pilotes à la nouvelle caméra insérée.
10. Enfin, cliquez sur le bouton “Terminer” (Finish) pour terminer l’installation.
Page 24

Assistance technique :
Veuillez remplir le Formulaire d’assistance technique sur http://www.typhoon.de/
, et communiquez-nous tout problème que vous
pourriez avoir lors de l’utilisation de Typhoon Easy Cam.
Spécifications :
• Interface E/S : USB2.0
• Résolution : 1280 x 960 (VGA)
• Vitesse : 640 x 480 (VGA) 30 trames
• Spécifications du capteur : 1/4” CMOS 350K pixels
• Spécifications de l’objectif : 3,6mm / 6mm
• Portée : Jusqu’à 3CM
• Mise au point : 30mm - infini
• Format de données : 24 bits, Couleurs réelles
• Niveau de bruit : >45dB
• Réglages exposition auto et balance N/B
• Consommation électrique : 5 V CC/ 65mA
• Dimensions : 37 x 75 x 51mm
TYPHOON EASY CAM
No. d’article : 50946
Toutes les spécifications et informations sont susceptibles de modification sans autre avis
14
3. Ajustez la mise au point du sujet jusqu’à ce que ce dernier soit bien net.
4. La caméra est prête à l’emploi.
5. VP-Eye possède un grand nombre d’applications d’imagerie intégrées, telles que Email vidéo, Netmeeting, Créateur
de cartes, Moniteur vidéo, Créateur d’albums, Effets spéciaux, Gestionnaire d’images et Jeux vidéo.
6. Pour configurer les fonctions de la caméra, sélectionnez l’icône en cercle sur la barre de menu en haut à droite.
Lecture
vidéo
Page 25

TYPHOON EASY CAM
Manuale di istruzioni
Numero articolo: 50946
Versione 5.00
http://www.typhoon.de
Page 26

CE
Dichiarazione di conformità
Direttiva EMC 89/336/EEC
La società produttrice/importatrice
ANUBIS Electronic GmbH
Am Langfeld 38
66130 Saarbrücken
Germania
dichiaria che il prodotto
Marca: Typhoon
N. modello: 50946
Modello: Easy Cam
è conforme a quanto prescritto dalla Direttiva del Consiglio sul ravvicinamento delle legislazioni nazionali relative
alla Direttiva di compatibilità elettromagnetica (89/336/EEC, emendata dalle Direttive 92/31/EEC, 93/68/EEC e
98/13/EC). Per valutare della compatibilità elettromagnetica (89/336/EEC, emendata dalle Direttive 92/31/EEC,
93/68/EEC e 98/13/EC) si applicano i seguenti standard:
Per EMC
EN 55022: 1998 +A1:2000 +A2:2003
EN 61000-3-2: 2000
EN 61000-3-3: 1995+A1:2001
EN 55024: 1998+A1:2001+A2:2003
IEC 61000-4-2 : 1995+A1:1998+A2:2000;
IEC 61000-4-3 : 1995+A1:2002;
IEC 61000-4-4 : 1995+A1:2000+A2:2001;
IEC 61000-4-5 : 1995+A1:2000;
IEC 61000-4-6 : 1996+A1:2000;
IEC 61000-4-8 : 1993+A1:2000;
IEC 61000-4-11: 1994+A1:2000
˔ˡ˨˕˜˦ʳ˘˿˸˶˼˶ʳ˚˵˛ˁʳ˔ʳ˟˴˺˹˸˿˷ʳˆˋˁˉˉ˄ˆ˃ʳ˦˴˴˵ü˶˾˸ˁʳ˚˸˴˼˴ʳ
TYPHOON EASY CAM
N. articolo: 50946
Tutte le specifiche tecniche e le informazioni sono soggette a modifica senza previo avviso
2
Page 27

Installazione del driver e del software:
1. Inserire il CD-ROM Typhoon Easy Cam nell’unità CD-ROM.
2. Non collegare per prima la fotocamera. Fare clic sul menu Driver per installare dapprima il driver.
3. Selezionare la lingua di installazione e fare clic su OK.
Il processo di installazione ha inizio.
4. Fare clic sul tasto “Avanti” (Next) per
continuare.
TYPHOON EASY CAM
N. articolo: 50946
Tutte le specifiche tecniche e le informazioni sono soggette a modifica senza previo avviso
4
Introduzione
Il Typhoon Easy Cam è creato con una risoluzione CIF di 300.000 pixel che consente un utilizzo ottimale con applicazioni per la
visualizzazione di chat e dirette via Internet. Creato con un’interfaccia USB 2.0 che garantisce semplicità di installazione ed
utilizzo. L’interfaccia USB 2.0 fornisce inoltre una maggiore larghezza di banda per le applicazioni video. Utilizzare l’Easy Cam in
vari modi, ad esempio videosorveglianza, videoconferenza e webcasting tramite Internet, ecc.
Avvio
Contenuto dell’imballaggio:
• Easy Cam
• CD-ROM del software
• Manuale dell'utente
Requisiti di sistema:
• Processore Intel® Pentium® III 2000MHz o superiore
• RAM di sistema da 128MB o superiore raccomandata
• Spazio libero minimo da 20MB per l’installazione del software
• Una porta USB2.0 disponibile
• Microsoft® Windows XP, 2000
• Unità CD-ROM per l’installazione del software
• Scheda VGA con supporto per funzioni DIRECTX ed Overlay
Nota prima dell’installazione:
Non collegare in primo luogo la fotocamera al computer. Installare dapprima il driver e le applicazioni.
Inserire il CD-ROM VP-Eye nel sistema e cambiare il nome di gruppo target, la directory e la cartella target,
quindi eseguire le opzioni di installazione prima di installare VP-Eye.
Page 28

7. Windows ricorda con un messaggio di testo le operazioni da compiere per prime. Fare clic su “Continuare” (Continue
Anyway) per proseguire. La seguente schermata mostra il processo di installazione.
8. Una volta completata, fare clic sul tasto “Fine” (Finish) per terminare l’installazione.
TYPHOON EASY CAM
N. articolo: 50946
Tutte le specifiche tecniche e le informazioni sono soggette a modifica senza previo avviso
6
5. Selezionare quindi l’opzione “Completa” (Complete) per installare tutti i driver sul disco rigido e fare clic su “Avanti”
(Next) per iniziare.
6. Fare di nuovo clic su “Avanti” (Next) per avviare l’installazione del driver.
Page 29

12. L’installazione di VP-Eye ha inizio.
13. Una volta completata, termina automaticamente il processo di installazione e torna di nuovo al menu principale.
14. Riavviare il computer per caricare i file del driver.
TYPHOON EASY CAM
N. articolo: 50946
Tutte le specifiche tecniche e le informazioni sono soggette a modifica senza previo avviso
8
9. Tornare al menu di apertura e fare clic su “Installa VP-Eye” (Install VP-Eye).
10. Selezionare, quindi, l’icona “Installa” (Install) situata nella parte inferiore sinistra della schermata di apertura.
11. Digitare il numero di serie situato nella copertina del CD e premere “OK” per continuare.
Page 30

5. Selezionare “No, non stavolta” (No, not this time) poiché il driver è già stato installato in precedenza.
6. Fare clic su “Avanti” (Next) per
continuare.
7. La Configurazione guidata consiglia
l’installazione automatica o di
specificare una directory.
Selezionare la prima opzione
“Installa il software
automaticamente” (Install the
software automatically). Fare clic sul
tasto “Avanti” (Next) per continuare.
8. Su Windows appare un messaggio di
testo. Selezionare “Continuare”
(Continue Anyway) per avviare
l’installazione.
TYPHOON EASY CAM
N. articolo: 50946
Tutte le specifiche tecniche e le informazioni sono soggette a modifica senza previo avviso
10
Installazione dell’hardware
1. Dopo aver caricato del tutto Windows, inserire la spina USB di tipo A della fotocamera alla porta USB 2.0.
2. La fotocamera dispone di 6 luci bianche, 3 su ciascun lato della lente,
per illuminare il soggetto. Si accendono se il soggetto o l’area è troppo
scuro/a.
3. Fissare la fotocamera allo schermo LCD del notebook o adoperare un
morsetto come supporto per tenerla dritta.
4. Dopo che Windows rileva l’USB, suggerisce di ricercare una fonte del
driver.
Page 31

Note: si prega di verificare quanto segue per una corretta installazione:
1. Confermare l’interfaccia USB nel PC;
2. Controllare che l’interfaccia USB funzioni correttamente;
3. Metodo di controllo: Fare clic suϘˣ˴˸˿˿ʳ˷˼ʳ˶˿˿ϙШϘSistemaϙШʳ˶˻˸˷˴ʳ“HardwareϙШʳ˴ʳ“Gestione
periferiche”, controllare se esiste e funziona correttamente l’elenco “Controller USB” (Universal serial bus).
4. Assicurarsi che non vi siano icone rosse o gialle davanti a ciascun elenco Controller USB.
5. Verificare, successivamente, che Windows abbia rilevato ed installato correttamente la fotocamera. Andare sull’elenco
Periferiche di imaging e verificare che sia presente “VGA SoC PC-Camer@”. In tal caso, l’installazione è stata
effettuata con esito.
Utilizzo della fotocamera:
Nota: installare dapprima driver e software, quindi eseguire il collegamento come segue.
1. Fare doppio clic sull’icona VP-Eye situata sul desktop. Nella finestra principale appare l’anteprima dell’immagine.
2. Il software VP-Eye è fornito di varie funzioni
disponibili sulla schermata principale di VP-Eye.
TYPHOON EASY CAM
N. articolo: 50946
Tutte le specifiche tecniche e le informazioni sono soggette a modifica senza previo avviso
12
9. Tramite l’installazione si assegnano i driver alla fotocamera collegata di recente.
10. Successivamente, e per ultimo, fare clic sul tasto “Fine” (Finish) per terminare l’installazione.
Page 32

Assistenza tecnica:
Compilare il modulo per l’assistenza tecnica su http://www.typhoon.de/
ed informare di qualsiasi inconveniente durante l’utilizzo
di Typhoon Easy Cam.
Specifiche tecniche:
• Interfaccia I/O: USB2.0
• Risoluzione di colori: 1280 x 960 (VGA)
• Velocità: 640 x 480 (VGA) 30 scatti
• Specifiche del sensore: 1/4” CMOS 350K pixel
• Specifiche della lente: 3,6mm / 6mm
• Gamma: Fino a 3CM
• Messa a fuoco: 30mm - infinito
• Formato dati: 24bit, True Colour
• Rapporto segnale/rumore: >45dB
• Esposizione automatica e regolazione equilibrio bianco/nero
• Consumo: CC5V / 65mA
• Dimension˼ˍʳ37 x 75 x 51mm
TYPHOON EASY CAM
N. articolo: 50946
Tutte le specifiche tecniche e le informazioni sono soggette a modifica senza previo avviso
14
3. Regolare la lente per mettere a fuoco il soggetto finché non è nitido.
4. La fotocamera è pronta all’uso.
5. Il VP-Eye dispone di varie applicazioni incorporate, quali Video Mail, Netmeeting, creazione di cartoline, schermo
video, creazione di album, effetti speciali, gestione immagini e videogiochi.
6. Per impostare le funzioni della fotocamera, selezionare l’icona “Circolo” (Circle) nella barra superiore destra del
menu.
Riproduzio
ne video
Page 33

TYPHOON EASY CAM
Gebruiksaanwijzing
Artikelnummer: 50946
Versie 5.00
http://www.typhoon.de
Page 34

CE
Conformiteitsverklaring
EMC Richtlijn 89/336/EEC
Wij, de fabrikant/invoerder
ANUBIS Electronic GmbH
Am Langfeld 38
66130 Saarbrücken
Duitsland
Verklaren dat het product
Merk: Typhoon
Model Nr. : 50946
Model: Easy Cam
conform is aan de vereisten beschreven in de Richtlijn van de Raad betreffende de onderlinge aanpassing van de
wetgevingen der Lidstaten met betrekking tot elektromagnetische compatibiliteit (89/336/EEC, gewijzigd door
92/31/EEC, 93/68/EEC & 98/13/EC), voor de evaluatie met betrekking tot de elektromagnetische compatibiliteit
(89/336/EEC, Gewijzigd door 92/31/EEC, 93/68/EEC & 98/13/EC), de volgende normen zijn van toepassing:
Voor EMC
EN 55022: 1998 +A1:2000 +A2:2003
EN 61000-3-2: 2000
EN 61000-3-3: 1995+A1:2001
EN 55024: 1998+A1:2001+A2:2003
IEC 61000-4-2 : 1995+A1:1998+A2:2000;
IEC 61000-4-3 : 1995+A1:2002;
IEC 61000-4-4 : 1995+A1:2000+A2:2001;
IEC 61000-4-5 : 1995+A1:2000;
IEC 61000-4-6 : 1996+A1:2000;
IEC 61000-4-8 : 1993+A1:2000;
IEC 61000-4-11: 1994+A1:2000
˔ˡ˨˕˜˦ʳ˘˿˸˶˼˶ʳ˚˵˛ˁʳ˔ʳ˟˴˺˹˸˿˷ʳˆˋˁˉˉ˄ˆ˃ʳ˦˴˴˵Ώ˶˾˸ˁʳ˗˼˿˴˷ʳ
TYPHOON EASY CAM
Artikelnr.: 50946
Alle specificaties en informatie kunnen zonder voorafgaande kennisgeving worden gewijzigd.
2
Page 35

De driver en de software installeren:
1. Plaats de Typhoon Easy Cam CD-ROM schijf in de CD-ROM speler.
2. Sluit de camera niet eerst aan. Klik eerst op het Driver menu om de drivers te installeren.
3. Selecteer de taal van de installatie en klik op OK. Het
installatieproces begint.
4. Op de “Volgende” (Next) toets drukken om
verder te gaan.
TYPHOON EASY CAM
Artikelnr.: 50946
Alle specificaties en informatie kunnen zonder voorafgaande kennisgeving worden gewijzigd.
4
Inleiding
De Typhoon Easy Cam werd ontworpen met een CIF-resolutie van 300.000 pixels voor optimaal gebruik met toepassingen om te
chatten en live te kijken over het internet. Uitgerust met een USB 2.0 interface voor eenvoudig gebruik en installatie. De USB 2.0
interface zorgt tevens voor een grotere bandbreedte voor videotoepassingen. Gebruik de Easy Cam in diversie toepassingen zoals
videobewaking, videoconferenties en webcasting over het internet, etc.
Aan de slag
Inhoud van de verpakking:
• Easy Cam
• Software CD-ROM
• Gebruiksaanwijzing
Systeemvereisten:
• Intel® Pentium® III 2000MHz processor of hoger
• 128MB Systeem-RAM of meer aanbevolen
• Minimum 20MB vrije ruimte op de harde schijf voor software-installatie
• Een vrije USB2.0 poort
• Microsoft® Windows XP, 2000
• CD-ROM speler voor software-installatie
• VGA-kaart met ondersteuning voor DIRECTX en Overlay-functies
Opmerking vóór de installatie:
Sluit de camera niet eerst aan op het computersysteem. Installeer eerst de driver en de toepassingen.
Plaats de VP-Eye CD-ROM in het systeem en u kunt eerst de naam van de doelgroep, het doelbestand en de
doelmap veranderen, en de installatie-instellingen kiezen vóór de installatie van de driver en VP-Eye.
Page 36

7. Windows geeft normaal een melding voor een Logo testbericht, herhaal als de eerste keer, klik op "Toch doorgaan"
(Continue Anyway) om voort te gaan. Hier ziet u het scherm tijdens de installatie.
8. Eenmaal uitgevoerd drukt u op de knop “Voltooien” (Finish) om de installatie te beëindigen.
TYPHOON EASY CAM
Artikelnr.: 50946
Alle specificaties en informatie kunnen zonder voorafgaande kennisgeving worden gewijzigd.
6
5. Selecteer vervolgens de “Volledige” (Complete) optie om al de drivers op de harde schijf te installeren en klik dan op
"Volgende" (Next) om te beginnen.
6. Nogmaals op “Volgende” (Next) klikken om te starten met installatie van de drivers.
Page 37

12. Het VP-Eye installatieproces begint.
13. Eenmaal voltooid eindigt het installatieproces automatisch en keert u terug naar het hoofdmenu.
14. Start de computer opnieuw om de driverbestanden te laden.
TYPHOON EASY CAM
Artikelnr.: 50946
Alle specificaties en informatie kunnen zonder voorafgaande kennisgeving worden gewijzigd.
8
9. Ga terug naar het startmenu en klik op “VP-Eye installeren” (Install VP-Eye).
10. Selecteer vervolgens het “Installeren” (Install) icoon onder de linkerknop van het startscherm.
11. Toets het serienummer dat op de CD hoes staat in en druk op "OK” om voort te gaan.
Page 38

5. Selecteer “Nee, ditmaal niet” (No, not this time) aangezien de driver reeds geïnstalleerd is.
6. Op de “Next” (volgende) toets drukken om
verder te gaan.
7. De Wizard geeft u dan de keuze tussen
automatische installatie of het specifiëren van
een doellocatie. Selecteer de eerste optie "De
software automatisch installeren". Op de
“Volgende” (Next) toets drukken om verder
te gaan.
8. Windows zal vervolgens de Logo testoptie
voorstellen, selecteer “Toch doorgaan”
(Continue Anyway) en de installatie start.
TYPHOON EASY CAM
Artikelnr.: 50946
Alle specificaties en informatie kunnen zonder voorafgaande kennisgeving worden gewijzigd.
10
De Hardware installeren
1. Als Windows geladen is, steek dan de USB-aansluiting type B van de camera aan op uw USB 2.0 poort.
2. Bij de camera horen 6 witte lampen, 3 aan elke kant van de lens om het
onderwerp te helpen belichten. Deze gaan branden als het onderwerp of
de omgeving te donker zijn.
3. Klam de camera op uw Notebook LCD paneel vast of gebruik de klem
als stand om de camera recht te houden.
4. Wanneer Windows het USB apparaat eenmaal heeft gedetecteerd,
vraagt het of het de driver moet zoeken.
Page 39

Opmerkingen: controleer het volgende voor een correcte installatie:
1. Controleer de USB interface in de PC;
2. Check de USB interface en zie of deze goed werkt;
3. Controlemethode: Druk op“Controlepaneel”ʻ“˖˿ʳ˴˸˿”ʼʳĺ“Systeem”ʻ“˦˸”ʼʳĺ“ Hardware”˸
ĺ“˔˴˴˴˵˸˻˸˸”ʳʻDevice manager) tab, controleer de lijst met “Universal serial bus controllers” indien die bestaat, en kijk
of deze normaal werkt.
4. Zorg ervoor dat er geen rode of gele iconen voor een USB controller lijst staan.
5. Check vervolgens of Windows de camera correct heeft gedetecteerd en geïnstalleerd. Ga naar de lijst Beeldapparaten
Imaging Device en kijk of de lijn “VGA SoC PC-Camer@” erin vermeld staat. Als dat het geval is, is de installatie geslaagd.
De camera gebruiken:
Opmerking: De driver en de software moeten eerst zijn geïnstalleerd, en dan als volgt zijn aangesloten.
Druk tweemaal op het VP-Eye icoon op het bureaublad, en het voorbeeld verschijnt in het hoofdscherm.
De VP-Eye software beschikt over vele functies,
die beschikbaar zijn vanuit het VP-Eye
hoofdscherm.
TYPHOON EASY CAM
Artikelnr.: 50946
Alle specificaties en informatie kunnen zonder voorafgaande kennisgeving worden gewijzigd.
12
9. De installatie wijst de drivers dan toe aan de nieuw gedetecteerde camera.
10. Tenslotte drukt u op de “Finish” button om de installatie te voltooien.
Page 40

Technische ondersteuning:
Vul het Formulier Technische Ondersteuning in op http://www.typhoon.de/
, en laat het ons weten als u problemen ondervindt bij
het gebruik van de Typhoon Easy Cam.
Specificaties:ʳ
• I/O Interface: USB2.0
• Kleurenweergave: 1280 x 960 (VGA)
• Snelheid: 640 x 480 (VGA) 30 Frames
• Sensorspecificaties: 1/4” CMOS 350K pixels
• Lensspecificaties: 3,6mm / 6mm
• Bereik: Tot 3 cm
• Focus: 30mm - oneindig
• Gegevensindeling: 24bit, True Colour
• S/N: >45dB
• Automatisch geregelde belichting en Z/W-balans
• Stroomverbruik: DC5V / 65mA
• ˔˹˸˼˺ʳˍʳˆˊʳʳˊˈʳʳˈ˄
TYPHOON EASY CAM
Artikelnr.: 50946
Alle specificaties en informatie kunnen zonder voorafgaande kennisgeving worden gewijzigd.
14
Stel de lens in en focus op het onderwerp tot het scherp staat.
De camera is klaar voor gebruik.
De VP-Eye heeft veel ingebouwde beeldtoepassingen zoals Video-Mail, Netmeeting, Card Maker, Video Monitor,
Album Maker, Special effects, Image manager, en Video Games.
Om de cameramogelijkheden in te stellen, het Cirkel icoon recht bovenaan de menubalk selecteren.
Video
playback
Page 41

TYPHOON EASY CAM
Manual de instruções
Artigo nº.: 50946
Vers ão 5.00
http://www.typhoon.de
Page 42

CE
Declaração de conformidade
Directiva CEM 89/336/CEE
Nós, o fabricante /importador
ANUBIS Electronic GmbH
Am Langfeld 38
66130 Saarbrücken
Alemanha
Declaramos que o produto
Marca: Typhoon
Modelo nº: 50946
Modelo: Easy Cam
aqui especificado está em conformidade com os requisitos definidos na Directiva do Conselho relativa à
aproximação das leis dos Estados-Membros referente à Directiva de compatibilidade electromagnética (89/336/CEE,
alterada pela Directiva 92/31/CEE, 93/68/CEE & 98/13/CE), para avaliação da compatibilidade electromagnética
(89/336/CEE, alterada pela Directiva 92/31/CEE, 93/68/CEE & 98/13/CE). São aplicadas as seguintes normas:
Para CEM
EN 55022: 1998 +A1:2000 +A2:2003
EN 61000-3-2: 2000
EN 61000-3-3: 1995+A1:2001
EN 55024: 1998+A1:2001+A2:2003
IEC 61000-4-2 : 1995+A1:1998+A2:2000;
IEC 61000-4-3 : 1995+A1:2002;
IEC 61000-4-4 : 1995+A1:2000+A2:2001;
IEC 61000-4-5 : 1995+A1:2000;
IEC 61000-4-6 : 1996+A1:2000;
IEC 61000-4-8 : 1993+A1:2000;
IEC 61000-4-11: 1994+A1:2000
˔ˡ˨˕˜˦ʳ˘˿˸˶˼˶ʳ˚˵˛ˁʳ˔ʳ˟˴˺˹˸˿˷ʳˆˋˁˉˉ˄ˆ˃ʳ˦˴˴˵ü˶˾˸ˁʳ˔˿˸˴˻˴ʳ
TYPHOON EASY CAM
Artigo nº: 50946
Todas as especificações e informações estão sujeitas a alteração sem aviso prévio
2
Page 43

Instalação do controlador e do software:
1. Coloque o CD-ROM que acompanha a Typhoon Easy Cam na unidade de CD-ROM.
2. Não comece por ligar a câmara. Clique no menu Driver (Controlador) para instalar primeiro os controladores.
3. Seleccione o idioma pretendido e clique em OK. O
processo de instalação é iniciado.
4. Clique em “Next” (Seguinte) para continuar.
TYPHOON EASY CAM
Artigo nº: 50946
Todas as especificações e informações estão sujeitas a alteração sem aviso prévio
4
Introdução
A Typhoon Easy Cam foi concebida com uma resolução CIF de 300.000 píxeis para um desempenho optimizado ao nível da
conversação pela Internet e das aplicações de visualização em directo. Esta câmara foi concebida com uma interface USB 2.0 para
uma fácil instalação e utilização. Esta interface USB 2.0 assegura também uma maior largura de banda para as suas aplicações de
vídeo. A Easy Cam pode ser utilizada numa vasta gama de áreas tais como, videovigilância, videoconferência e transmissão através
da Internet, etc.
Introdução
Conteúdo da embalagem:
• Easy Cam
• CD-ROM com software
• Manual do utilizador
Requisitos do sistema:
• Processador Intel® Pentium® III de 2000 MHz ou acima
• 128 MB de RAM do sistema ou acima recomendado
• Mínimo de 20 MB de espaço livre no disco rígido para instalação do software
• Uma porta USB 2.0 disponível
• Microsoft® Windows XP, 2000
• Unidade de CD-ROM para instalação do software
• Placa VGA com suporte para o DIRECTX e para as funções de sobreposição
Antes da instalação:
Não comece por ligar a câmara ao computador. Em primeiro lugar, deve instalar o controlador e as aplicações.
Introduza o CD VP-Eye na unidade de CD-ROM. Pode alterar o nome do ficheiro, do directório e da pasta de
destino e executar o programa de instalação antes de instalar o controlador e o VP-Eye.
Page 44

7. O Windows apresentará a mensagem relativa ao teste do Windows Logo, clique em “Continue Anyway” (Continuar
mesmo assim) para prosseguir. O ecrã seguinte mostra o progresso da instalação.
8. Quando a instalação estiver concluída, faça clique no botão “Finish” (Concluir) para concluir a operação.
TYPHOON EASY CAM
Artigo nº: 50946
Todas as especificações e informações estão sujeitas a alteração sem aviso prévio
6
5. Depois, escolha a opção “Complete” (Completa) para instalar todos os controladores para o disco rígido e clique em
“Next” (Seguinte) para dar início à instalação.
6. Clique novamente em “Next” (Seguinte) para iniciar a instalação do controlador.
Page 45

12. A instalação do VP-Eye é iniciada.
13. Quando o processo de instalação automática terminar será levado de volta ao menu principal.
14. Reinicie o computador para que os ficheiros do controlador sejam carregados.
TYPHOON EASY CAM
Artigo nº: 50946
Todas as especificações e informações estão sujeitas a alteração sem aviso prévio
8
9. Volte ao menu principal e clique em “Install VP-Eye” (Instalar o VP-Eye).
10. De seguida, seleccione o ícone “Install” (Instalar) existente no canto inferior esquerdo do ecrã.
11. Introduza o número de série que encontra na caixa do CD e prima “OK” para prosseguir.
Page 46

5. Seleccione “No, not this time” (Não, mais
tarde) uma vez que o controlador foi já instalado.
6. Clique em "Next" (Seguinte) para continuar.
7. O assistente pedirá de seguida para proceder
à instalação automática ou para especificar um
destino. Seleccione a primeira opção: “Install
the software automatically” (Instalar o
software automaticamente). Clique em “Next”
(Seguinte) para continuar.
8. O Windows volta a apresentar a mensagem
relativa ao teste do Windows Logo, seleccione
a opção “Continue Anyway” (Continuar
mesmo assim) para dar início à instalação.
TYPHOON EASY CAM
Artigo nº: 50946
Todas as especificações e informações estão sujeitas a alteração sem aviso prévio
10
Instalação do hardware
1. Após o completo carregamento do Windows, ligue a ficha USB de tipo A da câmara à porta USB 2.0 do computador.
2. Esta câmara inclui 6 lâmpadas brancas, 3 de cada lado da lente para uma
melhor iluminação do objecto. Estas lâmpadas acendem caso o objecto
ou a área estejam escuros.
3. Fixe a câmara ao ecrã LCD do seu PC Notebook ou utilize a mola da
mesma como um suporte para colocar a câmara na vertical.
4. Quando o Windows detecta a câmara, o mesmo pergunta-lhe se quer
procurar o respectivo controlador.
Page 47

Notas: Verifique os seguintes itens para uma instalação correcta:
1. Confirme a presença da interface USB no PC;
2. Verifique se a interface USB está a funcionar correctamente;
3. Método de verificação: Clique em “Control panel” (Painel de controlo)ĺ“System” (Sistema)ĺBotão “ Hardware”
ĺSeparador “Device manager” (Gestor de dispositivos), verifique se existe uma lista chamada “Universal serial bus
controllers” (Controladores USB (Universal Serial Bus)), e se tudo está a funcionar correctamente.
4. Certifique-se de que não existem ícones vermelhos ou amarelos em frente de cada controlador USB da lista.
5. De seguida, verifique se o Windows detectou e instalou a câmara correctamente. Vá até à lista Imaging Device (Dispositivos
de processamento de imagens) e verifique se o item “VGA SoC PC-Camer@” consta da lista. Se constar é porque a
instalação foi feita com êxito.
Utilização da câmara:
Nota: Em primeiro lugar deve instalar o controlador e o software e só depois ligar a câmara como se descreve a seguir.
1. Faça um duplo clique sobre o ícone VP-Eye existente no ambiente de trabalho, uma imagem é apresentada na janela
principal.
2. O software VP-Eye inclui muitas funções as
quais são apresentadas no ecrã principal do VPEye.
TYPHOON EASY CAM
Artigo nº: 50946
Todas as especificações e informações estão sujeitas a alteração sem aviso prévio
12
9. A operação de instalação irá atribuir os controladores à câmara recém-ligada.
10. Por último, faça clique no botão “Finish” (Concluir) para concluir a instalação.
Page 48

Assistência técnica:
Preencha o formulário de assistência técnica que encontra em http://www.typhoon.de/
, e diga-nos se tiver algum problema com a
Typhoon Easy Cam.
Especificações:
• Interface de entrada/saída: USB 2.0
• Resolução: 1280 x 960 (VGA)
• Velocidade: 640 x 480 (VGA) 30 imagens
• Especificação do sensor: CMOS de 1/4” e 350.000 píxeis
• Especificação da lente: 3,6 mm / 6 mm
• Alcance: Até 3 cm
• Focagem: 30 mm-infinito
• Formato dos dados: 24 bits, True Colour
• Relação sinal/ruído: >45 dB
• Exposição automática e ajuste do balanço de brancos
• Consumo de energia: d.c. 5 V / 65 mA
• DimensõesΚ37 x 75 x 51 mm
TYPHOON EASY CAM
Artigo nº: 50946
Todas as especificações e informações estão sujeitas a alteração sem aviso prévio
14
3. Ajuste a lente para focar o objecto até este ficar nítido.
4. A câmara está pronta para ser utilizada.
5. O VP-Eye inclui uma série de aplicações como é o caso do Video-Mail, do Netmeeting, do Card Maker, do Video
Monitor, do Album Maker, do Special effects, do Image manager e do Vídeo Games.
6. Para configurar as capacidades da câmara, seleccione o ícone com a forma de círculo existente na barra de menus no
canto superior direito.
Reprodução
de vídeo
Page 49

 Loading...