

Page 1
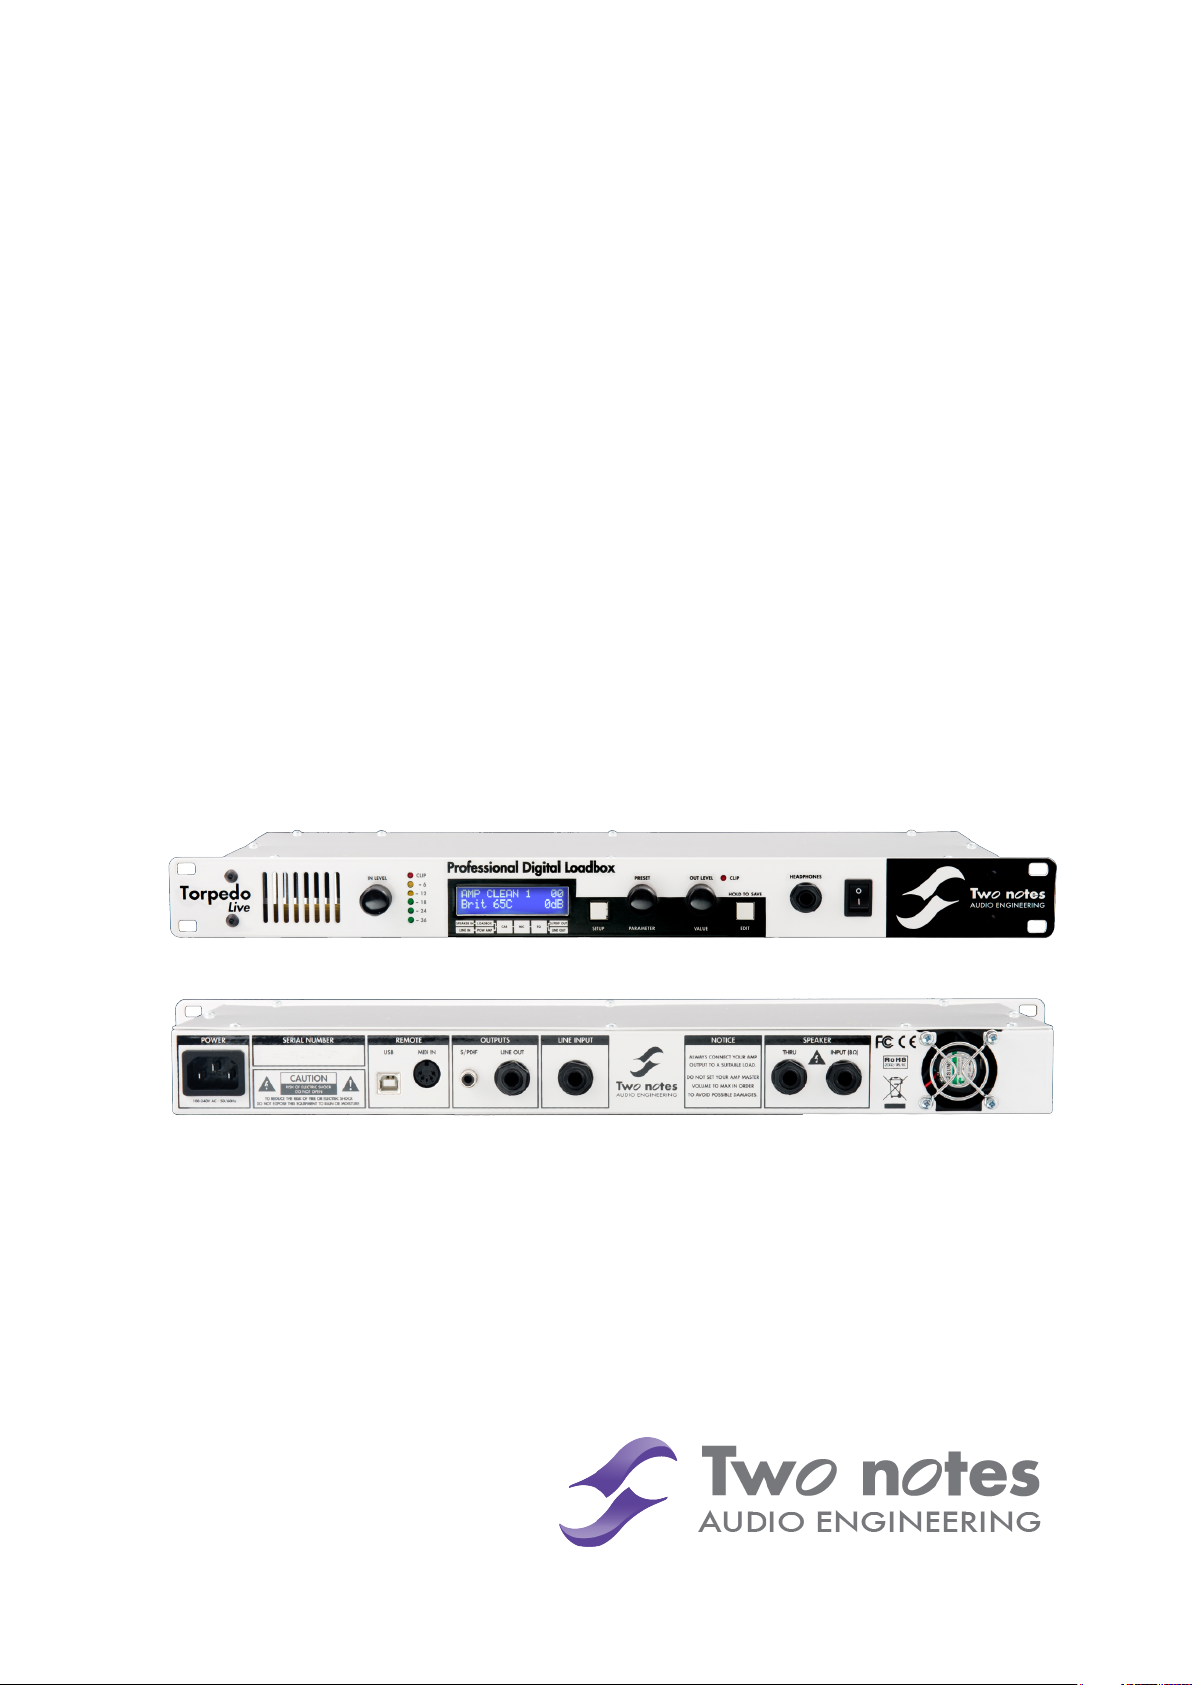
TORPEDO Live
Professional digital loadbox
User’s manual
V 1.4- 04/08/2014
Page 2

Page 3

TORPEDO Live User’s Manual
Manual Version V 1.4 - 04/08/2014.
The complete electronic version of this manual, as well as the Two Notes Audio Enginering software and
hardware products, are subject to updates. You can download the most recent versions of the products on the
following website http://www.two-notes.com.
This manual describes the TORPEDO Live and provides instructions for its operation. It is highly recommended
to read this document before using this product. The contents of this manual have been thoroughly verified
and it is believed, unless stated otherwise, to accurately describe the product at the time of shipment from the
factory or download from our website.
Two Notes Audio Engineering is a registered trademark of:
OROSYS SAS
145 rue de la Marbrerie, BAL n°6
34740 Vendargues
France
Tel: +33 (0)484 250 910
Fax: +33 (0)467 595 703
Contact & support: http://support.two-notes.com/
Website: http://www.two-notes.com
This document is the exclusive property of OROSYS SAS. In the interest of product development, OROSYS SAS
reserves the right to change the technical specifications, modify and/or cease the production without prior
notice. OROSYS SAS can not be held responsible for any damage, accidental or otherwise, that results from
an inappropriate use of the TORPEDO Live. Please refer to the safety instructions included in this manual. The
reproduction of any part of this document is strictly forbidden without the written authorization of OROSYS SAS.
All product names and trademarks are the property of their respective owners. Product names and trade-
marks found in this document were used during the development of the TORPEDO Live product but are in no
way associated or affiliated with OROSYS SAS.
Two Notes Audio Engineering TORPEDO Live 3
Page 4

Page 5

Contents
1 Foreword 7
1 Safety instructions . . . . . . . . . . . . . . . . . . . . . . . . . . . . . . . . . . . . . . . . . . . . . . . . . 7
1.1 Risk of electric shock . . . . . . . . . . . . . . . . . . . . . . . . . . . . . . . . . . . . . . . . . . . 7
1.2 Reader warning . . . . . . . . . . . . . . . . . . . . . . . . . . . . . . . . . . . . . . . . . . . . . . 7
1.3 Mains power . . . . . . . . . . . . . . . . . . . . . . . . . . . . . . . . . . . . . . . . . . . . . . . . 7
1.4 Ground connection . . . . . . . . . . . . . . . . . . . . . . . . . . . . . . . . . . . . . . . . . . . 8
1.5 Safety use conditions . . . . . . . . . . . . . . . . . . . . . . . . . . . . . . . . . . . . . . . . . . . 8
1.6 Cleaning . . . . . . . . . . . . . . . . . . . . . . . . . . . . . . . . . . . . . . . . . . . . . . . . . . 8
1.7 Maintenance . . . . . . . . . . . . . . . . . . . . . . . . . . . . . . . . . . . . . . . . . . . . . . . 8
2 Declaration of conformity . . . . . . . . . . . . . . . . . . . . . . . . . . . . . . . . . . . . . . . . . . . . 8
3 Contents of the package . . . . . . . . . . . . . . . . . . . . . . . . . . . . . . . . . . . . . . . . . . . . 9
4 Disposal of Waste Equipment by Users in Private Household in the European Union . . . . . . . . . . 9
5 Warranty . . . . . . . . . . . . . . . . . . . . . . . . . . . . . . . . . . . . . . . . . . . . . . . . . . . . . . 10
2 Warning regarding the proper use of a loadbox with a tube amplifier 11
1 What is a loadbox ? . . . . . . . . . . . . . . . . . . . . . . . . . . . . . . . . . . . . . . . . . . . . . . . . 11
2 Which output volume for my amplifier ? . . . . . . . . . . . . . . . . . . . . . . . . . . . . . . . . . . . . 12
3 About the TORPEDO Live 13
1 Introducing the TORPEDO Live . . . . . . . . . . . . . . . . . . . . . . . . . . . . . . . . . . . . . . . . . 13
2 Front panel . . . . . . . . . . . . . . . . . . . . . . . . . . . . . . . . . . . . . . . . . . . . . . . . . . . . . 14
3 Rear panel . . . . . . . . . . . . . . . . . . . . . . . . . . . . . . . . . . . . . . . . . . . . . . . . . . . . . 14
4 Only a speaker simulation ? . . . . . . . . . . . . . . . . . . . . . . . . . . . . . . . . . . . . . . . . . . . 14
4.1 Tube Stage Output . . . . . . . . . . . . . . . . . . . . . . . . . . . . . . . . . . . . . . . . . . . . 15
4.2 Section EQ . . . . . . . . . . . . . . . . . . . . . . . . . . . . . . . . . . . . . . . . . . . . . . . . . 15
4.3 The Torpedo technology, convolution and Impulse Responses . . . . . . . . . . . . . . . . . . 15
4.4 Third party impulse responses . . . . . . . . . . . . . . . . . . . . . . . . . . . . . . . . . . . . . . 15
4.5 Create your own IRs . . . . . . . . . . . . . . . . . . . . . . . . . . . . . . . . . . . . . . . . . . . 15
4 Connecting the TORPEDO Live 17
1 Overview . . . . . . . . . . . . . . . . . . . . . . . . . . . . . . . . . . . . . . . . . . . . . . . . . . . . . . 17
2 In the studio . . . . . . . . . . . . . . . . . . . . . . . . . . . . . . . . . . . . . . . . . . . . . . . . . . . . 18
3 On stage . . . . . . . . . . . . . . . . . . . . . . . . . . . . . . . . . . . . . . . . . . . . . . . . . . . . . . 19
5 Configuring and using the TORPEDO Live 21
1 The TORPEDO Live interface . . . . . . . . . . . . . . . . . . . . . . . . . . . . . . . . . . . . . . . . . . . 21
2 Input gain control . . . . . . . . . . . . . . . . . . . . . . . . . . . . . . . . . . . . . . . . . . . . . . . . . 21
3 Three modes: PERFORM, EDIT & SETUP . . . . . . . . . . . . . . . . . . . . . . . . . . . . . . . . . . . . . 21
4 PERFORM mode . . . . . . . . . . . . . . . . . . . . . . . . . . . . . . . . . . . . . . . . . . . . . . . . . . 22
5 EDIT mode . . . . . . . . . . . . . . . . . . . . . . . . . . . . . . . . . . . . . . . . . . . . . . . . . . . . . 22
5.1 Power Amp . . . . . . . . . . . . . . . . . . . . . . . . . . . . . . . . . . . . . . . . . . . . . . . . . 23
5.2 Miking . . . . . . . . . . . . . . . . . . . . . . . . . . . . . . . . . . . . . . . . . . . . . . . . . . . . 24
5.3 EQ . . . . . . . . . . . . . . . . . . . . . . . . . . . . . . . . . . . . . . . . . . . . . . . . . . . . . . 24
Two Notes Audio Engineering TORPEDO Live 5
Page 6

6 SETUP mode . . . . . . . . . . . . . . . . . . . . . . . . . . . . . . . . . . . . . . . . . . . . . . . . . . . . 25
7 MIDI setup . . . . . . . . . . . . . . . . . . . . . . . . . . . . . . . . . . . . . . . . . . . . . . . . . . . . . 26
8 Continuous save, preset save . . . . . . . . . . . . . . . . . . . . . . . . . . . . . . . . . . . . . . . . . . 26
9 Want more cabinets ? . . . . . . . . . . . . . . . . . . . . . . . . . . . . . . . . . . . . . . . . . . . . . . 26
9.1 .tsr files . . . . . . . . . . . . . . . . . . . . . . . . . . . . . . . . . . . . . . . . . . . . . . . . . . . 27
9.2 .tur files . . . . . . . . . . . . . . . . . . . . . . . . . . . . . . . . . . . . . . . . . . . . . . . . . . . 27
9.3 Third party IRs in .WAV or .AIF format . . . . . . . . . . . . . . . . . . . . . . . . . . . . . . . . . . 27
9.4 Uploading new Two Notes cabinets or third party IRs . . . . . . . . . . . . . . . . . . . . . . . . 27
6 MIDI 29
1 PROGRAM CHANGE (PC) . . . . . . . . . . . . . . . . . . . . . . . . . . . . . . . . . . . . . . . . . . . . 29
2 CONTROL CHANGE (CC) . . . . . . . . . . . . . . . . . . . . . . . . . . . . . . . . . . . . . . . . . . . . 29
7 Specifications 31
1 Power Amplifier list . . . . . . . . . . . . . . . . . . . . . . . . . . . . . . . . . . . . . . . . . . . . . . . . . 31
2 Microphones list . . . . . . . . . . . . . . . . . . . . . . . . . . . . . . . . . . . . . . . . . . . . . . . . . . 31
3 List of speaker cabinets embedded in the TORPEDO Live . . . . . . . . . . . . . . . . . . . . . . . . . 32
4 Technical data . . . . . . . . . . . . . . . . . . . . . . . . . . . . . . . . . . . . . . . . . . . . . . . . . . 33
8 Technical support 35
Page 7
Part 1
CAUTION
RISK OF ELECTRIC SHOCK
DO NOT OPEN
AVIS : RISQUE DE CHOC ELECTRIQUE. NE PAS OUVRIR.
Foreword
1 Safety instructions
Before using the product, it is necessary to carefully read and to bear in mind the following informations. Keep
this document in a safe place as it is important for the protection of the user and the product. If any malfunction
of the machine is suspected, you should always seek the assistance of a qualified technician.
1.1 Risk of electric shock
The warning panel located at the back of
the unit lists all the messages related to your
safety. All the internal parts of the unit must
only be manipulated by qualified techni-
cian.
The triangle symbol with a lightning means that some parts of the product, even when the
power is turned off or unplugged, can retain voltages high enough to lead to serious elec-
tric shock. Any operation that requires opening the machine should be left to a qualified
technician.
1.2 Reader warning
The triangle symbol with an exclamation mark indicates important messages concerning
the correct operation of the machine.
1.3 Mains power
Please verify that the voltage required by the machine matches the voltage of your country. If not or if unsure,
don’t connect the machine to the wall outlet, this could result in damages to the machine and injuries to the
user. This product must not be used when there is lightning. In case of severe weather with a risk of lightning,
unplug the mains power supply to reduce the risk of electric shock and fire. The mains power cable provided
Two Notes Audio Engineering TORPEDO Live 7
Page 8

Foreword
with the machine complies with the standards of the country where you purchased the product. If replacement
is needed, please use a standard compliant cable.
1.4 Ground connection
For safety reasons, the machine needs to be plugged to a wall outlet providing a ground connection. If your
electric installation does not provide a ground connection or if you are unsure, please ask a qualified electrician
for help.
If your mains power cable doesn’t match your wall outlet, ask a qualified electrician for help.
Never remove the outer or inner ground connection of the unit to prevent risks of electric shock or fire.
1.5 Safety use conditions
The TORPEDO Live must never be used near a heat source, near a flame, in the rain, in damp areas, near any
kinds of liquids.
The unit is designed to be rackmounted into a 19" rack unit with 4 screws (not provided).
When transporting the unit, care needs to be taken to avoid any shocks that could cause damage that
would require the assistance of a qualified technician.
Never cover or restrict the ventilation openings. Never unplug or deactivate the heat control monitoring
system, or you will be exposed to risk of electric shock and fire.
1.6 Cleaning
Always use a dry and soft cloth with no alcohol or solvents for cleaning. Please keep the unit clean and free
from dust.
1.7 Maintenance
All maintenance operations must be done by service centers approved by OROSYS SAS or by qualified techni-
cians. Never try to repair the machine by yourself.
2 Declaration of conformity
Manufacturer: OROSYS SAS
Category of product: digital audio signal processor
Product: TORPEDO Live
Test Manager: Guillaume Pille
The Two Notes TORPEDO Live is certified to be compliant to the CE and FCC standards:
• EN 55103-1 : 1996 and EN 55103-2 : 1996.
• EN 60065 05/2002 + A1 05/2006.
• EMC directive 89/336/EEC and Low Voltage Directive 73/23/EEC.
• FCC Part 15 : 2008.
• ICES-003 : 2004.
• AS/NZS 3548 class B for Australia and New Zealand.
• IEC : 2008 - CISPR 22 class B.
8 Two Notes Audio Engineering TORPEDO Live
Page 9
Foreword
3 Contents of the package
The shipped package contains:
1. One TORPEDO Live unit in a protecting sleeve,
2. One mains power cable,
3. One USB cable,
4. One owner’s manual.
The complete electronic version of this manual, as well as the TORPEDO Remote and TORPEDO Capture
softwares are subject to updates. You can download the most recent versions of these products on the following
website: http://www.two-notes.com.
4 Disposal of Waste Equipment by Users in Private Household in the
European Union
This symbol on the product or on its packaging indicates that this product must
not be disposed of with your other household waste. Instead, it is your respon-
sibility to dispose of your waste equipment by handing it over to a designated
collection point for the recycling of waste electrical and electronic equipment.
The separate collection and recycling of your waste equipment at the time of
disposal will help to conserve natural resources and ensure that it is recycled
in a manner that protects human health and the environment. For more in-
formation about where you can drop off your waste equipment for recycling,
please contact your local city office, your household waste disposal service or
the shop where you purchased the product.
Two Notes Audio Engineering TORPEDO Live 9
Page 10

Foreword
5 Warranty
OROSYS SARL warrants that this TWO NOTES AUDIO ENGINEERING product shall be free of defects in parts and
workmanship when used under normal operating conditions for a period of two (2) years from the date of
purchase. This warranty shall apply to the original purchaser when purchased from an Authorized TWO NOTES
AUDIO ENGINEERING dealer.
IMPORTANT: PLEASE RETAIN YOUR SALES RECEIPT, AS IT IS YOUR PROOF OF PURCHASE COVERING YOUR LIMITED
WARRANTY. THIS LIMITED WARRANTY IS VOID WITHOUT YOUR SALES RECEIPT.
Defective products that qualify for coverage under this warranty will be repaired or replaced, (at OROSYS
SAS’s sole discretion) with a like or comparable product, without charge. In the case that warranty service is
required, Please contact your authorized TWO NOTES AUDIO ENGINEERING dealer in order to obtain an RMA to
return the complete product to the Authorized TWO NOTES AUDIO ENGINEERING Service Center closest to you,
with proof of purchase, during the applicable warranty period.
Transportation costs to the service center ARE NOT INCLUDED in this limited warranty. OROSYS SAS will cover
the cost of standard ground return transportation for repairs performed under this warranty.
This limited warranty becomes void if the serial number on the product is defaced or removed, or the product
has been damaged by alteration, misuse including connection to faulty or unsuitable ancillary equipment,
accident including lightning, water, fire, or neglect; or if repair has been attempted by persons not authorized
by OROSYS SAS.
Any implied warranties, including without limitation, any implied warranties of merchantability or fitness for
any particular purpose, imposed under state or provincial law are limited to the duration of this limited warranty.
Some states or provinces do not allow limitations on how long an implied warranty lasts, so the above limitations
may not be applicable.
OROSYS SAS ASSUMES NO LIABILITY FOR PROPERTY DAMAGE RESULTING FROM ANY FAILURE OF THIS PRODUCT
NOR ANY LOSS OF INCOME, SATISFACTION, OR DAMAGES ARISING FROM THE LOSS OF USE OF SAME DUE TO
DEFECTS OR AVAILABILITY OF SAME DURING SERVICE.
In case you have to send your TWO NOTES AUDIO ENGINEERING product to any other location, it is of vital
importance to retain the original packing materials. It is very difficult to avoid damage if shipping the product
without these materials. OROSYS SAS is not responsible for damages to the product due to improper packaging
and reserves the right to charge a reboxing fee for any unit returned for service without the original packing
materials.
THE FOREGOING CONSTITUTES THE ONLY WARRANTY MADE BY OROSYS SAS WITH RESPECT TO THE PRODUCTS
AND IS MADE EXPRESSLY IN LIEU OF ALL OTHER WARRANTIES EXPRESSED OR IMPLIED
10 Two Notes Audio Engineering TORPEDO Live
Page 11
Part 2
Warning regarding the proper use of a
loadbox with a tube amplifier
1 What is a loadbox ?
In the normal use of a tube amplifier, it is recommended to always connect its power output to a speaker cabinet
prior to powering it up. The speaker cabinet (4, 8 or 16 Ohms) must always be connected to the corresponding
speaker output of your amplifier. Not doing so can lead to partial or complete destruction of the output stage
of the tube amplifier.
Most tube amplifier makers protect their products with fuses or other protection systems, but some amplifiers
still remain not or insufficiently protected. It is impossible to predict the behavior of all the amplifiers on the market
in case of use without a load (a speaker cabinet or a load box).
The electronic term that describes the speaker cabinet with respect to the amplifier is the "load": we say the
cabinet "loads" the amplifier. The term loadbox fits any product embedding a load. The main parameter of the
load box is its impedance, expressed in Ohms. An 8 Ohms load box has to be plugged to the 8 Ohms speaker out
of the amplifier. The power sent to the load is changed into heat, so please follow the cooling recommendation
of the load box, otherwise overheating may cause damage, both to the loadbox and the amp.
The TORPEDO Live is a loadbox. This term indicates that the TORPEDO Live is a load which can electrically
replace the speaker cabinet while dissipating (transforming into heat) the power coming out of the amplifier.
The embedded load in the TORPEDO Live is a reactive one: it embeds a specific circuit to simulate the
complex impedance of a real speaker. This kind of system is widely used in the industry to silently test amplifiers.
Always connect the speaker out of your tube ampilifier to a proper load
(speaker cabinet or load box). TORPEDO Live, once powered up, is such a
load. Please note that you always have to power up the TORPEDO Live before
your amplifier.
Two Notes Audio Engineering TORPEDO Live 11
Page 12
Warning regarding the proper use of a loadbox with a tube amplifier
2 Which output volume for my amplifier ?
The correct use of your amplifier with a loadbox requires some precautions. Because of the fact that you may
be playing "silently," it is much easier to accidentally run your amplifier beyond the reasonable limits set by the
manufacturer than when you are using an actual speaker cabinet. This can lead to faster tube wear and, in
some cases, to more serious inconveniences.
During the first tests at high volume on the amplifier, monitor the color of the
tubes and the general state of the amplifier. Red-glowing tubes or any appear-
ance of smoke are signs of a problem that could lead to partial or complete
destruction of the amplifier.
Keep in mind that the "sweet spot" — the perfect running point of the amplifier, the one that will give you the
tone you are looking for — is rarely obtained at maximum volume. In addition, the volume control of the amplifier
is usually logarithmic, which means that the volume goes up quickly on the first half of the potentiometer’s
rotation, reaches its maximum at 12 o’clock, and will not change much beyond that point. Therefore, you can
reach the maximum volume of your amplifier even if the volume potentiometer is not set at maximum.
By reaching the maximum output power of your amplifier, you will hear a lot of distortion, which may not
sound as good as you could hope. In fact, most amplifiers do sound rather poorly at maximum volume. Always
keep in mind that your amplifier may not have been conceived to be used at maximum volume for a long
time. Running an amplifier at high volume will cause premature wear of the tubes and possible malfunctions or
damages at the output stage.
The fact that the volume control of your amplifier is not set at maximum does
not mean your amplifier is not running at maximum volume. A good habit is
to keep the usual volume setup you would use in rehearsal or on stage, rather
than just following what the volume potentiometer indicates.
12 Two Notes Audio Engineering TORPEDO Live
Page 13

Part 3
About the TORPEDO Live
1 Introducing the TORPEDO Live
Two Notes Audio Engineering is proud to introduce the TORPEDO Live, the optimized for live playing version of the
critically-acclaimed TORPEDO hardware series. This product has been developed through years of technical re-
search, with great attention to the needs of guitarists, bassists and sound technicians confronted the challenges
of miking instrument amplifiers, on stage or in studio. Our goal is to provide ease of use, reliability, versatility and,
above all, perfect audio quality.
The Torpedo technology was created as an answer to the high pressure musicians have to deal with: lack
of time, limited gear availability, loud amplifiers that can’t be played at desired volume, as well as bulky and
heavy cabinets to carry. In addition, many musicians are more comfortable with their analog amplifier and
effect pedals, and don’t want to perform using digital modeling systems, which may compromise their playing
style and sound.
For them, the TORPEDO Live offers a "virtual" alternative to traditional miking, using a technology derived from
the convolution reverberation, to achieve a degree of realism never experienced previously with simulators. The
musician simply plugs the TORPEDO Live in place of his cabinet, connected to the speaker output of his amplifier,
without modifying his usual settings (or connected effect pedals as applicable).
The TORPEDO Live comes with a large library of 45 cabinets and 8 microphones among the most commonly
used models in the world. The virtual miking is done by choosing one cabinet and one microphone, and fine-
tuning the position of the microphone in front of the cabinet. The Torpedo allows the user to assume the role of
the sound engineer in a professional studio.
The TORPEDO Technology : to give you realism and playing comfort, Two Notes developed a unique technol-
ogy based on an adaptation of convolution techniques. Starting with the measurement of an actual cabinet
+ microphone setup, the TORPEDO Live can accurately reproduce the system as it was measured, as well as
the microphone position in space. In order to take full advantage of these digital algorithms, the highest quality
audio design assures a perfect analog-to-digital conversion and a huge dynamic range to retain the ultimate
playing experience.
This product has been thoroughly tested in professional studio and stage environments and is the alternative
many musicians were waiting for professional sound capture of their amplified instruments. The TORPEDO Live
will give you the elusive sound of the greatest recording studios and producers, every time, everywhere.
Two Notes Audio Engineering TORPEDO Live 13
Page 14
About the TORPEDO Live
2 Front panel
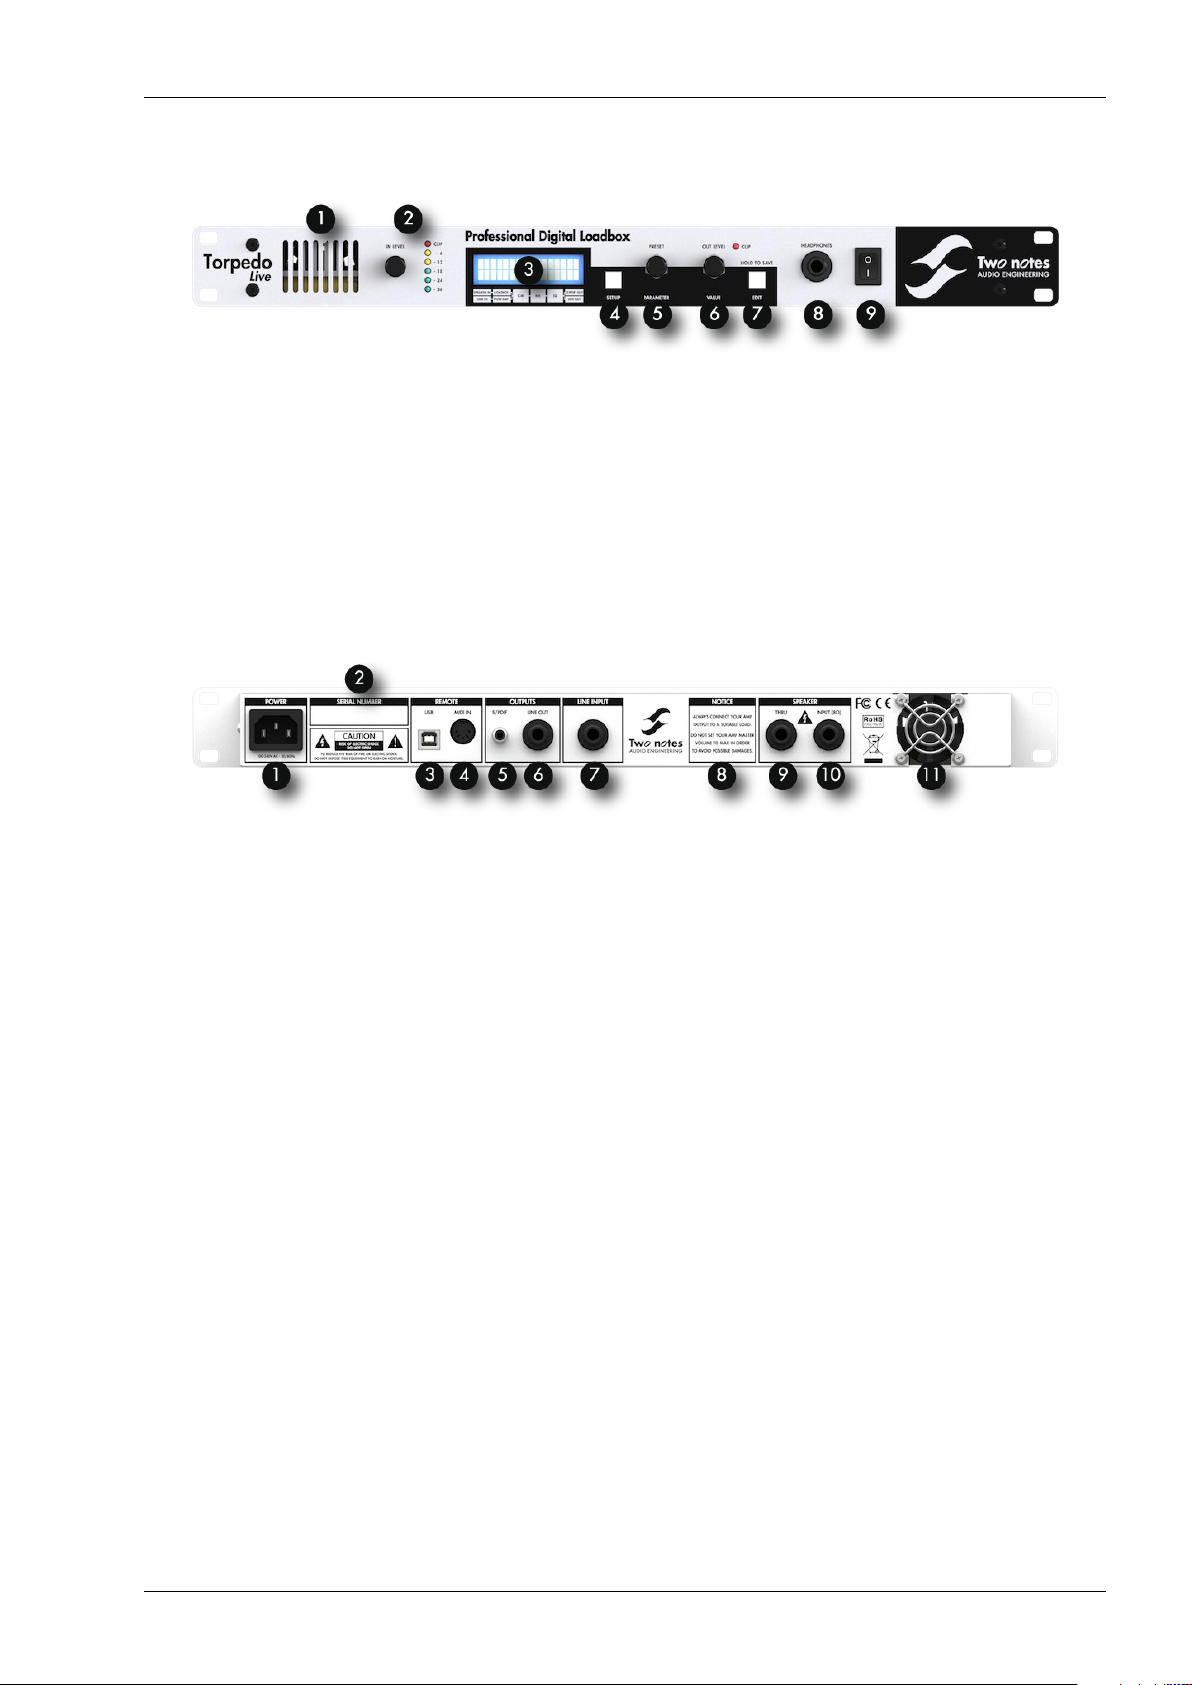
1 Ventilation slit 4 SETUP button 7 EDIT/SAVE button
2 Input gain 5 PRESET/PARAMETER encoder 8 Phones output
3 Display 6 OUT LEVEL/VALUE encoder 9 Mains switch
3 Rear panel
Figure 3.1: Front panel of the TORPEDO Live
Figure 3.2: Rear panel of the TORPEDO Live
1 Mains connector 4 MIDI 7 Balanced line input 10 Amplifier input
2 Serial number 5 S/PDIF output 8 8 Ohms load warning 11 Fan
3 USB 6 Balanced line output 9 Speaker output
4 Only a speaker simulation ?
The TORPEDO Live is a standalone unit you can bring with you in any situation, when silent playing is needed.
The role of the TORPEDO Live is to replace the following elements of the traditional guitar or bass setup:
• the guitar/bass power amplifier
• the speaker cabinet
• the microphone
• the microphone preamplifier
to provide a signal that is the closest possible to a traditional guitar/bass miking in a professional studio envi-
ronment.
14 Two Notes Audio Engineering TORPEDO Live
Page 15

About the TORPEDO Live
The miking is achieved in 3 steps with the TORPEDO Live:
1. choose a power amplifier (or switch it off if you are using a loadbox), a speaker cabinet and a microphone
(Amplifier, speaker and microphone section),
2. place the microphone in the virtual studio (Miking window and parameters),
3. shape the signal (Low Cut, Eq, Exciter and Comp sections).
With each step, Two Notes Audio Engineering implements its know-how to propose the most advanced sim-
ulations on the market and ensure a total realism both for the musician (playing sensations) and the listener
(sound quality).
You can embed up to 32 Two Notes cabinets in the TORPEDO Live. Download the free TORPEDO Remote
software (Mac OSX and Windows PC) from the Two Notes website, you will be able to add and remove the
embedded cabinets, there are currently 45 Two Notes cabinets, and new free cabinets available directly from
you TORPEDO Remote software.
4.1 Tube Stage Output
When using a guitar/bass preamplifier with other speaker emulators, the guitarist/bassist may miss the power
amplifier’s contribution to the overall sonic texture. Many musicians get their sound from a particular use of this
element and this possibility is present in the TORPEDO Live.
To do this, Two Notes developed an original tube stage modeling, giving you the choice between 4 different
tube models (6L6, EL34, EL84 and KT88) in Push-Pull (PP) in AB class or Single Ended (SE) in A class configurations.
You can push this tube stage like a conventional amplifier and look for this subtle yet particular distortion.
The TORPEDO Live can be used as a super-DI for keyboards. The tube amp simulation feature, developed for
guitarists and bassists, is also very interesting to warm-up the sound of a synthesizer, organ or a digital piano.
4.2 Section EQ
When recording guitars or basses, it is common to apply a few effects to shape the sound before sending it to
a PA or a recorder. In the TORPEDO Live you will find a simple but efficient EQ filter with two modes, GUITAR or
BASS.
4.3 The Torpedo technology, convolution and Impulse Responses
The impulse response (IR) of a system describes it behavior under the form of a very detailed filter. The convolu-
tion technique uses IRs to simulate the behavior or particular systems, such as reverbs, speakers, EQ...
It is the most accurate way to simulate sound signatures that are linear (i.e. without distortion) and time-
invariant (i.e. no effect like modulation, compression, hysteresis...). It is particularly well suited for speaker miking
simulation.
Two Notes developed a unique technology based on an adaptation of convolution techniques. Starting
with a measure of a real cabinet + microphone setup, the TORPEDO TORPEDO Live can accurately reproduce
the system as it was measured, as well as the microphone position in space by using IR synthesis.
4.4 Third party impulse responses
The TORPEDO Live is capable of delivering the best guitar and bass tones by using the TORPEDO technology,
but you can also embed impulse responses you can purchase or download for free from 3rd party developers,
in WAV or AIFF formats.
You can upload up to 512 third party IRs in the TORPEDO Live, using the free Torpedo Remote software.
4.5 Create your own IRs
Download the free TORPEDO Capture software from the Two Notes website. With this software you will be able
to capture your own cabinet + microphone setup and embed its sound signature into the TORPEDO Live.
Two Notes Audio Engineering TORPEDO Live 15
Page 16

Page 17
Part 4
Connecting the TORPEDO Live
1 Overview
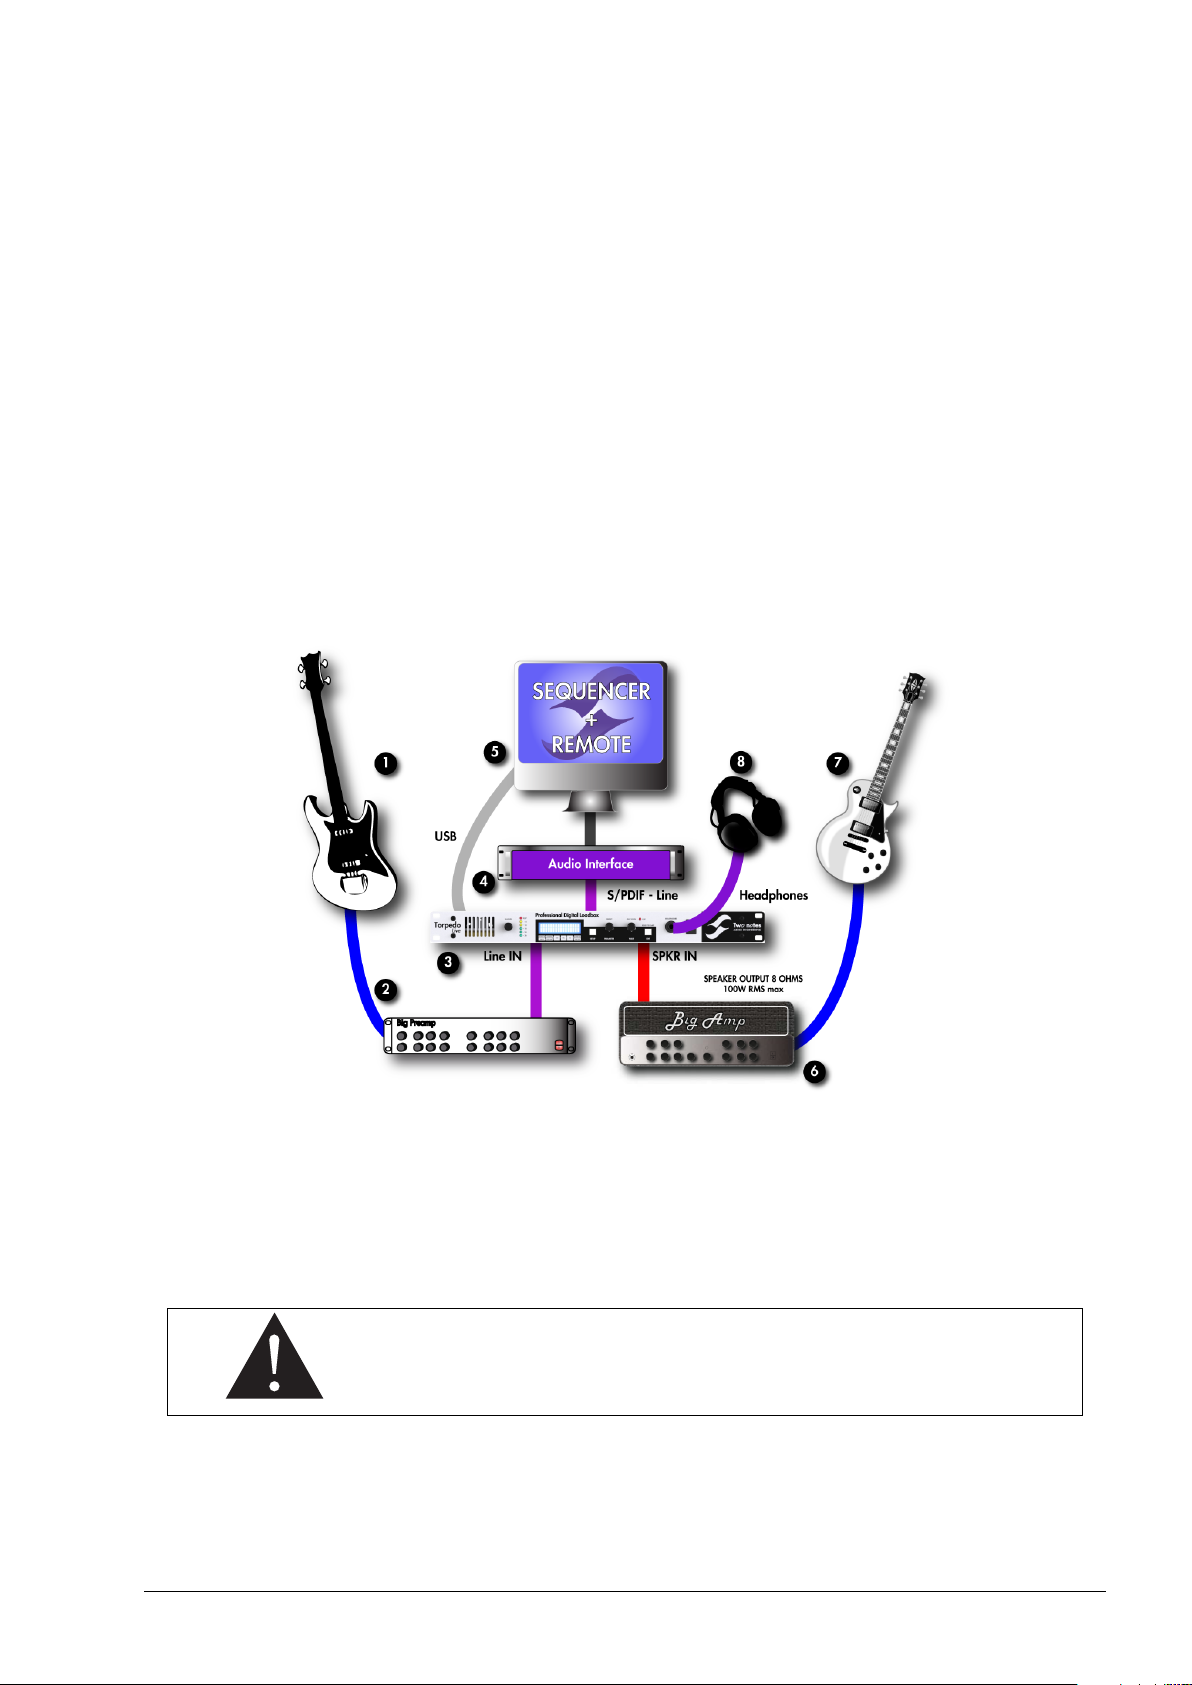
The TORPEDO Live offers a solution for silent and quality sound pick-up in many situations. The following illustrations
show the most common situations theTORPEDO Live has been created for.
1 Guitar/bass 3 TORPEDO Live 5 PC/MAC with TORPEDO Remote 7 Guitar/bass
2 Guitar/bass preamp 4 Audio interface 6 Guitar/bass amp 8 Headphones
Even if it was design to go on stage, the TORPEDO Live fits perfectly in a digital or analog studio, to bring you
the greatest tone with your amp, whatever the circumstances.
Please keep in mind that tube amplifiers have to be connected to an appro-
priate load (cabinet or load box). Always plug the 8 ohms output from your
amp to the 8 ohms input of the TORPEDO Live.
Two Notes Audio Engineering TORPEDO Live 17
Page 18
Connecting the TORPEDO Live
2 In the studio
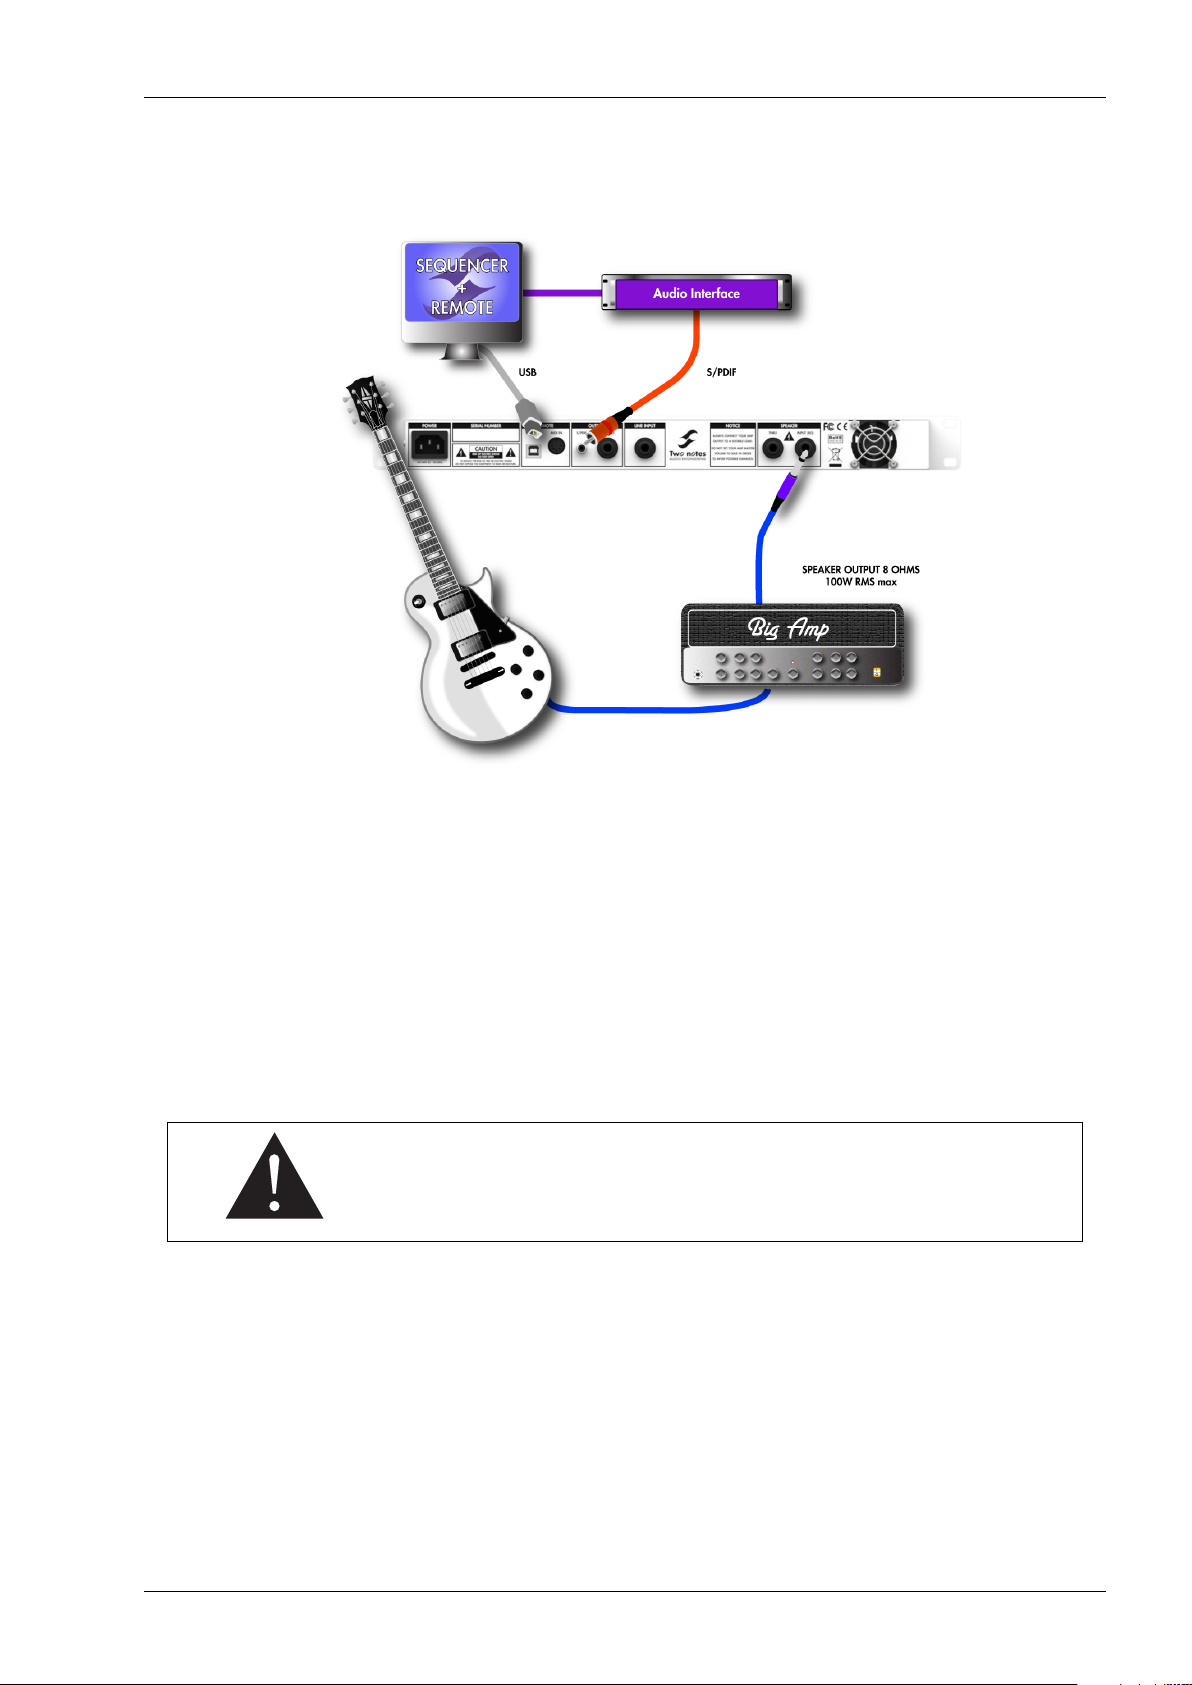
The studio setup shown here is an integration of the TORPEDO Live in a usual Digital Audio Workstation.
Plug your 8 ohms out on your amplifier to the SPEAKER input of the TORPEDO Live. If you want to use a
preamplifier, plug its line output to the LINE INPUT of the machine.
Connect the S/PDIF OUT of the TORPEDO Live to the S/PDIF IN of your audio interface. The sampling frequency
can be set to 48KHz or 96KHz.
In this configuration the TORPEDO Live is the master of the S/PDIF communication. This way, analog to digital
conversion is handle by the TORPEDO Live, so you preserve all the tone coming from your preamp/amp.
An S/PDIF signal contains two audio channels. The TORPEDO Live is a mono unit, so we decided to give
a great feature : sending the WET signal (with miking simulation) through the LEFT channel and the DRY signal
(without miking simulation) on the RIGHT. This way you can record the dry and wet signal simultaneously. Use
the WEt signal to play as usual, and the DRY signal from the amp with a plugin speaker simulator, such as our
TORPEDO PI-101 WoS !!
For a working S/PDIF connection, your audio interface must be in slave mode,
while the TORPEDO Live is in master mode. Your audio interface must handle
48KHz and/or 96KHz to properly work with the TORPEDO Live. For more infor-
mation on your audio interface, please refer to its user manual.
Control the machine from your computer (PC Windows or Mac OSX) with the TORPEDO Remote software in
USB. Create, save and load presets, load new cabinets or Impulse Response (IR) files. Download the TORPEDO
Remote for free on the Two Notes website.
18 Two Notes Audio Engineering TORPEDO Live
Page 19
Connecting the TORPEDO Live
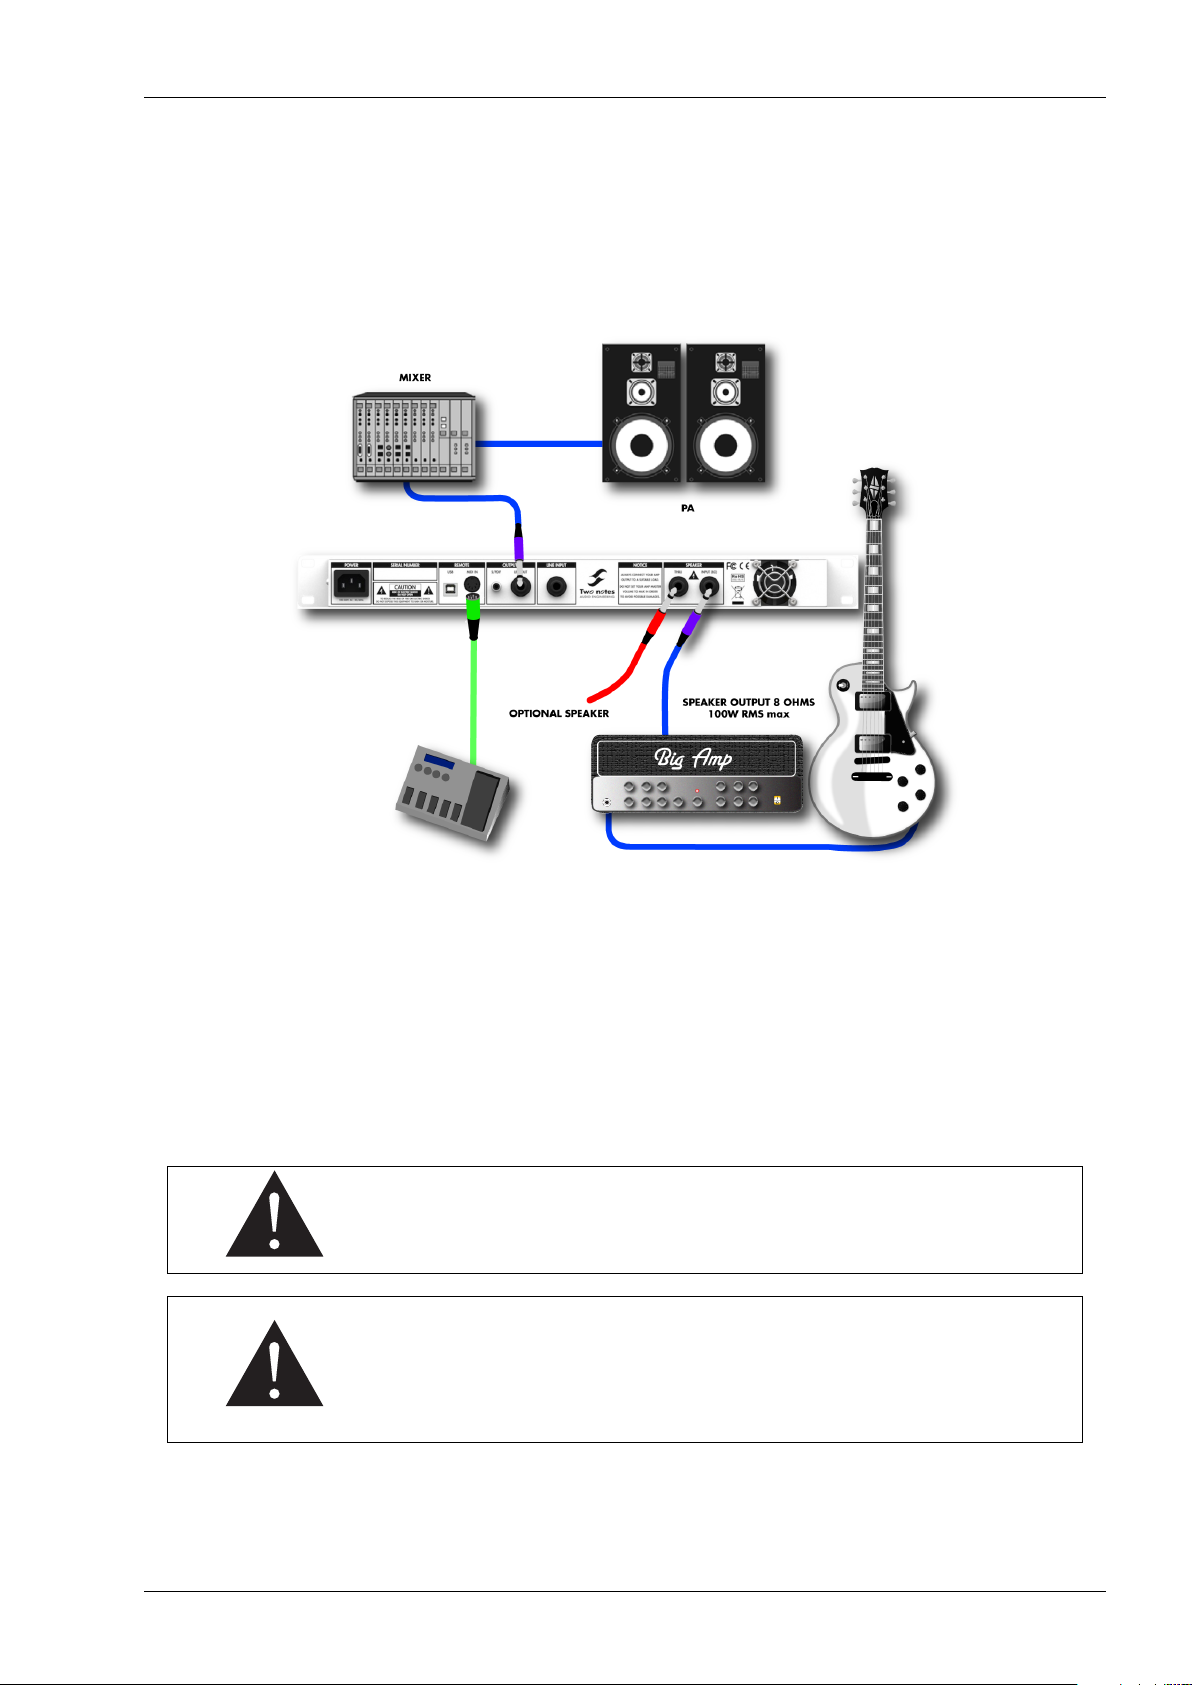
3 On stage
The analog I/O of the TORPEDO Live offers great options on stage. For example, the analog output can be
connected to the front mixing console. Or plug headphones to the appropriate output and enjoy playing your
amp LOUD in a total silence, at home.
On the following figure you will find a simple setup with an amplifier,the same can be done with a preamplifier
in the LINE INPUT of the TORPEDO Live.
With a MIDI foot controller, you gain access to the presets navigation and even parameter changing in real
time. The TORPEDO Live handles both PROGRAM CHANGE et CONTROL CHANGE commands.
Playing in silence is a great feature, but at some point you have to listen to what you play! We preset a few
option to use at home, in the studio or on stage:
1. Listen through the headphones out,
2. Listen on a guitar/bass cabinet plugged to the TORPEDO Live THRU output,
3. Having a local monitoring system on stage, by duplicating the LINE OUPUT with a mixer,
4. Having in-ear monitors or wedge speakers controlled by a sound engineer.
The THRU, S/PDIF and LINE outputs can be used simultaneously.
When you plug a cabinet to the THRU output, the impedance of this cabinet is
the one that your amplifier sees. In other words, with a 4 Ohms cabinet, you
need to connect the 4 Ohms output of your amplifier. In this configuration, the
load box inside the TORPEDO Live is disconnected. This way, you can override
the 8 Ohms only limitation of the TORPEDO Live.
you will probably find innovative ways to use the TORPEDO Live, share with other users your tips and tricks on
the Two Notes user forums and other social networks, go to the Two Notes website and click on Community.
Two Notes Audio Engineering TORPEDO Live 19
Page 20

Page 21
Part 5
Configuring and using the TORPEDO Live
1 The TORPEDO Live interface
The TORPEDO Live parameters are organized in menus, accessible by different push-buttons and knobs you will
see on the figure 3.1:
• Two 2-function rotary encoders: PRESET/PARAMETER, OUTPUT LEVEL/VALUE
• Two push-buttons: SETUP and EDIT/HOLD TO SAVE.
• One potentiometer: input gain.
When pushing a button or turning an encoder, you see a parameter moving on the two lines display (item 3
in figure 3.1).
2 Input gain control
This encoder controls the input gain of the unit. As the TORPEDO Live being a digital product, it is absolutely
critical to avoid any saturation of the input signal and avoid the risk of considerably reducing the audio quality.
The input level is controlled by a potentiometer and is the same for all presets. To get the best sound, try to
have the same volume (or close) on all different sounds coming to the TORPEDO Live. This way you won’t have
to change the input gain when switching the channels on your amplifier. If you don’t have individual volume
settings on your amplifier channels, always do the gain setting with the loudest channel.
The input gain adjustment must be done with input signal present at the input selected (speaker or line input).
The input bargraph gives you a visual indication of the input signal amplitude. The upper red led is on when there
is saturation in the input stage: lower the volume of your amplifier output and/or lower the input gain.
For optimum quality, we advise to keep the peak levels of the input signal at a
maximum of -12dB to -6dB on the bargraph.
3 Three modes: PERFORM, EDIT & SETUP
The TORPEDO Live has three different mode, giving you access to different parameters:
1. Navigate through the 100 presets in PERFORM mode
2. Edit a preset in EDIT mode
3. Setup global parameter of the machine in SETUP mode
To enter a mode, whatever the current mode, push the appropriate button. To see and modify the various
parameters, use the appropriate encoders wich function depends on the current mode.
Two Notes Audio Engineering TORPEDO Live 21
Page 22
Configuring and using the TORPEDO Live
4 PERFORM mode
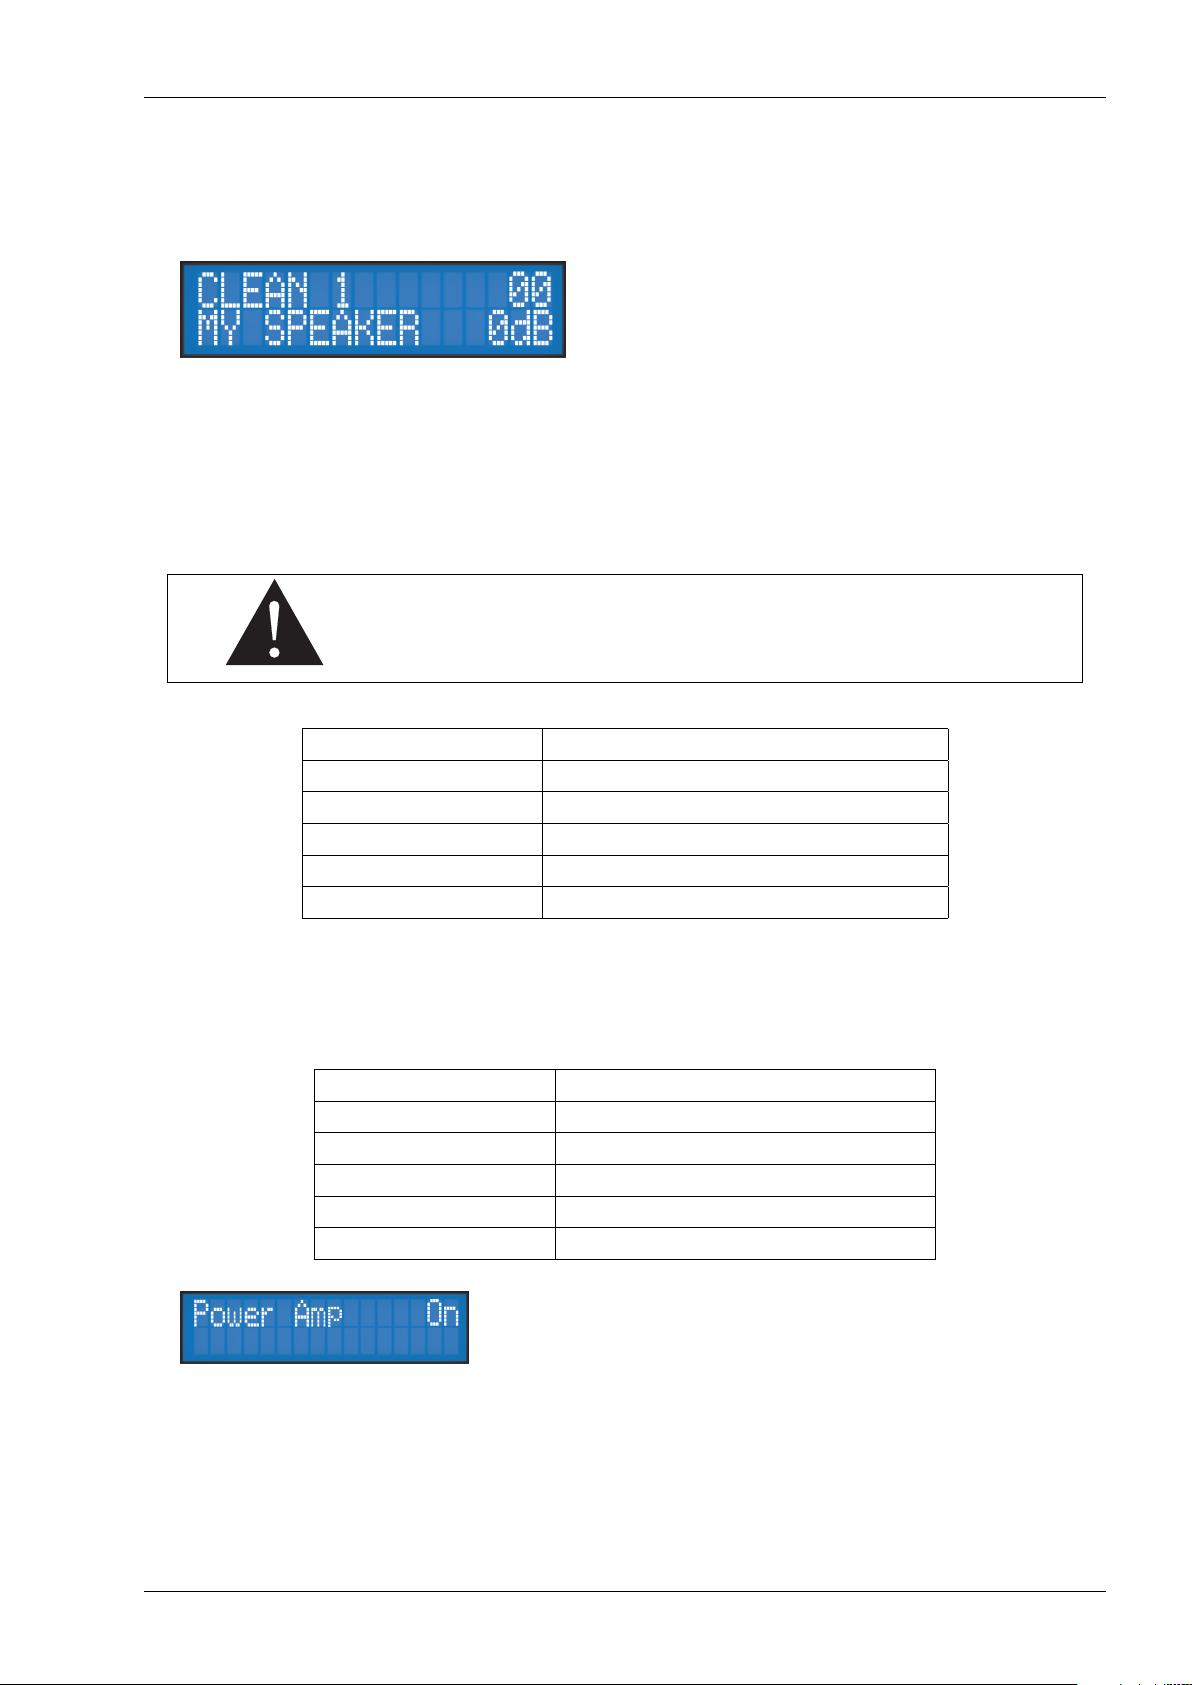
The PERFORM mode is the default mode you will see when first using the TORPEDO Live. You will have the
following information on screen:
• First line: preset name and number (between 01
and 00 corresponding to preset 100.
• Second line: Cabinet name (or IR name) and
output volume (OUT LEVEL between -95dB and
+12dB).
In this mode you can navigate in the presets and set the output volume of the machine. You will be in this
mode when playing without editing or modifying any parameter. This way you can have a fast access to the
volume in case you have to quickly lower or increase the volume in any situation.
We recommend first to search for a preset close to the sound you have in mind, then tweak the selected
preset in EDIT mode.
The preset name is limited to 12 letters or numbers. The authorized characters
are capital A to Z, 0 to 9 and space.
The various functions of the buttons in PERFORM mode are described in the following tab:
Button Function
SETUP Switch to SETUP mode
PRESET/PARAMETER Navigate the preset
OUT LEVEL/VALUE Set the output volume between -95dB and +12dB
HOLD TO SAVE/EDIT (hold) Save a preset between 01 and 00 (preset 100)
HOLD TO SAVE/EDIT (toggle) Switch to EDIT mode
5 EDIT mode
In the EDIT mode, you will have access to all the parameters of a preset. The various functions of the buttons in
PERFORM mode are described in the following tab:
Bouton Fonction
SETUP Switch to SETUP mode
PRESET/PARAMETER Navigate the parameters
OUT LEVEL/VALUE Modify the selected parameter
HOLD TO SAVE/EDIT (hold) Save a preset between 01 and 00 (preset 100)
HOLD TO SAVE/EDIT (toggle) Switch to PERFORM mode
You will find three modules in the EDIT mode (Power Amp, Miking
and EQ), followed by the output volume of the preset (this volume
setting is saved with the preset, so you can adjust the levels in order
for the presets to be at comparable volumes).
You will see on the first line of the screen the module name and its current state (On, Off, level in dB for the
OUTPUT LEVEL)
Navigate through the modules with the PARAMETER encoder. A module is activate when it’s On, you can
change the module state with the VALUE encoder. Once the module is On, you gain access to the module
parameters.
22 Two Notes Audio Engineering TORPEDO Live
Page 23
Configuring and using the TORPEDO Live
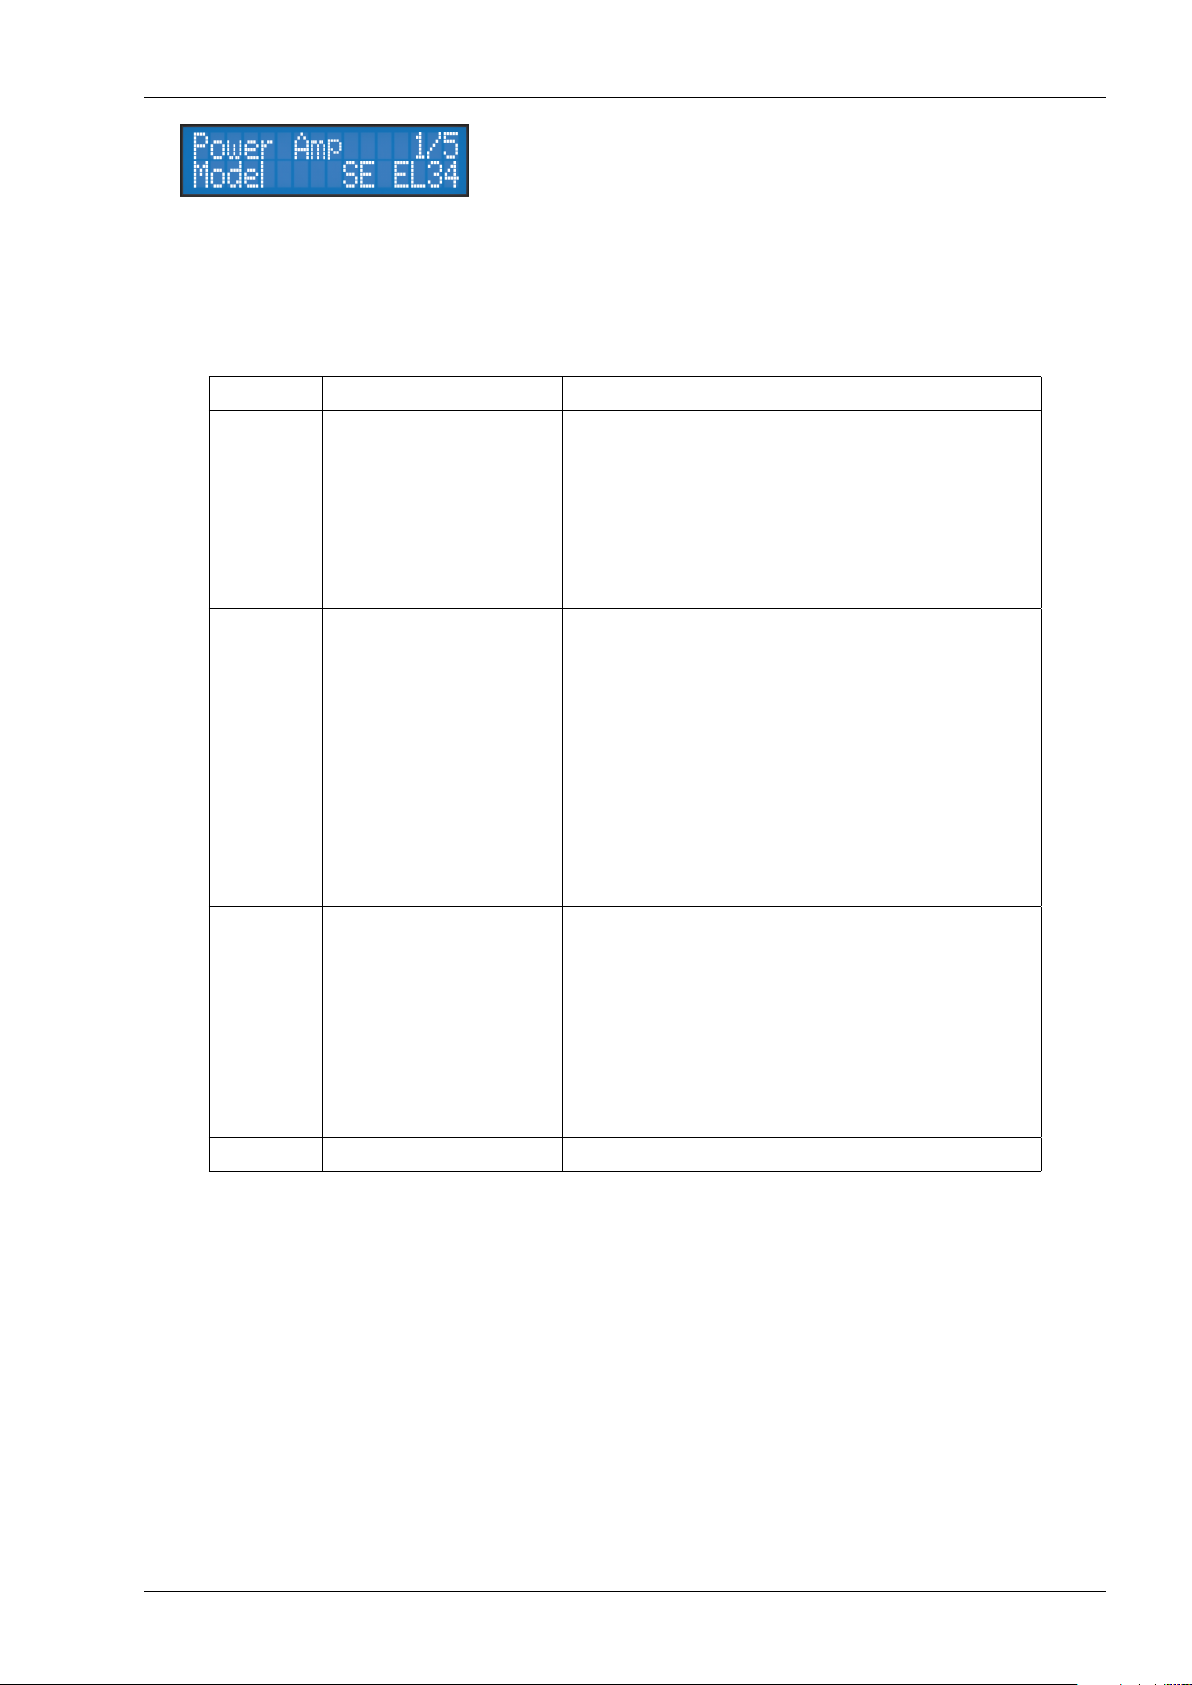
On a parameter page (change the page with the PARAMETER en-
coder), you will see on the first line the module name, the parame-
ter index and the number of parameters of the module.
On the second line you will find the parameter name and its value. Change the value using the VALUE
encoder. The following tab contains the modules list, their parameters with the possible values. All details about
the parameters are below.
Module Parameter
Power Amp
Model
Volume
Presence
Depth
Type
Miking
Bank
Cab or File
Mic
Distance
Center
Position
EQ
Mode
120Hz (Guitar) or 50Hz (Bass)
360Hz/120Hz
800Hz/360Hz
2KHz/800Hz
6KHz/4KHz
Level
Value
On or Off
8 models, from SE 6L6 to PP KT88
0 to 30dB
If Model PP: 0 to 100%
0 to 100%
Triode or Pentode
On or Off
Cab/mic, User 0 to User 3 (in User bank, the options Mic, Distance, Center and Position are not available). 32 memory
slots for Cab/mic, 128 per User bank
Cabinet name or IR file name
Microphone name
0 to 100% (i.e. 0 to 10 feet)
0 to 100% (i.e. 0 to cabinet side, length depending on the
real cabinet geometry)
Back or Front
On or Off
Guitar or Bass
-20dB to +20dB
-20dB to +20dB
-20dB to +20dB
-20dB to +20dB
-20dB to +20dB
-95 to 0dB
5.1 Power Amp
When using the TORPEDO Live with any kind of guitar/bass preamplifier, or even an electric piano or a synthesizer,
you need the color brought by the final stage of a traditional amplifier: the power amplifier. Plug your device
to the LINE input of the TORPEDO Live and enjoy the typical sound of the Two Notes electrically accurate virtual
tube power amplifier:
• Power Amp On: Activate the power amplifier simulation by turning "On" this parameter.
• Model: Choose the amplifier topology (Push Pull or Single Ended) and the tubes type (6L6, EL34, EL84 or
KT88).
• Volume: Set up the output volume of your virtual power amplifier.
Two Notes Audio Engineering TORPEDO Live 23
Page 24
Configuring and using the TORPEDO Live
• Presence: This setting affects the tube stage frequency (loudness).
• Depth: this setting affects the tube stage frequency (bandwidth).
• Pentode/Triode: elect how the tube is used, either in triode or in pentode mode. Pentode mode has more
headroom and volume than triode.
5.2 Miking
In the "MIKING" menu, you take the place of the sound engineer. This is where you will find the "sweet spot", the
perfect microphone position. You’ll also be able to control speaker saturation and balance between simulated
and non-simulated sound.
You have to choose whether you want to use the Two Notes cabinets and microphones combinations
(Cab/mic) or a third party IR (User) picked in on of the three User banks.
In Cab/mic mode, you have access to 32 different cabinets, each cabinet can be miked with 1 of the 8
available microphones. Please refer to Part 7 to discover the microphones and cabinets library.
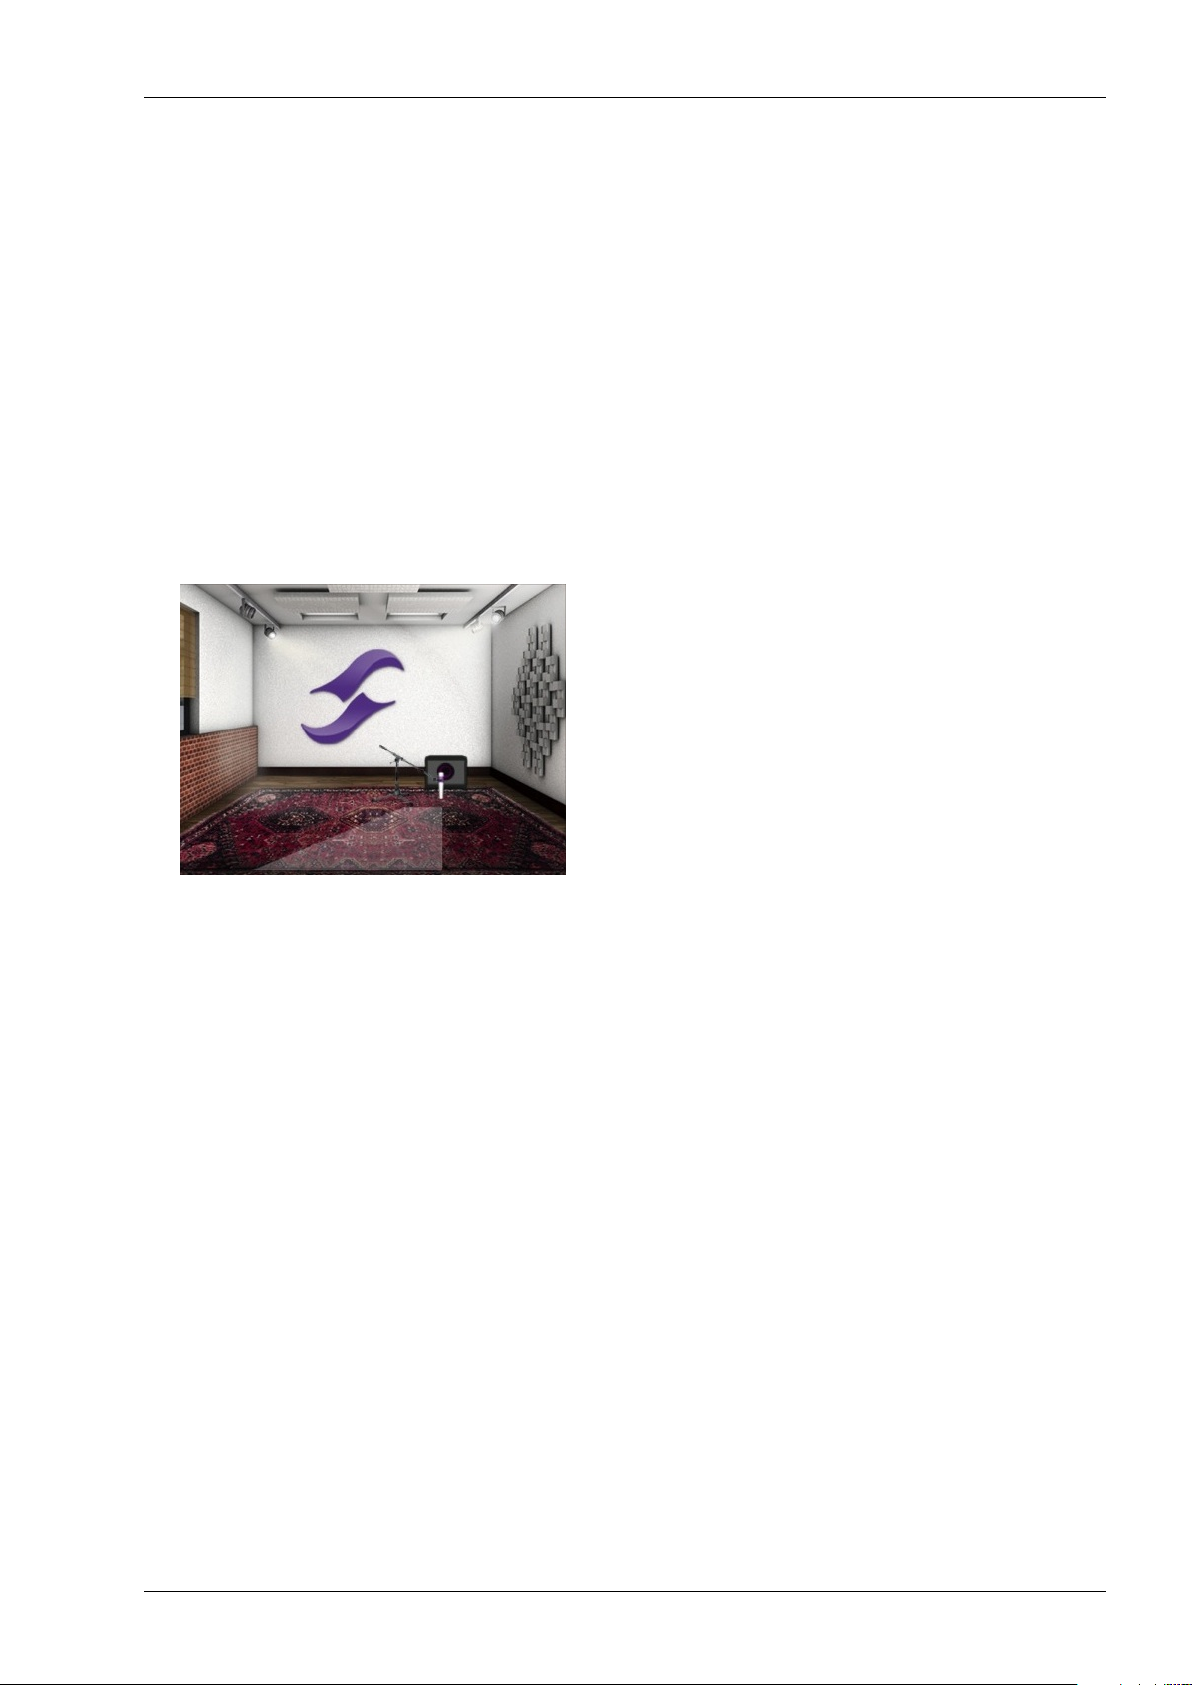
The next step is to place the microphone on the trapezoidal plan (you can see it in the TORPEDO Remote
interface):
• DISTANCE:
Determine the distance between the simulated
cabinet and microphone. Placing a microphone
close to the cabinet will result in a precise sound
with a large amount of proximity effect (depen-
dent on the chosen model of microphone). When
you move the microphone away from the cab-
inet, you increase the proportion of the studio’s
acoustics (early reflections) in the overall sound.
Furthermore, depending on the cabinet model used, and especially with the ones with multiple speakers,
moving the microphone away can bring some higher frequencies back. This is simply due to the directivity of
the loudspeakers. At the maximum position (100%), the microphone is placed 3 meters (10 feet) away from the
cabinet.
• CENTER: Determine the distance between the axis of the loudspeaker and the microphone (placed at
right angle). The on-axis position (0%) allows the maximum amount of treble frequencies which are highly
directional. Moving the microphone away from the axis decreases the treble, resulting in an enhancement
of bass response. At maximum position (100%), the microphone is placed at the edge of the speaker when
Distance is 0%, and 1 meter (3 feet) away from the axis when Distance is 100%.
• POSITION: in standard sound capture, the microphone is usually placed in front of the cabinet. However,
placing the microphone behind the cabinet can be quite interesting. The sound is usually softer and
darker. This is particularly obvious with closed cabinet, less with open ones.
5.3 EQ
This is a simple yet powerful 5-band EQ. Changing the mode (guitar or bass) shifts the band frequencies to focus
on the interesting signal frequencies for the corresponding instrument.
• EQ On: Activate the EQ filter.
• GUITAR | BASS: Guitar or Bass, EQ presets to fit the center frequencies with the instrument you play.
• 120Hz, 360Hz, 800Hz, 2000Hz, 6000Hz (Guitar mode): center frequency of each band, from the lower to
the higher. The frequencies depend on the mode, Guitar or Bass. You can adjust the level in dB of each
band.
24 Two Notes Audio Engineering TORPEDO Live
Page 25

Configuring and using the TORPEDO Live
6 SETUP mode
Bouton Fonction
SETUP Return to PERFORM mode
PRESET/PARAMETER Navigate the parameters
OUT LEVEL/VALUE Set a parameter value
HOLD TO SAVE/EDIT (hold) Save a preset between 01 and 00 (preset 100)
HOLD TO SAVE/EDIT (toggle) Switch to EDIT mode
Whether you are in EDIT or PERFORM mode, click on the SETUP button to enter the SETUP mode. The SETUP
mode groups all the global parameters of the TORPEDO Live. In this mode, you will gain access to some infor-
mation, such as the reception of a MIDI command or the syncing of the machine with the TORPEDO Remote.
Parameter
MIDI CC
MIDI PC
MIDI CHANNEL
MIDI MONITOR
REMOTE MONITOR
SPDIF Freq
Value
Control Change receive, On or Off
Program Change receive, On or Off
MIDI Channel selection, from 1 to 16 or ALL (the machine listens to all MIDI chan-
nels)
Incoming MIDI command monitoring
• "- -": a command is received on a MIDI channel different from the one
you selected for the machine.
• "In": a command is received on the channel you selected for the ma-
chine.
• No Connection: no active USB connection
• USB Connected: active USB connection
• Remote connected: active USB connection, sync with the TORPEDO re-
mote
Selection of the S/PDIF output frequency (48KHz or 96KHz)
Firmware
Serial
Current firmware version of the TORPEDO Live
Serial number
Two Notes Audio Engineering TORPEDO Live 25
Page 26

Configuring and using the TORPEDO Live
7 MIDI setup
The MIDI parameter can be found on the SETUP mode. The TORPEDO Live handles both preset change com-
mands (PROGRAM CHANGE or PC) and parameter change commands (CONTROL CHANGE or CC). This way,
you can interact with all the parameters on the machine from any kind of standard MIDI controller, like a MIDI
pedalboard or a keyboard.
1. Select if the machine is to receive to PROGRAM CHANGE and/or CONTROL CHANGE commands. For
example, if you plan to use the preset switching (PC), the CC receive can be Off.
2. Set a MIDI channel for the machine to receive. You can choose to receive all channels, which is useful
when you don’t know exactly on which channel the commands are sent.
3. With the MIDI monitor, check the correct reception of the commands by the TORPEDO textitLive.
8 Continuous save, preset save
The state of the machine is saved in real time, continuously, and is reloaded when you switch on the machine.
The parameters continuously saved are:
• the current preset,
• the modified preset if any (with all its parameters and name),
• the SETUP mode parameters,
• and the OUT LEVEL.
The navigation is not saved (for example if you were in a particular parameter menu). The purpose is to
reload the machine at its initial state, after a power outage on stage, for example.
When you edit a preset, a star can be seen after the preset number in PERFORM mode. It is possible to
navigate through the presets and to come back to the preset you are editing. This way, the modified and the
non-modified preset can be compared. If you edit a second preset, this will cancel the modification on the first
edited preset if it was not saved. It is only possible to edit one preset at a time.
Saving a preset can be done from any mode, by holding the HOLD TO SAVE/EDIT button. The saving process
is done in three steps:
1. "Rename & hold...": choose the preset name, use PARAM to change the character position and VALUE
change the character. Hold the button to go to the next step.
2. "Hold to save to:": Choose where you want to save the preset, the default slot is the current one. Hold the
button to go to the next step.
3. You will see on the screen "Saving, please wait..." for less than a second, the preset is now saved.
9 Want more cabinets ?
It is possible to add new cabinets or IRs files to your TORPEDO Live using the TORPEDO Remote software. Down-
load the software from the Two Notes website: http://www.two-notes.com. Take control of the machine through
USB, change the parameter, arrange or add/delete cabinets and IR files or apply updates. The TORPEDO Re-
mote detects any new update or new Two Notes cabinets (requires a working Internet connection).
The install process of the TORPEDO Remote creates two default folders where the Impulses are stored:
• "Program Files\Two Notes Audio Engineering\Impulses" on Windows™.
• "/Library/Application Support/Two Notes Audio Engineering/Impulses" on MAC™.
All the cabinets files have to be on this folder without any subfolders. The TORPEDO Remote automatically
saves the downloaded cabinets in this folder.
26 Two Notes Audio Engineering TORPEDO Live
Page 27
Configuring and using the TORPEDO Live
9.1 .tsr files
The .tsr files are the official Two Notes cabinet and microphones format. Two Notes provides new cabinets for
free from time to time. The Remote will request permission to download them and you just have to upload them
into your TORPEDO Live.
A .tsr file contains information of the cabinet response with 8 microphones placed at different places in our
controlled studio room.
If you ever have to move .tsr files, always remember the TORPEDO Remote will
only fetch the files located in the default folder, without sub-folders.
9.2 .tur files
The .tur files are created using the free TORPEDO Capture software, available on the Two Notes website. With
the TORPEDO Capture you will be able to measure the sound signature of your OWN cabinet and microphone.
To upload a .tur file in your machine, place the file in your default Remote folder (or in a folder you define in
the TORPEDO Remote) and use the Memory Manager of the TORPEDO Remote.
Moving the microphone is not available for IRs files in .tur format.
9.3 Third party IRs in .WAV or .AIF format
The TORPEDO Live complies with standards IRs in .WAV or .AIFF format. The remote will handle any kind of
resolution, frequency, length, and will do the following process to convert the file to the TORPEDO format:
The TORPEDO Live is compatible with standard IRs in .WAV or .AIFF format. The remote will handle any kind of
resolution, frequency, length, and will do the following process to convert the file to the TORPEDO format:
1. Normalizing to 0 dB
2. Troncation at 18,66 ms
3. Conversion to 24 bits/48 KHz
To upload a .WAV or AIFF file in your machine, place the file in your default Remote folder (or in a folder you
define in the TORPEDO Remote) and use the Memory Manager of the TORPEDO Remote.
Moving the microphone is not available for IRs files in .WAV or .AIFF format.
9.4 Uploading new Two Notes cabinets or third party IRs
The TORPEDO Live includes an innovative function named QUICK PREVIEW. The propose is to select an IR or a
new cabinet in QUICK PREVIEW to load it almost instantaneously. This way you can browse a huge IRs folder and
listen to the result on the fly. To use this mode:
1. Create a folder where you put all your IRs and select it with the TORPEDO Remote (folder icon behind
"IMPULSE").
2. Clik on the QUICK PREVIEW button (on the Remote main window). Choose a cabinet or an IR file from the
gear window.
To permanently upload a Two Notes cabinet or an IR file, open the Memory Manager window on the TOR-
PEDO Remote. Simply drag and drop files from your computer to an empty memory slot, wait for the transfer to
be done and you are ready to bring that new cabinet on stage.
Two Notes Audio Engineering TORPEDO Live 27
Page 28

Page 29
Part 6
MIDI
Your TORPEDO Live can receive MIDI PROGRAM CHANGE (PC) and CONTROL CHANGE (C) commands sent by
any kind of MIDI controller connected to the MIDI IN of the machine.
It is important to setup the TORPEDO Live so it will be listening to the MIDI control
commands. Please refer to part 5.6 of this manual.
1 PROGRAM CHANGE (PC)
Each preset on the TORPEDO Live has a single program number. The preset 01 of the machine is triggered by a
MIDI PC 00, you can address the 100 presets (from 01 to 00 meaning 100), with MIDI PC 00 to MIDI PC 99. This
way, it is possible to randomly access the preset by sending the appropriate MIDI PC number.
2 CONTROL CHANGE (CC)
The following table contains the assignment of the parameters of the machine and the MIDI CC numbers and
values. It is important to setup the TORPEDO Live so it will receive MIDI control change.
Two Notes Audio Engineering TORPEDO Live 29
Page 30

MIDI
Parameter name CC] Range
Power Amp
On/Off 0 0 - 1
Model 1 0 - 7
Volume 2 0 - 30
Presence 3 0 - 127
Depth 4 0 - 127
Character 5 0 - 1
Cab/Mic
On/Off 6 0 - 1
Mode 7 0 - 4
Cab 8 0 - (Cab Qty-1)
User 0 File 9 0 - (File Qty-1)
User 1 File 10 0 - (File Qty-1)
User 2 File 11 0 - (File Qty-1)
User 3 File 12 0 - (File Qty-1)
Mic 13 0 - 7
Distance 14 0 - 127
Center 15 0 - 127
Position 16 0 - 1
Behaviour
0 = Off ; 1 = On
0 = Model ]0 ; 1 = Model ]1...
0 = 0dB% ; 30 = 30dB
0 = 0% ; 63 = 50% ; 127 = 100%
0 = 0% ; 63 = 50% ; 127 = 100%
0 = Triode ; 1 = Pentode
0 = Off ; 1 = On
0 = Cab/Mic ; 1= User 0 ; 2= User1; 3 = User
2 ; 4 = User 3
0 = Cab ]0 ; 1 = Cab ]1...
0 = File ]0 ; 1 = File ]1...
0 = File ]0 ; 1 = File ]1...
0 = File ]0 ; 1 = File ]1...
0 = File ]0 ; 1 = File ]1...
0 = Mic ]0 ; 1 = Mic ]1...
0 = 0% ; 63 = 50% ; 127 = 100%
0 = 0% ; 63 = 50% ; 127 = 100%
0 = Back ; 1 = Front
EQ
On/Off 17 0 - 1
Mode 18 0 - 1
EQ - Low 19 0 - 40
EQ - Low Mid 20 0 - 40
EQ - Mid 21 0 - 40
EQ - High Mid 22 0 - 40
EQ - High 23 0 - 40
GENERAL
Preset Level 24 0 - 107
Out Level 25 0 - 107
Mute 21 0 - 1
Table 6.1: TORPEDO Live MIDI map
0 = Off ; 1 = On
0 = Guitar ; 1 = Bass
0 = -20dB ; 20 = 0dB ; 40 = 20dB
0 = -20dB ; 20 = 0dB ; 40 = 20dB
0 = -20dB ; 20 = 0dB ; 40 = 20dB
0 = -20dB ; 20 = 0dB ; 40 = 20dB
0 = -20dB ; 20 = 0dB ; 40 = 20dB
0 = -95dB ; 95 = 0dB
0 = -95dB ; 95 = 0dB ; 107 = 112dB
0 = Off ; 1 = Mute
30 Two Notes Audio Engineering TORPEDO Live
Page 31

Part 7
Specifications
1 Power Amplifier list
Designation
SE 6L6
SE EL34
SE EL84
SE KT88
PP 6L6
PP EL34
PP EL84
PP KT88
Characteristics
Configuration Single Ended - Class A with 6L6
Configuration Single Ended - Class A with EL34
Configuration Single Ended - Class A with EL84
Configuration Single Ended - Class A with KT88
Configuration Push-Pull - Class AB with 6L6
Configuration Push-Pull - Class AB with EL34
Configuration Push-Pull - Class AB with EL84
Configuration Push-Pull - Class AB with KT88
2 Microphones list
Designation
Dynamic 57
Dynamic 421
Knightfall
Condenser 87
Ribbon160
Ribbon121
Bass 20
Bass 5
Inspired by
Dynamic microphone Shure™ SM57
Dynamic microphone Sennheiser™ MD421
Condenser microphone Blue™ Dragonfly
Condenser microphone Neumann™ U87
Ribbon microphone Beyerdynamic™ M160N
Ribbon microphone ruban Royer™ R121
Dynamic microphonee Electrovoice™ RE20
Dynamic microphone Shure™ Beta52
Two Notes Audio Engineering TORPEDO Live 31
Page 32

Specifications
3 List of speaker cabinets embedded in the TORPEDO Live
Designation Inspired by
Embedded GUITAR cabinets
2Notes CSG Two Notes Custom 1x12" ElectroVoice® EVM12L
Angl VintC Engl® 4x12" Celestion® V30
Blonde 63 Fender® Bassman ’63 Blonde Tolex Piggy Back 2x12"
Brit 65C Marshall® 1965A 4x10" Celestion® G10L-35 close back
Brit VintC Marshall® Slash Signature 4x12" Celestion® V30 close back
Calif StdC Mesa/Boogie® Rectifier® Standard 4x12" Celestion® V30 close back
Eddie Peavey® 5150 2x12" Sheffield 1200
Free Rock2 VHT® Deliverance 2x12" Eminence® P50E
Green Tri Hughes&Kettner® Triamp 4x12" Celestion® Greenback
Jazz 120 Vintage Roland® JC120 2x12"
JubilGreen Marshall® 2550 2x12" Celestion® Greenback
Kerozen Diezel® 4x12" Celestion® V30
Silver77 Vintage Fender® Twin Reverb® 2x12" orange JBL®
SilverJen Vintage Fender® Twin Reverb® 2x12" Jensen® C12K
The One Brunetti® Neo1512 1x15" + 1x12"
Vibro Utah Vintage 1961 Fender® Vibrolux® 1x12" original Utah speaker
Vibro V30 Vintage 1961 Fender® Vibrolux® 1x12" Celestion® V30
Voice 30 Original Vox® AC30 JMI 2x12" Celestion® « Silver Bell »
Voice 65 1965 Vox® 2x12"
VoiceModrn Vox® V212H, 2x12" Celestion® Alnico Blue
Watt FanC Hiwatt® 2x12" Fane close back
XTCab Bogner® 4x12" Celestion® V30
Embedded BASS cabinets
2Notes CSB Two Notes Custom 1x15"
Alu XL Hartke® XL 4x12"
AZ Ben SWR® Big Ben 1x18"
AZ Work SWR® WorkingMan 4x10"
Calif Low Mesa/Boogie® 2x10"
Fridge Ampeg® 8x10"
Heaven Bot David Eden® 1x15"
Heaven Top David Eden® 4x10"
Marco Markbass® 2x10"
Voice V125 Vox® V125 2x12"
All other Two Notes speaker cabinets are available for testing and purchase via the Torpedo Remote software
or the Torpedo Wall of Sound III plug-in.
Please visit http://www.two-notes.com/en/hardware/torpedo-live/ for more information.
32 Two Notes Audio Engineering TORPEDO Live
Page 33

4 Technical data
Specifications
Designation
Speaker Input
LINE Input
Loadbox
Speaker Thru
LINE Output
Characteristics
Jack 6.35mm (1/4") unbalanced (TS, Tip/Sleeve)
Maximum input voltage: 280 Volts AC (51 dBu)
Security load: 220 Ohms / 10 Watts
Jack 6.35mm (1/4") balanced (TRS, Tip/Ring/Sleeve)
Maximum input level: 36 dBu
Input impedance: 10 KOhms
Reactive load, nominal impedance: 8 Ohms
Maximum admissible power: 100 Watts (assuming proper ventilation)
Cooled by temperature-controlled fan
High Impedance mode if a cabinet is connected to the THRU output (loadbox disconnected).
Jack 6.35mm (1/4") unbalanced (TS)
Jack 6.35mm (1/4") balanced (TRS)
Impedance: 470 Ohms
Maximum output level:
• (no load, balanced): 16.5 dBu
• (10k Ohms load, balanced): 16 dBu
• (no load, unbalanced): 11 dBu
• (10k Ohms load, unbalanced): 10.5 dBu
Headphones Output
Noise: less than -94 dBu from 20 Hz to 20 KHz
MONO out, Jack 6.35mm (1/4") balanced (TRS)
Two Notes Audio Engineering TORPEDO Live 33
Page 34

Specifications
Designation
S/PDIF
ADC
DAC
Frequency response (-1db)
Latency
Thermal security
Characteristics
Sampling frequency: 48 KHz or 96 KHz
Master only, no external synchronization
Wet signal on left channel, dry signal on right channel
Gain controlled by analogue potentiometer, -inf to 0dB
Minimal full-scale input level: -2.8 dBu (Line Input)
Sampling frequency: 96 KHz
Resolution: 24 bits
Signal to noise ratio: 100 dB
Sampling frequency: 96 KHz
Resolution: 24 bits
Signal to noise ratio: 105 dB
5 - 19 KHz
2.875 ms (Line Input to Line Output)
Power supply
Dimensions
Temperature controlled fan
At 100°C, a visual warning is displayed and -12 dB attenuation is applied on the signal
At 110°C, the loadbox is disconnected, the amplifier sees a 220 Ohms security load, and
signal is muted.
IEC60320 C14 power connector
Input voltage: 85-264 V AC, 47-63 Hz
Power: approx. 10 W
Width: 430mm, 483mm including rack-mounting edges
Depth: 163mm, 182mm including connectors and knobs
Height: 44mm
Weight: 2 kg
34 Two Notes Audio Engineering TORPEDO Live
Page 35

Part 8
Technical support
Should you encounter a problem with your TORPEDO Live or need help regarding any technical aspects, please
note that Two Notes Audio Engineering has developed on-line services to provide you with fast and efficient
technical support, the Two Notes Help Desk which you will find at this address:
http://support.two-notes.com/
Two Notes Website
On the http://www.two-notes.com website, you will find:
• news about the company and the products (news on the homepage),
• comprehensive information about the TORPEDO Live and its many applications (FAQ),
• firmware and software updates to download (products/TORPEDO Live/downloads),
• access to the Two Notes Store where you can buy new cabinets,
• the Torpedo BlendIR software (products/TORPEDO Live/downloads),
• an official forum where you can share tips and advice with other Torpedo users (forum).
The Two Notes Team often visits specialized forums to help out users.
E-mail
We do not offer technical support via e-mail. Please contact us via the Help Desk at the address above.
Two Notes Audio Engineering TORPEDO Live 35
Page 36

Page 37
http://www.two-notes.com/
 Loading...