

Page 1
Page 2

Page 3
Figures
Figure 1
Two notes Audio Engineering Le Preamp 3
Page 4
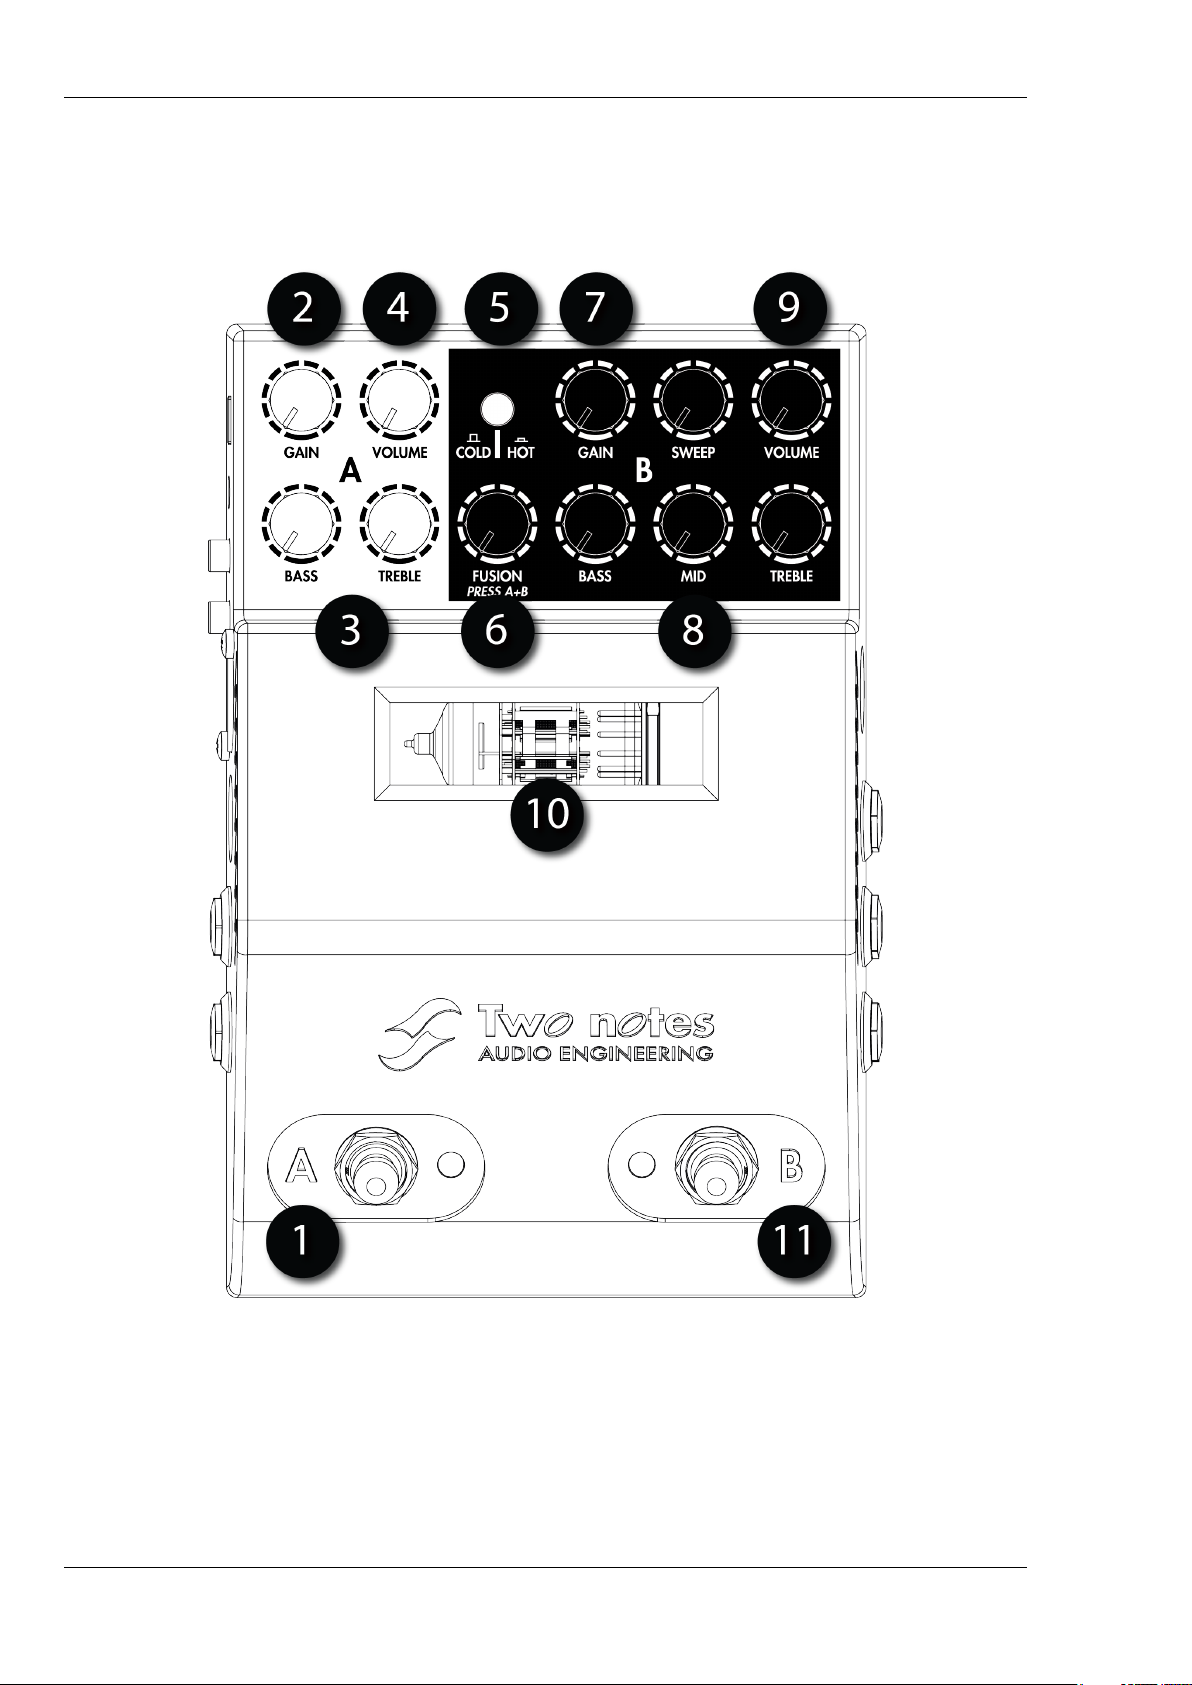
Figure 2
4 Two notes Audio Engineering Le Preamp
Page 5
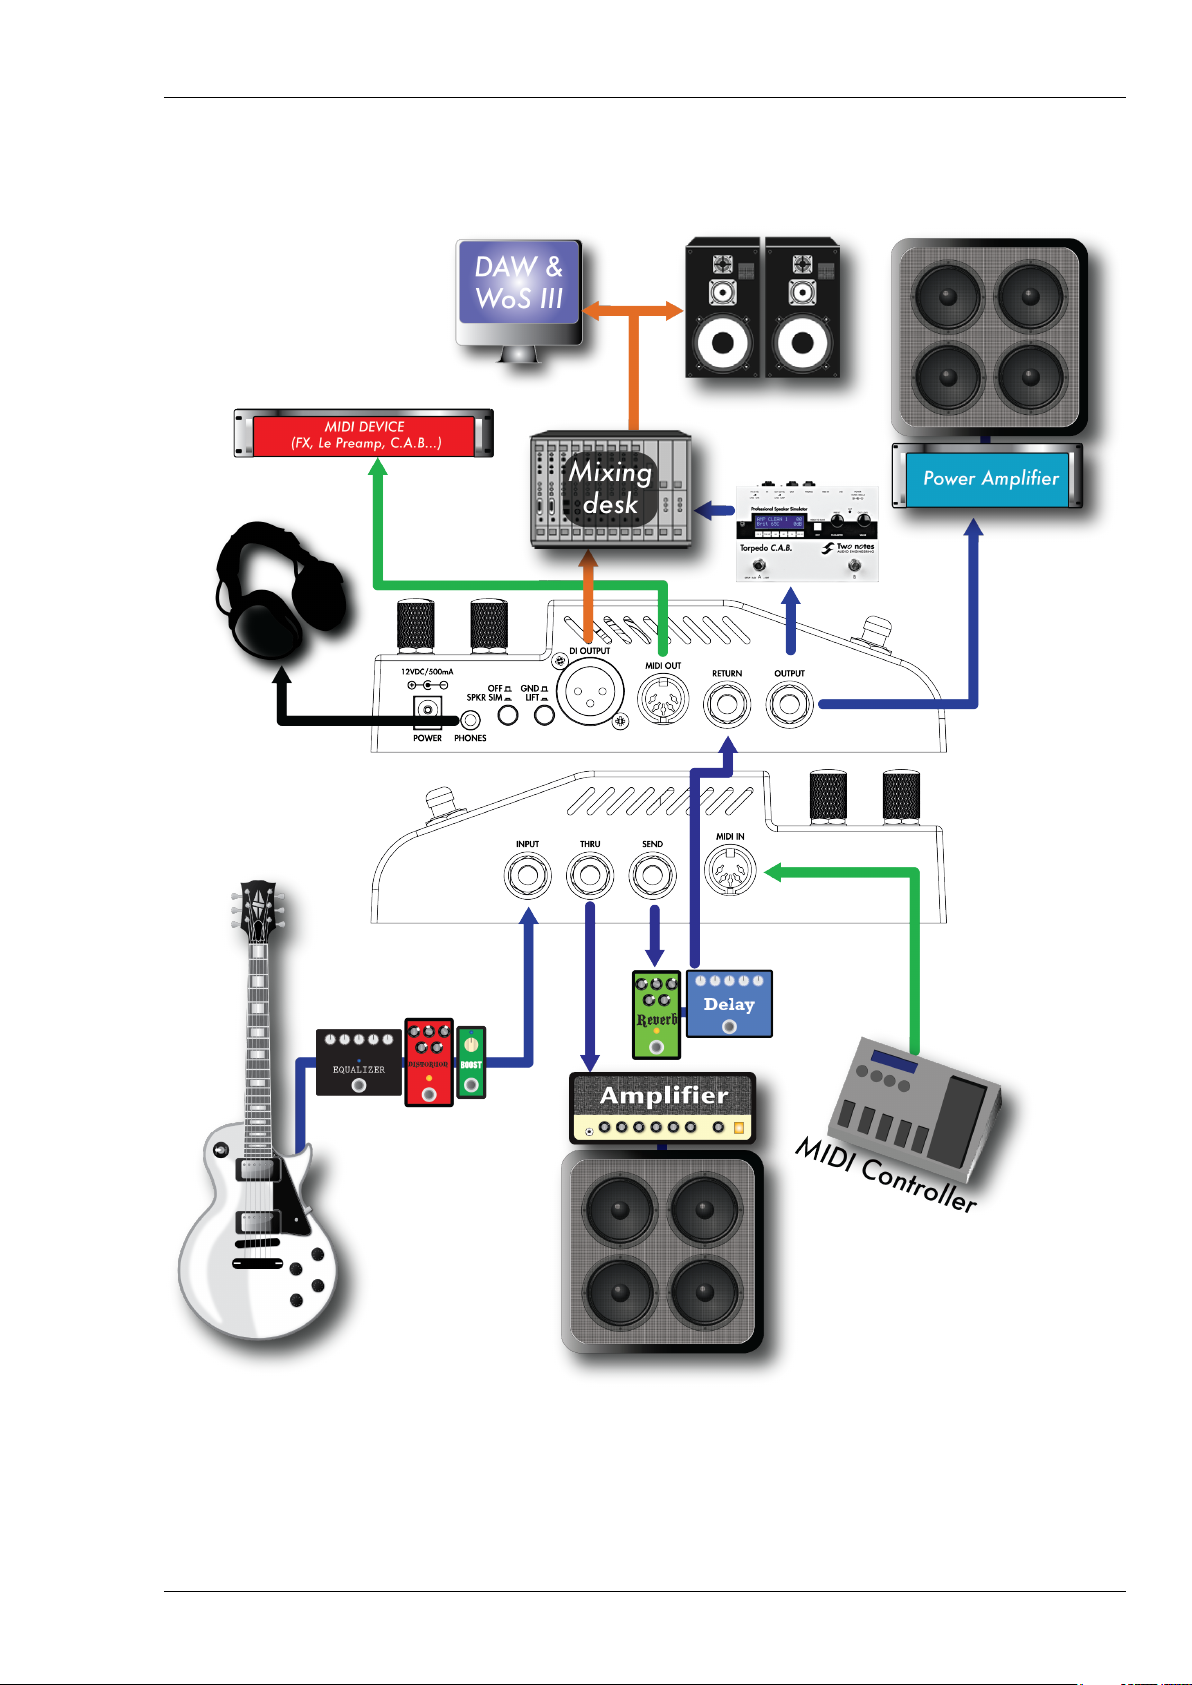
Figure 3
Two notes Audio Engineering Le Preamp 5
Page 6
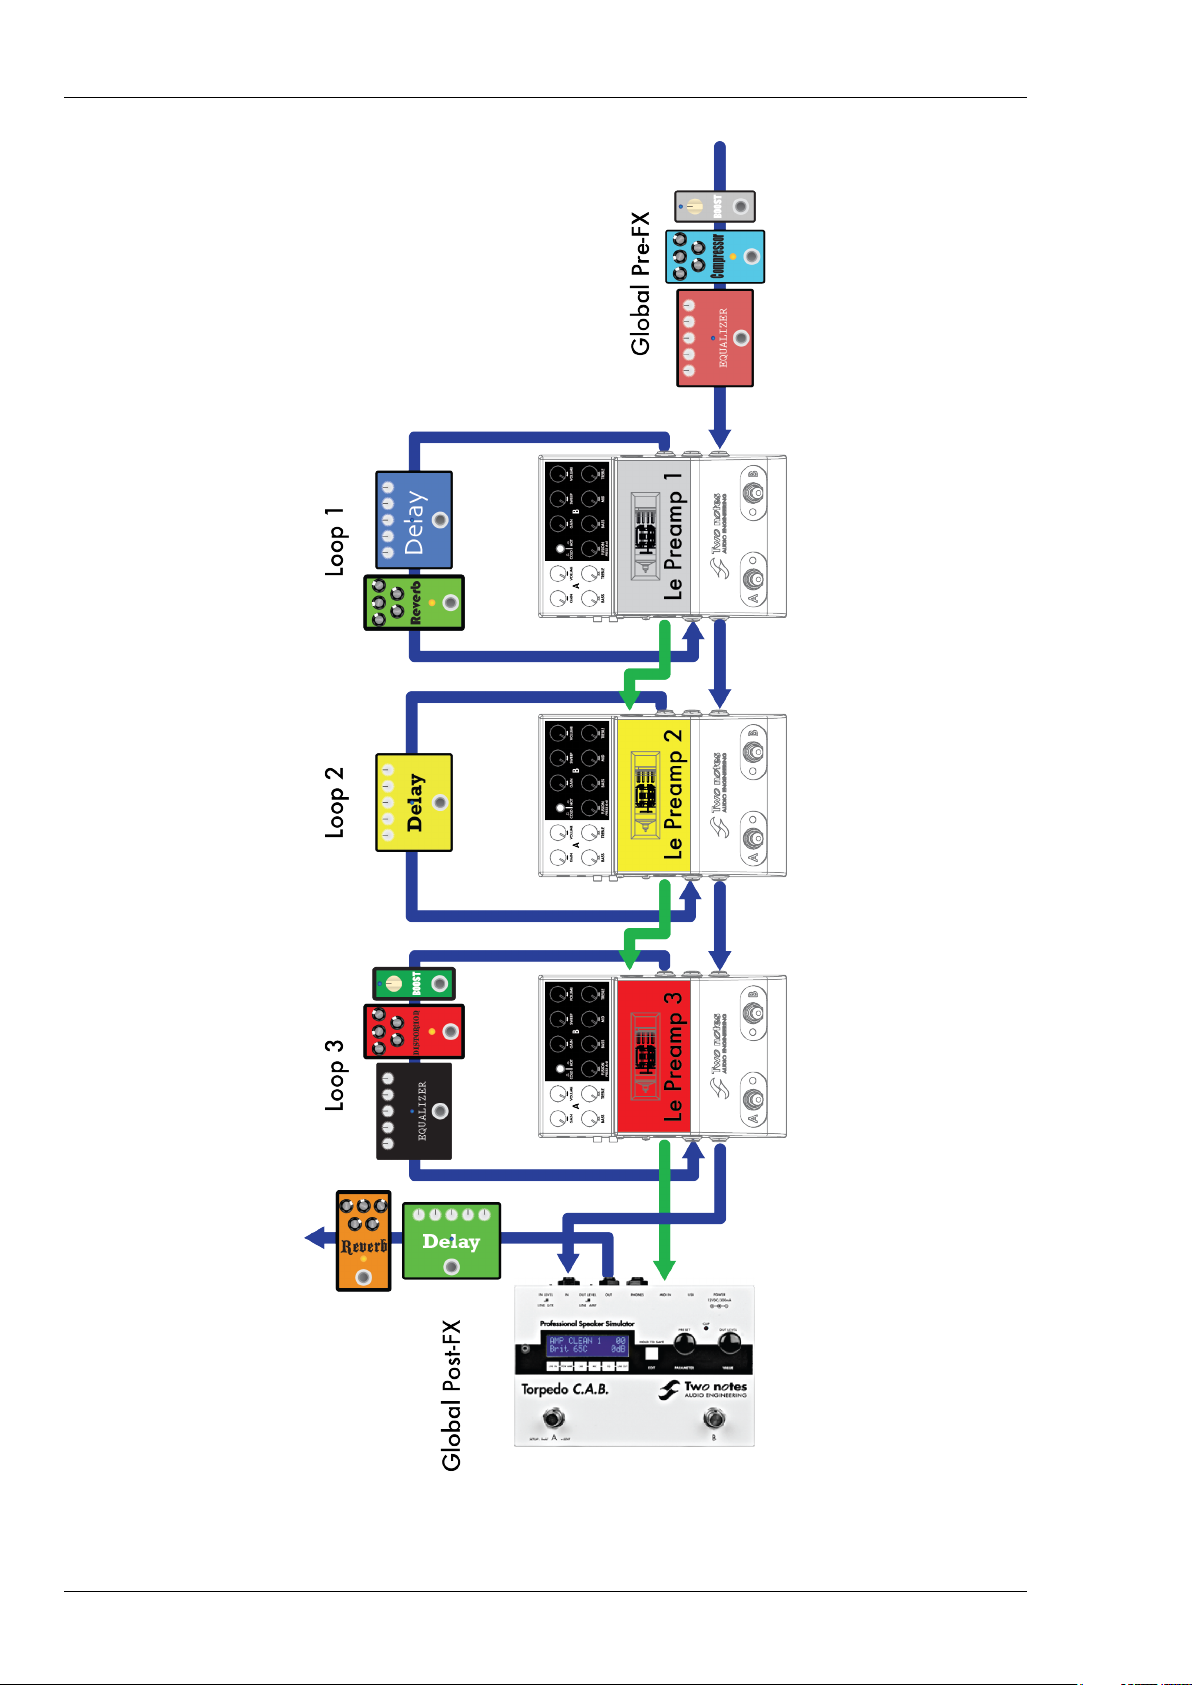
Figure 4
6 Two notes Audio Engineering Le Preamp
Page 7

Contents
1 English - User’s manual 9
1 Important Safety instructions . . . . . . . . . . . . . . . . . . . . . . . . . . . . . . . . . . . . . 9
2 Declaration of conformity . . . . . . . . . . . . . . . . . . . . . . . . . . . . . . . . . . . . . . . 10
3 Warranty . . . . . . . . . . . . . . . . . . . . . . . . . . . . . . . . . . . . . . . . . . . . . . . . . 10
4 Introducing the Le Preamp . . . . . . . . . . . . . . . . . . . . . . . . . . . . . . . . . . . . . . 11
4.1 The concept . . . . . . . . . . . . . . . . . . . . . . . . . . . . . . . . . . . . . . . . . . . 11
4.2 Two channels plus Fusion mode . . . . . . . . . . . . . . . . . . . . . . . . . . . . . . . 11
4.3 Switching . . . . . . . . . . . . . . . . . . . . . . . . . . . . . . . . . . . . . . . . . . . . . 12
5 Le Preamp Sonic Guide . . . . . . . . . . . . . . . . . . . . . . . . . . . . . . . . . . . . . . . . 12
6 Product description . . . . . . . . . . . . . . . . . . . . . . . . . . . . . . . . . . . . . . . . . . 13
6.1 Side views . . . . . . . . . . . . . . . . . . . . . . . . . . . . . . . . . . . . . . . . . . . . 13
6.2 Front view . . . . . . . . . . . . . . . . . . . . . . . . . . . . . . . . . . . . . . . . . . . . 13
7 More on the Fusion modes . . . . . . . . . . . . . . . . . . . . . . . . . . . . . . . . . . . . . . 14
7.1 Cold Fusion . . . . . . . . . . . . . . . . . . . . . . . . . . . . . . . . . . . . . . . . . . . 14
7.2 Hot Fusion . . . . . . . . . . . . . . . . . . . . . . . . . . . . . . . . . . . . . . . . . . . . 15
8 More on the Mid Sweep . . . . . . . . . . . . . . . . . . . . . . . . . . . . . . . . . . . . . . . . 15
9 Connections . . . . . . . . . . . . . . . . . . . . . . . . . . . . . . . . . . . . . . . . . . . . . . . 15
10 What if I want to use several Le Preamp? . . . . . . . . . . . . . . . . . . . . . . . . . . . . . 15
11 Tips & tricks . . . . . . . . . . . . . . . . . . . . . . . . . . . . . . . . . . . . . . . . . . . . . . . . 16
12 The Torpedo Wall of Sound III plugin . . . . . . . . . . . . . . . . . . . . . . . . . . . . . . . . . 17
13 MIDI . . . . . . . . . . . . . . . . . . . . . . . . . . . . . . . . . . . . . . . . . . . . . . . . . . . . 17
13.1 Factory configuration . . . . . . . . . . . . . . . . . . . . . . . . . . . . . . . . . . . . . 17
13.2 MIDI programming . . . . . . . . . . . . . . . . . . . . . . . . . . . . . . . . . . . . . . . 17
13.3 MIDI Monitor . . . . . . . . . . . . . . . . . . . . . . . . . . . . . . . . . . . . . . . . . . . 18
13.4 MIDI Learn . . . . . . . . . . . . . . . . . . . . . . . . . . . . . . . . . . . . . . . . . . . . 18
13.5 MIDI Channel . . . . . . . . . . . . . . . . . . . . . . . . . . . . . . . . . . . . . . . . . . 18
13.6 PC number . . . . . . . . . . . . . . . . . . . . . . . . . . . . . . . . . . . . . . . . . . . 19
13.7 Multi-channel Mode . . . . . . . . . . . . . . . . . . . . . . . . . . . . . . . . . . . . . . 19
13.8 Factory Reset . . . . . . . . . . . . . . . . . . . . . . . . . . . . . . . . . . . . . . . . . . 19
13.9 Firmware version . . . . . . . . . . . . . . . . . . . . . . . . . . . . . . . . . . . . . . . . 19
2 Français - Manuel de l’utilisateur 21
1 Consignes de sécurité . . . . . . . . . . . . . . . . . . . . . . . . . . . . . . . . . . . . . . . . . 21
2 Déclaration de conformité . . . . . . . . . . . . . . . . . . . . . . . . . . . . . . . . . . . . . . 22
3 Service Après Vente (SAV) . . . . . . . . . . . . . . . . . . . . . . . . . . . . . . . . . . . . . . 22
4 Introduction à la série Le Preamp . . . . . . . . . . . . . . . . . . . . . . . . . . . . . . . . . . 23
4.1 Le concept . . . . . . . . . . . . . . . . . . . . . . . . . . . . . . . . . . . . . . . . . . . 23
4.2 Deux canaux plus le mode Fusion . . . . . . . . . . . . . . . . . . . . . . . . . . . . . . 23
Two notes Audio Engineering Le Preamp 7
Page 8

4.3 Switching . . . . . . . . . . . . . . . . . . . . . . . . . . . . . . . . . . . . . . . . . . . . . 23
5 Quel Le Preamp est fait pour vous ? . . . . . . . . . . . . . . . . . . . . . . . . . . . . . . . . . 24
6 Description du produit . . . . . . . . . . . . . . . . . . . . . . . . . . . . . . . . . . . . . . . . . 25
6.1 Vues latérales . . . . . . . . . . . . . . . . . . . . . . . . . . . . . . . . . . . . . . . . . . 25
6.2 Vue du dessus . . . . . . . . . . . . . . . . . . . . . . . . . . . . . . . . . . . . . . . . . . 26
7 Précisions sur le mode Fusion . . . . . . . . . . . . . . . . . . . . . . . . . . . . . . . . . . . . . 26
7.1 Cold Fusion . . . . . . . . . . . . . . . . . . . . . . . . . . . . . . . . . . . . . . . . . . . 27
7.2 Hot Fusion . . . . . . . . . . . . . . . . . . . . . . . . . . . . . . . . . . . . . . . . . . . . 27
8 Le Mid Sweep . . . . . . . . . . . . . . . . . . . . . . . . . . . . . . . . . . . . . . . . . . . . . . 27
9 Connexions . . . . . . . . . . . . . . . . . . . . . . . . . . . . . . . . . . . . . . . . . . . . . . . 27
10 Et si je veux utiliser plusieurs Le Preamp ? . . . . . . . . . . . . . . . . . . . . . . . . . . . . . . 28
11 Trucs & astuces . . . . . . . . . . . . . . . . . . . . . . . . . . . . . . . . . . . . . . . . . . . . . 28
12 Le plugin Torpedo Wall of Sound III . . . . . . . . . . . . . . . . . . . . . . . . . . . . . . . . . 29
13 MIDI . . . . . . . . . . . . . . . . . . . . . . . . . . . . . . . . . . . . . . . . . . . . . . . . . . . . 29
13.1 Configuration d’usine . . . . . . . . . . . . . . . . . . . . . . . . . . . . . . . . . . . . . 29
13.2 Programmation MIDI . . . . . . . . . . . . . . . . . . . . . . . . . . . . . . . . . . . . . . 30
13.3 Moniteur MIDI . . . . . . . . . . . . . . . . . . . . . . . . . . . . . . . . . . . . . . . . . . 30
13.4 MIDI Learn . . . . . . . . . . . . . . . . . . . . . . . . . . . . . . . . . . . . . . . . . . . . 31
13.5 Canal MIDI . . . . . . . . . . . . . . . . . . . . . . . . . . . . . . . . . . . . . . . . . . . . 31
13.6 Numéro de PC . . . . . . . . . . . . . . . . . . . . . . . . . . . . . . . . . . . . . . . . . 31
13.7 Mode Multi-channel . . . . . . . . . . . . . . . . . . . . . . . . . . . . . . . . . . . . . . 32
13.8 Reset usine . . . . . . . . . . . . . . . . . . . . . . . . . . . . . . . . . . . . . . . . . . . . 32
13.9 Version Firmware . . . . . . . . . . . . . . . . . . . . . . . . . . . . . . . . . . . . . . . . 32
3 Specifications 33
Page 9

English - User’s manual
English - User’s manual
Manual Version V 1.0- 11/21/2015.
The complete electronic version of this manual, as well as the Two notes Audio Engineering software and hardware products, are subject to updates. You can download the most recent version
on the Two notes website: http://www.two-notes.com.
This manual describes the Le Preamp and provides instructions for its operation. It is highly recommended to read this document before using this product. The contents of this manual have been
thoroughly verified and it is believed, unless stated otherwise, to accurately describe the product at
the time of shipment from the factory or download from our website.
Two notes Audio Engineering is a registered trademark of OROSYS SAS. This document is the exclusive property of OROSYS SAS. In the interest of product development, OROSYS SAS reserves the right
to change technical specifications, modify and/or cease production without prior notice. OROSYS
SAS cannot be held responsible for any damage, accidental or otherwise, that results from an inappropriate use of the Le Preamp. Please refer to the safety instructions included in this manual. The
reproduction of any part of this document is strictly forbidden without the written authorization of
OROSYS SAS.
All product names and trademarks are the property of their respective owners. Product names
and trademarks found in this document were used during the development of the Le Preamp but
are in no way associated or affiliated with OROSYS SAS.
1 Important Safety instructions
1. Before using the product, it is necessary to carefully read and to bear in mind the following
information. Keep this document in a safe place as it is important for the protection of the user
and the product. If any malfunction of the machine is suspected, you should always seek the
assistance of a qualified technician.
2. Please verify that the voltage required by the mains power adapter matches the voltage in your
country. If not or if unsure, do not connect the machine to the wall outlet. This could result in
damage to the mains power adapter, the machine and injury to the user. This product must not
be used when there is lightning present. In case of severe weather with a risk of lightning, unplug
the power adapter to reduce the risk of electric shock and fire. The mains power adapter
provided with the machine complies with the standards of the country where you purchased
the product. If replacement is needed, please use a standard compliant mains power adapter.
3. The Le Preamp must never be used near a heat source, near a flame, in the rain, in damp areas
or near any liquid of any sort. When transporting the unit, care needs to be taken to avoid any
shocks that could cause damage requiring the assistance of a qualified technician.
4. Always use a dry and soft cloth with no alcohol or solvents for cleaning. Please keep the unit
clean and free from dust.
Two notes Audio Engineering Le Preamp 9
Page 10

English - User’s manual
5. All maintenance operations must be done by service centers approved by Two notes Audio
Engineering or by qualified technicians. Never try to repair the machine by yourself.
This symbol on the product or on its packaging indicates that this
product must not be disposed of with your other household waste. Instead, it is your responsibility to dispose of your waste equipment by
handing it over to a designated collection point for the recycling of
waste electrical and electronic equipment. The separate collection
6.
and recycling of your waste equipment at the time of disposal will help
to conserve natural resources and ensure that it is recycled in a manner
that protects human health and the environment. For more information about where you can drop off your waste equipment for recycling,
please contact your local city office, your household waste disposal
service or the shop where you purchased the product.
2 Declaration of conformity
Manufacturer: OROSYS SAS
Category of product: Analog Audio Signal Processor
Product: Le Preamp
Test Manager: Guillaume Pille
The Two notes Le Preamp and the provided mains power adapter are certified to be compliant
to the CE and FCC standards:
• EN 55103-1 : 1996 and EN 55103-2 : 1996. EN 60065 05/2002 + A1 05/2006. EMC directive
89/336/EEC and Low Voltage Directive 73/23/EEC. FCC Part 15 : 2008. ICES-003 : 2004. AS/NZS
3548 class B for Australia and New Zealand. IEC : 2008 - CISPR 22 class B.
3 Warranty
OROSYS SARL warrants that this Two notes Audio Engineering product shall be free of defects in
parts and workmanship when used under normal operating conditions for a period of two (2) years
from the date of purchase. This warranty shall apply to the original purchaser when purchased from
an Authorized Two notes AUDIO ENGINEERING dealer.
IMPORTANT: PLEASE RETAIN YOUR SALES RECEIPT, AS IT IS YOUR PROOF OF PURCHASE COVERING
YOUR LIMITED WARRANTY. THIS LIMITED WARRANTY IS VOID WITHOUT YOUR SALES RECEIPT.
Defective products that qualify for coverage under this warranty will be repaired or replaced,
(at OROSYS SAS’s sole discretion) with a like or comparable product, without charge. In the event
that warranty service be required, Please contact your authorized Two notes AUDIO ENGINEERING
dealer in order to obtain an RMA to return the complete product to the Authorized Two notes AUDIO
ENGINEERING Service Center closest to you, with proof of purchase, during the applicable warranty
period.
Transportation costs to the service center ARE NOT INCLUDED in this limited warranty. OROSYS SAS
will cover the cost of standard ground return transportation for repairs performed under this warranty.
10 Two notes Audio Engineering Le Preamp
Page 11

English - User’s manual
This limited warranty becomes void if the serial number on the product is defaced or removed,
or if the product has been damaged by alteration, misuse including connection to faulty or unsuitable ancillary equipment, accident including lightning, water, fire, or neglect; or if repair has been
attempted by persons not authorized by OROSYS SAS.
Any implied warranties, including without limitation, any implied warranties of merchantability or
fitness for any particular purpose, imposed under state or provincial law are limited to the duration
of this limited warranty. Some states or provinces do not allow limitations on how long an implied
warranty lasts, so the above limitations may not be applicable.
OROSYS SAS ASSUMES NO LIABILITY FOR PROPERTY DAMAGE RESULTING FROM ANY FAILURE OF THIS
PRODUCT NOR ANY LOSS OF INCOME, SATISFACTION, OR DAMAGE ARISING FROM THE LOSS OF USE
OF SAME DUE TO DEFECTS OR AVAILABILITY OF IT DURING SERVICE.
In case you have to send your Two notes AUDIO ENGINEERING product to any other location, it
is of vital importance to retain the original packing materials. It is very difficult to avoid damage
when shipping the product without these materials. OROSYS SAS is not responsible for damage to
the product due to improper packaging and reserves the right to charge a reboxing fee for any unit
returned for service without the original packing materials.
THE FOREGOING CONSTITUTES THE ONLY WARRANTY MADE BY OROSYS SAS WITH RESPECT TO THE
PRODUCTS AND IS MADE EXPRESSLY IN LIEU OF ALL OTHER WARRANTIES EXPRESSED OR IMPLIED.
4 Introducing the Le Preamp
Two notes is first and foremost a team of music lovers who are all great admirers of musicians. We
are highly qualified engineers, technicians, and musicians, whose purpose is to facilitate the life of
guitar and bass players without infringing on their playing habits. Our mission consists in providing
them with studio-grade products that are specifically designed for the guitar and bass.
From the moment we launched the Torpedo C.A.B., we believed it was possible to build a high
quality pedalboard to entirely replace a conventional tube amplifier system: the complete floor rig.
Even with an almost limitless choice of available guitar effects, we always felt that finding a very good
preamplifier in a pedal format was challenging. This is why Two notes is proud to premier its line of
tube preamplifiers: Le Clean, Le Crunch, Le Lead and Le Bass.
4.1 The concept
The selection of a preamplifier is the core of your overall tone and thus requires the greatest attention. When building a complete floor rig, only the very best will make the cut. The Two notes
preamplifiers are a True High Voltage Design running internally at 200 volts to preserve the interaction
between you and your guitar while working perfectly with your other effect pedals. Each of the four
different versions deliver the unique tube warmth, dynamics, and the musical compression from the
amps we know and love, now in a more convenient pedal package. And, of course, you can use
them as an elaborate tube overdrive, in front of your favorite amplifier!
4.2 Two channels plus Fusion mode
The A and B channels are totally independent, each with their own voicing and eq section: Bass
and Treble on A, Bass, Mid with Mid Sweep and Treble for B. On Channel A you will find a lower gain
tube stage with a pre-gain EQ using a more vintage design approach, while Channel B offers more
gain and a very powerful post-EQ (with mid sweep). The exclusive Fusion modes open new horizons.
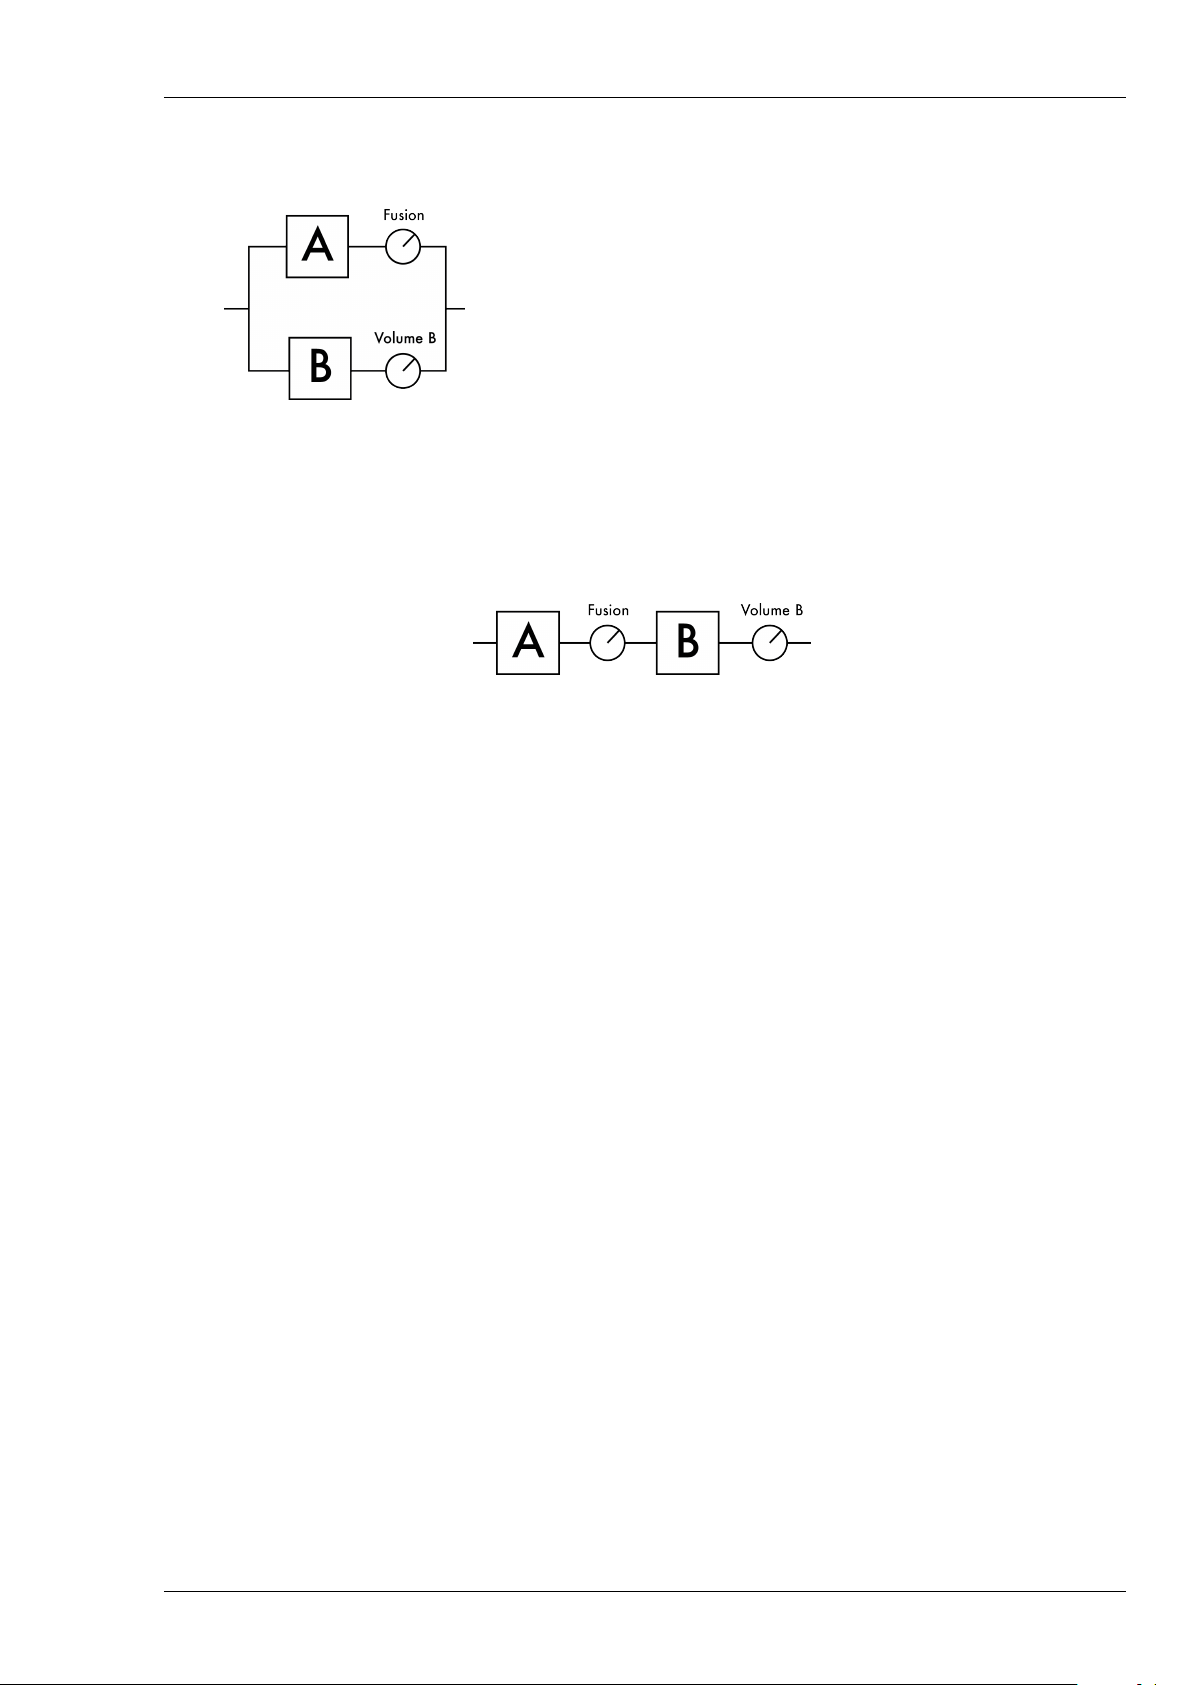
In “Hot Fusion”, A and B are cascaded, meaning A can be used as a boost for B with both A and
B EQ’s available to shape the result. In “Cold Fusion”, the two channels are in parallel, meaning
Two notes Audio Engineering Le Preamp 11
Page 12
English - User’s manual
you can blend the cleaner sound from A and your more distorted sound in B to gain clarity and
articulation.
4.3 Switching
Each preamp features 2 channel footswitches, A and B. Simultaneously pressing A and B will activate the Fusion mode. Pressing A, B or A and B will also send a specific Midi Program Change
command, that can be used to select a preset on your Midi multi effects and/or Torpedo C.A.B..
In addition, the preamplifier may respond to a Program Change sent from another Midi device allowing a seamless integration into any pedalboard switching system. Combining several Two notes
preamps on your pedalboard makes things really interesting. Connected via Midi, each preamp will
listen to the others. They can be configured in Multi-channel mode: pressing A on preamp 1 will bypass preamp 2, like the channels of an amplifier. Alternately, when this mode is off: traditional on/off
switching for all preamps, a preamp can be a boost/overdrive for the one that follows.
5 Le Preamp Sonic Guide
We designed four different preamplifiers, to match the modern needs of the demanding guitar
and bass player.
• Le Clean takes its inspiration from the classic amps of southern California in all shades of brown,
black and silver. Channel A has a pure ultra clean texture. Channel B lets you bring in classic
sweet overdrive of a dark desert highway. The Cold Fusion mode gets right to the heart of Texas
while Hot Fusion takes you out of the blue and into the gnarliest Tweed tones.
• Le Crunch combines the greatest tones of the classic British stack of amps that have defined
Rock’n’Roll since the late 60’s. Channel A’s clean throaty voice is pure plexi heaven while
Channel B screams move over, let there be rock! The Hot Fusion mode crosses over into the
high gain territory where shredders and down tuned riffers write all the rules.
• Le Lead’s Channel A shines on the fusion of a clean to slight crunch tone of a perfect melody.
Kicking in Channel B unleashes the fury of a super tight modern high gain amp, enhanced with
12 Two notes Audio Engineering Le Preamp
Page 13

English - User’s manual
the powerful mid sweep Eq. Hot Fusion takes it all over the top; huge gain, sustain and with the
combined EQ’s, everything from metal to all out fuzz at your fingertips.
• With Le Bass, the ultra clean Channel A is perfect for today’s modern techniques with lightning
fast response and a full spectrum of tone. Channel B tips its hat to the foundation of rock bass
with solid punch and a sweet break up available when things get down and dirty. Cold Fusion
lets you live in the limelight with the best of both worlds while Hot Fusion lets you take center
stage with searing bass from a focused distortion to synth-like growls.
6 Product description
6.1 Side views
You will find in this first table a description of the various inputs and outputs featured in your new
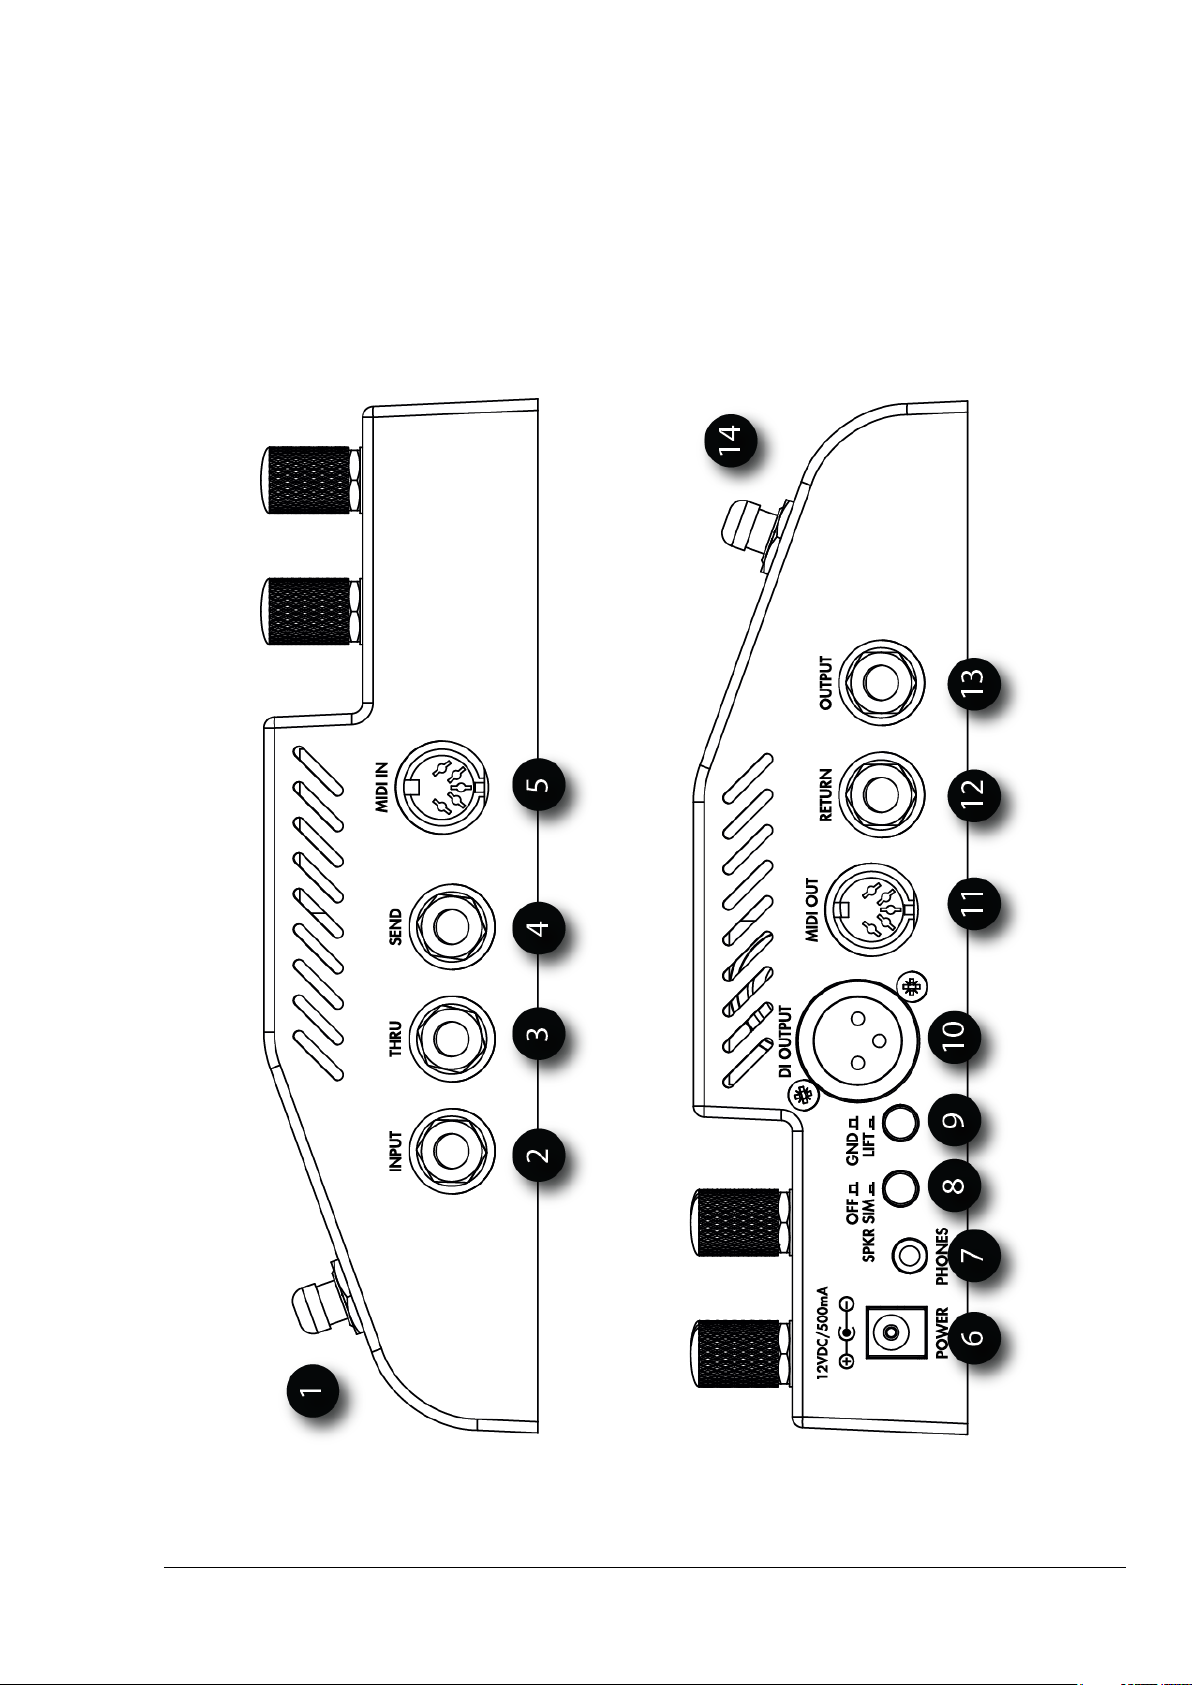
Le Preamp. Please refer to the Figure 1, page 3.
1 Channel A footswitch
2 Instrument input
3 Thru output
4 FX Loop Send output
5 MIDI input
6 Power adapter connector
7 Headphones output
8 Speaker Simulation
9 Ground Lift switch
10 Balanced DI output
11 MIDI output
12 FX Loop Return input
13 Instrument output
14 Channel B footswitch
This footswitch activates the clean Channel A or changes the page/parameter in MIDI programming.
If the Channel A is already selected, pressing a second time will put your Le Preamp in bypass mode.
Connect a 1/4" unbalanced shielded cable to your guitar or bass.
Connect a 1/4" unbalanced shielded cable to feed an amplifier with your instrument signal. This can
be useful on stage of you want to keep an amp as monitor, or to record the dry signal from the guitar
in studio.
Plug here a 1/4" unbalanced shielded cable to send the preamp signal to the pedals you want to
put after the preamp stage. The FX Loop is bypassed when the Le Preamp is bypassed. In other
words, the effects pedal that you put in this loop won’t be heard when your Le Preamp is bypassed.
That is very interesting in case you have several Le Preamp and you wish to assign specific effects to
each preamp.
Connect a MIDI controller (to remotely control your Le Preamp) or another Le Preamp to this input.
Use only a cable featuring a 5-pin DIN connector with all the pins wired (some cables only have pins
4, 2 and 5 connected). Pin 1 and 3 are used to carry the Multi-channel message.
Plug here your power adapter.
Plug your headphones and play in the middle of the night without disturbing anybody! With headphones, and in case you don’t have speaker simulator such as a Torpedo C.A.B. in the FX loop, we
recommend you activate the analog speaker simulation.
This analog speaker simulation is specifically voiced for your Le Preamp Model, and based on our
Torpedo simulator. This speaker simulation affects the DI output and the Headphones output.
If your DI output signal suffers from unwanted noise (interferences, hum), lifting the ground can lower
the noise level.
This direct balanced XLR output should be connected to a mixing desk, or a sound card for a recording. With the speaker simulation on that’s all you need to achieve a great sound!
Connect this MIDI output to a MIDI device or another Le Preamp you wish to control with your
preamplifier.
Plug here an unbalanced 1/4" cable connected to the last pedal you put in the loop. The FX Loop is
bypassed when the Le Preamp is bypassed.
Connect this output with a 1/4" unbalanced shielded cable either to a power amplifier or a speaker
simulator such as the Torpedo C.A.B., or directly into your digital audio interface for a recording.
This footswitch activates the B "dirty" channel or enter a page in MIDI programming. If the channel B
is already selected, pressing a second time will put your Le Preamp in bypass mode.
6.2 Front view
You will find in this table a description of the volume, tone and channel selection options. Please
refer to the Figure 2, page 4.
Two notes Audio Engineering Le Preamp 13
Page 14
English - User’s manual
1 Channel A footswitch
2 Channel A Input Gain
3 Channel A EQ settings
4 Channel A volume
5 Fusion mode selector
6 Fusion Level
7 Channel B Input Gain
8 Channel B EQ settings
9 Channel B volume
10 Tube window
11 Channel B footswitch
This footswitch activates the clean Channel A or changes the page/parameter in MIDI programming.
If the Channel A is already selected, pressing a second time will put your Le Preamp in bypass mode.
Determines the amount of gain for your clean tone. Increasing the gain can lead to more signal
distortion, and even unwanted clipping. Adjust that parameter to your taste, the gain level you will
be getting depends on Le Preamp, but also on your guitar/bass pickups level and the level of other
products such as pedals you may have inserted between your guitar and Le Preamp.
The Channel A features a passive Bass (low frequency) and Treble (high frequency) voicing section.
Determines the output volume of the channel A, the volume is located pre-FX Loop. This knob is
inactive in Fusion mode. In case you hear unwanted clipping, try lowering the volume too and make
sure the following device in your signal path is not overdriven.
Pressing the A and B footswitches at the same time will activate the Fusion mode. The Fusion switch
determines if either the Hot Fusion or the Cold Fusion modes will be activated. Read more about the
Fusion modes in the following pages.
In Hot Fusion, this knob determines the level of Channel A that will boost the Channel B. In Cold Fusion,
this knob determines the volume of Channel A that will be added in parallel to the channel B.
Select the amount of gain for your dirty tone. Increasing the gain will lead to more distortion of the
signal, and even unwanted clipping. Adjust that parameter to your taste, the gain level you will be
getting depends on Le Preamp, but also on your guitar/bass pickups level and the level of other
products such as pedals you may have inserted between your guitar and Le Preamp. Always keep
in mind that even if we put all our attention on keeping the noise level as low as possible, increasing
the gain can lead to unwanted noises and undesirable feedback.
The channel B features a passive Bass (low frequency) and Treble (high frequency) voicing section,
plus an active Mid (medium frequency) setting with Sweep. Thanks to the Sweep parameter you will
be able to choose the center frequency of your medium range voicing.
Determines the output volume of the channel B. The volume is located pre-FX Loop. In case you hear
unwanted clipping, try lowering the volume too and make sure the following device in your signal
path is not overdriven.
With Le Preamp, you can see the finely selected tube working! Plus, depending on the channel,
that area will display different colors: Green for Channel A, Yellow for Channel B, Blue for Cold Fusion
mode and Red for Hot Fusion mode. The MIDI programming features different colors, read more
about this in the MIDI section of this manual.
This footswitch activates the B "dirty" channel or enter a page in MIDI programming. If the channel B
is already selected, pressing a second time will put your Le Preamp in bypass mode.
Please note that the bypass mode is important in case you are either using several Le Preamp in
your pedalboard or if you plan to use your Le Preamp as a distortion pedal. With multiple Le Preamp
pedals, connect them in MIDI so the activation of one can defeat the others (Multi-channel function).
7 More on the Fusion modes
By pressing simultaneously the A and B switches, you will enter the Fusion mode. When the Fusion
mode is activated, pressing A and B again will defeat your Le Preamp.
7.1 Cold Fusion
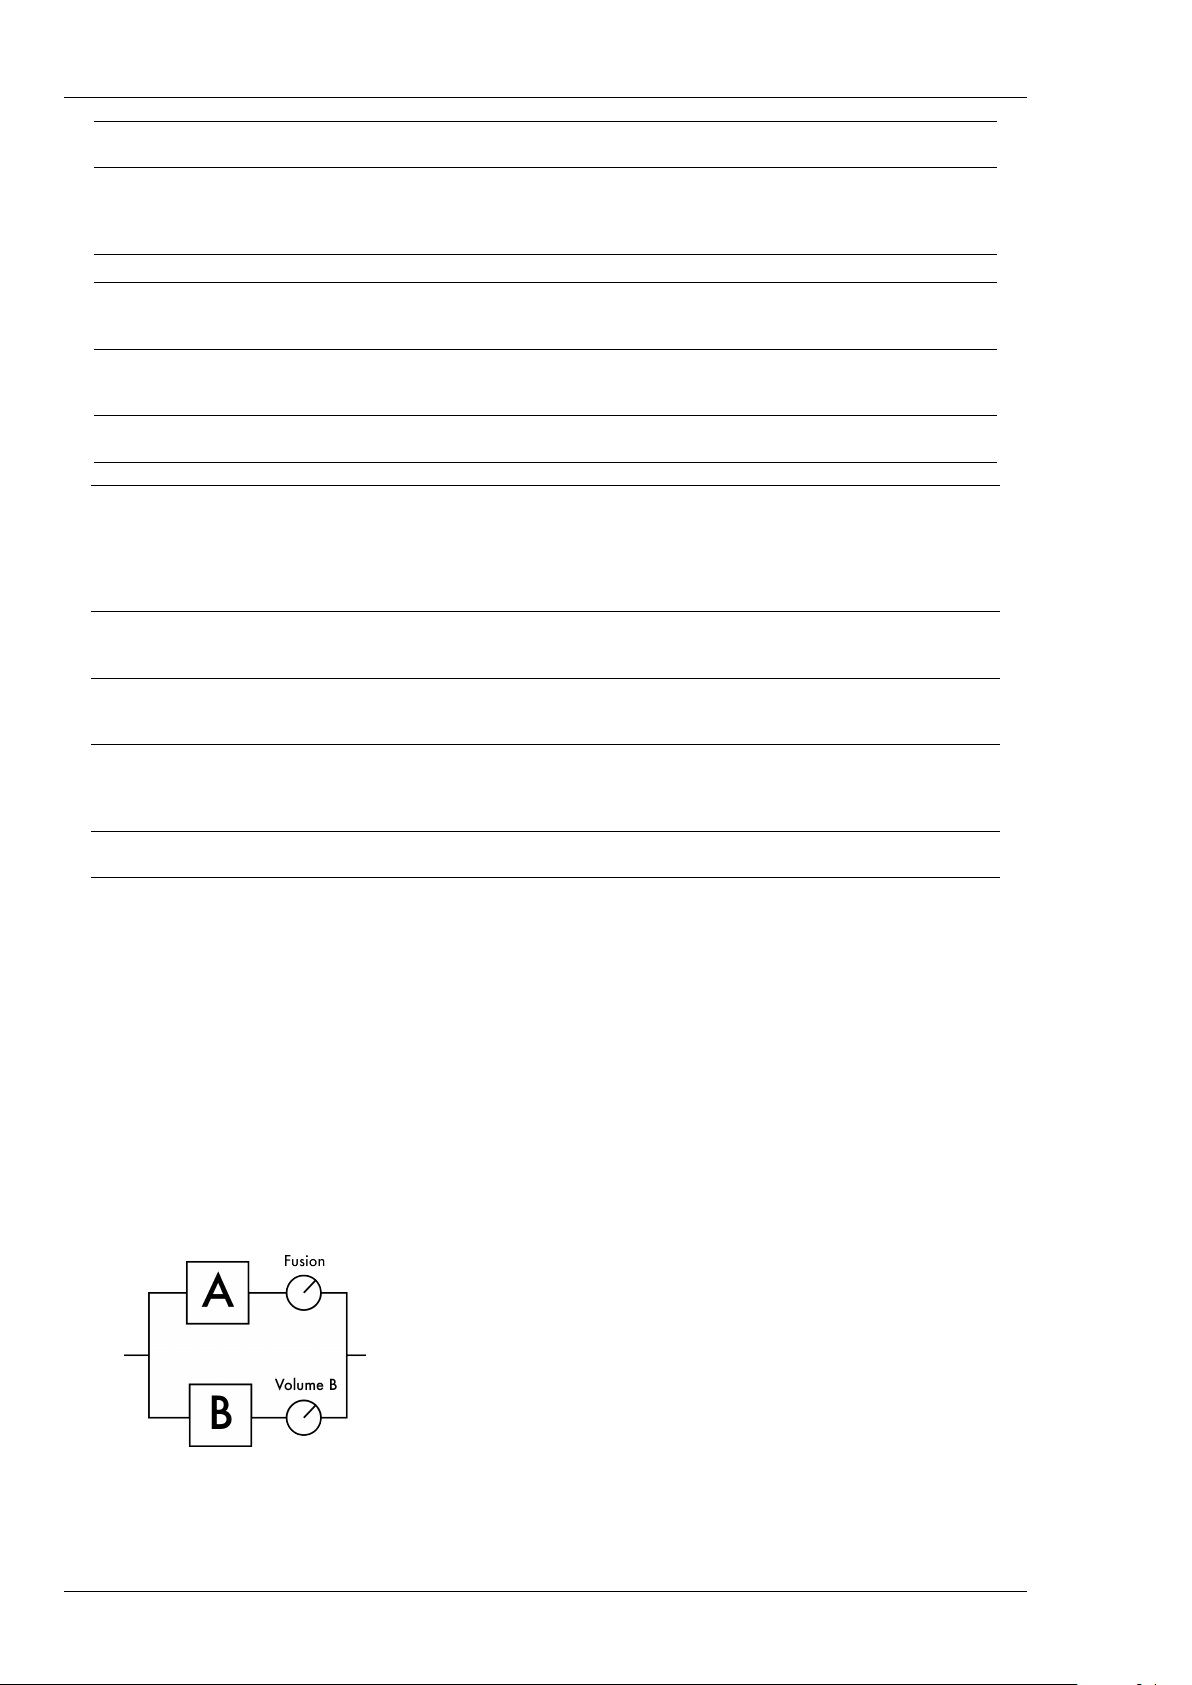
The Cold Fusion puts the Channels A and B in parallel. In
other words, you will be able to adjust the level of Channel
A that will be added to the output of Channel B. This technique consisting in adding a clean signal to a more distorted
one is widely used in the studio to regain dynamics and articulation when the dirty sounds can be too compressed for
example. The Fusion knob must be carefully adjusted and
we recommend starting very low on this value and increasing gradually.
14 Two notes Audio Engineering Le Preamp
Page 15
English - User’s manual
7.2 Hot Fusion
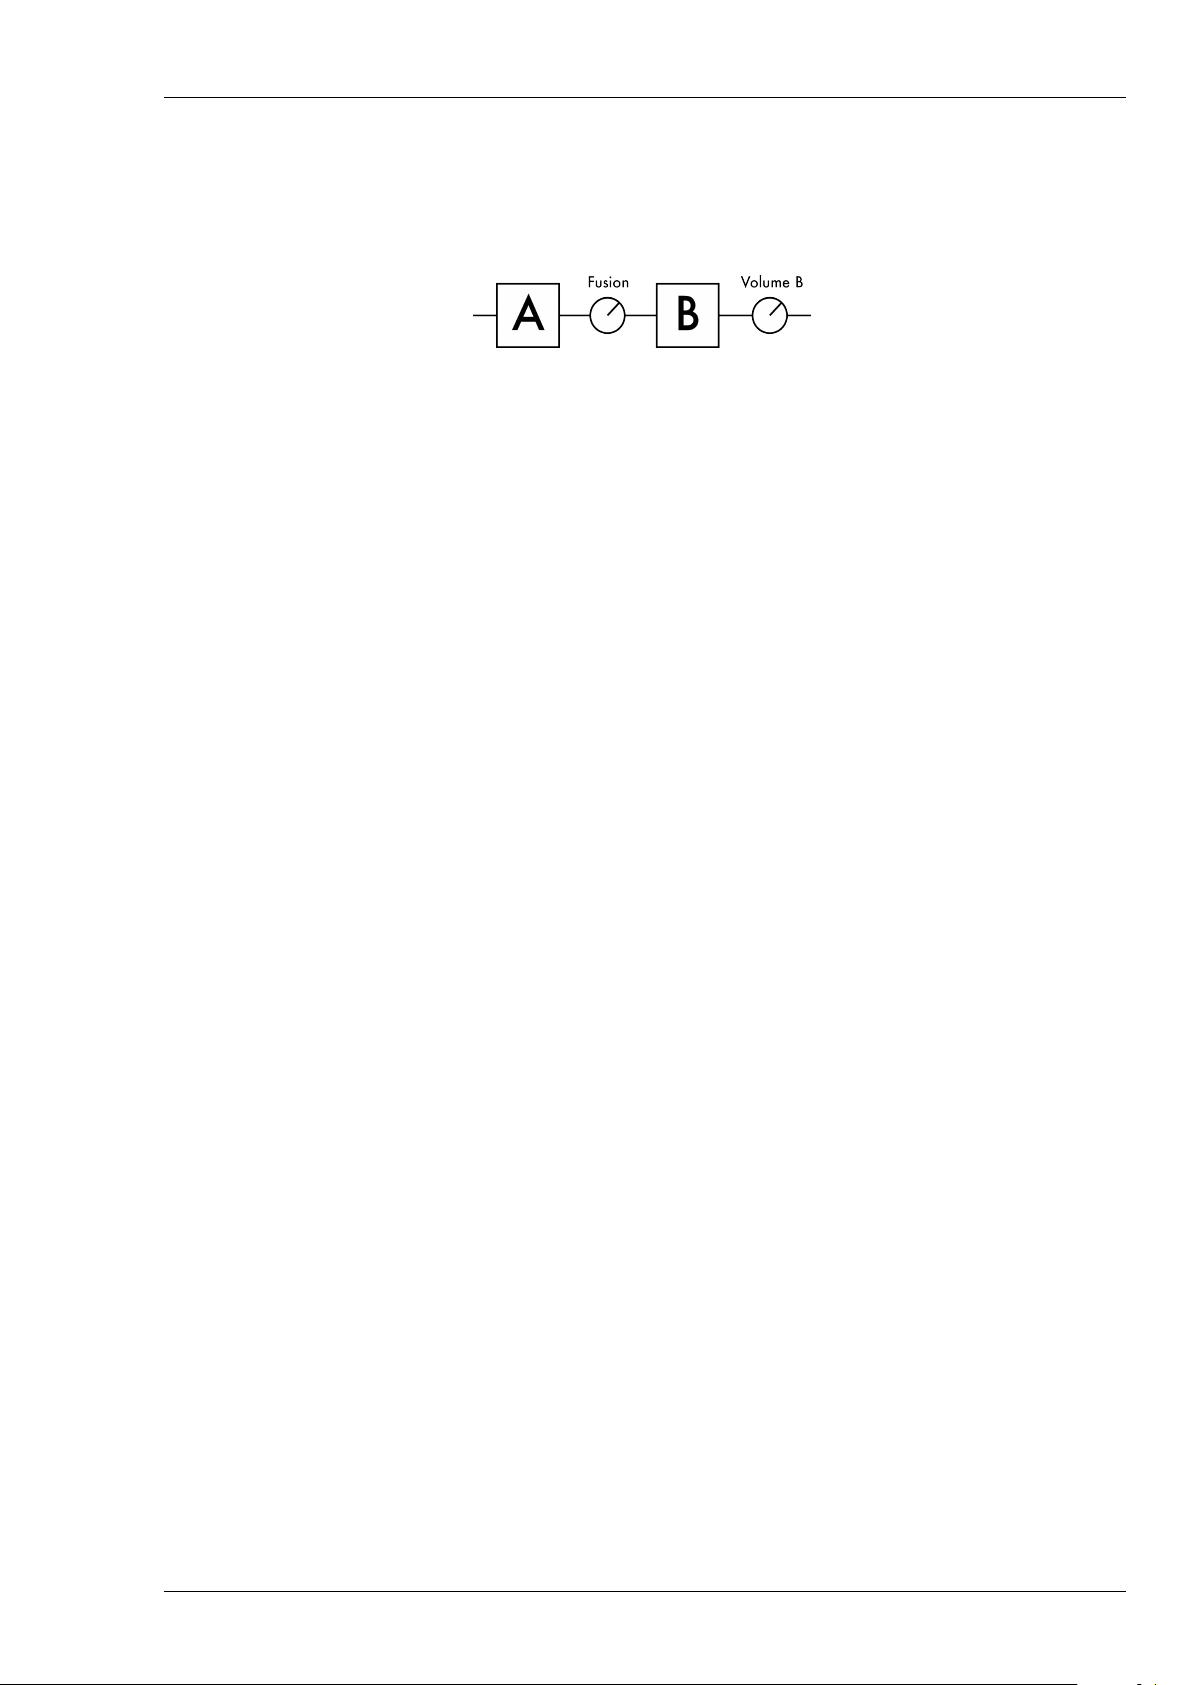
The Hot Fusion puts the Channels A and B in cascade. In this configuration, the Channel A can be
considered a boost for the channel B, and the Fusion knob determines the amount of boost signal
you send into B.
The gain on the channel A will be very important and it is the addition of this gain and the Fusion
amount that will determine the overall distortion you will get. The channel A features an EQ, and
changing the EQ will play a huge role in the overall tone. If you push the bass your sound will get
more fuzzy, and if you push the treble you will have a more glassy distortion. With these very simple
settings you will discover many tonal options! Always keep in mind that the sweet spot is rarely on the
maximum values, take the time to increase each parameter gradually. Sometimes it’s better to have
the Fusion knob at a lower value and increase the gain on channel A, remember these settings are
very sensitive.
8 More on the Mid Sweep
The Mid Sweep is a very powerful tonal option. It can be used either to boost or to attenuate a
medium frequency range. A good way to start with that function is, first, to set your Mid level to the
max, then search for the frequency you want either boost or attenuate by adjusting the SWEEP level.
When you hear that frequency, you can either lower a little the mid level or keep it that way for a
medium boost, or strongly attenuate the frequency by decreasing the Mid level.
9 Connections
The Le Preamp can be used in various configurations: as a boost or distortion pedal for your
amplifier, as a preamplifier connected to a power amplifier and cabinets, or in a direct setup for
recording, playing on stage or simply at home with your headphones. Please refer to the figure 3,
page 5.
10 What if I want to use several Le Preamp?
You can, in fact, they were specifically designed to work together! Please refer to the figure 4,
page 6. On this figure you will find, in green, the MIDI connections, and in blue the audio connections.
When connecting several Le Preamp with MIDI for the first time, switching on a preamp channel will
defeat the other preamps. We call it the Multi-channel mode: having more Le Preamp is like adding
channels on an amplifier, and it’s as simple as using a channel footswitch on a traditional multichannel amplifier. When connecting several Le Preamp with a MIDI cable, make sure you use a 5-pin
DIN cable with all the pins wired. Some cables only have pins 4, 2 and 5 connected. Pin 1 and 3 are
used to carry the Multi-channel message.
Regarding the effects position:
1. We put before the first preamp all the effects we may want to apply to any Le Preamp in the
chain. It could be a distortion pedal, a compressor, a volume pedal, anything you can put in
front of an amplifier.
Two notes Audio Engineering Le Preamp 15
Page 16

English - User’s manual
2. We put in the FX loop of each preamp the effects we want to apply only to one of the preamps.
For example, a specific delay we want only on Le Preamp 2.
3. Finally, we put after the last preamplifier all the global effects that are usually better sounding
after the preamp stage: modulation or reverb effects, a speaker simulator such as the Torpedo
C.A.B., and stereo effects. By placing the stereo effects at the end of the chain, the next device
(mixer, stereo power amp, recorder etc...) can be fed by a stereo signal.
11 Tips & tricks
• If you use a Torpedo C.A.B. with your Le Preamp, you may want to put the C.A.B. in the FX loop
of Le Preamp. That way, you can connect the XLR DI output of Le Preamp to the mixer and listen
to the whole system, including the Torpedo C.A.B. simulation, through Le Preamp’s headphones
output.
• Even if it’s not shown on the connections diagram, you can use your Le Preamp like a "simple"
tube overdrive/distortion. Just connect it in between your guitar/bass and your amplifier, like
any pedal. If you take the time to carefully set the gain and volume of both channels on the
preamp, you will be able to achieve amazing tones with your Le preamp!
• If you are using an overdrive or distortion pedal in front of your Le Preamp, you may want to
lower the Bass level of the Channel A to keep a cleaner signal.
• If you choose to add pedals after your Le Preamp, using unbalanced connections, you may
want to put a DI box before sending the signal to a mixer. Especially on stage, adding a DI will
help fighting noise, and protect your last pedal against potential phantom power coming from
the mixer.
• Having too much distortion in your tone can lead to a muddy sound that will lack dynamics,
and create or considerably emphasize some unwanted artefacts such as hum, feedback... If
you need a lot of distortion and if the resulting noise is an issue, you may want to consider
using a noise gate processor. Single coil pickups are more sensitive to noise than humbuckers,
moving your guitar around can help you find a noise source (lights, amp’s internal transformer,
computers, monitors...).
• In the studio, you can record three different signals coming from Le Preamp at the same time:
1. The dry guitar signal from the THRU output. This one can be used later for reamping purposes.
2. Le Preamp dry signal from the main output. This one can be processed by the Wall of Sound
III plugin to achieve the Torpedo speaker simulation.
3. Le Preamp with analog speaker simulation from the DI output. This one will give a totally
different sound and/or mix with the Torpedo simulation to thicken your tone.
• Always keep the unbalanced connections as short as possible.
• If you want to keep a balanced connection between your Le Preamp and the following device
connected to its output, you have to use the XLR DI output. If the following device only accepts
1/4", it is possible to use an XLR to 1/4" TRS jack cable.
16 Two notes Audio Engineering Le Preamp
Page 17
English - User’s manual
12 The Torpedo Wall of Sound III plugin
Wall of Sound III (WoS III) is a speaker and miking simulation plugin. A plugin is a software you can
load on a track of your sequencer, such as Cubase, Logic, Pro Tools, Reaper, inside your Digital Audio
Workstation.
With your Le Preamp, Two notes gives you access to 16 virtual cabinets you can load in our award
winning Wall of Sound III plugin. With your Le Preamp and WoS III you have the best configuration to
record amazingly good guitar or bass tones for all your musical projects.
To download your 16 cabinets, register your product on the Two notes Website, download and
install the WoS III plugin. You will be guided step by step through the process.
Once you have become familiar with the sound and operation of the Wall of Sound III plug-in,
please feel welcome to explore the in-app Two notes Boutique which will allow you to audition and
have the option to purchase additional cabinets.
You will find more information on WoS III on the Two notes Website: http://www.two- notes.com.
13 MIDI
13.1 Factory configuration
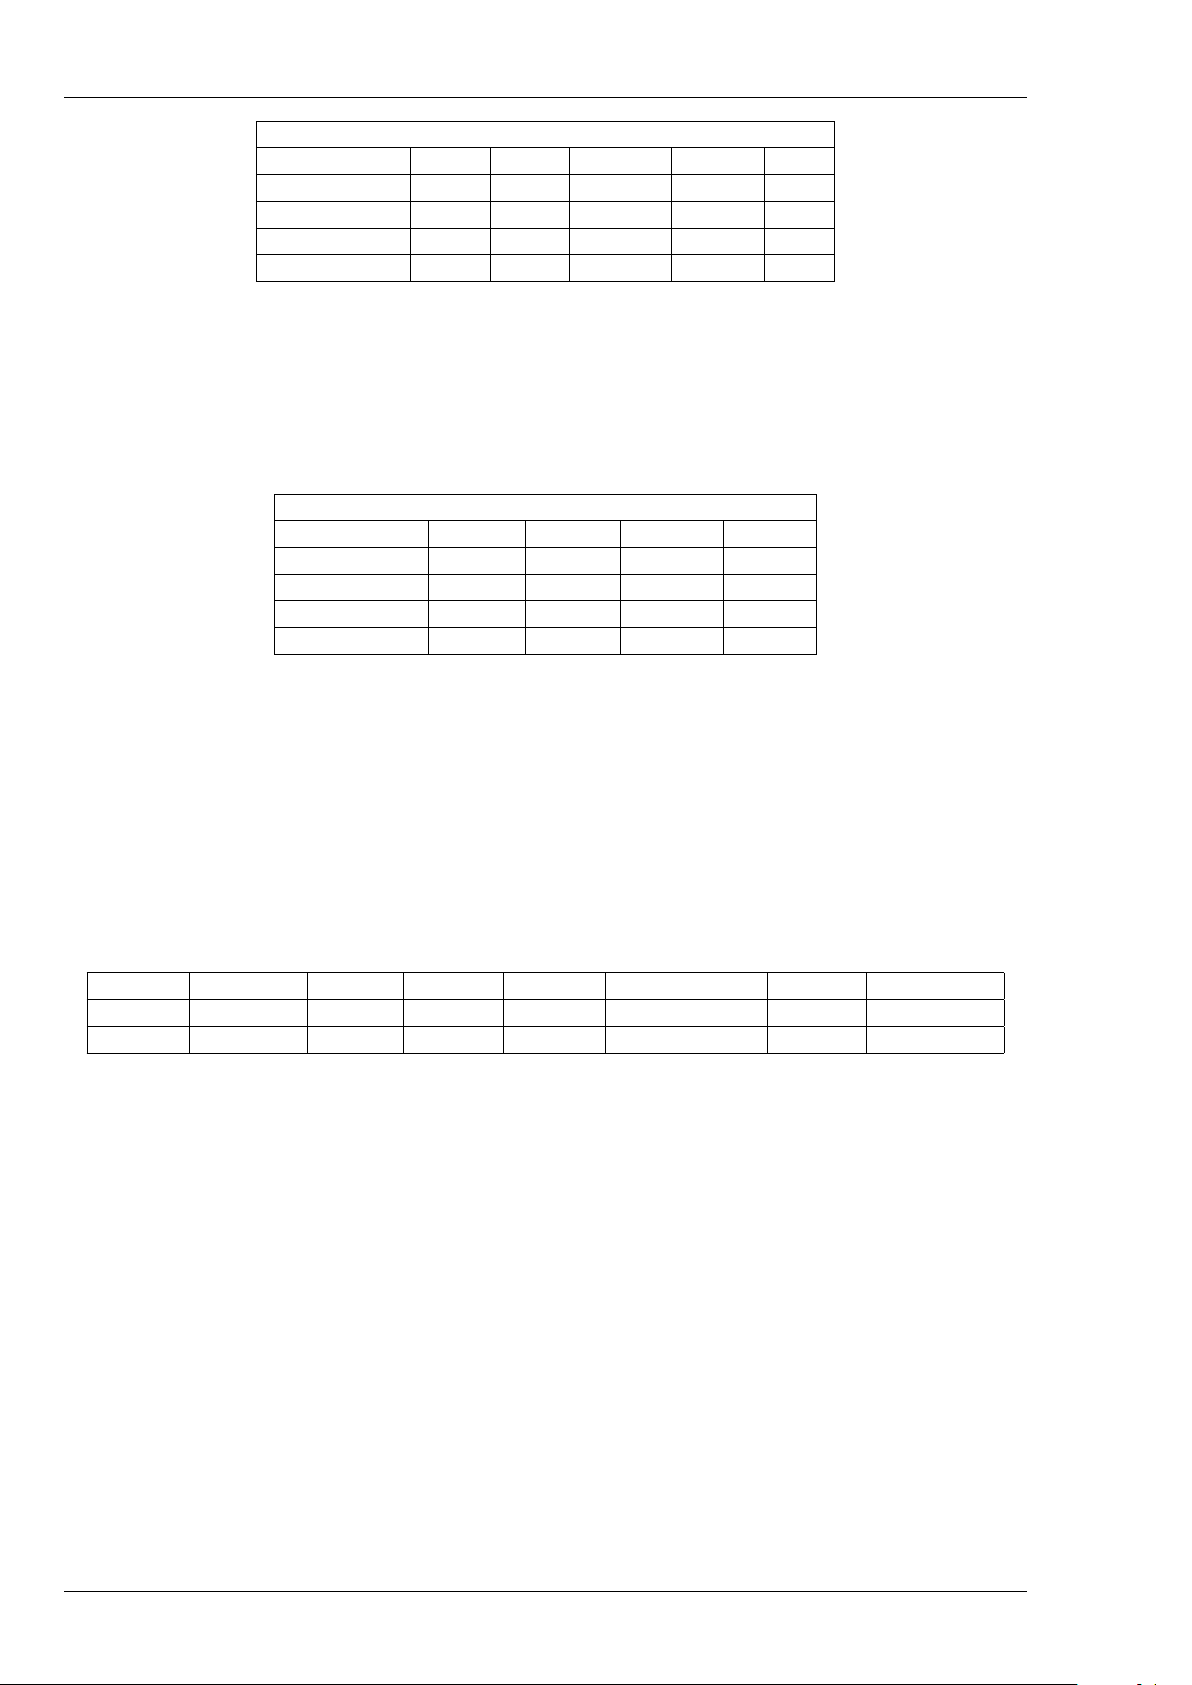
5 basic functions can be accessed through MIDI Program Changes (PC) sent by an external MIDI
device. The default MIDI receive configuration is the following:
MIDI RECEIVE
Le Preamp Model Channel A Channel B Cold Fusion Hot Fusion Bypass
Le Clean PC 1 PC 2 PC 3 PC 4 PC 5
Le Crunch PC 6 PC 7 PC 8 PC 9 PC 10
Le Lead PC 11 PC 12 PC 13 PC 14 PC 15
Le Bass PC 16 PC 17 PC 18 PC 19 PC 20
In other words, your Le Preamp can receive a MIDI PC asking for bypass or channel switch. Any
MIDI message received will be transmitted to the MIDI output (MIDI Thru function).
When using Le Preamp as a MIDI controller, you will be able to send a MIDI PC to trigger preset
changes on another MIDI device, such as a Torpedo C.A.B. or an FX unit. The default MIDI send
configuration is the following:
MIDI SEND
Le Preamp model Channel A Channel B Cold Fusion Hot Fusion
Le Clean PC 1 PC 2 PC 3 PC 4
Le Crunch PC 6 PC 7 PC 8 PC 9
Le Lead PC 11 PC 12 PC 13 PC 14
Le Bass PC 16 PC 17 PC 18 PC 19
Please note that bypassing a preamp does not send any PC message. The default MIDI channel
is OMNI and the Multi-channel mode is ON.
13.2 MIDI programming
It is possible for the advanced user to change the MIDI configuration of Le Preamp, thanks to the
setup configurator that you can start simply by pressing A while powering on Le Preamp.
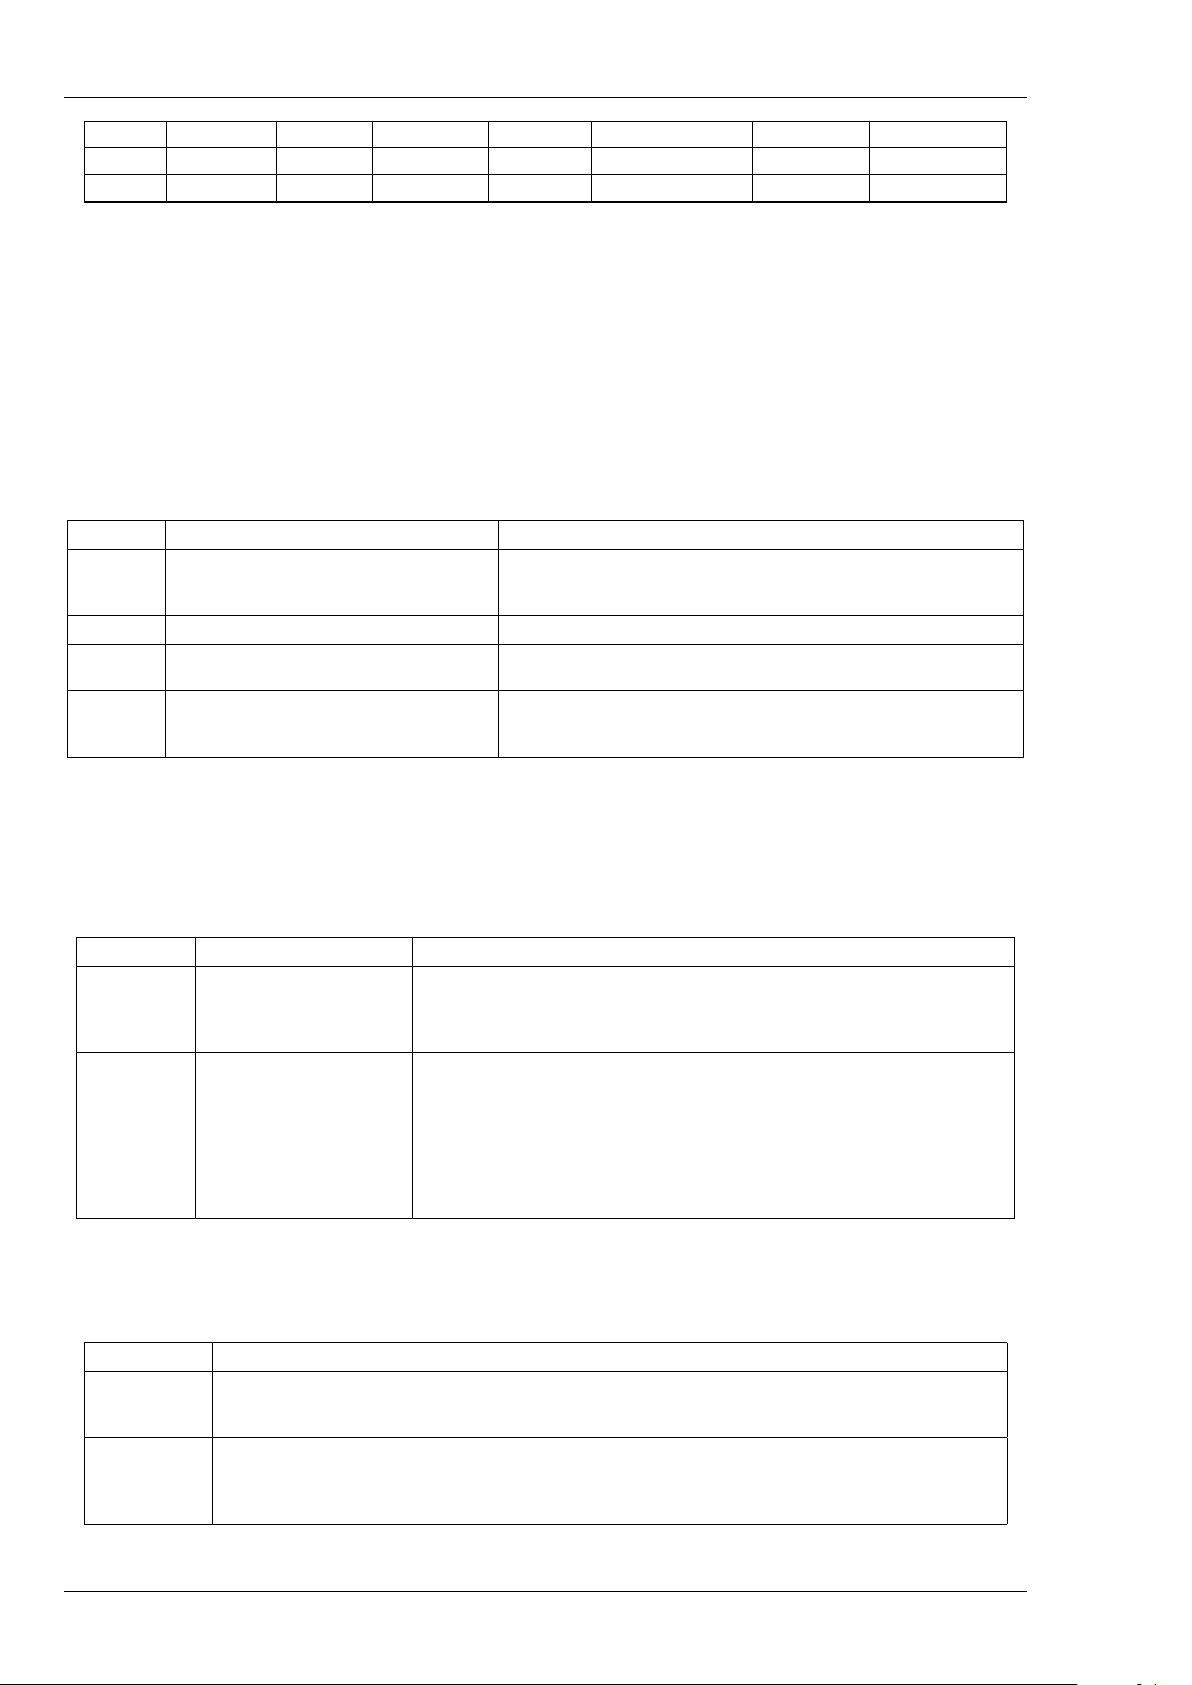
The configurator uses your Le Preamp LEDs and tube window color to guide you through the
process. There are 7 pages on the menu and therefore 7 tube window colors.
Two notes Audio Engineering Le Preamp 17
Page 18
English - User’s manual
Page # 1 2 3 4 5 6 7
Function MIDI Monitor MIDI Learn MIDI Channel PC Number Multi-channel Mode Factory Reset Firmware Version
Color White Green Yellow Red Purple Blue Turquoise
You can navigate through the pages using the A switch, and you enter a page using the B switch.
Once you entered a page you cannot go out, you will have to restart the configurator to access
another page. On each page, a modified parameter is instantaneously stored. The storing process
is validated by a fast flashing of the product’s LEDs.
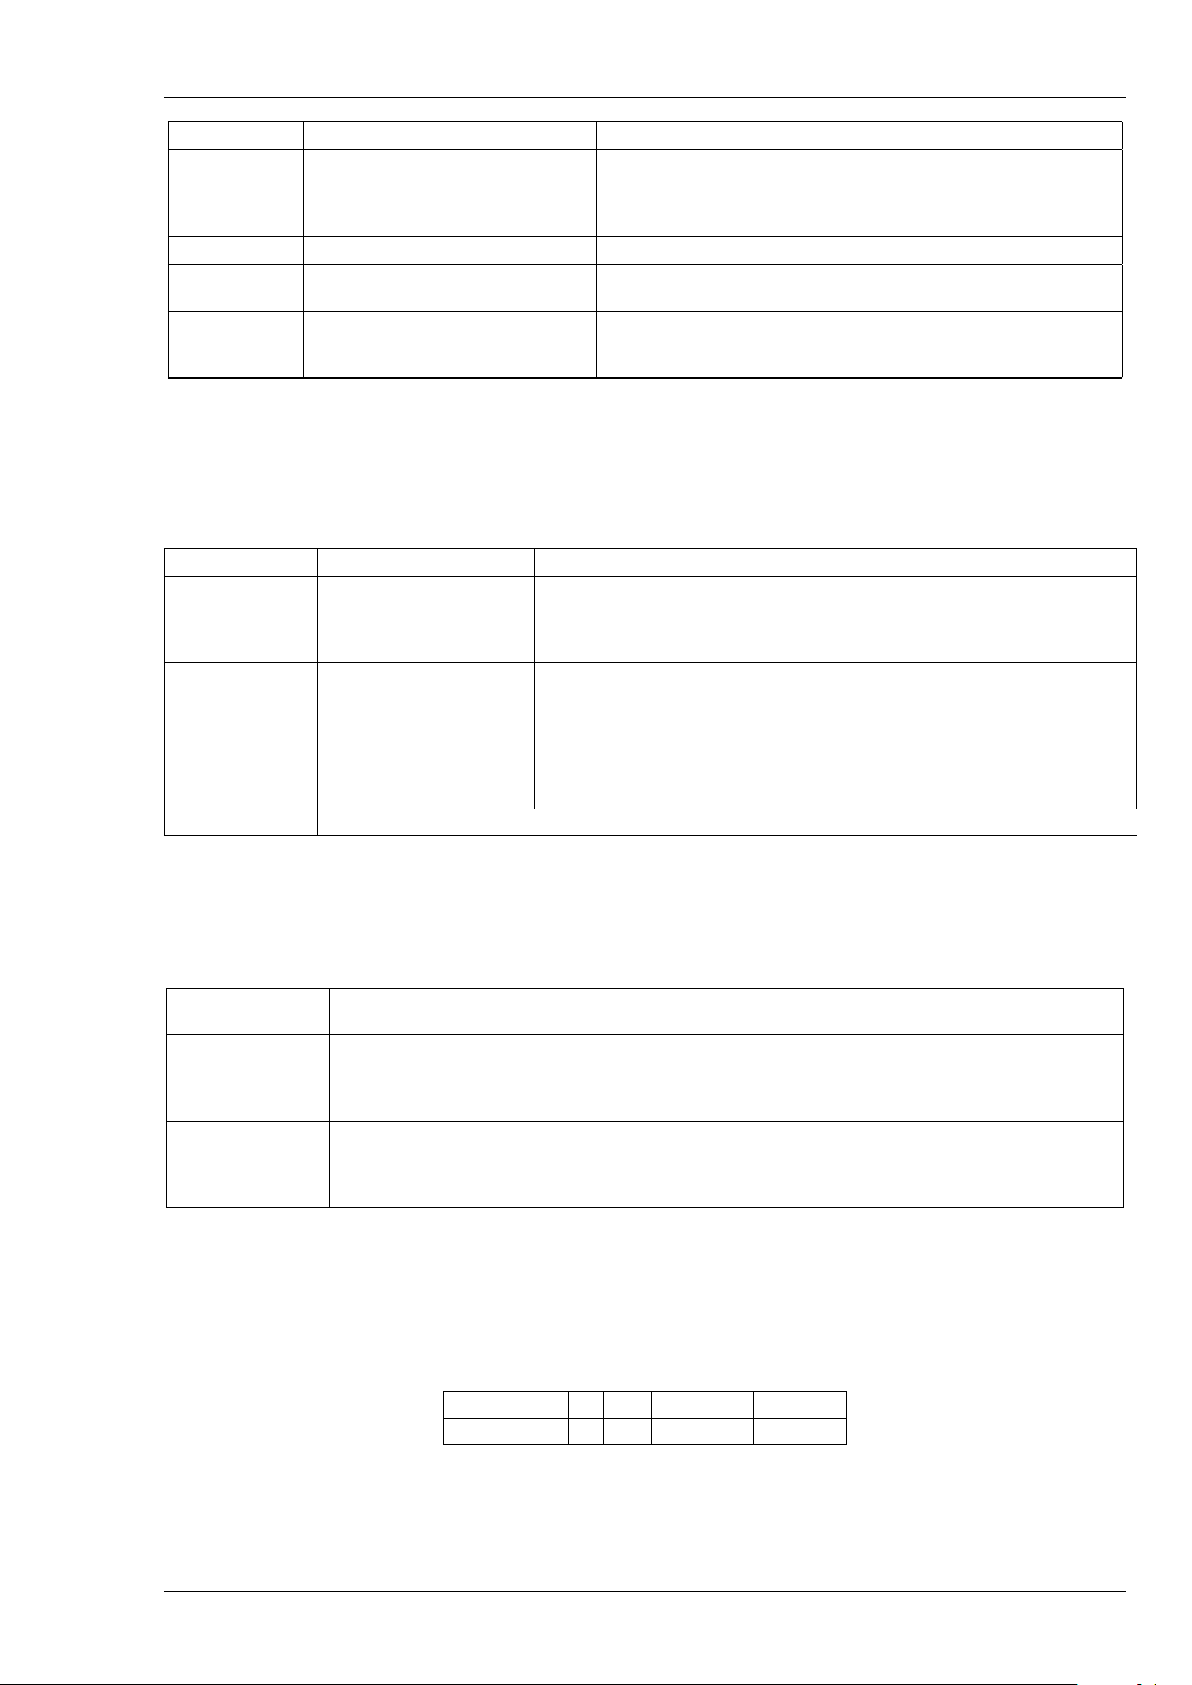
13.3 MIDI Monitor
The MIDI monitor uses the LEDs to display the type of message and the channel used by the
emitter. It is a powerful tool to help you debug a MIDI configuration issue. If you find that the MIDI
behavior of Le Preamp is not what you expected, this short guide will help you fix the issue.
Flash Color Meaning
No Light No MIDI Message received
Red MIDI message is not a PC
Yellow MIDI message not on the active MIDI channel
Green MIDI message on the active MIDI channel
What to do?
Control the connection between the MIDI output of your MIDI controller
and the MIDI input of Le Preamp. Control and eventually change the MIDI
cable. Make sure the MIDI controller is configured to send MIDI messages.
Make sure your MIDI controller is sending PC messages.
Set your MIDI controller to the same MIDI channel as your preamp, or set
the preamp to OMNI.
Configure your MIDI controller PC so it matches the default Le Preamp MIDI
mapping. Or use the MIDI Learn function on Le Preamp so the MIDI PC you
send triggers one of its functions.
13.4 MIDI Learn
Your Le Preamp can "learn" how to behave depending on the MIDI message it receives from a
MIDI controller. When entering the MIDI learn page, the tube window is white, indicating the Erase
mode.
Function
Erase a PC
Program a PC
Process Example
MIDI controller sends a MIDI
PC, this PC will not be interpreted by Le Preamp anymore
Channel A is selected, the
MIDI controller sends a PC
that is instantaneously stored
You want your Le Preamp not to react to PC42 . When the tube window is white, have
your MIDI controller send the PC42. You can continue with other PC # you want to
erase from memory.
You want the channel Hot Fusion to be triggered by PC84. Your Le Preamp is in Erase
mode (tube window is white) at first. Click on A+B and make sure the Fusion switch
is on Hot. When your preamp is in the correct state, have the MIDI device send the
PC 84. Several PCs can trigger the same channel on Le Preamp. If you send several
PCs while in this state, the Hot fusion will be activated for each and every stored PC.
You can continue by attributing other Le Preamp states (Channel A, B...) to other MIDI
PC, simply by selecting another channel and sending another PC(s) from your MIDI
controller.
13.5 MIDI Channel
This page uses the A and B LEDs flashing to indicate the channel number, OMNI mode or MIDI Off.
OMNI mode
MIDI Off
Channel Select
18 Two notes Audio Engineering Le Preamp
A and B LEDs are on, that is the factory setting. To go into OMNI mode, just select a channel over 16.
A and B LEDs are off. In this mode, any MIDI message sent to your Le Preamp will be sent to the MIDI output without
being interpreted. When in OMNI, press A or B once to enter this mode. Pressing A or B another time will start the
Channel Selection process. Please note the Multi-Channel function remains active (on or off) even when MIDI is off.
A LED flashes to indicate the decade (off or 10) and B the unity (off, 1 to 6). For example, "14" will be A flashing once
followed by B flashing 4 times, "8" will be A off and B flashing 8 times. After a pause, the flashing sequence is shown
again. Press the A switch to add 10 to the channel number and B to add 1. Going over 16 will bring the MIDI mode
back to OMNI.
Page 19

English - User’s manual
13.6 PC number
Your Le Preamp sends a PC every time you press either A, B or A + B. You can select the MIDI PC
number sent by the A switch, that we call "x". "x" is a number between 1 and 125. The other PCs sent
by the other switches are deducted from "x", following this rule:
Channel A B Cold Fusion Hot Fusion
PC number x x+1 x+2 x+3
Press the A switch to add 10 to "x" and B to add 1. The PC number is displayed using A and B LEDs
flashing. A indicates the decade and B the unity. For example, A flashing 11 times and B flashing 8
times means PC118.
13.7 Multi-channel Mode
The Multi-channel mode can be either ON (green tube window) or OFF (LEDs red tube window).
Press A to change this parameter.
13.8 Factory Reset
The factory reset will bring back the Le Preamp MIDI configuration to its initial state. Once you
entered that page, the tube window LEDs will flash in blue. Press simultaneously the A and B switches
to reset your Le Preamp. Once the reset is done, Le Preamp will reboot.
13.9 Firmware version
The firmware version number is displayed using A and B LEDs flashing. A indicates the decade and
B the unity. For example, A staying off and B flashing 3 times means firmware V03.
Two notes Audio Engineering Le Preamp 19
Page 20

Page 21

Français - Manuel de l’utilisateur
Version du manuel V 1.0- 11/21/2015. La version électronique complète de ce manuel, ainsi que
les produits logiciels et matériels Two notes Audio Engineering, peuvent être sujets à des mises à jour
(MAJ). Vous trouverez les plus récentes versions des produits et manuels sur notre site web à l’adresse :
http://www.two-notes.com.
Ce manuel décrit le fonctionnement du Le Preamp et donne les instructions pour son utilisation. Il
est hautement recommandé de lire ce manuel avant d’utiliser le matériel. Le contenu de ce manuel
a été vérifié en profondeur et peut être considéré, sauf mention contraire, comme une description
fidèle et précise du produit au moment de son acquisition et de son téléchargement ou de la livraison depuis notre entrepôt. Two notes Audio Engineering et le logo associé sont une marque déposée
de OROSYS SAS. Ce document est la propriété exclusive d’OROSYS SAS. Dans l’intérêt du développement des produits, OROSYS SAS se réserve le droit de modifier certaines spécifications techniques
ou d’arrêter la production d’un produit, sans notification préalable. OROSYS SAS ne peut être tenu
responsable pour tout dommage, accidentel ou non, qui résulterait d’une mauvaise utilisation de
ses produits. Merci de vous référer aux éventuelles instructions de sécurité inclues dans ce manuel.
La reproduction de tout ou partie de ce document est strictement interdite sans l’autorisation écrite
d’OROSYS SAS. Tous les noms de produits et marques sont les propriétés de leurs détenteurs. Certains
produits pouvant être cités dans ce manuel ont pu être utilisés dans le développement du Le Preamp
sans qu’ils soient associés ou affiliés à OROSYS SAS.
1 Consignes de sécurité
1. Avant toute mise en service du produit, il est nécessaire de lire attentivement et de retenir les
informations qui suivent. Gardez toujours ce document qui est important pour la protection de
votre personne et du produit. En cas de doute sur le bon fonctionnement de l’appareil, faites
toujours appel à l’expertise d’un technicien qualifié.
2. Assurez-vous que la tension électrique du secteur correspond à celle requise par l’adaptateur
secteur fournit avec le produit. En cas de doute, ne reliez pas l’appareil au secteur sous peine
de causer des dommages à l’appareil ou à l’utilisateur. Cet appareil ne doit pas être utilisé
en cas d’orage. Veuillez le débrancher du secteur pour réduire les risques d’électrocution ou
d’incendie. L’adaptateur secteur fourni avec l’appareil répond aux normes du produit dans
lequel le Le Preamp a été acheté. Si vous deviez utiliser un adaptateur secteur de remplacement, assurez-vous qu’il est lui aussi conforme aux normes en vigueur dans votre pays. Il devra
en outre être adapté à la tension, la puissance et la polarité du connecteur requises par le Le
Preamp.
3. L’utilisation de l’appareil ne doit jamais se faire à proximité d’une source de chaleur ou d’une
flamme, sous la pluie, dans des endroits humides, à proximité de tout type de liquides. Prenez soin lors d’un déplacement de l’appareil d’éviter tout choc qui pourrait conduire à des
dommages nécessitant l’intervention d’un technicien qualifié. Ne débranchez ni ne désactivez
Two notes Audio Engineering Le Preamp 21
Page 22
Français - Manuel de l’utilisateur
jamais les systèmes de contrôle de température. Dans le cas contraire, vous vous exposez à des
risques d’électrocution et d’incendie.
4. Le nettoyage de l’appareil devra toujours se faire au moyen d’un chiffon sec, sans solvant ni
alcool. Veillez à maintenir l’appareil propre et sans poussière.
5. La maintenance doit être réalisée dans des centres agréés par OROSYS SAS ou par des techniciens de maintenance qualifiés. Ne tentez sous aucun prétexte de réparer vous-même l’appareil.
Le symbole apposé sur ce produit ou sur son emballage indique que
ce produit ne doit pas être jeté avec les déchets ménagers ordinaires.
Il est de votre responsabilité de mettre au rebut vos appareils en les
déposant dans les centres de collecte publique désignés pour le recyclage des équipements électriques et électroniques. La collecte et
le recyclage de vos appareils mis au rebut indépendamment du reste
6.
des déchets contribue à la préservation des ressources naturelles et
garantit que ces appareils seront recyclés dans le respect de la santé
humaine et de l’environnement. Pour obtenir plus d’informations sur
les centres de collecte et de recyclage des appareils mis au rebut,
veuillez contacter les autorités locales de votre région, les services de
collecte des ordures ménagères ou le magasin dans lequel vous avez
acheté ce produit.
2 Déclaration de conformité
Fabricant : OROSYS SAS
Type d’équipement : Processeur de signal analogique
Produit : Le Preamp
Responsable des tests : Guillaume Pille
Le Two notes Le Preamp est certifié conforme aux normes CE et FCC :
• EN 55103-1 : 1996 et EN 55103-2 : 1996. EN 60065 05/2002 + A1 05/2006. EMC directive 89/336/EEC
et Low Voltage Directive 73/23/EEC. FCC Part 15 : 2008. ICES-003 : 2004. AS/NZS 3548 classe B
pour l’Australie et la Nouvelle Zélande. IEC :2008 - CISPR 22 classe B.
3 Service Après Vente (SAV)
Le Preamp est garanti deux (2) ans. Pendant cette période, toute panne liée à un défaut de
fabrication de la machine est prise en charge, pièce et main d’oeuvre, par OROSYS SAS. Sont exclus
de la garantie tous dommages liés à une utilisation de la machine non conforme et notamment à
un non-respect des prescriptions ci-dessus. Merci de vous adresser au vendeur du produit qui vous
indiquera la marche à suivre pour obtenir réparation.
22 Two notes Audio Engineering Le Preamp
Page 23

Français - Manuel de l’utilisateur
4 Introduction à la série Le Preamp
Two notes est avant tout une équipe d’amoureux de la musique et grand admirateurs des musiciens. Nous sommes des ingénieurs hautement qualifiés mais aussi des techniciens et musiciens, dont
l’objectif est de simplifier la vie des guitaristes et bassistes sans perturber leur habitudes de jeu. Notre
but est de vous apporter à la fois confort d’utilisation, robustesse, polyvalence et, le plus important,
une qualité audio irréprochable équivalente aux produits de studio mais conçus pour la guitare et la
basse.
Dès la conception de notre Torpedo C.A.B., nous avons imaginé qu’il était possible de concevoir un pedalboard de haute qualité capable de remplacer un système traditionnel avec ampli à
lampes. Même aujourd’hui où l’offre en terme de pédales semble illimitée, il nous semblait difficile
d’orienter nos utilisateurs vers une solution de préamplificateur au format pédale à la hauteur de
leurs attentes. C’est pourquoi l’équipe de Two notes est fière de vous présenter sa première série de
quatre préamplificateurs : Le Clean, Le Crunch, Le Lead et Le Bass.
4.1 Le concept
Le choix du préamplificateur est la clé de voute de votre son global et réclame par conséquent
la plus grande attention. Pour l’élaboration de ce pedalboard idéal, vous aurez besoin des meilleurs
éléments. Les préamplificateurs Two notes sont conçus autour d’une architecture haute tension à
200V (True High Voltage Design) pour préserver les finesses de l’interaction du musicien avec son instrument, tout en s’intégrant parfaitement avec d’autres pédales d’effet. Chacun de nos quatre préamplificateurs délivre la chaleur et la dynamique uniques des tubes, et cette compression naturelle
et musicale des amplificateurs connus que nous aimons. Le tout contenu dans une format pédale
extrêmement pratique. Bien entendu, vous pouvez aussi décider d’utiliser Le Preamp comme une
overdrive haut de gamme très élaborée, en façade de votre ampli préféré !
4.2 Deux canaux plus le mode Fusion
Les canaux A et B sont indépendant, chacun possédant sa propre couleur sonore (voicing) et son
EQ : basses et aigus sur A, basses, aigus et médiums à réglage semi-paramétrique (Sweep) sur B. Le
canal A possède un son plus clair avec une EQ placée avant le tube (d’inspiration plus vintage), le
canal B propose une approche plus moderne avec une EQ active post-gain et un son plus saturé.
En plus de ces deux canaux, les modes de Fusion vous ouvrent de nouveaux horizons. En "Hot Fusion"
(fusion chaude) A et B sont placés en série, ce qui signifie que A peut être considéré comme un
boost pour B, les EQ respectives de A et B étant un outil puissant pour façonner votre son. En "Cold
Fusion" (fusion froide) les deux canaux sont en parallèle, ce qui signifie que vous pouvez mélanger le
son clair du canal A avec le son plus saturé du canal B afin de gagner plus d’intelligibilité dans votre
son saturé.
4.3 Switching
Les préamplis possèdent deux footswitches correspondants aux deux canaux A et B. En appuyant
simultanément sur A et B, vous activez le mode Fusion. Appuyer sur A, B ou A + B envoie a chaque
fois un message MIDI de changement de programme (Program Change ou PC). Ce PC peut être
utilisé pour piloter un produit midi comme un multi-effets ou un Torpedo C.A.B., par exemple. De plus,
le préampli peut être lui-même contrôlé depuis un contrôleur MIDI tel qu’un switcher à embarquer
sur votre pedalboard. Pour pimenter les choses, vous pouvez mettre plusieurs Le Preamp sur votre
pedalboard. Connectés en MIDI, les préamplis vont "s’écouter" les uns les autres, c’est le mode Multi-
Two notes Audio Engineering Le Preamp 23
Page 24
Français - Manuel de l’utilisateur
channel : appuyer sur A sur Le Preamp 1 va mettre en bypass les autres Le Preamp, comme cela se
produit sur les différents canaux d’un ampli multi-canal traditionnel. Et si vous ne souhaitez pas utiliser
cette fonction, les différents Le Preamp peuvent être allumés simultanément pour qu’un premier
serve de boost au suivant, par exemple.
5 Quel Le Preamp est fait pour vous ?
Nous avons conçu quatre préamplis, pour couvrir les besoins basiques du guitariste ou du bassiste
d’aujourd’hui.
• Le Clean puise son inspiration dans les amplis du sud de la Californie qu’ils soient brown, black
ou silver face. Le canal A possède une texture ultra-clean parfaite pour s’accorder avec des
pédales en amont. Le canal B fera grogner votre guitare comme un V8 sur l’autoroute traversant un désert brulant. Le mode Cold Fusion vous transporte au coeur du Texas alors que le Hot
Fusion crie le Blues tiré des entrailles d’un Tweed enflammé.
• Le Crunch trouve sa source dans les ampli britanniques qui ont écrit certaines des plus grandes
pages de l’histoire du Rock’n’Roll depuis les années 60. Le clean du canal A, typé Plexi, sait
rester sage mais aussi montrer les dents. Le canal B est dur comme la pierre, et son autoroute
mène, elle, en Enfer ! Mélangez subtilement ces deux univers en Cold Fusion, et pénétrez sur le
territoire du High Gain en Hot Fusion, là où les shredders et les rois du riff écrivent les règles.
• Le Lead est la solution complète pour les amateurs de High Gain qui aiment parfois s’aventurer
dans des eaux plus claires. Le canal A délivre un son très clair qui pourra cruncher légèrement,
un paradis pour les arpèges et un supplément de polyvalence pour ce préampli. Cliquer sur le
canal B libère la furie d’un son High Gain moderne, qui profite à plein des énormes possibilités
apportées par le Mid Sweep. En Cold Fusion, découvrez le secret jalousement gardé des plus
grands enregistrements du Metal : ajouter un peu de son clair au son saturé pour retrouver
dynamique et intelligibilité. Et si l’apocalypse était un son, il se trouverait dans le mode Hot
Fusion. Saurez vous maitriser la Bête ?
24 Two notes Audio Engineering Le Preamp
Page 25

Français - Manuel de l’utilisateur
• Le Bass est l’arme ultime du bassiste. Le canal A, ultra clean, est idéal pour toutes les techniques
de jeu moderne avec une réponse rapide et un spectre extrêmement large, adouci par la
légère compression liée au tube : aucun style ne lui est interdit. Le canal B est un hommage
à la basse rock et balance en uppercut une distorsion rageuse qui rappellera à tous que sans
basse même le plus expansif des guitaristes sonne tout petit ! L’indispensable Cold Fusion vous
laisse doser juste ce qu’il faut de saturation sur votre son ultra-clean. Le Hot Fusion a fait l’objet
de toute notre attention, tant le High Gain est une matière hautement explosive en matière de
basse. Des sons ultra-saturés et agressifs au grondements fuzz à la limite du synthé basse, mettez
les Rangers dans le plat sans fausse note.
6 Description du produit
6.1 Vues latérales
Vous trouverez dans ce premier tableau une description des diverses entrées et sorties de votre
Le Preamp. Merci de vous reporter à la figure 1, page 3.
1 Footswitch A
2 Entrée instrument
3 Sortie Thru
4 Départ de boucle d’effet
5 Entrée MIDI input
6 Connecteur d’alimentation
7 Sortie casque
8 Simulateur d’enceinte
9 Interrupteur de masse - ground lift
10 Sortie symétrique DI
11 Sortie MIDI
12 Entrée retour de boucle d’effet
13 Sortie instrument
14 Footswitch B
Ce footswitch active le canal A ou change les pages/paramètres lors de la programmation MIDI.
Appuyer une seconde fois après avoir activé le canal met Le Preamp en bypass.
Branchez ici votre guitare ou basse via un câble jack 6,35mm asymétrique blindé.
Branchez ici un ampli supplémentaire via un câble jack 6,35mm asymétrique blindé. Avoir un ampli
supplémentaire peut être utile sur scène pour garder un son direct, ou bien vous pouvez récupérer
sur cette sortie le son brut de la guitare, dans le cadre d’une enregistrement par exemple.
Mettez vos effets dans la boucle (post-preamp) du Le Preamp en les connectant via un câble jack
6,35mm asymétrique blindé. La boucle est inactive lorsque Le Preamp est désactivé. Autrement dit,
mettez dans la boucle les effets que vous souhaitez réserver à ce préampli, qui devront être éteints
en même temps que le préampli. Cette fonction est utile si vous avez plusieurs Le Preamp, chacun
ayant son propre lot d’effets.
Reliez ici un contrôleur MIDI ou un autre Le Preamp. Utilisez exclusivement un câble midi avec
connecteur DIN 5 broches dont toutes les broches sont connectées. Attention, certains câbles n’ont
que les broches 4, 2 et 5 connectées. Nous utilisons les broches 1 et 3 pour transporter le message
Multi-channel.
Branchez ici l’adaptateur secteur fourni ou une alimentation compatible (voir les spécifications à la
fin de ce manuel).
Branchez votre casque (connecteur 3,5mm), activez la simulation analogique d’enceinte et jouez
au milieu de la nuit sans déranger qui que ce soit !
Cette simulation d’enceinte est spécifiquement étudiée pour chaque modèle de Le Preamp, et
inspirée de notre série Torpedo. Cette simulation affecte la sortie casque et la sortie DI.
Si vous constatez la présence de parasites sur la sortie DI (bruit 50Hz/hum par exemple) , parasite
souvent lié à la connection avec d’autres équipements, supprimer la connection de masse peut
parfois améliorer la situation.
Cette sortie directe au format XLR peut être connectée à une console de mixage ou une carte son
pour l’enregistrement. Une fois la simulation d’enceinte activée, vous n’aurez besoin de rien d’autre
pour obtenir LE son.
Branchez cette sortie MIDI à un autre produit MIDI ou à un autre Le Preamp, que vous souhaitez
piloter depuis votre Le Preamp.
Connectez ici votre dernière pédale de boucle d’effet à l’aide d’un câble jack 6,35mm asymétrique
blindé.
Cette sortie doit être connectée soit à un amplificateur de puissance (pour le jeu traditionnel avec
enceinte), un simulateur d’enceinte tel que le Torpedo C.A.B., ou directement à une interface audio
pour l’enregistrement avec le plugin WOS III par exemple.
Ce footswitch active le canal B ou entre dans une page lors de la programmation MIDI. Appuyer
une seconde fois après avoir activé le canal met Le Preamp en bypass.
Two notes Audio Engineering Le Preamp 25
Page 26

Français - Manuel de l’utilisateur
6.2 Vue du dessus
Dans le tableau suivant se trouve la description des différents paramètres dont vous disposez pour
sculpter votre son et ajuster les volumes. Merci de vous reporter à la figure 2, page 4.
1 Footswitch A
2 Gain d’entrée du Channel A
3 EQ du canal A
4 Volume du canal A
5 Sélecteur de mode de Fusion
6 Niveau de Fusion
7 Gain d’entrée du canal B
8 EQ du canal B
9 Volume du canal B
10 Fenêtre du tube
11 Footswitch B
Ce footswitch active le canal A ou change les pages/paramètres lors de la programmation MIDI.
Appuyer une seconde fois après avoir activé le canal met Le Preamp en bypass.
Détermine le niveau de gain de votre son clair. Pousser le gain peut conduire à plus de distortion
du signal, voire une distortion excessive. Ajustez ce paramètre selon votre goût, le niveau de gain
maximum que vous pouvez obtenir dépend des micros de votre guitare et des autres pédales que
vous pourriez placer devant Le Preamp.
Le canal A possède un réglage (passif) des basses (BASS) et des aigus (TREBLE).
Détermine le volume de sortie du canal A. Ce bouton est inactif en mode Fusion. Dans le cas où
vous entendriez une saturation non désirée, baisser ce volume peut améliorer les choses, et pensez
à vérifier que le produit suivant Le Preamp ne sature pas lui non plus.
Presser A et B simultanément fait entrer Le Preamp dans le Mode Fusion. Cet interrupteur vous permet
de choisir entre le mode Hot et le mode Cold, merci de vous reporter plus loin dans ce manuel pour
plus d’explication sur ces modes.
En Mode Hot Fusion, ce réglage détermine la quantité de boost venant de A que vous injectez dans
B. En mode Cold Fusion, ce réglage détermine quel niveau du canal A sera ajouté en parallèle du
canal B.
Détermine le niveau de gain de votre son saturé. Pousser le gain peut conduire à plus de distortion
du signal, voire une distortion excessive. Ajustez ce paramètre selon votre goût, le niveau de gain
maximum que vous pouvez obtenir dépend des micros de votre guitare et des autres pédales que
vous pourriez placer devant Le Preamp. Sur ce canal le niveau de gain est supérieur à celui du canal
A, attention à l’augmentation non souhaitée de bruits parasites et même de larsen.
Le canal B possède une EQ passive pour les basses et les aigus, plus un réglage actif des médiums
avec un medium semi-paramétrique. Grâce au paramètre Sweep vous serez en mesure de régler la
fréquence de la place de médium qui vous pourrez booster ou atténuer.
Détermine le volume de sortie du canal B. Dans le cas où vous entendriez une saturation non désirée,
baisser ce volume peut améliorer les choses, et pensez à vérifier que le produit suivant Le Preamp ne
sature pas lui non plus.
Avec Le Preamp, vous pouvez voir le tube travailler ! En fonction du canal choisi et du mode de Fusion
cette fenêtre prend différentes couleurs : vert pour le canal A, jaune pour le canal B, bleu pour Cold
Fusion et rouge pour Hot Fusion. Le mode de programmation MIDI affiche d’autres couleurs, merci
de vous reporter à la section MIDI de ce manuel.
Ce footswitch active le canal B ou entre dans une page lors de la programmation MIDI. Appuyer
une seconde fois après avoir activé le canal met Le Preamp en bypass.
Merci de noter l’importance du mode de bypass, en particulier si vous souhaitez utiliser plusieurs
modèles de Le Preamp simultanément, ou si vous souhaitez utiliser Le Preamp comme une distorsion
évoluée branché en façade de votre ampli. Reportez-vous à la description détaillée du mode Multichannel dans le cas de l’utilisation de plusieurs Le Preamp connectés en MIDI.
7 Précisions sur le mode Fusion
En appuyant simultanément sur les switches A et B, vous entrez dans le mode Fusion. Une fois dans
ce mode, appuyer à nouveau sur A et B met Le Preamp en bypass.
26 Two notes Audio Engineering Le Preamp
Page 27
Français - Manuel de l’utilisateur
7.1 Cold Fusion
Le mode Cold Fusion met les canaux A et B en parallèle.
Autrement dit, vous pouvez ajuster les niveaux respectif de
A (à l’aide du potentiomètre de Fusion) et B qui seront mélangés en sortie de B. Cette technique consistant à ajouter
un son clair à un son plus saturé est très utilisée en studio,
pour redonner à un son saturé et parfois un peu trop compressé dynamique et articulation. Dosez avec parcimonie le
son clair pour qu’il ne prenne pas trop le pas sur le son saturé,
augmentez la valeur de Fusion progressivement.
7.2 Hot Fusion
Le mode Hot Fusion met les canaux A et B en série. Dans cette configuration, le canal A devient
un boost pour le canal B, et le potentiomètre de Fusion détermine la quantité de A injecté dans B.
Le gain du canal A est très important et c’est l’addition de ce gain et du volume de Fusion qui
déterminent la quantité de distorsion globale que vous obtiendrez. L’EQ du canal A va jouer un
rôle très important dans le type de distortion que vous obtiendrez. Si vous poussez les basses vous
obtiendrez un son plus fuzzy, et plus brillant et tranchant en poussant les aigus. Vous verrez rapidement
que ces quelques réglages simples apportent beaucoup à la palette de sons que vous pouvez
obtenir. Rappelez-vous que le "sweet spot", le son optimal, se trouve rarement quand tous les réglages
sont a fond. Parfois il est préférable de monter le gain de A et de baisser Fusion, ou l’inverse. Prenez
le temps de faire varier lentement les différents réglages et d’écouter le résultat pour trouver votre
sweet spot !
8 Le Mid Sweep
Le medium paramétrique ou Mid Sweep est un outil puissant pour sculpter votre son, qu’il s’agisse
de booster ou couper des mediums. Une bonne manière de débuter avec le réglage Sweep est
d’abord de mettre le volume des Mids à fond et de chercher une fréquence intéressante à traiter.
Une fois cette fréquence trouvée, faites varier le niveau de Mids et écoutez le résultat. Attention,
faire disparaitre les mediums vous fera aussi sans doute disparaitre du mix si vous jouez en groupe, ce
réglage est comme un couteau très aiguisé : précis et dangereux, parfait dans entre les mains d’un
utilisateur expérimenté.
9 Connexions
Le Preamp peut être utilisé dans de nombreux cas de figure : comme boost devant un ampli,
comme préampli traditionnel branché dans un ampli de puissance et des enceintes, ou dans un
système prêt à brancher sur une console sur scène comme en studio. Retrouvez les cas usuels sur la
figure 3, page 5.
Two notes Audio Engineering Le Preamp 27
Page 28

Français - Manuel de l’utilisateur
10 Et si je veux utiliser plusieurs Le Preamp ?
Vous pouvez, ils ont été conçus pour fonctionner ensemble ! Merci de vous reporter au montage
de la figure 4, page 6.
Sur cette figure vous trouverez, en vert les connexions MIDI et, en bleu, les connexions audio. Une
fois reliés en MIDI, les Le Preamp communiquent pour s’activer et se désactiver. Par défaut, activer
le canal d’un préampli va mettre en bypass les autres préamplis reliés. C’est le mode Multi-channel :
ajouter un Le Preamp à votre chaine est comme ajouter des canaux à un amplificateur multi-canal
traditionnel. Lors de la connexion MIDI, assurez-vous d’utiliser un câble MIDI 5 broches dont toutes
les broches sont connectées. En effet, nous utilisons les broches 1 et 3 pour transporter le message
Multi-channel.
Un mot sur le positionnement des effets :
1. Nous mettons avant le premier préampli tous les effets que nous souhaitons appliquer à l’en-
semble de la chaine. Cela peut être une pédale de distortion, un compresseur, une pédale de
volume. En bref, tout ce que vous pourriez mettre devant l’entrée d’un amplificateur traditionnel.
2. Nous mettons dans la boucle d’effet (FX Loop) les effets que nous souhaitons réserver à un seul
préampli. Par exemple, un delay spécifique uniquement pour Le Preamp 2.
3. Enfin, nous plaçons après le dernier préampli tous les effets globaux qui sonnent généralement
mieux si placés après l’étage de préampli : effets de modulation, réverbération, une simulation d’enceinte telle que le Torpedo C.A.B. ou tout effet stéréo. En mettant les effets stéréos
en bout de chaine, l’appareil connecté après notre pedalboard (une console de mixage, un
enregistreur) pourra recevoir un signal stéréo.
11 Trucs & astuces
• Dans le cas de l’utilisation d’un Torpedo C.A.B. avec votre Le Preamp, il peut être intéressant
de mettre le C.A.B. dans la boucle du préampli. De cette manière, vous pouvez utiliser la sortie
DI XLR du préampli pour envoyer le signal vers une console de mixage tout en écoutant le son
complet sur la sortie casque du Le Preamp. n’oubliez pas de couper la simulation d’enceinte
sur Le Preamp sous peine de la mettre en série avec le Torpedo C.A.B., ce qui va probablement
assombrir le son de votre instrument de manière excessive.
• Même si ce montage n’est pas représenté sur la figure de connexion, vous pouvez utiliser Le
Preamp comme overdrive à tube devant votre amplificateur. Si vous prenez le temps d’ajuster
votre son sur chacun des canaux du préampli, vous pourrez obtenir des sons incroyables et
démultiplier les possibilités de votre ampli.
• Si vous mettez une pédale de distorsion, overdrive ou fuzz devant votre Le Preamp, nous vous
conseillons de baisser les basses sur l’EQ du préampli pour obtenir un son plus "propre". Comme
vous pourriez le faire sur un ampli traditionnel, si vous connaissiez cette astuce bien sûr !
• Si vous utilisez des pédales après Le Preamp, utilisant des connexions asymétriques, il peut être
souhaitable de connecter la dernière pédale à un boîtier DI avant d’attaquer une console de
mixage, en particulier sur scène. De cette manière vous diminuerez potentiellement les bruits
parasites, et vous éviterez qu’une possible alimentation 48V phantom soit envoyée dans vos
pédales, ce qui est généralement déconseillé.
28 Two notes Audio Engineering Le Preamp
Page 29

Français - Manuel de l’utilisateur
• Avoir trop de distorsion peut conduire à un son brouillon et manquant de dynamique, qui amplifie de plus tous les parasites captés par vos micros et votre chaine de matériel. Si vous avez
besoin de cette distorsion et que vous êtes gêné par le bruit résiduel, vous aurez sans doute besoin d’utiliser une noise gate (effet suppresseur de bruit). Les micros simple bobinage sont plus
sensibles au bruit que les humbuckers et les micros actifs. Bouger votre guitare dans l’espace
vous permettra peut-être d’identifier la source du bruit (un écran, un transformateur d’ampli,
des éclairages...) et de trouver une position qui atténue ce bruit au maximum.
• En studio, vous pouvez enregistrer simultanément 3 signaux différents émanent de Le Preamp :
1. Le signal brut de la guitare que vous trouvez sur la sortie THRU. Ce signal pourra être utilisé
ultérieurement par exemple dans le cadre d’un reamping.
2. Le signal brut de Le Preamp sur la sortie principale. Ce signal pourra être traité par le plugin
Wall of Sound III (WoS III), un des meilleurs simulateurs d’enceinte du monde.
3. Le signal avec simulation analogique d’enceinte sur la sortie DI output. Cette simulation
sonnera différemment des simulations du WoS III, l’addition des deux peut donner un rendu
très intéressant pour épaissir votre son.
• Essayez de maintenir des connexions asymétriques les plus courtes possibles.
• Si vous voulez maintenir une connexion symétrique entre Le Preamp et l’appareil suivant, vous
devrez utiliser la sortie DI XLR. Dans ce cas, si l’appareil suivant ne possède que des entrées jack
6.35 symétriques, vous trouverez dans le commerce des câbles XLR vers Jack 6.35 symétrique.
12 Le plugin Torpedo Wall of Sound III
Wall of Sound III est un simulateur d’enceinte et de prise de son pour la guitare et la basse, au
format plugin. Un plugin est un logiciel qui s’installe dans votre séquenceur favori (Pro Tools, Cubase,
Reaper, Logic etc...) et que vous pouvez activer sur une piste de ce séquenceur, en insert.
Avec votre Le Preamp sont fournies 16 enceintes valables pour le WoS III. L’addition du WoS III et
Le Preamp est une des meilleurs combinaisons pour enregistrer vos projets musicaux en studio ou à
la maison.
Pour obtenir vos 16 enceintes, enregistrez votre produit Le Preamp sur le site web de Two notes,
téléchargez le logiciel WoS III et installez-le. Vous serez guidé tout au long de ce processus.
Une fois que vous aurez pris vos marques sur le WOS III, foncez explorer La Boutique, l’interface de
test et d’achat de nouvelles enceintes et de nouveaux micros pour votre logiciel Torpedo.
Retrouvez toutes les informations nécessaires sur le site Two notes : http://www.two-notes.com.
13 MIDI
13.1 Configuration d’usine
5 fonctions de base peuvent être actionnées depuis un appareil MIDI externe à l’aide de messages MIDI Program Change (PC). La configuration d’usine en réception de messages MIDI est la
suivante :
Two notes Audio Engineering Le Preamp 29
Page 30
Français - Manuel de l’utilisateur
RECEPTION MIDI
Modèle Le Preamp Canal A Canal B Cold Fusion Hot Fusion Bypass
Le Clean PC 1 PC 2 PC 3 PC 4 PC 5
Le Crunch PC 6 PC 7 PC 8 PC 9 PC 10
Le Lead PC 11 PC 12 PC 13 PC 14 PC 15
Le Bass PC 16 PC 17 PC 18 PC 19 PC 20
En d’autres termes, votre Le Preamp peut recevoir des messages MIDI demandant le bypass ou
le changement de canaux. Tous les messages MIDI sont retransmis à la sortie MIDI OUT (fonction MIDI
THRU).
Mais Le Preamp peut aussi être utilisé comme contrôleur MIDI pour piloter d’autres produits MIDI
(multi-effets ou Torpedo C.A.B. par exemple) en envoyant des MIDI PC. La configuration MIDI en
émission par défaut est la suivante :
EMISSION MIDI
Modèle Le Preamp Channel A Channel B Cold Fusion Hot Fusion
Le Clean PC 1 PC 2 PC 3 PC 4
Le Crunch PC 6 PC 7 PC 8 PC 9
Le Lead PC 11 PC 12 PC 13 PC 14
Le Bass PC 16 PC 17 PC 18 PC 19
Merci de noter que bypasser Le Preamp n’envoie pas de message MIDI PC. Le canal de communication MIDI par défaut est OMNI (écoute de tous les canaux) et le mode Multi-channel est ON.
13.2 Programmation MIDI
Il est possible, pour l’utilisateur avancé, de modifier les paramètres MIDI du préampli (MIDI Mapping), à l’aide du menu de configuration MIDI. Lancez le menu MIDI en appuyant sur A tout en
allumant le préampli.
Le menu MIDI utilise les LEDS ainsi que la lumière de la fenêtre du tube pour vous guider. Il y a 7
pages dans le menu et par conséquent 7 couleurs de fenêtre du tube :
N° de Page 1 2 3 4 5 6 7
Fonction Moniteur MIDI MIDI Learn Canal MIDI Numéro PC Mode Multi-channel Reset usine Version Firmware
Couleur Blanc Vert Jaune Rouge Violet Bleu Turquoise
Passez d’une page à l’autre du menu à l’aide du Switch A, entrez dans une page du menu à
l’aide de B. Une fois que vous êtes entré dans une page il n’est plus possible d’en sortir, vous devrez
relancer le menu en redémarrant Le Preamp pour accéder à une autre page. Sur chaque page,
la modification d’un paramètre est immédiatement sauvegardée. Le processus de sauvegarde est
signifié par le clignotement rapide des LEDs.
13.3 Moniteur MIDI
Le moniteur MIDI utilise les LEDs pour afficher le type de message MIDI et le canal utilisé par un
émetteur. C’est un outil puissant qui vous permettra de débuger un problème éventuel de configuration MIDI. Si le comportement MIDI de votre Le Preamp ne correspond pas à ce que vous attendez,
le tableau suivant devrait vous aider à trouver la solution :
30 Two notes Audio Engineering Le Preamp
Page 31
Français - Manuel de l’utilisateur
Couleur de flash Signification
LEDs éteintes Aucun message MIDI n’est reçu
Rouge Le message MIDI n’est pas un PC
Jaune Message reçu sur le mauvais canal MIDI
Vert Message MIDI PC reçu sur le bon canal
Que faire?
Contrôlez la connexion entre la sortie MIDI de votre contrôleur et l’entrée
du Le Preamp. Contrôlez le câble et changez-le s’il s’avère défectueux.
Vérifiez que votre contrôleur est bien configuré pour envoyer des messages
MIDI PC.
Vérifiez que votre contrôleur envoie bien des PC.
Configurez votre contrôleur MIDI sur le même canal que votre Le Preamp,
ou passez Le Preamp en OMNI.
Configurez votre contrôleur MIDI pour qu’il envoie un PC correspondant
au mapping MIDI du Le Preamp. Ou utilisez la fonction MIDI Learn pour
adapter le mapping MIDI du préampli à votre contrôleur.
13.4 MIDI Learn
Votre préampli peut apprendre (learn) à réagir a des messages MIDI PC émis par un contrôleur.
En entrant dans ce menu, l’état par défaut est la fonction d’effacement (écran blanc).
Fonction
Effacer un PC
Programmer un PC
Procédure Exemple
Le contrôleur MIDI envoie un
PC qui à l’avenir ne sera plus
interprété par Le Preamp
Le canal A est activé, le
contrôleur envoie un PC qui
est immédiatement associé
au canal A
Vous souhaitez que votre Le Preamp ne réagisse plus au PC42. Lorsque la fenêtre du
tube est blanche, envoyez le PC42 depuis votre contrôleur MIDI, le PC42 est effacé de
la mémoire du préampli. Vous pouvez continuer ainsi pour effacer tous les PC que vous
enverrez depuis le contrôleur.
Vous voulez que le mode Hot Fusion soit activé par le PC84. Le Preamp est d’abord
en mode d’effacement (écran blanc). Appuyez sur A+B et vérifiez que le switch
HOT/COLD est bien sur HOT. Une fois que le préampli est dans l’état souhaité, envoyez
le PC84 depuis votre contrôleur. Si vous envoyez d’autres PCs en laissant le préampli
dans cet étant (Hot Fusion), tous les PCs seront associés à ce mode. Vous pouvez ensuite changer l’état du préampli en passant par exemple sur le canal A ou B, les PCs
suivants seront immédiatement associés à l’état du préampli.
13.5 Canal MIDI
Cette page utilise les LEDs A et B en flash pour indiquer le numéro de canal MIDI de communica-
tion qui va de 1 à 16, OMNI ou MIDI Off.
OMNI
MIDI Off
Choix de canal MIDI
Les LDEs A et B sont allumées en continu, c’est le réglage usine. Pour passer en mode OMNI, il suffit de sélectionner
un canal au-delà de 16.
Les LEDs A et B sont éteintes. Dans ce mode, les messages MIDI reçus à l’entrée du préampli sont transmise à sa
sortie sans être interprétés. Depuis le mode OMNI, appuyez sur A ou B un fois pour passer en MIDI Off. Appuyez
à nouveau sur A ou B pour initier la sélection d’un canal MIDI. Veuillez noter que le mode Multi-channel est actif
même en MIDI Off.
Les LEDs A et B clignotent. A indique le chiffre des dizaines (off ou 10) et B indique les unités (off, 1 à 6). Par exemple,
"14" sera représenté par A qui clignote 1 fois, suivi de B qui clignote 4 fois. "8" est représenté par A éteint, B clignote
8 fois. Après une pause, la séquence est à nouveau présentée. Pour modifier le numéro de canal, appuyer sur A
ajoute 10 et B ajoute 1. Dépasser 16 fait passer le canal en OMNI.
13.6 Numéro de PC
Votre Le Preamp envoie un PC chaque fois que vous pressez A, B, ou A+B. Vous pouvez choisir
quel PC sera envoyé par l’appui sur A, que nous appellerons "x". "x" est un nombre compris entre 1
et 125. Les autres PCs envoyés par les autres actions se déduisent de "x" selon la règle suivante :
Canal A B Cold Fusion Hot Fusion
Numéro de PC x x+1 x+2 x+3
Pour modifier "x", appuyer sur A ajoute 10 et B ajoute 1. Le numéro de PC est affiché en utilisant le
clignotement des LEDs A et B. A indique les dizaines et B les unités. Par exemple, A clignotant 11 fois
et B 8 fois signifie PC118.
Two notes Audio Engineering Le Preamp 31
Page 32

Français - Manuel de l’utilisateur
13.7 Mode Multi-channel
Le mode Multi-channel peut être, au choix, désactivé (fenêtre du tube verte) ou activé (fenêtre
du tube rouge). Appuyez sur A pour changer ce paramètre.
13.8 Reset usine
Le reset usine va remettre la configuration du Le Preamp dans son état d’origine. Une fois dans
cette page, la fenêtre du tube clignote en bleu. Appuyez simultanément sur A et B pour remettre Le
Preamp à l’état d’usine. Une fois ce reset effectué, Le Preamp redémarre.
13.9 Version Firmware
La version du Firmware (logiciel embarqué) est affichée en utilisant les LEDs A et B. A indique les
dizaines et B les unités. A éteinte et B flashant 3 fois indique Firmware V03.
32 Two notes Audio Engineering Le Preamp
Page 33
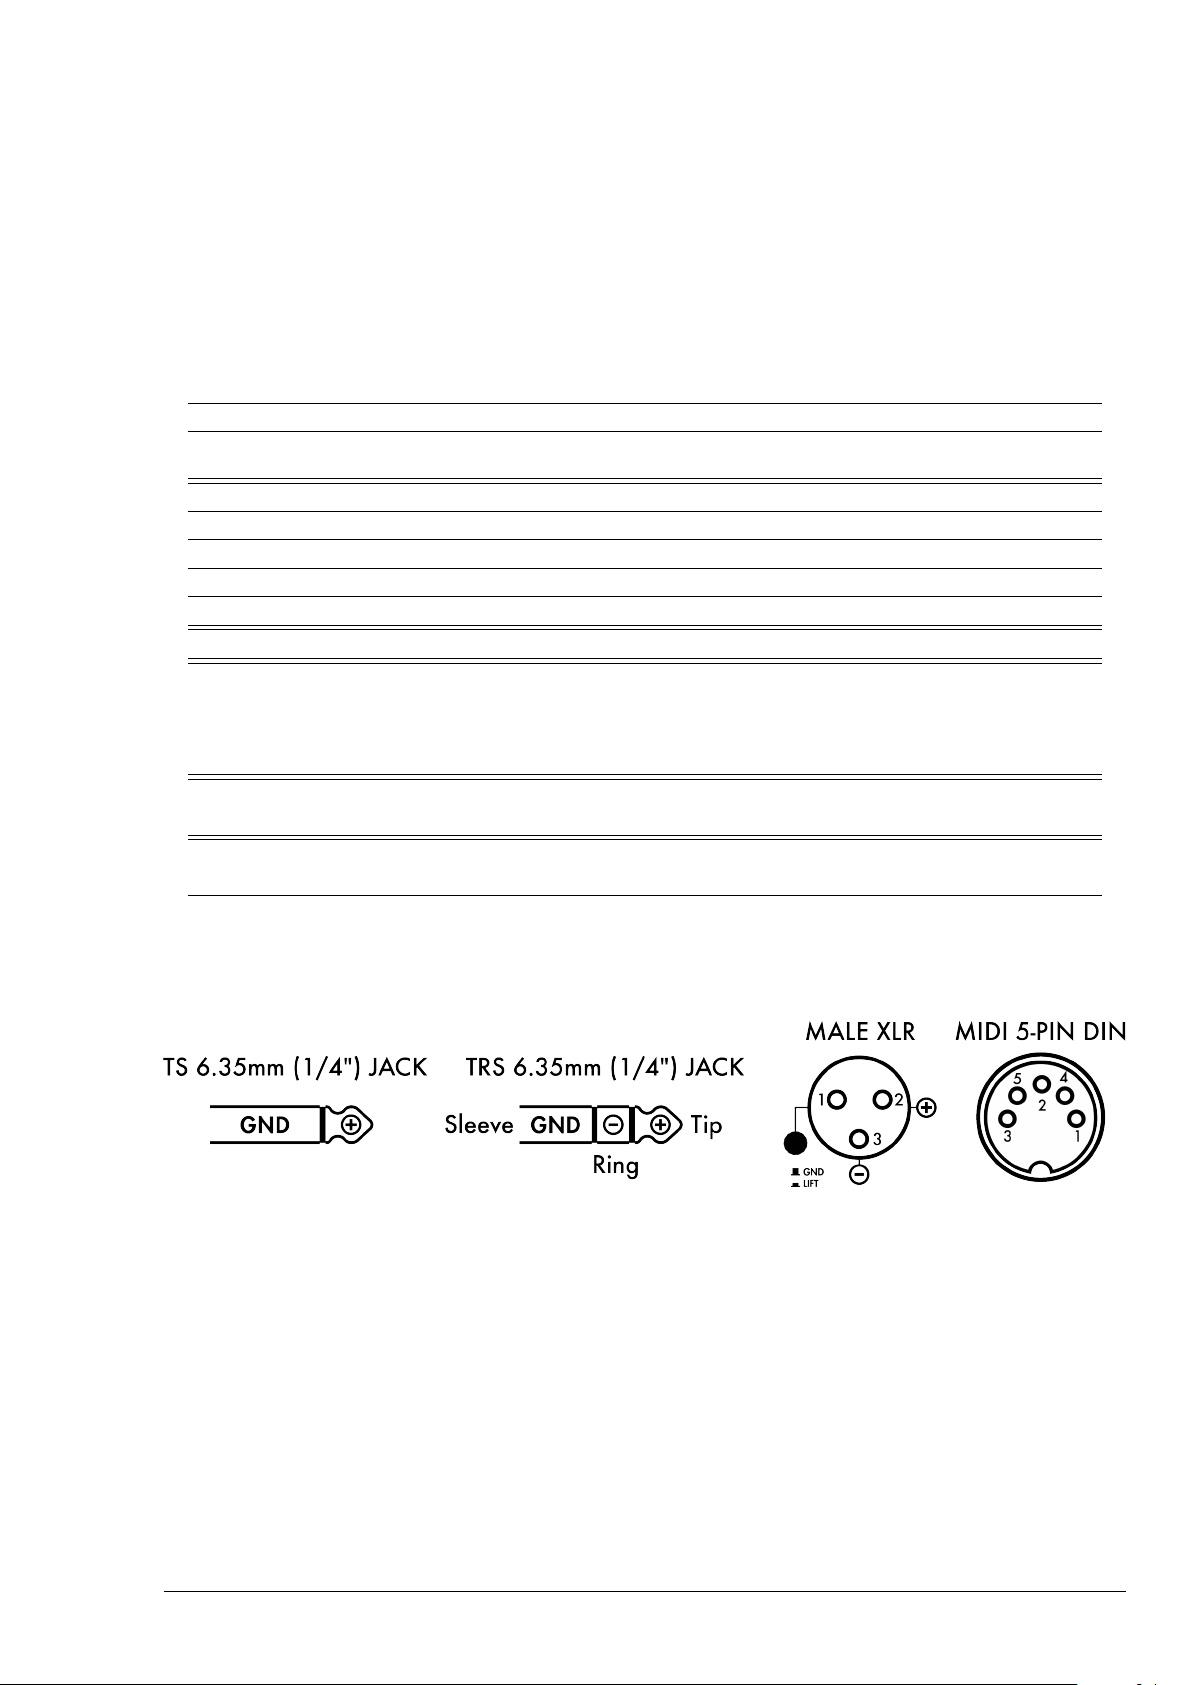
Specifications
Input Jack 6.35 mm (1/4") unbalanced (TS, Tip/Sleeve) - Impedance : 1 MOhms
Return
Output Jack 6.35 mm (1/4") unbalanced (TS) - Max output level : 11 dBu - Impedance : 300 Ohms
Thru Jack 6.35 mm (1/4") unbalanced (TS) - Unbuffered, directly connected to Input
Send Jack 6.35 mm (1/4") unbalanced (TS) - Max output level : 11 dBu - Impedance : 300 Ohms
DI Output XLR, balanced - Impedance : 600 Ohms balanced, 300 Ohms unbalanced - Max output level : -7 dBu
Phones Jack 3.5 mm (1/8") stereo (TRS, Tip/Ring/Sleeve)
Tube reference Ruby 12AX7AC5 HG
Tone control A channel : Passive Bass/Treble tonestack
Power Mains power adaptor DC Jack 2.1mm, negative center
Dimensions 124 x 189 x 50 (mm) - 4.88 x 7.44 x 1.97 (in)
Weight 750g - 1.65 lb
Jack 6.35 mm (1/4") unbalanced (TS) - Max input level : 17 dBu - Impedance : 2,2 MOhms - Unbuffered,
directly connected to Output when active
B channel : Passive Bass/Treble tonestack
Active Mid/Sweep control - Gain : -18 to +6 dB
Freq. (Le Clean, Le Crunch, Le Lead) : 300Hz to 1.5kHz - Freq. (Le Bass) : 220Hz to 1.5kHz
Input voltage : 12V DC - Power consumption : approx. 6W - Current draw : 500mA
FIGU RE 3.1 – Connectors
Two notes Audio Engineering Le Preamp 33
Page 34
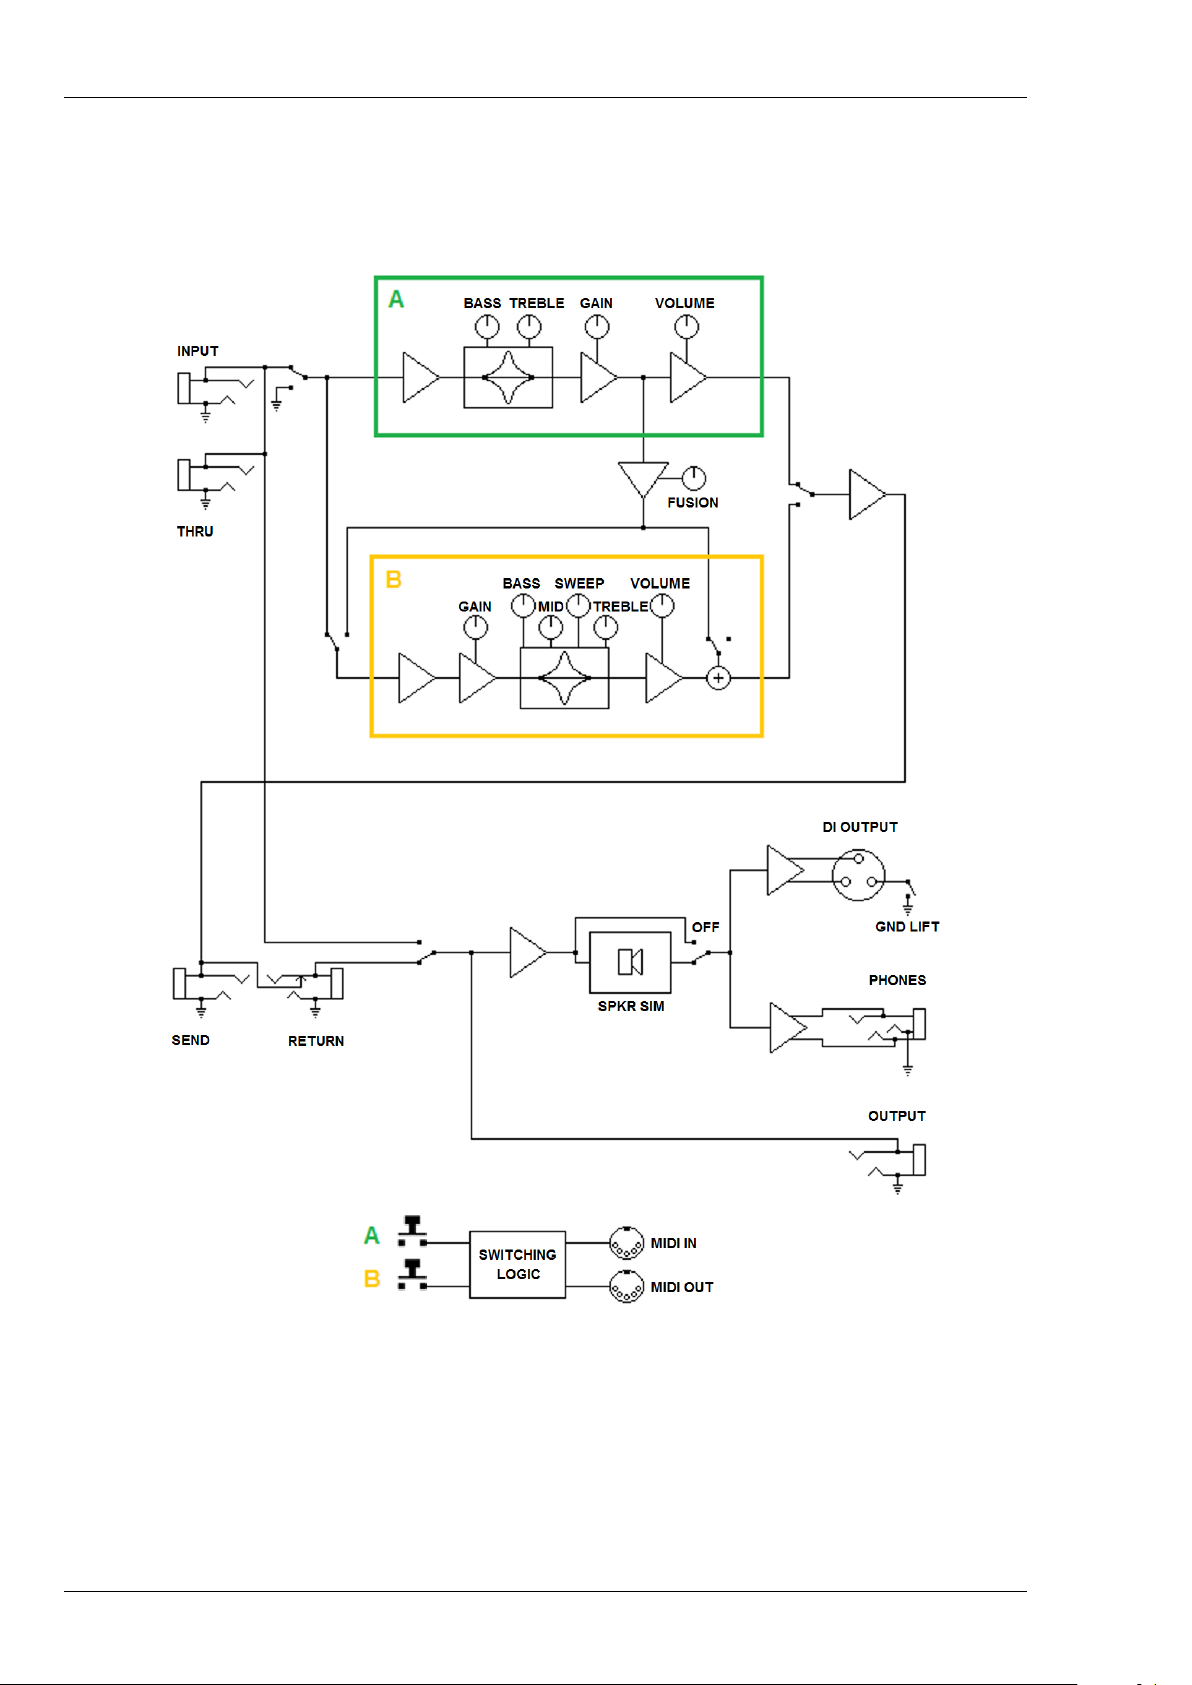
Specifications
FIGU RE 3.2 – Block Diagram
34 Two notes Audio Engineering Le Preamp
 Loading...