

Page 1

Dynatek Coil Kit DCK2-1
Kawasaki Prairie 650 4x4 2002-03, Kawasaki Prairie 700 4x4 2004-06
Kawasaki Brute Force 650 4x4 2005-06
Kawasaki Brute Force 650 4x4i 2006-07, Kawasaki Brute Force 750 4x4i 2005-07
Congratulations on your purchase of a Dynatek Ignition Coil Kit. Please take a moment to read these instructions
completely before installing the ignition coil. The installation will take about 1 hour.
WARNING: This kit is for carbureted models only. Do not use on fuel injected models or damage to the injection
computer may result. Injected models require kit number DCK2-7 supplied with 3 ohm coils .
This kit includes: (2) Dynatek Ignition 0.5ohm Mini-Coil, single output (4) Mounting brackets
(2) 15” Spark plug wires, with boot at coil end (4) M6 x 30 long Bolts
(2) Orange 3/16 to 1/4 wire adapters (4) Flat washers
(2) Zip-ties 8” (4) M6 locking nuts
This is a complete kit, and includes everything needed to install the ignition coils.
Note: Th
Note: Route all wires carefully. Secure wires in factory loops or use cable ties to ensure electrical wires do not chafe or
touch anything hot. Pay close attention to the wiring detail and wire crimping, successful installation depends on this.
Tools Required: 8mm, 10mm, 12mm socket wrench
Phillips screw drivers #2, #3
Adjustable wrench
Installation
1) Turn ignition key off. Remove seat. Disconnect the battery ground wire.
2) REAR CYLINDER,
3) FRONT CYLINDER,
4) SPARK PLUG CAPS
e stock sparkplug boots will be reused in this application.
(Right side, above floor board)
Remove right side body panels that cover engine. Remove air duct to transmission. Unplug the sparkplug boot
from rear cylinder spark plug. Disconnect wire harness spade terminals from coil. Remove the coil mounting
bolt, and the stock ignition coil from the ATV.
(Left front wheel well)
Unplug the sparkplug boot from front cylinder spark plug. Disconnect wire harness spade terminals from coil.
Remove the coil mounting bolt, and the stock ignition coil from the ATV.
, remove from the stock sparkplug wires.
Hold each sparkplug wire near the cap and unscrew the caps counterclockwise. Press in and screw the stock
sparkplug caps onto the 15” Dynatek sparkplug wires. Screw in clockwise until it is bottomed out. (lube wire for
easier screw on) Plug the sparkplug wire boots onto the coil output. Push the rubber boots onto the coil towers
to eliminate any gap, as this is a potential source of high-voltage arcing. Connect Orange wires to Dyna coil
terminals with the red dot.
DYNATEK
164 S. Valencia St., Glendora, CA 91741 800-928-3962 www.dynaonline.com 2801343B
Page 2
5) COIL MOUNTING,
Place brackets on coils as shown. Bolts should sandwich coil between brackets and flat washers. Tighten
locknuts last, but not all the way. Position coil on frame, using one mounting tab, and one zip-tie. (see pictures)
Tighten securely once coil is in position. Route the sparkplug wires in the stock location, and plug the sparkplug
boots back onto the sparkplugs. Unwind electrical tape and cut back sleeve to relieve strain on coil primary
wires at ATV harness. Connect the Black/Yellow wire to Orange wire on Dyna coil terminal with the red dot.
Connect the Blue/White (Rear) or Green/White (Front) wire to the other Dyna coil terminal (not the red dot).
Check the wiring. Make sure connections are tight and secure. Replace body parts, panels, and connect battery.
Turn ignition key on. Start the engine. Installation is complete!
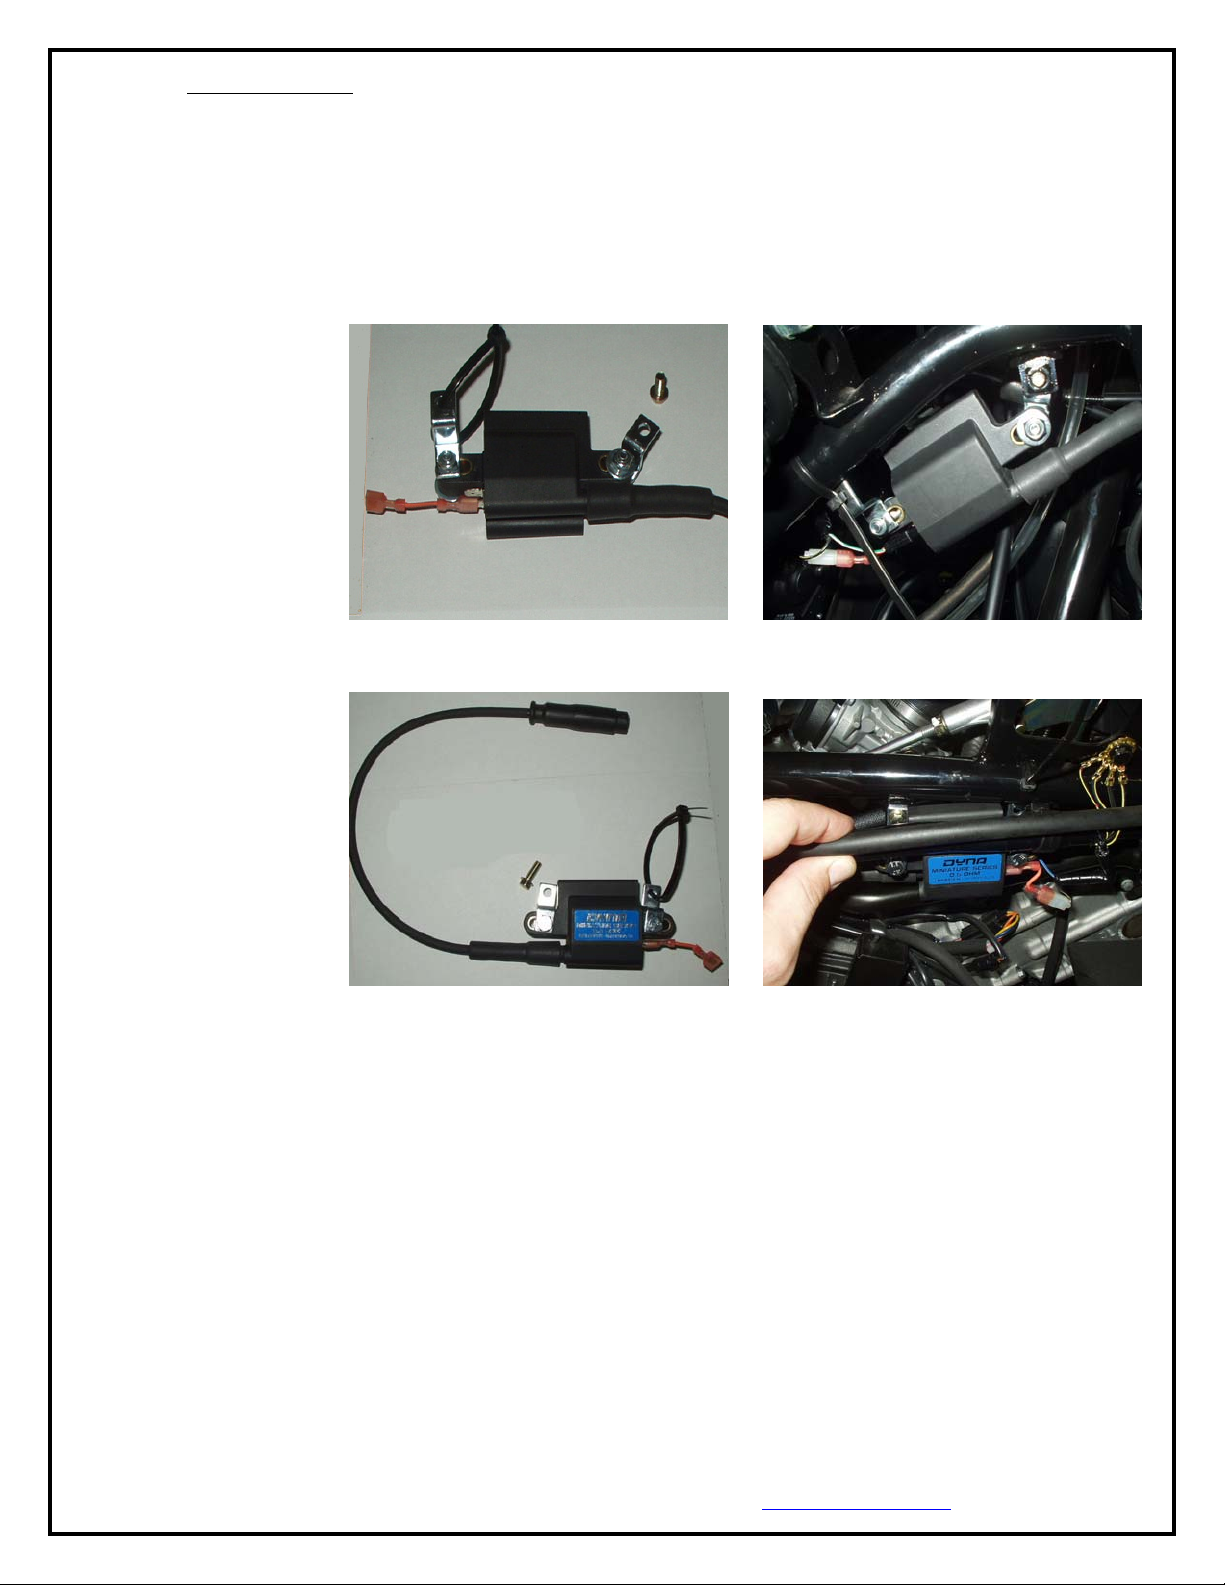
(see pictures)
1. Front cylinder coil location: 2. Dyna coil for front cylinder,
Front left wheel well. mounted to frame.
3.
Right side above floor board. mounted to frame.
Rear cylinder coil location: 4. Dyna coil for rear cylinder,
DYNATEK
164 S. Valencia St., Glendora, CA 91741 800-928-3962 www.dynaonline.com 2801343B
 Loading...