

Page 1

2006-2010 Suzuki GSXR600
PARTS LIST
I n s t a l l a t i o n I n s t r u c t i o n s
1 Juice Box Pro™
1 USB Cable
1 Top Tune CD-ROM
1 Installation Guide
2 Velcro strip
1 Alcohol swab
1 O2 optimizer
THE IGNITION MUST BE TURNED
OFF BEFORE INSTALLATION!
DOWNLOAD THE TOPTUNE SOFTWARE
AND LATEST MAPS FROM OUR
WEBSITE:
www.twobros.com
PLEASE READ ALL DIRECTIONS BEFORE STARTING INSTALLATION
401 S. Grand Ave. Santa Ana, CA 92705
(800) 211-2767 www.twobros.com
ITBR001-213 www.twobros.com 2006-2010 Suzuki GSXR600 - 1
Page 2
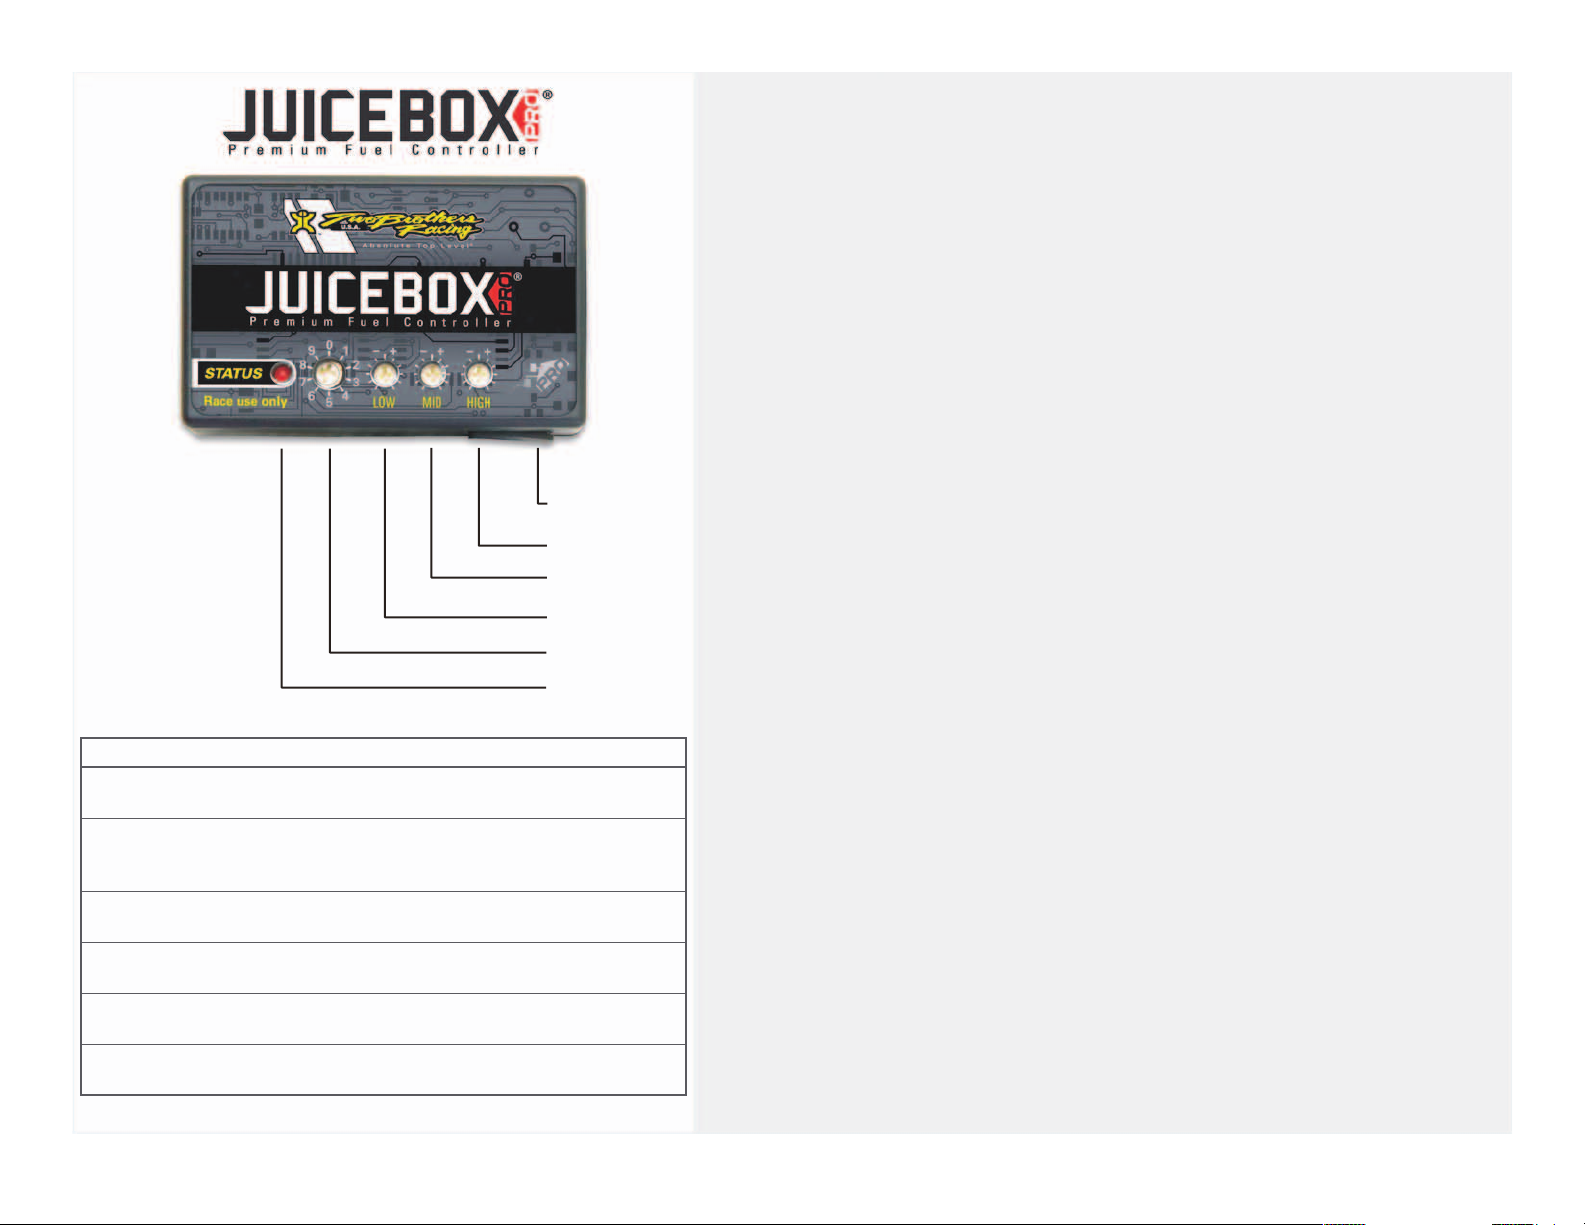
S electing the M ap Position
The J uice Box Pro com es loaded with up to ten m aps . U s ing a #1 Phillips
scr ewdr iver, turn the map select dial to to ggle betw een the loaded m aps . Refer to
the map po s ition ta ble below for the m a ps included in y our J uice B ox Pr o.
U s ing the R P M R ange Dials
The Low , M id, and High RPM Dials refer to the R PM range, in thirds , of your
vehicle. E ach dial allo w s +/- 10% fuel a djustm ent on top of what fuel changes are
done in the map. W ith the dial fa cing s traight up, there is no additional fuel change.
For exam ple, if you r vehicle r evs to 15,00 0 RPM :
• the low R P M dial w ill a djust 0-5000 R P M
• the m id R P M dial w ill a djust 5001-10000 R PM
• the high R PM dial w ill a djust 100 01-15000 R PM
U s ing Top Tune
Take y our tuning to the nex t le vel with the To p Tune s oftware.
U S B Port
High RPM Dial
M id D ia l R PM
Lo w D ia l R PM
M ap S elect
S tatus L ight
(Pow er to U nit)
Position 0 Zero map
Position 1 Stock exhaust
Stock air filter
Position 2 Two Brothers VALE slip-on
exhaust
Stock or aftermarket air filter
Position 3 Two Brothers full exhaust
Stock or aftermarket air filter
Position 4 Stock exhaust, Stock air filter 2008-2010
Position 5 Two Brothers Vale slip-on
Stock or aftermarket air filter
Position 6 Two Brothers full exhaust
Stock of aftermarket air filter
2006-2007
Suzuki GSXR600
2006-2007
Suzuki GSXR600
2006-2007
Suzuki GSXR600
Suzuki GSXR600
2008-2010
Suzuki GSXR600
2008-2010
Suzuki GSXR600
Installing the Top Tune S oftware
1 Ins ert the CD provided into your com puter ’s cd-rom driv e. T he launch pr ogr am
will run autom atically.
If a uto-run is dis abled, double-click the M y Com puter ico n then double-click the
CD drive icon. Double-click T BR Top Tune. exe to manually s tart the C D.
2 Click Ins tall S oftw are and follow the on-s cre en ins truction s to install the Top
Tune software. The Top Tune software an d m aps w ill be s tored in C : \Program
File s \TB R Top Tune.
3 Click M ap Database. A ll m aps w ill a utom atica lly be installed to the C:\Program
File s \TB R Top Tune\maps folder.
Loa ding A dditional M aps
1 Connect the U S B ca ble from the com puter to the J uice B ox Pro. Verify the cable
is fully seated in the J uice B ox Pro.
2 R un the Top Tune software by double-clicking the program icon installed on your
deskto p or o n y our start m enu .
3 Click Open M ap File and s elect a map file.
4 Click S end M a p. You can s end the map to a ny of the ten map pos itions.
Altering M aps Us ing Top Tune
The values in the map repre s ent a percenta ge of fu el change ov er s tock. A value of
10 in the map indicates at that thr ottle pos ition a nd R PM ran ge the vehicle will be
10% richer tha n stock. If the value is -10, then it w ould be 10% leaner than s to ck. You
ha ve the a bility to fine tune you r fuel curv e by altering thes e v a lues. T he Top Tune
softwar e allows a v a lue of +250 to -100 in each cell.
ITBR001-213 www.twobros.com 2006-2010 Suzuki GSXR600 - 2
Page 3

Figure AFigure BFigure C
unplug
ground wire
1. Remove the main seat and the passenger seat or solo cover.
2. Prop the fuel tank up using the prop rod in the tail section.
3. Lay the Juice Box Pro in the tail section.
4. Route the wiring harness from the Juice Box Pro under the tail section and go
towards the engine down the left hand side of the bike.
5. Attach the ground wire from the Juice Box Pro to the negative side of the battery
as shown in Figure A.
6. Unplug the stock wiring harness from each of the lower injectors as shown in
Figure B.
The lower injectors are much harder to access than the upper injectors. Using a
set of needle nose pliers will aid in removing the connectors.
Note: The #4 cylinder connector is not visible in this picture.
unplug
7. Attach the Juice Box Pro connectors to the stock lower injectors and stock wiring
harness as shown in Figure C.
ITBR001-213 www.twobros.com 2006-2010 Suzuki GSXR600 - 3
Page 4

8. Locate the throttle position sensor (TPS) connector on the far right hand side of
the throttle bodies as shown in Figure D.
The TPS connector has pink/black - red - black/brown colored wires.
9. Unplug the TPS connector.
Figure DFigure E
Figure F
TPS connector
10. Attach the 3-pin connectors from the Juice Box Pro to the stock TPS and wiring
harness as shown in Figure E.
11. Locate where the stock O2 sensor connects to the main wiring harness.
The O2 connector is a black 4-pin connector located under the fuel tank as shown
in Figure F.
12. Unplug this connector.
13. Attach the O2 optimizer into the main wiring harness.
Note: The stock O2 sensor will not be connected to anything at this time.
Note: Skip steps 11-13 for the 2006-2007 models as they do NOT have an O2
sensor.
O2 sensor
connector
ITBR001-213 www.twobros.com 2006-2010 Suzuki GSXR600 - 4
Page 5

14. Using the supplied velcro, secure the Juice Box Pro in the tail section. The Juice
Box Pro can be installed as shown in Figure G or to the inner fender.
Make sure to clean both surfaces with the alcohol swab before attaching.
15. Lower the fuel tank back into position. Verify none of the wires get pinched or
damaged.
Figure G
ITBR001-213 www.twobros.com 2006-2010 Suzuki GSXR600 - 5
 Loading...