

Twinhead R8300 User Manual

R8300 User Guide
Generra
csI
trot72
4
R8300 User Guide
l Dynamii
General Dynamics Itronix 72-0146-001
Rugged Notebook User Guide
-
1

R8300 User Guide
Table of Contents
Notices, Compliance and Safety ...........5
Disclaimer ............................................................ 5
Trademark and Patent Notice .............................5
Compliance Statements .....................................5
Warnings and Cautions ......................................6
Safety ...................................................................6
Service and Upgrade Safety and Precautions .................... 7
Battery Pack Safety and Precautions .................................. 7
Getting Started .......................................9
Standard Features ............................................... 9
Optional Features ................................................ 9
Operating System Information ..........................9
Tips for New Owners .......................................... 9
Turning Off the Device ........................................9
Getting Familiar With Your Notebook .10
Front View .......................................................... 10
Left Side View .................................................... 11
Right Side View .................................................12
Back Edge View.................................................. 12
Bottom View ......................................................13
Keyboard Basics ................................................ 14
Primary Keys .................................................................... 14
Arrow Keys ....................................................................... 15
Function Keys and Key Combinations .............................. 15
Numeric Keypad ............................................................... 16
Lock Keys ......................................................................... 16
Windows Keys ................................................................. 17
Radio ON/OFF Switch (Option) ........................17
To Turn all Radios on or off ................................................ 17
Application Launch Key .................................... 17
To Program the Application Launch Key in Windows 7 .... 17
Display ...............................................................18
Install the Stylus Tether .................................................... 18
Calibrate the Touch Screen ............................................... 18
Adjusting Display Brightness ............................................ 18
Adjusting Display Resolution ............................................ 18
Auto Dim Feature ............................................................. 19
Simultaneous or Extended Display .................................. 19
Cursor Visibility ................................................................. 19
Lid Switch ......................................................................... 19
LED Status Indicators........................................20
Audio .................................................................. 21
To Adjust the Volume ........................................................ 21
The PC Card Slot (Option) ................................................ 21
Inserting the Card ............................................................. 21
Ejecting a Card ................................................................. 21
TouchPad ............................................................22
Selecting Objects ............................................................. 22
Dragging Objects ............................................................. 22
Scrolling ............................................................................ 22
Zooming ........................................................................... 22
Rotating Objects .............................................................. 22
Application Gestures ........................................................ 23
Adjusting the TouchPad Settings ...................................... 23
TouchPad Precautions ...................................................... 23
Smart Card or EXPRESS Card Slot (Option) ... 24
To Insert a Card ................................................................ 24
To Remove a Card ............................................................24
The Hard Disk Drive (HDD) ............................... 24
Replacing the hard disk drive ...........................................24
Hard Disk Drive Heater.....................................................25
The Media Bay ...................................................25
To Change Swappable Media Bay Device ........................ 25
To Insert a Disk ................................................................. 25
To Remove a DVD or CD .................................................. 25
Precautions for Handling DVDs and CDs.......................... 26
Device Security .................................................. 26
Security Slot ..................................................................... 26
BIOS Level Passwords ..................................................... 26
Smart Card Reader (Option) ............................................. 26
Fingerprint Scanner (Option) ............................................ 26
Stealth Mode .................................................................... 26
Trusted Platform Module (TPM) .......................................26
ENERGY STAR
® ........................................................................................27
Rugged Notebook User Guide
2

R8300 User Guide
Table of Contents
Making Connections ............................28
Attaching Power ................................................28
To Attach AC Power .......................................................... 28
To Use the Vehicle Adapter (optional) .............28
USB Devices ......................................................28
External keyboard or pointing device ...............................28
Ethernet (LAN) ................................................... 29
Audio Devices ....................................................29
External Monitor or Video Device .................... 29
Using Simultaneous Display ............................................. 29
Using Extended Display ................................................... 29
Wireless Communication .....................30
WLAN radio option ...........................................30
About WLAN .................................................................... 30
CRMA Express WWAN (Option) ....................... 30
LTE ...................................................................................30
HSPA+ .............................................................................. 30
HSPA ................................................................................ 30
EDGE/GPRS/GSM Network ............................................. 30
UMTS/GPRS/GSM Network ............................................. 30
EV-DO Rev A/EV-DO Rev 0/1xRTT/CDMA ........................30
GPS (option) ......................................................31
Bluetooth (option) ............................................. 31
Antennas ............................................................ 31
Improving Radio Coverage ...............................32
On the Street ................................................................... 32
Inside a Building ............................................................... 32
When to use Landline Communication ........... 32
Operating with Battery Power ............33
Battery Calibration ............................................35
When to calibrate the battery: .......................................... 35
About Battery Calibration .................................................35
Managing Power ...............................................35
Low-Power States ............................................................35
Battery Tips ........................................................36
Tip 1. Avoid excessive heat and cold ................................ 36
Tip 2. Prevent wasted power ........................................... 36
Tip 3. Calibrate your battery .............................................36
Tip 4. Get a good charge ..................................................37
Tip 5. Prevent data loss .................................................... 37
Tip 6. Clean terminals ....................................................... 37
Tip 7. Storing batteries ...................................................... 37
Customizing Your BIOS ........................38
Starting the Setup Utility ..................................38
Navigation and Help .........................................38
The Main Menu .................................................39
The Advanced Menu ......................................... 40
Trusted Computing ........................................................... 41
Intel TXT(LT) Configuration ...............................................42
Radio Devices Configuration ............................................ 43
Stealth Mode Configurations ........................................... 44
F81216 Super IO Configuration ........................................ 45
FAN Calibration ................................................................. 46
Battery Calibration ............................................................ 46
The Boot Menu .................................................. 47
The Security Menu ............................................ 48
The Save & Exit Menu ......................................49
Optional Equipment and
Accessories ......................................... 50
Frequently Asked Battery Questions ...............33
The Battery ........................................................33
Using a battery for the first time ...................................... 33
Battery and Temperature .................................................. 33
Replacing the Battery ........................................34
Battery Charging ...............................................34
When to Replace the Battery ........................................... 34
Heat Considerations ......................................................... 34
Rugged Notebook User Guide
Surge Protection ...............................................50
Vehicle Adapter .................................................50
To connect the vehicle adapter.........................................50
Vehicle Dock .......................................................50
To charge a battery installed in the device ....................... 50
Communicating with Other Devices ................................ 51
External Antennas ............................................................ 51
Memory Upgrade .............................................. 51
3

R8300 User Guide
Table of Contents
Maintenance and Storage ....................52
Taking Care of Your Device ...............................52
Taking Care of Your AC Adapter .......................52
Servicing Your Device .......................................52
Storing Your Device ........................................... 52
Taking Care of Your Batteries ............................ 53
Taking Care of Your Hard Drive ........................ 53
For Internal Hard Drives ...................................................53
For External PC Cards .......................................53
Cleaning Your Device ........................................53
Cleaning the Outside Case ............................................... 53
Cleaning the Display ......................................................... 53
Cleaning the External Power Connector ........................... 54
Cleaning the RJ-45 / USB Connectors ............................. 54
Data Backup .......................................................54
Saving Important System Information .............................. 54
Data Recovery....................................................54
Option 1: Restoring System Information .......................... 54
Option 2 : Restoring a Backup .......................................... 54
Option 3: Restoring Drive C: ............................................54
Troubleshooting ....................................55
Application Troubleshooting ............................55
My application locks up, acts strangely, or produces a
General Protection Fault (GPF) error or blue screen ......... 55
Battery Troubleshooting .................................... 55
The battery does not charge............................................. 55
The batteries take much longer than seven hours to
charge ...............................................................................55
The batteries don’t last very long ..................................... 55
The gas gauge isn’t full after charging the battery ............ 55
The gas gauge reads “full,” but the charging LED is still
lit ...................................................................................... 55
My battery seems to have less and less capacity ............ 55
I changed my display resolution, but I see no difference
on the screen ................................................................... 56
Nothing happens when I try to use the stylus on my
touch screen .....................................................................56
The touch screen doesn’t respond after a suspend ......... 56
Hard Disk ............................................................56
The hard disk will not spin up so the device can’t boot
up ..................................................................................... 56
The notebook does not startup properly .......................... 56
Keyboard and Mouse Troubleshooting ...........57
Something unexpected happens when I press a key ......57
Incorrect characters appear on the screen when I press
certain keys ...................................................................... 57
I have difficulty double-clicking the mouse fast enough ... 57
PC Cards .............................................................57
I can’t remove the PC card ............................................... 57
Read Error ........................................................................57
The device locks up when I remove the PC card .............57
Miscellaneous Troubleshooting .......................57
The device shuts off unexpectedly ................................... 57
The speaker volume is too high or too low ...................... 57
The device won’t turn on .................................................. 57
The device won’t turn off .................................................. 57
The device enters suspend mode too quickly .................. 57
The device doesn’t automatically suspend ....................... 58
The system date and time are incorrect ........................... 58
I receive an “out of memory” error message .................. 58
Holding down the Power button to reset the device
doesn’t always work ......................................................... 58
The device doesn’t make any sounds, even during
boot-up ............................................................................. 58
The fan stopped running ..................................................58
Can I improve the startup speed of my programs by
cleaning up and rearranging files on the hard drive? ........ 58
Display / Touch Screen ......................................56
The display performance is slow ...................................... 56
I can’t read the display ...................................................... 56
The underlined, inverse, and hypertext characters are
difficult to read on the screen ..........................................56
I can’t see the cursor while using the DOS editor ............ 56
Rugged Notebook User Guide
4

R8300 User Guide
Notices, Compliance and Safety
Disclaimer
Twinhead International Corp. reserves the right to revise the
manual and make periodic changes to the content without
a direct or inferred obligation to notify any person of such
revision or changes. Twinhead International Corp. does not
assume responsibility for the use of this manual, nor for any
patent infringements or other rights or third parties who may
use the manual.
This document contains proprietary information of Twinhead
International Corp.
This product is available for purchase under Twinhead
International Corp.’s standard terms and conditions of
sale. Hardware products may be reconditioned, or be
manufactured from parts and components that may be new,
used, rebuilt, or recycled and in some cases, the hardware
product may not be new and may have been previously
installed. In any event, Twinhead International Corp. warranty
terms apply.
Trademark and Patent Notice
Microsoft, MS, Windows, and MS-DOS are registered
trademarks of Microsoft Corporation.
The following United States Patent Numbers apply to any
unit which incorporates a DVD drive - 5,434,678; 5,589,945;
5,913,013; 6,151,444; and 6,208,805.
This product incorporates copyright protection technology
that is protected by U.S. patents and other intellectual
property rights. Use of this copyright protection technology
must be authorized by Macrovision, and is intended for
home and other limited viewing uses only unless otherwise
authorized by Macrovision. Reverse engineering or
disassembly is prohibited.
ENERGY STAR® is a registered trademark of the U.S.
Environmental Protection Agency. As an ENERGY STAR
partner, Twinhead International Corp. has determined this
device meets ENERGY STAR program requirements for
computers.
Compliance Statements
This notebook has been tested and found to comply with
the limits for a Class B digital device, pursuant to Part 15
of the FCC Rules. These limits are designed to provide
reasonable protection against harmful interference in a
residential installation. This equipment generates, uses, and
can radiate radio frequency energy and, if not installed and
used in accordance with the instructions, may cause harmful
interference to radio communications. However, there is
no guarantee that interference will not occur in a particular
installation.
If this equipment does cause harmful interference to radio or
television reception, which can be determined by turning the
equipment off and on, the user is encouraged to try to correct
the interference by one or more of the following measures:
Reorient or relocate the receiving antenna.
Increase the separation between the equipment and
receiver.
Connect the equipment into an outlet on a circuit different
from that to which the receiver is connected.
Consult the dealer or an experienced radio/TV technician
for help.
This device complies with Part 15 of the FCC Rules. Operation
is subject to the following two conditions: (1) this device may
not cause interference, and (2) this device must accept any
interference, including interference that may cause undesired
operation of the device.
This Class B digital apparatus complies with Canadian
ICES-003.
Cet appareil numérique de la classe B est conforme à la
norme NMB-003 du Canada.
Rugged Notebook User Guide
5

R8300 User Guide
Notices, Compliance and Safety
Warnings and Cautions
WARNING It is important that only authorized personnel
service and attempt repairs on the equipment. Unauthorized
service or repair may void the warranty and any maintenance
contract in effect for the equipment. Unauthorized service
personnel might be subject to shock hazard on some
equipment if removal of protective covers is attempted.
There is danger of explosion if the battery is incorrectly
replaced. Replace only with the same or equivalent type
recommended by the manufacturer. Dispose of used batteries
according to the manufacturer’s instructions.
The product you have purchased is powered by a
rechargeable battery. The battery is recyclable and, under
various state and local laws, it may be illegal to dispose of
this battery into the municipal waste stream. Do not crush the
battery or place it in a fire. Check with your local solid-waste
officials for details on recycling options or proper disposal.
CAUTION Internal components of the notebook will be
damaged if exposed to contaminants. When dust covers, the
PC card door, or the bottom access panel are open on the
device, shield the unit from all contaminants such as liquids,
rain, snow, and dust.
This device may contain a WLAN radio transmitter, a WPAN
radio transmitter, and a WAN radio transmitter.
Each internal radio may or may not have an individual FCC
Identifier label. That FCC Identifier label is not applicable
to this configuration. Only the external FCC ID label is
applicable.
Only the antenna with which an intentional radiator is
authorized may be used with the intentional radiator.
The WAN embedded antenna location is in the upper center
edge of the display screen and is not to be modified.
The WPAN embedded antenna location is near the lower left
edge of the Keyboard and is not to be modified.
The WLAN embedded dual antennas are located internally in
the upper right and left edges of the display screen and are
not to be modified.
To comply with FCC RF exposure requirements when using
the WAN radio transmitter, a minimum separation distance of
20 cm must be maintained between the upper center edge of
the display screen antenna and all users/bystanders.
When using the WLAN transmitter, a minimum separation
distance of 20 cm must be maintained between the upper
right and left edges of the display screen and all users/
bystanders.,
The WAN transmitter, WLAN transmitter and WPAN
transmitter should be turned off before carrying the laptop PC
in order to comply with FCC RF exposure requirements.
The equipment has been approved to [Commission Decision
“CTR21”] for pan-European single terminal connection to
the Public Switched Telephone Network (PSTN). However,
due to differences between individual PSTNs provided in
different countries the approval does not, of itself, give an
unconditional assurance of successful operation on every
PSTN network termination point.
In the event of problems, you should contact your equipment
supplier in the first instance.
Safety
Do not proceed beyond a WARNING or CAUTION until the
indicated conditions are fully understood and met.
Read these instructions carefully. Following these guidelines
will help prevent damage to your device and help protect
your personal safety.
Read and follow all WARNINGS, CAUTIONS and
instructions marked on the product and noted in this
documentation.
Before using your device, read the Power Management
section to familiarize yourself with basic battery
information and ensure optimum performance.
CAUTION To reduce the risk of fire, only use a No. 26 AWG
or larger telecommunication line cord.
ATTENTION Pour réduire le risque d’incendie, utilisez
uniquement un cordon téléphonique N°26 AWG ou
supérieur.
CAUTION This device is designed to be used with the
provided dedicated AC Adapter or Vehicle Adapter.
ATTENTION Cet appareil a été conçu pour être utilisé
avec l’adaptateur CA fourni, ou avec un adaptateur pour
véhicule.
Unplug the device from the power outlet before cleaning.
Use a damp cloth for cleaning. Aerosols, solvents,
or strong detergents are not recommended cleaning
solutions and may void your warranty. For system
decontamination recommendations please contact your
service technician.
Slots and openings in the device case are for ventilation
purposes. Do not block or cover these openings or the
system could overheat.
Do not place the product on a soft surface such as a bed,
sofa, or rug where the ventilation slots and openings may
be blocked.
Do not place this product near or over a radiator or heat
register.
Do not place this product in a built-in installation unless
proper ventilation is provided.
Do not operate the device at temperatures above 140°F
(60°C) or below -10°F (-23°C).
Do not store the device at temperatures above 167°F
(75°C) or below -67°F (-55°C).
Do not step on or place anything on the power cord.
Do not slam the display lid when you close it.
Do not place any object on top of the device.
Rugged Notebook User Guide
6

R8300 User Guide
Notices, Compliance and Safety
If you use the device with an extension cord, ensure that
the total ampere ratings of all the devices sharing the
extension do not exceed the rating of the extension cord
or the rating of the wall outlet.
Do not push foreign objects into the device through any
of the slots or openings. Dangerous voltages are present,
which could cause electric shock, fire, or damage sensitive
components.
The device is designed to withstand spills. If a spill occurs,
immediately power off the device and wipe it down.
For best results, use a power strip with a built-in surge
protector. Do not use inferior extension cords as this may
result in damage to your device.
FAA regulations require that all transmit/receive devices
be turned off during flight. If you have radios in your
device (including GPS) and your device is equipped with
a Radio ON/OFF Switch, please use it to turn your radios
off during flight. If you have radios and you do not have
a switch to turn the radios off, either leave your device off
during flight or contact your help desk for assistance.
Service and Upgrade Safety and Precautions
Do not service this product yourself. Opening or removing
covers may expose you to dangerous voltage points or
other risks and may void your warranty. Damage caused by
servicing that is not authorized may void your warranty. If
your device needs service, remove power and turn it off, then
contact authorized service personnel.
Remove the hard drive (See Hard Disk Drive Removal).
Battery Pack Safety and Precautions
WARNING! There is danger of explosion if the battery is
incorrectly replaced. Replace only with a manufacturer
approved battery.
AVERTISSEMENT! Le remplacement incorrect de la pile
peut provoquer une explosion. Remplacez uniquement la
pile par une pile approuvée par le fabricant.
WARNING! Dispose of used batteries promptly and
according to the manufacturer’s instructions.
AVERTISSEMENT! Veillez à vous débarrasser de vos piles
usagées rapidement et conformément aux instructions du
fabricant.
WARNING! Batteries may explode if not handled properly.
Do not disassemble, open, puncture or dispose of battery
packs in a fire. The battery pack could burst or explode
releasing hazardous chemicals.
AVERTISSEMENT! Les piles incorrectement manipulées
risquent d’exploser. Il est interdit de démonter, d’ouvrir,
de percer ou de jeter au feu les blocs de piles - ceux-ci
risqueraient d’éclater ou d’exploser et de libérer des
produits chimiques dangereux.
WARNING! Keep battery packs away from children.
AVERTISSEMENT! Gardez les blocs de piles hors de
portée des enfants.
Refer all servicing to authorized service personnel under the
following conditions:
When the power cord or plug is damaged or frayed.
If the product does not operate normally when the
operating instructions are followed. Adjust only those
controls that are covered by the instructions in this
manual.
If the product exhibits a distinct change in performance,
indicating a need for service.
Before performing any manufacturer authorized service or
upgrade, first follow these instructions:
Prevent damage from static electricity by following ESD
precautions.
Place the device on a clean, flat surface.
Turn off the device and disconnect the power supply.
Undock the device if it is in an office dock or vehicle dock.
Disconnect any attached peripherals.
Disconnect any attached network, telephone or
telecommunication line.
Remove any PC Cards, EXPRESS Cards, Smart Cards, CDs,
DVDs or any other media in your device’s slots or bays.
Remove the battery (See Battery Removal).
WARNING! Do not remove or replace while circuit is live
unless the area is known to be non-hazardous.
AVERTISSEMENT! Ne pas retirer ou remplacer quand
le circuit est actif, à moins d’être sûr que la zone ne
représente pas un danger.
WARNING! To prevent ignition of a hazardous
atmosphere, batteries must only be changed in an area
known to be non-hazardous.
AVERTISSEMENT! Risque D’explosion – Afin d’eviter
tout risqué d’explosion, s’assurer que l’emplacement est
designe non dangereux avant de changer la batter ie.
WARNING! Explosion Hazard- Do not connect or
disconnect while circuit is live unless area is known to be
non-hazardous.
AVERTISSEMENT! Risque D’explosion. Ne pas debrancher
tant que le circuit est sous tension, a moins qu’ll ne
s’agisse d’un emplacement non dangereux.
WARNING! Explosion Hazard- Substitution of components
may impair suitability for class I, division 2 “CAUTION:
Danger of explosion if battery is incorrectly replaced.
Replace only with the same or equivalent type
recommended by the manufacturer.”
AVERTISSEMENT! Risque D’explosion- La substitution e
composantsp eutr endre ce materiel inacceptable pour les
Rugged Notebook User Guide
7

R8300 User Guide
emplacements de classe I, divsion 2.
Follow the safety instructions printed on the battery.
Only use approved manufacturer approved battery packs
with your device.
Do not abuse, deliberately pierce, or subject the battery
pack to excessive impact.
Immediately discontinue use of the battery if it appears
damaged or abnormal in any way and consult your local
provider for advice.
Do not immerse the battery pack in liquid.
Do not short together the battery connections. Do not
store the battery pack with metallic objects due to the risk
of short circuit.
Battery chemical leakage is harmful. In the unlikely event
of battery leakage; DO NOT TOUCH. In case of accidental
contact with the eyes or skin, immediately wash with
running water and seek medical advice. In the case of
accidental ingestion, seek immediate medical attention.
Follow Battery Tips for use and storage.
Notices, Compliance and Safety
Rugged Notebook User Guide
8

R8300 User Guide
Getting Started
Standard Features
XGA Color Display
Shock-mounted, ruggedized, removable Hard Disk Drive
with heater
Fully-rugged magnesium case
Full-size, 87-key sealed keyboard with embedded numeric
keypad and 12 function keys
Multi-Touch TouchPad
Lid Switch: The lid switch can be configured to suspend
your device when the lid is closed and to resume when the
lid is opened.
Application Launch Key and user programmable buttons
Internal Gigabit Ethernet LAN
Three USB 2.0 Ports
One USB 3.0 Port
Audio Jacks for external speakers and microphone and
internal speakers and microphone
Stealth Mode: This feature allows you to use the device
in an environment where sound and light could be
dangerous or disruptive
Microsoft Windows 7 operating system
Three-year limited warranty
Operating System Information
For information and help with Windows 7, select Start, Help
and Support, How to get started with your computer. You can
also browse or search help topics to learn more about using
the Windows 7 Operating System.
Tips for New Owners
Back up files often. Users who need to manage large
amounts of data may wish to use backup devices.
Create a set of recovery CDs or DVDs to recover your
hard disk in case it becomes corrupted. To do this, use the
Recovery CD Wizard by selecting Start, Programs, Mobile
Computer Tools.
Don’t leave passwords anywhere on your notebook or
carrying case.
Install antivirus software and keep it updated.
For added security, consider using a notebook lock with
the device’s Security Slot.
Develop ergonomic work habits to help prevent related
health issues. The science of ergonomics studies
the relationship between health and a suitable work
environment. For more information on ergonomics,
contact your nearest computer bookstore, local library,
reputable website.
Optional Features
Below is a list of some of the optional features supported by
your device. Contact your authorized dealer if you decide to
perform a key component upgrade.
XGA Transmissive HiBright DynaVue® Touch Screen Display
Fingerprint Scanner
Radio ON/OFF Switch
Smart Card reader (FIPS 201) or EXPRESS Card/54 slot
CRMA Express radio technology: Flexible, upgradeable
radio module for significant cost savings
Integrated Wireless LAN Communications: 802.11a/b/g/n
Wireless LAN with Mini-PCI wireless card support
Bluetooth
GPS
Media Bay Device: DVD multi drive or media bay battery
Backlit Keyboard
Hazloc
Memory
Type II PC Card Slot
Extra Media Bay Battery
Turning Off the Device
To turn off your device, select Start, Shut Down and follow
the instructions on the screen.
If you are going to be away from the device for a short period,
you can conserve power without shutting down the system.
See Managing Power and Battery Tips for details.
NOTE If you are unable to shut down your device normally,
follow the instructions in Troubleshooting.
CAUTION Shutting off the device improperly may result in
data loss.
Rugged Notebook User Guide
9
R8300 User Guide
1
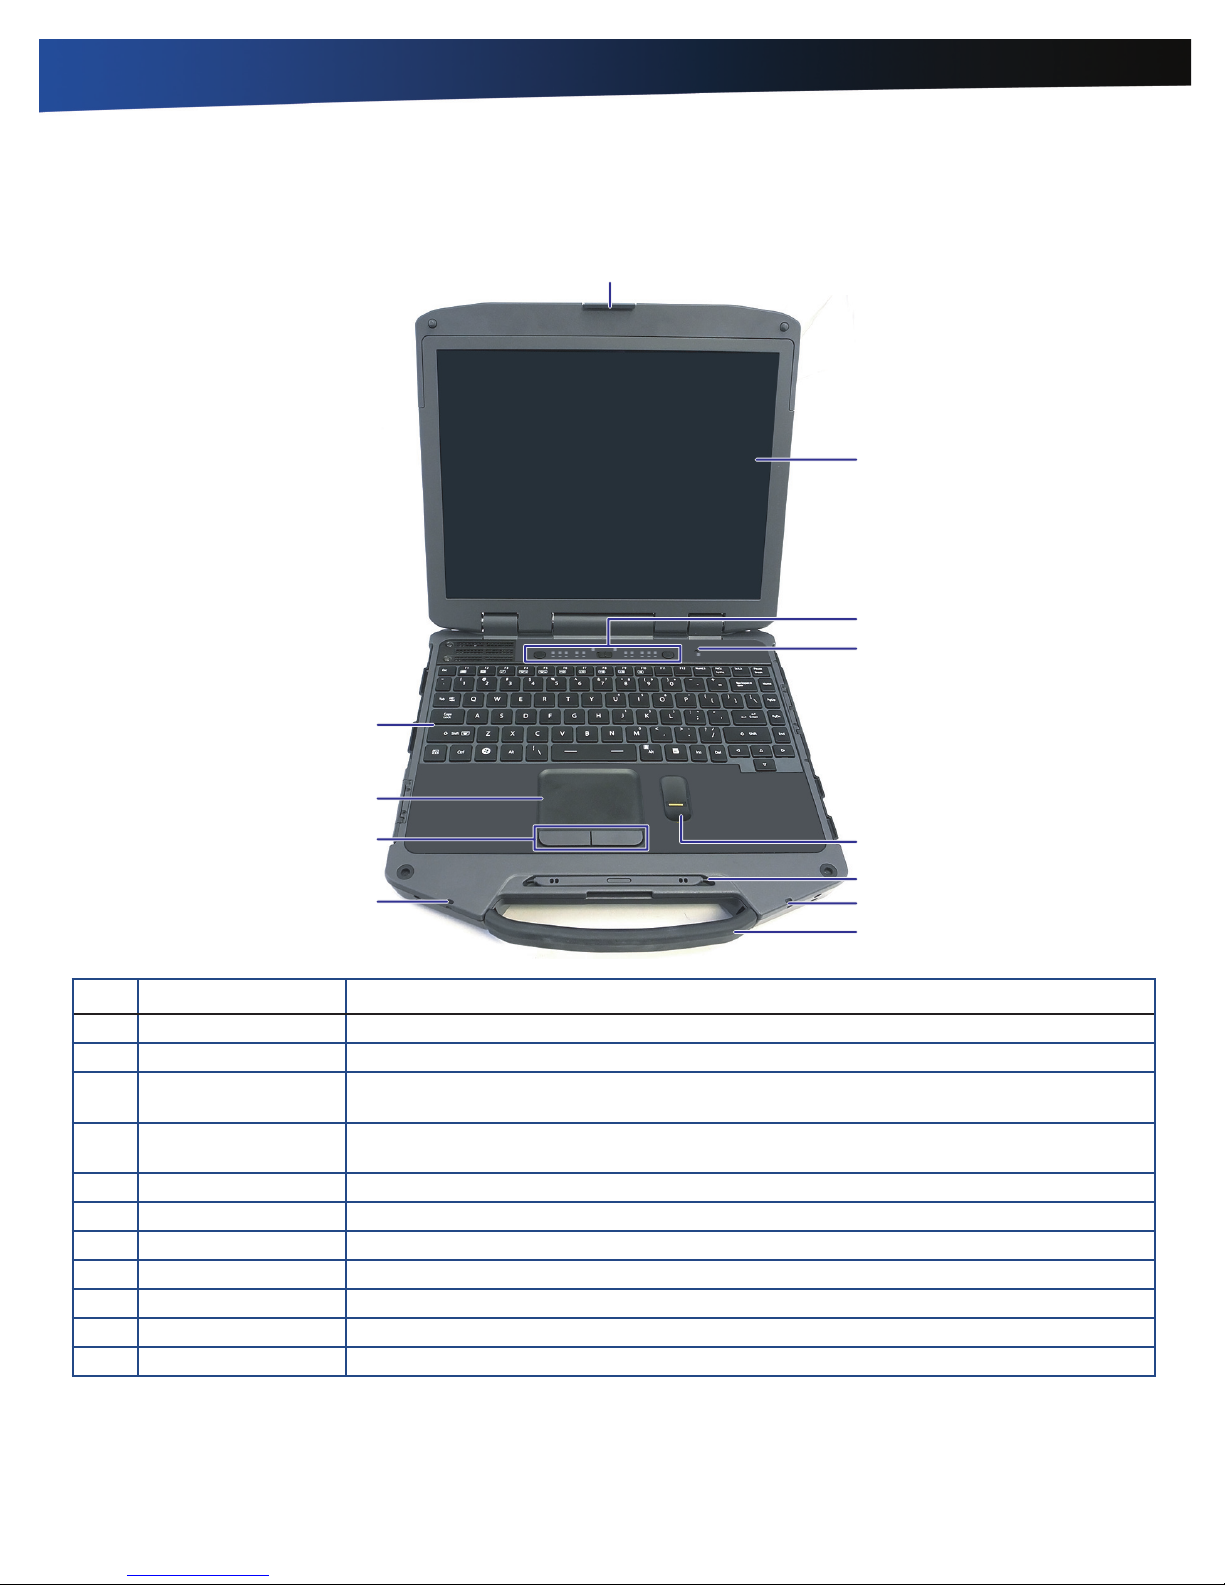
Front View
Getting Familiar With Your Notebook
2
3
4
11
10
9
7
5
6
7
8
No. Feature Description
1 Display Latch The display latch holds the display when closed.
2 Display 13.3-inch (4:3) XGA, outdoor-viewable, color display with an touch screen.
3 Button and LED
indicator
4 Internal Microphone Integrated, weatherized microphone can be used with various software applications that
5 Fingerprint scanner Scan your fingerprint to prevent access to your notebook by unauthorized users.
6 Pen / Stylus Slot Store the provided custom touch screen pen (stylus) in this slot.
7 Tether Slot A stylus tether can be attached at this location.
8 Handle Integrated handle for convenient carrying.
9 TouchPad Buttons Use like the buttons on a mouse.
10 TouchPad Use to point, select, drag, or scroll objects on the screen.
11 Keyboard Standard keyboard with embedded numeric keypad
Area above the keyboard with the power button, Radio ON/OFF Switch, Application Launch
Key and LED Status Indicators.
require audio input.
Rugged Notebook User Guide
10
R8300 User Guide
Getting Familiar With Your Notebook
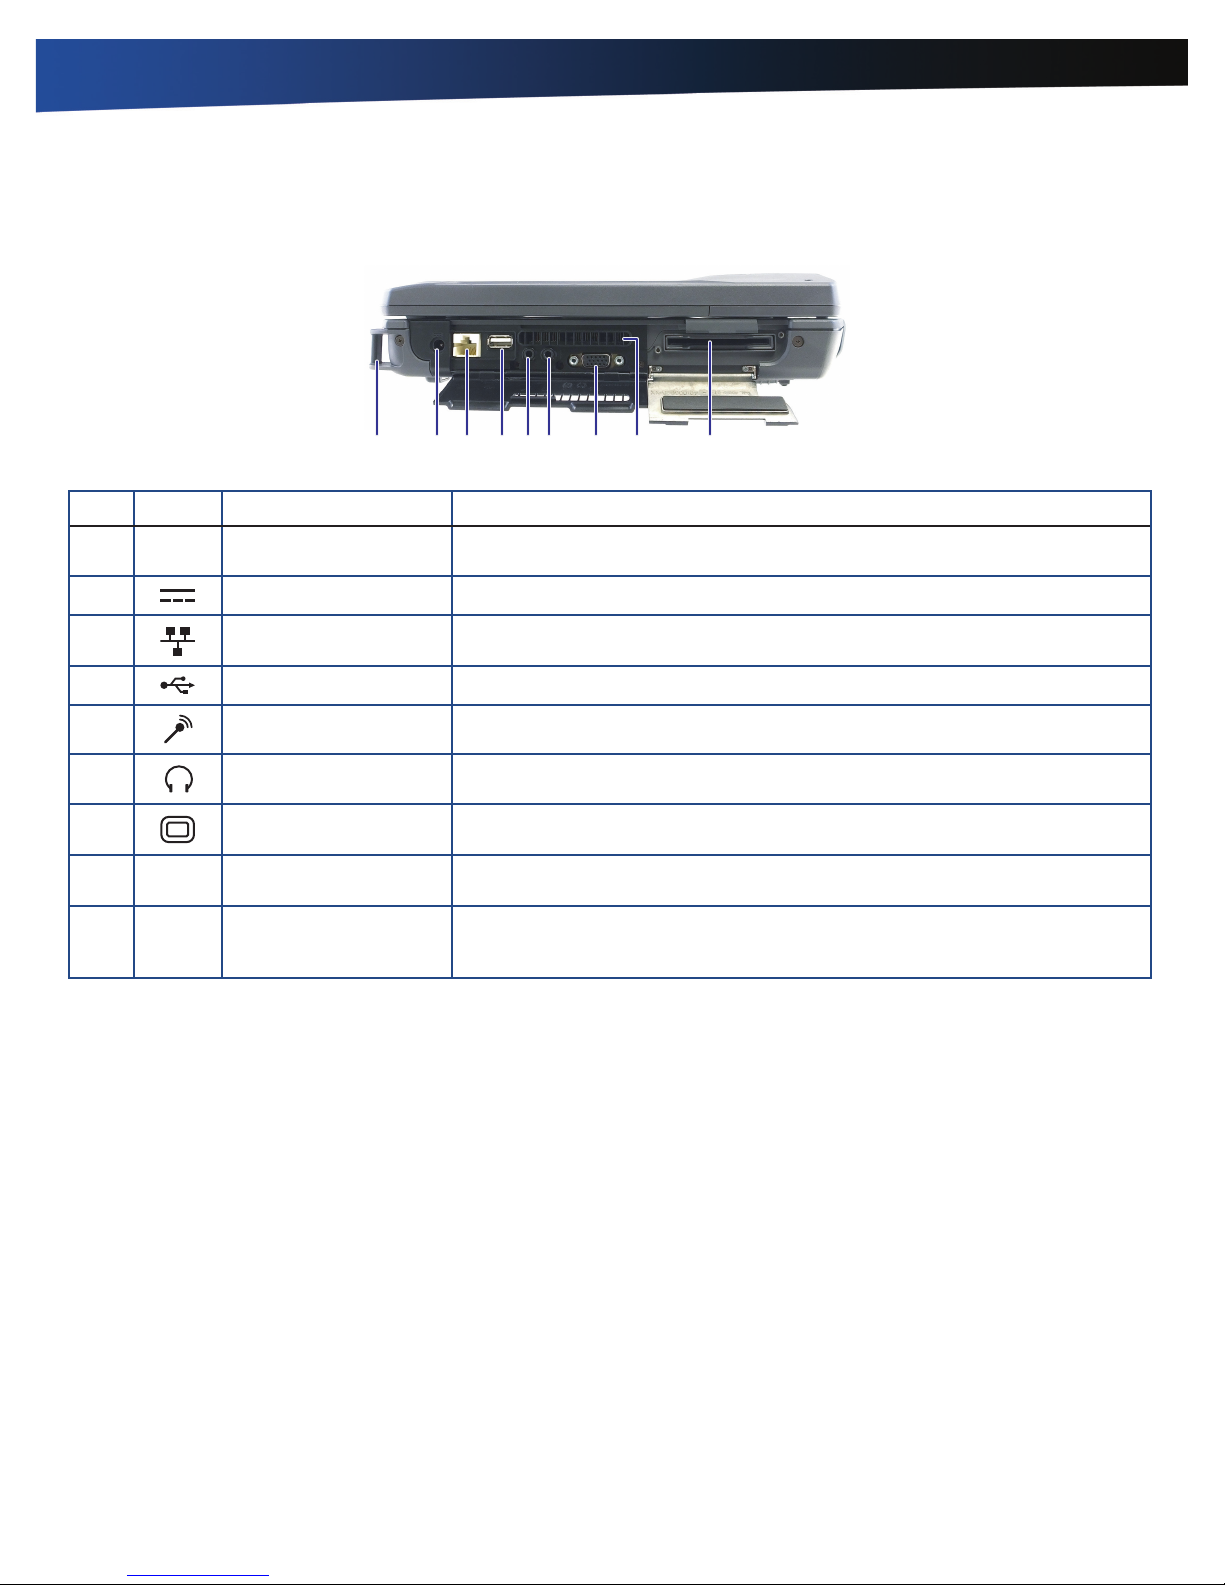
Left Side View
1 2 3 4 5 6 7 8 9
No. Icon Feature Description
1 Back Handle Mount
2 DC-in Jack Connects to an AC power adapter.
The back handle mount, located on both sides of the device is used with an
optional back handle.
3 Network Jack (RJ45/LAN)
4 USB 2.0 Port Connects to USB devices (e.g., USB digital camera).
5 Microphone Jack Connect a microphone to this jack to record audio.
6 Audio Out Jack
7 External Monitor Port Connects to a display monitor (up to 2048x1536 resolution).
8 Cooling Fan Exhaust
Smart Card Reader
9
or Express Card Slot
(optional)
Connects to an Ethernet-based network. The connection speed is 10/100/1000
Mbps.
Connect external speakers or a stereo headset to this jack to listen to
multimedia.
Cooling Fan exhaust area. DO NOT Block. This area may become hot as air vents
from the device.
Depending on your configuration, use with a Smart Card or EXPRESS Card.
Rugged Notebook User Guide
11
R8300 User Guide
ss
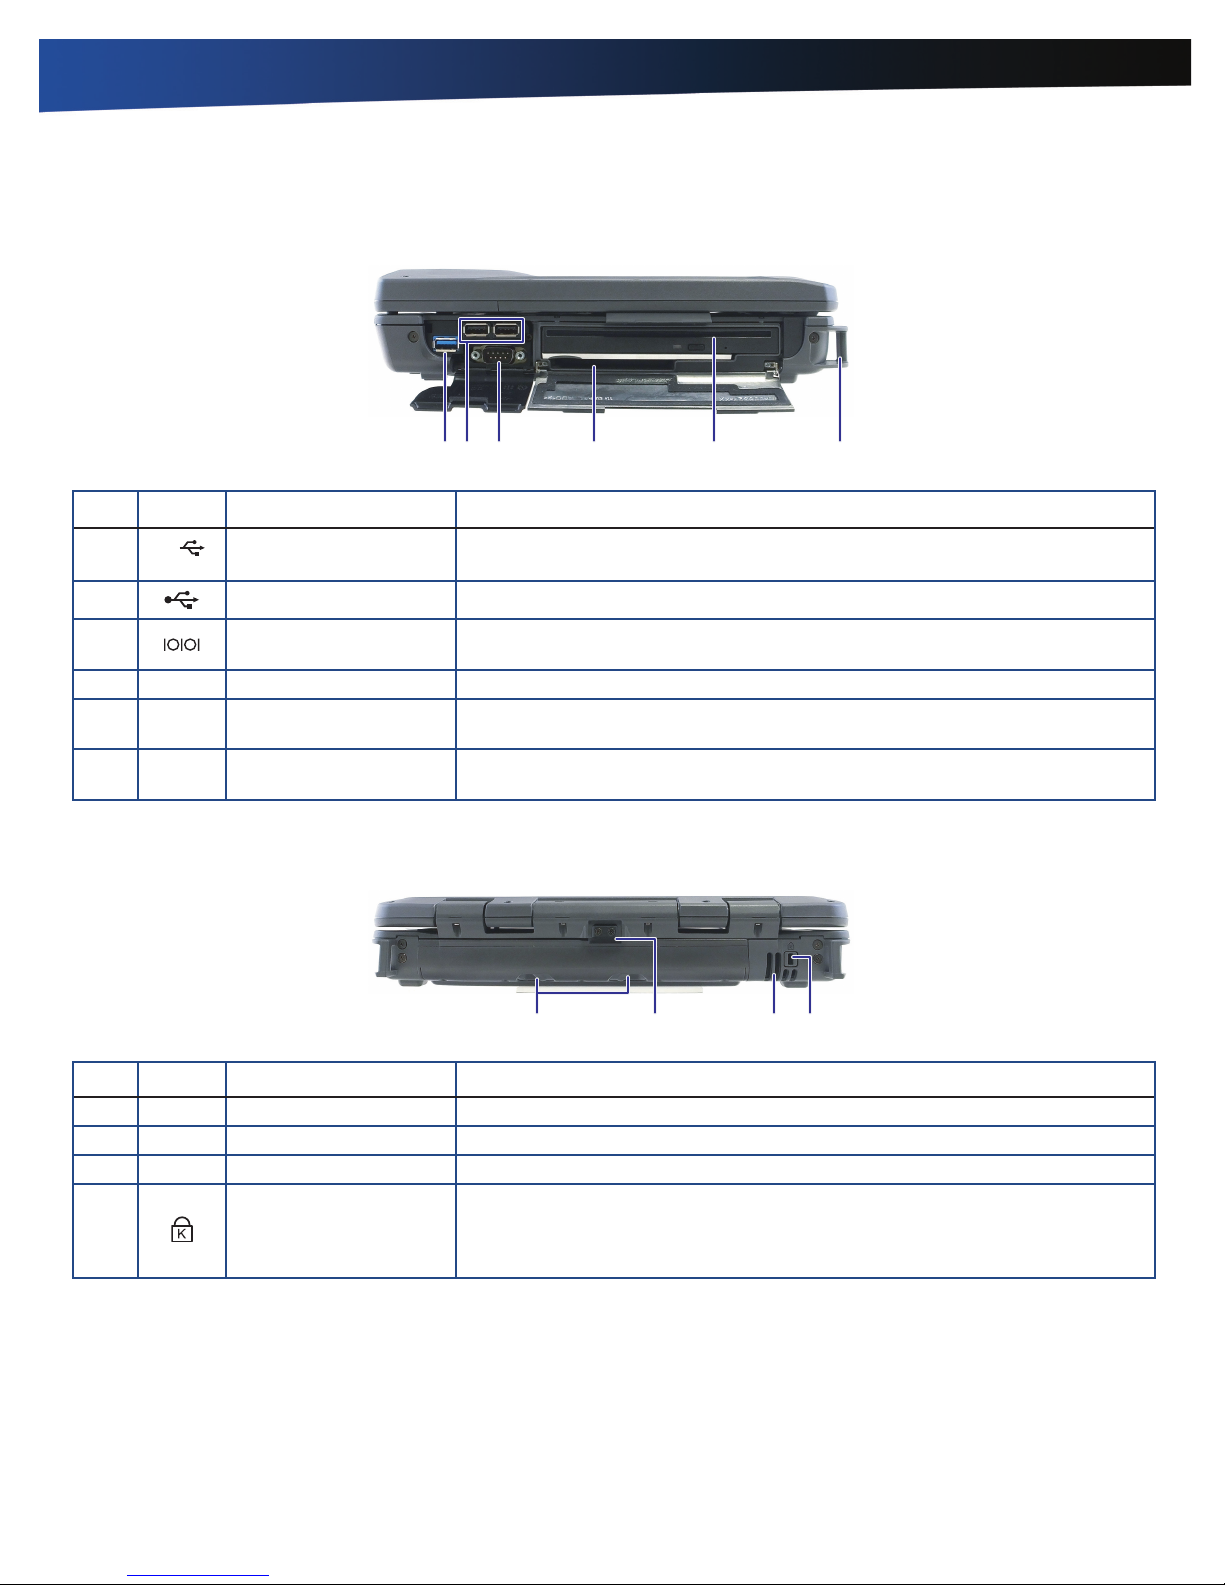
Right Side View
1 3 4 5 62
No. Icon Feature Description
Getting Familiar With Your Notebook
1
2 Two USB 2.0 Ports Connects to USB devices (e.g., USB digital camera).
3 Serial Port
4 PC Card Slot Use this slot for Type II PC Card devices.
5 Media Bay Combo
6 Back Handle Mount
USB 3.0
USB 3.0 Port Connects to USB devices (e.g., USB digital camera).
Connects your device to serial devices such a fax/modem or a serial mouse.This
port is identified as COM1.
DVD-ROM/CD-RW, DVD Multi-Drive (DVD-RAM/DVD-ROM/DVD-RW/CD-R/
CD-ROM/CD-RW), or second battery module.
The back handle mount located on both sides of the device is used with an
optional back handle.
Back Edge View
1 2 3 4
No. Icon Feature Description
1 Battery Release Latches Slide these toward the center of the unit to release the battery.
2 Battery Release Lock Press this in (toward the display) to unlock the battery.
3 Cooling Fan Intake Air intake for fan. DO NOT block this area.
The security slot can be used with a standard laptop-locking device, such as
4 Security Slot
a Kensington lock. You can connect the device to a large object with the lock
to prevent theft. See the documentation that comes with your lock for more
information.
Rugged Notebook User Guide
12
R8300 User Guide
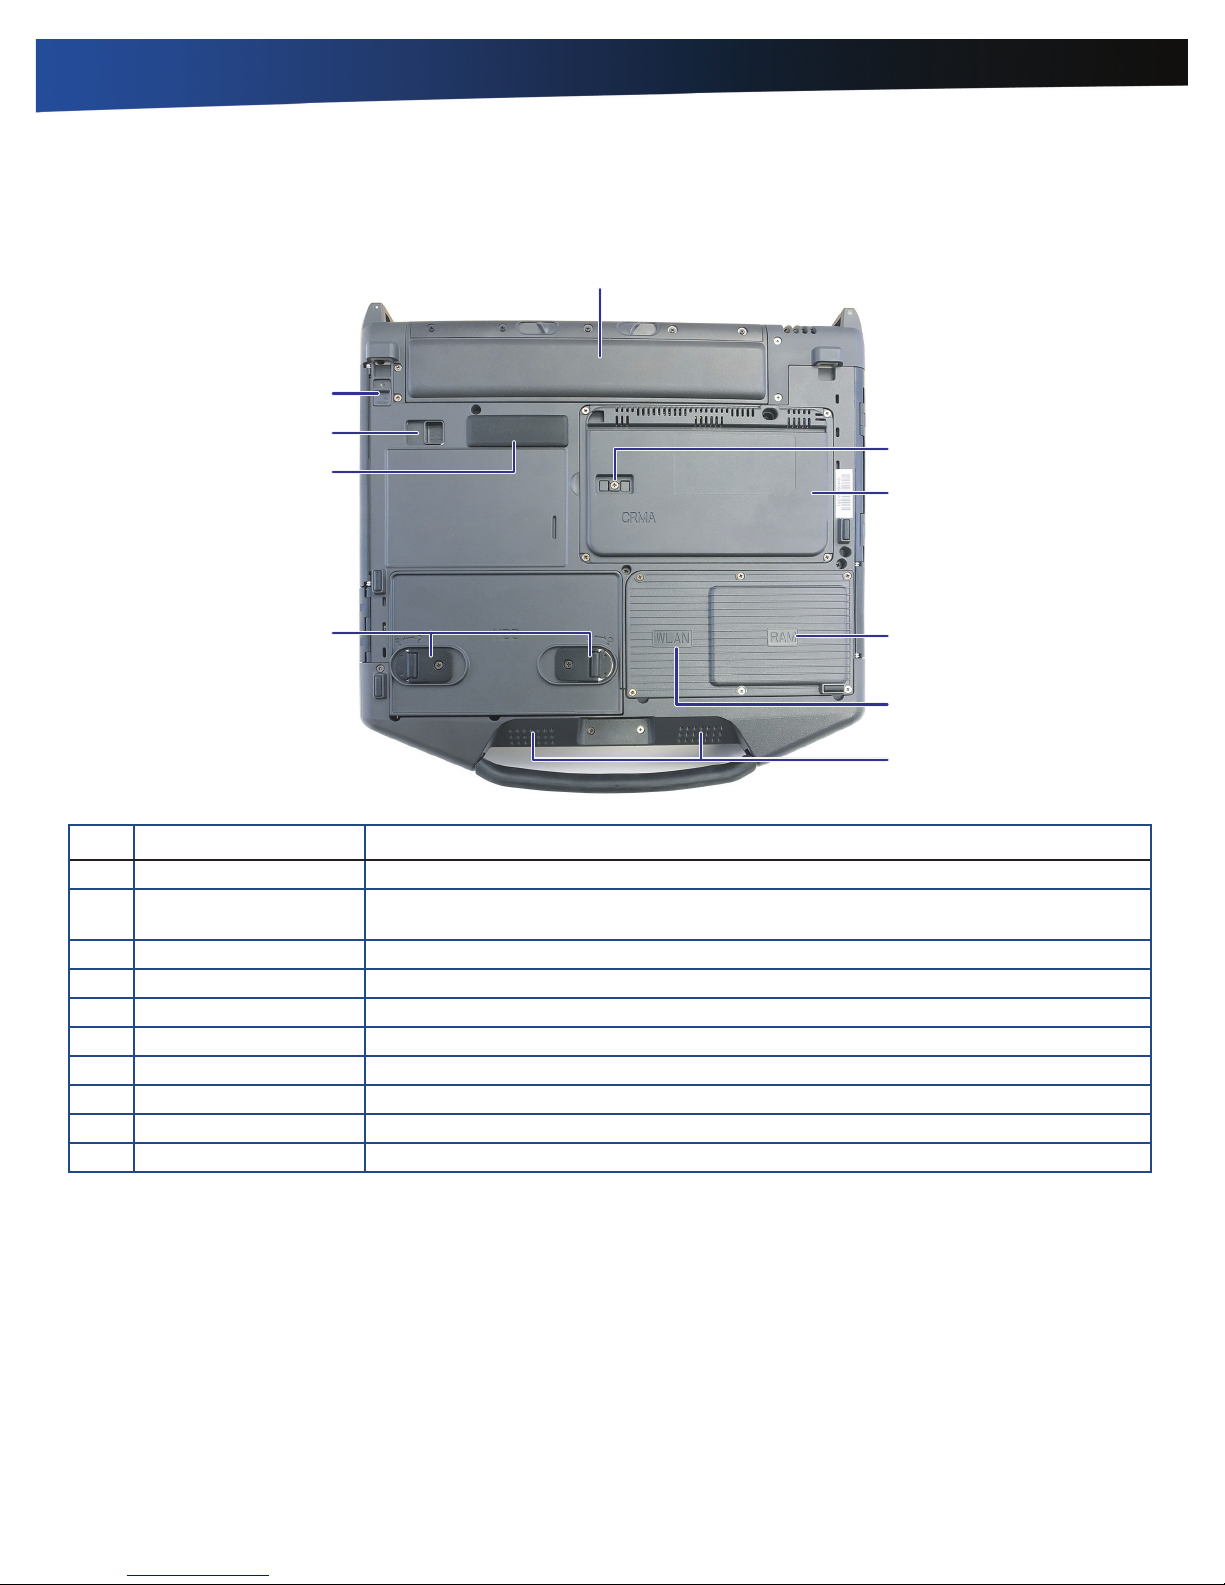
Bottom View
10
Getting Familiar With Your Notebook
1
9
2
8
3
7
4
5
6
No. Feature Description
1 Battery Pack Smart Lithium-Ion battery.
2 Dual External Antenna
Connector (DEAC)
3 CRMA Express Module Upgradeable WWAN radio module (optional).
4 Memory compartment User expandable memory slot.
5 WLAN compartment Integrated wireless LAN radio.
6 Speakers Integrated stereo speakers for audio output.
7 Hard Disk Drive Locks Open and turn these to lock or unlock the removable hard disk drive.
8 Docking Connector 84-pin cradle connector that mates with the Vehicle Dock, or Office Dock.
9 Media Bay Release After unlocking the media drive, slide this to release the media drive.
10 Media Bay Lock Slide Slide this to unlock the media drive before releasing it.
The DEAC gives you the ability to switch the internal WLAN and WWAN to an external
antenna to gain better performance when you are in a vehicle.
Rugged Notebook User Guide
13

R8300 User Guide
Getting Familiar With Your Notebook
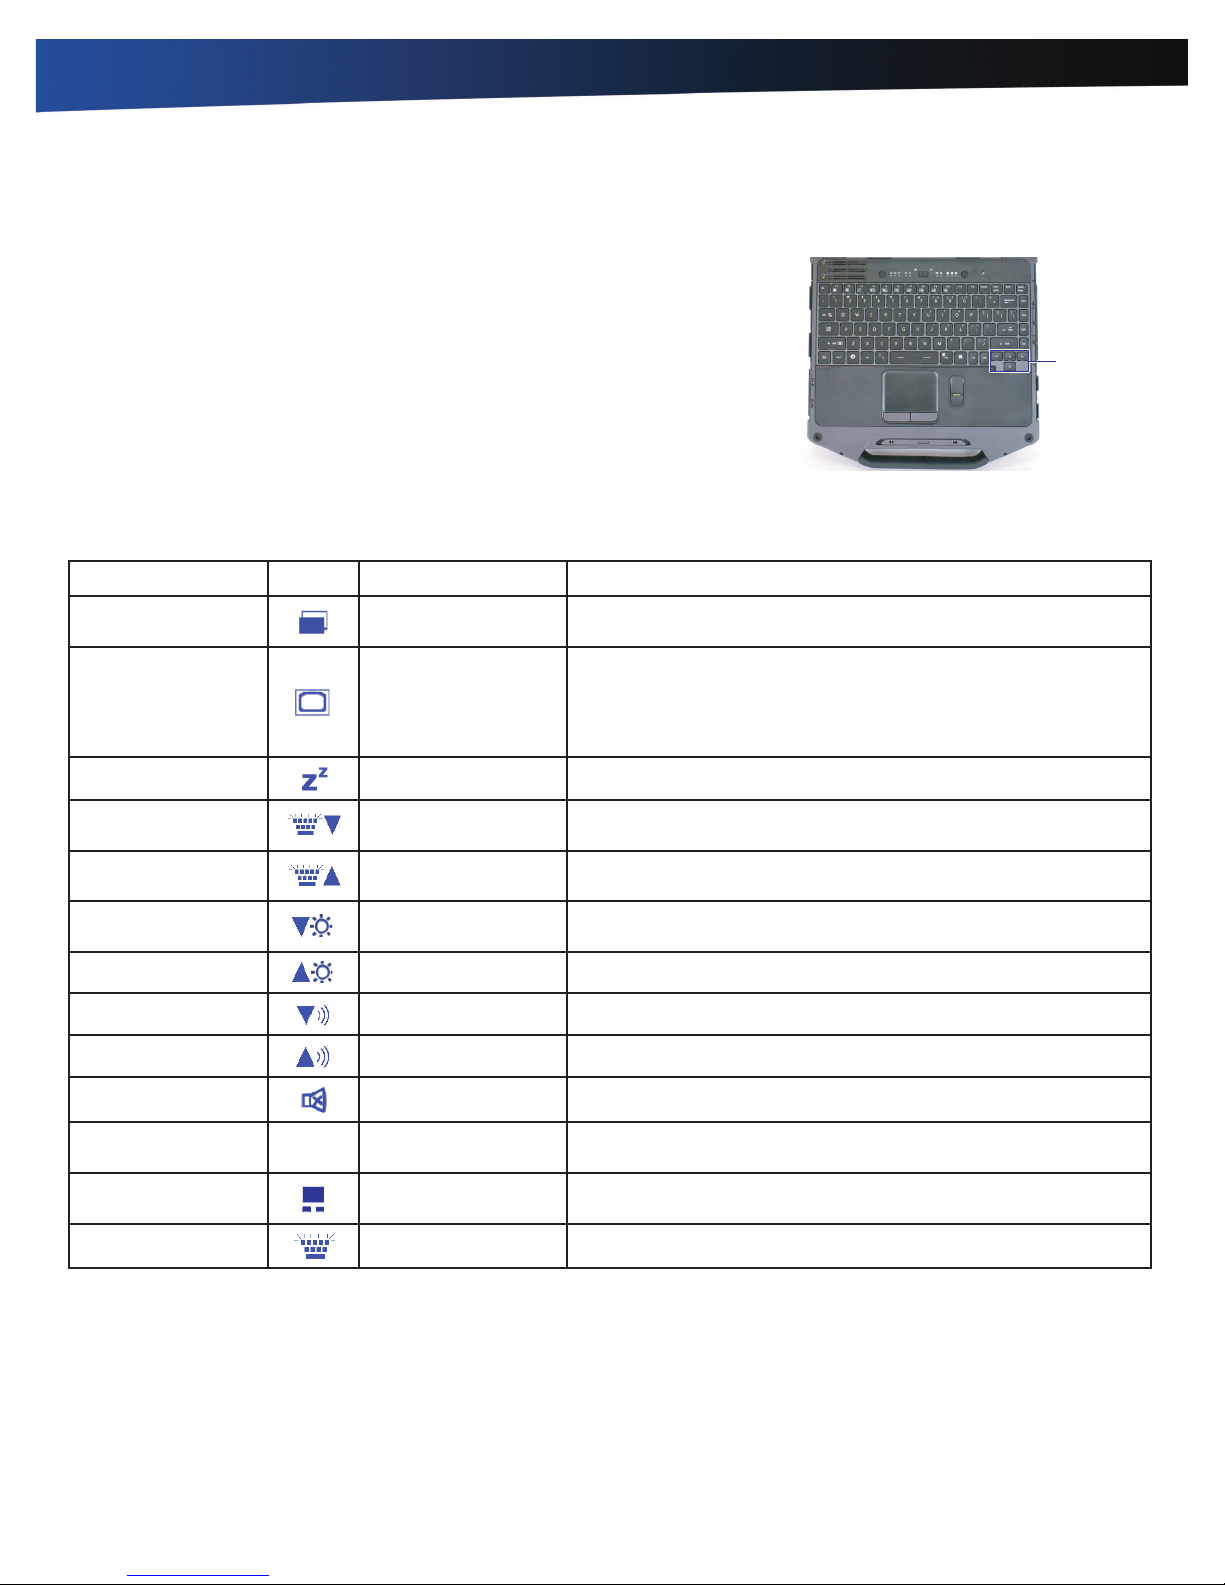
Keyboard Basics
The R8300 features:
Full size keys on a 85-key keyboard
Twelve function keys
Embedded numeric keypad
Application Launch Key (programmable button)
Radio ON/OFF Switch
Ergonomically designed wide palm rest located below the keyboard
Primary Keys
Key Description
Alt The Alt (alternate) key is used with other keys to perform special tasks. On some operating systems
pressing Ctrl + Alt + Del twice soft reboots the device.
Backspace The Backspace key, sometimes represented on the keyboard as a left arrow, moves the cursor one
position to the left. The character to the left of the cursor is erased.
Caps Lock Pressing the Caps Lock key one time locks keys A through Z in the UPPER CASE position. Pressing the
Caps Lock key again returns the letters to lower case. While in the upper case mode, pressing the Shift
key results in lowercase characters when entered. You still have to use the Shift key to display characters
located on the upper portion of the keyboard. For example, press Shift + 8 to type an asterisk (*), even
when the Caps Lock key is activated.
The Caps Lock LED lights when the keyboard is in Caps Lock mode.
Ctrl The Ctrl (control) key works with other keys to perform a variety of functions.
Enter The Enter key signals the device that you have completed your entry. This is your way of telling the
device to process the information that you have entered.
Esc The Esc (escape) key allows you to exit a pop-up window or message box.
PrtSc In Windows, pressing the PrtSc (print screen) key or Alt + PrtSc key copies the current screen or window
to the clipboard so you can paste it into documents.
Shift The Shift key changes the keys A through Z to the UPPER CASE position. When you press an alphabetic
key, the character appears as a capital letter. When you press Shift with other keys, the characters on the
upper part of the keys appear. For example, pressing Shift + 7 displays an ampersand (&).
Fn Some special Fn (function) keys have been established to perform important tasks when pressed in
combination with the Fn key. These keys are described later in this document. The Fn key legend is color
keyed to other special keys on the keyboard.
Spacebar Use the Spacebar to enter a space and move the cursor one character to the right.
Ta b The TA B key moves the cursor to the next tab stop or field. Tab stops are defined by your operating
system or application program. Press the Ta b key to move from one field or text box to another.
Rugged Notebook User Guide
14
R8300 User Guide
Getting Familiar With Your Notebook
Arrow Keys
The arrow keys are defined by the software application.
UP ARROW: usually moves the cursor up one line. In some cases, you can use the
up arrow to make selections from menus and scrollable list boxes.
DOWN ARROW: usually moves the cursor down one line. In Windows, you can use
the down arrow to make selections from menus and scrollable list boxes.
RIGHT ARROW: usually moves the cursor one character position to the right.
LEFT ARROW: usually moves the cursor one character position to the left.
Function Keys and Key Combinations
When using function keys, press and hold the FN key before pressing the other key in the key combination.
Function Key Icon Function Description
Fn + F1 Screen blank
Fn + F2 Display toggle
Turns off the display screen backlight. Press it again to turn the
light back on.
Switches the display output between the display screen, external
monitor (if connected) and both the display screen and external
monitor.
Arrow Keys
NOTE When a DVD or VCD is playing display toggle is disabled.
Fn + F3 Standby Puts the device in standby mode.
Fn + F4
Fn + F5
Fn + F6
Fn + F7 Display Brightness Up Increases the screen brightness.
Fn + F8 Audio Volume Down Decreases the audio volume.
Fn + F9 Audio Volume Up Increases the audio volume.
Fn + F10 Speaker on/off Turns the speakers on and off; mutes the sound.
Fn + F12 Stealth mode
Fn + RIGHT Alt TouchPad on/off Toggles the TouchPad on and off.
Fn + LEFT Shift Keyboard backlight Toggles the keyboard backlight (option) on and off.
Keyboard Backlight
Brightness Down
Keyboard Backlight
Brightness Up
Display Brightness
Down
Decreases the keyboard backlight brightness if you have the
optional EL keyboard.
Increases the keyboard backlight brightness if you have the
optional EL keyboard.
Decreases the screen brightness.
Provides the ability to disable sound and light features such as
system beeps, fan, and display backlight.
Rugged Notebook User Guide
15
R8300 User Guide
Getting Familiar With Your Notebook
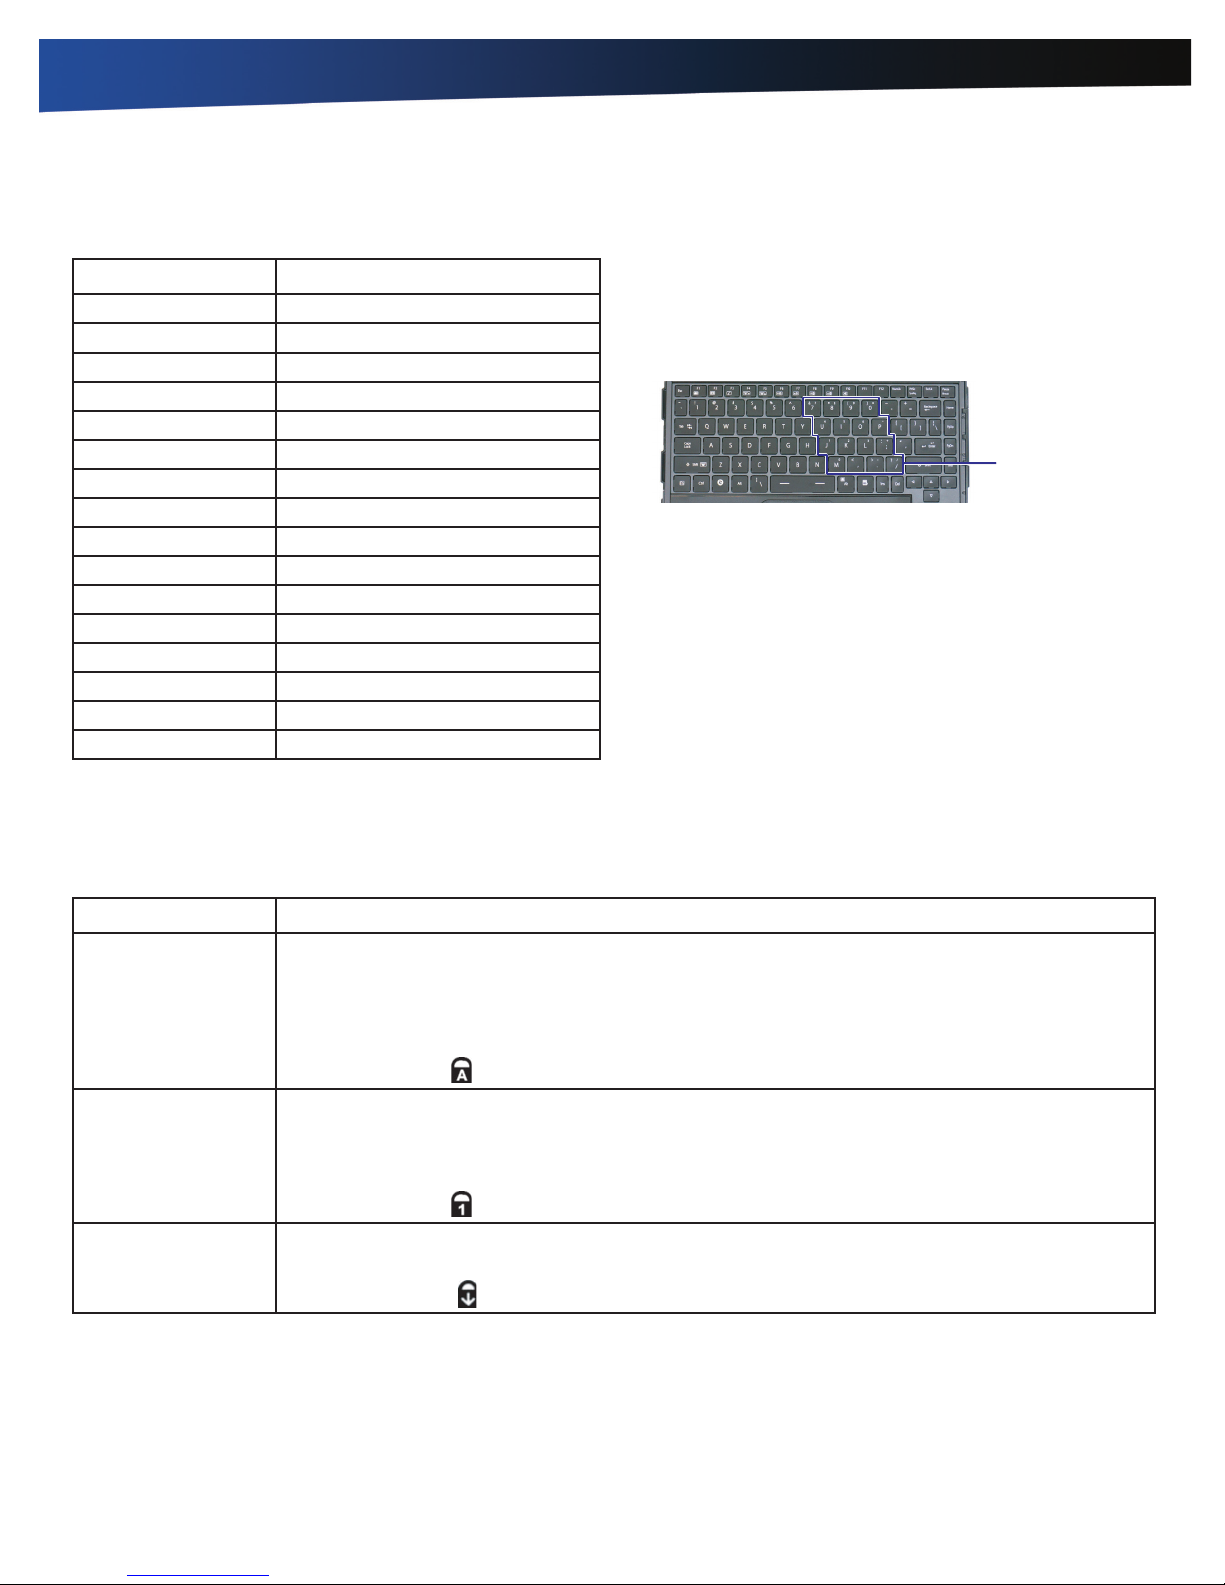
Numeric Keypad
Standard Key Key with Numlock On
7 7
8 8
9 9
0 *
U 4
I 5
O 6
P -
J 1
K 2
L 3
; +
M 0
. .
/ /
Enter Carriage Return
The embedded numeric keypad consists of sixteen keys that
make number intensive input more convenient. It is indicated
by small characters located on the lower right corner of the
key. Press NumLk to enable or disable the numeric keypad.
Numeric Keypad
Lock Keys
The keyboard has three lock keys you can toggle on and off.
Lock Key Description
CAPS LOCK Pressing the Caps Lock key one time locks keys A through Z in the UPPER CASE position. Pressing
the Caps Lock key again returns the letters to lower case. While in the upper case mode, pressing the
Shift key results in lowercase characters when entered. You still have to use the Shift key to display
characters located on the upper portion of the keyboard. For example, press Shift+8 to type an
asterisk (*), even when the Caps Lock key is activated.
The Caps Lock LED lights when the keyboard is in Caps Lock mode.
NUM LOCK Press the NumLk key to enter the Num Lock mode. When the Num Lock mode is on, the embedded
keypad is in numeric mode. The keys function as a calculator (with the arithmetic operators +, -,
*, and /). Use this mode when you need to do a lot of numeric data entry. Alternately, connect an
external keypad. See External keyboard.
The Num Lock LED lights when the keyboard is in Num Lock mode.
SCROLL LOCK Press the ScrLk key to enter the Scroll Lock mode. Scroll Lock varies between applications. It does not
work with some applications.
The Scroll Lock LED lights when the keyboard is in Scroll Lock mode.
Rugged Notebook User Guide
16
R8300 User Guide
Getting Familiar With Your Notebook
Windows Keys
The keyboard has two keys that perform Windows-specific functions.
Key Icon Description
Windows Logo Key Start button. Combinations with this key perform special functions. Below are a few examples:
+ Ta b (Activates next Taskbar button)
+ E (Opens My Computer in Windows Explorer)
+ M (Minimizes all Windows)
Shift + + M (Restores Minimized Windows)
+ R (Displays Run dialog box)
Refer to Keyboard Shortcuts in Windows Help and Support for a complete list of Windows key
combinations.
Application Key Opens the application’s context menu (same as right-click).
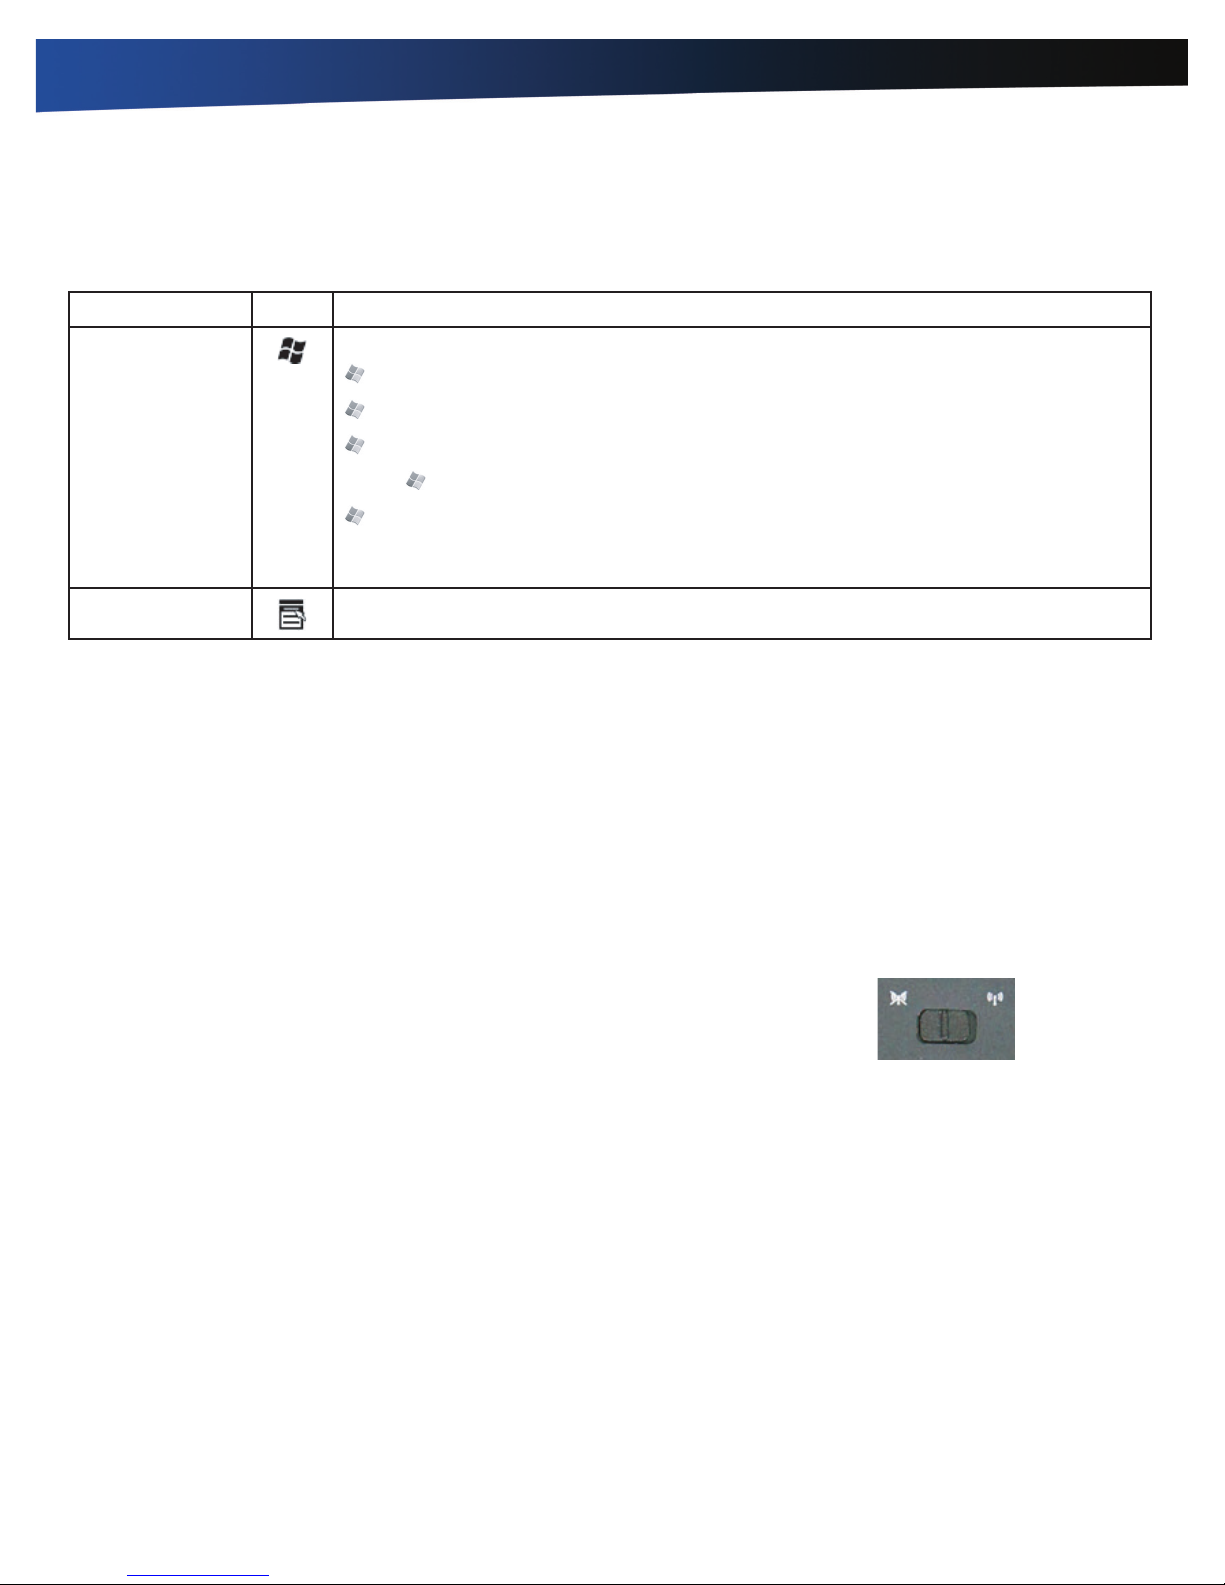
Radio ON/OFF Switch (Option)
The keyboard has two keys that perform Windows-specific functions.
CAUTION FAA regulations require that all transmit/receive devices be turned off during flight. If you have radios in your
device (including GPS) and your device is equipped with a Radio ON/OFF Switch, please use it to turn your radios off during
flight. If you have radios and you do not have a switch to turn the radios off, either leave your device off during flight or contact
your help desk for assistance.
The wireless Radio ON/OFF Switch is the middle button above the keyboard. This switch toggles the power on and off to all
radio devices. Radio devices include GPS, Bluetooth, WLAN, and WWAN radios.
To Turn all Radios on or off
1. Slide the radio switch to the left to power off all radio devices (airplane mode).
2. Slide the radio switch to the right to turn radio power on.
Application Launch Key
The application launch key is the right button above the keyboard. Press this key to open a specific application you have set
following the instructions below:
To Program the Application Launch Key in Windows 7
1. Select Mobile Computer Tools, OnScreenControl.
2. Select Launch Key Settings, Set, and then select Run. Click on Configure. Select Browse and choose an application based on
its path. To complete the settings, select Ok three times.
Rugged Notebook User Guide
17

R8300 User Guide
Display
This notebook features a 13.3-inch, XGA, outdoor-viewable,
color display with an integrated touch screen. You can
start programs and input data on the touch screen using
an approved pen (stylus) that comes with the device. The
Colorvue™ Transmissive display technology uses a built-in
backlight for easy reading in most ambient light conditions.
DynaVue® display technology provides improved outdoor
visibility and even works well in sunlight.
CAUTION To avoid damaging the display, do not slam it
when you close it. Also, do not place any object on top of the
device when the display is closed.
Getting Familiar With Your Notebook
Press down to remove stylus
Install the Stylus Tether
1. Insert one tether loop through one of the holes on the end
of the stylus, then pull it back through the adjacent hole.
NOTE The holes in the stylus are notched on one side and
smooth on the other. Feed the tether through the smooth
side first, so that it lies inside the notch when finished.
2. Insert the free end of the tether through the loop and pull
the slack back through the loop to secure the stylus.
3. Repeat these steps with the other end of the tether to attach
it to one of the tether slots on the front on your device.
Calibrate the Touch Screen
1. Press down on one side of the stylus to remove it from its
slot below the TouchPad.
2. From the Start menu select All Programs, eGalaxTouch.
3. On the Tools tab, select Linearization.
4. Use an approved stylus and follow the instructions
provided to complete touch screen calibration.
5. Click OK to save the new settings and click OK again to
begin using your notebook.
Adjusting Display Brightness
smooth side
Adjusting Display Resolution
Windows 7:
1. Click on the Start button and then on Control Panel.
2. Under Appearance and Personalization, click on Adjust
Screen Resolution.
3. On Resolution, use the slide bar to adjust the resolution.
4. Click Apply to save the new setting.
NOTE Using a lower resolution than the screen designation
will reduce the area of the display.
Press Fn + F6 to decrease display brightness.
Press Fn + F7 to increase display brightness.
Rugged Notebook User Guide
18
 Loading...