

Twinhead MC7355 User Manual
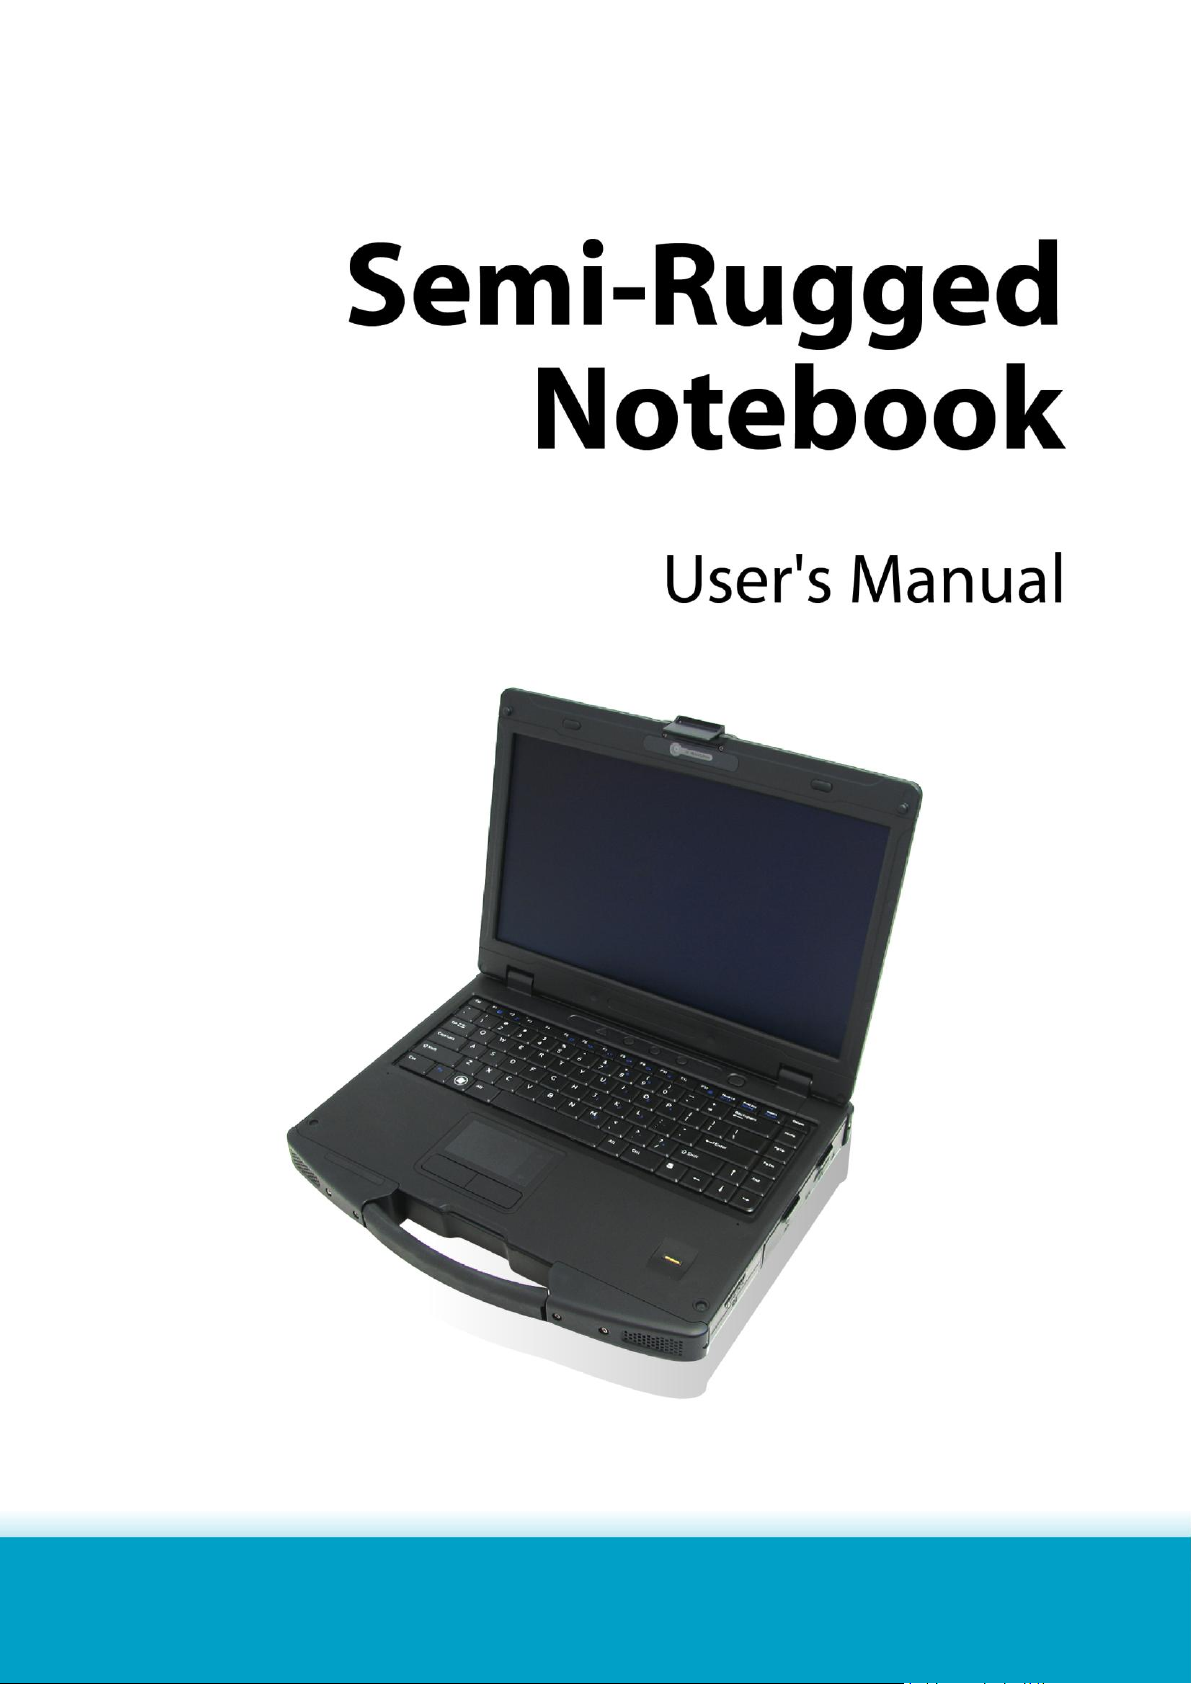
DURABOOK®SA14iT

Table of Contents
COPYRIGHT ................................................................................................. 4
REGULATORY STATEMENT ................................................................................. 4
Federal Communications Commission Statement .......................................................................................................... 4
Declaration of Conformity ............................................................................................................................................... 4
RF exposure warning ........................................................................................................................................................ 5
Canada, Industry Canada (IC) Notices ........................................................................................................................... 5
Battery Disposal ................................................................................................................................................................ 6
CLASS 1 LASER PRODUCT ........................................................................................................................................... 6
BEFORE YOU START ................................................................ 8
PACKAGE CONTENTS ...................................................................................... 8
COMPONENTS .............................................................................................. 9
Front View ......................................................................................................................................................................... 9
Back View ........................................................................................................................................................................ 10
Left View .......................................................................................................................................................................... 11
Right View ........................................................................................................................................................................ 12
Rear View ........................................................................................................................................................................ 13
Status Indicators .............................................................................................................................................................. 14
GETTING STARTED ................................................................ 15
POWERING UP YOUR NOTEBOOK ...................................................................... 15
Connecting the AC Adapter ............................................................................................................................................ 15
Using Battery Power ...................................................................................................................................................... 15
INSTALLING THE BATTERY............................................................................... 16
Charging the Battery....................................................................................................................................................... 16
Charging Time ................................................................................................................................................................. 16
Checking the Battery Level ............................................................................................................................................. 17
When to replace the Battery Pack .................................................................................................................................. 17
Removing the Battery ...................................................................................................................................................... 18
Installing the Second Battery (Optional) ....................................................................................................................... 19
Checking the Battery Pack Power Level ....................................................................................................................... 20
STARTING YOUR NOTEBOOK ........................................................................... 21
Turning On Your Notebook ............................................................................................................................................. 21
Shutting Down Your Notebook ....................................................................................................................................... 21
USING THE KEYBOARD .................................................................................. 22
USING THE QUICK MENU ............................................................................... 24
CONFIGURING THE SETUP MENU SETTINGS ........................................................ 25
Configuring Hotkey ........................................................................................................................................................ 26
Configuring Stealth Mode Button Setting ...................................................................................................................... 27
USING THE MEMORY CARDS ........................................................................... 28
Inserting a Memory Card ............................................................................................................................................... 28
Removing a Memory Card ............................................................................................................................................. 28
2

USING THE SMART CARD ............................................................................... 29
Inserting a Smart Card ................................................................................................................................................... 29
USING THE PC CARDS .................................................................................. 30
Inserting a PC Card ........................................................................................................................................................ 30
USING THE OPTICAL DISK DRIVE ..................................................................... 31
Placing a Disc ................................................................................................................................................................. 31
USING THE FINGERPRINT SCANNER ................................................................... 32
Initial Setup ..................................................................................................................................................................... 32
CONNECTING TO WIRELESS CONNECTIONS ......................... 37
CONNECTING TO A WIRELESS WIDE AREA NETWORK (WWAN) ................................. 37
USING THE BIOS SETUP UTILITY .......................................... 39
BIOS SETUP MENU ..................................................................................... 39
STARTING THE BIOS SETUP UTILITY ................................................................. 39
NAVIGATING AND ENTERING INFORMATION IN BIOS............................................... 40
MAIN MENU .............................................................................................. 41
ADVANCED MENU ........................................................................................ 41
BOOT MENU .............................................................................................. 42
SECURITY MENU ......................................................................................... 42
SAVE & EXIT MENU ..................................................................................... 43

Preface
Copyright
Copyright© 2013. All rights reserved.
No part of this user manual may be transmitted, stored in a retrieval system, or
translated into any language or computer language, in any form or by any
means, without the prior written permission of the manufacturer. Information is
subject to change without prior notice.
Regulatory Statement
Federal Communications Commission Statement
This equipment has been tested and found to comply with the limits for a Class
B digital device, pursuant to Part 15 of the FCC Rules. These limits are designed
to provide reasonable protection against harmful interference in a residential
installation. This equipment generates, uses, and can radiate radio frequency
energy and, if not installed and used in accordance with the instructions, may
cause harmful interference to radio communications. However, there is no
guarantee that interference will not occur in a particular installation. If this
equipment does cause harmful interference to radio or television reception,
which can be determined by turning the equipment off and on, the user is
encouraged to try to correct the interference by one or more of the following
measures:
Reorient or relocate the receiving antenna.
Increase the separation between the equipment and the receiver.
Connect the equipment into an outlet on a circuit different from that to
which the receiver is connected.
Consult the dealer or an experienced radio/TV technician for help.
Shielded interconnect cables and shielded AC power cable must be employed
with this equipment to insure compliance with the pertinent RF emission limits
governing this device. Changes or modifications not expressly approved by the
system's manufacturer could void the user's authority to operate the equipment.
Declaration of Conformity
This device complies with part 15 of the FCC rules. Operation is subject to the
following conditions:
This device may not cause harmful interference
This device must accept any interference received, including interference
that may cause undesired operation.
4

Preface
RF exposure warning
This equipment must be installed and operated in accordance with provided
instructions and must not be co-located or operating in conjunction with any
other antenna or transmitter. End-users and installers must be provided with
antenna installation instructions and transmitter operating conditions for
satisfying RF exposure compliance.
SAR Value: 0.317W/kg
This device is operation in 5.15 – 5.25GHz frequency range, then restricted in
indoor use only, Outdoor operations in the 5150~5250MHz is prohibit.
This device is slave equipment, the device is not radar detection and not ad-hoc
operation in the DFS band.
Canada, Industry Canada (IC) Notices
This Class B digital apparatus complies with Canadian ICES-003 and RSS-210.
Operation is subject to the following two conditions: (1) this device may not
cause interference, and (2) this device must accept any interference, including
interference that may cause undesired operation of the device.
Radio Frequency (RF) Exposure Information
The radiated output power of the Wireless Device is below the Industry Canada
(IC) radio frequency exposure limits. The Wireless Device should be used in such
a manner such that the potential for human contact during normal operation is
minimized.
This device has been evaluated for and shown compliant with the IC Specific
Absorption Rate (“SAR”) limits when installed in specific host products operated
in portable exposure conditions.
Canada, avis d'Industry Canada (IC)
Cet appareil numérique de classe B est conforme aux normes canadiennes ICES003 et RSS-210.
Son fonctionnement est soumis aux deux conditions suivantes : (1) cet appareil
ne doit pas causer d'interférence et (2) cet appareil doit accepter toute
interférence, notamment les interférences qui peuvent affecter son
fonctionnement.
Informations concernant l'exposition aux fréquences radio (RF)
La puissance de sortie émise par l’appareil de sans fil est inférieure à la limite
d'exposition aux fréquences radio d'Industry Canada (IC). Utilisez l’appareil de
sans fil de façon à minimiser les contacts humains lors du fonctionnement normal.
5

Preface
CAUTION:
THIS APPLIANCE CONTAINS A LASER SYSTEM AND IS
CLASSIFIED AS A "CLASS 1 LASER PRODUCT.” TO USE THIS
MODEL PROPERLY, READ THE INSTRUCTION MANUAL
CAREFULLY AND KEEP THIS MANUAL FOR FUTURE REFERENCE.
IN CASE OF ANY TROUBLE WITH THIS MODEL, PLEASE CONTACT
YOUR NEAREST "AUTHORIZED SERVICE STATION.” TO PREVENT
DIRECT EXPOSURE TO THE LASER BEAM, DO NOT TRY TO OPEN
THIS ENCLOSURE.
Ce périphérique a été évalué et démontré conforme aux limites SAR (Specific
Absorption Rate – Taux d'absorption spécifique) d'IC lorsqu'il est installé dans
des produits hôtes particuliers qui fonctionnent dans des conditions d'exposition
à des appareils portables.
Battery Disposal
THIS PRODUCT CONTAINS A LITHIUM-ION OR NICKEL-METAL HYDRIDE
BATTERY. IT MUST BE DISPOSED OF PROPERLY. CONTACT LOCAL
ENVIRONMENTAL AGENCIES FOR INFORMATION ON RECYCLING AND
DISPOSAL PLANS IN YOUR AREA.
CLASS 1 LASER PRODUCT
LASERSCHUTZKLASSE 1 PRODUKT TO EN60825
ANNEX IV
Symbol for the marking of electrical and electronic equipment
The symbol indicating separate collection for electrical and electronic equipment
consists of the crossed-out wheeled bin, as shown below. The symbol must be
printed visibly, legibly and indelibly.
6

Preface
CAUTION FOR ADAPTER
THE SA14iT SEMI-RUGGED NOTEBOOK IS FOR USE WITH DEDICATED AC
ADAPTER (DC +19V, 90W).
BATTERY SAFETY
DANGER OF EXPLOSION IF BATTERY IS INCORRECTLY REPLACED.
REPLACE ONLY WITH THE SAME OR EQUIVALENT TYPE RECOMMENDED BY THE
MANUFACTURER. DISPOSE OF USED BATTERIES ACCORDING TO THE
MANUFACTURER'S INSTRUCTIONS.
CAUTION FOR RJ-45
The RJ-45 jack is not used for telephone line connection.
7
Before You Start
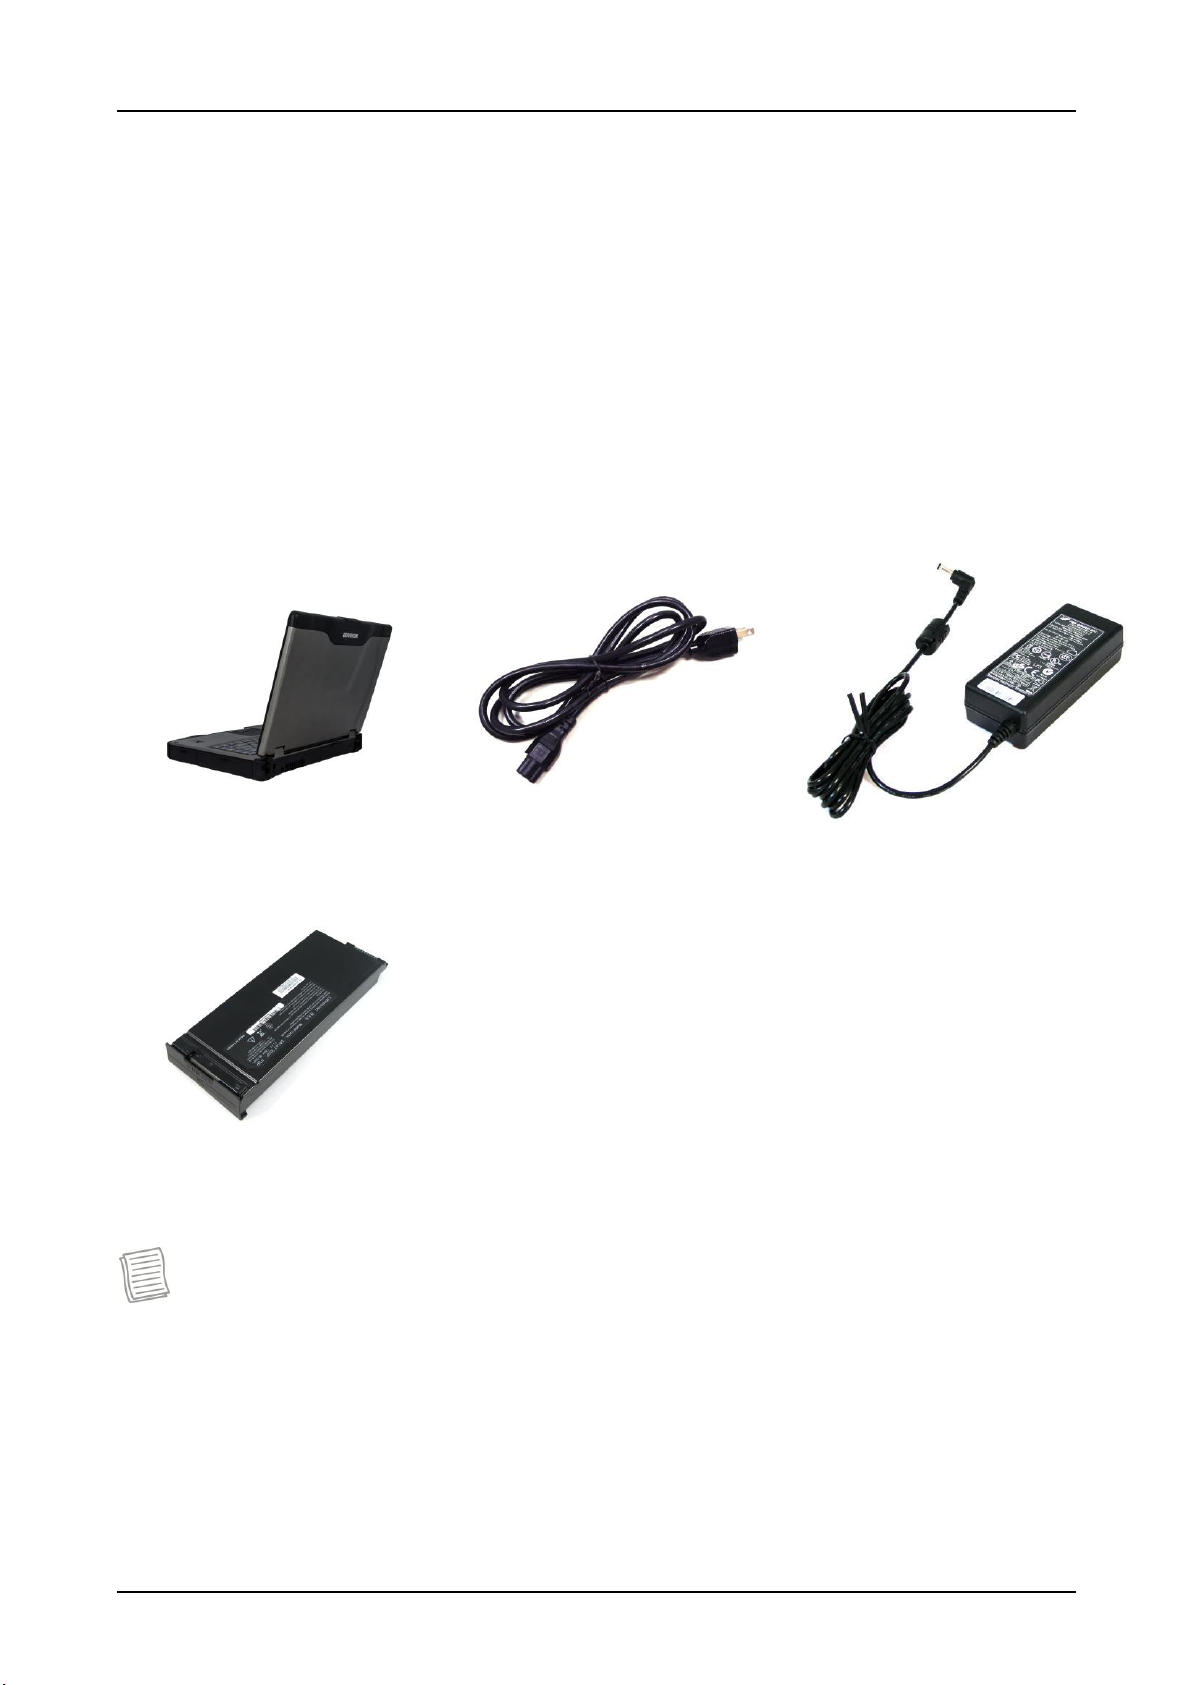
Notebook
Power cord
DC 19V 90W power
adapter
Standard 9-cell Li-ion
Battery
Before You Start
Congratulations on your purchase of this notebook.
This rugged notebook is portable and provides users with maximum mobile
computing experience in a wide range of working environments. Before you
begin using your notebook, read this chapter to familiarize yourself with the main
components installed in the system.
Package Contents
If any of following items is damaged, please contact your retailer.
NOTE
The pictures are for reference only, actual items may slightly differ.
8
No.
Item
No.
Item
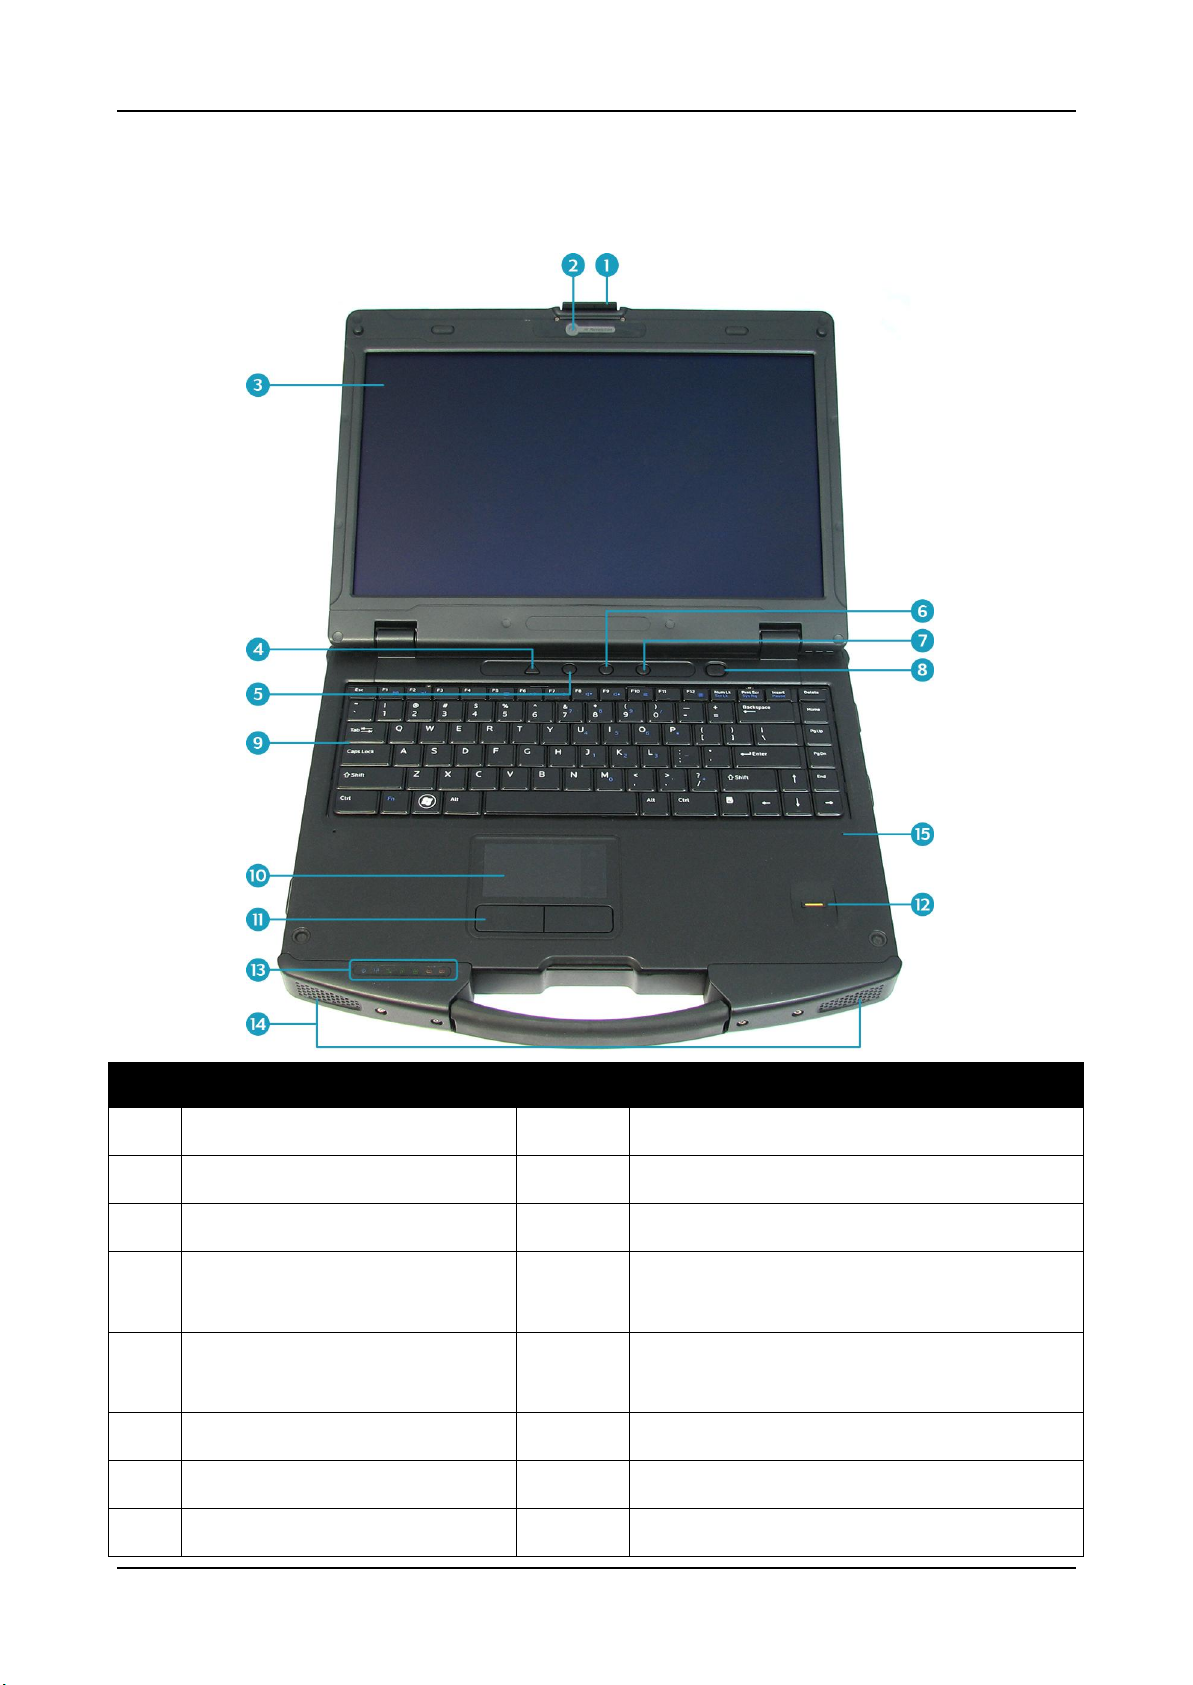
1
LCD cover latch
9
Waterproof Keyboard
2
1.3M CCD camera
10
Touch pad
3
Display screen
11
Touch pad button
4
Stealth mode/night vision
button
12
Fingerprint scanner
5
Quick menu button
13
Device Indicators (Power, Wireless,
HDD, Caps Lock, Num lock, Battery)
6
Programmable button
14
Speaker
7
RF button
15
Microphone
8
Power button
Components
Front View
Before You Start
9
Before You Start
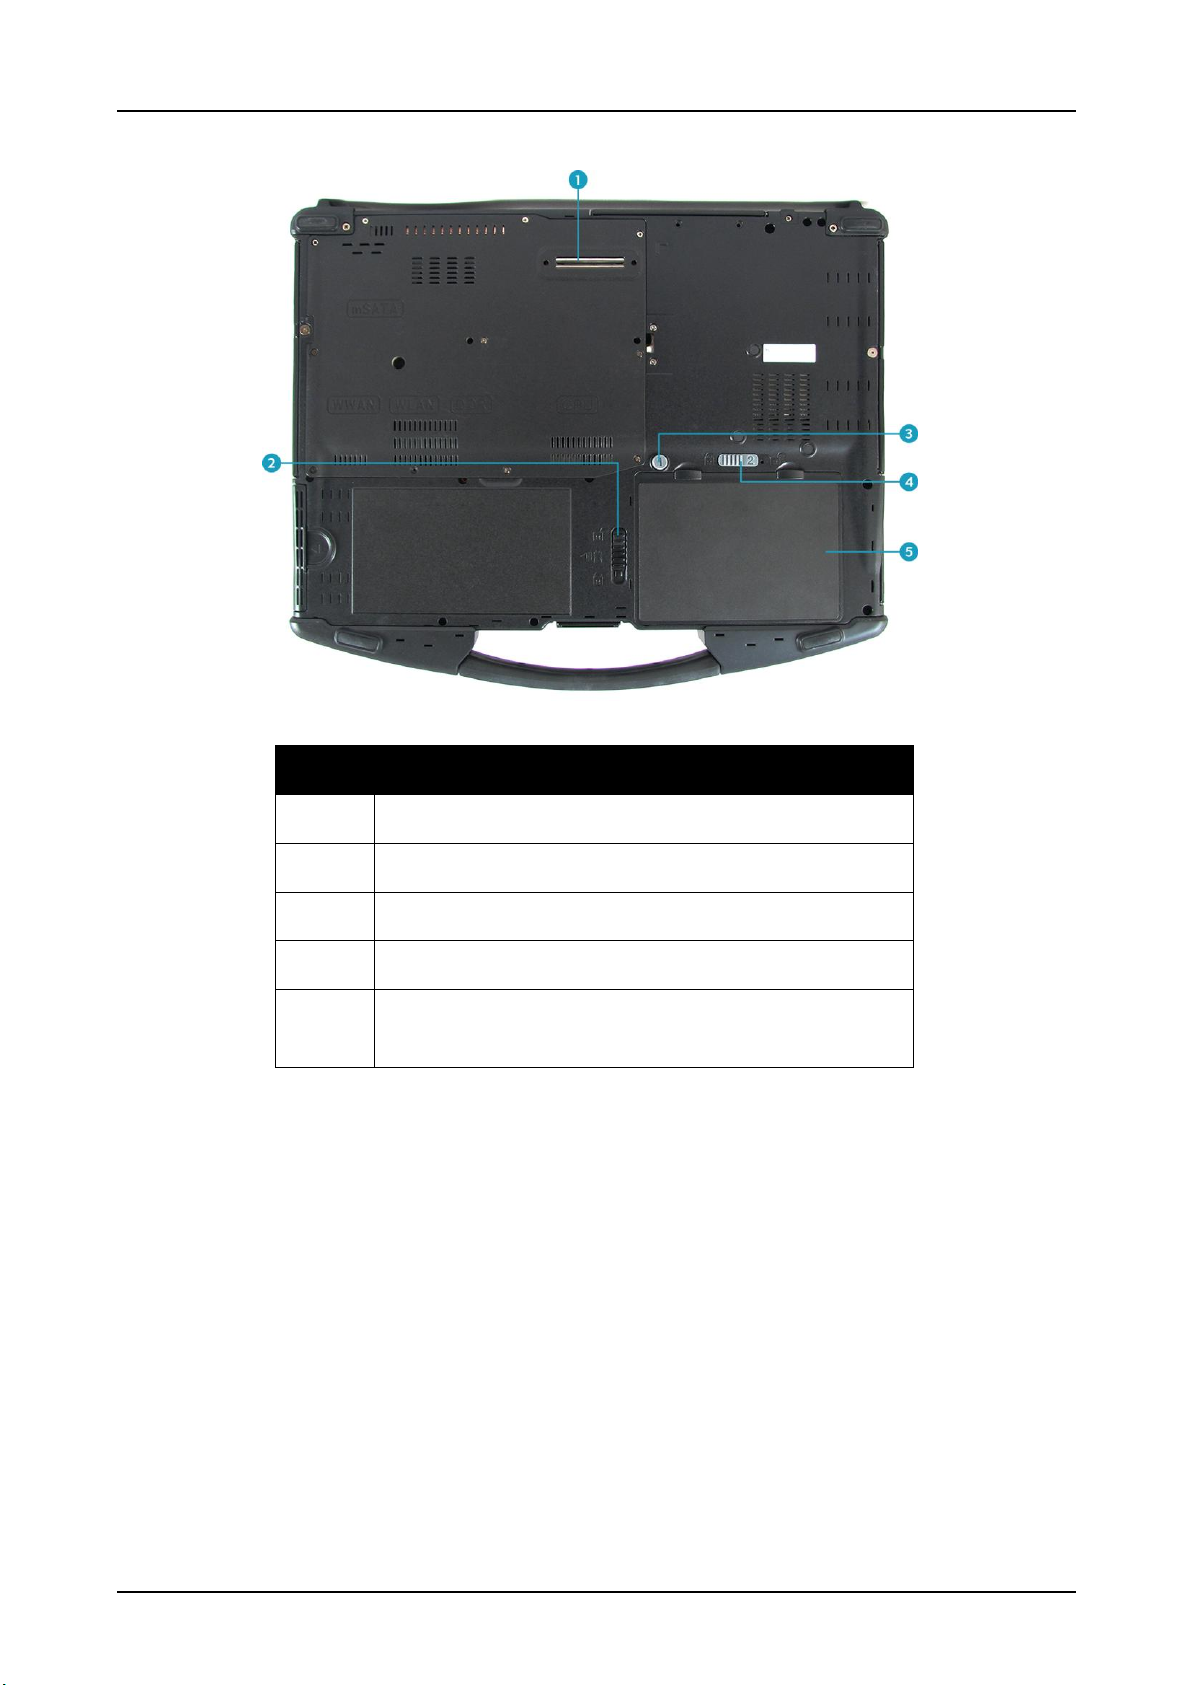
No.
Item
1
Docking connector
2
Battery latch
3
HDD latch release button
4
HDD latch
5
6-cell Battery / 2.5” SATA HDD
compartment
Back View
10
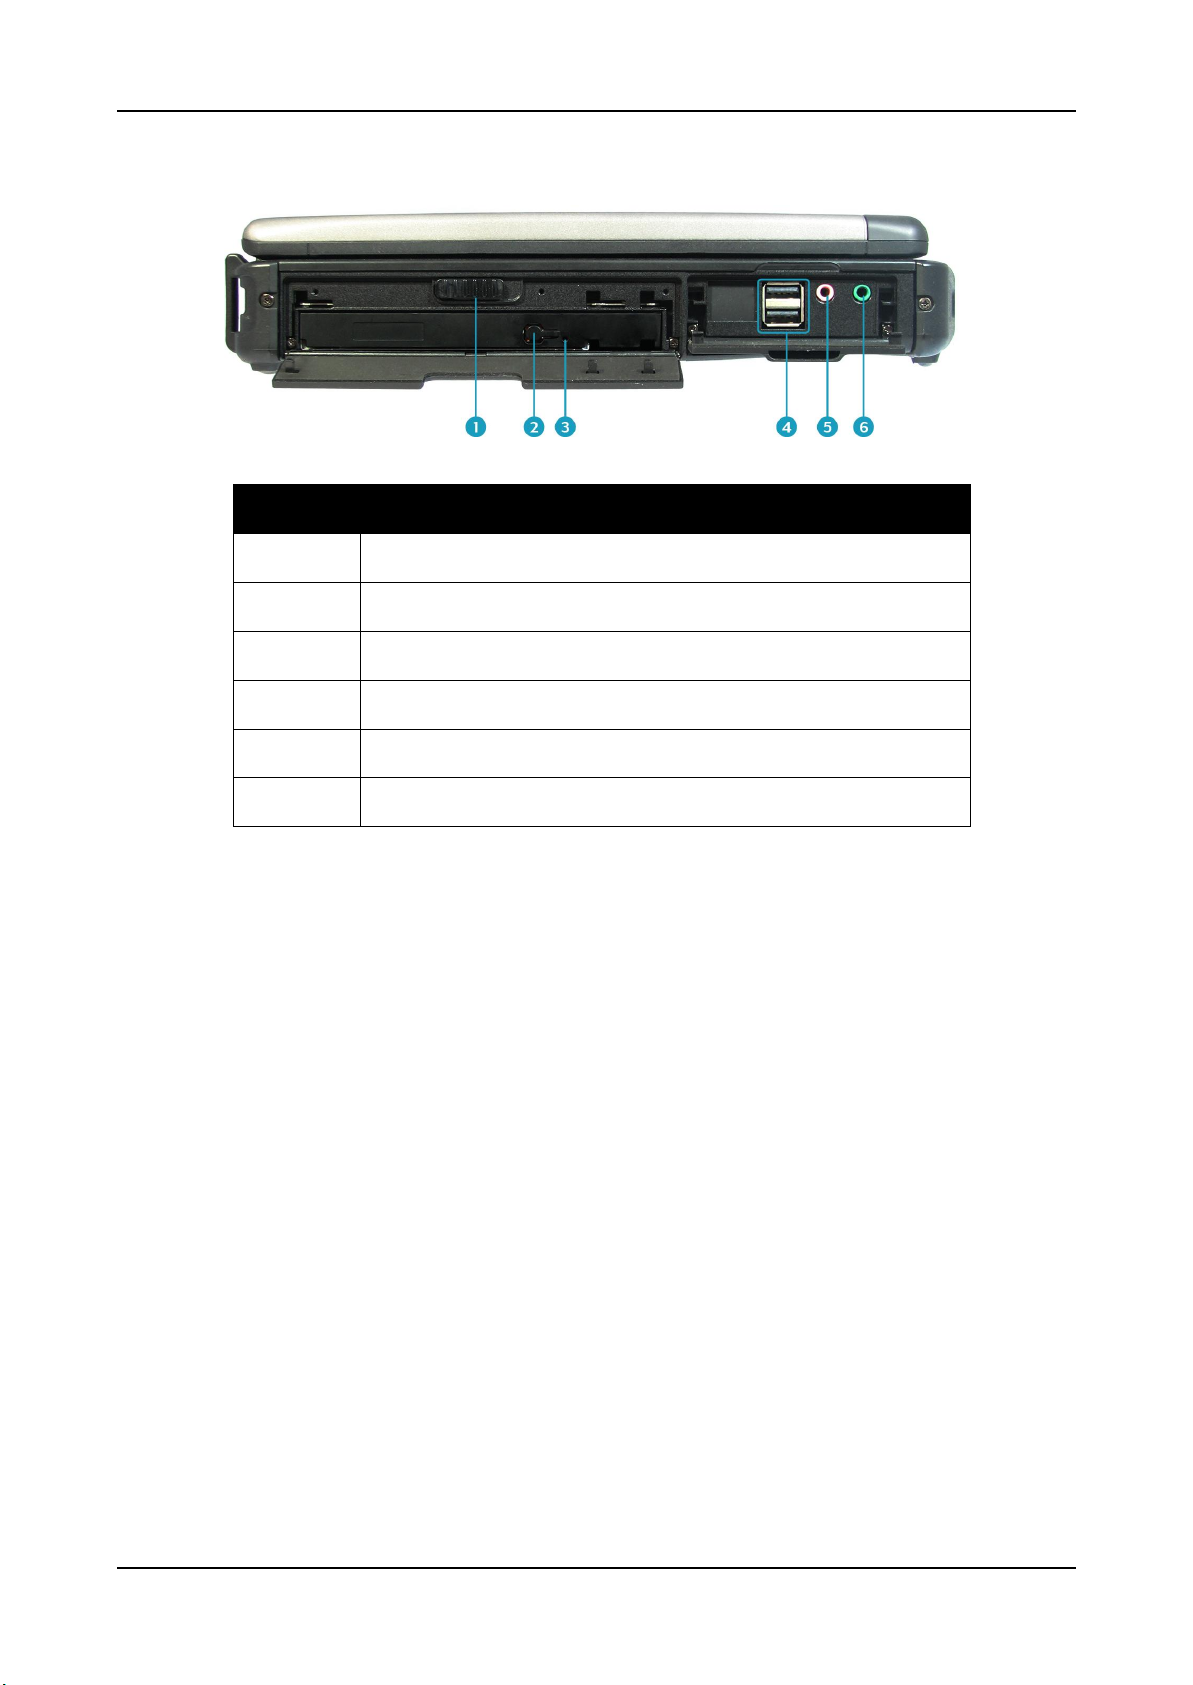
No.
Item
1
ODD cover latch
2
Eject button
3
Pin Hole Eject
4
USB 3.0 ports (x2)
5
Microphone jack
6
Earphone jack
Left View
Before You Start
11
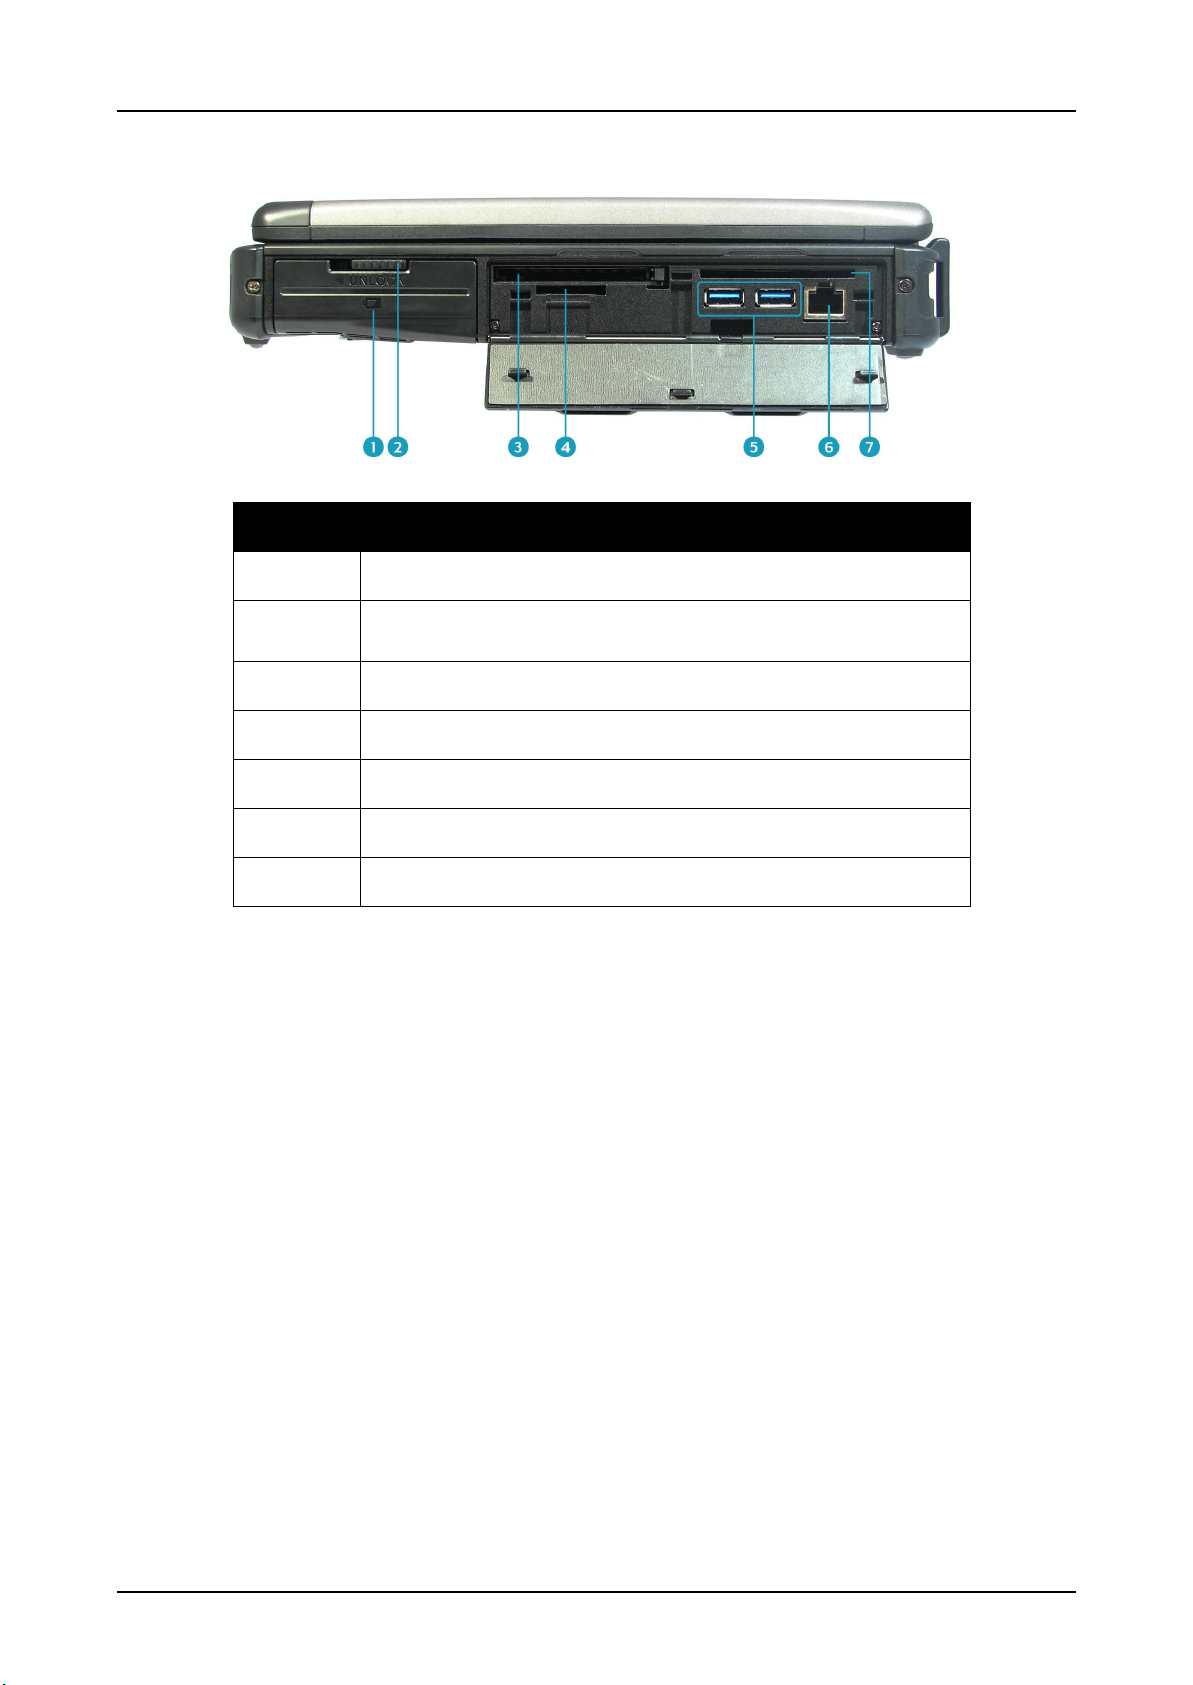
Before You Start
No.
Item
1
Battery compartment
2
Battery latch
3
PC Card slot
4
Card reader
5
USB 2.0 ports (x2)
6
RJ-45 port
7
Smart card reader
Right View
12
No.
Item
1
Kensington lock slot
2
HDMI output port
3
VGA port
4
RS-232 port
5
DC-in jack
Rear View
Before You Start
13
 Loading...