

Page 1
All you need to enjoy Digital TV
MDR-250 User Guide
Page 2
Important Safety Information
Thank you for choosing this
TVonics Freeview box
Before using your new Freeview box, please take a minute to read the
following important safety information:
Only use the supplied power adaptor.•
Do not cut o the supplied power adaptor’s plug.•
Do not allow the Freeview box, to get wet.•
Do not expose the Freeview box, to rain or moisture.•
Do not use the Freeview box, in hot, humid or excessively •
dusty places.•
Do not place any objects on the Freeview box.•
Allow for adequate ventilation around the Freeview box,.•
To clean the Freeview box, use a lightly dampened, soft cloth. Do •
not use any kind of abrasive cloth, sponge or cleaner.
Do not attempt to open the Freeview box. Refer all servicing to •
qualied service personnel.
To help prevent Screen Burn on Plasma and LCD screens, use the •
Screen Saver feature whenever possible.
This symbol on the product or in the instructions means that your
electrical and electronic equipment should be disposed at the end
of its life separately from your household waste. There are separate
collection systems for recycling in the EU.
For more information, please contact the local authority or your retailer
where you purchased the product.
2
Page 3

Contents
Important Safety Information .......................................................................................2
Getting Started
Package Contents ..............................................................................................................4
Overview of the Freeview Box ......................................................................................5
Connecting to a TV with a SCART socket ................................................................. .6
Connecting to a TV without a SCART socket ...........................................................7
Overview of the remote control....................................................................................8
Inserting batteries into the Remote Control .........................................................10
Setting up your TV ..........................................................................................................11
Automatically Tuning the Freeview Box..................................................................12
Using your Freeview box
Everyday Use .....................................................................................................................13
The Channel List ..............................................................................................................18
The Info Display ...............................................................................................................19
The TV Guide .....................................................................................................................20
The Timers Screen ...........................................................................................................22
The Main Menu ................................................................................................................24
Main Menu Options ........................................................................................................25
Common Symbols ...........................................................................................................26
The Help Pages .................................................................................................................27
Specications ....................................................................................................................28
Trouble Shooting .............................................................................................................29
3
Page 4
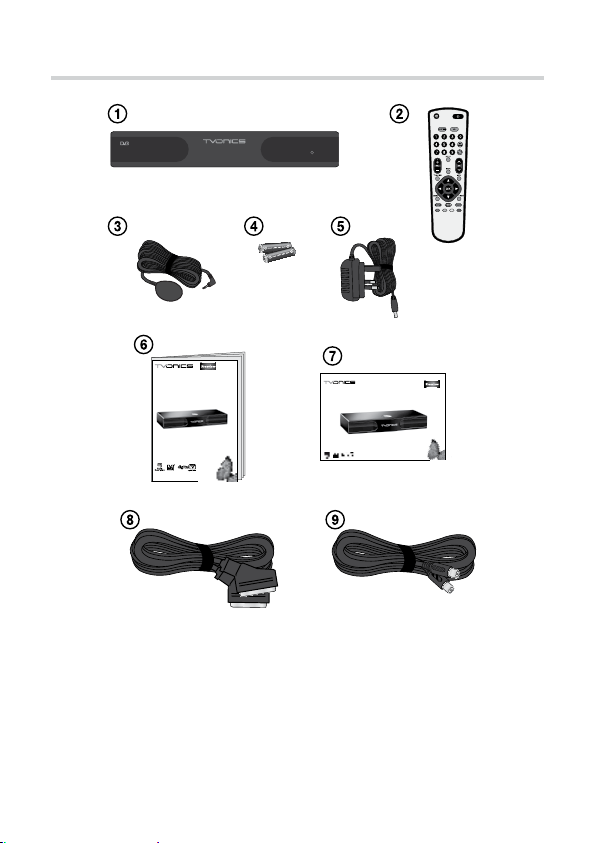
Package Contents
MDR-250 Quick Start Guide
All you need to enjoy digital TV
All you need to enjoy digital TV
MDR-250 User Guide
Freeview Box
1
Remote Control Extender
3
Power Adaptor
5
Quick Start Guide
7
RF Lead
9
Remote Control
2
AAA / R03 Batteries (2)
4
User Guide
6
SCART Lead
8
4
Page 5
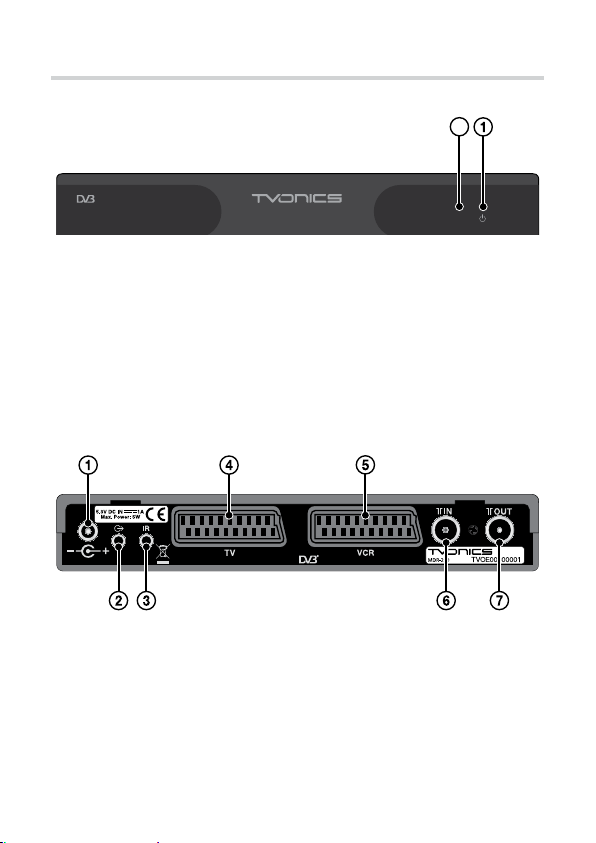
Overview of the Freeview Box
2
Front
LED (Green = On)
1
LED - Remote control feedback (ashes red everytime your
2
Freeview box detects a valid remote comand). Changes to static
Red when on standby.
Rear
DC Jack Input
1
Remote Control Extender
3
SCART (to VCR)
5
Aerial Out (to TV)
7
SPDIF/Digital Audio Output
2
SCART (to TV)
4
Aerial In (from aerial)
6
5
Page 6
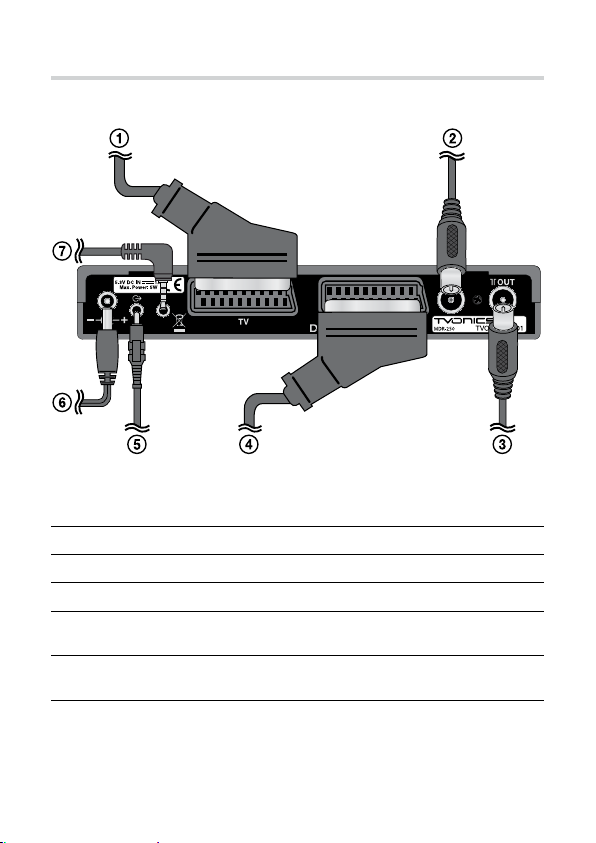
Connecting to a TV with a SCART Socket
To your TV (supplied SCART lead).
1
From your aerial.
2
To your TV or VCR/DVD Recorder (supplied RF lead).
3
To your VCR or DVD Recorder (SCART lead not supplied).
4
To your Hi-Fi/Surround Sound System (3.5mm jack plug lead/
5
optical lead not supplied).
To the mains power outlet (supplied power adaptor).
6
(Do not cut o the supplied power adaptor’s plug.)
Supplied remote control extender (only required when
7
installing the Freeview box out of sight or behind your TV).
6
Page 7
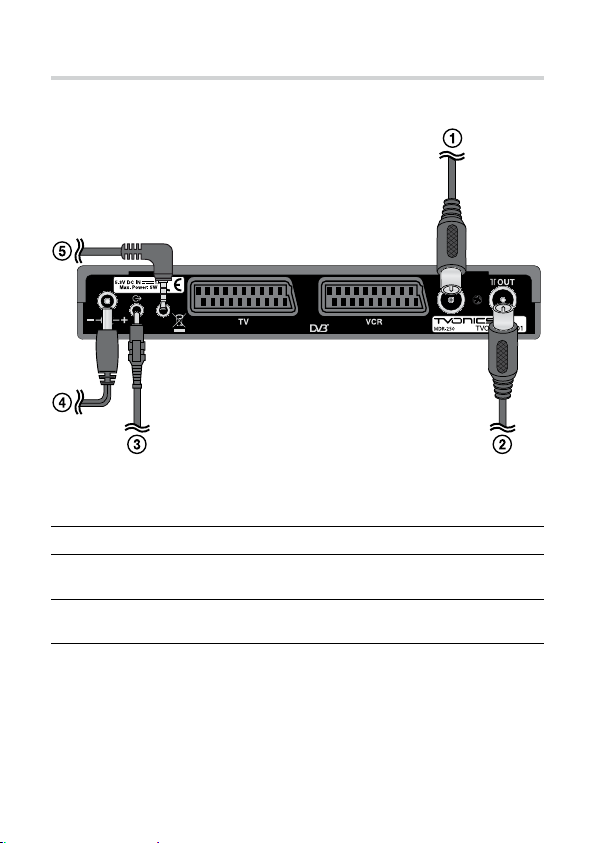
Connecting to a TV without a SCART Socket
From your aerial.
1
To your TV or VCR/DVD Recorder (supplied RF lead).
2
To your Hi-Fi/Surround Sound System (3.5mm jack plug lead/
3
optical lead not supplied).
To the mains power outlet (supplied power adaptor).
4
(Do not cut o the supplied power adaptor’s plug.)
Supplied remote control extender (only required when
5
installing the Freeview box out of sight or behind your TV). Red
LED indicates Standby, Green LED indicates Power On, Pulse
Green LED indicates the Freeview box has detected a valid
remote control command.
7
Page 8
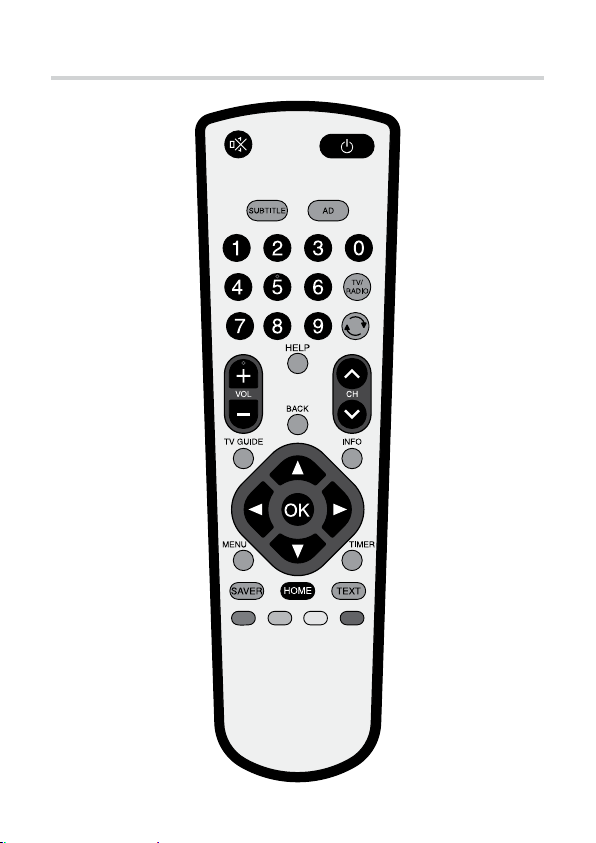
Overview of the Remote Control
8
Page 9
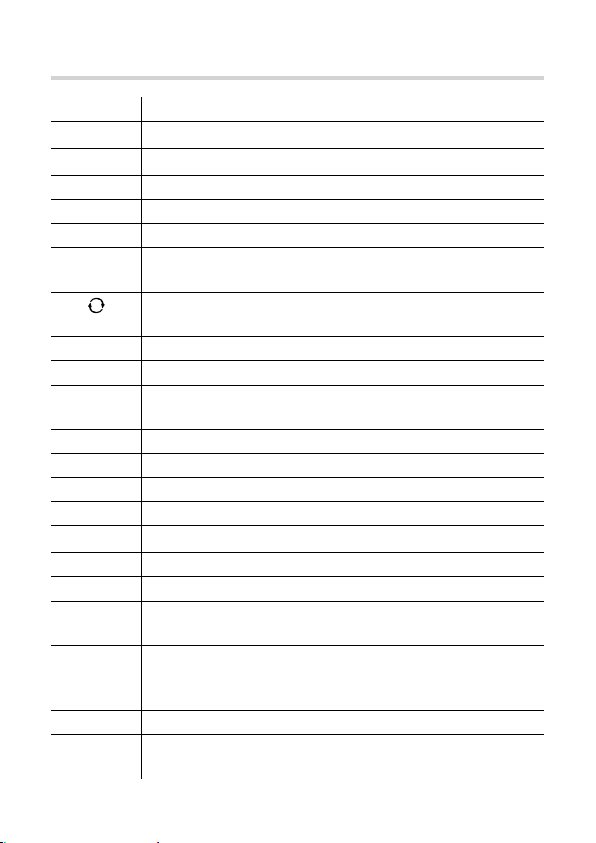
Overview of the Remote Control
Button Function
Turns the sound on/o.
%
Switches the Freeview box on/into standby.
1
SUBTITLE Displays subtitles (if available).
AD Switches Audio Description on/o.
0-9 Selects channels, enter PIN, use Help pages.
TV/RADIO Switches between Digital TV channels and Digital
Radio channels.
Returns to the previous channel watched. Switches
between 4 and 24 hours advance in TV Guide.
VOL. +/− Adjusts the Freeview box’s volume.
HELP Displays/exits the Help pages.
BACK Returns to the previous level in the menu. Exits TV
Guide, Info and Menu (rst level).
CH. U/u
TV GUIDE Switches the TV Guide on/o.
INFO Displays programme information.
OK Displays the Channel List/conrms a selection.
v, V, b, B
MENU Displays/exits the menu.
TIMER Displays/exits the Timers menu.
SAVER Switches the screen saver on. Press any button to
HOME Exits current menu/screen and returns to normal
TEXT Displays digital text (if available).
Coloured
buttons
Selects the next/previous channel.
Navigate the TV Guide/menu/Channel List/Info menu.
cancel.
TV mode, displaying the rst channel stored in the
channel list typically, BBC ONE).
Selects options in digital text/TV Guide/Channel List/
menu (Red/Green/Yellow/Blue).
9
Page 10
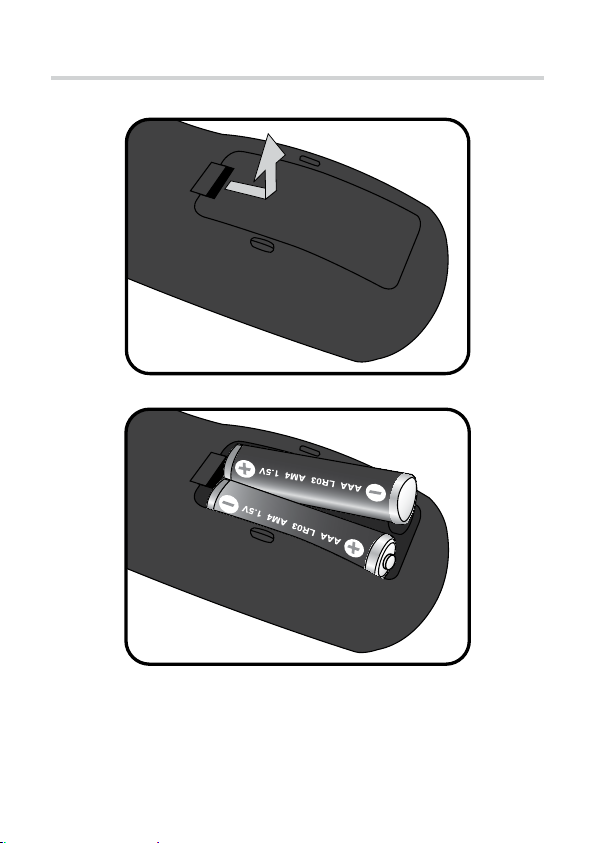
Inserting Batteries into the Remote Control
Always check the positive/negative symbols on the batteries to •
ensure they are inserted correctly.
Don’t forget to dispose of old batteries in an environmentally •
friendly way.
10
Page 11

Setting up your TV
If you have connected the Freeview Box to a TV without a SCART
socket: You will need to tune a spare channel on your TV.
Ensure the Freeview box is switched on before tuning the TV.
To automatically tune a spare channel on your TV:
1. Use your TV’s ‘automatic tune’ option to retune your TV (refer to
your TV’s user guide for more information). The Freeview box
must be switched on in order for the TV to detect it.
2. Once the automatic tuning has nished, use your TV’s remote
control to nd the channel that displays the Freeview box’s
picture. You should see the Start up screen, shown on the
next page.
3. Whenever you want to view pictures from the Freeview box, you
will need to select this channel rst.
To manually tune a spare channel on your TV:
1. Use your TV’s remote control to select a spare channel on your TV.
2. Use your TV’s ‘manual tune’ option to search for the Freeview
box (refer to your TV’s user guide for more information). The
Freeview box automatically outputs a signal on UHF Channel 38*.
Alternatively, if your TV allows you to enter the channel frequency
directly, the Freeview box’s output frequency is 607.25 MHz.
Once the channel has been tuned you should see Start up screen,
shown on the next page.
3. Store this channel on your TV. Whenever you want to view
pictures from the Freeview box, you will need to select this
channel rst.
*If UHF Channel 38 is already in use, or interference lines appear on the
picture, set the Freeview box’s output signal to a dierent UHF Channel and
retune your TV. Refer to “RF Output” on page 26.
11
Page 12
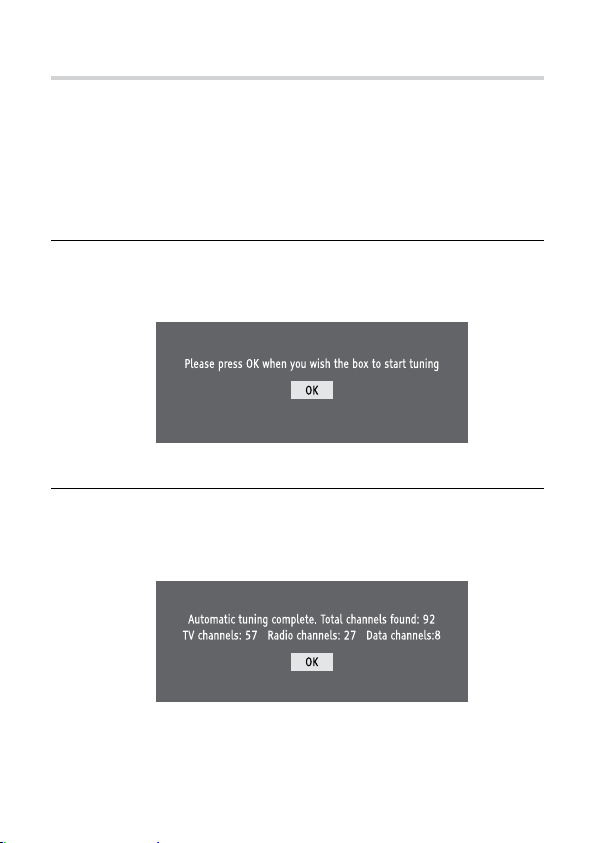
Automatically Tuning the Freeview Box
If you have connected the Freeview Box to a TV without a
1
SCART socket: Select the TV channel that you tuned in to view
the Freeview box’s pictures (see previous page).
If you have connected the Freeview box to a TV with a
SCART socket: If the TV doesn’t automatically display the
Freeview box’s pictures, select the relevant AV channel.
With the Freeview box’s Start up screen displayed, press the
2
[OK] button on the Freeview box’s remote control to begin
automatic tuning.
Start up screen
When the automatic tuning has nished, a summary screen, like
3
the one below, is displayed. The number of channels found may
vary according to your location and reception.
Automatic tuning summary screen
Press the [OK] button to remove the summary screen and start
watching digital TV.
12
Page 13

Everyday Use
Changing channels
Press the [0]-[9] buttons to select a channel. To select channels 10
and above, enter the second and third numbers quickly. Alternatively,
press the [CH U] and [CH u] buttons to select the next and previous
channel.
Channel hopping
Press the [ ] button to return to the previous channel watched.
Switching between TV and Radio channels
The Freeview Box stores all the digital TV channels together and all
the digital radio channels together. Press the [DTV/RADIO] button to
quickly switch between digital TV and digital radio channels.
Adjusting the volume
Press the [VOL+] and [VOL-] buttons to increase/decrease the
volume.
Muting the sound
Press the [%] button to turn o the Freeview box’s sound. Press again
to restore the sound.
Using standby
When you’re not watching TV, you should set the Freeview box to
standby. Press the [1] button to switch between ON (green power
light on the front panel) and STANDBY (red power light on the front
panel). If you plan to leave the Freeview box unattended for a long
period, put the Freeview box into standby and wait for 20 seconds
before switching it o at the mains.
13
Page 14

Everyday Use
Automatic standby
Every day, at 3.30am, the Freeview box will automatically switch to
standby mode to help reduce the amount of electricity it uses. If you
are still watching TV at this time, a screen will be displayed allowing
you to stop the Freeview box entering standby mode. It is also
possible to deactivate this automatic standby mode by setting the
‘Update Channels’ .
Standby retune
When the Freeview box is in standby mode it will automatically
search and add any new channels found to the channel list. In some
cases, existing channels may be removed (e.g. when you are receiving
your TV signal from 2 dierent transmitters). If this happens, you can
stop the Freeview box searching for new channels in standby mode
by setting the ‘Update Channels’ option to ‘O’. Refer to page 26 for
more details on the ‘Update Channels’ option.
Audio description
Audio description is an additional narration that describes all
signicant visual information such as body language, facial
expression, scenery, action, costumes - anything that is important to
conveying the plot of the story, event or image. Press the [AD] button
on the remote control to switch on audio description (if available).
When a valid AD service is detected on a channel you select, you will
hear two beeps in quick succession to inform you AD is available.
Press again to switch o audio description.
Screen saver in radio mode
When you are listening to a radio channel, the screen saver will
automatically start if no button is pressed for 15 minutes. To remove
the screen saver, press any button on the remote control.
14
Page 15

Everyday Use
Displaying digital text
Press the [TEXT] button to display digital text (if available). Press
again to exit digital text.
Displaying subtitles
Press the [SUBTITLE] button to display subtitles (if available). Press
again to switch o the subtitles.
Activating the screen saver
Press the [SAVER] button to display the screen saver. Press any button
to cancel the screen saver.
Home button
The [HOME] button on the remote control will cancel any on-screen
menu and return the Freeview box to the rst channel stored in the
channel list (typically, BBC ONE).
15
Page 16
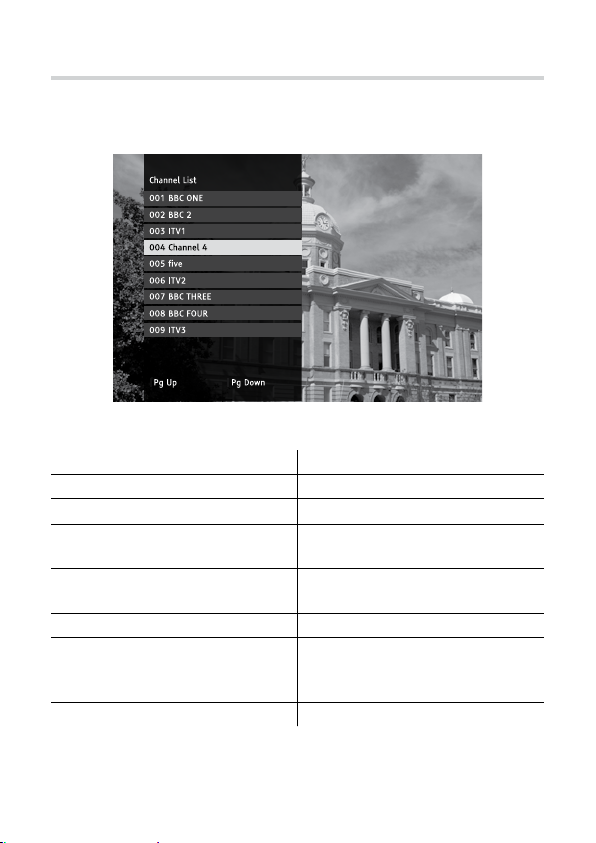
The Channel List
The Channel List displays all the available channels.
The Channel List
To Press
Access the Channel List... [OK] button while watching TV.
Select channels...
Display the previous nine
channels in the list...
Display the next nine channels in
the list...
Switch to the selected channel... [OK] button.
Exit the Channel List and return
to the rst channel stored in the
channel list (typically, BBC ONE)...
Exit the Channel List... [BACK] button.
[
v] and [V] buttons.
[RED] button.
[GREEN] button.
[HOME] button.
16
Page 17
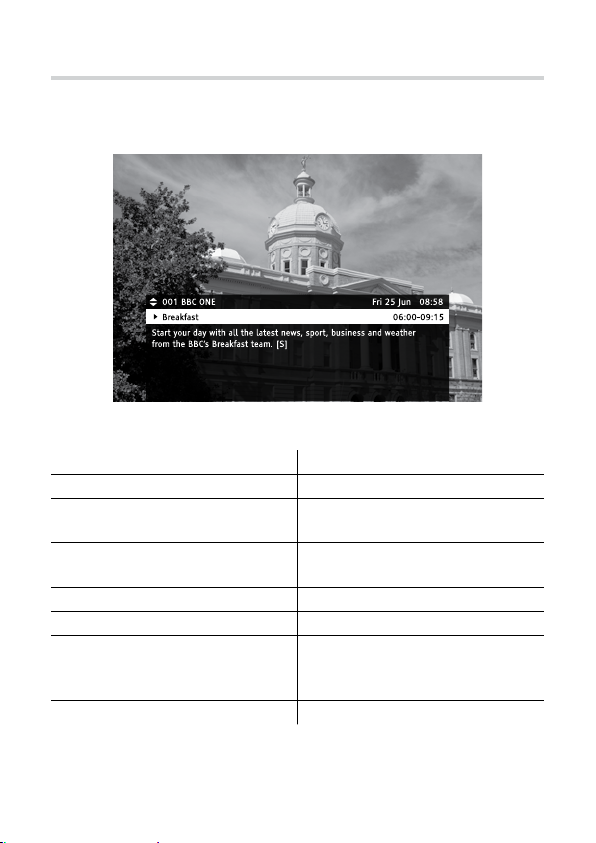
The Info Display
The Info display gives brief information on the current and future
programmes.
The Info Display
To Press
Access the Info display... [INFO] button.
View information for future/
previous programmes...
Set a reminder for future
programmes...
Change the Audio setting... [RED] button (if available).
Change the Subtitle setting... [GREEN] button (if available).
Exit the Info display and return
to the rst channel stored in the
channel list (typically, BBC ONE)...
Exit the Info display... [INFO] or [BACK] button.
[
v], [V], [b] and [B] buttons.
[OK] button while highlighting a
future programme.
[HOME] button.
17
Page 18
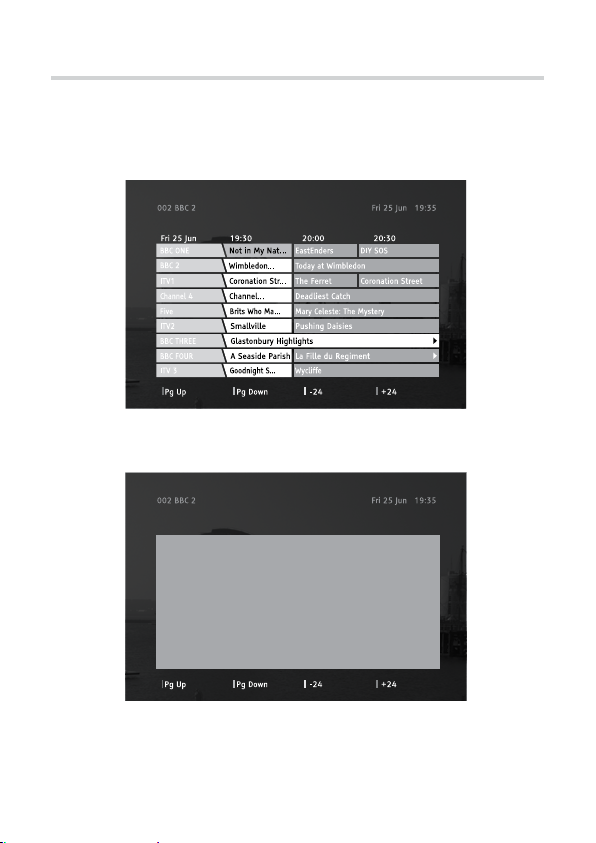
The TV Guide
A Timer had been set for:
BBC Ten O’Clock News
on BBC One at 22:00 (Fri)
The TV Guide displays programme information for the next 8 days
(when transmitted by broadcasters). You can also set timers that will
display a chosen programme when it starts.
The TV Guide
18
Setting a timer
Page 19
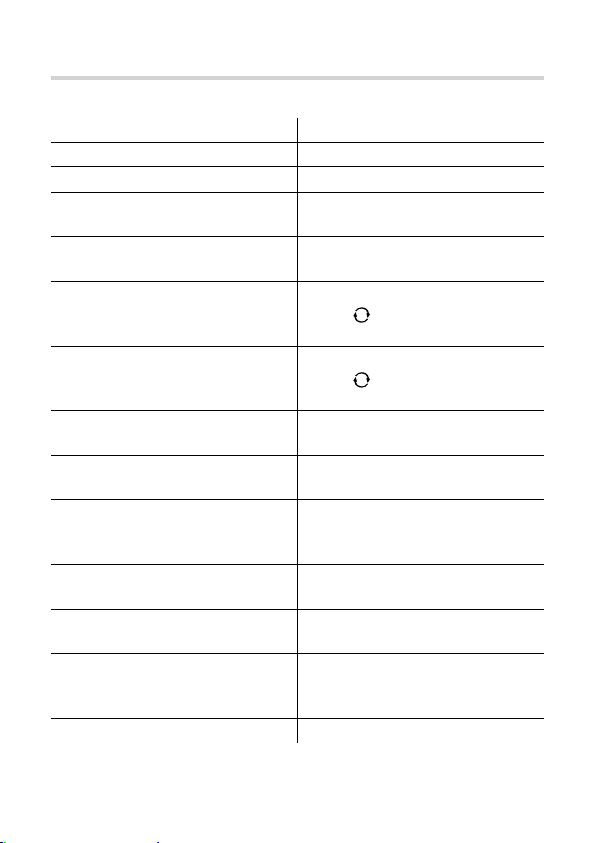
The TV Guide
To Press
Access the TV GUIDE... [TV GUIDE] button.
Move around the TV GUIDE...
Display the previous nine
channels in the list...
Display the next nine channels in
the list...
Move forward 4 or 24 hours... [BLUE] button.
Move back 4 or 24 hours... [YELLOW] button.
View selected programme
information...
Preview a current programme... [OK] button (while highlighting
Switch to the current programme
being previewed...
Set a timer for a future
programme...
Cancel a timer... [OK] button (while highlighting
Exit the TV Guide and return to
the rst channel stored in the
channel list (typically, BBC ONE)...
Exit the TV Guide... [TV GUIDE] or [BACK] button.
[
v], [V], [b] and [B] buttons.
[RED] button.
[GREEN] button.
(Press [
and 24 hours).
(Press [
and 24 hours).
[INFO] button.
a current programme).
[OK] button (while highlighting
a currently previewed
programme).
[OK] button (while highlighting
a future programme).
the required programme).
[HOME] button.
] to switch between 4
] to switch between 4
19
Page 20
The Timers Screen
7
7
7
7
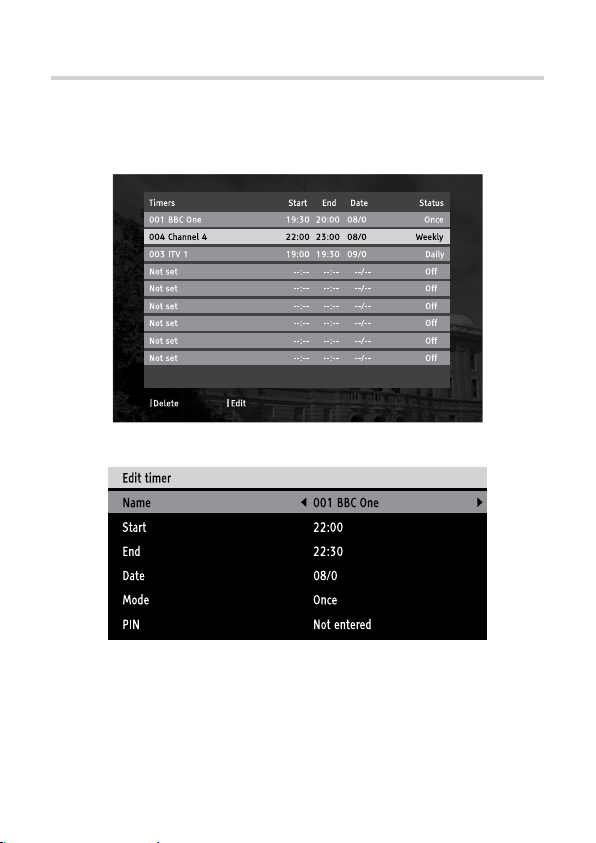
The Timers screen displays all the programmes that are currently set
to display. You can also set a timer and modify or cancel an existing
timer from the Timers screen.
The Timers screen
Editing a timer/Manually setting a timer event
*Use ‘Mode’ to set the timer event to occur ‘Once’, ‘Daily’ or ‘Weekly’.
**When a timer event is set to display a programme on a locked channel, you will
need to enter the PIN before the programme is displayed. If you enter your PIN when
setting the timer event, the programme will be displayed automatically.
20
Page 21
The Timers Screen
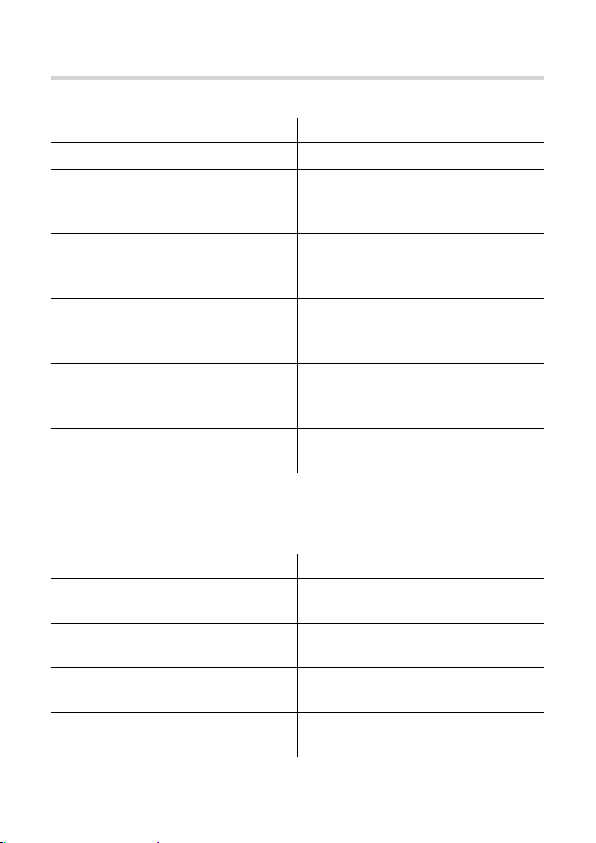
To Press
Move around the Timers screen...
Manually set a timer... [OK ] button (while highlighting
Edit a timer event... [RED] button (while highlighting
Delete a timer event... [GREEN] button (while
Exit the Timers screen and return
to the rst channel stored in the
channel list (typically, BBC ONE)...
Exit the Timers screen and return
to TV...
Editing a timer event / Manually setting a timer event
To Press
Move around the Edit timers
screen...
Change the ‘Name’, ‘Mode’* and
‘PIN’** settings...
Change the ‘Start’, ‘End’ and ‘Date’
settings...
Save and exit the Edit timers
screen...
[v] and [V] buttons.
the required timer event). See
below for further information.
the required timer event). See
below for further information.
highlighting the required timer
event).
[HOME] button.
[TIMER] or [BACK] button.
[v] and [V] buttons.
[b] and [B] buttons.
[0-9] buttons.
[OK] button.
21
Page 22
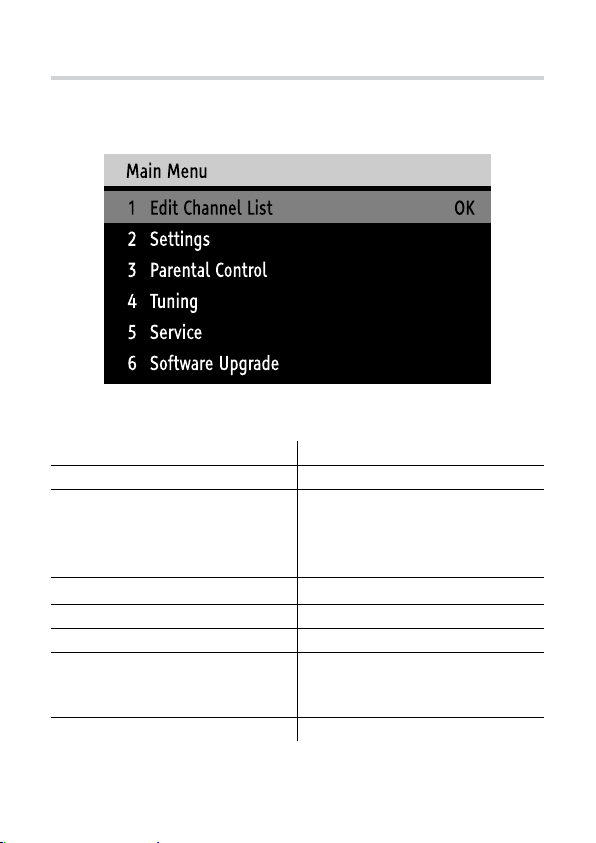
The Main Menu
The menu system lets you choose and change a wide range of your
Freeview box’s features.
The Main menu
To Press
Access the Main menu... [MENU] button.
Move around the Main menu...
Select a setting...
Move back to the previous level... [BACK] button.
Make a selection... [OK] button.
Exit the Main menu and return
to the rst channel stored in the
channel list (typically, BBC ONE)...
Exit the Main menu... [MENU] or [BACK] button.
[v] and [V] buttons.
(Alternatively, press the
corresponding number button to
directly select an option.)
[b] and [B] buttons.
[HOME] button.
22
Page 23

Main Menu Options
Edit Channel List
1 Hide Channels
Allows you to hide unwanted channels. Press [OK] to select a channel
to hide.
Press [OK] to select a channel to hide. An ‘X’ appears next to channels
that have been hidden. To make channels visible again, highlight
them and press [OK] to remove the ‘X’
2 Sort Channels
Allows you to rearrange the channel order. Press [OK] to select the
channel you wish to move. Press [
then press [OK].
When you search for new channels (using the Tuning option on the
Main Menu), your box will automatically revert to the original channel
order.
Settings
1 Keypress Beep
Allows you to switch on the keypress beep. When switched on, the
Freeview box will beep every time a button is pressed.
2 Subtitle
Allows you to set your preferred subtitle setting (if available).
v] or [V] to select the new position,
3 Audio
Allows you to set your preferred audio setting (if available).
4 TV Out
Allows you to switch the picture output between RGB, Y/C and CVBS
(via TV SCART socket only).
23
Page 24

Main Menu Options
5 Picture Mode
Allows you to change between Widescreen, traditional (4:3 Normal)
and traditional letterbox (4:3 Letterbox) picture formats.
6 RF Output
Allows you to select which RF Channel the Freeview box outputs
a signal on. The default RF Channel is channel 38. If Channel 38 is
already in use, or interference lines appear in the picture, set RF
Output to a dierent RF Channel (between channel 22 and 69) and
retune your TV.
7 Antenna Power
Allows you to send power to a connected active aerial or amplier
that requires a power adaptor to operate. When set to ‘On’, the
Freeview box will output 5V/50mA from the '8 OUT’ socket.
8 Update Channels
Allows the Freeview box to automatically search for new channels
when in standby mode. It is recommended that this option be set to
‘Automatically’.
9 Reset Set Top Box
Allows you to reset the Freeview box. You will be asked to enter your
PIN to reset the box (the default PIN is 0000).
Parental Controls
You will need to enter the PIN before the Parental Controls menu is
displayed. The default PIN is 0000.
1 Set PIN
Allows you to change the PIN. The default PIN is 0000.
24
Page 25
Main Menu Options
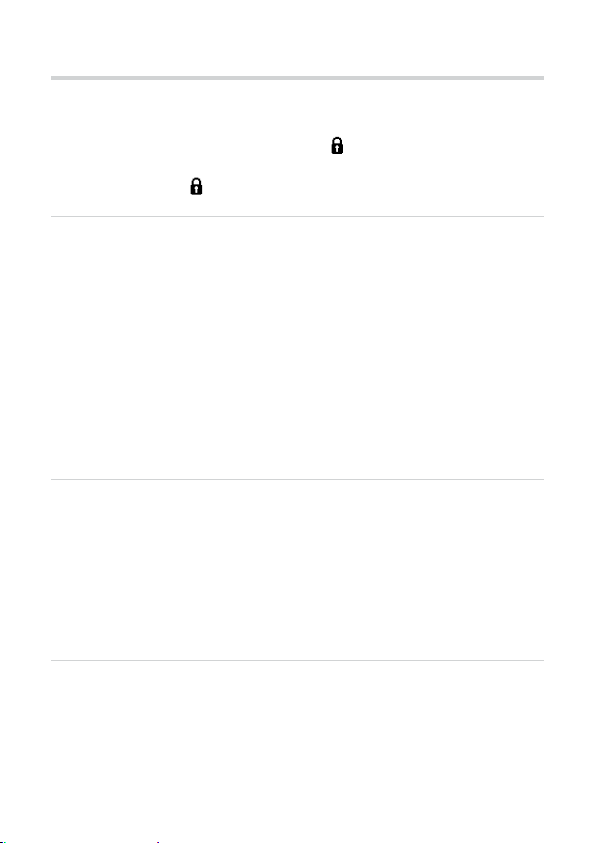
2 Lock Channels
Press [OK] to select a channel to lock. A appears next to channels
that have been hidden. To unlock channels, highlight them and press
[OK] to remove the
Tuning
1 Automatic Search
Allows you to automatically tune the Freeview box to search for any
new channels that may have been launched.
2 Manual Search
Allows you to manually tune the Freeview box to search for any new
channels that may have been launched.
Use the [0-9] buttons to enter a channel number then press [OK] to
search. Any new channels found are automatically added.
Service
1 Manufacturers Details
Allows you to check the software and hardware versions running on
your Freeview box.
2 Signal Strength
Allows you to check the signal strength and the transmitter name.
.
Software Upgrade
Allows you to search for software updates through your aerial (when
available). As updates are handled automatically by your Freeview
box it is not recommended that you use this option.
25
Page 26
Common Symbols
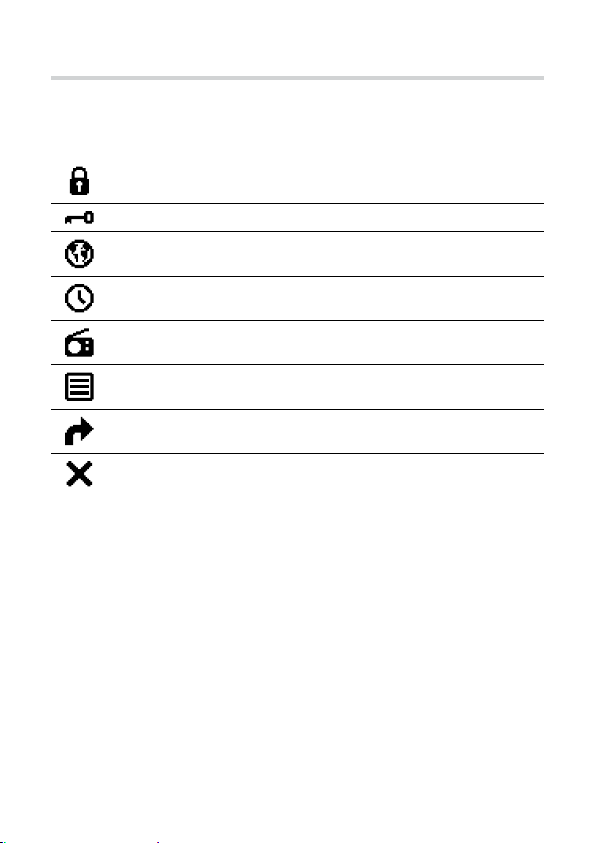
The following symbols may be visible in the TV Guide, Channel List
and Info display:
Locked channel.
Encrypted/scrambled channel.
Multilanguage option available (audio and subtitle).
Timer has been set.
Radio channel.
Teletext available.
Swap channel.
Hide channel.
26
Page 27
The Help Pages
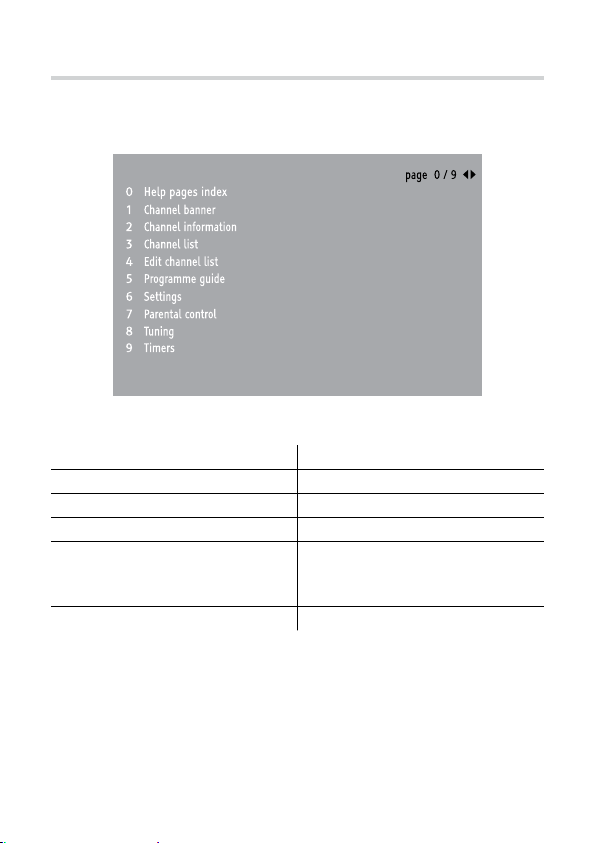
The Help pages give advice and information for many of the features
of this Freeview box.
The Help pages
To Press
Access the Help pages... [HELP] button.
Select a help topic... [1]-[9] buttons.
Return to the index page... [0] button.
Exit the Help pages and return
to the rst channel stored in the
channel list (typically, BBC ONE)...
Exit the Help pages... [HELP] or [BACK] button.
[HOME] button.
Additionally, pressing the [HELP] button whilst accessing any of the
following will take you directly to the relevant Help page:
Channel Banner, Channel Information, Channel List, Edit
Channel List, TV GUIDE, Settings, Parental Control, Tuning and Timers.
27
Page 28

Specications
Physical Specications
Size . . . . . . . . . . . . . . . . . . . . . . . . . . . . . . . . . . . (W)196mm x (H)31mm x (D)89mm
Weight . . . . . . . . . . . . . . . . . . . . . . . . . . . . . . . . . . . . . . . . . . . . . . . . . . . . . . . . . . . 0.23kg
Power Requirements
Input Voltage . . . . . . . . . . . . . . . . . . . . . 5.3V DC (with supplied power adaptor)
Power Consumption (On) . . . . . . . . . . . . . . . . . . . . . . . . . . . . . . . . . . . . . . . . . . .5.1W
Power Consumption (STBY) . . . . . . . . . . . . . . . . . . . . . . . . . . . . . . . . . . . . . . . . .1.7W
Operating Temperature . . . . . . . . . . . . . . . . . . . . . . . . . . . . . . . . . . +10°C to +40°C
Storage Temperature . . . . . . . . . . . . . . . . . . . . . . . . . . . . . . . . . . . . . . -20°C to +60°C
Tuner
RF Input . . . . . . . . . . . . . . . . . . . . . . . . . . . . . . . . . . . . . . . . . . . . . . . . . 1 x IEC (Female)
Output Connectors . . . . . . . . . . . . . . . . . . . . . . . . . . . . . . . . . . . . . . . . 1 x IEC (Male)
Channel Coverage . . . . . . . . . . . . . . . . . . . . UHF (B21 - B68/470MHz - 854MHz)
Video Decoder
Video Decoding . . . . . . . . . . . . . . . . . . . . . . . . . . MPEG-2 main Level/main Prole
Video Formats . . . . . . . . . . . . . . . . . . . . . . . . . . . . . . . . . . . . . . . . . . . . . . . . . . .16:9/4:3
Audio Decoder
Audio Decoding . . . . . . . . . . . . . . . . . . . . . . . . . . . . . . . . . . . . . . . . . MPEG-2 Layer 1
Audio Mode . . . . . . . . . . . . . . . . . . . . . . . . . . . . . . . . . . . . . . . . . . . . . . . .Stereo/Mono
AV Connectors
Video/Audio . . . . . . . . . . . . . . . . . . . . . . . . . . . . . . . . . . . . . . . . . . . . 2 x 21 Pin SCART
Audio . . . . . . . . . . . . . . . . . . . . . . . . . . . . . . . . . . . . . . . . . . . 1 x 3.5mm Jack/miniTOS
Supplied Accessories
Remote Control
AAA / R03 Batteries (2)
Quick Start Guide
User Guide
RF Lead
Design and specications are subject to change without notice.
28
(TV SCART = RGB, Y/C, CVBS, VCR SCART = CVBS)
(Analogue Stereo / PCM Audio Optical SPDIF)
Power Adaptor (5.3V 1Amp)
Remote Control Extender
Fixing Pads
SCART Lead
Page 29

Troubleshooting
Should you experience a problem with your Freeview box which
can’t be resolved using the table below, put the unit into Standby
mode, then unplug completely from the mains. Leave the unit
unplugged for at least one minute before connecting again to the
mains.
No picture/distorted picture1.
Check the Freeview box is switched on.•
Check the aerial is correctly connected to the unit.•
Check all connections between the unit and TV.•
Check the TV is displaying the correct AV input (refer to the •
instruction manual supplied with your TV for details).
Check the signal strength (refer to ‘Service menu’ on page • 25).
Black and white picture2.
Freeview box is set to output Y/C pictures and your TV does not •
support Y/C. Change the ‘TV Out’ setting (refer to ‘TV Out’ on
page 23).
RF input on TV not correctly tuned to RF output channel of Freeview •
box. Use the ne tuning mode (if available) on your TV to improve
the colour.
No sound3.
TV is muted.•
Check the aerial is correctly connected to the unit.•
Check all connections between the unit and TV/Hi-Fi or Surround •
Sound System.
Check the signal strength for the channel you are watching. If the •
signal is weak then you may have the picture but no sound. (Refer to
‘Service menu’ on page 25).
No power4.
Check the supplied power adaptor is correctly connected and the •
unit is switched on.
29
Page 30

Troubleshooting
Remote control does not work5.
Replace the batteries.•
TVonics Helpline:
TVonics Website:
TVonics E-mail support:
0870 80 30 551
www.tvonics.com
[email protected]
(calls charged at national rate)
30
Page 31

31
Page 32

www.tvonics.com
Printed in the EU on 100% recycled paper.
© 2008 TVonics Solutions Ltd. U-MAN-001-60/71-800-032-10
 Loading...