

Page 1
Digital TV Recorder
User Guide
Page 2
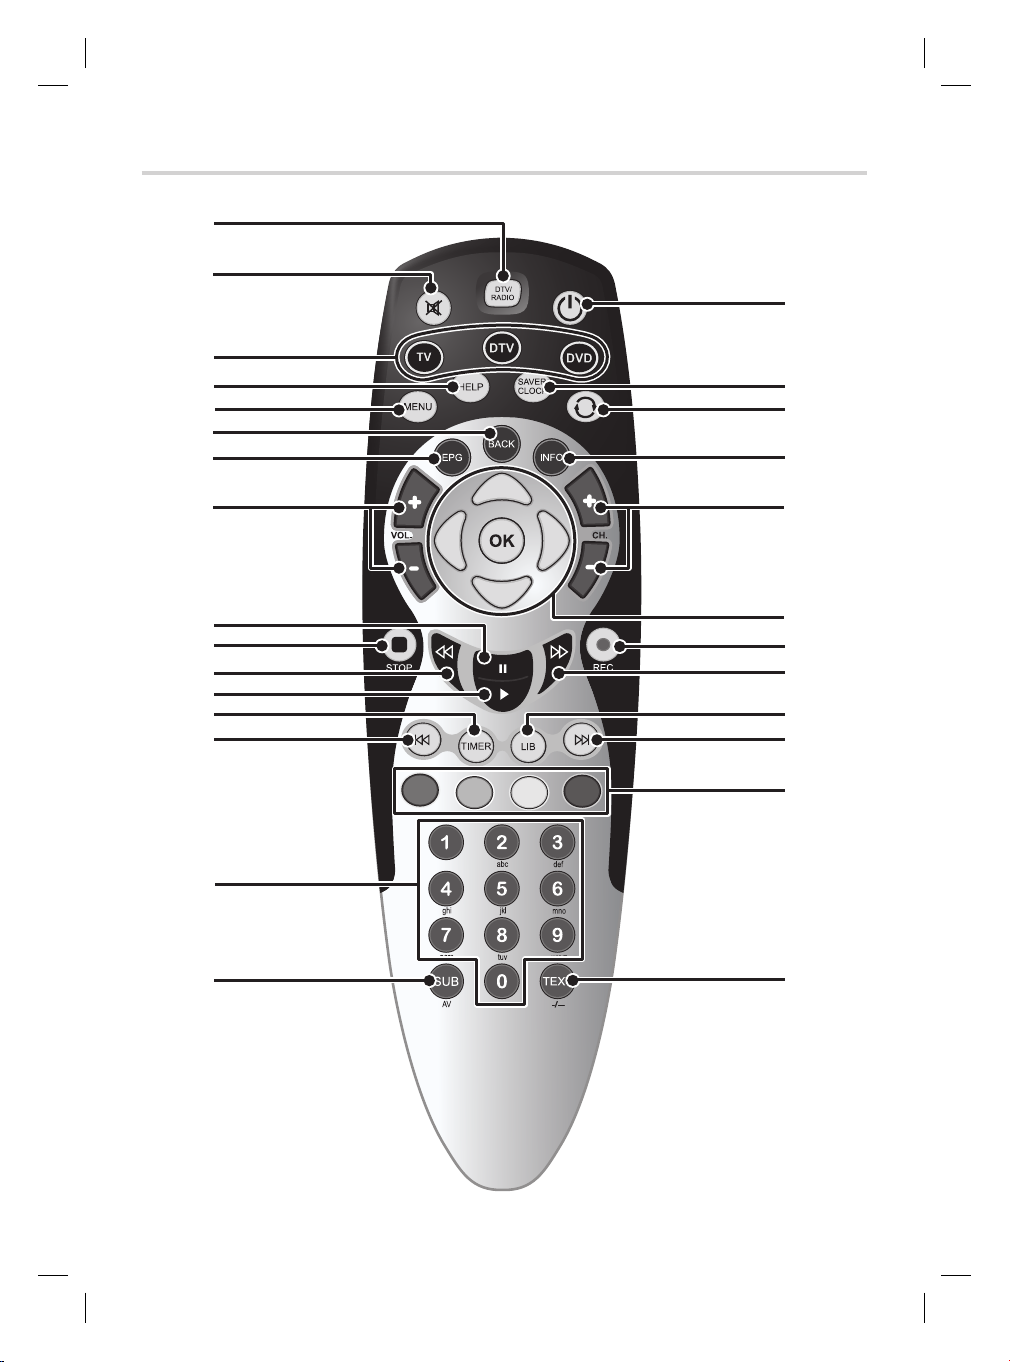
Overview of the Remote Control
1
2
3
4
5
6
7
wk
wj
wh
wg
8
9
q;
qa
qs
qd
qf
qg
qh
wf
wd
ws
wa
w;
ql
qk
qj
2
Page 3

DTV/RADIO - Switches between Digital TV channels and Digital Radio channels.
1
% - Turns the TV’s sound on/off*.
2
MODE buttons - Sets the remote control to operate the Digital TV Recorder, a TV or DVD*.
3
HELP - Displays/exits the Help pages.
4
MENU - Displays/exits the menu.
5
BACK - Returns to the previous level in the menu. Exits EPG, Info and Menu ( rst level).
6
EPG - Switches the Electronic Programme Guide (EPG) on/off.
7
VOL. +/− - Adjusts the TV’s volume*.
8
X - Pauses live TV and recordings.
9
x STOP - Stops playback when viewing recordings.
q;
j - Rewinds live TV and recordings. Press repeatedly to increase the rewind speed.
qa
B - Plays recording and resumes paused live TV and recordings.
qs
TIMER - Displays the Timers screen.
qd
l - Skips to the start when viewing a recording. Skips to the start of the pause buffer when
qf
watching live TV.
0-9 - Selects channels, enter PIN, use Help pages.
qg
SUB/AV - Displays subtitles (if available). In TV mode, changes the Video Input on the TV*.
qh
TEXT/−/−− - Displays digital text (if available). In TV mode, selects double digit channel numbers*.
qj
Coloured buttons - Selects options in digital text/EPG/Channel List/menu.
qk
L - Skips to the end when viewing a recording.
ql
LIB - Displays the Library of recorded programmes.
w;
J - Fast forwards recordings. Press repeatedly to increase the fast forward speed. When pausing live
wa
TV or recordings, press to watch in slow motion.
z REC - Records live TV. Sets highlighted programmes to timer record in the EPG.
ws
OK/UP/DOWN/LEFT/RIGHT - Displays the Channel List/con rms a selection (OK button).
wd
Navigate the EPG/menu/Channel List/Info menu (UP/DOWN/LEFT/RIGHT buttons).
CH. +/ − - Selects the next/previous channel.
wf
INFO - Displays programme and recording information
wg
- Returns to the previous channel watched. Switches between 4 and 24 hours advance in EPG
wh
SAVER/CLOCK - Displays the Clock for 4 seconds. With the Clock displayed, press again to display
wj
the Screen Saver.
1 - Switches the Digital TV Recorder, TV* or DVD* on/into standby.
wk
Remote Control
*Once the remote control has been programmed to operate your equipment. Refer to page 28.
3
Page 4

Introduction
Thank you for choosing this TVonics Digital TV Recorder.
This Digital TV Recorder will revolutionise the way you watch TV, allowing you to watch what you want,
when you want.
Access all available free-to-air Digital TV and Radio channels with no monthly subscription.•
Pause live TV.•
Rewind live TV.•
Record Digital TV onto the built in hard disk - no need for tapes.•
Watch a programme from the start while it’s still recording.•
Record one channel while watching another.•
Plan your viewing with the 8 day Electronic Programme Guide (EPG).•
Manage your recordings with the Library.•
Never miss a recording, even when it’s start time changes*•
Record the model name and serial number in the space provided below (the model name and
serial number can be found on both the rear of the product and the rear of the box).
Refer to these numbers whenever you call your dealer regarding this product.
Model Name: Serial Number:
Important Safety Information
Before using the Digital TV Recorder, please take a minute to read the following important safety information.
Only use the supplied AC adaptor.• Do not place any objects on the unit.•
Place the unit on a stable surface.• Do not place any magnetic objects (including
Never attempt to mount the unit vertically without
• Leave a space of at least 10cm around the unit to
the supplied stand.
Do not allow the unit to get wet.• Do not obstruct the fan on the rear of the unit.•
Do not expose the unit to rain or moisture.• To clean the unit, use a lightly dampened, soft cloth.
Do not expose the unit to shocks or vibrations as
• Do not attempt to open the unit. Refer all servicing
this could cause disk failure.
Do not use the unit in hot, humid or excessively
• To help prevent Screen burn on Plasma and LCD
dusty places.
•
speakers) on or near the unit.
•
allow for adequate ventilation.
•
Do not use any kind of abrasive cloth, sponge or
cleaner.
•
to quali ed service personnel.
•
screens, use the Screen Saver feature whenever
possible.
Environmental Information
This symbol on the product or in the instructions means that your electrical and electronic equipment should
be disposed at the end of its life separately from your household waste. There are separate collection systems
for recycling in the EU.
For more information, please contact the local authority or your retailer where you purchased the product.
4
Page 5

Overview of the Remote Control ...................................................................................................................2, 3
Introduction ..........................................................................................................................................................4
Important Safety Information ............................................................................................................................4
Environmental Information ................................................................................................................................4
Getting Started
Package Contents ................................................................................................................................................6
Inserting the Batteries into the Remote Control .........................................................................................6
Attaching the Supplied Feet ...............................................................................................................................7
Safe Installation .....................................................................................................................................................7
Connecting to your TV and VCR/DVD Recorder ........................................................................................8
Connecting to your Hi-Fi/Surround Sound System .....................................................................................8
Automatically Tuning ............................................................................................................................................9
Daily Use
Everyday Tasks .......................................................................................................................................................10
Common Symbols................................................................................................................................................11
Freeview Playback ................................................................................................................................................11
Recording Programmes ......................................................................................................................................12
Timeshifting ...........................................................................................................................................................13
The Electronic Programme Guide (EPG) .......................................................................................................14
The Info display .....................................................................................................................................................15
The Channel List ..................................................................................................................................................16
The Timers screen ...............................................................................................................................................17
The Library menu ................................................................................................................................................19
The Menu
Navigating the menu ............................................................................................................................................21
Overview of the menu ........................................................................................................................................22
Edit Channel List ......................................................................................................................................... 23
Settings .......................................................................................................................................................... 23
DVR Settings ................................................................................................................................................ 25
Parental Control .......................................................................................................................................... 26
Tuning ............................................................................................................................................................. 26
Service ........................................................................................................................................................... 27
Software Upgrade ....................................................................................................................................... 27
Additional Information
Programming the Remote Control ..................................................................................................................28
Automatically Programming the Remote Control .......................................................................................29
Finding the Remote Control’s Current Codes .............................................................................................29
Controlling a TV ...................................................................................................................................................30
Controlling a DVD player ..................................................................................................................................30
Speci cations .........................................................................................................................................................31
Troubleshooting ....................................................................................................................................................32
Remote Control Brand Codes .........................................................................................................................33
Table of Contents
5
Page 6
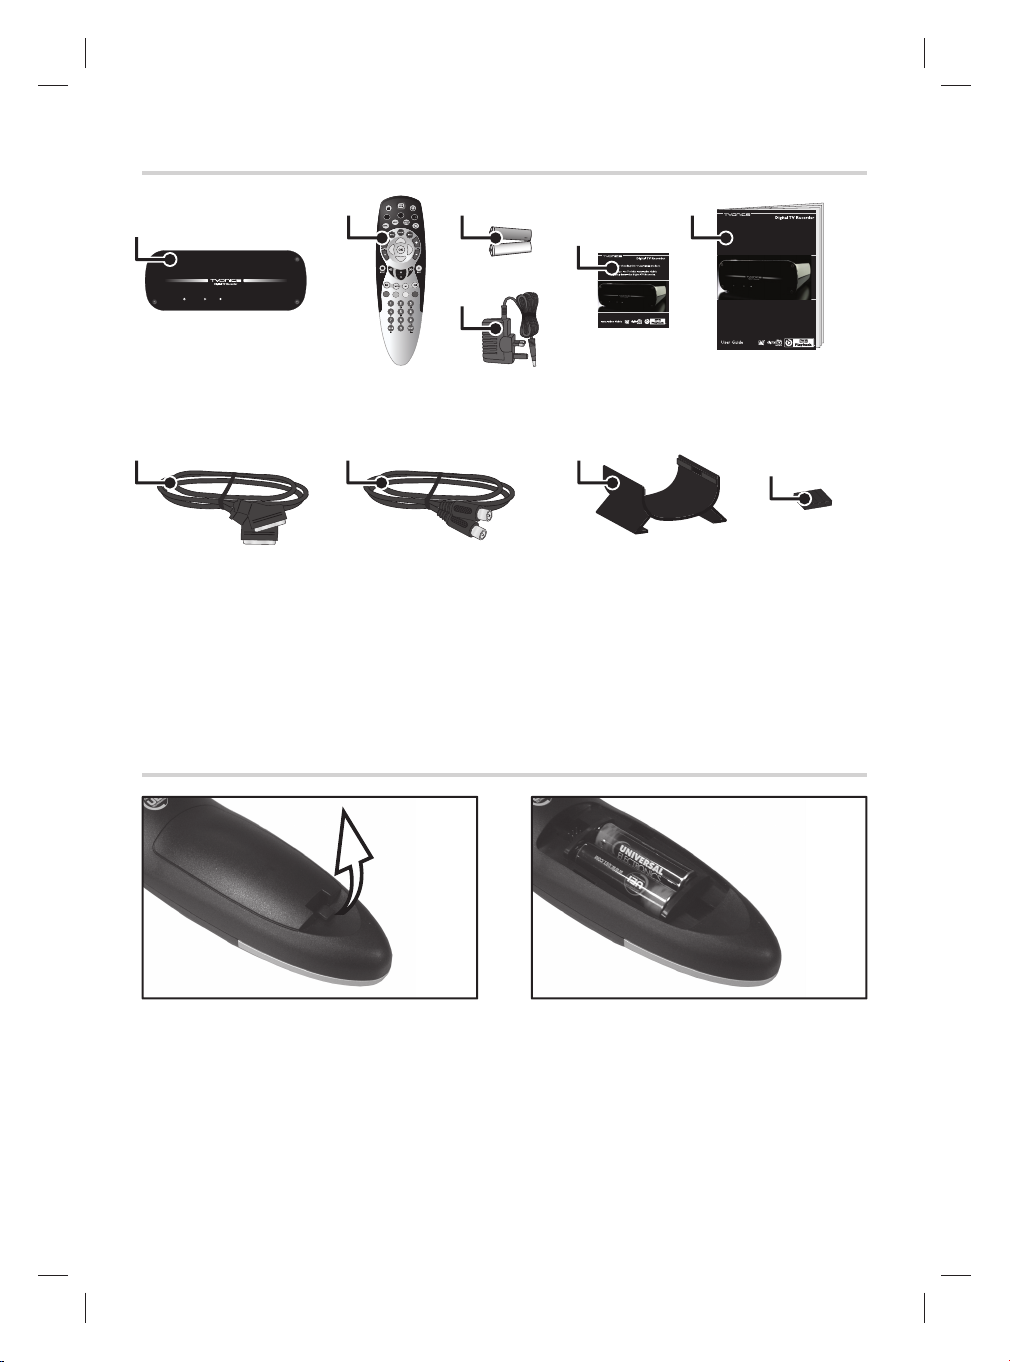
Package Contents
2
1
3
6
5
4
7
Digital TV Recorder
1
AA Batteries (2)
3
Installation Guide
5
SCART Lead
7
Stand
9
8 9
Remote Control
2
Power Supply
4
User Guide
6
RF Lead
8
Rubber Feet (4)
q;
Inserting the Batteries into the Remote Control
q;
6
Page 7
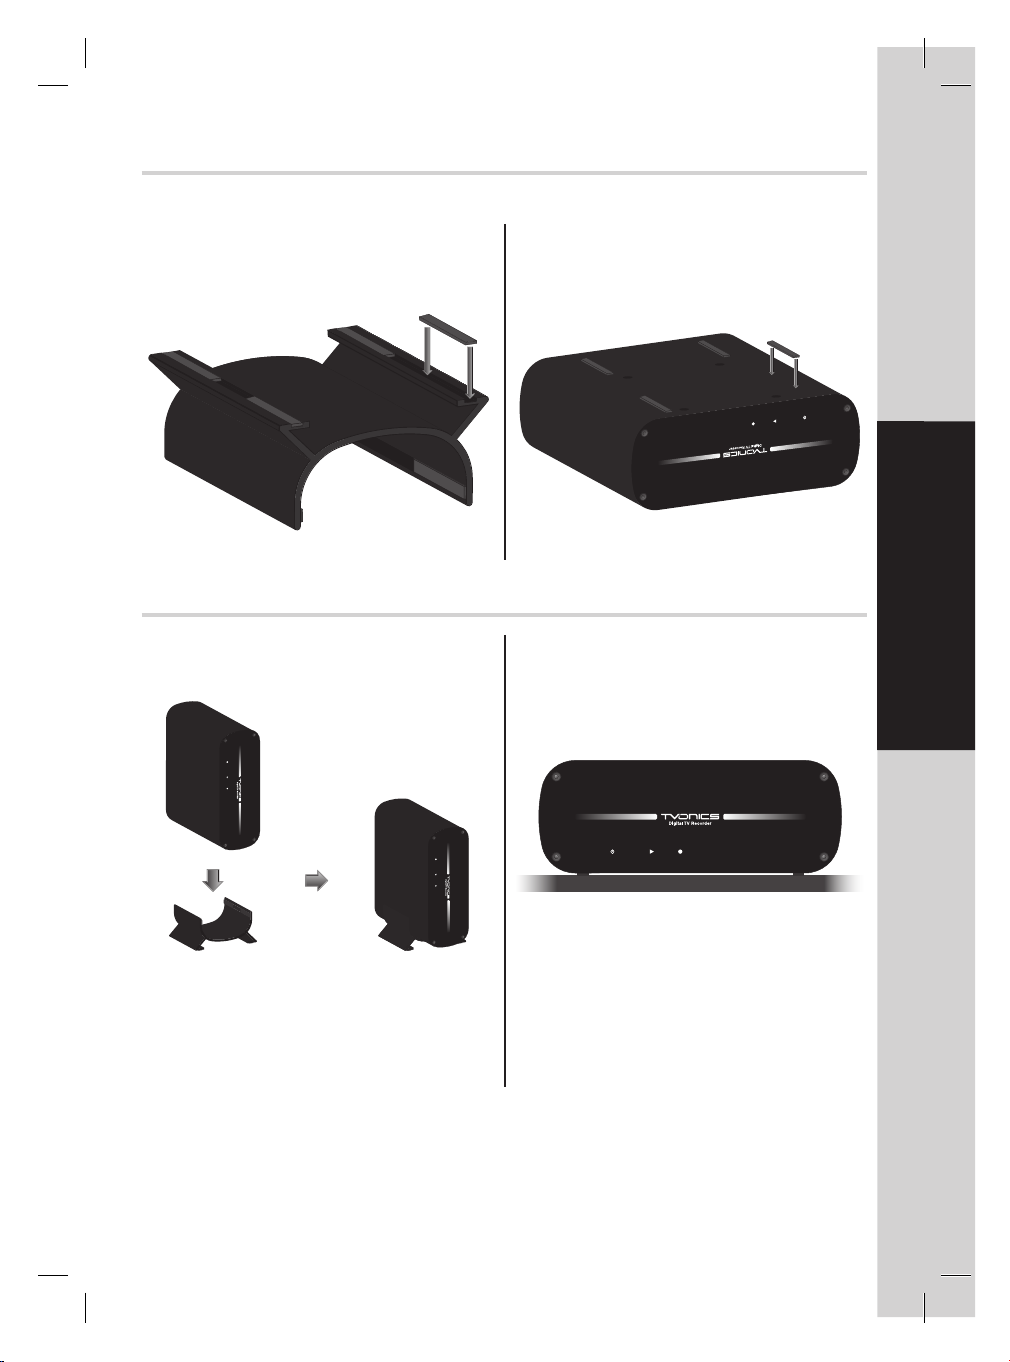
Attaching the Supplied Feet
Follow the instructions below to attach the supplied feet, according to which way you wish to install the Digital
TV Recorder:
Using the stand
(installing vertically):
Not using the stand
(installing horizontally):
Safe Installation
Getting Started
Using the stand
(installing vertically):
Always use the supplied stand when installing
the Digital TV Recorder vertically, as shown.
NEVER attempt to install the Digital TV
Recorder vertically without the supplied stand,
or with any other stand as this may result in
damage to the Digital TV Recorder.
Not using the stand
(installing horizontally):
Always install the Digital TV Recorder
horizontally as shown, on a stable surface.
Failure to do so may result in damage to the
Digital TV Recorder.
7
Page 8
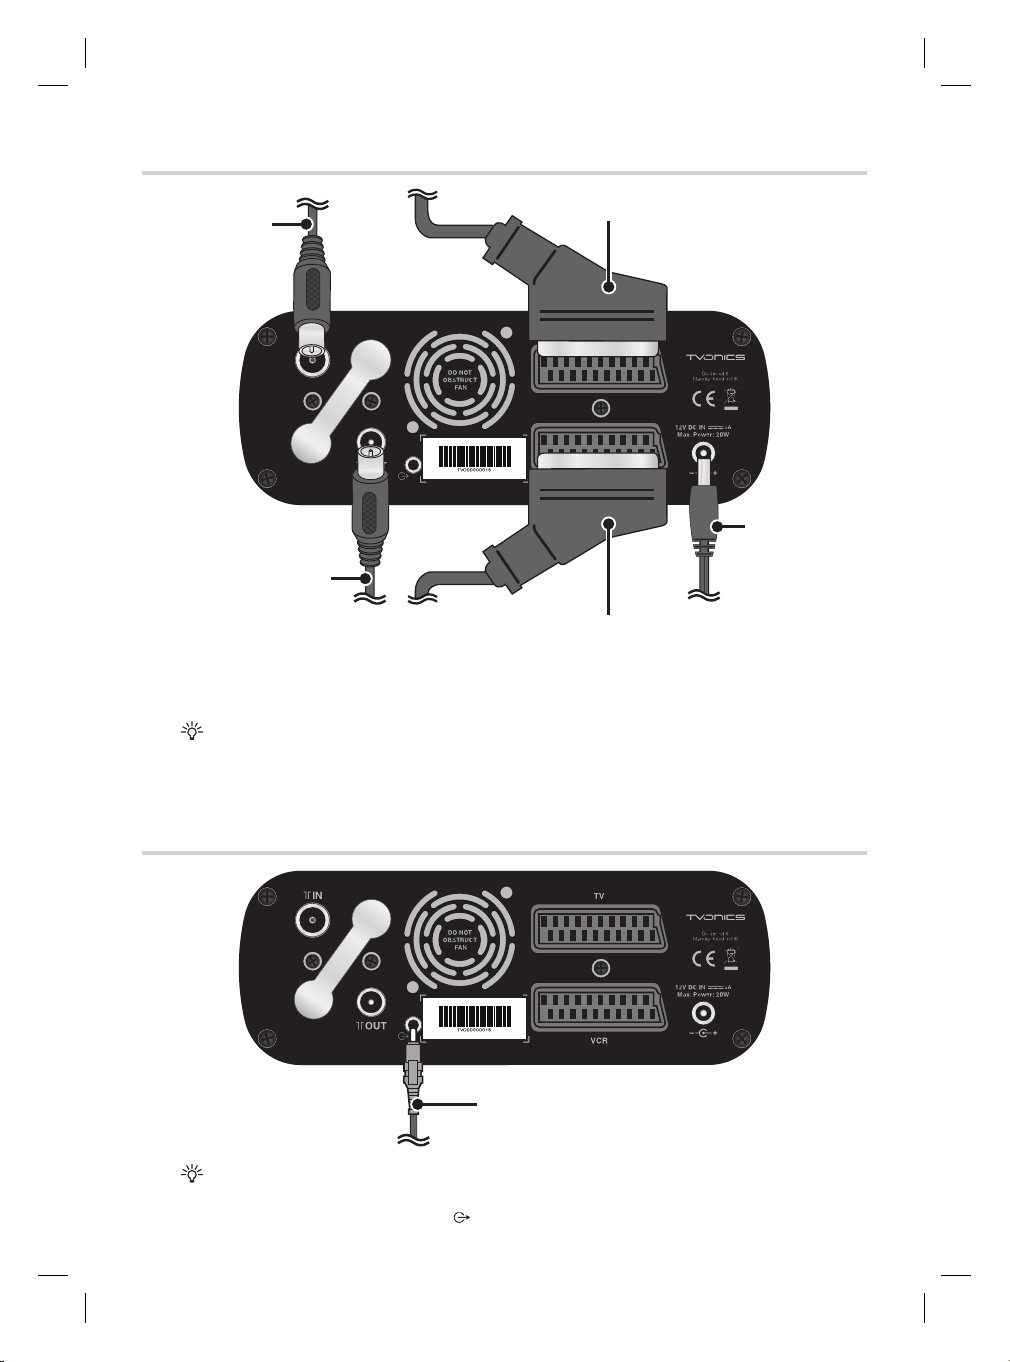
Connecting to your TV and VCR/DVD Recorder
To your TV
From your aerial
To your VCR/DVD Recorder/
TV
** (supplied RF lead)
To your VCR/DVD Recorder
(SCART lead not supplied)
If there isn’t already one in place, connect a second RF lead (not supplied) between your VCR/DVD
Recorder’s ‘RF OUT’ socket to your TV’s ‘RF IN’ socket*.
*Socket names may vary according to make and model of your equipment.
**If you don’t want to connect a VCR/DVD Recorder, connect the RF lead from the Digital TV Recorder’s ‘8
OUT’ socket to your TV’s ‘RF IN’ socket.
(supplied SCART lead)
To the mains
power outlet
(supplied power
supply)
Connecting to your Hi-Fi/Surround Sound System
To your Hi-Fi/Surround Sound System
(3.5mm jack plug lead/optical lead not supplied)
Depending on your Hi-Fi/Surround Sound System you can use either a conventional 3.5mm jack plug lead or an
optical lead (miniTOS).
Do not connect your headphones to the
8
socket.
Page 9
Automatically Tuning
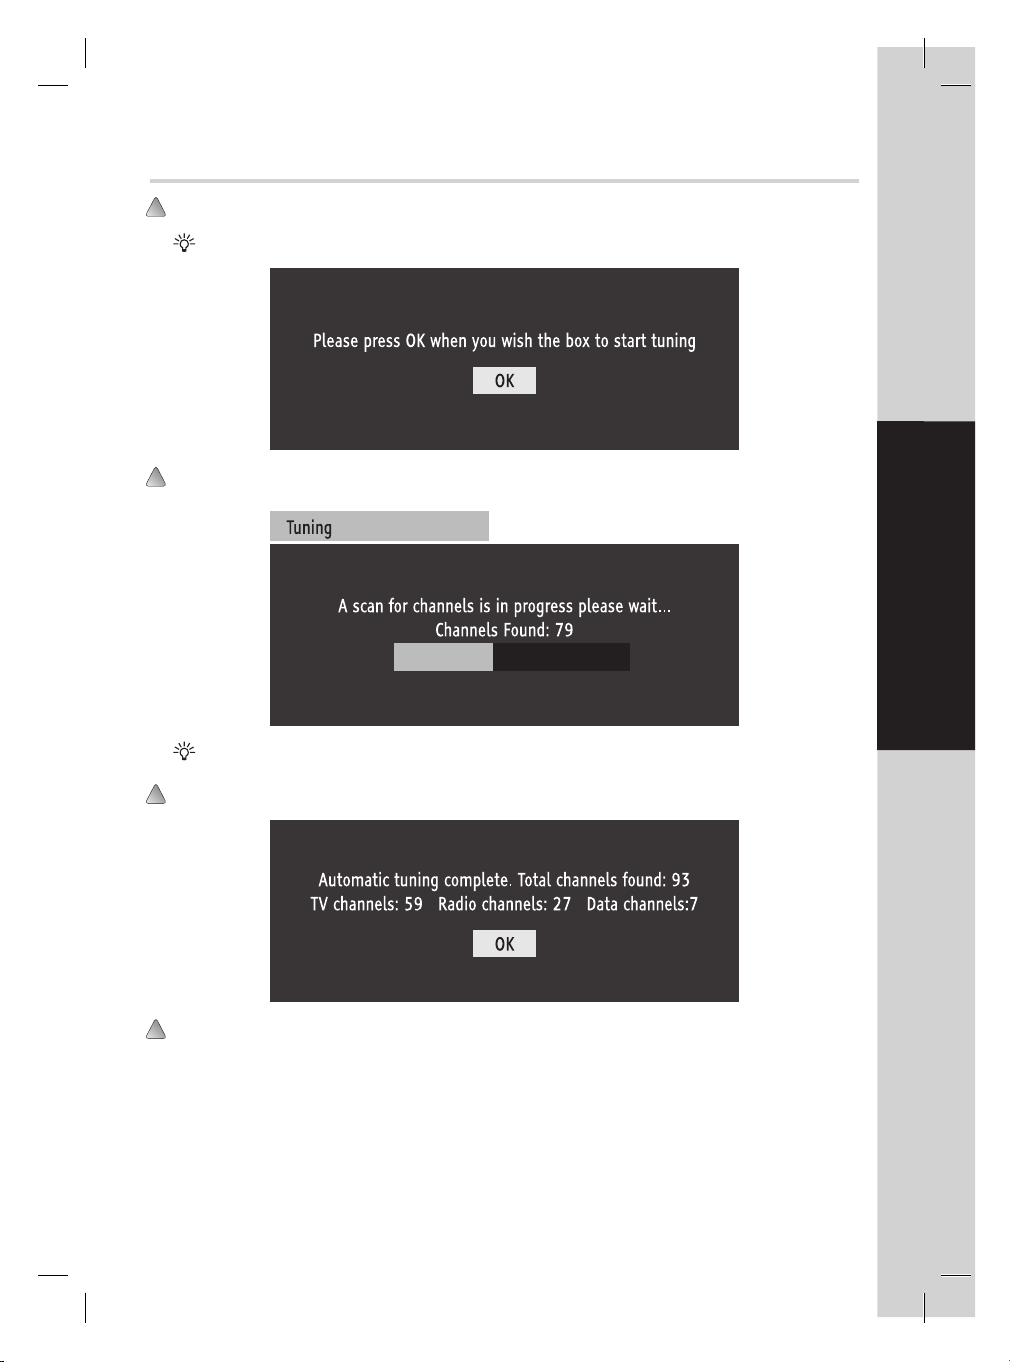
Once you have connected the Power Supply the following menu is displayed. Press OK to continue.
If the remote control does not work, press the DTV button and try again.
The Digital TV Recorder will now scan and store all available channels. Depending on the quality of your
reception, this may take several minutes. Please be patient and do not press any buttons.
If no channels are found a message is displayed asking you to check your aerial. Con rm that your aerial is
connected correctly and press OK to restart automatically tuning.
Once the automatic tuning is complete, a summary screen is displayed.
Press OK to exit the automatic tuning process.
Getting Started
Congratulations ! The Digital TV Recorder is now ready to use.
9
Page 10
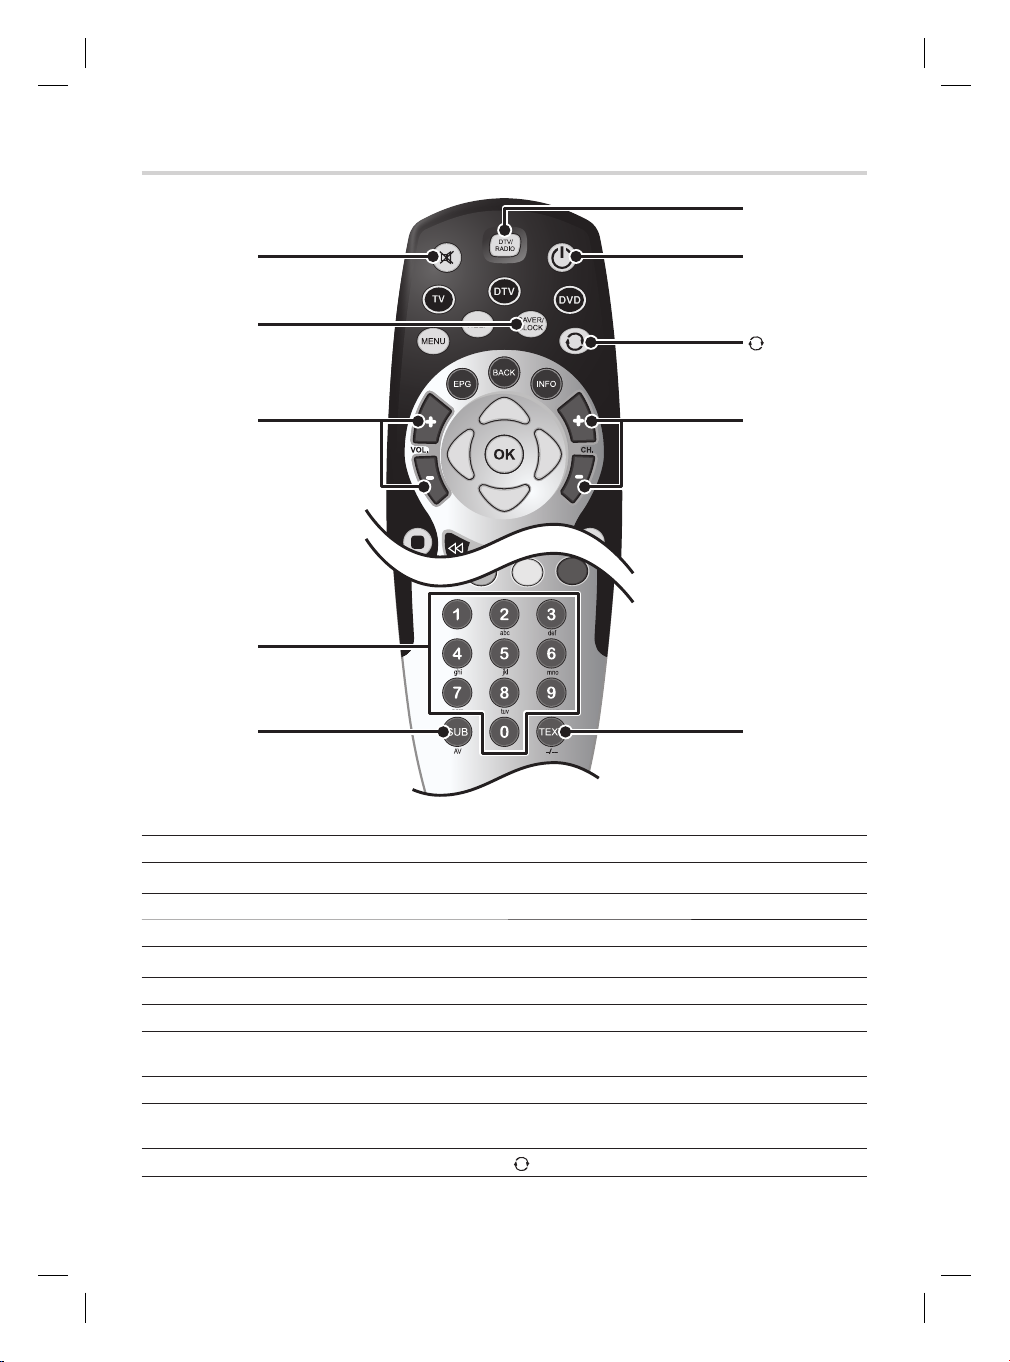
Everyday Tasks
%
button
SAVER/
CLOCK
button
DTV/RADIO
buttons
1
button
button
VOL. +/ −
buttons
0-9
buttons
SUB
button
CH. +/ −
buttons
TEXT
button
Basic operations
To Press
Switch the Digital TV Recorder on/off...
Select a channel... CH. +/ − or 0-9 buttons.
Adjust the volume.. VOL. +/− buttons*.
Mute the volume....
Display subtitles (when available)... SUB button. Press again to remove.
Display Digital Text (when available)... TEXT button.
Access Radio Channels.... DTV/RADIO button. Press again to return to TV
Display the clock... SAVER/CLOCK button.
Switch on the Screen Saver... SAVER/CLOCK button when the clock is
Return to the last channel watched...
1 button.
% button. Press again to restore*.
channels.
displayed.
button.
*Once the remote control has been programmed to operate your TV. Refer to page 28.
10
Page 11
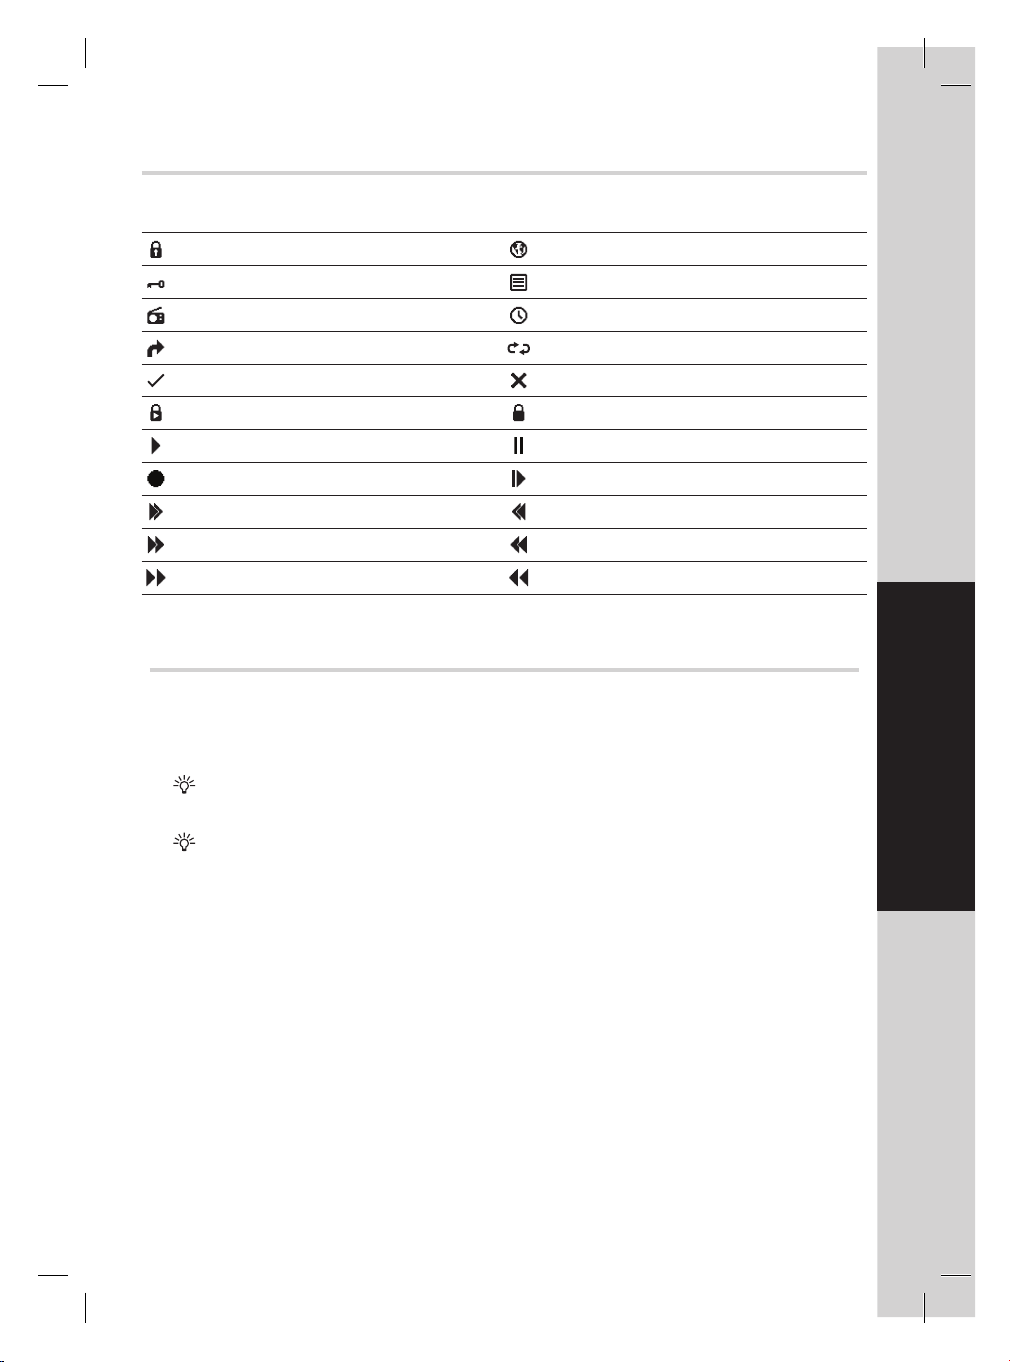
Common Symbols
The following symbols may be visible in the Electronic Programme Guide, Channel List, Info display, Timers
screen and Library menu.
Locked channel. Multiple audio languages available.
Encrypted/scrambled channel. Teletext available.
Radio Channel. Timer has been set.
Channel selected for moving. Timer is set to repeat (daily/weekly).
Recording has been viewed. Selected channel is hidden.
Playback of recording has been locked. Recording has been protected from deletion.
Play. Pause.
Record. Slow motion.
Fast Forward. Rewind.
Fast Forward (x16) Fast Rewind (x16)
Fast Forward (x128) Fast Rewind (x128)
Freeview Playback
Freeview Playback is designed to make recording digital TV even easier.
With Freeview Playback, the start and end times of recordings will automatically change if the programme
moves to ensure that everything is recorded.
Daily Use
For example, even if a sporting event overruns, the whole event will be recorded so you don’t miss a thing.
Programmes that are moved as a result of the sporting event overunning will also be recorded correctly, even
though they are starting later than originally scheduled.
The Digital TV Recorder will record programmes according to the programme information received from
broadcasters. If a programme starts or ends at a different time to the programme information broadcast, you may
miss the start or end of that programme. The programme information is the responsibility of the broadcasters. The
Digital TV Recorder will automatically extend recordings for 3 minutes, wherever possible, to minimise the risk of
missing the end of a recording..
At the time of this Digital TV Recorder’s manufacture, other Freeview Playback features, such as Series Link,
are not fully supported by broadcasters. Once other Freeview Playback features are fully available and tested
for compatibility with our products, TVonics will automatically update your Digital TV Recorder to use all these
features. This update will be via an over air download.
IMPORTANT ! In order to receive any updates it is recommended that the Digital TV Recorder is always left in
standby overnight when not in use. Do not unplug the Digital TV Recorder.
If you register your Digital TV Recorder we will contact you before the update with information on how to receive
the update and how to use any additional options. You can register your Digital TV Recorder by completing and
returning the Registration Form found on the supplied Quick Start Guide.
After your Digital TV Recorder has been updated you may notice additional options when setting a recording.
Alternatively, if you notice any changes and have not registered your Digital TV Recorder, check www.tvonics.com
for further details.
11
Page 12
Recording Programmes
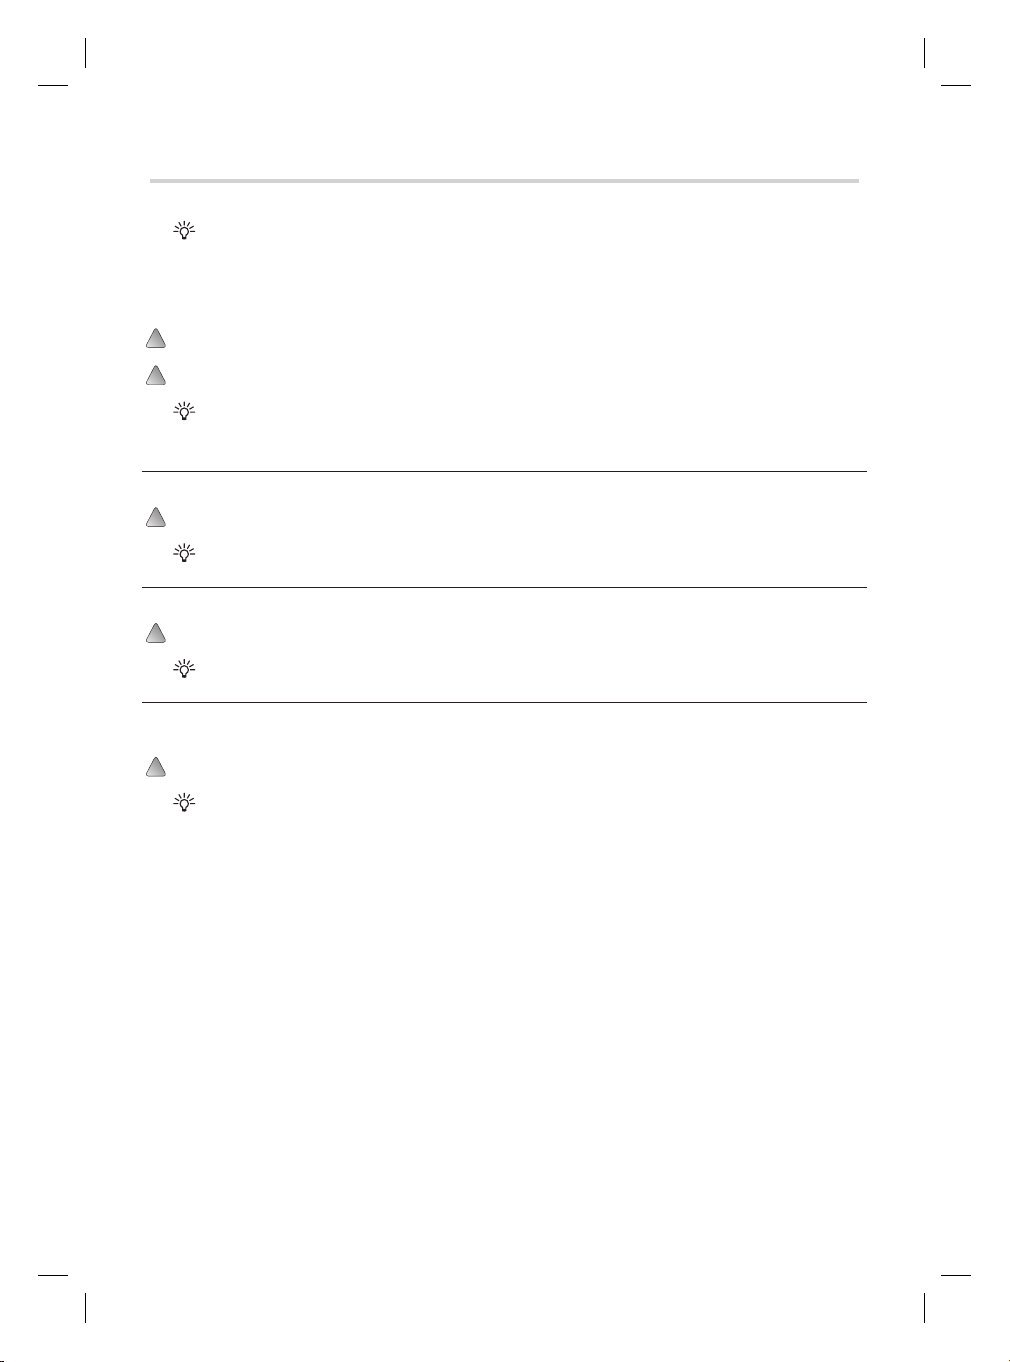
There are 4 different ways to record programmes:
The Digital TV Recorder will record programmes even if the programme is shown later than advertised (e.g. due to
a previous programme overrunning).
The Digital TV Recorder will also automatically add 3 minutes to the end of each recording.
Instant recording
While watching a programme, press z REC to start recording.
Press x STOP to stop recording.
While the Instant Recording menu is displayed you can press z REC to set subsequent programmes on that
channel to record.
While recording you can change channels but it is not possible to pause or rewind live TV.
Recording from the Electronic Programme Guide (EPG)
With the required programme highlighted in the EPG, press z REC to set the recording.
For full details on the EPG, refer to page 14.
Recording from the Info display
With the required programme highlighted in the Info display, press z REC to set the recording.
For full details on the Info display, refer to page 15.
Manually recording
You can manually set a recording from the Timers menu.
With the Timers menu displayed, press the YELLOW button to manually set a recording.
12
For full details on the Timers menu, refer to page 17.
Page 13
Timeshifting
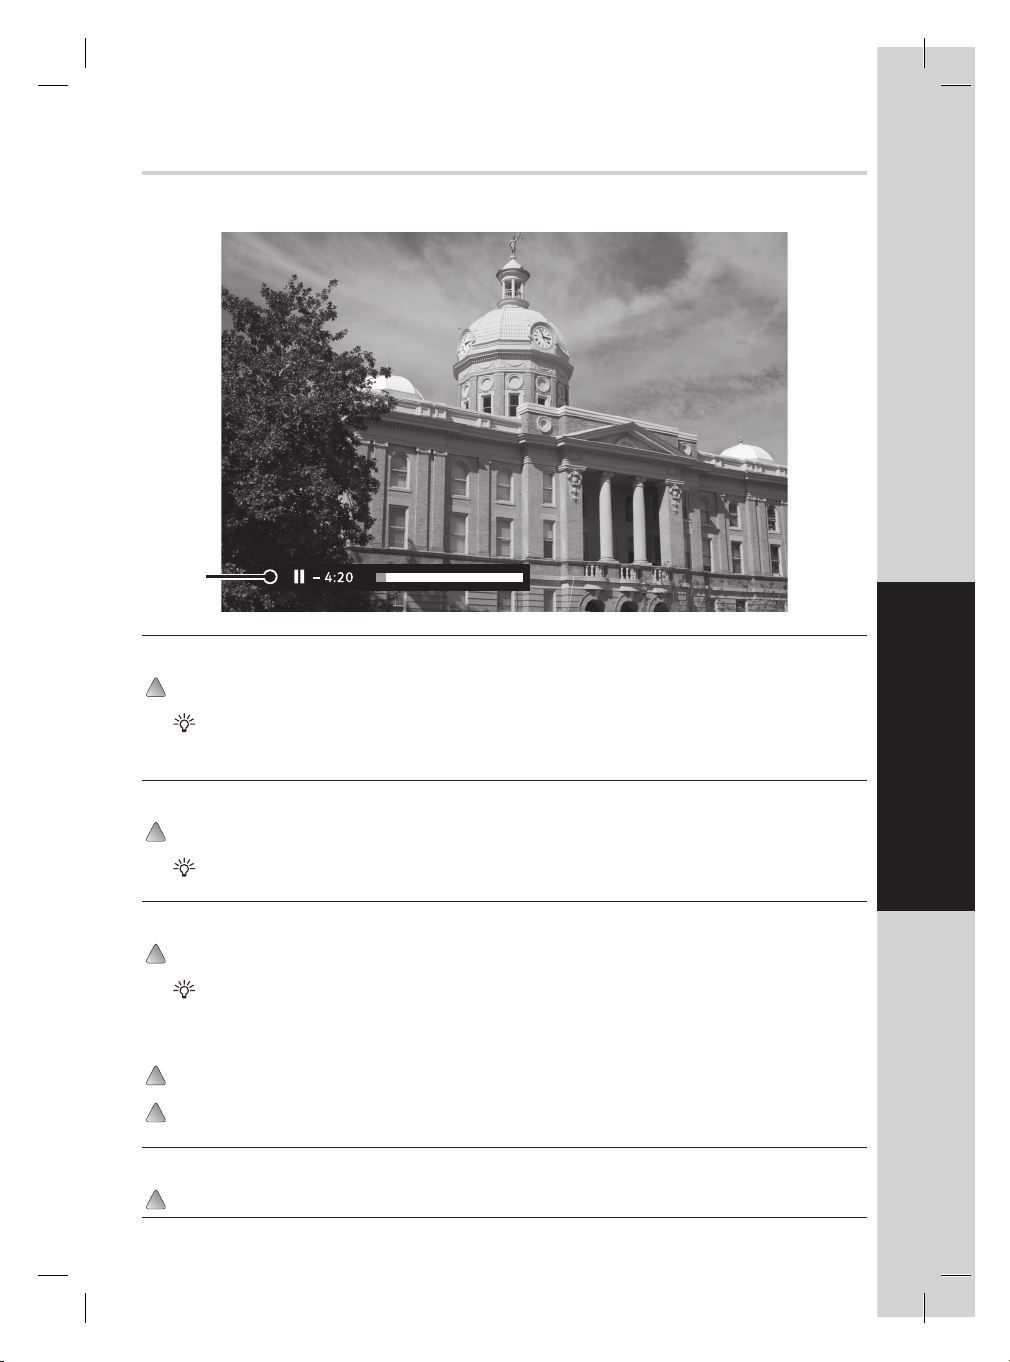
Timeshifting, also known as Pause live TV, lets you pause a broadcast programme and continue watching it later.
The maximum length of time you can pause is 2 hours.
Timeshift
banner
Pausing live TV
Press X to pause live TV. Press B to resume.
When live TV is paused, the timeshifting banner is displayed indicating how long the programme has been paused.
The length of time you can pause a programme for can be adjusted in the menu. See ‘Pause Buffer Size’ on page 25.
Daily Use
Rewinding live and timeshifted TV
Press j to rewind live TV. Press B to resume.
You can press j a further 3 times to rewind faster.
Fast forwarding timeshifted TV
Press J to fast forward timeshifted TV. Press B to resume.
You can press J a further 3 times to fast forward faster.
Watching in slow motion
Press X to pause live TV or a recording.
Press J to watch in slow motion. Press B to return to normal.
Stopping timeshifting
Press x STOP.
13
Page 14
The Electronic Programme Guide (EPG)
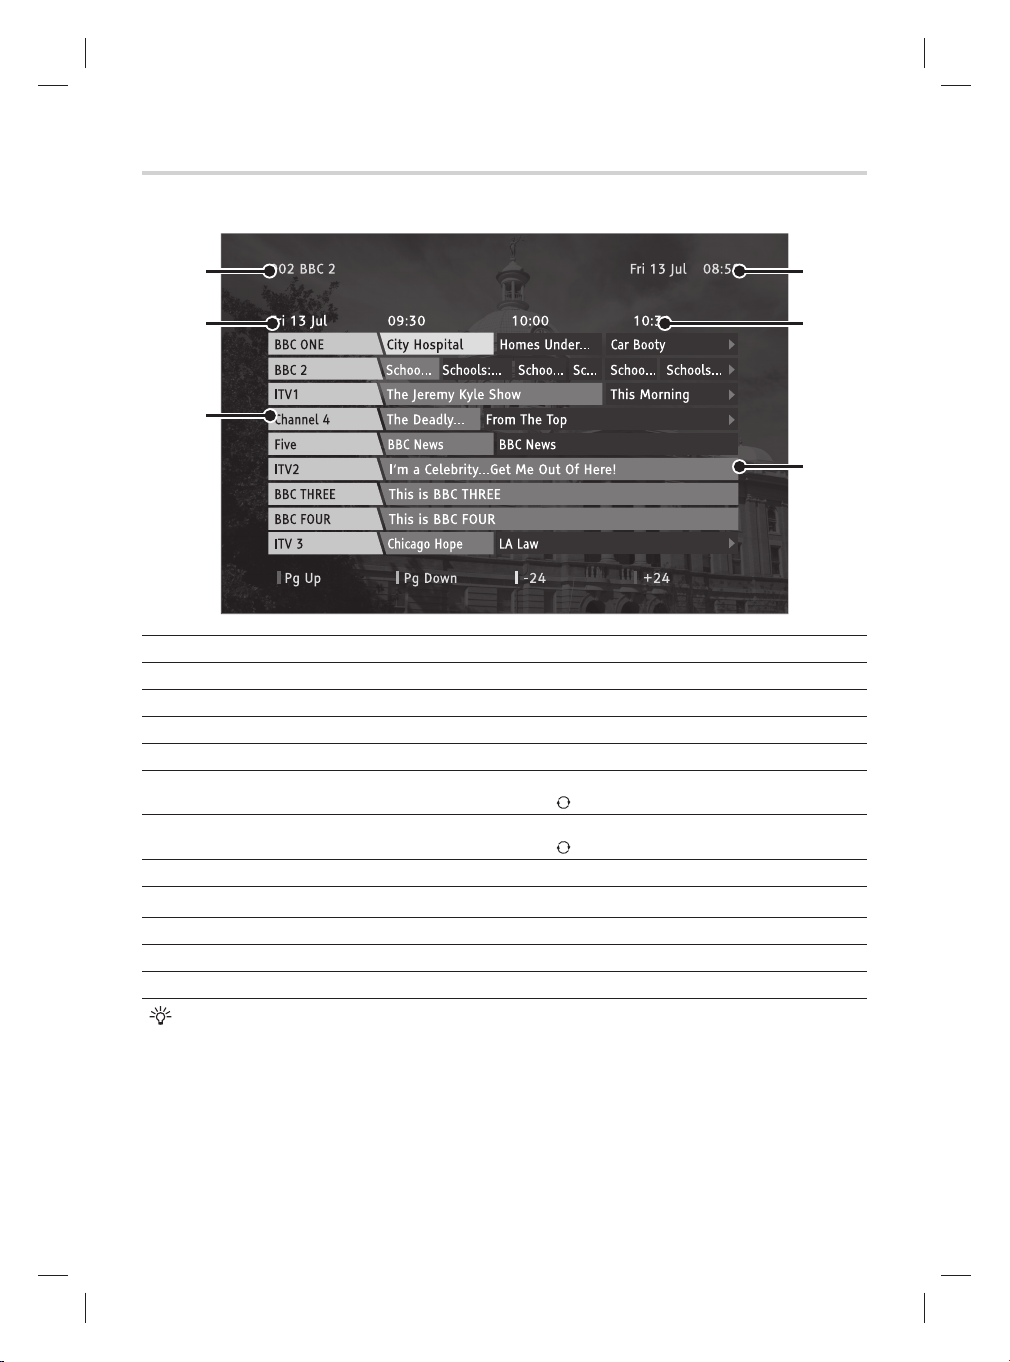
The EPG displays programme information for the next 8 days (when transmitted by broadcasters). You can also
set programmes to be recorded from the EPG.
Today’s date
Current
channel
and current
time
Date of
currently
displayed
programmes
List of
channels
To Press
Access the EPG... EPG button.
Move around the EPG... UP/DOWN/LEFT/RIGHT buttons.
Display the previous nine channels in the list... RED button.
Display the next nine channels in the list... GREEN button.
Move forward 4 or 24 hours... BLUE button.
to switch between 4 and 24 hours)
(Press
Move back 4 or 24 hours... YELLOW button.
(Press to switch between 4 and 24 hours)
View information for the highlighted programme... INFO button. Press again to return to the EPG.
Set a highlighted programme to record...
z REC button.
Preview a current programme (in the background)... OK button.
Exit the EPG and switch to a previewed programme... OK button.
Exit the EPG... EPG or BACK button.
Time of
currently
displayed
programmes
Programme
information
14
If you accidentally set a wrong programme to record, press the z REC button again to cancel.
Page 15
The Info display
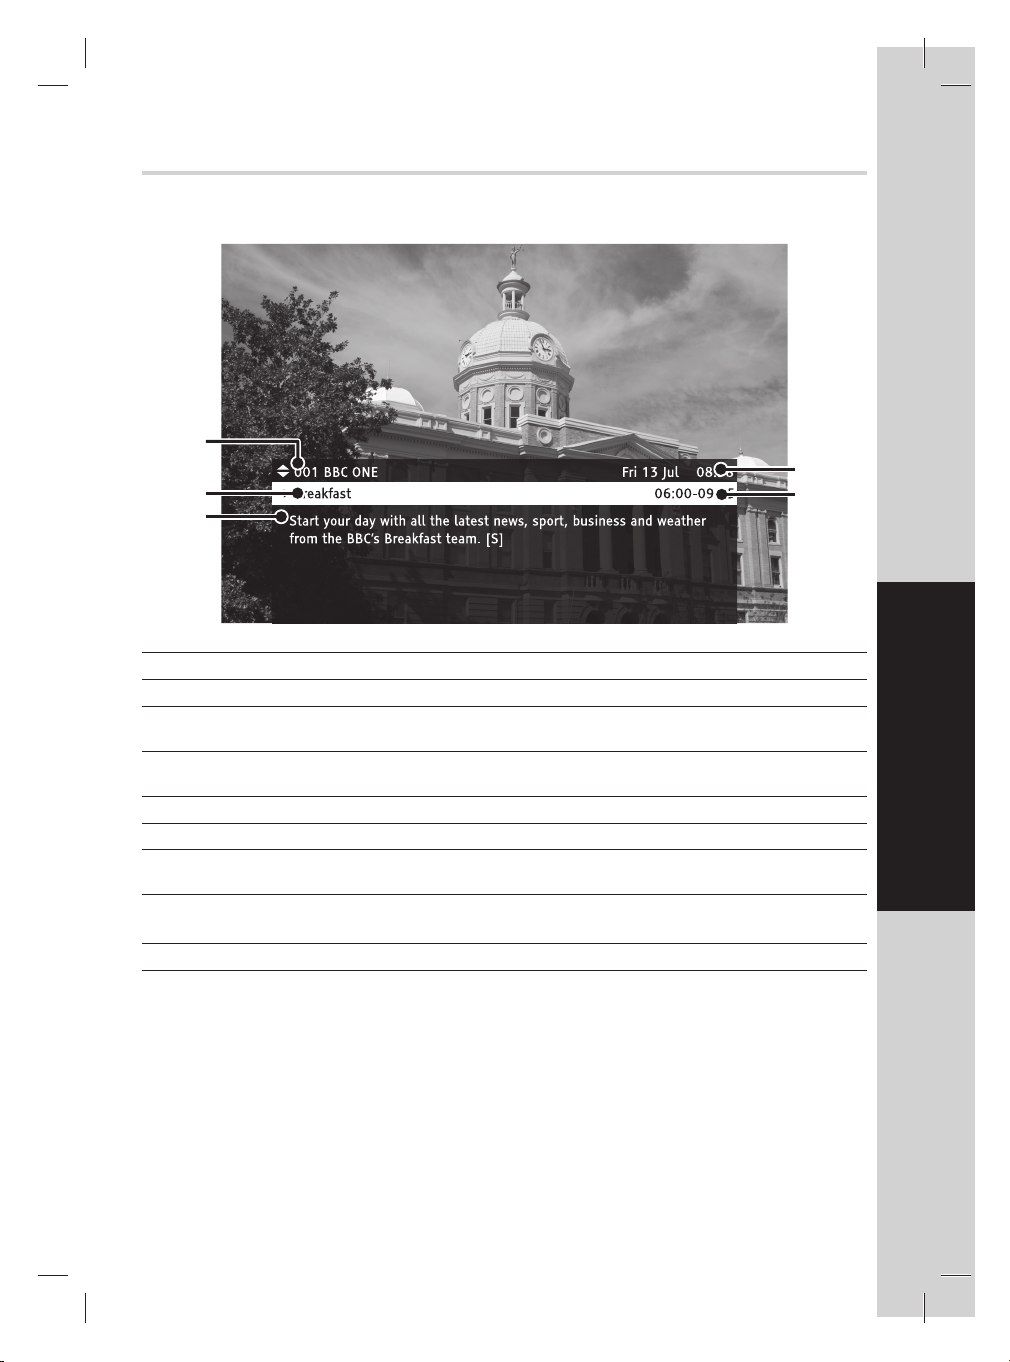
When watching TV, the Info display gives brief information on the current and future programmes (when the
programme information is transmitted by broadcasters). You can also set programmes to be recorded from the
Info display. When watching a recording, the Info display gives brief information on the recorded programme.
Today’s
Channel
Programme
name
Selected
programme’s
details
date and
current
time
Selected
programme’s
start and
end time
To Press
Access Info for the current programme/recording... INFO button.
View information for future programmes on the
current channel...
View information for programmes on other
channels...
Change the Audio setting (if available)... RED button.
Change the Subtitle setting (if available)... GREEN button.
Switch to another channel (when viewing that
channel’s information...
Set a future programme to record...
Exit Info... INFO or BACK button.
RIGHT button.
UP/DOWN buttons.
OK button.
z REC button (whilst viewing that programme’s
information).
Daily Use
15
Page 16
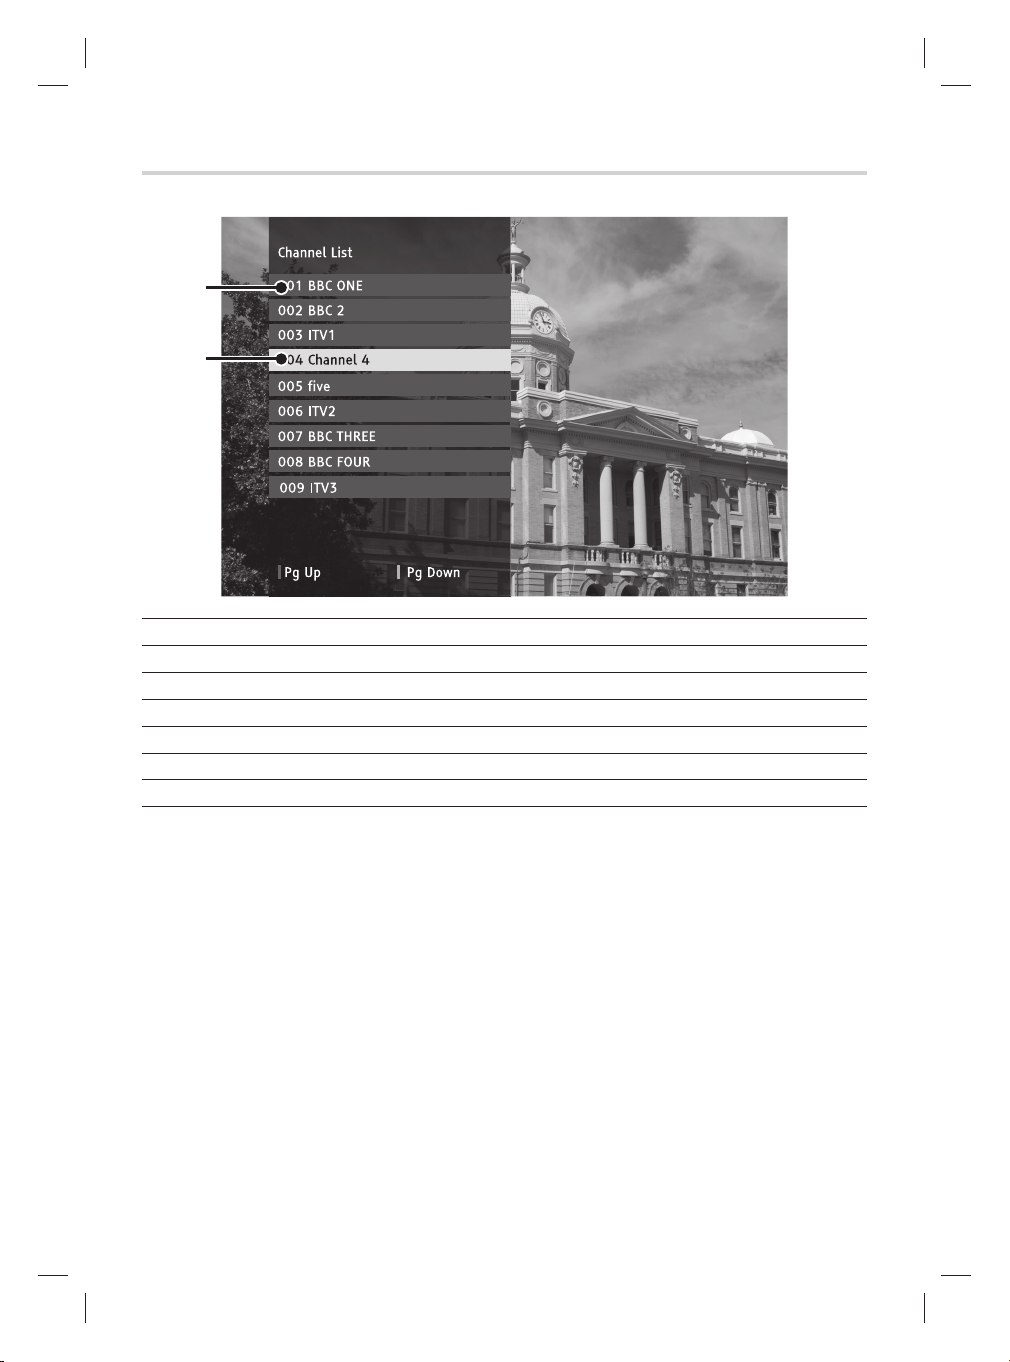
The Channel List
The Channel List displays all the available channels.
List of
channels
Highlighted
channel
To Press
Access the Channel List... OK button while watching TV.
Select channels... UP/DOWN buttons.
Display the previous nine channels in the list... RED button.
Display the next nine channels in the list... GREEN button.
Switch to the selected channel... OK button.
Exit the Channel List... BACK button.
16
Page 17
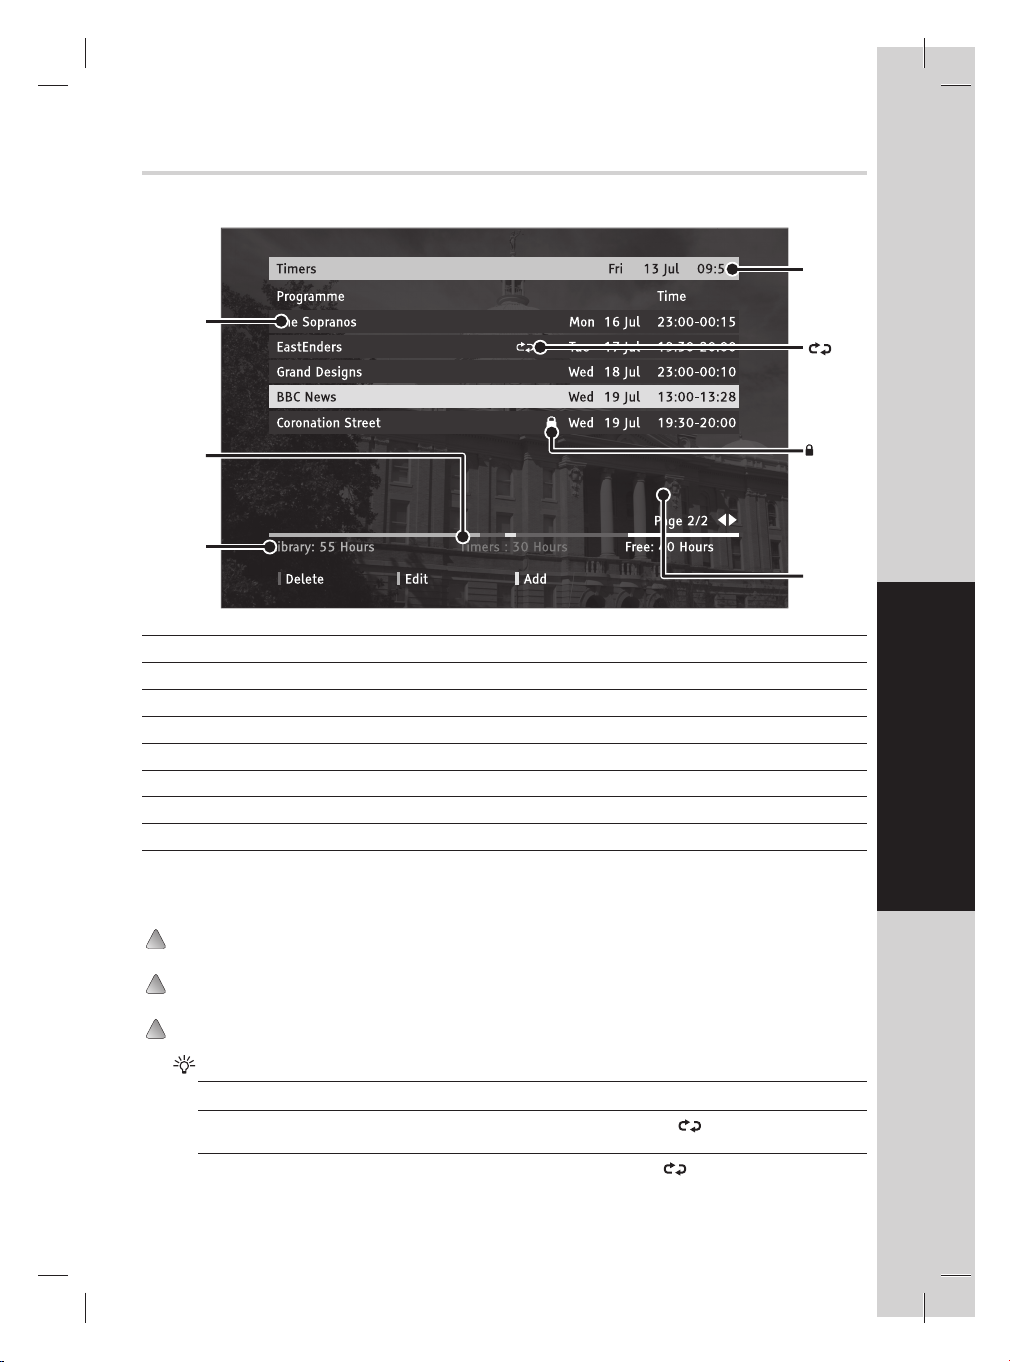
The Timers screen
The Timers screen displays all the programmes that are currently set to record. You can also set a manual timer
and modify or cancel an existing timer from the Timers screen.
Today’s date
and current
List of
timers
Size of
current
timers
(approx)
Size of
current
recordings
(approx)
To Press
Access the Timers menu... TIMER button.
Select a timer event... UP/DOWN buttons.
View additional pages of timer events (if available)... LEFT/RIGHT buttons.
Delete the selected timer event... RED button.
Modify the selected timer event... GREEN button (see below for more details).
Manually set a timer... YELLOW button (see below for more details).
Exit the Timers menu... TIMER or BACK button.
time
symbol
indicates
that the
timer is set
to repeat
symbol
indicates
that the
timer is
protected
from
deletion
Available
recording
space
(approx)
Daily Use
Modifying a timer
You can edit a current timer to change the channel, start and end time/date,
With the required timer highlighted, press GREEN. If the timer is protected, use the 0-9 buttons to
enter the PIN.
Press UP or DOWN to highlight the required setting. Use the UP, DOWN, LEFT, RIGHT and 0-9
buttons to make changes.
Press GREEN to save the changes.
‘Repeat’ options:
‘Once’ The timer will occur once.
‘Daily’
‘Weekly’
The timer will be repeated at the same time every day (
screen).
The timer will be repeated at the same time weekly (
screen).
is displayed in the Timer
is displayed in the Timer
17
Page 18
‘Change/Delete’ options:
‘Allowed’ The timer can be changed or deleted.
‘Disallowed’ The PIN must be entered correctly before the timer can be changed/deleted.
‘Playback’ options:
‘Allowed’ The recording can be viewed (even if it was recorded from a locked channel).
‘Disallowed’ The recording can not be viewed. The PIN must be entered correctly before the
‘Use parental settings’ If the recording is made from a locked channel, the PIN must be entered correctly
symbol will be added to recordings that have been protected from change or
(A
deletion.)
recording can be viewed.
symbol will be added to recordings that have been protected from playback.)
(A
before the recording can be viewed (see Parental Control on page 26).
Manually setting a timer
With the ‘Timers’ menu displayed, press YELLOW.
Press UP or DOWN to highlight the required setting. Use the UP, DOWN, LEFT, RIGHT and 0-9
buttons to make changes.
18
Page 19
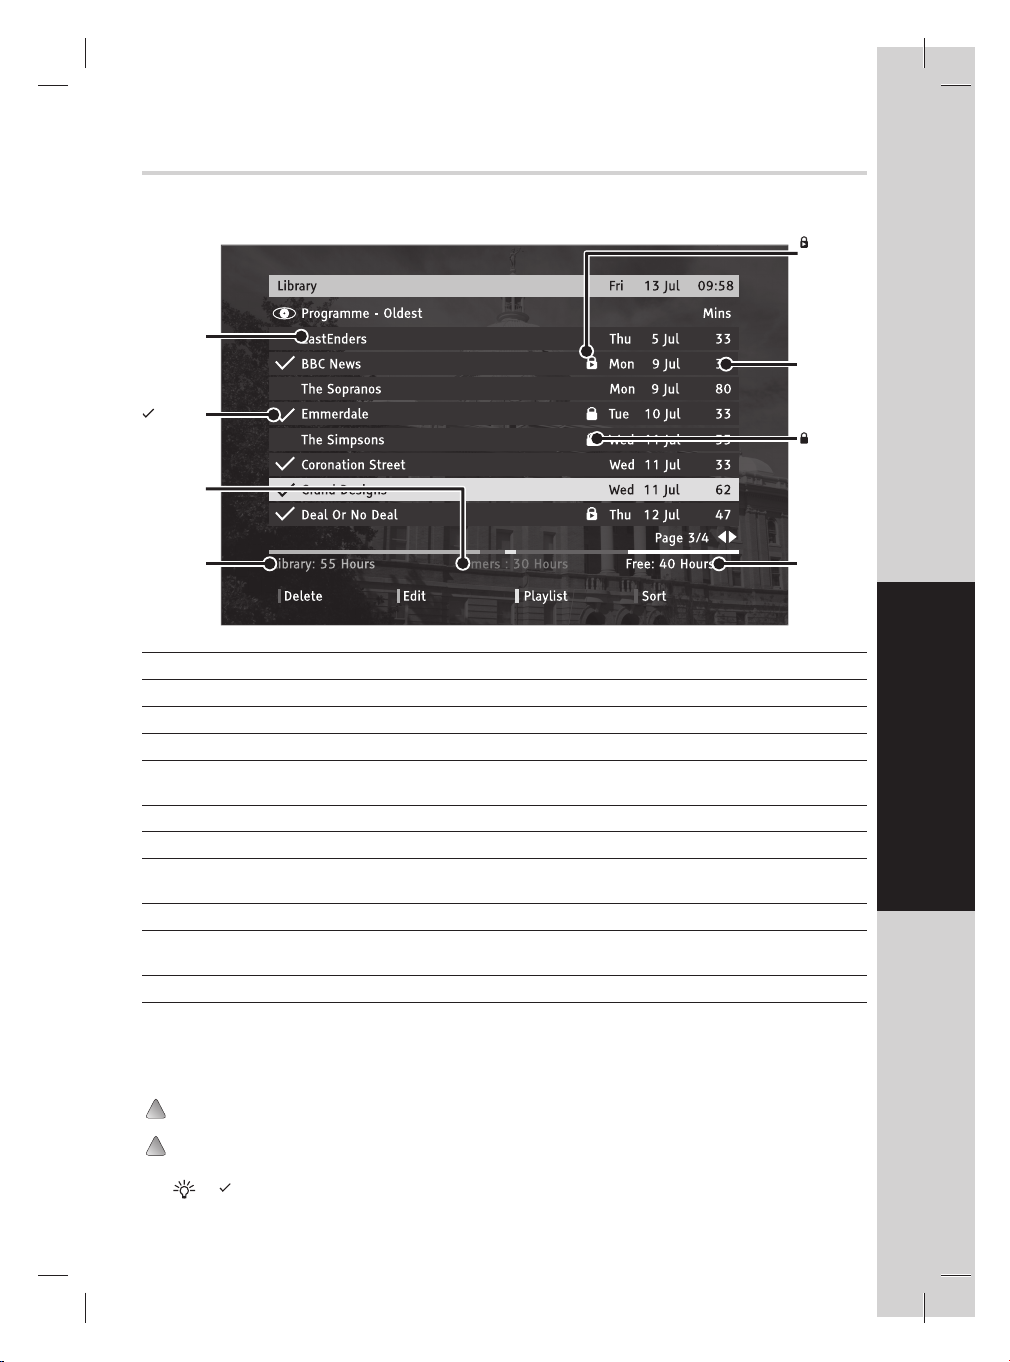
The Library menu
The Library menu displays all the recordings currently stored on the hard disk. You can also browse and manage
your recordings from the Library menu. The Library menu will take longer to load if you have lots of recordings
stored on the hard disk.
List of
recordings
symbol
indicates that the
recording has
been watched
Size of
current
timers
(approx)
Size of
current
recordings
(approx)
symbol
indicates
that the
recording is
protected
from
playback
Length of
recording
in minutes
(approx)
symbol
indicates
that the
recording is
protected
from
deletion
Available
recording
space
(approx)
To Press
Access the Library menu... LIB button.
Select a recording... UP/DOWN buttons.
View additional pages of recordings (if available)... LEFT/RIGHT buttons.
Play the selected recording from the last played
position...
B button.
Play the selected recording from a speci c position... OK button (see below for more details).
Delete the selected recording... RED button.
Edit the selected recording (to set protection and
GREEN button (see below for more details).
playback options)...
Add the selected recording to the playlist... YELLOW button (see below for more details).
Sort the recordings... BLUE button. Press the corresponding colour
button to select the required sort option.
Exit the Library menu... LIB or BACK button.
Playing a recording from a speci c position
You can play a recording from the start, the end, the last played position or from any point within the
recording.
With the required recording highlighted, press OK.
Press UP, DOWN, LEFT and RIGHT to highlight the required option. (For ‘Start playback from’, use
the 0-9 buttons to enter the required time.) Press OK to play the recording.
A symbol will be added to recordings that have been played.
Daily Use
19
Page 20

Setting protection and playback options
You can prevent a recording from being deleted or played unless the PIN is entered correctly. This can be
used to stop accidental deletion or prevent children watching inappropriate recordings.
With the required recording highlighted, press GREEN.
Press UP or DOWN to highlight the required setting. Use the LEFT and RIGHT buttons to make
changes. Press GREEN to save any changes,
A symbol will be added to recordings that have been protected from deletion.
symbol will be added to recordings that have been protected from playback.
A
Using the playlist
You can set multiple recordings to be played one after another. This can be useful when saving multiple
recordings to a video tape/DVD or just to watch several recordings in one go.
With the required recording highlighted, press YELLOW. A ‘1’ is added by the recording’s name.
Repeat to add further recordings to the playlist.
To remove a recording from the playlist, highlight the recording and press YELLOW.
With one of the recordings in the playlist highlighted, press OK. Press UP or DOWN to highlight ‘Start
playlist’. Press OK to play the playlist. If you are saving recordings to a video tape/DVD, don’t forget to
start recording on your VCR/DVD recorder.
While the playlist is playing, press L to skip to the next programme in the playlist. Press l to return to the
start of the current programme.
20
Page 21
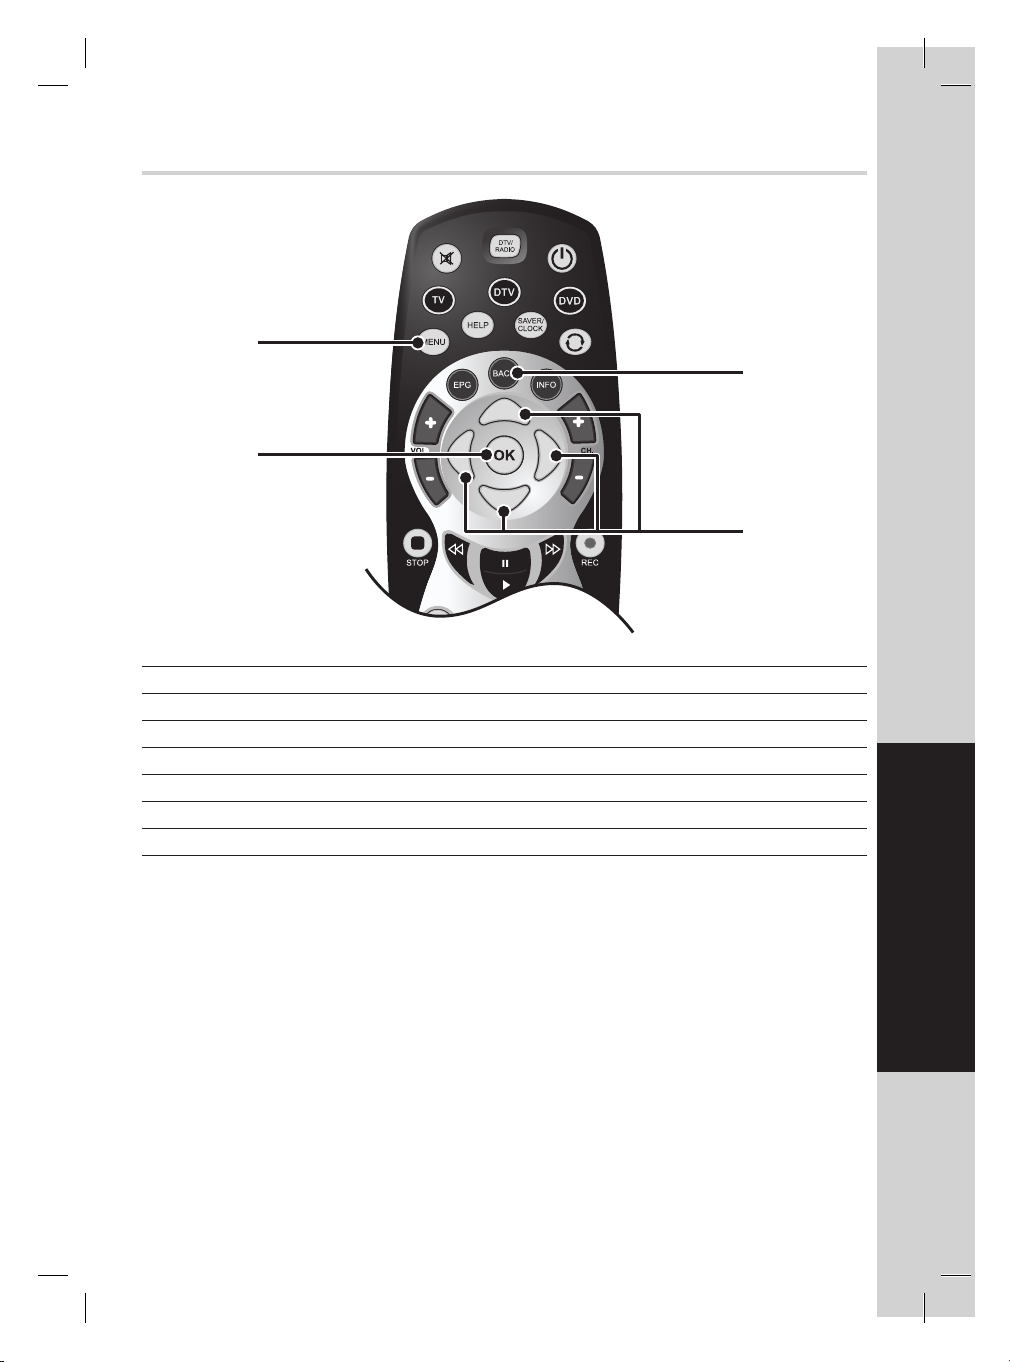
Navigating the menu
MENU
button
OK
button
To Press
Access the Menu... MENU button.
Highlight an option... UP/DOWN buttons.
Select an option... OK button.
Adjust an option’s settings.... LEFT/RIGHT buttons.
Go back a step... BACK button.
Exit the Menu... MENU button.
BACK
button
UP/DOWN/
LEFT/RIGHT
buttons
The Menu
21
Page 22
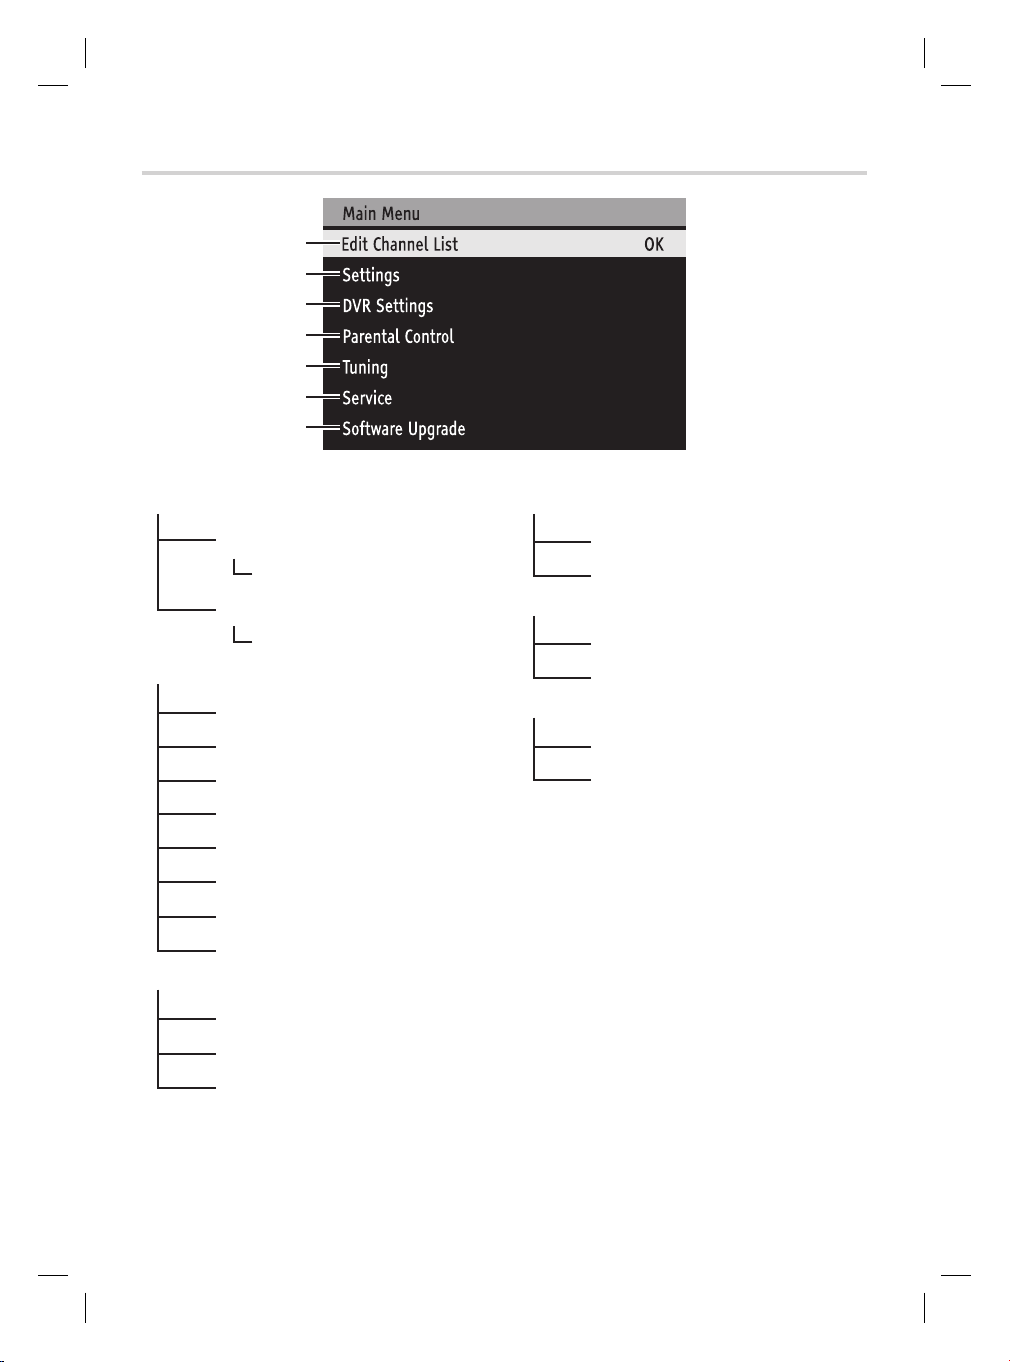
Overview of the menu
1
2
3
4
5
6
7
Edit Channel List
1
Hide Channels Set Pin
Edit Channel List Lock Channels
Sort Channels
Sort Channel List Automatic Search
Settings Manual Search
2
Language
Country Manufacturers Details
Subtitle Signal Strength
Audio
TV Out
Picture Mode
Picture Format
Reset Set Top Box
DVR Settings
3
Pause Buffer Size
Auto Delete
Format Disk
Parental Control
4
Tuning
5
Service
6
Software Upgrade
7
22
Page 23
Edit Channel List
Hide Channels
You can hide channels so they do not appear on the EPG, Info and Channel List.
Hidden channels do not appear when changing channels with the CH. +/ − buttons, but are still available by
entering the channel number with the 0-9 buttons.
Press MENU. With ‘Edit Channel List’ highlighted, press OK.
With ‘Hide Channels’ highlighted, press OK.
Press UP or DOWN to highlight the required channel, press OK.
An ‘X’ appears next to channels that have been hidden. Repeat for all required channels.
Press RED or GREEN to view the Previous or Next page of channels.
Make channels visible again by highlighting them and pressing OK to remove the ‘X’ in the step above.
Sort Channels
You can sort the channel order to one that suits you.
Press MENU. With ‘Edit Channel List’ highlighted, press OK.
With ‘Sort Channels’ highlighted, press OK.
Press UP or DOWN to highlight the required channel, press OK.
A ‘ ’ appears next to the selected channel.
Press UP or DOWN to highlight the new position for that channel, press OK.
The channel positions are swapped.
Press RED or GREEN to view the Previous or Next page of channels.
Settings
Language
You can select the language used in the Menu.
Press MENU. With ‘Settings’ highlighted, press OK.
With ‘Language’ highlighted, press LEFT or RIGHT to highlight the required language (if available).
Country
You can select the country in which you are using the Digital TV Recorder to ensure that the time and
channel information is correct.
Press MENU. With ‘Settings’ highlighted, press OK.
With ‘Country’ highlighted, press LEFT or RIGHT to highlight the required language.
Subtitle
You can select the default language used for subtitles.
Press MENU. With ‘Settings’ highlighted, press OK.
With ‘Subtitle’ highlighted, press LEFT or RIGHT to highlight the required country.
Subtitles are displayed in the selected language only when the necessary information is transmitted by the
broadcaster.
The Menu
23
Page 24
Audio
Some digital programmes may broadcast several audio languages. You can select which language to listen to.
Press MENU. With ‘Settings’ highlighted, press OK.
With ‘Audio’ highlighted, press LEFT or RIGHT to highlight the required language.
Alternative languages are only available when the necessary information is transmitted by the broadcaster.
TV Out
You can select which format to output the picture to the TV.
Press MENU. With ‘Settings’ highlighted, press OK.
With ‘TV Out’ highlighted, press LEFT or RIGHT to highlight the required setting.
For the best picture quality, select ‘RGB’.
RGB and Y/C are only available via the TV SCART socket.
Picture Mode
You can set the Digital TV Recorder to output 4:3 or 16:9 (widescreen) pictures.
Press MENU. With ‘Settings’ highlighted, press OK.
With ‘Picture Mode’ highlighted, press LEFT or RIGHT to highlight the required setting.
Picture Format
You can select whether to output 16:9 (widescreen) pictures on a 4:3 TV as full screen or letterbox.
Press MENU. With ‘Settings’ highlighted, press OK.
With ‘Picture Format’ highlighted, press LEFT or RIGHT to highlight the required setting.
When outputting ‘4:3’ pictures, setting ‘Picture Format’ to ‘Normal’ lls the TV screen but some of the picture is
lost. Setting ‘Picture Format’ to ‘Letterbox’ displays all of the picture with black bars visible on screen.
Reset Set Top Box
You can reset the Digital TV Recorder to it’s default state.
Press MENU. With ‘Settings’ highlighted, press OK.
With ‘Reset Set Top Box’ highlighted, press OK.
Press LEFT or RIGHT to highlight ‘YES’, press OK.
Enter your PIN (default 0000) to continue or press BACK to return to the Menu.
CAUTION ! Resetting the Digital TV Recorder will clear all settings and all channel information. After resetting, the
Digital TV Recorder will need to retune all channels. Only recorded programmes stored on the hard disk will be
kept.
24
Page 25
DVR Settings
Pause Buffer Size
You can set the amount of time the Digital TV Recorder will pause a programme for. This setting also
determines how far back you can rewind live TV.
Press MENU. With ‘DVR Settings’ highlighted, press OK.
With ‘Pause Buffer Size’ highlighted, press LEFT or RIGHT to highlight the required setting.
Auto Delete
You can set the Digital TV Recorder to automatically delete recorded programmes based on their size or if
they have been watched. Programmes will only be deleted when there is not enough hard disk space available
for new recordings.
Press MENU. With ‘DVR Settings’ highlighted, press OK.
With ‘Auto Delete’ highlighted, press LEFT or RIGHT to highlight the required setting.
Set ‘Auto Delete’ to ‘Never’ if you prefer to manage your recordings yourself.
Format Disk
You can format the hard disk to delete all stored programmes.
Press MENU. With ‘DVR Settings’ highlighted, press OK.
With ‘Format Disk’ highlighted, press OK.
Press LEFT or RIGHT to highlight ‘YES’, press OK.
Enter your PIN (default 0000) to continue or press BACK to return to the Menu.
CAUTION ! Formatting the hard disk will delete all the recorded programmes stored on the hard disk.
The Menu
25
Page 26
Parental Control
Set PIN
The default PIN is 0000. You can change this to something more memorable.
Press MENU. With ‘Parental Controls’ highlighted, press OK.
Enter the current PIN.
With ‘Set Pin’ highlighted, press OK.
Enter the new PIN. Re-enter the new PIN. Make a note of your new PIN and keep it in a safe place.
Lock channels
You can lock channels so they can only be viewed once the correct PIN is entered.
Press MENU. With ‘Parental Controls’ highlighted, press OK.
Enter the current PIN.
With ‘Lock Channels’ highlighted, press OK.
Press UP or DOWN to highlight the required channel, press OK.
An ‘ ’ appears next to the selected channel. Repeat for all required channels.
Press RED or GREEN to view the Previous or Next page of channels.
Unlock channels again by highlighting them and pressing OK to remove the ‘
’ in the step above.
Tuning
Automatic Search
You can automatically tune the Digital TV Recorder to search for any new channels that may have been
launched.
Press MENU. With ‘Tuning’ highlighted, press OK.
Enter the current PIN.
With ‘Automatic Search’ highlighted, press OK.
Press LEFT or RIGHT to highlight ‘YES’, press OK.
‘Automatic Search’ will overwrite any changes made to the channel order.
Manual Search
You can manually tune the Digital TV Recorder. This may be useful to search for any new channels that may
have been launched.
Press MENU. With ‘Tuning’ highlighted, press OK.
Enter the current PIN.
With ‘Manual Search’ highlighted, press OK.
Enter the frequency, press OK. The Digital TV Recorder will search for any new channels. This may take a
few minutes.
A list of the channels found is displayed. These channels are automatically stored, press OK.
26
Page 27
Service
Manufacturers Details
If you encounter problems with your Digital TV Recorder, you may be required to provide this information to
service personnel.
Check the Troubleshooting section of this instruction manual before contacting service personnel.
Press MENU. With ‘Service’ highlighted, press OK.
With ‘Manufacturers Details’ highlighted, press OK.
Signal Strength
Press MENU. With ‘Service’ highlighted, press OK.
With ‘Signal Strength’ highlighted, press OK.
Software Upgrade
Periodically, we may issue upgrades for the Digital TV Recorder’s software. The Digital TV Recorder will be
able to receive such upgrades through your TV aerial.
Press MENU. With ‘Software Upgrade’ highlighted, press OK.
The Digital TV Recorder will search for any available upgrades. This may take a few minutes. Follow the
on screen instruction to install any upgrades that are found.
The Digital TV Recorder will automatically check for software upgrades when it is in standby.
The Menu
27
Page 28
Programming the Remote Control
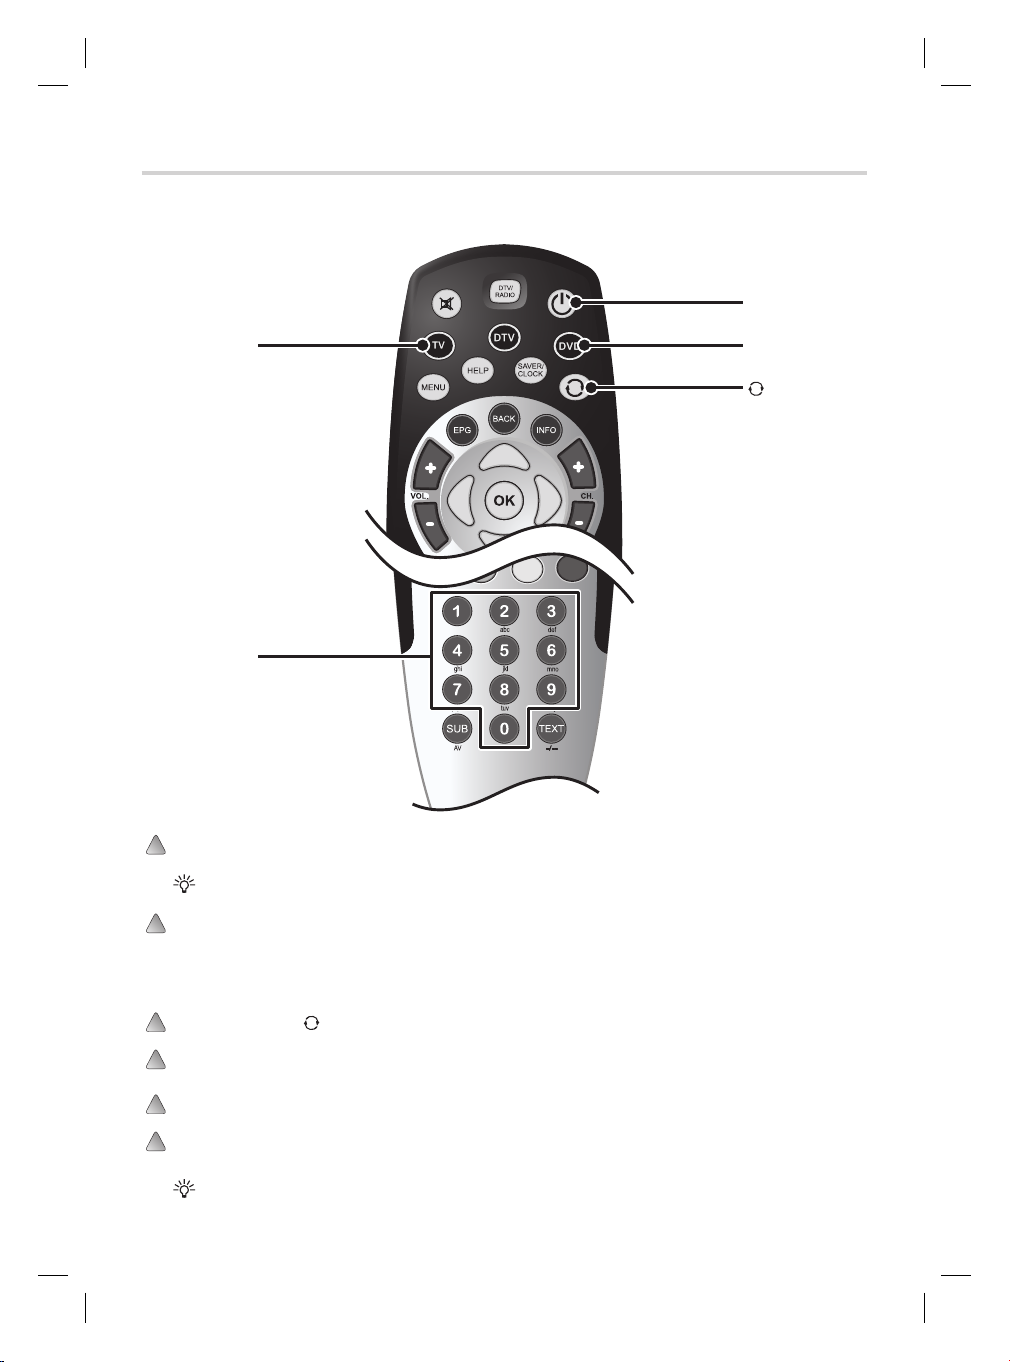
The Digital TV Recorder’s remote control can be programmed to operate certain TVs and DVD players. Follow
the procedure below to programme the remote control.
1
button
TV
button
0-9
buttons
DVD
button
button
28
Find the 4 digit code for brand of TV or DVD player from the brand codes, starting on page 33.
If your brand is not included in the list or the codes for your brand do not operate your equipment, refer to the
following page for an automatic method of programming the remote control.
If you want to programme the remote control to operate a TV:
Press the TV button.
If you want to programme the remote control to operate a DVD player:
Press the DVD button.
Press and hold the button for approximately 3 seconds. The TV/DV D button ashes twice.
Use the 0-9 buttons to enter the 4 digit code for your brand. The TV/DVD button ashes when every
digit of the code is entered.
If a valid code has been entered, the TV/DVD button will ash twice, quickly.
Check that the remote control operates your equipment by pressing the 1 button. If not, repeat the
above procedure and try another code for your brand.
The codes you enter may be lost if weak batteries are not replaced immediately. Even if your TV/DVD brand is
listed in the code table, in some instances it may not be possible to operate all of the available functions.
Page 29
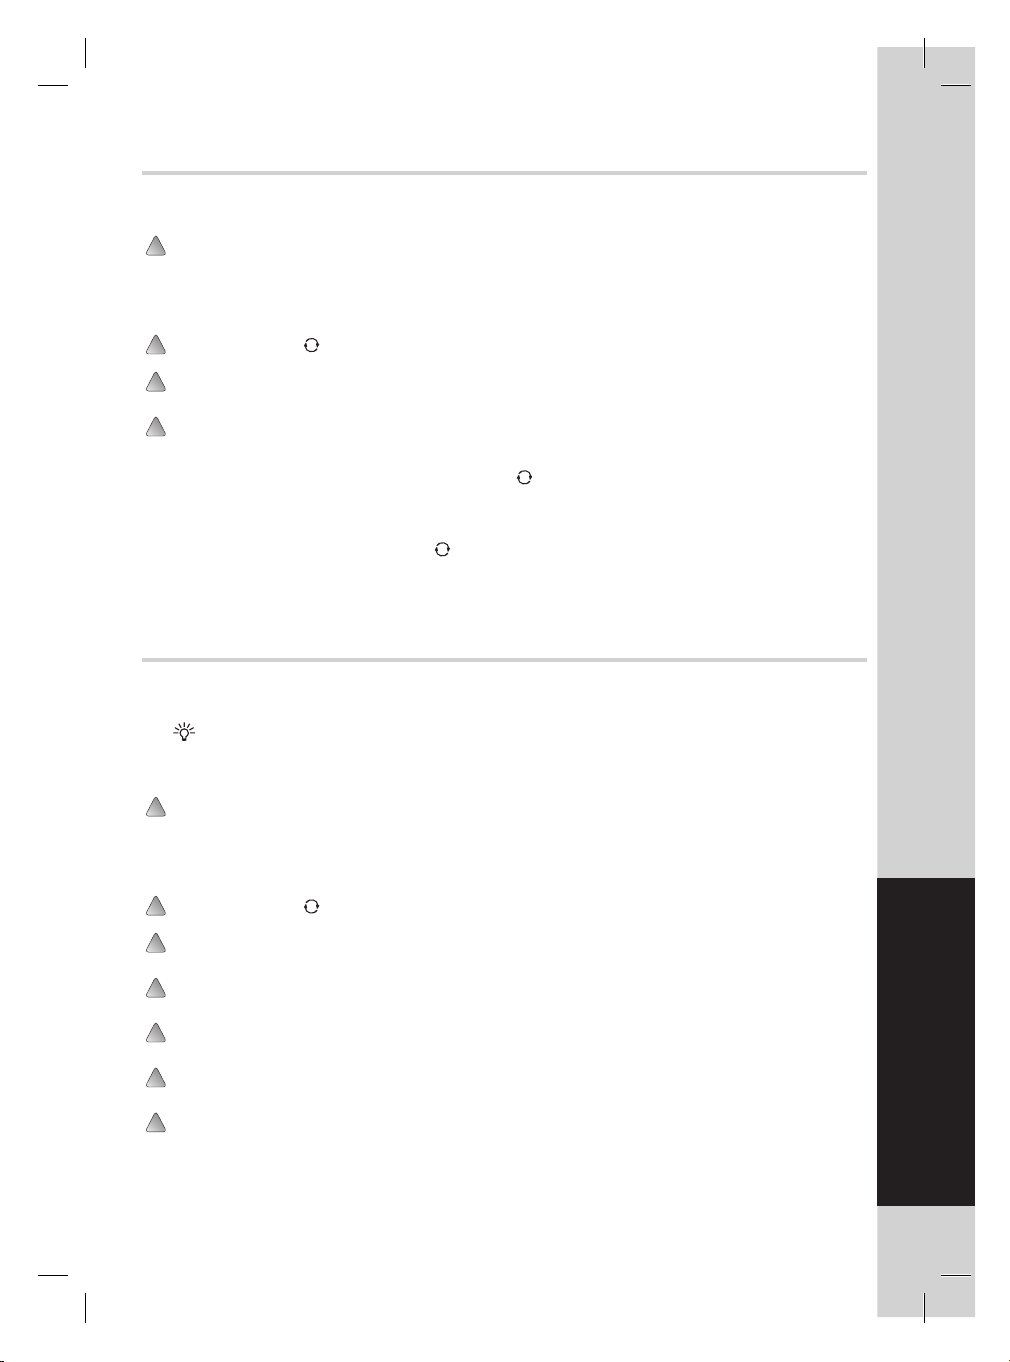
Automatically Programming the Remote Control
If your TV or DVD brand is not included in the code list or the brand codes in the list do not operate your
equipment it may still be possible to programme the remote control to operate your equipment.
If you want to programme the remote control to operate a TV:
Press the TV button.
If you want to programme the remote control to operate a DVD player:
Press the DVD button.
Press and hold the button for approximately 3 seconds. The TV/DV D button ashes twice.
Use the 0-9 buttons to enter the code ‘991’. The TV/DVD button ashes when every digit of the code
is entered. If the code has been entered correctly, the TV/DVD button will ash once, quickly.
Press the 1 button and note whether the remote control switches off your TV/DVD player.
If the remote control switches off your TV/DVD player:
The remote control has found your code. Press the
If the remote control does not switch off your TV/DVD player:
Press the CH+ button repeatedly until the remote control switches off your TV/DVD. The remote
control has found your code. Press the button to save.
button to save.
Finding the Remote Control’s Current Codes
If you have used the procedure above to programme the remote control to operate your TV or DVD, it may be
useful to know the correct code for your equipment.
Knowing the codes that operate your equipment will allow you to re-programme the remote control quickly using
the procedure on the previous page, should the need arise.
There is a label inside the remote control’s battery compartment where you can record your brand codes.
If you want to nd out the TV code:
Press the TV button.
If you want to nd out the DVD code:
Press the DVD button.
Press and hold the button for approximately 3 seconds. The TV/DV D button ashes twice.
Use the 0-9 buttons to enter the code ‘990’. The TV/DVD button ashes when every digit of the code
is entered. If the code has been entered correctly, the TV/DVD button will ash once, quickly.
Press the 1 button and count the number of times the TV/DVD button ashes. The number of ashes is
the rst number of the code.
Press the 2 button and count the number of times the TV/DVD button ashes. The number of ashes is
the second number of the code.
Press the 3 button and count the number of times the TV/DVD button ashes. The number of ashes is
the third number of the code.
Press the 4 button and count the number of times the TV/DVD button ashes. The number of ashes is
the forth number of the code.
Additional Information
29
Page 30
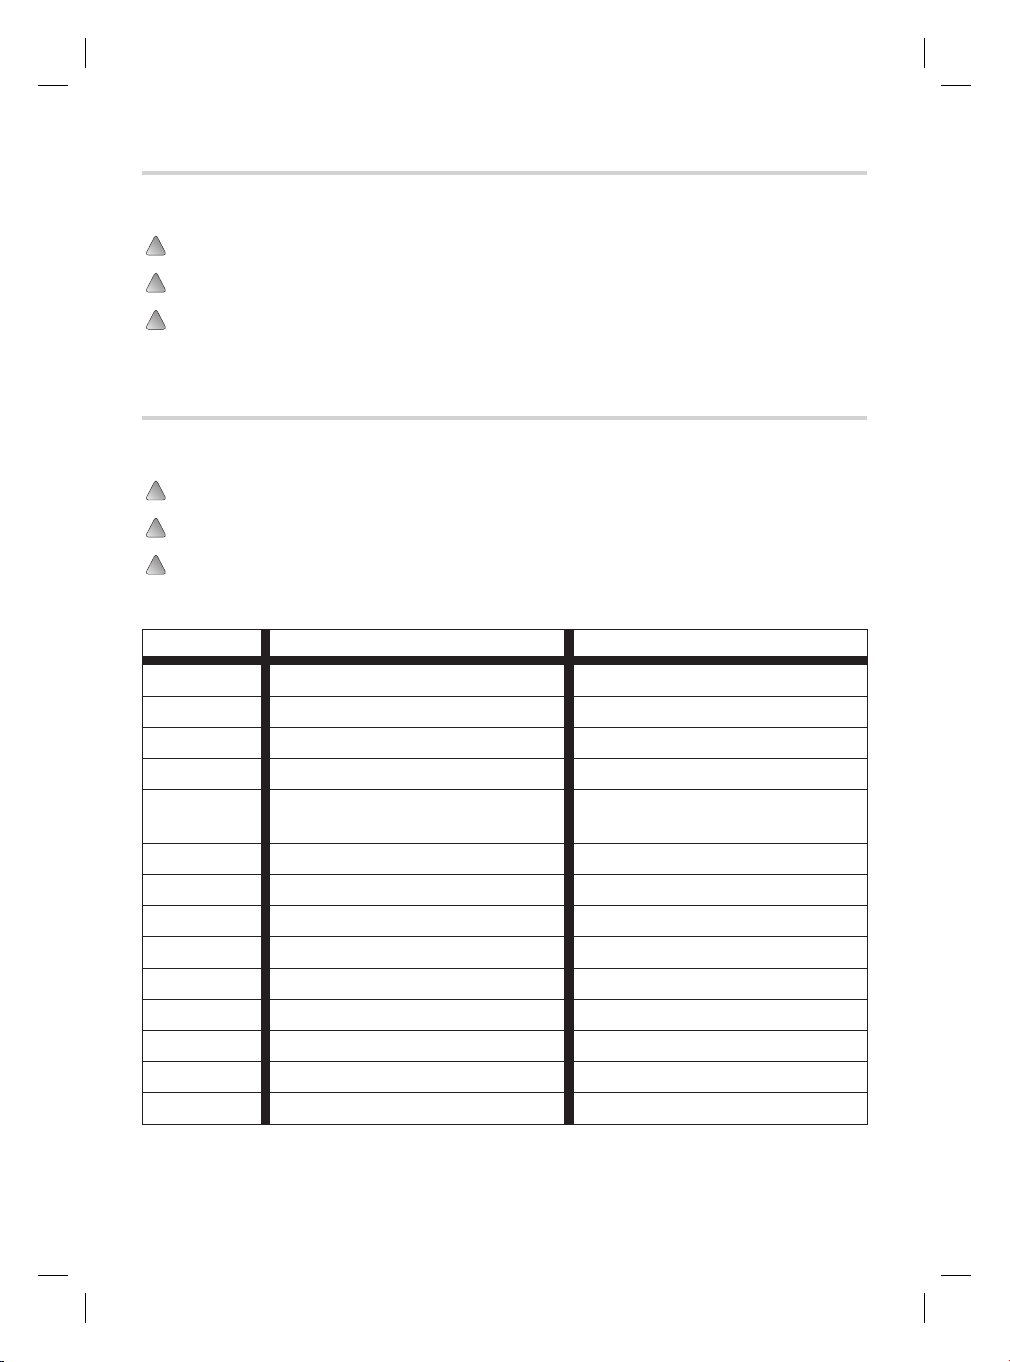
Controlling a TV
Before attempting to control a TV, ensure that the remote control has been programmed (refer to the previous
page).
Press the TV button.
Use the buttons in the table below to operate your TV.
When you have nished controlling your TV, press the DTV button to allow the remote control to
operate the Digital TV Recorder again.
Controlling a DVD player
Before attempting to control a DVD player, ensure that the remote control has been programmed (refer to the
previous page).
Press the DVD button.
Use the buttons in the table below to operate your DVD player.
When you have nished controlling your DVD player, press the DTV button to allow the remote
control to operate the Digital TV Recorder again.
Button Function in TV Mode Function in DVD Mode
%
1
VOL. +/− Adjusts the volume - No function -
CH. +/− Selects the next/previous channel - No function -
UP/DOWN/
LEFT/RIGHT
OK - No function - Makes a selection in menus
x STOP
j
B
X
J
0-9 Selects channels - No function -
SUB/AV Selects the Video Input - No function -
TEXT/−/−− Selects double digit channels - No function -
Mutes the TV - No function -
Switches the TV on/off Switches the DVD player on/off
- No function - Navigates menus
- No function - Stops playback
- No function - Rewind
- No function - Play
- No function - Pause
- No function - Fast Forward
30
Page 31

Speci cations
Physical Speci cation
Size (W) 185mm x (H) 70mm x (D) 210mm
Weight 1.9 kg
Power Requirements
Input Voltage 12V DC (with supplied Power Supply)
Power Consumption (On) 20W Max
Power Consumption (STBY) 3W
Operating Temperature +10˚C to +40˚C
Storage Temperature -20˚C to +60˚C
Twin Tuners
RF Input / Output Connectors 1x IEC (Female) / 1x IEC (Male)
Channel Coverage UHF (B21 to B68 / 470MHz to 860MHz)
Video Decoder
Video Decoding MPEG-2 Main Level / Main Pro le
Video Formats 16:9 / 4:3
Video Output RGB / Y/C / CVBS
Audio Decoder
Audio Decoding MPEG-2 Layer 1
Audio Mode Stereo / Mono
AV Connectors
Video 2x 21 Pin SCART (TV SCART = RGB / Y/C, VCR SCART = CVBS)
Audio 1x 3.5mm Jack/miniTOS (Analogue Stereo/PCM Audio Optical SPDIF)
Supplied Accessories
Universal Remote Control
2x AA / R06 Batteries
Instruction Manual
Quick Start Guide
4x Rubber Feet
Power Adaptor (12V 2Amp)
SCART Lead
RF Lead
Stand
Additional Information
Design and speci cations are subject to change without notice.
All information correct at time of going to press.
31
Page 32

Troubleshooting
Should you experience a problem with your Digital TV Recorder which can’t be resolved using
the table below, put the unit into Standby mode, then unplug completely from the mains. Leave
the unit unplugged for at least one minute before connecting again to the mains.
Picture
Problem Possible cause/remedy
No picture/distorted picture Check the Digital TV Recorder is switched on.
Black and white picture Digital TV Recorder is set to output Y/C pictures and your TV does
Sound
Problem Possible cause/remedy
No sound TV is muted.
Power
Problem Possible cause/remedy
No power
Digital TV Recorder does not
work
Digital TV Recorder takes a
long time to switch on
Remote Control
Problem Possible cause/remedy
Remote control does not work Check the remote control mode (for example, when trying to operate
Recording
Problem Possible cause/remedy
Digital TV Recorder does not
record
TVonics Helpline:
TVonics Website:
TVonics E-mail support:
•
Check the aerial is correctly connected to the unit.
•
Check all connections between the unit and TV.
•
Check the TV is displaying the correct AV input (refer to the
•
instruction manual supplied with your TV for details).
Check the signal strength (refer to “Signal Strength” on page 27).
•
•
not support Y/C. Change the “TV Out” setting (refer to “TV Out” on
page 24).
•
Check the aerial is correctly connected to the unit.
•
Check all connections between the unit and TV/Hi-Fi or Surround
•
Sound System.
Check the power supply is correctly connected and the unit is
•
switched on.
Check the remote control is in DTV mode.•
The Hard Disk is nearly full. Delete some recordings.•
•
the Digital TV Recorder, press the DTV button on the remote control
and retry).
If the remote control does not operate the equipment, even when the
•
remote control has been set to the correct mode, re-programme the
remote control (refer to page 28).
Replace the batteries.
•
Use the Library menu to check if there is any free space on the Hard
•
Disk. If there is little or no space, delete some recordings.
Put the Digital TV Recorder into Standby mode, then unplug
•
completely from the mains. Leave the unit unplugged for at least one
minute before connecting again to the mains.
Reformat the Hard Disk. Please note that this should only be done as
•
a last resort as formatting the Hard Disk will permanently delete all
recordings.
0870 80 30 551 (calls charged at national rate)
www.tvonics.co.uk
[email protected]
32
Page 33
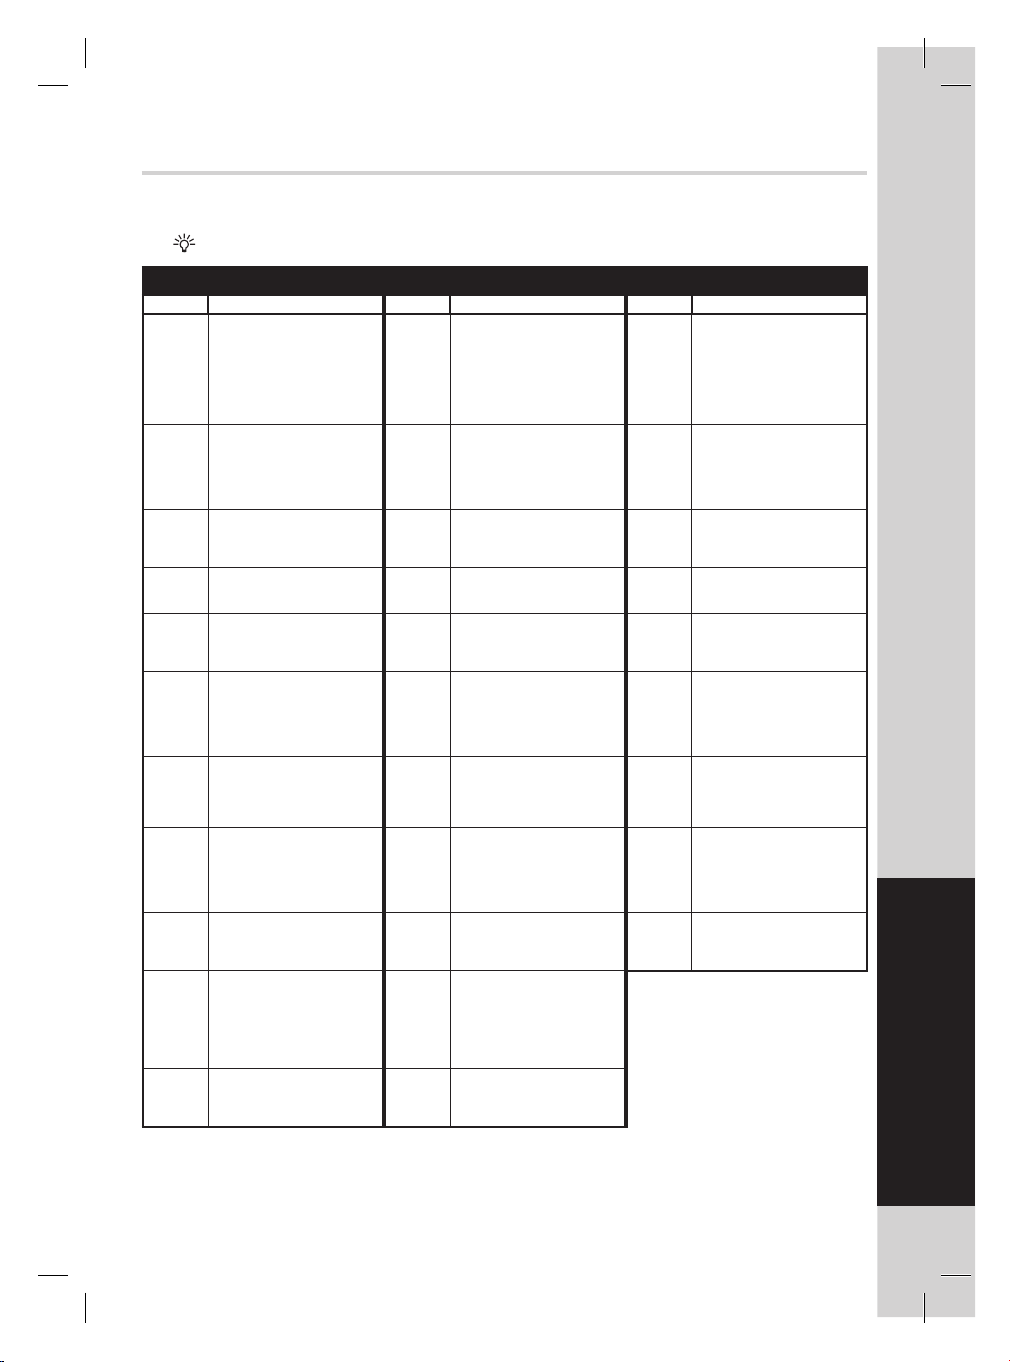
Remote Control Brand Codes
Use the brand codes in the following list when programming the remote control to operate your TV or DVD
player (refer to page 28).
Please refer to “www.tvonics.com/codes.pdf” for a complete list of all brands covered.
TV Brand List
Brand Code(s) Brand Code(s) Brand Code(s)
Aiwa: 1938 Hitachi: 0255, 1255, 0379, 0608, 0066,
Akai: 0391, 0238, 0401, 0067, 0463,
Alba: 0067, 1067, 0586, 0744, 0039,
Baird: 0139, 0373, 0102, 0103, 0247,
Bang &
Olufsen:
Beko: 0744, 0065, 0516, 0400, 0067,
Daewoo: 0664, 0404, 1939, 0529, 0691,
Ferguson: 0103, 0655, 0317, 0365, 0268,
Fidelity: 0193, 0542, 0393, 0067, 0586,
Goodmans:
Grundig: 0225, 0538, 0565, 0221, 0100,
0221, 0065, 0039, 0102, 0248,
0744, 0193, 0546, 0745, 0632,
0586, 0578, 0510, 0247, 0661,
0246, 0294, 0208, 0407, 0636,
1067, 1938, 0503, 1289
0448, 0400, 0265, 0401, 0698,
0385, 0248, 0246, 0277, 0193,
0517, 0066, 1938, 0473, 0581
0238
0595, 0117, 0305 Logik: 0041, 0090, 0039, 0294, 0401,
0448, 1067, 0586, 0636, 0745,
0838
0067, 0586, 0039, 0246, 0248,
0247, 1167, 1938, 0910
0139, 05900, 0067, 0586, 0065,
0373, 0134, 0138, 0391, 0578,
0473, 1067
0401, 0442, 0561, 0246, 0294,
1938, 0391
0064, 1289, 1067, 0067, 0529,
0586, 0744, 0698, 1939, 0404,
0066, 0294, 0102, 0546, 0039,
0209, 0517, 0401, 0373, 0265,
0065, 0510, 0590, 0247, 0365,
0248, 1938, 0660, 0691, 1930,
0910, 1338, 0617, 1406
0517, 0067, 0473, 0586, 0617,
0039, 0066, 0400, 0770, 1938,
0660, 1253, 1338, 0208, 1406
JVC: 0638, 0066, 0713, 0401, 0248,
LG: 0067, 0208, 0400, 0039, 0407,
Loewe: 0542, 0663, 0820, 0067, 0586,
Matsui: 0067, 0586, 0517, 0039, 0265,
Orion: 0067, 0209, 0473, 0385, 0586,
Panasonic:
Philips: 0586, 0067, 0268, 0221, 0117,
Pioneer: 0790, 0041, 0196, 0067, 0200,
Pye: 0067, 0586, 0017, 0404, 0379,
0386, 0138, 0503, 0193, 0373,
0226, 0247, 0224, 0546, 0102,
0511, 0529, 0067, 0586, 0139,
0393, 0578, 0664, 0774, 0208,
1167, 0135, 0522, 1511, 0391,
0542, 0510, 0827, 1067, 1606,
1179
0636, 0448, 0761, 0123
0247, 0586, 0744, 0246, 0193,
0636, 0139, 0745, 1667, 1176,
1221
0685, 0400, 0117, 0322, 0581,
0392, 0546
0910, 1247
0207, 0041, 0385, 0102, 0066,
0247, 0324, 0401, 0463, 0473,
0393, 0485, 0193, 0379, 0546,
0065, 0238, 0075, 0225, 0221,
0365, 0744, 1938, 1067
0685, 0744, 0265, 0324, 0207,
0350, 0041, 0039, 0351, 0132,
0294, 0442, 0546, 0561, 1938,
0910, 1226
0680, 1680, 0138, 0256, 0391,
0397, 0546, 0067, 0586, 0193,
0578, 1340, 0883
0373, 0404, 0802, 0039, 0230
0586, 1290, 0400, 0373, 0391,
0139, 0193, 0317, 0516, 0542
0442
Samsung: 0648, 0617, 0067, 0208, 0586,
Sanyo: 0238, 1238, 0187, 0322, 0066,
Sharp: 0123, 1223, 0187, 0066, 0324,
Sony: 1535, 1681, 1040, 0041, 1781,
Teac: 0542, 0067, 1067, 0586, 0742,
Tevion: 1289, 1328, 0067, 0586, 0698,
Thomson: 0655, 0590, 0373, 0317, 0139,
Thorn: 0138, 0139, 0103, 0255, 0373,
Toshiba: 0538, 0090, 1538, 0065, 1319,
1279, 0123, 0674, 1265, 0039,
0247, 0512, 0400, 0090, 0294,
0246, 0102, 0238, 0712, 0193,
0655
0041, 0400, 0369, 0102, 0246,
0247, 0134, 0075, 0585, 0039,
0193, 0403, 0067, 0138, 0586,
0516, 0765, 0200, 0734
0521, 0683, 0546, 0230, 0790,
1423, 1193
0383, 0066, 0132, 0067, 0586,
0187
0698, 0485, 0247, 0294, 1939,
0208, 0039, 0442, 0379, 0312,
0448, 0200, 0744, 1179, 1785
1167, 0744, 1067, 1278, 1319
0365, 0226, 0067, 0586, 0379
0391, 0268, 1535, 1040, 0104,
0114, 0529, 0565, 0067, 0102,
0586, 0041, 0134, 0365, 0542,
0066, 0075, 0404, 0065, 0100,
0131, 0386
0066, 0100, 0132, 0744, 0271,
0247, 0139, 0225, 0221, 0648,
1938, 0039, 0067, 1194, 1193
Additional Information
33
Page 34
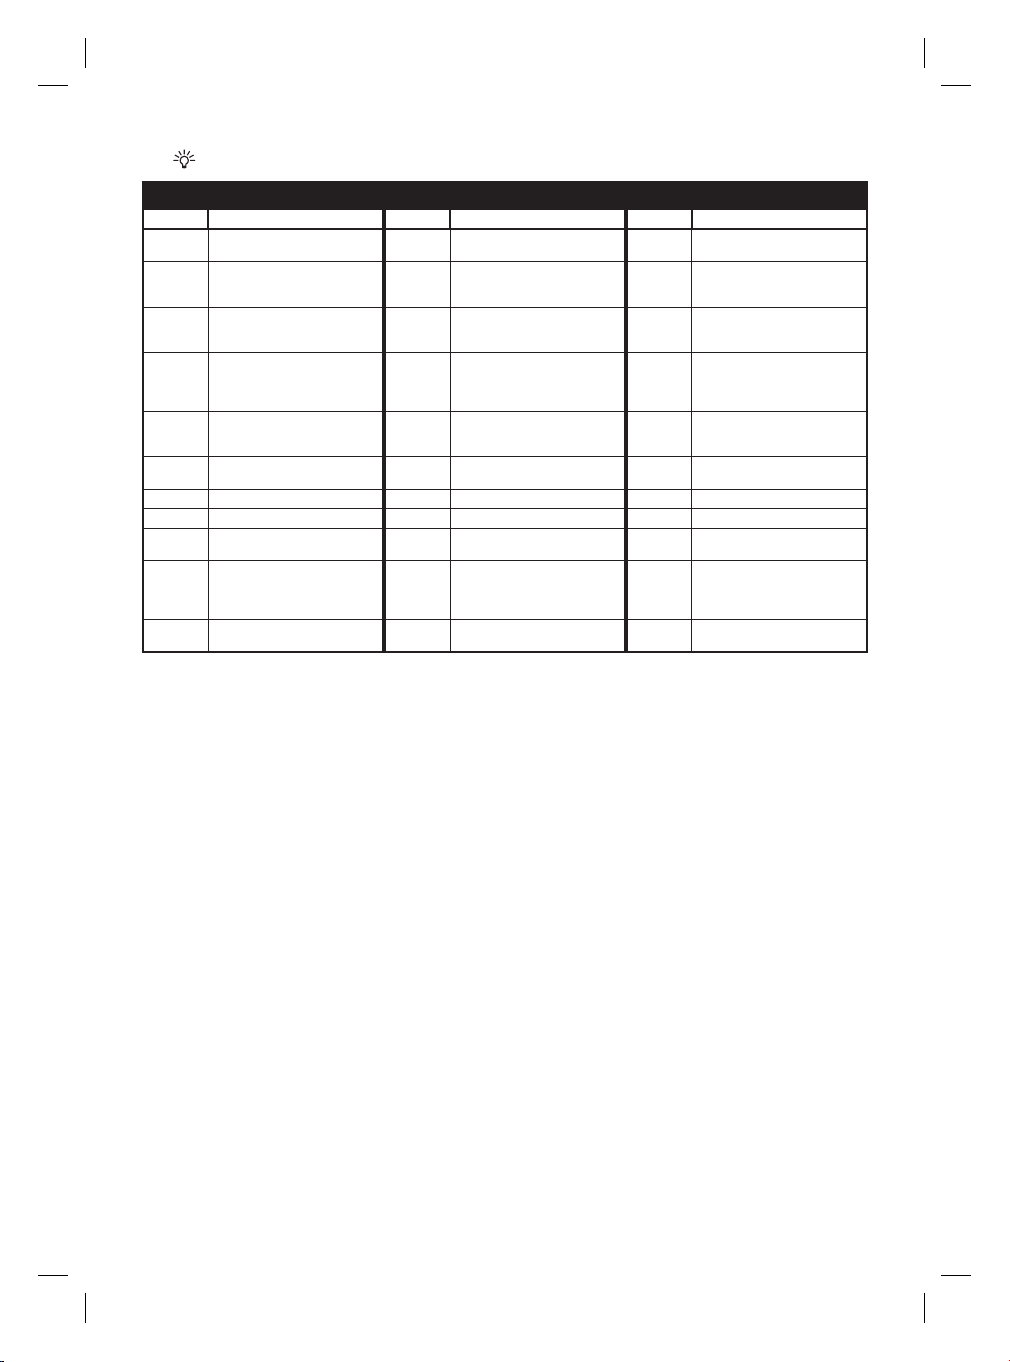
Please refer to “www.tvonics.com/codes.pdf” for a complete list of all brands covered.
DVD Brand List
Brand Code(s) Brand Code(s) Brand Code(s)
Aiwa: 0671, 0725, 0899, 0563 JVC: 0653, 0588, 1931, 1970, 1194,
Akai: 0820, 0809, 0818, 1145, 0928,
Alba: 0747, 0729, 0743, 0753, 0725,
Bush: 0743, 0725, 0863, 1725, 0760,
Daewoo: 0862, 0863, 1513, 0735, 0800,
Denon: 0520, 0664, 1664 Matsui: 0681, 0743, 0702, 0725, 0914,
DMTECH:
Ferguson: 0681, 1760, 0928 Orion: 0725, 1158, 1725, 1263, 1449 Umax: 1181
Goodmans:
Grundig: 0725, 0805, 0569, 0681, 0735,
Hitachi: 0694, 0809, 1950, 2024, 0695,
0796, 0746, 0914, 0743, 0882,
0735, 1119, 1725, 1263
0760, 0813, 0569, 0702, 1170,
1081, 1560, 1725
0861, 0729, 0747, 0808, 0848,
0909, 0914, 0753, 1195, 1466,
1449, 1513
0744, 1948, 1466, 0902, 1171,
1471, 0808
0813, 0820, 2076, 1301
0743, 1034, 0753, 0791, 0813,
0760, 0681, 0820, 0848
0820, 0743, 0700, 0753, 1725,
2076, 1034, 1760, 1950, 1466,
1513
0603, 0887, 0743
Kenwood: 0564, 0520 Sanyo: 0700, 0725, 0820, 0903, 0743
Kiss: 0871, 1553, 0695 Sharp: 0660, 0782, 0743, 0725, 2045,
LG: 0771, 0621, 1936, 0899, 2032 Sony: 0563, 1663, 2011, 1100, 2050,
Loewe: 0569, 0771 Technics: 0520, 1935, 1937, 1938
Mitsubishi:
Panasonic:
Philips: 0569, 0676, 0915, 0705, 0533,
Pioneer: 0601, 1995, 0661, 0555, 1930,
0569, 0533, 0897, 1271
1760
0743 Toshiba: 0533, 1075, 1540, 2036
0520, 1938, 1935, 1864, 1937 XBox: 0552
1842, 1843, 1848, 1188
1601, 1490
Samsung: 0603, 0774, 1962, 0850, 1105,
Thomson: 0581, 0552
Yamada: 1034, 0902, 1181, 1446, 1086,
Yamaha: 0569, 0676, 0520
2038, 0520
1286, 1449, 2054
1933, 0802, 1964, 0603, 2073,
1897, 1854
1519, 1188
34
Page 35

Page 36

U-MAN-001-15 © 2007 TVonics Ltd. Printed in UK 71-800-010-10
 Loading...