

Page 1
Quick Start Guide
Watch Turtle Beach product training videos at:
youtube.com / TurtleBeachVideos
For a copy of the Declaration of Conformity, please go to http://www.turtlebeach.com/products/PX51 and look in Declaration
of Conformity Section of the on-line User Guide for model PX51.
Copyright © 2013 Voyetra Turtle Beach, Inc. (VTB, Inc.) All rights reserved. No part of this package may be reproduced without
permission. Turtle Beach, the Turtle Beach Logo, Voyetra, Ear Force, and Engineered for Gaming are either trademarks
or registered trademarks of VTB, Inc. All other trademarks are properties of their respective companies and are hereby
acknowledged. PlayStation is registered trademark and PS3 is a trademark of Sony Computer Entertainment. Xbox, Xbox 360,
and Xbox LIVE are registered trademarks of Microsoft Corporation. Dolby and the double-D symbol are trademarks of Dolby
Laboratories. Made in China
product support and warranty information:
TurtleBeach.com / support
This product is compliant with the Consumer
Product Safety Improvement Act of 2008,
Public Law 110-314 (CPSIA)
N30375
For the full user guide, please go to http://www.turtlebeach.com/products/PX51
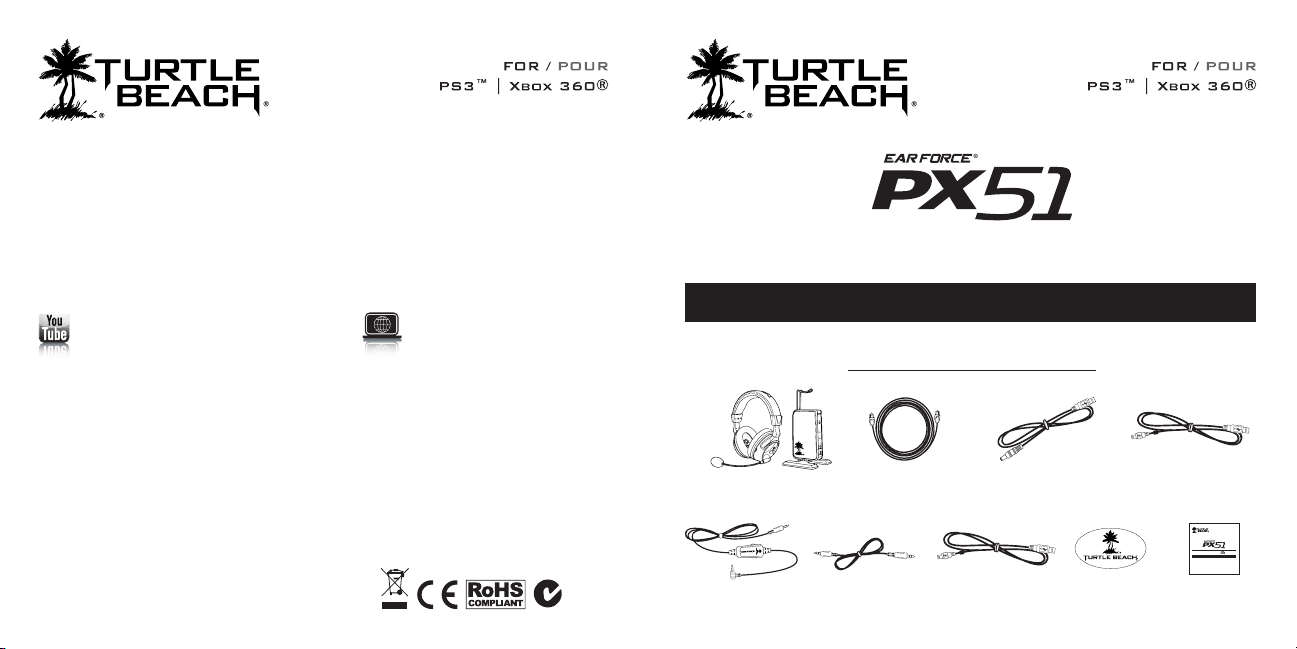
Package Contents | Contenu de la boîte
PX51 Headset and RF Transmitter
PX51 casque et l’émetteur RF
Xbox Talkback Cable
Câble casque Charge
Digital Optical Cable
Câble optique numérique
Mobile Device Cable
Câble Périphénique Mobile
USB Transmitter Power Cable
Câble d’alimentation USB
Headset Charging Cable
Câble casque Charge
USB Câble de programmation
T
U
C
M
O
R
B
T
E
.
H
L
E
A
C
Turtle Beach Sticker
Vignette Turtle Beach
USB Data Cable
FOR / POUR
®
XBOX 360
| PS3 ™
Presets Reference
Download new presets or customize your own with the Tango software from TurtleBeach.com
Presets Reference
référence Presets
Page 2
Title ENG I Title FREPower + Charge I Puissance et chargePower + Charge I Puissance et charge
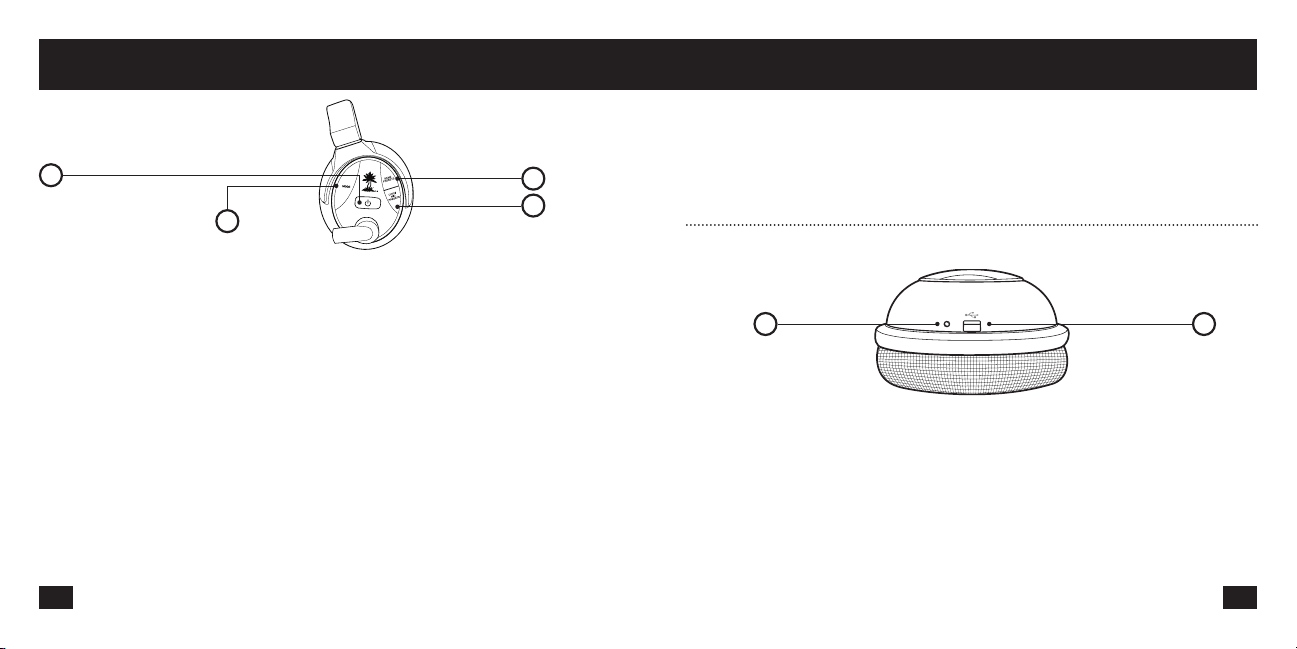
PX51 Headset - Left
Power Button: ON/OFF: press and hold for 3 seconds.
Pairing Mode: press and hold for 6 seconds.
1
Mode Button
4
FR I Casque PX51 – Gauche
1. Bouton de marche : Appuyez pendant 3 secondes pour
mettre en marche ou à l’arrêt. Appuyez pendant 6 secondes
pour mettre en mode couplage.
2. Préréglages du jeu
3. Discuter préréglages micro
4. Bouton principal
ES I Auriculares PX51 – Vista izquierda
1. Botón de alimentación eléctrica: Encendido/Apagado:
manténgalo presionado durante 3 segundos. Modo pareado:
manténgalo presionado durante 6 segundos.
2. Presets de juego
3. Chat y micrófono presets
4. botón principal
DE I PX51 Headset – Linke Seite
1. Ein/Aus-Taste: Ein/Aus: Drücken und 3 Sekunden lang
gedrückt halten. Pairing-Modus: Drücken und 6 Sekunden
lang gedrückt halten.
2. Spiel Presets
3. Chat / Mic Presets
4. Hauptknopf
Game Presets
Chat / Mic Presets
IT I Cuffia PX51 – Vista lato sinistro
1. Tasto di alimentazione: On/Off: tenere premuto per 3 secondi.
Modalità di abbinamento: tenere premuto per 6 secondi.
2. Gioco Preset
3. Chat / Mic Preset
4. Button principale
PT I Fone de ouvido PX51 – Vista esquerda
1. Botão de ligar: Ligar/desligar: pressione e segure por 3
segundos. Modo de emparelhamento: pressione e segure
por 6 segundos.
2. Predefinições de jogos
3. Bate-papo / Mic presets
4. Button Geral
SV I PX51 Headset – Vänster vy
1. På/Av-knapp: På/Av: tryck och håll intryckt i 3 sekunder
Ihopkopplingsläge: Tryck och håll intryckt i 6 sekunder.
2. spel förinställda
3. Chatt / Mic förinställningar
4. MAIN-knappen
2
3
DA I PX51 headset - set fra venstre side
1. Tænd-/slukknap: Tændt/slukket: Tryk og hold knappen nede
i 3 sekunder. Pardannelsestilstand: Tryk og hold knappen
nede i 6 sekunder.
2. Spil forudindstillinger
3. Chat og mic forudindstillinger
4. Main knop
Headset - Right
Charging LED Headset Charging and
2 1
FR I Casque PX51 – Droite
1. Port de chargement du casque.
2. DEL de chargement.
ES I Auriculares PX51 – Vista derecha
1. Puerto de carga de los auriculares.
2. LED de carga.
DE I PX51 Headset – Rechte Seite
1. Headset-Aufladeanschluss.
2. LED-Ladeanzeige.
IT I Cuffia PX51 – Vista lato destro
1. Ingresso ricarica cuffia.
2. LED indicatore di ricarica.
PT I Fone de ouvido PX51 – Vista direita
1. Porta de carregamento de fone
de ouvido.
2. LED de carregamento.
SV I PX51 Headset – Höger vy
1. Laddningsport headset:
2. Laddnings-LED.
NL I PX51 Headset – Linkerkant
1. Power-knop: Aan/Uit: Houd gedurende 3 seconden
ingedrukt. Pairing Mode: Houd gedurende 6 seconden
ingedrukt.
2. Spel Presets
3. Praten / Mic Presets
4. belangrijkste Button
Programming Port
DA I PX51 headset - set fra højre side
1. Opladningsport til headset:
2. Lysdiode til opladning.
NL I PX51 Headset – Rechterkant
1. Oplaadpoort voor de headset.
2. Batterijlader LED-lampje.
1 2
Page 3
Pair PX51 + Transmitter I Couplage du casque et de l’émetteur Pair PX51 + Transmitter I Couplage du casque et de l’émetteur
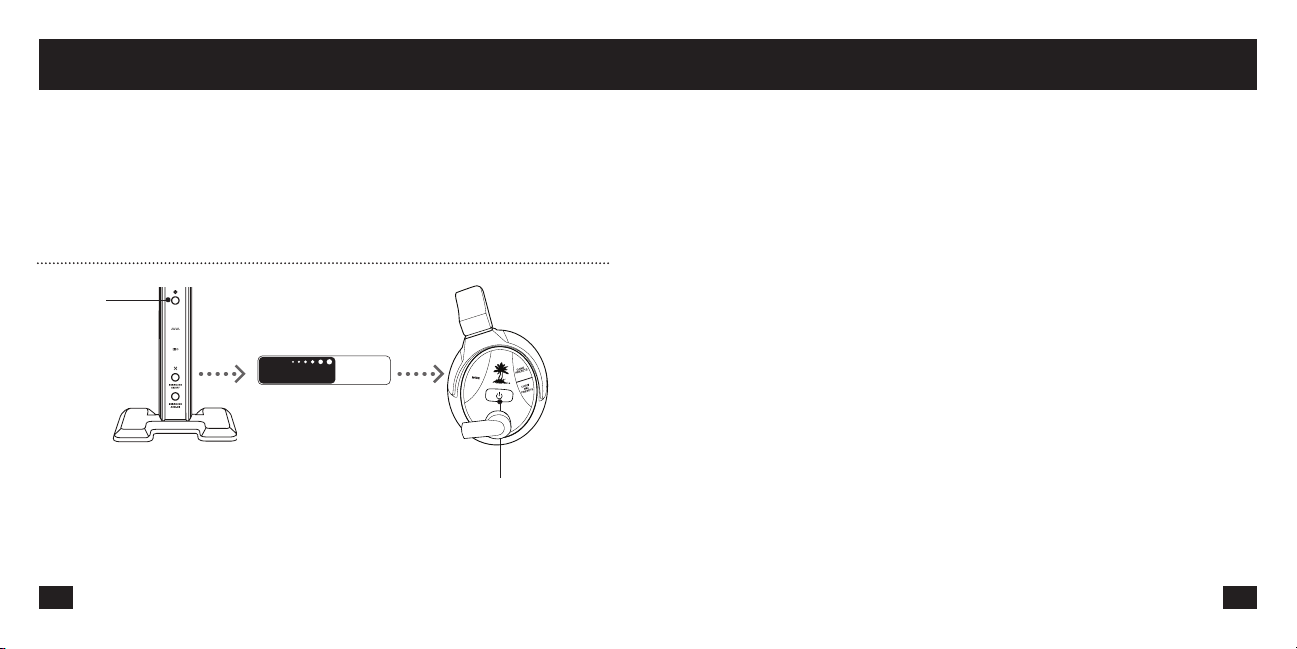
EN I The headset and transmitter are factory paired. The following
instructions are only necessary if the transmitter LED is breathing.
FR I Le casque et l’émetteur sont jumelés en usine. Les instructions suivantes
ne sont nécessaires que si l’émetteur clignote.
ES I Los auriculares y el transmisor están emparejados de fábrica.
Las siguientes instrucciones sólo son necesarios si el transmisor esté
parpadeando.
DE I Das Headset und Transmitter sind ab Werk gepaart. Die folgenden
Anweisungen sind nur notwendig, wenn die Sende-LED blinkt.
IT I L’auricolare e il trasmettitore sono accoppiati in fabbrica. Le seguenti
istruzioni sono necessarie solo se il trasmettitore LED lampeggia.
PAIR Button
bouton PAIRE
5
dual band wireless
1. Turn OFF the Headset.
PT I O fone de ouvido eo transmissor estão emparelhados fábrica. As
instruções seguintes são necessários apenas se o transmissor LED está
a piscar.
SV I Headsetet och sändaren är fabriken parade. Följande instruktioner är
endast nödvändiga om sändaren lysdioden blinkar.
DA I Headsettet og senderen er fabrikken parret. De følgende instruktioner er
kun nødvendig, hvis LED senderen blinker.
NL I De headset en zender zijn in de fabriek gekoppeld. De volgende
instructies zijn alleen nodig als de zender LED knippert.
WiFi
GHz
Power Button
bouton d’alimentation
FR I Couplage du casque et de l’émetteur
1. Éteindre le casque.
2. Appuyez et maintenez enfoncé le bouton jusqu’à ce que
le PAIR émetteur LED sur le dessus de l’émetteur clignote
rapidement.
3. Appuyer sur la touche d’alimentation du casque jusqu’à ce
que son voyant clignote rapidement.
4. Attendez que le casque et l’émetteur soient couplés. Ce
processus peut prendre jusqu’à 30 secondes. Le casque se
met à clignoter une fois par seconde quand il est associé, le
Tx sera allumé. Si le couplage n’aboutit pas, recommencez
les étapes 1 à 4. Il peut falloir jusqu’à 5 tentatives pour réussir
le couplage.
ES I Apareamiento de los auriculares y el transmisor
1. Apague los auriculares.
2. Mantenga pulsado el botón transmisor PAR hasta que el LED
en la parte superior del transmisor parpadea rápidamente.
3. Oprima el botón de encendido hasta que el LED se encienda
intermitentemente.
4. Espere a que los auriculares y el transmisor se apareen.
Este proceso podría demorar hasta 30 segundos. El auricular
parpadeará una vez por segundo cuando se combinan, el TX
se ilumina de manera sólida. Si el apareamiento falla, repita
los pasos 1 a 4. Es posible que tenga que intentarlo hasta 5
veces a fin de que se apareen correctamente.
DE I Pairing von Headset und Sender
1. Schalten Sie das Headset AUS.
2. Drücken und halten Sie Sender PAIR-Taste, bis die auf der
Oberseite der Sende-LED blinkt schnell.
3. Halten Sie die POWER-Taste (Ein/Aus) solange gedrückt, bis
die Headset-LED schnell zu blinken beginnt.
4. Warten, bis das Pairing von Headset und Sender
abgeschlossen ist. Dieser Vorgang kann bis zu 30 Sekunden
dauern. Das Headset blinkt einmal pro Sekunde, wenn
gepaart, wird das Tx durchgehend leuchten. Wenn das
Pairing fehlschlägt, wiederholen Sie Schritte 1 - 4. Es können
bis zu 5 Versuche notwendig sein, um das Pairing erfolgreich
abzuschließen.
IT I Abbinamento tra cuffie e trasmettitore
1. Spegnere la cuffia.
2. Premere e tenere premuto il pulsante PAIR trasmettitore
fino a quando il LED sulla parte superiore del trasmettitore
lampeggia velocemente.
3. Tenere premuto il pulsante di accensione fino a quando il
LED della cuffia lampeggia rapidamente.
4. Attendere che cuffia e trasmettitore completino
l’abbinamento L’operazione può richiedere fino a 30 secondi.
L’auricolare lampeggia una volta al secondo quando
associato, il Tx sarà illuminato solido. In caso di mancato
abbinamento, ripetere i punti da 1 a 4. L’operazione può
richiedere fino a 5 tentativi.
2. Press and hold Transmitter PAIR button until the LED on top of the transmitter flashes rapidly.
3. Press and hold the Headset POWER button until the Headset LED flashes rapidly.
4. Wait for the headset and transmitter to pair. This process could take up to 30 seconds. The headset will blink once per second
when paired, the transmitter will be lit solid.If pairing fails, repeat steps 1-4. It may take up to 5 attempts to pair successfully.
3 4
Page 4
Pair PX51 + Transmitter I Couplage du casque et de l’émetteur Setup / Installation I Configuration / Installation
PT I Emparelhamento do Fone de Ouvido e do Transmissor
1. DESLIGUE o fone de ouvido.
2. Pressione e segure o botão PAIR transmissor até que o LED
na parte superior do transmissor pisca rapidamente.
3. Ressione e segure o botão POWER do fone de ouvido até o
LED do fone piscar rapidamente.
4. Aguarde até o fone de ouvido e o transmissor ficarem
emparelhados. Isso pode levar até 30 segundos. O fone de
ouvido piscará uma vez por segundo quando emparelhado,
o Tx será acesa sólido. Se o emparelhamento falhar, repita
as etapas 1-4. Podem ser necessárias até 5 tentativas para
emparelhar com êxito.
SV I Ihopkoppling av headset och sändare
1. Se till att headset och sändare är avstängda och på minst 60
cm avstånd från varandra.
2. Tryck och håll knappen sändare PAIR tills lysdioden ovanpå
sändaren blinkar snabbt.
3. Tryck in och håll intryckt IHOPKOPPLINGS-knappen på
sändaren tills LED-lyset blinkar i snabb takt.
4. Vänta på att headset och sändare kopplar ihop sig.Denna
åtgärd kan ta upp emot 30 sekunder. Headsetet kommer att
blinka en gång per sekund när det paras ihop kommer Tx
tändas fast ämne. Om ihopkopplingen misslyckas, upprepa
steg 1–4. Det kan ta upp emot 5 försök för att få till stånd en
framgångsrik ihopkoppling.
DA I Pardannelse med headset og radiosender
1. Sluk dit headset.
2. Tryk og hold transmitter PAIR knappen indtil LED på toppen af
senderen blinker hurtigt.
3. Tryk og hold dit headsets POWER knap nede, indtil
headsettets LED blinker hurtigt.
4. Vent på, at headsettet og radiosenderen pardannes.
Denne proces kan tage op til 30 sekunder. Headsettet vil
blinke en gang per sekund, når parret vil Tx blive lyser. Hvis
pardannelsen mislykkes, gentages trin 1-4. Det kan tage op til
5 forsøg, før pardannelsen lykkes.
NL I De headset en de zender aan elkaar koppelen (pairing)
1. Zorg ervoor dat de headset en de zender uitgeschakeld
zijn en zich op ten minste 60 centimeter afstand van elkaar
bevinden.
2. Houd zender PAIR knop ingedrukt totdat de LED op de top
van de zender knippert snel.
3. Houd de PAIR-knop op de zender ingedrukt tot het LEDlampje snel knippert.
4. Wacht terwijl de headset en de zender gekoppeld worden.
Dit kan wel 30 seconden duren. De headset zal een keer
knipperen per seconde wanneer deze is gekoppeld, zal
de Tx branden solide. Als het koppelen mislukt, herhaal je
stap 1-4. Het kan zijn dat je 5 pogingen nodig hebt voor een
succesvolle koppeling.
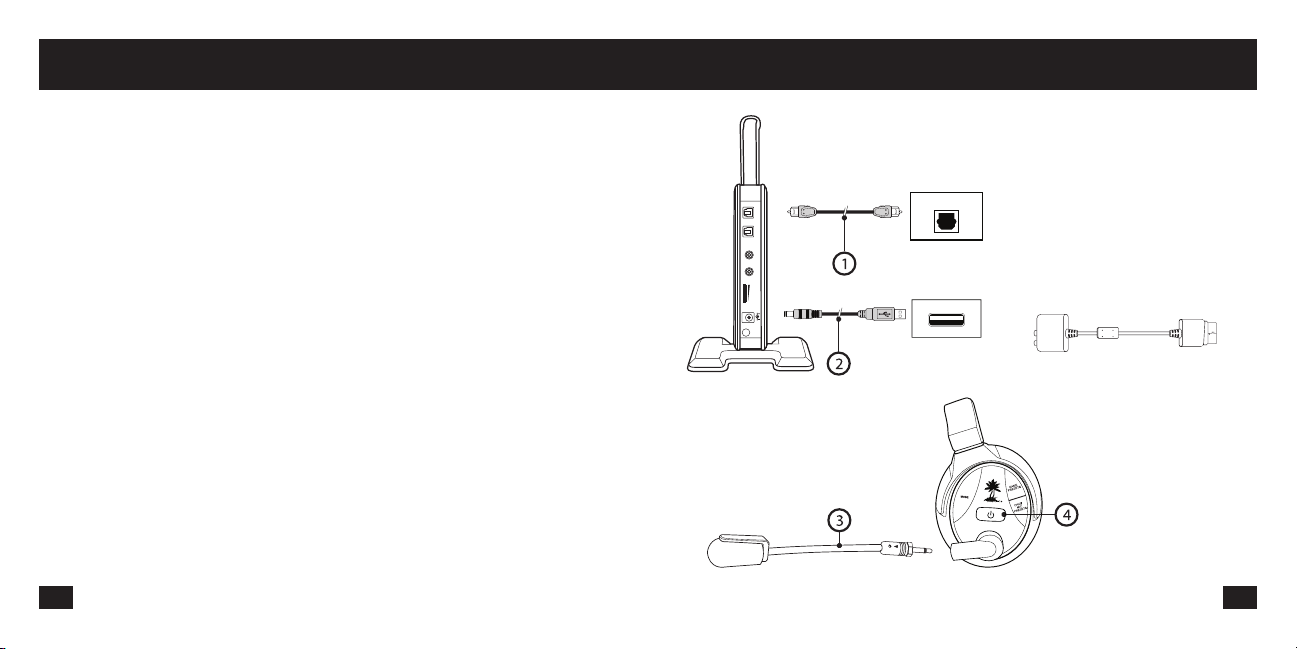
1. Connect the Optical Cable.*
NOTE: Remove the protective caps from each end
of the optical cable.
CONSOLE
IN
DIGITAL
OUT
L
LINE IN
R
LINE IN
VOLUME
DC 5V
DIGITAL OUT
CONSOLE
USB
2. Connect the Transmitter Power Cable.
3. Insert the Microphone Boom.
4. Turn ON the Headset: press the POWER button
until LED turns solid, then release. Listen for voice
announcement.
*Xbox 360 original models require the Xbox 360 HDMI
Audio Adapter Cable, sold separately.
5 6
Page 5

Setup / Installation I Configuration / InstallationSetup / Installation I Configuration / Installation
FR I Configuration / Installation
1. Brancher le câble optique*.
REMARQUE : Retirer les capuchons protecteurs à chaque e
trémité du câble optique.
2. Brancher le câble d’alimentation de l’émetteur.
3. Brancher le microphone à tige.
4. Allumer le casque en appuyant sur la touche d’alimentation
jusqu’à ce que le voyant s’allume en continu, puis en la
relâchant. Écouter l’annonce vocale.
5. Allumer l’émetteur.
* Les premiers modèles de Xbox 360 nécessitent un câble
adaptateur Xbox 360 HDMI vendu séparément.
ES I Configuración / Instalación
1. Conecte el cable óptico.*
NOTA: Quite la tapa de cada extremo del cable.
2. Conecte el cable de alimentación del transmisor.
3. Coloque el micrófono.
4. Encienda el auricular: Oprima el botón de encendido hasta
que se encienda el LED. Espere hasta escuchar elanuncio.
5. Encienda el transmisor.
* Los modelos Xbox 360 necesitan un cable adaptador HDMI
que se vende separadamente.
DE I Setup / Installation
1. Schließen Sie das Lichtleiterkabel an.*
HINWEIS: Entfernen Sie die Schutzkappen von den
Kabelenden.
2. Schließen Sie das Transmitter-Netzkabel an.
3. Stecken Sie den Mikrofonarm ein.
4. Schalten Sie das Headset EIN: Halten Sie die POWERTaste
solange gedrückt, bis die LED durchgehend leuchtet. Lassen
Sie die Taste los. Achten Sie auf Sprachansagen.
5. Schalten Sie den Transmitter EIN.
* Original-Xbox 360-Modelle erfordern ein Xbox 360 HDMI-
Adapterkabel (separat erhältlich).
IT I Setup / Installazione
1. Collegare il cavo ottico.*
NOTA: rimuovere i cappucci protettivi da ciascuna estremità
del cavo ottico.
2. Collegare il cavo di alimentazione del trasmettitore.
3. Inserire lo spinotto del microfono.
4. Accendere la cuffia: premere il pulsante di accensione fino
a quando il LED diventa fisso, quindi rilasciare. Attendere
l’annuncio vocale.
5. Accendere il trasmettitore.
* I modelli originali di Xbox 360 richidedono un cavo adattatore
Xbox 360 HDMI Adapter, venduto separatamente.
PT I Configuração / Instalação
1. Conecte o cabo óptico.*OBS.: Remova a tampa protetora de
cada extremidade do cabo óptico.
2. Conecte o cabo de força do transmissor.
3. Insira o braço do microfone.
4. LIGUE o fone de ouvido: pressione o botão POWER, até o
LED ficar estável, em seguida, solte-o. Ouça ao aviso de voz.
5. LIGUE o transmissor.
* Os modelos originais do Xbox 360 requerem um cabo de
adaptor HDMI para Xbox 360, vendido separadamente.
SV I Inställningar / Installation
1. Anslut den optiska digitalkabeln.*
OBS! Ta bort skyddskapseln på varje ände av den optiska
digitalkabeln.
2. Anslut strömkablen till sändaren.
3. Sätt fast mikrofonhållaren.
4. Slå på headsetet: tryck på POWER-knappen tills lampan
lyser utan att blinka och släpp sedan. Vänta tills du hör ett
röstmeddelande.
5. Slå på sändaren.
* Ursprungsmodellerna av Xbox 360 kräver en Xbox 360 HDMI-
adapterkabel som säljs separat.
DA I Opsætning / Installation
1. Tilslut det optiske kabel.*
BEMÆRK: Fjern de beskyttende hætter fra begge ender af
det optiske kabel.
2. Tilslut transmitterens strømkabel.
3. Indsæt mikrofon boom
4. Tænd for dit headset: tryk på POWER knappen, indtil LED er
konstant, og giv så slip. Lyt efter beskeden.
5. Tænd for transmitteren.
* Xbox 360 originale modeler kræver en Xbox 360 HDMI
Adapter kabel sælges særskilt.
NL I Setup / Installatie
1. Sluit de optische kabel aan.*
Opmerking: haal de beschermdop van elk uiteinde van de
optische kabel af.
2. Sluit de voedingskabel van de zender aan.
3. Breng de microfoon in.
4. Zet de headset aan: druk op de POWER-knop totdat de LED
constant brandt en laat de knop vervolgens los. Wacht totdat
u een gesproken bericht hoort.
5. Zet de zender aan.
* Voor originele Xbox 360-modellen is een apart verkrijgbare
Xbox 360 HDMI-adapterkabel vereist.
7 8
Page 6

PS3™ Bluetooth® Setup I Configuration de la PS3 BluetoothPS3™ Bluetooth® Setup I Configuration de la PS3 Bluetooth
0
12/14 12:15 PM
Manage Bluetooth® Devices
Register to manage Bluetooth® devices such as
headsets, keyboards and mouse devices
1. PS3 Settings > Accessory Settings > Manage Bluetooth Devices. (PX51 Bluetooth OFF).
2. Scan for Bluetooth devices.
3. PX51 powered-ON: press and hold the Bluetooth button until the Bluetooth LED flashes blue and red, then release.
4. Select “Turtle Beach PX51” from the list.
5. Enter “0000” as the Pass Key. The Bluetooth LED on the headset will flash blue about once per second, indicating that the
Bluetooth has paired to your PS3.
FR I Configuration de la PS3 Bluetooth
1. Paramètres PS3 > Paramètres accessoires > Gérer les
périphériques Bluetooth. (PX51 Bluetooth ÉTEINT).
2. Démarrez la recherche de périphériques Bluetooth.
3. Mise en marche de PX51 : appuyez sur le bouton Bluetooth
jusqu’à ce que le voyant DEL Bluetooth clignote en passant
du bleu au rouge.
4. Sélectionnez « Turtle Beach PX51 » dans la liste.
5. Entrez la clé d’identification « 0000 ». Le voyant DEL Bluetooth
du casque passera au bleu et clignotera toutes les secondes
environ, indiquant que le Bluetooth s’est couplé à votre PS3.
ES I Configuración de Bluetooth en PS3
1. Configuración de PS3 > Configuración de accesorios >
Administrar dispositivos Bluetooth. (Bluetooth de PX51
apagado).
2. Busque los dispositivos Bluetooth.
3. PX51 encendido: mantenga presionado el botón Bluetooth
hasta que el indicador LED de Bluetooth destelle de color
azul y rojo; luego, suéltelo.
4. Seleccione “Turtle Beach PX51” en la lista.
5. Ingrese “0000” como la Clave de paso. El indicador LED de
Bluetooth de los auriculares destellará de color azul una
vez por segundo aproximadamente, lo que indica que el
Bluetooth se ha apareado a su PS3.
DE I PS3 Bluetooth Setup
1. PS3 Settings > Accessory Settings > Verwalten Von
Bluetooth - Geräten (PX51 Bluetooth AUS).
2. Nach Bluetooth-Geräten suchen.
3. PX51 angeschaltet: Bluetooth-Taste drücken und gedrückt
halten, bis die Bluetooth-LED blau und rot blinkt, dann
loslassen.
4. Aus der Liste „Turtle Beach PX51“ auswählen.
5. „0000“ als Pass Key (Passwort) eingeben. Die Bluetooth-LED
auf dem Headset blinkt etwa einmal pro Sekunde in blauer
Farbe. Dies zeigt an, dass das Pairing zwischen Bluetooth
und Ihrer PS3 erfolgreich abgeschlossen wurde.
6. Stellen Sie die PSN-Chat-Lautstärke mit der BluetoothLautstärkentaste auf der rechten Ohrmuschel ein.
IT I Configurazione Bluetooth per PS3
1. PS3 Settings > Accessory Settings > Manage Bluetooth
Devices (Impostazioni PS3 > Impostazioni accessori >
Gestione dispositivi Bluetooth). (Bluetooth PX51).
2. Ricerca di dispositivi Bluetooth.
3. PX51 acceso: premere e tenere premuto il tasto Bluetooth
fino a quando il LED Bluetooth lampeggia di colore blu e
rosso, quindi rilasciare.
4. Selezionare “Turtle Beach PX51” dall’elenco.
5. Immettere “0000” come Pass Key. Il LED Bluetooth
sulla cuffia lampeggerà di colore blu circa una volta al
secondo, indicando che il sistema Bluetooth ha eseguito
l’abbinamento con la PS3.
9 10
Page 7

PS3™ System Settings I Configurer les paramètres système PS3PS3™ Bluetooth® Setup I Configuration de la PS3 Bluetooth
PT I Configuração de Bluetooth PS3
1. Configurações PS3 > Configurações de Acessórios
> Gerenciar Dispositivos Bluetooth. (PX51 Bluetooth
DESATIVADO).
2. Procurar dispositivos Bluetooth.
3. PX51 ativado: pressione e segure o botão do Bluetooth até o
LED Bluetooth piscar azul e vermelho, em seguida solte.
4. Selecione “Turtle Beach PX51” na lista.
5. Insira “0000” como senha. O LED do Bluetooth no fone de
ouvido piscará em azul cerca de uma vez por segundo,
indicando que o Bluetooth emparelhou com o PS3.
6. Ajuste PSN chat volume com o botão Volume Blueto oth no
copo orelha direito.
SV I PS3 Bluetooth-installation
1. PS3-inställningar > Tillbehörsinställningar > Hantera
Bluetooth-enheter. (PX51 Bluetooth AV).
2. Sök efter Bluetooth-enheter.
3. PX51 påslagen-PÅ: Tryck och håll nedtryckt Bluetoothknappen tills Bluetooth LED-lyset blinkar i blått och rött,
släpp sedan.
4. Välj ”Turtle Beach PX51” ur förteckningen.
5. Ange ”0000” som lösenord. Bluetooth LED-lyset på headsetet
kommer att blinka blått ungefär en gång i sekunden, vilket
indikerar att Bluetooth har kopplats ihop med din PS3.
11 12
DA I Opsætning af PS3 Bluetooth
1. PS3-indstillinger > Indstillinger til tilbehør > Hold styr på
Bluetooth-enheder. (PX51 Bluetooth slukket).
2. Scan for Bluetooth-enheder.
3. PX51 - tændt: Tryk og hold Bluetooth-knappen nede, til
lysdioden til Bluetooth blinker blå og rød, og slip så knappen.
4. Vælg “Turtle Beach PX51” fra listen.
5. Indtast “0000” som adgangskode. Lysdioden til Bluetooth
på headsettet vil blinke blå cirka én gang i sekundet, hvilket
angiver, at Bluetooth er blevet pardannet til din PS3.
NL I Installatie PS3 Bluetooth
1. PS3 Settings > Accessory Settings > Manage Bluetooth
Devices. (PX51 Bluetooth UIT).
2. Scan voor Bluetooth-apparaten.
3. PX51 INgeschakeld: houd de Bluetooth-knop ingedrukt
totdat het Bluetooth LED-lampje blauw en rood knippert,
laat het dan los.
4. Selecteer “Turtle Beach PX51” uit de lijst.
5. Voer “0000” in als de Pass Key. Het Bluetooth LED-lampje
op de headset zal ongeveer één keer per seconde blauw
knipperen, wat aangeeft dat de Bluetooth aan uw PS3
gekoppeld is.
Audio Device Settings
Microphone Level 3
FR
1. Sélectionner Paramètres > Paramètres accessoires >
Paramètres périphériques audio > Périphérique d’entrée /
sortie > “Turtle Beach PX51”.
2. Régler le volume du microphone.
ES
1. Configuración de PS3 > Ajustes de accesorios > Ajustes
de dispositvos de audio > Dispositivo de entrada / salida >
“Turtle Beach PX51”.
2. Ajuste el nivel del micrófono
DE
1. PS3-Einstellungen > Peripheriegeräte-Einstellungen >
Audio-Gerät-Einstellungen > Eingabe / Ausgabe-Gerät >
“Turtle Beach PX51”.
2. Mikrofonpegel einstellen.
IT
1. PS3 Impostazioni > Impostazioni degli accessori >
Impostazioni dei dispostivi audio > Dispositivo di ingresso /
uscita > “Turtle Beach PX51”.
2. Regolare il livello del microfono.
Output Device
X Enter
Turtle Beach PX51
Turtle Beach PX51
OK
Back
Options
1. PS3 Settings > Accessory Settings > Audio Device Settings >
Input / Output Device > “Turtle Beach PX51”.
2. Adjust microphone level.
3. Adjust PSN chat volume with the Bluetooth Volume button on
the right ear cup.
PT
1. Configurações PS3 > Definições de Acessórios > Definições
de Dispositivos de Áudio > Dispositivo de entrada / saída >
“Turtle Beach PX51”.
2. Ajuste o nível do microfone.
SV
1. PS3 Inställningar > Tillbehörsinställningar > inställningar för
ljudenhet > indataenhet / utdataenhet > “Turtle Beach PX51”.
2. Justera mikrofonnivån.
DA
1. PS3 indstillinger > Tilbehørsindstillinger > Audio
enhedsindstillinger > Input / output enhed > “Turtle Beach
PX51”.
2. Juster mikrofon niveau.
NL
1. PS3-instellingen > randapparatuurinstellingen >
instellingen audioapparaat > invoerapparaat /
Uitvoerapparaat > “Turtle Beach PX51”.
2. Regel het microfoonniveau.
Page 8

PS3™ System Settings I Configurer les paramètres système PS3PS3™ System Settings I Configurer les paramètres système PS3
Audio Output Settin
1. Settings > Sound Settings > Audio Output Settings > Optical
Digital > Dolby Digital 5.1 Ch.
gs
Select the connector on the TV or
Turn on the power of the connected device.
AV amplifier (receiver).
Cancel
0
12/14 12:15 PM
Audio Output Settings
Sets to output audio through multiple connectors
simultaneously. Audio output to connectors that
are not selected in [Audio Output Settings] is
downsized to 2 Ch.
2. Settings > Sound Settings > Audio Multi-Output.
FR I Configurer les paramètres système PS3
1. Paramètres > Paramètres son > Paramètres de sortie audio
> Sortie numérique (optique) > Dolby Digital 5.1
2. Paramètres > Paramètres son > Sortie audio multiple
3. Régler le volume des communications vocales PSN avec la
touche de volume Bluetooth de l’écouteur de droite.
ES I Configuración del sistema PS3 ™ Configuración
1. Ajustes > Ajustes de sonido > Salida de audio Ajustes >
optica digital > Dolby Digital 5.1 Ch.
2. Ajustes > Ajustes de sonido > Multisalida de audio.
3. Ajuste el volumen PSN con el botón de Volumen de
Bluetooth en el audífono derecho.
DE I Konfigurieren PS3 ™-System-Einstellungen
1. Einstellungen > Sound-Einstellungen > Audio-AusgangsEinstellungen > Optisch Digital > Dolby Digital 5.1 k.
2. Einstellungen > Sound-Einstellungen > Audio-MehrfachAusgang.
3. Stellen Sie die PSN-Chat-Lautstärke mit der BluetoothLautstärkentaste auf der rechten Ohrmuschel ein.
IT I Configurare le Impostazioni di sistema PS3 ™
1. Impostazioni > Impostazioni dell’audio > Impostazioni di
uscita audio > digitale ottica > Ottico Can. Dolby Digital 5.1.
2. Impostazioni > Impostazioni dell’audio > Uscita audio multipla
3. Regolare il volume della chat PSN con il tasto Volume
Bluetooth sulla cuffia destra.
PT I Configurar sistema PS3 ™ Configurações
1. Definições > Definições de som > Definições de saída de
áudio > digital óptico > Dolby Digial 5.1 canais.
2. Definições > Definições de som > Multisaída de áudio.
3. Ajuste PSN chat volume com o botão Volume Blueto oth no
copo orelha direito.
SV I Konfigurera PS3 ™ System Settings
1. Inställningar > ljudinställningar > inställningar for ljudutdata >
optiskt digitalt > Dolby Digital 5.1-kan.
2. Inställningar > ljudinställningar > Multi-ljudutdata.
3. Justera chattvolymen för PSN med volymknappen för
Bluetooth på höger öronkåpa.
DA I Konfigurer PS3 ™ System Settings
1. Indstillinger > Lydindstillinger > Audio output indstillinger >
Optisk digital > Dolby Digital 5.1 kanal.
2. Indstillinger > Lydindstillinger > Audio multi-output.
3. Juster PSN chattens lydstyrke med Bluetooth Volume
knappen på højre øre kop.
NL I Configureren PS3 ™-systeem-instellingen
1. Instellingen > geluidsinstellingen > instellingen audiouitvoer
> optisch digitaal > Dolby Digital 5.1 Ch.
2. Instellingen > geluidsinstellingen > meervoudige audiouitvoer.
3. Regel het PSN-chatvolume met de Bluetoothvolumeknop op
de rechteroorschelp.
13 14
Page 9

Using the Bluetooth® Technology I Utilisant la Technologie BluetoothUsing the Bluetooth® Technology I Utilisant la Technologie Bluetooth
Pairing Bluetooth Enabled Mobile Phones
1. PX51 powered-ON: press and hold the Bluetooth button
until the Bluetooth LED flashes blue and red, then release.
2. Mobile phone: turn on the Bluetooth and search for devices
as described in the phone’s user guide.
3. Select “Turtle Beach PX51”
4. Enter “0000” as the Pass Key.
FR I Bluetooth Couplage des téléphones mobiles
compatibles Bluetooth
1. Mise en marche de PX51 : appuyez sur le bouton Bluetooth
jusqu’à ce que le voyant DEL Bluetooth clignote en passant
du bleu au rouge.
2. Téléphone mobile : allumez le Bluetooth et cherchez les
périphériques suivant les instructions du guide de l’utilisateur
du téléphone.
3. Sélectionnez « Turtle Beach PX51 »
4. Entrez la clé d’identification « 0000 »
ES I Bluetooth Apareamiento de teléfonos celulares
con Bluetooth activado
1. PX51 encendido: mantenga presionado el botón Bluetooth
hasta que el indicador LED de Bluetooth destelle de color
azul y rojo; luego, suéltelo.
2. Teléfono celular: encienda el Bluetooth y busque los
dispositivos según se indica en el manual del usuario del
teléfono.
3. Seleccione “Turtle Beach PX51”.
4. Ingrese “0000” como la Clave de paso.
DE I Bluetooth Pairing von Handys mit Bluetooth
1. PX51 angeschaltet: Bluetooth-Taste drücken und gedrückt
halten, bis die Bluetooth-LED blau und rot blinkt, dann
loslassen.
2. Handy: Bluetooth einschalten und gemäß des
Benutzerhandbuchs für das Handy nach Geräten suchen.
3. „Turtle Beach PX51“ auswählen.
4. „0000“ als Pass Key (Passwort) eingeben.
IT I Bluetooth Abbinamento di telefoni cellulari con funzione
Bluetooth
1. PX51 acceso: premere e tenere premuto il tasto Bluetooth
fino a quando il LED Bluetooth lampeggia di colore blu e
rosso, quindi rilasciare.
2. Sul telefono cellulare: attivare la funzione Bluetooth ed
eseguire la ricerca di dispositivi come descritto nella guida
per l’utente del telefono.
3. Selezionare “Turtle Beach PX51”
4. Immettere “0000” come Pass Key.
PT I Bluetooth Emparelhamento de Bluetooth com telefones
celulares habilitados
1. PX51 ativado: pressione e segure o botão do Bluetooth até o
LED Bluetooth piscar azul e vermelho, em seguida solte.
2. Telefones celulares: ligue o Bluetooth e procure os
dispositivos conforme está descrito no manual do usuário
do celular.
3. Selecione “Turtle Beach PX51”
4. Insira “0000” como senha.
SV I BluetoothIhopkoppling av Bluetooth-aktiverade
mobiltelefoner
1. PX51 påslagen-PÅ: Tryck och håll nedtryckt Bluetoothknappen tills Bluetooth LED-lyset blinkar i blått och rött,
släpp sedan.
2. Mobiltelefon: Slå på Bluetooth och sök efter enheter enligt
beskrivningen i bruksanvisningen för telefonen.
3. Välj ”Turtle Beach PX51”
4. Ange ”0000” som lösenord.
DA I Bluetooth Pardannelse af Bluetooth-aktiverede
mobiltelefoner
1. PX51 - tændt: Tryk og hold Bluetooth-knappen nede, til
lysdioden til Bluetooth blinker blå og rød, og slip så knappen.
2. Mobiltelefon: Tænd for Bluetooth, og søg efter enheder som
beskrevet i brugervejledningen til telefonen.
3. Vælg “Turtle Beach PX51”
4. Indtast “0000” som adgangskode.
NL I Bluetooth Het koppelen van Bluetooth compatibele
mobiele telefoons
1. PX51 INgeschakeld: houd de Bluetooth-knop ingedrukt
totdat het Bluetooth LED-lampje blauw en rood knippert,
laat het dan los.
2. Mobiele telefoon: zet de Bluetooth aan en zoek naar andere
apparaten, zoals beschreven in de gebruikershandleiding
van de telefoon.
3. Selecteer “Turtle Beach PX51”.
4. Voer “0000” in als de Pass Key.
15 16
Page 10

Bluetooth®: Dual Pairing I Couplage avec Deux Appareils BluetoothBluetooth®: Dual Pairing I Couplage avec Deux Appareils Bluetooth
For more information on dual pairing please go to:
http://www.turtlebeach.com/products/PX51
The PX51 headset connects to two Bluetooth devices at once. The “dual-pairing” feature enables online chat with other
gamers, plus the ability to instantly switch to a phone call
FR I Le casque PX51 peut se connecter à deux appareils Bluetooth à la fois. Ce double couplage permet de basculer
instantanément entre une communication vocale en ligne avec d’autres joueurs et un appel téléphonique.
ES I El PX51 se conecta a dos dispositivos Bluetooth al mismo tiempo. La función “doble vínculo” permite comunicarse en
línea con otros jugadores y además instantáneamente a una llamada telefónica.
DE I PX51 verbindet zwei Bluetooth-Geräten gleichzeitig. Die “Dual-Pairing”-Funktion ermöglicht den Online-Chat mit
anderen Spielern und den sofortigen Wechsel zum Telefonanruf.
IT I PX51 si connette a due dispositivi Bluetooth contemporaneamente. Il “doppio abbinamento” consente di parlare in chat
online con altri giocatori, oltre alla possibilità di passare istantaneamente a una chiamata telefonica.
Pour plus d’informations sur le jumelage double s’il vous
plaît aller à: http://www.turtlebeach.com/products/PX51
PT I O PX51 conecta dois dispositivos Bluetooth ao mesmo tempo. O emparelhamento duplo permite bate-papo online com
outros jogadores, além da possibilidade de mudar instantaneamente para um telefonema.
SV I PX51 kan anslutas till två Bluetooth-enheter på samma gång. Funktionen “dubbel länkning” gör det möjligt att chatta
online med andra spelare, samt att snabbt växla till ett telefonsamtal.
DA I PX51 forbinder til to Bluetooth-enheder på én gang. Denne “dual-parring” funktion gør online chat mulig med andre
spillere, plus muligheden for øjeblikkeligt at skifte til et telefonopkald.
NL I De PX51 kan op twee Bluetooth-apparaten tegelijk worden aangesloten. De functie ‘dubbele koppeling’ maakt online
chatten met andere gamers en direct overschakelen naar een telefoongesprek mogelijk.
17 18
Page 11

Xbox 360® Settings I Configurer les paramètres système Xbox 360Xbox 360® Settings I Configurer les paramètres système Xbox 360
Digital Output
Digital Stereo
Dolby Digital 5.1
Dolby Digital 5.1 with WMA
Select Back
1. Settings > Audio > Accessory Settings > Audio Device
Settings > Set the “Digital Output” to “Dolby Digital 5.1”
Current Setting
Dolby Digital
Choose the digital output
type for your system.
This setting only applies
to optical digital and HDMI
audio outputs.
Voice
Voice Volume 10
Game Volume 10
Mute Kinect
Voice Output
Play Through Headset
Play Through Speakers
Play Through Both
2. Settings > Preferences > Voice > Voice Output = Play
Through Headset
FR I Configurer les paramètres système Xbox 360
1. Paramètres > Audio > Paramètres accessoires audio >
Paramètres appareil audio > Configurer la « sortie numérique
» sur « Dolby Digital 5.1 ».
2. Paramètres > Préférences > Voix > Sortie vocale = Son via
le casque.
ES I Establezca las configuraciones del sistema de Xbox 360
1. Configuración > Audio > Configuración de accesorios >
Configuración de dispositivo de audio > Configure la “Salida
digital” en “Dolby digital 5.1”.
2. Configuración > Preferencias > Voz > Salida de voz = Jugar
con auriculares.
DE I Konfiguration der Xbox 360 Systemeinstellungen
1. Settings > Audio > Accessory Settings > Audio Device
Settings > Stellen Sie den „Digital Output“ auf „Dolby Digital
5.1“.
2. Settings > Preferences > Voice > Voice Output = Play
Through Both (Über Headset wiedergeben).
IT I Configurazione delle impostazioni di sistema per
Xbox 360
1. Impostazioni > Audio > Impostazioni accessori >
Impostazioni dispositivi audio > Impostare “Uscita digitale”
su “Dolby Digital 5.1”.
2. Impostazioni > Preferenze > Voce > Output voce = Riproduci
in cuffia.
PT I Configure os ajustes do sistema Xbox 360
1. Configurações> Áudio> Configurações de Acessórios>
Definições de Dispositivos de Áudio> Definir a “Saída
Digital” para Dolby Digital 5.1”.
2. Configurações> Preferências> Voz > Saída de Voz =
Reproduzir Através de Fone de Ouvido.
SV I Konfigurera systeminställningar för Xbox 360
1. Inställningar > Ljud > Tillbehörsinställningar > Inställningar av
ljudenheter > ställ in ”digital utgång” på ”Dolby Digital 5.1”.
2. Inställningar > Alternativ > Röst > Röstutgång = Spela genom
headset.
DA I Konfigurér Xbox 360’s systemindstillinger
1. Indstillinger > Lyd > Indstillinger for tilbehør > Lydenhedens
indstillinger > Sæt den “Digitale udgang” til “Dolby Digital
5.1”.
2. Indstillinger > Præferencer > Stemme > Stemmeudgang =
Afspil gennem headset.
NL I Configureer de instellingen voor het Xbox 360-systeem
1. Settings > Audio > Accessory Settings > Audio Device
Settings > Stel de “Digital Output” in op “Dolby Digital 5.1”.
2. Settings > Preferences > Voice > Voice Output = Play
Through Headset.
19 20
Page 12

Xbox 360® Wired Chat Setup I Configuration de chat Fil
Connect the XBOX 360 Talkback Cable.
Mobile Device Cable I Câble périphérique mobile
Title ENG I Title FRE
This cable allows you to listen to stereo audio using
any standard headphone jack. Connect your headset’s
Xbox 360 Input Jack to the 3.5mm jack on your audio
Mic Mute
Muet de MIC
Chat Volume
Chat volume
FR I Brancher le câble Xbox 360 Talkback.
ES I Conecte el cable de enlace del XBOX 360.
DE I Schließen Sie das XBOX 360-Talkback-Kabel an.
IT I Collegare la XBOX 360 al cavo Talkback.
PT I Conecte o cabo de retorno do XBOX 360.
SV I Anslut Talkback-kabeln för XBOX 360.
DA I Tilslut XBOX 360 talkback kabel.
NL I Sluit de XBOX 360-talkbackkabel aan.
21 22
device(mp3 player, smart phone, tablet, or computer) using
the Mobile Device Cable
This mode can be used when:
1. Your headset is turned on and not connected to your
transmitter (Headset blinking twice per second)
2.Bluetooth is not in use
Note: When in this mode there is no Mic functionality.
You can remove the Mic boom if you wish.
FR I Câble de Mobile Device
Ce câble vous permet de lire des flux audio stéréo en utilisant
n’importe quel prise casque standard.
Connectez l’entrée Xbox360 le casque de votre Jack à
votre appareil audio en streaming (lecteur mp3, téléphone,
ordinateur) en utilisant le câble périphérique mobile
Ce mode peut être utilisé lorsque:
1. Votre oreillette est allumé et non branché à votre
émetteur (casque clignote deux fois par seconde)
2. Bluetooth n’est pas en cours d’utilisation
Remarque: Dans ce mode, il n’existe aucune
fonctionnalité Mic.
ES I Cable para dispositivos móviles
Este cable le permite transmitir audio estéreo con cualquier
conector estándar de auriculares.
Conecte el Jack Xbox360 auricular de entrada al dispositivo
de reproducción de audio (reproductor de mp3, teléfono,
computadora) usando el cable del dispositivo móvil
Este modo se puede utilizar cuando:
1. El auricular está encendido y no está conectado a su
transmisor (auricular parpadea dos veces por segundo)
2. Bluetooth no está en uso
Nota: En este modo no hay ninguna funcionalidad Mic.
DE I Mobile Device Cable
Dieses Kabel können Sie Stereo-Audio mit einem beliebigen
Standard-Kopfhöreranschluss streamen.
Schließen Sie das Headset die Xbox360 Input Jack zu Ihrem
Streaming Audio-Gerät (MP3-Player, Telefon, Computer) mit
dem Mobile Device Cable
Dieser Modus kann verwendet werden, wenn:
1. Das Headset ist eingeschaltet und nicht auf Ihren Sender
angeschlossen (Headset blinkt zweimal pro Sekunde)
2. Bluetooth ist Nichtgebrauch
Hinweis: Wenn in diesem Modus gibt es keine
Mic-Funktionalität.
Page 13

Title ENG I Title FRE
Mobile Device Cable I Câble périphérique mobile
Using Presets I Utilisation des préréglages
IT I Cavo dispositivo mobile
Questo cavo consente lo streaming audio stereo con qualsiasi
standard di jack per cuffie.
Collegate il vostro dell’auricolare Xbox360 Jack di ingresso per il
dispositivo audio in streaming (lettore mp3, telefono, computer)
utilizzando il cavo Mobile Device
Questa modalità può essere utilizzata quando:
1. L’auricolare è acceso e non collegato al trasmettitore
(auricolare lampeggia due volte al secondo)
2. Bluetooth non è in uso
Nota: In questo modo non vi è alcuna funzionalità Mic.
PT I Cabo Mobile Device
Este cabo permite transmitir áudio estéreo com qualquer fone de
ouvido padrão.
Conecte o fone de ouvido do seu Xbox360 entrada Jack para o
seu dispositivo de transmissão de áudio (mp3 player, telefone,
computador), utilizando o cabo do dispositivo móvel
Este modo pode ser usado quando:
1. O fone de ouvido está ligado e não ligado ao seu
transmissor (Headset piscando duas vezes por segundo)
2. Bluetooth não está em uso
Nota: Quando neste modo não há nenhuma funcionalidade Mic.
23 24
SV I Mobile Device Cable
Denna kabel kan du strömma stereoljud med en vanlig
hörlursuttag.
Anslut headsetet är Xbox360 Ingång till strömmande ljud-enhet
(mp3-spelare, telefon, dator) med Mobile Device Cable
Detta läge kan användas när:
1. Ditt headset är påslagen och inte ansluten till din sändare
(headset blinkar två gånger per sekund)
2. Bluetooth inte används
Obs: När du är i detta läge finns det ingen Mic funktionalitet.
DA I Mobile Device Cable
Med dette kabel kan du streame stereolyd ved hjælp af en
standard hovedtelefonstik.
Tilslut din headsettets Xbox360 Input Jack til din Streaming
lydenhed (mp3-afspiller, telefon, computer) via Mobile Device
Cable
Denne tilstand kan bruges, når:
1. Dit headset er tændt og ikke tilsluttet din sender
(headset blinker to gange per sekund)
2. Bluetooth ikke er i brug
Bemærk: Når du er i denne tilstand er der ingen Mic funktionalitet.
NL I Mobile Device Cable
Deze kabel kunt u streamen stereo audio met behulp van een
standaard hoofdtelefoonaansluiting.
Sluit de headset de Xbox360 input jack om je streaming audioapparaat (mp3-speler, telefoon, computer) met behulp van de
Mobile Device Cable
Deze modus kan worden gebruikt als:
1. Uw headset is ingeschakeld en niet is aangesloten op
de zender (headset knipperen twee keer per seconde)
2. Bluetooth niet in gebruik
Opmerking: In deze modus is er geen Mic functionaliteit
For descriptions of the presets refer to the Presets
Reference. To download additional presets visit
http://www.turtlebeach.com/presets
Mode Button
FR I Préréglages du jeu et Chat / Mic
1. Pour faire le tour des préréglages alternatifs.
2. Préréglage par défaut. Pour plus d’informations sur les
presets, s’il vous plaît aller à http://www.turtlebeach.com/
presets.
ES I Juego y charla / Mic Presets
1. Recorrido de modos preasignados de alternativa.
2. Botón MAIN Para obtener más información acerca de
presintonías, por favor vaya a http://www.turtlebeach.com/
presets.
DE I Spiel und Chat / Mic Presets
1. Durch Alternativvoreinstellungen schalten.
2. Haupteinstellung Für weitere Informationen über Presets,
gehen Sie bitte auf http://www.turtlebeach.com/presets.
IT I Gioco e Chat / Mic Presets
1. passa da una preimpostazione alternativa all’altra.
2. Principale Per ulteriori informazioni su preset, visitare http://
www.turtlebeach.com/presets.
Pour une description des paramètres prédéfinis, reportezvous à la référence prédéfinis. Pour télécharger les
réglages supplémentaires, visitez:
http://www.turtlebeach.com/presets
Game and Chat / Mic Presets
Cycle through alternate presets
PT I Predefinições de jogos e Chat / Mic
1. percorrer as pré-configurações alternativas.
2. Principal Para mais informações sobre predefinições, por
favor, vá para http://www.turtlebeach.com/presets.
SV I Spel och chatt / Mic förinställningar
1. Bläddra mellan alternativa förinställningar.
2. Växla För mer information om förinställningar, gå till
http://www.turtlebeach.com/presets
DA I Spil og Chat / Mic Presets
1. Løb gennem de alternative forudindstillinger.
2. Main For mere information om presets, skal du gå til
http://www.turtlebeach.com/presets
NL I Spiel und Chat / Mic Presets
1. Doorloop alternatieve presets .
2. Main Voor meer informatie over presets, ga dan naar
http://www.turtlebeach.com/presets.
Page 14

Using Presets I Utilisation des préréglagesUsing Presets I Utilisation des préréglages
1. Tap the Game/Chat Preset buttons to cycle through your alternate (1-8) Game/Chat Presets.
2. Hold the Game Presets Button for 1 second to switch to your Main Game Preset.
3. Hold the Chat/Mic Presets Button for 1 second to switch to your Main Chat Preset.
4. Tap the Mode Button to switch to your Main Game and Chat Presets simultaneously.
5. Hold the Mode Button for 1 second to toggle between Game, Movie, and Music mode.
6. Movie and Music mode use Turtle Beach customized tuning to enhance your listening experience.
FR I Présélection du casque Contrôle
1. Appuyez sur le jeu / chat boutons de préréglage pour faire défiler votre 9 (Main, 1-8) Jeu / Chat Presets.
2. Maintenez le bouton Presets jeu pendant 1 seconde pour passer au mode de jeu principal Preset.
3. Maintenez le bouton Chat / Mic Presets pendant 1 seconde pour passer au mode principal Preset chat.
4. Appuyez sur le bouton Mode pour passer à votre jeu principal et chat Presets.
5. Maintenez le bouton de mode pendant 1 seconde pour alterner entre Jeu, Film et le mode Musique.
6. Mode Movie et Music utilisation Turtle Beach réglage personnalisé pour améliorer votre expérience d’écoute.
ES I Preconfiguración de auriculares Controles
1. Toque en el Juego / Chat botones de memoria a través de su ciclo de 9 (Main, 1-8) Juego / Chat Presets.
2. Mantenga el botón del juego Presets durante 1 segundo para cambiar a su juego principal predefinido.
3. Sostenga el botón de Chat / Mic Presets durante 1 segundo para cambiar a su principal predefinido chat.
4. Pulse el botón de modo para cambiar a su juego principal y chat Presets.
5. Sostenga el botón de modo durante 1 segundo para cambiar entre juegos, películas y el modo Music.
6. Modo de película y música utilizan Turtle Beach ajuste personalizado para mejorar su experiencia auditiva.
DE I Headset Preset Steuert
1. Tippen Sie das Spiel / Chat Preset-Tasten, um durch Ihre 9 (Main, 1-8) Game / Chat Presets.
2. Halten Sie das Spiel Presets-Taste für 1 Sekunde, um Ihren Main Game Preset wechseln.
3. Halten Sie den Chat / Mic Presets-Taste für 1 Sekunde, um die Main-Chat Preset wechseln.
4. Tippen Sie die Mode-Taste, um Ihre Main Game wechseln und Chat Presetss.
5. Halten Sie die Mode-Taste für 1 Sekunde, um zwischen Spiel, Film und Musik-Modus zu wechseln.
6. Film-und Musik-Modus Verwendung Turtle Beach kundenspezifische Abstimmungen zur Verbesserung
Ihrer Hörerlebnis.
25 26
IT I Headset Preset Controlli
1. Toccare il gioco / chat Tasti di preselezione per passare in rassegna il tuo 9 (Principale, 1-8) gioco / Chat Presets.
2. Tenere premuto il pulsante di gioco predefiniti per 1 secondo per passare al gioco principale Preset.
3. Tenere la Chat / Mic pulsante Presets per 1 secondo per passare al principale Chat Preset.
4. Premere il pulsante Mode per passare al gioco principale e Chat Preset.
5. Tenere premuto il pulsante Mode per 1 secondo per passare da Gioco, Film, e la modalità Musica.
6. Modalità Movie e Music uso sintonizzazione Turtle Beach su misura per migliorare l’esperienza di ascolto.
PT I Fone de ouvido predefinido Controles
1. Toque no Jogo / Chat botões predefinidos para percorrer o seu 9 (Main, 1-8) Jogo / Chat Presets.
2. Segure o botão Presets jogo por 1 segundo para mudar para o seu principal jogo Predefinição.
3. Segure o Chat / Mic botão Presets para 1 segundo para mudar a sua principal via Chat Predefinição.
4. Toque no botão MODE para mudar para o seu jogo principal e Chat Presets.
5. Segure o botão MODE por 1 segundo para alternar entre Jogo, Filme, e modo de música.
6. Modo de película y música utilizan Turtle Beach ajuste personalizado para mejorar su experiencia auditiva.
SV I Headset som förval Controls
1. Tryck på Spel / Chat Snabbvalsknappar för att gå igenom din 9 (Main, 1-8) Spel / chatt Förinställningar.
2. Håll spelet Förinställningar knappen i 1 sekund för att växla till din huvudsakliga spel Förinställd.
3. Håll Chatt / mikrofon Förinställningar knappen i 1 sekund för att växla till din huvudsakliga Chatt Förinställd.
4. Tryck på knappen MODE för att växla till din huvudsakliga spel och chatt Förinställningar.
5. Håll MODE-knappen i 1 sekund för att växla mellan spel, film och musik-läge.
6. Film och Musikläge användning Turtle Beach anpassad inställning för att förbättra ditt lyssnande.
DA I Headset Preset Controls
1. Tryk på Spil / Chat programmerbare knapper til at bladre gennem din 9 (Main, 1-8) Spil / Chat Presets.
2. Hold spillet Presets knappen i 1 sekund for at skifte til din Main spil Preset.
3. Hold Chat / Mic Presets Knap til 1 sekund for at skifte til din Main Chat Preset.
4. Tryk på knappen Mode for at skifte til din Main spil og chat Presets.
5. Hold Mode i 1 sekund for at skifte mellem Spil, Film og Musik mode.
6. Film og musik mode skal du bruge Turtle Beach tilpassede tuning at forbedre din lytteoplevelse.
NL I Hoofdtelefoonstand Controls
1. Tik op het Game / Chat Preset toetsen gebruiken om door je 9 (Main, 1-8) Game / Chat Presets.
2. Houd de Game Presets-knop 1 seconde ingedrukt om over te schakelen naar uw Main Game Preset.
3. Houd de Chat / Mic Presets-knop 1 seconde ingedrukt om over te schakelen naar uw Main Chat Preset.
4. Druk op de Mode-knop om over te schakelen naar uw Main Game en Presets Chatten.
5. Houd de Mode-knop gedurende 1 seconde ingedrukt om te schakelen tussen Game, Film, en voor muziek.
6. Movie en Music-modus gebruik Turtle Beach op maat af te stemmen op uw luisterervaring te verbeteren.
Page 15

Notes I NoteNotes I Note
27 28
 Loading...