

Page 1

User Guide /
Guide d’Utilisation
Page 2
Xbox 360® game console with one of the following Xbox
®
cables to support digital audio output:
• Component A/V cable
• VGA A/V cable
• S-Video A/V cable
• Advanced SCART A/V cable
• HDMI audio adapter cable
• Composite A/V cable with digital output
Available USB port
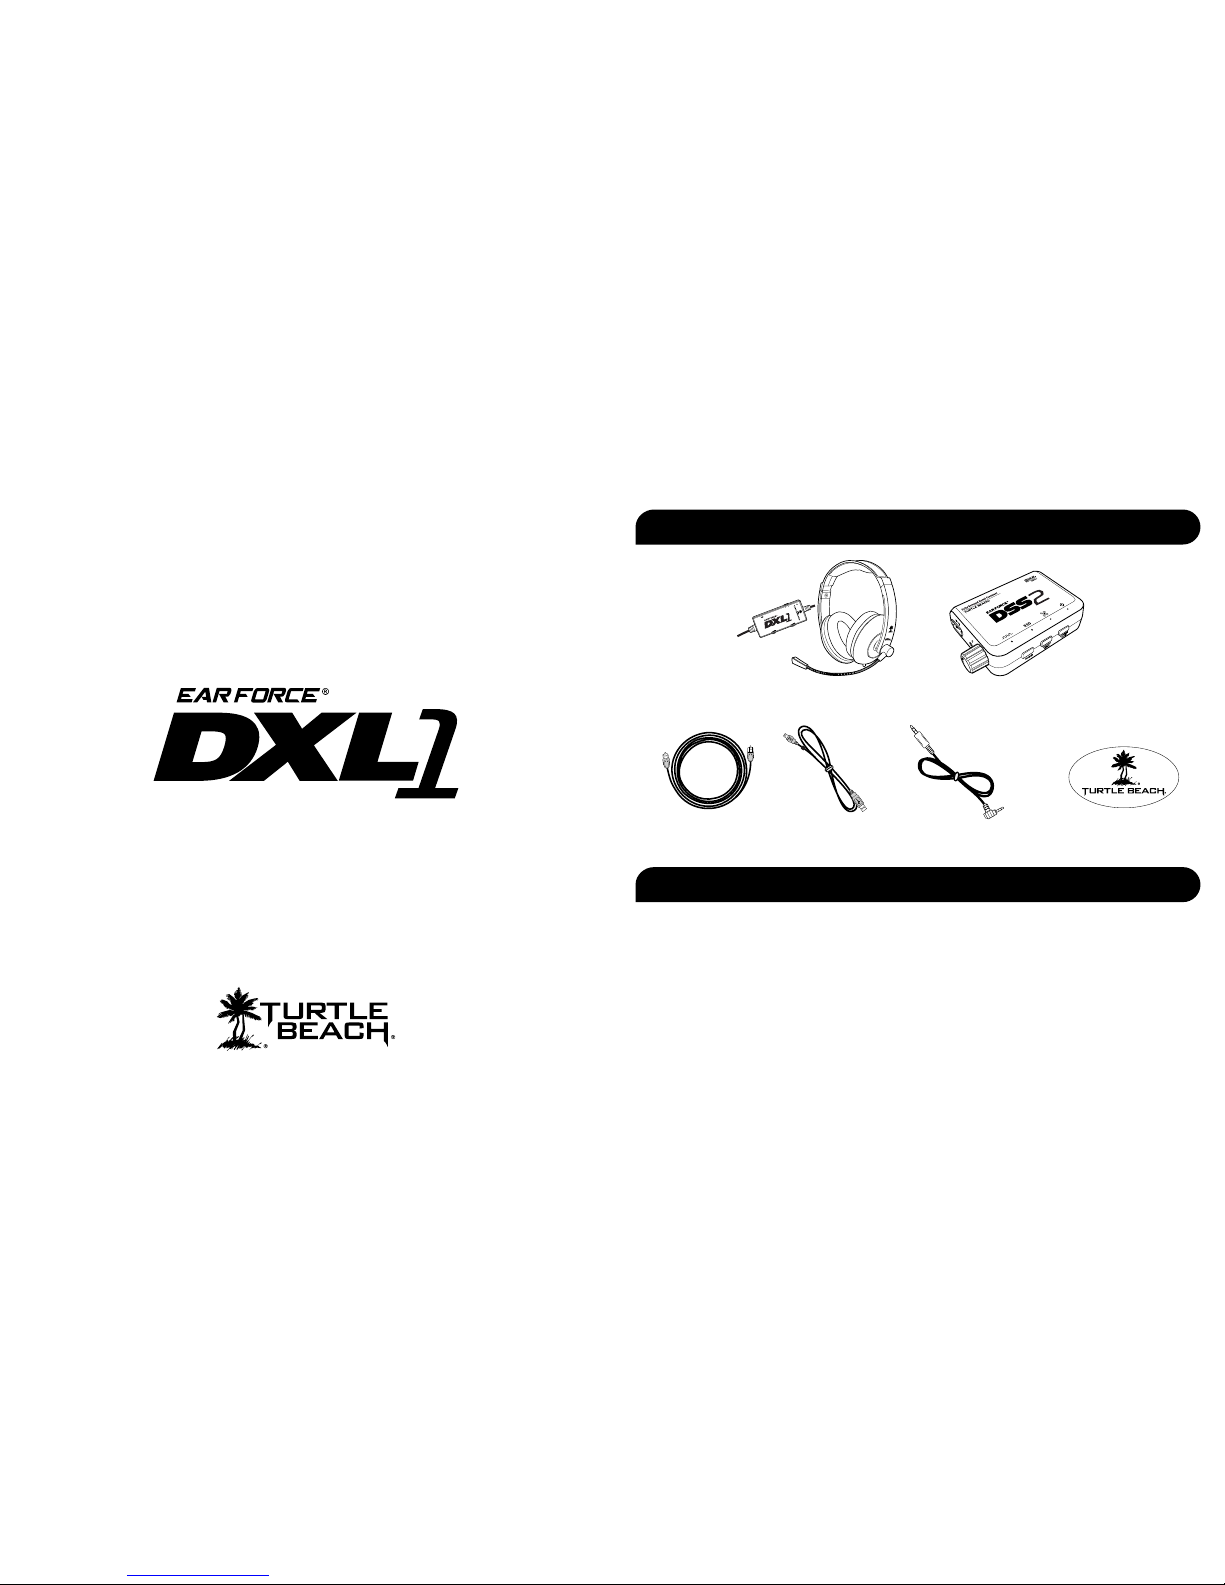
DSS2 Surround Sound Processor /
Processeur de Son Surround DSS2
Digital Optical Cable /
Câble optique numérique
T
U
R
T
L
E
B
E
A
C
H
.
C
O
M
System Requirements / Configuration requise
Xbox 360® Talkback Cable /
Câble de réponse XBOX 360
DXL1 Headset /
Casque DXL1
Dolby® Surround Sound Gaming Headset /
Casque pour jeux vidéo avec son Surround Dolby
Package Contents / Contenu de la boîte
Console de jeux Xbox 360 avec sortie optique ou l’un des câbles
suivants pour la sortie optique:
• Câble adaptateur audio HDMI
• Câble AV HD composant
• Câble S-Vidéo
• Câble AV composite avec sortie numérique
• Câble AV VGA
• Câble AV SCART avancé
Requiert une alimentation USB
USB Cable /
Câble USB
Turtle Beach Sticker /
Autocollant Turtle Beach
GAME
CHAT
ON MIC MUTE
GAME
CHAT
ON MIC MUTE
GAME
CHAT
ON MIC MUTE
Page 3
1 2
GAME
CHAT
ON MIC MUTE
GAME
CHAT
ON MIC MUTE
Using the Amplifier
FRANCAIS
1. Chat Volume
2. Game Volume
3. Mic Mute LED
4. Mettez Mic Mute
DEUTSCH
1. Chat Band
2. Game Band
3. Mic Mute-LED
4. Mic Mute Schalter
ITALIANO
1. Chat Volume
2. Game Volume
3. Mic Mute LED
4. Interruttore Mute Mic
PORTUGUÊS
1. Chat Volume
2. Volume Jogo
3. Mic Mute LED
4. Ligue Mic Mute
ESPAÑOL
1. Chat de Volumen
2. Juego de Volumen
3. Mic Mute LED
4. Cambie Mute
SVENSK
1. Chatta Volym
2. Spel Volym
3. Mic Mute LED
4. Mic Mute omkopplare
DANSK
1. Chat Bind
2. Game Bind
3. Mic Mute LED
4. Mic Mute Switch
NEDERLANDS
1. Deel Chat
2. Deel Game
3. Mic Mute LED
4. Mic Mute-Schakelaar
1
2
4 3
Amplifier / Amplificateur
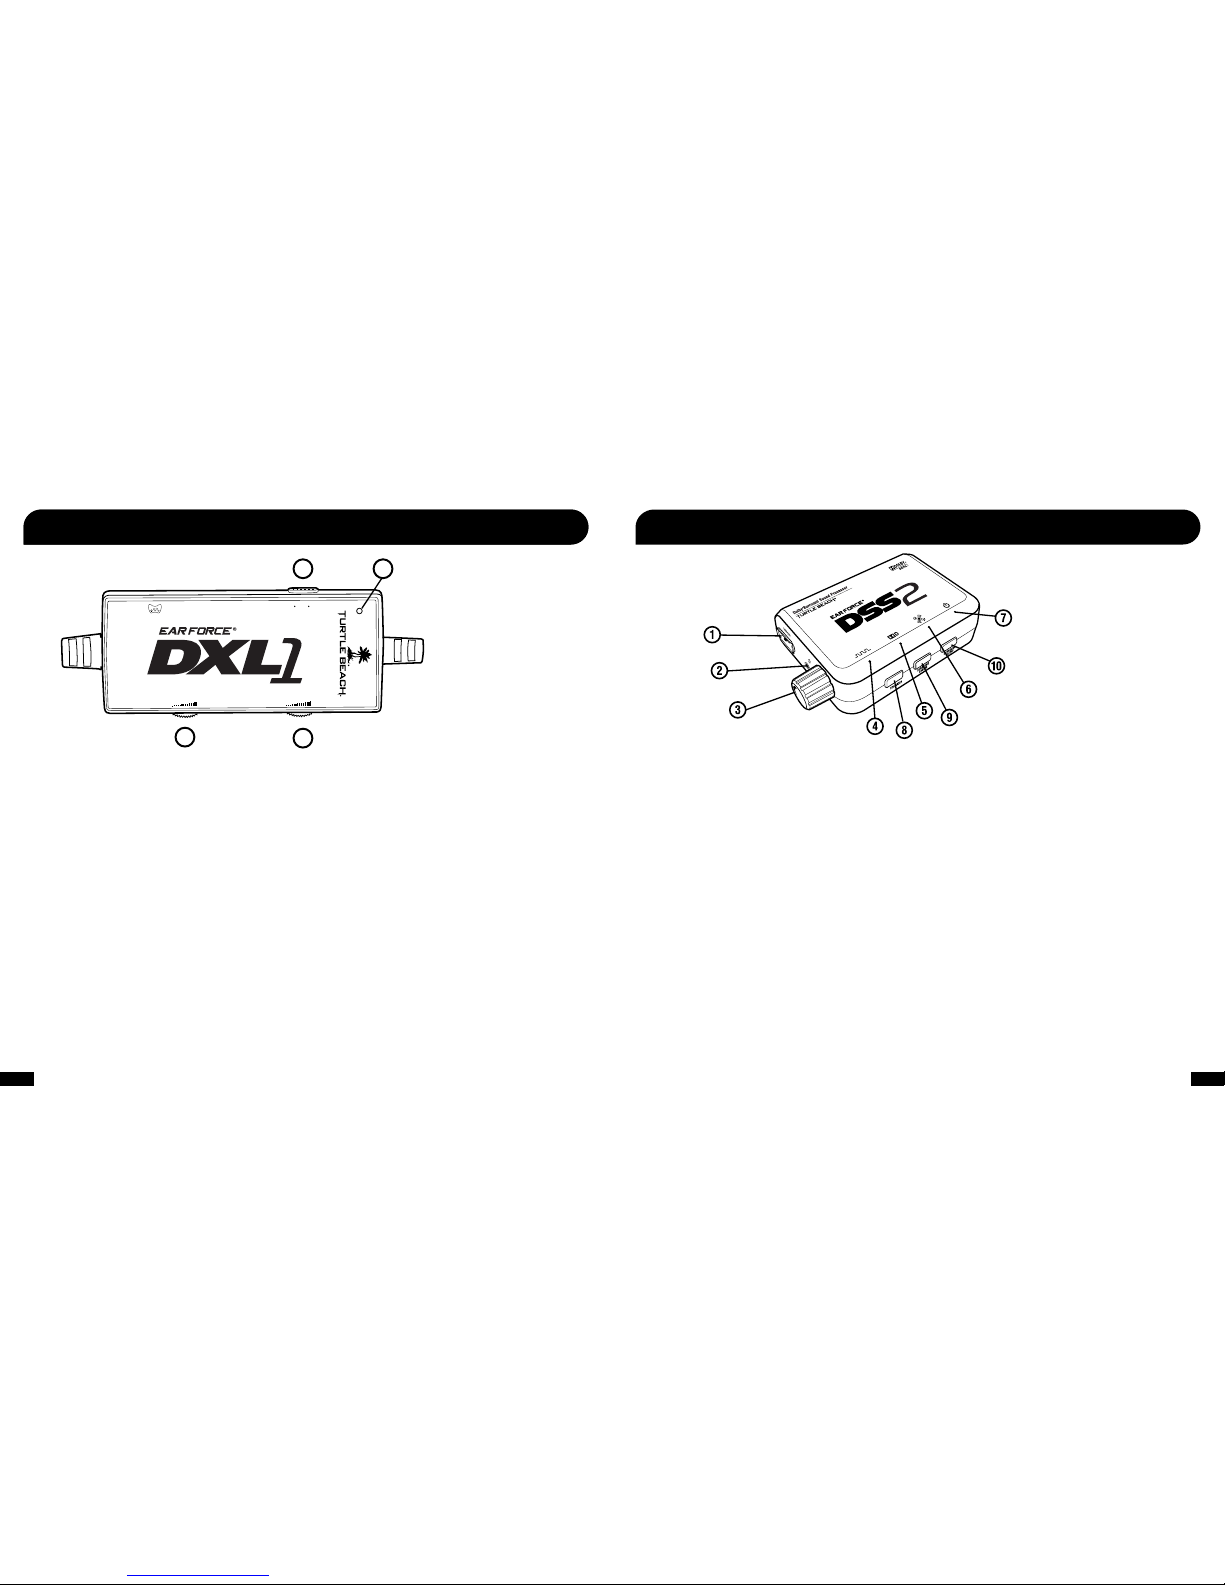
1. USB Output
2. Headphone Output Jack
3. Volume Control
4. Digital Input LED
5. Dolby® Digital LED
6. Surround Sound LED
7. Power LED
8. Equalizer Button
9. Surround Angles Button
10. Surround Sound On/Off
FRANCAIS
1. Sortie USB
2. Sortie casque
3. Commande du volume
4. DEL d’entrée numérique
5. DEL Dolby Digital
6. DEL son surround
7. DEL d’alimentation
8. Bouton d’égalisateur
9. Bouton d’angles du son
surround
10. Marche/Arrêt du son surround
DEUTSCH
1. USB-Ausgang
2. Kopfhörer-Ausgangsbuchse
3. Lautstärkeregelung
4. Digitaleingang-LED
5. Dolby Digital-LED
6. Surround-Sound-LED
7. Stromversorgungs-LED
8. Equalizer-Taste
9. Surround-Winkel-Taste
10. Surround-Sound Ein/Aus
ITALIANO
1. Uscita USB
2. Connettore uscita cufa
3. Controllo volume
4. LED ingresso digitale
5. LED Dolby Digital
6. LED audio surround
7. LED accensione
8. Tasto Equalizer (Equalizzatore)
9. Tasto Surround Angles (Ango
lazione surround)
10. Audio surround On/Off
PORTUGUÊS
1. Saída USB
2. Saída para fones de ouvido
3. Controle de volume
4. LED de entrada digital
5. LED Dolby Digital
6. LED de som surround
7. LED de energia
8. Botão de equalização
9. Botão de ângulos surround
10. Som surround Liga/Desliga
ESPAÑOL
1. Salida USB
2. Toma de salida de auriculares
3. Control de volumen
4. LED con entrada digital
5. LED digital Dolby
6. LED con sonido envolvente
7. LED de encendido
8. Botón ecualizador
9. Botón de ángulos envolventes
10. Encendido/Apagado de sonido
envolvente
SVENSK
1. USB-utgång
2. Hörlursuttag
3. Volymkontroll
4. Digital ingång LED
5. Dolby Digital LED
6. Surroundljud LED
7. Ström LED
8. Equalizerknapp
9. Surroundvinkelknapp
10. Surroundljud På/Av
DANSK
1. USB-udgangssignal
2. Udgangsstik til hovedtelefon
3. Lydstyrkekontrol
4. Lysdiode til digital indgang
5. Lysdiode til Dolby Digital
6. Lysdiode til surroundsound
7. Strømlysdiode
8. Equalizer-knap
9. Knap til surround-vinkler
10. Surround sound tændt/slukket
NEDERLANDS
1. USB-uitgang
2. Stekker hoofdtelefoonuitgang
3. Volumebediening
4. LED-lampje digitale ingang
5. Dolby Digital LED-lampje
6. LED-lampje surround sound
7. LED-lampje voeding
8 Equalizerknop
9. Knop surround sound-richtingen
10. Surround sound aan/uit
DSS2 - Front / Avant
1. Chat Volume
2. Game Volume
3. Mic Mute LED
4. Mic Mute Switch
Page 4
3 4
USB Cable /
Câble USB
Xbox 360 A/V cable or
HDMI Cable / Xbox 360
Câble A/V ou câble HDMI
Digital Optical Cable /
Câble optique numérique
FRANCAIS
11. Entrée auxiliaire
12. Entrée analogique
13. Entrée numérique
14. Entrée USB
15. Interrupteur d’alimentation
DEUTSCH
11. Aux-Eingang
12. Analogeingang
13. Digitaleingang
14. USB-Eingang
15. Netzschalter
ITALIANO
11. Ingresso ausiliario
12. Ingresso analogico
13. Ingresso digitale
14. Ingresso USB
15. Interruttore di accensione
PORTUGUÊS
11. Entrada auxiliar
12. Entrada analógica
13. Entrada digital
14. Entrada USB
15. Interruptor
ESPAÑOL
11. Entrada auxiliar
12. Entrada analógica
13. Entrada digital
14. Entrada USB
15. Interruptor de encendido
SVENSK
11. Extra ingång
12. Analog ingång
13. Digital ingång
14. USB-ingång
15. Strömbrytare
DANSK
11. Aux-indgang
12. Analog indgang
13. Digital indgang
14. USB-indgang
15. Tænd/sluk-knap
NEDERLANDS
11. Hulpingang
12. Analoge input
13. Digitale ingang
14. USB-ingang
15. Aan/uit knop
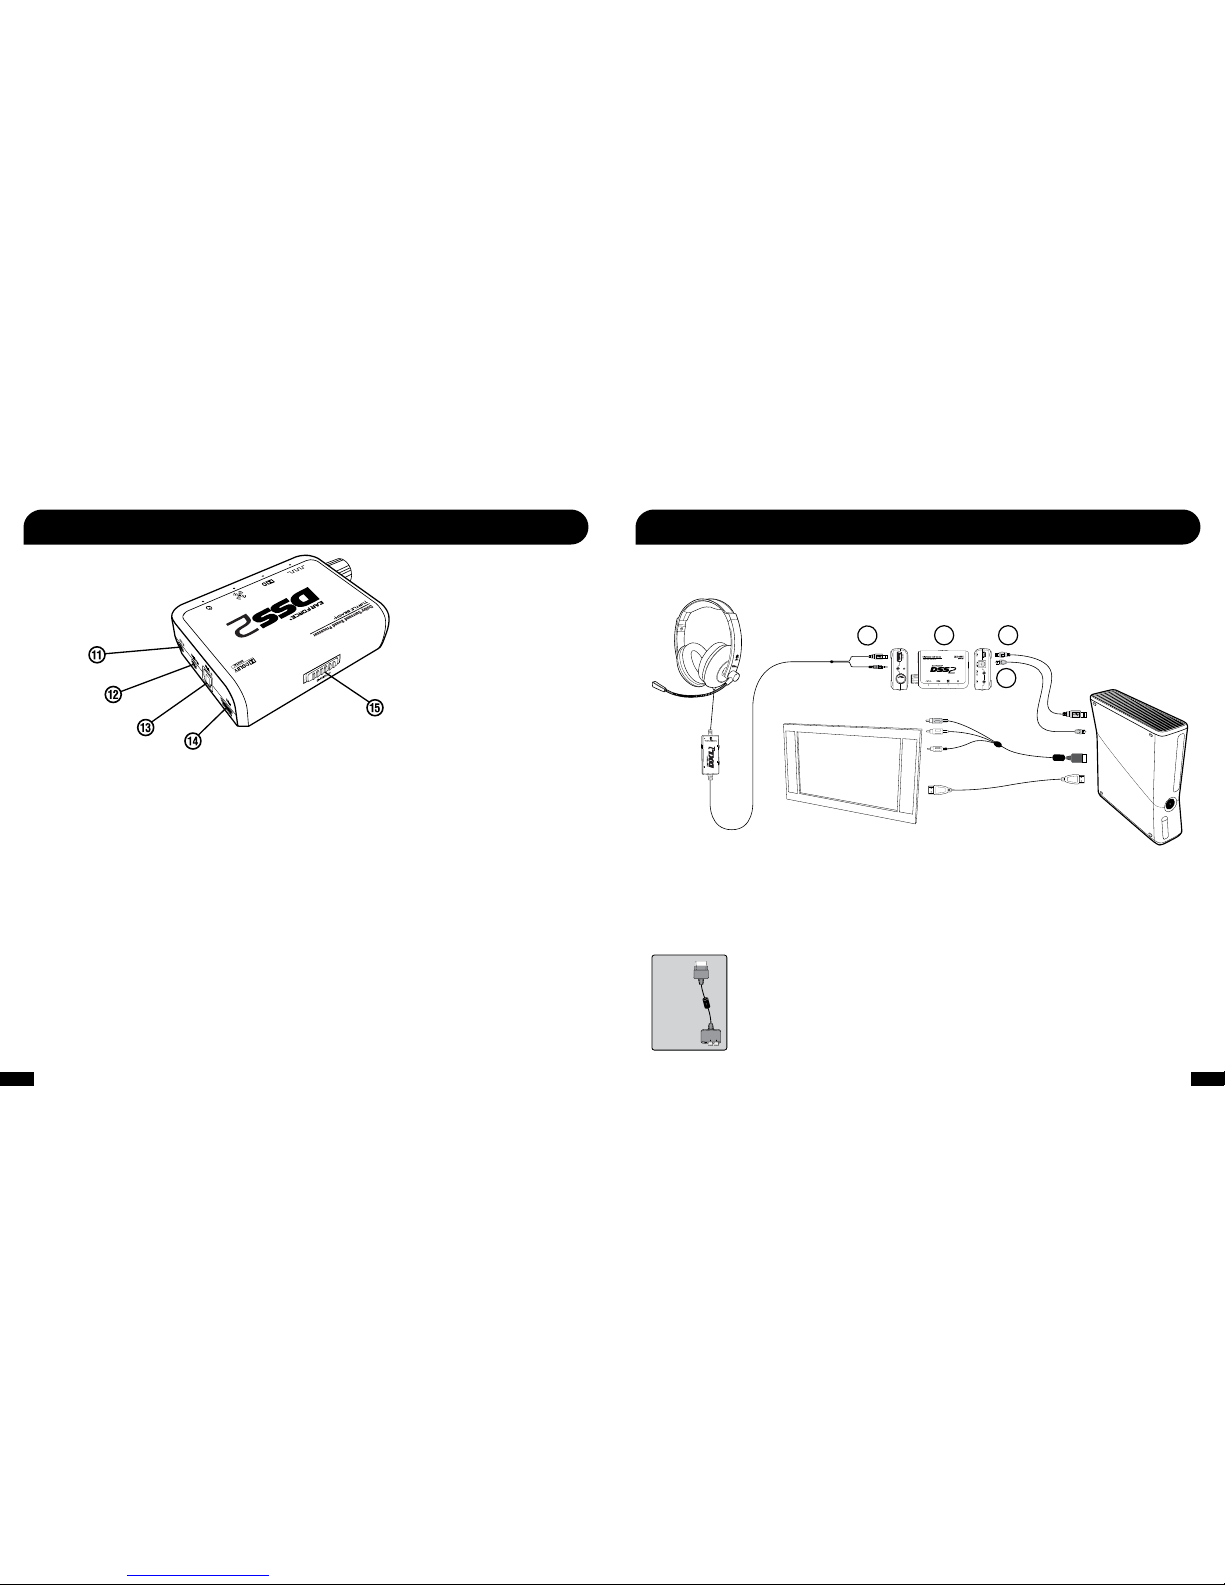
DSS2 - Rear / Arrière
11. Auxiliary Input
12. Analog Input
13. Digital Input
14. USB Input
15. Power Switch
1. Connect the optical cable
2. Connect the USB cable
3. Turn on the DSS2
4. Connect the headset
NOTE: Older Xbox 360 models require an Xbox 360 HDMI
Audio Adapter Cable for optical audio output (sold separately).
If your HDTV has a optical AUDIO OUT jack, you can use it to
connect the optical cable to the DSS2 and feed sound from
the gaming console to the DSS2.
Xbox 360
HDMI
Audio
Adapter
XBOX 360® Setup / Configuration XBOX 360
Xbox 360
1
2
3
4
OR
GAME
CHAT
ON MIC MUTE
Page 5
5 6
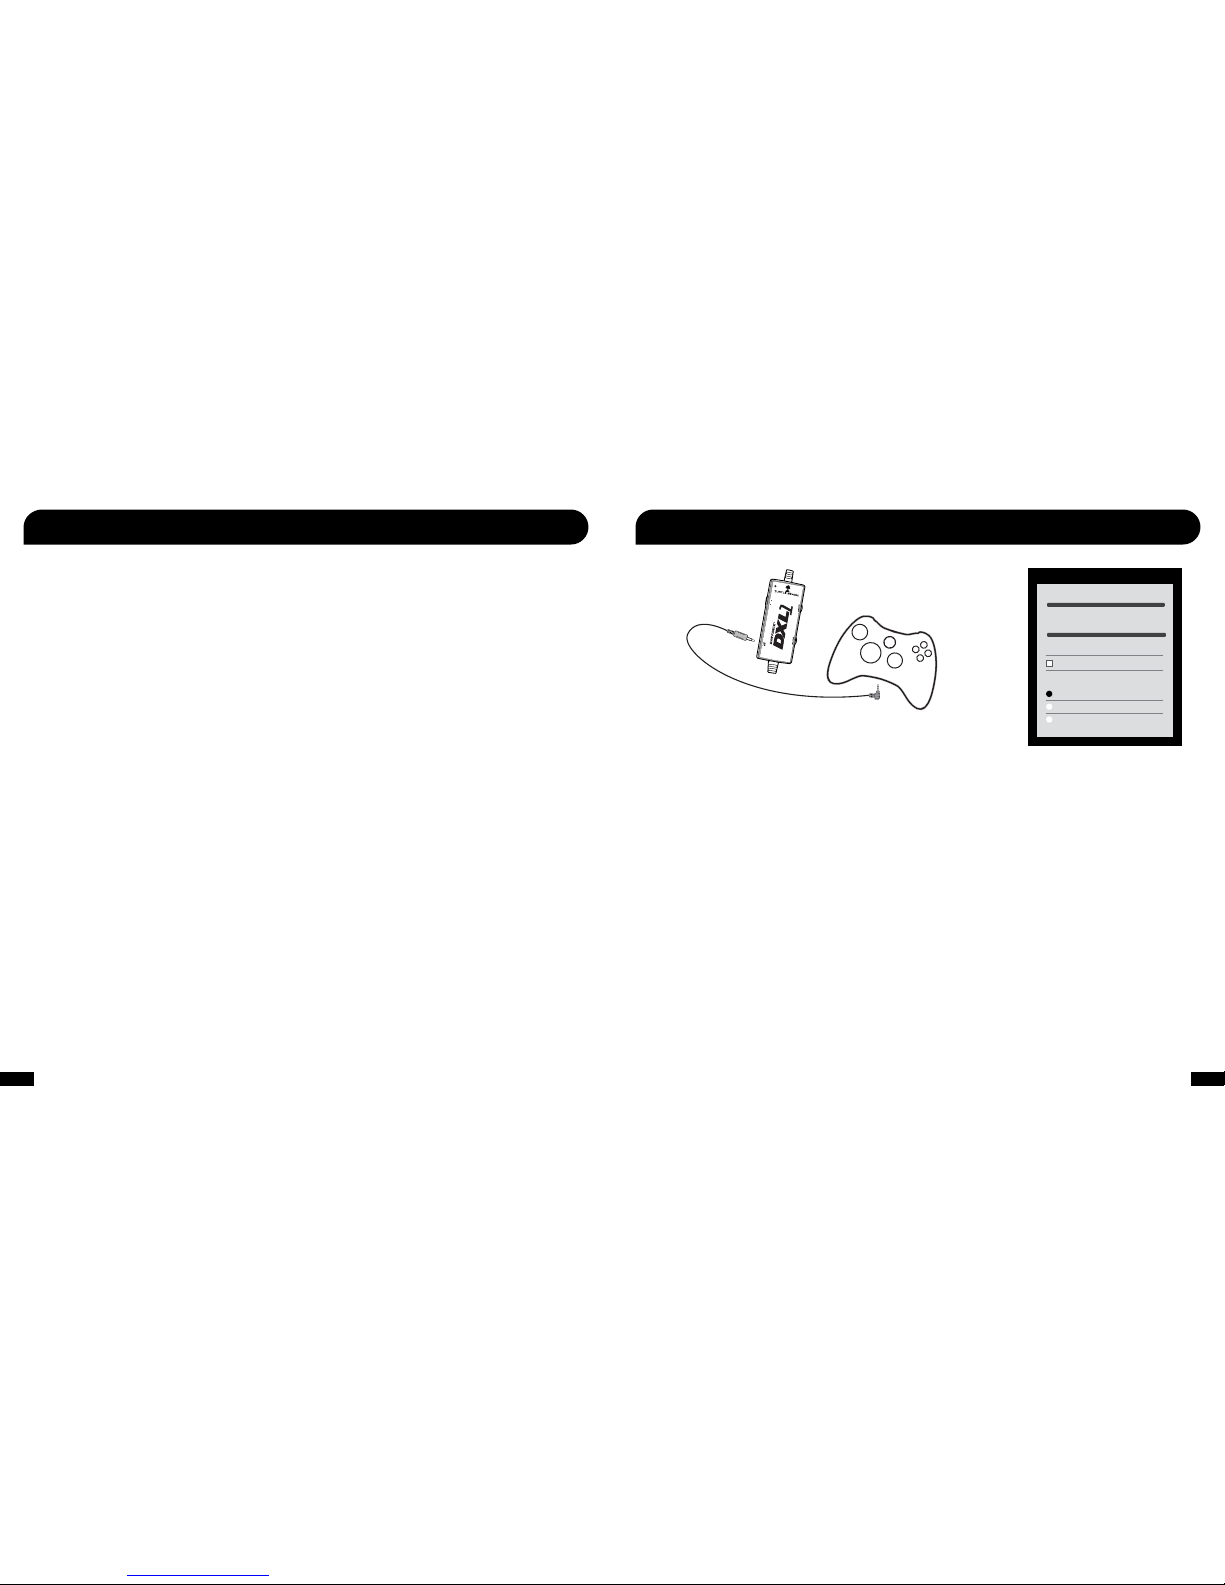
1. Connect the XBOX 360 Talkback Cable.
2. In the XBOX 360 System Settings, select “Preferences” > “Voice” > “Play Through Headset”
Voice Volume 10
Voice
Mute Kinect
Voice Output
Play Through Headset
Play Through Speakers
Voice Output
Game Volume 10
FRANCAIS
1. Brancher le câble Xbox 360 Talkback.
2. Au tableau de bord de la Xbox 360, sélectionner Paramètres >
Préférences > Voix > Son via le casque
DEUTSCH
1. Schließen Sie das XBOX 360-Talkback-Kabel an.
2. Wählen Sie in den XBOX 360-Systemeinstellungen
“Präferenzen” > “Sprache” > “Im Headset abspielen” aus
ITALIANO
1. Collegare la XBOX 360 al cavo Talkback.
2. Nelle Impostazioni di sistema della XBOX 360 , selezionare
“Preferenze” > “Voce” > “Ascolta in cufa”
PORTUGUÊS
1. Conecte o cabo de retorno do XBOX 360.
2. Nas Congurações de Sistema do XBOX 360, selecione
“Preferências” > “Voz” > “Reproduzir através do fone de ouvido”
ESPAÑOL
1. Conecte el cable de enlace del XBOX 360.
2. En Conguración del sistema para XBOX 360 seleccione
Preferencias > Voz > Reproducir por auriculares
SVENSK
1. Anslut Talkback-kabeln för XBOX 360.
2. Under ”Systeminställningar”, välj “Preferences” > “Voice” > “Play
Through Headset”
DANSK
1. Tilslut XBOX 360 talkback kabel.
2. Under XBOX 360 systemindstillinger vælger du “Præferencer” >
“Stemme” > “Spil gennem headset”
NEDERLANDS
1. Sluit de XBOX 360-talkbackkabel aan.
2. Selecteer in de systeeminstellingen van de XBOX 360 voorkeuren >
spraak > spelen via headset
XBOX 360® Setup / Configuration XBOX 360 XBOX 360 Chat Setup / Configuration vocale de la XBOX 360
FRANCAIS
1. Branchez le câble optique
2. Branchez le câble USB
3. Mettez le DSS2 en marche
4. Branchez le casque
REMARQUE: les anciens modèles
de Xbox 360 nécessitent un câble
adaptateur audio HDMI Xbox 360
pour sortie audio optique (vendu
séparément). Si votre télévision haute dénition comporte
une prise de sortie AUDIO OUT
optique, vous pouvez l’utiliser
pour brancher le câble optique au
DSS2 et acheminer le son de la
console de jeu au DSS2.
DEUTSCH
1. Optisches Kabel anschließen
2. USB-Kabel anschließen
3. DSS2 einschalten
4. Headset anschließen
HINWEIS: Ältere Xbox 360-Mod-
elle benötigen ein Xbox 360 HDMI
Audioadapter-Kabel für den
optischen Audioausgang (separat
erhältlich). Wenn das HDTV-Gerät
eine optische Audioausgangsbuchse (AUDIO OUT) hat, kann
das optische Kabel an den
DSS2-Prozessor angeschlossen werden, um Audio von der
Spielkonsole zum DSS2-Prozessor
zu übertragen.
ITALIANO
1. Collegare il cavo ottico
2. Collegare il cavo USB
3. Accendere l’unità DSS2
4. Collegare la cufa
NOTA: i modelli di Xbox 360 più
vecchi richiedono un cavo adattatore audio HDMI per Xbox 360
per l’uscita audio ottica (venduto
separatamente). Se l’apparecchio
HDTV usato dispone di un connettore AUDIO OUT ottico, è possibile
utilizzarlo per collegare il cavo
ottico all’unità DSS2 e trasferire
l’audio dalla console giochi
all’unità DSS2.
PORTUGUÊS
1. Conecte o cabo óptico
2. Conecte o cabo USB
3. Ligue o DSS2
4. Conecte o fone de ouvido
OBSERVAÇÃO: modelos mais
antigos de Xbox 360 requerem um
cabo adaptador de áudio HDMI
Xbox 360 para saída óptica de
áudio (vendido separadamente).
Se a sua HDTV possuir uma saída
AUDIO OUT, você pode utilizá-la
para conectar o cabo óptico
no DSS2 e alimentar o áudio do
console de jogos para o DSS2.
ESPAÑOL
1. Conecte el cable óptico
2. Conecte el cable USB
3. Encienda el DSS2
4. Conecte los auriculares
NOTA: Los modelos más antiguos
de Xbox 360 requieren un cable
adaptador de audio HDMI para
Xbox 360 para la salida de audio
óptica (se vende por separado).
Si su televisor de alta denición
tiene una toma óptica de SALIDA
DE AUDIO, puede utilizarla para
conectar el cable óptico al DSS2 y
pasar el sonido de la consola para
juegos al DSS2.
SVENSK
1. Anslut den optiska kabeln
2. Anslut USB-kabeln
3. Slå på DSS2
4. Anslut headsetet
OBS! Äldre Xbox 360-modeller
kräver Xbox 360 HDMI Audio
Adapter Cable för optisk ljudutgång (säljs separat). Om din HDTV
har ett optiskt AUDIO OUT-uttag
kan du använda den för att ansluta
den optiska kabeln till DSS2 och
mata ljudet från spelkonsolen till
DSS2.
DANSK
1. Forbind det optiske kabel
2. Forbind USB-kablet
3. Tænd for DSS2
4. Forbind headsettet
B
EMÆRK: Ældre Xbox 360-mod-
eller kræver et Xbox 360 HDMI
lydadapterkabel for optisk lydudgangssignal (sælges separat).
Hvis dit HDTV har et optisk AUDIO
OUT-stik, kan du bruge det til at
forbinde det optiske kabel til DSS2
og lede lyden fra spillekonsollen
til DSS2
NEDERLANDS
1. Sluit de optische kabel aan
2. Sluit de USB-kabel aan
3. Zet de DSS2 aan
4. Sluit de hoofdtelefoon aan
OPMERKING: Voor oudere Xbox
360-modellen is een Xbox 360
HDMI audio adapterkabel voor
optische geluidsweergave nodig
(apart verkrijgbaar). Als uw HDTV
een aansluiting voor optische
AUDIO OUT heeft, kunt u deze
gebruiken om de optische kabel
op de DSS2 aan te sluiten, om
geluid vanaf de spelconsole naar
de DSS2 over te brengen.
GAME
CHAT
ON MIC MUTE
Page 6

7 8
Current Setting
Dolby Digital
Choose the digital output
type for your system.
This setting only applies
to optical digital and HDMI
audio outputs.
Digital Stereo
Select Back
Digital Output
Dolby Digital 5.1
Dolby Digital 5.1 with WMA Pro
Settings > Audio > Accessory Settings > Audio Device Settings.
Set the “Digital Output” to “Dolby Digital 5.1”
Configure Xbox 360® System Settings /
Configurer les paramètres système Xbox 360
FRANCAIS
Configurer les paramètres système Xbox 360
Settings > Audio > Accessory Settings > Audio Device Settings
(Paramètres > Audio > Paramètres d’accessoires > Paramètres de
périphériques audio). Congurez « Digital Output » (« Sortie numér
que ») sur « Dolby Digital 5.1 »
DEUTSCH
Konfiguration der Xbox 360 Systemeinstellungen
Zum Auswählen der Audiogeräteeinstellungen „Settings > Audio
> Accessory Settings > Audio Device Settings“ wählen. „Digital
Output“ (Digitalausgang) auf „Dolby Digital 5.1“ einstellen
ITALIANO
Configurazione delle impostazioni di sistema per Xbox 360
Settings > Audio > Accessory Settings > Audio Device Settings
(Impostazioni > Audio > Impostazioni accessori > Impostazioni
dispositivo audio). Impostare la “Digital Output” (Uscita digitale)
su “Dolby Digital 5.1”
PORTUGUÊS
Configure os ajustes do sistema Xbox 360
Settings > Audio > Accessory Settings > Audio Device Settings
(Congurações > Áudio > Congurações de acessório > Congu
rações de dispositivo de áudio). Dena a “Digital output” (Saída
digital) para “Dolby Digital 5.1”
ESPAÑOL
Establezca la configuración de sistema de Xbox 360
Conguración > Audio > Conguración de accesorios >
Conguración de dispositivo de audio. Congure la “Salida digital”
en “Dolby digital 5.1”
SVENSK
Konfigurera systeminställningar för Xbox 360
Inställningar > Ljud > Tillbehörsinställningar > Inställningar för
ljudenhet. Sätt den ”Digitala utgången” på ”Dolby Digital 5.1”
DANSK
Konfigurér Xbox 360’s systemindstillinger
Indstillinger > Lyd > Tilbehørsindstillinger > Lydenhedsindstillinger.
Sæt “Digital udgangssignal” til “Dolby Digital 5.1”
NEDERLANDS
Configureer de instellingen voor het Xbox 360-systeem
Settings > Audio > Accessory Settings > Audio Device Settings.
Zet de “Digital Output” op “Dolby Digital 5.1”
Connect the music player to the Auxiliary Input if
you want to hear music with the game audio.
Connect the music player to the Analog Input if you want
to process the music with surround sound.
1
2
Connecting a Digital Music Player /
Branchement d’un lecteur musical numérique
FRANCAIS
1. Branchez le lecteur musical à l’entrée auxiliaire si vous voulez
entendre de la musique avec l’audio du jeu.
2. Branchez le lecteur musical à l’entrée analogique si vous voulez
traiter la musique avec le son surround.
DEUTSCH
1. Um zusätzlich zum Spielsound Musik wiederzugeben, den Musik-
Player am Aux-Eingang anschließen.
2. Um die Musik im Surround-Sound wiederzugeben, den
Musik-Player am Analogeingang anschließen.
ITALIANO
1. Per ascoltare la musica con l’audio dei giochi, collegare il
riproduttore musicale all’Ingresso ausiliario.
2. Per ascoltare la musica con l’audio surround, collegare il
riproduttore musicale all’Ingresso analogico.
PORTUGUÊS
1. Conecte o reprodutor de música à entrada auxiliar se você quiser
ouvir música com o áudio do jogo.
2. Conecte o reprodutor de música à entrada analógica se você
quiser processar a música com som surround.
ESPAÑOL
1. Conecte el reproductor de música a la entrada auxiliar si desea
escuchar música con el audio del juego.
2. Conecte el reproductor de música a la entrada analógica si desea
procesar la música con el sonido envolvente.
SVENSK
1. Anslut musikspelaren till extraingången om du vill spela upp musik
med spelljudet.
2. Anslut musikspelaren till analoga ingången om du vill bearbeta
musiken för surroundljud.
DANSK
1. Forbind musikafspilleren til Aux-indgangen, hvis du ønsker at høre
musik med spillyden.
2. Forbind musikafspilleren til den analoge indgang, hvis du ønsker at
fremkalde lyden med surround sound.
NEDERLANDS
1. Sluit de muziekspeler op de hulpingang aan, als je bij het geluid van
de game ook muziek wilt horen.
2. Sluit de muziekspeler op de analoge ingang aan, als je de muziek
wilt horen via surround sound.
Page 7

9 10
Surround Sound Angle Presets:
Front Angle; 30 degrees
Rear Angle; 105 degrees
C
RL
FL
30
o
105
o
C
FR
105
o
RR
30
o
RR
RL
45
o
120
o
45
o
120
o
FR
FL
Front Angle; 45 degrees
Rear Angle; 120 degrees
135
o
RR
135
o
RL
45
o
45
o
FR
FL
Front Angle; 45 degrees
Rear Angle; 135 degrees
60
o
FR FL
60
o
RR
RL
120
o
120
o
Front Angle; 60 degrees
Rear Angle; 120 degrees
135
o
RR
135
o
RL
60
o
FR FL
60
o
Front Angle; 60 degrees
Rear Angle; 135 degrees
150
o
150
o
RL
60
o
FR FL
60
o
RR
Front Angle; 60 degrees
Rear Angle; 150 degrees
1 2 3
4 5 6
Surround Sound Angles / Angles du Son Surround
Press the Surround Angles button to cycle
through 6 different surround sound angles.
FRANCAIS
Préréglages des angles du son surround
Appuyez sur le bouton Angles surround pour faire déler 6 différents
angles de son surround:
1. Angle avant : 30 degrés, Angle arrière : 105 degrés
2. Angle avant : 45 degrés, Angle arrière : 120 degrés
3. Angle avant : 45 degrés, Angle arrière : 135 degrés
4. Angle avant : 60 degrés, Angle arrière : 120 degrés
5. Angle avant : 60 degrés, Angle arrière : 135 degrés
6. Angle avant : 60 degrés, Angle arrière : 150 degrés
DEUTSCH
Surround-Sound-Winkel-Voreinstellungen
Die Taste „Surround Angles“ drücken, um 6 verschiedene SurroundWinkel der Reihe nach abzurufen:
1. Vorderer Winkel: 30 Grad, Hinterer Winkel: 105 Grad
2. Vorderer Winkel: 45 Grad, Hinterer Winkel: 120 Grad
3. Vorderer Winkel: 45 Grad, Hinterer Winkel: 135 Grad
4. Vorderer Winkel: 60 Grad, Hinterer Winkel: 120 Grad
5. Vorderer Winkel: 60 Grad, Hinterer Winkel: 135 Grad
6. Vorderer Winkel: 60 Grad, Hinterer Winkel: 150 Grad
ITALIANO
Preset delle angolazioni dell’audio surround
Premere il tasto Surround Angles (Angolazione surround) per scegliere tra 6 diverse angolazioni di audio surround:
1. Angolo anteriore: 30 gradi, Angolo posteriore: 105 gradi
2. Angolo anteriore: 45 gradi, Angolo posteriore: 120 gradi
3. Angolo anteriore: 45 gradi, Angolo posteriore: 135 gradi
4. Angolo anteriore: 60 gradi, Angolo posteriore: 120 gradi
5. Angolo anteriore: 60 gradi, Angolo posteriore: 135 gradi
6. Angolo anteriore: 60 gradi, Angolo posteriore: 150 gradi
PORTUGUÊS
Pré-ajustes de ângulo de som surround
Pressione o botão Surround Angles (Ângulos surround) para alternar
entre os 6 diferentes ângulos de som surround:
1. Ângulo frontal: 30 graus, ângulo traseiro: 105 graus
2. Ângulo frontal: 45 graus, ângulo traseiro: 120 graus
3. Ângulo frontal: 45 graus, ângulo traseiro: 135 graus
4. Ângulo frontal: 60 graus, ângulo traseiro: 120 graus
5. Ângulo frontal: 60 graus, ângulo traseiro: 135 graus
6. Ângulo frontal: 60 graus, ângulo traseiro: 150 graus
ESPAÑOL
Ángulos de sonido envolvente preestablecidos
Presione el botón Ángulos envolventes para recorrer los 6 ángulos
distintos de sonido envolvente:
1. Ángulo delantero: 30 grados, ángulo trasero: 105 grados
2. Ángulo delantero: 45 grados, ángulo trasero: 120 grados
3. Ángulo delantero: 45 grados, ángulo trasero: 135 grados
4. Ángulo delantero: 60 grados, ángulo trasero: 120 grados
5. Ángulo delantero: 60 grados, ángulo trasero: 135 grados
6. Ángulo delantero: 60 grados, ángulo trasero: 150 grados
SVENSK
Snabbval för surroundljudsvinklar
Tryck på surroundvinkelknappen för att gå igenom de sex olika surroundljudsvinklarna:
1. Vinkel framifrån: 30 grader, Vinkel bakifrån: 105 grader
2. Vinkel framifrån: 45 grader, Vinkel bakifrån: 120 grader
3. Vinkel framifrån: 45 grader, Vinkel bakifrån: 135 grader
4. Vinkel framifrån: 60 grader, Vinkel bakifrån: 120 grader
5. Vinkel framifrån: 60 grader, Vinkel bakifrån: 135 grader
6. Vinkel framifrån: 60 grader, Vinkel bakifrån: 150 grader
DANSK
Forudindstillede surround sound-vinkelindstillinger
Tryk på knappen til surround-vinkler for at løbe gennem 6 forskellige
surround sound-vinkler:
1. Frontvinkel: 30 grader, bagvinkel: 105 grader
2. Frontvinkel: 45 grader, bagvinkel: 120 grader
3. Frontvinkel: 45 grader, bagvinkel: 135 grader
4. Frontvinkel: 60 grader, bagvinkel: 120 grader
5. Frontvinkel: 60 grader, bagvinkel: 135 grader
6. Frontvinkel: 60 grader, bagvinkel: 150 grader
NEDERLANDS
Fabrieksinstellingen voor de richting van surround sound
Druk op de knop voor surround sound-richtingen om zes verschillende richtingen voor surround sound door te lopen:
1. Hoek vanaf voorkant: 30 graden, hoek vanaf achterkant: 105 graden
2. Hoek vanaf voorkant: 45 graden, hoek vanaf achterkant: 120 graden
3. Hoek vanaf voorkant: 45 graden, hoek vanaf achterkant: 135 graden
4. Hoek vanaf voorkant: 60 graden, hoek vanaf achterkant: 120 graden
5. Hoek vanaf voorkant: 60 graden, hoek vanaf achterkant: 135 graden
6. Hoek vanaf voorkant: 60 graden, hoek vanaf achterkant: 150 graden
Page 8

11 12
Equalizer (EQ) Presets / Préréglages de l’égalisateur
Press the Equalizer button to cycle through the EQ presets.
Double press the button to turn off the preset.
EQ Presets:
1. Flat
2. Bass Boost
3. Aggressive Bass Boost
4. Treble Boost
5. Aggressive Treble Boost
6. Bass + Treble Boost
7. Aggressive Bass + Treble Boost
8. Mid-Range Boost
9. Aggressive Mid-Range Boost
FRANCAIS
Préréglages de l’égalisateur
Appuyez sur le bouton d’égalisateur pour en faire déler les
préréglages. Appuyez deux fois sur le bouton pour désactiver le
préréglage:
1. Sans déviation
2. Ampli basses fréquences
3. Super ampli basses fréquences
4. Ampli hautes fréquences
5. Super ampli hautes fréquences
6. Ampli basses et hautes fréquences
7. Super ampli basses et hautes fréquences
8. Ampli plage intermédiaire
9. Super ampli plage intermédiaire
DEUTSCH
EQ-Voreinstellungen
Die Equalizer-Taste drücken, um die EQ-Voreinstellungen der Reihe
nach abzurufen. Die Taste zwei Mal drücken, um die Voreinstellung
zu deaktivieren:
1. Linear
2. Bass anheben
3. Bass aggressiv anheben
4. Höhen anheben
5. Höhen aggressiv anheben
6. Bass + Höhen anheben
7. Bass + Höhen aggressiv anheben
8. Mittelton anheben
9. Mittelton aggressiv anheben
ITALIANO
Preset di equalizzazione
Premere il tasto Equalizer (Equalizzatore) per scegliere tra i preset di
equalizzazione disponibili. Premere due volte il tasto per disattivare il
preset:
1. Flat (Neutro)
2. Bass Boost (Esalta bassi)
3. Aggressive Bass Boost (Esalta bassi max)
4. Treble Boost (Esalta alti)
5. Aggressive Treble Boost (Esalta alti max)
6. Bass + Treble Boost (Esalta bassi + alti)
7. Aggressive Bass + Treble Boost (Esalta bassi + alti max)
8. Mid-Range Boost (Esalta medi)
9. Aggressive Mid-Range Boost (Esalta medi max)
PORTUGUÊS
Pré-ajustes do equalizador
Pressione o botão Equalizer (Equalizador) para alternar entre os préajustes do equalizador. Pressione duas vezes o botão para desligar o
pré-ajuste:
1. Flat
2. Bass Boost
3. Aggressive Bass Boost
4. Treble Boost
5. Aggressive Treble Boost
6. Bass + Treble Boost
7. Aggressive Bass + Treble Boost
8. Mid-Range Boost
9. Aggressive Mid-Range Boost
ESPAÑOL
Ecualizador preestablecido
Presione el botón Ecualizador para recorrer los valores preestablecidos del ecualizador. Presione dos veces el botón para desactivar el
valor preestablecido:
1. Plano
2. Refuerzo de graves
3. Refuerzo dinámico de graves
4. Refuerzo de agudos
5. Refuerzo dinámico de agudos
6. Refuerzo de graves + agudos
7. Refuerzo dinámico de graves + agudos
8. Refuerzo de medios
9. Refuerzo dinámico de medios
SVENSK
EQ-snabbval
Tryck på equalizerknappen för att gå igenom snabbvalen för EQ. Dubbeltryck på knappen för att stänga av snabbvalet:
1. Jämn
2. Bas-boost
3. Aggressiv bas-boost
4. Diskant-boost
5. Aggressiv diskant-boost
6. Bas- och diskant-boost
7. Aggressiv bas- och diskant-boost
8. Mellanregister-boost
9. Aggressiv mellanregister-boost
DANSK
Fabrieksinstellingen voor de equalizer
Druk op de knop Equalizer voor het doorlopen van zes fabrieksinstellingen. Dubbelklik op de knop om de fabrieksinstellingen uit te zetten:
1. Plat
2. Extra basgeluid
3. Zwaar basgeluid
4. Extra hoge tonen
5. Zeer hoge tonen
6. Extra basgeluid + hoge tonen
7. Zwaar basgeluid + extra hoge tonen
8. Extra middenbereik
9. Zwaar middenbereik
NEDERLANDS
Fabrieksinstellingen voor de equalizer
Druk op de knop Equalizer voor het doorlopen van zes fabrieksinstellingen. Dubbelklik op de knop om de fabrieksinstellingen uit te zetten:
1. Plat
2. Extra basgeluid
3. Zwaar basgeluid
4. Extra hoge tonen
5. Zeer hoge tonen
6. Extra basgeluid + hoge tonen
7. Zwaar basgeluid + extra hoge tonen
8. Extra middenbereik
9. Zwaar middenbereik
Page 9

13 14
Safety Notice / Avis de sécurité
To avoid potential damage to the device, always disconnect all cables before transporting it.
WARNING: Permanent hearing damage can occur if a headset is used at high volumes for extended periods of time, so it is important
to keep the volume at a safe level. Over time, your ears adapt to loud volume levels, so a level that may not cause initial discomfort can still damage your hearing. If
you experience ringing in your ears after listening with the headset, it means the volume is set too loud.
The louder the volume is set, the less time it takes to affect your hearing. So, please take care to listen at moderate levels.
• Before placing a headset on your ears, turn the volume down completely,
then slowly increase it to a comfortable level.
• Turn down the volume if you can’t hear people speaking near you.
• Avoid turning up the volume to block out noisy surroundings.
FRANCAIS
Consigne de sécurité: Pour éviter un endommagement potentiel sur l’appareil, veuillez à toujours débrancher tous les câbles avant de le déplacer.
MISE EN GARDE: Des dommages auditifs permanents peuvent se produire si le casque est utilisé à des volumes élevés pendant de très longues périodes de temps,
par conséquent il est important de maintenir le volume à un bon niveau. Au l du temps, vos oreilles s’adaptent aux volumes élevés, de sorte qu’un niveau qui n’est
pas de nature à causer initialement de l’inconfort peut toujours nir par endommager votre audition. S’il y a un écho dans vos oreilles après avoir utilisé le casque,
cela signie que le volume est trop élevé. Plus le volume est réglé haut, moins de temps ça prend pour affecter votre audition. De grâce, veuillez prendre soin de faite
l’écoute à des niveaux modérés.
• Avant de placer un casque à vos oreilles, baissez totalement le volume, puis augmentez-le doucement jusqu’à un niveau confortable.
• Baissez le volume si vous ne pouvez pas entendre les voix des gens qui sont autour de vous.
• Évitez d’augmenter le volume pour bloquer le bruit ambiant.
DEUTSCH
Sicherheitshinweis: Um mögliche Schädigungen des Gerätes zu vermeiden, trennen Sie vor einem Transport immer alle Kabel.
WARNUNG: Es kann ein dauerhafter Hörschaden entstehen, wenn ein Headset über einen längeren Zeitpunkt bei hoher Lautstärke verwendet wird, daher ist es
wichtig, die Lautstärke auf einem vernünftigen Pegel zu halten. Mit der Zeit gewöhnen sich die Ohren an hohe Lautstärken; das führt dazu, dass eine Lautstärke, die
kein anfängliches Unbehagen verursacht, trotzdem Ihr Gehör schädigen kann. Wenn Sie ein Klingeln in Ihren Ohren wahrnehmen, nachdem Sie mit dem Headset
Musik gehört haben, bedeutet dies, dass die Lautstärke zu hoch war. Je höher die Lautstärke eingestellt wird, desto weniger Zeit benötigt es, bis Ihr Gehör beeinträchtigt wird. Achten Sie deshalb bitte darauf, in einer vernünftigen Lautstärke zu hören.
• Bevor Sie das Headset aufsetzen, drehen Sie die Lautstärke ganz nach unten und dann langsam etwas lauter auf ein angenehmes Level.
• Drehen Sie die Lautstärke niedriger, wenn Sie die Leute um sich herum nicht mehr verstehen.
• Vermeiden Sie es, die Lautstärke höher zu drehen, um den Lärm um Sie herum auszuschalten.
ITALIANO
Avviso di sicurezza: Per evitare danni al dispositivo, scollegare sempre i cavi prima del trasporto.
AVVERTENZA: se la cufa viene utilizzata ad alto volume per lunghi periodi di tempo, potrebbe causare danni all’udito. Pertanto mantenere il volume a livelli accettabili. Nel tempo, le orecchie potrebbero adattarsi al volume alto, pertanto un livello che non causa fastidio all’inizio potrebbe comunque danneggiare l’udito. Se si
avvertono ronzii nelle orecchie dopo aver utilizzato le cufe, signica che il volume impostato è troppo alto. Più il volume è alto, minor tempo sarà necessario per
danneggiare l’udito. Pertanto, impostare volumi moderati.
• Prima di indossare le cufe, abbassare il volume e quindi alzarlo no a raggiungere un livello accettabile
• Abbassare il volume se non si riesce a sentire la voce delle persone nelle vicinanze.
• Evitare di alzare il volume per estraniarsi da luoghi rumorosi.
PORTUGUÊS
Aviso sobre Segurança: Para evitar danos potenciais no dispositivo, desconecte sempre todos os cabos antes de o transportar.
AVISO: Poderão ocorrer danos auditivos permanentes se forem usados uns auscultadores com o volume elevado durante longos períodos de tempo, pelo que é importante manter o volume num nível seguro. Ao longo do tempo, os seus ouvidos adaptar-se-ão aos níveis de volume elevados, pelo que estes, ainda que não causem
desconforto inicial, poderão, mesmo assim, prejudicar a sua audição. Se ouvir campainhas depois de ter estado a usar os auscultadores, isso signica que o volume
está demasiado alto. Quanto mais alto o volume, menos tempo levará a afectar a sua audição. Portanto, tenha o cuidado de usar níveis de volume moderados.
• Antes de colocar os auscultadores nos ouvidos, diminua o volume para o mínimo; depois, aumente-o lentamente até um nível confortável.
• Diminua o volume se não conseguir ouvir as pessoas a falar perto de si.
• Evite aumentar o volume para o sobrepor a ambientes ruidosos
ESPAÑOL
Advertencia de seguridad: Para evitar que el equipo sufra daños potenciales, desconecte siempre todos los cables antes de moverlo de lugar.
ADVERTENCIA: Si los auriculares se utilizan a volúmenes altos durante periodos prolongados, pueden provocar la pérdida permanente de la audición; por eso es
importante mantener el volumen en un nivel seguro. Con el tiempo, sus oídos se acostumbran a los volúmenes altos, por lo que incluso un nivel de volumen que inicialmente no le haga sentir molestias podría afectar su audición. Si siente un pitido en los oídos después de haber usado los auriculares, signica que el nivel al que
está ajustado el volumen es demasiado alto. Cuanto más alto ajuste el volumen, más pronto afectará su audición. Por lo tanto, preste atención al volumen y ajústelo a
niveles moderados.
• Antes de colocarse los auriculares, baje completamente el volumen y, una vez puestos, suba el volumen lentamente hasta el nivel que le resulte cómodo.
• Si no puede oír las voces de otras personas a su alrededor, baje el volumen.
• Evite subir el volumen para contrarrestar los ruidos exteriores
SVENSK
Säkerhetsföreskrifter: För att undvika att skada enheten, koppla alltid ur alla kablar innan du yttar på den.
VARNING! Permanenta hörselskador kan uppstå om headsetet används med hög volym under en längre tid. Det är viktigt att hålla ljudet på en säker nivå. Dina öron
anpassar sig till höga ljudnivåer om de utsätts för detta under en längre tid. En ljudnivå som inte upplevs som obekväm kan således fortfarande skada din hörsel. Om
du upplever att det ringer i dina öron efter att du använt headsetet betyder det att ljudnivån är för hög. Ju högre du ställer in volymen, desto kortare tid tar det för din
hörsel att skadas. Var försiktig och lyssna på en rimlig ljudnivå.
• Innan du sätter på dig headsetet, skruva ner volymen helt för att sedan sakta och kontrollerat skruva upp den till en behaglig nivå.
• Skruva ner volymen om du inte kan höra personer som pratar bredvid dig.
• Undvik att skruva upp volymen för att stänga ute oönskade ljud i din omgivning.
DANSK
Sikkerhedsnotits: Undgå mulig skade på anordningen ved altid at fraslutte alle kabler før transport.
ADVARSEL: Permanent høreskade er mulig, hvis et headset bruges ved høj lydstyrke i længere tid, så det er vigtigt at holde lydstyrken nede på et sikkert niveau. Med
tiden vil dine ører tilpasse sig højere lydniveauer, så et niveau som ikke føles ubehageligt i begyndelsen, kan stadigt beskadige din hørelse. Hvis du oplever ringen for
ørene efter du har brugt dit headset, betyder det, at lydstyrken er for høj. Jo højere lyden er sat, jo kortere tid tager det at påvirke din hørelse. Så sørg venligst for at
lytte ved et moderat niveau.
• Før du tager dit headset på, skal du skrue helt ned for lyden og så langsomt skrue op igen til et behageligt niveau.
• Skru ned for lyden hvis du ikke kan høre andre, der snakker i nærheden.
• Undgå at skrue op for lyden for at lukke støj fra omgivelserne ude.
NEDERLANDS
Veiligheidsmededeling: Koppel altijd alle kabels van het apparaat los tijdens vervoer om beschadiging van het apparaat te voorkomen.
WAARSCHUWING: Er kan onherstelbaar gehoorverlies ontstaan als een headset langdurig met hoog volume worden gebruikt. Daarom is het belangrijk om het volume op een veilig niveau te houden. De oren raken na verloop van tijd gewend aan hoge volumeniveaus zodat een niveau dat niet meteen ongemak veroorzaakt het
gehoor toch kan beschadigen. Als uw oren na luisteren met de headset suizen, betekent dit dat het volume te hoog is ingesteld. Hoe hoger het volume, des te sneller
het gehoor beschadigd raakt. Luister daarom bij voorkeur met een gematigd volumeniveau.
• Zet voordat u een headset opzet eerst het volume helemaal omlaag en verhoog dit dan langzaam tot
een comfortabel niveau.
• Verlaag het volume als u mensen in de buurt niet kunt horen praten.
• Maak er geen gewoonte van het volume te verhogen om omgevingslawaai buiten te sluiten.
Page 10

15 16
Technical Specifications
DXL1 Headset
• 50mm diameter speakers
• Speaker Frequency Response: 20Hz - 20kHz, >120dB SPL @ 1kHz
• Condenser Microphone Frequency Response: 50Hz - 15kHz
• Cable length: 16 ft.
DXL1 Amplifier
• Stereo DC-coupled, 35mW/ch, THD <1%, Frequency Response: DC - 30kHz
• Fixed Bass Boost +9dB @150Hz• Mic mute switch
• Maximum analog input level with volume control on maximum setting: 2Vpp (700mV rms)
• 3.5mm plug for line input
• 2.5mm Xbox 360 talkback cable jack
• USB connector for power (5VDC @ <60 @ mA max)
DSS2 Surround Sound Processor
• Game audio frequency response: 20Hz - 20kHz, >120dB SPL @ 1kHz
• Headphone amplier: Stereo 35mW/ch, THD <1%
• Digital Audio Input: TOSLINK connector compatible with 48kHz Digital Audio Streams
• Maximum Analog Input: 2Vpp (700mV rms)
• USB connector for power (5VDC @ <380 @ mA max)
Troubleshooting
Xbox 360 Does Not Have Digital Output
Older Xbox 360 models don’t include an digital optical output. If this is the case with your Xbox 360, then you will have to purchase a cable that
includes a digital output jack on the connector. Here are the Xbox 360 cables that support digital output:
• Component A/V cable
• VGA A/V cable
• S-Video A/V cable
• Advanced SCART A/V cable
• HDMI audio adapter cable
• Composite A/V cable with digital output
If you are using HDMI and your Xbox A/V cable does not have a digital output, then you can alternatively connect the DSS2 digital optical cable
to a digital audio output on your HDTV (if your HDTV has a digital optical output).
No Audio When Using a BluRay Player
Ensure the audio settings in the BluRay player are congured to play Dolby Digital. The DSS2 is not DTS compatible. If the DSS2 is connected to
a digital source with a DTS signal, then the DSS2 will not receive audio.
No Sound When Using a Digital Connection
Ensure the digital cable is connected properly and receiving a signal. When connected to a console that is powered on, carefully check to see if
a red light is being emitted from the end of the digital optical cable. Also be sure that the protective covers have been removed from the ends of
the digital optical cable.
Analog Input isn’t Working
The DSS2 analog input will automatically shut off whenever the digital input is active. To hear the analog input signal, either
disconnect the optical cable from the digital input on the DSS2, shut off the device connected to the optical cable (e.g. Xbox 360) to disable the
digital audio signal, or connect to the auxiliary input.
GAME
CHAT
ON MIC MUTE
GAME
CHAT
ON MIC MUTE
GAME
CHAT
ON MIC MUTE
GAME
CHAT
ON MIC MUTE
GAME
CHAT
ON MIC MUTE
Page 11

17 18
Manufacturer: Voyetra Turtle Beach
Manufacturers Address: 150 Clearbrook Rd. Suite 162, Elmsford, NY 10523
Product Name: Ear Force XL1
Type of Product: Wired Headset
Model Number(s): TB300-2149-01
Year of Manufacture: 2011
We, Voyetra Turtle Beach, Inc. of Elmsford, New York, declare under our own responsibility that the above-referenced product complies
following directives and standards:
Low Voltage Directive 2006/95/EC
EN 50332-2:2003
EMC Directive 2004/108/EC
EN 55022: 2006+A1: 2007, Class B
EN 55024: 1998+A1: 2001+A2: 2003
All test reports have been reviewed and approved with a Positive Opinion from the following Notied Bodies:
SGS Taiwan Ltd
No.134, Wu Kung Road, Wuku Industrial Zone,
Taipei County, Taiwan, R.O.C
Tel: +886-2-2299-3279, Fax: +886-2-2298-0488, Web: tw.sgs.com
Shenzhen EBO Technology Co., Ltd.
No.710, Yihua Building, Futian District
Shenzhen, China 518040
Tel: +86-512-62515088, Fax: +86-512-62515098, Web: quietek.com
The technical documentation required by this Directive is maintained at the corporate headquarters of
Voyetra Turtle Beach, 150 Clearbrook Road. Suite 162, Elmsford, New York, 10562.
Authorized Person:
____________________________ Date:________________
Printed Name: Frederick Romano
Title: Executive Vice President
FCC Declaration of ConformityEC Declaration of Conformity
10/05/11
Product Name: EAR FORCE XL1
Model Number(s): TB300-2149-01
FCC Rules: FCC Part 15:2010, Subpart B, CLASS B
Operating Environment: GENERAL OFFICE AND HOME USE
FCC COMPLIANT STATEMENT
This device complies with part 15 of the FCC rules. Operation is subjected to the following conditions:
(1) This device may not cause harmful interference, and
(2) This device must accept any interference received including interference that may cause undesired operation.
INFORMATION TO USER
This equipment has been tested and found to comply with the limits for a Class B digital device, pursuant to Part 15 of FCC rules.
These limits are designed to provide reasonable protection against harmful interference in a residential installation. This equipment
generates, uses and can radiate radio frequency energy and, if not installed and used in accordance with the instructions, may cause
harmful interference to radio communications. However, there is no guarantee that interference will not occur in a particular installation.
If this equipment does cause harmful interference to radio or television reception, which can be determined by turning the equipment off
and on, the user is encouraged to try to correct the interference by one or more of the following measures:
1) Reorient or relocate the receiving antenna.
2) Increase the separation between the equipment and receiver.
3) Connect the equipment into an outlet on a circuit different from that to which the receiver is connected.
4) Consult the dealer or an experienced radio/TV technician for help.
The user’s manual or instruction manual for an intention or unintentional radiator shall caution the user that the changes or modications
not expressly approved by the party responsible for compliance could void the user’s authority to operate the equipment.
WARNING: Changes or modications made to this equipment not expressly approved by VOYETRA TURTLE BEACH, INC. may void user’s
authority to operate this equipment.
Page 12

19 20
EC Declaration of Conformity
Manufacturer: Voyetra Turtle Beach
Manufacturers Address: 150 Clearbrook Rd. Suite 162, Elmsford, NY 10523
Product Name: Ear Force DSS2
Type of Product: Dolby Surround Sound Adapter
Model Number(s): TB300-2200-01
Year of Manufacture: 2011
We, Voyetra Turtle Beach, Inc. of Elmsford, New York, declare under our own responsibility that the above-referenced product complies in accor-
dance with following directives:
EMC Directive 2004/108/EC
EN 55022: 2006+A1: 2007, Class B
EN 55024: 1998+A1: 2001+A2: 2003
All test reports have been reviewed and approved with a Positive Opinion from the following Notied Body:
Bay Area Compliance Laboratories,
No.69 Pulong Village, Puxinhu Industry Zone Tangxia, China
Tel: +86-769-8685 8888, Fax: +86-769-8685 8891, Web: baclcorp.com
The technical documentation required by this Directive is maintained at the corporate headquarters of Voyetra Turtle Beach, 150 Clearbrook Road.
Suite 162, Elmsford, New York, 10562.
Authorized Person:
____________________________ Date:________________
Printed Name: Frederick Romano
Title: Executive Vice President
FCC Declaration of Conformity
10/28/11
Product Name: EAR FORCE DSS2
Model Number(s): TB300-2200-01
FCC Rules: FCC Part 15 Subpart B CLASS B
Operating Environment: GENERAL OFFICE AND HOME USE
FCC COMPLIANT STATEMENT
This device complies with part 15 of the FCC rules. Operation is subjected to the following conditions:
(1) This device may not cause harmful interference, and
(2) This device must accept any interference received including interference that may cause undesired operation.
INFORMATION TO USER
This equipment has been tested and found to comply with the limits for a Class B digital device, pursuant to Part 15 of FCC rules.
These limits are designed to provide reasonable protection against harmful interference in a residential installation. This equipment
generates, uses and can radiate radio frequency energy and, if not installed and used in accordance with the instructions, may cause harmful interference to radio communications. However, there is no guarantee that interference will not occur in a particular installation. If this equipment does
cause harmful interference to radio or television reception, which can be determined by turning the equipment off and on, the user is encouraged to
try to correct the interference by one or more of the following measures:
1) Reorient or relocate the receiving antenna.
2) Increase the separation between the equipment and receiver.
3) Connect the equipment into an outlet on a circuit different from that to which the receiver is connected.
4) Consult the dealer or an experienced radio/TV technician for help.
The user’s manual or instruction manual for an intention or unintentional radiator shall caution the user that the changes or modications not
expressly approved by the party responsible for compliance could void the user’s authority to operate the equipment.
WARNING: Changes or modications made to this equipment not expressly approved by VOYETRA TURTLE BEACH, INC. may void user’s authority to
operate this equipment.
Page 13

21 22
Voyetra Turtle Beach, Inc. ("VTB") warrants to the original end-user purchaser ("Purchaser") that the retail Turtle Beach hardware product herein
("Product") will be free of defects in materials and workmanship for a period of one year from the date of purchase by the Purchaser ("Warranty
Period"). Any Extended Warranty or Service Plans purchased through a Retail store are not honored by VTB. The Warranty refers to the repair/
replacement of a defective product during this period and not a refund.
This limited warranty extends only to the Purchaser and is not transferable or assignable to any subsequent purchaser. This limited warranty is applicable only in the country or territory where the Product was purchased from an authorized VTB retailer and does not apply to a Product that has
been purchased as used or refurbished (except refurbished by VTB) or was included as part of a non-VTB product.
WARRANTY SERVICE
In the USA and CANADA Warranty Service is provided by our TURTLE BEACH OFFICEs and in all other Countries it is provided by our local International Distributors.
VTB does not warrant uninterrupted or error-free operation of the Product and is under no obligation to support the Product for all computer operating systems or future versions of such operating systems.
If a defect should occur during the Warranty Period, Purchaser must contact VTB to obtain a Return Merchandise Authorization ("RMA") number.
Purchaser will be responsible for shipping costs incurred in returning the defective Product to an authorized VTB service center, or to the repair
facility located at VTB's corporate headquarters. A copy of the dated proof of purchase and a description of the problem must be included with the
defective Product. VTB will not be responsible for other products or accessories included with the defective Product sent to VTB. The RMA number
must be clearly indicated on the outside of the package. Packages without an RMA number will be refused by VTB or its representatives and
returned to sender at the sender's expense.
In the event of a defect, Purchaser's sole and exclusive remedy, and VTB's sole liability, is expressly limited to the correction of the defect by adjustment, repair, or replacement of the Product at VTB's sole option and expense. VTB owns all Products it has replaced and all parts removed from
repaired Products. VTB uses new and reconditioned parts made by various manufacturers in performing warranty repairs and building replacement
products. If VTB repairs or replaces a product, the original Warranty Period is not extended, however, VTB warrants that repaired or replacement
parts will be free from defects in material and workmanship for a period of thirty (30) days from the date of repair or replacement, or for the remainder of the Warranty Period, whichever is greater.
This warranty does not apply to any Product that has had its serial number altered, removed or defaced, or any Product damage caused by shipping, improper storage, accident, problems with electrical power, abuse, misuse, neglect, ordinary wear, acts of God (e.g. ood), failure to follow
directions, improper maintenance, use not in accordance with product instructions, unauthorized modication or service of the Product or damage
resulting from the use of the Product with hardware, software or other products not provided by or specically recommended by VTB.
Limited Warranty for Turtle Beach Products
THIS LIMITED WARRANTY IS PURCHASER'S SOLE AND EXCLUSIVE REMEDY AND IS IN LIEU OF ALL OTHER WARRANTIES, EXPRESS OR IMPLIED.
TO THE EXTENT PERMITTED BY APPLICABLE LAW, VTB HEREBY DISCLAIMS THE APPLICABILITY OF ANY IMPLIED WARRANTY OF MERCHANTABILITY, FITNESS FOR A PARTICULAR PURPOSE OR USE FOR THE PRODUCT. IF SUCH A DISCLAIMER IS PROHIBITED BY APPLICABLE LAW, THE
IMPLIED WARRANTY IS LIMITED TO THE DURATION OF THE FOREGOING LIMITED WRITTEN WARRANTY.
IN NO EVENT SHALL VTB BE LIABLE FOR ANY INDIRECT, INCIDENTAL, SPECIAL, PUNITIVE OR CONSEQUENTIAL DAMAGES, OR DAMAGES,
INCLUDING BUT NOT LIMITED TO ANY LOST PROFITS, DATA, OR LOSS OF USE, ANY THIRD PARTY CLAIMS, AND ANY INJURY TO PROPERTY OR
BODILY INJURY (INCLUDING DEATH) TO ANY PERSON, ARISING FROM OR RELATING TO THE USE OF THIS PRODUCT OR ARISING FROM BREACH
OF THE WARRANTY, BREACH OF CONTRACT, NEGLIGENCE, TORT, OR STRICT LIABILITY, EVEN IF VTB HAS BEEN ADVISED OF THE POSSIBILITY OF
SUCH DAMAGES.
This warranty supersedes all prior agreements or understandings, oral or written, relating to the Product, and no representation, promise or condition not contained herein will modify these terms. Some states do not allow the exclusion or limitation of incidental or consequential damages, so
the above exclusion or limitation may not apply to you. This warranty gives you specic legal rights. You may also have other rights, which vary from
state to state. Any action or lawsuit for breach of warranty must be commenced within eighteen (18) months following the purchase of the Product.
EXCLUSIONS FROM LIMITED WARRANTY:
This Limited Warranty shall not apply and VTB has no liability under this Limited Warranty if the Turtle Beach Product:
• is used for commercial purposes such as "LAN Centers" (including rental or lease);
• is modied or tampered with;
• is damaged by Acts of God, power surge, misuse, abuse, negligence, accident, wear and tear,
mishandling, misapplication, or other causes unrelated to defective materials or workmanship;
• serial number is defaced, altered or removed;
• is not used in accordance with the documentation and use instructions; or
• is repaired, modied or altered by other than authorized repair centers.
• product is no longer available because it was discarded.
Page 14

23 24
DESIGNED AND ENGINEERED BY TURTLE BEACH IN NEW YORK, USA
Copyright © 2012 Voyetra Turtle Beach, Inc. (VTB, Inc.) All rights reserved. No part of this user guide may be reproduced without permission. Turtle
Beach, the Turtle Beach Logo, Voyetra, Ear Force, and Engineered For Gaming are either trademarks or registered trademarks of VTB, Inc. XBOX,
XBOX 360 and XBOX LIVE are registered trademarks of Microsoft Corporation. Manufactured under license from Dolby Laboratories. Dolby and
the double-D symbol are trademarks of Dolby Laboratories. All other trademarks are properties of their respective companies and are hereby
acknowledged. Assembled in China.
Federal Communications Commission Interference Statement
This equipment has been tested and found to comply with the limits for a Class B digital device, pursuant to part 15 of the FCC Rules. These limits are
designed to provide reasonable protection against harmful interference in a residential installation. This equipment generates, uses and can radiate
radio frequency energy and, if not installed and used in accordance with the instructions, may cause harmful interference to radio communications.
However, there is no guarantee that interference will not occur in a particular installation. If this equipment does cause harmful interference to radio
or television reception, which can be determined by turning the equipment off and on, the user is encouraged to try to correct the interference by one
or more of the following measures:
• Reorient or relocate the receiving antenna.
• Increase the separation between the equipment and receiver.
• Connect the equipment into an outlet on a circuit different from that to which the receiver is connected.
• Consult the dealer or an experienced radio/ TV technician for help.
FCC Caution:
Any changes or modications not expressly approved by the grantee of this device could void the user's authority to operate the equipment.
CANADA, INDUSTRY CANADA (IC) NOTICES
This Class B digital apparatus complies with Canadian ICES-003. Operation is subject to the following two conditions: (1) this device may not cause
interference, and (2) this device must accept any interference, including interference that may cause undesired operation of the device.
Radio Frequency (RF) Exposure Information:
This device has been certied for use in Canada. Status of the listing in the Industry Canada’s REL (Radio Equipment List) can be found at the following web address: http://www.ic.gc.ca/app/sitt/reltel/srch/nwRdSrch.do?lang=eng
Additional Canadian information on RF exposure also can be found at the following web address: http://www.ic.gc.ca/eic/site/smt-gst.nsf/eng/
sf08792.html
Canada, avis d’Industry Canada (IC)
Cet appareil numérique de classe B est conforme aux normes canadiennes ICES-003.Son fonctionnement est soumis aux deux conditions suivantes
: (1) cet appareil ne doit pas causer d’interférence et (2) cet appareil doit accepter toute interférence, notamment les interférences qui peuvent affecter son fonctionnement.
Informations concernant l’exposition aux fréquences radio (RF)
Ce périphérique est homologué pour l’utilisation au Canada. Pour consulter l’entrée correspondant à l’appareil dans la liste d’équipement radio (REL Radio Equipment List) d’Industry Canada rendez-vous sur: http://www.ic.gc.ca/app/sitt/reltel/srch/nwRdSrch.do?lang=eng
Pour des informations supplémentaires concernant l’exposition aux RF au Canada rendez-vous sur:http://www.ic.gc.ca/eic/site/smt-gst.nsf/eng/
sf08792.html
This product is CE marked according to the provisions of the Low Voltage Directive (2006/95/EC) and EMC Directive (2004/108/EC)
For more products, accessories and general product information, please visit
TurtleBeach.com
For warranty information and product support, please visit
TurtleBeach.com/support
FRANÇAIS
Pour plus d’informations sur les produits et accessoires, veuillez visiter le site TurtleBeach.com
Pour toute question de garantie ou d’assistance technique, veuillez visiter la page TurtleBeach.com/support
DEUTSCH
Weitere Hinweise zu Produkten, Zubehör und allgemeine Produktinformationen nden Sie unter: TurtleBeach.com
Informationen über Garantieleistungen und Produkt-Support nden Sie unter: TurtleBeach.com/worldwide
ITALIANO
Per ulteriori prodotti, accessori e informazioni generali sul prodotto, visitare: TurtleBeach.com
Per informazioni sulla garanzia e supporto delprodotto, visitare: TurtleBeach.com/worldwide
PORTUGUÊS
Para mais produtos, acessórios e informações gerais do produto, visite: TurtleBeach.com
Para informações sobre garantia e suporte ao produto, visite: TurtleBeach.com/worldwide
ESPAÑOL
Podrá encontrar más productos, accesorios e información general en TurtleBeach.com
Información sobre la garantía y apoyo técnico en: TurtleBeach.com/support
SVENSK
För ytterligare produkter, tillbehör och allmän produktinformation, vänligen besök: TurtleBeach.com
För information om garanti och produktsupport, vänligen besök: TurtleBeach.com/support
DANSK
For ere produkter, tilbehør og generel produkt information, besøg venligst: TurtleBeach.com
For garantioplysninger og produktsupport, kan du besøge: TurtleBeach.com/support
NEDERLANDS
Bezoek voor meer producten, accessoires en algemene productinformatie: TurtleBeach.com
Voor garantie-informatie en productondersteuning kunt u terecht op: TurtleBeach.com/support
Page 15

TB521-2123-01
Join The Conversation / Participez à la conversation
Join The Conversation / Participez à la conversation
 Loading...