

Page 1

DualBoard
User Guide
Page 2

DualBoard 2
© 2015 Turning Technologies, LLC. All rights reserved.
Portions Responsive Innovations, LLC, Microsoft Corporation
No part of this document may be reproduced or transmitted in any form or by any means, electronic or mechanical, for any purpose,
without the express written permission of Turning Technologies, LLC. All rights reserved.
Turning Technologies, LLC, 255 West Federal Street, Youngstown, OH 44503 USA.
TurningPoint® is a registered trademark of Turning Technologies, LLC. Other trademarked product names mentioned in this manual
are owned by their respective companies.
The following regulatory statements apply to radio frequency and infrared transmitters and receivers mentioned in this manual,
including the ResponseCard RF, ResponseCard RF LCD, ResponseCard IR, ResponseCard XR, ResponseCard NXT, QT Device,
CPS IR, CPS Pulse, CPS Spark, Gen 2, PRS RF, PRS IR, DualBoard, Touch Board, Touch Board Plus, MeetingBoard, SchoolBoard,
iPannel, Mobi, MobiView, MobiKWIK, Mobi Learner, Mobi 360 and their respective receivers.
FCC Statement
This device complies with part 15 of the FCC Rules. Operation is subject to the following two conditions: (1) This device may not
cause harmful interference, and (2) this device must accept any interference received, including interference that may cause
undesired operation.
Changes or modifications not expressly approved by the party responsible for compliance could void the user’s authority to operate
the equipment.
IC Statement
This device complies with Industry Canada licence-exempt RSS standard(s). Operation is subject to the following two conditions: (1)
this device may not cause interference, and (2) this device must accept any interference, including interference that may cause
undesired operation of the device.
Le présent appareil est conforme aux CNR d'Industrie Canada applicables aux appareils radio exempts de licence. L'exploitation est
autorisée aux deux conditions suivantes : (1) l'appareil ne doit pas produire de brouillage, et (2) l'utilisateur de l'appareil doit accepter
tout brouillage radioélectrique subi, même si le brouillage est susceptible d'en compromettre le fonctionnement.
turningtechnologies.com/user-guides
Page 3

DualBoard 3
TABLE OF CONTENTS
WARNINGS 4
GETTING STARTED 6
What’s in the Box?
Pens
SET UP 8
Installing WorkSpace
Installing Ubuntu GNOME
Setting Up the Pen Station
Mounting the DualBoard
Connecting the Video Projector
Turning on the DualBoard
Connecting the DualBoard via USB
Calibrating the DualBoard
USING THE DUALBOARD 13
How the DualBoard Works
DualBoard Features Menu
Setting the Customizable Function Keys
Getting Started with WorkSpace
Opening Workspace from DualBoard
Viewing Connected Devices
WorkSpace Window
WorkSpace Modes
Creating a Lesson
Multi-User Mode
Setting Up Multi-User Mode
Selecting the Presenter
Locking Tablets and Clickers
Distributing Files
Distributing Files as GWB (PC Only)
Distributing Files as Common File Format (IWB)
Exporting Files
6
7
8
9
9
10
11
11
11
12
13
13
14
15
16
16
17
18
19
19
20
21
21
22
22
22
22
OPTIONAL ACCESS ORIES 24
CARE A ND MAINTENANCE 25
TROUBLESHOOTING 26
CONTACT US 27
turningtechnologies.com/user-guides
Page 4

DualBoard 4
WARNINGS
WARNING
l A minimum of two people are required to mount the DualBoard to avoid personal injury and/or damage to the board.
l Stabilize the floor stand before repositioning the board. To stabilize the floor stand, lock down the thumb tabs on the
casters, or push the board against the wall to prevent it from rolling, or place your foot on the floor stand foot.
l Position the floor stand on a level surface to avoid tipping.
l Lower the DualBoard to the lowest position before moving the floor stand.
l Do not hang objects on the DualBoard.
ATTENTION!
l Il faut deux personnes pour fixer le tableau blanc sur le mur ou sur le pied afin d’éviter tout endommagement ou
blessure.
l Une seule personne peut ajuster la position du tableau blanc (vers le haut ou le bas) mais assurez-vous que le pied de
sol est bien stable avant de repositionner le tableau. Abaissez les pattes de verrouillage des roulettes avec le pouce,
poussez le pied contre un mur pour éviter qu’il ne roule ou placez l’un de vos pieds sur le pied du tableau pour maintenir
celui-ci en place pendant que vous ajustez sa position.
l Positionnez le pied du tableau sur une surface plane afin d’éviter tout basculement.
l Descendez le tableau blanc jusqu’à la position la plus basse du pied avant de le déplacer.
WARNUNG
l Zum Befestigen des DualBoard an der Wand oder am Ständer sind zwei Personen erforderlich, um Personenverletzung
oder Beschädigungen des DualBoard zu vermeiden.
l Die Höhe des DualBoard kann auch von einer Person allein verstellt werden, dazu muss jedoch sichergestellt sein,
dass der Ständer des Boards sicher steht und nicht umfallen kann. Dazu entweder die Laufrollen arretieren, den Ständer
gegen eine Wand rollen oder einen Fuß auf den Ständer stellen, damit das DualBoard beim Verstellen der Höhe nicht
wegrollen kann.
l Stellen Sie den DualBoard-Ständer auf einen ebenen Untergrund, damit er nicht umfallen kann.
l Stellen Sie das DualBoard vor dem Transport in die niedrigste Position.
l Hängen Sie keine Gegenstände an das DualBoard.
¡ADVERTENCIA!
l Dos son las personas recomendadas para instalar la pizarra en la pared o en la base de pie con el fin de evitar que se
produzcan heridas personales o se dañe la pizarra.
l Una persona puede ajustar la posición de la pizarra hacia arriba o hacia abajo pero asegurándose de que la base de pie
haya quedado estable antes de intentar colocar el tablero. Fije el bloqueo manual de las ruedecillas o coloque la base de
pie contra la pared para evitar que se mueva, también puede poner uno de sus pies en la base para sujetarla cuando
ajuste la posición de la pizarra.
l Coloque la base de pie de la pizarra en una superficie nivelada para evitar que vuelque.
l Baje la pizarra hasta la posición más baja de la base de pie antes de transladar esta última.
l No cuelgue objetos en la pizarra.
turningtechnologies.com/user-guides
Page 5

DualBoard 5
AVVERTENZA!
l Due persone devono montare la Lavagna sulla parete o su un cavalletto per evitare lesioni o danni alla Lavagna.
l Una persona può regolare la posizione della Lavagna verso l’alto o il basso, ma assicurarsi di stabilizzare il cavalletto
prima di tentare di riposizionare la lavagna. Bloccare verso il basso le linguette di bloccaggio sulle rotelle o spingere il
cavalletto contro una parete per impedirne il rotolamento, oppure appoggiare il proprio piede sul piede del cavalletto per
tenerlo fermo mentre si regola la posizione della Lavagna.
l Posizionare il cavalletto della Lavagna su una superficie piana per evitarne il rovesciamento.
l Abbassare la Lavagna alla posizione più bassa sul cavalletto prima di spostare il supporto.
l Non appendere oggetti sulla Lavagna.
turningtechnologies.com/user-guides
Page 6

DualBoard 6
GETTING STARTED
DualBoard™ is the first interactive whiteboard designed specifically to allow two interactive electro-magnetic pens to be used
at the same time on a single digital whiteboard.
With DualBoard:
l Write, draw, insert images, highlight, interact with, and annotate
over content. Create content in WorkSpace® or project
instructional content from external sources (e.g., PDFs and
webpages).
l Participants can work simultaneously, in equal or separate areas
of the board, as defined by the instructor.
l Two participants can write on the board at a time ("split screen").
l Multiple participants can work in the same display area
("sandbox").
l Pens are conveniently seated in the pen charger, ensuring that a
pen is always readily available.
l Dry erase markers can be used on the DualBoard.
What’s in the Box?
DualBoard ships with the following items:
WorkSpace DVD Power Supply with Adapters
WorkSpace Content DVD Wall Hanger
WorkSpace Language Pack DVD Two (2) Mounting Clips
Two (2) pens Pen Station
USB Cable DualBoard User Guide
turningtechnologies.com/user-guides
Page 7
DualBoard 7
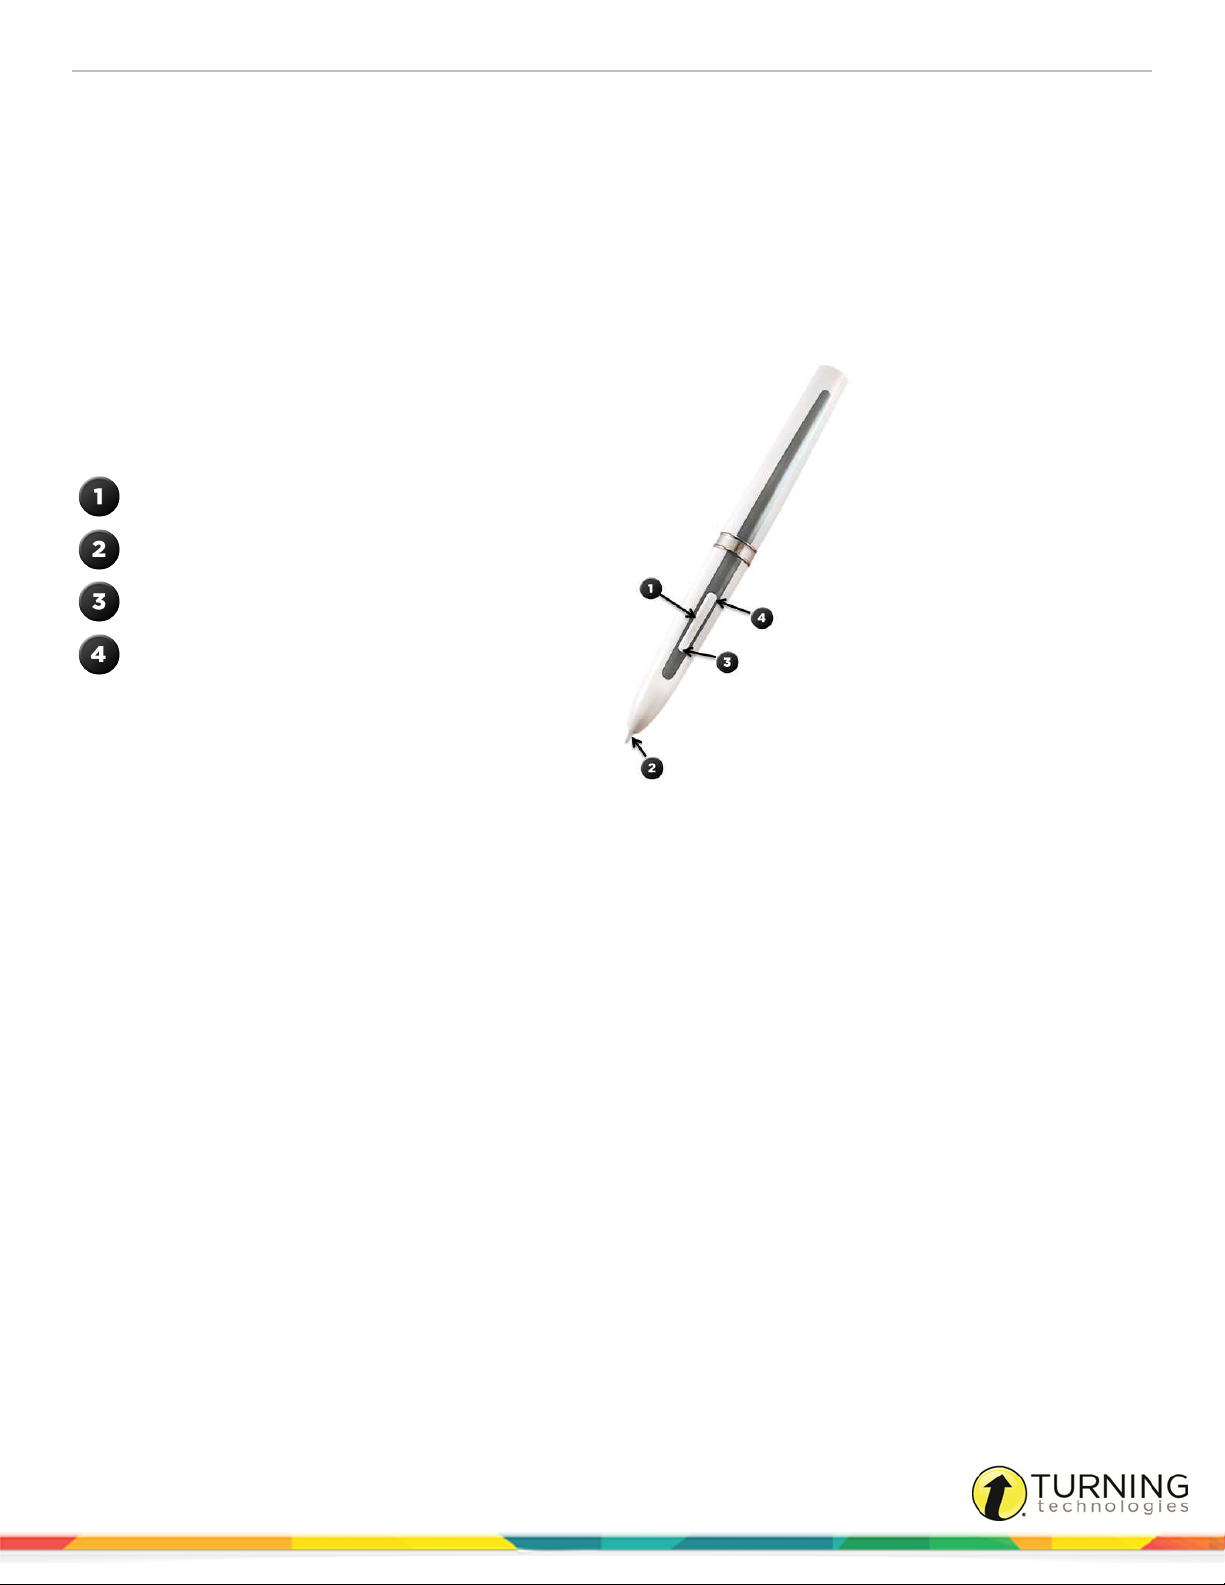
Pens
The pen functions as both a mouse and a virtual pen when using the DualBoard. Two grey and white pens are included with the
DualBoard. Both pens can be used at the same time.
Store the pens in the Pen Station attached to the side of the Dualboard. Insert the pen tip-down and listen for the
beep. The beep indicates that the pen is correctly inserted into the pen charger. A yellow light indicates that the pen
is successfully charging.
The pens switch to "sleep" mode after two minutes of inactivity. Click the pen tip or the rocker button to reactivate.
Rocker button
Pen tip
Double-click
Right-click(PC)/Control-click(Mac)
turningtechnologies.com/user-guides
Page 8

DualBoard 8
SET UP
This chapter covers:
Installing WorkSpace
Installing Ubuntu GNOME
Setting Up the Pen Station
Mounting the DualBoard
Connecting the Video Projector
Turning on the DualBoard
Connecting the DualBoard via USB
Calibrating the DualBoard
Installing WorkSpace
You must have administrative privileges to install WorkSpace. If you do not have administrative privileges on your computer,
contact your IT department.
Prerequisites
The WorkSpace disc and Content disc are required unless the software is downloaded from
http://www.turningtechnologies.com/responsesystemsupport/downloads.
PC and Mac
1
Insert the WorkSpace disc into the DVD drive. If the disc does not auto-run, navigate to your disc drive and double-click
the auto-run.exe file.
2
Follow the on-screen prompts to proceed through the installation process.
3
Repeat steps 1 and 2 using the WorkSpace Content disc.
4
Restart your computer to complete the installation process.
After the installation, a shortcut for the software will appear on the desktop and the Turning Technologies icon will
appear in the notification area (PC)/Menu Extras area (Mac).
Linux
1
Login as "root" or "sudo."
2
Insert the WorkSpace disc into the DVD drive. Double-click the DVD icon that appears on the desktop.
3
Under Permissions, select Allow executing file as program.
4
Follow the on-screen prompts to proceed through the installation process.
After the installation, the software can be found in Home\eInstruction\WorkSpace\WorkSpace.
5
Repeat steps 1 - 4 using the WorkSpace Content disc.
6
Restart your computer to complete the installation process.
turningtechnologies.com/user-guides
Page 9

DualBoard 9
Installing Ubuntu GNOME
DualBoardTouchBoard must be used with the Ubuntu GNOME environment. Follow the steps below to install GNOME.
1
Ubuntu 12.04 users: open Terminal and run one the following commands:
l sudo apt-get install gnome -session -fallback
l
sudo apt-get install gnome -session -panel
2
Ubuntu 14.04 users: open Terminal and run the following command:
l
sudo apt-get install gnome -session -flashback
3
Ubuntu 12.04 users must log in with GNOME Classic (No effects). Ubuntu 14.04 users must log in with GNOME
Flashback (Metacity)
Setting Up the Pen Station
The Pen Station conveniently clips to the side of the DualBoard so that the pens are able to charge when not in use.
1
Insert the clip into the Pen Station.
2
Attach the Pen Station to the side of the DualBoard.
TIP
Adjust the Pen Station by sliding the device to the desired location.
3
Connect one end of the power cord to the Pen Station and connect the other end to the controller.
4
Insert each pen tip-down into the Pen Station.
turningtechnologies.com/user-guides
Page 10

DualBoard 10
Mounting the DualBoard
WARNING
It is recommended that a skilled professional assess the strength of
the wall and determine the appropriate hardware required to securely
attach the DualBoard to the wall. A minimum of two people are
required to safely lift and mount the whiteboard to the wall.
Prerequisites
If you are using a ceiling mount projector, ensure that the DualBoard is aligned with
the projector image prior to mounting the board.
NOTE
Due to the sizable number of wall types, hardware for the wall hanger
and mounting clips is not included.
1
Attach the wall hanger to the wall.
2
Hang the DualBoard on the wall hanger.
3
Hook the mounting clips over the back lip of the DualBoard frame, positioning one mounting clip in each
corner at the bottom of the board.
4
On the wall, mark the location of the mounting clip holes.
5
Install suitable wall anchors into the wall.
6
Install screws to secure the mounting clips to the wall. Use two screws per mounting clip. The recommended screw
size is number 8 or M4.
turningtechnologies.com/user-guides
Page 11

DualBoard 11
Connecting the Video Projector
TIP
For optimal usage and viewing, the minimum
required screen resolution should be set at 1024 x
768.
1
With the computer turned on, connect the
projector video cable from the computer to the
video projector.
2
Turn on the video projector.
3
With the video projector aimed at the DualBoard, align the
projected image onto the DualBoard so that it is within
the board’s active area.
TIP
It is recommended to leave a 3 cm (30 mm)
perimeter.
Turning on the DualBoard
1
Connect the AC/DC power adapter to the DualBoard controller box.
2
Plug the opposite end of the AC/DC power adapter into a
wall outlet.
3
Press the power switch on the right side of the board.
A beep indicates that the board has power.
Connecting the DualBoard via USB
1
Turn on your computer.
2
Connect the USB cable to the DualBoard controller box located on the back of the board. The controller box is located
on the bottom right of the board, if the board has already been hung up.
3
Attach the other end of the USB cable into a working USB port on your computer.
Device Manager establishes connection with the DualBoard.
turningtechnologies.com/user-guides
Page 12

DualBoard 12
Calibrating the DualBoard
The DualBoard must be calibrated in order to assure pen accuracy.
IMPORTANT
Linux users must calibrate the DualBoard in the Ubuntu GNOME environment. Refer to Installing
Ubuntu GNOME on page 9.
1
Turn on the DualBoard and the computer.
2
Turn on the projector and, if necessary, adjust the image to fit within the board’s active writing area.
3
Click the Calibrate icon on the DualBoard Features Menu .
4
Using the pen, click each calibration target as it appears on the blue calibration screen. A beep will sound
with each successful click.
5
To cancel the calibration, press the Esc key on your keyboard or press the bottom rocker button on the pen.
To repeat a calibration point, press the top rocker button.
Alternatively, the DualBoard can be calibrated via Device Manager. To calibrate the DualBoard from within
Device Manager:
a
Click the Turning Technologies icon in the notification area (PC)/Menu Extras area (Mac)
/Applications (Ubuntu GNOME).
b
Select eInstruction Device Manager.
c
Select the DualBoard device from the Device Manager window.
d
Select the Calibrate icon from the toolbar.
e
Follow the instructions on the calibration screen.
IMPORTANT
If the DualBoard and/or projector is moved, you must recalibrate the board via the DualBoard Features
Menu or from the Calibrate icon in Device Manager.
turningtechnologies.com/user-guides
Page 13

DualBoard 13
USING THE DUALBOARD
This chapter covers the following topics:
How the DualBoard Works
DualBoard Features Menu
Getting Started with WorkSpace
How the DualBoard Works
DualBoard is used collaboratively with WorkSpace, which allows instructors to annotate on their computer desktops. Using a
projector, WorkSpace annotations can be projected onto the DualBoard where participants can interact with the material using
the DualBoard pens.
WorkSpace provides the ability to:
l Run applications and access the internet
l Capture and annotate the current computer desktop
l Run audio and video files
l Create a blank lesson page or integrate existing lessons into your presentation
l Split the DualBoard screen into sections, allowing students to either work together or in individual sections of the
whiteboard at the same time
DualBoard Features Menu
DualBoard provides quick access to key WorkSpace software annotation tools. Click the desired icon to access a specific
tool.
Icon Use
Click the WorkSpace icon to open the WorkSpace application.
Click the Access Whiteboard Mode icon to use WorkSpace in Whiteboard Mode. When Whiteboard Mode is
selected, all notes made on the whiteboard can be captured and saved as pages within WorkSpace for
distribution.
Click the On-screen Keyboard icon to type text on the screen. Indicate where to add the typed text by clicking
the location in the Annotation window or in the application file. To begin typing, tap an On-screen Keyboard key
with the pen.
Click the Clear icon to delete the selected object or objects. If nothing is selected on the page, the Clear tool
deletes everything on the page.
Click the Save icon to save annotation(s) or page(s).
turningtechnologies.com/user-guides
Page 14

DualBoard 14
Icon Use
Click the Calibrate icon to align the DualBoard. Refer to Calibrating the DualBoard on page 12 for more
information.
To prohibit students from drawing on the board and regain control of the session, click the Lock icon to lock
connected devices.
Click the Unlock icon to unlock connected devices.
Click the Customizable Function Key (1) to perform a WorkSpace function, open an application or website, or
run a macro. See Setting the Customizable Function Keys for more information.
Click the Customizable Function Key (2) to perform a WorkSpace function, open an application or website, or
run a macro. See Setting the Customizable Function Keys for more information.
Click the Customizable Function Key (3) to perform a WorkSpace function, open an application or website, or
run a macro. See Setting the Customizable Function Keys for more information.
Click the Mouse Mode icon to select and start applications and perform all the functions you would typically
perform with the mouse and keyboard.
Click the Pen icon to access the Pen tool.
Click the Highlighter icon to access the Highlighter tool.
Click the Eraser icon to erase annotated content.
Click the Blank/New Page icon to open a new WorkSpace page.
Click the Previous icon to navigate to the previous page.
Click the Advance icon to advance to the next page.
Setting the Customizable Function Keys
1
Click the Turning Technologies icon in the notification area (PC)/Menu Extras area (Mac)/Dash Home (Linux
Ubuntu 14.04).
2
Select eInstruction Device Manager.
TheDevice Manager window opens.
turningtechnologies.com/user-guides
Page 15

DualBoard 15
3
Select the DualBoard device.
4
Click the Properties icon.
The Properties window opens.
5
Select the Softkeys tab.
6
Select a button.
7
Click an icon to add a custom function:
WorkSpace Tools - Add a WorkSpace tool as a custom function from the drop-down menu. For more
information on WorkSpace tools, refer to the WorkSpace User Guide.
Interwrite Learning Applications - Use the drop-down menu to open CPS or Whiteboard Mode.
NOTE
If CPS is not installed on the computer, the option to select it from the drop-down menu
will not be available.
Application Path - Browse to an application or file.
a
Click the icon.
b
Navigate to the application or file and click Open.
URL - Set the programmable button to open a website.
a
Copy and paste the website URL into the URL field.
Mouse Events - These options determine the pen button functions. Select double-click or right-click from the
drop-down menu.
8
Click OK.
Getting Started with WorkSpace
This section provides a brief overview of how to use WorkSpace with DualBoard. For more information on using WorkSpace,
refer to the WorkSpace User Guide available in the WorkSpace software.
Opening Workspace from DualBoard
Viewing Connected Devices
WorkSpace Window
WorkSpace Modes
Creating a Lesson
Multi-User Mode
Distributing Files
Distributing Files as GWB (PC Only)
Distributing Files as Common File Format (IWB)
Exporting Files
turningtechnologies.com/user-guides
Page 16

DualBoard 16
Opening Workspace from DualBoard
1
From the DualBoard Features Menu, click the WorkSpace icon.
Alternatively, WorkSpace can be opened from your computer.
Viewing Connected Devices
Turning Technologies Device Manager is automatically installed with WorkSpace. Device Manager runs in the background of
the computer, establishing and securing communication between Turning Technologies hardware and software.
1
Click the Turning Technologies icon from the notification area (PC)/Menu Extras area (Mac) and select eInstruction
Device
Manager.
2
View and manage connected devices from the main Device Manager window.
Device Manager Toolbar
Icon Use
Add/connect a Bluetooth device.
*Icon changes depending on
device connected
Manually connect or disconnect a device. The device will appear in Device Manager until it is
manually deleted.
Delete a device from Device Manager.
Trigger a device to make an audible beep (useful for identifying multiple Mobi devices).
Calibrate the device. Recalibration is required whenever the board or projector is moved.
Lock devices so they cannot participate in the current session. Locked devices remain
connected unless turned off.
Presenter Mode allows a specific device to control WorkSpace and other connected devices
(such as Mobis or clickers) during a multi-user session.
Connect pre-selected devices when Device Manager is activated. Select the checkbox next to
each Bluetooth-enabled device to connect automatically.
View properties, such as the current firmware version, for the selected device.
turningtechnologies.com/user-guides
Page 17

DualBoard 17
WorkSpace Window
The WorkSpace Window consists of a page in the presentation file and several toolbars on the right side and bottom of the
window. By default, the window can be sized and moved.
WorkSpace Window PC
The Toolbar displays when WorkSpace is opened in Lesson Mode. The default toolbar scheme is set to Intermediate.
The Page Navigation Toolbar displays the tools used to navigate through the presentation file, including the Pan
Page, Previous Page, Page Counter, Next Page and Multi-User Mode tools.
Click the Extend/Scroll Page arrows to extend the page.
The Properties Bar provides options to change the properties of the selected annotation tool (pen, highlighter, shape).
For example, the pen tool Properties Bar includes color, width, transparency, line ends and line styles.
The Properties Bar also contains the Page Properties, including backgrounds, color and transparency, which can be
accessed by clicking the Selection tool on the WorkSpace Toolbar.
To the left of the Properties Bar is the Layers Toolbar. The Layers window appears when using the Layers Toolbar. By
default, all annotations on a page are arranged in a single layer. Add, delete, show, hide, and arrange different layers.
Use the Recycle Bin to delete selected objects from the page. Drag the selected object and drop it in the Recycle Bin.
Click the Undo tool to retrieve objects dropped into the Recycle Bin.
turningtechnologies.com/user-guides
Page 18

DualBoard 18
WorkSpace Window Mac
The Toolbar displays when WorkSpace is opened in Lesson Mode. The default toolbar scheme is set to Intermediate.
The Page Navigation Toolbar displays the tools used to navigate through the presentation file, including the Multi-
User Mode tools.
The Properties Bar provides options to change the properties of the selected annotation tool (pen, highlighter, shape).
For example, the pen tool Properties Bar includes color, width, transparency, line ends and line styles.
The Properties Bar also contains the Page Properties, including backgrounds, color and transparency, which can be
accessed by clicking the Selection tool on the WorkSpace Toolbar.
To the left of the Properties Bar is the Layers Toolbar. The Layers window appears when using the Layers toolbar. By
default, all annotations on a page are arranged in a single layer. Add, delete, show, hide, and arrange different layers.
Use the Recycle Bin to delete selected objects from the page. Drag the selected object to the Recycle Bin and drop it
in. Click the Undo tool to retrieve objects dropped into the Recycle Bin.
WorkSpace Modes
By default, WorkSpace opens in Lesson Mode with the WorkSpace toolbar floating on the desktop.
The WorkSpace toolbar will become transparent if not in use. To reactivate it, click anywhere on the toolbar.
WorkSpace allows you to capture text, graphics, or virtually any image from any application that you can project from your
computer. The software is categorized into "modes," each consisting of different capabilities:
By default, WorkSpace opens in Lesson Mode. While in Lesson Mode, two-way communication is
enabled between interactive devices and the computer. Interact with the computer using a
whiteboard or Mobi tablets.
In Mouse Mode, the internet (PC)/desktop (Mac/Linux) can be accessed using the Mouse tool.
Additionally, select any of the annotation tools while in Mouse Mode to change/return to Lesson
Mode.
turningtechnologies.com/user-guides
Page 19

DualBoard 19
By selecting Annotate Over Desktop Mode (PC ONLY), the desktop is turned into a canvas. Use
the Annotation Tools, Page Tools or Capture Tools to write and draw on the desktop.
Multi-User Mode allows two or more participants to interact with Turning Technologies whiteboards
using collaborative (shared) or defined (one person per defined area) space. Multiple Mobi devices
can be displayed on the whiteboard at the same time.
Open and interact with Microsoft Office applications directly from the WorkSpace software in Office
Mode (PCONLY).
All notes made on the whiteboard can be captured and saved as pages within WorkSpace for
distribution, without the use of the projector in Whiteboard Mode. For Mac and Linux users, a
special “pens” folder is needed to use Whiteboard Mode.
Creating a Lesson
WorkSpace automatically saves all pages created during a single session as a lesson. Lesson files allow you to easily manage
and share lesson plans with participants and instructors.
How to add pages to a lesson...
Each time a blank page is created or a desktop image is annotated, a new page is added to the current lesson file.
1
Click the Blank/New Page icon from the DualBoard Features Menu to open a new page.
2
Use the icons to navigate through open pages.
How to edit a lesson...
1
From the WorkSpace toolbar, click the Page Sorter icon.
2
Within the Page Sorter, you can:
l Rearrange a page by dragging and dropping it into a new position.
l
Delete a page by selecting it and clicking the Recycle Bin icon.
l Create a duplicate page by selecting a page, clicking the Page Sorter icon and selecting Create Duplicate
Page.
TIP
Click the Page Sorter Menu icon to view other editing options.
3
Click the X in the upper-right corner (PC)/left-corner (Mac) of the window to close the Page Sorter.
Multi-User Mode
Multi-User Mode allows up to nine participants to interact using collaborative (shared) or defined (one person per defined area)
space. Multiple mobile devices can be displayed on the board at the same time.
From the Multi-User Menu:
l Set up multiple participants to interact with Turning Technologies products. Define the number of areas for multi-user
use and determine if participants will use a collaborative or defined workspace. In Multi-User Mode, participants can
select objects on any Multi-User layer within their area.
turningtechnologies.com/user-guides
Page 20

DualBoard 20
l Toggle Multi-User Mode on and off using the Multi-User option.
l Add, remove and move Mobi tablets to different areas using Edit Devices. Each multi-user page will remember specific
device placement when moving between pages or returning from Mouse Mode.
Setting Up Multi-User Mode
1
Connect up to nine devices in Device Manager.
IMPORTANT
Do not add the device that will be used to control the main toolbar or the other devices unless it is
set to "presenter" within Device Manager. Refer to Selecting the Presenter on page 21.
2
Click the Multi-User Menu icon on the Page Functions toolbar.
3
Select Multi-User Page Setup.
The Multi-User Page Setup window opens.
4
Select either a Collaborative or Defined work area.
Collaborative - When this option is selected, all devices will be able to work within the same area.
Defined - When this option is selected, two devices will work within their own defined space.
Defined - When this option is selected, up to four devices will work within their own defined space.
Defined - When this option is selected, up to six devices will work within their own defined space.
Defined - When this option is selected, up to nine devices will work within their own defined space.
5
Drag and drop a device to the area needed.
NOTE
It is recommended to leave one device out to keep control of all users. Ideally, this will be the
"presenter" device.
6
Click OK after all devices have been dropped into place.
turningtechnologies.com/user-guides
Page 21

DualBoard 21
Selecting the Presenter
The presenter in Multi-User Mode controls when multi-user mode begins
and ends.
1
Open Device Manager.
Images of each available device appear in the main window.
2
Select the icon for the desired presenter device.
3
From the menu bar, click Options and select Set Presenter.
The selected device is now the presenter device.
Locking Tablets and Clickers
If using student tablets or clickers with WorkSpace, the presenter can lock any devices in use and regain control of the
session.
1
Open Device Manager.
Images of each available device appear in the main window.
2
Select the icon for the device to be locked.
3
Select the Lock icon.
To unlock a device, select the Unlock icon.
TIP
You can also lock all devices by clicking the Toolbox icon on the WorkSpace toolbar and
selecting Lock.
turningtechnologies.com/user-guides
Page 22

DualBoard 22
Distributing Files
WorkSpace files can be distributed in a number of formats.
TIP
To simply save a WorkSpace file in its native format, click the Save icon from the WorkSpace toolbar. If
the Save icon is not on the WorkSpace toolbar, click the Main Menu icon, mouse over File and
select Save.
Distributing Files as GWB (PC Only)
The GWB file format is native to WorkSpace. Files saved with the GWB extension can be easily opened and edited in
WorkSpace as needed.
1
Click the Main Menu icon.
2
Mouse over File and select Save.
The Save GWB File window is displayed.
3
Name the file and click Save.
Distributing Files as Common File Format (IWB)
Content saved as a Common File Format (IWB) can be shared with any interactive whiteboard and software if the whiteboard
and software accept the IWB formatting.
IMPORTANT
It is important to note that some formatting and interactive content may be lost due to the inability to
exchange information between the software applications.
1
Click the Main Menu icon.
2
Mouse over File and select Save As.
The Save GWB File window is displayed.
3
Name the file.
4
From the Files of Type drop-down menu, select IWB.
5
Click Save.
Exporting Files
Prerequisites
You must save the file prior to export.
1
Click the Main Menu icon.
2
Mouse over File and select Export.
The Export Current Pages window is displayed.
3
Select an export option from the Export As drop-down menu.
turningtechnologies.com/user-guides
Page 23

DualBoard 23
4
Enter a file name in the Export File Name field.
Optionally, click Browse to change the Export Directory.
5
Click Export.
TIP
To print, email, export as PDF or email as PDF, click the Main Menu icon, mouse over File
and select the appropriate export option.
turningtechnologies.com/user-guides
Page 24

DualBoard 24
OPTIONAL ACCESSORIES
There are several accessories available for the DualBoard. For more information on any of the products listed below, visit
http://www.turningtechnologies.com/contact-sales to contact Sales.
The Wireless Kit for DualBoard allows the DualBoard and up to 10 interactive tablets to communicate
with a wireless RF Hub, providing maximum flexibility in the classroom.
The Floor Mount Stand with castors provides a mobile mounting solution that allows instructors to wheel
the DualBoard from room to room.
The AdjustIt 3™ provides a convenient mounting alternative for:
l Short throw projection
l Adjustable height solution; because the projector is mounted to the stand, the board can be
adjusted without recalibrating
l A mobile solution, as the stand can be moved with the mobile foot option
MobiView™ and Mobi™ Learners provide instructors with a multi-user solution.
Using the Mobi, participants and instructors can engage in a lesson from anywhere in the classroom.
Instructors can view participant responses and instant reports via MobiView.
Turning Technologies student response systems, such as CPS Pulse™, ResponseCard RF/RF LCD
and ResponseCard NXT, work with Turning Technologies software to capture real-time assessment
data, allowing instructors to gauge participant comprehension in real-time.
turningtechnologies.com/user-guides
Page 25

DualBoard 25
CARE AND MAINTENANCE
This chapter covers basic care and maintenance tips for the DualBoard and pens.
DualBoard
The DualBoard may be used as a standard whiteboard. Expo dry erase whiteboard pens and cleaner are recommended. Use a
soft cloth and gentle cleanser safe for whiteboards to clean the DualBoard.
Pens
Pens are automatically charged when they are correctly seated in the pen charger. The pen charger will beep when the pen is
correctly inserted and a yellow light will indicate that the pen is successfully charging.
If the pen no longer holds a charge, the battery may need replaced. The pen uses one half-cell AAAA NiMH battery.
To change the battery:
1
Depress the small tab and slide the two sections of the digital pen apart.
2
Insert the new battery with the positive (+) terminal facing towards the tip of the pen.
3
Depress the pen tip. The pen LED will flash four times if the battery was correctly inserted.
4
Align the ridges within the rear to the slots in the front section.
5
Slide the two sections together until the tab re-engages.
6
Charge the pen for 8 to 12 hours.
turningtechnologies.com/user-guides
Page 26

DualBoard 26
TROUBLESHOOTING
The pen is not charging.
Check to ensure that the pen is seated securely in the pen charger. The pen charger will beep when the pen is properly
inserted. The indicator light with turn green while charging and remain green when the pen has been fully charged. Additionally,
check to ensure that the pen charger is plugged into the DualBoard controller and that the DualBoard is plugged into a working
power source.
The pen is not working.
The pen will go into "sleep mode" after two minutes of inactivity. Click the rocker button or pen tip to reactivate. Additionally,
the pen may need recharged.
The DualBoard is not communicating.
The DualBoard may need reconnected in Device Manager.
How to reconnect the DualBoard...
1
Click the Turning Technologies icon in the notification area (PC)/Menu Extras area (Mac)/Dash Home (Linux).
2
Select eInstruction Device Manager.
Device Manager opens.
3
Select the DualBoard device from the Device Manager window.
4
Click Options and select Connect.
The DualBoard device connects and is displayed with a green checkmark.
How to reconnect the RFCOM wireless receiver...
1
Click the Turning Technologies icon in the notification area (PC)/Menu Extras area (Mac)/Dash Home (Linux).
2
Select eInstruction Device Manager.
Device Manager opens.
3
Select the RFCOM device from the Device Manager window.
4
Click Options and select Connect.
The device connects and is displayed with a green checkmark.
Additionally, check the physical, wired cable connection and confirm that the DualBoard is turned on.
Annotations are not in the correct spot.
The DualBoard needs to be re-calibrated. See Calibrating the DualBoard on page 12.
IMPORTANT
The DualBoard needs re-calibrated anytime it or the projector is moved.
turningtechnologies.com/user-guides
Page 27

DualBoard 27
CONTACT US
For additional help, contact Turning Technologies Technical Support.
Technical Support is available from 7 a.m. - 9 p.m. EST.
From within the contiguous United States, you can reach Technical Support toll-free by calling 866.746.3015. If you are calling
from outside of the United States, please call +1 330.746.3015.
Technical Support may also be reached via e-mail at support@turningtechnologies.com or support@einstruction.com, a brand
of Turning Technologies.
Office Locations
Ohio
255 West Federal Street
Youngstown, Ohio 44503
Toll-Free: 866.746.3015
Direct: 330.746.3015
International: +1 330.746.3015
Paris
26/36 rue Alfred Nobel
93600 Aulnay-sous-Bois
France
Direct/Support: +33 (0)1 58 31 10 60
Belfast
19 Colvin House
Inspire Business Park
Carrowreagh Road
Belfast BT16 1QT
United Kingdom
Direct: +44 (0)28 9048 7898
Amsterdam
Keizersgracht 75, Garden
1015 CE, Amsterdam
The Netherlands
Direct: +31 (0)85 4011 040
turningtechnologies.com/user-guides
 Loading...