

Page 1

CPS for PowerPoint Mac
Page 2

CPS for PowerPoint Mac 2
© 2014 Turning Technologies, LLC. All rights reserved.
Portions Responsive Innovations, LLC, Microsoft Corporation
No part of this document may be reproduced or transmitted in any form or by any means, electronic or mechanical, for any purpose,
without the express written permission of Turning Technologies, LLC. All rights reserved.
Turning Technologies, LLC, 255 West Federal Street, Youngstown, OH 44503 USA.
TurningPoint® is a registered trademark of Turning Technologies, LLC. Other trademarked product names mentioned in this manual
are owned by their respective companies.
The following regulatory statements apply to radio frequency and infrared transmitters and receivers mentioned in this manual,
including the ResponseCard RF, ResponseCard RF LCD, ResponseCard IR, ResponseCard XR, ResponseCard NXT, QT Device
and their respective receivers.
FCC Statement
This device complies with part 15 of the FCC Rules. Operation is subject to the following two conditions: (1) This device may not
cause harmful interference, and (2) this device must accept any interference received, including interference that may cause
undesired operation.
Changes or modifications not expressly approved by the party responsible for compliance could void the user’s authority to operate
the equipment.
IC Statement
This device complies with Industry Canada licence-exempt RSS standard(s). Operation is subject to the following two conditions: (1)
this device may not cause interference, and (2) this device must accept any interference, including interference that may cause
undesired operation of the device.
Le présent appareil est conforme aux CNR d'Industrie Canada applicables aux appareils radio exempts de licence. L'exploitation est
autorisée aux deux conditions suivantes : (1) l'appareil ne doit pas produire de brouillage, et (2) l'utilisateur de l'appareil doit accepter
tout brouillage radioélectrique subi, même si le brouillage est susceptible d'en compromettre le fonctionnement.
turningtechnologies.com/user-guides
Page 3

CPS for PowerPoint Mac 3
TABLE OF CONTENTS
CPS for PowerPoint
Technical Requirements
Downloading and Installing CPS
Opening CPS for PowerPoint
Hardware Setup
Compatible Devices
CPS Receiver Setup
Changing the Channel on RF Receivers
Changing the Channel on a CPS Pulse Clicker
Changing the Channel on a CPS Spark Clicker
Programming ResponseCard NXT Device IDs
Changing the Channel on a ResponseCard NXT
Delivery Options
Accessing the Delivery Options
Setting Delivery Options
Databases
Creating a CPS Database in CPS for PowerPoint
Opening a Database in CPS for PowerPoint
Classes and Students
Creating a Class in CPS for PowerPoint
Adding Students to a Class in CPS for PowerPoint
Copying Students to a Class in CPS for PowerPoint
Importing a Class from another CPS Database in CPS for PowerPoint
Editing Class or Teacher Information in CPS for PowerPoint
Editing Student Information in CPS for PowerPoint
Show All Students in CPS for PowerPoint
Deleting a Student in CPS for PowerPoint
Deleting a Class in CPS for PowerPoint
Create CPS Slides
Creating a CPS Slide
Engage CPS for PowerPoint
Engaging the Presentation in CPS for PowerPoint
Creating a Quick Class
Associating Dynamic Standards to Questions
Engaging Verbal Questions in CPS for PowerPoint
Reports
Generating Reports in CPS for PowerPoint
Creating Attendance from an Assessment in CPS for PowerPoint
Report Types
Class Reports
Individual Reports
Export Reports
Regrading an Assessment in CPS for PowerPoint
5
5
6
6
7
7
7
8
8
9
9
9
9
9
11
11
11
12
13
13
14
14
15
15
15
16
17
18
19
19
20
21
21
22
22
25
27
29
turningtechnologies.com/user-guides
Page 4

CPS for PowerPoint Mac 4
Deleting Sessions in CPS for PowerPoint
30
Contact Us 31
turningtechnologies.com/user-guides
Page 5

CPS for PowerPoint Mac 5
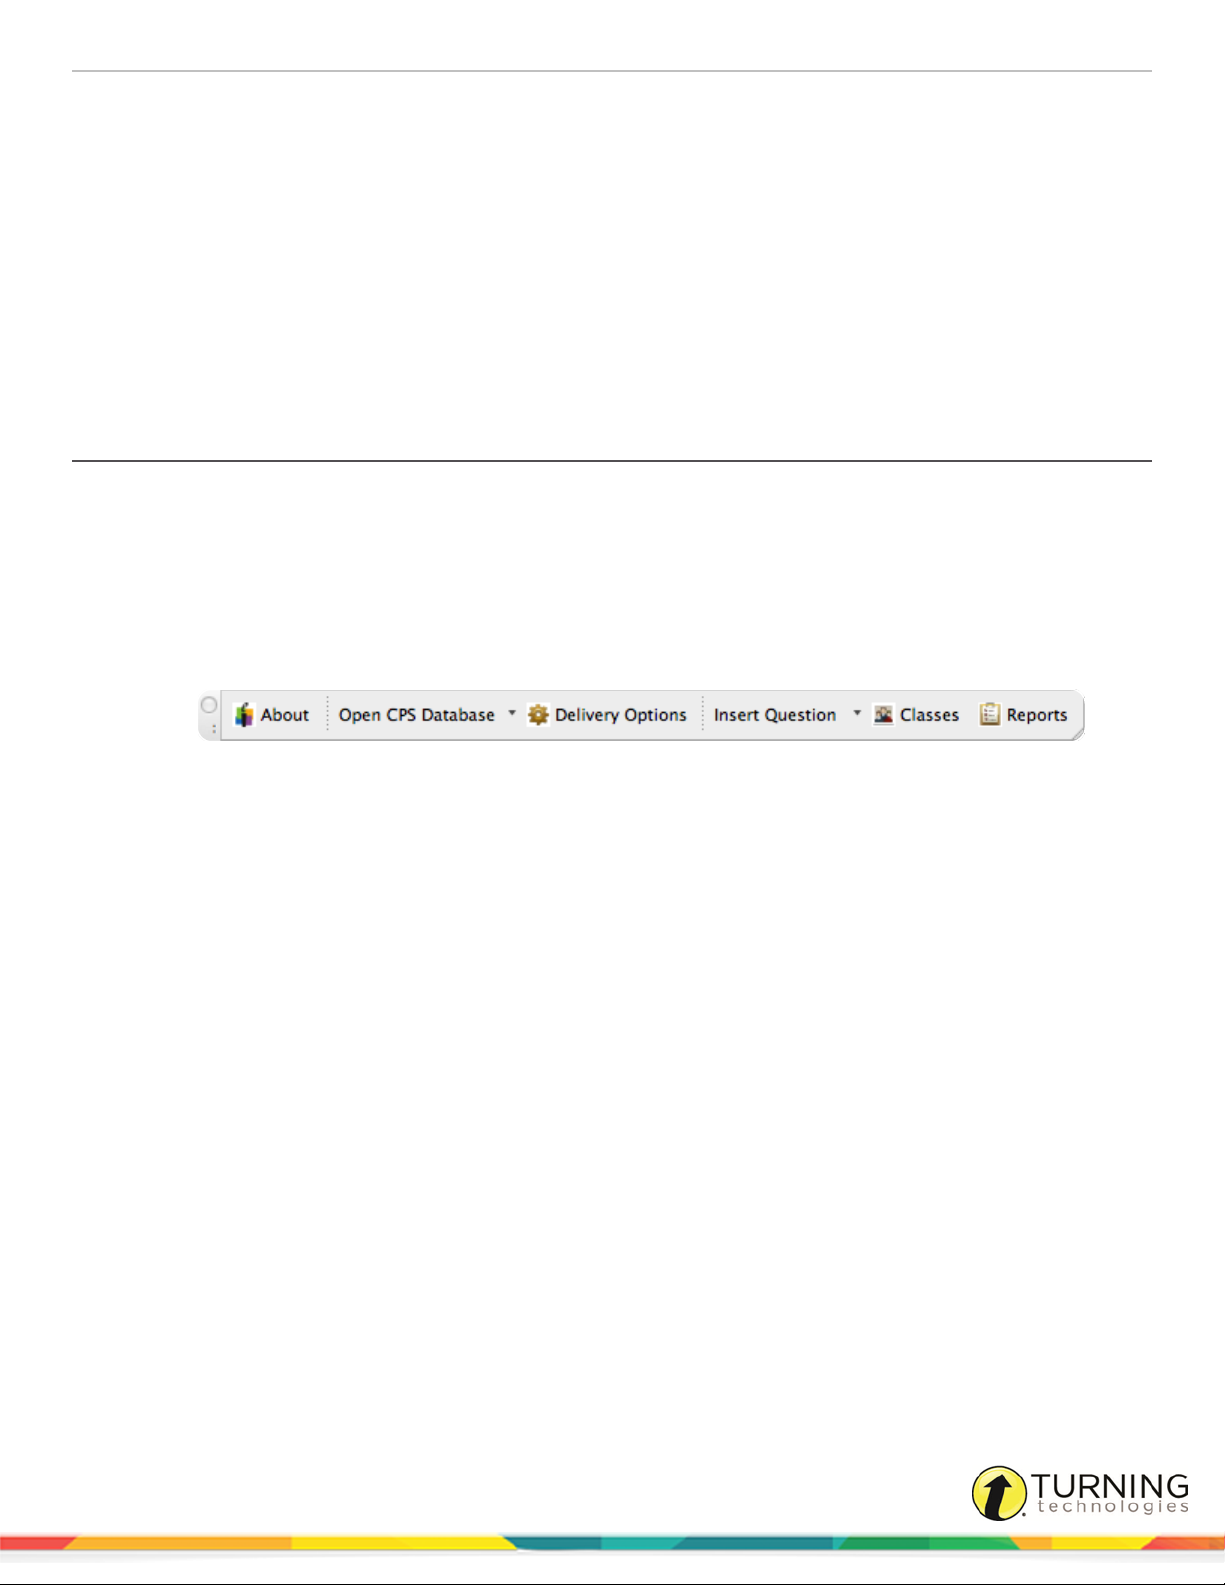
CPS FOR POWERPOINT
CPS for PowerPoint adds a CPS toolbar to Microsoft PowerPoint so interactive slides can be added to PowerPoint
presentations and engaged through the CPS Engage toolbar while viewing a slide show.
This chapter covers the following topics:
Technical Requirements
Downloading and Installing CPS
Opening CPS for PowerPoint
Hardware Setup
Delivery Options
Accessing the Delivery Options
Databases
Technical Requirements
Minimum System Requirements Mac:
l Mac OS X 10.7 or higher
l Intel Core 2 Duo Processor 1.66 GHz
l 32-bit/64-bit Kernel and Extensions
l 2 GB RAM
l 1 GB hard disk space for installation
l 1024 x 768 resolution at 24-bit color or higher
l Standard USB 2.0 port (2)
l Microsoft Office 2011
Downloading and Installing CPS
Prerequisites
Please verify that your computer meets the Technical Requirements before downloading CPS.
1
Go to www.turningtechnologies.com/responsesystemsupport/downloads.
2
Below Polling Software, click CPS.
3
Below Download Options, click the link of the appropriate version.
4
Enter the required information and click Submit.
5
Click the Click to Download icon.
The End User License Agreement Statement window appears.
turningtechnologies.com/user-guides
Page 6
CPS for PowerPoint Mac 6
6
Click Accept.
The CPS file downloads.
7
Once the download is complete, double-click the file.
The CPS Installation window will appear.
8
Double-click Install CPS and/or CPS PPT in the installation window.
9
Follow the on-screen prompts.
10
Click Install.
11
After the installation is complete, restart the computer.
A CPS and/or CPS for PowerPoint icon appears on the desktop.
Opening CPS for PowerPoint
CPS for PowerPoint is compatible with PowerPoint 2011.
Prerequisites
CPS for PowerPoint must be installed.
1
Double-click the CPS for PowerPoint icon on your desktop.
2
PowerPoint opens with the CPS add-in.
3
Create a new PowerPoint presentation or edit an existing presentation.
Next Steps
Add interactive CPS slides to your PowerPoint presentation through CPS for PowerPoint. For more information, see Creating
a CPS Slide.
Hardware Setup
Participants interact with CPS through clickers that communicate through a receiver. The CPS response system uses either
infrared (IR) or radio frequency (RF) technology. See Compatible Devices for a list of supported devices.
This section covers the following topics:
Compatible Devices
CPS Receiver Setup
Changing the Channel on RF Receivers
Changing the Channel on a CPS Pulse Clicker
Changing the Channel on a CPS Spark Clicker
Programming ResponseCard NXT Device IDs
Changing the Channel on a ResponseCard NXT
turningtechnologies.com/user-guides
Page 7
CPS for PowerPoint Mac 7
Compatible Devices
The following devices are compatible with CPS:
Clicker Receiver
l The infrared (IR) receiver supports up to 64 CPS IR clickers.
CPS IR clicker CPS IR receiver
CPS Spark clicker
CPS Pulse RF receiver
CPS Pulse clicker
l The IR receivers can accept signals from IR clickers up to 60 feet
away within a direct line-of-sight.
l The CPS Pulse Radio Frequency (RF) receiver supports up to 500
CPS Spark and/or CPS Pulse clickers.
l The RF receivers can accept signals up to 150 feet away and do not
require a line-of-sight to accept signals from the clickers.
Turning Technologies
ResponseCard NXT
RRRF-03 receiver
RRRF-04 receiver
IMPORTANT
ResponseCard NXT requires programmed Device IDs to work with CPS. For information on how to
program Device IDs, see Programming ResponseCard NXT Device IDs.
CPS Receiver Setup
1
Plug the CPS receiver into an available USB port on your
computer.
2
Double-click the CPS desktop icon to open CPS.
3
CPS automatically detects your receiver settings. If the receiver is not automatically detected, follow the steps below.
a
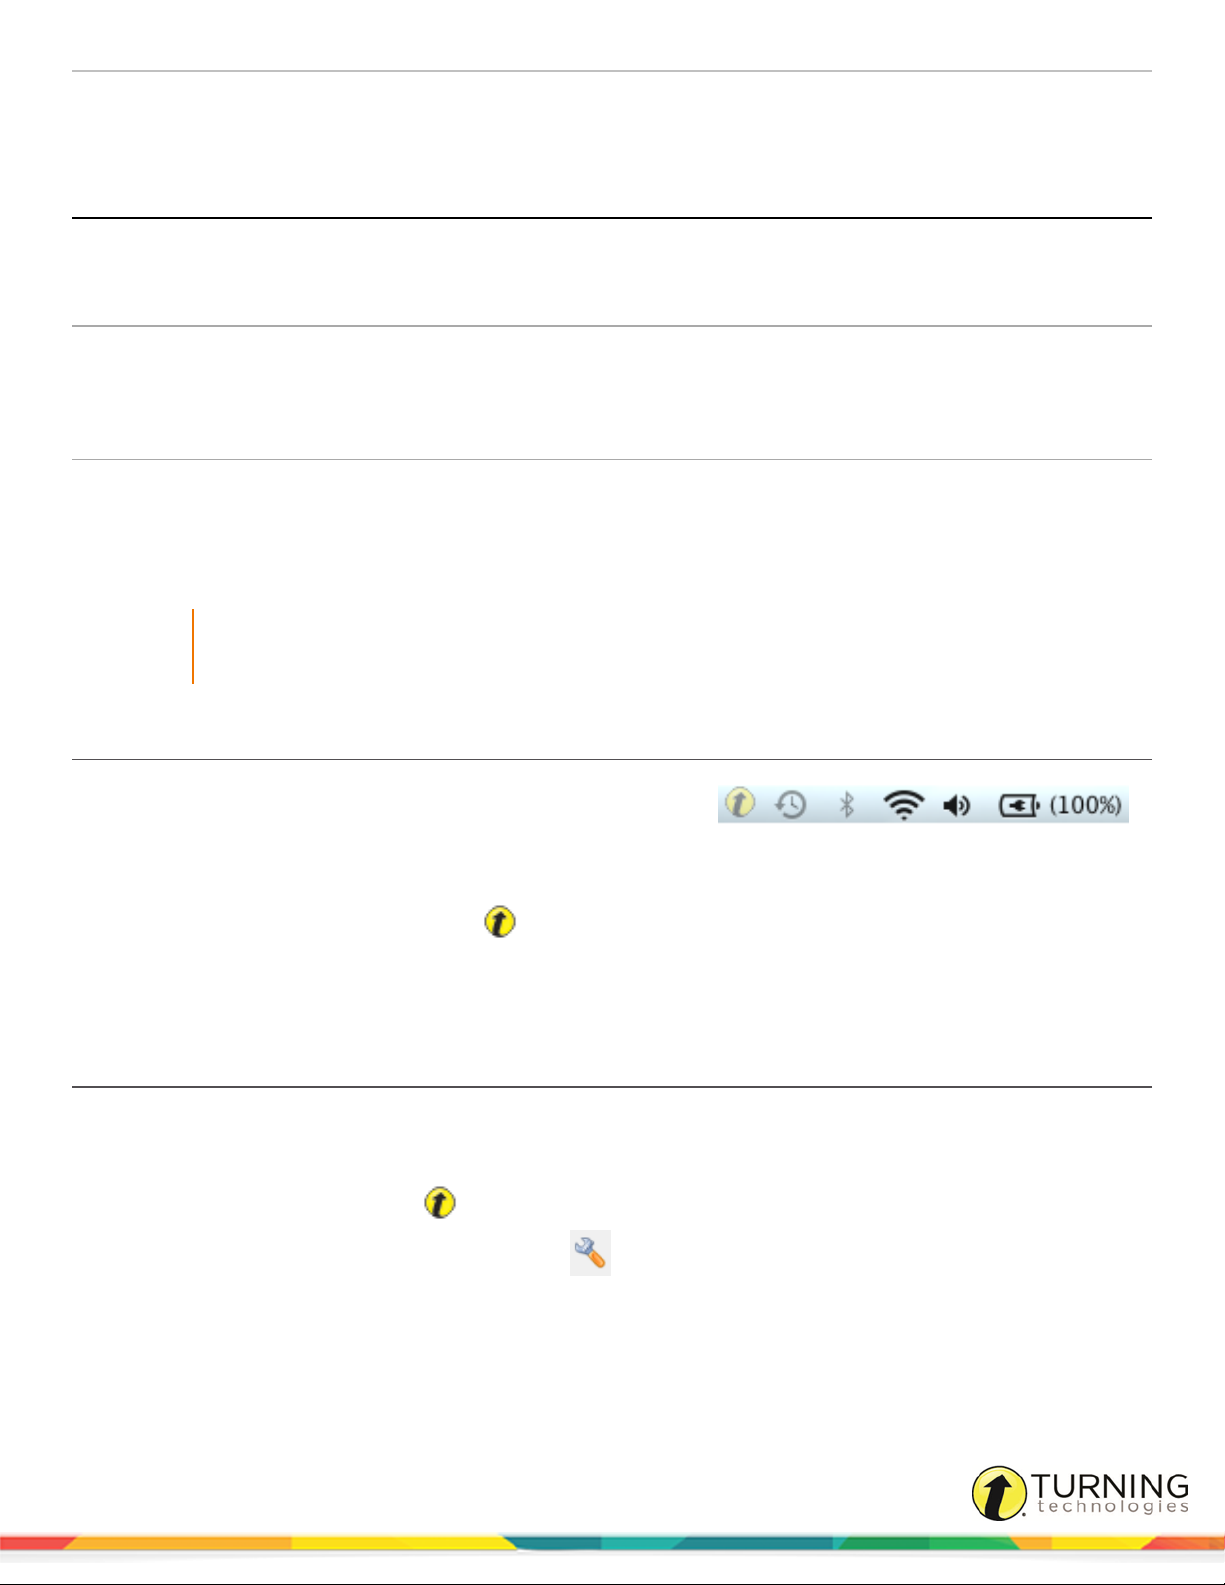
Click the Turning Technologies icon in the Menu Extra area and select Device Manager from the menu.
b
Click Options and select Discover Devices.
Device Manager displays an icon of your receiver with a green check mark to show it is connected.
l The Turning Technologies RRRF-03 and RRRF-04 receivers support
up to 1000 clickers per receiver.
l The RF receivers can accept signals up to 200 feet away and do not
require a line-of-sight to accept signals from the clickers.
Changing the Channel on RF Receivers
The clickers and receiver need to be set to the same channel to communicate.
1
Plug the receiver in to an available USB port and open CPS.
2
Click the Turning Technologies icon in the Menu Extras area and select Device Manager.
3
Select the receiver and then click the wrench icon . Alternatively, double-click the image of the receiver.
The Receiver Properties window opens.
4
Locate (RR)RF Receiver Options and click the arrows next to Base Channel to adjust the channel number or click once
on the channel number and use the keyboard to input a new channel number.
5
Click OK to save the channel number.
turningtechnologies.com/user-guides
Page 8
CPS for PowerPoint Mac 8
Changing the Channel on a CPS Pulse Clicker
The clickers need to be set to the same channel as the receiver when polling.
1
Press the Power button.
2
Simultaneously press both arrows and release.
3
Press the button.
Channel appears on the screen.
4
Enter the two-digit channel number.
NOTE
The channel number must be between 01 - 75.
5
Press the Enter button.
Clicker # appears on the screen.
6
Enter the number found on the front of the clicker.
7
Press the Enter button.
A summary appears on the screen, and the clicker turns off.
Changing the Channel on a CPS Spark Clicker
The clickers need to be set to the same channel as the receiver when polling.
1
Press the Power button.
2
Simultaneously press both arrows and release.
3
Press the button.
Channel appears on the screen.
4
Enter the first digit of the channel number by pressing the button to increase the number or the button to
decrease the number.
NOTE
The channel number must be between 01 - 75.
5
Press the right arrow to advance to the second digit and repeat step 4.
6
To save the channel number, press the right arrow .
Clicker # appears on the screen.
7
Repeat steps 4 - 5 to enter the number on the front of the clicker.
8
Press the right arrow to save the clicker ID.
A summary appears on the screen, and the clicker turns off.
turningtechnologies.com/user-guides
Page 9

CPS for PowerPoint Mac 9
Programming ResponseCard NXT Device IDs
A ResponseCard NXT requires a programmed Device ID for use with CPS. ResponseCard NXT can be programmed with the
ResponseCard Programmer or by following the steps below. For more information about the ResponseCard Programmer,
contact Turning Technologies toll-free at 1.866.746.3015 or email support@turningtechnologies.com.
NOTE
ResponseCard NXT is required to be on firmware 2.1.1 or higher.
1
Press the Enter button to "wake-up" the ResponseCard NXT.
2
Press the right function key below the Wrench icon.
3
Use the right arrow to scroll to Device Info and press the Enter button.
4
Press the Channel button twice, the ABC button and finally the Enter button.
5
Enter the new numeric Device ID using keys '0' to '9'.
NOTE
Entering '000000' will reset the Device ID to factory default.
6
Press the Enter button.
The programmed Device ID appears on the screen.
Changing the Channel on a ResponseCard NXT
1
Press the Channel button.
2
Use the number pad to enter the new channel number.
3
Press the Enter button.
Delivery Options
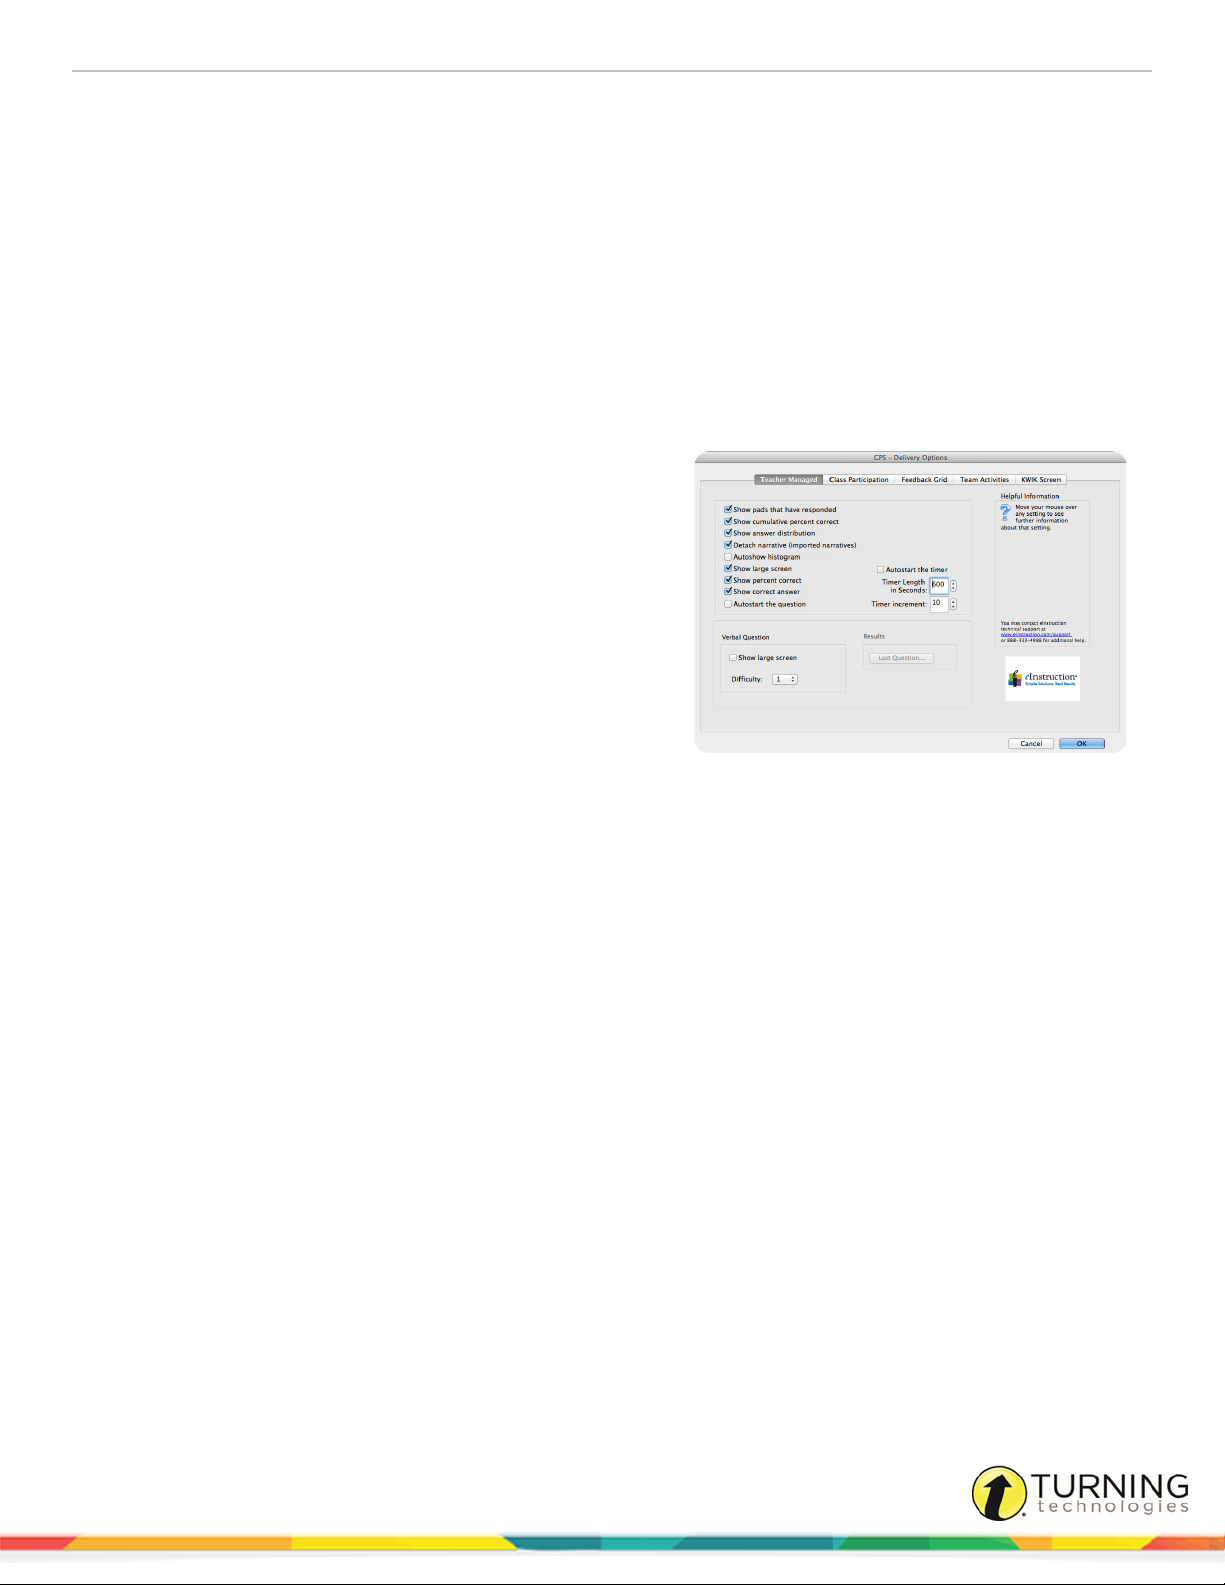
Each delivery mode has specific features that you can change within CPS. Changes can be made through the CPS - Delivery
Options window.
Accessing the Delivery Options
1
Open CPS for PowerPoint from the desktop icon.
2
From the CPS for PowerPoint toolbar, click Delivery Options .
The CPS - Delivery Options window appears.
3
Select your delivery options.
TIP
For more information on CPS Delivery Options, see Setting Delivery Options.
Setting Delivery Options
Each delivery mode has specific configurable features. You can configure these options through the CPS - Delivery Options
window.
turningtechnologies.com/user-guides
Page 10
CPS for PowerPoint Mac 10
Delivery Options allow you to set and manage teacher-managed options. The Delivery Options window consists of five tabs:
l Teacher Managed - Set teacher managed options such as session display settings. The settings apply to any teacher-
managed lessons. Options are enabled for all future applications.
l Class Participation - The Class Participation Incentive scale allows you to add or deduct points for incorrect answers
on a particular assessment. A student can be rewarded for attempting to answer a question or can be penalized for
answering a question incorrectly.
l Feedback Grid - Optimize clicker responses by adjusting the time interval and the number of clickers displayed for the
Question Preview.
l KWIK Screen - Configure MOBI screen display settings.
l Team Activities - Team activity settings for the There It Is! activity.
Teacher Managed Delivery Options
Options
l Show Pads That Have Responded - Alters the on-
screen appearance of the CPS clicker numbers during the
response cycle to either remain displayed in blue or flash
when the answer is sent and then remain white.
l Show Cumulative Percent Correct - Displays the
cumulative percent of correct answers for the session in
the Feedback Grid after the response cycle ends.
l Show Answer Distribution - Displays the number of
students who responded to each answer choice for a
question after the response cycle ends.
l Detach Narrative (Imported Narratives) - Creates a button on the Feedback Grid for questions with narratives
imported from ExamView so the user can choose whether or not to show the associated narrative with the question in
the Content Delivery window.
l Autoshow Histogram - Automatically displays the Histogram window after the response cycle ends.
l Show Large Screen - Displays questions in the Content Delivery window. The Content Delivery window contains the
questions and answer choices for each question.
l Show Percent Correct - Displays the percentage of students that correctly answered the question after the response
cycle ends.
l Show Correct Answer - Displays the correct answer to the question as a green check mark in the Content Delivery
window after the response cycle ends.
l Auto Start the Question - Automatically starts the response cycle.
l Auto Start the Timer - Automatically begins the question timer when the response cycle is started.
l Timer Length - Changes the default length of time displayed in the Content Delivery window during a response
cycle.
l Timer Increment - Changes the default increment of time change when using the + and - sign displayed in the
Content Delivery window during a response cycle.
Verbal Questions
l Show Large Screen - Displays the Content Delivery window and Feedback Grid when you engage a verbal question.
This allows you to type in a question and the answer text that are then recorded. If this option is not selected, only the
turningtechnologies.com/user-guides
Page 11

CPS for PowerPoint Mac 11
Feedback Grid is displayed.
l Difficulty - Default difficulty level.
Results
l Last Question - Show the results for the last question.
Databases
A CPS database contains class information, lessons and questions, team activities, standards and student performance data
for sessions already administered.
This section covers the following topics:
Creating a CPS Database in CPS for PowerPoint
Opening a Database in CPS for PowerPoint
Creating a CPS Database in CPS for PowerPoint
1
From the CPS for PowerPoint toolbar, click the Open CPS Database drop-down menu and select New Database.
2
Enter a name and select a location.
3
Click Save.
Opening a Database in CPS for PowerPoint
1
From the CPS for PowerPoint toolbar, click the Open CPS Database drop-down menu and select Open Database.
The CPS: Open window appears.
2
Browse to the location of the database and click Open.
turningtechnologies.com/user-guides
Page 12

CPS for PowerPoint Mac 12
CLASSES AND STUDENTS
After a CPS database has been created or opened in CPS for PowerPoint, a class or classes can be created. A class consists
of a roster of student names and clicker ID numbers. The roster can also contain optional information such as student ID
numbers and demographic information such as gender and ethnicity.
This chapter covers the following topics:
Creating a Class in CPS for PowerPoint
Adding Students to a Class in CPS for PowerPoint
Copying Students to a Class in CPS for PowerPoint
Importing a Class from another CPS Database in CPS for PowerPoint
Editing Class or Teacher Information in CPS for PowerPoint
Editing Student Information in CPS for PowerPoint
Show All Students in CPS for PowerPoint
Deleting a Student in CPS for PowerPoint
Deleting a Class in CPS for PowerPoint
Creating a Class in CPS for PowerPoint
1
From the CPS for PowerPoint toolbar, click Classes .
The CPS Database window appears.
2
Below Classes, click New.
The CPS - Class Wizard appears.
3
Select the appropriate institution.
TIP
Select K-12 as the institution type unless a CPSOnline account has been created. Selecting
Higher Education requires a CPSOnline Username and password.
4
Click Continue.
5
If this is your first time creating a CPS class, set up your teacher account by selecting No and click Continue. Enter
your contact information and click Continue.
6
Enter the Class Name and any optional fields pertaining to the class.
The optional fields are:
l Course Number - Course number assigned by your school.
l Section - Section number for your class.
l Period- Period in which you hold your class.
l Semester - Semester during which you teach your class.
l Campus - Building or campus where you teach your class.
l Classroom Number - Room number for your class.
l Make this a CPSOnline class (An Instructor Setup Code is required) - Leave the box in front of this option
blank.
7
Click Continue.
8
Click Continue to create your class or click Go Back to review your information.
turningtechnologies.com/user-guides
Page 13

CPS for PowerPoint Mac 13
9
When finished, click Done to close the CPS - Class Wizard.
10
To create an additional class, select the option I want to make another class.
TIP
To edit the class name or details, click on the class name and select Edit. To save any changes,
click Save.
Next Steps
Add students to your class roster. For more information, see Adding Students to a Class in CPS for PowerPoint.
Adding Students to a Class in CPS for PowerPoint
1
From the CPS for PowerPoint toolbar, click Classes .
The CPS Database window appears.
2
Below Students, click New.
3
Enter the student’s first name in the highlighted field below Student Information at the bottom of the window.
4
Press the Tab key on your keyboard to move to the next field. First Name, Last Name and Pad ID are required.
TIP
Pressing the Enter key on the keyboard saves the information and navigates to the next student
data row. CPS automatically assigns the next student a Pad ID number in numeric order.
5
Click Save Student when finished.
NOTE
Any class created in the database can be used in conjunction with any lesson delivery mode.
TIP
Click the column headers labeled First Name, Last Name or Pad ID to sort the view.
Copying Students to a Class in CPS for PowerPoint
1
From the CPS for PowerPoint toolbar, click Classes .
The CPS Database window appears.
2
Select the class containing the student(s) to be copied.
The class roster appears in the right panel.
3
Select a student name.
TIP
To select multiple students, press and hold the Command key while clicking each student name.
4
Click Edit and select Copy to Class when the desired student or students are selected.
turningtechnologies.com/user-guides
Page 14

CPS for PowerPoint Mac 14
5
Select the class into which you want to copy the student(s).
The student information is copied into the selected class and appears in the class roster.
IMPORTANT
The Pad ID can be set to a different number in each class. However, changes made to other student
information will be updated in any class into which the student was copied. This is only true for students
who have been copied from one class to another, not for classes that have been copied.
Importing a Class from another CPS Database in CPS for PowerPoint
1
From the CPS for PowerPoint toolbar, click Classes .
The CPS Database window appears.
2
Click the Import icon.
The CPS - Class Wizard window appears.
3
Select CPS Database from the list and click Continue.
4
Click Browse.
The Open window appears.
5
Browse to the location of the database containing the class or classes to import and click Open.
A list of the available classes within the database is displayed.
6
Select each class to be imported or to select all the classes in the database, select the box labeled Select All.
7
Click Continue.
8
Click Done.
CPS imports the class roster and displays the class information.
Editing Class or Teacher Information in CPS for PowerPoint
1
From the CPS for PowerPoint toolbar, click Classes .
The CPS Database window appears.
2
Select a class name to edit.
3
Click Edit.
The CPS - Class Information window appears.
4
Edit any of the onscreen options:
Class Name The name of the class roster. (Required)
Course Number The course number assigned by your school. (Optional)
Section The section number for your class. (Optional)
Period The period in which the class is held. (Optional)
Semester The semester during which the class is taught. (Optional)
Campus The building or campus name where the class is taught. (Optional)
turningtechnologies.com/user-guides
Page 15

CPS for PowerPoint Mac 15
Classroom Number The room number of the class. (Optional)
5
Click Save to save any changes.
6
Click Close to close the CPS - Class Information window.
Editing Student Information in CPS for PowerPoint
1
From the CPS for PowerPoint toolbar, click Classes .
The CPS Database window appears.
2
Select a class name to display the students in the class.
3
Click the student data field that contains the student information you want to edit.
4
Edit student information at the bottom below Student Information.
5
Click Save Student.
6
Repeat steps 3 - 5 to edit additional student information from the class roster.
Show All Students in CPS for PowerPoint
1
From the CPS for PowerPoint toolbar, click Classes .
The CPS Database window appears.
2
Below Students, click Show All .
A list of all of your students will appear on the student side on the right.
NOTE
You cannot edit student information while in the Show All view.
3
Click Show All again to return to the regular view.
Deleting a Student in CPS for PowerPoint
You can delete one or more students from a class roster. The student's information and grades will also be deleted from the
class roster.
NOTE
Deleting a student who is copied into another class roster will not delete that student from the other class
roster.
1
From the CPS for PowerPoint toolbar, click Classes .
The CPS Database window appears.
2
Select the name of the class containing the student(s) to delete.
3
From the right panel, click the student(s) to delete.
TIP
To select multiple students, press and hold the Command key while clicking each student name.
turningtechnologies.com/user-guides
Page 16

CPS for PowerPoint Mac 16
4
Below Students, click Delete.
5
Click Delete Student(s) to confirm the deletion or click Cancel to quit this action.
Deleting a Class in CPS for PowerPoint
You can delete a class from the list of classes in a CPS database. Deleting a class also removes any student information
within that class roster.
WARNING
Deleting a class cannot be undone.
1
From the CPS for PowerPoint toolbar, click Classes .
The CPS Database window appears.
2
Select the name of the class to delete.
3
Below Classes, click Delete.
4
Click Delete Class to confirm the deletion or click Cancel to quit this action.
turningtechnologies.com/user-guides
Page 17

CPS for PowerPoint Mac 17
CREATE CPS SLIDES
Creating a CPS Slide
Interactive CPS slides allow students to respond to a question in a PowerPoint presentation. CPS slides can be inserted
anywhere in the presentation.
WARNING
A presentation created in CPS for PowerPoint can only be delivered with CPS for PowerPoint. Material
created in CPS for PowerPoint cannot be imported or delivered with the stand-alone CPS software.
1
Double-click the CPS for PowerPoint icon on your desktop.
The CPS for PowerPoint toolbar appears.
2
Click the Insert Question drop-down menu and select a question template:
l True/False
l Yes/No
l Numeric
l Multiple Choice
l Likert Scale
3
Edit the question and answer text on the CPS slide.
4
Click the Enter question here field, delete the text and enter the question text.
5
Depending on the question template, enter the answer choices and select a correct answer choice.
a
For multiple choice questions, delete the text within the brackets and enter the answer text. Click the
symbol on the answer choice that is correct to change the symbol to .
l To leave a question subjective, do not change any of the symbols.
l To set multiple correct answers, select one of the following options below Default:
l MC Any - Students must select at least one of the answers marked as correct to receive credit for
this question.
l MC All - Students must select all of the answers marked as correct to receive credit for this
question.
b
For numeric questions, enter the correct answer to the right of the symbol. Enter the margin of error allowed
in the space below.
c
For True/False or Yes/No questions, click the symbol on the answer choice that is correct to change the
symbol to .
TIP
Adding custom animations, changing the slide layout and/or transitions or changing the slide
design does not affect the way a CPS slide is engaged. For more information on these options,
see Microsoft PowerPoint Help.
turningtechnologies.com/user-guides
Page 18

CPS for PowerPoint Mac 18
ENGAGE CPS FOR POWERPOINT
This chapter covers the following topics:
Engaging the Presentation in CPS for PowerPoint
Engaging Verbal Questions in CPS for PowerPoint
Engaging the Presentation in CPS for PowerPoint
1
In PowerPoint, open the presentation with interactive slides.
2
Click the Slide Show tab.
3
In the Play Slide Show group, click From Start or From Current Slide.
The Session Setup window appears.
4
Select your session options.
Option Description
Anonymous Mode Results will not be associated with student information
Dynamically associate one or more standards to questions engaged
during this session. For more information see Associating Dynamic
Standards to Questions steps 4 - 7.
Automatically Upload Session Upon
Completion
Session Title Enter the name of the session in the Session Title field
Session Type Select a category for the session
Class
Generate Attendance Report from this session Generate an attendance assessment for this session.
5
Click Start to begin the presentation.
The CPS Engage Toolbar appears.
6
Click Engage.
7
Click Start to begin the response cycle.
The CPS Ballot Grid displays the student clicker ID numbers. As students answer, their clicker ID number changes to
blue.
8
Click End to end the response cycle.
9
When finished with the slide show, click Close to close the CPS Engage Toolbar. Click End Session to close the
PowerPoint slide show and end the assessment.
Automatically upload performance data to CPSOnline, Blackboard,
WebCT. This option is only available if you have a CPSonline class.
From the drop-down menu, assign a class or select Create to create a
new class. For more information about creating a new class see
Creating a Quick Class steps 5 - 7.
turningtechnologies.com/user-guides
Page 19

CPS for PowerPoint Mac 19
Creating a Quick Class
The Class Wizard allows you to quickly create a class before you deliver a session. This "on-the-fly" class contains the clicker
ID values specific to the number of students participating in the session. The Class Wizard saves the Quick Class generated
during the session into the open database.
1
Click Lessons.
2
In the Lessons group, click Verbal.
The Verbal Questions Setup window appears.
3
Click Class and select Create Class.
The CPS - Create Class window appears.
4
Click Start.
5
Enter a Class Title.
6
The Lower Range and Upper Range numbers indicate
the number of clickers to be used in the session. The
clicker ID values begin at the number indicated in the
Lower Range field.
EXAMPLE
A lower range of 6 and an upper range of
15 will create a class of 10 students
assigned clickers 6 - 15.
7
Click Create.
The Quick Class has now been created.
8
Click Start to begin a verbal session.
Alternatively, click Cancel to return to CPS.
Associating Dynamic Standards to Questions
The Dynamic Standards feature allows you to align state standards to questions during a session. This feature allows you to
choose a subset or list of standards to apply to the lesson you are engaging.
You can choose to be prompted with this subset before you ask each question, or you can automatically apply all the standards
in your subset to all of the questions in the lesson you are engaging.
1
Click Lessons.
2
Click the lesson to engage.
3
Click the Engage icon.
The CPS - Session Setup window appears.
4
Click the Dynamic Standards icon.
NOTE
The Dynamic Standards icon is only available in the Teacher Managed Assessment mode.
The CPS - Dynamic Standards Setup window appears.
5
Select the standard(s) to be included in your subset.
turningtechnologies.com/user-guides
Page 20

CPS for PowerPoint Mac 20
6
Below When a Question is Engaged, select one of the following options:
l If Prompt for Dynamic Standards is selected, the Dynamic Standards Setup window appears with every
question you engage. This allows you to decide during the delivery of each question and which standard(s) to
apply.
TIP
This option is useful with the Verbal Question feature.
l If Automatically Align Selected Dynamic Standards is selected, CPS automatically aligns the standard(s)
defined in the subset with each question in the session. CPS will not prompt you with the Dynamic Standards
Setup window.
l If None is selected, CPS will not prompt you with the Dynamic Standards Setup window and no standards will
be applied to the questions in the session. However, a subset of standards can be selected and applied to
questions at any time by clicking the Dynamic Standards icon from the Question Deliver window.
7
Click Apply to apply the standards and settings and return to the CPS - Session Setup window.
8
Click Start to start the lesson.
Engaging Verbal Questions in CPS for PowerPoint
On-the-fly questions can be engaged from CPS and non-CPS slides in a PowerPoint presentation. Verbal questions can be
asked at anytime during the presentation.
NOTE
Before beginning your slide show, from the CPS for PowerPoint toolbar, click Delivery Options. In the
Verbal Questions group, select Show Large Screen so that while delivering a verbal question the
Content Delivery screen appears and displays the question and answer choices. If it is not selected,
only the CPS Ballot Grid will be displayed.
1
In PowerPoint, open your presentation with interactive slides.
2
Click the Slide Show tab.
3
In the Play Slide Show group, click From Start or From Current Slide.
The Session Setup window appears.
4
Select your session options and click Start.
The CPS Engage Toolbar appears.
5
Click Verbal and select a question type.
l If Verbal is selected and the Show Large Screen option is selected, enter your question and answer text.
l If Verbal is selected and the Show Large Screen option is not selected, verbally ask your class the question.
6
Click Start to begin the response cycle.
7
Click End to end the response cycle.
8
Optionally, select a correct answer from the Charting window.
9
When finished with the slide show, click Close to close the CPS Engage Toolbar. Click End Session to close the
PowerPoint slide show and end the assessment.
turningtechnologies.com/user-guides
Page 21

CPS for PowerPoint Mac 21
REPORTS
Reports can be viewed, exported or printed directly from CPS for PowerPoint.
This chapter covers the following topics:
Generating Reports in CPS for PowerPoint
Creating Attendance from an Assessment in CPS for PowerPoint
Report Types
Regrading an Assessment in CPS for PowerPoint
Deleting Sessions in CPS for PowerPoint
Generating Reports in CPS for PowerPoint
1
From the CPS for PowerPoint toolbar, click Reports .
The CPS Database window appears.
2
Select a session.
3
Click the Reports icon.
The CPS - Reporting window appears.
4
Below Students, click the student(s) to include in the report.
l Optionally, click the box next to Select All to select all of the student names on the list.
l Optionally, click the box next to Filter out students who didn't respond to only select students who
responded during the session. If this option is selected, the class average is calculated only using the scores of
students who responded.
5
Below Reports, select the type of report to generate.
TIP
For more information on report types, see Report Types.
6
Click Preview.
The Print Preview window appears.
7
Review, print or export the report.
l To print the report, click Print.
l To export the report, click the Export drop-down menu and select the file type.
NOTE
The report can be exported as an PDF, HTML, TXT or XLS file.
8
Click Close to return to the CPS - Reporting window.
Creating Attendance from an Assessment in CPS for PowerPoint
1
From the CPS for PowerPoint toolbar, click Reports .
The CPS Database window appears.
2
Select the session to create an attendance assessment.
turningtechnologies.com/user-guides
Page 22

CPS for PowerPoint Mac 22
3
Click Generate Attendance.
The attendance assessment appears in the list of sessions.
Report Types
There are 18 different types of reports that can be generated from CPS performance data.
There are three CPS report categories:
l Class Reports - Class reports provide general information about the overall class performance. Class reports may
provide some information on individual students, however the focus of the report is on the class.
l Individual Reports - Individual reports focus on the performance data for each student.
l Export Reports - Export reports are reports that can be exported to third-party software applications or are compatible
with Microsoft Excel.
Class Reports Individual Reports Export Reports
l Instructor Summary
l Question
l Response
l Item Analysis
l Item Analysis with Standards
l Standards Analysis
l Study Guide
l Study Guide - Incorrect Answers
l Study Guide - Class Summary
l Standards Analysis with Student
Cross Index
l Question Grid Export
l WebCT Export
l Session Data Export
l eSembler Export
l Response Data Export
l Question Response Data Export
l Session Grade Export
l Attendance Data Export
Class Reports
Class reports provide general information about overall class performance. While these reports may also provide information
on each student, the overall focus of the report is on the class.
Instructor Summary Report
The Instructor Summary Report provides a quick overview of the class assessment. The Instructor Summary Report lists the
number of correct out of attempted answers and the percentage of correctly answered questions for all selected students in the
report. You can also view the class average and student information.
NOTE
Scores are calculated using the first answer submitted for sessions delivered with Student Managed
Practice mode.
turningtechnologies.com/user-guides
Page 23

CPS for PowerPoint Mac 23
Question Report
The Question Report details each question in the assessment. The report indicates the correct answer to each question, a
summary of each student's response to each question, the percentile of respondents per answer option and a bar graph
showing answer distribution.
The Question Report evaluates the effectiveness of a specific question and can also determine the most common answer to a
question, regardless of whether the answer is correct or incorrect.
NOTE
The Question Report indicates the number of attempts made to submit the correct answer for sessions
delivered with Student Managed Practice mode.
Response Report
The Response Report shows only the percentage of students who selected each answer choice. This report presents data in
an anonymous format, so that you can evaluate the overall class performance without looking at individual performance.
NOTE
The Response Report is unavailable for sessions delivered with Student Managed Practice mode.
turningtechnologies.com/user-guides
Page 24

CPS for PowerPoint Mac 24
Item Analysis Report
The Item Analysis Report shows each question and the percentage of students who selected each answer choice. The correct
answer has an asterisk before the percentage.
NOTE
The Item Analysis Report is unavailable for sessions delivered with Student Managed Practice mode.
Item Analysis Report with Standards
The Item Analysis Report with Standards provides the same information as the Item Analysis Report but also includes an
associated standard.
NOTE
The Item Analysis with Standards Report is unavailable for sessions delivered with Student Managed
Practice mode.
turningtechnologies.com/user-guides
Page 25

CPS for PowerPoint Mac 25
Standards Analysis Report
The Standards Analysis Report lists each standard code, the actual standard and the percentage of students who correctly
answered the questions associated with the standard. This percentage does not calculate any questions in the lesson that are
not associated with standards.
NOTE
This report is only available if the session contained questions with associated standards. Scores are
calculated using the first answer inputted for sessions delivered with Student Managed Practice mode.
Individual Reports
Individual reports focus on the performance data for each student.
Study Guide Report
The Study Guide Report provides a detailed study guide for each student for review. This report shows the number of correctly
answered questions, percentage of correctly answered questions, correct answer for each question and the student's answer
for each question.
NOTE
The Study Guide Report indicates the number of attempts made to submit the correct answer for session
delivered with Student Managed Practice mode.
turningtechnologies.com/user-guides
Page 26

CPS for PowerPoint Mac 26
Study Guide - Incorrect Answers Report
The Study Guide - Incorrect Answer Report provides the student with the same information as the Study Guide report, but
excludes questions that the student answered correctly.
NOTE
This report indicates the number of attempts made to submit the correct answer for session delivered
with Student Managed Practice mode.
Study Guide - Class Summary Report
The Study Guide - Class Summary Report summarizes the questions missed for each student. This report lists each student,
each question the student missed, the correct answer and the student answer.
This report indicates the number of attempts made to submit the correct answer for session delivered with Student Managed
Practice mode.
turningtechnologies.com/user-guides
Page 27

CPS for PowerPoint Mac 27
Standards Analysis with Student Cross Index Report
The Standards Analysis with Student Cross Index Report lists each standard code, the actual standard and the percentage of
students who correctly answered the questions associated with the standard. It also includes each student's name and
performance per standard. The report is exported as a CSV.
NOTE
This report is only available if the session contained questions with associated standards.
Export Reports
Export reports are reports that can be exported to third-party applications, including Microsoft Excel, WebCT and other school
integrations.
Question Grid Export Report
The Question Grid Export Report lists each student who participated in the session, question number and correct answer. If the
student answered a question correctly, a "+" is displayed in the corresponding box on the grid. If the student answered
incorrectly, the letter representing the student's answer is displayed in the corresponding box on the grid. The report also
displays the total number of correctly answered questions by all students in the class and the percentage of correct answers.
NOTE
The Question Grid Export report exports as a CSV file.
turningtechnologies.com/user-guides
Page 28

CPS for PowerPoint Mac 28
Session Data Export Report
The Session Data Export Report contains only the performance data. The column headings (from left to right) are: Last Name,
First Name, Student ID, number of correct answers, total number of questions, percentage of correctly answered question and
total percentage available.
NOTE
The Session Data Export Report exports as a CSV file.
Session Grade Export Report
The Session Grade Export Report contains session details, including session date, class name and class average, and
performance data for individual students.
NOTE
The Session Grade Export Report exports as a CSV file.
Response Data Export Report
The Response Data Export Report shows session name, class name, individual student response per question, total number
correct and percentage correct.
NOTE
This report exports as a CSV file.
turningtechnologies.com/user-guides
Page 29

CPS for PowerPoint Mac 29
Question Response Data Export Report
The Question Response Data Export Report shows session name, class name and response percentages per question.
NOTE
This report exports as a CSV file.
School Integration Reports
CPS offers several integration specific reports that export as compatible files for integrations such as WebCT, eSembler,
Classroom Manager, AEISIT, Ontrack and an LMS Report.
Regrading an Assessment in CPS for PowerPoint
1
From the CPS for PowerPointtoolbar, click Reports .
2
Select the assessment to regrade.
3
Click the Re-grade icon.
The CPS - Re-grade Assessments window appears.
4
Click the box corresponding to the correct answer.
NOTE
Multiple correct answers can be selected.
5
Click the check to remove it from any box.
6
Optionally, click the corresponding Omit box to omit any
questions from grading.
TIP
Click the question to view the question text.
7
When finished, click OK to save any changes or Cancel to close the Re-grading window without saving any changes.
turningtechnologies.com/user-guides
Page 30

CPS for PowerPoint Mac 30
Deleting Sessions in CPS for PowerPoint
1
From the CPS for PowerPoint toolbar, click Reports .
The CPS Database window appears.
2
Select the session(s) to delete.
TIP
To select multiple sessions, press and hold the Command key on the keyboard while clicking the
session names.
3
Click the Delete icon.
WARNING
Use caution when deleting sessions. Deleting sessions cannot be undone.
4
Click Delete Session(s) to confirm the deletion of the selected session(s) or Cancel to return to the Reports window.
turningtechnologies.com/user-guides
Page 31

CPS for PowerPoint Mac 31
CONTACT US
For additional help, contact Turning Technologies Technical Support.
Technical Support is available from 7 a.m. - 9 p.m. EST.
From within the contiguous United States, you can reach Technical Support toll-free by calling 866.746.3015. If you are calling
from outside of the United States, please call +1 330.746.3015.
Technical Support may also be reached via e-mail at support@turningtechnologies.com or support@einstruction.com, a brand
of Turning Technologies.
Office Locations
Ohio
255 West Federal Street
Youngstown, Ohio 44503
Toll-Free: 866.746.3015
Direct: 330.746.3015
International: +1 330.746.3015
Paris
26/36 rue Alfred Nobel
93600 Aulnay-sous-Bois
France
Direct: +33 (0)1 58 31 10 60
Support: +33 (0)1 58 31 10 65
Belfast
19 Colvin House
Inspire Business Park
Carrowreagh Road
Belfast BT16 1QT
United Kingdom
Direct: +44 (0)28 9048 7898
Amsterdam
Seinstraat 20-05
1223 DA, Hilversum
The Netherlands
Direct: +31 (0)85 4011 040
turningtechnologies.com/user-guides
 Loading...