

Page 1
Accelerating the World of Cooking
TM
Service Manual
FOR THE TURBOCHEF i5 RAPID COOK OVEN
Page 2

Page 3

For further information, call
800.90TURBO
or
+1 214.379.6000
Page 4

The information contained in this manual is important for the proper installation, use, maintenance,
and repair of this oven. Follow these procedures and instructions to help ensure satisfactory baking
results and years of trouble-free service.
Errors – descriptive, typographic, or pictorial – are subject to correction. Specifications are subject to
change without notice.
Please carefully read this manual and retain it for future reference.
Page 5

Safety Instructions
General Safety Information i
Reducing Fire Risk i
Grounding Instructions ii
Power Cord Replacement ii
Precautions to be Observed Before and During Servicing to Avoid
Possible Exposure to Excessive Microwave Energy ii
RF Interference Considerations ii
Specifications and Installation
Theory of Operation 1
Certifications 1
Dimensions 1
Oven Construction 1
Electrical Specifications 2
Unpacking Instructions 3
Lifting and Placing the Oven 3
Installation Near Open Heat Source 4
Optional Installation Items 4
Voltage Selection 4
Daily Maintenance 7
Oven Controls and Cooking
Oven Controls 9
Cooking 10
Mode 1: Oven Off 10
Mode 2: Temperature Select 11
Mode 3: Warming Up 11
Mode 4: Soak 11
Mode 5: Ready to Cook or “Idle” 11
Mode 6: Adjust Time 11
Mode 7: Cooking 12
Mode 8: Remove Food from Oven 12
Mode 9: Cook More 12
Mode 10: Cooling Down 12
Info Mode
Overview of the Info Mode 13
Viewing Cook Counter/Time Logs 13
Viewing the Fault Log 13
Viewing the Service Numbers 13
Table of Contents
Page 6

Resetting the Oven 14
Turning Oven Options On/Off 14
Setting the Language 14
Setting the Date/Time 14
Test Mode - Testing Oven Parts 15
Test Mode - Status Indicators 15
Test Mode - Fault Log 15
Test Mode - Turning On/Off Diagnostic Mode 15
Test Mode - Self Test 16
Test Mode - Manufacturing Mode 16
Microwave Leakage Test (How to Use Oven for Testing) 16
Microwave Power Test 16
Burn-In 16
Serial Number Edit 17
Changing Temperature Measurement Setting 17
Self Test 17
Erase/Default Oven Settings 17
Loading a Menu 17
Updating the Software 18
Edit Mode
Overview of the Edit Mode 19
Single vs. Multiple Temperature Mode 19
Changing Set Temperatures 20
Changing Food Group/Recipe Name 20
Changing Recipe Settings 21
Oven Systems
Overview of the Convection System 23
Blower Motor (Bottom) 23
Blower Motor (Top) 23
Blower Motor Controller (BMSC) 23
Heater Element 23
Jetplate (Bottom) 23
Jetplate (Top) 23
Stirrer Motor and Assembly 23
Troubleshooting 24
Overview of the Oven Door 24
Removing/Reinstalling the Oven Door 24
Adjusting the Oven Door 24
Interlock Switches 26
Adjusting the Door Switches 26
Hinges and Counter-Balance Assembly 26
Adjusting the Counter-Balance Assembly 26
Measuring RF Leakage for Microwave Safety 27
Troubleshooting 28
Page 7

Overview of the Microwave System 29
Capacitors 29
Testing a Capacitor 29
Filament Transformers 29
Wiring the Filament Transformers 29
High-Voltage Transformers 30
Wiring the High-Voltage Transformers 30
Testing a Filament or High-Voltage Transformer 30
High-Voltage Diodes 30
Testing a High-Voltage Diode 31
Magnetrons 32
Testing a Magnetron for an Open/Shorted Filament 32
Stirrer Motor and Assembly 32
Wave Guides 32
Troubleshooting 32
Overview of the Control System 33
Control Board 33
Display 33
Electrical Compartment Cooling Fans 33
Electrical Compartment Cooling Fan Thermostat 33
Electrical Compartment Thermocouple 33
EMI Filter 33
Fuses 33
High-Limit Thermostat 34
Keypad 34
Magnetron Cooling Fans 34
Magnetron Thermostats 34
Power Supply 34
Relay - K1 Filament 34
Relay - K2 Anode 34
Relay - K3 Monitor 34
Relay - K6 Voltage 34
Relay - K7 Magnetron Cooling Fan 35
Relay - K8 Stirrer Motor 35
RTD 35
Smart Card Reader 35
Solid State Relay - K4/K5 Heater 35
Speaker 35
USB Port 35
Voltage Sensor 35
Wire Harness 35
Troubleshooting 35
Overview of the Filtering System 36
Catalytic Converter 36
Drain Pan 36
Air Filter 36
Vent Catalyst 36
Troubleshooting 36
Page 8

Troubleshooting
Overview of Troubleshooting 37
Fault Code Descriptions 37
Fault Code Troubleshooting - F1 Blower Running Status Bad 39
Fault Code Troubleshooting - F2 Cook Temperature Low 40
Fault Code Troubleshooting - F3 Magnetron Current Low 41
Fault Code Troubleshooting - F4 Door Monitor Defective 42
Fault Code Troubleshooting - F5 Magnetron Over Temperature 42
Fault Code Troubleshooting - F6 Electrical Compartment Temperature High 43
Fault Code Troubleshooting - F7 Open RTD 43
Fault Code Troubleshooting - F8 Heat Rise Low 44
Non-Fault Code Troubleshooting - No Keypad Input 45
Non-Fault Code Troubleshooting - “Door Open” Message when Door is Closed 45
Non-Fault Code Troubleshooting - No Display (Screen is Blank) 46
Non-Fault Code Troubleshooting - Food Not Cooking Properly 47
Non-Fault Code Troubleshooting - “Read Fail” Message when Loading a Menu 48
Non-Fault Code Troubleshooting - “Write Fail” Message when Loading a Menu 49
Non-Fault Code Troubleshooting - “Defective Media” Message When Oven is
Plugged in or Restarted 50
Oven Schematic 51
Appendix - Replacing Oven Components
Comprehensive Table of Oven Components A-1
Replacing Items - No Cover Removal Required A-3
Replacing Items - Opening Top Cover Required A-5
Replacing Items - Removing Top Cover Required A-7
Replacing Items - Removing Left Side Cover Required A-9
Replacing Items - Removing Right Side Cover Required A-11
Replacing Items - Removing/Opening Multiple Covers Required A-12
Page 9

i
Safety Instructions
Strictly adhere to the following safety precautions to reduce the risk of burns, electric shock, fire, injury,
damage to oven or property near oven, or possible exposure to excessive microwave energy.
General Safety Information
Read all instructions before using this appliance.
Read and follow the specific "Precautions to be Observed Before and During Servicing to Avoid Possible
Exposure to Excessive Microwave Energy" found on page ii.
This appliance must be grounded. Connect only to properly grounded outlet. See "Grounding
Instructions" found on page ii.
Install or locate this appliance only in accordance with the provided installation instructions.
Some products such as whole eggs and sealed containers (e.g., closed glass jars) may explode and
should not be heated in this oven.
Use this appliance only for its intended uses as described in this manual.
This appliance should be serviced only by qualified service personnel. Contact the nearest authorized
service facility for examination, repair, or adjustment.
Keep cord away from heated surfaces.
Liquids, such as water, coffee, or tea are able to be overheated beyond the boiling point without
appearing to be boiling. Visible bubbling or boiling when the container is removed from the microwave
oven is not always present. THIS COULD RESULT IN VERY HOT LIQUIDS SUDDENLY
BOILING OVER WHEN THE CONTAINER IS DISTURBED OR A UTENSIL IS INSERTED
INTO THE LIQUID.
X
DO NOT allow children to use this appliance.
X
DO NOT
use corrosive chemicals or vapors in this appliance - it is not designed for industrial or
laboratory use.
X
DO NOT operate this appliance if it has a damaged cord or plug, is not working properly, or has been
damaged or dropped. See Power Cord Replacement found on page ii.
X
DO NOT cover or block any openings on this appliance.
X
DO NOT store this appliance outdoors.
X
DO NOT use this product near water (e.g., near a kitchen sink, in a wet basement, near a swimming pool).
X
DO NOT immerse cord or plug in water.
X
DO NOT let cord hang over the edge of table or counter.
X
DO NOT use a water jet for cleaning. See the Maintenance section (pages 7-8) for proper cleaning
procedures.
Reducing Fire Risk
Remove wire twist-ties from paper or plastic bags used to facilitate cooking in the oven.
If materials inside the oven ignite, keep the oven door closed, turn the oven off, and disconnect the power
cord or shut off power at the fuse or circuit breaker panel.
If smoke is observed, switch off or unplug the oven. Keep the door closed to stifle any flames.
X
DO NOT use the cook cavity for storage purposes.
X
DO NOT
overcook food. Carefully attend to the oven if paper, plastic, or other combustible materials are
placed inside the oven to facilitate cooking.
X
DO NOT leave paper products, cooking utensils, or food in the cavity when not in use.
SAFETY INSTRUCTIONS
SAVE THESE INSTRUCTIONS
Page 10

Grounding Instructions
This appliance must be grounded. In the event of an electrical short circuit, grounding reduces the risk of
electric shock by providing an escape wire for the electric current. This oven is equipped with a cord that
has a grounding wire with a grounding plug, which must be plugged into an outlet that is properly
installed and grounded. Consult a qualified electrician or serviceman if uncertain about the ability to
follow grounding instructions or if doubt exists as to whether the appliance is properly grounded.
X
DO NOT
use an extension cord. If the power cord is too short, have a qualified electrician or
serviceman install an outlet near the appliance.
WARNING: Improper grounding can result in risk of electric shock.
Power Cord Replacement
If the power cord is damaged, it must be replaced by the manufacturer, its service agent, or a similarly
qualified person.
Precautions to be Observed Before and During Servicing to Avoid Possible
Exposure to Excessive Microwave Energy
(a)
DO NOT
operate or allow the oven to be operated with the door open.
(b) Make the following safety checks on all ovens to be serviced before activating the magnetron or other
microwave source, and make repairs as necessary: (1) interlock operation, (2) proper door closing,
(3) seal and sealing surfaces (arcing, wear, and other damage), (4) damage to or loosening of hinges
and latches, (5) evidence of dropping or abuse.
(c) Before turning on microwave power for any service test or inspection within the microwave
generating compartments, check the magnetron, wave guide or transmission line, and cavity for
proper alignment, integrity, and connections.
(d) Any defective or misadjusted components in the interlock, monitor, door seal, and microwave
generation and transmission systems shall be repaired, replaced, or adjusted by procedures described
in this manual before the oven is released to the owner.
(e) A microwave leakage check to verify compliance with the Federal Performance Standard should be
performed on each oven prior to release to the owner.
RF Interference Considerations
The i5 oven generates radio frequency signals. This device has been tested and was determined to be in
compliance with applicable portions of FCC part 18 requirements and to the protection requirements of
Council Directive 89/336/EEC on the approximation of the laws of the Member States relating to electromagnetic compatibility at the time of manufacture. However, some equipment with sensitivity to signals
below these limits may experience interference.
If your equipment experiences interference:
Increase the physical separation between this oven and the sensitive equipment.
If the sensitive device can be grounded, do so following accepted grounding practices.
If battery-powered microphones are being affected, ensure that the batteries are fully charged.
Keep sensitive equipment on separate electrical circuits if possible.
Route intercom wires, microphone wires, speaker cables, etc. away from the oven.
ii SAFETY INSTRUCTIONS
Page 11

Specifications and Installation
Page 12
SPECIFICATIONS AND INSTALLATION
1
Theory of Operation
The i5 rapid cook oven combines preciselycontrolled impinged air and microwave energy to
create higher heat transfer rates than conventional
ovens. Top-launched microwave and impinged air
are stirred to further ensure even heat distribution,
while impinged air enters the cavity from the top
and bottom, generated by dual independentlycontrolled blower motors. The combination of this
technology with the size of the cook cavity allows
for higher throughput than other batch ovens.
This manual includes instructions for servicing,
troubleshooting, installing, cleaning, and operating
the i5 oven. If you have questions that are not
addressed in this manual, contact Technical Service
(800.90TURBO, +1 214-379-6000) or your
Authorized Distributor.
Certifications
cULus, UL EPH, TÜV, CE, FDA
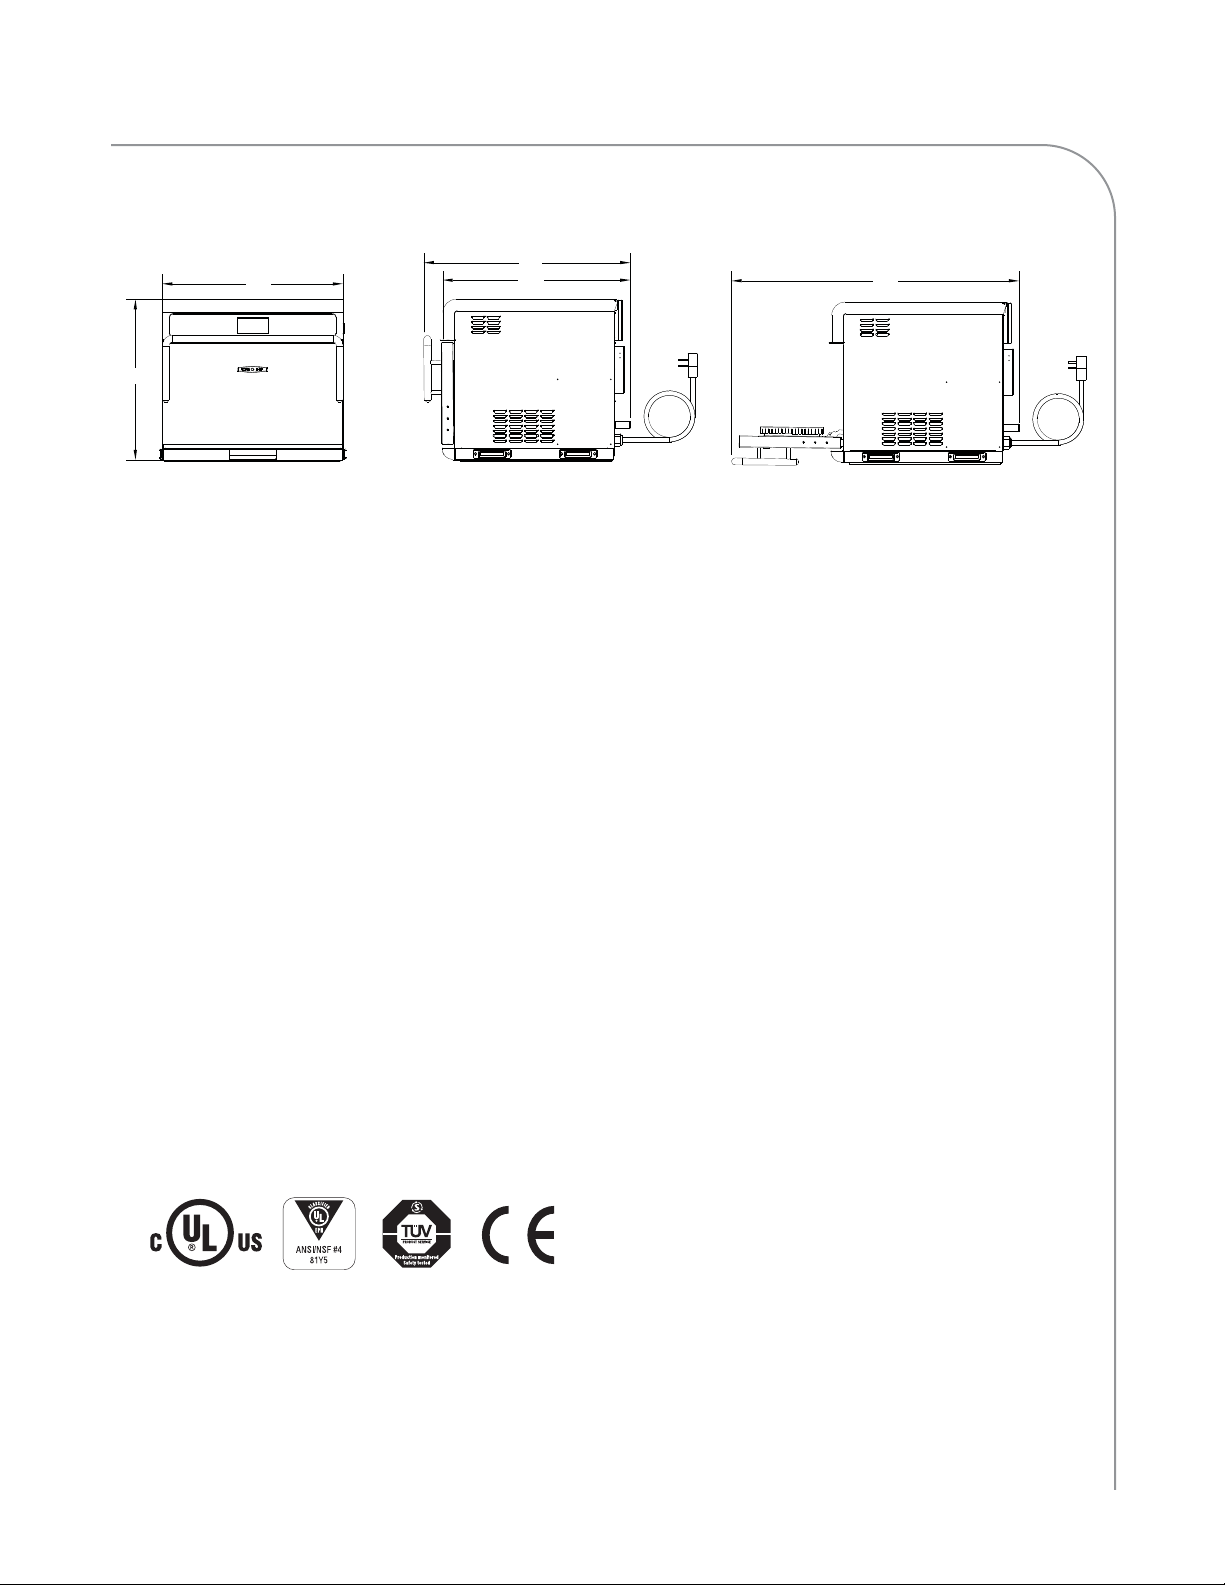
Dimensions
Oven Dimensions
Height: 24.3” (618 mm)
Width: 27.2” (691 mm)
Depth (door closed): 28.25” (718 mm)
Depth (door open): 43.4” (1102 mm)
Weight: 275 lbs (125 kg)
Cook Cavity Dimensions
Height: 10” (254 mm)
Width: 24” (610 mm)
Depth: 16” (406 mm)
Volume: 2.22 ft
3
(63 liters)
Clearances
Top: 16” (406 mm)
Sides: 2” (51 mm)
Oven Construction
Exterior
- Two-tone stainless steel front, top and sides
- 304 stainless steel removable grease pan
- Ergonomic door handle
- Rubber seal for surface mounting
- Side handles for lifting
Interior
- 304 stainless steel interior
- Fully-insulated cook chamber
- Removable rack with dual setting option
- Top and bottom jetplates
27.2”
Figure 1: i5 Oven Dimensions
(691 mm)
24.3”
(618 mm)
31.1”
(790 mm)
28.25”
(718 mm)
43.4”
(1102 mm)
Page 13

2 SPECIFICATIONS AND INSTALLATION
Single Phase
i5 US model (i5-9500-1)
Voltage: 208/240 VAC*
Frequency: 60 Hz
Current: 48 amps
Max Input: 9500/11500 watts
Plug: NEMA 6-50P
i5 UK model (i5-9500-2-UK)
Voltage: 230 VAC
Frequency: 50 Hz
Current: 48 amps
Max Input: 10000 watts
Plug: IEC 309, 3-pin
i5 BK model (i5-9500-6-BK)
Voltage: 220 VAC
Frequency: 60 Hz
Current: 48 amps
Max Input: 10000 watts
Plug: IEC 309, 3-pin
i5 LA model (i5-9500-7-LA)
Voltage: 220 VAC
Frequency: 60 Hz
Current: 48 amps
Max Input: 10000 watts
Plug: NEMA 6-50P
i5 JK model (i5-9500-8-JK) - 50 Hz
(i5-9500-10-JK) - 60 Hz
Voltage: 200 VAC
Frequency: 50 or 60 Hz
Current: 46 amps
Max Input: 9000 watts
Plug: PSE-marked, 3-blade
* North America models include a voltage sensor
which detects 208 or 240 VAC. The voltage
sensor does not compensate for lack-of or overvoltage installations.
Multi Phase
i5 EW model (i5-9500-4-EW)
Voltage: 400 VAC
Frequency: 50 Hz
Current: 19 amps
Max Input: 10000 watts
Plug: IEC 309, 5-pin
i5 AU model (i5-9500-5-AU)
Voltage: 400 VAC
Frequency: 50 Hz
Current: 19 amps
Max Input: 10000 watts
Plug: Clipsal 5-pin
i5 KW model (i5-9500-12-KW)
Voltage: 400 VAC
Frequency: 60 Hz
Current: 19 amps
Max Input: 10000 watts
Plug: IEC 309, 5-pin
i5 ED model (i5-9500-3-ED)
Voltage: 230 VAC
Frequency: 50 Hz
Current: 28 amps
Max Input: 10000 watts
Plug: IEC 309, 4-pin
i5 SD model (i5-9500-13-SD)
Voltage: 230 VAC
Frequency: 60 Hz
Current: 28 amps
Max Input: 10000 watts
Plug: IEC 309, 4-pin
i5 JD model (i5-9500-9-JD) - 50 Hz
(i5-9500-11-JD) - 60 Hz
Voltage: 200 VAC
Frequency: 50 or 60 Hz
Current: 25 amps
Max Input: 10000 watts
Plug: PSE-marked, 4-blade
Electrical Specifications
TurboChef recommends a Type D circuit breaker for all installations outside the US.
Page 14
SPECIFICATIONS AND INSTALLATION
3
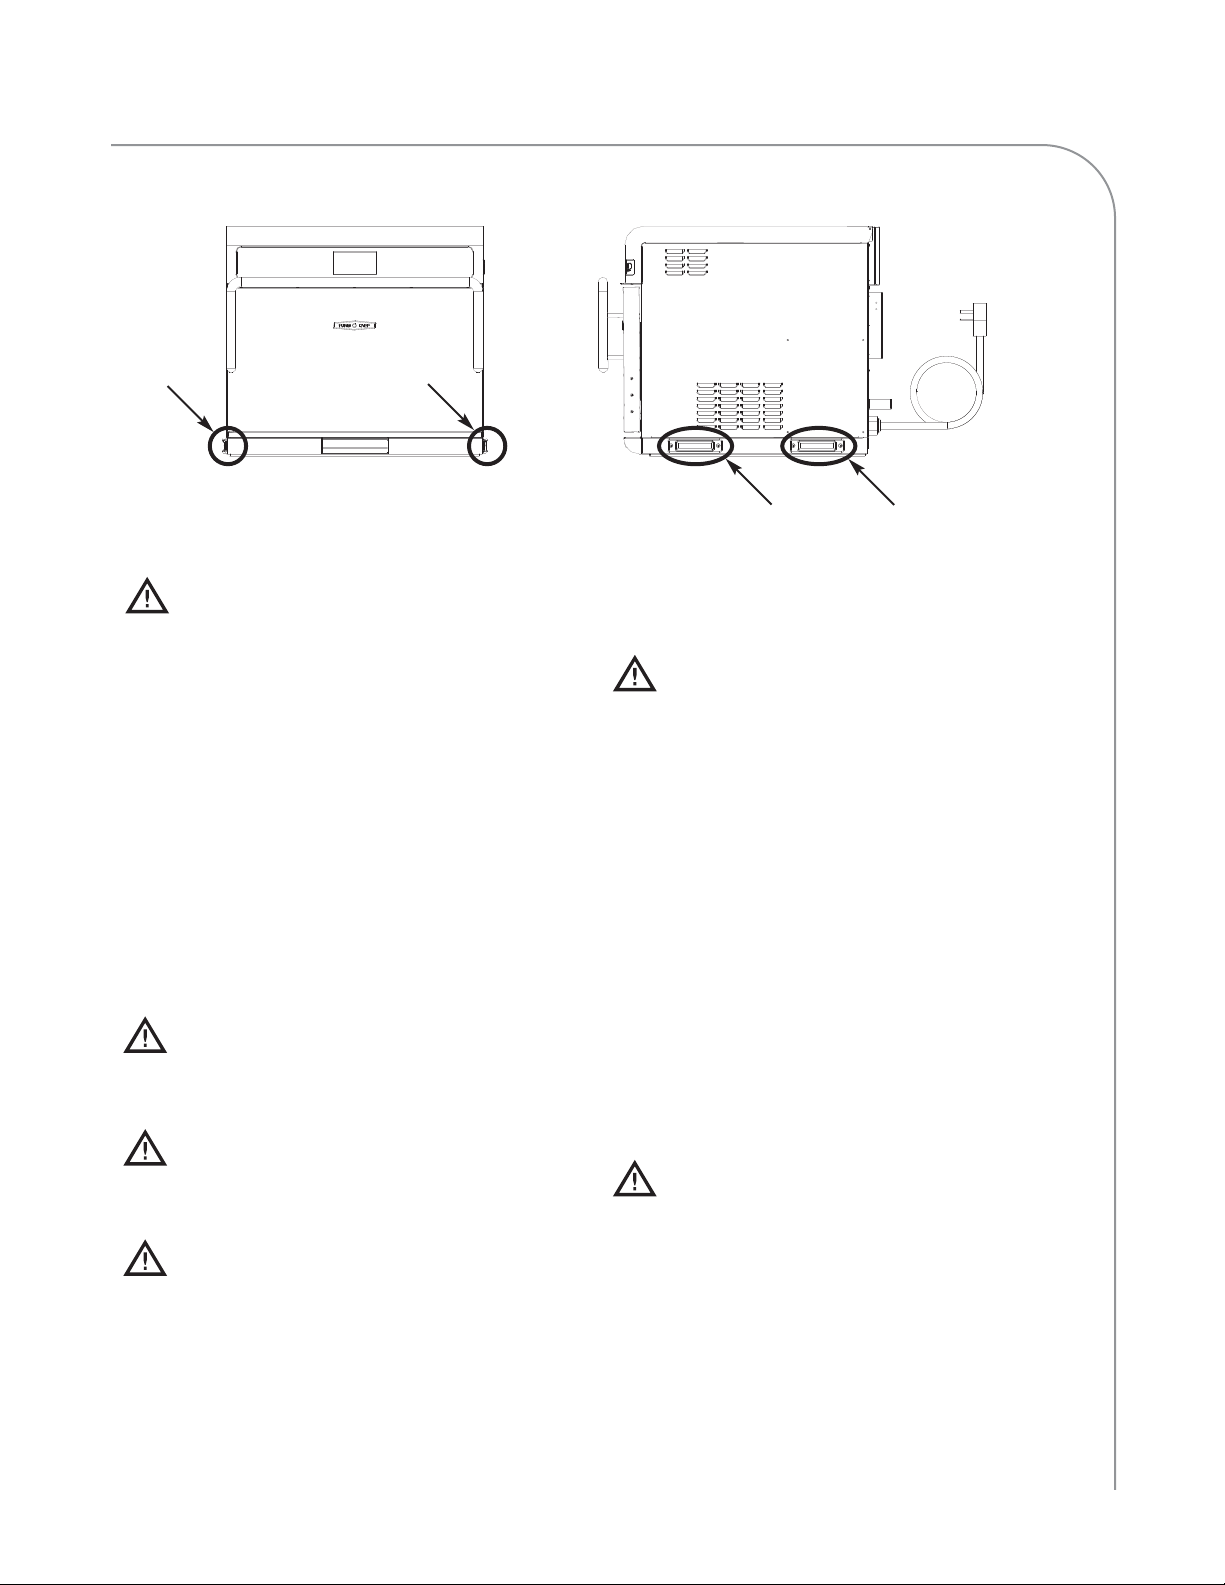
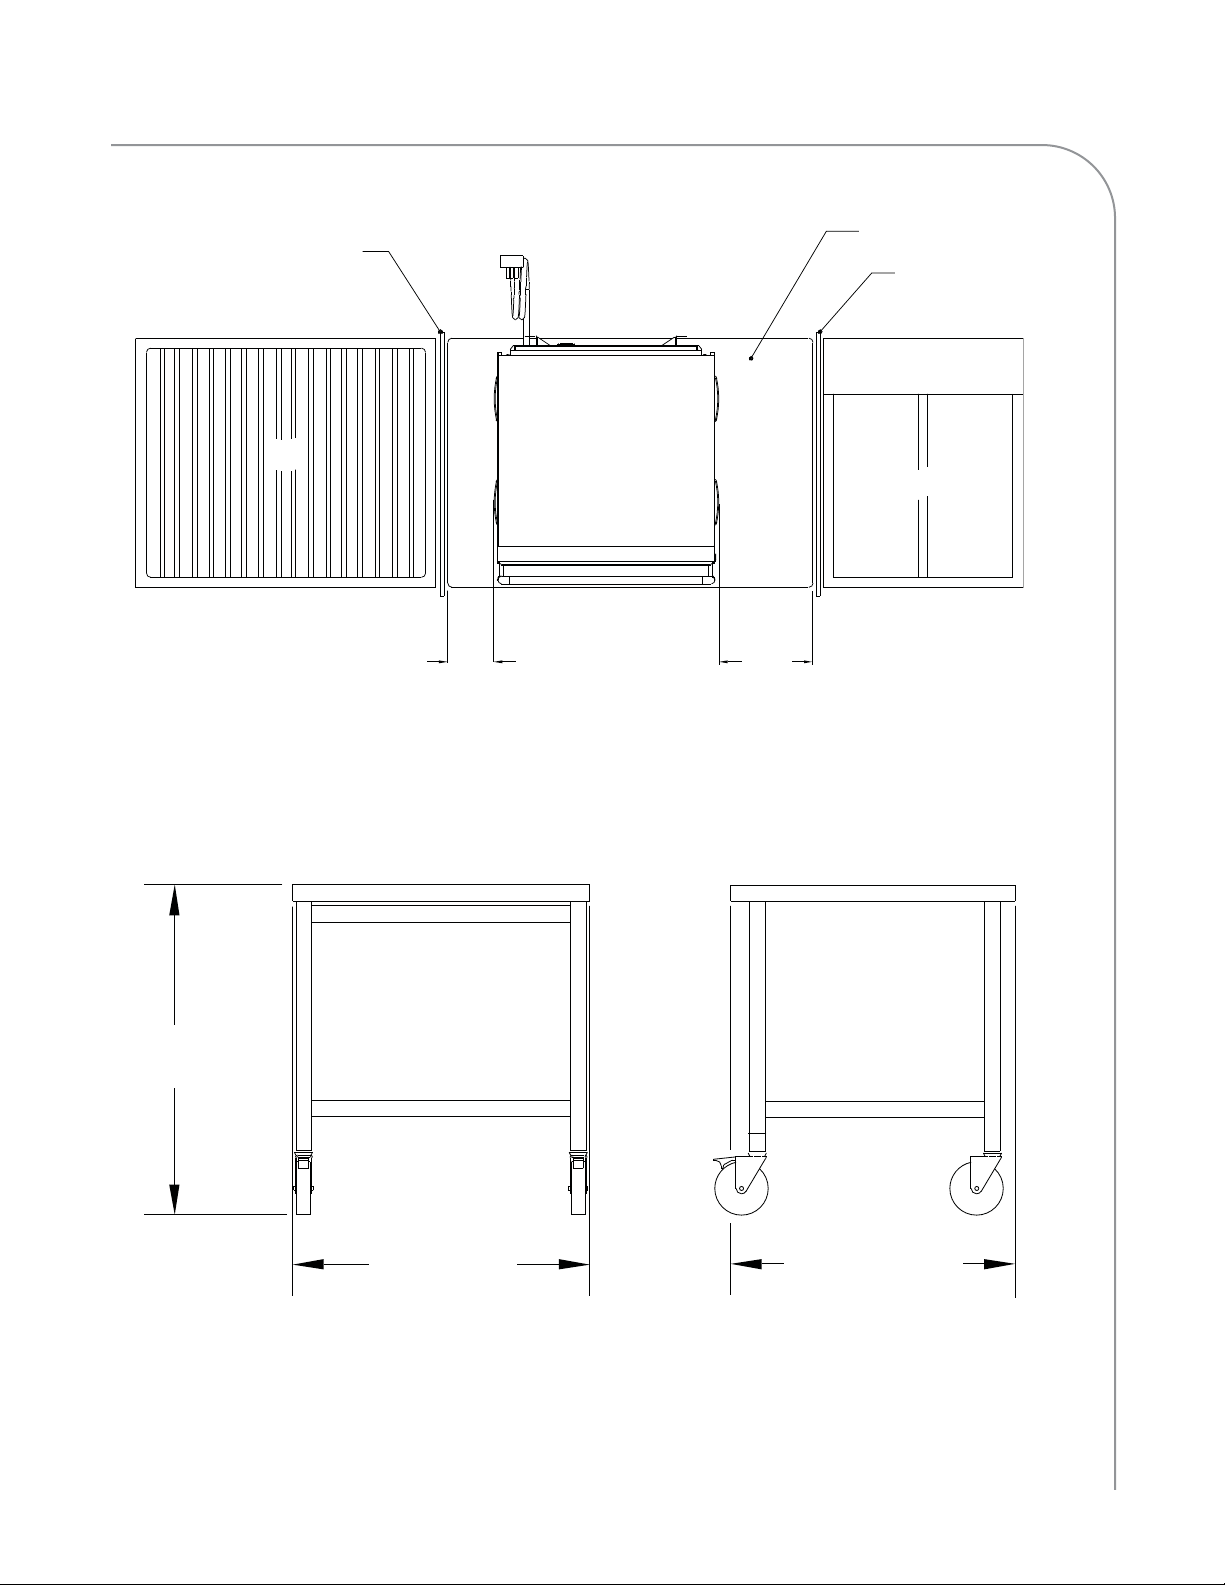
Figure 2: Hand Grip Locations
Unpacking Instructions
1. Remove oven from packaging.
2. Before discarding packaging, check
thoroughly for accessories, consumables,
and literature.
3. Discard packaging.
4. Check cook cavity thoroughly for accessories,
consumables, and literature. Discard any
packaging.
Lifting and Placing the Oven
WARNING: Oven weighs approximately
275 lbs (125 kg). Never lift with fewer than
two people.
WARNING: Lift only using the provided
hand grips. Never lift the oven by the door
handle or by its base.
WARNING: The oven must be properly
placed on a table or countertop at all times.
TurboChef will not recognize a fallen oven as
a warrantable claim and is not liable for any
injuries that may result.
WARNING: This oven is not intended for
built-in installation (i.e., installing the oven in
any structure that surrounds the oven by five
or more sides). Be sure to provide a minimum
of 2” (51 mm) clearance for all sides and 16”
(406 mm) clearance for the top.
1. Position one or more persons at the front and
rear of the oven.
2. Place hands into grips (see Figure 2) and lift.
3. Place the oven on a surface that is at least 30”
(762 mm) deep and capable of supporting
280 lbs (127 kg). If installing onto an oven
cart, make sure the wheels/casters are locked.
4. Install the oven rack or other provided
cooking surface.
5. Plug in the oven.
NOTE: The oven is primarily serviced through
its top. DO NOT install shelving directly over
the unit. The operator will be responsible for
service charges incurred as a result of added
time required to access the top of the oven.
Install or locate this appliance only in accordance with the instructions below.
Page 15
4 SPECIFICATIONS AND INSTALLATION
Installation Near Open Heat Source
See Figure 4, page 5.
When placing a TurboChef oven near an open heat
source, strictly adhere to the following:
- If the oven is being placed near a grill or stove,
a divider must exist between the oven and the
open heat source, with a minimum of 6” (152
mm) between the oven and the divider.
- If the oven is being placed near a fryer, a
divider must exist between the oven and fryer,
with a minimum of 12” (305 mm) between
the oven and the divider.
- The height of the divider must be greater than
or equal to the height of the oven (24.3” or
618 mm).
- Verify oven location has a minimum 16” (406
mm) clearance on top and minimum 2” (51
mm) of clearance on each side.
Optional Installation Items
See Figure 5, page 5.
TurboChef Oven Cart
- Part Number: NGC-1217-3
- Height: 32” (813 mm)
- Width: 27.8” (706 mm)
- Depth: 26.625” (676 mm)
Oven Restraint Kit
Part Number: TC3-0242
WARNING: The Oven Restraint Kit will not
prevent the oven from falling off a countertop
if the oven is pulled off or allowed to slide off
the edge. Installation instructions are included
with the kit.
ChefComm Pro
ChefComm Pro is a PC program for developing
and maintaining menus and recipes. To purchase
ChefComm Pro and a card reader, contact
customer service at 800.90
TURBO or
+1 214-379-6000.
Voltage Selection
For North America oven models, the oven will
detect 208 or 240 incoming voltage.
The initial voltage selection is typically completed
before the oven is used by the customer. However,
if incoming voltage for the store is different than
the preset voltage, the operator will be required to
select either 208 or 240 after pressing the On/Off
key to turn on the oven. The correct voltage will be
enlarged on the screen, identifying which option to
select (see Figure 3 below).
Figure 3: Selecting Voltage
208 VAC
SELECT VOLTAGE:
240 VAC
Page 16
SPECIFICATIONS AND INSTALLATION
5
Figure 5: Oven Cart Dimensions
Figure 4: Installation Near Open Heat Source
Partition
24.3” (618 mm)
Above Counter Top
Grill
(152 mm)
Minimum
Counter Top / Table
Partition
24.3” (618 mm)
Above Counter Top
TurboChef
i5 Oven
Deep Fryer
6”
12”
(305 mm)
Minimum
32.0”
(813 mm)
27.8” (706 mm)
26.625” (676 mm)
Page 17

6 SPECIFICATIONS AND INSTALLATION
This page intentionally
left blank.
Page 18

Daily Maintenance
Page 19
DAILY MAINTENANCE
7
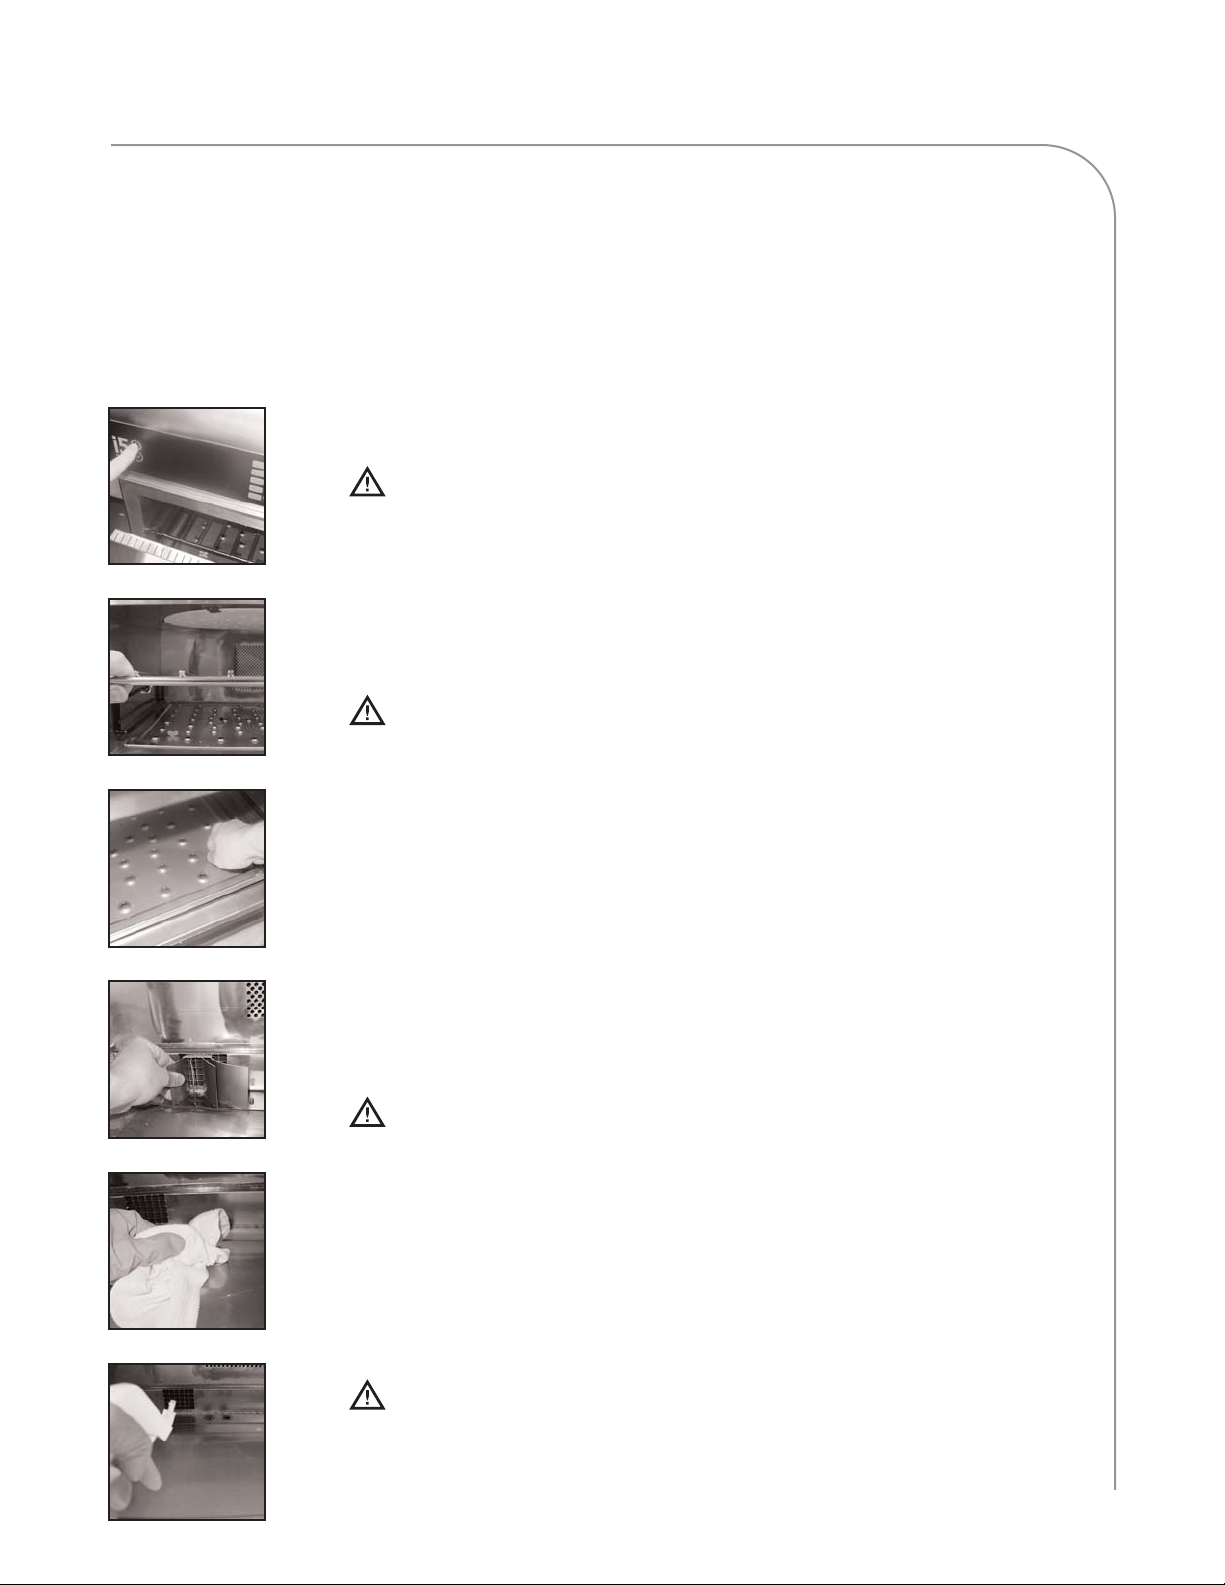
Step 1: Prepare the Oven
WARNING: Oven operates at approximately 450°F (232°C) and may cause
injury if not allowed to cool properly.
- Turn off the oven by pressing the On/Off key.
- Slightly open the oven door. Cooling takes approximately 40 minutes.
-
DO NOT
attempt to clean the oven until the oven displays “Oven Off”.
Step 2: Remove and Clean the Wire Rack
WARNING: Be sure the oven interior is cool before you remove the wire rack.
- Wash, rinse, and sanitize the wire rack.
Step 3: Remove and Clean the Lower Jetplate
- Unscrew the two thumb screws on the lower jetplate.
- Lift the lower jetplate by gripping the thumb screws.
- Remove the lower jetplate.
- Wash, rinse, and sanitize the lower jetplate.
Step 4: Remove and Clean the Lower Air Diverter
- Remove the lower air diverter.
- Wash, rinse, and sanitize the lower air diverter.
WARNING: DO NOT discard the lower air diverter. The oven will not work
without the lower air diverter installed.
Step 5: Wipe the Oven Interior
- Wipe any large particles from the oven interior with a damp towel.
Step 6: Clean the Oven Interior
- Spray oven cleaner onto the top, bottom, and sides of the oven interior.
CAUTION: DO NOT spray oven cleaner into the perforation on the back
oven wall. Doing so can damage critical oven components, resulting in a
non-warranty service call.
- Allow Oven Cleaner to penetrate stains for five minutes.
- Clean the oven interior with a nylon scrub pad.
Daily Maintenance
The following steps will help maintain your i5 Oven.
Use only TurboChef Oven Cleaner and Oven Guard.
The use of any other cleaning products can damage
critical oven components, resulting in a
non-warranty service call.
Supplies and Equipment
- TurboChef Oven Cleaner (Part Number: 103180)
- TurboChef Oven Guard (Part Number: 103181)
- Nylon scrub pad, cleaning towel, disposable gloves,
protective eyewear, dust mask (optional), *pair of
tongs wrapped with towel (optional - see step 11)
Step 1
Step 2
Step 3
Step 4
Step 5
Step 6
Page 20
8 DAILY MAINTENANCE
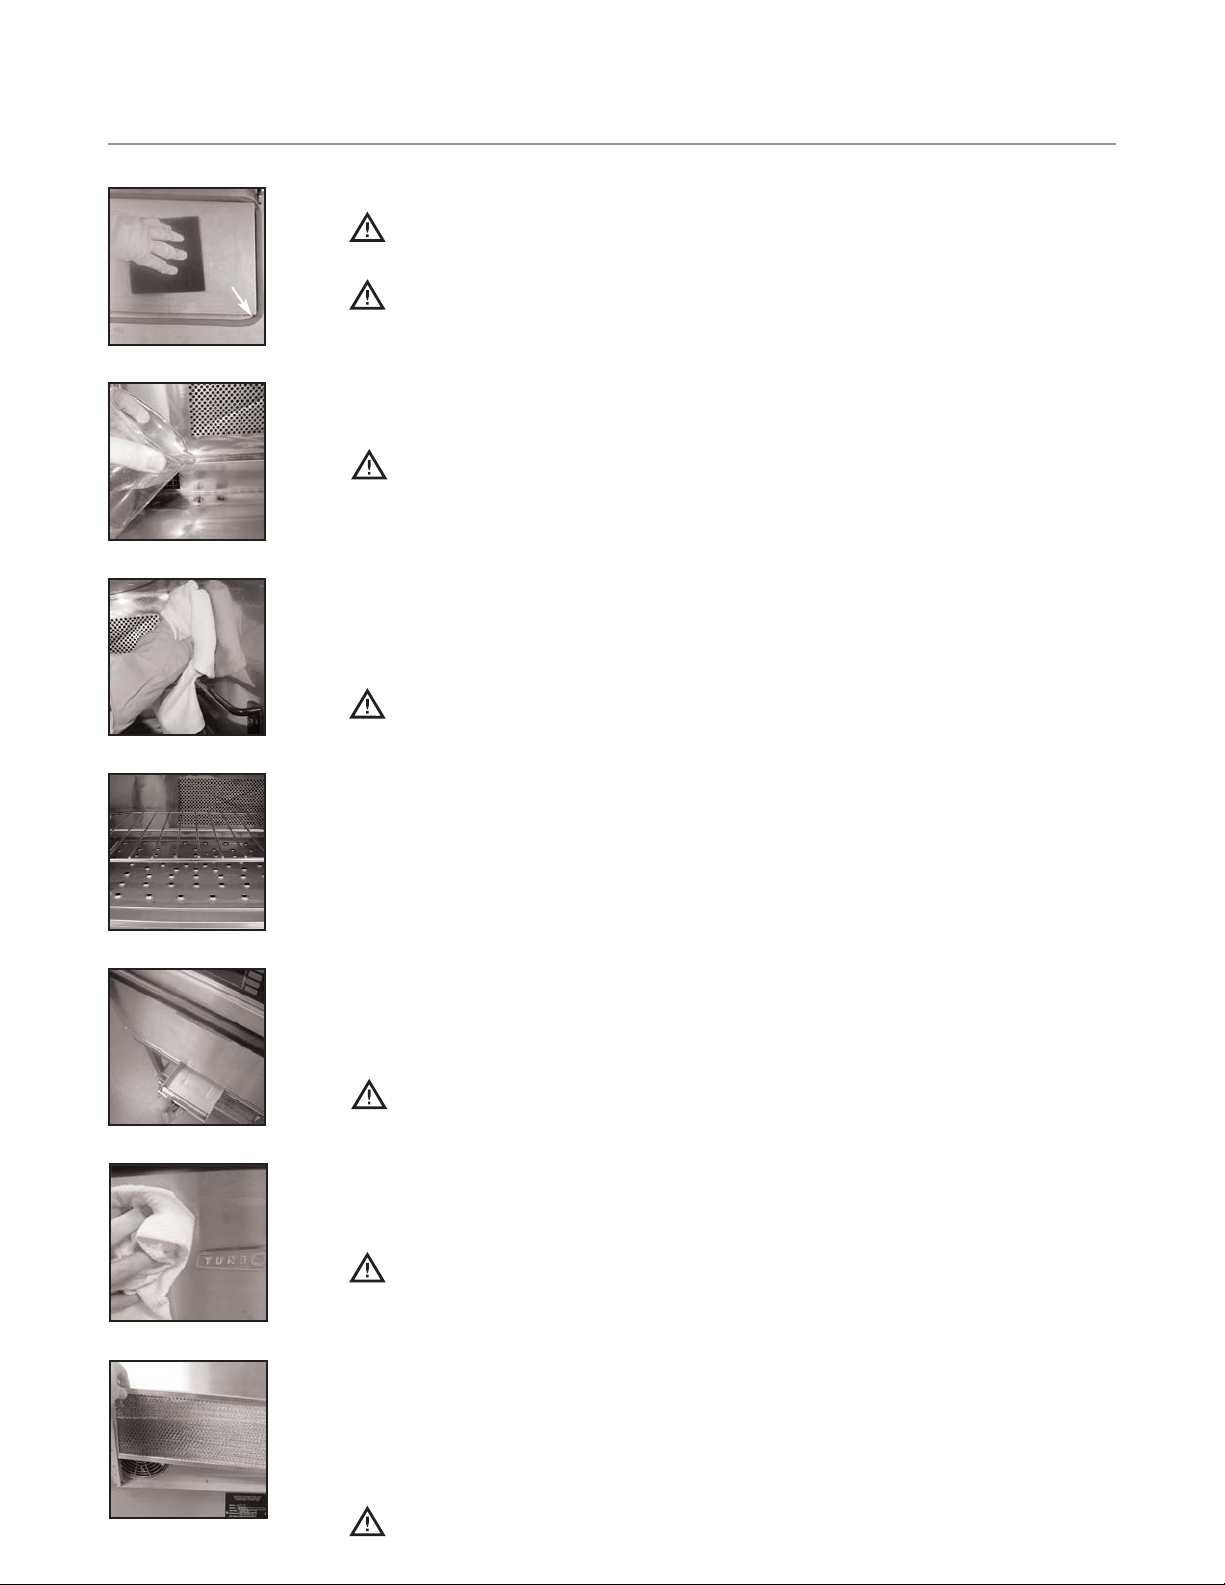
Step 7: Clean and Dry the Oven Door
CAUTION: DO NOT spray oven cleaner directly onto the oven door gasket
(reference “A” in adjacent photo) or saturate it with water.
CAUTION: DO NOT scrub or attempt to clean the oven door gasket. Doing
so may cause the oven door to misalign, resulting in a non-warranty service call.
- Clean oven door with oven cleaner and a nylon scrub pad.
- Wipe the oven door with a damp towel.
Step 8: Rinse the Oven Interior
CAUTION: DO NOT use a hose or water jet for cleaning. Doing so can
damage critical oven components, resulting in a non-warranty service call.
- Rinse the oven interior with clean water.
- Dry the oven interior with a clean towel.
Step 9: Apply TurboChef Oven Guard
- Spray Oven Guard onto a clean towel.
- Wipe the oven’s interior walls and the inside of the oven door.
CAUTION: DO NOT apply Oven Guard to the oven door gasket. Doing so
may damage the gasket, resulting in a non-warranty service call.
Step 10: Reinstall Components
- Reinstall the lower air diverter.
- Reinstall the lower jetplate. Screw in the two thumb screws to lock the lower
jetplate in place.
- Reinstall the wire rack.
- Close the oven door.
Step 11: Clean the Drain Pan
- Remove the drain pan entirely from the bottom of the oven.
- Wipe down* the inside of the area the drain pan fits within.
- Empty, clean, and reinstall the drain pan.
CAUTION: Ensure the drain pan’s outer edge is flush with the door panel (i.e.
not sticking out). Failure to do so will damage the oven door, resulting in a
non-warranty service call.
Step 12: Clean the Oven Exterior
- Wipe the oven exterior with a clean, damp towel.
CAUTION: DO NOT spray chemicals into any openings, such as the louvers
on the side panels or the rear vent catalyst housing. Doing so can damage
critical oven components, resulting in a non-warranty service call.
Step 13: Clean the Air Filter (once a week)
- Remove the air filter from the back panel.
- Wash in dishwasher or rinse with hot water.
-
DO NOT use a water jet. Doing so will shorten the life of the filter.
- Reinstall the air filter.
CAUTION: DO NOT operate the oven without the air filter in place.
A
Step 7
Step 8
Step 9
Step 10
Step 11
Step 12
Step 13
Page 21

Oven Controls and Cooking
Page 22
OVEN CONTROLS AND COOKING
9
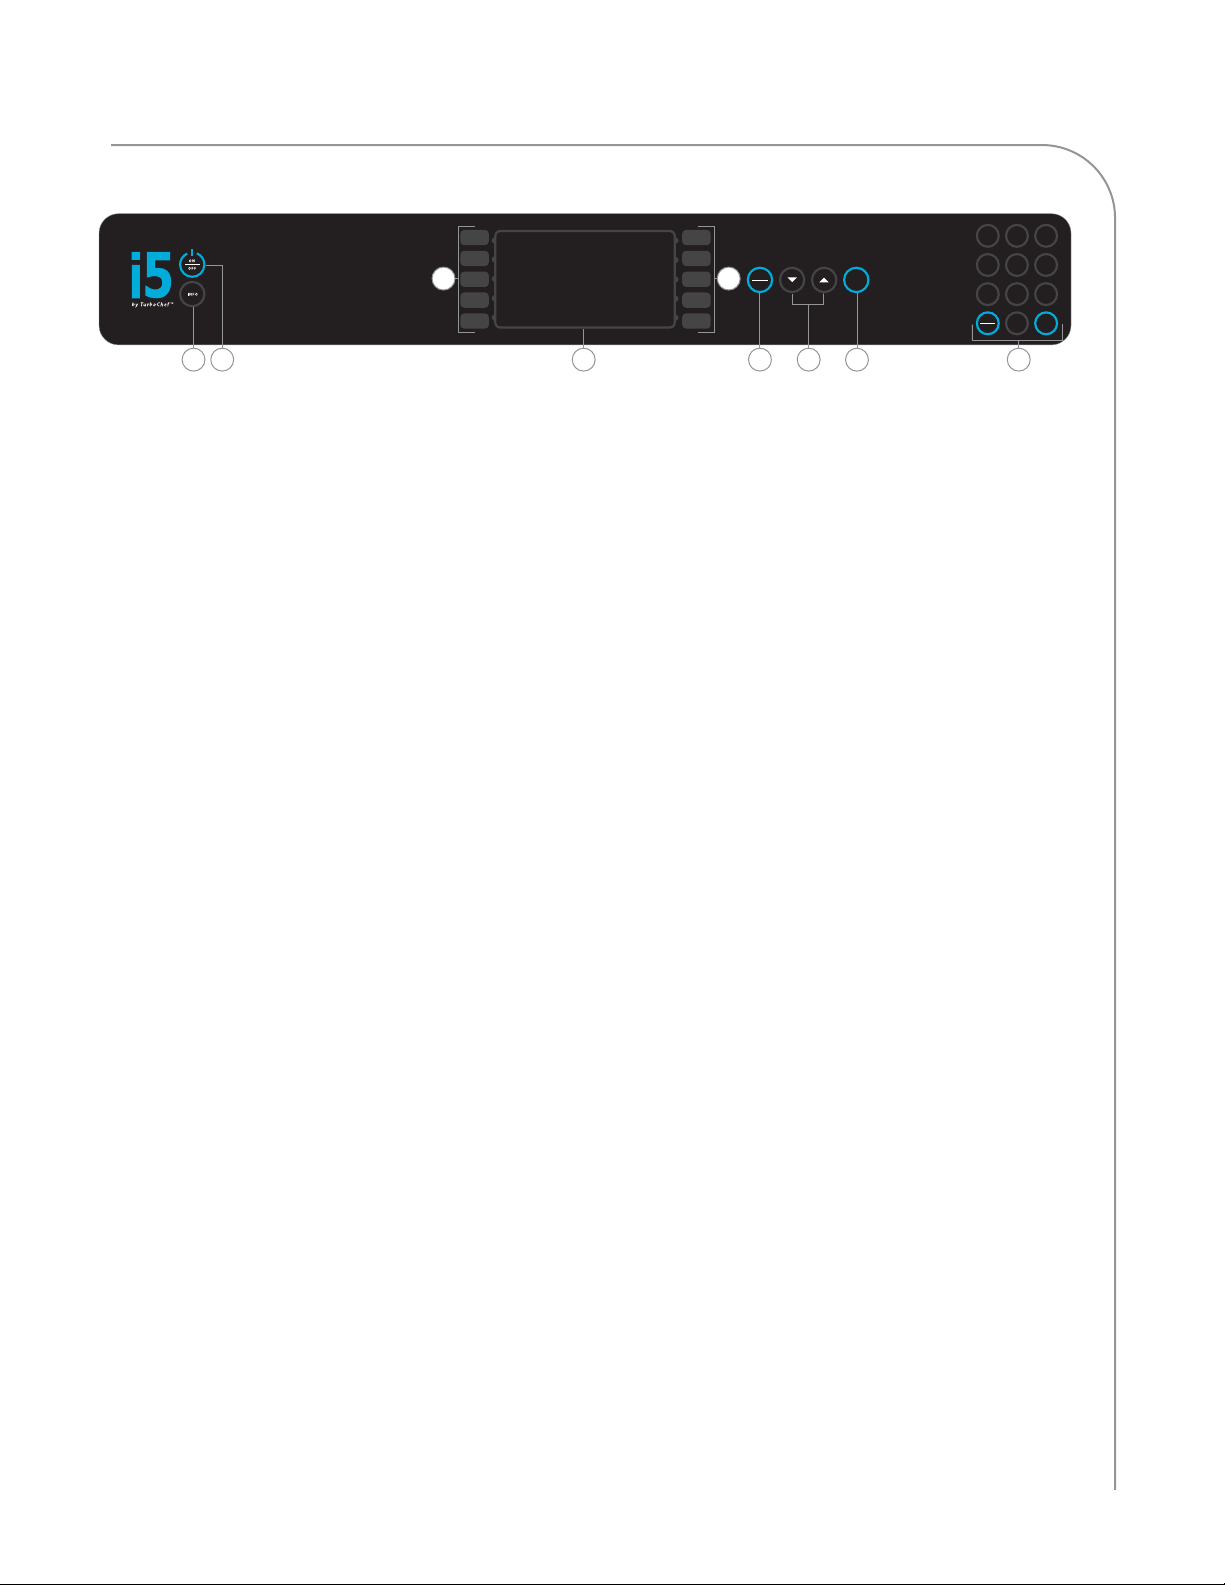
Oven Controls
1. Info Key
When the oven is off or cooling down, press to
access the
INFO MODE (see page 13).
2. On/Off Key
When the oven is cooling down or off, press to
turn on the oven.
When the oven is on or warming up, press to turn
off the oven.
When the oven is in the
INFO MODE (see page 13),
press to return the oven to the “Cooling Down/
Oven Off” screen.
3. Display
The display shows information relevant to the
current oven operation and/or user options.
4. Soft Keys
There are ten soft keys - five to the left (L1 thru
L5, where L1 = top) and right (R1 thru R5, where
R1 = top) of the display. Press a soft key to select
an option adjacent to that key on the display.
5. Back/Stop Key
When the oven is cooking, press the Back/Stop key
to immediately terminate a cook cycle.
When the oven is in the
IDLE MODE (see page 11,
MODE 5) or the INFO MODE (see page 13), press to
return to the previous screen.
6. Up and Down Keys
When the oven is ready to cook (i.e., warmed up
and waiting for a cook command), press the Up or
Down key to view additional food groups (if
applicable).
When the oven is in the
INFO MODE (see page 13),
press to navigate between and within screens.
7. Enter Key
Press the Enter key to confirm a selection (where
applicable).
8. Numeric Keypad
Use the numeric keypad to program the oven or
modify cook settings. The numeric keypad also
contains a Back/Stop key and an Enter key, which
are functionally identical to Items 5 and 7 (above).
BACK
STOP
ENTER
12
ABC3DEF
4
GHI5JKL6MNO
BACK
STOP
ENTER
7
PQRS8TUV9WXYZ
0
44
11
22
44
55
66
77
8833
Figure 6: Oven Controls
Page 23
10 OVEN CONTROLS AND COOKING
Cooking
This section explains how to cook a food product
by describing the “standard operation” modes
through which the oven progresses.
The oven is preprogrammed with recipe settings at
the time of manufacture and is ready to operate out
of the box. If these settings are erased, new menu
settings must be either loaded via smart card/USB
drive (page 17) or programmed manually (pages
19-21). The oven will not cook unless settings are
present.
Note that modes are not always sequential, as
shown in Figure 7, above. Typically, modes 5-9 will
be repeated before cooling the oven (mode 10).
MODE 1: Oven Off
MODE 2: Temperature Select (if applicable)
MODE
3: Warming Up
MODE 4: Soak
MODE 5: Ready to Cook (or “Idle”)
MODE
6: Adjust Time (if enabled)
MODE 7: Cooking
MODE 8: Remove Food from Oven
MODE
9: Cook More (if enabled)
MODE
10: Cooling Down
Mode 1: Oven Off
Mode during which all cooking components are off
and the oven temperature has receded below 150°F
(66°C), but the display and keypad remain on.
OVEN OFF
READY TO CLEAN
500F
450F
375F
SELECT COOK TEMPERATURE
350F
WARMING UP
OVEN TCC = 244F
SET POINT= 500F
WARMING UP
OVEN TCC = 500F
SET POINT= 500F
08:00
GROUP 1
GROUP 2
GROUP 3
GROUP 4
SETPOINT: 500F
GROUP 5
RECIPE 1
RECIPE 2
RECIPE 3
RECIPE 4
GROUP 1
RECIPE 5
RECIPE 6
RECIPE 7
RECIPE 8
RECIPE 9
RECIPE 10
ADJUST TIME
START COOK
01:40
COOKING
01:17
PLEASE REMOVE FOOD FROM OVEN
COOKING DONE
11
22
33
44
55aa
55bb
66
77
88
Figure 7: Standard Operation Modes
ADDITIONAL COOKING OPTIONS
COOK AND BROWN MORE
BROWN MORE
COOK MORE
SAVE ADJUSTED TIME EXIT
COOLING DOWN
PLEASE OPEN OVEN DOOR
288F
99
1100
Page 24

OVEN CONTROLS AND COOKING
11
Happens When...
- The oven completes
MODE 10.
Goes To...
-
MODE 2 when On/Off key is pressed.
-
INFO MODE (page 13) when Info key is pressed.
Mode 2: Temperature Select
NOTE: If cooking with only one temperature, this
screen will be bypassed.
The i5 Oven can store up to four different cook
temperature settings. Each temperature setting has 5
food groups assigned to it, each consisting of 10
food recipes (50 recipes per temperature setting).
NOTE: Earlier i5 software versions store only two
temperatures, each containing 100 food recipes.
The operator will be able to cook only recipes
associated with the selected temperature setting. See
“Edit Mode,” page 19 for more information on
using and changing multiple temperatures.
To select a temperature (if applicable), press the
adjacent soft key.
Happens When...
- The On/Off key is pressed from
MODE 1.
- The Back key is pressed from
MODE 3.
Goes To...
-
MODE 3 when a temperature is selected.
-
MODE 1 or 10 if the On/Off key is pressed.
Mode 3: Warming Up
Mode during which the oven warms to the pre-set
cook temperature.
Happens When...
- A temperature is selected from
MODE 2 (if
multiple temperatures are present).
- On/Off key is pressed from
MODE 1 or 10 (if
single temperature is present).
Goes To...
-
MODE 4 when the oven temperature reaches
the selected set temperature - if the oven
temperature needed to recover more than
125°F (70°C) at the time warmup initiated.
-
MODE 5 when the oven temperature reaches
the selected set temperature - if the oven
temperature needed to recover less than
126°F (70°C) at the time warmup initiated.
-
MODE 10 if the On/Off key is pressed.
Mode 4: Soak
SOAK MODE provides an additional 8 minutes of
warmup time for the cook cavity surfaces to warm.
Happens When...
-
MODE 3 completes - if the oven temperature
needed to recover more than 125°F (70°C) at
the time warmup initiated.
Goes To...
-
MODE
5 when counter reads 00:00.
-
MODE 10 if the On/Off key is pressed.
Mode 5: Ready to Cook (or “Idle”)
Mode during which a food group and item can be
selected for cooking.
WARNING: Inside of oven and oven door are
hot! Use extreme caution.
1. Place the food into the oven.
2. Select a food group by pressing its adjacent
soft key, or press the Up key or Down key for
additional food groups, if available.
3. Select an item to cook by pressing its adjacent
soft key.
Happens When...
-
MODE 3 or 4 completes.
Goes To...
-
MODE 6 if food item is selected and “Adjust
Time” is enabled (see page 14).
-
MODE 7 if food item is selected and “Adjust
Time” is disabled.
-
MODE 10 if the On/Off key is pressed.
Mode 6: Adjust Time
After a food item has been selected to cook, it may
be necessary to change the cook time. Do so using
the number keys, and then press the Enter key to
confirm the change.
Page 25

12 OVEN CONTROLS AND COOKING
The ADJUST TIME MODE can be turned on or off
from the “Options” screen (see page 14). It is
turned off by default.
Happens When...
-
ADJUST TIME MODE
is enabled and a food item
is selected from
MODE 5.
Goes To...
-
MODE 7 when “Start Cook” is selected.
-
MODE 10 if the On/Off key is pressed.
Mode 7: Cooking
Mode during which the oven cooks a food item.
NOTE: To immediately terminate a cook cycle,
press the Back/Stop key.
NOTE: If the oven door is opened during a cook
cycle, the cycle will pause until the door is closed
and “Resume” is selected.
Happens When...
- A food item is selected from
MODE 5 if MODE
6 is disabled.
- “Start Cook” is selected from
MODE 6.
Goes To...
-
MODE
8 when the cook cycle completes.
Mode 8: Remove Food from Oven
Mode during which the oven beeps until the oven
door is opened. During this mode, the oven
temperature remains constant.
WARNING: Dish and inside of oven/oven
door are hot! Use extreme caution.
Happens When...
- A cook cycle completes.
Goes To...
- MODE 9 if “Cook More” is enabled (page 14).
-
MODE 5 if “Cook More” is disabled.
-
MODE 10 if the On/Off key is pressed.
Mode 9: Cook More
At the completion of a cook cycle, the user has the
option to cook an item longer per the following:
- Select “cook more” if the inside temperature of
the dish is below the desired range.
- Select “brown more” if the outside of the dish
requires more browning or crispness.
- Select “cook and brown more” if both the
inside and outside of the dish are not done.
- Select “save time” to save any change to the
cook time made during
MODE 6. Note that
this option is not available if
MODE 6 is
disabled.
- Select “exit” to return to the food group
selection screen.
Cook More mode can be enabled/disabled from
the Options menu (see page 14). It is disabled by
default.
Happens When...
- A cook cycle completes.
Goes To...
-
MODE 7 if one of the “Cook More” options is
selected.
-
MODE 5 if “Save Time” is selected, “Exit” is
selected, or if nothing is selected after 10
seconds.
-
MODE 10 if the On/Off key is pressed.
Mode 10: Cooling Down
Mode during which the oven blows cool air into
the cook cavity to return it to room temperature.
Happens When...
- The On/Off key is pressed from
MODES 2-6,
8, or 9.
Goes To...
-
MODE 1 when the oven temperature recedes
below 150°F (66°C).
-
INFO MODE (page 13) when the Info key is
pressed.
Page 26
OVEN CONTROLS AND COOKING
13
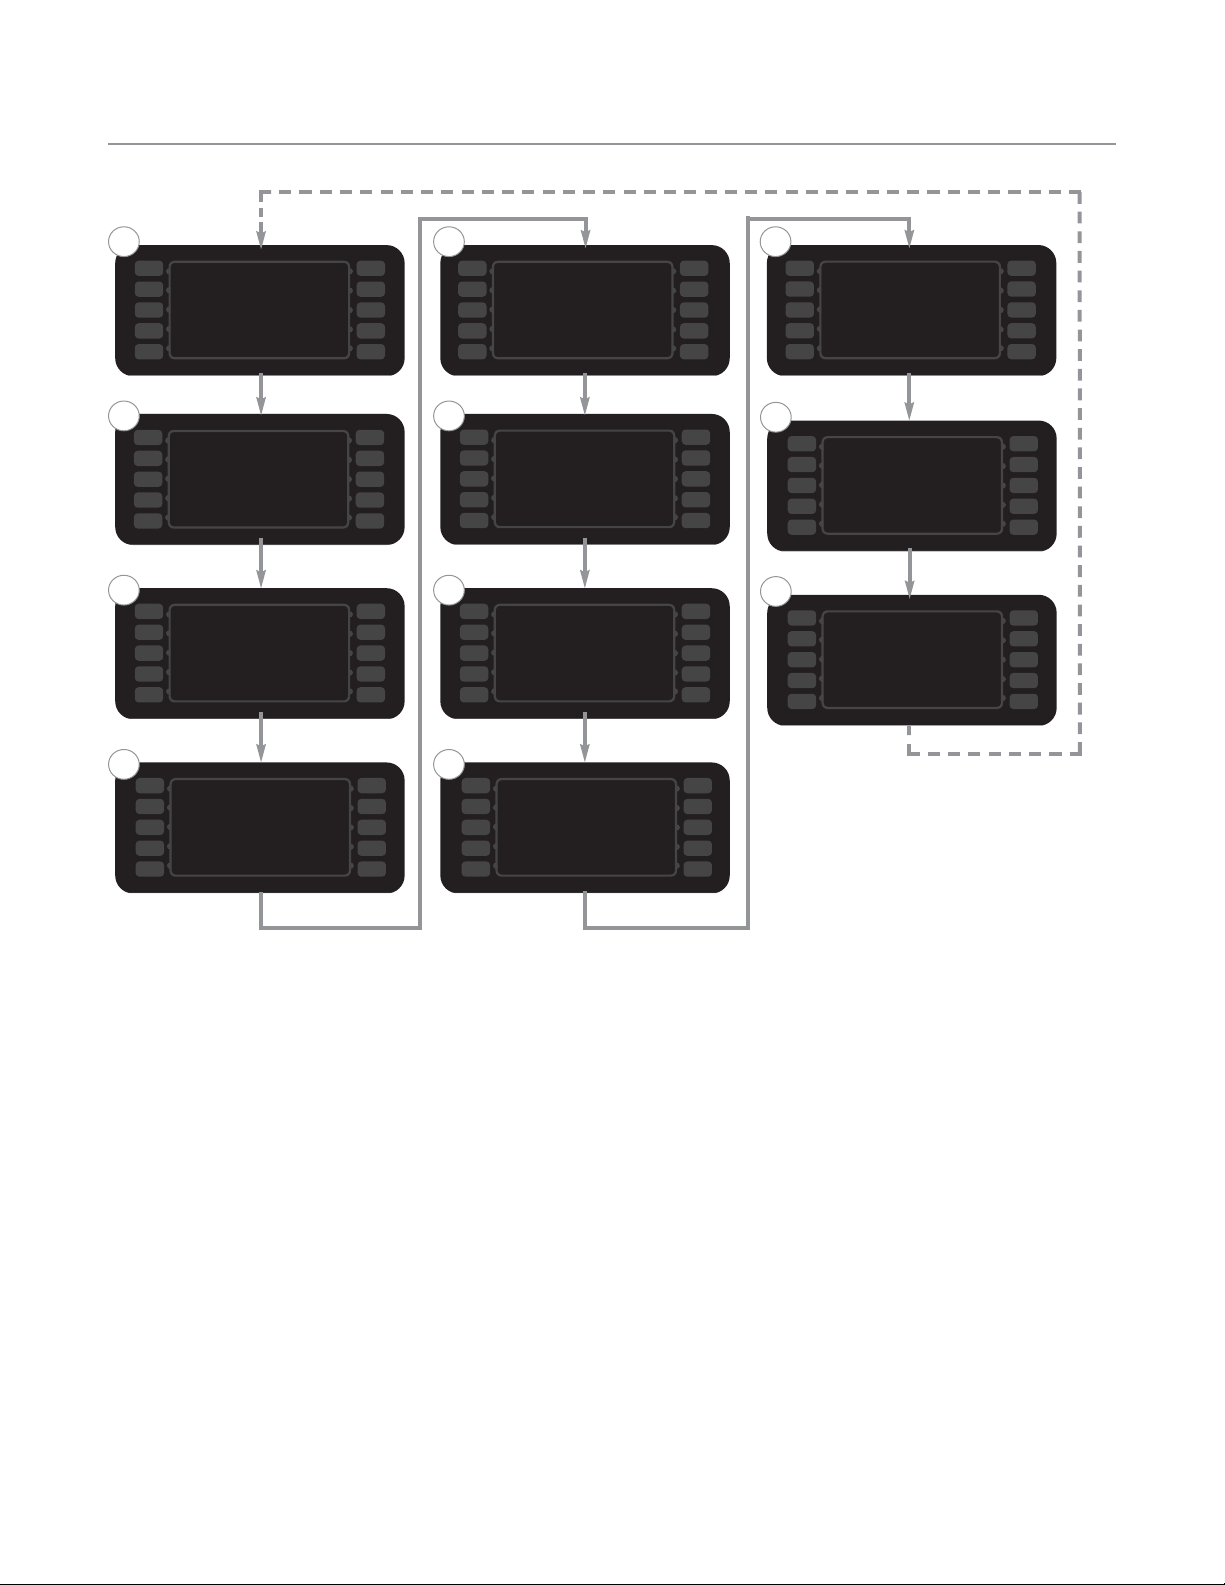
Overview of the Info Mode
The INFO MODE serves four main purposes:
1. To display oven information.
2. To provide access to
TEST MODE and additional
diagnostic tools for service technicians.
3. To turn oven options and features on/off.
4. To update oven settings.
To access the
INFO MODE
, simply press the Info key
when the oven is either off or cooling down.
The
INFO MODE consists of two screens. To toggle
between screens, press the Up key or Down key.
From screen 1 of the
INFO MODE (Figure 8):
- View the oven serial number
- View the oven software version
- View the menu part number and revision
- View the last temperature selected to cook
- View the electrical compartment temperature
- View the cook counter, total cook time,
magnetron time, and total oven on time
- View the operating voltage (North America
models only)
- Access the fault log
- Access service phone numbers
- Reset the oven
From screen 2 of the
INFO MODE (Figure 9):
- Access
TEST MODE
- Access the “Options” screen
- Set the language (not available on all models)
- Set the date/time
- Access the “Load Menu” screen
Viewing Cook Counter/Time Logs
From screen 1 of
INFO MODE, press the R1 soft key:
- Once to display the cook counter.
- Twice to display total cook time.
- Three times to display total magnetron time.
- Four times to display total “oven on” time.
Viewing the Fault Log
Figures 10-11. This log is read-only. To zero the fault
counters, see page 15. For more information on
faults, see pages 37-38.
From screen 1 of the
INFO MODE, press the R3 soft
key to view the fault log (Figure 10). To view a
detailed log of each fault occurrence (Figure 11),
press the soft key adjacent to the fault code.
Viewing the Service Numbers
From screen 1 of the INFO MODE, press the R4 soft
key to view the phone numbers for TurboChef
Technical Support.
MENU P/N AND REV
INFO 1
SOFTWARE VERSION
LAST COOK: 500F
ELECTRICAL: 84F
S/N: i5-DXXXXXX
FAULT LOG
208 VAC
SERVICE NUMBERS
RESET OVEN
COOKS: 257
SET LANGUAGE
INFO 2
SET OPTIONS
SET DATE/TIME
TEST MODE LOAD MENU
Figure 8: Info Mode Screen 1
Figure 9: Info Mode Screen 2
F6: EC OT
F8: HX RISE LOW
F1: BLOWER
F2: LOW TEMP
F3: MAG C LOW
F4: MONITOR
F5: MAG OT
FAULT LOG
8
0
0
0
0
F7: RTD OPEN
0
0
0
Figure 10: Fault Log
07/14/07 05:22
F1 FAULT DETAIL
07/14/07 13:54
07/14/07 22:07
07/15/07 08:36
07/18/07 14:35
09/26/07 17:42
12/04/07 20:18
MORE
Figure 11: Fault Detail
R1
R2
R3
R4
R5
L1
L2
L3
L4
L5
R1
R2
R3
R4
R5
L1
L2
L3
L4
L5
R1
R2
R3
R4
R5
L1
L2
L3
L4
L5
R1
R2
R3
R4
R5
L1
L2
L3
L4
L5
Page 27

Info Mode
Page 28

14 INFO MODE
Resetting the Oven
Resetting the oven is one way to potentially clear an
error message, should one occur. From screen 1 of
the
INFO MODE, press the R5 soft key.
Turning Oven Options On/Off
Figure 12.
From screen 2 of the
INFO MODE, press the L2 soft
key to access the “Options” screen. When
prompted, enter the password 9 4 2 8 and press
the Enter key.
From the “Options” screen, the following oven
options can be turned on or off:
- “Adjust Time” screen (page 11 for more details)
- “Cook More” screen (page 12 for more details)
- Edit Mode (page 19 for more details)
- “Load Menu” screen (page 17 for more details)
- Demo Mode (TurboChef use only)
- DHCP (TurboChef use only)
Setting the Language
NOTE: Not available on some oven models.
From screen 2 of the
INFO MODE, press the L3 soft
key to set a different language. Each time L3 is
pressed, a different language is selected in the
following order: English (default), Spanish, French,
German, Portuguese, Italian, Russian, Greek,
Polish.
Setting the Date/Time
Figure 13.
Having an accurate date and time is important for
logging oven counts, diagnostics, and fault
conditions, should any occur. The oven time and
date are set at the time of manufacture; however,
the operator may at some point be required to
make an adjustment.
From screen 2 of the
INFO MODE, press the L4 soft
key to access the “Set Date/Time” screen.
To set the date and time,
1. Use the L3 and R3 soft keys (middle left and
middle right) to navigate between fields.
2. Use the numeric keypad to enter the month,
day, and year, followed by the hour and minute.
NOTE: The clock is a 24-hour clock (e.g., 20:30 =
8:30 PM).
3. Select “Save” to save your changes or “Cancel”
to cancel and exit the screen.
NOTE: The oven will not retain the time if it is left
unplugged for two or more weeks.
EDIT MODE
OVEN OPTIONS
COOK MORE
LOAD MENU
DEMO MODE
ADJ TIME DHCPOFF
ON
ON
OFF
ON
OFF
Figure 12: Options Screen
R1
R2
R3
R4
R5
L1
L2
L3
L4
L5
_
SET DATE/TIME
0 9 / 2 9 / 0 8 2 0 : 3 0
MM / DD / YY HH:MM
CANCEL
SAVE
<>
Figure 13: Set Date/Time
R1
R2
R3
R4
R5
L1
L2
L3
L4
L5
Page 29

INFO MODE
15
Test Mode - Testing Oven Parts
From screen 2 of the Info mode, press the L1 soft
key to access
TEST MODE. When prompted, enter
the password 9 4 2 8 and press the Enter key.
From
TEST MODE, the oven’s components can be
tested independently, or a comprehensive/
selective self-test can be run. Unless otherwise
specified, idle airflow is set to 10% and the stirrer
motor is turned on.
Top Blower
Press the L2 soft key to increase top blower speed
in 10% increments.
NOTE: While the top blower is being tested, the
bottom blower remains at 10% idle airflow.
Bottom Blower
Press the L3 soft key to increase bottom blower
speed in 10% increments.
NOTE: While bottom blower is being tested, the
top blower remains at 10% idle airflow.
Heaters
Press the L4 soft key to turn heaters on/off.
NOTE: When the heaters are not being tested,
make sure they are turned off; otherwise, the oven
will overheat.
Magnetron Test
Press and hold the L5 soft key to turn on the
magnetrons. To turn off the magnetrons, simply let
go of the L5 soft key.
Stirrer
Press the R1 soft key to turn the stirrer on/off.
Test Mode - Status Indicators
Figure 14. The status indicators are located at the
bottom of the
TEST MODE screen, and consist of:
- P = Primary switch (backlit = open)
- S = Secondary switch (backlit = open)
- M = Monitor switch (backlit = open)
- t = Magnetron thermostat (backlit = open)
- H = Heaters (backlit = on)
- B = Bottom blower (backlit = on)
- T = Top blower (backlit = on)
- W = Microwave (backlit = on)
In Figure 14:
- All three door switches are engaged (closed).
- The heaters are on.
- Both blower motors are on.
- Microwave is not being used.
Test Mode - Fault Log
Press the L1 soft key to access the fault log.
This fault log is identical to the one accessible from
screen 1 of the
INFO MODE (page 13), except on this
screen, pressing the 0 key clears all faults.
Test Mode - Turning On/Off
Diagnostic Mode
Press the R2 soft key to place the oven in
DIAGNOSTIC MODE. When in DIAGNOSTIC MODE,
the oven displays additional cooking parameters
during a cook cycle, including:
- Event currently being cooked
- Time left per event
- % wave, % top air, % bottom air
- Status indicators
- Group and recipe name
- CC temperature
- CC set point
For normal oven operation, ensure
DIAGNOSTIC
MODE
is turned off.
BOTTOM BLOWER 20%
TEST MODE
TOP BLOWER 10%
HEATERS ON
MAG OFF
FAULT LOG
MANUFACTURING MODE
DIAGNOSTICS OFF
SELF TEST
STIRRER ON
P S M t H B T W
Figure 14: Test Mode
R1
R2
R3
R4
R5
L1
L2
L3
L4
L5
Page 30

16 INFO MODE
Test Mode - Self Test
From TEST MODE, press the R4 soft key to access the
“Self Test” screen (Figure 15). From the “Self Test”
screen:
- L1 soft key initiates a comprehensive self test.
The oven will check the door switches, blowers,
magnetrons, and heaters in sequence.
- L2 soft key initiates a door switch test only.
- L3 soft key initiates a blower test only.
- L4 soft key initiates a magnetron test only.
- L5 soft key initiates a heater test only.
When each test completes, the oven will display
PASS or FAIL.
Test Mode - Manufacturing Mode
Press the R3 soft key to place the oven in
MANUFACTURING MODE (Figure 16). When in
MANUFACTURING MODE
, the following tests and
settings can be accessed:
- Microwave leakage test
- Microwave power test
- Burn in
- Serial number edit
- Temperature measurement (F or C)
- Self test (same as
TEST MODE).
- Erase/default oven settings
Microwave Leakage Test
Press the L1 soft key to initiate the microwave
leakage test. The oven will warm up to 500°F
(260°C). When warmup is complete, insert the
water load. Follow the steps on page 27.
Microwave Power Test
This test should only be performed by the
manufacturer.
Burn-In
Press the L3 soft key to initiate a 25-minute burn-in.
This feature helps ensure all cavity walls reach thermal equilibrium before testing is conducted.
ERASE SETTINGS
ERASE COUNTERS
AND FAULT LOGS
COMPLETE ERASE
Figure 18: Erase Settings
R1
R2
R3
R4
R5
L1
L2
L3
L4
L5
_
SERIAL NUMBER EDIT
i 5 - D 1 0 0 0 1
CANCEL
SAVE
<>
Figure 17: Serial Number Edit
MAG TEST
HEATER TEST
AUTO TEST
DOOR TEST
BLOWER TEST
SELF TEST
P S M t H B T W
Figure 15: Self Test
R1
R2
R3
R4
R5
L1
L2
L3
L4
L5
R1
R2
R3
R4
R5
L1
L2
L3
L4
L5
BURN IN
MANUFACTURING MODE
MW POWER TEST
MW LEAK TEST
SERIAL NUMBER EDIT
FAHRENHEIT
SELF TEST
SETPOINT = 500F
ERASE/DEFAULT
Figure 16: Manufacturing Mode
R1
R2
R3
R4
R5
L1
L2
L3
L4
L5
Page 31

INFO MODE
17
Serial Number Edit
Press the L4 soft key to access the “Edit Serial
Number” screen. To edit the serial number:
- Use the number/letter keys to change a
character. After one second, the cursor will
advance to the next character.
- Press the R3 soft key to advance to the next
character.
- Press the L3 soft key to return to the previous
character.
- Press the R5 soft key to save the changes or the
L5 soft key to cancel.
Changing Temperature Measurement Setting
From the manufacturing mode screen, press the L5
soft key to change the temperature measurement
from Fahrenheit to Celsius, or vice versa.
Self Test
Press the R1 soft key to access Self Test. Self Test is
also accessible from the
TEST MODE screen - see page
16 for more details about Self Test.
Erase/Default Oven Settings
CAUTION: Settings cannot be retrieved once
an erase option is confirmed.
Press the R5 soft key to access the “Erase” screen.
From the “Erase” screen,
- Press the L2 soft key to erase counters and
fault logs.
- Press the R2 soft key to erase counters, fault
logs, menu settings, temperature settings, serial
number, date, and time. Doing so will also
default all oven options (page 14 for more
detail) to OFF, with the exception of “load
menu.”
Loading a Menu
From screen 2 of the INFO MODE, press the R1 soft
key to access the “Load Menu” screen (Figure 19).
NOTE: This feature can be turned on or off via the
“Options” screen (page 14).
To load a menu to the oven,
1. Insert the source (smart card or USB - see
Figure 21, page 18).
2. Press the L1 soft key to load from a smart
card, or the L4 soft key to load from USB*
(Figure 19).
3. Verify the oven beeps and reads “FINISHED”
(Figure 20).
* NOTE: To successfully load a menu from USB:
- The menu file must be a binary (.BIN) file
- The menu file name must be
MENUDATA.BIN
- The menu file must exist in a top-level folder,
i.e., the folder cannot be a sub-folder of any
other folder on the USB device.
- The folder name must be TC_MENUS
To save a copy of a menu from the oven,
1. Insert the source (smart card or USB - see
Figure 21, page 18).
2. Press the L2 soft key to save to a smart card or
the L5 soft key to save to USB** (Figure 19).
3. Verify the oven beeps and reads “FINISHED”.
** NOTE: To successfully save a menu to USB:
- The USB device must contain a top-level
folder titled TC_MENUS
SAVE TO CARD
LOAD FROM CARD
SAVE TO USB
LOAD FROM USB
Figure 19: Load Menu Screen
SAVE TO CARD
LOAD FROM CARD ++++++++FINISHED
SAVE TO USB
LOAD FROM USB
Figure 20: Loading...Finished
R1
R2
R3
R4
R5
L1
L2
L3
L4
L5
R1
R2
R3
R4
R5
L1
L2
L3
L4
L5
Page 32

18 INFO MODE
Updating the Software
From the Oven Off screen,
1. Insert the smart card (see Figure 21).
If multiple smart cards are required, ensure
the correct smart card is loaded first.
2. From the
COOLING DOWN or OVEN OFF
mode, press and hold the Info key until the
oven resets (approximately 5 seconds).
3. When the oven beeps one long high tone,
the load was successful. If a second card
was provided, insert it.
4. When the oven restarts and the display
turns on, the update is complete. Remove
the smart card.
NOTE: If the update is unsuccessful, the
display will remain off and the oven will beep
one long, low tone. If this occurs, repeat the
above procedure. If the update fails multiple
times, a smart card may be damaged. Contact
TurboChef to obtain a new smart card.
Figure 21: Inserting Smart Card/USB Device
Smart Card
USB Port
Smart Card Reader Slot
Page 33

Edit Mode
Page 34

EDIT MODE
19
Overview of the Edit Mode
The EDIT MODE serves three main purposes:
1. To edit set temperatures.
2. To edit names of food groups and recipes.
3. To edit recipe settings.
To access the
EDIT MODE,
1. Enable it from the “Options” screen (page 14).
2. Press the On/Off key to return the oven to the
“Cooling Down” or “Off” screen.
3. Press the On/Off key again to enter
EDIT MODE.
Single vs. Multiple Temperature Mode
The i5 Oven is capable of utilizing four unique set
temperatures. By default, the oven operates in
“Single Temperature” mode, in which all four
temperatures are the same. By contrast, if more than
one temperature is specified in the
EDIT MODE
, the
oven will operate in “Multiple Temperature” mode.
The i5 Oven is capable of storing 200 recipes. If
more than one temperature is desired, at least 50
recipe spots must be allocated to each unique
temperature setting. Think of each temperature as a
“block” of 5 food groups, or 50 recipes. The table
below outlines differences between the two modes in
more detail.
NOTE: Earlier i5 software versions store only two
temperatures, each containing 100 food recipes.
Single Temperature Mode Multiple Temperature Mode
Edit Mode: - Four temperatures available to edit
(Figure 22, page 20).
- Adjacent soft key to access recipes
associated with temperatures (Figure
22, page 20).
- When in “group select” (Figure 23,
page 20), all 200 recipes will be
available to edit (because all
temperature settings are identical).
- Temperature displayed adjacent to
each “block” of five food groups
(Figure 23, page 20).
- Same as single temperature mode.
- Same as single temperature mode.
- When in “group select” (Figure 23, page
20), only recipes associated with the
selected temperature will be available to
edit. (NOTE: if additional temperature
settings are identical to the one that was
selected, the associated recipes for those
temperature settings will also be available
to edit.)
- Same as single temperature mode.
Cook Mode: - No temperature selection screen. The
oven automatically warms up when
the On/Off key is pressed (Figure
7.3, page 10).
- When the oven is turned on, select a
temperature before warming up (Figure
7.2, page 10).
Number of Recipes
Available to Cook:
- 200 (all) - If 2 unique temperatures: 100/100 or
150/50
- If 3 unique temperatures: 100/50/50
- If 4 unique temperatures: 50/50/50/50
Page 35

20 EDIT MODE
Changing Set Temperatures
If a menu was loaded via smart card or USB (page
17), the temperatures are already set - they need not
be changed. The set temperature should never be
changed during normal operation.
Changing the set temperatures is not advised to
compensate for over-cooking or under-cooking
situations. Rather, consult your authorized distributor
or TurboChef Customer Service if recipe settings are
not cooking as desired.
To change a set temperature,
1. Place the oven in
EDIT MODE (see page 14).
2. Select the temperature to change by pressing
the adjacent soft key (Figure 22).
3. Using the number keys, enter the new set
temperature.
4. Press the Enter key to confirm the change, or
the Back/Stop key to cancel.
Changing Food Group/Recipe Name
To change a food group or recipe name,
1. Place the oven in
EDIT MODE (see page 14).
2. Select a “block” of food groups by pressing the
corresponding right-side soft key (Figure 22).
NOTE: Earlier i5 software versions store only two
temperatures, each containing 2 food group “blocks.”
3. Select the group that contains the recipe(s) you
want to edit (Figure 23).
4. Select a recipe to edit (Figure 24).
5. From the “Recipe Edit” screen (Figure 25),
edit the food group name:
- Use the numeric keypad to change a character.
- Press the R1 soft key to advance to the next
character.
- Press the L1 soft key to return to the previous
character.
- Press the R3 soft key to save changes.
6. Edit the recipe name:
- Press the Down key to move to the “Recipe
Name” field.
- Use the instructions provided in step 5 to
edit the recipe name.
SINGLE
X2
X3
X4
MUFFINS
X6
RECIPE 6
RECIPE 7
RECIPE 8
RECIPE 9
RECIPE 10
Figure 24: Select Recipe to Edit
EVENT %TIM %TOP %BOT %WAV
1 025
020 020 050
2 025% 040 060 025
3 025 060 040 075
4 025
090 100 010
5 000 010 010 000
6 000
010 010 000
7 000 010 010 000
8 000
010 010 000
TOTAL TIME = 01:40
MUFFINS RECIPE 6
% TOTAL = 100
PSM TCC = 482F
COOK
TIME
%TIM
SAVE
Figure 25: Recipe Edit Screen
EDIT TEMP 1 GROUPSEDIT TEMP 1: 500F
EDIT TEMP 2: 500F
EDIT TEMP 3: 450F
EDIT TEMP 4: 400F EDIT TEMP 4 GROUPS
EDIT TEMP 3 GROUPS
EDIT TEMP 2 GROUPS
VALID RANGE BETWEEN 350 - 525F
Figure 22: Temperature Edit Screen
MUFFINS
BISCUITS
BAGELS
PASTRY
BLANK GROUP
BLANK GROUP
BLANK GROUP
BLANK GROUP
BLANK GROUP
BLANK GROUP
SELECT GROUP SCREEN 1
SETPOINT: 500F
Figure 23: Select Food Group
R1
R2
R3
R4
R5
L1
L2
L3
L4
L5
R1
R2
R3
R4
R5
L1
L2
L3
L4
L5
R1
R2
R3
R4
R5
L1
L2
L3
L4
L5
R1
R2
R3
R4
R5
L1
L2
L3
L4
L5
Page 36

EDIT MODE
21
Changing Recipe Settings
Recipe settings consist of the following:
- Up to eight “events” or stages of the cook cycle.
- Cook time.
To change recipe settings,
1. Place the oven in
EDIT MODE (see page 14).
2. Access the “Food Group” screen (page 20).
3. Select a recipe to edit (Figure 24).
4. Use the Down key to move the cursor to the
desired “Event Setting” field (Figure 25).
NOTE: To help make navigation easier, the
currently-selected field will be displayed in the
top-right corner of the display. In Figure 25, the
cursor is in the %TIM column.
5. Use the number keys to adjust event settings:
- % Time (0-100% in 1% increments). The
sum of the percentages across eight events
must equal 100.
- % Top Blower (10-100% in 10% incr.)
- % Bottom Blower (10-100% in 10% incr.)
- % Microwave (0-100% in 10% incr.)
6. Use the Down key to move the cursor to the
“Total Time” field.
NOTE: To help make navigation easier, the R4
“Time” soft key jumps the cursor to the total time
field.
7. Use the number keys to adjust the cook time.
8. Press the R3 soft key to save changes.
NOTE: For the save to take effect, the cursor must
be advanced past the field that was last edited.
9. If desired, press the R5 soft key to test-cook
the new settings. In doing so, the oven may
require additional warmup time.
10. When all editing is complete, return to the
“Options” screen and turn off the
EDIT MODE
(see page 14). This will allow access into the
regular cook mode.
Page 37

22 EDIT MODE
This page intentionally
left blank.
Page 38

Oven Systems
Page 39

OVEN SYSTEMS
23
Convection System
The convection system is designed to rapidly heat,
clean, and recirculate air into the cook cavity.
This section contains information about the
following components:
- Blower motor (bottom)
- Blower motor (top)
- Blower motor controller
- Heater element
- Jetplate (bottom)
- Jetplate (top)
- Stirrer motor and assembly
For information on accessing and removing parts,
see the Appendix.
Blower Motor (Bottom)
The convection motor is a brushless AC switch
reluctance type. Its top speed is 7100 RPM at 1
HP. The motor is controlled by a proprietary
controller. The bottom blower spins clockwise.
The bottom blower motor can be tested in
TEST
MODE
(see page 15).
Blower Motor (Top)
The convection motor is a brushless AC switch
reluctance type. Its top speed is 7100 RPM at 1
HP. The motor is controlled by a proprietary
controller. The top blower spins counterclockwise.
The top blower motor can be tested in
TEST MODE
(see page 15).
Blower Motor Controller (BMSC)
The motor controller is proprietary and will only
operate the convection motors described above.
The motor controller is controlled on command
from the I/O control board and a 0-10VDC speed
command from the I/O control board.
The blower motor controller can be tested in
TEST
MODE
by testing the blower motors (see page 15).
For additional troubleshooting, see page 39.
Heater Element
The main convection heater is a finned-style heater
rated at 3000 watts at 208 VAC with a resistance
of 14.4 Ohms. The convection heater is controlled
by the K4/K5 solid state relay.
The heater element can be tested in
TEST MODE
(see page 15).
Jetplate (Bottom)
The bottom jetplate channels air that is generated
from the bottom blower motor.
Jetplate (Top)
The top jetplate channels air that is generated from
the top blower motor. This air passes through a
stirrer before entering the cook cavity through the
jetplate holes.
CAUTION: The top jetplate is ceramic. Be
careful when removing or reinstalling it.
Stirrer Motor and Assembly
The stirrer is responsible for evenly distributing
hot air and microwave that are launched from the
top of the oven into the cook cavity. The stirrer is
driven by a motor that remains on during a cook
cycle or when the oven is in
TEST MODE. The
stirrer motor turns off when the cook cavity
temperature recedes below 150°F (66°C).
The stirrer motor can be tested in
TEST MODE (see
page 15).
CAUTION: Be careful to not allow debris
into the waveguides when servicing the
stirrer assembly.
Page 40

Troubleshooting Convection System
The following faults may occur in relation to the
convection system:
- F1: Blower (see page 39)
- F2: Low Temp (see page 40)
- F6: EC Temp (see page 43)
- F7: Thermo (see page 43)
- F8: Heat Low (see page 44)
The following cooking performance issues may
occur in relation to the convection system:
- Food not browning properly (see page 47)
Oven Door
This section contains information about the
following components:
- Oven door
- Interlock switches
- Hinges and counter-balance assembly
This section also contains procedures for:
- Removing/reinstalling the oven door
- Adjusting the oven door
- Adjusting the oven door switches
- Measuring RF leakage for microwave safety
For information on accessing and removing parts,
see the Appendix.
The proper fit and adjustment of the oven door is
essential for safe and reliable oven operation.
The oven door assembly consists of a shunt plate,
skin, and handle. Each of these items can be
purchased independently.
Removing/Reinstalling the Oven Door
To remove or reinstall the oven door, follow the
steps below. For illustrations, see page A-4.
1. Ensure the oven has cooled to 150°F (66°C).
2. Open the oven door to its full open position.
3. Locate and remove #8-32 screws (3 per side).
4. Carefully remove the oven door by pulling
the door away from the oven. It will slide off
the hinges and the hinge blocks will stay in
place. See Figure A-1, page A-4.
5. To reinstall or fit a new door, carefully slide it
back over the hinge blocks and replace the 6
#8-32 screws (3 each side).
6. Verify that the door is parallel to the oven
frame. If it is not parallel, adjust the door per
the instructions below.
7. From
TEST MODE, check the status indicators
“P” “S” and “M” to verify the switches engage
(door closed) and disengage (door open)
properly. If they do not, adjust the switches
per the instructions on page 26.
8. Complete a MW leakage test (page 27).
Adjusting the Oven Door
WARNING: Procedure should be done while
oven is hot. As a result, exercise extreme
caution when adjusting the door.
1. Ensure the oven door is closed.
2. Remove the two 1/4-20 bolts securing the
door hinge to the oven (Figure 26A, page 25).
3. Allow the oven to warm up to the set
temperature. If more than one set temperature
is present, select the highest.
4. If the oven will not warm up because the
switches are misaligned as a result of the oven
door, slide the switches or switch bracket
accordingly until each switch is engaged.
5. Reference Figures 26B and 26C (page 25) to
determine where to tap. If following Figure
26C, remove the primary, secondary, and
monitor switches before adjusting the door.
6. Gently tap the oven door in the areas marked
in Figures 26B or 26C until the door is
parallel to the oven frame.
7. If the switches were removed, reinstall them.
8. From
TEST MODE, check the status indicators
“P” “S” and “M” to verify the switches open
and close in the correct sequence: P, S, M
when the door is open and M, S, P when the
door is closed. If they do not, adjust the
switches per the instructions on page 26.
9. Perform a MW Leak Test (page 27).
24 OVEN SYSTEMS
Page 41

OVEN SYSTEMS
25
Figure 26A: Properly Adjusted Door - Side Views
Oven Door
Oven Frame
Hinge
SM Switches
Remove
Bolts
Oven Door
Hinge
P Switch
Oven Frame
Figure 26B: Door Misaligned Variation 1 - Side Views
Tap in this
corner
Figure 26C: Door Misaligned Variation 2 - Side Views
Tap in this
corner
Remove
Bolts
First remove
switches, then
tap here
Page 42

26 OVEN SYSTEMS
Interlock Switches
The primary, secondary, and monitor interlock
switches engage and disengage in sequence to ensure
a proper seal. When the door is opened, the switch
sequence is P, S, M. Subsequently, the sequence is
M, S, P when the door is closed.
Adjusting the Door Switches
WARNING: Procedure requires work while
the oven is hot. As a result, exercise extreme
caution when adjusting the door switches.
1. Ensure the oven door is closed.
2. Verify the oven door is not misaligned. If it is,
align it (see procedure on page 24, illustrations
on page 25.
3. If the door is properly aligned, loosen the hex
screws on the switch bracket and slide the
bracket accordingly until each switch is just
engaged. If the bracket is properly positioned,
but the switches are not, slide the switches
until they just engage.
4. Allow the oven to warm up to the set
temperature. If more than one set temperature
is present, select the highest.
5. Once the oven warms to the set temperature,
go to
TEST MODE (page 15).
6. Check the status indicators “P” “S” and “M”
to verify the switches open and close in the
correct sequence: P, S, M when the door is
open and M, S, P when the door is closed.
7. If necessary, repeat steps 3-6.
8. Perform a MW Leak Test (adjacent).
Hinges and Counter-Balance Assembly
The door hinges and counter-balance assembly
work to ensure the door consistently opens and
closes smoothly.
Adjusting the Counter-Balance Assembly
WARNING: Procedure requires work while
the oven is hot. As a result, exercise extreme
caution when adjusting the door switches.
NOTE: In Figure 27, some oven components
have been removed for clarity. The adjustment
procedure MUST be performed with the
counter-balance and hinges installed.
1. Ensure the oven door is closed.
2. Remove both side panels.
3. Remove both switch bracket assemblies (one on
each side of the oven). See Figure 27.
4. Remove the door hinge gussets from each side
of the oven. See Figure 27.
5. On one side of the oven, loosen the screw
as shown in Figure 27.
6. Slide the adjustment spacer (included with
counter-balance assembly kit) under the
counter-balance bracket. The thin side of the
spacer should go between the screw and the
bracket, and the notch should rest against the
side of the bracket. See Figure 27.
7. Tighten the screw against the adjustment spacer
so that the spacer cannot slide out.
8. Loosen the screw just enough to allow the
spacer to slide out.
9. Repeat steps 5-8 for the other side of the oven.
10. Reinstall the door hinge gussets and ensure the
bolts are snug.
11. Reinstall the switch bracket assemblies,
verifying that the levers on the switches are in
the closed position (i.e., snug against the
actuator).
12. Warm up the oven, allowing the additional 8minute “soak” to achieve thermal equilibrium in
the cook cavity.
13. If necessary, adjust the oven door by ensuring it
is parallel to the frame. See page 24.
14. Adjust the door switches to ensure the proper
sequence (adjacent).
15. Test for microwave leakage (page 27).
Page 43

OVEN SYSTEMS
27
Measuring RF Leakage for Microwave Safety
WARNING: Procedure requires work while
the oven and water loads are hot. As a result,
exercise extreme caution when testing.
An RF (microwave) leakage test must be performed
at the conclusion of the following service tasks:
- Door removal, replacement and/or adjustment
- Wave guide removal and /or replacement
- Magnetron removal and/or replacement
- Door gasket
WARNING: If the unit fails the microwave
leakage test (leakage greater than 5mW/cm
2
),
the oven must be taken out of service immediately
until the defect is corrected. In addition, the CDRH
Regulation 21 Subpart C, 1002.20 requires that leakage readings of over 5mW/cm
2
must be reported to
the manufacturer.
To measure RF leakage,
1. Place the oven in
WARMING UP MODE (page 11)
and allow it to warm up to the set temperature
(approximately 15 minutes if the oven starts
cold).
2. Once the oven has warmed up, place the oven
in
TEST MODE (see page 15). From TEST MODE,
select “MFG Mode.”
3. From the Manufacturing Mode screen, select
“MW Leak Test” and follow the instructions on
the screen (also detailed in following steps).
4. Place a water load into the cook cavity. Water
load must conform to the following
specifications:
- Volume: 275 ml ± 15 ml
- Temperature: 68ºF ± 9ºF (20ºC ± 5ºC)
- Vessel: Low form, 600 ml beaker with an
inside diameter of approximately 3.35" (85
mm) and made of Pyrex or equivalent.
Figure 27: Counter Balance Adjustment
Step 3
Step 3
Step 4
Step 4
Step 5 = Loosen,
Step 7 = Tighten,
Step 8 = Loosen Slightly
Step 6: Notch should rest
against side of bracket.
Step 6: Thin side of spacer fits
between screw and bracket.
Page 44

28 OVEN SYSTEMS
5. Close the oven door and press the Enter key.
The microwave system will turn on.
6. Position the microwave survey meter as shown
in Figure 28, above.
7. Measure microwave emission around the door,
moving the meter sensor at 0.5 inches/second.
As microwave leakage is observed moving the
sensor at 0.5 inches/second, note any meter
spike areas that come close to 5mW/cm
2
for
later re-measurement.
8. Replace the water load every 60 seconds until
the test is completed, and also after scanning
the door.
9. Close the oven door and return the meter
probe to any "meter spike" areas and allow the
probe to remain in the "spike" area for 17
seconds. Note the highest reading obtained.
NOTE: There may be several places on the door
where this procedure needs to be done. If so, start
out with a fresh water load each time a new area is
measured, or if measurement of an area takes
longer than 60 seconds.
10. After each test is complete, open the oven door
and dispose of the hot water.
Troubleshooting
The following faults may occur in relation to the
oven door:
- F4: Monitor (see page 42)
The following issues may occur in relation to the
oven door:
- “Cook Door Open” message when door is
closed (see page 45).
Figure 28: Survey Meter Placement
Page 45

OVEN SYSTEMS
29
Microwave System
The i5 oven employs two independent microwave
systems (left and right). In the case of an overcurrent situation relative to the left system, the F3
fuse will blow. In the case of an over-current
situation relative to the right system, the F4 fuse
will blow.
This section contains information about the
following components:
- Capacitors
- Filament Transformers
- High-Voltage Diodes
- High-Voltage Transformers
- Magnetrons
- Stirrer Motor and Assembly
- Wave Guides
This section also contains procedures for:
- Testing a capacitor
- Wiring the filament transformers
- Testing a filament transformer
- Testing a high-voltage diode
- Wiring the high-voltage transformers
- Testing a high-voltage transformer
- Testing a magnetron for an open/shorted
filament
For information on accessing and removing parts,
see the Appendix.
Capacitors
- Capacitor rating is 0.91uF, 2500 VDC for all
60 Hz installations (except Japan).
- Capacitor rating is 1.15uF, 2500 VDC for all
50 Hz installations.
- Capacitor rating is 0.85uF, 2500 VDC for
60 Hz Japan installations.
Testing a Capacitor
DANGER: Never attempt any
measurement of the capacitors while they
are enabled. Lethal voltage will be present.
Measure only in compliance with these procedures.
1. Disconnect the oven from the power source.
2. Fully discharge the capacitor.
3. Isolate the capacitor from the circuit.
4. Check for an open or shorted capacitor by
placing ohmmeter leads between the capacitor
terminals:
- Inconsistent readings = capacitor OK
- Constant infinite resistance = capacitor open
- Constant very low resistance = capacitor
shorted
5. If the capacitor is not open or shorted, set the
meter to measure capacitance and again place
the leads between the capacitor terminals. The
meter reading should equal the label value, plus
or minus 10%. If not, replace the capacitor.
Filament Transformers
For better operation and reliability, the oven
uses separate transformers in order to preheat the
magnetron filament.
The control energizes the filament transformers for
approximately five seconds prior to energizing the
Microwave Circuit via the high-voltage
transformers. When in operation, the filament
transformers supply approximately 3.15 VAC at 10
amps to each magnetron filament. The filament
transformers are controlled via the K1 relay.
Wiring the Filament Transformers
DANGER: Never attempt to measure the
secondary voltage values of the filament
transformers when they are enabled. Lethal voltage
will be present.
The installation of filament transformers is
straightforward. Filament transformers are wired
in-phase and in-line. Refer to the schematic on
page 51, detailing the proper wiring.
To verify correct wiring (North America),
measure the voltages between terminals
1&2and
1&3on FT1 and FT2. The voltages must be 208
and 240 VAC respectively.
Page 46

30 OVEN SYSTEMS
NOTE: The terminals with the orange dot or the
orange wire always go to Terminal
3 on US models.
To verify correct wiring (International), measure
the voltage between the taps on FT1 and FT2. The
voltage must be 220 VAC (Latin America), 200
VAC (Japan), or 230 VAC (International).
High-Voltage Transformers
High-voltage transformers are a ferro-resonant
design which limits fault currents and minimizes
magnetron power changes due to input voltage
changes. The high-voltage transformer supplies the
high voltage for the Voltage Doubler Circuit. They
are controlled via the K2 relay.
Wiring the High-Voltage Transformers
DANGER: Never attempt to wire or
measure the secondary voltage values of the
high-voltage transformers with the high-voltage
transformers enabled. Lethal voltage will be present.
The proper reinstallation of a high-voltage
transformer is critical. Upon removing a highvoltage transformer, make sure to note where each
wire was installed. Refer to the oven schematic
(page 51) detailing the proper wiring.
As shown in the schematic, transformers are
installed mirror opposite and wired
180
º
out-ofphase. It is essential for longevity that the highvoltage transformers remain 180ºout-of-phase. This
can be checked by placing a volt meter across
terminals
T1-1 and T2-1 (primary voltage).
With the microwave system energized, the volt
meter will read
the incoming voltage (different
readings for different electrical installations).
If the
meter reads
0 VAC, the high-voltage transformers
are most likely wired in-phase. As a last check,
energize the microwave system and verify the
voltages between the taps on each high-voltage
transformer.
The wiring issue must be corrected prior to returning the oven to service, as the voltages must be:
-
NORTH AMERICA: 208 VAC between 1&2and
240 between 1&3.
- LATIN AMERICA
: 220 VAC
- JAPAN: 200 VAC
- INTERNATIONAL: 230 VAC
NOTE: The terminals with the orange dot/orange
wire always go to terminal
3 on USA models.
Testing a Filament or HV Transformer
DANGER: Never attempt to measure the
secondary voltage values of the transformers
when they are enabled. Lethal voltage will be
present.
1. Disconnect the AC power source and discharge
the high-voltage capacitors.
2. Disconnect all the wires in question going to the
transformer.
3. Use an ohmmeter to check the impedance of the
primary and secondary winding. Refer to the
adjacent resistance table to determine if the
transformer is OK. If the resistance is different
then the table indicates, replace the transformer.
High-Voltage Diodes
The high-voltage diode (Figure 29) is assembled by
connecting several 1000-1500 volt semi-conductor
diodes in a series to increase the reverse voltage
capability. In the circuit, the high-voltage diode
conducts to prevent the filament voltage from
becoming positive, thus as the high-voltage winding
of the transformer goes to 2400 VPK, the highvoltage capacitor is charged to 2400 volts.
Figure 29: High Voltage Diode
Page 47

OVEN SYSTEMS
31
When the high-voltage winding starts to go toward
negative, the high-voltage diode becomes nonconducting with the charged high-voltage capacitor
in series with the high-voltage winding. When the
transformer gets to its negative peak of -2400 VPK,
the voltage applied to the filament is negative 4500
volts. The high-voltage diodes are rated at 16
kVDC.
Testing a High-Voltage Diode
DANGER: Never attempt to measure high
voltage directly. Death or serious injury
could result.
1. Disconnect the oven from the power source.
2. Fully discharge the capacitors.
3. Connect the voltage meter in series with diode.
4. Using a multimeter set to DC voltage, connect
one meter lead to one side of a 9-volt battery
and the other lead to one side of the diode.
5. Connect the other side of the 9-volt battery to
the other side of the diode. DC voltage should
only be present on the meter in one direction.
6. Switch the meter leads on the diode, which will
cause the opposite reading to be visible.
Depending on the voltage of the battery, voltage
between 5-7 VDC should be present in only one
direction and 0-0.1 VDC in the other direction.
High Voltage Transformers Primary Voltage, Frequency, Taps,
and Resistance
Secondary Taps and Resistance
NGC-3062-1 208 VAC, 60 Hz, 1 & 2,
0.819–1.001
WW
240 VAC, 60 Hz, 1 & 3,
0.972–1.188
WW
4, Ground, 53.60–65.52
WW
NGC-3062-2 230 VAC, 50 Hz, 1 & 2,
0.972–1.188
WW
3, Ground, 57.52–70.30
WW
NGC-3062-3 200 VAC, 50/60 Hz, 1 & 2,
0.784–0.958
WW
3, Ground, 55.75–68.13
WW
Filament Transformers Primary Voltage, Frequency, Taps,
and Resistance
Secondary Taps and Resistance
NGC-3061-1 208 VAC, 60 Hz, 1 & 2,
17.49–21.37
WW
240 VAC, 60 Hz, 1 & 3,
20.61–25.19
WW
4, 5, very low resistance - if reading is open, transformer has failed.
NGC-3061-2 230 VAC, 50 Hz, 1 & 2,
18.99–23.21
WW
3, 4, very low resistance - if reading is open, transformer has failed.
NGC-3061-3 200 VAC, 50/60 Hz, 1 & 2,
15.70–19.18
WW
3, 4, very low resistance - if reading is open, transformer has failed.
High Voltage and Filament Transformer Resistance Table
Page 48

32 OVEN SYSTEMS
Magnetrons
Figure 30. Magnetrons supply the RF energy at
2.45 GHz and begin to oscillate when they are
supplied with approximately 4.1 kVDC at
approximately .350 mA. During operation each
magnetron will output a nominal 1 kW of power.
If replacement is required, conduct a microwave
leakage test (page 27) after installation of new
magnetron.
Testing a Magnetron for an Open/Shorted
Filament
DANGER: The only safe way to test a
magnetron is by a resistance test of its
filament. Never attempt to measure the magnetron
using any other method while the microwave
system is on. Death or serious injury could occur.
1. Disconnect the AC power source and discharge
the high-voltage capacitors.
2. Isolate the magnetron from the circuit by
removing the wires from the F and FA terminals.
Figure 30.
3. An ohmmeter connected between the filament
terminals (F, FA) should indicate a reading of less
than 1 ohm. Figure 30.
4. A continuity check between either filament
terminal and the magnetron chassis should
indicate an infinite resistance (open).
CAUTION: Be careful to not allow debris
into the wave guides when servicing the
magnetrons.
Stirrer Motor and Assembly
The stirrer is responsible for evenly distributing hot
air and microwaves that are launched from the top
of the oven into the cook cavity. The stirrer is
driven by a 3.6 RPM motor, which remains on
during a cook cycle or when the oven is in
TEST
MODE
.
The stirrer motor can be tested in
TEST MODE
(see
page 15).
CAUTION: Be careful to not allow debris
into the waveguides when servicing the
stirrer assembly.
Wave Guides
The wave guides channel microwave into the cook
cavity. If debris or contamination gets into the wave
guides, the life of the magnetrons may be
shortened. Be careful to not allow debris into the
waveguides when servicing the magnetrons or
stirrer assembly.
Troubleshooting
The following faults may occur in relation to the
microwave system:
- F3: Magnetron Current Low (see page 41)
- F5: Magnetron Over Temperature (see page 42)
The following issues may occur in relation to the
microwave system:
- Electrical component failure (blank or
scrambled display, damaged control board, etc.)
- Food not cooking properly
Figure 30: Magnetron
FFA
FILAMENT AND
HIGH VOLTAGE
TERMINALS
ANTENNA
Page 49

OVEN SYSTEMS
33
Control System
This section contains information about the
following components:
- Control board
- Display
- Electrical compartment cooling fans
- Electrical compartment cooling fan thermostat
- Electrical compartment thermocouple
- EMI Filter
- Fuses
- High-limit thermostat
- Keypad
- Magnetron cooling fans
- Magnetron thermostats
- Power Supply
- Relay (K1 - Filament)
- Relay (K2 - Anode)
- Relay (K3 - Monitor)
- Relay (K6 - Voltage)
- Relay (K7 - Mag fan)
- Relay (K8 - Stirrer)
-RTD
- Smart card reader
- Solid state relay (K4/K5 - Heater)
- Speaker
- USB port
- Voltage sensor
- Wire harness
Control Board
The control board controls each electrical component of the oven. See page 51 for a schematic. 24
VDC can be measured at pin 2 of the J7
connector.
Display
The vacuum fluorescent display is the primary user
interface.
Electrical Compartment Cooling Fans
The cooling fans (located in the rear of the oven)
are actuated by the cooling fan thermostat when
the temperature of the electrical compartment
reaches 120ºF (49ºC).
Electrical Compartment Cooling Fan
Thermostat
The cooling fan thermostat actuates the rear
cooling fans when the electrical compartment
temperature reaches 120ºF (49ºC).
Electrical Compartment Thermocouple
The electrical compartment thermocouple is a type
“K” thermocouple, which measures the
temperature of the electrical compartment. If the
temperature of the electrical compartment is above
158ºF (70ºC), an F6: EC TEMP” fault will
display. The control board checks the temperature
of the electrical compartment once every 60
seconds.
EMI Filter
The EMI filter helps suppress the amount of RF
interference emitted by the oven.
Fuses
All four fuses are 12-amp, class CC.
The F1 fuse (via blue wire) or F2 fuse (via brown
wire) is designed to blow in case of an over-current
situation relative to the following components:
- BMSC motor controller
- Electrical compartment cooling fans
- Filament transformers
- Magnetron cooling fans
- Power supply
- Stirrer motor
The F3 fuse is designed to blow in case of an overcurrent situation relative to the left microwave
system (magnetron, high-voltage transformer,
diode, capacitor).
The F4 fuse is designed to blow in case of an overcurrent situation relative to the right microwave
system (magnetron, high-voltage transformer,
diode, capacitor).
Page 50

34 OVEN SYSTEMS
High Limit Thermostat
The high limit thermostat is a 250 VAC, 3-pole,
manual-reset thermostat with a trip point of 572ºF
(300ºC). The thermostat interrupts power to the
main convection heater in the event of an abnormal
condition.
Reset the high-limit thermostat by pressing the
reset button (Figure 31).
Keypad
The keypad is a 7 x 10 matrix membrane switch.
For details on key functions, see page 9.
Magnetron Cooling Fans
The magnetron cooling fans supply air to the
magnetrons, and are actuated by the K7 relay. They
operate at:
- 208/240 VAC (60 Hz installations with voltage
sensing)
- 220 VAC (60 Hz installations with no voltage
sensing)
- 230 VAC (50 Hz installations)
- 200 VAC (Japan installations)
Magnetron Thermostats
The magnetron thermostats are “open-on rise.”
They are designed to open at 212ºF (100ºC),
which triggers an F5 fault.
NOTE: The magnetron thermostats are wired in
series. If one opens, the control will switch off both
microwave systems until the open thermostat
closes. The thermostats are self-resetting.
Power Supply
The power supply outputs 24 VDC at 40 watts to
the control board and relays.
Relay - K1 Filament
The K1 relay is a 240 VAC, 30 amp, double-pole,
double-throw, 24 VDC relay coil. It switches power
to the magnetron filament transformers.
Relay - K2 Anode
The K2 relay is a 240 VAC, 30 amp, double-pole,
double-throw, 24 VDC relay coil. It switches power
to the magnetron high-voltage transformers.
Relay - K3 Monitor
The K3 relay is a 240 VAC, 30 amp, double-pole,
double-throw, 24 VDC relay coil. It shorts L1 and
L2 if the monitor switch opens before the primary
or secondary switches.
Relay - K6 Voltage
The K6 relay is a 240 VAC, 30 amp, three-pole,
double-throw, 24 VDC relay coil. Applicable in
North America only, it switches between 208 and
240 VAC on the high-voltage transformer and
filament transformer taps (depending on incoming
voltage).
Figure 31: High-Limit Reset Button
Reset
Button
Page 51

OVEN SYSTEMS
35
Relay - K7 Magnetron Cooling Fan
The K7 relay is a 240 VAC, 30 amp, double-pole,
double-throw, 24 VDC relay coil. It switches power
to the magnetron cooling fans when the magnetron
filaments are actuated. Power is switched off after 4
minutes, 15 seconds.
NOTE: The 4:15 timer starts over each time the
magnetron filaments are actuated.
Relay - K8 Stirrer Motor
The K8 relay is a 240 VAC, 30 amp, double-pole,
double-throw, 24 VDC relay coil. It switches power
to the stirrer motor.
RTD
The RTD measures the temperature of the heater
element. If the display reads “999°F/C”, the RTD
is open, resulting in an F7 fault. See page 43 for
troubleshooting.
Smart Card Reader
The smart card reader allows the oven operator to
load a menu/software updates from a smart card. A
menu that already exists in the oven can also be
saved to a smart card. For instructions, see page 17.
Solid State Relay - K4/K5 Heater
The solid state relay is a 240 VAC, dual 40-amp
relay. K4 (right) switches power to heater 1. K5
(left) switches power to heater 2.
Speaker
The speaker provides audible feedback to the oven
operator whenever a key is pressed or a task (such
as a cook cycle) is completed, etc.
USB Port
The USB port allows the oven operator to load a
menu/software updates from a USB drive. A menu
that already exists in the oven can also be saved to a
USB drive. For instructions, see page 17.
Voltage Sensor
For North America oven models, the oven will
detect 208 or 240 incoming voltage.
The initial voltage selection is typically completed
before the oven is used by the customer. However,
if incoming voltage for the store is different than
the preset voltage, the operator will be required to
select either 208 or 240 after pressing the On/Off
key to turn on the oven. The correct voltage will be
enlarged on the screen, identifying which option to
select.
Wire Harness
The wire harness distributes power to the oven’s
electrical components. See page 51 for a schematic.
Troubleshooting
Potentially, any fault may occur in relation to the
control system. See section “Fault Code
Troubleshooting,” pages 39-44.
Potentially, any one of the issues diagnosed in the
section “Non-Fault Code Troubleshooting” may
occur in relation to the control system. See section
“Non-Fault Code Troubleshooting,” pages 45-49.
Page 52

36 OVEN SYSTEMS
Filtering System
This section contains information about the
following components:
- Catalytic converter
- Drain pan
- Air Filter
- Vent catalyst
Catalytic Converter
The catalytic converter, a VOC type catalyst, is
located behind the inside cook cavity wall and is
responsible for cleaning the recirculating airflow.
The catalyst functions by substantially lowering
the combustion temperature of grease entrained in
the air path to approximately the same temperature
of the airflow, thus the grease burns and breaks
down into CO
2
and H2O as it passes through the
catalytic converter. The catalyst will operate most
efficiently at temperatures above 475ºF (246ºC).
The catalyst material is very sensitive to certain
chemical compounds. Irreversible damage can
occur if the catalyst is exposed to cleaning
chemicals containing phosphates, NaOH, silicates,
Na and Potassium Salts. These chemicals are found
in most commercial degreasers and cleaners;
therefore, only TurboChef
®
Oven Cleaner should
be used.
CAUTION: Clean the catalytic converter
with TurboChef
®
Oven Cleaner and rinse
thoroughly with distilled water. Let the catalytic
converter air dry before reinstalling. If TurboChef
®
Oven Cleaner is not available, do not use a
substitute. Use distilled water only.
Drain Pan
The drain pan collects debris as it is flushed
through the bottom of the cook cavity.
Air Filter
The filter is located on the back of the oven. It
helps prevent debris from getting into the electrical
compartment.
Vent Catalyst
In addition to the main catalytic converter, the i5
oven contains an additional catalyst in the vent
tube path. This catalyst further assists in the
breakdown of grease and particulate matter before
the excess air enters the atmosphere.
Troubleshooting
The following issues may occur in relation to the
filtering system:
- Fire in the cook cavity (if catalytic converter is
clogged and oven is not regularly cleaned).
- Electrical component failure (if filter is not
present or is clogged).
- Undesirable flavor transfer.
- Undesirable odor emissions.
Page 53

Troubleshooting
Page 54

TROUBLESHOOTING
37
Overview of Troubleshooting
This section contains information on the
following:
- Fault code descriptions
- Fault code troubleshooting
- Non-fault code troubleshooting
For information on accessing
TEST MODE
, see page
15. For information and illustrations on replacing
components, see the appendix.
Fault Code Descriptions
For instructions on viewing the fault counter, see
page 13.
F1: Blower Running Status Bad
This fault is displayed when the motor controller
indicates no running status.
The motors and motor controller are monitored
continuously in all modes with special handling in
the
TEST MODE (see page 15). If a fault is detected,
the control will terminate a cook cycle and display
“F1: Blower.”
Upon turning on the oven, the control will
attempt to restart the motors. If the restart of both
motors is successful, the fault code will be cleared
from the display. The fault is also cleared from the
display at the onset of cooking or when a blower
motor is tested in
TEST MODE.
F2: Cook Temperature Low
This fault is displayed if the cook cavity
temperature is more than 84ºF (47ºC) below the
set temperature after five seconds into a cook cycle.
The fault is cleared from the display at the onset of
cooking if the cook cavity temperature is within
84ºF (47ºC) of the set temperature or when the
heater is tested in
TEST MODE (see page 15).
F3: Magnetron Current Low
This fault is displayed when the current
transformer (CT) on the I/O control board detects
less than 10 amps. The fault is monitored when
the microwave is on during a cook cycle or in
TEST
MODE
.
The fault is cleared from the display at the onset of
a cook cycle if the CT detects 10 amps or when
the magnetrons are successfully energized in
TEST
MODE
.
F4: Door Monitor Defective
This fault is displayed when the control detects
that the monitor interlock switch unlatches before
the primary or secondary interlock switches. In
addition, this fault will blow the F3 and F4 fuse if
the microwave high voltage system is energized
when the fault occurs. The fault is cleared from the
display when the oven is powered off and then
back on.
NOTE: Door interlock switches are in parallel. See
the oven schematic, page 51. The fault is
monitored during a cook cycle and in
TEST MODE
when the microwave is on.
F5: Magnetron Over Temperature
This fault is displayed when either magnetron
thermostat reaches 212ºF (100ºC).
The thermostats will reset automatically, and are
wired in series. The fault is cleared from the
display at the onset of a cook cycle if the
thermostat is closed or when the magnetrons are
successfully tested in
TEST MODE.
F6: Electrical Compartment Temperature High
This fault is displayed when the EC thermocouple
exceeds 158ºF (70ºC). The EC temperature is
monitored once per minute.
The fault is cleared from the display if on the next
check, the EC thermocouple temperature is below
the indicated limit.
Page 55

38 TROUBLESHOOTING
Fault Code and Description When Active Refer to...
Warmup Idle Cooking Test Mode
F1: Blower Running Status Bad
Page 39
F2: Cook Temperature Low
Page 40
F3: Magnetron Current Low
Page 41
F4: Door Monitor Defective
Page 42
F5: Magnetron Over Temperature
Page 42
F6: EC Temperature High
Page 43
F7: RTD Open
Page 43
F8: Heat Low
Page 44
Fault codes are listed in order of hierarchy. For example, if during cooking the oven experiences an F1
and F2 fault, the oven will report only the F1 fault because the software will halt all actions upon
discovering the F1 fault.
Fault codes F1 - F5 and F7 will terminate a cook cycle upon discovery.
F7: RTD Open
This fault is displayed when the control detects
that the RTD is “open.” The display will show a
reading of “999ºF/C,” indicating the RTD is open.
The fault is cleared when the control detects
continuity.
F8: Heat Low
This fault displays during
WARMING UP or TEST
MODE
if the cook cavity temperature fails to rise at
least 14ºF (7ºC) within a given 30 seconds.
Figure 32: Fault Code Table
Page 56

TROUBLESHOOTING
39
Troubleshooting:
F1: BLOWER (Blower Running Status Bad)
NO
YES
NO
YES
NO
YES
NO
To From Description Expected Resistance
Black Red Winding (A-B) 5.9-7.3 Ohms
Black White Winding (A-C) 5.9-7.3 Ohms
Red White Winding (B-C) 5.9-7.3 Ohms
Black, Red, or White Green Windings to Chassis Open
Figure 33: Motor Windings Resistance Table
Is the wiring
harness properly
connected?
Check the motor
controller, top and
bottom blower motors,
and I/O control board.
(See page 51 for
schematic.)
Replace the blower motor(s). Be
sure to check both the top and
bottom blower motors (pages A-9
through A-10).
Correct the wiring
or replace I/O control
board (page A-8)/motor
controller (page A-7)
if damaged.
Are Status Indicators “B”
and “T” backlit in
TEST
MODE
? (see page 15)
Remove obstruction or if necessary, replace blower motor(s)
(pages A-9 through A-10).
Replace motor
controller. (page A-7)
Fault Code Troubleshooting
From TEST MODE, you can run oven diagnostics and check fault counts. To access TEST MODE or turn on
Diagnostic mode, see page 15.
Replace the I/O
board (page A-8).
NO
YES
YES
Do resistance measurements
between windings and chassis
agree with values on motor
windings resistance table?
(Figure 33, below)
Is output from I/O
board to harness 1-10
volts? (Verify at test
points).
Is each blower motor
spinning freely?
Page 57

40 TROUBLESHOOTING
Troubleshooting:
F2: LOW TMP (Cook Temperature Low)
YES
Replace the defective
heater. (page A-11)
Replace the solid state
relay. (page A-5)
NO
YES
YES
Replace the I/O
control board (page
A-8).
Correct wiring.
YES
NO
Reset and determine
why it tripped – excess
grease buildup, etc.
(Figure 31, page 34)
Is either of the heater elements defective? (heaters
should have a resistance of
14.4 Ohms)
Is the high-limit
thermostat tripped?
Is the solid state relay
defective?
Is wiring from the
solid state relay to the
I/O control board OK?
(See page 51 for
schematic)
Is the RTD
functioning properly?
Ensure wiring is
correct. If necessary,
replace RTD. (page
A-11)
NO
NO
YES
NO
Page 58

TROUBLESHOOTING
41
Troubleshooting:
F3: MAG CURR (Magnetron Current Low)
Replace K6 relay
(see pages A-5
through A-6).
YES
Run test cook
cycles to see if fault
repeats (page 10).
If not, clear faults.
Did fault repeat?
NO
Are the F3 and F4 fuses
functioning properly?
YES
Replace the F3
and/or F4 fuse (see
pages A-5 through
A-6) and verify the
operation of the
interlock switches
(page 26).
Check the condition of the
F3 and F4 fuses (pages 42,
A-5 through A-6). Are they
12-amps?
YES
Replace the
diode(s). See page
A-7 through A-8.
Replace the
capacitor(s).
See page A-7
through A-8.
NO
YES
NO
Replace the
magnetron(s).
See page A-12
through A-13.
YES
NO
Replace the HV
transformers(s).
See page A-7
through A-8.
Test the high-voltage diodes
(page 30). Are the diodes
functioning properly?
NO
Replace the filament
transformers(s). See
page A-7 through A-8.
YES
Replace the
control board.
See page A-8.
Test the filament transformers
(page 30). Are the filament transformers functioning properly?
U.S.
Intl.
Is the K6 mechanical
relay in good working
order?
YES
YES
NO
Is control board
detecting 10A or
more current? Test
for 24 VDC on pin
2 of J7 connector
(page 51).
NO
Is amperage present at the
current transformer even
if the control board is not
detecting it?
YES
Replace the
control board.
See page A-8.
Test the high-voltage
transformers (page 30). Are the
high voltage transformers
functioning properly?
Test the magnetron for an
open/shorted filament (page
32). Are the filaments
functioning properly?
Is the oven U.S. or International?
NO
NO
YES
YES
NO
Test the capacitors (page 29).
Are the capacitors
functioning properly?
Page 59

42 TROUBLESHOOTING
Troubleshooting:
F4: MONITOR (Door Monitor Defective)
NO
YES
Is the F3 or F4 fuse blown?
YES
Disconnect oven from
power supply and then
reconnect. The fault
should clear.
Replace the F3 or F4
fuse (see page A-5
through A-6).
NO
Are the switches opening in the correct
sequence (P, S, M)? To
access
TEST MODE or for
info on status indicators,
see page 15.
Readjust the monitor safety switch.
See page 26 for instructions.
Disconnect oven from power supply
and then reconnect. The fault
should clear.
Troubleshooting:
F5: MAG TEMP (Magnetron Over Temperature)
NO
YES
Fault message
should disappear.
NO
Replace the control board
(pages A-7 through A-8).
Verify wiring. If necessary, replace the cooling
fans (see pages A-7
through A-8).
Open the top cover, place the oven in
TEST MODE and test the magnetrons
(see page 15). Are the magnetron
cooling fans operating?
Correct wiring/
replace the thermostats (pages A-12
through A-13).
NO
YES
Are the switches
closing in the
correct sequence
(M, S, P)?
Remove the debris
or reposition the
oven away from
obstruction.
YES
NO
NO
YES
Do the magnetrons pass testing in the
TEST MODE? See page 15.
NO
Is the airpath into the electrical compartment blocked or
clogged with debris? Check
the cooling fan finger guards
and filter on the back panel.
YES
Verify wiring to
magnetrons, and verify
magnetron thermostats are
not open. Are wiring and
thermostats ok?
Replace the magnetron(s) (page A-12
through A-13) and test again in
TEST
MODE
. Do the magnetrons pass testing?
YES
Page 60

TROUBLESHOOTING
43
NO
Troubleshooting:
F6: EC TEMP (Electrical Compartment Temperature High)
YES
NO
Does the oven have
room to ventilate?
Required clearances:
Top: 16” (406 mm)
Sides: 2” (51 mm)
Is the oven in an area of moderate
temperature (120ºF (49ºC) or cooler)?
YES
Are both cooling
fans rotating?
NO
Relocate oven to
cooler area.
YES
Check for
obstructions in
the airflow and
remove them and
clean the filter.
YES
Replace defective
component – see page
A-7 through A-8.
Troubleshooting:
F7: THERMO (RTD Open)
YES
NO
Is the RTD properly connected to the
control board? (See page 51 for
schematic.)
NO
Correct wiring.
YES
NO
Correct connection.
Is the wire harness properly
connected? Check cooling
fan thermostat and cooling fans.
(See page 51 for schematic.)
Move oven to open area or remove
items that are in close proximity.
Is the RTD open?
Using an Ohm
Meter, measure at
the control board.
RTD should measure approximately
109 Ohms at 75
ºF
(24ºC)
.
Replace I/O Control Board. (page A-8)
Replace the RTD (page A-11).
Page 61

44 TROUBLESHOOTING
NO
YES
Replace the control
board (page A-8).
Correct wiring.
NO
YES
YES
Troubleshooting:
F8: HEAT LOW
YES
NO
Is the high-limit
thermostat tripped?
Are both blower motors moving air?
Check in
TEST MODE - see page 15.
YES
Reset (page 34) and
determine why it
tripped – excess
grease buildup, etc.
NO
See page 39
to troubleshoot
F1: BLOWER
(Blower Running
Status Bad)
NO
Is the solid state relay
defective or damaged?
Is the heater defective? Check in
TEST MODE - see page 15.
Replace defective
heater. (page A-11)
Verify the solid state
relay is not shorted
across output.
Replace the solid state relay
(page A-5 through A-6).
Is the wiring from the solid
state relay to the control
board OK? (See page 51 for
schematic.)
Page 62

TROUBLESHOOTING
45
Troubleshooting:
No Keypad Input
YES
NO
Replace the keypad
(page A-5 through
A-6). If the problem
persists, replace the
control board (page
A-8).
Is the keypad cable properly connected to the
control board?
Correct wiring.
Correct wiring.
If wiring is damaged,
replace door switch(es)
(page A-9 through A-11).
Replace the door
switch(es) (page A-9
through A-11).
YES
Refer to troubleshooting procedures
on page 42.
NO
Troubleshooting:
“Cook Door Open”Message when Door is Closed
Non-Fault Code Troubleshooting
This section provides troubleshooting tips for issues that may occur independently of an oven fault.
NO
Is “F4 MONITOR” fault present?
NO
YES
NO
Is the wiring from the door
switches to control board OK?
YES
Loosen the two switch
bracket screws. With the
door closed, position the
bracket so that the trailing
arm is just engaging the
switch levers. Open and
close the door. Are door
switches freely opening and
closing?
Tighten the
switch bracket
screws.
Verify the action of the trailing arm. When the door
closes, does the trailing arm
engage the switches?
YES
Adjust the counterbalance assembly (page
26). Is issue resolved?
Page 63

46 TROUBLESHOOTING
NO
Troubleshooting:
No Display – Screen is Blank
YES
NO
Does the keypad beep when
a key is pressed?
Is wiring from the
control board to the
display OK?
Is pin 1 on the J7
connector receiving 5
VDC? (see schematic,
page 51)
NO
YES
YES
Replace the display
(page A-8).
NO
NO
YES
Is the power supply
output 24 VDC?
NO
YES
YES
Verify 5 VDC is
present on pin 1 of the
J7 connector. If not,
replace the control
board (page A-8).
Is the control board
receiving correct VDC?
Verify voltage on pin 2
of the J7 connector is
24 VDC (see
schematic, page 51).
Replace the fuses.
(page A-5 through A-6)
Check wiring from the
power supply to the
control board. Correct
wiring if necessary.
Replace the control
board. (page A-8)
Correct wiring. If ribbon
cable is damaged, replace
the keypad (page A-5
through A-6).
Is the power supply
receiving power?
Replace the power
supply (page A-5
through A-6).
Page 64

TROUBLESHOOTING
47
NO
YES
NO
NO
YES
Is the food item in the
correct starting state
(e.g., frozen, fresh, etc.)?
NO
Ensure the food item
is being properly
stored/prepared
before cooking.
YES
NO
Place the oven rack in
correct position.
Is the oven rack positioned correctly (upper
vs. lower position)?
YES
NO
Ensure that the correct
amount is being
cooked - not more or
less than the recipe
specifies.
Is the correct amount
of food (portion)
being cooked?
NO
Ensure that the food
item is properly
prepared.
YES
Is the food item being prepared correctly
and consistently? For example, bread cuts
are straight and not “V” cuts, meat is
sliced at correct thickness, pizza dough is
correct consistency, etc.
YES
Is the menu part number and
revision correct? Verify with
customer or contact
TurboChef Customer Service.
YES
Are there any fault
codes present? See page
37.
Troubleshoot the
fault(s) using the steps
on pages 37-44.
NO
Are there any fault
codes present? See page
37.
YES
NO
Does the problem
occur EVERY time the
food item is cooked?
Replace the control
board (page A-8).
Troubleshooting:
Food Not Cooking Properly
Does the problem occur for all
programmed recipes? For example, are all
recipes undercooked/overcooked/etc.?
Contact Customer
Service to obtain the
correct menu and load
it to the oven.
NO
YES
Is the menu part number and
revision correct? Verify with
customer or contact
TurboChef Customer Service.
Troubleshoot the
fault(s) using the steps
on pages 37-44.
YES
Page 65

48 TROUBLESHOOTING
Troubleshooting:
“Read Fail” Message When Loading Menu
Smart Card
USB Device
Did you use a smart card or USB
device?
NO
YES
NO
YES
Verify the USB device is
securely attached to the
USB port on the oven.
Replace the card reader/
USB port (page A-5
through A-6). If the
problem persists, replace
the control board (page
A-8).
Is the connection
from USB port to
control board OK?
Ensure the cable
connecting the USB
port to the control
board is securely
attached and not
damaged.
NO
YES
Name the file
“menudata.bin” and store
it in a top-level folder
named “TC_Menus”.
Is the USB device
securely attached to the
oven?
Is the file named
correctly (menudata.bin)
and in the correct location
(TC_Menus)?
If the menu card was created by
TurboChef, obtain a new menu card
by contacting customer service at
800.90
TURBO or +1 214-379-6000.
YES
Replace the card reader
(page A-8). If the
problem persists, replace
the control board (page
A-8).
Ensure the cable
connecting the reader to
the control board is
securely attached and
not damaged.
NO
Is the connection from
smart card reader to
control board OK?
No backup copy
NO
Does a backup copy of
the menu work?
Page 66

TROUBLESHOOTING
49
Troubleshooting:
“Write Fail” Message When Loading Menu
Smart Card
USB Device
Are you trying to write to a smart
card or USB device?
YES
NO
YES
Verify the USB device is
securely attached to the
USB port on the oven.
Is the connection from
USB port to control
board OK?
Ensure the cable
connecting the USB
port to the control
board is securely
attached and not
damaged.
NO
Try writing to a new
smart card. Was the
write successful?
YES
Replace the card reader
(page A-8). If the
problem persists, replace
the control board (page
A-8).
NO
Ensure the cable
connecting the reader to
the control board is
securely attached and
not damaged.
Is the connection from
smart card reader to
control board OK?
On the USB device, create
a top-level folder named
“TC_Menus”.
NO
YES
Does the USB device
contain a top-level folder
named “TC_Menus”?
NO
Is the USB device
securely attached to the
oven?
Replace the card reader/
USB port (page A-5
through A-6). If the
problem persists, replace
the control board (page
A-8).
Page 67

50 TROUBLESHOOTING
Troubleshooting:
“Defective Media” Message When Oven is
Plugged in or Restarted
YES
NO
Does the message prevent the oven
from reaching the “Oven Off/
Cooling Down” screen?
NO
Check for microwave
leakage (page 27). If no
leakage is found, replace the
control board (page A-8).
YES
Operate the oven as
you would normally.
Unplug the oven and
then plug it back in.
Did this fix the
problem?
Page 68

Oven Schematic
Page 69

SPLICE 1
J1
DELTA
K3-7L1
EMI FILTER
L1
HX1 CKT
K6-7
K4-A1
MW1 CT
L1
230VAC, 3Ø
4 W IRE INPUT
L1
AUX CT
BRN
GRN
BLK
BLK
L2
L3
L3
HX2CT
L2
LOAD
DIAGRAM
F2-1
VOLTS E4
F3-1
K5-B1
K4-A1
F1-1
VOLTS E3
F2-1
F1-1
K5-B1
380- 415, 3Ø
5 W IRE INPUT
AYA6A
N
L2L3G
N
50A
L2
L3
G
F3-1
HX2-2
L1
L3
L2
N
BRN
BLU
GRN
GRAY
BLK
L1
N
AUX CT
HX1 CKT
L3
MW1 CT
L2L1L3NG
EMI FILTER
N
L3
L2
L1
AYA6A
50A
G
HX2-2
HX1-2
AYA6A
L1L2L3
G
N
L1
JUMPER ONLY FOR
SINGLE PHASE
EMI FILTER
50A
L2
L3
G
N
180-240
VAC IN
1
HX2 CKT
L2
A-5
DIAGRAM
LOAD
2
2
C-3 1
QC10
BMSC
VOLTAGE
E4
WYE
MODULE
E2 (RED)
E3
K3-7
K6-7
E1(BLACK)
1
F1
2
F3
F2
1 1
2 2
SUPPLY
C-5
-V
C-19 +V
N
POWER
G
L
24VDC
1
2
3
J3
INTERLOCK
FAN1 (C OOLI NG/COM PARTMENT)
Analog Speed 0-10V
ENABLE
STATUS OK
I/O COM
I/O COMMON
I/O COMMON
0-10V
I/O COMMON
ENABLE
STATUS OK
I/O COM
I/O COMMON
BOTTOM
MTR
(CW)
BLWR
RED
GREEN
WHITE
BLACK
MTR
(CCW)
TOP
BLWR
BLACK
GREEN
WHITE
RED
3 PHASE
240 VAC
2
4
J4
3
OUT
1
3 PHASE
240 VAC
2
4
3
OUT
J5
1
C-9
C-10
C-6
C-5
QC5
C-7
C-20
2
1
C-11
6
A-17(RED)
B-8 (BLACK)
B-2 (WHITE)
B-8 (BLACK)
B-10 (GRAY)
3
5
4
6
GND
1
2
C-1 (GRAY)
B-7 (BLACK)
B-1 (WHITE)
B-7 (BLACK)
A-18 (RED)
2
3
5
4
GND
J2
1
SPEAKER
FAN 2 (CO OLI NG/R EAR)
MONITOR
C
SECONDARY
SAFETY INTERLOCKS
PRIMARY
NO
INTERLOCK
NC
C
C
SWITCH
NO
NO
NC
NC
120°F
QC5
2
1
2
QC4
1
OT2
C
NO
QC2QC1
K2 ANODE
03/01/2007
08/14/2006
DATE
2
F4 : 1 2 AMP S CLASS CC
F3 : 1 2 AMP S CLASS CC
F2 : 1 2 AMP S CLASS CC
F1 : 1 2 AM PS CLASS CC
DASH
SUBSTITU TE IEC 3-PIN PLUG
6-50P
FOR UK VERSION,
NO
APPLICATION
NE XT ASSY
i5-XXXX
USED ON
i5
DAVID CASTILLO
PRODUCTION
QA
CHECKED
ENG INEER
SIGNATURE
DRAWN
B1
9
3
C-22
C-21
F4
1
2
B-17
A
A2
4231
4
B
1
A
K5
-
B2
K4
-++
A1
C-13
B
6
K1 (FI LAMENT)
A
7
9
7
B
C-14
4
1
3
6
4
1
MANUAL RESET
31
11
21
22
OT1
12
32
HX 2 (3000 W/14.4 OHMS)
1
(208)
C-12
(240)
FT2
(C)
(240)
K1
A
SHEET 1 OF 1
KEYSCALE
NONE
DRAWING NOCODE IDENT NOSIZE
TITLE
i5-9100
417
ABBABABAB
RELAY ASSY
2
HX 1 (300 0W/14. 4 OHMS)
1
K2
639
417
K3
639
417
2
1
2
1
369
K6
46
31
97
528
K7
417
639
NOTE: ALL 50 HZ OVENS HAVE 230VAC TRANSFORM ERS( TAPS 1-2 ARE CONNECTED)
(-) D1 (+)
i5-9100
A
K3 (MONIT OR)
7
A
9
9
C-11
B
3
6
4
C-4
1
(208)
B
6
K6 (VOLTS)
MAG
CT
8
7
A
9
2
(240)
(208)
(240)
3
5
4
1
(208)
(240)
B
C-16
6
3
(208)
(C)
FT1
(208)
(240)
(C)
T2
HV TRANS FORMERS
(208)
(240)
(C)
T1
K7 (FAN S)
K8 (S TI RRER)
7
A
7
9
B-16
1
4
B
3
6
4
1
STIRRER
QC3
1
2
A
LTR
DWG NO
AB
FAN 2
F
MAGNETRON OVERTEMP
212°F (100°C)
MAG 2
212°F (100°C)
C
NC
OT3
NC
MAG 1
FA
MAG 2
K8
OT4
C
417
639
QC7
MAG
FAN 1
MAG
MAG 1
(-) D2 (+)
FA
F
QC6
DCASTILLO
APPROVED
REVISIONS
RELEASE FOR PRODUCTION
DESCRIPTION
11/20-2007
DATE
1
SH
(QC9 RTD)
A-8
A-7
A-9
MW2 CT
MW2 CT
JUMPER FOR 50 HZ OPERATION ONLY (BETWEEN PIN 1&3)
2
1
.19UF3.91UF
C1
2.2K 1/2W
TURBOCHEF TECHNICAL SUPPORT
800-908-8726 (USA)
C-17
J7
J4
J11
J10
J8
J5
SMART
CARD
READER
HX2-1
.19UF
1
C2
32
C4- K6-B (VOLTAGE SELECTOR)/WHITE
C5- CDM-C & CDS-C (GROUND)/BLACK
C6- CDP-C (GROUND)/BLACK
C7- SPEAKER GROUND/BLACK
C8-24 VDC (-) INPUT/BLACK
C9-CDS-N.O STATUS/WHITE
C10- CD P-N.O STATUS/W HITE
C11 - K3-B (MONI TOR ST ATU S)/OR ANGE
C12-K2-A (MAG-OT) STATUS/WHITE
C13- K1-B (FILAMENT TRANSFORMERS)/WHITE
C14 -K2- B (MAG NETR ONS) /WHIT E
C16- K7-B (MAGNETRON FANS)/WHITE
C17-MAG OT +24VDC/RED
C19 - +24 VD C INPU T/R ED
C20- SPEAKER (+)/RED
C21-K4-A2 (HEATER)/WHITE
C22-K5-B4 (HEATER)/WHITE
B1-TOP BLOWER EN ABLE (J2-3)/WHITE
B2-BOT BLOWER EN ABLE (J1-3)/WHITE
B7-TOP BMSC GND (J2-2 &4)/BLACK
B8-BOT BMSC GND (J1-2 &4)/BLACK
B10-BOT BMSC STATUS (J1-5)/GRAY
B16-K8-B(STIRRER)/WHITE
B17-K1-A (+24 VDC OUTPUT)/RED
A7-RTD-3 INPUT/RED
A8- RTD-2 INPUT/ORANGE
A9- RTD-1 INPUT/ORANGE
A17- BOT BLOWER 0-10 VDC/RED
A18-TOP BLOWER 0-10 VDC/RED
C3 - (V OLT AGE SEL EC TO R IN PU T) /R ED
C1- TOP BM SC STATUS/GRAY
A5- VOLT AGE MO DULE GROUND/BLACK
C (22 PIN)
B (24 PIN)
A (20 PIN)
+214-379-6000 (International)
(49°C)
1
20
10
2412
1
11
1
13
11
22
1
12
.91UF
NOTE: NOT CONNECTED FOR
INTERNATIONAL MARKETS
OVEN SCHEMATIC
51
Figure 34: i5 Oven Schematic
Page 70

52
This page intentionally
left blank.
Page 71

Appendix - Replacing Oven
Components
Page 72

A-1
APPENDIX - REPLACING OVEN COMPONENTS
To Replace This... First Remove This...
Item Part Number
No Covers
(Page A-3)
No CoversOpen Top
(Page A-5)
Top Cover
(Page A-7)
Left Side
Cover
(Page A-9)
Right Side
Cover
(Page A-11)
Items Obstructing
Access
Blower Motor (Bottom) I5-9042
EMI Filter, EMI Fil Brkt
Blower Motor (Top) I5-9040
EMI Filter, EMI Fil Brkt
Blower Wheel (Bottom) 103550
Blower Motors
Blower Wheel (Top) 103551
Blower Motors
Capacitor, High-Voltage 100232
Capacitor Clamps
Capacitor Clamp 100134
Catalytic Converter I5-9066
RTD and Heater Assy
Control Board CON-7002
Cooling Fan (Exterior) TC3-0433
Filter, Filter Brkt, Finger
Guard
Cooling Fan (Interior) TC3-0433
Cooling Fan Finger Guard 100086
Filter, Filter Bracket
Cooling Fan, Magnetron 100083
Cooling Fan (Magnetron) Bracket I5-9263
Diodes, High-Voltage 100481
Display 103360
Door Assembly* I5-9308
Door Gasket I5-9309
Shunt Plate
Door Handle I5-9253
Door Skin
Door Skin I5-9109
Door
Drain Pan I5-9252
EMI Filter 100546
EMI Filter Bracket I5-9257
Filter, Air I5-9039
Filter Bracket I5-9060
Fuse, F1, 12-amp 100592
Fuse, F2, 12-amp 100592
Fuse, F3, 12-amp 100592
Fuse, F4, 12-amp 100592
Fuse Holder 103548
Fuses
Hand Grip I5-9256
Heat Shield/Support Bracket I5-9224
Heat Slinger 102708
Blower Motors
Heater Assembly I5-9284
RTD
Helper Spring, Interlock Switch (Left) 103599
Helper Spring, Interlock Switch (Right) 103599
Hinge, Bracket, Slide, LHS I5-9196
Door, Switches
Hinge, Bracket, Slide, RHS I5-9195
Door, Switches
Hinge, Cam, Weldment, LHS I5-9313
Door, Switches
Hinge, Cam, Weldment, RHS I5-9314
Door, Switches
Comprehensive Table of Oven Components
DANGER: Before replacing any oven component, ensure the oven is removed from any power
source. Replacing a component while the oven is plugged in can result in serious injury or death.
NOTE: For hardware, see the illustrations contained in this appendix.
* See page A-12 through A-13 for removing door, hinge components, magnetrons, magnetron thermostats, or waveguides.
Page 73

A-2
APPENDIX - REPLACING OVEN COMPONENTS
To Replace This... First Remove This...
Item Part Number
No Covers
(Page A-3)
No CoversOpen Top
(Page A-5)
Top Cover
(Page A-7)
Left Side
Cover
(Page A-9)
Right Side
Cover
(Page A-11)
Items Obstructing
Access
Hinge, Guide, Switch Slide, Lower I5-9316
Door, Switches
Hinge, Guide, Switch Slide, Upper I5-9315
Door, Switches
Hinge, Gusset, LHS I5-9178
Door, Switches
Hinge, Gusset, RHS I5-9179
Door, Switches
Hinge Module, Base I5-9193
Door, Switches
Hinge, Torsion Bar I5-9144
Door, Switches
Hinge, Weldment, Countrblnce Bracket, LHS I5-9326
Door, Switches
Hinge, Weldment, Countrblnce Bracket, RHS I5-9327
Door, Switches
Interlock Switch (Monitor) 102012
Interlock Switch (Primary) 102012
Interlock Switch (Secondary) 102012
Jetplate (Bottom) I5-9159
Rack
Jetplate (Top) I5-9203
Keypad I5-9247
Lower Front Panel I5-9246
Drain Pan
Magnetron (Left)* NGC-3015
Magnetron (Right)* NGC-3015
Motor Controller 100446
Power Cord I5-9127
Power Supply 101211
Pwr Supply Brkt
Power Supply Bracket I5-9280
Rack I5-9168
Rack Support I5-9165
Rack
Relay (K1 - Filament) 101273
Relay (K2 - Anode) 101273
Relay (K3 - Monitor) 101273
Relay (K6 - Voltage) 101272
Relay (K7 - Mag Fan) 101273
Relay (K8 - Stirrer) 101273
Relay Bracket I5-9261
Relay, Solid State (K4/K5 - Heaters) 101286
RTD, Cook Cavity HHC-6517
Shunt Plate Assembly I5-9307
Door
Smart Card/USB Port CON-7005
Control Board
Speaker 104155
Stirrer I5-9154
Top Jetplate
Stirrer Hub 104132
Stirrer Motor
Stirrer Motor I5-9361
Stirrer Mtr Bracket
Stirrer Motor Bracket I5-9075
Stirrer Shaft I5-9151
Stir Mtr, Brkt, Top
Jetplate, Stirrer
Thermocouple, EC 700-1199
* See page A-12 through A-13 for removing door, hinge components, magnetrons, magnetron thermostats, or waveguides.
Page 74

APPENDIX - REPLACING OVEN COMPONENTS
A-3
Figure
Reference #
Item Description Item Part Number Hardware Description Hardware Part Number(s)
1 Door Assembly* I5-9308 Screw, #8-32 x 3/8, PFH, 100 Deg, SS 102809 (qty 6)
2 Door Gasket I5-9309 None None
3 Door Handle I5-9253 Screw, 1/4-20 x .25 lg, Serrated Hex 102947 (qty 4)
4 Door Skin I5-9109 Screw, 6-32 x .38, PFH, 100 Deg, SS 101430 (qty 9)
5 Drain Pan I5-9252 None None
6 Filter, Air I5-9039 None None
7 Filter Bracket i5-9060
Screw, Sh Mtl #8 x 1/2, Serrated PHTRH
Plug, Knockout, 1/2”, Black
A) 101688 (qty 6)
B) 101191 (qty 1)
8 Hand Grip I5-9256 Screw, #8 X 1/2, Serrated, PHTRH, Black Oxide 101691 (qty 2)
9 Jetplate (Bottom) I5-9159 N/A Included with part
Replacing Items - No Cover Removal Required (Figures A-1, A-2)
DANGER: Before replacing any oven component, ensure the oven is removed from any power
source. Replacing a component while the oven is plugged in can result in serious injury or death.
CAUTION: Before removing/installing any component, make sure it is disconnected from the
wire harness (where applicable).
NOTE: Hardware listed is required for installing component to oven.
To Replace This... First Remove This...
Item Part Number
No Covers
(Page A-3)
No CoversOpen Top
(Page A-5)
Top Cover
(Page A-7)
Left Side
Cover
(Page A-9)
Right Side
Cover
(Page A-11)
Items Obstructing
Access
Thermostat, Cooling Fans 102086
Thermostat, High-Limit 102075
Filter, Filter Bracket
Thermostat, Magnetron (Left)* 102070
Magnetron (Left)
Thermostat, Magnetron (Right)* 102070
Magnetron (Right)
Transformer, Filament NGC-3061-1
Transformer, High-Voltage NGC-3062-1
Vent Catalyst Foil Pack RWD-9191
Vent Tube Cover
Vent Tube Cover I5-9209
Heat Chnl Wldmt
Voltage Sensor 100783
Waveguide (Left)* I5-9330
Mag, FT/Diode
Bracket, Capacitor,
WG Gasket
Waveguide (Right)* I5-9330
Mag, FT/Diode
Bracket, Capacitor,
WG Gasket
Waveguide Gasket (Left)* I5-9331
Mag, FT/Diode
Bracket, Capacitor,
WG Gasket
Waveguide Gasket (Right)* I5-9331
Mag, FT/Diode
Bracket, Capacitor,
WG Gasket
Weldment, Heat Channel, Vent Tube NGC-1397
* See page A-12 through A-13 for removing door, hinge components, magnetrons, magnetron thermostats, or waveguides.
Page 75

APPENDIX - REPLACING OVEN COMPONENTS
Figure A-1: No Cover Removal Required
5
9
11
8
16
7
6
12
13
10
15
1
2 3 4
Figure
Reference #
Item Description Item Part Number Hardware Description Hardware Part Number(s)
10 Jetplate (Top) I5-9203 None None
11 Lower Front Panel i5-9246 None None
12 Rack I5-9168 None None
13 Rack Support I5-9165 Screw, Sh Mtl #8 x 1/2, Serrated PHTRH 101688 (qty 4)
14 Shunt Plate Assembly I5-9307 Screw, 6-32 x .38, PFH, 100 Deg, SS 101430 (qty 9)
15 Stirrer I5-9154
A) Screw, #10-32 x 1/2, PPH, SS
B) Washer, Lock, #10 Ext Tooth, Cres
A) 101460 (qty 1)
B) 102260 (qty 1)
16 Vent Catalyst Foil Pack RWD-9191 None None
17 Vent Tube Cover I5-9209 Screw, #6 x 1/2, PPHD, Drill Point, SS 101687 (qty 2)
18 Weldment, Heat Chnl, Vent Tube NGC-1397 Screw, Sh Mtl #8 x 1/2, Serrated PHTRH 101688 (qty 6)
A-4
14
1817
Figure A-2: Door Assembly Detail
3
4
14
2
Page 76

APPENDIX - REPLACING OVEN COMPONENTS
A-5
Replacing Items - Opening Top Cover Required (Figure A-3)
DANGER: Before replacing any oven component, ensure the oven is removed from any power
source. Replacing a component while the oven is plugged in can result in serious injury or death.
CAUTION: Before removing/installing any component, make sure it is disconnected from the
wire harness (where applicable).
NOTE: Hardware listed is required for installing component to oven.
To open the top cover:
1. Open the oven door.
2. The top cover is secured to the heat shield via 2 sheet metal screws (above the oven door). Remove
these screws.
3. Open the top cover.
4. Secure the support arms in place.
Figure A-3: Opening Top Cover Required
7
54
3
8
10
9
14
12
16
15
17
13
18
1
11
2
6
Page 77

A-6 APPENDIX - REPLACING OVEN COMPONENTS
Figure
Reference #
Item Description Item Part Number Hardware Description Hardware Part Number(s)
1 Cover, Top I5-9243 Screw, #10-32 x 3/8 lg, PFLH, 100 Deg, SS 101401 (qty 2)
2 Fuse, F1, 12-amp 100592 None None
3 Fuse, F2, 12-amp 100592 None None
4 Fuse, F3, 12-amp 100592 None None
5 Fuse, F4, 12-amp 100592 None None
6 Fuse Holder 103548 Screw, #8-32 x 3/8, PPHD, Int Sems, SS 102921 (qty 4)
7 Heat Shield/Support Bracket I5-9224 Screw, Torx Head, Sh Mtl, 3/8, Cres 102752 (qty 2)
8 Keypad* I5-9247 None None
9 Power Supply 101211 Screw, M3 x 8mm, Sems, PPHD, Cres 103444 (qty 3)
10 Power Supply Bracket I5-9280 Screw, Sh Mtl #8 x 1/2, Serrated PHTRH 101688 (qty 2)
11 Relay (K1 - Filament) 101273 Nut, Keps, Hex, #6-32, Ext Tooth, Cres 102961 (qty 2)
12 Relay (K2 - Anode) 101273 Nut, Keps, Hex, #6-32, Ext Tooth, Cres 102961 (qty 2)
13 Relay (K3 - Monitor) 101273 Nut, Keps, Hex, #6-32, Ext Tooth, Cres 102961 (qty 2)
14 Relay (K6 - Voltage) 101272 Nut, Keps, Hex, #6-32, Ext Tooth, Cres 102961 (qty 2)
15 Relay (K7 - Mag Fan) 101273 Nut, Keps, Hex, #6-32, Ext Tooth, Cres 102961 (qty 2)
16 Relay (K8 - Stirrer) 101273 Nut, Keps, Hex, #6-32, Ext Tooth, Cres 102961 (qty 2)
17 Relay Bracket I5-9261 Screw, #8 x 3/8 PH Mod Truss, Cres 101682 (qty 4)
18 Relay, Solid State (K4/K5 - Heaters) 101286 Screw, Sh Mtl #8 x 1/2, Serrated PHTRH 101688 (qty 2)
* NOTE: Additional keypad detail on Figure A-6, page A-8.
Page 78

APPENDIX - REPLACING OVEN COMPONENTS
A-7
Figure A-4: Removing Top Cover Required
Replacing Items - Removing Top Cover Required (Figures A-4, A-5, A-6)
DANGER: Before replacing any oven component, ensure the oven is removed from any power
source. Replacing a component while the oven is plugged in can result in serious injury or death.
CAUTION: Before removing/installing any component, make sure it is disconnected from the
wire harness (where applicable).
NOTE: Hardware listed is required for installing component to oven.
To remove the top cover:
1. Open the top cover (see page A-5 for instructions).
2. Remove the hinge screws located near the back of each side of the top cover.
3. Detach the support braces from the oven frame. (The should remain attached to the top panel.)
CAUTION: When detaching the support braces, be sure to support the top cover to prevent
it from collapsing onto the components in the electrical compartment.
4. Remove the top panel and place it somewhere safe.
CAUTION: The top cover has critical components attached. Handle it carefully.
2
1
8
5
4
18
768
7
9
9
20
20
11
Figure A-5: Stirrer Motor and
Assembly Detail
14
15
13
15
14
16
19
21
13
16
Page 79

A-8
APPENDIX - REPLACING OVEN COMPONENTS
Figure
Reference #
Item Description Item Part Number Hardware Description Hardware Part Number(s)
1 Capacitor, High-Voltage 100232 None None
2 Capacitor Clamps 100134 Screw, Sh Mtl #8 x 1/2, Serrated PHTRH 101688 (qty 2)
3 Control Board CON-7002 Nut, Keps, Hex, #6-32, Ext Tooth, Cres 102961 (qty 4)
4 Cooling Fan (Exterior) TC3-0433 Screw, Sh Mtl #8 x 1/2, Serrated PHTRH 101688 (qty 2)
5 Cooling Fan (Interior) TC3-0433 Screw, #8-32 x 2 1/2 Lg, PPHD, SS 101661 (qty 2)
6 Cooling Fan Finger Guard 100086 Screw, Sh Mtl #8 x 1/2, Serrated PHTRH 101688 (qty 2)
7 Cooling Fan, Magnetron 100083
A) Screw, #10-32 x 2 1/4, PPH, SS
B) Washer, Lock, #10 Int Tooth, Cres
A) 101484 (qty 3)
B) 102290 (qty 3)
8 Cooling Fan (Magnetron) Bracket I5-9263 Screw, Sh Mtl #8 x 1/2, Serrated PHTRH 101688 (qty 4)
9 Diode, High-Voltage 100481 Screw, Sh Mtl #8 x 1/2, Serrated PHTRH 101688 (qty 2)
10 Display 103360 Nut, Keps, Hex, #4-40, Ext Tooth 102960 (qty 4)
11 Motor Controller 100446 Screw, Sh Mtl #8 x 1/2, Serrated PHTRH 101688 (qty 4)
12 Smart Card/USB Port CON-7005
A) Standoff, Round, .12 ID, .25 OD x .375”
B) Nut, Keps, Hex, #4-40, Ext Tooth
A) 101923 (qty 4)
B) 102960 (qty 4)
13 Stirrer Hub 104132 Set Screw (Provided) N/A
14 Stirrer Motor I5-9025 Screw, M4 x 0.7 x 8, PPHD, Int Tooth, SS 101672 (qty 2)
15 Stirrer Motor Bracket I5-9075 Screw, M4 x 0.7 x 8, PPHD, Int Tooth, SS 101672 (qty 2)
16 Stirrer Shaft I5-9151 None None
17 Thermocouple, EC 700-1199 None None
18 Thermostat, Cooling Fans 102086 Screw, #6 x 1/2, PPHD, Drill Point, SS 101687 (qty 2)
19 Thermostat, High-Limit 102075 Screw, M4 x 0.7 x 8, PPHD, Int Tooth, SS 101672 (qty 2)
20 Transformers, Filament NGC-3061-1 Screw, Sh Mtl #8 x 1/2, Serrated PHTRH 101688 (qty 4)
21 Transformers, High-Voltage NGC-3062-1 Screw, Sh Mtl #8 x 1/2, Serrated PHTRH 101688 (qty 4)
Figure A-6: Top Cover Detail
3
10
12
17
Page 80

APPENDIX - REPLACING OVEN COMPONENTS
A-9
Figure
Reference #
Item Description Item Part Number Hardware Description Hardware Part Number(s)
1 Blower Motor (top) I5-9040 Nut, 1/4 - 20, Serr Hex Flange, Plated 100906 (qty 4)
2 Blower Motor (bottom) I5-9042 Nut, 1/4 - 20, Serr Hex Flange, Plated 100906 (qty 4)
3 Blower Wheel (top) 103551 None None
4 Blower Wheel (bottom) 103550 None None
5 Cover, Left Side I5-9301 Screw, #8 Serr, PHD Truss, Black Oxide 101691 (qty 5)
6 EMI Filter 100546 Screw, M5 x 8, PPHD, Sems, SS 101707 (qty 4)
7 EMI Filter Bracket I5-9257 Screw, #10-32 x 3/4 lg, PPH Sems, Int Th 102937 (qty 2)
8 Heat Slinger 102708 None None
9 Helper Spring, Interlock Switch* 103599 None None
10 Interlock Switch, Primary* 102012 Screw, #4-40 x 1”, PPH, Sems 102903 (qty 2)
11 Mounting Bracket, Interlock Switch* I5-9272 Screw, #10-32 x 3/4 lg, PPH Sems, Int Th 102937 (qty 2)
12 Power Cord I5-9127 None None
13 Voltage Sensor 100783 Screw, Sh Mtl #8 x 1/2, Serrated PHTRH 101688 (qty 1)
Replacing Items - Removing Left Side Cover Required (Figures A-7, A-8)
DANGER: Before replacing any oven component, ensure the oven is removed from any power
source. Replacing a component while the oven is plugged in can result in serious injury or death.
CAUTION: Before removing/installing any component, make sure it is disconnected from the
wire harness (where applicable).
CAUTION: Be careful to not tear the insulation when servicing components. Always reset the
insulation properly before reinstalling the side panel.
NOTE: Hardware listed is required for installing component to oven.
To remove the left side cover, remove the screws securing the panel to the oven frame. To re-install the left
side cover, you may need to open the top cover (see page A-5).
* NOTE: For more interlock switch detail, see Figure A-11, page A-13.
Page 81

A-10 APPENDIX - REPLACING OVEN COMPONENTS
Figure A-7: Removing Left Side Cover Required
Figure A-8: Blower Motor Assembly
1
3 8
6
7
9
12
13
1
8
3
11
5
2
10
2
8
4
Page 82

APPENDIX - REPLACING OVEN COMPONENTS
A-11
Figure A-9: Removing Right Side Cover Required
Figure
Reference #
Item Description Item Part Number Hardware Description Hardware Part Number(s)
1 Catalytic Converter I5-9066 None None
2 Cover, Right Side I5-9302 Screw, #8, Serr PPHD, Truss, Black Oxide 101691 (qty 5)
3 Heater Assembly I5-9284 Screw, Sh Mtl #8 x 1/2, Serrated PHTRH 101688 (qty 10)
4 Helper Spring, Interlock Switch* 103599 None None
5 Interlock Switch - Monitor* 102012 Screw, #4-40 x 1”, PPH, Sems 102903 (qty 2)
6 Interlock Switch - Secondary* 102012 Screw, #4-40 x 1”, PPH, Sems 102903 (qty 2)
7 Mounting Bracket, Interlock Switch* I5-9272 Screw, #10-32 x 3/4 lg, PPH Sems, Int Th 102937 (qty 2)
8 RTD, Cook Cavity HHC-6517 Screw, Sh Mtl #8 x 1/2, Serrated PHTRH 101688 (qty 2)
Replacing Items - Removing Right Side Cover Required (Figure A-9)
DANGER: Before replacing any oven component, ensure the oven is removed from any power
source. Replacing a component while the oven is plugged in can result in serious injury or death.
CAUTION: Before removing/installing any component, make sure it is disconnected from the
wire harness (where applicable).
NOTE: Hardware listed is required for installing component to oven.
To remove the right side cover:
1. Remove the screws securing the panel to the oven frame.
2. Remove the right side cover.
* NOTE: For more interlock switch detail, see Figure A-11, page A-13.
1
3
4
5
6
7
2
8
Page 83

A-12 APPENDIX - REPLACING OVEN COMPONENTS
Figure
Reference #
Item Description Item Part Number Hardware Description Hardware Part Number(s)
1 Hinge, Bracket, Slide, LHS I5-9196 Nut, Keps, Hex, #8-32, Ext Tooth, Cres 102962 (qty 4)
2 Hinge, Bracket, Slide, RHS I5-9195 Nut, Keps, Hex, #8-32, Ext Tooth, Cres 102962 (qty 4)
3 Hinge, Cam, Weldment, LHS I5-9313 Washer, Nylon, Hingepin C0504 (qty 1)
4 Hinge, Cam, Weldment, RHS I5-9314 Washer, Nylon, Hingepin C0504 (qty 1)
5 Hinge, Guide, Switch Slide, Lower I5-9316 Screw, 10-32 x 3/8 lg, PFLH, 100 Deg, SS 101401 (qty 2)
6 Hinge, Guide, Switch Slide, Upper I5-9315 Nut, Keps, Hex, #8-32, Ext Tooth, Cres 102962 (qty 4)
7 Hinge, Gusset, LHS I5-9178 Nut, 1/4 - 20, Serr, Hex Flange, Plated Steel 100906 (qty 2)
8 Hinge, Gusset, RHS I5-9179 Nut, 1/4 - 20, Serr, Hex Flange, Plated Steel 100906 (qty 2)
9 Hinge Module, Base I5-9193 None None
10 Hinge, Torsion Bar I5-9144 Spacer, Adjustment Call TurboChef
11 Hinge, Weldmt, Ctrblnce Brkt, LHS I5-9326 Screw, 10-32 x 3/8 lg, PFLH, 100 Deg, SS 101401 (qty 3)
12 Hinge, Weldmt, Ctrblnce Brkt, RHS I5-9327 Screw, 10-32 x 3/8 lg, PFLH, 100 Deg, SS 101401 (qty 3)
13 Magnetron (Left) NGC-3015 Screw, Sh Mtl #8 x 1/2, Serrated PHTRH 101688 (qty 4)
14 Magnetron (Right) NGC-3015 Screw, Sh Mtl #8 x 1/2, Serrated PHTRH 101688 (qty 4)
15 Thermostat, Magnetron (Left) 102070 Screw, Sh Mtl, Drill Point, 6-32 x 3/8, PPHD, Zinc 101684 (qty 2)
16 Thermostat, Magnetron (Right) 102070 Screw, Sh Mtl, Drill Point, 6-32 x 3/8, PPHD, Zinc 101684 (qty 2)
17 Waveguide (Left) I5-9330 Nut, Keps, Hex, #10-32, Ext Tooth, Cres 102963 (qty 9)
18 Waveguide (Right) I5-9330 Nut, Keps, Hex, #10-32, Ext Tooth, Cres 102963 (qty 9)
19 Waveguide Gasket (Left) I5-9331 None None
20 Waveguide Gasket (Right) I5-9331 None None
Replacing Items - Removing/Opening Multiple Covers Required (Figures A-10, A-11)
DANGER: Before replacing any oven component, ensure the oven is removed from any power
source. Replacing a component while the oven is plugged in can result in serious injury or death.
CAUTION: Before removing/installing any component, make sure it is disconnected from the
wire harness (where applicable).
NOTE: Hardware listed is required for installing component to oven.
To remove the left side cover, see page A-9.
To remove the right side cover, see page A-11.
To open the top cover, see page A-5.
Page 84

APPENDIX - REPLACING OVEN COMPONENTS
A-13
Figure A-10: Removing/Opening Multiple Covers Required
Figure A-11: Counter Balance Assembly, Hinge, and Switch Detail
10
3
4
1
2
14
16
13
15
18
20
17
19
7
8
12
9
11
5
6
Page 85

For service or information:
WITHIN NORTH AMERICA CALL
Customer Service at 800.90TURBO or
OUTSIDE NORTH AMERICA CALL
+1 214-379-6000 or Your Authorized Distributor
Part Number: i5-9231/Revision B/March 2008
Country Code: NA/EU
Accelerating the World of Cooking
TM
Corporate Headquarters
Six Concourse Pkwy, Suite 1900
Atlanta, Georgia 30328
USA
+1 678.987.1700 PHONE
+1 678.987.1750 FAX
Global Operations
4240 International Pkwy, Suite 105
Carrollton, Texas 75007
USA
+1 214.379.6000 PHONE
+1 214.379.6073 FAX
turbochef.com
 Loading...