

Page 1
High h Batch Service Manual
Accelerating the World of Cooking
800.90TURBO
art Number: HHB-8707/Revision A/June 2005
P
TM
Page 2

Page 3

For further information call:
Customer Service at .
Sales & Marketing at .
Accelerating the World of Cooking
TM
Page 4

The information contained in this manual is important for the proper installation, use, maintenance,
and repair of this oven. Follow these procedures and instructions to ensure satisfactory baking results and
years of trouble-free service.
Errors – descriptive, typographic, or pictorial – are subject to correction. Specifications are subject to
change without notice.
PLEASE CAREFULLY READ THIS MANUAL AND RETAIN IT FOR FUTURE REFERENCE.
Page 5

Table of Contents
Safety Instructions
Important Safety Information – Please Read First i
General Safety Information i
Reducing Fire Risk i
Preventing Oven Damage ii
Grounding Instructions ii
Power Cord Replacement ii
Theory of Operation, Specifications and Installation
Theory of Operation 1
Certifications 1
Dimensions 1
Construction
Electrical S
Installation 2
pecifications 2
North America (except Canada)/South America 2
Canada 2
Europe/Asia/Pacific 2
United Kingdom/Ireland 2
Lifting and Placing the Oven 2
Setup 3
2
ating the Oven
Oper
Control Display and Key Identification 5
Oven States and Menu Access 5
Oven State Descriptions 5
escriptions
enu D
M
Powering Up 6
owering Down 6
P
Cooking Instructions 6
Cooking Options 7
Time Screen Options 7
Done Screen Options 7
Using the Options Menu 8
Enabling/Disabling the Edit Menu 8
rasing the R
E
Enabling/Disabling the Write Card Function 9
Enabling/Disabling the Time Screen 10
Enabling/Disabling the Done Screen 10
nabling/D
E
ecipe Menu 9
isabling the D
emonstration M
ode
6
11
Page 6

Programming Recipes 11
Adjusting the Cook Chamber Temperature 12
Modifying Recipes 12
Loading Menu from Smart Card 14
Saving Menu to Smart Card 14
Checking Recipe Counter 16
Diagnosing an Issue
Fault Codes: Descriptions, Clearing Instructions, 17
and Troubleshooting
F1: BLOWER (Blower Running Status Bad) 17
F2: LOW TEMP (Cook Temperature Low) 17
F6: EC TEMP (Electrical Compartment Temperature High) 20
THERMO (Thermocouple Open) 20
F7:
F8: HEAT LOW (Heat Rise Low) 20
Status Indicators 23
Door 23
Heater A 23
Heater B 23
Blower 23
Testing Options 23
Testing the B
Viewing/Clearing the Fault Log 24
Adjusting Temperatur
Checking H
Testing the Rack Oscillator 27
Enabling/Disabling Diagnostic Mode 27
Viewing Cook Counter/Time 27
Viewing Cumulative Operating Time 28
Viewing EC Temperature 28
Changing Fahrenheit/Celsius Option 29
Viewing/Entering Serial Number 29
lower Motor 24
e Offset 24
eaters A and B 25
The Control System
viceable Components
er
S
Blower Motor Controller 32
Cooling F
Display 34
Display Keypad 35
Door Switch 36
uses
F
I/O Control Board 39
Power Supply 39
elay
R
Smart Card Reader 39
Solid State Relay 40
ans 33
31
37
39
Page 7

Rack Oscillator Motor 40
Thermocouple – Cook Chamber 42
Thermocouple – Electrical Compartment 42
Thermostat – Cooling Fan 43
Thermostat – Hi-Limit 44
Voltage Sensor 45
Troubleshooting 46
No Keypad Input 46
No Display – Screen is Blank 47
The Oven Door
Serviceable Components 49
Door Gasket 50
oor Hinge 51
D
Door Switch 51
Troubleshooting 52
“Cook Door Open” Message when Door is Closed 52
The Impingement Circuit
Serviceable Components 53
Blower Motor 53
Heater E
Jetplates (Top and Bottom) 55
Swing Arm Assembly 56
lement 54
The Filtering System
Serviceable Components 57
Catalytic Converter 57
Filters 58
Cleaning the Oven
Daily Maintenance Procedures 59
Deep Clean Procedures 59
High h Batch S
High h Batch Oven Schematic 61
Schematic P
I/O Control Board Test Point Locations 64
Comprehensive Part Listing
Compr
Hardware Descriptions 69
sar
Glos
Subject Index
chematic
arts 63
t Listing
ar
ehensiv
y of T
e P
erms
65
Page 8

Page 9

SAFETY INSTRUCTIONS
MPORTANT SAFETY INFORMATION – PLEASE READ FIRST
I
Improper installation, adjustment, alteration, service, or maintenance of this equipment can cause property
damage, injury, or death. Thoroughly read the installation, operating, and maintenance instructions before
installing or servicing this equipment. Strictly adhere to the following safety information to reduce the
risk of:
o
Damage to the oven
o
Damage to property near the oven
o
Personal injury
o
Burns
o
Fire
o
Electric shock
GENERAL SAFETY INFORMATION
o
Use this appliance only for its intended uses as described in this manual.
o
Only qualified service personnel should service this appliance. Contact the nearest authorized service
facility for examination, r
o
Always ensure the oven is disconnected fr
epair, or adjustment.
om the power supply before servicing, repairing, or adjusting
any components or parts.
x
o
DO NOT place the cord near heated surfaces.
x
o
DO NOT store or use flammable vapors or liquids (e.g., gasoline) in the vicinity of this appliance.
x
o
DO NOT allow children to use this appliance.
x
o
DO NO
T place corrosive chemicals or vapors in this appliance. It is not designed for industrial or
laboratory use.
x
o
DO NOT operate this appliance if it
Has a damaged cor
d or plug
Is not working properly
Has been damaged or dropped
x
o
DO NOT cover or block any openings on this appliance.
x
o
DO NOT store this appliance outdoors.
x
o
DO NOT use this appliance near water.
x
o
DO NOT immerse this appliance or any of its components (e.g., cord, plug, etc.) in water.
x
o
DO NOT let the cord hang over the edge of a table or counter.
i
REDUCING FIRE RISK
ed,
f materials inside the o
I
en ignite or if smoke is obser
v
v
1. Keep the oven door closed.
urn off the o
T
2.
Disconnect the power cord or shut off power at the fuse/circuit breaker panel.
3.
o
Carefully attend the oven if paper, plastic, or other combustible materials are placed inside the oven
ven.
to facilitate cooking.
x
o
DO NOT leave items in the Cook Chamber when the oven is not in use.
x
o
DO NOT cook items wrapped in cling wrap or plastic film.
x
o
DO NO
ercook food.
v
o
T
Page 10

ii
SAFETY INSTRUCTIONS
REVENTING OVEN DAMAGE
P
o
When servicing this appliance, do not tear insulation to get to components. Rather, find the edge of
the insulation and remove the tape that holds it in place.
o
Operate the oven only when food is in the Cook Chamber.
o
Clean the oven daily.
o
Clean the oven only with TurboChef Oven Cleaner.
x
o
DO NOT clean with a water jet.
x
o
DO NOT slam or mishandle the oven door.
x
o
DO NOT frequently open and close the door to check the cook status of the food.
x
o
DO NOT allow cleaning solution or water to remain in the Cook Chamber longer than necessary.
GROUNDING INSTRUCTIONS
WARNING:
Improper grounding increases the risk of electric shock.
This appliance must be grounded. It is equipped with a cord that has a grounding wire and plug that,
educe the risk of electric shock by providing an escape wire for
in the ev
ent of an electrical short cir
the electric current. The wir
e must be plugged into an outlet that is pr
cuit, r
operly installed and grounded.
Consult a qualified electrician or serviceman for help understanding
o
Grounding instructions
o
Whether or not the appliance is properly grounded
x
o
DO NO
T use an extension cord. If the power supply cord is too short, request a qualified electrician
or serviceman to install an outlet near the appliance.
POWER CORD REPLACEMENT
oid potential hazar
o av
T
ds, only the manufactur
er, its service agent, or a similarly qualified person should
replace a damaged power cord.
Page 11

Theory of Operation,
Specifications, and Installation
Page 12

Page 13
THEORY OF OPERATION, SPECIFICATIONS AND INSTALLATION
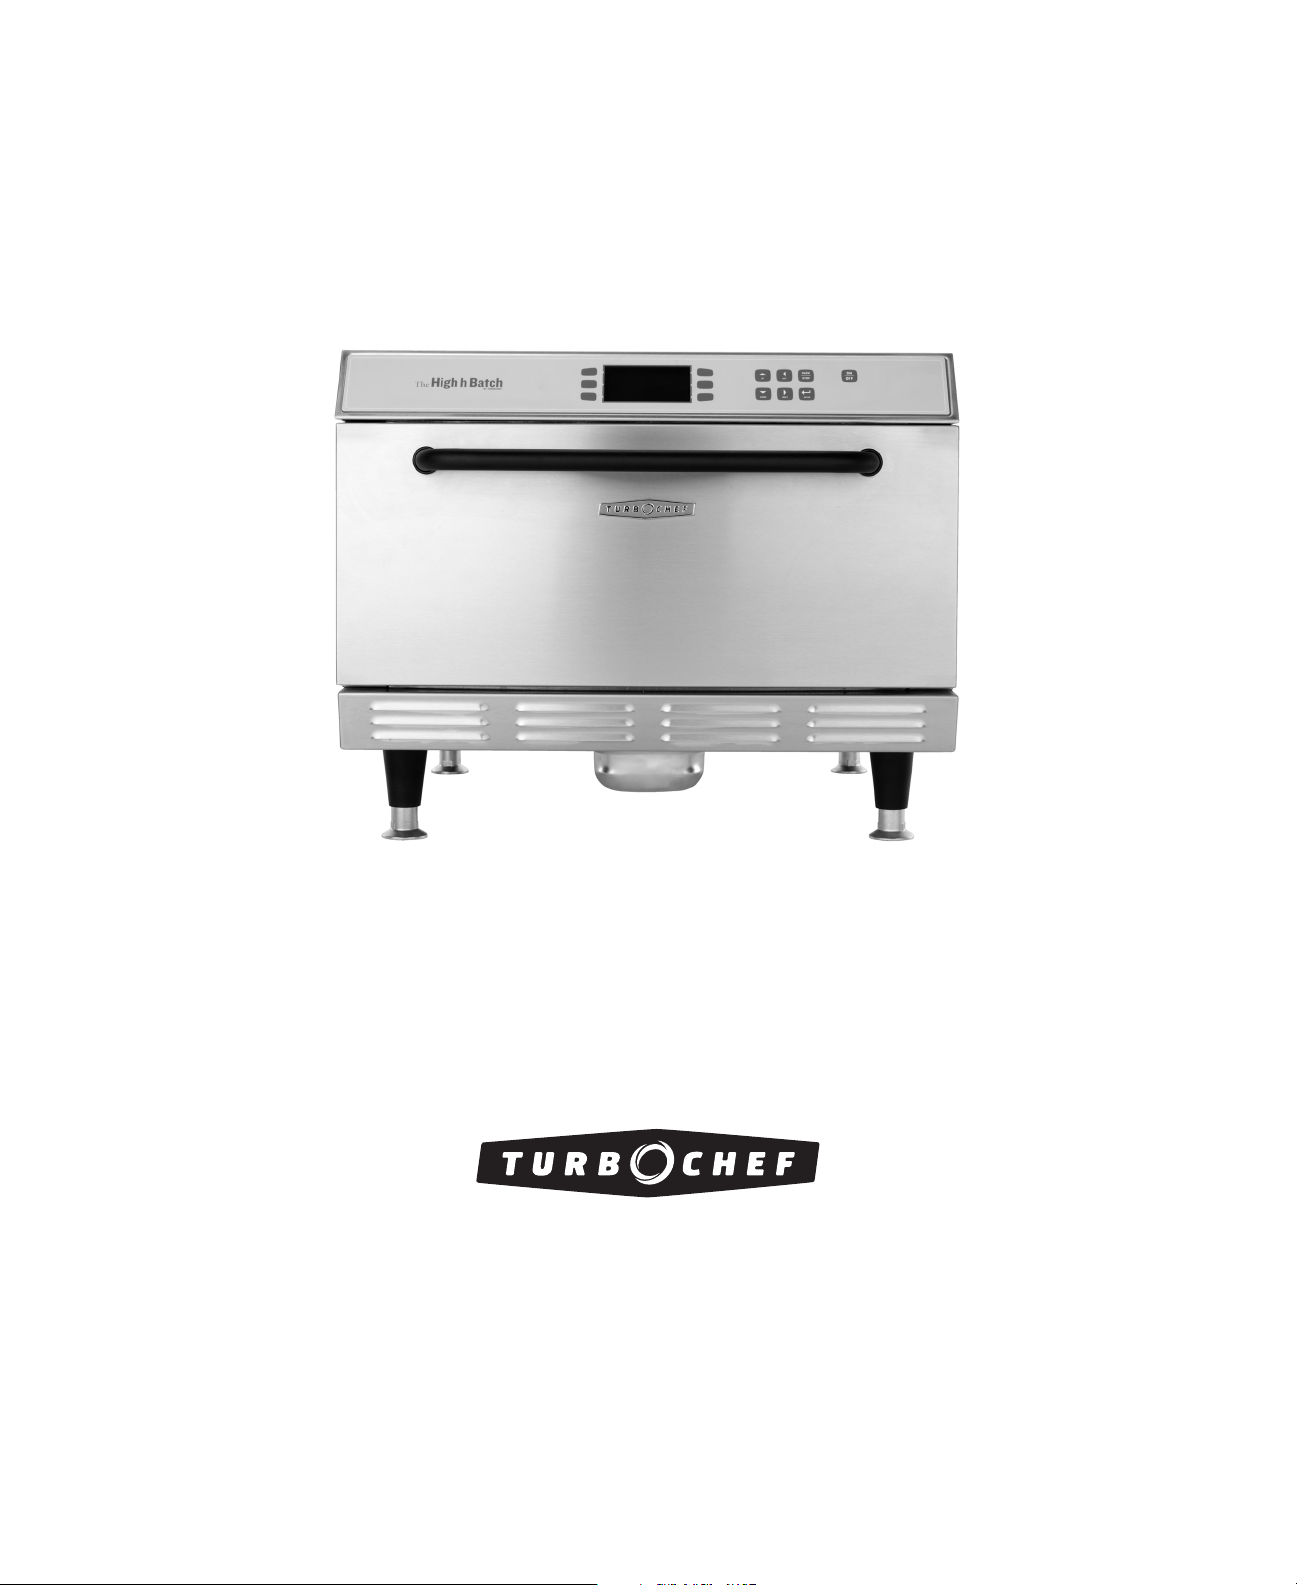
1
HEORY OF OPERATION
T
The TurboChef®High h Batch speed cook oven
uses high heat transfer rates developed by force air
impingement to rapidly cook food. The High h
batch utilizes top and bottom Jetplates that have
been optimized for specific food items. The plates
can be easily removed and replaced to facilitate
either higher or lower heat transfer rates. As a result,
the operator can cook foods that require maximum
browning/caramelizing (high heat transfer), or more
delicate foods that require low heat transfer to
ensure quality is not compromised.
The technology is similar to but about twice as fast
as the fastest impingement conveyor oven. The High
h Batch utilizes a variable speed blower, oscillating
rack, and Catalytic Converter to provide maximum
speed, minimal energy input, ventless operation and
the highest food quality.
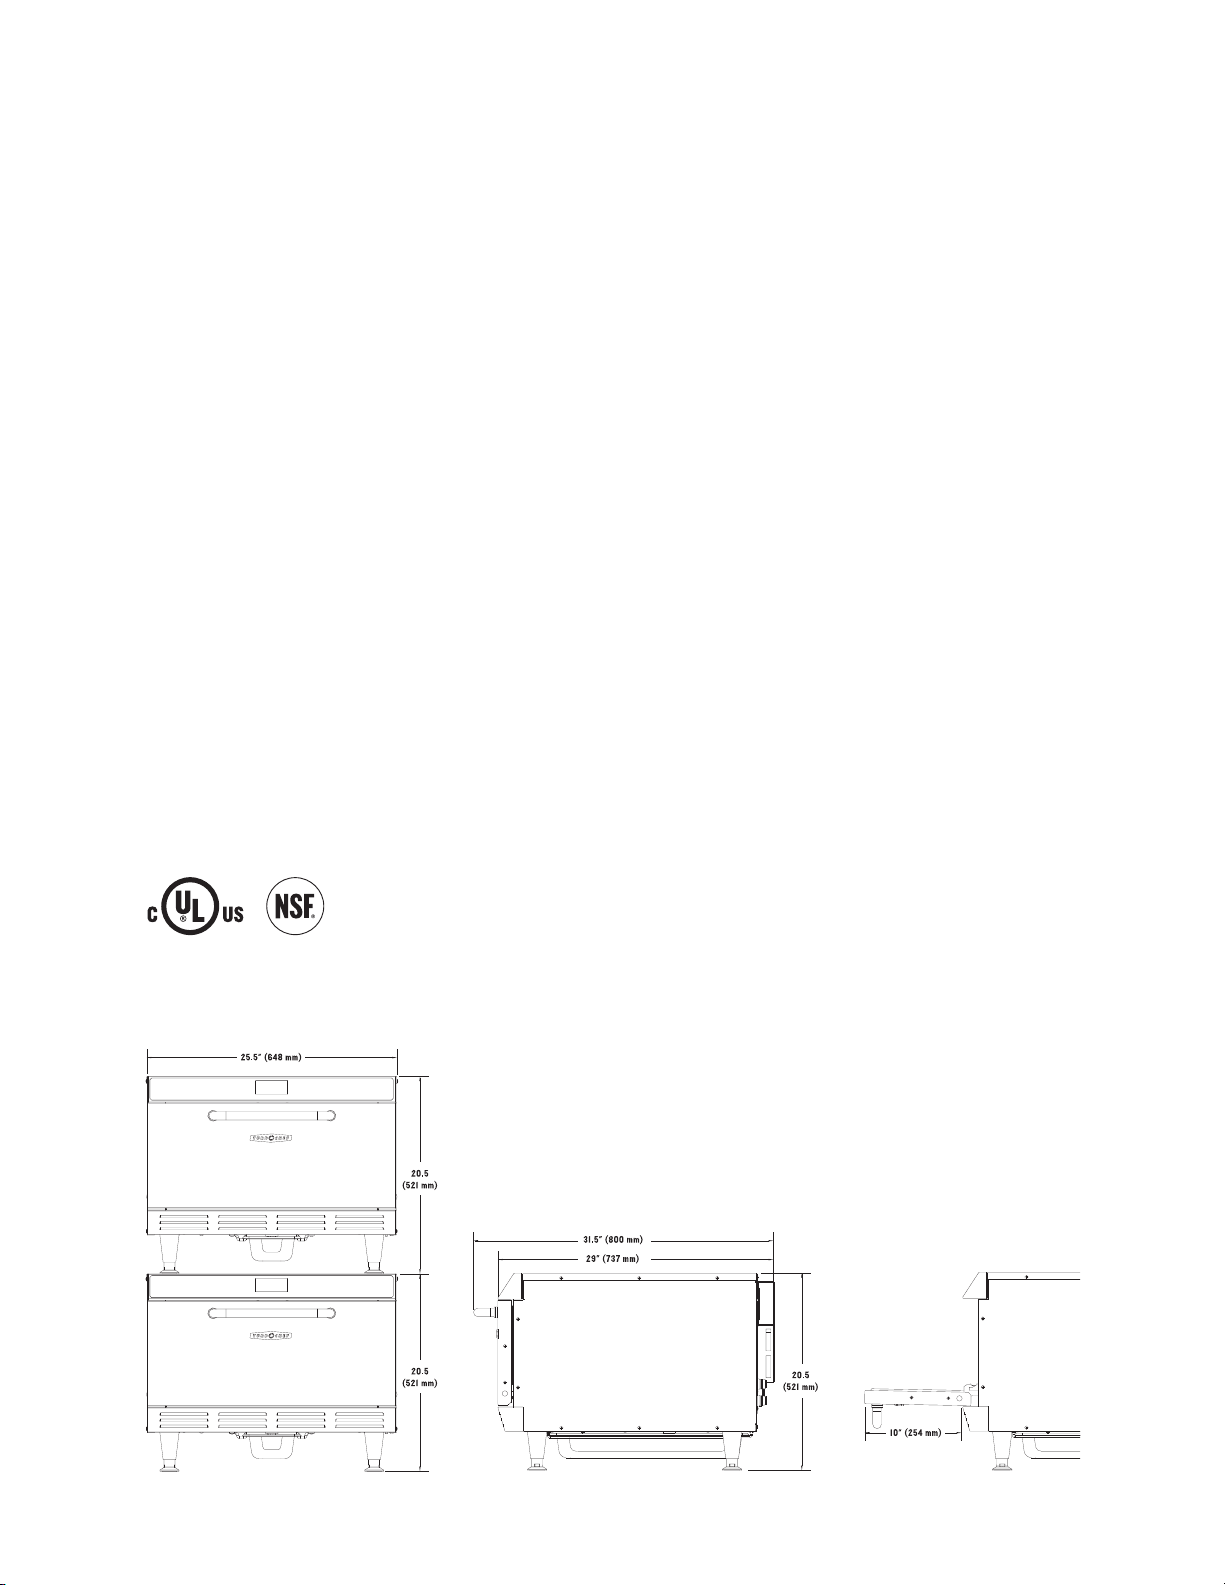
IMENSIONS
D
Single Units
Height 20.5
Width 25.5
Depth 29
with handle 31.5
′′ (521 mm)
′′ (648 mm)
′′ (737 mm)
′′ (800 mm)
Weight 157 lbs. (71 kg)
Double Units (requires Stacking Kit)
Height 41
Width 25.5
Depth 29
with handle 31.5
′′ (1042 mm)
′′ (648 mm)
′′ (737 mm)
′′ (800 mm)
Weight 314 lbs. (42 kg)
Cook Chamber
Height 8′′ (203 mm)
Width 18.75
Depth
′′ (476 mm)
16.75
′′ (425 mm)
Volume 1.45 cu. ft. (41.1 liters)
CERTIFICATIONS
UL, cUL, NSF
Wall Clearance
Top 2′′ (51 mm)
Sides 2
′′ (51 mm)
: High h Batch Dimensions
Page 14

2
THEORY OF OPERATION, SPECIFICATIONS AND INSTALLATION
ONSTRUCTION
C
Exterior
o
Stainless steel front, top, sides, and back
o
4′′ (102 mm) matte black legs
o
Cool-to-touch coated handle
o
Removable drain pan
o
Removable cook door for cleaning
o
HHBED (P/N: HHB-8601-1D)
Phase 3
Voltage 230 VAC
Frequency 50/60 Hz
Current 18 amp
Cord HO7RN-F, 4 wire
Plug IEC 309, 4-pin, 32 amp
Interior
o
304 stainless steel interior
o
Drain system helps prevent debris buildup
o
Removable Jetplates for deep cleaning
ELECTRICAL SPECIFICATIONS
North America (except Canada)/South America
o
HHB (P/N: HHB-8601-1)
Phase 1
Voltage* 208/240 VAC
Frequency 50/60 Hz
Current 24 amp
Cord 10 gauge, 3 wire, 6 foot, SOOW
Plug NEMA 6-30P
Canada
o
HHBC (P/N: HHB-8601-1C)
Phase 1
Voltage* 208/240 VAC
Frequency 50/60 Hz
Current 24 amp
Cord 10 gauge, 3 wire, 6 foot, SOOW
Plug NEMA 6-50P
oltage S
V
t
mar
S
*
ensor Technology automatically
senses the supply voltage and configures the oven
to the correct setting (208 or 240). It does not
compensate for lack of or o
ver voltage situations.
Europe/Asia/Pacific
o
HHBEW (P/N: HHB-8601-1W)
Phase 3
Voltage 400 VAC
Frequency
Current
Cord
50/60 Hz
10 amp
HO7RN-F, 5 wire
Plug IEC 309, 5-pin, 16 amp
United Kingdom/Ireland
o
HHBUK (P/N: HHB-8601-1K)
Phase 1
Voltage 230 VAC
Frequency 50/60 Hz
urrent 24 amp
C
Cord HO7RN-F, 3 wire
Plug IEC 309, 3-pin, 32 amp
NOTE: The owner is responsible for supplying
voltage that corresponds to the above specifications.
For help in answering questions about electrical
specifications, consult a qualified electrician.
INSTALLATION
Install or locate this appliance only in accordance
with the instr
uctions below.
Lifting and Placing the Oven
WARNING: Oven weight is approximately
157 lbs. (71 kg).
wo or mor
T
e persons ar
e
required to lift it.
o prevent personal injury or
T
ARNING
W
:
damage to the oven DO NOT lift the oven
rom the front and rear or by the handle.
f
WARNING: The operator must ensure that
the oven is properly placed on the table or
counter
top at all times.
urboChef will not r
T
ecogniz
a fallen oven as a warrantable claim and is not liable
for any injuries that may r
esult.
When lifting and placing the oven:
1. Position one or more persons on left and right
sides of oven.
e
Page 15

2. Lift from bottom of oven.
THEORY OF OPERATION, SPECIFICATIONS AND INSTALLATION
3
3. Place oven on surface at least 30
′′ (762 mm)
deep and capable of supporting 167 lbs (76 kg).
Setup
Once oven is properly positioned on the counter:
1. Remove packing material and/or foreign objects
from within Cook Chamber.
2. Install Oven Rack by placing it over support pins.
3. Plug in oven to appropriate electrical outlet.
Page 16

Page 17

Operating the Oven
Page 18

Page 19
PERATING THE OVEN
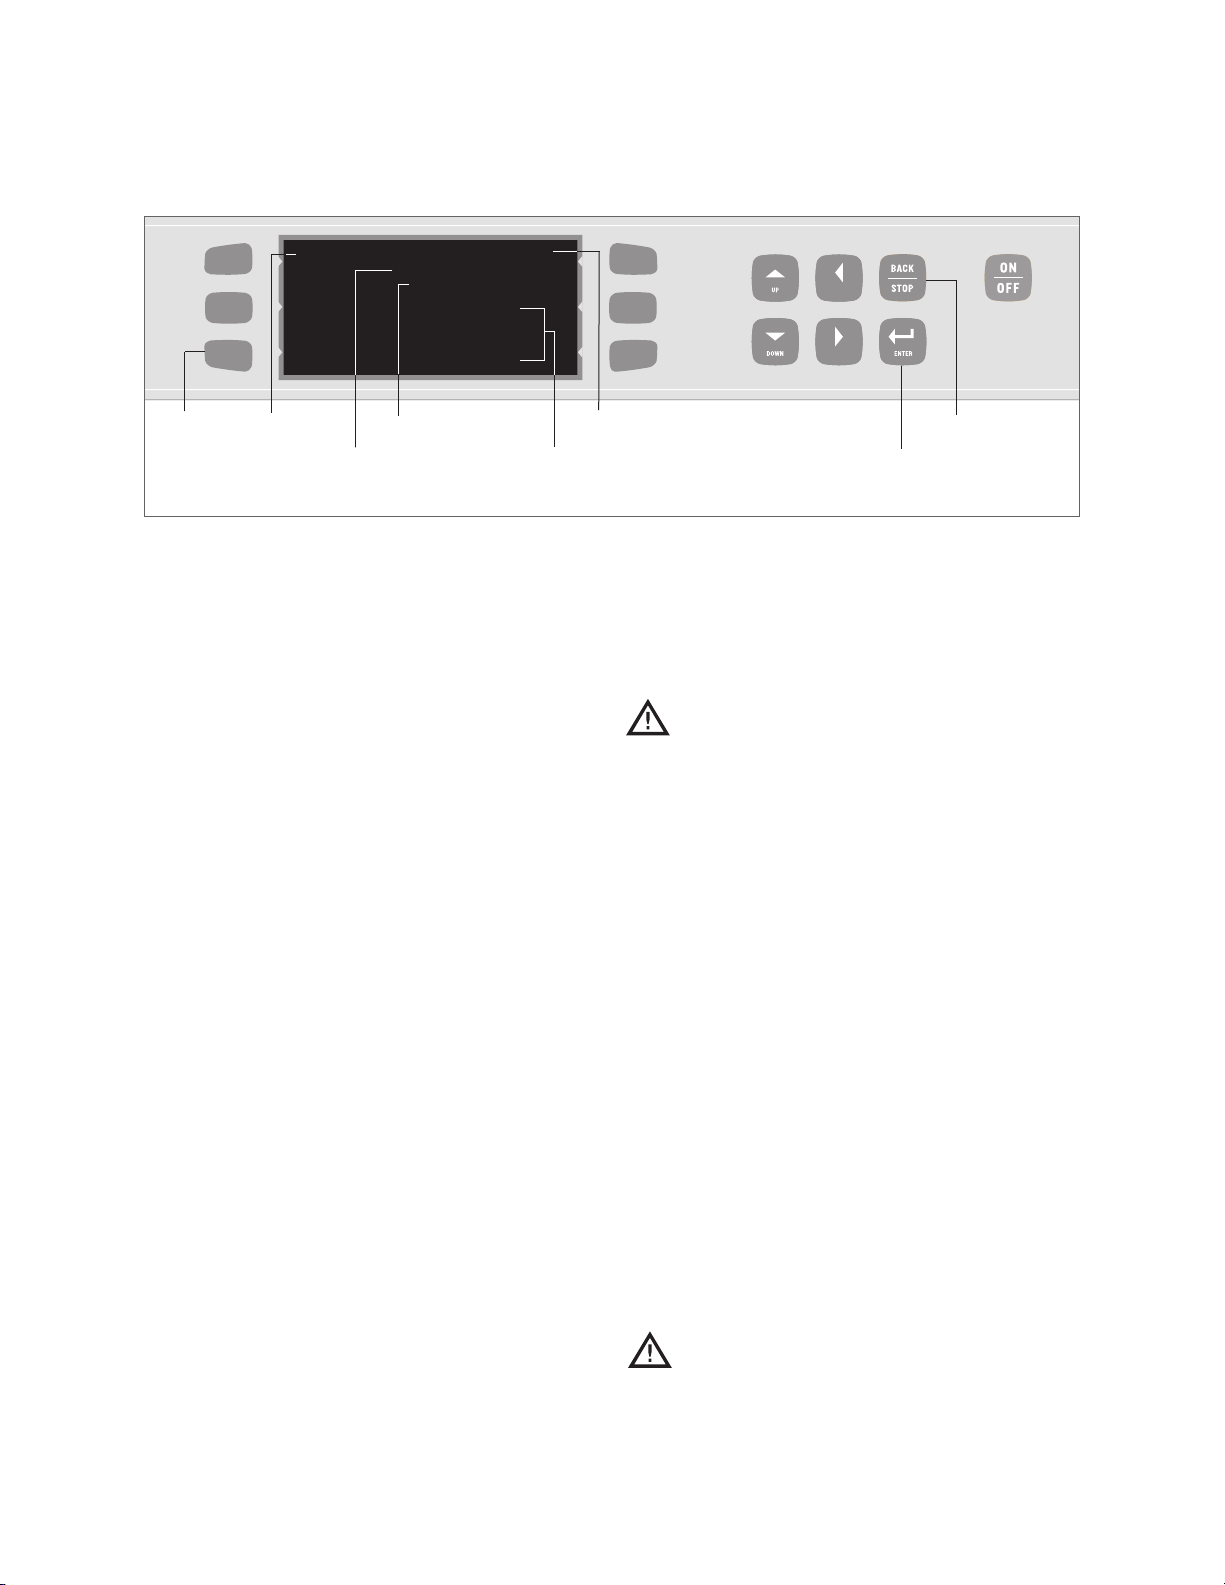
L
EFT
R
IGHT
LEFT
RIGHT
O
5
2
1
: High h Batch Keypad
This section contains information on:
o
Control Display and K
o
Powering up
o
Powering do
o
Cooking Instructions
o
Cooking Options
o
Programming Recipes
o
Using the Options Menu
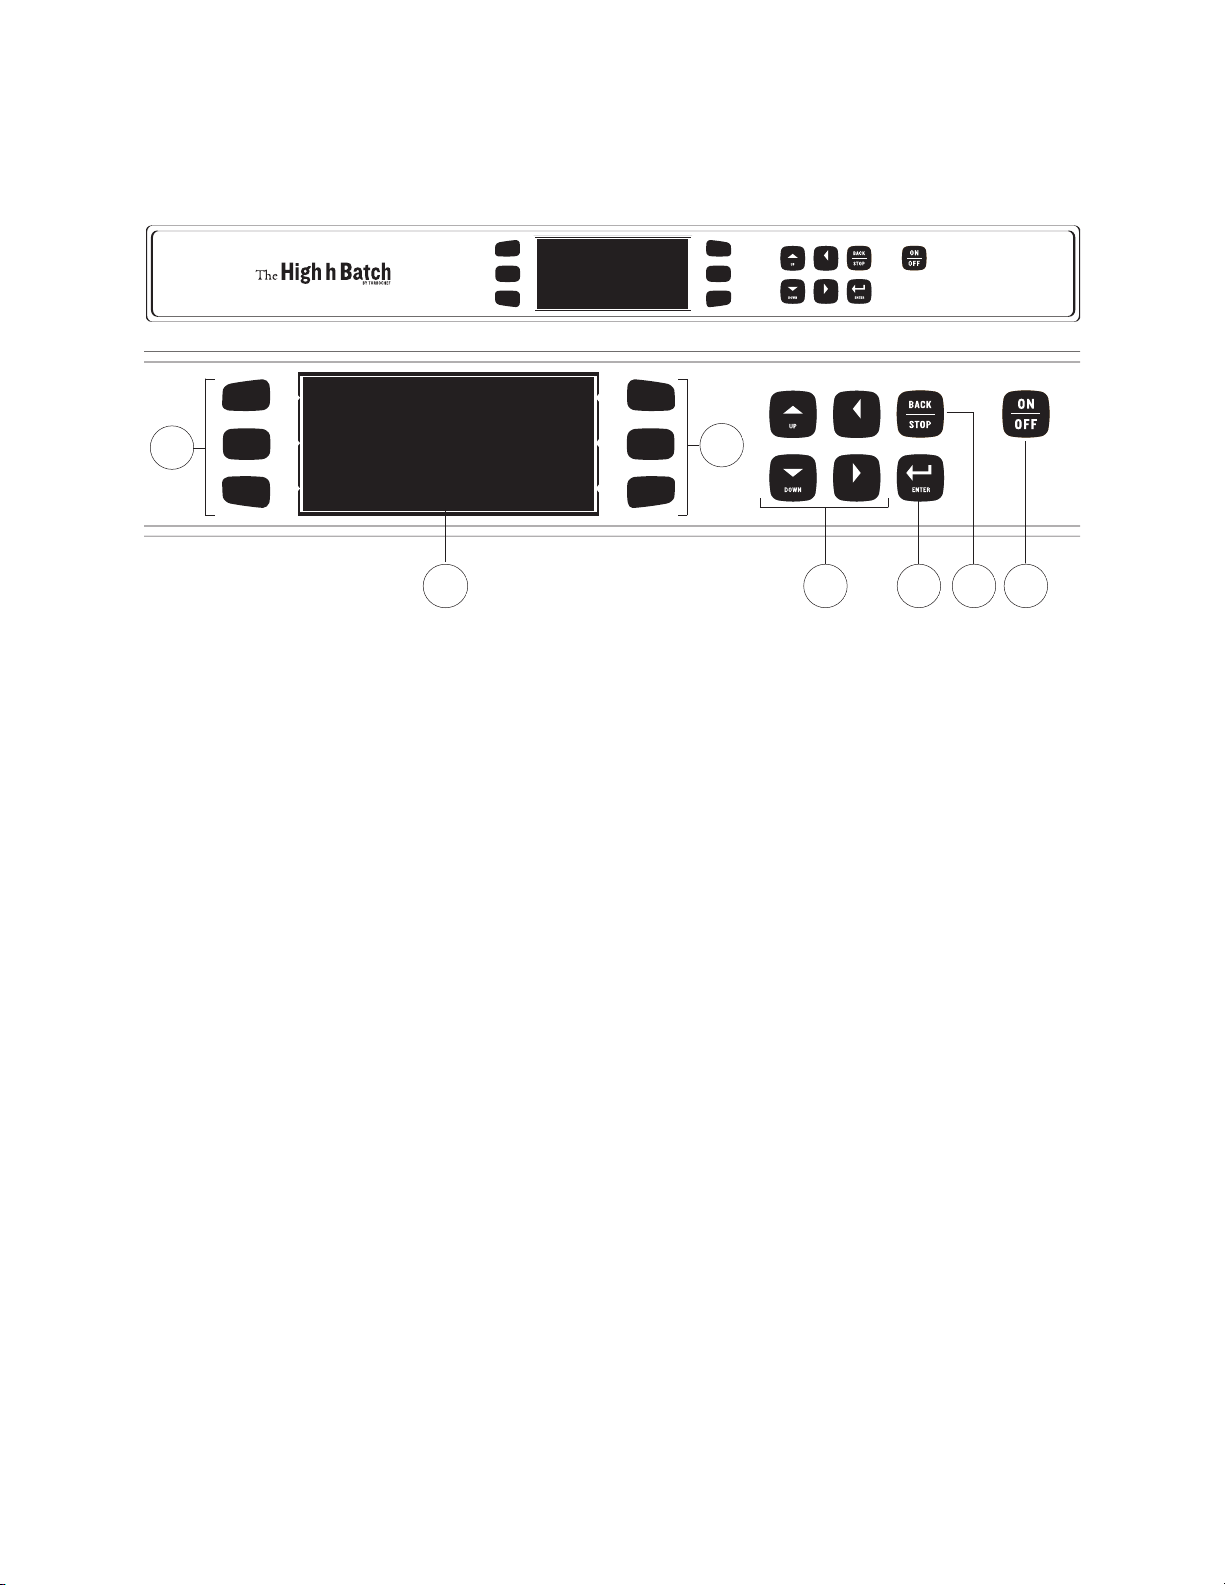
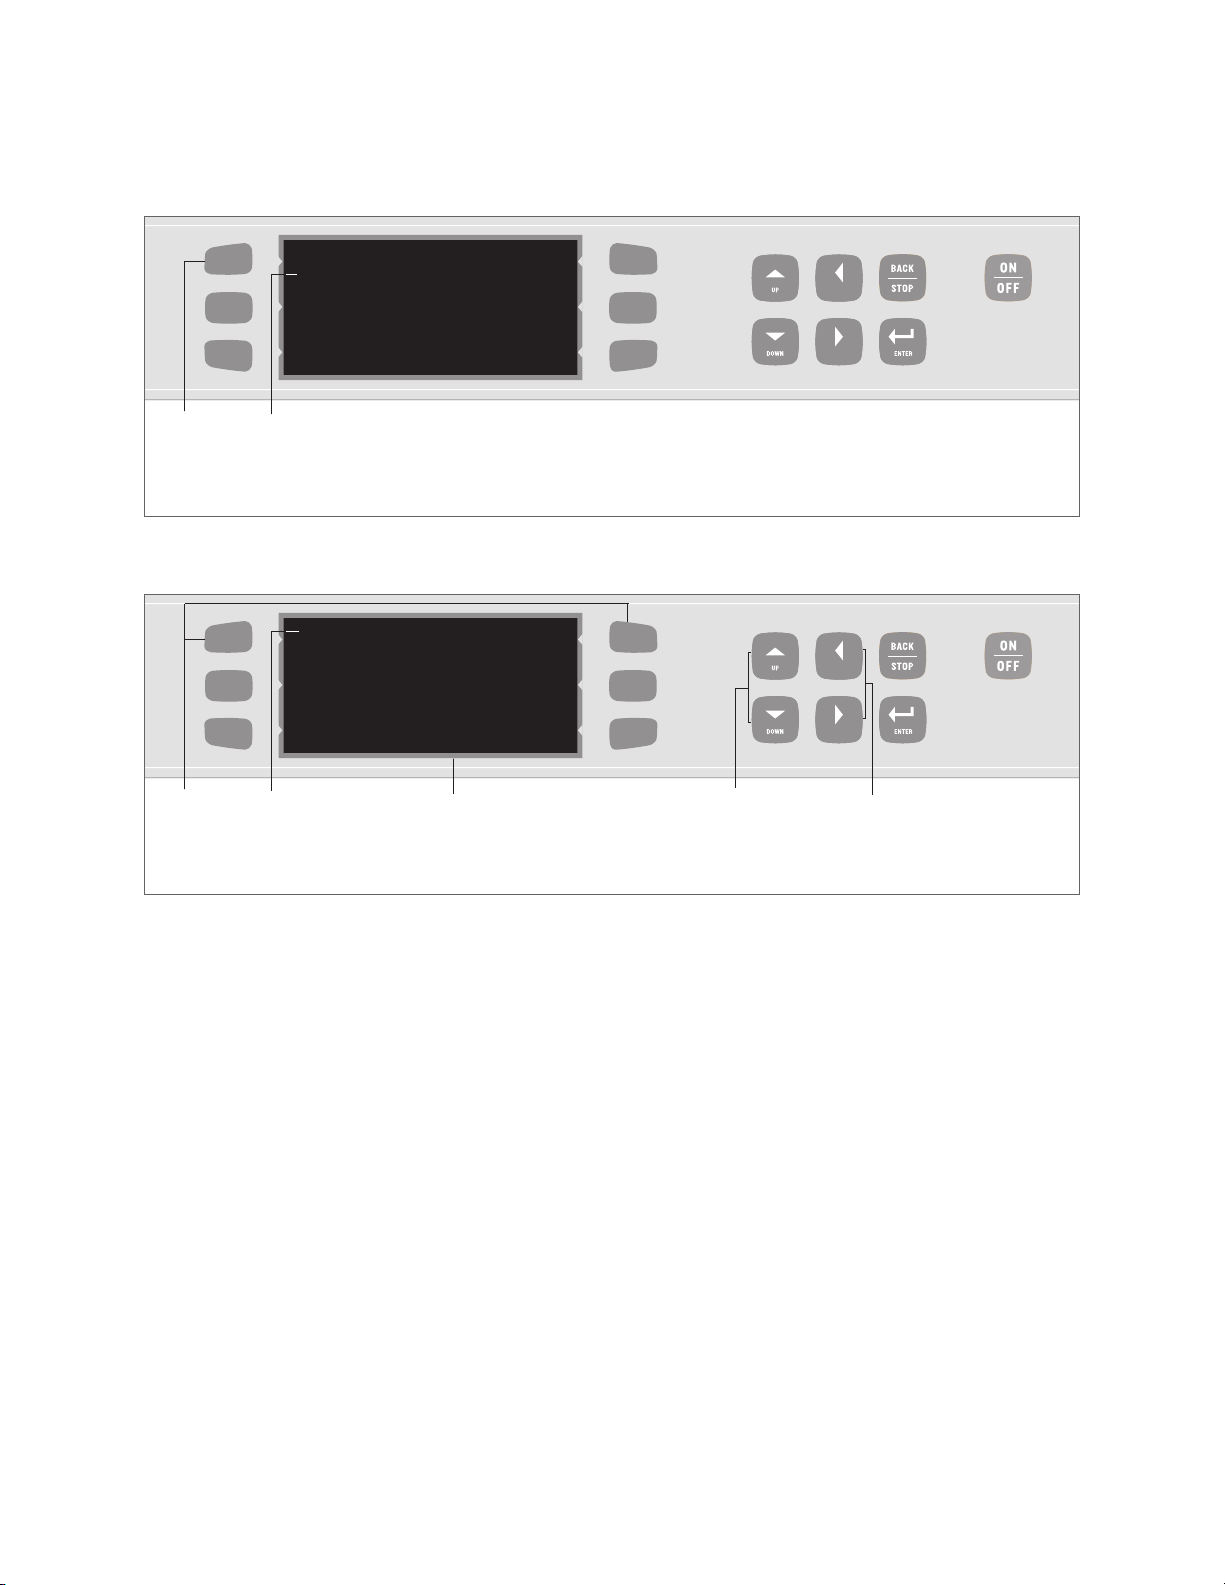
CONTROL DISPLAY AND KEY IDENTIFICATION
ence F
efer
R
wn
igure 2.
1. Display
Displays operational information.
ys
e
oft k
S
2.
ix (6) keys used for differ
S
depending on what is adjacently displayed.
3. Directional keys
Allow user to navigate menus and adjust
incremental settings.
ey Identification
ent functions
2
3
6. On/Of
Turns the oven on and off.
OVEN STATES AND MENU ACCESS
(Refer
Oven State Descriptions
1. Warm-up
2. Ready to Cook
3.
fkey
ence Figure 3, page 6)
State during which the oven warms itself to the
predetermined Cook Chamber temperature.
The oven is “ready to cook” when it has warmed
up to the preset Cook Chamber temperature. At
this point, the operator can enter cook commands
via the keypad.
Cool-down
State during which the Blower Motor blows cool
air into the Cook Chamber until the temperature
is below 150ºF (66°C). This takes approximately
90 minutes.
4 5 6
4. Enter key
Used to sav
e edited information.
5. Back/Stop key
Press to stop a Cook Cycle or to return to a
previous scr
een.
ff
O
4.
Cooking components are off and Cook
Chamber temperatur
e is belo
w 150ºF (66°C),
but Control System remains operational.
Page 20

6
OPERATING THE OVEN
Menu Descriptions
1. Edit Menu
Menu from which operator/technician can
modify Cook Chamber temperature, recipes,
and recipe settings.
2. Options Menu
Menu from which operator can enable/disable
various operative functions.
3. Recipe Menu (or “Menu”)
ighest superset of recipes, the menu consists of
H
12 food groups of 6 recipes, or 72 recipes total.
4. Test Mode Menu
Menu from which technician can run
diagnostics and check statistics in test mode.
POWERING UP
To turn on the oven, press the “ON/OFF” Key.
The oven will begin to warm up to its predefined
cooking temperature (typically 500ºF (260ºC)).
This takes appr
oximately 10 minutes.
When the Warm-up Cycle is completed, the
oven will beep and display “READY TO COOK.”
ithin a fe
W
w seconds, the oven will display food
groups from which to select a food item.
NOTE: To expedite the cooling process, open the
Oven Door.
WARNING: The oven door is hot.
To prevent possible burns, ensure that the
door is not blocking a throughway or aisle when
opened to expedite cooling process.
COOKING INSTRUCTIONS
Recipes have developed and programmed into the
ven, depending on the customer’s request.
o
To select a recipe and initiate a Cook Cycle:
Press the “ON/OFF” K
1.
ven will start warming up.
The o
ey to turn the oven on.
2. Once the oven reaches its predetermined cook
temperature (typically 500°F (260°C)), it will
display a menu.
3. Carefully place the food item to be cooked in
the Cook Chamber.
WARNING: Inside of oven is HOT and
could r
esult in injur
y.
4. To select a food group, press the corresponding
Soft Key (Figure 4)
WERING DOWN
PO
o turn off the o
T
en, pr
v
ess the “ON/OFF” Key.
groups 7–12.
Total cool down time is approximately 90 minutes.
NOTE: Press the “DOWN” Key to view food
ATE ACCESS TO:
T
VEN S
O
Edit Menu Options Menu Recipe Menu Test Mode Menu
arm-up
W
NO
NO NO NO
Ready to Cook NO NO YES NO
Cool-down YES YES NO YES
Off YES YES NO YES
: Oven State/Menu Access Table
Page 21

PERATING THE OVEN
LEFT
RIGHT
L
EFT
R
IGHT
O
7
Press the Soft Key that corresponds to the desired food
group. In this example, pressing the top right Soft Key
would access all Food Items in the “1st Group”.
: Selecting a Food Group
Press the Soft Key corresponding to the desired food item.
In this example, pressing the top right Soft Key would initiate
a Cook Cycle for the “First Item”.
: Selecting a Food Item
NOTE: Press the “DOWN” Key to view Food
Groups 7-12.
5. Each of the 12 food groups contains 6 food
items (r
ecipes). Select a recipe by pressing the
corresponding Soft Key (Figure 5).
NOTE: To immediately terminate a Cook Cycle,
press the “BACK/STOP” Key.
COOKING OPTIONS
ime S
T
f the
I
een Options (Figur
cr
ime Screen is enabled, before initiating a
T
e 6, page 8)
Cook Cycle the operator will be given the option
to adjust the cook time in 5-second increments.
To learn about enabling and disabling the Time
Screen, see page 10.
Done Screen Options (Figure 7, page 8)
f the Done Screen is enabled, when the operator
I
opens the door at the end of a Cook Cycle he/she
will be given two (2) choices:
1. Save Time – save an adjusted cook time (if Time
Screen is also enabled).
2. Cook More – cook an item longer after it reaches
the end of its Cook Cycle.
When an item is cooked longer, the oven cooks it
to the specifications of the final event in the initial
Cook Cycle. To learn about events (or phases) of a
recipe, see Modifying Recipes (pages 12-14).
o learn about enabling and disabling the D
T
een, see page 10.
Scr
one
Page 22

PERATING THE OVEN
LEFT
RIGHT
S
TART
E
NTER COOK TIME
02:00
L
EFT
RIGHT
COOK MORE
DONE
P
LEASE REMOVE
FROM OVEN
SAVE TIME
8
O
Press the “START” Soft Key (bottom right)
to initiate a Cook Cycle.
: Time Screen
Press the “SAVE TIME” Soft Key (bottom left)
to save an adjusted time.
Press the “COOK MORE” Soft Key
(bottom right) to cook an item longer.
: Done Screen
Use the “UP” and “DOWN” Keys to adjust
time in 5 second increments.
After selecting “Cook More,” adjust additional
time in 5 second increments using the “UP” and
“DOWN” Keys.
USING THE OPTIONS MENU
se the O
U
o
Enable/disable the Edit Menu
o
Erase Recipe Menu
o
E
o
Enable/disable the Time Screen
o
E
o
Enable/disable Demonstration Mode
ptions M
nable/disable the
nable/disable the Done Screen
enu to:
rite Car
W
d Function
To access the Options Menu:
1.
E
nsur
e the o
en is in either Cool-do
v
wn S
Off State.
imultaneously press and hold top left and top
S
2.
right Soft Keys for 5 seconds.
tate or
Enabling/Disabling Edit Menu (Figure 8)
nabling the Edit Menu allows operators to modify
E
Cook Chamber temperature, recipes, and recipe
settings. Disabling the Edit Menu prevents operators
from accessing these options.
By default, the Edit Menu is enabled unless
otherwise requested by the customer.
To enable/disable the Edit Menu:
1. From the Options Menu, press the “EDIT
MENU” Soft Key (top left) to turn the Edit
Menu on or off.
2.
P
O
ess the “
r
ptions M
BA
enu.
CK/ST
OP” Key to exit the
Page 23

PERATING THE OVEN
LEFT
RIGHT
OVEN OPTIONS
E
DIT MENU ON
ERASE MENU
W
RITE CARD OFF
T
IME SCREEN ON
DONE SCREEN ON
D
EMONSTRATE OFF
L
EFT
RIGHT
OVEN OPTIONS
EDIT MENU ON
ERASE MENU
WRITE CARD OFF
TIME SCREEN ON
DONE SCREEN ON
DEMONSTRATE OFF
ERASE MENU? PRESS “ENTER”
O
9
Step: 1
: E
Step: 1
Here the “Edit Menu” is turned on.
nabling/Disabling the Edit Menu
After “Erase Menu” is selected, a
confirmation message appears.
: Erasing the Menu
To access the Options Menu,
simultaneously press and hold for 5 seconds.
Step: 2
To access the Options Menu,
simultaneously press and hold for 5 seconds.
Step: 2
Step: 3
Erasing the Recipe Menu (Figure 9)
rasing the Recipe Menu will permanently delete
E
currently-stored recipes and recipe settings.
To erase the menu:
1. From the Options Menu, press the “ERASE
MENU” Soft Key (middle left) to erase menu.
ess the “ENTER” Key to confirm or the
r
P
2.
“BACK/STOP” Key to cancel.
3. Press the “BACK/STOP” Key to exit the
Options Menu.
Enabling/Disabling the Write Card Function
e 10, page 9)
(Figur
Enabling the Write Card function allows
operators to save recipes from the oven to a Smart
Card. Disabling the Write Card function prevents
operators from doing so.
By default, the Write Card function is disabled
unless other
wise r
equested b
y the customer.
To enable/disable the Write Card function:
1. From the Options Menu, press the “WRITE
CARD” Soft Key (bottom left) to turn the Write
Card function on or off.
CK/STOP” Key to exit the
BA
ess the “
r
P
2.
Options Menu.
Page 24

LEFT
RIGHT
OVEN OPTIONS
E
DIT MENU ON
ERASE MENU
W
RITE CARD OFF
T
IME SCREEN ON
DONE SCREEN ON
D
EMONSTRATE OFF
L
EFT
RIGHT
OVEN OPTIONS
EDIT MENU ON
ERASE MENU
WRITE CARD OFF
TIME SCREEN ON
DONE SCREEN ON
DEMONSTRATE OFF
10
OPERATING THE OVEN
Step: 1
: Enabling/Disabling the Write Card Function
To access the Options Menu,
simultaneously press and hold for 5 seconds.
: Enabling/Disabling the Time Screen
Here the “Write Card” function
is turned off.
Here the “Time” Screen function
is turned on.
To access the Options Menu,
simultaneously press and hold for 5 seconds.
Step: 1
Step: 2
Step: 2
Enabling/Disabling Time Screen (Figure 11)
nabling the Time Screen function allows the
E
operator to adjust the Total Cook Time before
initiating a Cook Cycle. Disabling it prevents the
operator from doing so and helps ensure originallyprogrammed cook times remain unaltered.
By default, the Time Screen is enabled unless
other
wise r
equested b
y the customer.
To enable/disable the Time Screen:
1. From the Options Menu, press the “TIME
SCREEN” Soft Key (top right) to turn the Time
Screen function on or off.
CK/STOP” Key to exit the
ess the “
r
P
2.
Options Menu.
BA
Enabling/Disabling Done Screen (Figure 12)
nable the D
E
o
Save an adjusted cook time
o
Cook an item longer after it reaches the end
one Scr
een to:
of its Cook Cycle
isabling it prevents the operator from doing the
D
e and helps ensur
v
abo
cook times r
emain unalter
e all originally programmed
ed.
By default, the Done Screen is enabled unless
otherwise requested by the customer.
To enable/disable the Done Screen:
1. From the Options Menu, press the “DONE
SCREEN
” Soft Key (middle right) to turn the
Done Screen function on or off.
2.
ess the “
r
P
CK/STOP” Key to exit the
BA
Options Menu.
Page 25

LEFT
RIGHT
OVEN OPTIONS
E
DIT MENU ON
ERASE MENU
W
RITE CARD OFF
T
IME SCREEN ON
DONE SCREEN ON
D
EMONSTRATE OFF
ere the “Done” Screen function
L
EFT
RIGHT
OVEN OPTIONS
EDIT MENU ON
ERASE MENU
WRITE CARD OFF
TIME SCREEN ON
DONE SCREEN ON
DEMONSTRATE OFF
H
is turned on.
To access the Options Menu,
simultaneously press and hold for 5 seconds.
: Enabling/Disabling the Done Screen
tep: 1
S
PERATING THE OVEN
O
Step: 2
11
Demonstration Mode is turned off.
To access the Options Menu,
simultaneously press and hold for 5 seconds.
: Enabling/Disabling the Demonstration Mode
Enabling/Disabling Demonstration Mode (Figure 13)
nabling Demonstration Mode allows the operator
E
to view/show every operational aspect of the oven
without the oven actually heating up.
By default, the Demonstration Mode is disabled
unless otherwise requested by the customer.
o enable/disable D
T
emonstration M
ode:
1. From the Options Menu, press the
“DEMONSTRATE” Soft Key (bottom right) to
turn the Demonstration Mode on or off.
Step: 1
Step: 2
PROGRAMMING RECIPES
Programming options include:
o
Adjusting the Cook Chamber Temperature
o
Modifying Recipes
o
Loading a Menu from a Smart Card
o
aving a M
S
o
Checking the Recipe Counter
ogram r
o pr
T
enu to a S
ecipes, the o
mar
v
d
t Car
en must be in either the
Cool-down State or Off State.
2. Press the “BACK/STOP” Key to exit the
ptions M
O
enu.
Page 26

PERATING THE OVEN
LEFT
RIGHT
SET TEMP 475ºF
P
RESS “ENTER”
L
EFT
RIGHT
EDIT GROUP
1ST GROUP
2ND GROUP
3RD GROUP
4TH GROUP
5TH GROUP
6TH GROUP
12
O
: Adjusting the Cook Chamber Temperature
Step: 5
: Modifying Recipes – Step 5
In this example, pressing the top right Soft Key would
access all Food Items in the “1st Group”.
Step: 3 & 4
NOTE: Press the “DOWN” Key to view Food
Groups 7-12.
Step: 5
Adjusting the Cook Chamber Temperature (Figure 14)
Ensure oven is in either the Off State or Cool-
1.
down State.
2. Verify Edit Menu is enabled (for instructions see
page 8).
3. Simultaneously press and hold the “UP” and
“DO
WN” K
eys for 1 second.
4. Adjust Cook Temperature in 25°F (15ºC) increments by using the “UP” and “DOWN” Keys.
5. Press “ENTER” Key to verify selection or press
ey to cancel.
” K
OP
the “
CK/ST
BA
NOTE: Pressing the “ENTER” Key will open the
next menu – modifying r
ecipes. If you do not wish
to modify recipes, simply press the “BACK/STOP”
Key to exit the Options Menu.
Modifying Recipes (Figures 15-18)
The Recipe function of the High h Batch speed
en maximiz
v
o
es cooking efficiency b
y allowing the
operator to preset cooking specifications for up to
72 items on his/her menu.
The High h Batch
stores these menu items into twelve Food Groups,
each containing six Food Items (recipes).
NO
TE
:
o erase all r
T
ecipes and r
ecipe settings, see
Erasing Recipe Menu, page 9.
Page 27
PERATING THE OVEN
LEFT
RIGHT
1ST GROUP
F
IRST ITEM
SECOND ITEM
T
HIRD ITEM
F
OURTH ITEM
FIFTH ITEM
S
IXTH ITEM
L
EFT
RIGHT
< 1ST GROUP> FIRST ITEM
COOK TIME 00:00
RACK ON
EVENT
% TIME
% AIR
TEST
1
100
100
2
0
100
3
0
100
4
0
100
WARMING UP
O
13
Step: 6
In this example, pressing the top right Soft Key will
allow the operator to modify the first food item in the
first food group.
: Modifying Recipes – Step 6
Step: 6a
The field selected
to be modified will
be bracketed.
Throughout this process, the oven
warms up in case the operator wishes
to test a new/modified recipe.
: Navigating the Food Item Menu
Step: 6b
Step: 6c
To modify a food item:
Ensure oven is in either the Off State or Cool-
1.
down State.
2. Verify Edit Menu is enabled (for instructions,
see page 8).
imultaneously pr
S
3.
ess and hold the “UP” and
“DOWN” Keys for 1 second.
4. Adjust the cook temperature in 25°F (15°C)
increments by using “UP” and “DOWN” Keys.
To verify selection (or to proceed without changing
ess the “ENTER” K
igur
e), pr
e 15).
the cook temperatur
5. Select the Food Group that contains the item to
be modified (F
ey
6. Select Food Item to be modified (Figure 16).
NOTE: To learn how to navigate the Food Item
Menu (Figure 17), review the following:
a. To navigate characters (numbers and letters
within a field), use the top left and top right
Soft Keys.
b. To change characters, use the “UP” and
WN” Keys. Press and hold these keys to
“DO
rapidly scroll through characters.
NOTE: Pressing the “UP” and “DOWN” Keys will
clear the field of its curr
.
ent content UNLESS y
first press either the top left or top right Soft Key.
se the “LEFT” and “RIGHT” Keys to navigate
U
c.
fields.
ou
Page 28
PERATING THE OVEN
LEFT
RIGHT
<
1ST GROUP> FIRST ITEM
COOK TIME 00:00
RACK ON
EVENT
% TIME
% AIR
TEST
1
100
100
2
0
100
3
0
100
4
0
100
WARMING UP
14
O
Step: 8
: Modifying Recipes – Steps 7-10
Step: 7a
Step: 7c
Step: 7d
Step: 7e
7. From “Food Item” Screen (Figure 18, page 14),
the operator can:
a. Enter/change food group name.
b. Enter/change food item name.
c. Set cook time b
y using the “UP” and
“DOWN” Keys (5-second increments).
d. Choose whether to turn rack on or off by
using the “UP” and “DOWN” Keys.
e. Specify Events, which allow each food item to
cook in different phases at different air levels.
o
Enter percentage of cook time per event
(total must equal 100%).
o
nter per
E
centage of air per ev
ent
(10% increments).
8. To test settings before saving, press bottom left
Soft Key. Oven will initiate a Cook Cycle to the
specifications of new settings.
Step: 7b
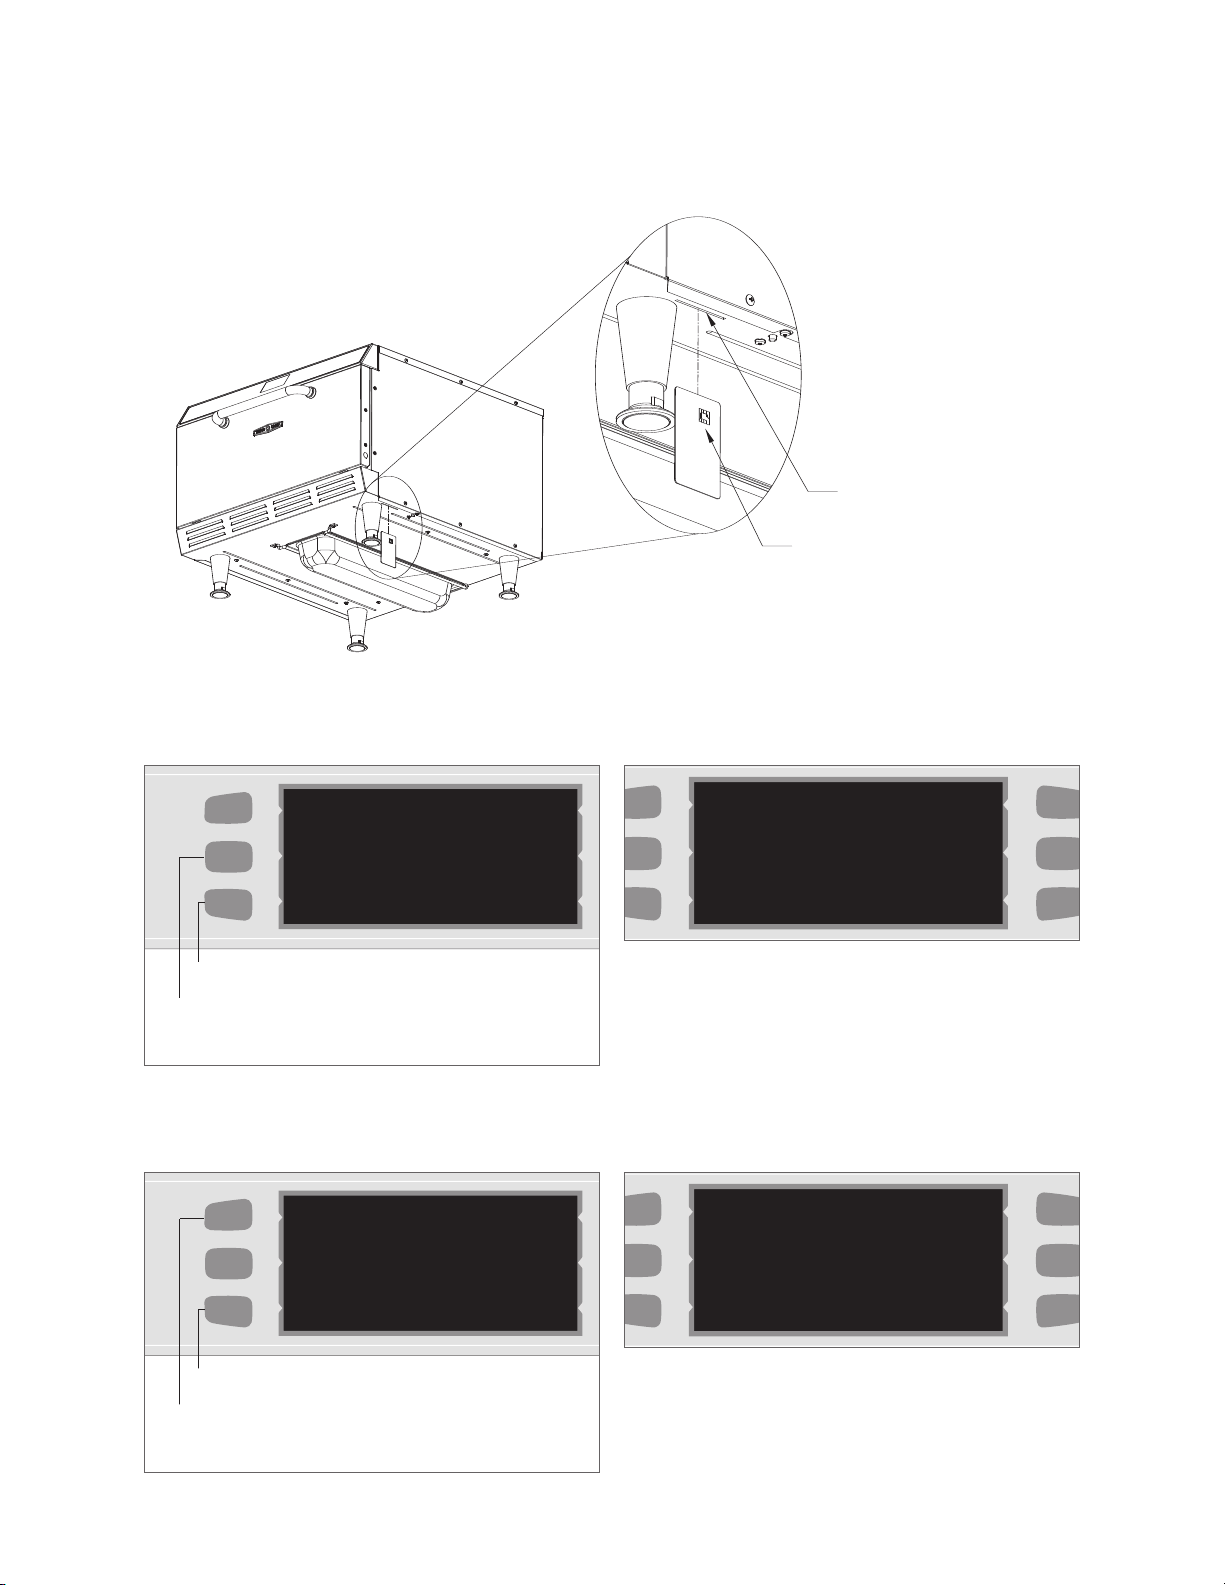
Loading Menu fr
om Smart Card (Figures 19 and 20)
Step: 10
Step: 9
CAUTION: Loading a menu from a Smart
Card will overwrite all existing recipes
programmed into the oven.
To load a menu from a Smart Card:
1. Ensure oven is in either the Off State or Cooldown S
tate.
2. Insert Smart Card into Smart Card Reader.
Orient card as shown in Figure 19.
Press bottom left Soft Key.
3.
Press middle left Soft Key to LOAD MENU
4.
FROM CARD (Figure 20).
5. Press the “ENTER” Key to confirm or the
“BACK/STOP” Key to cancel. After approximately 5 seconds, screen will display that menu
has loaded from card (Figure 20).
9. To save settings, press “ENTER” Key until SETTINGS SAVED is displayed (can be up to three
(3) times
befor
TINGS SAVED displays).
e SET
10. Press the “BACK/STOP” Key 3 times to exit
the menu (doing so before saving settings will
erase changes).
Saving Menu to Smart Card (Figures 19 and 21)
CAUTION: Saving a menu to a Smart
Card will overwrite all existing recipes
ogrammed into the S
pr
mart Card.
To save a menu to a Smart Card:
do
wn S
tate.
1. Ensure oven is in either the Off State or Cool-
Page 29
OPERATING THE OVEN
Smart Card Reader Slot
Smart Card - Notice orientation of chip
LOADING . . . DONE
FROM CARD
SAVING . . .DONE
TO CARD
LEFT
R
IGHT
L
OADING . . .
FROM CARD
LEFT
RIGHT
SAVING . . .
TO CARD
15
: Inserting Smart Card into Reader
Step: 3
tep: 4
S
: Loading from Smart Card
Step: 4
tep: 5
S
: Saving to Smart Card
Page 30

PERATING THE OVEN
LEFT
RIGHT
1ST GROUP
FIRST ITEM
SECOND ITEM
THIRD ITEM
FOURTH ITEM
FIFTH ITEM
SIXTH ITEM
0
1
0
0
0
0
ZERO COUTNERS? PRESS “ENTER”
16
O
Step: 1
At any point, the operator can zero out the
Step: 2
counters for a given group.
In this example, the second item (recipe) in the first group has completed one cook cycle.
: Checking the Recipe Counter
2. Verify Write Card function is enabled (for
instructions, see page 9).
Checking R
To view how many times each recipe (Food Item)
ecipe Counter (Figure 22)
has been used:
3. Insert Smart Card into Smart Card Reader
Orient card as shown in Figure 19.
4. Press the bottom left S
oft Key.
1. Simultaneously pr
middle right Soft K
Screen will display food items in first food
2.
group. To view other food groups, use the “UP”
5. Press middle left Soft Key to SAVE MENU TO
and “DOWN” Key.
CARD (Figure 20).
3. After viewing desired Food Items, press the
Press the “ENTER” Key to confirm or the
6.
“BACK/STOP” Key to exit the menu.
“BACK/STOP” Key to cancel. After approximately 5 seconds, scr
een will display
has saved to the card (Figure 21, page 15).
that menu
NOTE: To erase counters, press the “ENTER” Key
when viewing the totals.
Step: 3
ess and hold middle left and
eys for 3 seconds.
Page 31

Diagnosing an Issue
Page 32

Page 33

DIAGNOSING AN ISSUE
17
To help in troubleshooting, this section contains
information on
o
Fault Codes: Descriptions, Clearing Instructions,
and Troubleshooting
o
Control Display and Key Identification
o
Oven States and Menu Access
o
Status Indicators
o
Testing Options
FAULT CODES: DESCRIPTIONS, CLEARING
TRUCTIONS, AND TROUBLESHOOTING
INS
The High h Batch oven continually monitors and
logs fault conditions. For instructions on viewing
the Fault Log, see page 24.
ault Log
The F
o
Logs each fault up to 255 instances befor
e
rolling back to zero.
o
ements when a fault is detected, but does
Incr
not decrement when the fault is cleared (whether
through service or some other action).
Reference Figure 23 (below) to determine when
(i.e., which oven state) a fault can occur.
F1: BLOWER (Blower Running Status Bad)
This fault will display when the Blower Motor
Controller indicates no running status. The oven
responds to this fault by terminating a Cook Cycle
and/or reverting to the Off State. The oven will
automatically attempt to restart every 2 seconds
until the fault is cleared.
To clear this fault:
1. Turn the oven on. The Control System may be
able to successfully restart the Blower Motor.
2. Test the Blower Motor from the Test Mode
Menu (for instructions, see page 24).
Troubleshooting this fault:
To troubleshoot an F1 Fault, see the diagram
on page 18.
F2: LOW TMP (Cook Temperature Low)
This fault will display if the Cook Chamber
temperature is more than 84°F (47ºC) below the
set temperature after 5 seconds into a Cook Cycle.
To clear this fault:
Try cooking again. If the Cook Chamber
temperature is within 84°F (47ºC) of the set
temperature, the fault will clear.
Troubleshooting: F2 Fault
To troubleshoot an F2 Fault, see the diagram
on page 19.
FAULT CODE AND WHEN ACTIVE REFER TO
DESCRIPTION W
F1: B
lo
w
er R
unning S
tatus Bad* x x x x Page 17
arm-up Ready to Cook Cool Down Off State
F2: Cook Temperature Low* x x Page 17
F6: EC
F7:
Temperature High x x x x Page 20
Thermocouple O
pen
x
x x Page 20
F8: Heat Low x x Page 20
*Will terminate a Cook Cycle upon discovery.
: Fault Code Description Table
Page 34

18
DIAGNOSING AN ISSUE
Troubleshooting:
F1: BLOWER (Blower Running Status Bad)
Is the wiring
harness properly
connected?
Check the Motor
Controller, Blower
Motor, and I/O
Control Board.
(S
NO
ee page 61 for
schematic.)
NO
Correct the wiring
or replace I/O Control
Board (page 39)/M
otor
Controller (page 32)
if damaged.
YES
Is Status Indicator A backlit
on the “Test” Screen?
(see page 23)
YES
Replace Blower
Motor (page 53) or
remove obstruction.
Replace Blower
Motor. (page 53)
NO
Is the Blower Motor
spinning freely?
NO
YES
Do resistance measurements
between windings and chassis
agree with v
Windings R
alues on Motor
esistance Table?
(Figure 24, below)
NO
YES
eplace
R
Motor Controller.
page 32
(
)
TO FROM DESCRIPTION EXPECTED RESISTANCE
Black Red Winding (A-B) 2.0-2.6 Ohms
inding (A-C) 2.0-2.6 Ohms
B
lack
White
W
Red White Winding (B-C) 2.0-2.6 Ohms
Black, Red or White Green Windings to Chassis Open
: Motor Windings Resistance Table
Page 35

Troubleshooting:
F2: LOW TMP (Cook Temperature Low)
DIAGNOSING AN ISSUE
19
Is wiring from the
Door Switch to the I/O
Control Board OK?
(See page 61 for
schematic.)
YES
Replace Door Switch.
(page 36)
If problem
persists, replace the
I/O Control Board.
(page 39)
YES
Does the Display read “Cook Door
Open” when the door is closed?
ect wiring.
NO
Corr
Reset and determine
why it tripped – excess
ease buildup, etc.
gr
(Figure 25, page 20)
YES
NO
Is the Hi-Limit
Thermostat tripped?
NO
s wiring from
I
SSR to I/O Control
Board OK?
(See page 61 for
schematic.)
YES
Replace I/O Control
d. (page 39)
Boar
s the SSR defectiv
I
NO
NO
Correct wiring.
e?
YES
Replace SSR.
(page 40)
NO
lement
s the H
I
eater E
defectiv
e?
YES
e jam nut is
nsur
E
adequately tightened
and flange nut
(behind jam nut) is
not over-tightened.
If the problem
persists, r
eplace the
defective heater.
(page 54)
Page 36

20
DIAGNOSING AN ISSUE
: Location of Hi-Limit Thermostat Reset Button
F6: EC TEMP (Electrical Compartment (EC)
Temperature High)
This fault displays if the E
(EC) temperatur
ol System checks the EC Thermocouple
Contr
e exceeds 158°F (70°C). The
lectrical Compartment
once per minute.
NOTE: This fault will not terminate a Cook Cycle.
To clear this fault:
The EC temperature must recede below
158°F (70°C).
oubleshooting: F6 F
r
T
ault
To troubleshoot an F6 Fault, see the diagram
on page 21.
F7: THERMO (Thermocouple Open)
This fault will display if the Control System
detects that the CC
Thermocouple is “O
pen,”
or 999°F/C.
To clear this fault:
ystem must detect continuity on
The Contr
ol S
the thermocouple circuit.
Troubleshooting: F7 Fault
oubleshoot an F7 F
o tr
T
ault, see the diagram
on page 21.
F8: HEAT LOW
This fault will display if during warm-up the
Cook Chamber temperature fails to rise at least
35°F (approximately 18ºC) every five minutes.
NOTE: This fault will not log; rather it will
display an Error Message during warm-up.
Troubleshooting: F8 Fault
To troubleshoot an F8 Fault, see the diagram
on page 22.
Page 37

Troubleshooting:
F6: EC TEMP (Electrical Compartment (EC) Temperature High)
DIAGNOSING AN ISSUE
21
Does the oven have
room to ventilate?
(not tightly enclosed
by other appliances
or fixtures?)
YES
e both Cooling
Ar
Fans rotating?
YES
Check for
uctions in
obstr
the airflow and
remove them.
YES
NO
NO
Is the oven in an area of moderate
temperature (120ºF (49ºC) or cooler)?
Move oven to open area
or remove items that are
in close proximity.
Is Wiring Harness properly
connected? Check Cooling
Fan Thermostat, I/O Control
Boar
d, and F
ans. (See page 61
for schematic.)
YES
Replace defective
component – either Cooling
Thermostat (page 43),
Fan
I/O Control Board (page 39),
or Fan (page 33).
NO
Relocate oven to
cooler area.
NO
ect wiring.
Corr
Is the CC
Thermocouple an
open circuit?
Using the Ohm
Meter, measure at
40-pin connector
CC Thermocouple
should measure
approx. 4-5 Ohms.
Troubleshooting:
F7: THERMO (Thermocouple Open)
Is the open Thermocouple properly
YES
connected to the I/O Control Board?
NO
Correct connection.
(See page 61 for schematic.)
YES
.
NO
Replace the defective Thermocouple.
(page 42)
Replace I/O Control Board.
(page 39)
Page 38

22
DIAGNOSING AN ISSUE
Troubleshooting:
F8: HEAT LOW
Is the Hi-Limit
Thermostat tripped?
YES
Reset and
determine why it
tripped – excess
grease buildup, etc.
(Figure 25, page 20)
YES
Is the Blower Motor blowing air?
NO
Replace defective
. (page 54)
heater
Verify Solid State
Relay is not shor
across output.
Is the Heater
Element defective?
YES
ted
Replace SSR.
(page 40)
NO
Is the Solid S
defective?
YES
NO
to troubleshoot
F1: BLOWER
(Blower Running
elay
tate R
NO
Is wiring from SSR to
I/O Contr
ol Boar
(See page 61 for
schematic.)
See page 17
Status Bad)
d OK?
eplace I/O Contr
R
d. (page 39)
Boar
YES
ol
NO
Correct wiring.
Page 39

L
EFT
R
IGHT
: Test Mode Menu, Screen 1 of 2
IAGNOSING AN ISSUE
D
23
STATUS INDICATORS
Displayed in Test and Diagnostic Modes, Status
Indicators help in troubleshooting. The following
oven par
ts are repr
of the display (Figur
esented by letters at the bottom
e 26).
Door (represented by “D”)
Backlit = OPEN
Not backlit = CLOSED
Heater A (represented by left “H”)
Backlit = OFF
Not backlit = ON
Heater B (represented by right “H”)
Backlit = OFF
Not Backlit = ON
Blower (represented by “A” for “air”)
acklit = OFF
B
Not Backlit = ON
TE: In Figure 26, the door is open (the “D”
NO
is backlit), Heater A and B are on (neither “H” is
backlit) and the Blower is off (the “A” is backlit).
TESTING OPTIONS
From the Test Mode Menu (Figure 26), a service
technician can test/reference the following oven
components:
o
wer Motor
Blo
o
Fault Log
o
Temperature Offset
o
Heaters A & B
o
Rack Oscillator
o
Diagnostic Mode
o
Cook Counter/Time
o
Cumulative Operating Time
o
Electrical Compar
o
Fahrenheit/Celsius Options
o
Serial Number
tment Temperature
To access the Test Mode Menu:
1. Ensure the oven is in the Off or Cool-down
State.
2. Simultaneously press and hold the “Down” and
eys for 1 second.
” K
“Right
NOTE: The Test Mode Menu contains two
screens. Use the “UP” and “DOWN” Keys to toggle
from screen to screen.
Page 40

L
EFT
R
IGHT
LEFT
RIGHT
24
IAGNOSING AN ISSUE
D
Step: 1/2
: Testing the Blower Motor
Step: 1
: Viewing the Fault Log
Airflow increases 10%
each time the “BLOWER”
Soft Key is pressed.
In this example, test shows the oven has
logged one (1) F1 Fault.
Status Indicator “A”
should not be backlit.
Simultaneously press and hold for 1
second to get to the Test Mode Menu
(Screen 1). NOTE: Oven must be in
the Off or Cool-down State.
second to get to the Test Mode Menu
(Screen 1). NOTE: Oven must be in
the Off or Cool-down State.
Step: 2
Step: 3Simultaneously press and hold for 1
Step: 3
Testing the Blower Motor (Figure 27)
From Screen 1 of the Test Mode Menu, press
1.
the “BLOWER” Soft Key (top left).
2. Continue pressing the “BLOWER” Soft Key (top
left) to raise blower speed in 10% increments.
3. When finished, press the “BACK/STOP” Key to
end the test and exit the
T
ode Menu.
est M
Viewing/Clearing the Fault Log (Figure 28)
1. From Screen 1 of the Test Mode Menu, press
the “FAULTS” Soft Key (middle left).
2.
o z
T
o-out the F
er
ault Log, pr
ess the “Enter” key.
3. When finished, press the “BACK/STOP” Key to
est Mode Menu.
exit the
T
Adjusting the Temperature Offset (Figure 29)
Temperature Offset is a feature that ensures
The
accurate temperature readings where the food actually
cooks, as opposed to where the thermocouple is.
The value entered for temperature offset will
deduct from the oven’s temperature reading. For
example, if the oven temperature = 500ºF, and the
ven will display
temperatur
e offset is 20ºF
, the o
480ºF.
To adjust the Temperature Offset:
1. From Screen 1 of the Test Mode Menu, press
the “OFFSET” Soft Key (bottom left).
oft Key to
Continue pr
2.
adjust the Temperature Offset in 5°F increments.
essing the “
OFFSET
” S
Page 41

IAGNOSING AN ISSUE
LEFT
RIGHT
L
EFT
R
IGHT
D
25
Step: 1/2
: A
In this example, Heater A is on.
: Checking Heater A
In this example, the Temperature Offset is
set at 20ºF (approximately 11ºC).
djusting the Temperature Offset
Step: 1/2
Step: 3Simultaneously press and hold for 1
second to get to the Test Mode Menu
(Screen 1). NOTE: Oven must be in
the Off or Cool-down State.
Step: 3Simultaneously press and hold for 1
second to get to the Test Mode Menu
(Screen 1). NOTE: Oven must be in
the Off or Cool-down State.
NOTE: Adjustments can be made only in
ahrenheit. (5ºF equals approximately 2.8ºC.)
F
NOTE: At 20°F, pressing the “OFFSET” Soft Key
rolls the Temperature Offset back to 0°F.
3. Press “ENTER” to confirm.
4. When finished, press the “BACK/STOP” Key to
exit the
Test Mode Menu.
Checking Heaters A and B (Figures 30-31)
NOTE: If the Blower Speed is “0”, the Blower will
w at the initiation of
automatically set to idle air
flo
this test.
To turn on Heater A: (Figure 30)
From Screen 1 of the Test Mode Menu, press
1.
the “HEATER A” Soft Key (top right).
2. When finished testing, press the “HEATER A”
Soft Key (top right) to turn Heater A off.
3.
ess the “
r
P
BACK/STOP” Key to end the test
and exit the Test Mode Menu.
To turn on Heater B: (Figure 31, page 26)
1. From Screen 1 of the Test Mode Menu, press
the “HEATER B” Soft Key (middle right).
2. When finished testing, press the “HEATER B”
Soft Key (middle right) to turn Heater B off.
3. Press the “BACK/STOP” Key to end the test
and exit the Test Mode Menu.
Page 42

LEFT
RIGHT
L
EFT
RIGHT
L
EFT
RIGHT
26
IAGNOSING AN ISSUE
D
In this example, Heater B is on.
: Checking Heater B
In this example, the Rack Oscillator is on.
: Testing the Rack Oscillator
Step: 1/2
Step: 1/2
second to get to the Test Mode Menu
(Screen 1). NOTE: Oven must be in
ff or Cool-down State.
the O
second to get to the Test Mode Menu
(Screen 1). NOTE: Oven must be in
the Off or Cool-down State.
Step: 3Simultaneously press and hold for 1
Step: 3Simultaneously press and hold for 1
Step: 2
n this example, the D
I
iagnostic M
ode is
enabled. If it were disabled, the screen
would read “Normal Display” rather
then “Diag Display”.
: Enabling/Disabling the Diagnostic Mode
tep: 1
S
imultaneously pr
S
ess and hold for 1
second to get to the Test Mode Menu
(Screen 1). NOTE: Oven must be in
the Off or Cool-down State.
tep: 3
S
Page 43

IAGNOSING AN ISSUE
LEFT
RIGHT
D
27
Step: 2/3
: Viewing the Cook Counter/Cumulative Cook Time
In this example, the oven has completed 10 Cook
Cycles. Press the “COOKS” Soft Key again to
view the cumulative cook time.
Testing the Rack Oscillator (Figure 32)
NOTE: The Oven Rack will not oscillate if it is
not properly set on the support pins.
To test the Rack O
scillator:
1. From Screen 1 of the Test Mode Menu, press
the “RACK OSC” Soft Key (bottom right).
When finished testing, press the “RACK OSC”
2.
Soft Key (bottom right) again to turn the rack
oscillator off.
Press the “BACK/STOP” Key to end the test
3.
and exit the Test Mode Menu.
Enabling/Disabling the Diagnostic Mode (Figure 33)
Enable Diagnostic Mode to
o
View Cook Cycle parameters when cooking.
o
View Status Indicators (page 23) during a
cle.
Cook C
o enable/disable the D
T
From Screen 1 of the Test Mode Menu, press
1.
y
iagnostic Mode:
the “DOWN” Key to toggle to Screen 2 of the
Test Mode Menu.
2. Press “DIAG” Soft Key (top left) to turn the
Diagnostic Mode on or off.
Step: 1
Simultaneously press and hold for 1
second to get to the Test Mode Menu
(Screen 1). NOTE: Oven must be in
the Off or Cool-down State.
Step: 4
3. When finished, press the “BACK/STOP” Key to
exit the Test Mode Menu.
Viewing Cook Counter/Time (Figure 34)
The High h Batch oven logs how many Cook
Cycles hav
e completed, as well as the cumulative
cook time.
w how many Cook Cycles have completed
To vie
and the cumulative cook time:
1. From Screen 1 of the Test Mode Menu, press
DOWN” Key to toggle to Screen 2 of the
the “
Test Mode Menu.
2. Press the “COOKS” Soft Key (middle left) to view
cles completed.
total number of Cook C
y
3. To view the cumulative cook time, press the
COOKS
“
When finished, press the “BACK/STOP” Key
4.
” S
ey (middle left) again.
oft K
to exit the Test Mode Menu.
NOTE: To permanently erase the Cook Cycle
totals, pr
ess the “ENTER” K
ey when vie
wing the
total number of completed Cook Cycles.
Page 44

LEFT
RIGHT
L
EFT
R
IGHT
28
IAGNOSING AN ISSUE
D
Step: 2
: Viewing the Cumulative Operating Time
In this example, the EC
Temperature is 110ºF (43ºC)
: Viewing the Electrical Compartment (EC) Temperature
In this example, the oven has been on for
15 hours and 30 minutes.
Step: 2
Step: 1
Step: 1
imultaneously press and hold for 1
S
second to get to the Test Mode Menu
(Screen 1). NOTE: Oven must be in
the Off or Cool-down State.
Simultaneously press and hold for 1
second to get to the Test Mode Menu
(Screen 1). NOTE: Oven must be in
the Off or Cool-down State.
Step: 3
Step: 3
Viewing the Cumulative Operating Time (Figure 35)
igh h Batch oven logs the total amount of
The H
time the oven has been on.
To view this statistic:
1. From Screen 1 of the Test Mode Menu, press
the “DOWN” Key to toggle to Screen 2 of the
Test Mode Menu.
2. Press the “ACCUM” Soft Key (bottom left) to
view cumulative operating time.
3. When finished, press the “BACK/STOP” Key to
exit the Test Mode Menu.
NOTE: To permanently erase the Cumulative
perating time, press the “ENTER” Key when
O
viewing the total.
Viewing the Electrical Compartment (EC) Temperature
(Figure 36)
1. From Screen 1 of the Test Mode Menu, press
ey to toggle to Screen 2 of the
” K
WN
DO
the “
Test Mode Menu.
2. Press the “ºELEC” Soft Key (top right) to view
the EC Temperature.
When finished, pr
3.
ess the “
BA
CK/ST
OP
ey to
” K
exit the Test Mode Menu.
Page 45

IAGNOSING AN ISSUE
L
EFT
RIGHT
LEFT
RIGHT
D
29
In this example, the temperature is
being measured in Fahrenheit.
: Changing the Fahrenheit/Celsius Option
Serial Number will be displayed.
Simultaneously press and hold for 1 second to get to the Test Mode
Menu (Screen 1). NOTE: Oven must be in the Off or Cool-down State.
: Viewing/Entering the Serial Number
Step: 2
Step: 2
Step: 1
second to get to the Test Mode Menu
(Screen 1). NOTE: Oven must be in
ff or Cool-down State.
the O
Step: 1
Step: 5Step: 3/4
Step: 3Simultaneously press and hold for 1
Step: 6
Changing the Fahrenheit/Celsius Option (Figure 37)
From Screen 1 of the Test Mode Menu, press
1.
the “DOWN” Key to toggle to Screen 2 of the
Test Mode Menu.
2. Press the “ºF/ºC” Soft Key (middle right) to
change the type of temperature measurement.
When finished, pr
3.
ess the “
BACK/STOP” Key to
exit the Test Mode Menu.
Viewing/Entering the Serial Number (Figure 38)
1. From Screen 1 of the Test Mode Menu, press
the “DOWN” Key to toggle to Screen 2 of the
enu.
ode M
est M
T
2. Press the “S/N” Soft Key (bottom right) to view
the S
erial N
umber.
3. To change the Serial Number or enter it for the
first time, pr
ess either the “UP” or “DOWN”
Key. An editable Serial Number will display
above the current one.
4. Edit each character using the “UP” and “DOWN”
Key. The cursor will move to the next character
ou wait 2 seconds.
if y
Press the “ENTER” Key to confirm or the
5.
“BACK/STOP” Key to cancel.
6. When finished, press the “BACK/STOP” Key to
enu.
ode M
est M
T
exit the
Page 46

Page 47

The Control System
Page 48

Page 49

The Control System signals, senses, commands, and
actuates the oven’s other components. For a
schematic that includes all Control System components, see Figure 61, page 61. For more comprehensive hardware descriptions, see page 69.
This section contains:
o
Serviceable Component Information and
Replacement Instructions
o
Parts and Part Numbers
o
Troubleshooting
THE CONTROL SYSTEM
ERVICEABLE COMPONENTS
S
The following components of the Control System
may at some point need to be replaced:
o
Blower Motor Controller
o
Cooling Fans – Inlet and Exhaust
o
Display
o
Display Keypad
o
Door Switch
o
Fuses
o
I/O Control Board
o
Power Supply
o
Rack Oscillator Motor
o
Relay
o
Smart Card Reader
o
Solid State R
o
Thermocouple – CC
o
Thermocouple – EC
o
Thermostat – Cooling Fan
o
Thermostat – Hi-Limit
o
Voltage Sensor
elay
31
Page 50

2
4
3
1
32
THE CONTROL SYSTEM
Blower Motor Controller (Figure 39)
The proprietary Brushless DC Blower Motor
Controller actuates the Blower Motor.
To replace a defective Blower Motor Controller:
1. Ensure “Cool Down” process is completed. (“Cool
Down” message will disappear upon completion)
and unplug the oven.
2. Remove Blower Motor Controller Bracket. The
Motor Controller is attached to the bracket on
the reverse side.
3. Disconnect Wiring Harness from the defective
Blower Motor Controller.
4. Replace the defective Blower Motor Controller
with P/N 100443.
5. Reconnect Wiring Harness and reattach the
Blower Motor Controller cover.
NUMBER P
1
2
3
4
: Removing Blower Motor Controller
ART
er M
w
lo
B
w – B
e
Scr
racket – B
B
w – B
e
Scr
otor Contr
otor Contr
er M
w
lo
er M
w
lo
otor Contr
er M
w
lo
oller
otor Contr
ART NUMBER
P
100443
oller (x4) 101688
oller
oller Bracket (x4) 101688
HHB-8111
Page 51

THE CONTROL SYSTEM
Airflow
5
6
7
8
9
Airflow
33
Cooling Fans (Figure 40)
Located on the back of the oven, the Cooling Fans
ventilate air into the Electrical Compartment (via the
inlet fan), then back out (via the exhaust fan).
To replace a defective fan:
1. Ensure “Cool Down” process is completed (“Cool
Down” message will disappear upon completion)
and unplug the oven.
2.
Remove side panel nearest to defective fan.
3. If removing exhaust fan, remove covering.
4. Remove finger guard.
NOTE: The screws that hold finger guards in place
also hold fans in place.
5. Disconnect Wiring Harness from fan.
6. Install new fan (P/N 100516) and reconnect
Wiring Harness.
7. Reinstall finger guard(s)/covering.
8. Reattach side panel(s).
NUMBER PART PART NUMBER
5 Cooling Fans – Inlet/Exhaust 100516
6 Cooling Fan Finger Guard 100087
: R
7 Screw – Cooling Fan Assy (4 x 2 fans = 8) 101694
8 Cover – Cooling Fan (Exhaust) HHB-8079
9 Screw – Cooling Fan Cover (x3) 101688
eplacing Cooling F
ans
Page 52

34
10
11
12
13
14
15
16
17
18
THE CONTROL SYSTEM
Display (Figure 41)
To replace a defective Display:
1. Ensure “Cool Down” process is completed (“Cool
Down” message will disappear upon completion)
and unplug the oven.
2. Remove both side panels.
3. Remove Display Panel.
4. If ribbon cable is damaged, replace with P/N
103024 (not pictured) and jump to step 10.
5. If Display is defective, remove from Display
Panel.
6. Remove Display Brackets from Display.
7. Replace Display with P/N 100505.
: R
NUMBER PART PART NUMBER
10 Display 100505
11 Screw – Display (x4) 101520
12 Bracket – Display (x2) HHB-8130
13 Nut – Display (x2) 102963
14 Panel – Display HHB-8025
15 Panel – Left Side HHB-8023-2
16 Screw – Side Panel (x8 per side) 101688
17 Panel – Right Side HHB-8024-2
18 Screw – Front Side Panel (x2 per side) 101663
eplacing the D
isplay
Page 53

THE CONTROL SYSTEM
19
35
8. Attach Display Brackets to the new Display.
9. Attach new Display to Display Panel.
10. Reinstall Display Panel and reattach side panels.
Display Keypad (Figure 42)
The keypad is connected to I/O Control Board via
14 Pin Flat Cable.
To replace a defective keypad:
1. Ensure “Cool Down” process is completed (“Cool
Down” message will disappear upon completion)
and unplug the oven.
2. Remove Right Side Panel.
3. Disconnect keypad cable at I/O Control Board.
(See page 61 for schematic.)
4. Gently peel keypad from Display Panel. If any
adhesive residue remains on the Display Panel,
clean with MEK.
5. Route the new keypad cable through correct
openings (Figure 42).
CAUTION: The keypad cable is delicate.
If necessary, remove the Display Panel for
easier access when routing the cable to avoid
damaging it.
6. Peel paper strip from the back of the new keypad
(P/N HHB-8064).
7. Starting from one corner, carefully place new
keypad on the Display Panel.
8. Connect keypad cable to the I/O Control Board.
9. Reattach Right Side Panel.
NUMBER PART PART NUMBER
19 Display Keypad HHB-8064
: R
eplacing the D
isplay Keypad
Page 54

36
20
21
22
23
THE CONTROL SYSTEM
Door Switch (Figure 43)
The Door Switch is a sensor that detects the Door
Actuator and determines whether the door is open
or closed.
To replace a defective Door Switch:
1. Ensure “Cool Down” process is completed (“Cool
Down” message will disappear upon completion)
and unplug the oven.
2. Remove both side panels and Display Panel.
3. At the I/O Control Board, disconnect Wiring
Harness that routes to Door Switch. (See page
61 for schematic.)
4. Replace defective switch with P/N 102788.
NOTE: Retain mounting bracket for use with
new switch.
5. Reconnect wiring to I/O Control Board.
6. Reattach Display Panel and side panels.
NOTE: Some oven components have been removed for clarity.
NUMBER PART PART NUMBER
20 Screw – Door Switch/Actuator (x2) 101421
21 Nut – Display Panel (x2) 100903
22 Door Switch/Actuator Mounting Bracket HHB-8086
23 Door Switch 102788
: Replacing the Door Switch
Page 55

THE CONTROL SYSTEM
24
25
26
27
37
Fuses (Figure 44)
The Aux Fuses protect the Control System and
Blower Motor.
CAUTION: Replace fuses with only class
CC fuses of the same rating.
To replace a fuse:
1. Ensure “Cool Down” process is completed (“Cool
Down” message will disappear upon completion)
and unplug the oven.
2. Remove the Fuse Cover.
3. Rotate fuse cap 90° counterclockwise to access
the fuse.
4. Disconnect Wiring Harness from fuse.
5. Replace the defective fuse with P/N 100592.
6. Reattach Wiring Harness.
7. Reinstall Fuse Holder and Fuse Cover.
: R
NUMBER PART PART NUMBER
24 Screw – Fuse Cover 101688
25 Fuse Cover HHB-8136
26 Fuse – Class CC, 12 Amp (x2) 100592
27 Fuse Holder (x2) 100586
emoving Fuses
Page 56

38
33
28
29
30
31
32
34
35
36
37
38
39
40
THE CONTROL SYSTEM
28
29
30
31
32
33
34
35
36
37
38
39
40
ART
P
d (x4) 102910
w – I/O Contr
e
Scr
tandoff – I/O Contr
S
I/O Contr
olid S
S
Scr
tandoff – S
S
Scr
mar
S
Cable – S
elay
R
Scr
wer Supply 101206
o
P
Scr
ol Boar
tate R
olid State Relay (x2) 101688
w – S
e
mart Card Reader (x4) 102911
w – S
e
d Reader 100506
t Car
mar
w – Relay (x2) 101687
e
w – Power Supply (x3) 102911
e
late Assembly
ol Boar
d (x4)
ol Boar
d
elay 101286
t Card Reader (x4) 101947
mar
d Reader 103023
t Car
PART NUMBER
101951
NGC-1008
101273
NUMBER
: Component P
Page 57

THE CONTROL SYSTEM
39
Refer to the Component Plate Assembly
(Figure 45) when replacing
o
I/O Control Board
o
Power Supply
o
Relay
o
Smart Card Reader
o
Solid State Relay
I/O Control Board (Figure 45)
The I/O Control Board controls all aspects of oven
operation.
To replace a defective I/O Control Board:
1. Ensure “Cool Down” process is completed (“Cool
Down” message will disappear upon completion)
and unplug the o
ven.
2. Record the Serial Number (see page 29 for
viewing instructions).
3. Remove Right Side Panel.
4. Disconnect wiring from I/O Control Board.
5. Replace defective I/O Control Board with
P/N NGC-1008.
econnect wiring and reattach Right Side Panel.
R
6.
4. Replace defective Power Supply with P/N 101206.
5. Reconnect Wiring Harness.
6. Reattach Right Side Panel.
Relay (Figure 45)
240 VAC, 30 Amp, Double Pole, Double Throw,
24 VDC Relay Coil. Actuates Rack Oscillator Motor.
To replace a defective relay:
1. Ensure “Cool Down” process is completed (“Cool
Down” message will disappear upon completion)
and unplug the oven.
Remove Right Side Panel.
2.
3. Disconnect Wiring Harness from defective relay.
4. Replace defectiv
e relay with P/N 101273.
5. Reconnect Wiring Harness.
6. Reattach Right Side Panel.
)
t Card Reader (Figur
Smar
e 45
Loads Recipe Menus from and writes Recipe
enus to the S
M
mart Card.
7. Re-enter the Serial Number (see page 29).
Power Supply (Figure 45)
24 VDC Output at 40 Watts. Supplies control
oltage for I/O Contr
v
elay (SSR).
tate R
S
ol Board, Relay, and Solid
To replace a defective Power Supply:
nsure “Cool Down” process is completed (“Cool
E
1.
Down” message will disappear upon completion)
en.
and unplug the o
v
2. Remove Right Side Panel.
3. Disconnect Wiring Harness from the defective
Power Supply.
To replace a defective Smart Card Reader:
e “Cool Down” process is completed (“Cool
nsur
E
1.
Down” message will disappear upon completion)
and unplug the oven.
e Right Side Panel.
v
emo
R
2.
3. Check if connection cable is damaged. If so,
eplace with P/N 103023 (not pictur
r
ed) and
jump to step 5.
4. If Smart Card Reader is defective, replace with
P/N 100506.
5. Reattach Right Side Panel.
Page 58

40
THE CONTROL SYSTEM
Solid State Relay (SSR) (Figure 45, Page 38)
The 240 VAC, Dual 40 Amp Solid State Relay
actuates the Heater Element. When the SSR is
actuated, the (-) control input will go to 0.00
VDC. When not actuated, the control input will
read -24.00 VDC.
To replace a defective SSR:
1. Ensure “Cool Down” process is completed (“Cool
Down” message will disappear upon completion)
and unplug the oven.
2. Remove Right Side Panel.
3. Disconnect Wiring Harness from defective SSR.
4. Replace defective SSR with P/N 101286.
5. Reconnect Wiring Harness.
6. Reattach Right Side Panel.
Rack Oscillator Motor (Figure 46)
The Rack Oscillator Motor actuates the Swing
Arm Assembly, which causes the rack to oscillate.
2. Remove Blower Motor Controller Bracket (see
page 32 for instructions). This will allow access
to Rack Oscillator Motor.
3. Remove washer and retaining ring from crank.
Retain them for use with new motor.
4. Remove the Rack Oscillator Motor from the
Drag Link (not pictured).
5. Remove the Rack Oscillator Motor Bracket
(with motor attached) from oven.
emove Rack Oscillator Motor from Bracket.
6. R
7. Remove the crank from the motor shaft (attached
via 3/16-inch screw, P/N 101714, not pictured.)
8. Disconnect the Wiring Harness from Rack
Oscillator Motor.
9. Install new motor (P/N HHB-8135) and
reconnect Wiring Harness.
einstall crank and bracket.
10. R
To replace a defective Rack Oscillator Motor:
1. Ensure “Cool Down” process is completed (“Cool
Down” message will disappear upon completion)
and unplug the oven.
11. Reattach Rack Oscillator Motor to drag link.
12. Fasten washer and retaining ring.
13. Reinstall Blower Motor Controller Bracket.
Page 59

THE CONTROL SYSTEM
41
42
43
44
45
46
47
41
ART P
NUMBER
41
42
43
44
45
46
47
: Removing the Rack Oscillator Motor
P
Rack O
C
Scr
W
R
B
Scr
scillator M
rank – Rack O
w – Rack O
e
asher – Rack O
etaining Ring – Rack O
racket – Rack O
w – Rack Oscillator Motor Bracket (x2) 101688
e
otor
scillator M
scillator Motor (x2) 101672
scillator M
scillator M
scillator M
ART NUMBER
HHB-8135
otor HHB-8045
otor 102451
otor 101297
otor HHB-8049
Page 60

42
49
48
THE CONTROL SYSTEM
Thermocouple – Cook Chamber (Figure 47)
Type K Thermocouple. Thermocouple measures
the temperature of the recirculating impingement
airflow. If the display indicates 999ºF/C, the
Thermocouple is “open,” resulting in an F7 Fault.
To replace a defective CC Thermocouple:
1. Ensure “Cool Down” process is completed (“Cool
Down” message will disappear upon completion)
and unplug the oven.
2. Remove Right Side Panel.
3. Pull back insulation where necessary.
4. Replace defective thermocouple with P/N
NGC-1140.
5. Reset insulation and reattach Right Side Panel.
Thermocouple – Electrical Compartment (EC)
This Type K Thermocouple measures the temperature
of the Electrical Compartment. If the temperature
within the Electrical Compartment is above 158ºF
(70°C), the control will display an F6 Fault.
To replace a defective EC Thermocouple:
1. Ensure “Cool Down” process is completed (“Cool
Down” message will disappear upon completion)
and unplug the oven.
2. Remove Right Side Panel.
3. Disconnect defective thermocouple from the
I/O Control Board and install new one (P/N
700-1199). See page 61 for schematic.
Reattach Right S
4.
ide Panel.
NUMBER PART PART NUMBER
48 Thermocouple – Cook Chamber NGC-1140
49 Screw – Thermocouple – Cook Chamber 101688
: Removing the Cook Chamber (CC) Thermocouple
Page 61

THE CONTROL SYSTEM
51
50
43
Thermostat – Cooling Fan (Figure 48)
The Cooling Fan Thermostat actuates the
cooling fans when the Electrical Compartment
Temperature reaches 120°F (49°C).
To replace a defective Cooling Fan Thermostat:
1. Ensure “Cool Down” process is completed (“Cool
Down” message will disappear upon completion)
and unplug the oven.
2. Remove Right Side Panel.
3. Pull back insulation where necessary.
4. Disconnect the Wiring Harness from the
Cooling Fan Thermostat.
5. Replace defective thermostat with P/N 102086.
6. Reconnect Wiring Harness.
7. Reset insulation and reattach Right Side Panel.
ART
NUMBER
50
51
: Removing Cooling Fan Thermostat
P
Thermostat – Cooling F
Thermostat – Cooling F
w –
e
Scr
an
an (x2)
ART NUMBER
P
102086
101687
Page 62

44
52
53
54
55
THE CONTROL SYSTEM
Thermostat – Hi-Limit (Figure 49)
The Hi-Limit Thermostat is a 250VAC, 3-Pole,
manual-reset thermostat with a trip point of 572ºF
(300°C). The Thermostat, which interrupts power
to the Heater Element, should never operate during
normal operation.
To replace a defective Hi-Limit Thermostat:
1. Ensure “Cool Down” process is completed (“Cool
Down” message will disappear upon completion)
and unplug the o
ven.
2. Remove Right Side Panel.
3. Pull back insulation where necessary.
4. Disconnect the Wiring Harness from the
Hi-Limit Thermostat.
5. Replace defective thermostat with P/N 102075.
6. Reconnect Wiring Harness.
7. Reset insulation and reattach Right Side Panel.
NOTE: Some oven components have been removed for clarity.
NUMBER PART PART NUMBER
52 Thermostat – Hi-Limit 102075
53 Screw – Thermostat – Hi-Limit (x2) 101672
54
55
: Removing the Hi-Limit Thermostat
Screw – Thermostat Clamp 101688
Thermostat Clamp NGC-1152
Page 63

Voltage Sensor (Figure 50)
61
60
59
58
57
56
Proprietary device designed to measure incoming
line voltage and distribute either 208 or 240 VAC
operation. The sensor is only included in ovens
operated in North and South America.
THE CONTROL SYSTEM
Voltage Sensor Screw.
4. Disconnect wiring from Voltage Sensor (2 wires to
Wiring Harness and 2 wires to terminal block).
5. Replace defective Voltage Sensor with P/N
100783.
45
To replace a defective Voltage Sensor:
1. Ensure “Cool Down” process is completed (“Cool
Down” message will disappear upon completion)
and unplug the oven.
Remove Right Side Panel.
2.
3. Remove Electrical Plate Assembly for access to
6. Reconnect wiring.
7. Reattach the Electrical Plate Assembly and
side panel.
ART PART NUMBER
NUMBER
56
57
58
59
60
61
: Replacing Voltage Sensor
P
w – Voltage Sensor 101688
e
Scr
lectrical P
E
oltage S
V
ommet – Electrical Plate 100644
r
G
ut – Electrical Plate Ground 100903
N
ew – Electrical Plate (x2) 102911
Scr
late HHB-8134
ensor 100783
Page 64

46
THE CONTROL SYSTEM
ROUBLESHOOTING
T
Troubleshooting:
No Keypad Input
YES
Replace
Display Keypad.
(page 35)
If the problem
persists, replace the
I/O Control Board.
(page 39)
Is the keypad cable properly connected
to the I/O Control Board?
NO
Correct wiring.
Page 65

Troubleshooting:
No Display – Screen is Blank
THE CONTROL SYSTEM
47
Is wiring from the
I/O Contr
ol Board to
Display OK?
YES
Is J3 Connector
receiving 5 VDC?
igure 62, page 64)
(F
YES
Replace Display.
(page 34)
YES
NO
NO
Does the Control beep when
a key is pressed?
Replace Fuses.
(page 37)
Correct wiring.
If ribbon cable is
damaged, r
eplace
with P/N 103024.
Replace Power Supply.
(page 39)
Replace I/O Control
d. (page 39)
Boar
Check wiring from
P
ower Supply to I/O
Control Board. Correct
wiring if necessary.
NO
NO
NO
NO
Is the Power Supply
receiving power?
YES
Is the P
ower Supply
output correct VDC?
(see page 2 for electrical
specifications.)
YES
Is I/O Control Board
receiving correct VDC?
Check voltage on D6
Diode on striped end
(Figure 62, page 64 for
schematic of the I/O
Control Board)
YES
Verify 5 VDC is
present on J3
Connector. If not,
eplace I/O Contr
r
Board (page 39)
ol
Page 66

Page 67

The Oven Door
Page 68

Page 69

62
Rotate Hinge Retainer
forward to unlocked position
THE OVEN DOOR
49
This section contains information on the Oven
Door as it pertains to
o
Serviceable Component Information and
Replacement Instructions
o
Parts and Part Numbers
o
Troubleshooting
For more comprehensive hardware descriptions, see
page 69.
SERVICEABLE COMPONENTS
The following components of the oven door may
at some point need to be replaced
o
Door Gasket
o
Door H
o
Door Switch
inge
To access these components, first remove the Oven
Door (Figure 51):
1. Ensure “Cool Down” process is completed. (“Cool
Down” message will disappear upon completion.)
2. Open oven door.
3. Rotate hinge retainers to the unlocked state.
4. Raise oven door so it rests on hinge retainers.
5. Remove door.
ART
NUMBER
62
: Removing the Oven Door
P
oor
D
PART NUMBER
HHB-8080-2
Page 70

50
63
64
65
THE OVEN DOOR
Door Gasket (Figure 52)
To remove a damaged Door Gasket:
1. Ensure “Cool Down” process is completed. (“Cool
Down” message will disappear upon completion.)
2. Remove door (page 49).
3. Remove inner plate.
4. Replace damaged gasket with P/N HHB-8101.
5. Reinstall inner plate.
6. Reattach oven door.
7. Return hinge retainers to locked state and close
oven door.
NUMBER PART PART NUMBER
63 Screw – Door Inner Plate (x10) 102809
64 Door Inner Plate HHB-8083
65 Door Gasket HHB-8101
asket
: R
emo
ving the D
oor G
Page 71

THE OVEN DOOR
69
68
67
66
51
Door Hinge (Figure 53)
Spring-loaded hinge can be removed and replaced
as an entire unit.
To replace a Door Hinge:
1. Ensure “Cool Down” process is completed. (“Cool
Down” message will disappear upon completion.)
2. Remove Oven Door (page 49).
3. Replace hinge(s) with P/N 102807.
4. Reattach oven door.
5. Return hinge retainers to locked state and close
oven door.
Door Switch
See Control System for description and
replacement instructions (page 36).
NUMBER PART PART NUMBER
66 Door Hinge 102807
67 Push Nut (x2) 101293
68 Hole Plug (x2) 101191
69 Screw – Door Hinge (1 per hinge =2 total) 101402
: Replacing a Hinge
Page 72

52
Ensure that this side (rather
than the bracket-side) faces
the oven upon reinstallation.
70
52
THE OVEN DOOR
ROUBLESHOOTING
T
Troubleshooting:
“Cook Door Open” Message when Door is Closed
Is the Door Switch
properly installed?
(Ensure it is not loose
or cracked.)
NO
Reset D
oor Switch.
YES
YES
Is wiring from Door Switch to
I/O Control Board OK?
Replace Door Switch
(page 36).
If problem persists,
e Door Actuator
ensur
(see Figure 54, below) is
properly installed. If
problem continues to
persist, replace I/O
Control Board
(page 39).
NO
Correct wiring.
If wiring is damaged,
replace the Door
Switch (page 36).
: D
NOTE: S
NUMBER
70
en components have been removed for clarity.
v
ome o
PART PART NUMBER
Door Actuator 102789
ctuator and Mounting Bracket
oor A
Page 73

The Impingement Circuit
Page 74

Page 75

THE IMPINGEMENT CIRCUIT
71
72
74
73
53
The Impingement Circuit provides the high
temperature airflow necessary to brown and
cook food items. For a schematic that includes
all Impingement Circuit components, see
Figure 61, page 61. For more comprehensive
hardware descriptions, see page 69.
This section contains
o
Serviceable Component Information and
Replacement Instructions
o
arts and Part Numbers
P
SERVICEABLE COMPONENTS
The following components of the Impingement
Circuit may at some point need to be replaced.
o
Blower M
o
Heater Element
o
Jetplates (Top and Bottom)
o
Swing Arm Assembly
otor
Blower Motor (Figure 55)
A Brushless DC Switch reluctance type. Its top
speed is 7200 RPM at 3/4 HP.
To replace a defective Blower Motor:
1. Ensure “Cool Down” process is completed (“Cool
Down” message will disappear upon completion)
and unplug the oven.
2. Remove Blower Motor Controller (see page 32).
3. Disconnect wiring at Blower Motor Controller.
4. Remove Blower Motor Cover.
5. Replace defectiv
e motor with P/N HHB-8106.
6. Reconnect wiring and reinstall Blower Motor
Controller/Blower Motor Cover.
NUMBER
71 Nut – Blower Motor (x6) 100905
72 Blower Motor HHB-8106
73 Screw – Blower Motor Cover (x8) 101688
74 Blower Motor Cover NGC-1081
: R
PART PART NUMBER
ving the Blower Motor
emo
Page 76

54
75
76
77
78
79
THE IMPINGEMENT CIRCUIT
Heater Element (Figure 56)
Sheathed-style/Calrod heaters. Attached to the
same cartridge, Heaters A and B can be tested
independently of one another.
To replace a defective heater:
1. Ensure “Cool Down” process is completed (“Cool
Down” message will disappear upon completion)
and unplug the oven.
2. Remove Right Side Panel.
Disconnect Wiring Harness from heaters.
3.
4. Remove Insulation Shield.
5. Pull back insulation where necessary.
6. Replace defective heater cartridge with
P/N HHB-8099.
a. Tighten flange nut
b. Reconnect Wiring Harness
c. Tighten jam nut
CAUTION: An over-tightened flange nut
may cause heater failure. To prevent heater
failure, hold a wrench to the flange nut to keep it
in place when tightening the jam nut. This ensures
the jam nut tightens to the flange nut, rather than
the flange nut tightening mor
e than it should.
7. Reset insulation.
ART PART NUMBER
NUMBER
75
76
77
78
79
: Removing the Heater Element
P
Nut (Jam) – Heater Element (x4) 102963
Nut (Flange) – Heater Element (x4) 100903
Heater Insulation Shield HHB-8097
Screw – Heater Element (x6) 101688
Heater Element HHB-8099
Page 77

THE IMPINGEMENT CIRCUIT
83
85
84
82
81
80
55
8. Reinstall Insulation Shield.
9. Reattach Right Side Panel.
Jetplates (Figure 57)
The Jetplates help maximize food quality. Different
Jetplates facilitate different cooking results.
To replace a Jetplate:
1. Ensure “Cool Down” process is completed. (“Cool
Down” message will disappear upon completion.)
2. Remove Oven Rack.
3. Remove Support Rails.
NOTE: Removing hardware is not required –
the Support Rails snap on and off. However,
they may require a gentle tap with a utensil to
snap into and out of place.
4. Replace Jetplate(s). For a listing of the different
types of Jetplates, see the comprehensive part
listing, page 65.
5. Reinstall Support Rails and Oven Rack.
NUMBER PART PART NUMBER
80 Rack HHB-8104
81 Support Rail – Bottom Left HHB-8058-1
82 Support Rail – Bottom Right HHB-8058-2
83 Support Rails – Top (x2) HHB-8117
84 Jetplate – Standard – Bottom HHB-8013-1
85 Jetplate – Standard – Top HHB-8013-2
: Removing Jetplates
Page 78

89
88
87
86
56
THE IMPINGEMENT CIRCUIT
Swing Arm Assembly (Figure 58)
The Swing Arm Assembly is actuated by the Rack
Oscillator Motor. The attached oven rack oscillates
when the Swing Arm Assembly is in motion.
If the rack is not oscillating properly,
1. Ensure “Cool Down” process is completed. (“Cool
Down” message will disappear upon completion.)
Ensure recipe settings have the rack set at “ON.”
2.
(See pages 12-14 for modifying recipes.)
3. If recipe settings are correct, ensure the Rack
Oscillator Motor is working properly (page 41).
4. If problem persists, use the figure below to troubleshoot the Swing Arm Assembly.
5. Unplug the oven.
6. Remove all components from the left and right
sides of the oven (including insulation) to access
the Swing Arm Assemblies.
7. Remove the Swing Arm Covers.
Correct problem and reinstall all components.
8.
NOTE: Some oven components have been removed for clarity.
NUMBER PART PART NUMBER
86 Drag Link – Swing Arm Assembly HHB-8044
87 Swing Arm Assembly with Link Bar HHB-8050
88 Bushing – Swing Arm Assembly (x2) 100152
89 Swing Arm Assembly HHB-8040
: S
wing Arm Assembly
Page 79

The Filtering System
Page 80

Page 81

THE FILTERING SYSTEM
90
91
92
93
94
95
96
57
The filtering system helps remove debris from the
Cook Chamber. However, daily maintenance and
deep cleaning are still required to ensure oven
functions most efficiently. For more comprehensive
hardware descriptions, see page 69.
This section contains
o
Serviceable Component Information and
Replacement Instructions
o
Parts and Part Numbers
SERVICEABLE COMPONENTS
o
Catalytic Converter
o
Filters
Catalytic Converter (Figure 59)
The Catalytic Converter – a VOC-type catalyst –
cleans the recirculating airflow. The catalyst substantially lowers the combustion temperature of
grease entrained in the air path to approximately
the same temperature of the airflow, thus breaking
down grease into CO
and H2O as it passes through
2
the Catalytic Converter. The catalyst operates most
efficiently at temperatures above 475ºF (246°C).
o service the Catalytic Converter:
T
1. Ensure “Cool Down” process is completed. (“Cool
Down” message will disappear upon completion.)
2. Remove Oven Rack.
NOTE: Some oven components have been removed for clarity.
ART PART NUMBER
NUMBER
90
91
92
93
94
95
96
: F
P
Catalytic Conv
iverter Plate HHB-8030
Air D
ew – Air Diverter Plate (x4) 101688
Scr
Filter (x2) HHB-8114
Filter Clip (x2) HHB-8115
Drain Pan 101091
Drain Lid HHB-8141
iltering S
ystem P
erter HHB-8108
ts
ar
Page 82

58
THE FILTERING SYSTEM
3. Remove Jetplates (page 55).
4. Remove Air Diverter Plate.
5. Remove the Catalytic Converter.
6. Clean the Catalytic Converter with TurboChef
Oven Cleaner (P/N 103180).
CAUTION: DO NOT use a substitute
cleaner.
7. Rinse thoroughly with distilled water.
CAUTION: Use distilled water only.
8. Let the Catalytic Converter air dry before
reinstalling.
9. If necessary, replace the Catalytic Converter
with P/N HHB-8108.
Filters (Figure 59)
The two Filters help prolong the life of the
Catalytic Converter by trapping excess grease.
They are attached to the Air Diverter Plate via the
Filter Clips. When deep cleaning the oven (see
page 59), the operator/technician should check to
see if the Filters need to be replaced.
To remove a Filter:
1. Ensure “Cool Down” process is completed. (“Cool
Down” message will disappear upon completion.)
2. Remove Oven Rack.
3. Remove Jetplates (page 55).
4. If more room to operate is necessary, remove the
ter Plate.
iver
Air D
5. Unfasten the Filter Clip from the center of the
Air Div
erter Plate.
6. Swing the clip open and remove the Filter.
7. If necessary, replace it with P/N HHB-8114.
8. Reconnect the clip and reinstall all components.
Page 83

Cleaning the Oven
Page 84

Page 85

CLEANING THE OVEN
59
AILY MAINTENANCE
D
The procedures below will help in maintaining
the High h Batch oven. Be sure to use only
TurboChef Oven Cleaner. Using any other cleaning
products can damage critical parts and may void
warranty on those parts. Refer to Figure 60, page 60
to view the Cook Chamber components.
Supplies and Equipment
o
TurboChef Oven Cleaner
o
Nylon scrub pad
o
Cleaning towel
Cleaning Procedures
Step 1: Prepare the Oven for Cleaning.
o
Ensure oven is turned off. To turn off oven,
press “ON/OFF” Key.
o
Ensure Cool Down process is complete. (“Cooling
Down” will disappear upon completion.)
WARNING:
Possible injury can occur if
oven is not allowed to cool properly before
cleaning. do not attempt to clean it until the
“Cooling Down” message is off.
Step 2: Remove Oven Rack.
o
Wash, rinse, and sanitize Oven Rack.
Step 3: Clean Oven Door and Cook Chamber.
o
U
sing a damp towel, remove food particles.
o
In case of stubborn stain, spray TurboChef
Oven Cleaner.
CAUTION: Do not spray or wipe cleaning
chemicals onto the Catalytic Converter (See
Figure 60 for a diagram of the Cook Chamber).
o
Allow cleaner to penetrate for 5 minutes.
o
ub with nylon scr
Scr
o
Wipe Oven Door and Cook Chamber with
damp tow
el.
ub pad, if necessar
y.
Step 4: Reattach the Oven Rack.
EEP CLEAN INSTRUCTIONS
D
TurboChef recommends deep cleaning the oven
once a month (or more frequently, depending on
use) to ensure optimal performance. Be sure to use
only TurboChef Oven Cleaner. Using any other
cleaning products can damage critical parts and
may void warranty. Reference Figure 60, page 60,
to view Cook Chamber components.
Supplies and Equipment
o
TurboChef Oven Cleaner
o
Nylon scrub pad
o
Cleaning towel
Deep Clean P
rocedures
Step 1: Prepare the Oven for Cleaning.
o
Ensure oven is turned off. To turn off oven,
press “ON/OFF” Key.
o
Ensure Cool Down process is complete. (“Cooling
Down” will disappear upon completion.)
WARNING: Possible injury can occur if
oven is not allowed to cool properly before
cleaning. do not attempt to clean it until the
“Cooling D
Step 2: Clean and R
o
Spray TurboChef Oven Cleaner to break up
stubborn stains. Allo
own” message is off.
emove the Oven Door.
w cleaner to penetrate for
5 minutes.
o
Scrub with nylon scrub pad, if necessary.
o
Wipe down.
o
See page 49 for removal instructions.
Step 3: Remove Oven Rack.
o
ash, rinse, and sanitize Oven Rack.
W
op and Bottom Jetplates.
e T
v
Step 4: R
o
o
emo
For instructions, see page 55.
Wash, rinse and sanitize the Jetplates and
Support Rails.
Step 5: Wipe Ov
en Exterior with a Clean, D
amp T
wel.
o
Page 86

Top Jetplate
Air Diverter Plate
(
covers the Catalytic Converter)
Filter
Oven Rack
Bottom Jetplate
60
LEANING THE OVEN
C
: The Cook Chamber
Step 5: Check Gr
o
Plate is attached via 4 screws.
o
Check to see if Filters (P/N HHB-8114) need to
eplaced.
be r
our Authorized Distributor.
or y
o
If necessary, remove Filters by first unhooking
ease Filters.
To order Filters, call 800.90TURBO
the Filter Clip (P/N HHB-8115) which is
attached at the center of the Air Diverter Plate.
Step 6: Clean the Cook Chamber and Dr
o
S
pray
T
urboChef Ov
en Cleaner to br
ain System.
eak up
stubborn stains. Allow cleaner to penetrate for
5 minutes.
o
Scrub with nylon scrub pad, if necessary.
o
Open the Drain Lid and use water to flush out
food particles into the Drain Pan.
Step 7: Dr
o
Using a clean dry towel, dry the Cook Chamber
y Cook Chamber and Drain System.
and Drain System.
Step 8: Remove the Drain Pan.
o
Wash, rinse and sanitize the Drain Pan.
ach and Reinstall all Clean Components.
Step 9: R
eatt
Step 10: Wipe Down the Outside of the Oven with a
Clean, Damp Towel.
Page 87

High h Batch Schematic
Page 88

BL 3
BR 4
GY 1
G
Y 2
BR 4
BL 3
BR 6
B
R 5
BL 8
BL 7
BR 13BL 17
B
L 9
BR 10
BR 12
BR 11
B
R 14
BL 16
BL 15
1
1
2
2
3
3
4
4
BL 18
BR 19
BR 20
BR 21
BL 22 BL 24 BL 23
BL 28
BL 27
BL 25
BL 26
C2/C3
BR 29
F1 F2
F1: 12 AMPS CLASS CC (100595)
F2: 12 AMPS CLASS CC (100595)
RD-19
121
2
OR-13
BK-33
OR-13
BK-33
OR-6
2500 WATTS @ 208 V
17.30 OHMS
HX ELEMENT (HHB-8107)
B2
A2
B1
A1
K5
K4
2
1
-
B
+
RD-19
RD-16
RD-16
RD-24
BK-25
WH-31
BK-32
OR-9
RD-24
BK-25
WH-31
BK-32
BK-20
A
-
+
WH-301
WH-28
WH-301
BK-22
B
K-22
OR-6
WH-30
BK-20
WT-27
WT-27
WT-28
PINOUT
RELAY ASSY
K1
OR-9
O
SCILLATING RACK MOTOR
O
SCILLATING RACK RELAY, K1
RD - 19
1
2
BLUE
BLUE
WHT
RED
0.1uF 700V
(HHB-8135)
(101273)
(
101206)
-V
SUPPLY
+V
P
OWER
2
4VDC
L
N
E1
F
AN2 (COOLING)
NO
C
(102086)
OT 2 - 120F
NC
D
OOR SWITCH
NO
C
VOLTAGE MODULE
22
12
C
C
32
C
21
11
NC
NC
31
NC
MANUAL RESET
OT1
G
SOLID STATE RELAY (DUAL)
(
100516)
(100783)
FAN1 (COOLING)
(
100516)
(100516)
(101286)
K6-B (VOLTS MOD OUT)
29 29
KEYPAD
14
2
1
P4
21
P6
-
-
21
J6
---
-
14
14
--
--
2
1
J4
-
-
-
--
14
-
---
-
CC
40
39
THERMOCOUPLES
EC
37
36
38
BMSC (4) (COM RTN)
32
34
33
35
BMSC (3) (ENABLE OUT)
31
K4 (B-) (CONV OUT)
30
A(-)
C(+)
CC
40
39
A(-)
C(+)
EC
37
36
38
32
34
33
35
31
30
17
1-9
23
26
27
28
CT
BMSC 0-10V OUT
BMSC COMM (2)
24
25
20
-24V PS IN
MAG
-24V MONITOR RTN
-24V P&S INTER RTN
22
21
J6
19
18
11
2
14
16
15
+24V PS IN
ASPEN
3
13
12
VOLT MODUAL IN
8
BMSC SEL
P3
1
9
BMSC (9) (STATUS OK)
HX STATUS IN
1
0
5
MONITOR (NO) INTER IN
6
7
17
23
26
27
28
24
25
20
22
21
19
18
11
14
16
15
13
12
8
9
1
0
5
6
7
1
2
3
4
32
P5
1
1
25 26
21
P2
21
P
5
--
--
2
1
25-26
-
25 26
-----
-----
21
CN3
-
-
--
2
625
---
--- -
---- -
6
4X 128 DOTS
32
CN2
V
FD DISPLAY
2
3
4
1
3
1
2
VAC IN
I/O COM
I/O COM
200-240
STATUE OK
6
4
5
SPD CMD
ENABLE
I/O COM
0-10V
3
2
1
3
4
M1 BLK
1
2
OUT
240 VAC
3 PHASE
BMSC
MTR
BLWR
-24V (VOLT MODULE RTN)
M2 RED
M3 WHITE
GREEN
A
9
7
B
3
6
4
1
A
7
4
1 3
6
9
B
cavity air
RJ11
RJ11
SMART CARD CONNECTOR
(100506)
(103023)
CABLE, SMART CARD
: High h Batch Schematic
HIGH H BATCH SCHEMATIC
61
Page 89

Page 90

HB OVEN SCHEMATIC
H
Figure 61. Inside of fold-out page. Rev 2 Board,
VFD Display, Single Phase, 280/240 VAC, 60 Hz
NOTE: Schematic shows the oven with door open
and without power applied.
Color Code (Line Voltage)
BL – Blue = Line V (208/240)
BR – Brown = Line V (208/240)
OR – Orange = 240 Line Input for Tap 3 on
all Transformers
BK – Black = Hi-Temp 240 VAC Wire
Color Code (Low/Control Voltage)
BK – Black = 24 VDC Common
OR – Orange = Status Input
WH – White = Control Input
RD – Red = +24
VDC
Line Voltage Components
Blower M
Blower M
Cooling F
otor
otor Controller
ans
Fuses
Heater Element
Power Supply, +24VDC
Rack Oscillator Motor
elay
R
Solid State Relay
Thermostat – Cooling Fan
Thermostat – H
i-Limit
Voltage Sensor Module
iring Harness – Line Voltage
W
HIGH H BATCH SCHEMATIC
Low Voltage Components
Cable – Smart Card Connector
Display, VFD
Door Switch
I/O Control Board
Keypad
Ribbon Connector – Display
Smart Card Reader
Thermocouple – CC
Thermocouple – EC
iring Harness – Low Voltage
W
I/O CONTROL BOARD COMPONENT IDENTIFICATION
AND TEST POINT LOCATIONS
Figure 62, page 64
J2
J3
J4 14-P
40-Pin Connector for LV Harness
3-Pin Connector for VFD Display
in Connector for K
eypad
J5 26-Pin Connector for Display Data
J6 RS-232 Connector
(for computer hookup
, if necessary)
RJ11 Connector for Smart Card Cable
U15 EPROM Socket
P1 Voltage Refer
ence 0-5 VDC
P3 Blower Controller Pin Configuration
SKP1 Beeper
R51 Beeper Volume Adjustment
63
Page 91

64
RJ11
RJ11
J2
J6
BR1
J4
+
U15
R51
D6
P1
P3
J3
SKP1
HIGH H BATCH SCHEMATIC
: I/O Control Board and Test Point Locations
Page 92

Comprehensive Part Listing
Page 93

Page 94

COMPREHENSIVE PART LISTING
OMPREHENSIVE PART LISTING
C
PART PART NUMBER ILLUSTRATION
Air Diverter Plate HHB-8030 Figure 59, page 57
Blower Motor HHB-8106 Figure 55, page 53
Blower Motor Controller 100443 Figure 39, page 32
Blower Motor Cover NGC-1081 Figure 55, page 53
Blower Motor Mounting Plate HHB-8009 Not labeled
Bracket – Blower Motor Controller HHB-8111 Figure 39, page 32
Bracket – Display (x2) HHB-8130 Figure 41, page 34
Bracket – Rack Oscillator Motor HHB-8049 Figure 46, page 41
Bushing – Swing Arm Assembly (x2) 100152 Figure 58, page 56
Cable – Smart Card Reader 103023 Figure 45, page 38
Cable Mount – Adhesive (x3) 100174 Not labeled
65
Catalytic Converter HHB-8108 Figure 59, page 57
Component Plate HHB-8055 Not labeled
Component Plate Shield
Cooling Fan F
inger Guard 100087 Figure 40, page 33
HHB-8088 Not labeled
Cooling Fans – Inlet/Exhaust 100516 Figure 40, page 33
Cover – Cooling Fan (Exhaust) HHB-8079 Figure 40, page 33
Cover – Drag Link/Left S
er – Right Swing Arm Assembly HHB-8052 Not labeled
v
Co
rank – Rack Oscillator Motor HHB-8045 Figure 46, page 41
C
isplay
D
isplay K
D
oor
D
oor A
D
oor G
D
oor H
D
oor I
D
oor R
D
eypad
ctuator
asket
inge
late HHB-8083 Figure 52, page 50
nner P
er HHB-8084 Not labeled
eceiv
wing Arm Assembly HHB-8053 Not labeled
igure 41, page 34
100505
HHB-8064
HHB-8080-2
102789
HHB-8101
102807
F
Figure 42, page 35
igure 51, page 49
F
Figure 54, page 52
Figure 52, page 50
Figure 53, page 51
witch
oor S
D
witch/A
Door S
Drag Link – S
Drain Lid
Drain P
Drain P
an 101091 Figure 59, page 57
an Rack HHB-8105 Not labeled
102788 Figure 43, page 36
ctuator Mounting Bracket HHB-8086 Figure 43, page 36
wing Arm Assembly
HHB-8044 Figure 58, page 56
HHB-8141 Figure 59, page 57
Page 95

66
COMPREHENSIVE PART LISTING
ART PART NUMBER ILLUSTRATION
P
Electrical Plate HHB-8134 Figure 50, page 45
Filter (x2) HHB-8114 Figure 59, page 57
Filter Clip (x2) HHB-8115 Figure 59, page 57
Fuse – Class CC, 12 AMP (x2) 100592 Figure 44, page 37
Fuse Cover HHB-8136 Figure 44, page 37
Fuse Holder (x2) 100586 Figure 44, page 37
Grommet – Electrical Plate 100644 Figure 50, page 45
Heater Element HHB-8099 Figure 56, page 54
Heater Insulation Shield HHB-8097 Figure 56, page 54
Hole Plug (x2) 101191 Figure 53, page 51
I/O Control Board NGC-1008 Figure 45, page 38
Insulation – Left Side Can HHB-8041 Not labeled
Insulation – Main Can HHB-8028 Not labeled
Insulation – Right Side Can HHB-8029 Not labeled
Insulation – Top/Door HHB-8085 Not labeled
Jetplate – High Coverage – Bottom (Accessory) HHB-8155-1 Not labeled
Jetplate – High Coverage – Top (Accessory) HHB-8155-2 Not labeled
Jetplate – Pizza – Bottom (Accessor
Jetplate – Pizza –
Top (Accessory) HHB-8156-2
y) HHB-8156-1 Not labeled
Not labeled
Jetplate – Standard – Bottom HHB-8013-1 Figure 57, page 55
Jetplate – Standard – Top HHB-8013-2 Figure 57, page 55
Leg 100785 Not labeled
Leg – Non-Skid Pad 100786 Not labeled
Nut – Blower Motor (x6) 100905 Figure 55, page 53
Nut – Display (x2) 102963 Figure 41, page 34
Nut – Display Panel (x2) 100903 Figure 43, page 36
Nut – Electrical Plate Ground 100903 Figure 50, page 45
Nut – Pinches Wiring Harness to Terminal Block (x2) 100903 Not labeled
Nut – Smart Card Reader Standoff (x4) 102961 Not labeled
N
ut (Flange) – Heater Element (x4) 100903 Figure 56, page 54
Nut (Jam) – Heater Element (x4) 102963 Figure 56, page 54
Panel – Display HHB-8025 Figure 41, page 34
Panel – Left Side HHB-8023-2 Figure 41, page 34
Panel – Right Side HHB-8024-2 Figure 41, page 34
ot labeled
Power Cor
d
100187
N
Page 96

COMPREHENSIVE PART LISTING
ART PART NUMBER ILLUSTRATION
P
Power Cord Mounting Bracket NGC-1167 Not labeled
Power Supply 101206 Figure 45, page 38
Push Nut (x2) 101293 Figure 53, page 51
Rack HHB-8104 Figure 57, page 55
Rack – Offset (Accessory) HHB-8118 Not labeled
Rack Oscillator Motor HHB-8135 Figure 46, page 41
Relay 101273 Figure 45, page 38
Retaining Ring – Rack Oscillator Motor 101297 Figure 46, page 41
Retaining Ring – Swing Arm Assembly 101297 Not labeled
Ribbon Connector – Display 103024 Not labeled
Screw – Air Diverter Plate (x4) 101688 Figure 59, page 57
Screw – Blower Motor Controller (x4) 101688 Figure 39, page 32
67
Screw – Blower Motor Controller Bracket (x4) 101688 Figure 39, page 32
Screw – Blower Motor Cover (x8) 101688 Figure 55, page 53
Screw – Component Plate Standoff (x4) 102921 Not labeled
Screw – Cooling Fan Assy (4 x 2 fans = 8) 101694 Figure 40, page 33
Screw – Cooling Fan Cover (x3) 101688 Figure 40, page 33
Screw – Display (x4)
101520 Figure 41, page 34
Screw – Door Actuator (x2) 101421 Not labeled
Screw – Door Hinge (1 per hinge = 2 total) 101402 Figure 53, page 51
Screw – Door Hinge Receiver (x4) 101693 Not labeled
Screw – Door Inner Plate (x10) 102809 Figure 52, page 50
Screw – Door Switch/Actuator (x2) 101421 Figure 43, page 36
Screw – Drain Pan Rack (x3) 101688 Not labeled
Screw – Electrical Plate (x2) 102911 Figure 50, page 45
Screw – Front Side Panel (x2 per side) 101663 Figure 41, page 34
Screw – Fuse Cover 101688 Figure 44, page 37
Screw – Heater Element (x6) 101688 Figure 56, page 54
Screw – I/O Control Board (x4) 102910 Figure 45, page 38
Screw – I/O Control Board Standoff (x4) 102911 Not labeled
Screw – Power Supply (x3) 102911 Figure 45, page 38
Screw – Rack Oscillator Motor (x2) 101672 Figure 46, page 41
Screw – Rack Oscillator Motor Bracket (x2) 101688 Figure 46, page 41
Screw – Rack Oscillator Motor Crank 101714 Not labeled
e 45, page 38
igur
Screw – R
elay (x2)
101687
F
Page 97

68
COMPREHENSIVE PART LISTING
ART PART NUMBER ILLUSTRATION
P
S
crew – Side Panel (8 per panel) 101688 Figure 41, page 34
Screw – Smart Card Reader (x4) 102911 Figure 45, page 38
Screw – Solid State Relay (x2) 101688 Figure 45, page 38
Screw – Terminal Block (x2) 102963 Not labeled
Screw – Thermocouple – Cook Chamber 101688 Figure 47, page 42
Screw – Thermostat Clamp 101688 Figure 49, page 44
Screw – Thermostat – Cooling Fan (x2) 101687 Figure 48, page 43
Screw – Thermostat – Hi-Limit (x2) 101672 Figure 49, page 44
Screw – Voltage Sensor 101688 Figure 50, page 45
Smart Card Reader 100506 Figure 45, page 38
Solid State R
Standoff – Component P
elay 101286 Figure 45, page 38
late (x4) 102921 Not labeled
Standoff – I/O Control Board (x4) 101951 Figure 45, page 38
Standoff – Smart Card Reader (x4) 101947 Figure 45, page 38
Support Rail – Bottom Left HHB-8058-1
Support Rail – Bottom Right
t Rails – Top (x2) HHB-8117 Figure 57, page 55
Suppor
HHB-8058-2 Figure 57, page 55
Figure 57, page 55
Support Tube – Front Side Panel Screws (2 per panel) HHB-8110 Not labeled
Swing Arm Assembly HHB-8040 Figure 58, page 56
Swing Arm Assembly with Link Bar HHB-8050 Figure 58, page 56
Thermocouple – Cook Chamber NGC-1140 Figure 47, page 42
Thermocouple – Electrical Compartment 700-1199 Not labeled
Thermostat Clamp NGC-1152 Figure 49, page 44
Thermostat – Cooling Fan 102086 Figure 48, page 43
Thermostat – Hi-Limit 102075 Figure 49, page 44
TurboChef Oven Cleaner 103180 Not labeled
TurboChef Oven Guard 103181 Not labeled
oltage S
V
W
W
Wiring H
Wiring H
ensor 100783 Figure 50, page 45
asher – Rack O
asher – S
wing Arm Assembly 102451 Not labeled
arness – Line Voltage 103022 Not labeled
arness – Low Voltage 103021 Not labeled
scillator Motor 102451 Figure 46, page 41
Page 98

ARDWARE DESCRIPTIONS
H
PART NUMBER DESCRIPTION
100903 Nut – #10-32, Hex, Serrated, Flange, SS
100905 Nut – #1/4-20, Hex, Serrated, Flange,SS
101402 Screw – #10-32 X 1/4, PHFH
101421 Screw – #4-40 x 1/2, PHFH, 100 Deg, SS
101520 Screw – #4-40 X .25 Lg
101663 Screw – #8, Type A X 2-1/4, PHFH, Sheet Metal, SS
101672 Screw – M4 X .7 X 8, Sem, Internal Tooth
101687 Screw – #6-32 X 1/2, PPH, Sheet Metal, Drill Point, Zinc
101688 Screw – #8-15, Sheet Metal, Type A, PTRHD, Serrated
COMPREHENSIVE PART LISTING
69
101693
Screw – #10-32 X 1/4, PHTRH, SS
101694 Screw – #10-32 X 1/2, PPHD, Thread Cutting, Cres or Other
101714 Screw – Set, #8-32 X 3/16, Skt Hd, BO Steel
101913 Standoff – #8-32 X 1.25 Lg, Hex, M/F, Zinc
101947 Standoff – #6-32 X 1.25 Lg, M/F, Zinc-plated Steel
101951 Standoff – #6-32 X 5/8 X .25 Hex, F/F, Zinc
102809 Screw – #8-32 X 3/8, PFLH, 100 Deg, SS
102910 Screw – #6-32 X 1/4, Sems, Internal Tooth, PPHD, Cres
102911 Screw – #6-32 X 3/8, PPH, Sem, Internal Tooth, SS
102921 Screw – #8-32 X 3/8, PPHD, Sem, Internal Tooth, SS
102961 Nut – #6-32 KEPS, External Tooth, SS
ut – #10-32, Keps, External Tooth, SS
102963
N
Page 99

Page 100

Glossary of Terms
 Loading...