

Page 1
Accelerating the World of Cooking
TM
Owner’s Manual
FOR THE TURBOCHEF 2020 HIGH h CONVEYOR OVEN
Page 2

Page 3

For further information, call
800.90TURBO
or
+1 214.379.6000
Page 4

The information contained in this manual is important for the proper installation, use, maintenance,
and repair of this oven. Follow these procedures and instructions to help ensure satisfactory baking
results and years of trouble-free service.
Errors – descriptive, typographic, or pictorial – are subject to correction. Specifications are subject to
change without notice.
Please carefully read this manual and retain it for future reference.
Page 5

Table of Contents
Safety Information
Important Safety Information - Please Read First i
General Safety Information i
Reducing Fire Risk i
Preventing Oven Damage ii
Grounding Instructions ii
Power Cord Replacement ii
Specifications and Installation
Dimensions 1
Electrical Specifications 1
Packaging 2
Certifications 2
Oven Construction 2
Installation Instructions 2
Delivery and Initial Inspection 2
Lifting the Oven 2
Oven Location and Placement 3
Installation Near Open Heat Source 3
Ventilation Requirements 3
Cleaning
Daily Cleaning Instructions 4
Weekly Cleaning Instructions 5-7
Standard Oven Operation
Oven Controls 8
Cooking a Product 9
Editing a Cooking Profile 11
Changing a Cooking Profile Name 11
Adjusting the Belt Speed 11
Adjusting the Temperature 12
Adjusting the Top and Bottom Air 12
Page 6

Oven Modes
Config Mode 13
Smart Card Screen (Loading a Menu) 13
Accessing the Fault Count Screen 13
Accessing the Setup Mode 13
Setup Mode 13
Changing the Display Temperature 14
Edit Options Screen 14
Changing the Display Language 14
Info Screen 14
Updating the Firmware 15
Troubleshooting 16
Replaceable Parts 18
North America Limited Warranty 19
International Limited Warranty 22
Page 7

SAFETY INFORMATION
Important Safety Information – Please Read First
Improper installation, adjustment, alteration, service, or maintenance of this equipment can cause property
damage, injury, or death. Thoroughly read the installation, operating, and maintenance instructions before
installing or servicing this equipment. Strictly adhere to the following safety information to reduce the
risk of:
Damage to the oven
Damage to property near the oven
Personal injury
Burns
Fire
Electric shock
General Safety Information
Use this appliance only for its intended uses as described in this manual.
Only qualified service personnel should service this appliance. Contact the nearest authorized service
facility for examination, repair, or adjustment.
Always ensure the oven is disconnected from the power supply before servicing, repairing, or adjusting
any components or parts.
x
DO NOT place the cord near heated surfaces.
x
DO NOT store or use flammable vapors or liquids (e.g., gasoline) in the vicinity of this appliance.
x
DO NOT allow children to use this appliance.
x
DO NOT place corrosive chemicals or vapors in this appliance. It is not designed for industrial or
laboratory use.
x
DO NOT operate this appliance if it:
Has a damaged cord or plug
Is not working properly
Has been damaged or dropped
x
DO NOT cover or block any openings on this appliance.
x
DO NOT store this appliance outdoors.
x
DO NOT use this appliance near water.
x
DO NOT immerse this appliance or any of its components (e.g., cord, plug, etc.) in water.
x
DO NOT let the cord hang over the edge of a table or counter.
Reducing Fire Risk
If materials inside the oven ignite or if smoke is observed,
1. Keep the oven door closed.
2. Turn off the oven.
3. Disconnect the power cord or shut off power at the fuse/circuit breaker panel.
Carefully attend the oven if paper, plastic, or other combustible materials are placed inside the oven
to facilitate cooking.
x
DO NOT leave items in the cook cavity when the oven is not in use.
x
DO NOT cook items wrapped in cling wrap or plastic film.
x
DO NOT overcook food.
i
Page 8

ii SAFETY INFORMATION
Preventing Oven Damage
When servicing this appliance, do not tear insulation to get to components. Rather, find the edge of
the insulation and remove the tape that holds it in place.
Clean the oven daily.
Clean the oven only with TurboChef Oven Cleaner.
x
DO NOT clean with a water jet.
x
DO NOT allow cleaning solution or water to remain in the cook cavity longer than necessary.
Grounding Instructions
WARNING: Improper grounding increases the risk of electric shock.
This appliance must be grounded. The cord is equipped with a grounding wire and plug, which in the
event of an electrical short circuit, reduce the risk of electric shock by providing an escape wire for the
electric current. The wire must be plugged into an outlet that is properly installed and grounded.
Consult a qualified electrician or serviceman to determine whether or not the appliance is properly
grounded.
x
DO NOT use an extension cord. If the power supply cord is too short, request a qualified electrician
or serviceman to install an outlet near the appliance.
Power Cord Replacement
To avoid potential hazards, only the manufacturer, its service agent, or a similarly-qualified person should
replace a damaged power cord.
Page 9
SPECIFICATIONS AND INSTALLATION
1
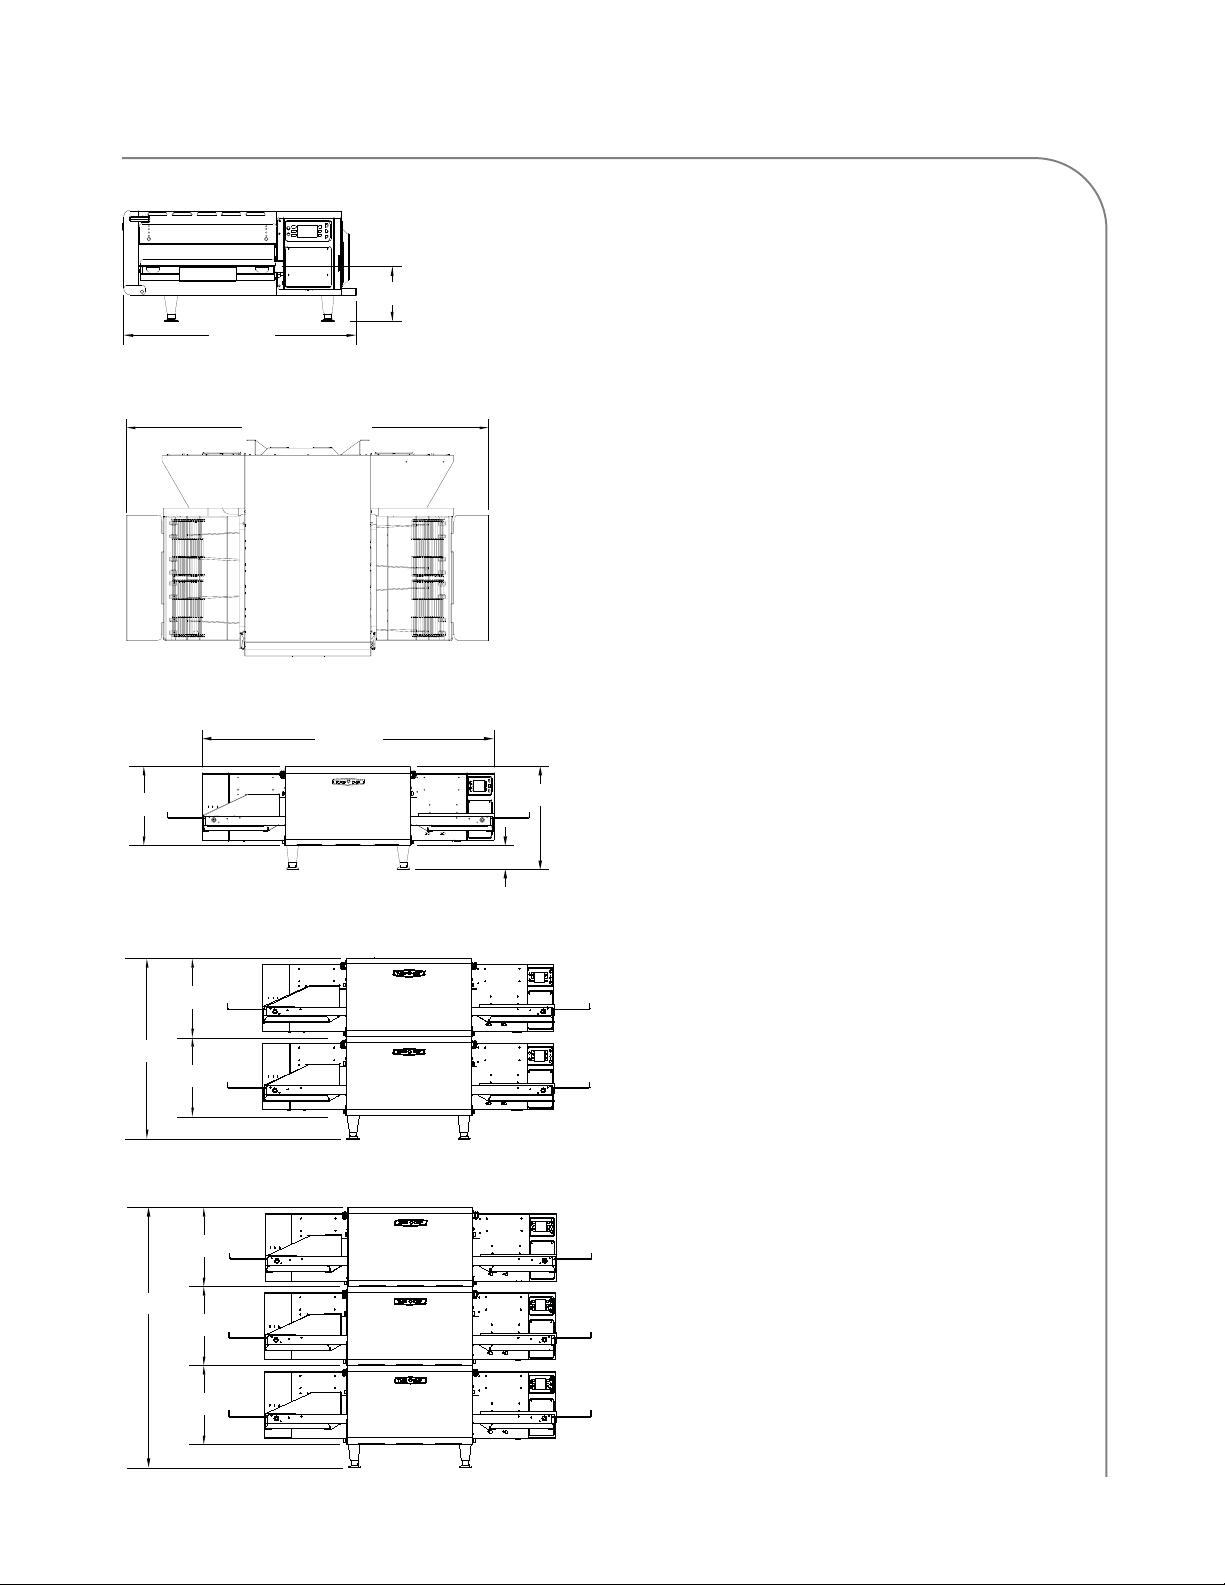
Dimensions
Exterior
Height 13.0” (330 mm)
--with legs 17.0” (432 mm)
Width 48.3” (1227 mm)
Depth 35.7” (907 mm)
Conveyor
Length 48.3” (1227 mm)
Width (Single) 20.0” (508 mm)
Width (50/50) 9.5” / 9.5” (241 mm / 241 mm)
Width (70/30) 15” / 4” (381 mm / 102 mm)
Electrical Specifications
North America
3 Phase
208/240 VAC
50/60 Hz
40 amp current draw
4-wire supply
NEMA 15-50P plug (4-pin IEC60309 available by
special order)
50-amp max circuit breaker protection
Europe/Asia (220-240 VAC)
3 Phase
220-240 VAC
50/60 Hz
40 amp current draw
4-wire supply
IEC60309 4-pin plug
64-amp max circuit breaker protection
Europe/Asia (380-415 VAC)
3 Phase
380-415 VAC
50/60 Hz
20 amp current draw
5-wire supply
IEC60309 5-pin plug
32-amp max circuit breaker protection
35.7” (907 mm)
8.5”
(216 mm)
48.3” (1227 mm)
13.0”
(330 mm)
17.0”
(432 mm)
4.0” (102 mm)
60.1” (1527 mm) with extensions
43.0”
(1092 mm)
13.0”
(330 mm)
13.0”
(330 mm)
13.0”
(330 mm)
30.0”
(762 mm)
13.0”
(330 mm)
13.0”
(330 mm)
Figure 1: Oven Dimensions - Side
Figure 2: Oven Dimensions - Top
Figure 3: Oven Dimensions - Front (Single)
Figure 4: Oven Dimensions - Front (Double)
Figure 5: Oven Dimensions - Front (Triple)
Page 10
2 SPECIFICATIONS AND INSTALLATION
Packaging
All ovens are packaged in a double-wall corrugated
box with integrated wooden skids. All international
ovens shipped via Air or Less than Container Loads
are packaged in wooden crates.
Certifications
Oven Construction
- 430 stainless steel front, top, sides, and back
- Cool to touch covers and panels
- Stainless steel interior
- 20-inch-wide cook chamber
Installation Instructions
The TurboChef HhC2020 Conveyor Oven is
designed and certified for safe operation when
installed in accordance with local and/or national
codes. It is the owner and/or installer's responsibility
to comply with any codes that may exist. Install this
oven according to the policies and procedures
outlined below and throughout this manual.
WARNING: Death, injury, and equipment
damage can result from improper installation
of a unit damaged during shipment or storage.
WARNING: Do not install an oven suspected
of damage. Improper installation or the
installation of a unit damaged during shipment
or storage may void the Limited Warranty.
Delivery and Initial Inspection
All TurboChef ovens are shipped so as to prevent
damage.
Upon delivery, inspect the shipping container for
external damage. Any evidence of damage should be
noted on the delivery receipt which must be signed
by the driver.
Upon removing the oven from its shipping carton,
check for any possible damage. Make note of any
damage and contact the shipping company to file a
claim. Carriers will accept claims for concealed
damage if notified within fifteen days of the delivery
and if the shipping container is retained for
inspection.
TurboChef does not assume responsibility for any
loss or damage suffered in transit. The carrier
assumes full responsibility for delivery in good order
when the shipment is accepted. However, when
necessary, TurboChef can assist in filing a claim.
Lifting the Oven
WARNING: The oven weighs approximately
195 lbs (88.5 kg). Two or more people are
required to lift it.
Position one or more people on either side of the
oven. Lift from the bottom. Never lift the oven from
the front and rear. The countertop must be at least
30” (762 mm) deep and capable of supporting 200
lbs (90.7 kg).
Once properly positioned on the counter, plug the
oven into a wall mounted electrical receptacle. See
Electrical Specifications on page 1.
PENDING
PENDING
Page 11
SPECIFICATIONS AND INSTALLATION
3
Oven Location and Placement
WARNING: Death, injury and equipment
damage may result from improper positioning.
WARNING: DO NOT stack ovens without
proper installation of stacking brackets. Contact
Customer Service for more information.
WARNING: DO NOT stack ovens more than
three high.
It is the operator's responsibility to ensure the oven
is properly positioned on countertop. TurboChef
will not warrant any damage or injury to ovens that
fall off countertops due to improper placement.
Proper placement of the oven will enhance
long-term operator convenience and satisfactory
performance. Be sure to place the oven in an area
accessible for proper operation and servicing.
The surface on which the oven is placed must be at
least 30” (762 mm) deep and capable of supporting
200 lbs. (90.7 kg) per oven. The manufacturer shall
not assume liability for damage or injury resulting
from the improper installation of this equipment
including temporary or unstable work stations or
countertops.
The oven must be installed level front to back and
side to side. For additional stability, the oven legs
may be bolted to the countertop if desired.
Installation Near Open Heat Source
Figure 6.
When placing a TurboChef oven near an open heat
source, strictly adhere to the following:
- If the oven is being placed near a grill or stove,
a divider must exist between the oven and the
open heat source, with a minimum of 6” (152
mm) between the oven and the divider.
- If the oven is being placed near a fryer, a divider
must exist between the oven and fryer, with a
minimum of 12” (305 mm) between the oven
and the divider.
- The height of the divider must be greater than
or equal to the height of the oven(s) - page 1.
- Verify oven location has a minimum 10” (254
mm) clearance on top and minimum 2” (51
mm) of clearance on each side.
Ventilation Requirements
The HhC2020 should be operated underneath a
ventilation hood, except where local laws or codes
allow for use without a ventilation hood. For more
information or to order a ventilation hood, contact
800.90
TURBO, +1 214-379-6000, or your local
distributor.
NOTE: In no event shall the manufacturer assume
any liability for damages or injuries resulting from
installations which are not in compliance with local
and national codes, and with the instructions
previously listed.
Figure 6: Installation Near Open Heat Source
Partition
Above Counter Top:
Single Oven = 17.0” (432 mm)
Double Stack = 30.0” (762 mm)
Triple Stack = 43.0” (1092 mm)
Grill
6”
(152 mm)
Minimum
Counter Top / Table
12”
(305 mm)
Minimum
Partition
Above Counter Top:
Single Oven = 17.0” (432 mm)
Double Stack = 30.0” (762 mm)
Triple Stack = 43.0” (1092 mm)
Deep Fryer
Page 12

4 CLEANING
= Wash, rinse, sanitize. (Use only TurboChef-
approved cleaner, part number 103180).
= Completely dry with clean towel.
1
Daily Cleaning Instructions
2
3
4
5
6
7
8
WARNING: Always disconnect power before cleaning or servicing oven.
WARNING: DO NOT attempt to clean the oven until it has cooled (screen reads “Oven Off”).
WARNING: DO NOT use a water jet when cleaning the oven.
High h Conveyor
BREAKFAST
COOKING
BELT
10:00
High h Conveyor
BREAKFAST PIZZA
COOLING DOWN
LUNCH
High h Conveyor
BREAKFAST PIZZA
OVEN OFF
LUNCH
by TurboChef
by TurboChef
by TurboChef
TM
TOP AIR 80%
BTM AIR 80%
TM
WINGS
TM
WINGS
BACK
OFF
SET
475F
IDLE
G
R
E
E
N
M
C
E
Y
S
T
P
O
BACK
OFF
IDLE
G
R
E
E
N
M
C
E
Y
S
T
P
O
BACK
OFF
IDLE
G
R
E
E
N
M
C
E
Y
S
T
P
O
Page 13

CLEANING
5
WARNING: Always disconnect power before cleaning or servicing oven.
WARNING: DO NOT attempt to clean the oven until it has cooled (screen reads “Oven Off”).
WARNING: DO NOT use a water jet when cleaning the oven.
Weekly Cleaning Instructions
= Wash, rinse, sanitize. (Use only
TurboChef-approved cleaner, part
number 103180).
= Completely dry with clean towel.
Step 1: Turn the Oven O
Step 2: Remove Outer Oven
Components
1.
High h Conveyor
BREAKFAST
COOKING
BELT
10:00
High h Conveyor
BREAKFAST PIZZA
COOLING DOWN
LUNCH
by TurboChef
by TurboChef
TM
TOP AIR 80%
BTM AIR 80%
TM
WINGS
BACK
OFF
SET
475F
IDLE
G
R
E
E
N
M
C
E
Y
S
T
P
O
BACK
OFF
IDLE
G
R
E
E
N
M
C
E
Y
S
T
P
O
1.
2.
2.
by TurboChef
TM
High h Conveyor
BREAKFAST PIZZA
OVEN OFF
LUNCH
WINGS
BACK
OFF
IDLE
G
R
E
E
N
M
C
E
Y
S
T
P
O
3.
4.
5.
Page 14

6
2.
4.
Step 4: Clean Oven Components
1.
3.
5.
6.
Replace lters if damaged or torn.
CLEANING
Step 3: Remove Inner Oven
Components
1.
2
1
2.
1
3.
4.
5.
2
2
1
11
Page 15

CLEANING
7
1.
2.
3.
4.
Step 5: Replace Oven Components
1
22
1
2
6.
7.
8.
9.
5.
Latch
Step 7: Ready the Oven for Use
1.
2.
Step 6: Verify Chain Tension
Acceptable - Chain (A) is tight and
easily clears crumb tray holder (B)
A
B
Call service to have link removed - Chain (A) is
loose and risks contact with crumb tray holder (B)
A
B
See detail below.
Page 16

8
Oven Controls
Figure 7.
1. Display
The display shows current oven operation and/or
user programming information.
2. Soft Keys
Six soft keys are on the oven controls, three on the
left (L1, L2, L3, where L1 = top) and three on the
right (R1, R2, R3, where R1 = top). Use the soft
keys to select the option/command that is adjacent
to it.
3. Up and Down Keys
When the oven is in the OVEN OFF MODE, use the
up key to access the
CONFIG MODE (page 13). Use
the down key to access cooking profiles 5-8.
Also, press the up and down keys to adjust various
oven settings (see pages 11-15).
Oven Controls
Figure 19
4. Back/Off Key
Depending on the mode the oven is in, the back/off
key will return the oven to the previous screen or
turn the oven off (page 9).
5. Idle Key
The idle key activates the
IDLE MODE (page 10).
6. Emergency Stop Key
The emergency stop key shuts down the conveyor
and heaters and returns the oven to the
OVEN OFF
MODE
(page 9).
NOTE: Depending on the temperature within the
oven, the cooling fans will remain on to prevent
damage to critical oven components.
CAUTION: DO NOT use the emergency stop
key as a general on/off switch. Doing so can
damage the oven and shorten its life span.
Figure 7: Oven Controls
STANDARD OVEN OPERATION
2
High h Conveyor
3
2
by TurboChef
1
TM
BACK
OFF
IDLE
G
E
R
N
E
C
M
Y
E
S
P
T
O
4
5
6
Page 17

STANDARD OVEN OPERATION
Cooking a Product
Figure 8.
This section explains how to cook a food product by
describing the “standard operation” modes through
which the oven progresses (Figure 6).
-
MODE 1: Oven Off
-
MODE 2: Belt Speed Select
-MODE 3: Warming
-MODE 4: Soaking
-
MODE 5: Cooking
-
MODE 6: Cooling Down
-MODE 7: Idle
NOTE:
MODE 7 is not part of a “standard” cooking
cycle. It only occurs when the user intervenes as
described on page 10.
Mode 1: Oven Off
Mode during which all cooking components are off
and the oven temperature has receded below 150°F
(66°C), but the display and keypad remain on. The
user can access cooking profiles 1-4 on this screen (1)
or press the down key to access cooking profiles 5-8.
Happens When...
-Power is supplied to the oven.
-The oven completes
MODE 6.
-The user presses the down key while-accessing
the
CONFIG MODE (refer to page 13 for more
information).
Goes To...
-
MODE 2 when the user selects a cooking profile
(soft keys L1, L3, R1, or R3).
-
CONFIG MODE when the user presses the up key.
Mode 2: Belt Speed Select
Mode during which the user selects the desired belt
speed.
NOTE: If a different key is pressed, the oven will ask
if you wish to continue or return to the belt speed
select screen. If you select continue, the oven will not
save the belt speed.
Happens When...
-The user selects a cooking profile from
MODE
1 or 6.
Goes To...
-
MODE 3.
BREAKFAST
LUNCH
DINNER
OVEN OFF
DESSERT
BREAKFAST
5:00
3:00
LUNCH
DINNER
2:00
3:20
4:00
BELT SPEED
2:45
2:00 2:30
DESSERT
BREAKFAST
BELT F
5:00
BELT R
3:20
TOP AIR 80 %
SET
COOKING
475F
BTM AIR 100 %
BREAKFAST
BELT F
5:00
BELT R
3:20
TOP AIR 80 %
SET
SOAKING
TIME LEFT = 5:00
475F
BTM AIR 100 %
1
2
5
4
BREAKFAST
BELT F
5:00
BELT R
3:20
TOP AIR 30%
SET
OVEN IDLE
PRESS ANY KEY
475F
BTM AIR 30%
BREAKFAST
LUNCH
DINNER
COOLING DOWN
OVEN TCC = 425F
DESSERT
7
BREAKFAST
BELT F
5:00
BELT R
3:20
TOP AIR 60 %
SET
WARMUP
OVEN TCC = 275F
475F
BTM AIR 60 %
3
6
Figure 8: Cooking Modes
9
Page 18

10 STANDARD OVEN OPERATION
Mode 3: Warming
Mode during which the oven warms to the preset
cooking temperature defined by the cooking profile
that was selected.
Happens When...
- A selection is made from
MODE 2, and the oven’s
temperature at the beginning of warmup was not
within (less than) 25°F (14°C) of the oven’s set
temperature.
Goes To...
-
MODE 4 once the oven has reached the temperature
defined by the selected cooking profile.
-
MODE 6 when the user presses the back/off key
and the oven is above 150°F (66°C).
Mode 4: Soaking
Mode during which the oven has completed
warming up and automatically allows an additional
five minutes for the oven cavity surfaces to warm.
Happens When...
-
MODE 3 completes (within 5°F [3°C] of set point)
Goes To...
-
MODE 5 when soaking completes.
- MODE 6 when the user presses the back/off key and
the oven is above 150°F (66°C).
Mode 5: Cooking
Mode during which the oven is ready to cook. The
user can place food on the conveyor to cook, or edit
cook settings if the full edit or flex option is enabled.
See page 11 for more information on full edit and
flex options.
Happens When...
-
MODE 4 completes.
- The user presses the idle key, up key, down
key, or any soft key during
MODE 7.
Goes To...
-
MODE 6 when the user presses the back/off key.
-
MODE 7 when the user presses the idle key.
-
MODE 3 if the temperature drops 25°F (14°C)
or more below the set point.
Mode 6: Cooling Down
Mode during which the burner assembly shuts off to
allow the oven to cool.
Happens When...
- The user presses the back/off key from
MODE 3
(and the oven temperature is above 150°F [66°C]),
or from
MODES
4, 5, or 7.
Goes To...
-
MODE
1 when the oven temperature has receded
below 150°F (66°C).
-
MODE 2 when the user selects a cooking profile.
Mode 7: Idle
Mode during which both blowers are reduced to
30% and the belt speed reduces to 20 minutes to
save power. All other oven components remain the
same.
Happens When...
-The user presses the idle key from
MODE 5.
Goes To...
-MODE 5 when the user presses the idle key, up
key, down key, or any soft key.
-
MODE 6 when the user presses the back/off key.
Page 19

STANDARD OVEN OPERATION
11
Editing a Cooking Profile
To edit a cooking profile, the oven must be in the
COOKING MODE and the full edit or flex option
must be enabled for each option to be edited. For
more information on selecting between full edit,
rigid, and flex options for each editable setting, see
Edit Options Screen on page 14.
When the rigid option is enabled for a given setting,
the soft key adjacent to that setting (Figure 9) is
disabled and no menu editing is allowed.
When the full edit option is enabled for a given
setting, that setting is fully customizable and
changes are saved once the oven returns to the
OVEN
OFF
or COOLING DOWN MODE.
When the flex option is enabled for a given setting,
that setting is customizable within flex option
limitations (as described in the following sections),
and changes will reset when the oven returns to the
OVEN OFF
or COOLING DOWN MODE
. NOTE: The
flex option does not apply to editing a profile name.
This section assumes that the full edit option is
enabled (except where otherwise noted) and that a
cooking profile and belt speed have been selected.
Changing a Cooking Profile Name
1. From the cooking screen (Figure 9), press
L1 to access the name change screen
(Figure 10).
2. Change the name of the cooking profile.
- The up key moves up through the available
characters. e.g. A,B,C…
- The down key moves down through the
available characters e.g. A,+,-, ,9,8…
- INS (L1) inserts a space.
- DEL (R1) deletes the selected character.
- ---> (R1) moves the cursor to the right.
- <--- (L1) moves the cursor to the left.
3. Press save (R3) to save the changes or cancel
(L3) to cancel any changes.
Figure 9: Cooking Screen
Figure 10: Name Change Screen
L1
L2
L3
R1
R2
R3
L1
L2
L3
R1
R2
R3
PROFILE 1
BELT F
5:00
BELT R
3:20
COOKING
TOP AIR 80 %
SET
475F
BTM AIR 100 %
INS
<--- --->
[PROFILE 1 ]
CANCEL
DEL
SAVE
Page 20

12 STANDARD OVEN OPERATION
BELT R
10:00
TOP AIR 80 %
<--- --->
PROFILE 1
Adjusting the Belt Speed
The High h Conveyor Oven can accommodate
either one or two conveyor belts. The oven will
automatically detect the number of conveyor belts
installed and display the option to change the speed
of each conveyor belt independently.
1. From Figure 9, press the soft key adjacent
to the conveyor belt you wish to adjust
(press L2 for the front belt [Belt F] or L3
for the rear belt [Belt R]).
2. Adjust the time it takes for the conveyor
belt to completely cycle through the oven.
- The up key increases bake time in
5-second increments up to 20 minutes.
+ Flex option enabled: the user can only
increase the time up to an additional
15 seconds.
- The down key decreases bake time in
5-second increments.
+ Flex option enabled: the user cannot
decrease the time by more than 15
seconds.
3. Press the soft key adjacent to the belt that
was adjusted to exit the belt speed controls.
Adjusting the Temperature
1. Press R2 (Figure 9, page 11) to access the
temperature controls.
2. Adjust the temperature (range is 300-550°F
[149-288°C]).
- Press the up key to increase the
temperature in 5°F/5°C increments.
+ Flex option enabled: the user can only
increase the temperature up to an
additional 10°F/5°C.
- Press the down key to decrease the
temperature in 5°F/°5C increments.
+ Flex option enabled: the user cannot
decrease the temperature by more than
10°F/5°C.
3. Press R2 again to exit temperature controls.
Adjusting the Top and Bottom Air
1. Press R1 (Figure 9, page 11) to access the top air
controls, or R3 to access the bottom air controls.
2. Adjust the air speed.
- Press the up key to increase the air speed in 5%
increments up to 100%.
+Flex option enabled: the user can only
increase the air speed by up to an
additional 15%.
- Press the down key to decrease the air
speed in 5% increments down to 30%.
+Flex option enabled: the user cannot
decrease the air speed by more than
15%.
- Press the soft key again to exit the air
controls.
Page 21

OVEN MODES
Config Mode
The CONFIG MODE (Figure 11) serves four main
purposes:
1. To access the smart card screen.
2. To access the fault count screen.
3. To access the
SETUP MODE.
4. To access the
TEST MODE (service use only).
To access the
CONFIG MODE, press the up key from
the
OVEN OFF MODE.
Smart Card Screen (Loading a Menu)
The smart card screen allows the user to
-Load a menu from smart card to oven.
-Save a menu from oven to smart card.
To load or save a menu,
1. Press L3 (Figure 11) to access the smart card
screen (Figure 12).
2. Insert a smart card into the smart card slot
(Figures 13 and 14), with the gold chip
facing the front of the oven.
3. Load or save a menu.
- Press R1 to load a menu from the smart
card to the oven (Figure 12).
- Press R2 to save a menu from the oven to
the smart card (Figure 12).
Accessing the Fault Count Screen
From the CONFIG MODE (Figure 11), press R1 to
access the fault counts screen (Figure 15). The oven
will display the number of faults that have occurred.
Accessing the Setup Mode
From the CONFIG MODE (Figure 11), press L1 to
access the
SETUP MODE. The SETUP MODE allows the
user to customize several oven settings - see below
for more details.
Setup Mode
Figure 16, page 14.
The
SETUP MODE serves four main purposes:
1. To change the display temperature.
2. To access the edit option screen.
3. To change the display language.
4. To access the info screen.
To access
SETUP MODE, press the up key from the
OVEN OFF or COOLING DOWN MODE (to access the
CONFIG MODE), and then press L1.
Figure 11: Config Mode
Figure 12: Smart Card Screen
Figure 14: Insert Smart Card Screen
13
Figure 13: Loading a Smart Card
L1
L2
L3
R1
R2
R3
L1
L2
L3
R1
R2
R3
L1
L2
L3
R1
R2
R3
SETUP
CONFIG MENU
SMARTCARD
TEST MODE
SMARTCARD
LOAD FROM CARD
SAVE TO CARD
FAU LTS
INSERT SMART CARD
PRESS [BACK] TO EXIT
Page 22

14
Figure 19: Info Screen
Figure 16: Setup Mode
Changing the Display Temperature
The oven can display the temperature in either Celsius
or Fahrenheit units. To change the display
temperature, press L1 in
SETUP MODE (Figure 16).
Edit Options Screen
The edit options screen (Figure 18) allows the user to
switch between full edit, rigid, and flex options for
profile name, belt speed, temperature, and % air. For
more information on the different edit options, see
Editing a Cooking Profile on page 11.
To access the edit options screen,
1. Press L3 (Figure 16) to access the password
screen (Figure 17).
2. Input the password 6 6 3 3 by pressing the
soft keys adjacent to the numbers.
To change the edit option (Figure 18),
- Press L1 to select full edit or rigid for the profile
name.
- Press L3 to select full edit, rigid, or flex for the
belt speed.
- Press R1 to select full edit, rigid, or flex for the
profile cook temperature setting.
- Press R3 to select full edit, rigid, or flex for the
% air setting.
Changing the Display Language
NOTE: Feature is not available on all oven models.
From the setup menu screen (Figure 16), press R1 to
set the language to English, French, German, or
Spanish.
Info Screen
The info screen (Figure 18) is used to display the following information in an easy to access place:
- Serial number
- Electrical compartment temperature
- Voltage
- Total time the oven has been on
- Total time the oven has been idle
- Firmware version
To access the info screen, press R3 within the
SETUP
MODE
(Figure 16).
Figure 15: Fault Counts Screen
Figure 17: Password Screen
Figure 18: Edit Option Screen
L1
L2
L3
R1
R2
R3
L1
L2
L3
R1
R2
R3
L1
L2
L3
R1
R2
R3
L1
L2
L3
R1
R2
R3
L1
L2
L3
R1
R2
R3
OVEN MODES
FAULT COUNTS
F1: 0
F2: 0
F3: 0
F4: 0
F5: 0
DEGS F
SETUP MENU
EDIT/RIGID/FLEX
1
2
3
NAME: FULL
BELT: RIGID
ENTER PASSWORD
<6633>
EDIT MODES
SELECT
F6: 0
F7: 0
F8: 0
F9: 0
F10: 0
ENGLISH
TEMP: FLEX
AIR: FLEX
INFO
4
5
6
SERIAL_NUMBER
EC=82F 208V
SOFTWARE VERSION
INFO
RUN: 65432 HR
IDLE: 12345 HR
Page 23

15
OVEN MODES
Updating the Firmware
From the oven off screen,
1. Insert the gray smart card (see Figure 13, page
13) with the gold chip facing the front of the
oven. If multiple smart cards are required, they
will be labeled in sequence - ensure the correct
sequence is followed.
2. From the
COOLING DOWN or OVEN OFF MODE,
press and hold the idle key until the oven resets
(approximately 5 seconds). The display will go
blank until the upload is complete.
3. When the oven beeps one long high tone, the
load was successful. If a second card was
provided, insert it.
4. When the oven restarts and the display turns
on, the update is complete. Remove the smart
card from the oven.
NOTE: If the update is unsuccessful, the display
will remain off and the oven will beep one long,
low tone. If this occurs, repeat the above
procedure. If the update fails multiple times, a
smart card may be damaged. Please note that the
oven will be inoperable until a successful update is
performed. As such, TurboChef reinforces proper
handling of smart cards to help prevent static
damage, and recommends that each service
technician keep a backup copy.
Page 24

16 TROUBLESHOOTING
Issue Possible Cause(s) Resolution
No power to oven. - Oven is not plugged in.
- Main circuit breaker is
tripped.
- Plug oven in.
- Verify wall circuit breaker is on. Reset breaker
and then power oven back on.
Oven is not warming up properly.
- Oven is in the off state.
- Oven has been switched off at
the main circuit breaker.
- Problem with the heater.
- Select a cooking profile.
- Press the back/off key until the oven is in the
off state – leave for two minutes. Unplug the
oven – leave for two minutes. Re-plug in the
oven, switch on the isolator/main power supply
and select a cooking profile.
- Call customer service.
Oven is not cooking properly
- Oven is not clean.
- Incorrect cooking profile or
belt speed was selected for the
product.
- Product was not cooked from
correct starting state, e.g.
chilled, frozen, etc.
- Clean the oven following the weekly cleaning
instructions on pages 5-7.
- Ensure that the correct cooking profile is
selected for the product.
- Ensure product is in the correct state before
being placed in the oven.
F1: Blower Failure - Oven power interrupted. - Verify wall circuit breaker is on. Reset breaker
and then power the oven back on. Press the
back/off key until the oven is in the off mode –
leave for two minutes. Unplug the oven – leave
for two minutes. Re-plug in the oven, switch
on the isolator/main power supply and select a
cooking profile.
F2: Low Temp
During Cook
- Oven power interrupted.
- Excessive load.
- Oven is not clean.
- Oven not fully warmed up.
- Defective heater.
- Blower motor not running.
- Low supply voltage.
- Verify wall circuit breaker is on. Reset breaker
and then power oven back on.
- Reduce load.
- Clean the oven following the weekly cleaning
instructions on pages 5-7.
- Press the back/off key until oven returns to the
oven off mode. Re-select the cooking profile
and allow oven to reheat.
- Call customer service.
- Call customer service.
- Call electrician to improve power supply.
Page 25

17
TROUBLESHOOTING
Issue Possible Cause(s) Resolution
F5: CC Over Temp - Blockage of airflow into the
oven.
- Problem with the blower
motors or heater.
- Defective SSR.
- Check for and remove anything that may be
obstructing regular airflow into the oven.
- Call customer service.
- Call customer service.
F6: EC Over Temp - Blockage of airflow into the
electrical compartment.
- Problem with the cooling
fans.
- Check for paper towels or anything that may
be obstructing cool air into the electrical
compartment.
- Call customer service.
F7: RTD Failure - Damaged or defective oven
components.
- Call customer service.
F8: High Limit
Tripped
- Oven is not clean. - Clean the oven following the weekly cleaning
instructions on pages 5-7. If problem persists,
call customer service.
F9: Belt Run
Failure
- Too much weight on belt.
- Obstruction blocking belt
rotation.
- Damaged or defective oven
components.
- Overheated conveyor drives
- Ensure oven is in the off state and completely
cooled and belt is completely stopped. If belt is
overloaded, remove product from belt.
- Ensure oven is in the off state and completely
cooled and belt is completely stopped. Look
into oven cavity and remove any obstructions
that are blocking the belt’s rotation.
- Call customer service.
- Ensure the filters are clean and fans are
running. Also ensure ambient temperature is
not excessive (greater than 100°F [38°C]).
Page 26

18
TROUBLESHOOTING
Replaceable Parts
The following is a list of parts that may need replacing during the life of the oven. For more information,
please contact TurboChef. (Within North America, call 800.90
TURBO. Outside North America, call
+1 214.379.6000 or your authorized distributor.)
Part Description TurboChef Part Number
Air Filter HCT-4067
Blower Motor HCT-4205
Blower Motor Controller (BMSC) 100443
Control Board CON-7002
Cooling Fan TC3-0433
Display 100505
EMI Filter 100539
Fuse, 20A 100599
Gear Drive HHC-4120
Gear Drive Controller 103581
Heater, Back HCT-4161
Heater, Front HCT-4162
Keypad HHC-1234
Power Supply 101211
Relay, K3, 30A 101279
Relay, SSR 101286
RTD Probe, 3-Inch HHC-6517-2
Page 27

NORTH AMERICA LIMITED WARRANTY
19
North America Limited Warranty
TurboChef “HhC 2020” Conveyor Oven – North America
The TurboChef HhC 2020 Conveyor oven Limited Warranty outlined below is activated upon shipment of
your oven. Should you require additional assistance after reviewing the warranty outlined below, please call
TurboChef Customer Service at 800.90TURBO.
Limited Warranty
TurboChef Technologies, Inc. (“TurboChef ”) warrants to you, the purchaser, that under normal use the
TurboChef HhC 2020 Conveyor oven you have purchased (the “Equipment”) will be free from defects in
material and workmanship during the Warranty Period, subject to the terms and conditions set forth herein.
The “Warranty Period” is twelve (12) months from the date the Equipment is shipped from TurboChef ’s
U.S. factory or distribution center. This warranty is conditioned upon you promptly notifying TurboChef of
any claims, as provided in the paragraph entitled “Warranty Claims” below, and providing TurboChef with
all data and information requested by TurboChef or its service agents in connection with such claims as well
as all necessary access to your premises and the Equipment. This warranty is made only to the initial purchaser of the Equipment from TurboChef or its authorized dealer; it is not assignable to subsequent purchasers unless TurboChef consents to such assignment in writing.
Disclaimer of Warranties
EXCEPT AS PROVIDED IN THE LIMITED WARRANTY ABOVE, THE EQUIPMENT IS PROVIDED “AS IS”. THERE ARE NO WARRANTIES, EXPRESS, IMPLIED OR STATUTORY, WHICH
EXTEND BEYOND THE DESCRIPTION ON THE FACE HEREOF INCLUDING ANY IMPLIED
WARRANTY OF MERCHANTABILITY AND/OR FITNESS FOR A PARTICULAR PURPOSE
AND/OR ANY IMPLIED WARRANTY OF NON-INFRINGEMENT. THIS LIMITED WARRANTY
GIVES YOU SPECIFIC LEGAL RIGHTS WHICH MAY VARY DEPENDING UPON THE LAW OF
YOUR STATE OR COUNTRY.
Warranty Exclusions
Improper Installation, Operation or Maintenance: Equipment that is not installed, operated and maintained
in accordance with TurboChef ’s HhC 2020 Conveyor oven owner’s manual (as may be updated by
TurboChef from time to time, the “Manual”), a copy of which is provided to you with the Equipment or
otherwise will be furnished to you upon request, is excluded from this limited warranty. This limited warranty shall not apply to damage to the product which results, in TurboChef ’s or its service agent’s sole opinion,
due to any of the following causes: failure to provide a suitable installation and operating environment
(including power and HVAC) and facilities as prescribed by the Manual; misuse; abuse; accident; neglect;
power failure or power surges (over or under voltage); flood, fire, lightning, other natural or man-made disasters, or other Acts of God. This limited warranty shall not apply to Equipment that has missing or altered
serial numbers.
Page 28

20 NORTH AMERICA LIMITED WARRANTY
Modifications and Repair: Equipment that has been modified or altered by persons other than TurboChef or its
service agents, or Equipment that has had non-approved devices or connection items attached thereto, is
excluded from coverage under this warranty. Repair of the Equipment by anyone other than TurboChef or its
authorized service agents will void all warranties on the Equipment.
Accessories: Accessories and parts (collectively “Accessories”) that are consumed in the normal course of
Equipment operation or maintenance are excluded from this warranty. Failure of or damage to Equipment or
components from the use of non-approved cleaning chemicals, devices or processes is also excluded from this
warranty. Accessories may include, but are not limited to, ceramic cooking platters, paddles and approved
cleaning chemicals and devices.
Outstanding Invoices: If the full invoiced amount for Equipment purchased has not been paid within forty-five
(45) days from the invoice date, then TurboChef will have no obligation to honor this or any other warranty
on the Equipment until payment is received in full, including any accrued interest or other charges, has been
satisfied, at which time warranty coverage will be reinstated, but the Warranty Period will not be extended.
Warranty Service, Exclusive Remedy
TurboChef will be solely responsible for determining whether or not the Equipment or any component thereof
is defective. Defective components covered by this warranty will be repaired or replaced at TurboChef ’s option
without charge to you and such repaired or replacement components will be covered by this warranty for the
balance of the Warranty Period. Parts used in the repair of defective components and replacement components
may be new, recovered or rebuilt. At its sole option, TurboChef may decide to replace defective Equipment covered by this warranty with new, recovered or rebuilt Equipment of equal or greater capability, and such
Equipment will be covered by this Limited Warranty for the balance of the Warranty Period. Defective
Equipment and components will become the property of TurboChef. This paragraph states TurboChef ’s sole
and exclusive obligation and liability and your sole and exclusive remedy under this warranty. TurboChef shall
not be responsible for a failure to provide warranty services due to causes beyond TurboChef ’s or its service
agents’ control.
Warranty Claims
Claims under this warranty must be reported to TurboChef during our normal working hours at the following
number: 800.90TURBO, or such other reporting service as TurboChef may designate. Upon receipt of the
claim and related information and preliminary verification that the claim is valid, TurboChef will promptly
notify an authorized service agent to contact you and arrange for an on-site repair visit during the service
agent’s normal working hours. Any costs incurred by TurboChef or its service agent associated with a service
agent being refused or unable to gain access to the Equipment on your premises, or a claim not covered by this
warranty, will be charged to you.
Charges for Non-Warranty Service or Rejection of Service Visit
In the event that repairs, replacement or service are provided by TurboChef ’s service agents for work not covered by this limited warranty, customer agrees to pay the service agent directly according to the service agent’s
normal scale of charges. In the event TurboChef is invoiced by the service agent for services not covered under
this limited warranty, TurboChef will invoice customer and customer will pay such invoice based on terms of
Page 29

NORTH AMERICA LIMITED WARRANTY
21
net 10 days. Customer also agrees to pay any cost incurred by TurboChef or its service agent associated with
a service agent responding to a call for service, but then being refused or unable to gain access to the Oven
on Customer’s premises. Failure to submit payment may, at TurboChef ’s discretion, result in TurboChef
voiding the balance of the warranty. In no event will TurboChef authorize service to a store with an outstanding Non-Warranty invoice.
Disclaimer of Damages
TURBOCHEF DISCLAIMS ALL INCIDENTAL, SPECIAL AND CONSEQUENTIAL DAMAGES,
INCLUDING BUT NOT LIMITED TO, LOSS OF USE, LOST REVENUE OR PROFITS, OR SUBSTITUTE USE, SUFFERED BY YOU OR ANY THIRD PARTY, WHETHER ARISING IN CONTRACT, TORT (INCLUDING NEGLIGENCE), OR OTHERWISE, RESULTING FROM ANY
BREACH BY TURBOCHEF OR ITS SERVICE AGENTS OF THIS LIMITED WARRANTY, OR
RESULTING FROM THE MANUFACTURE, USE, OR DEFECTS, OF OR IN THE EQUIPMENT,
EVEN IF TURBOCHEF WAS APPRISED OF THE POSSIBILITY OF SUCH DAMAGES. SOME
STATES AND COUNTRIES DO NOT ALLOW THE EXCLUSION OF INCIDENTAL OR CONSEQUENTIAL DAMAGES, SO THE ABOVE LIMITATION MAY NOT APPLY TO YOU.
Customer Indemnity
You agree to indemnify, defend and hold TurboChef harmless from all third party claims, demands, judgments, fees and costs directly or indirectly arising out of or related to your use of the Equipment. You further
agree to indemnify and hold TurboChef harmless from any incidental, consequential or special damages suffered by you, including lost revenue or profits, loss of use, or substitute use, during periods of Equipment
failure or loss of use.
Territory
This warranty is valid in the United States of America, Canada and Puerto Rico.
Governing Law, Entire Warranty
This warranty shall be governed and construed in accordance with the laws of the State of Georgia, USA
(except with respect to its provisions regarding conflicts of laws). The warranty described herein is the
complete and only warranty for Equipment and supersedes all prior oral or written agreements and understandings that may have existed between us relating to Equipment warranties. The terms of this warranty
may not be altered, amended or modified except by a signed writing from TurboChef. Any purported
alteration, amendment or modification by a service agent or anyone else will not be enforceable against
TurboChef.
Waiver: Waiver by TurboChef of any default will not be deemed a continuing waiver of such default or a
waiver of any other default.
Page 30

22 INTERNATIONAL LIMITED WARRANTY
This Limited Warranty shall apply to the sales of all TurboChef HhC 2020 Conveyor ovens (the
“Equipment”) manufactured by TurboChef Technologies, Inc. (“TurboChef”), and sold to purchasers
outside of the United States, Canada, and Puerto Rico by an Authorized Distributor of TurboChef
International (the “Authorized Distributor”).
Limited Warranty
You, the purchaser (“You”) have entered into a sales contract with the Authorized Distributor for the
purchase of the Equipment. This Limited Warranty is made to you by the Authorized Distributor from
whom you purchased the Equipment with the support of TurboChef. Subject to the limitations stated
below, the Authorized Distributor warrants to You that the quantity and specification of the Equipment
delivered to You shall be as set out in the Authorized Distributor’s acceptance of your order and that the
Equipment will be free from any material defects in the product and workmanship for twelve (12) months
from the date of installation (the “Warranty Period”), subject to the terms and conditions set forth herein.
Disclaimer
EXCEPT AS PROVIDED IN THE LIMITED WARRANTY ABOVE, THE EQUIPMENT IS PROVIDED “AS IS”. THERE ARE NO WARRANTIES, EXPRESS, IMPLIED, COMMON LAW OR STATUTORY, WHICH EXTEND BEYOND THE DESCRIPTION ON THE FACE HEREOF INCLUDING
ANY IMPLIED WARRANTY OF MERCHANTABILITY AND/OR FITNESS FOR A PARTICULAR
PURPOSE AND/OR ANY IMPLIED WARRANTY OF NON-INFRINGEMENT. THIS LIMITED
WARRANTY GIVES YOU SPECIFIC LEGAL RIGHTS WHICH MAY VARY DEPENDING UPON
THE LAW OF YOUR STATE OR COUNTRY.
The TurboChef Global Warranty System
This Limited Warranty commences upon delivery of the Equipment to Your premises. The Authorized
Distributor will inspect and install the Equipment at Your premises in accordance with TurboChef ’s
instructions and will record the serial number of the Equipment, Your contact details, the date and location
of installation and the results of the Authorized Distributor’s inspection. This information will be entered
by the Authorized Distributor into the TurboChef global warranty system and will be used by TurboChef,
the Authorized Distributor and its authorized service agents for the provision of the warranty service.
International Limited Warranty
Page 31

INTERNATIONAL LIMITED WARRANTY
23
Warranty Service
During the Warranty Period, any materially defective Equipment will be repaired or replaced free of charge
at TurboChef ’s option provided that:
1. You notify the Authorized Distributor from whom You purchased the Equipment and/or TurboChef as
soon as reasonably possible after discovery of a defect and in accordance with the warranty claims
procedure set out below;
2. You provide the Authorized Distributor from whom You purchased the Equipment and/or TurboChef
with all data and information reasonably requested by TurboChef, the Authorized Distributor or its
authorized service agents in connection with Your warranty claim;
3. You make the Equipment available to TurboChef, the Authorized Distributor or its authorized service
agents;
4. The Equipment has been installed by an Authorized Distributor and you have provided all necessary
information for the Authorized Distributor to register the Equipment in the TurboChef global warranty
system;
5. The Equipment has been operated and maintained by You in accordance with TurboChef’s “Owner’s
Manual” provided with the Equipment (and as updated by TurboChef );
6. You have not used any non-approved devices, accessories, consumables or parts in conjunction with the
Equipment; and
7. Repairs, modifications or alterations have not been attempted other than by TurboChef, an Authorized
Distributor or its authorized service agent.
Neither TurboChef nor the Authorized Distributor assumes any liability for damage caused, in TurboChef’s,
its Authorized Distributor’s or its service agent’s sole opinion, by any of the following: Your failure to
provide a suitable installation and operating environment (including power and HVAC) or facilities as
prescribed by the Manual; misuse or abuse; accident; neglect; power failure or power surges (over or under
voltage); Acts of God; lightning, floods, or other natural disasters; fire; or man-made disasters. This limited
warranty shall not apply to Equipment that has missing or altered serial numbers.
At its sole option, TurboChef may replace defective Equipment or components with new, recovered or
rebuilt Equipment of equal or greater capability, and such Equipment or components will be warranted by
the Authorized Distributor for the balance of the Warranty Period. Replaced defective Equipment or
components will become the property of TurboChef.
Warranty Claims:
Any warranty claim must be made directly in writing either to the Authorized Distributor from whom You
purchased the Equipment or to TurboChef at the following address:
TurboChef Technologies, Inc.
4240 International Parkway, Suite 105
Carrollton, Texas 75007
Phone: +1 214-379-6000
Fax: +1 214-379-6073
Page 32

24 INTERNATIONAL LIMITED WARRANTY
The claim must include the serial number of the Equipment and be received by TurboChef on or before the
last day of the Warranty Period. Upon receipt of Your claim, TurboChef will promptly notify an Authorized
Distributor or an authorized service agent to contact You, to verify Your claim and, if necessary, to arrange
for an on-site repair visit during normal working hours.
Consumables and Parts Used with The Equipment: Neither TurboChef nor the Authorized Distributor
assumes any liability for consumables and parts that are used in the normal course of Equipment operation
or for failure of or damage to Equipment or components from the use of non-approved cleaning chemicals,
devices or processes.
Charges for Service Not Covered by Limited Warranty: In the event the You request and receive repairs,
replacement or service not covered by this Limited Warranty, You will be invoiced and must pay the
Authorized Distributor or authorized service agent directly according to its normal scale of charges and business terms.
Product Liability: NEITHER TURBOCHEF NOR THE AUTHORIZED DISTRIBUTOR ASSUMES
ANY LIABILITY FOR ANY INCIDENTAL, SPECIAL OR CONSEQUENTIAL DAMAGES,
INCLUDING BUT NOT LIMITED TO LOSS OF USE, LOST REVENUE OR PROFITS, OR
SUBSTITUTE USE SUFFERED BY YOU OR ANY THIRD PARTY, WHETHER ARISING IN
CONTRACT, TORT (INCLUDING NEGLIGENCE), OR OTHERWISE RESULTING FROM ANY
BREACH BY TURBOCHEF OR THE AUTHORIZED DISTRIBUTOR OF THE LIMITED
WARRANTY PROVIDED HEREIN, EVEN IF TURBOCHEF AND/OR THE AUTHORIZED
DISTRIBUTOR WERE APPRISED OF THE POSSIBILITY OF SUCH DAMAGES. THIS LIMITED
WARRANTY GIVES YOU SPECIFIC LEGAL RIGHTS, AND YOU MAY ALSO HAVE OTHER
RIGHTS THAT VARY FROM COUNTRY TO COUNTRY. SOME COUNTRIES MAY NOT ALLOW
THE EXCLUSION OR LIMITATION OF INCIDENTAL OR CONSEQUENTIAL DAMAGES, MAY
NOT ALLOW LIMITATIONS ON HOW LONG AN IMPLIED WARRANTY OR CONDITION
LASTS, OR ALLOW PROVISIONS THAT PERMIT THE WARRANTY TO BE VOIDED. THUS,
SOME OF THE ABOVE LIMITATIONS OR EXCLUSIONS MAY NOT APPLY TO YOU.
Exclusive Remedy: This Limited Warranty states the Authorized Distributors and TurboChef ’s sole and
exclusive obligation and liability and your sole and exclusive remedy under this Limited Warranty.
Third Party Rights: The UK Contract (Rights of Third Parties) Act 1999 is excluded from applying to this
Limited Warranty and nothing herein confers or purports to confer on any third party any benefit or any
right to enforce any term of this Limited Warranty.
Severability: If any item or provision contained in this Limited Warranty or any part of them (“an offending
provision”) is declared to be or becomes unenforceable, invalid or illegal for any reason whatsoever in any
jurisdiction, the other terms and provisions of this Limited Warranty shall remain in full force and effect in
that jurisdiction as if it had been executed without the offending provision appearing in it and the entire
Limited Warranty shall remain in full force and effect in all other jurisdictions.
Page 33

INTERNATIONAL LIMITED WARRANTY
Governing Law, Entire, Agreement: This Limited Warranty shall be governed by and construed according
to English law. The application of the United Nations Convention on International Sale of Goods to this
Limited Warranty is expressly excluded. This Limited Warranty may not be altered, amended or modified
by the Authorized Distributor or its service agent, and no representation, alteration, amendment or
modification by TurboChef shall be valid unless in a signed form from TurboChef.
Waiver: Waiver by TurboChef or an Authorized Distributor of any default will not be deemed a continuing
waiver of such default or a waiver of any other default.
25
Page 34

Accelerating the World of Cooking
TM
Corporate Headquarters
Six Concourse Parkway, Suite 1900
Atlanta, Georgia 30328
USA
+1 678.987.1700 PHONE
+1 678.987.1750 FAX
Sales & Marketing: 866.90TURBO
Global Operations
4240 International Pkwy,Suite 105
Carrollton, Texas 75007
USA
+1 214.379.6000 PHONE
+1 214.379.6073 FAX
Customer Service: 800.90TURBO
+1 214.379.6000
turbochef.com
Part Number: HCT-4201 / Rev. A / June 2008
Country Code: NA/EU
For service or information:
WITHIN NORTH AMERICA CALL
Customer Service at 800.90TURBO or
OUTSIDE NORTH AMERICA CALL
+1 214-379-6000 or Your Authorized Distributor
 Loading...