Turbochef TORNADO Operator’s Manual

4 (1)

TM

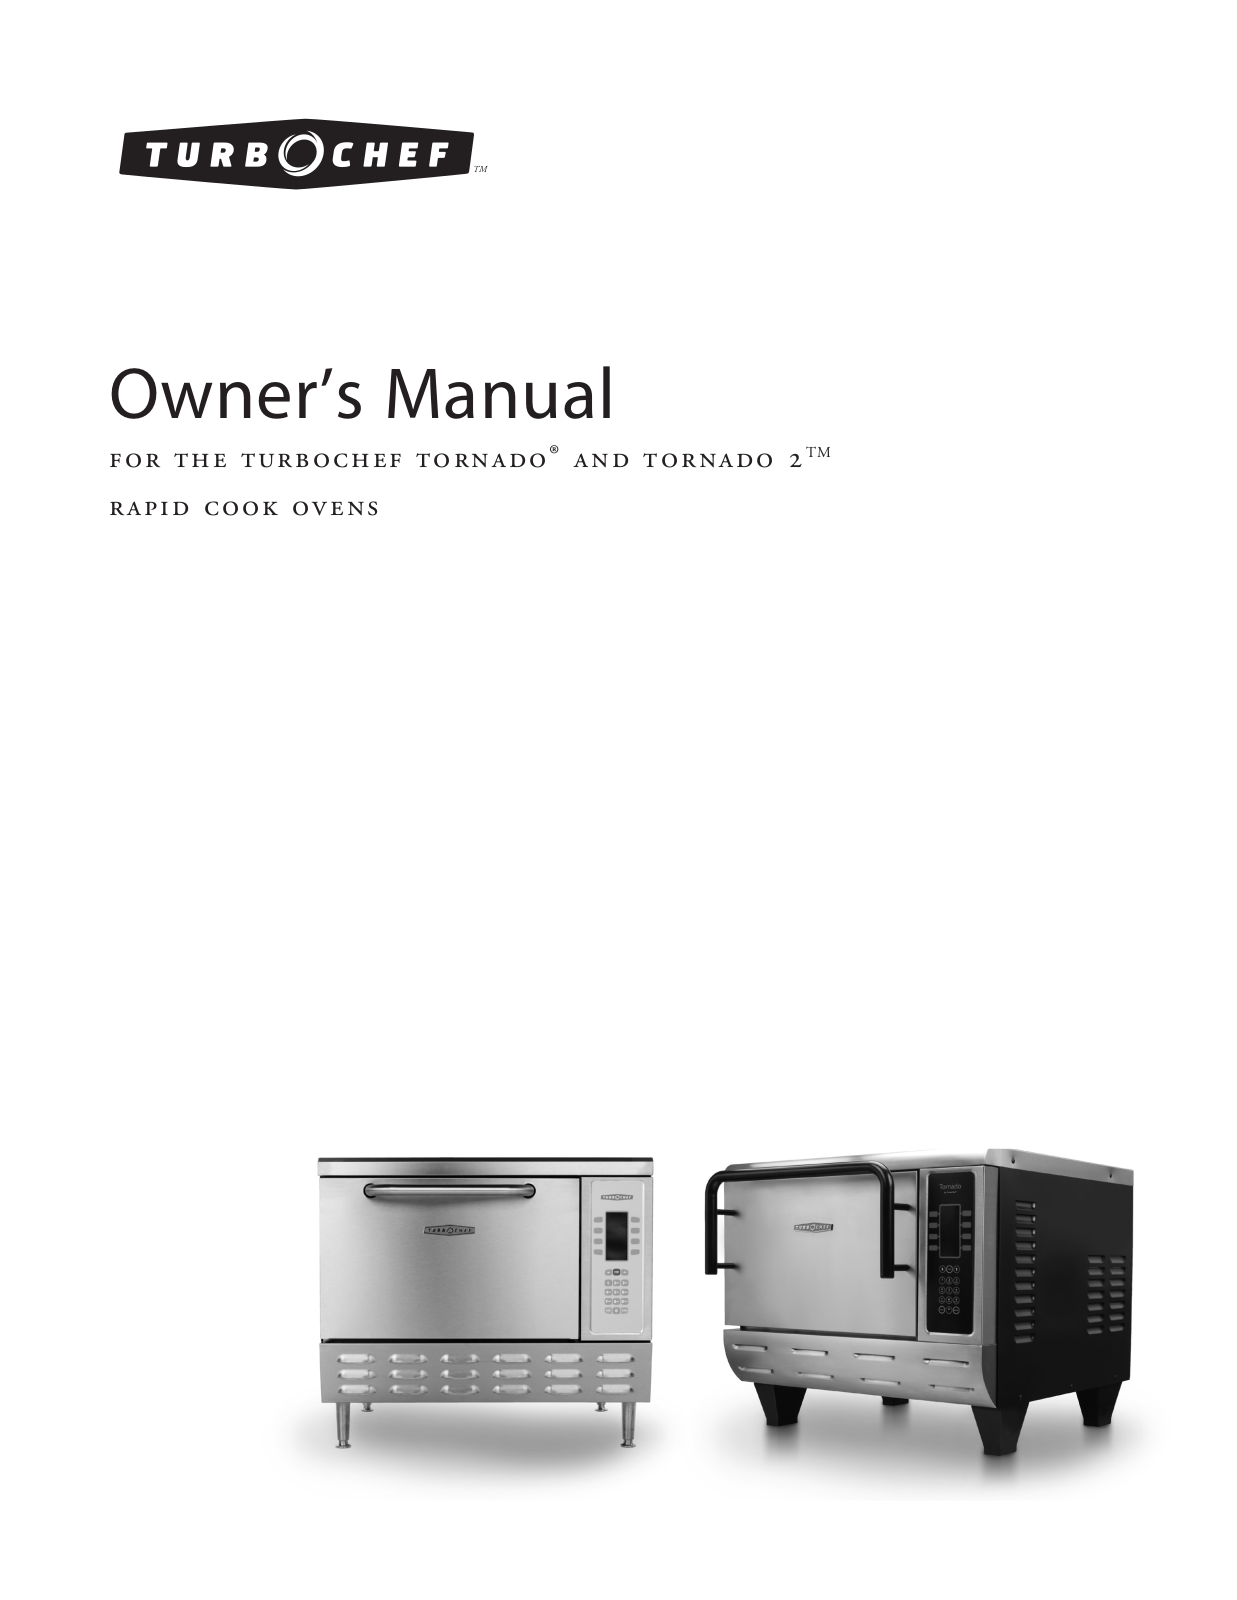
Owner’s Manual

for the turbochef tornado® and tornado 2TM rapid cook ovens

model

serial number

installed by

installation checked by

service center name / number

For service or information:

within north america call

Customer Service at 800.90turbo or Sales & Marketing at 866.90turbo

outside north america call

+1 214-379-6000 or Your Authorized Distributor

TM

IMPORTANT SAFETY INFORMATION - PLEASE READ FIRST

WARNING: Improper installation, adjustment, alteration, service or maintenance can cause property damage, injury or death. Read the installation, operating and maintenance instructions

thoroughly before installing or servicing this equipment.

This product employs an exposed radiant heating element on the bottom of the cavity. This element is HOT during operation and will remain at dangerous temperatures after the unit is switched off. NEVER attempt to touch the element during operation or while the oven is warm.

ox DO NOT store or use gasoline or any other flammable vapors or liquids in the vicinity of this or any other appliance.

The information contained in this manual is important for the proper installation, use and maintenance of this oven. Adherence to these procedures and instructions will result in satisfactory cooking results and long, trouble-free service. Please read this manual carefully and retain it for future reference.

Errors— descriptive, typographic, or pictorial—are subject to correction. Specifications are subject to change without notice.

Table of Contents

Important Safety Instructions

i

To Reduce the Risk of Fire in the Oven Cavity

ii

Precautions to Avoid Possible Exposure


to Excessive Microwave Energy

ii

Grounding Instructions

ii

Power Supply Cord Replacement

iii

RF Interference Considerations

iii

Protective Earth (Ground) Symbol

iii

Equipotential Bonding Symbol

iii

Overview of the TornadoTM


Specs and Dimensions

1

Dimensions


Construction


Standard Features


Accessories


Certifications


Packaging


Electrical Specifications

2

How the Technology Works


The Technology Behind the Tornado

3

Assembly and Installation


Installation Instructions

4

Delivery and Initial Inspection


Lifting the Oven


Oven Location and Placement


Securing Oven to Cart


Double Stacking Ovens


Built-In Installation


Installation Near Open Heat Source


Ventilation Requirements


Oven Assembly

7

Optional Installation Items

7

Oven Restraint Kit

7

Oven Carts

8

Loading a Menu from a Smart Card

9

Saving a Menu to a Smart Card

9

Common Operating Terms


Oven Operating Components

11

Modes and States

11

Common Cooking Terms

11

Faults and Errors

12

Operating the Tornado


The Control Pad

13

Powering Up the Oven

14

Initial Power-Up


Power-Up


Voltage Sensing

14

Cooking Instructions

15

Turning the Oven Off

16

Editing a Food Item

17

Changing the Edit Pin Number


Editing a Food Item


Changing the Idle IR Set Temperature

18

Enabling/Disabling the Edit Mode

18

Cooking Options - Time, Done, and Snooze

18

The “Enter Cook Time” Screen


The “Done” Screen


The “Snooze” Mode


Recipe Development and Cooking Tips


Developing Recipes

21

Development Methodology


The Importance of Consistency


Ovenables

23

Dual-Ovenable Paper Board


Baking Papers/Sheets


Ceramics, Earthenware, Corningware


Toughened Glass


Plastics


NordicWare


What Not To Use


Maintenance and Troubleshooting


Daily Maintenance for the Tornado

25

Tips for Prolonging Oven Life

26

Troubleshooting

26

Catalytic Converter

29

Limited Warranty


North America Limited Warranty

30

International Limited Warranty

33

I N T R O D U C T I O N i

IMPORTANT SAFETY INSTRUCTIONS

WARNING: When operating this oven, strictly adhere to the following safety precautions to reduce the risk of burns, electric shock, fire, injury, damage to oven or property near oven, or possible exposure to excessive microwave energy.

General Safety Information

aRead all instructions before using this appliance.

aRead and follow the specific “Precautions to be Observed to Avoid Possible Exposure to Excessive Microwave Energy” found on page ii.

aThis appliance must be grounded. Connect only to a properly grounded outlet. See “Grounding Instructions” on page ii.

aInstall or locate this appliance only in accordance with the provided installation instructions.

aThis appliance should be serviced by qualified service personnel only. Contact the nearest authorized service facility for examination, repair, or adjustment.

aKeep the cord away from heated surfaces.

aLiquids, such as water, coffee, or tea are able to be overheated beyond the boiling point without appearing to be boiling. Visible bubbling or boiling when the container is removed from the microwave oven is not always present. this could result in very hot liquid suddenly boiling over when the container is disturbed or a utensil is inserted into the liquid.

awarning: The contents of feeding bottles and baby food jars must be stirred or shaken and the temperature checked before consumption, in order to avoid burns (IEC 60335-2-90).

aUse this appliance only for its intended uses as described in this manual.

aOnly use utensils that are suitable for use in microwave ovens (IEC 60335-2-90).

X do not use corrosive chemicals or vapors in this appliance; it is not designed for industrial/laboratory use.

Xwarning: Failure to maintain the oven in a clean condition could lead to deterioration of the surface that could adversely affect the life of the appliance and possibly result in a hazardous situation.

Xwarning: do not heat liquids or other foods in sealed containers (e.g., jars, whole eggs, etc.) since they are liable to explode.

X do not allow children to use this appliance.

Xdo not operate this appliance if it has a damaged cord or plug, is not working properly, or has been damaged or dropped. See “Power Cord Replacement” found on page ii.

X do not cover or block any openings on this appliance. X do not store this appliance outdoors.

X do not use this product near water (e.g., near a kitchen sink, in a wet basement, near a swimming pool). X do not immerse the cord or plug in water.

X do not let the cord hang over the edge of a table or counter.

X do not use a water jet for cleaning. See pages 5-6 in this manual for proper cleaning procedures.

XThis appliance is not to be used by children or persons with reduced physical, sensory or mental capabilities, or lack of experience and knowledge, unless they have been given supervision or instruction.

Reducing Fire Risk

aRemove wire twist-ties from paper or plastic bags used to facilitate cooking in the oven.

aIf materials inside the oven ignite, keep the oven door closed, turn the oven off, and disconnect the power cord or shut off power at the fuse or circuit breaker panel.

aIf smoke is observed, switch off or unplug the oven. Keep the door closed to stifle any flames.

X do not use the cook cavity for storage purposes.

Xdo not overcook food. Carefully attend to the oven if paper, plastic, or other combustible materials are placed inside the oven to facilitate cooking.

X do not leave paper products, cooking utensils, or food in the cavity when the oven is not in use.

SAVE THESE INSTRUCTIONS

SAVE THESE INSTRUCTIONS

ii I N T R O D U C T I O N

Grounding Instructions

This appliance must be grounded. In the event of an electrical short circuit, grounding reduces the risk of electric shock by providing an escape wire for the electric current. This oven is equipped with a cord that has a grounding wire with a grounding plug, which must be plugged into an outlet that is properly installed and grounded. Consult a qualified electrician or serviceman if uncertain about the ability to follow grounding instructions or if doubt exists as to whether the appliance is properly grounded.

Xdo not use an extension cord. If the power cord is too short, have a qualified electrician or serviceman install an outlet near the appliance.

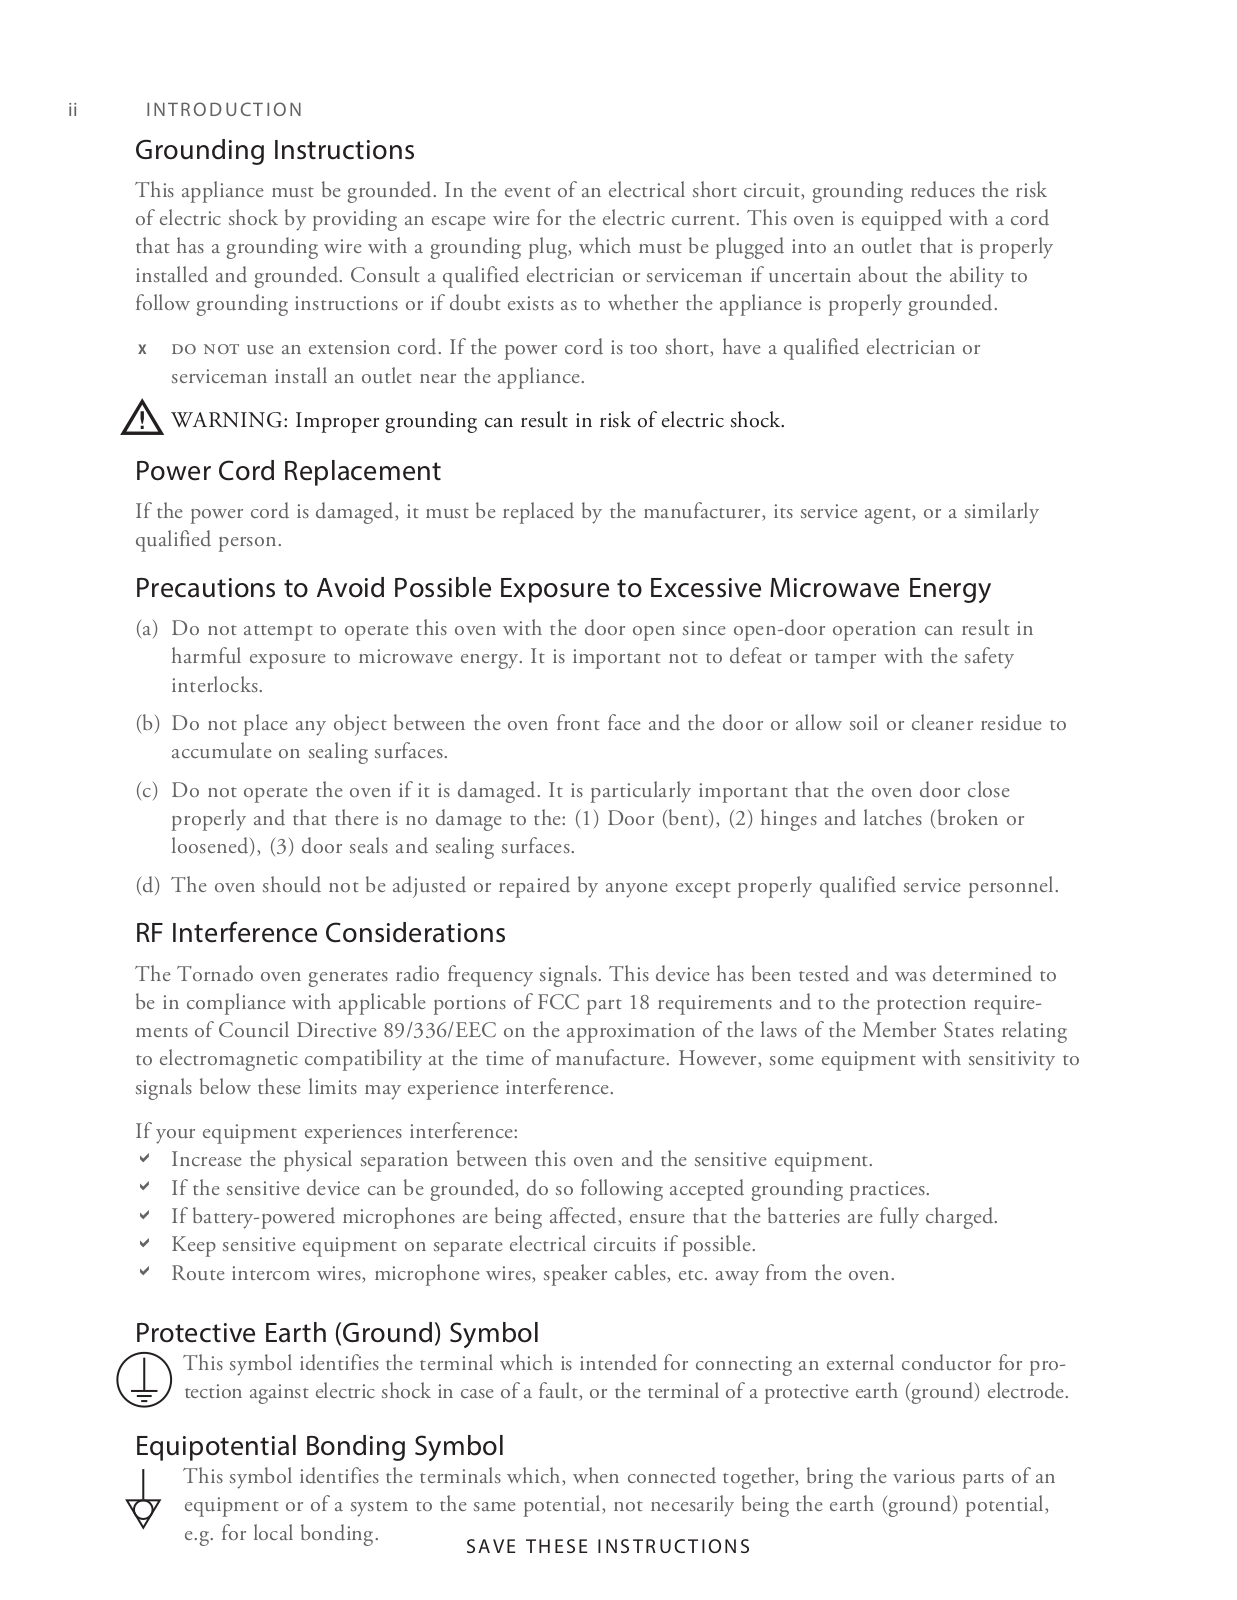
WARNING: Improper grounding can result in risk of electric shock.

Power Cord Replacement

If the power cord is damaged, it must be replaced by the manufacturer, its service agent, or a similarly qualified person.

Precautions to Avoid Possible Exposure to Excessive Microwave Energy

(a)Do not attempt to operate this oven with the door open since open-door operation can result in harmful exposure to microwave energy. It is important not to defeat or tamper with the safety interlocks.

(b)Do not place any object between the oven front face and the door or allow soil or cleaner residue to accumulate on sealing surfaces.

(c)Do not operate the oven if it is damaged. It is particularly important that the oven door close properly and that there is no damage to the: (1) Door (bent), (2) hinges and latches (broken or loosened), (3) door seals and sealing surfaces.

(d)The oven should not be adjusted or repaired by anyone except properly qualified service personnel.

RF Interference Considerations

The Tornado oven generates radio frequency signals. This device has been tested and was determined to be in compliance with applicable portions of FCC part 18 requirements and to the protection requirements of Council Directive 89/336/EEC on the approximation of the laws of the Member States relating to electromagnetic compatibility at the time of manufacture. However, some equipment with sensitivity to signals below these limits may experience interference.

If your equipment experiences interference:

aIncrease the physical separation between this oven and the sensitive equipment.

aIf the sensitive device can be grounded, do so following accepted grounding practices.

aIf battery-powered microphones are being affected, ensure that the batteries are fully charged.

aKeep sensitive equipment on separate electrical circuits if possible.

aRoute intercom wires, microphone wires, speaker cables, etc. away from the oven.

Protective Earth (Ground) Symbol

This symbol identifies the terminal which is intended for connecting an external conductor for protection against electric shock in case of a fault, or the terminal of a protective earth (ground) electrode.

Equipotential Bonding Symbol

This symbol identifies the terminals which, when connected together, bring the various parts of an equipment or of a system to the same potential, not necesarily being the earth (ground) potential, e.g. for local bonding.

OVERVIEW OF THE TORNADO OVEN

1

Overview of the Tornado Oven

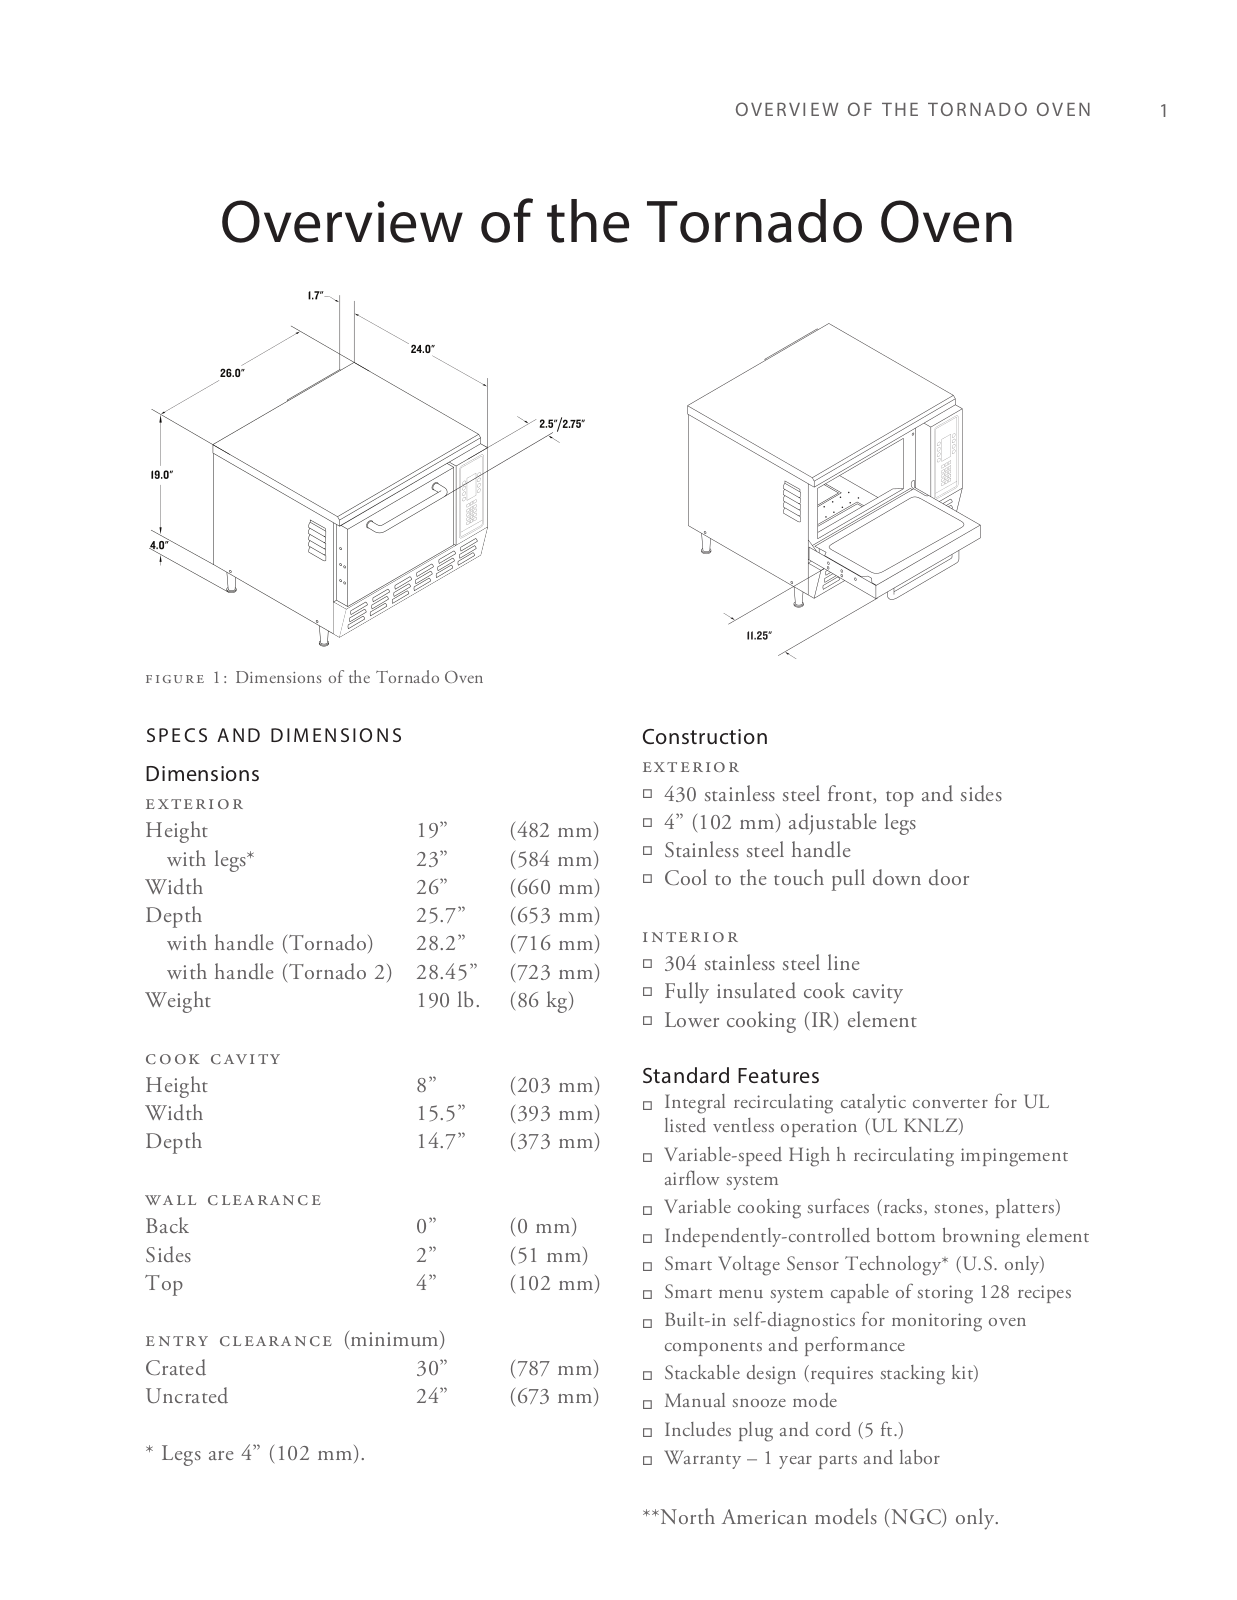
figure 1: Dimensions of the Tornado Oven


SPECS AND DIMENSIONS


Dimensions


exterior


Height

19”

(482 mm)

with legs*

23”

(584 mm)

Width

26”

(660 mm)

Depth

25.7”

(653 mm)

with handle (Tornado)

28.2”

(716 mm)

with handle (Tornado 2)

28.45”

(723 mm)

Weight

190 lb.

(86 kg)

cook cavity


Height

8”

(203 mm)

Width

15.5”

(393 mm)

Depth

14.7”

(373 mm)

wall clearance


Back

0”

(0 mm)

Sides

2”

(51 mm)

Top

4”

(102 mm)

entry clearance (minimum)


Crated

30”

(787 mm)

Uncrated

24”

(673 mm)

* Legs are 4” (102 mm).

Construction exterior

o430 stainless steel front, top and sides

o4” (102 mm) adjustable legs

oStainless steel handle

oCool to the touch pull down door

interior

o304 stainless steel line

oFully insulated cook cavity

oLower cooking (IR) element

Standard Features

oIntegral recirculating catalytic converter for UL listed ventless operation (UL KNLZ)

oVariable-speed High h recirculating impingement airflow system

oVariable cooking surfaces (racks, stones, platters)

oIndependently-controlled bottom browning element

oSmart Voltage Sensor Technology* (U.S. only)

oSmart menu system capable of storing 128 recipes

oBuilt-in self-diagnostics for monitoring oven components and performance

oStackable design (requires stacking kit)

oManual snooze mode

oIncludes plug and cord (5 ft.)

oWarranty – 1 year parts and labor

**North American models (NGC) only.

2 OVERVIEW OF THE TORNADO OVEN

Accessories (Additional Charge)

o24” (610 mm) stainless steel oven stand with locking casters

o18” (457 mm) stainless steel oven stand with locking casters

Certifications

Packaging

All ovens are packaged in a double-wall corrugated box with integrated corrugated skids.

ELECTRICAL SPECIFICATIONS

NGC (1 Phase, 60 Hz )


Operating Voltage

208/240 VAC*

Current Draw

30 Amps

Phase

1 Phase

Frequency

60 Hz

Plug

NEMA 6-30

Max Input

5990/6675 watts

Microwave Input Power

3500 watts

*Smart Voltage Sensor Technology automatically senses the supply voltage and allows the user to configure the oven to the correct setting (208 or 240) with the touch of a button.

NOTE: The Smart Voltage Sensor Technology does not compensate for lack of, or over voltage situations. It is the responsibility of the owner to supply voltage to the unit according to the above specifications.

NGCEW (3 Phase, WYE, 50 Hz)

Operating Voltage

400 VAC

Current Draw

16 Amps

Phase/Frequency

3 Phase/50 Hz

Plug

IEC 309, 5 PIN (32 A)

Heaters Input Power

6300 watts

Microwave Input Power

3500 watts

NGCED (3 Phase, Delta, 50 Hz)

Operating Voltage

230 VAC

Current Draw

30 Amps

Phase/Frequency

3 Phase/50 Hz

Plug

IEC 309, 4 PIN (32 A)

Heaters Input Power

6300 watts

Microwave Input Power

3500 watts

NGCUK (1 Phase, 50 Hz)


Operating Voltage

230 VAC

Current Draw

30 Amps

Phase/Frequency

1 Phase/50 Hz

Plug

IEC 309, 3 PIN (32 A)

Heaters Input Power

6300 watts

Microwave Input Power

3500 watts

NGCBK (1 Phase, 60 Hz)


Operating Voltage

220 VAC

Current Draw

30 Amps

Phase/Frequency

1 Phase/60 Hz

Plug

IEC 309, 3 PIN (32 A)

Heaters Input Power

6300 watts

Microwave Input Power

3500 watts

NGCJD (3 Phase, 50/60 Hz)

Operating Voltage

200 VAC

Current Draw

30 Amps

Phase/Frequency

3 Phase/50 or 60 Hz

Plug

PSE, 4-blade (30 A)

Heaters Input Power

6300 watts

Microwave Input Power

3500 watts

NGCJK (1 Phase, 50/60 Hz)

Operating Voltage

200 VAC

Current Draw

30 Amps

Phase/Frequency

1 Phase/50 or 60 Hz

Plug

PSE, 3-blade (30 A)

Heaters Input Power

6300 watts

Microwave Input Power

3500 watts

NOTE: Model NGC is typically the oven model used in North America. NGCEW, NGCED, NGCUK, NGCBK, NGCJD, and NGCJK are primarily used in international markets and locations.

HOW THE TECHNOLOGY WORKS

3

How the Technology Works

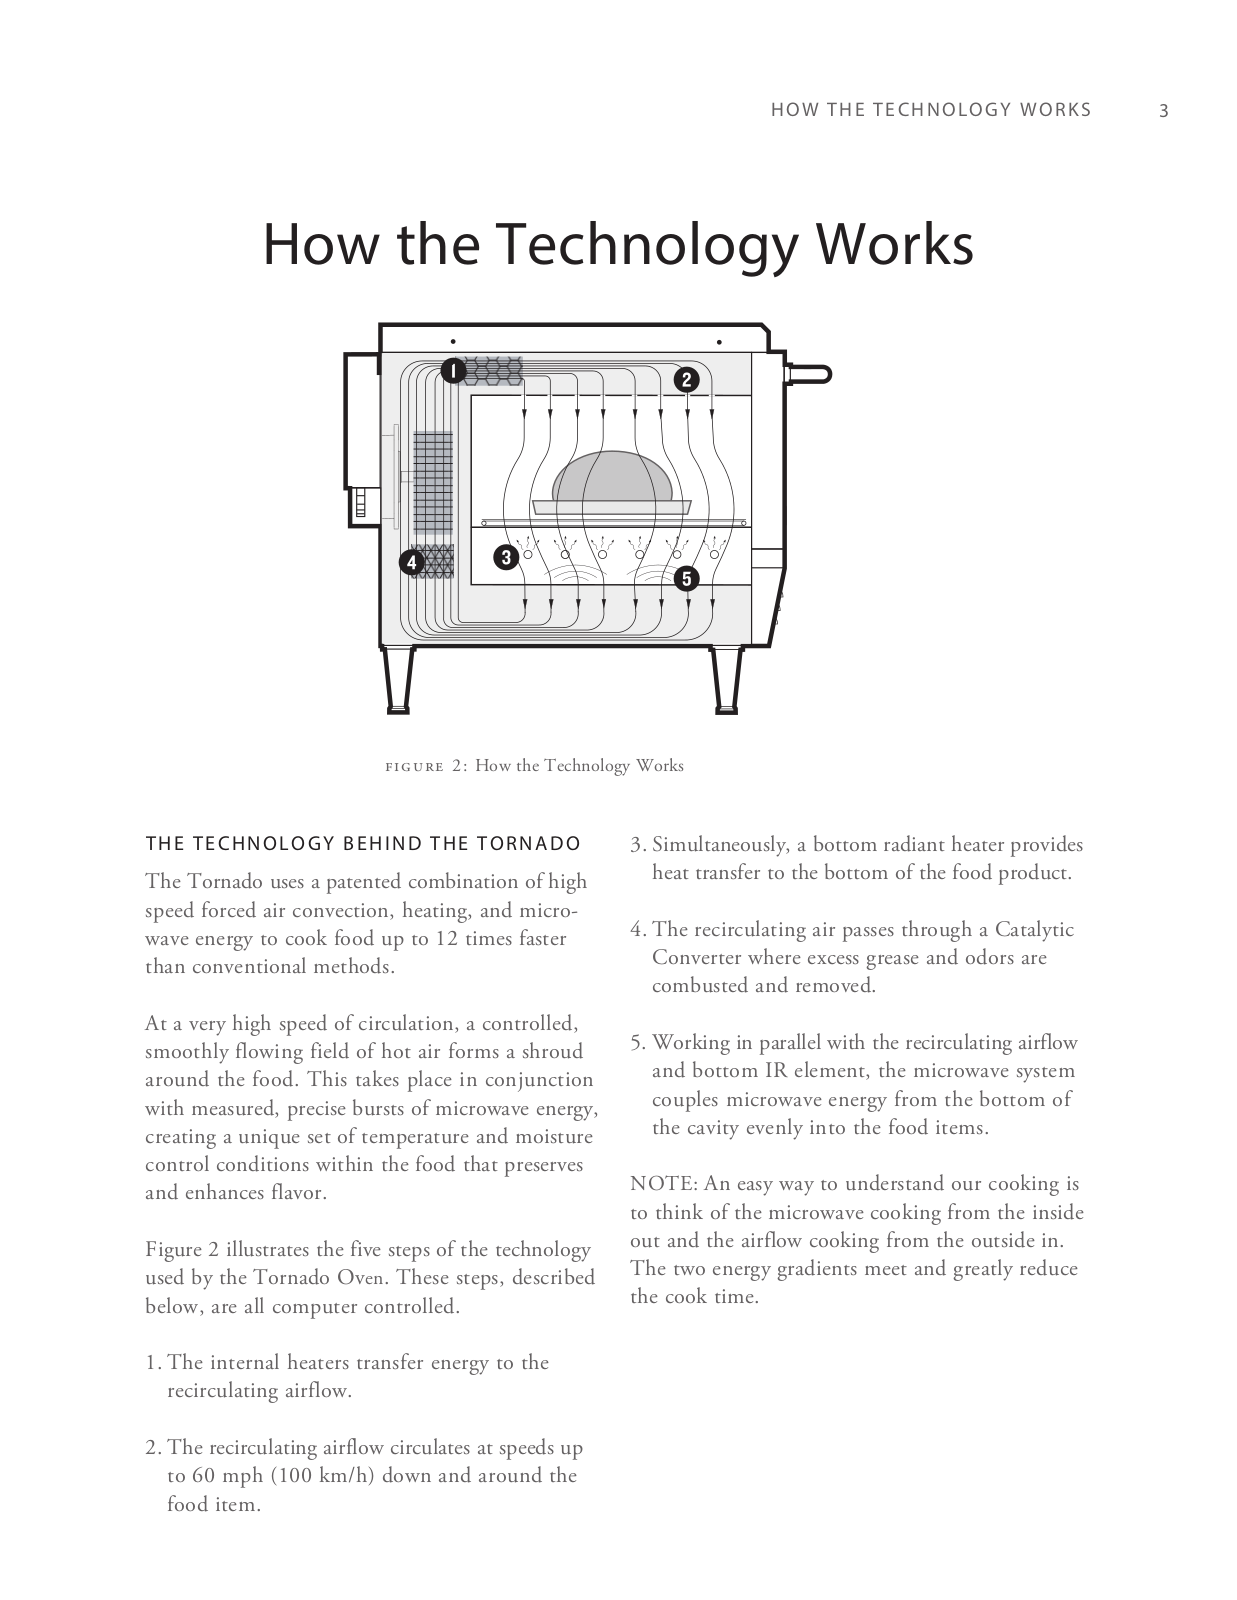
figure 2: How the Technology Works

THE TECHNOLOGY BEHIND THE TORNADO

The Tornado uses a patented combination of high speed forced air convection, heating, and microwave energy to cook food up to 12 times faster than conventional methods.

At a very high speed of circulation, a controlled, smoothly flowing field of hot air forms a shroud around the food. This takes place in conjunction with measured, precise bursts of microwave energy, creating a unique set of temperature and moisture control conditions within the food that preserves and enhances flavor.

Figure 2 illustrates the five steps of the technology used by the Tornado Oven. These steps, described below, are all computer controlled.

1.The internal heaters transfer energy to the recirculating airflow.

2.The recirculating airflow circulates at speeds up to 60 mph (100 km/h) down and around the food item.

3.Simultaneously, a bottom radiant heater provides heat transfer to the bottom of the food product.

4.The recirculating air passes through a Catalytic Converter where excess grease and odors are combusted and removed.

5.Working in parallel with the recirculating airflow and bottom IR element, the microwave system couples microwave energy from the bottom of the cavity evenly into the food items.

NOTE: An easy way to understand our cooking is to think of the microwave cooking from the inside out and the airflow cooking from the outside in.

The two energy gradients meet and greatly reduce the cook time.

4 ASSEMBLY AND INSTALLATION

Assembly and Installation

INSTALLATION INSTRUCTIONS

The TurboChef Tornado is manufactured to comply with applicable CE, NSF, UL, cUL, TÜV, PSE, GOST R, FDA, and FCC requirements. All equipment is designed and certified for safe operation when installed in accordance with local and/ or national codes. It is the owner and/or installer’s responsibility to comply with any codes that may exist.

Install the oven only in accordance with the procedures detailed in this manual.

WARNING: Death, injury and equipment damage can result from improper installation of the oven or installation of a unit damaged during shipment or storage.

ox DO NOT install an oven suspected of damage.

NOTE: Improper installation or the installation of a unit damaged during shipment or storage may result in the voiding of the Limited Warranty.

Delivery and Initial Inspection

All TurboChef speed cook ovens are shipped so as to prevent damage.

Upon delivery, inspect the shipping container for external damage. Any evidence of damage should be noted on the delivery receipt which must be signed by the driver.

Upon removing the oven from its shipping carton, check for any possible damage. Make note of any damage and contact the shipping company to file a claim. Carriers will accept claims for concealed damage if notified within fifteen (15) days of the delivery and if the shipping container is retained for inspection.

TurboChef does not assume responsibility for any loss or damage suffered in transit. The carrier assumes full responsibility for delivery in good order when the shipment is accepted. However, when necessary, TurboChef can assist in filing a claim.

Lifting the Oven

WARNING: Oven weighs approximately 190 lbs. (90 kg). Two or more people are required to lift it.

Position at least one person on either side of the oven. Lift from the bottom. Never lift the oven from the front and rear. The countertop surface on which the oven is placed must be at least 30” (762 mm) deep and capable of supporting 200 lbs. (90 kg).

Once properly positioned on the counter, plug the oven into a wall-mounted electrical receptacle. See Electrical Specifications on page 2.

Oven Location and Placement

WARNING: Death, injury and equipment damage may result from improper positioning. It is the operator’s responsibility to ensure the oven is properly positioned on countertop. TurboChef will not warrant any damage or injury to ovens that fall off countertops due to improper placement.

Proper placement of the oven will enhance long-term operator convenience and satisfactory performance. Be sure to place the oven in an area accessible for proper operation and servicing.

The surface on which the oven is placed must be at least 30” (762 mm) deep and capable of supporting 200 lbs. (90 kg). The manufacturer shall not assume liability for damage or injury resulting from the improper installation of this equipment, including temporary or unstable work stations or countertops.

Turbochef TORNADO Operator’s Manual


ASSEMBLY AND INSTALLATION

5


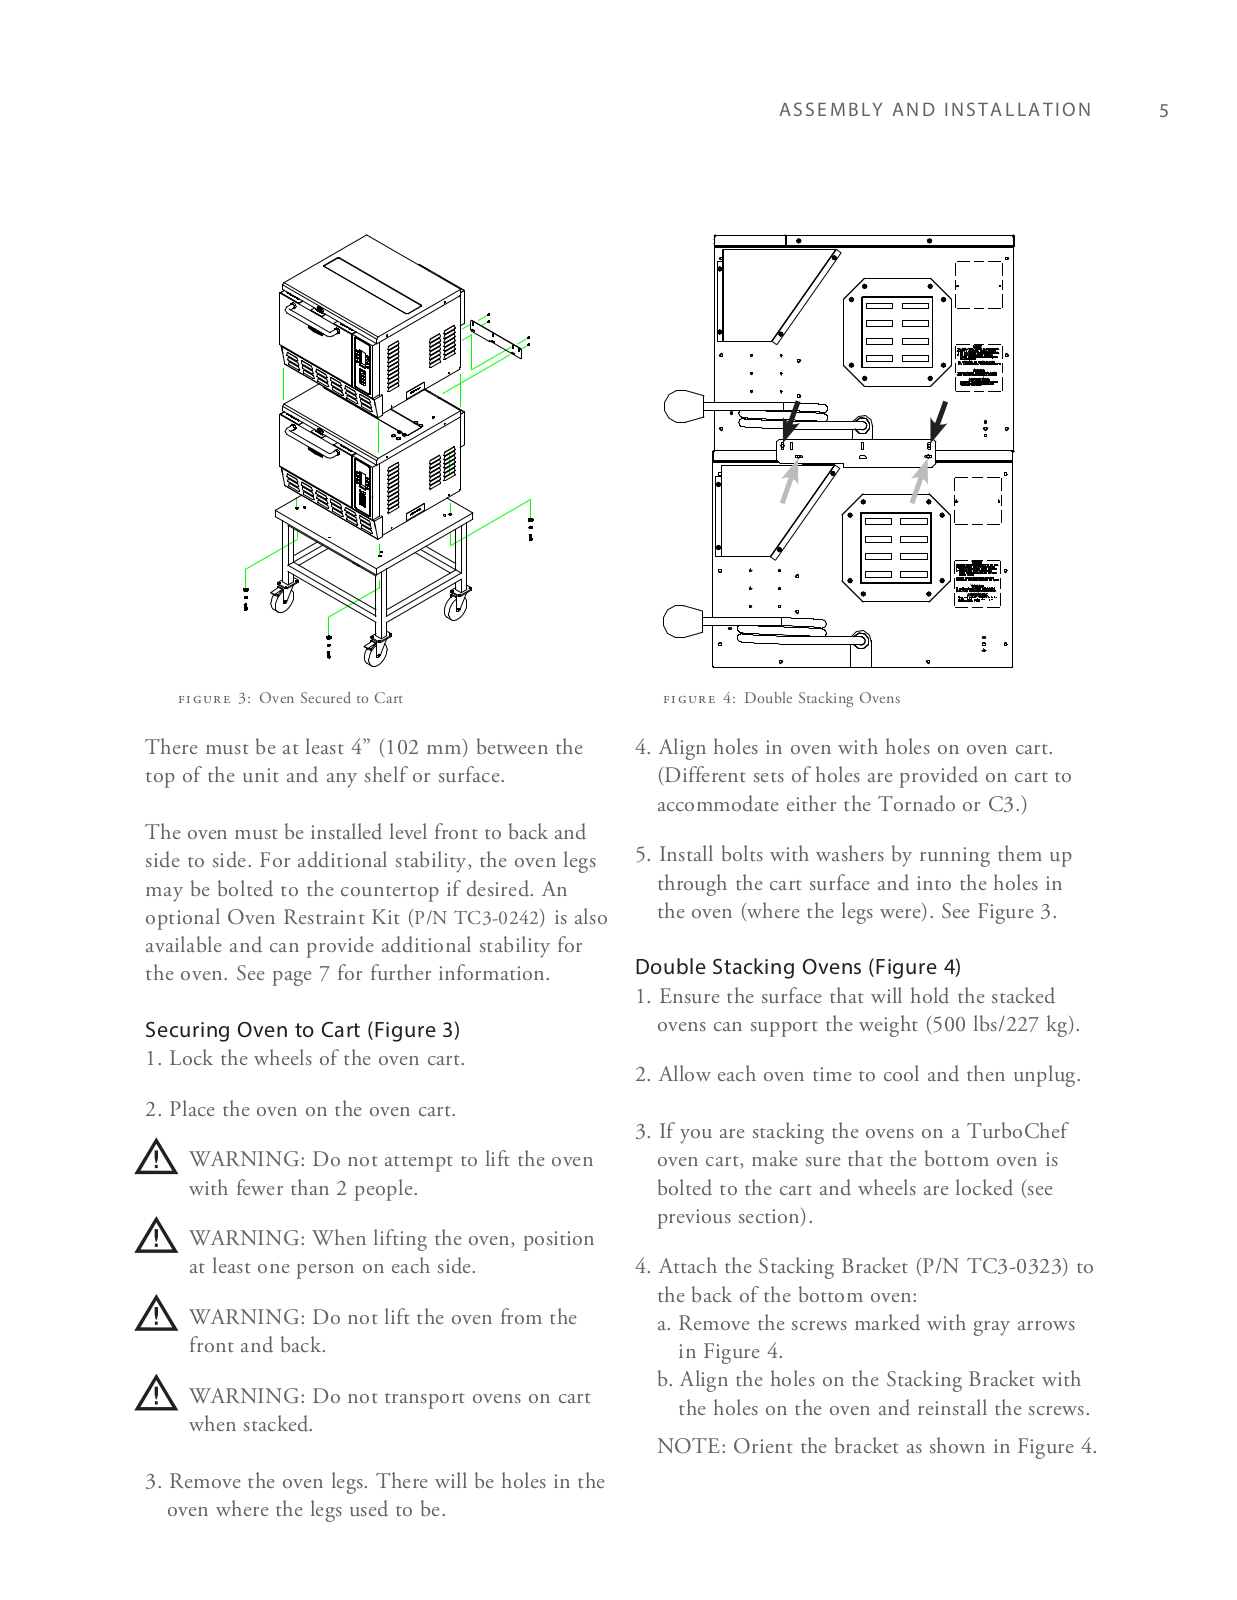
figure 3: Oven Secured to Cart

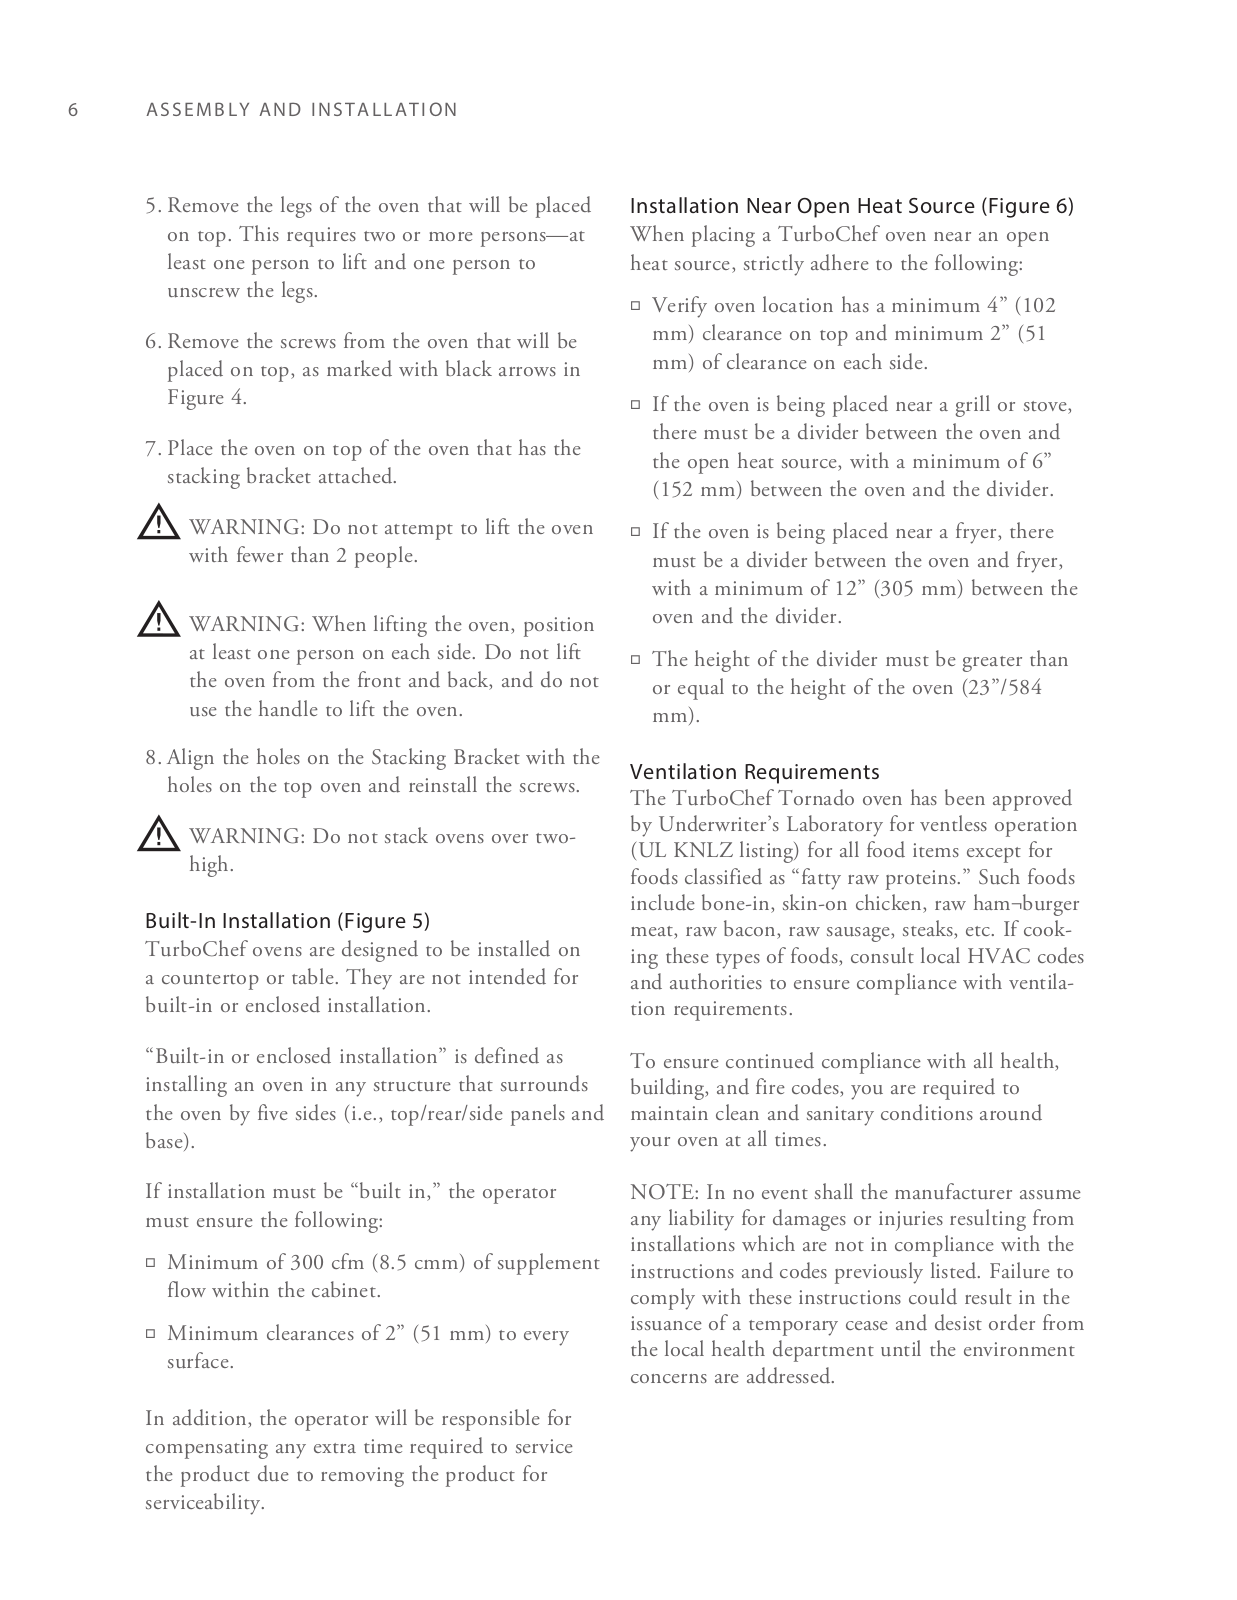
figure 4: Double Stacking Ovens

There must be at least 4” (102 mm) between the top of the unit and any shelf or surface.

The oven must be installed level front to back and side to side. For additional stability, the oven legs may be bolted to the countertop if desired. An optional Oven Restraint Kit (P/N TC3-0242) is also available and can provide additional stability for the oven. See page 7 for further information.

Securing Oven to Cart (Figure 3)

1.Lock the wheels of the oven cart.

2.Place the oven on the oven cart.

WARNING: Do not attempt to lift the oven with fewer than 2 people.

WARNING: When lifting the oven, position at least one person on each side.

WARNING: Do not lift the oven from the front and back.

WARNING: Do not transport ovens on cart when stacked.

3.Remove the oven legs. There will be holes in the oven where the legs used to be.

4.Align holes in oven with holes on oven cart. (Different sets of holes are provided on cart to accommodate either the Tornado or C3.)

5.Install bolts with washers by running them up through the cart surface and into the holes in the oven (where the legs were). See Figure 3.

Double Stacking Ovens (Figure 4)

1.Ensure the surface that will hold the stacked ovens can support the weight (500 lbs/227 kg).

2.Allow each oven time to cool and then unplug.

3.If you are stacking the ovens on a TurboChef oven cart, make sure that the bottom oven is bolted to the cart and wheels are locked (see previous section).

4.Attach the Stacking Bracket (P/N TC3-0323) to the back of the bottom oven:

a.Remove the screws marked with gray arrows in Figure 4.

b.Align the holes on the Stacking Bracket with the holes on the oven and reinstall the screws.

NOTE: Orient the bracket as shown in Figure 4.

6 ASSEMBLY AND INSTALLATION

5.Remove the legs of the oven that will be placed on top. This requires two or more persons—at least one person to lift and one person to unscrew the legs.

6.Remove the screws from the oven that will be placed on top, as marked with black arrows in Figure 4.

7.Place the oven on top of the oven that has the stacking bracket attached.

WARNING: Do not attempt to lift the oven with fewer than 2 people.

WARNING: When lifting the oven, position at least one person on each side. Do not lift the oven from the front and back, and do not use the handle to lift the oven.

8.Align the holes on the Stacking Bracket with the holes on the top oven and reinstall the screws.

WARNING: Do not stack ovens over twohigh.

Built-In Installation (Figure 5)

TurboChef ovens are designed to be installed on a countertop or table. They are not intended for built-in or enclosed installation.

“Built-in or enclosed installation” is defined as installing an oven in any structure that surrounds the oven by five sides (i.e., top/rear/side panels and base).

If installation must be “built in,” the operator must ensure the following:

oMinimum of 300 cfm (8.5 cmm) of supplement flow within the cabinet.

oMinimum clearances of 2” (51 mm) to every surface.

In addition, the operator will be responsible for compensating any extra time required to service the product due to removing the product for serviceability.

Installation Near Open Heat Source (Figure 6)

When placing a TurboChef oven near an open heat source, strictly adhere to the following:

oVerify oven location has a minimum 4” (102

mm)clearance on top and minimum 2” (51

mm)of clearance on each side.

oIf the oven is being placed near a grill or stove, there must be a divider between the oven and the open heat source, with a minimum of 6” (152 mm) between the oven and the divider.

oIf the oven is being placed near a fryer, there must be a divider between the oven and fryer, with a minimum of 12” (305 mm) between the oven and the divider.

oThe height of the divider must be greater than or equal to the height of the oven (23”/584

mm).

Ventilation Requirements

The TurboChef Tornado oven has been approved by Underwriter’s Laboratory for ventless operation (UL KNLZ listing) for all food items except for foods classified as “fatty raw proteins.” Such foods include bone-in, skin-on chicken, raw ham¬burger meat, raw bacon, raw sausage, steaks, etc. If cooking these types of foods, consult local HVAC codes and authorities to ensure compliance with ventilation requirements.

To ensure continued compliance with all health, building, and fire codes, you are required to maintain clean and sanitary conditions around your oven at all times.

NOTE: In no event shall the manufacturer assume any liability for damages or injuries resulting from installations which are not in compliance with the instructions and codes previously listed. Failure to comply with these instructions could result in the issuance of a temporary cease and desist order from the local health department until the environment concerns are addressed.

Loading...
+ 30 hidden pages