

Page 1
Securing Tornado, C3, and High h Batch Ovens to
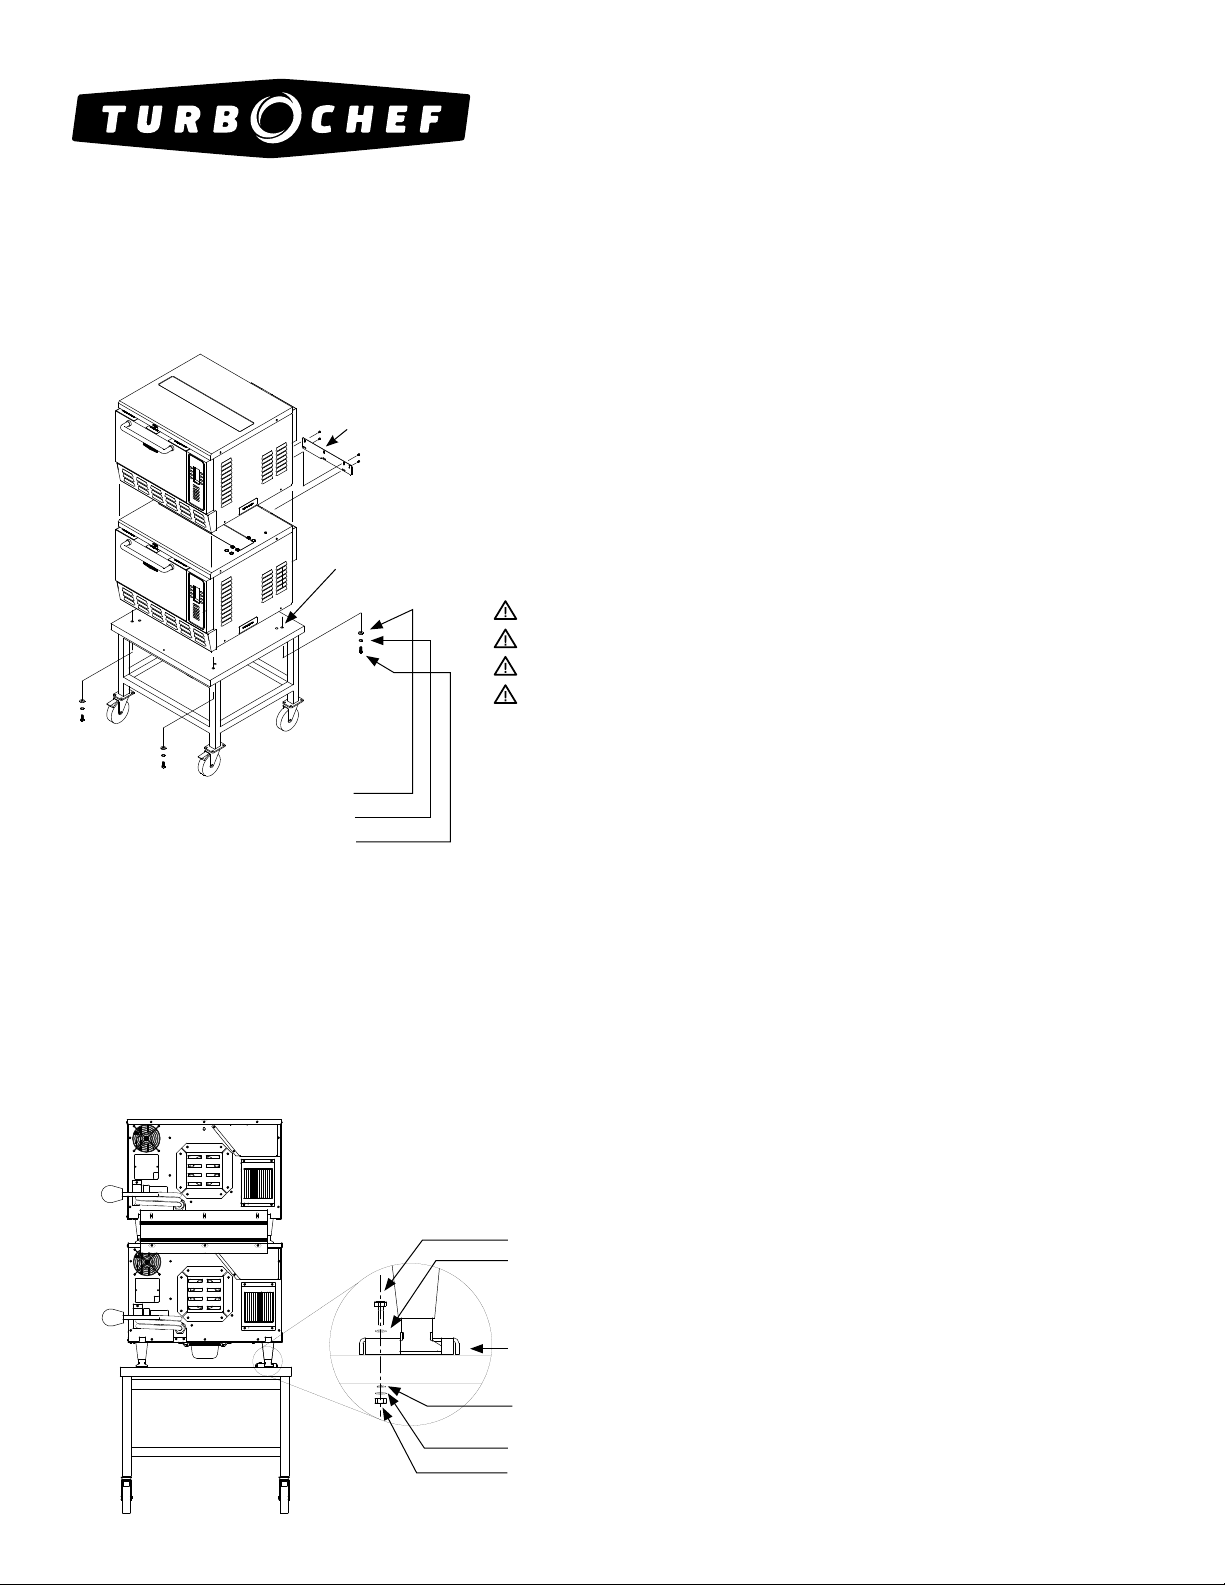
Tornado or C3 (Figure 1)
Split Lock
Washer
Flat Washer
Bolt
Stacking
Bracket
Outer Holes = Tornado
Inner Holes = C3
an Oven Cart
FOR ALL OVENS:
1. Unplug the oven.
2. Lock the wheels of the oven cart.
NOTE: For additional skid prevention of C3 and Tornado ovens, place a TurboChef
sorbothane stacking mat (part number NGC-1342-1) on the cart, aligning the edges of
the mat with the edges of the cart.
3. Place the oven on the oven cart.
WARNING: Do not attempt to lift the oven with fewer than 2 people.
WARNING: When lifting, position at least one person on each side.
WARNING: Do not lift the oven from the front and back.
WARNING: Do not lift the oven by the door handle.
FOR TORNADO & C3 ONLY: FIGURE 1
4. If the oven is a C3 or Tornado, remove the legs. There will be holes in the oven where
the legs used to be.
5. Align the oven holes with the oven cart holes. (Dierent sets of holes are provided
on cart to accommodate either the Tornado or C3 - see Figure 1.)
High h Batch (Figure 2)
6. Install bolts with washers by running them up through the cart surface and into the
holes in the oven (where the legs were).
FOR HIGH H BATCH: FIGURE 2
4. Attach one oven cart bracket to each leg (part number HHB-8206 includes four
brackets).
5. Secure each leg by aligning the bracket with the holes on the oven cart and
attaching the parts listed in Figure 2.
NOTE: Ensure the nut is securely tightened.
Bolt
Flat Washer
Bracket
Flat Washer
Split Lock Washer
Nut
TurboChef Global Operations
4240 International Pkwy, Suite 105
Carrollton, Texas 75007 USA
US: 800.90TURBO (800.908.8726)
International: +1 214.379.6000
Fax: +1 214.379.6073
turbochef.com
DOC-1032/Revision E/
August 2010
Page 2

Option 1: Tornado/Tornado
Option 2: C3/C3
Stacking Tornado, C3, and High h Batch Ovens
1. Ensure the surface that will hold the stacked ovens can support the total
weight plus the intended use. Each High h Batch: 157 lbs. (71 kg), each
Tornado: 190 lbs. (86 kg), each C3: 255 lbs. (116 kg).
2. Allow each oven adequate time to cool and then unplug.
3. If stacking the ovens on an oven cart, ensure the bottom oven is bolted to
the cart and the wheels are locked (see reverse side of sheet).
4. Attach the stacking bracket* to the back of the bottom oven:
a. Remove the screws marked with white arrows in the adjacent gures.
b. Align the holes on the stacking bracket with the holes on the oven and
reinstall the screws. Be sure to orient the bracket as shown in the
adjacent gures.
* Options 1-3 use bracket part number TC3-0323.
Options 4-6 use bracket part number HHB-8165.
5. If the top oven is a Tornado or C3, remove the legs. This requires two or more
persons—at least one to lift and one to unscrew the legs.
DO NOT REMOVE THE LEGS IF THE TOP OVEN IS A HIGH H BATCH.
Option 3: Tornado/C3
Option 4: HHB/HHB
Option 6: Tornado/HHBOption 5: HHB/C3
6. Remove the screws from the oven that will be placed on top, as marked with
black arrows in the adjacent gures.
7. Place the top oven on the bottom oven.
WARNING: Do not attempt to lift the oven with fewer than 2 people.
WARNING: When lifting, position at least one person on each side.
WARNING: Do not lift the oven from the front and back.
WARNING: Do not lift the oven by the door handle.
8. Align the holes on the stacking bracket with the holes on the top oven and
reinstall the screws.
WARNING: Do not stack ovens over two-high.
WARNING: Any stacking combinations not specied on this sheet will result in
unsafe conditions.
TurboChef Global Operations
4240 International Pkwy, Suite 105
Carrollton, Texas 75007 USA
US: 800.90TURBO (800.908.8726)
International: +1 214.379.6000
Fax: +1 214.379.6073
turbochef.com
DOC-1032/Revision E/
August 2010
Page 3

Stacking HhC 2020 Ovens
WARNING: DO NOT use this appliance without the legs installed on the bottom oven.
WARNING: Make sure all HhC 2020 ovens are unplugged before stacking.
WARNING: DO NOT stack ovens more than 3 high.
WARNING: DO NOT attempt to lift the oven with fewer than 2 people.
1. Remove the legs from the oven(s) that are going to be stacked on top.
2. Cover the leg holes with the abrasive pads provided with kit HCT-3001.
3a. If the front panel on each oven contains side hinges, skip to step 4.
3b. If the front panel on the ovens that are going to be stacked on top contain
bottom hinges (adjacent), ensure that a thumb screw is installed on each side
to allow for front panel removal. If the oven has security screws, replace them
with the thumb screws provided with kit HCT-3001.
4. Stack the top oven on the bottom oven. If stacking three ovens, stack only the
middle oven at this point.
5. Remove the 6 screws marked A or B in the illustration below.
6. Align each bracket with the holes in the bottom oven and reinstall the screws marked A in the illustration below.
7. Align each bracket with the holes in the top oven and reinstall the screws marked B in the illustration below.
8. If stacking three ovens, repeat steps 2-6 above to stack the top oven to the middle oven.
9. Ensure each stacked oven is secured to the oven beneath it via two stacking brackets – one on each side.
Step 3b: Must be
Thumb Screw
B
Bracket
A
A
Bracket
B
A
A
Stacking HhC 3240 Ovens
Follow all instructions in the Installation Manual (part number HHC-6651), included with each oven.
DOC-1032/Revision E/
August 2010
Page 4

Stacking i3 and i5 Ovens
59.7” (1516 mm)
(handle)
32.5” (826 mm)
(handle)
27.8” (706 mm)
28.6” (726 mm)
4.5”
(114 mm)
30.0” (762 mm)
31.5” (800 mm)
32.5” (826 mm)
44.6” (1133 mm)
17.3”
(439 mm)
15.8”
(401 mm)
21.25” (540 mm)
Reference the below illustrations for the proper stacking conguration,
as well as dimensions.
1. Unplug each oven.
2. Set the oven stand (part number i5-9369) in place.
WARNING: Do not attempt to lift the oven with fewer than 2 people.
WARNING: Position at least one person at the front and back of the oven and
always use the hand grips when lifting.
WARNING: Do not lift the oven by the door handle.
3. Lock the wheels of the oven cart (part number NGC-1217-2).
4. Place the lower oven on the oven cart.
5. Place the top oven on the oven stand.
6. Unlock the wheels of the oven cart and position it beneath the stand,
as shown in the below illustration.
24.3” (617 mm)
1.5” (38 mm)
62.7” (1594 mm)
(handle)
20.5” (521 mm)
26.5” (673 mm)
35.5” (902 mm)
(handle)
44.6” (1133 mm)
27.8”
(706 mm)
28.6” (726 mm)
30.0” (762 mm)
31.5” (800 mm)
32.5” (826 mm)
i5 Oven i3 Oven
(439 mm)
15.8”
(401 mm)
17.3”
DOC-1032/Revision E/
August 2010
 Loading...