

Page 1
Commercial
Refrigerator & Freezer
Service Manual
Solid Door
Model No. : MSR-23NM
MSR-49NM
MSF-23NM
MSF-49NM
Glass Door
Model No. : MSR-23G-1
MSR-49G-2
Page 2
TABLE OF CONTENTS
1. FEATURE CHART
1-1. FRONT VIEW(MSF-49NM)
1-2. SIDE VIEW(MSF-49NM)
1-3. FRONT VIEW(MSR-49G-2)
1-4. SIDE VIEW(MSR-49G-2)
2. WIRING DIAGRAM
2-1. REFRIGERATOR : MSR-23NM, MSR-49NM
2-1. REFRIGERATOR : MSR-23G-1, MSR-49G-2
2-2. FREEZER : MSF-23NM, MSF-49NM
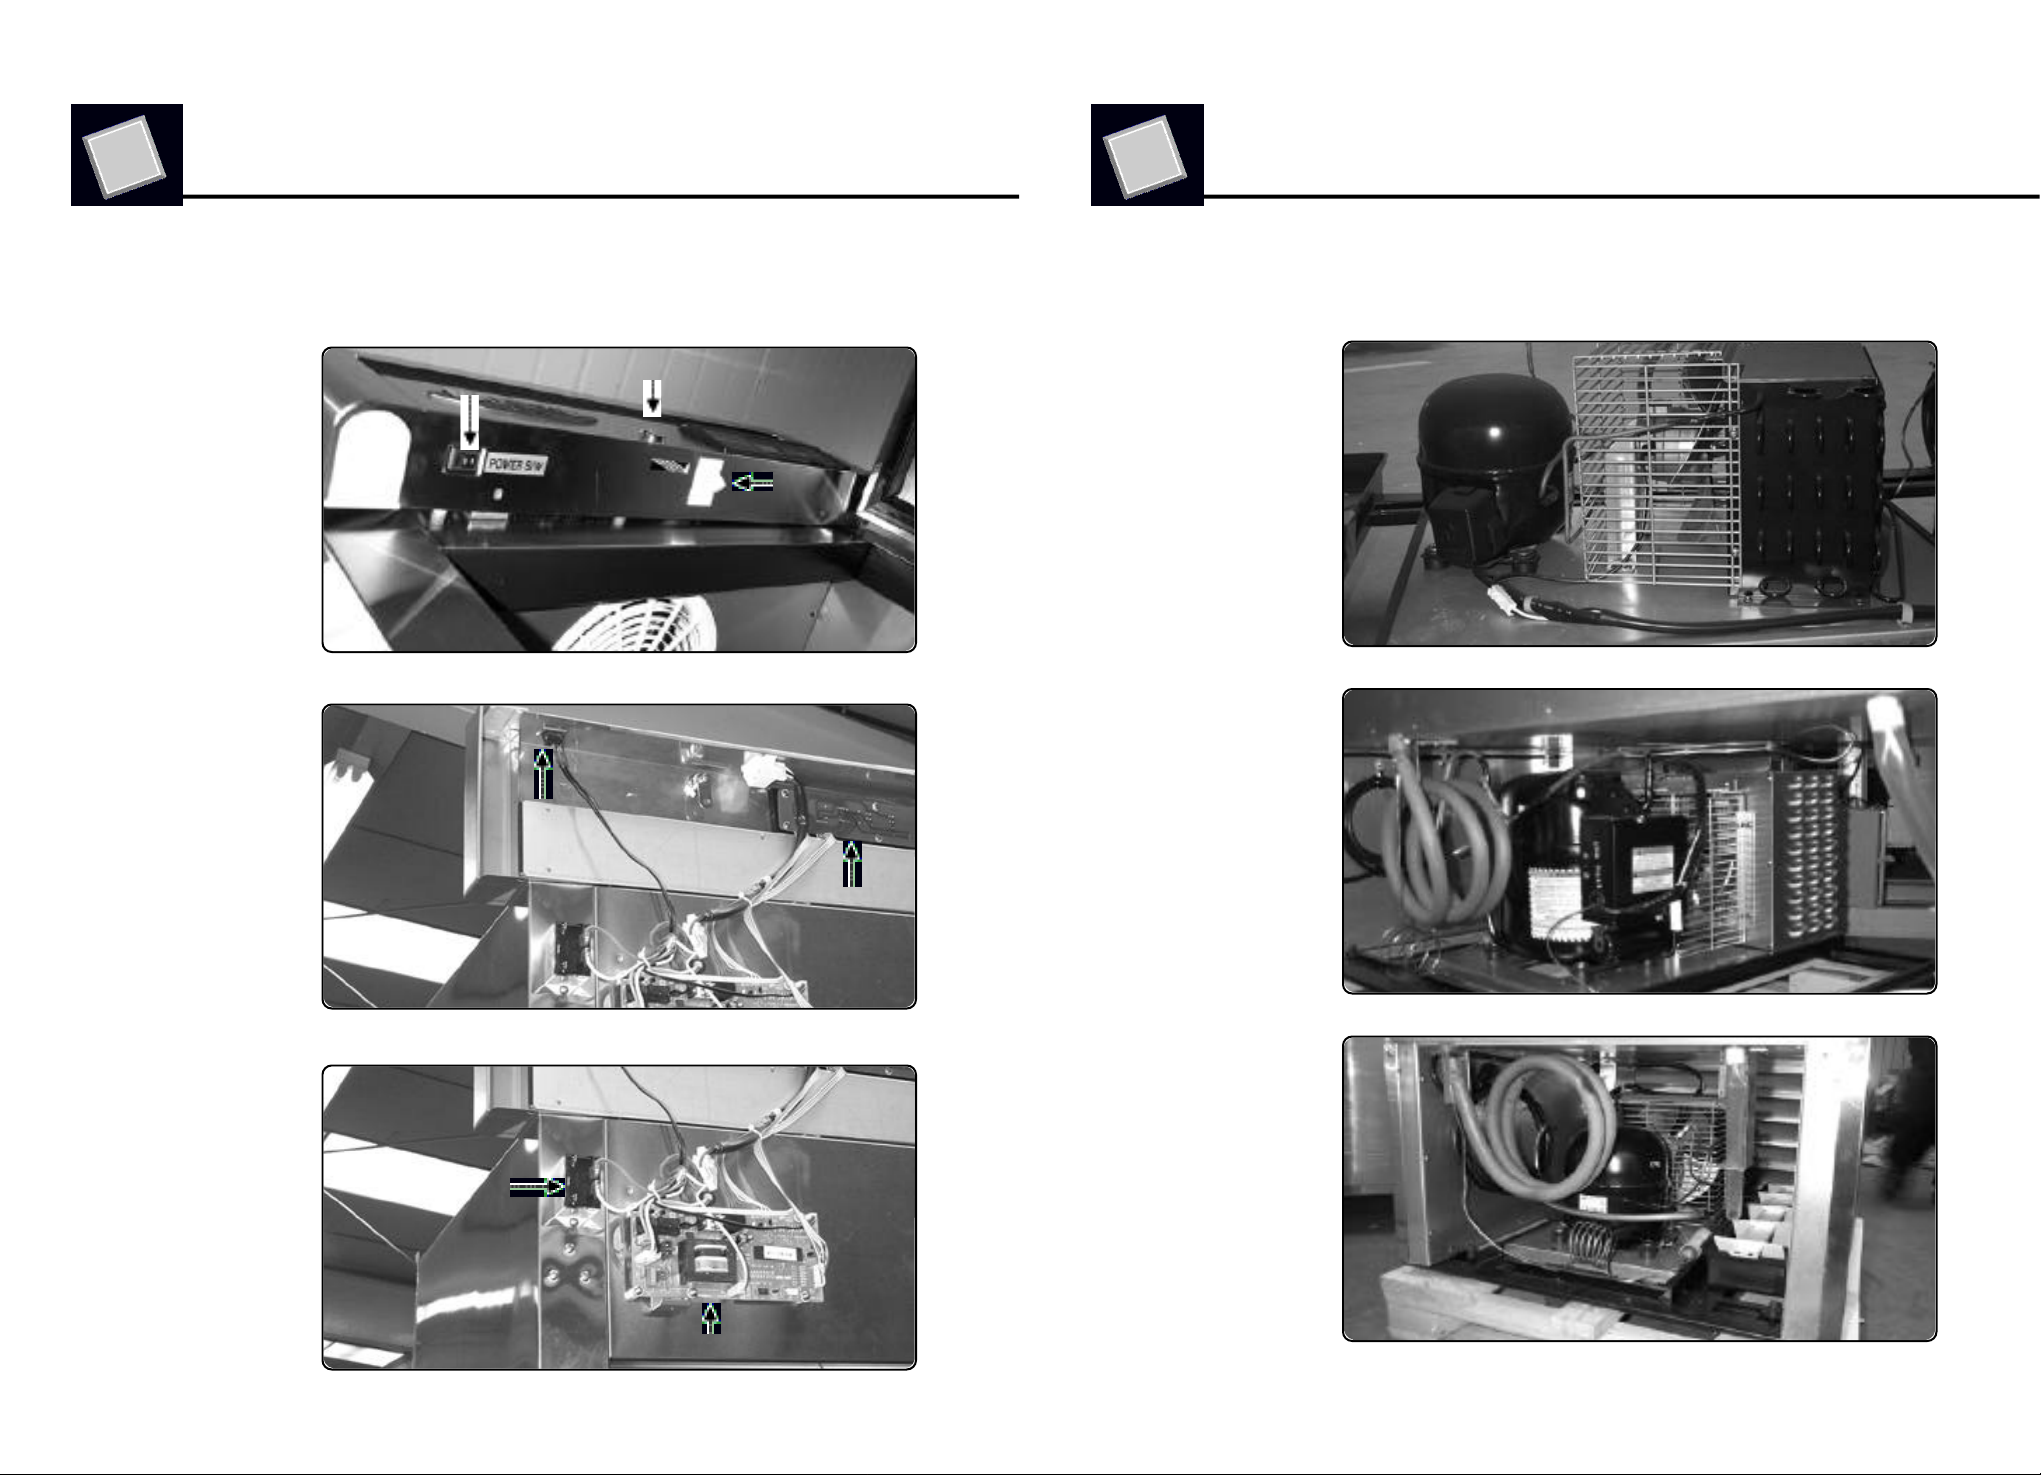
3. PART DETAILS
3-1. TOP PANEL
3-2. COMPRESSOR COMPARTMENT
3-3. DOOR
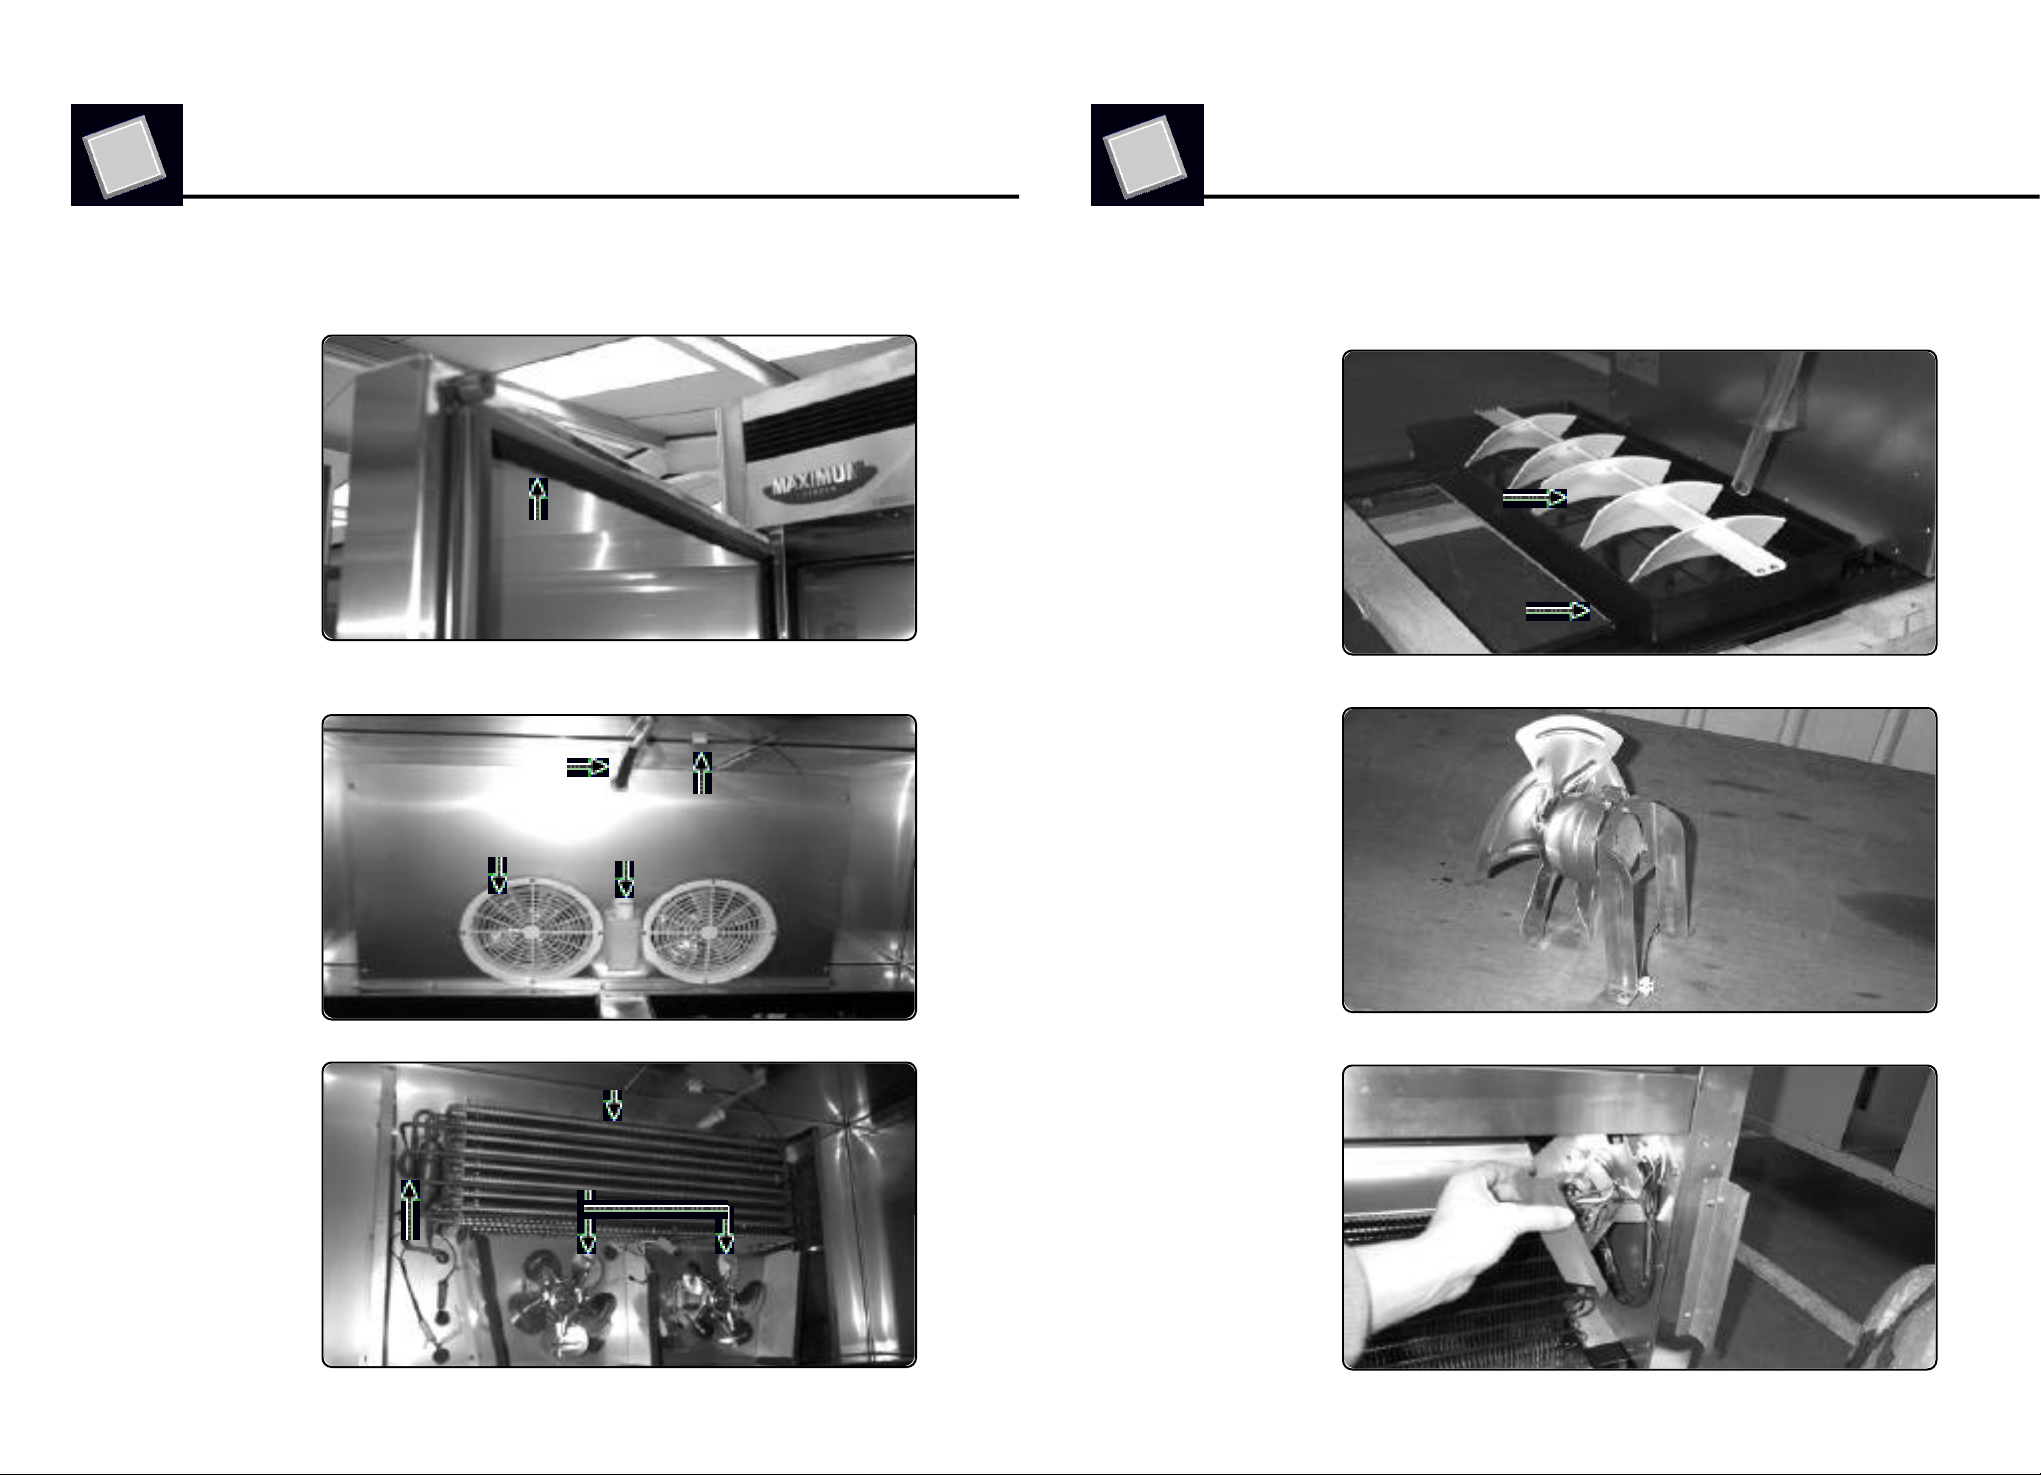
3-4. COOLING COMPARTMENT
4. MAIN COMPONENTS
4-1. COMPRESSOR
4-2. POWER RELAY(COMP. RELAY)
4-3. CONDENSER DRYER
4-4. COMPRESSOR CAPACITOR
4-5. EVAPORATOR FAN MOTOR
4-6. CONDENSER FAN MOTOR
4-7. EVAPORATOR DEFROST HEATER
4-8. LAMP BULB
4-9. MAIN PCB
4-10. DISPLAY PCB
4-11. BALLAST
1. FEATURE CHART
1-1. FRONT VIEW(MSF-49NM)
①
⑨
③
⑥
⑤
②
④
⑦
⑧
⑩
⑪
⑫
5. ELECTRONIC CONTROL INSTRUCTIONS
5-1. FREEZER CONTROL
5-1-1. HOW TO USE THE DISPLAY PCB PANEL
5-1-2. MANUAL DEFROST
5-1-3. FUNCTION TABLE
5-1-4. ERROR CODE TABLE
5-2. REFRIGERATOR CONTROL
5-2-1. HOW TO USE THE DISPLAY PCB PANEL
5-2-2. FUNCTION TABLE
5-2-3. ERROR CODE TABLE
6. REPLACEMENT OF MAIN COMPONENTS
6-1. TOP PANEL PARTS
6-2. REPLACING DOOR
6-3. DOOR SPRING ADJUSTMENT
6-4. REVERSIBLE-DOOR ASSEMBLING METHOD
6-5. REFRIGERATION COMPARTMENT PARTS
6-6. CONDENSING UNIT
6-7. LIGHTING-PARTS
7. PART-LIST
2
⑯
①TOP PANEL
②DOOR SWITCH
③POWER SWITCH
④DOOR LOCK
⑤MAIN PCB
⑥POWER RELAY(COMP.RELAY)
⑦DISPLAY PCB
⑧CONTROL BOARD HOUSING
⑬
⑭
⑮
⑨FREEZER BRAND LOGO
⑩DOOR HINGE TOP
⑪DOOR
⑫DOOR HANDLE
⑬DOOR HINGE BOTTOM
⑭BOTTOM GRILLE
⑮CASTER
⑯DRAIN PAN
3
Page 3
FEATURE CHART
FEATURE CHART
1-2. SIDE VIEW(MSR-49NM)
③
②
①
⑦
⑨
⑧
⑬
⑥-②
④
⑭
⑯
⑤
⑥-④
⑥-③
⑩
⑥-①
⑪
⑫
⑮
1-3. FRONT VIEW(MSR-49G-2)
① ⑦ ⑧ ⑨
⑲
③
⑥
⑤
②
⑩
⑪
④
⑱
⑰
⑱
⑲
⑰
①TOP PANEL
②POWER RELAY
③MAIN PCB
④DOOR
⑤EVAPORATOR FAN MOTOR
⑥SENSOR
⑥-① FREEZER C SENSOR
⑥-② DEFROST SENSOR
⑥-③ REFRIGERATOR C SENSOR
⑥-④ REFRIGERATOR T SENSOR
⑦LAMP BULB
⑳
⑧LAMP SHIELD
⑨LAMP SOCKET
⑩
EVAPORATOR DEFROST HEATER
⑪EVAPORATOR DRAIN HOSE
⑫
EVAPORATOR DRAIN PAN HEATER
⑬
EVAPORATOR FAN MOTOR GUARD
⑭SHELF
⑮SHELF CLIPS
⑯SHELF STANDARD
⑰BOTTOM GRILLE
⑱
COMPRESSOR CAPACITOR COVER
⑲COMPRESSOR CAPACITOR
⑳CONDENSOR COIL
CONDENSOR FAN MOTOR
CONDENSOR DRYER
COMPRESSOR
CAPILLARY TUBE
SUCTION LINE
DRAIN-HOSE
CASTER
4
⑫
⑬
⑭
①TOP PANEL
②DOOR SWITCH
③POWER SWITCH
④LAMP SWITCH
⑤MAIN PCB
⑥POWER RELAT(COMP RELAY)
⑦DOOR LOCK
⑧DISPLAY PCB
⑨CONTROL BOARD HOUSING
⑩DOOR HEATER HARNESS
⑯
⑮
⑪DOOR HINGE TOP
⑫DOOR HINGE BOTTOM
⑬BALLAST
⑭DRAIN PAN
⑮CASTER
⑯BOTTOM GRILLE
⑰DOOR HANDLE
⑱GLASS DOOR
⑲REFRIGERATOR BRAND LOGO
5
Page 4
FEATURE CHART
2. WIRING DIAGRAM
1-4. SIDE VIEW(MSR-49G-2)
①
⑦
⑧
⑨
⑩
⑪
⑫
⑦
② ③ ④
2-1. REFRIGERATOR
● MSR-23NM
⑤
⑥
● MSR-49NM
⑬
①TOP PANEL
②EVAPORATOR FAN BLADE
③EVAPORATOR FAN MOTOR
④EVAPORATOR COIL
⑤EVAPORATOR TOP DRAIN HOSE
⑥EVAPORATOR DRAIN FAN
⑦LAMP SOCKET
⑧FLUORESCENT LAMP
⑨SHELF STANDARD
⑩DOOR HANDLE
6
⑭
⑪DOOR FRAME
⑫FLUORESCENT LAMP ASSEMBLY
⑬BOTTOM GRILLE
⑭CASTER
7
Page 5
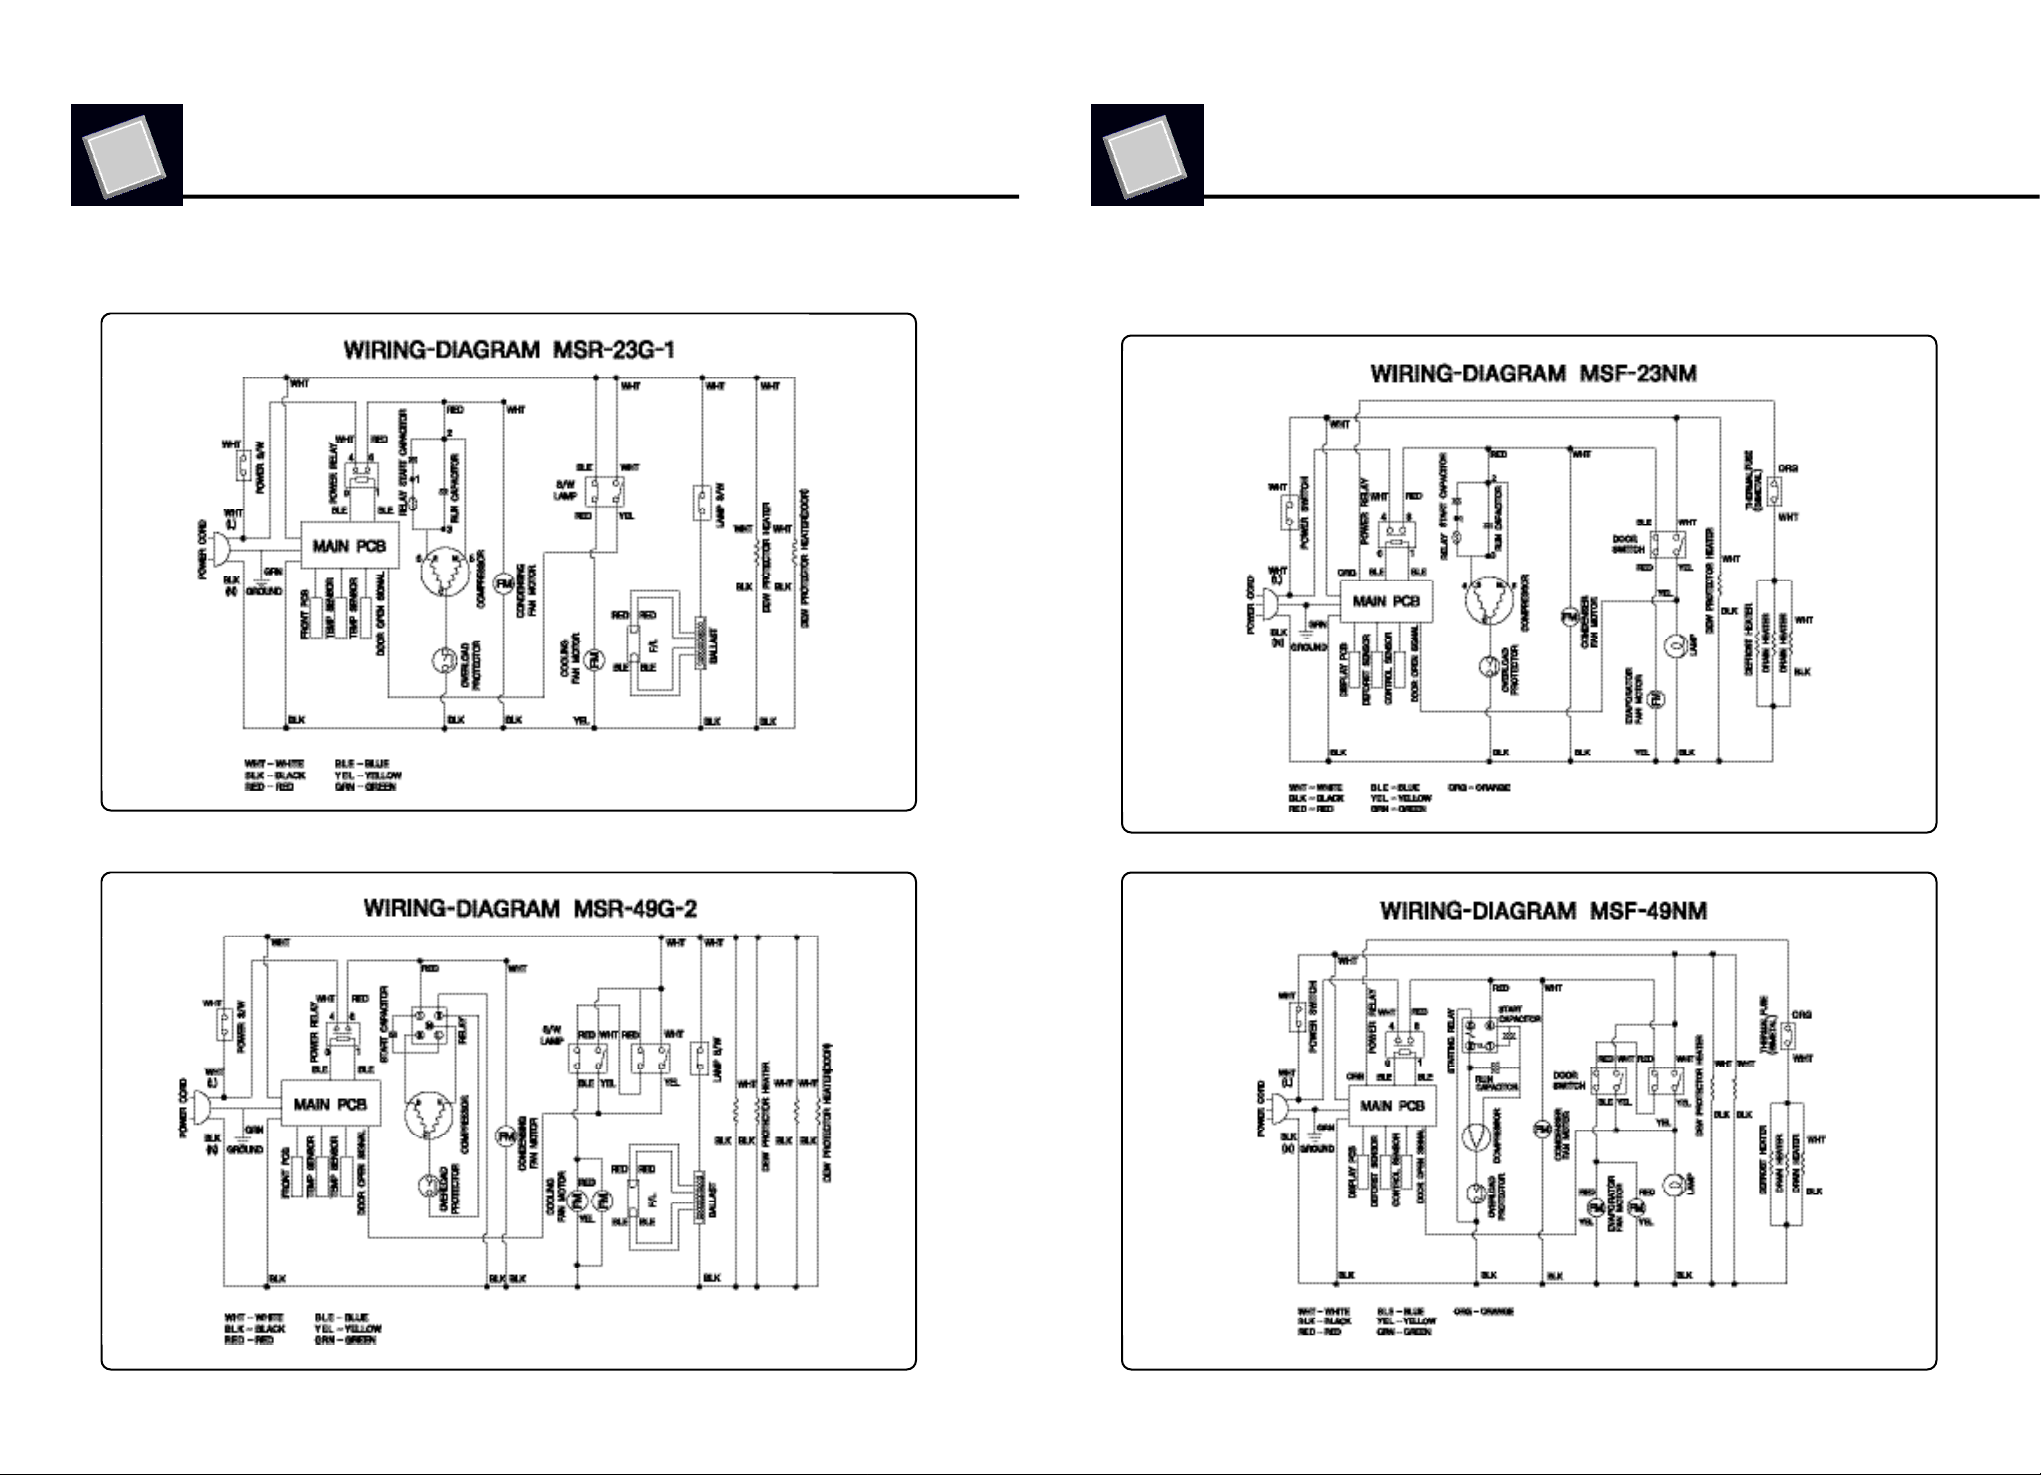
WIRING DIAGRAM
WIRING DIAGRAM
● MSR-23G-1
● MSR-49G-2
2-2. FREEZER
● MSF-23NM
● MSF-49NM
8
9
Page 6
3. PART DETAILS
PART DETAILS
3-1. TOP PANEL
Display PCB
Power SwitchPower SwitchPower Switch
Power Switch
Power Switch
Power Switch
Power Switch
Power Switch
Power Switch
Power Switch
Power Switch
Power Switch
Power Switch
Power Switch
Power Switch
Power SwitchPower Switch
Power SwitchPower Switch
Power Switch
Power SwitchPower Switch
POWER SWITCHPOWER SWITCHPOWER SWITCH
POWER SWITCH
POWER SWITCH
POWER SWITCH
POWER SWITCH
POWER SWITCH
POWER SWITCH
POWER SWITCH
POWER SWITCH
POWER SWITCH
POWER SWITCH
POWER SWITCH
Door LockDoor LockDoor Lock
Door Lock
Door Lock
Door Lock
Door Lock
Door Lock
Door Lock
Door Lock
Door Lock
Door Lock
Door Lock
Door Lock
Door Lock
Door Lock
Door Lock
Door Lock
Door Lock
Door Lock
Door LockDoor Lock
Lamp SwitchLamp SwitchLamp Switch
Lamp SwitchLamp Switch
Lamp SwitchLamp Switch
Lamp Switch
Lamp Switch
Lamp Switch
Lamp Switch
Lamp Switch
Lamp Switch
Lamp Switch
Lamp Switch
Lamp Switch
Lamp Switch
Lamp Switch
Lamp Switch
Lamp Switch
Lamp SwitchLamp Switch
3-2. COMPRESSOR COMPARTMENT
Condensing Unit
MSR-49NM
Main PCB
POWER RELAYPOWER RELAYPOWER RELAY
POWER RELAY
POWER RELAY
POWER RELAY
POWER RELAY
POWER RELAY
POWER RELAY
POWER RELAY
POWER RELAY
POWER RELAY
POWER RELAY
POWER RELAY
10
MAIN PCB
MAIN PCB
MAIN PCB
MAIN PCB
MAIN PCB
MAIN PCB
MAIN PCB
MAIN PCB
MAIN PCB
MAIN PCB
MAIN PCB
MAIN PCB
MAIN PCBMAIN PCB
DISPLAY PCB
DISPLAY PCB
DISPLAY PCB
DISPLAY PCB
DISPLAY PCB
DISPLAY PCB
DISPLAY PCB
DISPLAY PCB
DISPLAY PCB
DISPLAY PCB
DISPLAY PCB
DISPLAY PCB
DISPLAY PCBDISPLAY PCB
MSF-49NM
MSF-23NM, MSR-23NM
11
Page 7
3-3. DOOR
Door Gasket
GASKET
GASKET
GASKET
GASKET
GASKET
GASKET
GASKET
GASKET
GASKET
GASKET
GASKET
GASKET
GASKETGASKET
PART DETAILS
Drain Pan
DRAIN
DRAIN
DRAIN
DRAIN
DRAIN
DRAIN
DRAIN
DRAIN
DRAIN
DRAIN
DRAIN
DRAIN
DRAIN
DRAIN
WICKING
WICKING
WICKING
WICKING
WICKING
WICKING
WICKING
WICKING
WICKING
WICKING
WICKING
WICKING
WICKING
WICKING
PAD
PAD
PAD
PAD
PAD
PAD
PAD
PAD
PAD
PAD
PAD
PAD
PAD
PAD
DRAIN PANDRAIN PANDRAIN PAN
DRAIN PAN
DRAIN PAN
DRAIN PAN
DRAIN PAN
DRAIN PAN
DRAIN PAN
DRAIN PAN
DRAIN PAN
DRAIN PAN
DRAIN PAN
DRAIN PAN
PART DETAILS
3-4. COOLING COMPARTMENT
Evaporator Housing (Duct) (MSF-49NM)
DRAIN HOSEDRAIN HOSEDRAIN HOSE
DRAIN HOSE
DRAIN HOSE
DRAIN HOSE
DRAIN HOSE
DRAIN HOSE
DRAIN HOSE
DRAIN HOSE
DRAIN HOSE
DRAIN HOSE
DRAIN HOSE
DRAIN HOSE
EVAPORATOR
EVAPORATOR
EVAPORATOR
EVAPORATOR
EVAPORATOR
EVAPORATOR
EVAPORATOR
EVAPORATOR
EVAPORATOR
EVAPORATOR
EVAPORATOR
EVAPORATOR
EVAPORATOR
EVAPORATOR
FAN MOTOR
FAN MOTOR
FAN MOTOR
FAN MOTOR
FAN MOTOR
FAN MOTOR
FAN MOTOR
FAN MOTOR
FAN MOTOR
FAN MOTOR
FAN MOTOR
FAN MOTOR
FAN MOTOR
FAN MOTOR
Freezer Evaporator(MSF-49NM)
FREEZER C SENSORFREEZER C SENSORFREEZER C SENSOR
FREEZER C SENSOR
FREEZER C SENSOR
FREEZER C SENSOR
FREEZER C SENSOR
FREEZER C SENSOR
FREEZER C SENSOR
FREEZER C SENSOR
FREEZER C SENSOR
FREEZER C SENSOR
FREEZER C SENSOR
FREEZER C SENSOR
LAMP
LAMP
LAMP
LAMP
LAMP
LAMP
LAMP
LAMP
LAMP
LAMP
LAMP
LAMP
LAMPLAMP
EVAPORATOR COIL
EVAPORATOR COIL
EVAPORATOR COIL
EVAPORATOR COIL
EVAPORATOR COIL
EVAPORATOR COIL
EVAPORATOR COIL
EVAPORATOR COIL
EVAPORATOR COIL
EVAPORATOR COIL
EVAPORATOR COIL
EVAPORATOR COIL
EVAPORATOR COILEVAPORATOR COIL
EVAPORATOR
EVAPORATOR
EVAPORATOR
EVAPORATOR
EVAPORATOR
EVAPORATOR
EVAPORATOR
EVAPORATOR
EVAPORATOR
EVAPORATOR
EVAPORATOR
EVAPORATOR
EVAPORATOR
EVAPORATOR
FAN MOTOR
FAN MOTOR
FAN MOTOR
FAN MOTOR
FAN MOTOR
FAN MOTOR
FAN MOTOR
FAN MOTOR
FAN MOTOR
FAN MOTOR
FAN MOTOR
FAN MOTOR
FAN MOTOR
FAN MOTOR
Condenser Fan Motor Assembly
Compressor Capacitor(Running & Starting Capacitor)
EVAPORATOR
EVAPORATOR
EVAPORATOR
EVAPORATOR
EVAPORATOR
EVAPORATOR
EVAPORATOR
EVAPORATOR
EVAPORATOR
EVAPORATOR
EVAPORATOR
EVAPORATOR
EVAPORATOR
EVAPORATOR
DEFROST HEATOR
DEFROST HEATOR
DEFROST HEATOR
DEFROST HEATOR
DEFROST HEATOR
DEFROST HEATOR
DEFROST HEATOR
DEFROST HEATOR
DEFROST HEATOR
DEFROST HEATOR
DEFROST HEATOR
DEFROST HEATOR
DEFROST HEATOR
DEFROST HEATOR
12
13
Page 8

PART DETAILS
4. MAIN COMPONENTS
4-1. COMPRESSOR
Evaporator Housing (Duct) (MSF-23NM, MSR-23NM Type)
Freezer Evaporator (MSF-23NM)
MODEL
Refrigerant
Voltage
Comp. Model
Part code
Starting type
MSR-23NM MSR-49NM MSF-23NM MSF-49NM MSR-23G-1 MSR-49G-2
SK182C-L2U
R7439-010
RSCR
4-2. COMP. RELAY
MODEL
Voltage
Relay Model
Part code
MSR-23NM MSR-49NM MSF-23NM MSF-49NM MSR-23G-1 MSR-49G-2
4-3. DRYER
MODEL
Refrigerant
Spec
Part code
MSR-23NM MSR-49NM MSF-23NM MSF-49NM MSR-23G-1 MSR-49G-2
R-134a R-404a R-134a
115 V / 60 Hz
SK1A1C-L2W
R7439-110
CSR
R-134a
36GR
R2183-032
AJA2425ZXA
R7439-030
-
115 V / 60 Hz
G7L-1A-TUB
R7253-040
R-404a
36GR
R2183-043
SK1A1C-L2W
R7439-110
CSR
R-134a
36GR
R2183-032
AKA4476YXA
R7439-150
-
Evaporator Defrost Heater (MSF-49NM, MSF-23NM)
14
MSF-49NMMSF-49NMMSF-49NM
MSF-49NM
MSF-49NM
MSF-49NM
MSF-49NM
MSF-49NM
MSF-49NM
MSF-49NM
MSF-49NM
MSF-49NM
MSF-49NM
MSF-49NM
MSF-23NMMSF-23NMMSF-23NM
MSF-23NM
MSF-23NM
MSF-23NM
MSF-23NM
MSF-23NM
MSF-23NM
MSF-23NM
MSF-23NM
MSF-23NM
MSF-23NM
MSF-23NM
4-4. CAPACITOR
MODEL
Voltage
Running
Part code
Starting
Part code
MSR-23NM MSR-49NM MSF-23NM MSF-49NM MSR-23G-1 MSR-49G-2
250VAC 12uF
R7543-030
─
250VAC 12uF
R7543-110
125VAC 125uF
R7543-100
4-5. EVAPORATOR FAN MOTOR
MODEL
Voltage
Motor Model
Part code
MSR-23NM MSR-49NM MSF-23NM MSF-49NM MSR-23G-1 MSR-49G-2
115 V / 60 Hz
115 V / 60 Hz
IS-4420DADY
R7423-031
15
250VAC 12uF
─ ─
R7543-110
125VAC 125uF
R7543-100
Page 9

MAIN COMPONENTS
5. ELECTRONIC CONTROL INSTRUCTIONS
4-6. CONDENSER FAN MOTOR
MODEL
Voltage
Motor Model
Part code
MSR-23NM MSR-49NM MSF-23NM MSF-49NM MSR-23G-1 MSR-49G-2
4-7. DEFROST HEATER
MODEL
Voltage
Spec
Part code
MSR-23NM MSR-49NM MSF-23NM MSF-49NM MSR-23G-1 MSR-49G-2
─
4-8. LAMP
MODEL
Voltage
Spec
Part code
MSR-23NM MSR-49NM MSF-23NM MSF-49NM MSR-23G-1 MSR-49G-2
25 W
R7494-010
4-9. MAIN PCB
115 V / 60 Hz
SR-043
R7423-020
115 V / 60 Hz
445 W
R7303-400
115 V / 60 Hz
600 W
R7303-410
─
FLUORESCENT 32W/865RS
R7494-150
5-1. FREEZER CONTROL
5-1-1. How to use the display PCB panel
- 88 LED
- It indicates setting temperature,
except defrost function
-Door Open LED
-Temperature can be controlled by the user.
-Factory setting is at level "2 ℉". Setting can
be changed by pressing up/down button.
MODEL
Voltage
Part code
MSR-23NM MSR-49NM MSF-23NM MSF-49NM MSR-23G-1 MSR-49G-2
R7103-260 R7103-250 R7103-260
4-10. DISPLAY PCB
MODEL
Voltage
Part code
MSR-23NM MSR-49NM MSF-23NM MSF-49NM MSR-23G-1 MSR-49G-2
4-11. BALLAST
MODEL
Voltage
Spce
Part code
115 V / 60 Hz
115 V / 60 Hz
R7113-190
MSR-23G-1 MSR-49G-2
120V / 60Hz
32W
R7553-011
16
5-1-2. Manual Defrost Function
Press temperature setting UP/DOWN key for 2 seconds at
the same time, manual defrost mode will start.
If you press UP/DOWN key for 2 seconds again on defrosting
manual defrost will be cancelled and it will revert to nomal
mode after 10 minutes of pause(Display panel indicates “DF”
for pause period)
17
Page 10

ELECTRONIC CONTROL INSTRUCTION
ELECTRONIC CONTROL INSTRUCTION
5-1-3. FUNCTION TABLE
Function
No
1
2
Initial
Operation
Temperature
Control
Controlled
Part
Compressor
LED
Description
1. 88 LED displays inside temperture
2. Begin to run immediately on the higher than 50℉ and
begin to run after 5 minutes pause on the lower
than 50℉.
1. The temperature can be changed by pushing up/down
buttons.
2. 88 LED displays inside temperture
3. Buzzer buzzes 1time whenever a button is pressed
4. Compressor automatically turns on and off by C-sensor
(Except error mode)
5. Comp. on/off temperature (℉)
Setting 5.0 3.0 1.0 -1.0 -2.0
Comp On 5.3 3.5 0.8 -1.3 -1.8
Comp OFF -2.5 -4.7 -7.4 -9.4 -10.6
-------------------------------------------------------Setting -3.0 -5.0 -7.0 -9.0
Comp On -3.1 -4.9 -5.8 -7.6
Comp OFF -11.2 -13.0 -13.9 -15.7
No
4
Function
MAIN PCB
Controlled
Part
FREEZER /
R E F R I G E R A T O R
DEFROST TIME
Description
1. It can be set as below according to the connection of
JUMPER (J1,J2,J3)in the main PCB.
P. C . B
D I S C O N N E C T I
- O N
Indicated to ℉
T e m p e r a t u r e
The controller
of Refrigerator
REMARKS
Applied to the
Freezer model
only.
TRANSFORMER
JUMPER
NO.
JP1
JP2
JP3
JUMPER
FUNCTION
Unit of the
Temperature
Mode of the
control to
Refrigerator
/ Freezer
Control of
Defrost cycle
JUMPER
1,2,3
C O N N E C T I O N
Indicated to ℃
T e m p e r a t u r e
The controller
of Freezer
8 Hr 6 Hr
ERROR CODE (FREEZER)
1. Defrost Cycle : It can be set 8Hr or 6Hr by OPTION
JUMPER (JP3)
TRANSFORMER
JUMPER
1,2,3
P. C . B
2. The condition of DEFROST operation
3
Defrost
Function
Heater
Compressor
-It runs regularly according to the defrost cycle with
adding up the plug in time.
-When the defrost starting time comes, COMPRESSOR
must be turned off and the defrost operation cycle
begins to run according to the conditions as the
below 1 and 2 after checking the temperature by
DEFROST SENSOR.
Cond ition 1(In case the temperature checked by
DEFROST SENSOR is low than 23℉); Defrost Heater
(Max. 40Min. running) runs by that time DEFROST-SENSOR
sensor 53℉ and COMPRESSOR runs after 10minutes
pauses.
18
Code
─
c S
c O
c S
c O
Content Perception Method Refrigeration state
D-sensor
- short circuit
- wire disconnection
- Normal operation
- Defrost
Heater ON : 20 MINUTES
- short circuit
C-sensor
- wire disconnection
- Time control
Comp ON : 10 MINUTES
C-sensor
D-sensor
- short circuit
- wire disconnection
Comp OFF : 6 MINUTES
19
Page 11

SENSOR DESCRIPTION
ELECTRONIC CONTROL INSTRUCTION
ELECTRONIC CONTROL INSTRUCTION
Sensor
D-sensor
C-sensor
T-sensor
Model Role Wire Color
Freezer
Freezer
Refrigerator
Refrigerator
Detect Eva coil’s temp. to terminate
defrosting
Detect inside air temp. to operate comp and to
indicate the inside temp. on the display PCB
Detect Eva coil’s temp. to operate comp
Detect inside air temp. to indicate the inside temp
on the display PCB
5-2. REFRIGERATOR CONTROL
5-2-1. HOW TO USE THE DISPLAY PCB PANEL
- 88 LED
- It indicates setting temperature,
except defrost function
WHT
BLK
BLK
WHT
-Door Open LED
5-2-2. FUNCTION TABLE
1
Temperature
2
Function
Initial
Operation
Control
No
Controlled
Part
Compressor
LED
Description
1. 88 LED displays inside temperture
2. Begin to run immediately on the higher than 41℉ and
begin to run after 5 minutes pause on the lower
than 41℉.
1. The temperature can be changed by pushing up/down
buttons.
2. 88 LED displays inside temperture
3. Buzzer buzzes 1time whenever a button is pressed
4. Compressor automatically turns on and off by C-sensor
(Except errer mode)
5. Comp. on/off temperature (℉)
Setting 39 38 37 36 35
Comp On 39.0 39.0 39.0 39.0 39.0
Comp OFF 30.2 28.4 27.5 27.0 25.0
----------------------------------------------------------------Setting 34 32 30 28
Comp On 39.0 39.0 39.0 39.0
Comp OFF 23.0 21.2 19.0 17.6
-Temperature can be controlled by the user.
-Factory setting is at level "35 ℉". Setting can
be changed by pressing up/down button.
20
ERROR CODE
Code
ㄱS
ㄱO
─
ㄱS
ㄱO
Content Perception Method Refrigeration state
T-sensor
C-sensor
C-sensor
T-sensor
- short circuit
- wire disconnection
- short circuit
- wire disconnection
- short circuit
- wire disconnection
- Normal operation
- Time control
Comp ON : 10 MINUTES
Comp OFF : 20 MINUTES
21
Page 12

6. REPLACEMENT OF MAIN COMPONENTS
6-1. TOP PANEL PARTS
REPLACEMENT OF MAIN COMPONENTS
- MAIN PCB
- LOCK ASSEMBLY or POWER SWITCH
- DOOR SWITCH
A. Untie the screws located on top grille panel.
B. Untie the screws located on bottom of top panel.
# caution : When unscrewing, hold the top panel.
Panel may fall & cause injury.
C. Place the top panel on top of the cabinet.
D. You can replace POWER-RELAY and MAIN PCB
22
POWER RELAYPOWER RELAYPOWER RELAY
POWER RELAY
POWER RELAY
POWER RELAY
POWER RELAY
POWER RELAY
POWER RELAY
POWER RELAY
POWER RELAY
POWER RELAY
POWER RELAY
POWER RELAY
23
MSF-23NM
MAIN PCBMAIN PCBMAIN PCB
MAIN PCB
MAIN PCB
MAIN PCB
MAIN PCB
MAIN PCB
MAIN PCB
MAIN PCB
MAIN PCB
MAIN PCB
MAIN PCB
MAIN PCB
Page 13

REPLACEMENT OF MAIN COMPONENTS
REPLACEMENT OF MAIN COMPONENTS
6-2 REPLACING DOOR
E. Pull out the harness located back of top panel.
You can separate top panel out of the unit.
You can replace power switch, lamp switch and display PCB.
A. Disassemble top panel as described section 6-1 A,B
B. Remove bottom grille by unscrewing the four screws located on each side
of bottom grille.
C. Open the capacitor cover.
Disconnect the Mullion Heater
24
25
Page 14

REPLACEMENT OF MAIN COMPONENTS
REPLACEMENT OF MAIN COMPONENTS
6-3 DOOR SPRING ADJUSTMENT
D. Untie the hinge.
A. Detailed structure of DOOR-HINGE
SCREW
SCREW
SCREW
SCREW
SCREW
SCREW
SCREW
SCREW
SCREW
SCREW
SCREW
SCREW
SCREWSCREW
HINGE
HINGE
HINGE
HINGE
HINGE
HINGE
HINGE
HINGE
HINGE
HINGE
HINGE
HINGE
HINGEHINGE
DOOR
DOOR
DOOR
DOOR
DOOR
DOOR
DOOR
DOOR
DOOR
DOOR
DOOR
DOOR
DOOR
DOOR
SPRING
SPRING
SPRING
SPRING
SPRING
SPRING
SPRING
SPRING
SPRING
SPRING
SPRING
SPRING
SPRING
SPRING
B. Coordinated principle of DOOR TENSION
After putting Tool for revolving DOOR-HINGE STOP-PIN HOLE, Insert DOOR-HINGE
STOP-PIN into the hole after revolving up to the requested TENSION.
DOOR HINGE
DOOR HINGE
DOOR HINGE
DOOR HINGE
DOOR HINGE
DOOR HINGE
DOOR HINGE
DOOR HINGE
DOOR HINGE
DOOR HINGE
DOOR HINGE
DOOR HINGE
DOOR HINGE
DOOR HINGE
STOP PIN
STOP PIN
STOP PIN
STOP PIN
STOP PIN
STOP PIN
STOP PIN
STOP PIN
STOP PIN
STOP PIN
STOP PIN
STOP PIN
STOP PIN
STOP PIN
DOORDOORDOOR
DOOR
DOOR
DOOR
DOOR
DOOR
DOOR
DOOR
DOOR
DOOR
DOOR
DOOR
26
TOOLTOOLTOOL
TOOL
TOOL
TOOL
TOOL
TOOL
TOOL
TOOL
TOOL
TOOL
TOOL
TOOL
REMOVEREMOVEREMOVE
REMOVE
REMOVE
REMOVE
REMOVE
REMOVE
REMOVE
REMOVE
REMOVE
REMOVE
REMOVE
REMOVE
DOOR-HINGE SHAFT-UPPERDOOR-HINGE SHAFT-UPPERDOOR-HINGE SHAFT-UPPER
DOOR-HINGE SHAFT-UPPER
DOOR-HINGE SHAFT-UPPER
DOOR-HINGE SHAFT-UPPER
DOOR-HINGE SHAFT-UPPER
DOOR-HINGE SHAFT-UPPER
DOOR-HINGE SHAFT-UPPER
DOOR-HINGE SHAFT-UPPER
DOOR-HINGE SHAFT-UPPER
DOOR-HINGE SHAFT-UPPER
DOOR-HINGE SHAFT-UPPER
DOOR-HINGE SHAFT-UPPER
DOOR HINGE STOP PIN
DOOR HINGE STOP PIN
DOOR HINGE STOP PIN
DOOR HINGE STOP PIN
DOOR HINGE STOP PIN
DOOR HINGE STOP PIN
DOOR HINGE STOP PIN
DOOR HINGE STOP PIN
DOOR HINGE STOP PIN
DOOR HINGE STOP PIN
DOOR HINGE STOP PIN
DOOR HINGE STOP PIN
DOOR HINGE STOP PINDOOR HINGE STOP PIN
DOOR HINGE UPPERDOOR HINGE UPPERDOOR HINGE UPPER
DOOR HINGE UPPER
DOOR HINGE UPPER
DOOR HINGE UPPER
DOOR HINGE UPPER
DOOR HINGE UPPER
DOOR HINGE UPPER
DOOR HINGE UPPER
DOOR HINGE UPPER
DOOR HINGE UPPER
DOOR HINGE UPPER
DOOR HINGE UPPER
27
Page 15

C. Remove the door hinge stop pin
TOOL
TOOL
TOOL
TOOL
TOOL
TOOL
TOOL
TOOL
TOOL
TOOL
TOOL
TOOL
TOOLTOOL
REPLACEMENT OF MAIN COMPONENTS
DOOR-HINGE STOP-PIN
DOOR-HINGE STOP-PIN
DOOR-HINGE STOP-PIN
DOOR-HINGE STOP-PIN
DOOR-HINGE STOP-PIN
DOOR-HINGE STOP-PIN
DOOR-HINGE STOP-PIN
DOOR-HINGE STOP-PIN
DOOR-HINGE STOP-PIN
DOOR-HINGE STOP-PIN
DOOR-HINGE STOP-PIN
DOOR-HINGE STOP-PIN
DOOR-HINGE STOP-PIN
DOOR-HINGE STOP-PIN
REPLACEMENT OF MAIN COMPONENTS
6-4. REVERSIBLE-DOOR ASSEMBLING METHOD
APPLIED MODEL : MSF-23NM, MSR-23NM
1. Taking apart TOP GRILL and GRILL ASSEMBLY
1) Take apart TOP GRILL
after eliminating screw connected
Upper or downward located ①
in the PICTURE (A)
2) Take apart GRILL
after eliminating the screw connected
Left and right side located ②
in the PLCTURE (A)
# Attention : Heed not to damage Electricity
wire and not to fall top-grill
from the upper.
Also be careful the sharp
edges during working.
②
①
TOP GRILL
GRILL
ASSEMBLY
PICTURE A
B. Place the door hinge stop pin and adjust the strength of the door spring.
REMOVE
28
2. Taking apart of DOOR-ASSEMBLY
1) Take apart ①~⑩ in order at the PICTURE (B)
# Attention : Heed the elasticity
when eliminating the
PIN and the weight
during taking apart
DOOR ASSEMBLY.
29
②M5✽27 SCREW
④DOOR-HINGE
SHAFT-UPPER
⑨M5✽27 SCREW
PICTURE B
③DOOR-HINGE
UPPER
①DOOR-HINGE
STOP PIN
⑤DOOR-HINGE
BUSHING
⑥DOOR
ASSEMBLY
⑦DOOR-HINGE
BUSHING
⑧DOOR-HINGE
SHAFT-LOWER
⑩DOOR-HINGE
LOWER
Page 16

3. Assembling method of REVERSIBLE DOOR
1) After reversing 180 degree
DOOR ASSEMBLY of ⑥,
③DOOR-HINGE
LOWER
have the HANDLE be the
requested side.
2) Assemble as the following
⑧DOOR-HINGE
SHAFT-LOWER
order
⑥DOOR ASSEMBLY
⑤DOOR-HINGE BUSHING
①DOOR-HINGE STOP PIN
③DOOR-HINGE UPPER
REPLACEMENT OF MAIN COMPONENTS
⑨M5✽27 SCREW
⑦DOOR-HINGE
BUSHING
④DOOR-HINGE
SHAFT-UPPER
②M5✽27 SCREW
REPLACEMENT OF MAIN COMPONENTS
6-5. REFRIGERATION COMPARTMENT'S PARTS
- LAMP BULB, LAMP SHIELD
- EVAPORATOR FAN MOTOR
- D-SENSOR, C-SENSOR, T-SENSOR
- EVAPORATOR COIL
- EVAPORATOR DEFROST HEATER
A. Disassemble lamp shield
LAMP BULBLAMP BULBLAMP BULB
LAMP BULB
LAMP BULB
LAMP BULB
LAMP BULB
LAMP BULB
LAMP BULB
LAMP BULB
LAMP BULB
LAMP BULB
LAMP BULB
LAMP BULB
LAMP SHIELDLAMP SHIELDLAMP SHIELD
LAMP SHIELD
LAMP SHIELD
LAMP SHIELD
LAMP SHIELD
LAMP SHIELD
LAMP SHIELD
LAMP SHIELD
LAMP SHIELD
LAMP SHIELD
LAMP SHIELD
LAMP SHIELD
B. Disassemble duct
LAMP SOCKETLAMP SOCKETLAMP SOCKET
LAMP SOCKET
LAMP SOCKET
LAMP SOCKET
LAMP SOCKET
LAMP SOCKET
LAMP SOCKET
LAMP SOCKET
LAMP SOCKET
LAMP SOCKET
LAMP SOCKET
LAMP SOCKET
-After assembling ③②, assemble ④⑤
PICTURE C
-Insert ④ into ⑥
-After inserting ⑦⑧, fix ③⑨
-Insert reversly for suitable spring elasticity
# Attention : When screw connected, should well be connected to maintain sufficient sustain
4. Assembling TOP GRILL and GRILL ASSEMBLY
1) Connect the screw at the
①
location ① on the top
and bottom of the top grill
2) Connect the screw at the
location ② on the left and
right side of the grill assembly.
②
PICTURE D
C. Pull out the lamp
EVAPORATOR
EVAPORATOR
EVAPORATOR
EVAPORATOR
EVAPORATOR
EVAPORATOR
EVAPORATOR
EVAPORATOR
EVAPORATOR
EVAPORATOR
EVAPORATOR
EVAPORATOR
EVAPORATOR
EVAPORATOR
DEFROST HEATOR
DEFROST HEATOR
DEFROST HEATOR
DEFROST HEATOR
DEFROST HEATOR
DEFROST HEATOR
DEFROST HEATOR
DEFROST HEATOR
DEFROST HEATOR
DEFROST HEATOR
DEFROST HEATOR
DEFROST HEATOR
DEFROST HEATOR
DEFROST HEATOR
EVAPORATOR DRAIN PAN HEATEREVAPORATOR DRAIN PAN HEATEREVAPORATOR DRAIN PAN HEATER
EVAPORATOR DRAIN PAN HEATER
EVAPORATOR DRAIN PAN HEATER
EVAPORATOR DRAIN PAN HEATER
EVAPORATOR DRAIN PAN HEATER
EVAPORATOR DRAIN PAN HEATER
EVAPORATOR DRAIN PAN HEATER
EVAPORATOR DRAIN PAN HEATER
EVAPORATOR DRAIN PAN HEATER
EVAPORATOR DRAIN PAN HEATER
EVAPORATOR DRAIN PAN HEATER
EVAPORATOR DRAIN PAN HEATER
EVAPORATOR FAN MOTOREVAPORATOR FAN MOTOREVAPORATOR FAN MOTOR
EVAPORATOR FAN MOTOR
EVAPORATOR FAN MOTOR
EVAPORATOR FAN MOTOR
EVAPORATOR FAN MOTOR
EVAPORATOR FAN MOTOR
EVAPORATOR FAN MOTOR
EVAPORATOR FAN MOTOR
EVAPORATOR FAN MOTOR
EVAPORATOR FAN MOTOR
EVAPORATOR FAN MOTOR
EVAPORATOR FAN MOTOR
30
31
Page 17

REPLACEMENT OF MAIN COMPONENTS
REPLACEMENT OF MAIN COMPONENTS
D. Replacing evaporator fan motor
D-1. Disconnect the fan motor's harness.
D-2. Untie the four screws which located on bottom of fan motor
EVAPORATOR FAN MOTOR
EVAPORATOR FAN MOTOR
EVAPORATOR FAN MOTOR
EVAPORATOR FAN MOTOR
EVAPORATOR FAN MOTOR
EVAPORATOR FAN MOTOR
EVAPORATOR FAN MOTOR
EVAPORATOR FAN MOTOR
EVAPORATOR FAN MOTOR
EVAPORATOR FAN MOTOR
EVAPORATOR FAN MOTOR
EVAPORATOR FAN MOTOR
EVAPORATOR FAN MOTOREVAPORATOR FAN MOTOR
E. Replacing sensor
E-1. FREEZER C-sensor of
Untie as illustrated below and pull-out the FREEZER C-sensor from the cover.
E-2. DEFROST-sensor of Freezer
Disassemble the DEFROST-sensor from the evaporator
DEFROST SENSOR
DEFROST SENSOR
DEFROST SENSOR
DEFROST SENSOR
DEFROST SENSOR
DEFROST SENSOR
DEFROST SENSOR
DEFROST SENSOR
DEFROST SENSOR
DEFROST SENSOR
DEFROST SENSOR
DEFROST SENSOR
DEFROST SENSORDEFROST SENSOR
E-3. C-sensor of Refrigerator
FREEZER C SENSOR
FREEZER C SENSOR
FREEZER C SENSOR
FREEZER C SENSOR
FREEZER C SENSOR
FREEZER C SENSOR
FREEZER C SENSOR
FREEZER C SENSOR
FREEZER C SENSOR
FREEZER C SENSOR
FREEZER C SENSOR
FREEZER C SENSOR
FREEZER C SENSORFREEZER C SENSOR
32
FREEZER C SENSOR
FREEZER C SENSOR
FREEZER C SENSOR
FREEZER C SENSOR
FREEZER C SENSOR
FREEZER C SENSOR
FREEZER C SENSOR
FREEZER C SENSOR
FREEZER C SENSOR
FREEZER C SENSOR
FREEZER C SENSOR
FREEZER C SENSOR
FREEZER C SENSOR
FREEZER C SENSOR
33
C SENSORC SENSORC SENSOR
C SENSOR
C SENSOR
C SENSOR
C SENSOR
C SENSOR
C SENSOR
C SENSOR
C SENSOR
C SENSOR
C SENSOR
C SENSOR
Page 18

REPLACEMENT OF MAIN COMPONENTS
E-4. T-Sensor (Temperature Display Sensor) of Refrigerator
DISPLAY T-SENSOR
DISPLAY T-SENSOR
DISPLAY T-SENSOR
DISPLAY T-SENSOR
DISPLAY T-SENSOR
DISPLAY T-SENSOR
DISPLAY T-SENSOR
DISPLAY T-SENSOR
DISPLAY T-SENSOR
DISPLAY T-SENSOR
DISPLAY T-SENSOR
DISPLAY T-SENSOR
DISPLAY T-SENSORDISPLAY T-SENSOR
REPLACEMENT OF MAIN COMPONENTS
6-6. CONDENSING UNIT
- Condensing units : Compressor, Condenser Fan Motor, Condenser Coil,
Condenser Dryer.
- Others : Power-cord, Drain pan
A. Untie two screws as below.
REFRIGERATOR C-SENSORREFRIGERATOR C-SENSORREFRIGERATOR C-SENSOR
REFRIGERATOR C-SENSOR
REFRIGERATOR C-SENSOR
REFRIGERATOR C-SENSOR
REFRIGERATOR C-SENSOR
REFRIGERATOR C-SENSOR
REFRIGERATOR C-SENSOR
REFRIGERATOR C-SENSOR
REFRIGERATOR C-SENSOR
REFRIGERATOR C-SENSOR
REFRIGERATOR C-SENSOR
REFRIGERATOR C-SENSOR
DISPLAY T-SENSORDISPLAY T-SENSORDISPLAY T-SENSOR
DISPLAY T-SENSOR
DISPLAY T-SENSOR
DISPLAY T-SENSOR
DISPLAY T-SENSOR
DISPLAY T-SENSOR
DISPLAY T-SENSOR
DISPLAY T-SENSOR
DISPLAY T-SENSOR
DISPLAY T-SENSOR
DISPLAY T-SENSOR
DISPLAY T-SENSOR
34
B. Pull-out the condensing unit (MSF-49 NM)
35
Page 19

6-7. LIGHTING-PARTS
A. MSR-23G-1
REPLACEMENT OF MAIN COMPONENTS
REPLACEMENT OF MAIN COMPONENTS
B. MSR-49G-2
2. Separate the Lamp Reflection
1. Untie three screws seciromg the Lamp
Reflection.
3. Separate the Lamp out of the Lamp
socket and replace it.
1. Separate the Shelves
2. Separate the Lamp Socket
3. Take out the Doors and separate the
Lamp from the Lamp Holder.
36
4. Separate the Lamp shield End Cap
37
Page 20

REPLACEMENT OF MAIN COMPONENTS
7. PART-LIST
C. BALLAST
1. Untie four screws securing the sign frame End separate Sign Frame End.
2. Separate connector of the ballast
3. Untie two screws for separating the Ballast.
Part name Code Description
CASTER
CASTER R3323-010 SPCC 4" 2 2 2 2 2 2
CASTER BRAKE R3323-020 SPCC 4" 2 2 2 2 2 2
COMPRESSOR
COMPRESSOR R7439-030 AJA2425ZXA 1
COMPRESSOR R7439-110 SK1A1C-L2W 1 1 1
COMPRESSOR R7439-010 SK182C-L2U 1
COMPRESSOR R7439-150 AKA4476YXA 1
COMPRESSOR RUN CAPACITOR R7543-110 250VAC 12UF 1 1
COMPRESSOR START CAPACITOR R7543-100 125VAC 125UF 1 1
COMPRESSOR RUN CAPACITOR R7543-030 250VAC 12UF 1
COMPRESSOR RELAY HARNESS R7373-770 AWG18 1
COMPRESSOR RELAY HARNESS R7373-780 AWG18 1
COMPRESSOR RELAY HARNESS R7373-790 AWG18 1
COMPRESSOR RELAY HARNESS R7373-800 AWG18 1
COMPRESSOR RELAY HARNESS R7283-070 AWG18 1
COMPRESSOR RELAY HARNESS R7283-080 AWG18 1
POWER-CORD R7363-060 3000MM 1 1 1 1 1 1
CONDENSER
CONDENSER COIL R2272-012 1
CONDENSER COIL R2202-030 4.7613340 1
CONDENSER COIL R2202-031 4.7618960 1 1 1
CONDENSER COIL R2273-021 1
CONDENSER DRYER R2183-032
CONDENSER DRYER R2183-043
CONDENSER FAN
CONDENSER FAN MOTOR R7423-020 SE-043
CONDENSER FAN MOTOR BLADE R3729-020
CONDENSER FAN MOTOR BRACKET
DRAIN
DRAIN PAN R3743-060 ABS BLK 1 1 1
DRAIN PAN R3742-070 ABS BLK 1 1 1
DRAIN WICKING BAR R3853-230 PP
DRAIN WICKING BAR R3853-240 PP
DRAIN WICKING PADS R1154-101 PP T2.599103 1 1 1
DRAIN WICKING PADS R1154-020 PP T2.583180 1 1 1
R3313-260 SBHG1-0 T2.0164 1 1 1 1 1 1
25.41690.635
25.41300.635
9W CCW 1550RPM
AL3004H14
WHT T2.040569
WHT T2.040657
9" CCW T1.0 1 1 1 1 1 1
Solid Glass
R23 R49 F23 F49 R23 R49
1 1 1 1 1
1
1 1 1 1 1 1
1 1 1
1 1 1
38
39
Page 21

PART-LIST
PART-LIST
Part name Code Description
EVAPORATOR
EVAPORATOR COIL R2263-044 CU+AL 1 1
EVAPORATOR COIL R2263-034 CU+AL 1
EVAPORATOR COIL R8613-342 CU+AL 1 1
EVAPORATOR COIL R8613-353 CU+AL 1
EVAPORATOR DEFROST HEATER R7303-410 SUS304 ¢8 600 W 22.0Ω 1
EVAPORATOR DEFROST HEATER R7303-400 SUS304 ¢8 445 W 29.7Ω 1
EVAPORATOR DRAIN PAN HEATER R7303-180 PVC 105℃ 90W 147Ω 1
EVAPORATOR DRAIN PAN HEATER R7303-170 PVC 105℃ 90W 147Ω 1
SENSOR BRACKET R3314-190 P.P, WHT 1 1 1 1 1 1
EVAPORATOR THERMAL FUSE (BIMETAL)
EVAPORATOR FAN MOTOR R7423-031 IS-4420 1650±150RPM 1 1 1 2 1 2
EVAPORATOR FAN MOTOR BLADE R3729-010 8" C.C.W 1 1 1 2 1 2
EVAPORATOR FAN MOTOR BRACKET R3204-360 STS-304 T1.012090 1 1 1 2 1 2
FREEZER SENSOR R7213-081 YELLOW 1 1
DEFROST SENSOR R7213-101 WHITE 1 1
REFRIGERATOR SENSOR R7213-091 BLACK 1 1 1 1
DISPLAY SENSOR R7213-111 WHITE 1 1 1 1
TOP PANEL
TOP PANEL ASSEMBLY R8182-130 1 1
TOP PANEL ASSEMBLY R8182-120 1 1
TOP PANEL ASSEMBLY R8182-120 1
TOP PANEL ASSEMBLY R8182-130 1
FREEZER BRAND LOGO R5133-150 1 1
REFRIGERATOR BRAND LOGO R5133-140 1 1 1 1
FREEZER MAIN PCB R7103-250 1 1
REFRIGERATOR MAIN PCB R7103-260 1 1 1 1
CONTROL BOARD HOUSING R7113-190 1 1 1 1 1 1
DISPLAY PCB R7113-190 20220 T1.5 1 1 1 1 1 1
DISPLAY PCB FILM R4113-370 PC-SHEET 1 1 1 1 1 1
SUPPORTER PCB R3084-010 NYLON66 6 6 6 6 6 6
POWER RELAY R7253-040
DOOR SWITCH R7203-020 125V 1.5A 1 2 1 2 1 2
DOOR SWITCH HARNESS R7373-423 AWG18 1 1
DOOR SWITCH HARNESS R7373-433 AWG18 1 1
DOOR LOCK R3739-010 1 2 1 2 1 2
R7253-050 80℃±4 G4A00 1 1
OMRON G7L-1A-TUB
Solid Glass
R23 R49 F23 F49 R23 R49
1 1 1 1 2 2
Part name Code Description
BOTTOM GRILLE
BOTTOM GRILLE ASSEMBLY R8182-080 1 1 1
BOTTOM GRILLE ASSEMBLY R8182-092 1 1 1
SHELF
SHELF CLIP R3313-151 12 24 12 24 12 24
SHELF R3233-072 3 3
SHELF R3233-063 6 6
SHELF (GLASS) R3233-180 3
SHELF L (GLASS) R3233-160 3
SHELF R (GLASS) R3233-170 3
SHELF STANDARD R3373-121 4 8 4 8 4 8
DOOR
DOOR ASSEMBLY R8272-220 1 1
DOOR ASSEMBLY R8272-170 2 2
GLASS DOOR ASSEMBLY L R8172-650 1
GLASS DOOR ASSEMBLY R R8172-630 1
GLASS DOOR ASSEMBLY R8172-640 1
DOOR GASKET R3903-354 RD-PVC BLACK 1 2 1 2
MULLION R8163-031 30W PINK 1
MULLION R8163-121 38W YELLOW 1
DOOR HINGE TOP R3394-120 AL 1 2 1 2
DOOR HINGE BOTTOM R3394-130 AL 1 2 1 2
DOOR HINGE WASHER R3034-020 18 T2.2 2 4 2 4
DOOR HINGE STOP PIN R3044-040 330 1 2 1 2
LAMP
LAMP BULB R7394-010 25W, E26 1 1 1 1
LAMP SHIELD R3813-130 MIPS (HR-3370) 1 1 1 1
LAMP SOCKET R7393-020 660W 250V 1 1 1 1
FLUORESCENT LAMP
FLUORESCENT R7394-150 PHILIPS 32W/865RS 1 1
BALLAST R7553-010 ADVANCE (R-1P32-TP) 1 1
LAMP GUARD R3894-030 PP 1 1
GUARD SOCKET R3814-550 ABS V0 2 2
LAMP SOCKET R7393-180 ABS V0 2
LAMP SOCKET R7393-170 ABS V0 2
Solid Glass
R23 R49 F23 F49 R23 R49
40
41
 Loading...