

Page 1
S A F E T Y W A R N I N G S
High-voltage is accessible within this instrument.
Unplug the power source before removing the cover.
The Model 3077 and 3077A Neutralizers contain
radioactive material that is subject to the regulations
of the U.S. Nuclear Regulatory Commission as well
as local regulations.
The Model 3088 Advanced Aerosol Neutralizer
contains an x-ray source. During normal operation,
you will not be exposed to x-ray radiation. Do not
make any changes (such as detaching the x-ray
source from the neutralizer tube) to the neutralizer.
Where required, obey local regulations to operate an
x-ray device before turning the Model 3088 on.
The classifier can weigh up to 58 lb (26 kg) with the
DMA installed. Protect your back when lifting.
Do not grip the DMA when lifting.
A Condensation Particle Counter (CPC) may be
combined with the classifier as particle detector.
CPCs are Class 1 laser-based instruments. You will
not be exposed to laser radiation during normal
operation of the CPC. However, you must not
remove any parts from the CPC unless the manual
instructs you to do so. Do not remove any part of
the instrument housing while the instrument is
powered on.
Qty
Description
1
Model 3082 Electrostatic Classifier
1
Model 3082 & Model 3938 Operation and
Service Manual
1
Model 3082 & Model 3938 Quick Start Guide
1
3082 Accessory Kit
1
Model 3082 Certificate of Calibration
1
Cable, AC power
ELECTROSTATIC CLASSIFIER
SMPS™ SPECTROMETER
Use this guide to quickly set up your Model 3082
Electrostatic Classifier. For more detailed information,
see the Operation and Service manual.
Safety
Advisory and identification labels (described in the
Operation and Service manual) are attached to the
exterior of the Classifier.
QUICK START GUIDE
MODEL 3082
MODEL 3938
3082 Accessory Kit, DMA Upgrade Kits, and optional
accessories are given in the Operation and Service
Manual.
Retain the packaging for use when shipping the
instrument; use of other packaging for shipment may
result in damage to the instrument.
Packing List
Unpacking
Carefully unpack the classifier. Verify that all items in
the packing list (see below) are present. Contact TSI if
items are missing or broken. Complete details of the
Setting Up the Electrostatic Classifier
For ventilation, install the cabinet with > 2-inch (50 mm)
clearance between the back and side panels and any
other surface. Setting up the classifier requires the
following procedures (described in detail in the Operation
and Service Manual P/N 6006760):
1. If needed, install the optional lead shielding.
2. Install a Model 3077, 3077A, or 3088 Neutralizer.
3. If needed, remove inlet adapter and install impactor.
4. Upgrade DMA if needed.
5. Install a DMA. Connect the DMA flow ports and high
voltage cable to the classifier.
6. If needed, install the flow equalizer assembly as
described in the Operation and Service Manual.
7. Connect the classifier to a PC (if used with Aerosol
Instrument Manager® software).
8. If setting up the classifier in an SMPS™
spectrometer configuration, connect the classifier to
a CPC.
9. Connect the AC power cable.
Page 2
10. Upgrade CPC firmware if necessary.
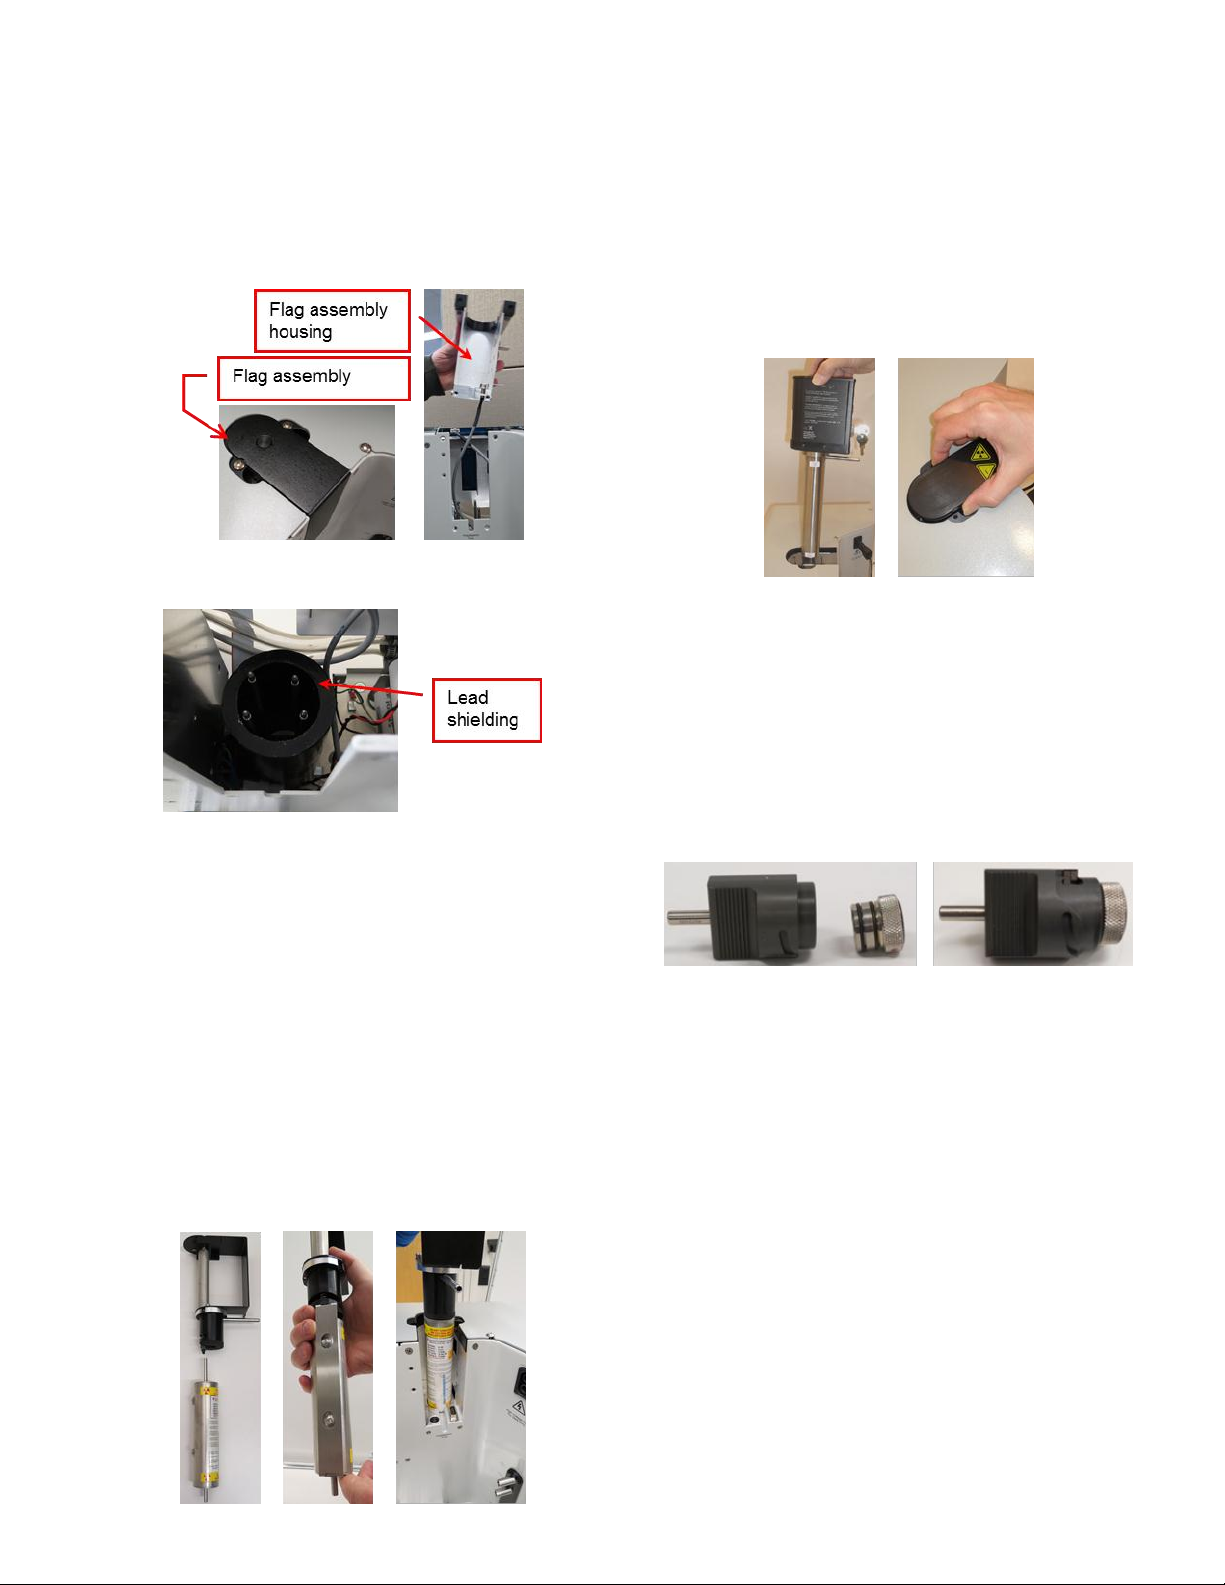
Installing Optional Lead Shielding
In some countries or localities, the Model 3077A
neutralizer must be operated with lead shielding
installed. It is an optional accessory. To install:
1. Remove the instrument cover.
2. Remove the flag assembly and the flag assembly
housing.
3. Locate the four lead shielding guide rods and slide
the lead shield into place around them.
4. Replace the flag assembly housing, flag assembly,
and cover.
5. Install the flag assembly into the housing and replace
the two screws removed in Step 1.
Installing Model 3088 Neutralizer
The 3088 Advanced Aerosol Neutralizer has the
neutralization capacity of the 3077A neutralizer but has
an x-ray source (instead of a Kr-85 source) which can be
turned on and off. To install:
1. Remove the flag assembly (2 screws) from the top of
the classifier and store in Accessory kit.
2. Remove the black vinyl end caps from the 3088 and
install the 3088 in the Electrostatic Classifier.
3. Replace the two screws removed in Step 1.
Installing Impactor
To remove particles larger than the size range of interest
and/or to measure aerosol inlet flow to the classifier, the
inlet adapter should be removed and an impactor should
be installed. The impactors are provided in the 3082
Accessory Kit (shipped with the instrument). To install:
1. Remove impactor and impaction plate from
accessory kit. Push the stainless steel impactor plate
into the body.
Installing Model 3077/3077A Neutralizer
The neutralizer provides a known charge distribution
on the aerosol entering the DMA. Model 3077 (2 mCi)
and Model 3077A (10 mCi) have a radioactive Krypton
85 source. To install:
1. Remove the flag assembly (2 screws) from the top
of the classifier.
2. Fit the long tube on the Model 3077/3077A
Neutralizer into the flag assembly.
3. Remove the 6006269 retainer bracket from
accessory kit.
4. Slide the bracket over the bottom tube. Compress
the spring and push the bracket into place.
2. Remove the inlet adapter and put it in the Impactor
Kit case.
3. Push the impactor into position. Lock in place by
twisting clockwise until the dot on the impactor aligns
with the arrow on the bezel.
Upgrading DMA
If you have a previous-model DMA (3081 or 3085)
purchased before 2014, you can purchase an upgrade
kit (3081U, 3085U) from TSI to make it compatible with
the Model 3082. See the 3082 manual for details on how
to perform the upgrade.
P/N 6006761 Rev. C © 2016 TSI Incorporated TSI Model 3082 Quick Guide page 2
Page 3
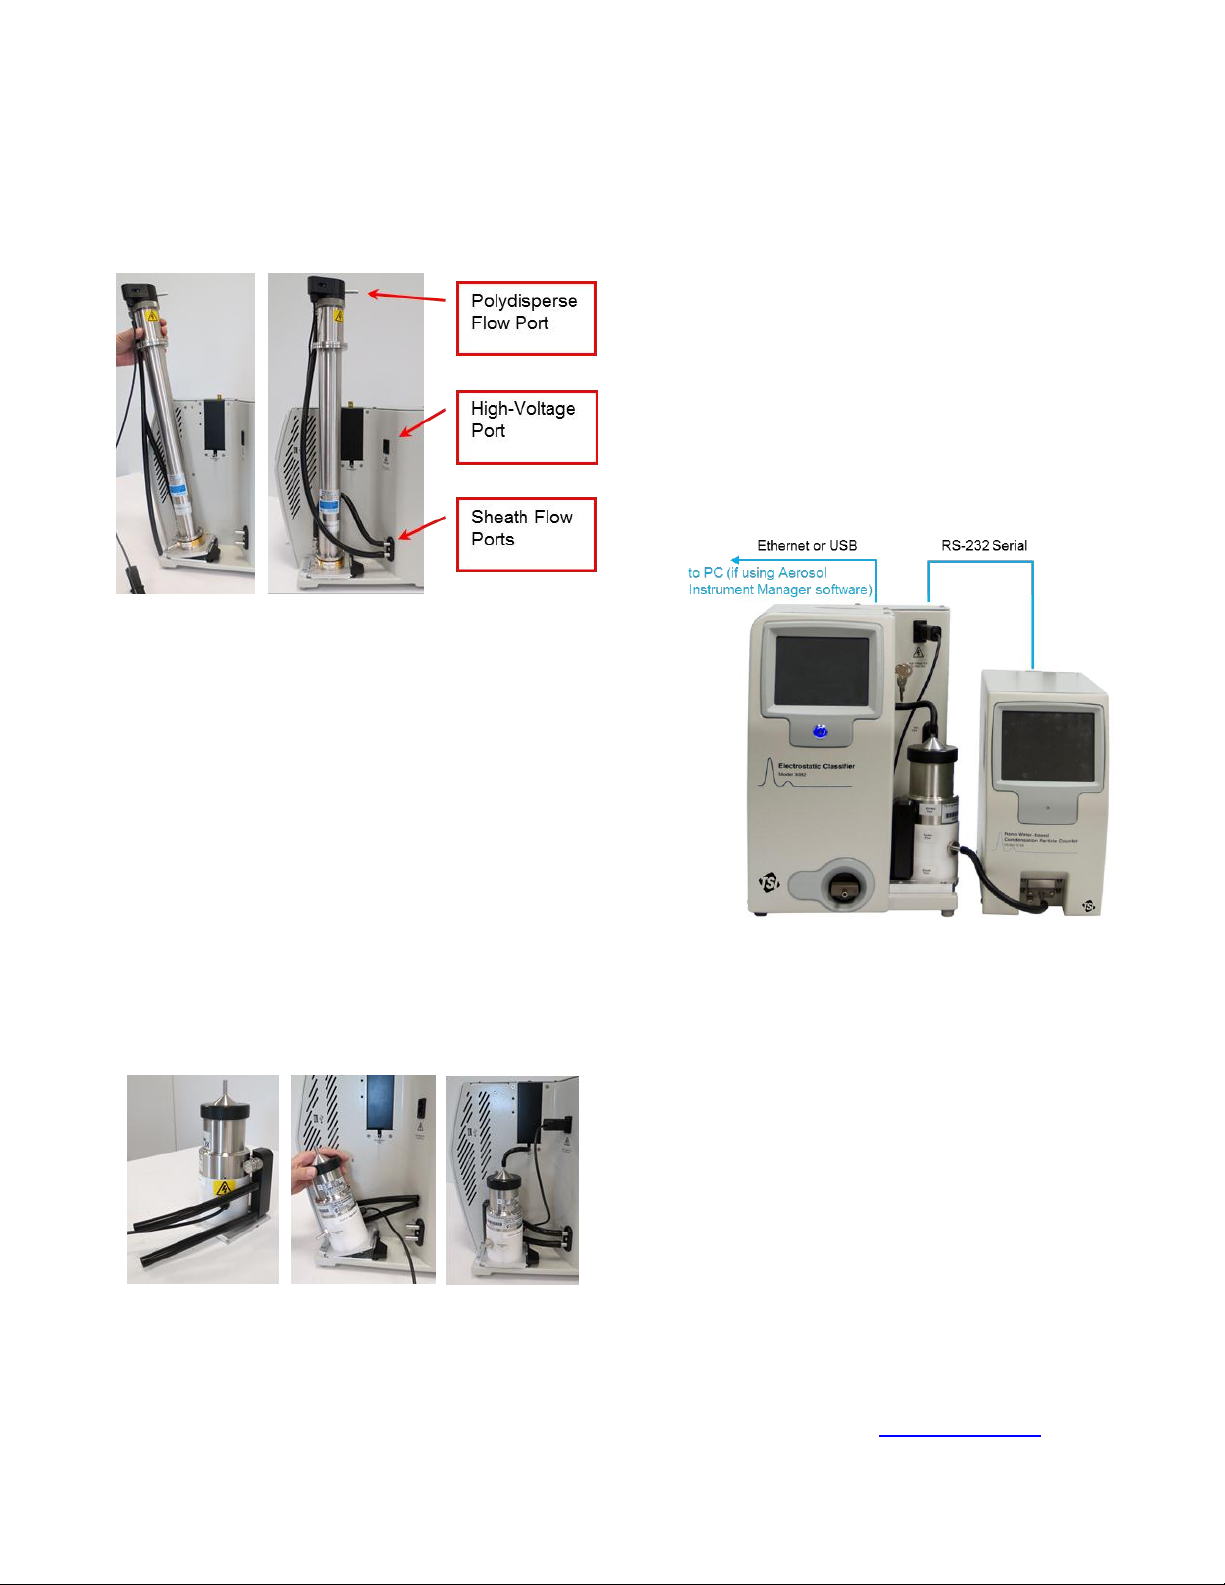
Installing Model 3081A Long DMA
1. From the accessory kit, cut 25” and 12” lengths of
3/8” tubing and connect them to the DMA Sheath
Flow + and Sheath Flow – ports, respectively.
2. Tilt the Long DMA over the mounting plate and
snap into place.
3. Connect the tubing to the Sheath Flow + and
Sheath Flow – ports on the classifier.
4. From the accessory kit, cut a 21” length of ¼”
tubing and connect it between the Polydisperse
Flow ports on the classifier and on the DMA.
5. Insert the high-voltage connector into the highvoltage port on the classifier. Align the flattened
side of the connector with the flattened side of
the port.
5. Insert the high-voltage connector into the high-voltage
port on the classifier. Align the flattened side of the
connector with the flattened side of the port.
Note: For alternative installation of the 1nm-DMA (to
minimize diffusion losses between the Model 3777
Nano Enhancer and the 1nm-DMA), refer to the
Operation and Service Manual.
Connecting Classifier to Detector
The Model 3082 supports communication to a 3772,
3775, 3776, 3787, or 3788 CPC.
1. Connect the CPC outlet to a vacuum source (3772
only).
2. Connect the DMA Monodisperse outlet (or outlet of
flow equalizer, is installed) to the CPC inlet with a
10” (25 cm) length of ¼” black conductive tubing.
3. Connect the Serial port on the back panel of the
classifier to the Serial port on the back of the
detector using provided RS-232 cable.
Installing Model 3085A Nano DMA or Model 3086 1nm-DMA
1. If using bypass flow, remove the fitting from the
Nano DMA or 1nm-DMA manifold and connect the
manifold outlet to a vacuum line. If you are not
using bypass flow, leave the fitting in place on the
Nano DMA manifold.
2. Fit the Nano DMA or 1nm-DMA manifold into
place. From the accessory kit, cut two 6.5” lengths
of 3/8” tubing and connect them to the Sheath
Flow + and Sheath Flow – fittings on the manifold.
3. Tilt the Nano DMA or 1nm-DMA over the mounting
plate and snap into place. Connect the tubing to
the respective ports on the classifier.
4. From the accessory kit, cut a 4” length of ¼” tubing
and connect it between the Polydisperse Flow
ports on the classifier and on the Nano DMA.
Connecting Classifier to PC
Connect the classifier to the PC using either the provided
USB cable or an Ethernet connection (not provided).
The 3082 supports Aerosol Instrument Manager software
versions 10.1 and above. If you will be using this
software, consult the Aerosol Instrument Manager
Software User’s Manual P/N 1930038 for install steps.
Powering On
1. Plug the supplied power cord into the AC Power In
connection on the classifier back panel. Plug the
other end into your electrical supply.
2. Flip the rocker switch on the AC Power In
connection to turn on the device.
Upgrading CPC Firmware
If your CPC has a firmware version earlier than 2.15
(3772, 3775, 3776) or 1.26 (3787, 3788), it will need new
firmware to be compatible with the Model 3082.
1. Open the TSI website http://www.tsi.com.
2. From the Support tab > TSI Software and
Firmware > Software and Firmware Wizard.
P/N 6006761 Rev. C © 2016 TSI Incorporated TSI Model 3082 Quick Guide page 3
Page 4
3. Follow the onscreen instructions to find the correct
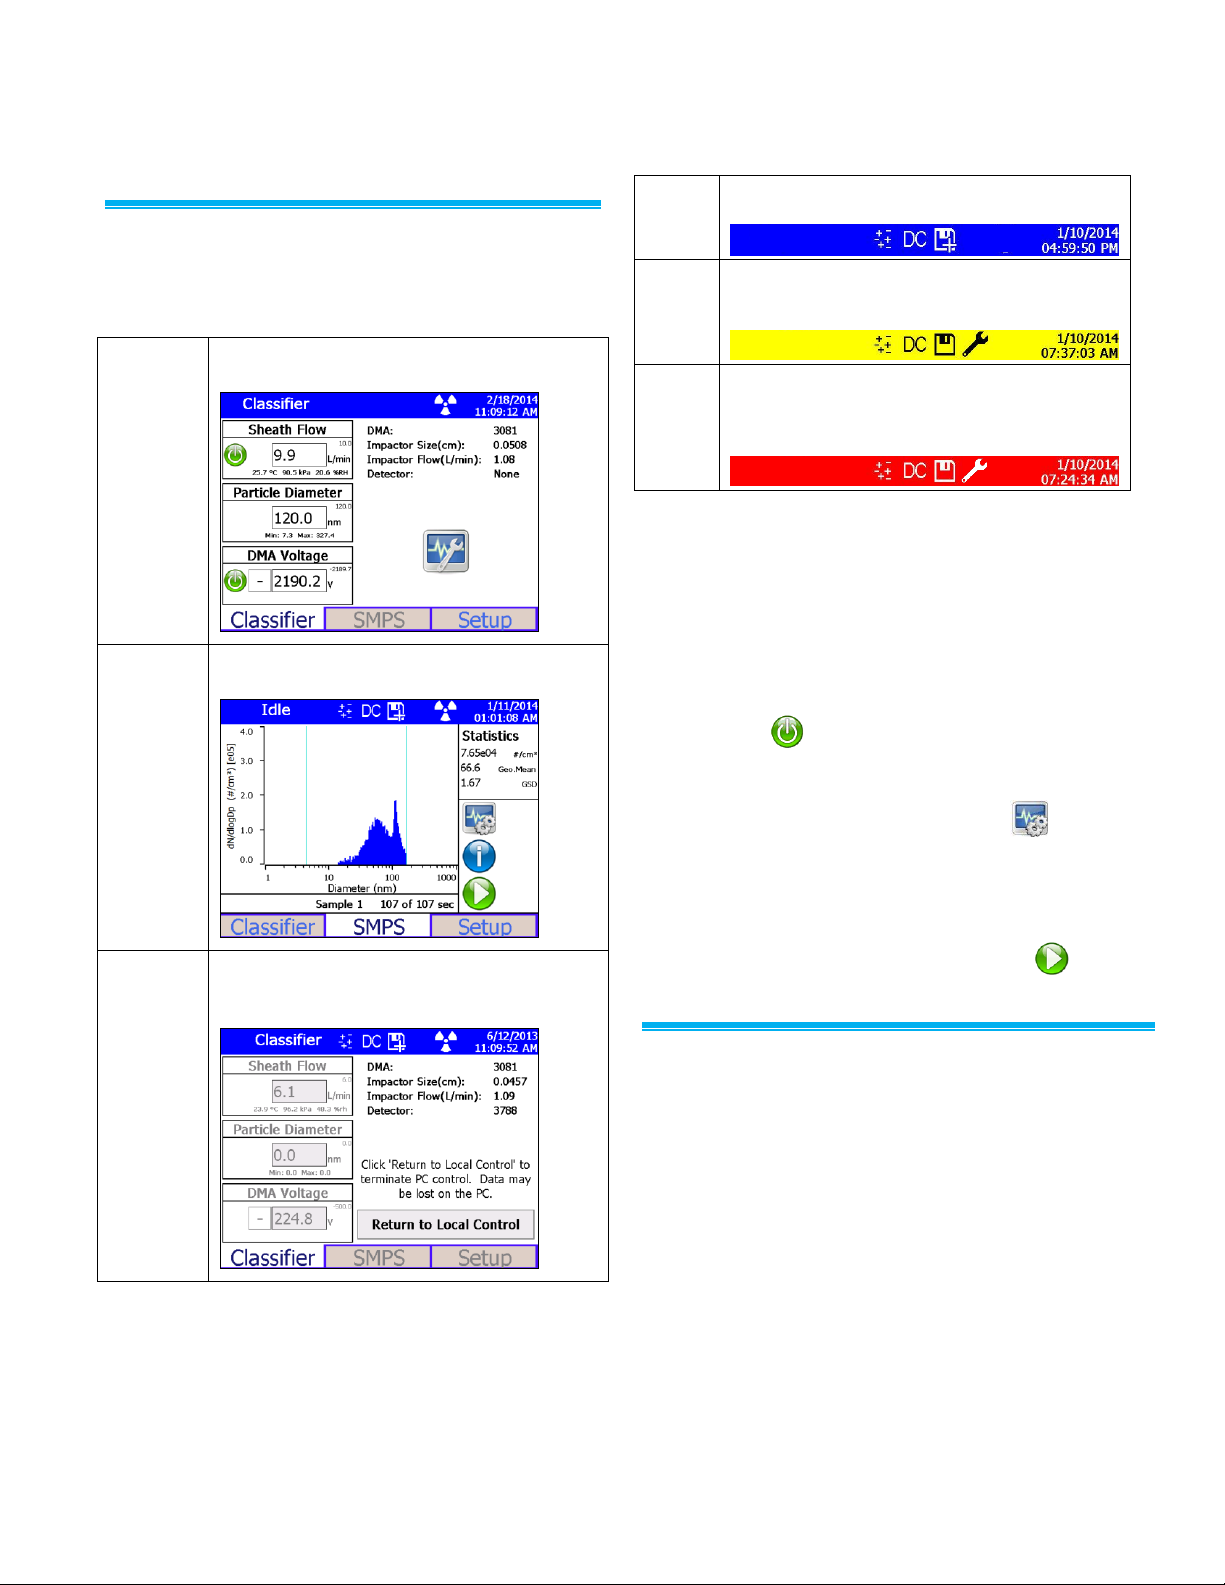
Classifier
Mode
Use Classifier tab. No CPC or computer
required. 3082 acts as a size selector.
SMPS
Mode
Use SMPS tab. CPC required. Set up,
run, and log SMPS scans from display.
External
Control
Mode
Use Aerosol Instrument Manager
software. CPC required. Set up, run, and
log SMPS scans from a computer.
Blue
Indicates the instrument is operating as
expected.
Yellow
Indicates a warning condition. Touch the
wrench to see a description of the warning
condition.
Red
Indicates an error condition. When the title bar
is red, the wrench icon flashes. Touch the
wrench to see a description of the error
condition.
firmware upgrade.
4. Check firmware version on boot-up. Verify that
firmware version is 1.26 or greater for 3787 or
3788, and 2.15 or greater for 3772, 3775, or 3776.
Operating the Electrostatic Classifier
You can operate the Electrostatic Classifier in three
modes:
Title Bar
The Title Bar indicates date and time, scan status, and
errors. It also contains icons for toggling data logging
and size distribution corrections.
Setting Up a Basic SMPS Scan
Although the correct scan settings for your application
depend on the size range you are interested in and the
type of measurement you are trying to make, the steps
below can provide a starting point.
1. Follow steps in this QuickStart guide for connecting a
CPC and neutralizer to the 3082. Verify that they are
listed on the Classifier tab.
Setup Tab
Screens in the Setup tab provide options to set
properties, view device details, set logging and
communication settings, and calibrate instrument
flows.
Full details of the display options and modes are given
in the Operation and Service Manual P/N 6006760.
P/N 6006761 Rev. C © 2016 TSI Incorporated TSI Model 3082 Quick Guide page 4
2. Press the button to enable sheath flow. Set
sheath flow to approximately 10X the aerosol flow of
your CPC.
3. Navigate to the SMPS tab and press to access
scan properties.
4. On the Scan tab, set scan time (i.e., 30 seconds). On
the Schedule tab, set Scans per Sample (i.e., 1) and
Number of Samples (i.e., 1).
5. Press OK to return to SMPS tab. Press to start.
Size distribution data and statistics are displayed.
Moving and Shipping
1. Power off the classifier and disconnect the power
cord from the power supply.
2. If using a DMA, disconnect all tubing and cap the
fittings, disconnect the high-voltage supply, and then
depress the lever on the classifier base plate to
release the DMA.
3. If installed, remove the Neutralizer.
4. If installed, remove the optional lead shielding.
5. When shipping, place the classifier in the original
packing materials. The classifier should be placed in
the smaller of the two supplied boxes and anchored
with the foam inserts. The box should be taped shut
and then placed in the larger of the two boxes,
protected at the corners by foam inserts.
Note: If your impactors require calibration, return
them along with the classifier to TSI.
 Loading...