

Page 1

by a qualified factory-authorized technician.
hazardous optical radiation.
QUICK START GUIDE
AEROTRAK™ Model 9306
Handheld Airborne Particle Counter
Thank you for purchasing a TSI A
Model 9306 Handheld Airborne Particle Counter.
This guide will help you quickly begin using your
particle counter.
More detailed information is in the manual located
on the included T
Please refer to the manual if you have questions on
the operation of your new particle counter.
RAKPRO™ Lite Software CD.
Safety
This section gives instructions to promote safe and
proper handling of the A
Airborne Particle Counters.
IMPORTANT
There are no user-serviceable parts inside the
instrument. Refer all repair and maintenance to a
qualified factory-authorized technician. All maintenance
and repair information in this manual is included for use
LASER SAFETY
The Model 9306 Handheld Airborne Particle Counter is a
Class I laser-based instrument. During normal operation,
you will not be exposed to laser radiation. However,
precaution should be taken to avoid exposure to
hazardous radiation in the form of intense, focused,
visible light. Exposure to this light may cause blindness.
DO NOT remove any parts from the particle counter
unless you are specifically told to do so in this manual.
DO NOT remove the housing or covers. There are no
user-serviceable components inside the housing
EROTRAK™ Handheld
EROTRAK™
Handheld Particle Counters
The use of controls, adjustments, or
procedures other than those specified in
this manual may result in exposure to
WARNING
The battery supplied by TSI (700032) has built in
protection against explosion and fire hazard. Do not use
a substitute. Do not use non-rechargeable batteries in
this instrument. Fire, explosions, or other hazards may
result.
Labels
Advisory and identification labels are attached to
the outside of the particle counter housing and to
the optics housing on the inside of the instrument.
Serial number
label (back
panel)
Calibration Label
(Side Panel)
Laser radiation
label (internal)
Laser radiation
symbol label
(internal)
European symbol
for nondisposable item.
Item must be
recycled.
VISIBLE LASER RADIAT ION WHEN
WARNING: NO USER SERVIC ABLE
PARTS INSIDE. REFER SER VICING
DANGER!
OPEN. AVOID DIRECT
EXPOSURE TO BEAM
TO QUALIFIED PERSONNEL
Page 2
Unpacking
1. Carefully unpack the particle counter from the
shipping container and verify that all the items
listed in the following table are present.
2. Contact TSI immediately if items are missing or
broken.
Item
Description
Qty
A
1
1 Power
1 Isokinetic
1 Battery pack 700032
EROTRAK™
Airborne
Particle
Counter
Supply with
universal
plugs
inlet
Part/Model Reference Picture
9306-03
9306-04
9306-V2
801694
700003 AL
Item
Qty
Description Part/Model Reference Picture
1 Calibration
certificate
N/A
3. Additional items may be included if you
ordered accessories or spare parts.
4. The Model 9306 is equipped with an integral
instrument support stand and stylus (for use
with the touch screen).
Isokinetic Inlet
Stylus
1 Computer
cable (2 m),
USB A to B
1 Stylus N/A
1 HEPA zero
filter
assembly
1 TRAKPRO™
Lite (version
2.2 or later)
data
download
utility CD
(includes
manual)
1 Operation
and Service
Manual
700033
700005
7001384
6004215 (installed on
RAKPRO™ Lite CD)
T
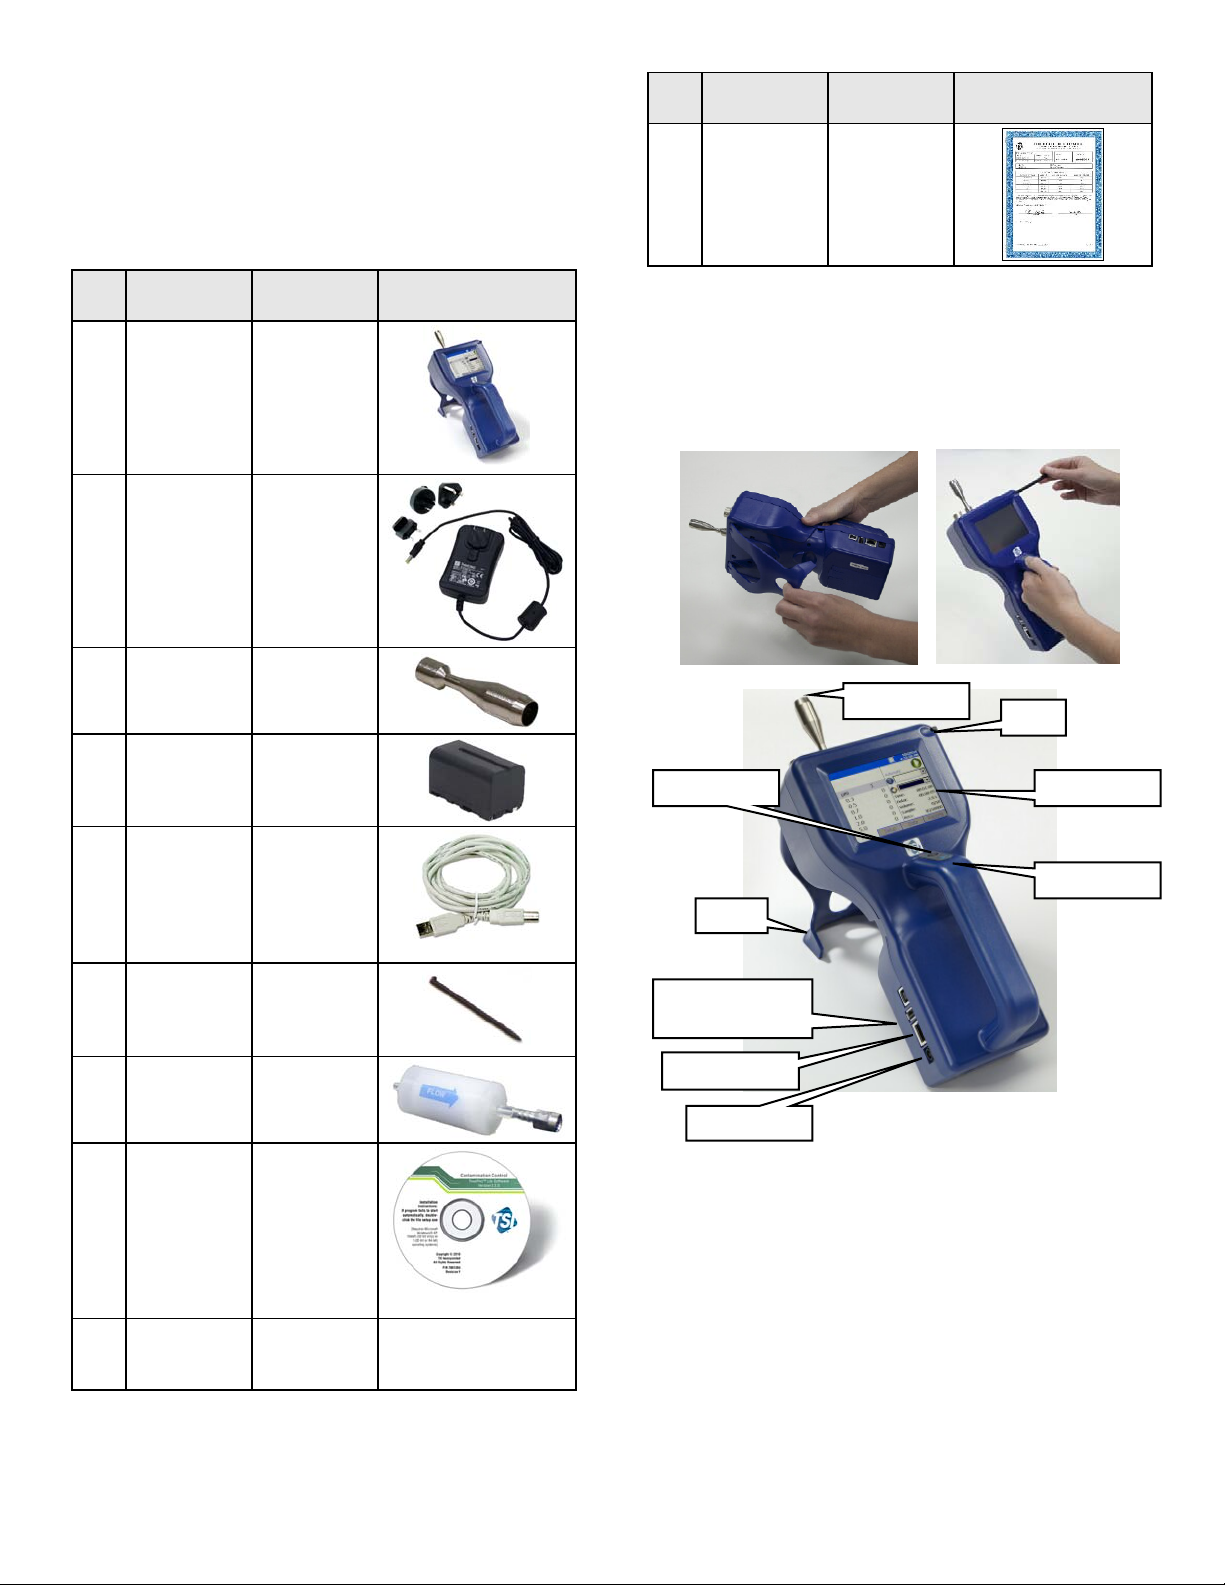
Power Button
Stand
USB Host and
Device Ports
Ethernet Port
Touch-Screen
Start Sample
Power Entry
Power
5. The Model 9306 may be powered using a
rechargeable lithium-ion battery, or through an
AC power cord.
6. To install the lithium-ion battery, remove the
battery cover from the back of the instrument
by lightly depressing the textured tab on the
cover located on the lower left.
6004216 Rev B Copyright 2010 TSI Incorporated TSI Model 9306 Quick Guide
Page 3

7. Place the lithium-ion battery into the battery
compartment and slide it forward (toward the
top of the unit) until it locks into place.
8. Replace the battery cover and slide it in place
until you hear a click.
9. Your particle counter battery was partially
charged before shipping, and the battery
charges when the instrument is connected to
AC power, but not while actively sampling.
10. Connect the particle counter to AC power by
connecting the AC power adapter to the
appropriate country-specific power cord. Then
insert the AC power adapter into the bottom of
the Model 9306 and connect the power cord to
an AC source (100-240 VAC, 50-60 Hz, 1.9 A).
The particle counter is now ready for use (or
recharging the battery when unit is not
sampling).
11. The battery icon’s bars
charge amount in the battery.
correspond to the
Running the Particle Counter
12. The Model 9306 AEROTRAK™ Handheld
Airborne Particle Counter is controlled using a
touch screen display. Use the plastic stylus or
your finger tip. DO NOT use sharp objects
(such as a pen point) that may damage the
screen overlay.
13. Press the on/off button
handle of the instrument).
(located on the
14. After a splash screen displays the TSI logo, a
brief start-up sequence begins as the Windows
CE operating system boots up.
15. The instrument is ready for operation when the
Main screen appears.
16. To turn the power off, hold the On/Off button
down and then select the turn off icon. This
prevents accidentally turning off the
instrument. An option to charge batteries will
also be presented if AC is plugged in and a
battery is present.
17. There are four screens accessible using the
tabs at the bottom: Main, Setup, Data, and
Reports. Some screens require you to enter
information. To enter information, tap on the
screen and an on-screen keyboard appears.
• The Main screen is the default. It shows the
current status of the particle counter and
the latest sample values.
• The Setup screen lets you set up
parameters for the particle counter
(including data display, system
configuration, device, sampling, and
recipes).
• The Data screen lets you preview data that
has been collected.
• The Reports screen lets you select various
standard reports for viewing and printing.
18. Each screen and their options is explained in
detail in the manual.
®
Set up Time/Date
19. From the Main tab, select the Setup tab then
Device Setup, then select Date and Time.
20. This screen lets you set the current date and
time and set the date format. Press OK when
finished. You can select options using the
arrows or tap on the screen to use the onscreen keyboard.
Using the Onscreen Keyboard
21. Throughout the setup screens, a keyboard will
appear on the screen. Data may be entered
using this keyboard.
22. When the entry is complete, press either the
(Enter) or Esc key. The keyboard will then be
hidden until another text entry box is selected.
6004216 Rev B Copyright 2010 TSI Incorporated TSI Model 9306 Quick Guide
↵
Page 4

Set up Sampling
23. From the Main tab, select the Setup tab, then
select Sampling. The Sample Timing Screen
appears.
24. This screen lets you select parameters for
sampling. Use the up and down arrows or the
on-screen keyboard to change or enter
information. (These parameters are only valid
when the Model 9306 is running in Automatic
mode.)
Collecting Samples
26. Press or the blue-triangle button next to
the On/Off button. This turns on the pump
and the particle counter runs for 10 cycles that
are one minute long with 10 second hold times
in-between.
27. The Main tab is updated as samples are
collected.
Reviewing Data
28. The Data screen lets you preview data that has
been collected. Use the scroll bar (slide) on the
right to scroll though the records.
29. The record number is displayed near the
bottom of the screen. As each record displays,
its data and relevant parameters are displayed.
30. Channel data is highlighted in red when that
channel is in alarm.
31. The print Icon allow printing of the data to the
external printer accessory. The USB drive icon
allows down loading of the data to a USB
memory device.
Field Description
Sample Sample is the total number of samples you
want collected.
Delay Delay indicates how long it will be before the
first sample is taken. It takes approximately
6 seconds for the pump to reach the flow set
point; taking a measurement before the pump
is functioning properly may result in a
data error.
Hold Hold indicates how long the instrument pauses
between samples.
Time Time indicates the duration of each sample run
(count particles).
Volume Volume sets the volume of air that will pass
through the instrument for each sample. If you
select volume, you must select Cubic Feet,
Cubic Meters or Liters for measurement using
the arrows.
25. Press OK when finished, and press Back to
return to the Main tab.
Software
32. The TRAKPRO™ Lite Data Transfer utility comes
on the CD that came with your particle
counter.
33. To install the communications software and
drivers, insert the CD into your computer drive
and follow the on-screen instructions.
34. See the T
(P/N 6002796) on CD (P/N 7001384) for
installation instructions.
Make sure the particle counter is connected before you
run the software.
RAKPRO™ Lite Software User’s Guide
NOTE
6004216 Rev B Copyright 2010 TSI Incorporated TSI Model 9306 Quick Guide
 Loading...