

TruTech PVS31170S1 User Manual
2
PLACEMENT INFORMAPLACEMENT INFORMA
PLACEMENT INFORMAPLACEMENT INFORMA
PLACEMENT INFORMA
TIONTION
TIONTION
TION
• Do not use this unit in places which are extremely hot, cold, dusty, or
humid.
• Do not restrict the air flow of this unit by placing it somewhere with poor air flow,
by covering it with a cloth, or by placing it on bedding or carpeting.
SAFETY INFORMASAFETY INFORMA
SAFETY INFORMASAFETY INFORMA
SAFETY INFORMA
TIONTION
TIONTION
TION
• When connecting or disconnecting the AC power cord, grip the plug and
not the cord itself. Pulling the cord may damage it and create a hazard.
• When you are not going to use the unit for a long period of time, disconnect
the AC power cord.
CONDENSACONDENSA
CONDENSACONDENSA
CONDENSA
TION INFORMATION INFORMA
TION INFORMATION INFORMA
TION INFORMA
TIONTION
TIONTION
TION
• When left in a heated room where it is warm and damp, water droplets or
condensation may form inside the unit. When there is condensation inside
the unit, the unit may not function normally. Let the unit stand for 1-2 hours
before turning the power on, or gradually heat the room and allow the unit
to dry before use.
FCC INFORMAFCC INFORMA
FCC INFORMAFCC INFORMA
FCC INFORMA
TIONTION
TIONTION
TION
WARNING:WARNING:
WARNING:WARNING:
WARNING: Changes or modifications to this unit not expressly approved by the party
responsible for compliance could void the user authority to operate the equipment.
NOTE:NOTE:
NOTE:NOTE:
NOTE: This equipment has been tested and found to comply with the limits for a Class
B digital device, pursuant to part 15 of the FCC Rules. These limits are designed to
provide reasonable protection against harmful interference in a residential installation.
This equipment generates, used in accordance with the instructions, may cause
harmful interference to radio communications. However, there is no guarantee that
interference will not occur in a particular installation. If this equipment does cause
SAFETY PRECAUTIONSSAFETY PRECAUTIONS
SAFETY PRECAUTIONSSAFETY PRECAUTIONS
SAFETY PRECAUTIONS
* SEE REAR OF UNIT FOR GRAPHIC SYMBOLS ** SEE REAR OF UNIT FOR GRAPHIC SYMBOLS *
* SEE REAR OF UNIT FOR GRAPHIC SYMBOLS ** SEE REAR OF UNIT FOR GRAPHIC SYMBOLS *
* SEE REAR OF UNIT FOR GRAPHIC SYMBOLS *
WARNING: TO REDUCE THE RISK OFWARNING: TO REDUCE THE RISK OF
WARNING: TO REDUCE THE RISK OFWARNING: TO REDUCE THE RISK OF
WARNING: TO REDUCE THE RISK OF
ELECTRIC SHOCK, DO NOT REMOVEELECTRIC SHOCK, DO NOT REMOVE
ELECTRIC SHOCK, DO NOT REMOVEELECTRIC SHOCK, DO NOT REMOVE
ELECTRIC SHOCK, DO NOT REMOVE
COVER (OR BACK). NO USER-SERVICEABLECOVER (OR BACK). NO USER-SERVICEABLE
COVER (OR BACK). NO USER-SERVICEABLECOVER (OR BACK). NO USER-SERVICEABLE
COVER (OR BACK). NO USER-SERVICEABLE
PARTS INSIDE. REFER SERVICING TOPARTS INSIDE. REFER SERVICING TO
PARTS INSIDE. REFER SERVICING TOPARTS INSIDE. REFER SERVICING TO
PARTS INSIDE. REFER SERVICING TO
QUALIFIED PERSONNEL.QUALIFIED PERSONNEL.
QUALIFIED PERSONNEL.QUALIFIED PERSONNEL.
QUALIFIED PERSONNEL.
WARNING: TO PREVENT FIRE OR SHOCKWARNING: TO PREVENT FIRE OR SHOCK
WARNING: TO PREVENT FIRE OR SHOCKWARNING: TO PREVENT FIRE OR SHOCK
WARNING: TO PREVENT FIRE OR SHOCK
HAZARD, DO NOT EXPOSE THIS UNIT TOHAZARD, DO NOT EXPOSE THIS UNIT TO
HAZARD, DO NOT EXPOSE THIS UNIT TOHAZARD, DO NOT EXPOSE THIS UNIT TO
HAZARD, DO NOT EXPOSE THIS UNIT TO
RAIN OR MOISTURE. DO NOT PLACERAIN OR MOISTURE. DO NOT PLACE
RAIN OR MOISTURE. DO NOT PLACERAIN OR MOISTURE. DO NOT PLACE
RAIN OR MOISTURE. DO NOT PLACE
OBJECTS FILLED WITH LIQUIDS ON OROBJECTS FILLED WITH LIQUIDS ON OR
OBJECTS FILLED WITH LIQUIDS ON OROBJECTS FILLED WITH LIQUIDS ON OR
OBJECTS FILLED WITH LIQUIDS ON OR
NEAR THIS UNITNEAR THIS UNIT
NEAR THIS UNITNEAR THIS UNIT
NEAR THIS UNIT
..
..
.
CAUTION: CAUTION:
CAUTION: CAUTION:
CAUTION:
DANGER OF EXPLOSION IFDANGER OF EXPLOSION IF
DANGER OF EXPLOSION IFDANGER OF EXPLOSION IF
DANGER OF EXPLOSION IF
BABA
BABA
BA
TTERTTER
TTERTTER
TTER
Y IS INCORRECTLY IS INCORRECTL
Y IS INCORRECTLY IS INCORRECTL
Y IS INCORRECTL
Y REPLACED.Y REPLACED.
Y REPLACED.Y REPLACED.
Y REPLACED.
REPLACE ONLREPLACE ONL
REPLACE ONLREPLACE ONL
REPLACE ONL
Y WITH THE SAME ORY WITH THE SAME OR
Y WITH THE SAME ORY WITH THE SAME OR
Y WITH THE SAME OR
EQUIVALENT TYPE.EQUIVALENT TYPE.
EQUIVALENT TYPE.EQUIVALENT TYPE.
EQUIVALENT TYPE.
The symbol forThe symbol for
The symbol forThe symbol for
The symbol for
Class II (DoubleClass II (Double
Class II (DoubleClass II (Double
Class II (Double
lnsulation)lnsulation)
lnsulation)lnsulation)
lnsulation)
INVISIBLE LASER RADIAINVISIBLE LASER RADIA
INVISIBLE LASER RADIAINVISIBLE LASER RADIA
INVISIBLE LASER RADIA
TIONTION
TIONTION
TION
WHEN OPEN.WHEN OPEN.
WHEN OPEN.WHEN OPEN.
WHEN OPEN.
AVOID EXPOSURE TO BEAMAVOID EXPOSURE TO BEAM
AVOID EXPOSURE TO BEAMAVOID EXPOSURE TO BEAM
AVOID EXPOSURE TO BEAM
..
..
.
This productThis product
This productThis product
This product
contains a lowcontains a low
contains a lowcontains a low
contains a low
power laser device.power laser device.
power laser device.power laser device.
power laser device.
CLASS 1 LASER PRODUCTCLASS 1 LASER PRODUCT
CLASS 1 LASER PRODUCTCLASS 1 LASER PRODUCT
CLASS 1 LASER PRODUCT
AVIS
RISQUE DE CHOC ÉLECTRIQUE NE
PAS OUVRIR
CAUTION
RISK OF ELECTRIC SHOCK
DO NOT OPEN
The exclamation point within a triangle
alerts you to the presence of important
operating, servicing and maintenance
instructions in this user’s manual.
The lightning flash with an arrowhead
within a triangle alerts you to
uninsulated dangerous voltage within
the product's enclosure that could
cause an electric shock.

3
NOTES ON COPYRIGHTNOTES ON COPYRIGHT
NOTES ON COPYRIGHTNOTES ON COPYRIGHT
NOTES ON COPYRIGHT
It is forbidden by law to copy, broadcast, show, broadcast on cable, play in public, or
rent copyrighted material without permission.
Apparatus Claims of U.S. Patent Nos. 4,907,093; 5,315,448; and 6,516,132
licensed for limited viewing uses only.
This product incorporates copyright protection technology that is protected by U.S.
patents and other intellectual property rights. Use of this copyright protection
technology must be authorized by Macrovision, and is intended for home and other
limited viewing uses only unless otherwise authorized by Macrovision. Reverse
engineering or disassembly is prohibited.
WW
WW
W
ARNING:ARNING:
ARNING:ARNING:
ARNING: Should any problems occur, disconnect the AC power
cord and refer servicing to a qualified technician.
SAFETY PRECAUTIONSSAFETY PRECAUTIONS
SAFETY PRECAUTIONSSAFETY PRECAUTIONS
SAFETY PRECAUTIONS
harmful interference to radio or television reception, which can be determined by
turning the equipment off and on, the user is encouraged to try to correct
the interference by one or more of the following measures:
• Reorient or relocate the receiving antenna.
• Increase the separation between the equipment and receiver.
• Connect the equipment into an AC power outlet on a circuit different from
that to which the receiver is connected.
• Consult the dealer or an experienced radio/TV technician for help.
Shielded cables must be used with this unit to ensure compliance with the Class FCC
limits.

4
IMPORIMPOR
IMPORIMPOR
IMPOR
TT
TT
T
ANT SAFETY INSTRUCTIONSANT SAFETY INSTRUCTIONS
ANT SAFETY INSTRUCTIONSANT SAFETY INSTRUCTIONS
ANT SAFETY INSTRUCTIONS
1. Read these instructions.
2. Keep these instructions.
3. Heed all warnings.
4. Follow all instructions.
5. Do not use this apparatus near
water.
6. Clean only with a dry cloth.
7. Do not block any ventilation
openings. Install in accordance
with the manufacturer’s
instructions.
8. Do not install near any heat
sources such as radiators, heat
registers, stoves, or other
apparatus (including amplifiers)
that produce heat.
9. Do not defeat the safety purpose
of the polarized or groundingtype plug. A polarized plug has
two blades with one wider than
the other. A grounding type plug
has two blades and a third
grounding prong. The wide blade
or the third prong are provided
for your safety. When the
provided plug does not fit into
your AC power outlet, consult an
electrician for replacement of
the obsolete AC power outlet.
10. Protect the AC power cord from
being walked on or pinched
particularly at plug, convenience
receptacles, and the point where
they exit from the apparatus.
11. Only use attachments/
accessories specified by the
manufacture.
12.Use only with the
cart, stand, tripod,
bracket, or table
specified by the
manufacturer, or
sold with the
apparatus. When a cart is
used, use caution when moving
the cart/apparatus
combination to avoid injury from
tip-over.
13.Unplug this apparatus during
lightning storms or when unused
for long periods of time.
14. Refer all servicing to qualified
service personnel. Servicing is
required when the apparatus has
been damaged in any way, such
as the AC power cord or plug is
damaged, liquid has spilled or
objects have fallen into the
apparatus, the apparatus has
been exposed to rain or moisture,
does not operate normally, or
has been dropped.

5
TT
TT
T
ABLE OF CONTENTSABLE OF CONTENTS
ABLE OF CONTENTSABLE OF CONTENTS
ABLE OF CONTENTS
SAFETY PRECAUTIONSSAFETY PRECAUTIONS
SAFETY PRECAUTIONSSAFETY PRECAUTIONS
SAFETY PRECAUTIONS
........................
........................
............
2 – 32 – 3
2 – 32 – 3
2 – 3
IMPORIMPOR
IMPORIMPOR
IMPOR
TT
TT
T
ANT SAFETY INSTRUCTIONSANT SAFETY INSTRUCTIONS
ANT SAFETY INSTRUCTIONSANT SAFETY INSTRUCTIONS
ANT SAFETY INSTRUCTIONS
...................................................... 4...................................................... 4
...................................................... 4...................................................... 4
...................................................... 4
DISC FORMADISC FORMA
DISC FORMADISC FORMA
DISC FORMA
TSTS
TSTS
TS
........................................................
........................................................
............................
66
66
6
REMOTE CONTROLREMOTE CONTROL
REMOTE CONTROLREMOTE CONTROL
REMOTE CONTROL
..........................................
..........................................
.....................
7 7
7 7
7
ACCESSORIESACCESSORIES
ACCESSORIESACCESSORIES
ACCESSORIES
..........................................................
..........................................................
.............................
77
77
7
REMOTE CONTROL REFERENCE GUIDEREMOTE CONTROL REFERENCE GUIDE
REMOTE CONTROL REFERENCE GUIDEREMOTE CONTROL REFERENCE GUIDE
REMOTE CONTROL REFERENCE GUIDE
............................................... 8 – 9............................................... 8 – 9
............................................... 8 – 9............................................... 8 – 9
............................................... 8 – 9
UNIT REFERENCE GUIDEUNIT REFERENCE GUIDE
UNIT REFERENCE GUIDEUNIT REFERENCE GUIDE
UNIT REFERENCE GUIDE
.....
.....
..........
.....
10 – 1110 – 11
10 – 1110 – 11
10 – 11
CONNECTIONSCONNECTIONS
CONNECTIONSCONNECTIONS
CONNECTIONS
......................................
......................................
...................
12 – 1712 – 17
12 – 1712 – 17
12 – 17
Connecting a TV Antenna/Cable/
Satellite ................................. 12
Connecting an A/V Device (VCR,
PVR Camcorder, Game System,
etc.) ............................... 13 – 15
Connecting a Hhigh-Definition (HD)
Source .................................. 16
Connecting a PC ...................... 16
Connecting an Audio Amplifier ........ 17
Connecting the AC Power Cord ...... 17
INSTINST
INSTINST
INST
ALLAALLA
ALLAALLA
ALLA
TIONTION
TIONTION
TION
......................................................
......................................................
...........................
18 18
18 18
18
Removing the Base Stand ......... 18
Mounting on the Wall ............... 18
USING HEADPHONES .................. 19USING HEADPHONES .................. 19
USING HEADPHONES .................. 19USING HEADPHONES .................. 19
USING HEADPHONES .................. 19
UNIT OPERAUNIT OPERA
UNIT OPERAUNIT OPERA
UNIT OPERA
TIONTION
TIONTION
TION
..............................................
..............................................
.......................
1919
1919
19
Turning the Unit on .................. 19
Turning the Unit on for the First
Time ...................................... 19
SOUND SYSTEMSOUND SYSTEM
SOUND SYSTEMSOUND SYSTEM
SOUND SYSTEM
..............................................
..............................................
.......................
1919
1919
19
CD/DVD OPERACD/DVD OPERA
CD/DVD OPERACD/DVD OPERA
CD/DVD OPERA
TIONTION
TIONTION
TION
......................
......................
...........
20 – 2120 – 21
20 – 2120 – 21
20 – 21
Playing a Disc ......................... 20
Pausing Playback (Still Mode) ...... 20
Stopping Playback .................... 20
Skip (Forward/Reverse) ............ 20
Fast Forward/Fast Reverse ...... 20
Slow-motion Play (DVD) ............. 20
Audio Selection (DVD) .............. 21
Subtitle Selection (DVD) ........... 21
Angle Selection (DVD) .............. 21
SPECIAL FUNCTIONSSPECIAL FUNCTIONS
SPECIAL FUNCTIONSSPECIAL FUNCTIONS
SPECIAL FUNCTIONS
....................................
....................................
..................
22 22
22 22
22
Display Function (DVD) ............. 22
Locating a Specific Title (DVD) ....... 22
Locating a Specific Chapter/Track
................................................ 22
Locating a Specific Time ........... 22
CD/DVD PROGRAMMABLE MEMORYCD/DVD PROGRAMMABLE MEMORY
CD/DVD PROGRAMMABLE MEMORYCD/DVD PROGRAMMABLE MEMORY
CD/DVD PROGRAMMABLE MEMORY
.................................................. 23.................................................. 23
.................................................. 23.................................................. 23
.................................................. 23
Programmable Memory ............. 23
Title/Chapter Programmed Playback
(DVD) .................................... 23
Track Programmed Playback (CD)
............................................ 23
REPEAREPEA
REPEAREPEA
REPEA
T PLAT PLA
T PLAT PLA
T PLA
YBACKYBACK
YBACKYBACK
YBACK
..........................
..........................
.............
23 – 2423 – 24
23 – 2423 – 24
23 – 24
Repeating a Phapter/Title (DVD)
................................................ 23
Repeating a Single Track/Whole CD
(CD) ...................................... 23
. Repeating a Specific Section (DVD)
(CD) ...................................... 24
PLAPLA
PLAPLA
PLA
YING A PICTURE FILE DISCYING A PICTURE FILE DISC
YING A PICTURE FILE DISCYING A PICTURE FILE DISC
YING A PICTURE FILE DISC
............
............
......
2424
2424
24
CUSTOMIZING THE DVD FUNCTIONCUSTOMIZING THE DVD FUNCTION
CUSTOMIZING THE DVD FUNCTIONCUSTOMIZING THE DVD FUNCTION
CUSTOMIZING THE DVD FUNCTION
SETTINGSSETTINGS
SETTINGSSETTINGS
SETTINGS
................................................................
................................................................
................................
2525
2525
25
Language Setup ...................... 25
Video Setup ............................ 25
System Setup ......................... 25
TV Type .................................. 25
Default .................................. 25
TV SETUP ............................. 26 – 31TV SETUP ............................. 26 – 31
TV SETUP ............................. 26 – 31TV SETUP ............................. 26 – 31
TV SETUP ............................. 26 – 31
Video Menu ............................ 26
VGA Settings in PC Mode ......... 27
Audio Menu ............................ 27
TV Menu ................................ 28
Skip Channel Setting ................ 28
Setup Menu ...................... 28 - 30
Time Setup Setting .................. 29
Caption Setting ....................... 30
Restore Setting .......................... 30
Parental Menu .................... 30 – 31
Password ............................... 30
Parental Control Setting ........... 31
LANGUAGE CODE LIST ................. 32LANGUAGE CODE LIST ................. 32
LANGUAGE CODE LIST ................. 32LANGUAGE CODE LIST ................. 32
LANGUAGE CODE LIST ................. 32
MAINTENANCE ........................... 33MAINTENANCE ........................... 33
MAINTENANCE ........................... 33MAINTENANCE ........................... 33
MAINTENANCE ........................... 33
TROUBLE SHOOTING GUIDETROUBLE SHOOTING GUIDE
TROUBLE SHOOTING GUIDETROUBLE SHOOTING GUIDE
TROUBLE SHOOTING GUIDE
........................
........................
............
..............................................................................
.......................................
.......................................
.......................................
34 – 3534 – 35
34 – 3534 – 35
34 – 35
6
This unit can playback:
TITLE, CHAPTER AND TRACKSTITLE, CHAPTER AND TRACKS
TITLE, CHAPTER AND TRACKSTITLE, CHAPTER AND TRACKS
TITLE, CHAPTER AND TRACKS
• DVDs are divided into
“titles”“titles”
“titles”“titles”
“titles” and
“chapters”“chapters”
“chapters”“chapters”
“chapters”. If the DVD has more
than one movie on it, each movie
would be a separate
“title”“title”
“title”“title”
“title”.
“Chapters”“Chapters”
“Chapters”“Chapters”
“Chapters” are sections of titles.
• Audio CDs are divided into
“tracks”“tracks”
“tracks”“tracks”
“tracks”.
A
“track”“track”
“track”“track”
“track” is usually one song on an
Audio CD.
ICONS USED ON DVDSICONS USED ON DVDS
ICONS USED ON DVDSICONS USED ON DVDS
ICONS USED ON DVDS
Sample lcons
Language selections for audio
Language selections for subtitles
Screen aspect ratio
Multiple camera angles
Region code indicator
Note:Note:
Note:Note:
Note:
• When playing back a CD-G (Graphics) or CD EXTRA disc, the audio portion will be
played, but the graphic images will not be shown.
DISC FORMADISC FORMA
DISC FORMADISC FORMA
DISC FORMA
TSTS
TSTS
TS
DVDS
[8CM/12CM DISC]
AUDIO CDS
[8CM/12CM DISC]
CD-R/CD-RW
Compatible
REGION MANAGEMENT INFORMAREGION MANAGEMENT INFORMA
REGION MANAGEMENT INFORMAREGION MANAGEMENT INFORMA
REGION MANAGEMENT INFORMA
TIONTION
TIONTION
TION
Region Management Information: This unit is designed and manufactured to
respond to the Region Management Information that is encoded on DVDs. If
the region number printed on the DVD does not correspond to the region
number of this unit, this unit cannot play that disc.
The region number of this unit is
.
Note:Note:
Note:Note:
Note:
• Numbers identify each title, chapter, and track on a disc. Most discs have
these numbers recorded on them, but some do not.
Notes on Unauthorized Discs:Notes on Unauthorized Discs:
Notes on Unauthorized Discs:Notes on Unauthorized Discs:
Notes on Unauthorized Discs:
You may not be able to play some DVD on this unit if they were purchased
from outside your geographic area or made for business purposes.
JPG-CD
picture viewer
DISC FUNCTION OR OPERADISC FUNCTION OR OPERA
DISC FUNCTION OR OPERADISC FUNCTION OR OPERA
DISC FUNCTION OR OPERA
TION THATION THA
TION THATION THA
TION THA
T IS NOT AVT IS NOT AV
T IS NOT AVT IS NOT AV
T IS NOT AV
AILABLEAILABLE
AILABLEAILABLE
AILABLE
When the symbol appears on the screen, it indicates that the function or operation
attempted is not available at that time. This occurs because the DVD manufacturer
determines the specific functions. Certain functions may not be available on some
discs. Be sure to read the documentation provided with the DVD.
1
7
Many universal remote controls have a “learning” feature. We recommend
you use that feature to program the remote control.
For any questions or problems related to programming a universal remote
control, you must contact the customer service department of the universal
remote control manufacturer for assistance, or refer to the instructions
included with the universal remote control. We cannot offer assistance in
programming universal remote controls.
REMOTE CONTROLREMOTE CONTROL
REMOTE CONTROLREMOTE CONTROL
REMOTE CONTROL
USING THE REMOTE CONTROLUSING THE REMOTE CONTROL
USING THE REMOTE CONTROLUSING THE REMOTE CONTROL
USING THE REMOTE CONTROL
• Point the remote control at the REMOTE SENSOR located on the unit.
• When using this unit in bright light, the infrared REMOTE CONTROL
SENSOR may not work properly.
• The recommended effective distance for using the remote control is
about 16 feet.
TO CHANGE THE REMOTE CONTROL BATO CHANGE THE REMOTE CONTROL BA
TO CHANGE THE REMOTE CONTROL BATO CHANGE THE REMOTE CONTROL BA
TO CHANGE THE REMOTE CONTROL BA
TTERIESTTERIES
TTERIESTTERIES
TTERIES
1. Open the battery door. 2. Insert two “AA” batteries.
BABA
BABA
BA
TTERTTER
TTERTTER
TTER
Y REPLACEMENTY REPLACEMENT
Y REPLACEMENTY REPLACEMENT
Y REPLACEMENT
When the batteries become weak, the operating distance of the remote control will
be greatly reduced and you will need to replace the batteries.
Note:Note:
Note:Note:
Note: • If the remote control is not going to be used for a long time, remove
the batteries to avoid damage caused by battery leakage corrosion.
• Do not mix old and new batteries. Do not mix ALKALINE, standard (CARBONZINC) or rechargeable (NICKEL-CADMIUM) batteries.
WARNING:WARNING:
WARNING:WARNING:
WARNING: Do not dispose of batteries in a fire. They may leak
and/or explode.
ACCESSORIESACCESSORIES
ACCESSORIESACCESSORIES
ACCESSORIES
PLEASE LOCATE THE INCLUDED ACCESSORIES.
• To order replacement units, call customer service at visit
http://www.1800customersupport.com/trutech
Remote control ............................................................................... x 1
AA batteries ................................................................................... x 2
Need More Help?Need More Help?
Need More Help?Need More Help?
Need More Help?
DO NOT RETURN THIS TO THE STORE
Please call Customer Service at visit online help at
http://www.1800customersupport.com/trutech
Specifications and appearance are subject to change without notice.
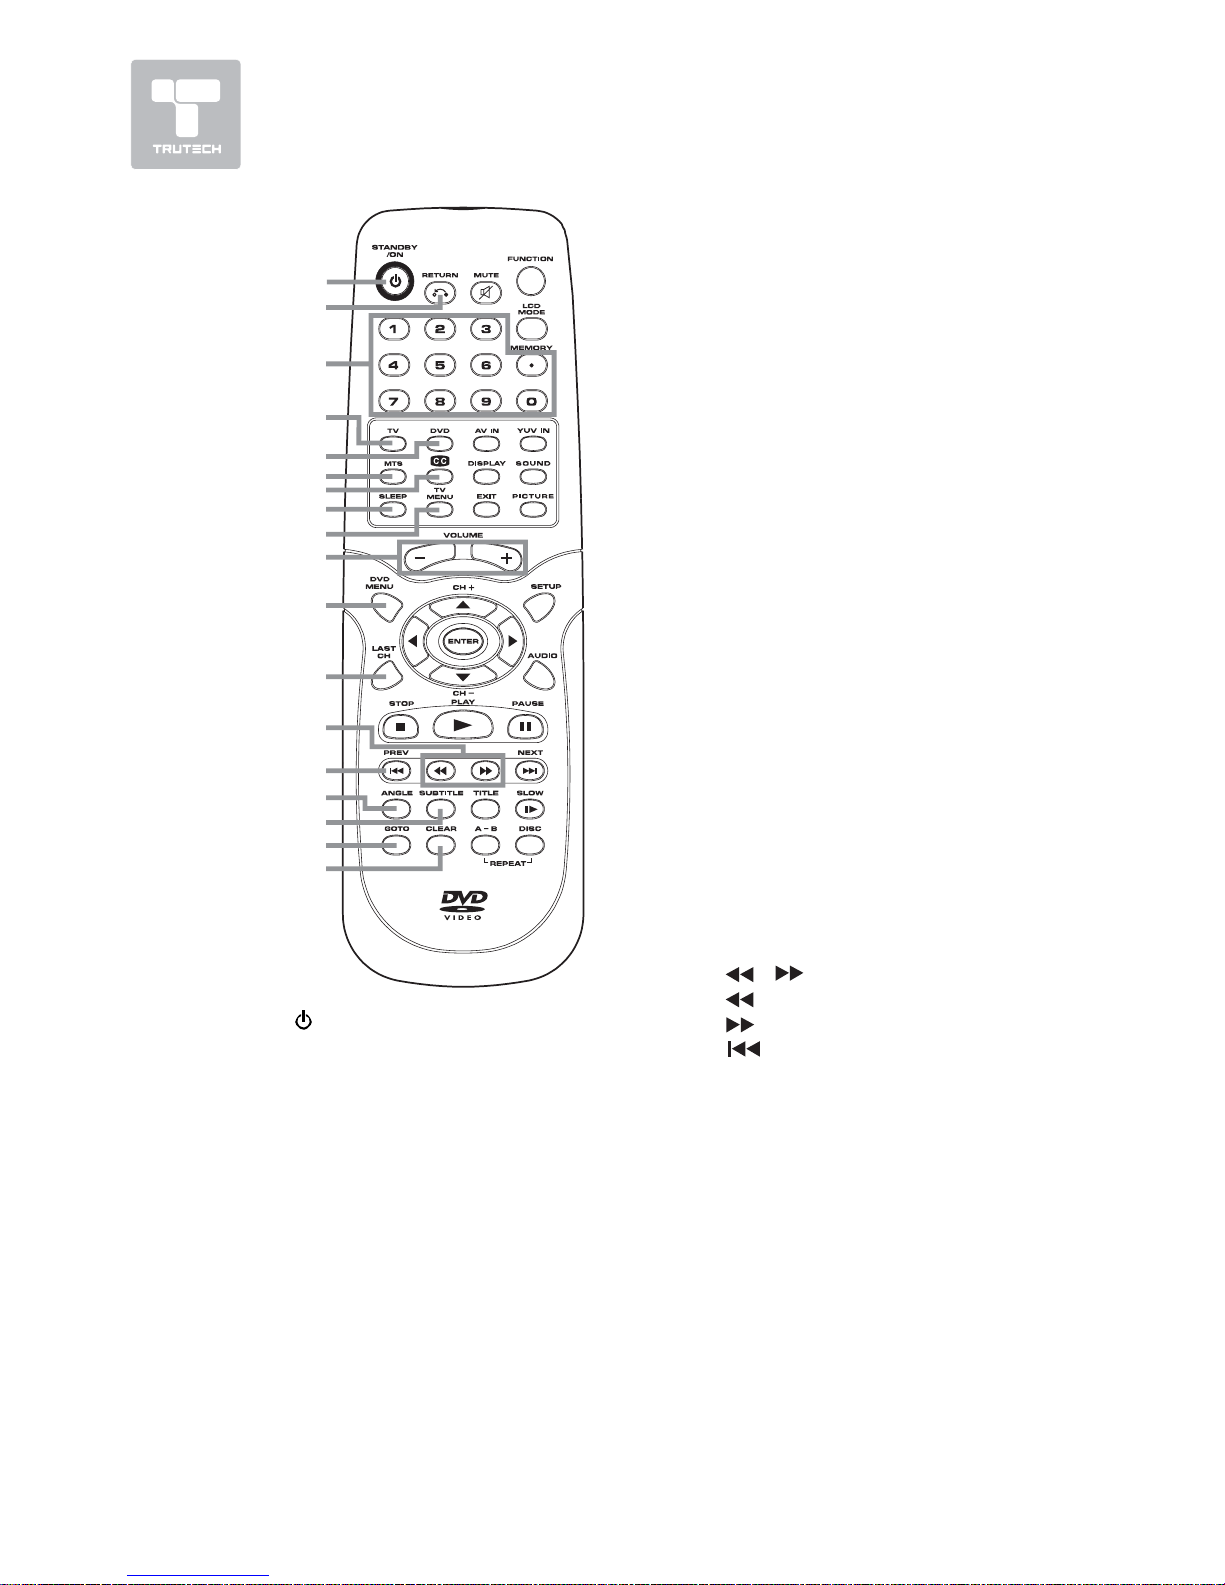
8
REMOTE CONTROL REFERENCE GUIDEREMOTE CONTROL REFERENCE GUIDE
REMOTE CONTROL REFERENCE GUIDEREMOTE CONTROL REFERENCE GUIDE
REMOTE CONTROL REFERENCE GUIDE
1)1)
1)1)
1)
ST ST
ST ST
ST
ANDBY/ON ButtonANDBY/ON Button
ANDBY/ON ButtonANDBY/ON Button
ANDBY/ON Button
Press to turn ON the unit or put
it in STANDBY (OFF) mode.
2)2)
2)2)
2)
RETURN ButtonRETURN Button
RETURN ButtonRETURN Button
RETURN Button
Press to return to normal
operation after using the SETUP
menu of a DVD.
3)3)
3)3)
3)
Number (0 - 9 and dot) ButtonsNumber (0 - 9 and dot) Buttons
Number (0 - 9 and dot) ButtonsNumber (0 - 9 and dot) Buttons
Number (0 - 9 and dot) Buttons
In DVD mode, use when creating
programs and locating a title/
chapter or specific time.
In TV and other modes, use
when inputting TV channel
number and entering a parental
control password.
MEMORMEMOR
MEMORMEMOR
MEMOR
YY
YY
Y
: :
: :
: Set predetermined
playback.
DOTDOT
DOTDOT
DOT
::
::
: Digital TV channels (ie 11.3
or 12.7)
4)4)
4)4)
4)
TV ButtonTV Button
TV ButtonTV Button
TV Button
Press to select TV mode.
5)5)
5)5)
5)
DVD ButtonDVD Button
DVD ButtonDVD Button
DVD Button
Press to select DVD mode.
6)6)
6)6)
6)
MTS ButtonMTS Button
MTS ButtonMTS Button
MTS Button
Press to select MONO sound,
STEREO sound and Secondary
Audio Program (SAP).
7)7)
7)7)
7)
CC ButtonCC Button
CC ButtonCC Button
CC Button
Press to activate the Closed
Captioning feature. This function
only works on programs
broadcast with captions.
8)8)
8)8)
8)
SLEEP ButtonSLEEP Button
SLEEP ButtonSLEEP Button
SLEEP Button
Press to set the SLEEP timer. The
unit will remain on for the time
that is set, and will automatically
shut off afterwards.
9)9)
9)9)
9)
TV MENU ButtonTV MENU Button
TV MENU ButtonTV MENU Button
TV MENU Button
Press to display the on-screen
TV menu.
10)10)
10)10)
10)
VOLUME (–/+) ButtonsVOLUME (–/+) Buttons
VOLUME (–/+) ButtonsVOLUME (–/+) Buttons
VOLUME (–/+) Buttons
Press to adjust the volume level.
11)11)
11)11)
11)
DVD MENU ButtonDVD MENU Button
DVD MENU ButtonDVD MENU Button
DVD MENU Button
While viewing a DVD, press to
enter the main menu.
12)12)
12)12)
12)
LAST CH ButtonLAST CH Button
LAST CH ButtonLAST CH Button
LAST CH Button
Press to switch repeatedly
between the last two channels
displayed.
13)13)
13)13)
13)
//
//
/
Buttons Buttons
Buttons Buttons
Buttons
: Fast reverse playback.
: Fast forward playback.
14)14)
14)14)
14)
PREV Button PREV Button
PREV Button PREV Button
PREV Button
Press to select previous chapters
or tracks on a disc.
15)15)
15)15)
15)
ANGLE ButtonANGLE Button
ANGLE ButtonANGLE Button
ANGLE Button
Press to switch the camera angle
of the video presentation when
scenes with multiple camera
angles are recorded on a DVD.
16)16)
16)16)
16)
SUBTITLE ButtonSUBTITLE Button
SUBTITLE ButtonSUBTITLE Button
SUBTITLE Button
Press to select one of the subtitle
languages programmed on a DVD.
17)17)
17)17)
17)
GOTO ButtonGOTO Button
GOTO ButtonGOTO Button
GOTO Button
Press to skip directly to a
specific location on a DVD/CD.
18)18)
18)18)
18)
CLEAR ButtonCLEAR Button
CLEAR ButtonCLEAR Button
CLEAR Button
Press to clear input selections.
1
2
3
4
5
6
7
8
9
10
11
12
13
14
15
16
17
18
9
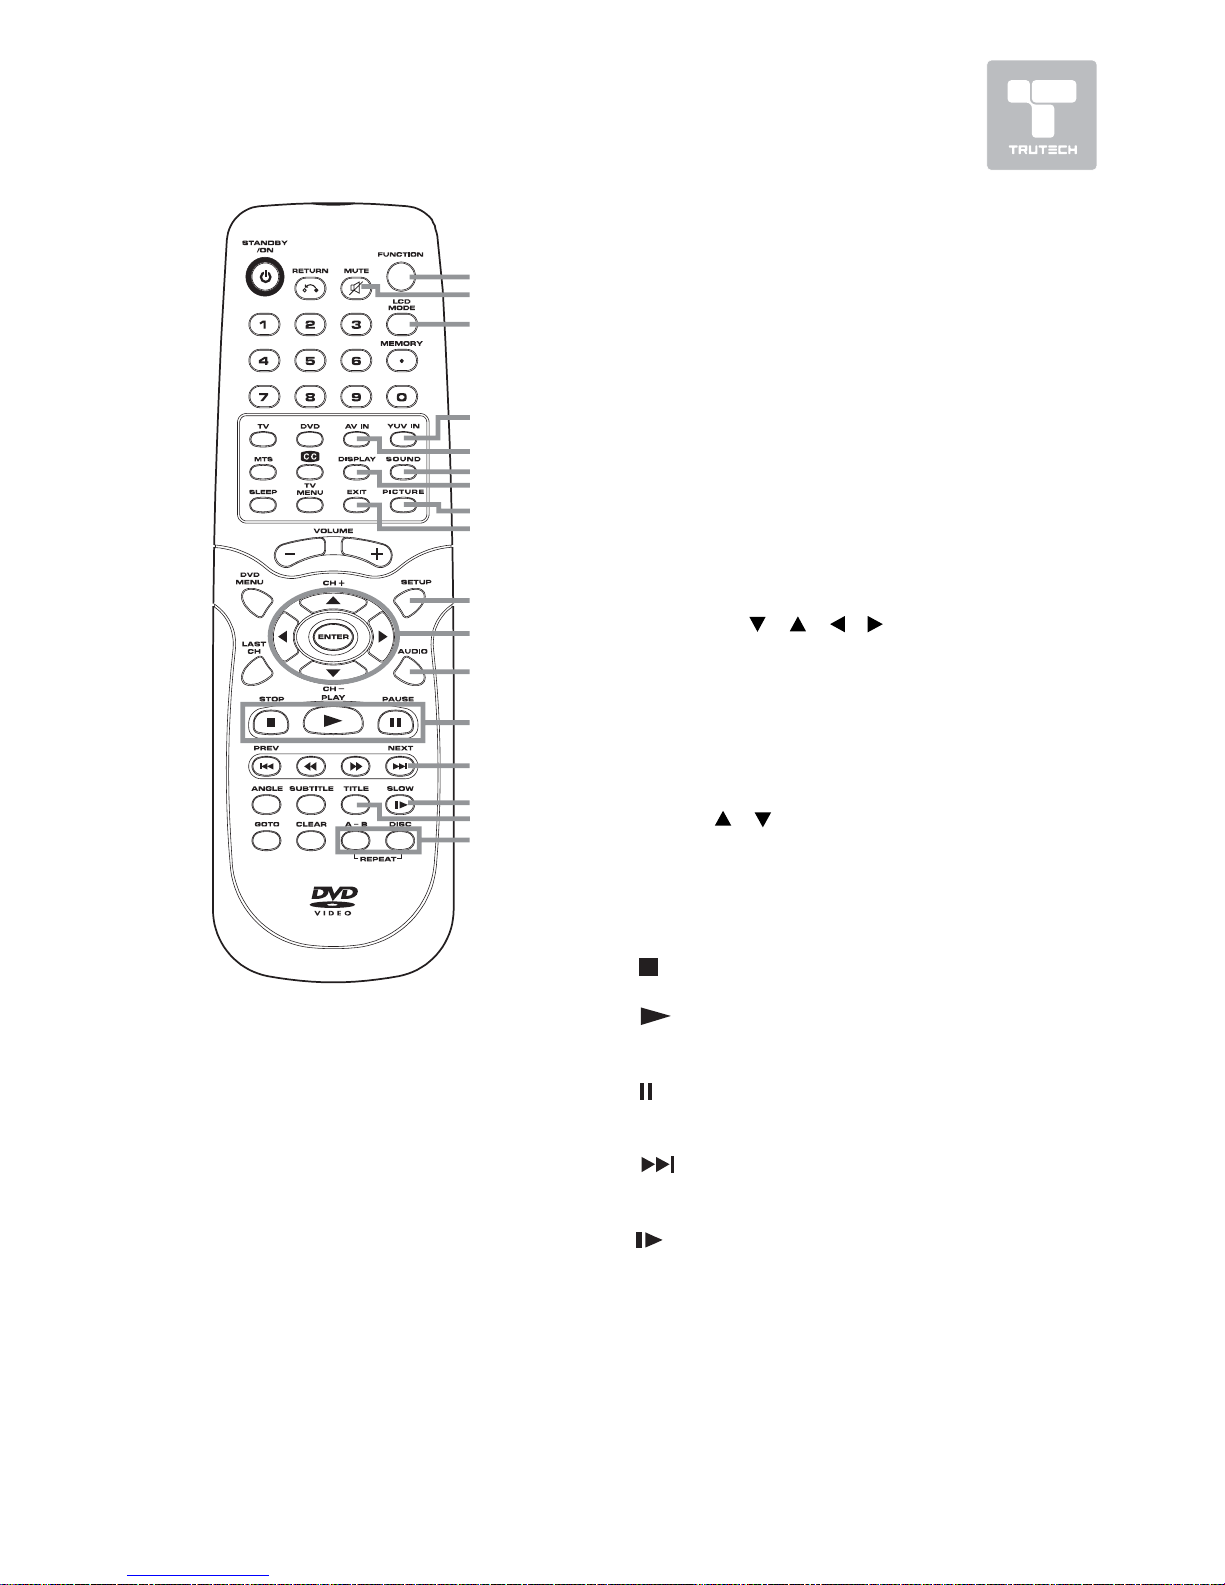
19)19)
19)19)
19)
FUNCTION ButtonFUNCTION Button
FUNCTION ButtonFUNCTION Button
FUNCTION Button
Press to switch between TV /
AV IN / YUV IN / DVD / PC IN.
20)20)
20)20)
20)
MUTE ButtonMUTE Button
MUTE ButtonMUTE Button
MUTE Button
Press to mute the sound. Press
again to cancel mute.
21)21)
21)21)
21)
LCD MODE ButtonLCD MODE Button
LCD MODE ButtonLCD MODE Button
LCD MODE Button
Press to set the size of the LCD
display.
22)22)
22)22)
22)
YUV IN ButtonYUV IN Button
YUV IN ButtonYUV IN Button
YUV IN Button
Press to select source connected
to YUV IN.
23)23)
23)23)
23)
AV IN ButtonAV IN Button
AV IN ButtonAV IN Button
AV IN Button
Press to select source connected
to AV IN.
24)24)
24)24)
24)
SOUND ButtonSOUND Button
SOUND ButtonSOUND Button
SOUND Button
Press to select from preset sound
settings (Personal, Standard, Voice,
Music, Theater) to match the type
of show you are watching.)
25)25)
25)25)
25)
DISPLADISPLA
DISPLADISPLA
DISPLA
Y ButtonY Button
Y ButtonY Button
Y Button
Press to change disc status
information displayed on the screen.
26)26)
26)26)
26)
PICTURE ButtonPICTURE Button
PICTURE ButtonPICTURE Button
PICTURE Button
Press to select from preset
screen display settings to match
the type of show you are watching
(Standard, Dynamic, Personal,
Soft & Movie)
27)27)
27)27)
27)
EXIT ButtonEXIT Button
EXIT ButtonEXIT Button
EXIT Button
Press to return to previous menu
or exit the menu and return
directly to normal viewing.
28)28)
28)28)
28)
SETUP ButtonSETUP Button
SETUP ButtonSETUP Button
SETUP Button
Press to enter and exit the
SETUP menu of the DVD player.
29)29)
29)29)
29)
CURSOR (CURSOR (
CURSOR (CURSOR (
CURSOR (
, ,
, ,
,
, ,
, ,
,
, ,
, ,
,
) Buttons) Buttons
) Buttons) Buttons
) Buttons
Press to highlight selections on a
menu screen and adjust certain
settings.
ENTER ButtonENTER Button
ENTER ButtonENTER Button
ENTER Button
Press to confirm selections on
a menu screen.
CH+/CH– ButtonCH+/CH– Button
CH+/CH– ButtonCH+/CH– Button
CH+/CH– Button
Press
/ to change the TV
channels.
30)30)
30)30)
30)
AUDIO ButtonAUDIO Button
AUDIO ButtonAUDIO Button
AUDIO Button
Press to select audio soundtracks
of a DVD or change the output
mode of a CD.
31)31)
31)31)
31)
STOP Button STOP Button
STOP Button STOP Button
STOP Button
Press to stop playing a disc.
PLA PLA
PLA PLA
PLA
Y ButtonY Button
Y ButtonY Button
Y Button
Press to start and resume
playback of a disc.
P P
P P
P
AUSE ButtonAUSE Button
AUSE ButtonAUSE Button
AUSE Button
Press to pause playback and
single frame advance.
32)32)
32)32)
32)
NEXT Button NEXT Button
NEXT Button NEXT Button
NEXT Button
Press to select next title,
chapter or track on a disc.
33)33)
33)33)
33)
SLOW Button SLOW Button
SLOW Button SLOW Button
SLOW Button
Press to play a DVD in slow-motion.
34)34)
34)34)
34)
TITLE ButtonTITLE Button
TITLE ButtonTITLE Button
TITLE Button
Press to select the title menu
screen.
35)35)
35)35)
35)
REP A-B ButtonREP A-B Button
REP A-B ButtonREP A-B Button
REP A-B Button
Press to perform point-to-point
repeat playback on a DVD or CD.
REP DISC ButtonREP DISC Button
REP DISC ButtonREP DISC Button
REP DISC Button
Press to repeat chapter of a DVD
or repeat single track or whole CD.
19
20
21
22
23
24
25
26
27
28
29
30
31
32
33
34
35
REMOTE CONTROL REFERENCE GUIDEREMOTE CONTROL REFERENCE GUIDE
REMOTE CONTROL REFERENCE GUIDEREMOTE CONTROL REFERENCE GUIDE
REMOTE CONTROL REFERENCE GUIDE
10
14
12
13
6
7
8
9
10
11
1
15
2
4
5
3
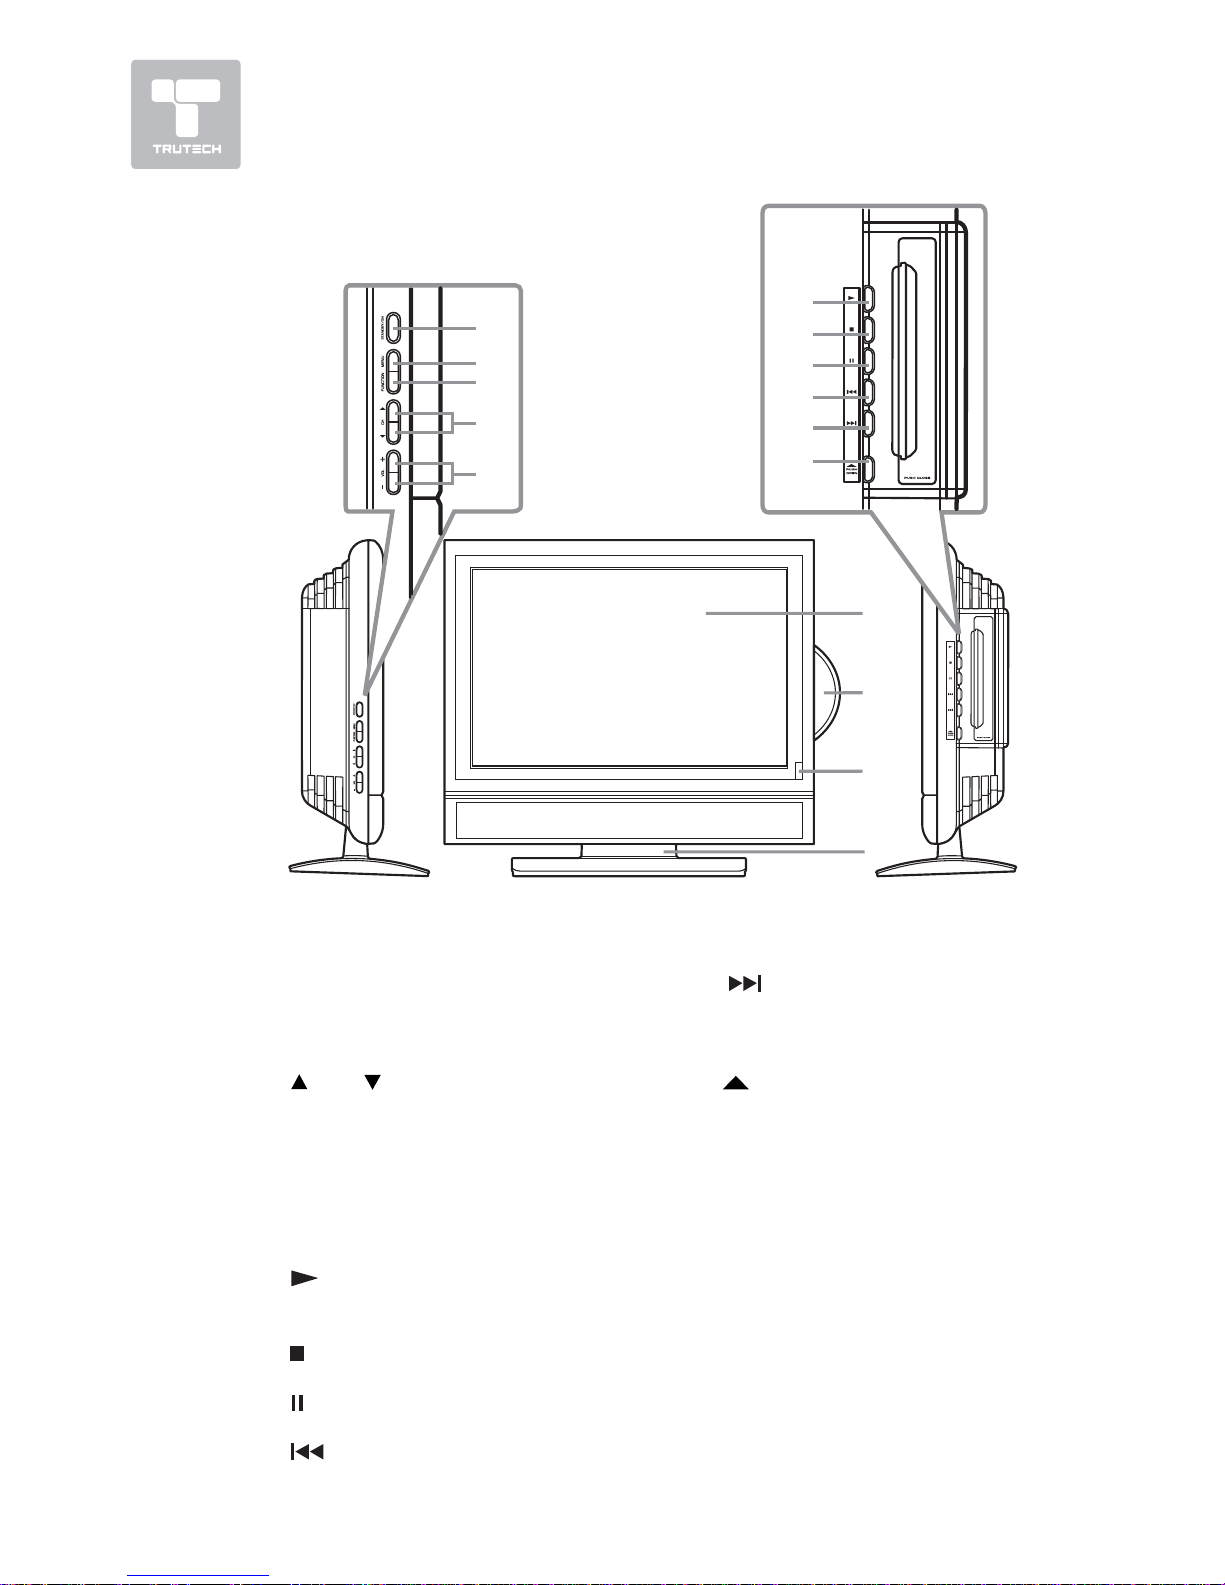
UNIT REFERENCE GUIDEUNIT REFERENCE GUIDE
UNIT REFERENCE GUIDEUNIT REFERENCE GUIDE
UNIT REFERENCE GUIDE
FRONTFRONT
FRONTFRONT
FRONT
, LEFT & RIGHT SIDE VIEW, LEFT & RIGHT SIDE VIEW
, LEFT & RIGHT SIDE VIEW, LEFT & RIGHT SIDE VIEW
, LEFT & RIGHT SIDE VIEW
1)1)
1)1)
1)
STST
STST
ST
ANDBY/ON ButtonANDBY/ON Button
ANDBY/ON ButtonANDBY/ON Button
ANDBY/ON Button
Turns the unit on and off.
2)2)
2)2)
2)
MENU ButtonMENU Button
MENU ButtonMENU Button
MENU Button
Enters and exits the TV menu.
3)3)
3)3)
3)
FUNCTION ButtonFUNCTION Button
FUNCTION ButtonFUNCTION Button
FUNCTION Button
Selects TV, AV IN, YUV IN, DVD,
or PC IN.
4)4)
4)4)
4)
CH CH
CH CH
CH
Buttons Buttons
Buttons Buttons
Buttons
Selects a TV channel and
highlights selections (Up & Down)
on the menu screen.
5)5)
5)5)
5)
– VOL + Controls– VOL + Controls
– VOL + Controls– VOL + Controls
– VOL + Controls
Adjusts the volume level and
highlights selections (Left &
Right) on the menu screen.
6)6)
6)6)
6)
PLAY Button PLAY Button
PLAY Button PLAY Button
PLAY Button
Starts or resumes playback of a
disc.
7)7)
7)7)
7)
STOP Button STOP Button
STOP Button STOP Button
STOP Button
Stops playing a disc.
8)8)
8)8)
8)
PAUSE Button PAUSE Button
PAUSE Button PAUSE Button
PAUSE Button
Pauses playback and frame advance.
9)9)
9)9)
9)
PREV Button PREV Button
PREV Button PREV Button
PREV Button
Goes backwards to previous
chapters/tracks.
Press and hold to fast reverse
playback.
10)10)
10)10)
10)
NEXT Button NEXT Button
NEXT Button NEXT Button
NEXT Button
Advances chapters/tracks.
Press and hold to fast forward
playback.
11)11)
11)11)
11)
PUSH OPEN Button PUSH OPEN Button
PUSH OPEN Button PUSH OPEN Button
PUSH OPEN Button
Opens the disc door.
12)12)
12)12)
12)
Color LCD ScreenColor LCD Screen
Color LCD ScreenColor LCD Screen
Color LCD Screen
13)13)
13)13)
13)
Disc DoorDisc Door
Disc DoorDisc Door
Disc Door
Closes the disc door.
14)14)
14)14)
14)
STANDBY IndicatorSTANDBY Indicator
STANDBY IndicatorSTANDBY Indicator
STANDBY Indicator
Indicates whether the unit is ON
or in STANDBY (OFF) mode.
Light On: The unit is in STANDBY.
Light Off: The unit is turned ON.
REMOTE CONTROL SENSORREMOTE CONTROL SENSOR
REMOTE CONTROL SENSORREMOTE CONTROL SENSOR
REMOTE CONTROL SENSOR
Do not block this sensor or
remote control will not work.
15)15)
15)15)
15)
Removable Base StandRemovable Base Stand
Removable Base StandRemovable Base Stand
Removable Base Stand
11
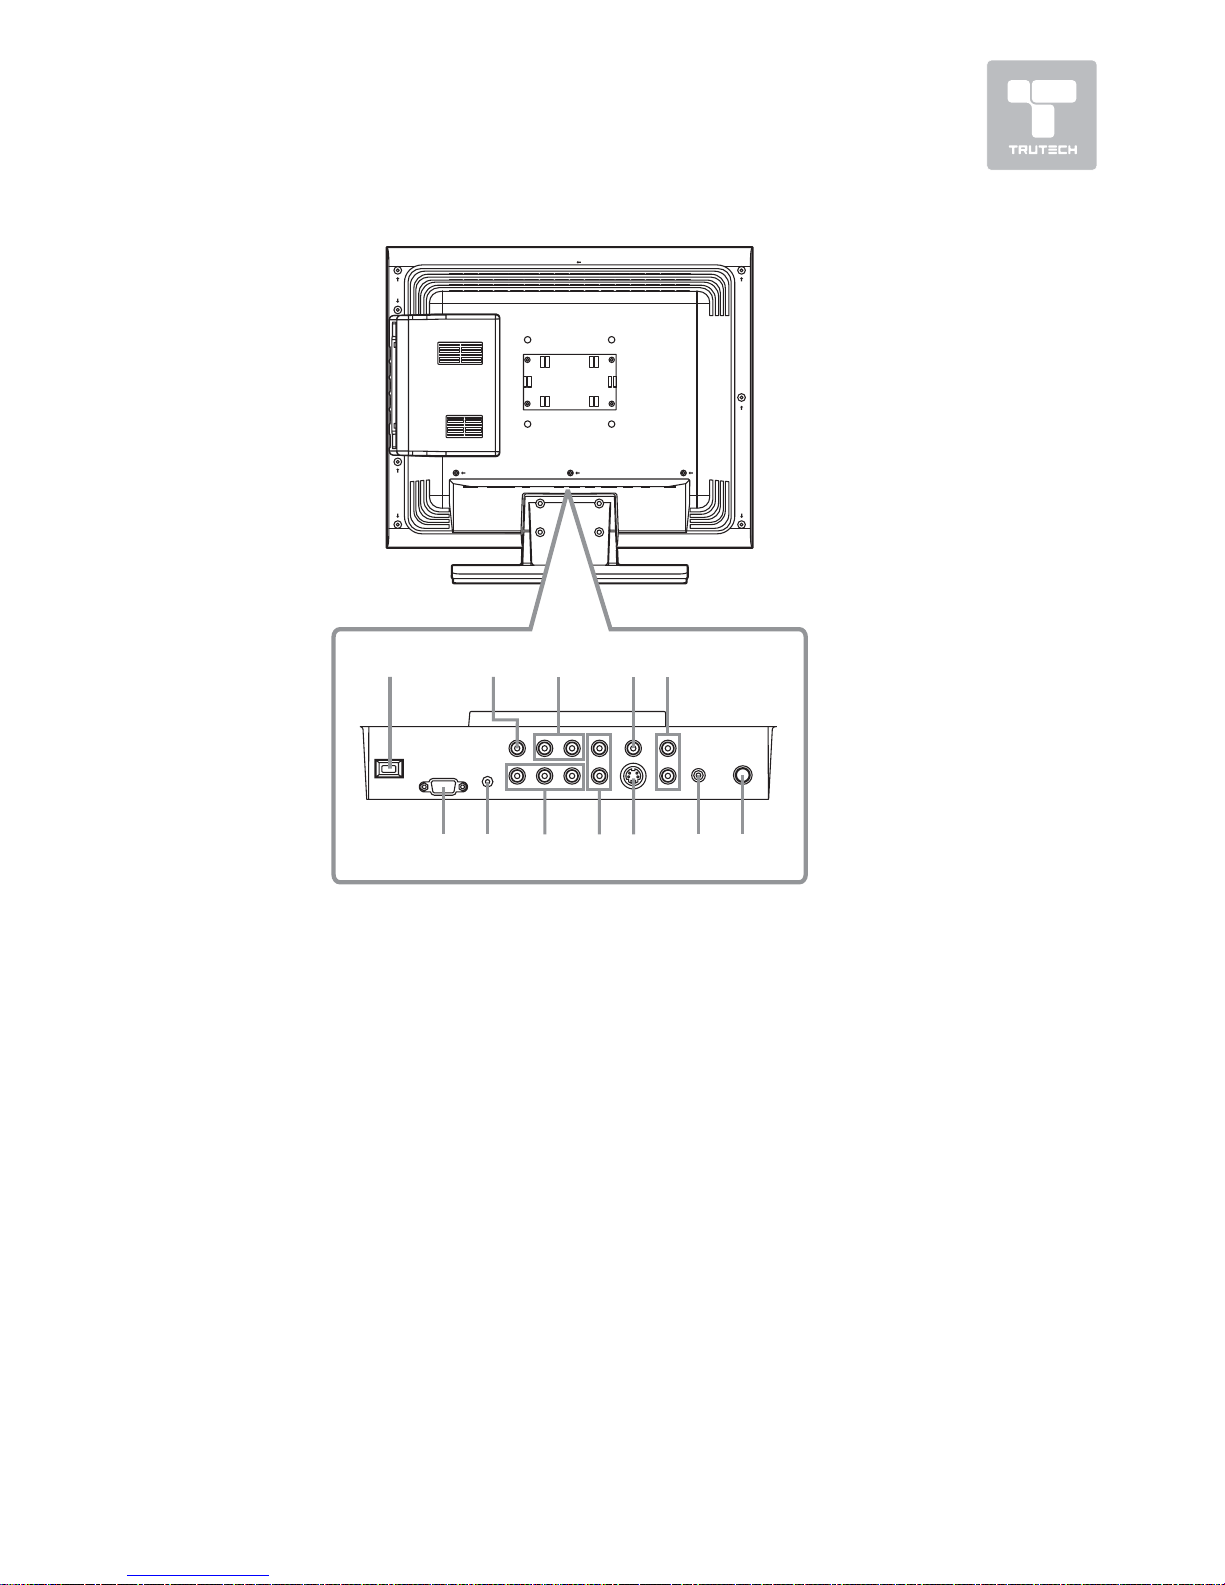
BACK & BOTTOM VIEWBACK & BOTTOM VIEW
BACK & BOTTOM VIEWBACK & BOTTOM VIEW
BACK & BOTTOM VIEW
UNIT REFERENCE GUIDEUNIT REFERENCE GUIDE
UNIT REFERENCE GUIDEUNIT REFERENCE GUIDE
UNIT REFERENCE GUIDE
16)16)
16)16)
16)
AC Power CordAC Power Cord
AC Power CordAC Power Cord
AC Power Cord
17)17)
17)17)
17)
AV OUT Video Output JackAV OUT Video Output Jack
AV OUT Video Output JackAV OUT Video Output Jack
AV OUT Video Output Jack
18)18)
18)18)
18)
AV OUT Audio Output JacksAV OUT Audio Output Jacks
AV OUT Audio Output JacksAV OUT Audio Output Jacks
AV OUT Audio Output Jacks
(Left/Right)(Left/Right)
(Left/Right)(Left/Right)
(Left/Right)
19)19)
19)19)
19)
AV IN Video Input JackAV IN Video Input Jack
AV IN Video Input JackAV IN Video Input Jack
AV IN Video Input Jack
20)20)
20)20)
20)
AV IN Audio Input Jacks (Left/AV IN Audio Input Jacks (Left/
AV IN Audio Input Jacks (Left/AV IN Audio Input Jacks (Left/
AV IN Audio Input Jacks (Left/
Right)Right)
Right)Right)
Right)
21)21)
21)21)
21)
PC IN MONITOR/VGA JackPC IN MONITOR/VGA Jack
PC IN MONITOR/VGA JackPC IN MONITOR/VGA Jack
PC IN MONITOR/VGA Jack
22)22)
22)22)
22)
PC IN Audio JackPC IN Audio Jack
PC IN Audio JackPC IN Audio Jack
PC IN Audio Jack
23)23)
23)23)
23)
YUV IN Component Video InputYUV IN Component Video Input
YUV IN Component Video InputYUV IN Component Video Input
YUV IN Component Video Input
Jacks (Y/PJacks (Y/P
Jacks (Y/PJacks (Y/P
Jacks (Y/P
BB
BB
B
/P/P
/P/P
/P
RR
RR
R
))
))
)
24)24)
24)24)
24)
YUV IN Audio Input Jacks (Left/YUV IN Audio Input Jacks (Left/
YUV IN Audio Input Jacks (Left/YUV IN Audio Input Jacks (Left/
YUV IN Audio Input Jacks (Left/
Right)Right)
Right)Right)
Right)
25)25)
25)25)
25)
AV IN S-Video Input JackAV IN S-Video Input Jack
AV IN S-Video Input JackAV IN S-Video Input Jack
AV IN S-Video Input Jack
26)26)
26)26)
26)
Headphone JackHeadphone Jack
Headphone JackHeadphone Jack
Headphone Jack
27)27)
27)27)
27)
TV Antenna Cable Terminal -TV Antenna Cable Terminal -
TV Antenna Cable Terminal -TV Antenna Cable Terminal -
TV Antenna Cable Terminal Coaxial TV Antenna InputCoaxial TV Antenna Input
Coaxial TV Antenna InputCoaxial TV Antenna Input
Coaxial TV Antenna Input
16 17 18 19
21 22 23 24 25 27
20
26
 Loading...