

Page 1
TRUST 850F VIBRAFORCE FEEDBACK SIGHTFIGHTER
1
UK
Instructions when using for the first time Chapter
1. Uninstalling old drivers and devices (3.1)
2. Installing the driver in Windows (3.2)
3. Installing DirectX 8.1 in Windows (3.3)
4. Connecting the gamepad (3.4)
5. Use (4)
1 Introduction
This instruction manual is for users of the TRUST 850F VIBRAFORCE FEEDBACK
SIGHTFIGHTER. The TRUST 850F VIBRAFORCE FEEDBACK SIGHTFIGHTER
can be used to play games. The built-in Vibration Feedback function gives the
gamepad increased realism and better control over the games.
2 Safety
Carefully read the following instructions before use:
- The TRUST 850F VIBRAFORCE FEEDBACK SIGHTFIGHTER does not
require any special maintenance. Use a slightly damp, soft cloth to clean the
gamepad.
- Do not use aggressive substances, such as petrol or white spirit, to clean the
device. These may harm the material.
- Do not submerge the device in liquid. This may be dangerous and will
damage the device. Do not use this device near water.
- Make sure nothing is placed on the cable. Do not use this device in an area
where the cable can become worn or damaged as a result of people walking
over it.
- Do not repair this device yourself. If you open this device, you may touch live
components.
- Under the following circumstances, have the device repaired by qualified
personnel:
- The cable or plug is damaged or worn.
- The device has come into contact with rain, water or another liquid.
2.1 Vibration Feedback
Note: Playing games using the Vibration Feedback function for long
periods of time may eventually lead to physical injury. It is
strongly recommended to take a break after playing for no
longer than one hour or to temporarily turn off the Vibration
Feedback function. The Vibration Feedback function can be
turned off in the ‘Game Controller’ settings in the Windows
Control Panel. See chapter 4.2 for more information concerning
turning off the vibration.
Page 2

TRUST 850F VIBRAFORCE FEEDBACK SIGHTFIGHTER
2
3 Installation
3.1 Uninstalling old drivers and devices
The most common cause of faults during installation is the presence of a driver for a
similar, old device. The best solution is to first remove all drivers related to old
devices before installing the new driver. Make sure you only delete programs for old,
unused (similar) devices.
1. Enter the Windows ‘Safe Mode’. (Press F8 when starting Windows before the
Windows start screen is displayed and select ‘Safe Mode’.)
2. Click on ‘Start – Settings – Control Panel’ and double-click on the
‘Add/Remove Programs’ icon.
3. Find all the programs for similar, old devices and remove these by clicking on
the ‘Add/Remove’ button. When in the ‘Safe Mode’, it is possible for some
programs to appear twice. In that case, remove all the programs which
appear twice.
4. Restart the computer.
3.2 Installing the driver in Windows 98 / Windows ME /
Windows 2000 / Windows XP
Note: The latest driver can be downloaded from www.trust.com/13017.
Check whether a new driver is available and use this for the
installation.
Note: Make sure all other programs (except Windows) are closed
during the installation.
Note: During installation in Windows 2000 and Windows XP, you may
receive a message saying that the driver has not been signed.
This does not cause a problem for the functionality. Continue
with the installation.
1. Start Windows.
2. Insert the CD-ROM containing the drivers and applications into your CD-ROM
drive.
3. The Trust Soft ware Installer will start auto matically (see figure 1 ). If it does
not start automatically, click on ‘Start – Run’, type [D:\SETUP.EXE] and click
on ‘OK’.
Note: In the example, ‘D’ is used to indicate the CD-ROM drive. Check
which letter is used to indicate your CD-ROM drive.
4. Click on ‘TRUST 850F DRIVER 3.0’ to start the installation of the driver (see
figure 1).
5. The installation window will appear (see figure 2). Click on ‘Next’ and follow
the on-screen instructions.
6. Restart your system after the driver has been installed.
3.3 Installing Microsoft DirectX 8.1
Note: The latest version of DirectX can be downloaded from
www.microsoft.com/directx.
Note: DirectX 8.1 is included as standard in Windows XP. You,
therefore, do not have to install this in Windows XP.
Page 3
TRUST 850F VIBRAFORCE FEEDBACK SIGHTFIGHTER
3
UK
Installing DirectX 8.1 will give you the best support for the Vibration Feedback
functions in games. Follow the instructions given below to do this.
1. Follow points 1 to 3 in chapter 3.2 to start the Trust Software Installer (see
figure 1).
2. Click on ‘MICROSOFT DIRECTX 8.1’ to start th e installation.
3. Follow the on-screen instructions.
4. Restart your computer after the installation.
3.4 Connecting the Trust 850F gamepad
You can connect the 850F VibraForce Feedback SightFighter to your computer after
installing the driver and DirectX 8.1. Follow the instructions given below.
1. Start Windows.
2. Connect the gamepad’s USB cable to a free USB port on your computer.
3. Windows will detect new h ardware and automatically install the correct driver.
In Windows 2000 and Windows XP, select the option to automatically search
for the best driver.
Note: During installation in Windows 2000 and Windows XP, you may
receive a message saying that the driver has not been signed.
This does not cause a problem for the functionality. Continue
with the installation.
Your Trust 850F VibraForce Feedback SightFighter has now been installed. See the
next chapter for instructions on how to test the gamepad.
4 Use
4.1 Gamepad functions
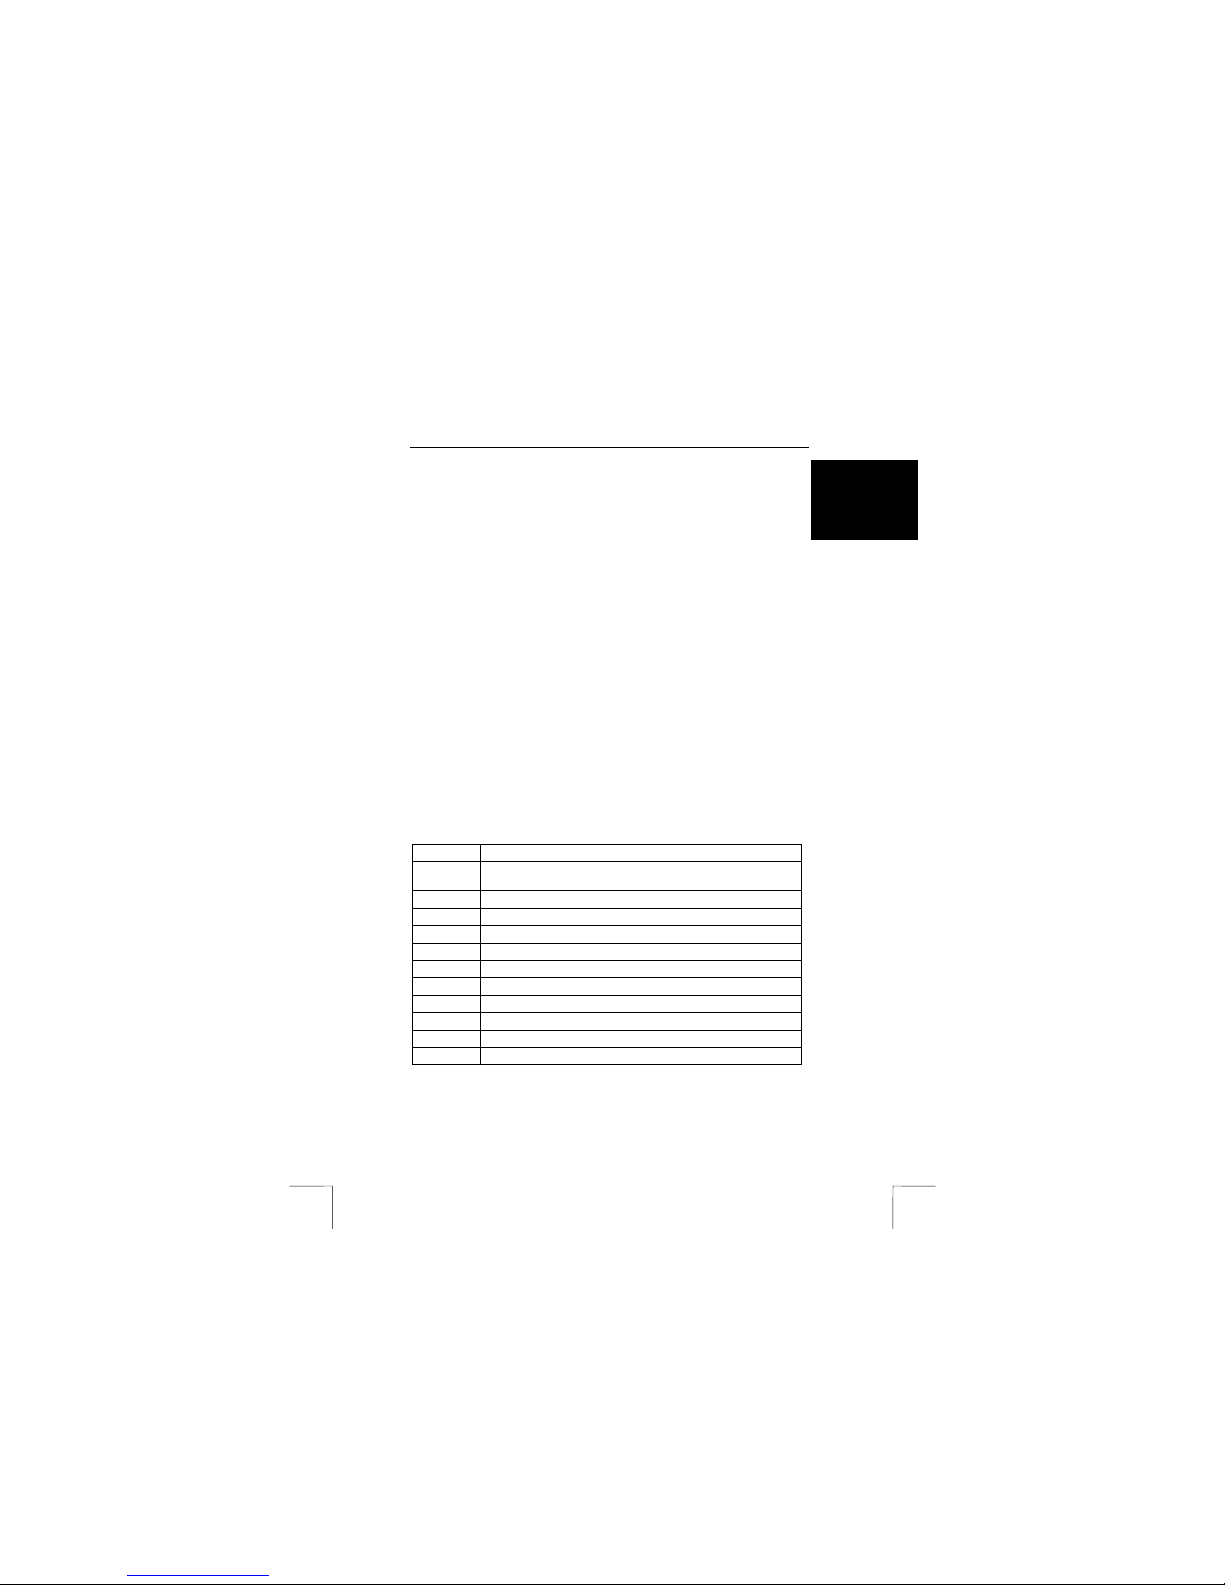
See the table below and figure 3 for a description of the various gamepad functions.
Function Description
A
Direction pad for steering in 8 different directions (operates the
x-axis and the y-axis in game controllers).
B
Throttle (operates the 3rd axis in game controllers).
C
Rudder (operates the 4th axis in game controllers).
D
Action button 1
E
Action button 2
F
Action button 3
G
Action button 6
H
Action button 5
I
Action button 4
J
Action button 8
K
Action button 7
Two motors are built into the gamepad for the Vibration Feedback function. The
vibration can be adjusted via the ‘Game Controller’ settings in the Windows Control
Panel. See chapter 4.2 for more information.
Page 4

TRUST 850F VIBRAFORCE FEEDBACK SIGHTFIGHTER
4
4.2 Testing
The 850F VibraForce Feedback SightFighter has an automatic calibration function.
Therefore, you do not have to calibrate the gamepad. Follow the instructions given
below to test the gamepad in Windows.
1. Click on 'Start - Settings – Control Panel’ and double-click on the ‘Gaming
Options’ icon. The option menu for the game controllers will appear (see
figure 4). The Trust 850F VIBRAFORCE FEEDBACK SIGHTFIGHTER will be
displayed here.
2. Make sure the ID no. for the Trust 850F VIBRAFORCE FEEDBACK
SIGHTFIGHTER is ‘1’. If necessary, click on ‘Change’ to change the ID no. to
‘1’ (if a number of game controllers are connected).
3. Return to the ‘Controllers’ tab, select the Trust 850F VIBRAFORCE
FEEDBACK SIGHTFIGHTER and click on ‘Properties’ (see figure 4).
4. The ‘Test Input’ tab will appear (see figure 5). Here, you can test the x-axis
and the y-axis (direction pad A, press in 8 directions), the throttle (B, operates
the 3rd axis), the rudder (C, operates the 4th axis) and the 8 action buttons.
5. Click on the ‘Vibration’ tab (see figure 6). Here, you can set the strength and
duration of the vibration and test both vibration motors, either separately or
together.
6. Click on the ‘Gain Settings’ tab (see figure 7). Here, you can adjust the
strength of the Vibration Feedback from 0% (off) to 100% for games which
support this function.
Your Trust 850F VibraForce Feedback SightFighter is now ready for use. Also see
the instruction manuals provided with your games for additional information
concerning the programming of the gamepad’s buttons and the Vibration Feedback.
5 Removal
Follow the instructions below if you wish to remove the gamepad.
1. Click on 'Start - Settings – Control Panel’ and double-click on the
‘Add/Remove Programs’ icon.
2. Select the TRUST 850F VIBRAFORCE FEEDBACK SIGHTFIGHTER from
the list and click on ’Add/Remove’.
3. Follow the on-screen instructions to remove the gamepad from your
computer.
4. Remove the gamepad’s USB plug from the USB port on your computer.
5. Restart your computer.
Page 5
TRUST 850F VIBRAFORCE FEEDBACK SIGHTFIGHTER
5
UK
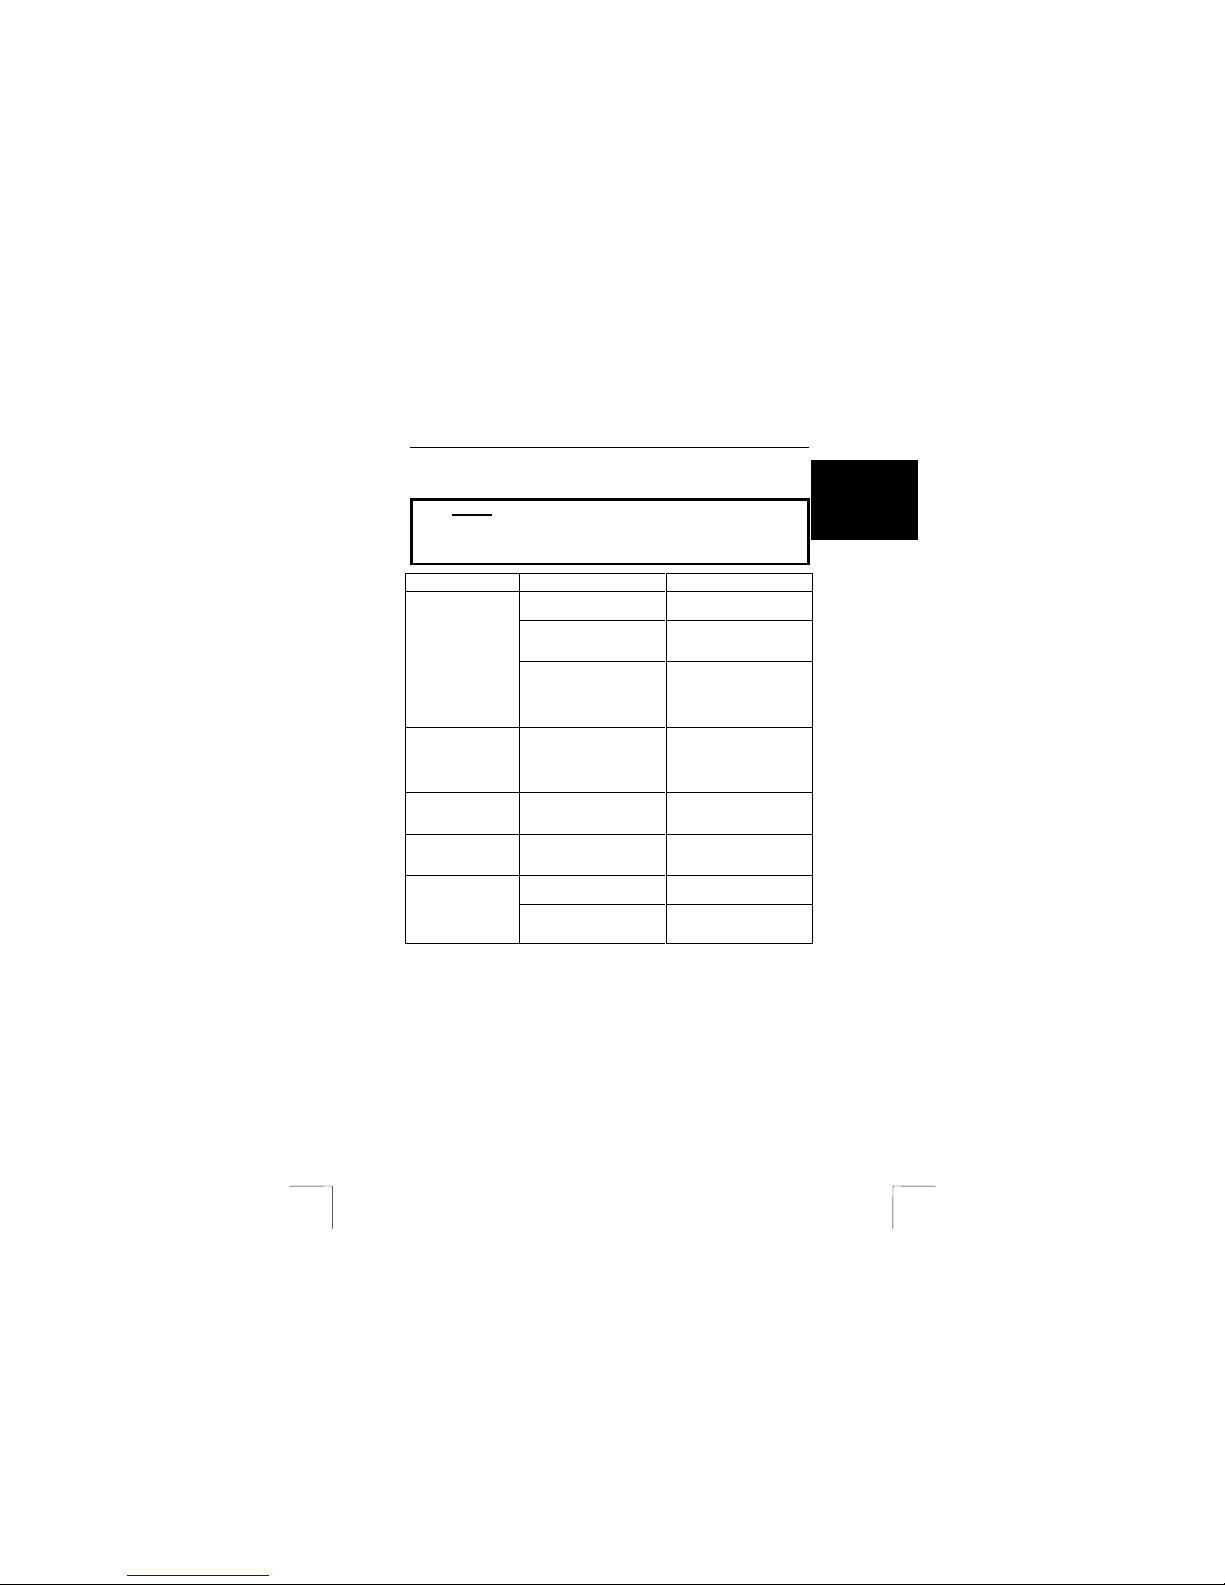
6 Troubleshooting
Method
1. Read the solutions gi ven below.
2. Check for up-to-date FAQ’s, drivers and instruction
manuals on the Internet (www.trust.com/13017).
Problem Cause Possible solution
The cables have not been
connected properly.
Check the connection.
The computer's USB port
does not work.
Delete the USB port from
the ‘Device Manager’ and
re-install it.
Windows does not
detect a new device
after connecting the
gamepad.
The driver has not been
installed correctly.
Disconnect the gamepad
from the USB port and then
install the driver. Next,
reconnect the gamepad to
the USB port.
The gamepad does
not react correctly
in the game .
DirectX 8.0 or a later version
has not been installed.
Install the version of DirectX
8.1 provided with the
gamepad or go to
www.microsoft.com/d irectx
for the latest version.
The game pad does
not react.
The gamepad’s ‘Controller
ID’ no. is not ‘1’ in the
‘Control Panel’. 1
Make sure the gamepad’s
‘Controller ID’ no. is ‘1’ (see
chapter 4.2).
The computer jams
when using USB.
The USB port has shared an
IRQ with another device.
Remove cards from your
computer or divide your
computer differently.
The vibration setting has
been set to 0% (off).
Adjust the strength of the
vibration (see chapter 4.2).
It is possible use
the gamepad, but
the Vibration
Feedback function
does not work.
The game does not support
Vibration Feedback.
Play a different game.
If you still have problems a fter trying these solu tions, please contact one of the Trust
Customer Care Centers. You can find more information at the back of this instruction
manual. Please have the following information available:
• The article number. This is 13017.
• A good description of what does not work.
• A good description of when the problem occurs.
 Loading...