

Page 1
742AV USB2.0 LCD POWER VIDEO
UK
DE
FR
IT
ES
PL
NL
PT
GR
User’s manual
V
1.0
Page 2
742AV USB2.0 LCD POWER VIDEO
UK
DE
FR
IT
ES
PL
NL
PT
GR
Thank you for your purchase. Register your product via our Internet site at
www.trust.com/register, so that you will be eligible for optimal guarantee and service support. You
will also be automatically informed of the development of your and other Trust products.
Page 3
742AV USB2.0 LCD POWER VIDEO
Fig. 1
Fig. 2
Fig. 3 Fig. 4
Page 4
742AV USB2.0 LCD POWER VIDEO
UK
DE
FR
IT
ES
PL
NL
PT
GR
Fig. 5
Fig. 6
Fig. 7
Fig. 8
Fig. 9
Fig. 11
Fig. 10
Page 5

742AV USB2.0 LCD POWER VIDEO
1
UK
Table of contents
1 INTRODUCTION.........................................................................................2
GENERAL COMMENTS REGARDING PHOTOGRAPHY ................................................................2
2 SAFETY......................................................................................................3
2.1 GENERAL INFORMATION.........................................................................................3
2.2 BATTERIES............................................................................................................3
3 APPROVAL................................................................................................ 3
4 DESCRIPTION OF THE CAMERA .............................................................4
5 SETTING THE CAMERA FOR THE FIRST TIME....................................... 5
5.1 ATTACH THE WRIST STRAP.....................................................................................5
5.2 INSERT BATTERIES ................................................................................................5
5.3 TURNING THE CAMERA ON .....................................................................................5
5.4 SETTING THE DATE AND TIME................................................................................. 5
6 USING THE CAMERA ................................................................................6
6.1 TAKING VIDEO CLIPS AND PICTURES ....................................................................... 6
6.2 REVIEWING VIDEO/AUDIO-CLIPS AND PICTURES.......................................................6
7 INSTALL DRIVER (WINDOWS) .................................................................7
DRIVER INSTALLATION WINDOWS 98SE/ME/2000/XP .........................................................7
8 CONNECTING TO A COMPUTER..............................................................7
8.1 ACTIVATING MASS STORAGE (MSD)...................................................................... 7
8.2 COPY PHOTOS/VIDEO-CLIPS TO THE COMPUTER......................................................7
8.3 COPY MP3 FILES TO YOUR CAMERA .......................................................................8
9 INSTALL APPLICATION SOFTWARE (PC ONLY).................................... 8
9.1 PHOTO EXPRESS 4.0.............................................................................................8
9.2 PHOTO EXPLORER 8.0...........................................................................................8
9.3 VIDEO STUDIO 7....................................................................................................9
10 ADVANCED CAMERA USE........................................................................9
10.1 PLAYING MP3 FILES....................................................................................... 9
10.2 MENU BUTTON .............................................................................................10
10.3 SETTINGS MODE...........................................................................................12
10.4 MACRO SELECT DIAL .................................................................................... 13
10.5 SELECTING METERING (STILL-IMAGE MODE)...................................................13
10.6 USING FLASH STROBE (STILL-IMAGE MODE)...................................................14
10.7 CONNECTING THE CAMERA TO A TV ..............................................................14
10.8 WEBCAM INSTALL.........................................................................................14
11 INSTALL TRUST PHOTO SITE................................................................15
Page 6

742AV USB2.0 LCD POWER VIDEO
2
11.1 INSTALL TRUST PHOTO SITE ......................................................................... 15
11.2 USING TRUST PHOTO SITE............................................................................ 15
11.3 USING TRUST PHOTO UPLOAD SOFTWARE..................................................... 16
12 TECHNICAL SPECIFICATIONS...............................................................16
13 TROUBLESHOOTING..............................................................................17
13.1 UNINSTALL OLD DRIVERS AND PRODUCTS...................................................... 17
13.2 CHECKING AFTER INSTALLATION................................................................... 17
13.3 REMOVING CAMERA DRIVER ......................................................................... 18
14 WARRANTY CONDITIONS...................................................................... 21
Use the Quick Installation Guide when using the camera for the first time. This guide
contains the basic instructions you will need to know in order to be able to use this
camera.
1 Introduction
This instruction manual is for users of the TRUST 742AV USB2. 0 LCD POWER
VIDEO. The TRUST 742AV USB2.0 LCD POWER VI DEO can be used to take
photographs, to record live video images, to record voice memos, to play MP3 files or
as a web cam for video- conferencing on the Internet.
The applications supplied with the camera have a wide range of options for browsing
photographs and editing video clips. When the TRUST 742AV USB2.0 LCD PO WER
VIDEO is connected to your computer, it can be accessed directly as a removable
disk. You can open the photographs and video clips, edit them, send them via e-mail,
save them on your computer, etc.
The camera also works with Mac OS 9.x and Mac OS 10.1 or later releases as a
mass storage device.
General comments regarding photography
Test photograph
Before you start photographing a unique event, it is a good idea to f irst take a
number of test photographs. This will help to ensure that the camera works as
required.
No compensation for unsuccessful photographs
No compensation may be claimed for unsuccessful photographs as a result of a
faulty camera, faulty software, etc.
Exchanging photographs and video clips
No guarantees are given that photographs and video clips produced with this camera
can be displayed on other devices or that photograph and video clips produced with
other devices can be displayed using this camera.
Sunlight
Do not aim the camera directly at the sun for a long period of time. T his may damage
the sensor.
Page 7

742AV USB2.0 LCD POWER VIDEO
3
UK
Shaking/knocks
Do not shake the camera or knock it against anything, because this may cause a
fault, unsuccessful photographs, memory incompatibility or the loss of phot ographs
from the memory.
LCD screen
There may sometimes be small black or clear dots visible on the LCD screen. This is
normal and does not affect the photographs. There is no reason to exchange t he
camera if there are 10 dots or less.
Exposing the LCD screen to direct sunlight for a long period of time m ay cause faults.
Lens
Keep the glass of the lens clean. Use a cotton bud to clean the lens. If necessary,
use special cleaning fluid for camera lenses. Camera cleaning fluid can be purchased
from photography shops. Do not use a different type of cleaning product.
2 Safety
2.1 General information
Carefully read the following instructions before use.
• The TRUST 742AV USB2.0 LCD PO WER VIDEO does not require any special
maintenance. Use a slightly damp, soft cloth to clean the camera.
• Do not use aggressive substances, such as white spirit, to clean the device.
These may harm the material.
• Do not submerge the device in liquid. This may be dangerous and will damage
the device. Do not use the device near water.
• Do not repair the device yourself.
2.2 Batteries
1. The alkaline batteries supplied are not rechargeable. Do not try to recharge
them, because this may cause them to explode.
2. Never throw the batteries onto an open fire. The batteries may explode.
3. Never drill holes into the batteries.
4. Keep the batteries out of the reach of small children.
5. Only use AA alkaline batteries with this camera. You can also use rechargeable
AA NiMH batteries (minimum 1800 mAh).
6. When the alkaline batteries are empty, ask your local authorit y where you can
dispose of them.
Note: Standard AA NiCd batteries are unsuitable for use with this device.
Note: Do not use old and new batteries at the same time, because the old
batteries may deplete the new ones.
Note: The batteries should be removed if the camera is not going to be used
for some time. This will save the battery capacity.
3 Approval
Page 8

742AV USB2.0 LCD POWER VIDEO
4
This device meets the essential requirements and other relevant conditions of the
applicable European directives. The Declaration of Conformity (DoC) is available at
www.trust.com/13929/ce.
4 Description of the camera
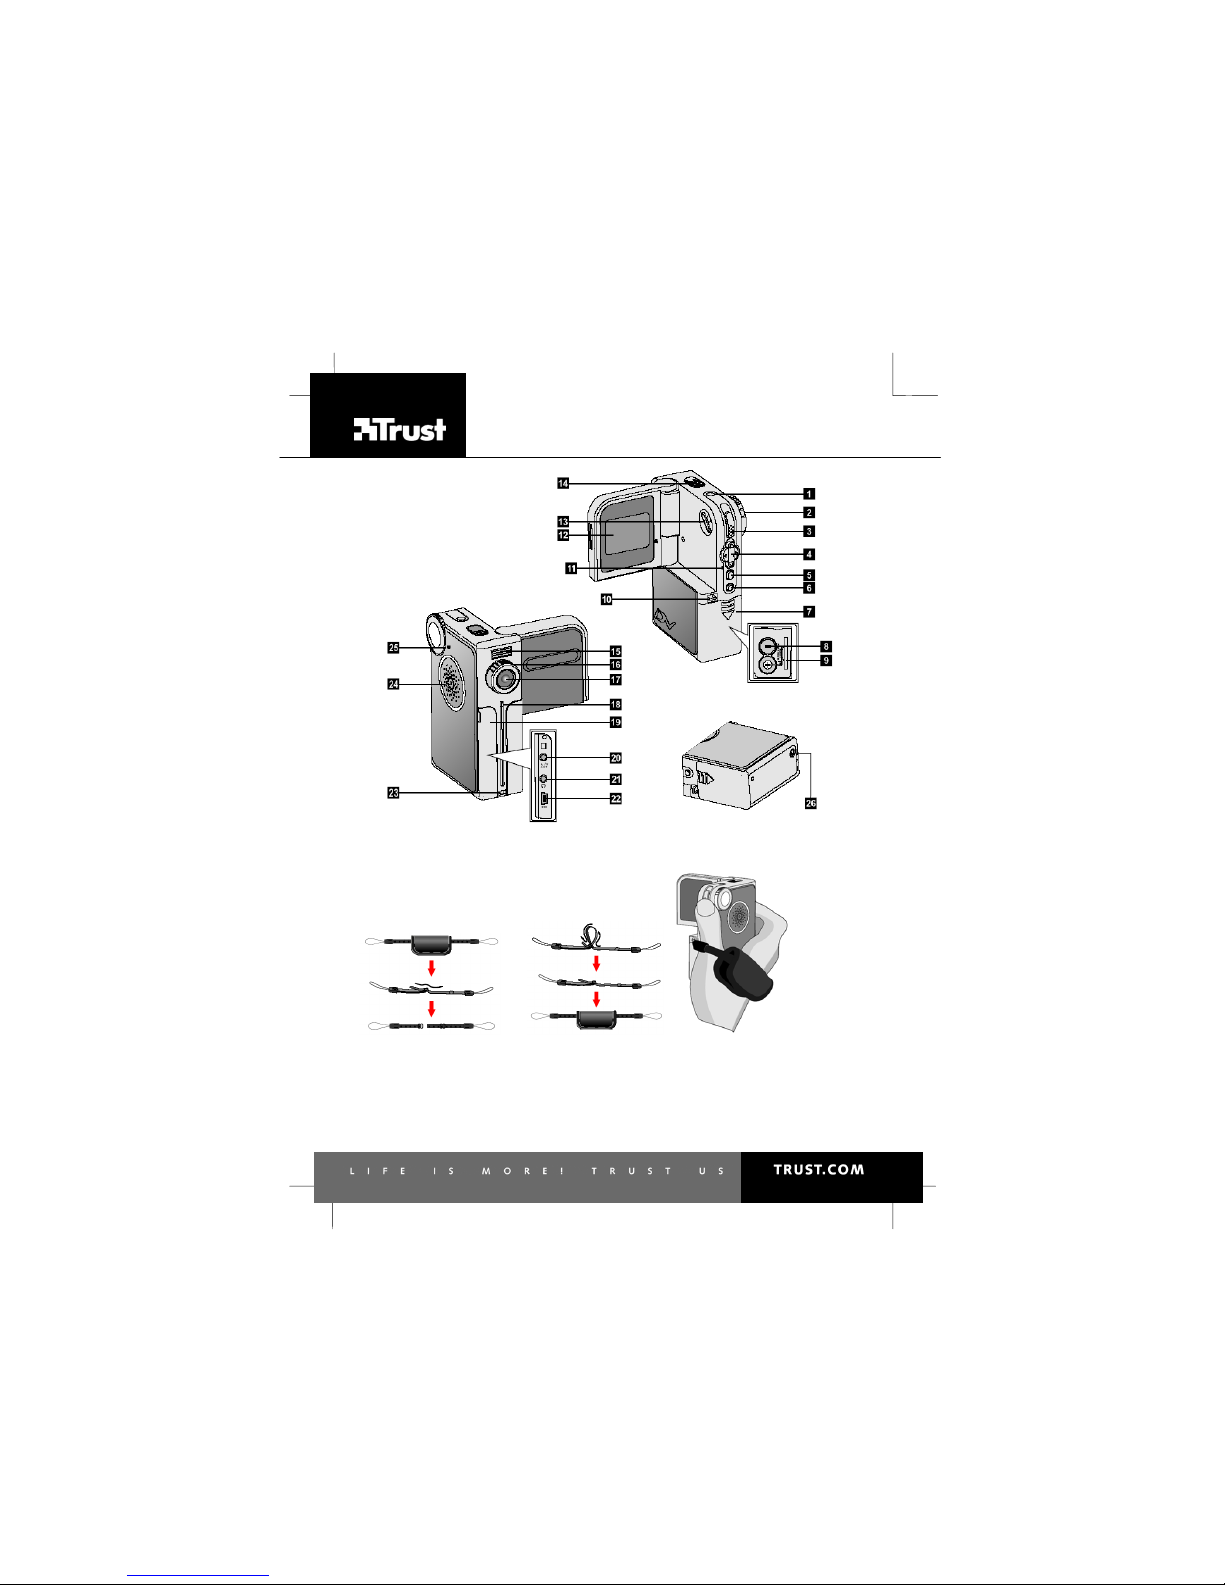
Use table 1 in combination with figure 1.
Item Description Function
1
Power switch On/Off switch.
2
Mode dial
Switches modes:
- Video clip
- Still Image
- Audio recording
- MP3
3
Record / Shutter /
Play / Pause - button
Video clip mode: Record button
Still image mode: Shutter button
Review mode: Play / Pause button
4
Direction buttons Left / Rig ht / Up / Down button
5
Menu / OK button
- Enter to the menu options
- When in menu: OK-button
6
Index button
Review mode: switches between thumbnail
and full-screen mode
7
Battery compartment
cover
Covers batteries
8
Battery compartment
For batteries (see step 1 of the Quick
Installation Guide)
9
Memory card slot Slot for SD/MMC memory card (optional)
10
Strap hook (1) Attach wrist strap here (see chapter 5.1)
11
Status LED
Red: Busy storage (MSD or capture) /
Charging Flash
Green: Ready
12
LCD panel
Operates as:
1) Viewfinder for the camera.
2) Displaying pictures and video clips.
3) Displaying menus.
13
LCD display switch Tur n on/off status indicators
14
Microphone Records sound
15
Flash strobe
Flash (can be used when light is not
sufficient)
16
Macro select dial
Switch focus for short- or long-distance
picture-taking (see chapter 10.3)
17
Lens Image recording sensor
18
Self-timer LED Indicator when using self-timer
19
Connector cover
Covers A/V out, ear-phone and USB
connectors
Page 9
742AV USB2.0 LCD POWER VIDEO
5
UK
Item Description Function
20
A/V out connector Connector for A/V cable ( see chapter 10.5)
21
Earphone connector Connector f or earphone
22
USB connector Connector for USB cable
23
Strap hook (2) Attach wrist strap here (see chapter 5.1)
24
Speaker
When playing a video clip or audio file the
sound can be heard from this part.
25
Mode dial pointer Indicator for mode dial
26
Tripod socket Socket for tripod stand
Table 1: Description of the camera
5 Setting the camera for the first time
5.1 Attach the wrist strap
A wrist strap is supplied with the camera. Carry out the following to attach it to the
camera.
1. Unfasten and separate the strap into two parts (fig. 2).
2. Thread one part of the strap into the hook at the backside of the camera (10,
fig. 1).
3. Thread the other part of the strap into the hook at the f ront of the camera (23,
fig. 1)
4. Fasten the wrist strap as indicated in fig. 3. Moving the ring on the strap to the
right will tighten the strap and vice versa. Use the leather wrap to hold the strap.
5. Hold the camera as shown in fig. 4
5.2 Insert batteries
To install the batteries see step 1 of the Quick Installation Guide.
5.3 Turning the camera on
See step 2 of the Quick Installation Guide.
Note: The LCD screen will turn to black after 1 - 5 minutes of inactivity
depending on the auto-off setting (see chapter 10.2).
5.4 Setting the date and time
When you transfer a photo or video clip to a computer, the date and t ime will be show
when it was taken. When using the camera for the fir st time the date and time has to
be set.
To set the date:
1. Turn on the camera (see step 2 of the quick installation guide)
2. Set the Mode dial (2, fig. 1) to settings mode.
Settings menu will appear
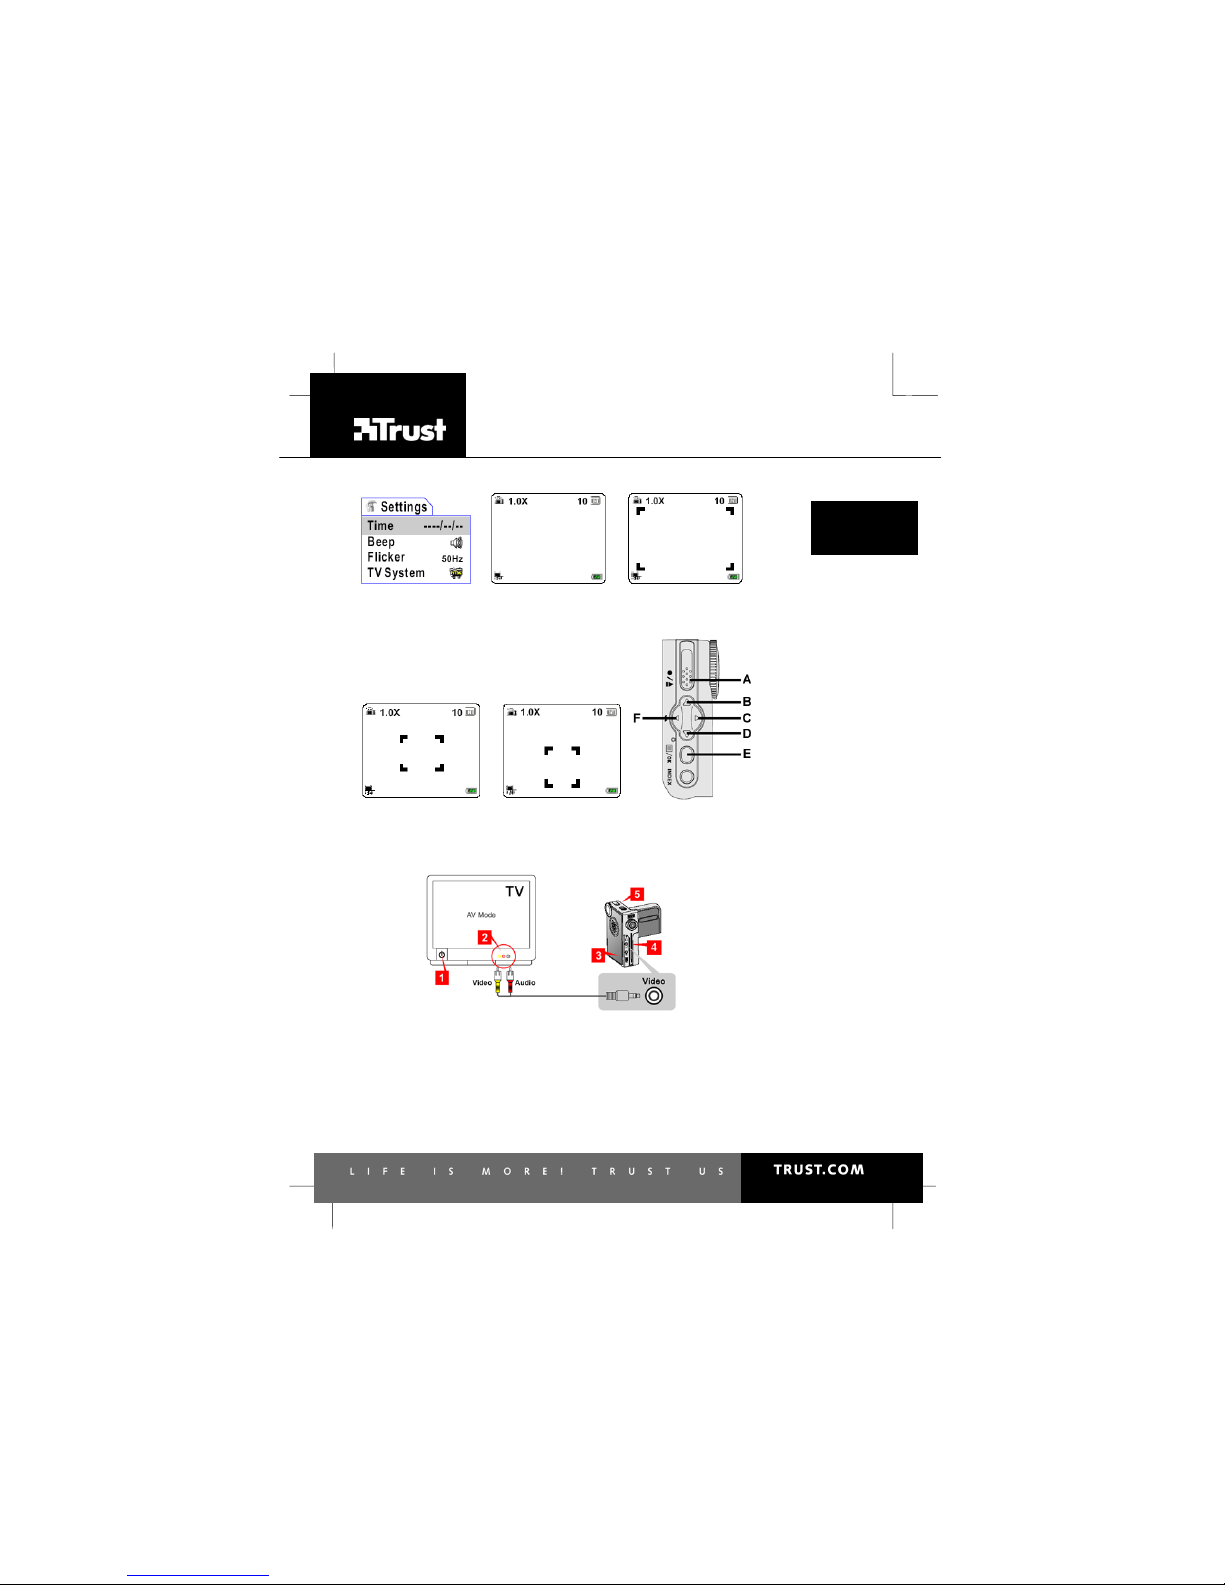
(fig. 5).
Page 10

742AV USB2.0 LCD POWER VIDEO
6
3. Select ‘Time’ and press OK-button (5, fig. 1). Time /Date settings will appear.
4. Use the direction buttons (4, fig. 1) to set the date/time:
- Up = Decrease 1 value
- Down = Increase 1 value
- Left = Move to previous field
- Right = Move to next field
5. Press OK-button (5, fig. 1) to go back to the setting s menu.
Note: The date format is shown as: <year>.<month>.<day>
6 Using the camera
6.1 Taking video clips and pictures
6.1.1 How to record video clips
Note: To save the battery, the camera will tur n off automatically after a
couple of minutes depending on the settings.
See step 3 of the Quick Installation Guide.
6.1.2 How to take pictures
See step 4 of the Quick Installation Guide.
Note: Keep the glass of the lens clean. Use a lens tissue to clean the lens. If
necessary, use special cleaning liquid for camera lenses. Do not use a
different cleaning product.
Tip: The quality of the photograph depends on the surrounding light. More
light will result in a better picture.
6.1.3 How to record audio clips
1. Turn on the camera (see step 2 of the quick installation guide)
2. Set the Mode dial (2, fig. 1) to Audio-recording mode.
3. Press shutter-button (3, fig. 1) to start recor ding an audio-clip.
4. Press shutter-button again to stop recording.
6.2 Reviewing video/audio-clips and pictures
See step 5 of the Quick Installation Guide.
6.2.1 Full screen review
The default Playback method is to show each individual picture one at a time at fullscreen size.
See table 2 for the functions of the direction buttons (4, f ig. 1) in full-screen review:
Video-clip: Set volume higher
Up
Still-image: Zoom in
Video-clip: Set volume lower
Page 11
742AV USB2.0 LCD POWER VIDEO
7
UK
Down
Still image: Zoom out
Left
Go to previous still-image / video-clip
Right
Go to next still-image / video-clip
Table 2: Functions full-screen review
Press ‘Index’-button (6, fig. 1) to switch to thumbnail mode.
6.2.2 Thumbnail review
The thumbnail review gives an overview of max. 6 pictures / video clips per screen.
You can browse through these thumbnails by using the direction buttons (4, fig. 1).
Press ‘Index’-button (6, fig. 1) to switch back to full screen mode.
7 Install driver (Windows)
Note: There’re no drivers needed to be installed on Mac OS 9.x / OS X.
Please continue to chapter 8.
Caution: Install the drivers first before connecting your camera to the PC!
Driver Installation Windows 98SE/ME/2000/XP
See step 6 of the Quick Installation Guide.
Note: During installing on Windows ME / 98SE, your Windows CD might be
requested. In this case Windows needs this to install additional system
files.
8 Connecting to a computer
8.1 Activating Mass Storage (MSD)
MSD allows you to use the camera just like a standard storage device where you can
copy, delete and move files to and from the camera just as a normal disk drive. T o
activate MSD on your computer see step 7 of the Quick Installation Guide.
8.2 Copy photos/video-clips to the computer
When connected to your computer, the digital camera behaves exactly like any
another disk drive attached to your computer. This makes copying the images to your
hard drive as easy as copying files from a floppy disk, zip drive or CD-ROM.
8.2.1 Windows 98SE / ME / 2000 / XP
See step 8 of the Quick Installation Guide.
Note: Format the memory card using the camera. Do not use a card reader.
The camera cannot process the FAT32 or NTFS formats.
Page 12

742AV USB2.0 LCD POWER VIDEO
8
Note: Make a backup of the files before using Windows Explorer in Windows
XP. This program may alter your photographs and this cannot be
undone.
8.2.2 MAC
1. Make sure your computer is turned on.
2. Connect the camera to your MAC.
3. An extra folder will be added to your desktop. Your pictures are stored in this
folder.
4. Open this folder to access your pictures and video clips.
5. In MAC OS X, the image capture will be activated automatically to easily import
your pictures into the ‘Pictures’ folder on your system.
Note You might need additional software to edit your pictures as the
software included with the camera is designed for a PC with Windows.
Note For this camera only pictures, audio- and MP3 files are supported on
the Mac!
8.3 Copy MP3 files to your camera
1. Make sure your computer is turned on.
2. For PC: Open ‘My computer’ located on your desktop.
3. Connect the camera to your PC.
4. A removable drive will be added.
5. Open this drive. Two folders will appear: DCIM and MP3.
6. Copy your MP3 files to the MP3 folder.
9 Install application software (PC only)
Three applications are supplied with the camera. These applications do not have to
be installed to use the camera. However, it is recommended to install these programs
in order to use all the extra options available with the camera.
Note: Make sure all other applications are closed during the installation.
9.1 Photo Express 4.0
Ulead Photo Express 4.0 SE is a program which you can edit your photographs.
Follow the instructions below to install Photo Express 4.0 SE:
1. Start the Trust Software Installer.
2. Select ‘Install Software’.
3. Select ‘Ulead Photo Express 4.0 SE’.
4. Select the language you wish to use.
5. Follow the on-screen instructions.
9.2 Photo Explorer 8.0
Ulead Photo Explorer 8.0 SE is a program which you can use to organise your
photographs. Simple processes can be carried out, such as rotating, printing and
viewing the photographs. Photo Explorer is useful if you wish to download
Page 13

742AV USB2.0 LCD POWER VIDEO
9
UK
photographs and save them on your computer. Follow the instructions below to install
Photo Explorer 8.0 SE:
1. Start the Trust Software Installer.
2. Select ‘Install Software’.
3. Select ‘Ulead Photo Explorer 8.0 SE’.
4. Select the language you wish to use.
5. Follow the on-screen instructions.
9.3 Video Studio 7
Ulead Video Studio 7 SE is a program which you can edit your video clips. Follow the
instructions below to install Video Studio 7 SE:
1. Start the Trust Software Installer.
2. Select ‘Install Software’.
3. Select ‘Ulead Video Studio 7 SE’.
4. Select the language you wish to use.
5. Follow the on-screen instructions.
10 Advanced camera use
10.1 Playing MP3 files
Note: Make sure to copy MP3 files first to your camera. For more information
see chapter 8.3.
1. Turn on the camera (see step 2 of the quick installation guide)
2. Set the Mode dial (2, fig. 1) to MP3 mode.
3. Press Shutter-button (3, fig. 1) to start playing MP3 files.
4. Press Shutter-button again to stop playing.
Page 14

742AV USB2.0 LCD POWER VIDEO
10
See table 3 for the basic functions in MP3 mode. Use this table with fig. 10
Item Function
A
Play / Pause button
B
Volume up
C
Next file / Fast wind (during playing)
D
Volume down
E
OK / Menu button (for menu options see chapter 10.2.4)
F
Previous file / Rewind (during playing)
Table 3: Basic functions MP3 mode
10.2 Menu button
To go to the menu options of the each mode, press the MENU button (5, fig . 1). Use
the direction buttons (4, fig. 1) to move the selection bar.
See chapter 10.2.1 – 10.2.4 for descriptions of all menu functions per mode.
10.2.1 Playback mode
Options Description
Exit Exit menu
Delete Delete selected video/audio-clip or picture
Delete All Delete all video clips and pictures
Info
Display all information about the taken video/audio-clip or stillimage such as filename, size, date, resolution and recordingtime.
Lock Lock selected file to prevent from being erased accidentally
Lock All Lock all files to prevent from being erased accidentally
Index Sorts the file types the camera should display in playback
mode
Table 4: Menu options in playback mode
10.2.2 Video clip mode
Options Description
Exit Exit menu
Resolution
Set the resolution when taking video-clips:
- 640 x 480 (Fine)
- 352 x 288 (Normal) *
- 160 x 128 (Low)
Page 15

742AV USB2.0 LCD POWER VIDEO
11
UK
Exposure
Adjusts the exposure compensation:
+1.5
+1.2
+0.9
+0.6
+0.3
0.0 *
- 0.3
- 0.6
- 0.9
- 1.2
- 1.5
Effect
Add special effect when recording video-clip:
- Normal (No effect) *
- B / W (Black & White)
- Classic (Sepia toned; video-clip will look like an old classic
film)
(* = default)
Table 5: Menu options in video clip mode
10.2.3 Still image mode
Options Description
Exit Exit menu
Resolution
Set the resolution when taking still-images:
- 2304 x 1728 (Super Fine)
- 2048 x 1536 (Fine)
- 1600 x 1200 (Normal) *
- 640 x 480 (Low)
Self Timer Activate self-timer, ideal for making self-port raits
White Balance
Set the white-balance:
- Auto (camera will determine the best white balance setting f or
your shooting environment) *
- Sunny (for outdoor shooting in sunny weather)
- Cloudy (for outdoor shooting in cloudy weather)
- Tungsten (for indoor shoot ing with incandescent lamp
lighting)
- Fluorescent (for indoor shooting with f luorescent lamp
lighting)
Page 16

742AV USB2.0 LCD POWER VIDEO
12
Exposure
Adjusts the exposure compensation:
+1.5
+1.2
+0.9
+0.6
+0.3
0.0 *
- 0.3
- 0.6
- 0.9
- 1.2
- 1.5
Effect
Add special effect when making a photograph:
- Normal (No effect) *
- B / W (Black & White)
- Classic (Sepia toned; video-clip will look like an old classic
film)
Date Stamp Print the dat e of shooting on the picture
(* = default)
Table 6: Menu options in still image mode
10.2.4 MP3 mode
Options Description
Exit Exit menu
Repeat Repeats when playing MP3 files
3D Enhance
Enable the 3D enhancement effect to enrich the sound quality:
- Strong
- Low
- Off *
BASS
Enable the bass effect to enrich the sound quality:
- Strong
- Low
- Off *
Info
Display all information about the MP3 file such as track-index,
filename, size and length.
Delete Delete selected MP3 file
Hold
Prevents the current settings to be changed when carrying the
camera.
(* = default)
Table 7: Menu options in MP3 mode
10.3 Settings mode
Options Description
Time Set the date and time. (see chapter 5.4)
Beep Set the beep sound of the camera on/off
Page 17
742AV USB2.0 LCD POWER VIDEO
13
UK
Flicker
Set the flicker-setting:
50 Hz (Europe) *
60 Hz (America)
TV System
Set the setting of your TV system:
PAL (Europe) *
NTSC (America)
Language
Set the language of the camera:
- English *
- German
- French
- Italian
- Dutch
- Spanish
- Portuguese
Auto-off
Set the auto save mode (turn camera off after inactivity):
- 1 min. *
- 3 min.
- 5 min.
Format
Format the internal memory and/or SD/MMC memory card.
Caution: Locked files will also be erased!
Default Set all settings back to default settings
(* = default)
Table 8: Menu options in Settings mode
10.4 Macro select dial
To take short-distance pictures or movies (15 – 50 cm), rotate the Macro select dial
(16, fig. 1) to the Macro mode
. To take normal-distance pictures or movies,
rotate the Macro select dial to the Normal focus mode
.
10.5 Selecting metering (Still-image mode)
Under normal conditions, the light is automatically measured based on overall
lighting. If the subject of shooting appears t oo dark and the background too bright,
you can manually select a proper metering mode according to the subject’s position.
To set the metering:
1. Set the mode dial (2, fig. 1) to ‘Still-image’ m ode
2. Press the ‘Right-button of the direction buttons (4. f ig. 1) repeatedly to switch
the metering mode in the following order:
- Auto, see fig. 6 (Camera will automatically the best metering method f or the
overall conditions)
- Average, see fig. 7 (Camera will measure the lighting condition within the
bracketed area)
Page 18

742AV USB2.0 LCD POWER VIDEO
14
- Centre, see fig. 8 (Camera will measure the lighting condition within the
central area)
- Centre low, see fig. 9 (Camera will focus the metering on the centre-low
area)
10.6 Using flash strobe (Still-image mode)
If the light is not sufficient for pictur e-taking, you can use the flash strobe. To activate
flash:
1. Set the mode dial (2, fig. 1) to ‘Still-image’ m ode
2. Press the ‘Left-button of the direction buttons (4. f ig. 1) repeatedly to switch to
the following flash modes:
- Off
(Flash disabled)
- Auto
(Automatic flash when light is not sufficient)
Note When the batteries are low, the flash may be disabled due of
insufficient voltage. Please change the batteries!
Note When using flash make sure the distance between camera and object
is between 0.3m – 1.8m.
Note You can not take pictures when the flash strobe is recharging.
10.7 Connecting the camera to a TV
The camera can be connected to a TV to view your pictures and video-clips. The
LCD screen will be turned off. A standard RCA video cable is supplied with the
camera.
To connect the camera to your TV (see fig. 11):
1. Turn on your TV and switch to AV mode.
2. Connect the audio and video ends of the AV cable to your TV.
3. Open the connector cover of your camera.
4. Connect the other end of the video cable to your camera.
5. Turn on the camera.
Note: Make sure to set the TV system of your camera to PAL for use in
Europe. Setting to the wrong standard makes the screen fuzzy and
everything will be displayed in black and white. For setting TV system
see chapter 10.2
Note: The camera’s AV output is not suitable for connecting to the aerial
connection on your TV. Your TV must have a video input.
Note: If you do not see an image and hear a loud humming sound through
the speakers, then you may have connected the image plugs to the
wrong connection. Check the connections and try again.
10.8 Webcam install
Note: Before using Webcam mode, install the drivers first! (See chapter 7)
Page 19

742AV USB2.0 LCD POWER VIDEO
15
UK
Note: Webcam function is not supported on a Mac!
See step 11 of the Quick Installation Guide.
11 Install Trust photo site
11.1 Install Trust photo site
Trust offers you the possibility to publish your photographs on the Internet at
www.trustphotosite.com. There are a number of conditions attached to the use of this
site. The conditions can be found at www.trustphotosite.com.
This software can be used to upload your photographs to the Trust Photo Site.
Note: The latest version of the Trust Photo Upload software can always be
downloaded from the Trust website.
1. Start the Trust Software Installer.
2. Select ‘Install software’.
3. Select ‘Trust Photo Upload Software’.
4. Follow the on-screen instructions to complete the installation.
11.2 Using Trust photo site
You must first register with Trust before you can upload photographs to the T rust
Photo Site.
11.2.1 Register first
1. Go to Trust website (www.trust.com) to register yourself and your camera. After
registering, you will receive a confirmation e-mail.
2. Sign in using the confirmation code which is sent to you.
3. Next, follow the instructions below to create your own account.
11.2.2 After registered
1. Go to the Trust Customer Care section of the website
(www.trust.com/customercare). Register using your e-mail address and
password (the password for the Trust website).
2. Enter the item number of your digital camera and click on ‘Search’ to g o to the
support page for your camera
3. To create an account, click on ‘Create account’ on the right-hand side of the
Trustphotosite.com banner.
4. Click on the ‘Create trustphotosite.com account’ button. It m ay take a while
before the next window appears.
5. Click on ‘Continue’. In the window that appears, you can download software for
uploading your photographs to the Trust Photo Site. You can download the
latest version of the software here. (The Trust Photo Upload sof tware is also
included on the CD-ROM supplied with the camera.)
Page 20

742AV USB2.0 LCD POWER VIDEO
16
11.3 Using Trust photo upload software
1. Start Trust Photo Upload from the W indows Start menu (Start – Programs –
Trust – Trust Photo Upload).
2. Use the ‘Explorer’ to select the photographs you wish to upload. You can use
the buttons on the right-hand side of the Explorer to select photographs,
unselect photographs, view photographs, etc.
3. Click on ‘Upload’.
4. Enter your e-mail address and the password for your Trust registration (not the
password for your e-mail account).
5. Click on ‘Next’. Your login information will be checked. This may take some
time.
6. Select the photo album where you wish to upload the photographs to or create
a new album.
7. Click on ‘Next’. The photographs will now be uploaded. The progress will be
displayed on your monitor. This may take a long time if you use an analogue
modem.
8. Click on ‘Close’ to close the window.
9. Go to the website www.trustphotosite.com and sign in.
You can now view your photographs, arrange them, etc. See the Help section on the
website for more information.
12 Technical Specifications
Enhanced camera resolution 2304 x 1728 (4 MPixel)
Hardware sensor resolution 1600 x 1200 (2 MPixel)
Internal memory 16 MB
External memory Built-in SD/MMC slot (maximum: 512 MB)
Digital still camera JPEG format
2304 x 1728 (4 MPixel),
2048 x 1536 (3,1 Mpixel),
1600 x 1200 (2 Mpixel),
640 x 480
Digital video camcorder ASF format
CIF (352 x 288 pixels) / up to 29 fps
LCD screen 4 cm colour TFT LCD 280 x 220 pixels
Digital zoom 4x
Image effects 3 modes (normal, black & white, classic)
Lens F = 3.5, 8.5mm
Interface USB 2.0 (USB 1.1 compatible)
Energy saving Auto power-off
Built-in microphone Yes
Built-in speaker Yes
Batteries Duracell Ultra, 2x, AA, 1,5V
Table 9: Specifications
Page 21
742AV USB2.0 LCD POWER VIDEO
17
UK
13 Troubleshooting
Method
1. Read the solutions given below.
2. Check for up-to-date FAQ’s, drivers and instruction
manuals on the Internet www.trust.com/13929
13.1 Uninstall old drivers and products
The most common cause of faults during installation is the presence of a driver for a
similar, old device. The best solution is to first remove all drivers related to old
devices before installing the new driver. Make sure you only delete programs for old,
unused (similar) devices.
1. Enter the Windows ‘Safe Mode’. (Press F8 when starting Windows befor e the
Windows start screen is displayed and select ‘Safe Mode’.)
2. Click on ‘Start – Settings – Control Panel’ and double-click on the ‘Add/Remove
Programs’ icon.
3. Find all the programs for similar, old devices and remove these by clicking on
the ‘Add/Remove’ button. When in the ‘Safe Mode’, it is possible for some
programs to appear twice. In that case, remove all the programs which appear
twice.
4. Restart the computer.
13.2 Checking after installation
After the installation of the drivers and applications, the following devices have been
added to your system and can be checked:
Start – Settings – Control panel – System – Device manager
In Mass Storage mode:
Trust 742AV MSD USB Device
Start – Settings – Control panel – System – Device manager
In PC-Camera mode (for Windows XP, 2000, 98, ME)
742AV(Still)
742AV(Video)
USB Audio device
Start – Settings – Control panel – Add or Remove Programs
Trust 742AV USB2.0 LCD Power Video
Trust Photo Upload
Ulead Photo Explorer 8.0, Ulead Photo Express 4.0, Ulead Video Studio 7.
Note: The information given above will vary when the installation has been
altered by the user (for example, not everything has been installed or
locations other than the default locations have been selected).
Page 22

742AV USB2.0 LCD POWER VIDEO
18
Note: Deviations may also occur as a result of using new drivers available on
the Internet.
Note: The location or name may vary in the ‘Control Panel’ for different
operating systems.
13.3 Removing camera driver
To remove the camera driver from your computer do the following steps:
1. Select START -> Programs -> Trust - > 742AV USB2.0 LCD POWER VIDEO > Uninstall 742AV USB2.0 LCD POWER VIDEO
2. Following the instructions on the screen.
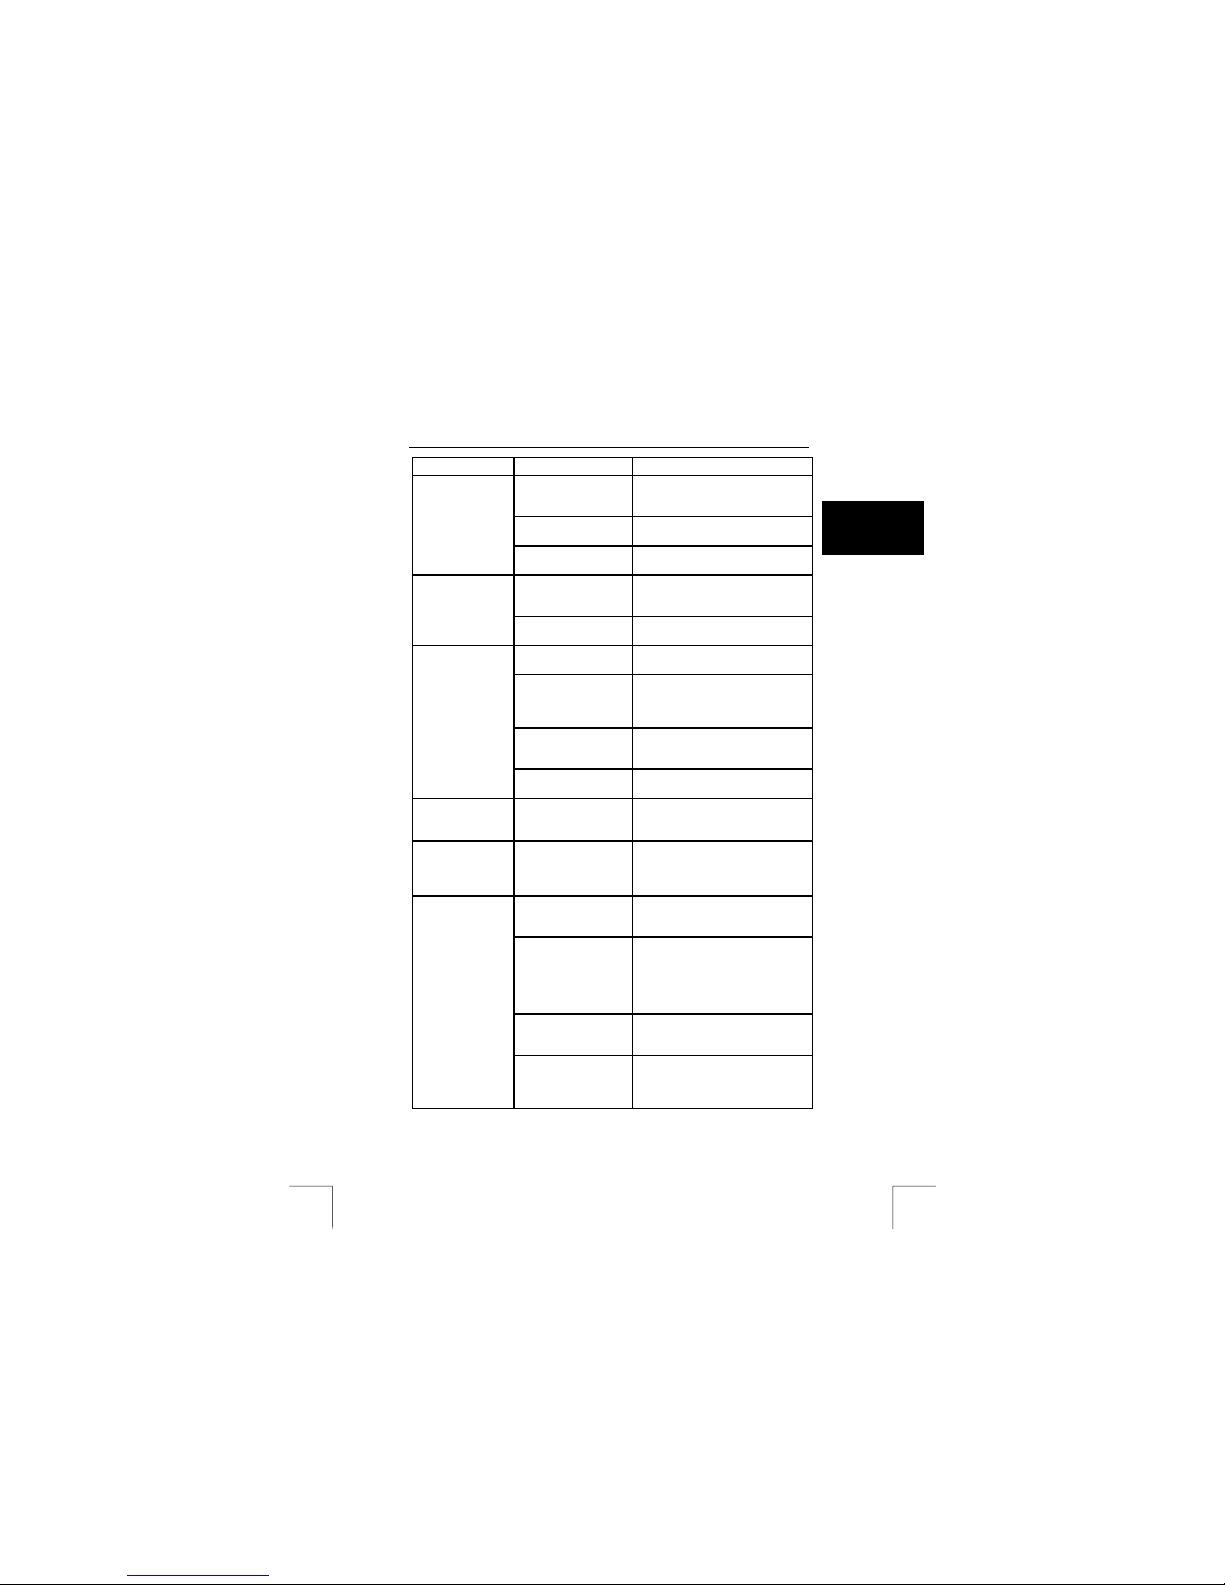
Problem Cause Possible solution
The computer's USB
port does not work.
Check the settings of your USB
port. For more information, see
www.trust.com/customercare/help/u
sb.
The camera has not
been connected to a
USB port.
Connect the camera to a USB port.
The camera has been
connected to a USB
hub which does not
have a power supply.
Connect the camera to a USB hub
which has a power supply or to a
USB port on your computer.
Windows does
not detect a new
device after
connecting the
camera.
The drivers have not
been installed
correctly.
Uninstall the drivers, remove the
USB cable and reinstall the drivers.
The drivers have not
been installed
correctly.
Install the drivers before connecting
the camera.
The USB port does
not work correctly.
Test the USB port using a different
device or see the USB troubleshooter at www.trust.com.
The camera is
marked with an
exclamation mark
‘!’ in the Device
Manager.
The camera has been
connected to a USB
hub which does not
have a power supply.
Connect the camera to a USB hub
which has a power supply or to a
USB port on your computer.
The camera’s
webcam mode
does not work.
The PC has a TV
capture card.
There is a conflict
between the camera
and the TV card.
Carry out the following:
1) Remove the TV capture card.
2) Reinstall the camera.
3) Reinstall the TV capture card.
If this does not solve the problem,
try to reinstall the drivers for the TV
capture card.
The camera does
not do anything.
The batteries have
been inserted
incorrectly.
Reinsert the batteries (see chapter
5.2).
Page 23
742AV USB2.0 LCD POWER VIDEO
19
UK
Problem Cause Possible solution
The camera is still
connected to your
computer.
Disconnect the USB cable. The
camera cannot be operated when it
is connected to a computer.
The camera is turned
off.
Turn the camera on.
The batteries are
empty.
Replace the batteries.
The camera has shut
down automatically by
power save.
Turn the camera on again.
The camera
suddenly turns
itself off.
The battery power is
low.
Replace the batteries.
The camera was
moved.
Try to hold the camera still or use
the stand.
The macro setting is
still selected while the
distance to the object
is too far.
Rotate the Macro select dial to
normal-distance setting (see
chapter 10.4).
The distance to the
subject is too small.
Increase the distance to the object
to be photographed or select the
macro setting.
The recordings
are not clear
(hazy).
There is insufficient
light.
Improve the lighting.
There is no
connection with
the computer.
The camera has been
connected incorrectly.
Reconnect the cables
The camera does
not give an image
in the application
(webcam).
Another application is
open and is using the
camera image.
Close the other application first
before starting the program.
The background
lighting is not white.
Change the lighting. If this does not
help, use Photo Express to edit the
colour.
The monitor has not
been set correctly.
Compare the photograph to other
photographs (for example, on the
Internet) where you know the colour
is correct. Adjust your monitor
correctly (see the instruction manual
provided with your monitor).
The printer has been
set incorrectly.
If the photographs look good on
your monitor, check your printer
settings.
Photographs are
discoloured on
the monitor or
when printed.
An inkjet printer has a
blocked ink cartridge.
See the instruction manual provided
with your printer for instructions on
how to test the printer and solve any
problems.
Page 24

742AV USB2.0 LCD POWER VIDEO
20
Problem Cause Possible solution
The paper used is
unsuitable for printing
photographs.
Use original paper from your printer
manufacturer for the most reliable
result.
The video
recordings
contain a lot of
noise (snow).
There is insufficient
light.
Improve the lighting or select a
different location.
The distance to the
sound source is too
great.
Move closer.
The volume of the
computer speakers is
set very low.
Increase the volume of the
speakers.
The sound is very
soft.
The microphone is
blocked.
Make sure your fingers do not cover
the microphone (14, fig. 1).
The card was not
empty. The memory
card contains
recordings made with
other cameras.
Format the memory card to make
sure it is 100% empty.
Fewer recordings
can be saved on
the memory card
than expected.
The recordings
contain a lot of detail
or noise.
In the case of noise, select a
location with more light. If there is
too much detail, it is normal that
less photographs or video clips can
be saved.
The memory card has
been formatted in the
wrong format.
Format the memory card in the
camera.
The memory card has
not been inserted
correctly
Press the memory card firmly into
the slot. The card must not protrude
from the camera.
The memory card
cannot be used.
The card is faulty. Try to use the card in a different
camera or use a different card.
The cables have not
been connected
correctly.
Connect the cables correctly: yellow
is for the image signal.
The camera is turned
off.
Turn the camera on.
The TV
connection does
not work.
The camera has been
connected to the
computer.
Disconnect the camera from the
computer.
There is noise in
the photographs
or the
photographs are
too dark.
The photographs are
taken in dark
surroundings.
Make sure there is sufficient light.
Page 25
742AV USB2.0 LCD POWER VIDEO
21
UK
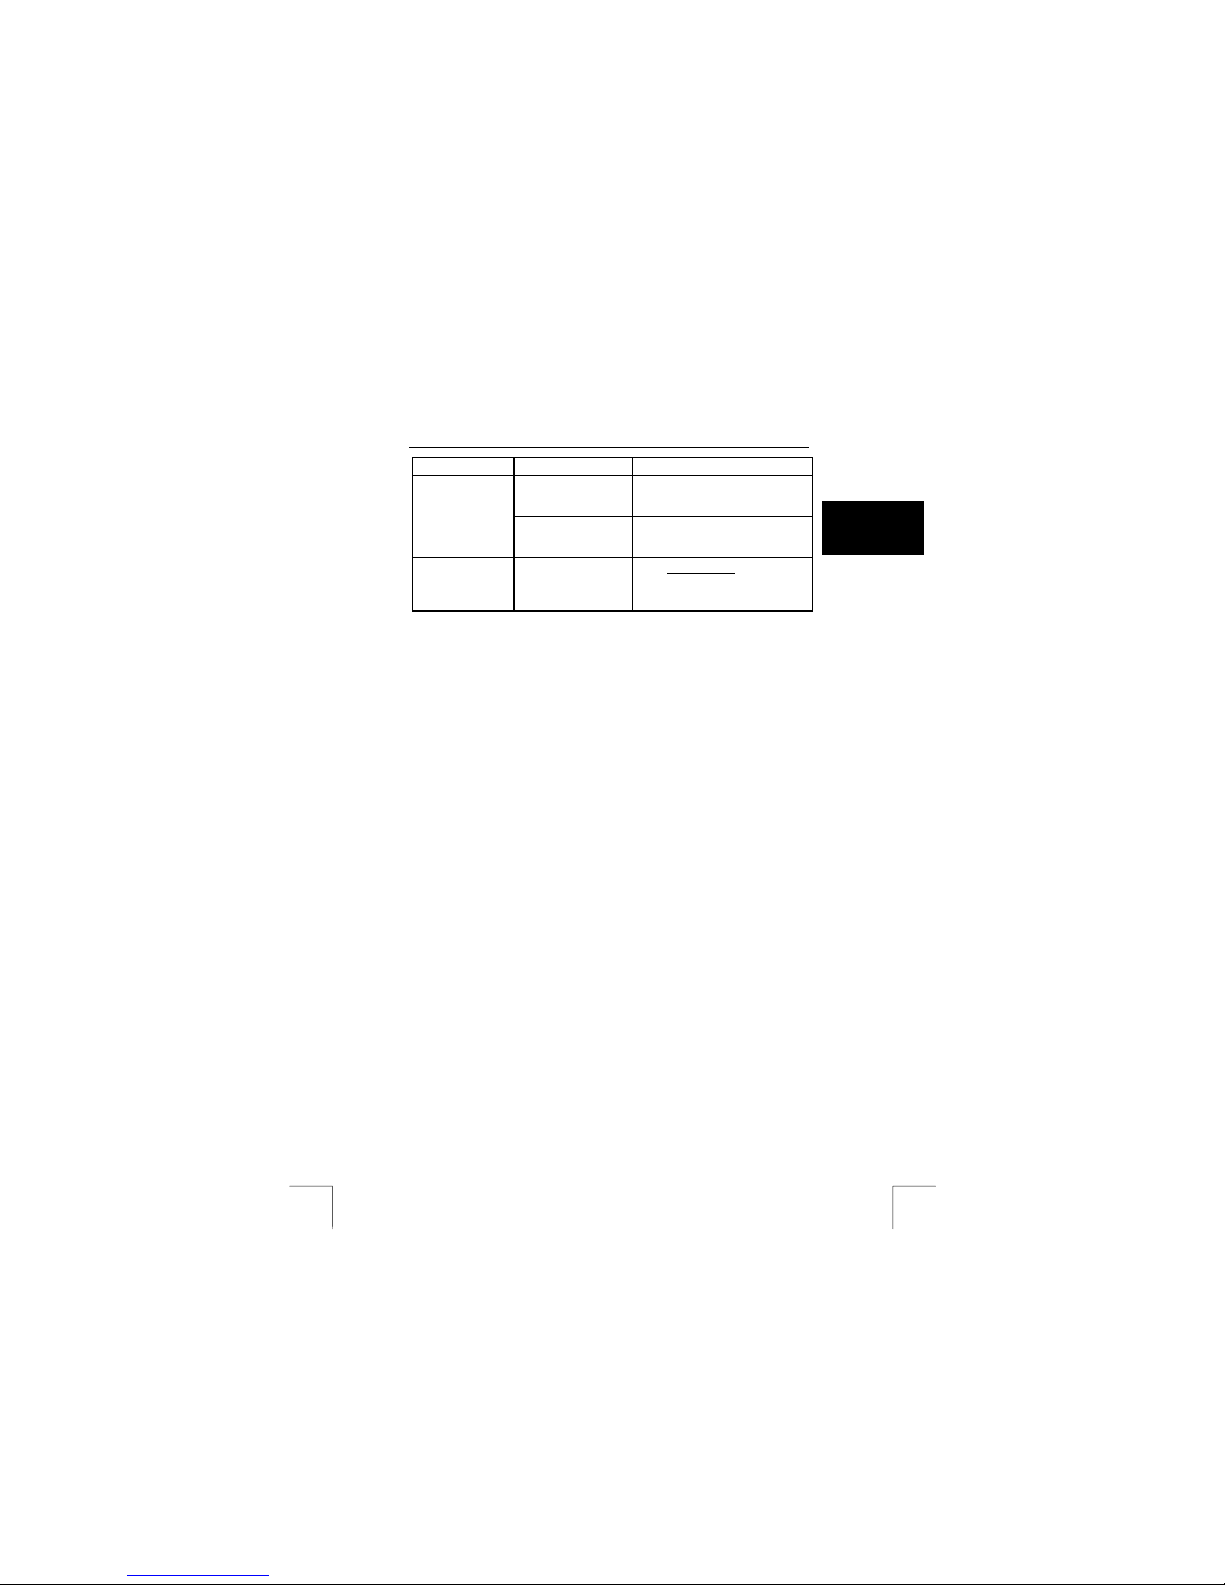
Problem Cause Possible solution
The contrast in the
subject is too great.
Change the lighting or take the
photographs closer by or further
away.
The photographs
are overexposed.
The photographs were
taken in bright
sunlight.
Take photographs in shadow.
The problem is
not listed here.
Check the Internet for
the latest update of
the camera Troubleshooter.
Go to www.trust.com
If you still have problems after trying these solutions, please contact one of the T rust
Customer Care Centres. You can find more information at the back of this instruction
manual. Please have the following information available:
• The item number. T his is 13929
• A good description of what does not work.
• A good description of when the problem occurs .
14 Warranty conditions
- Our products have a two-year manufacturer's warranty which is effective f rom
the date of purchase.
- If there is a fault, return the product to your dealer and include an explanation of
the fault, the proof of purchase and all the accessories.
- During the warranty period, you will receive a similar model, if one is available.
If no similar product is available, your product will be repaired.
- Please contact our help desk for missing components, such as the instruction
manual, software or other components.
- The warranty becomes invalid if the product has been opened, if there is
mechanical damage, if the product has been misused, if alterations have been
made to the product, if the product has been repaired by a third party, in the
case of negligence or if the product has been used f or a purpose other than
that originally intended.
- Excluded from the warranty:
• Damage caused by accidents or disasters, such as fire, flood, earthquakes,
war, vandalism or theft.
• Incompatibility with other hardware/sof tware which is not stated in the
minimum system requirements.
• Accessories, such as batteries, f uses (if applicable).
- Under no circumstances will the manufacturer be held responsible for any
incidental or consequential damage, including the loss of income or other
commercial losses resulting from the use of this product.
Copyright disclaimer
Reproduction of this manual or any part of it is prohibited without permission
from Trust International B.V.
Page 26
SERVICE CENTRE
24 HOURS free service: www.trust.com
Residents in the UK and Ireland should contact:
Mon - Fri
From 8:00 - 16:00
UK Office
Phone +44-(0)845-6090036
Fax +31-(0)78-6543299
I residenti in Italia possono contattare:
lun - ven
9:00 – 17:00
Ufficio italiano
Telefono +39-(0)51-6635947
Fax +31-(0)78-6543299
Les habitants de la France et de l’Afrique du Nord peuvent contacter :
Lundi-vendredi
De 9:00 à 17:00
Bureau français
Téléphone +33-(0)825-083080
Fax +31-(0)78-6543299
Kontaktadresse für Einwohner Deutschlands:
Mo – Fr
9:00 - 17:00
Deutsche Geschäftsstelle
Telefon +49-(0)2821-58835
Fax +31-(0)78-6543299
Los habitantes de España pueden ponerse en contacto con:
lun – viernes
De las 9:00 a las 17:00
horas
Oficina española
Teléfono +34-(0)902-160937
Fax +31-(0)78-6543299
Osoby mieszkające na terytorium Polski powinny skontaktować się:
Pon do pią
w godz 09:00-17:00
Biuro w Polska
Tel +48-(0)22-8739812
Fax +31-(0)78-6543299
Inwoners van Nederland kunnen contact opnemen met:
ma – vr
9:00 - 17:00 uur
Kantoor Nederland
Tel +31 (0)78-6543387
Fax +31-(0)78-6543299
All other countries / Alle anderen Länder / Tous les autres pays
Tutti gli altri paesi / Todos los demás países / Alle andere landen
Mon - Fri
From 9:00 - 17:00
European Head Office
Phone +31-(0)78-6549999
Fax +31-(0)78-6543299
 Loading...