

Page 1

7230 Easy Connect
7230 Easy Connect
User's Manual
Page 2

7230 Easy Connect
Copyright
Without the writ ten consent of the manufactur er it is prohibited to
reproduce or transfer any part of this manual in any format, either
electronically or mechanical ly, as photocopy or recor ding,
infor mation or search systems other than for per sonal use by t he
purchaser.
Liability
The manufacturer accept s no l iability for any explicit or implicit
guarantees, including but not l imit ed to the guarantees for
saleability and suitability pertaining to a given objective with
respect to the sof tware, the enclosed product manual or manuals
and written documentation and al l other hardware incl uded. The
manuf ac turer reserves the r ight to modify or improve its product
without prior warni ng or ac k nowledgement of any k ind to third
parties.
The manufacturer accept s no l iability for any ensuing or
accidental damages, including damages resulting in any f or m of
business or commerc ial for feiture on the strength of use of the
product.
All company and product names are trademarks or registered
trademark s of the relevant owners.
Page 3

7230 Easy Connect
Preface
This manual describes how to install and use the 7230 E asy
Connect scanner. No special knowledge is required.
Convent ions used in this manual :
<key>
This means pressing a key. The name is shown
between the arrow symbols.
‘System’
This is a specific t erm from a progr am. This
contains the terms used by Windows for
example.
[DIR]
Text shown in this font has to be keyed in.
Additi onal infor mation shown as follows:
Note: Switch of f the computer befor e c onnec ting the
scanner.
Page 4

7230 Easy Connect
Blank page
Page 5

7230 Easy Connect
Contents
1. Introduction.......................................................................... 1
2. Safety First............................................................................ 3
3. Connecting ........................................................................... 5
4. Installation Software ............................................................ 7
4.1 TWAIN driver and application sof tware..............................7
4.1.1 Instal lation in Windows 3.1x........................................ 7
4.1.2 Instal lation in Windows 95/Windows NT 4.0 ................ 8
4.2 Installing iPhoto Plus 4.0................................................. 10
5. Working with One-Click Easy Go ! .................................... 13
6. Working with iPhoto Plus 4.0 ............................................ 17
6.1 One-off installation.......................................................... 17
6.2 Scanning wit h iPhoto Plus 4.0 ......................................... 18
7. Working with TextBridge Classic...................................... 23
7.1 One-off Setting ................................................................ 23
7.2 Scanning wit h TextBridge Classic.................................... 26
8. Troubleshooting................................................................. 27
Appendix A: Specifications ................................................... 31
Page 6

7230 Easy Connect
Blank Page
Page 7

7230 Easy Connect
1
1. Introduction
The 7230 Easy Connect is a flatbed scanner for originals in A4
format. The scanner has power-saving features and automatic
power switch on and switch off.
The scanner is suitabl e for use in an of fice environment
combined with an AT-compatible computer running under
Windows 95, Windows NT or Windows 3.1x. Connec ting to your
computer is a simple procedur e, as the scanner is connected to
the printer por t. The print er in turn is connected to the special port
on the scanner, so you can print as normal.
Note: The scanner does NOT work under DOS, O/S2 or an
Apple Macintosh computer, you need to use Windows
3.1x, Windows 95 or Windows NT on a P C.
Contents of the box
• Scanner;
• This User Manual;
• Scanner cable;
• CD-ROM with appl ication sof tware (the manual for the
software is on the CD-RO M ) ;
• CD-ROM with i P hoto Plus 4.0;
• Disks with TWAIN drivers;
• Alternat ing current (AC) adaptor.
Contact your dealer if any item i s missing.
Page 8

7230 Easy Connect
2
System requirements
• MS Windows 3.1 or higher;
• MB RAM (16 MB rec ommended);
• Hard disk with at least 20MB free;
• Graphics board which can display at least 256 colours (16.8
million recommended);
• Mouse;
• CD-ROM drive.
As a result of enhanc ements to the product , diagrams shown in
this manual may differ from those shown on your screen.
Page 9

7230 Easy Connect
3
2. Safety First
Read the following instruct ions carefully:
1. Remove the plugs fr om the sockets befor e c leaning the
device. Do not use liquid cleaning agent s or spray cans.
Wipe down the devi c e with a damp clot h.
2. Never use the device in damp conditions such as bathrooms,
damp cellars, swimming pools, and so forth.
3. Make sure there is nothing on the power cable. Do not place
the dev ice where the cable m ay be subj ec t to wear and tear
or become damaged.
4. Never insert any objects i nto the groov es on the outside of
the dev ice, as you may t ouc h haz ar dous voltage points or
components. T his can cause a fire or severe elect r ic shocks.
5. Never attempt t o r epair the device yourself. If y ou open or
remove the housing, you may accidentally touch parts
carrying a v oltage. You will also be running other r isks. This
device can only be m aintained by specially trained staff .
6. Remove the plug from the socket under the following
conditi ons onl y , and have the device r epaired by specially
trained staff:
• the cable of the plug is damaged or worn;
• liqui d has ended up i n the devi c e;
• the dev ice has been in contact with rain or water;
• the dev ice is not working normally;
• the dev ice has fallen or the housing is damaged;
• the dev ice is clearly performing poorly;
Page 10

7230 Easy Connect
4
Blank Page
Page 11

7230 Easy Connect
5
3. Connecting
Proceed as fol lows to connect the scanner to your PC:
1. Switch of f the PC and all the peripherals connected (for
example the moni tor and the printer ) .
2. Unplug the various cables from the PC and not e their
position.
3. Remove the interface cable from the scanner box, connect it
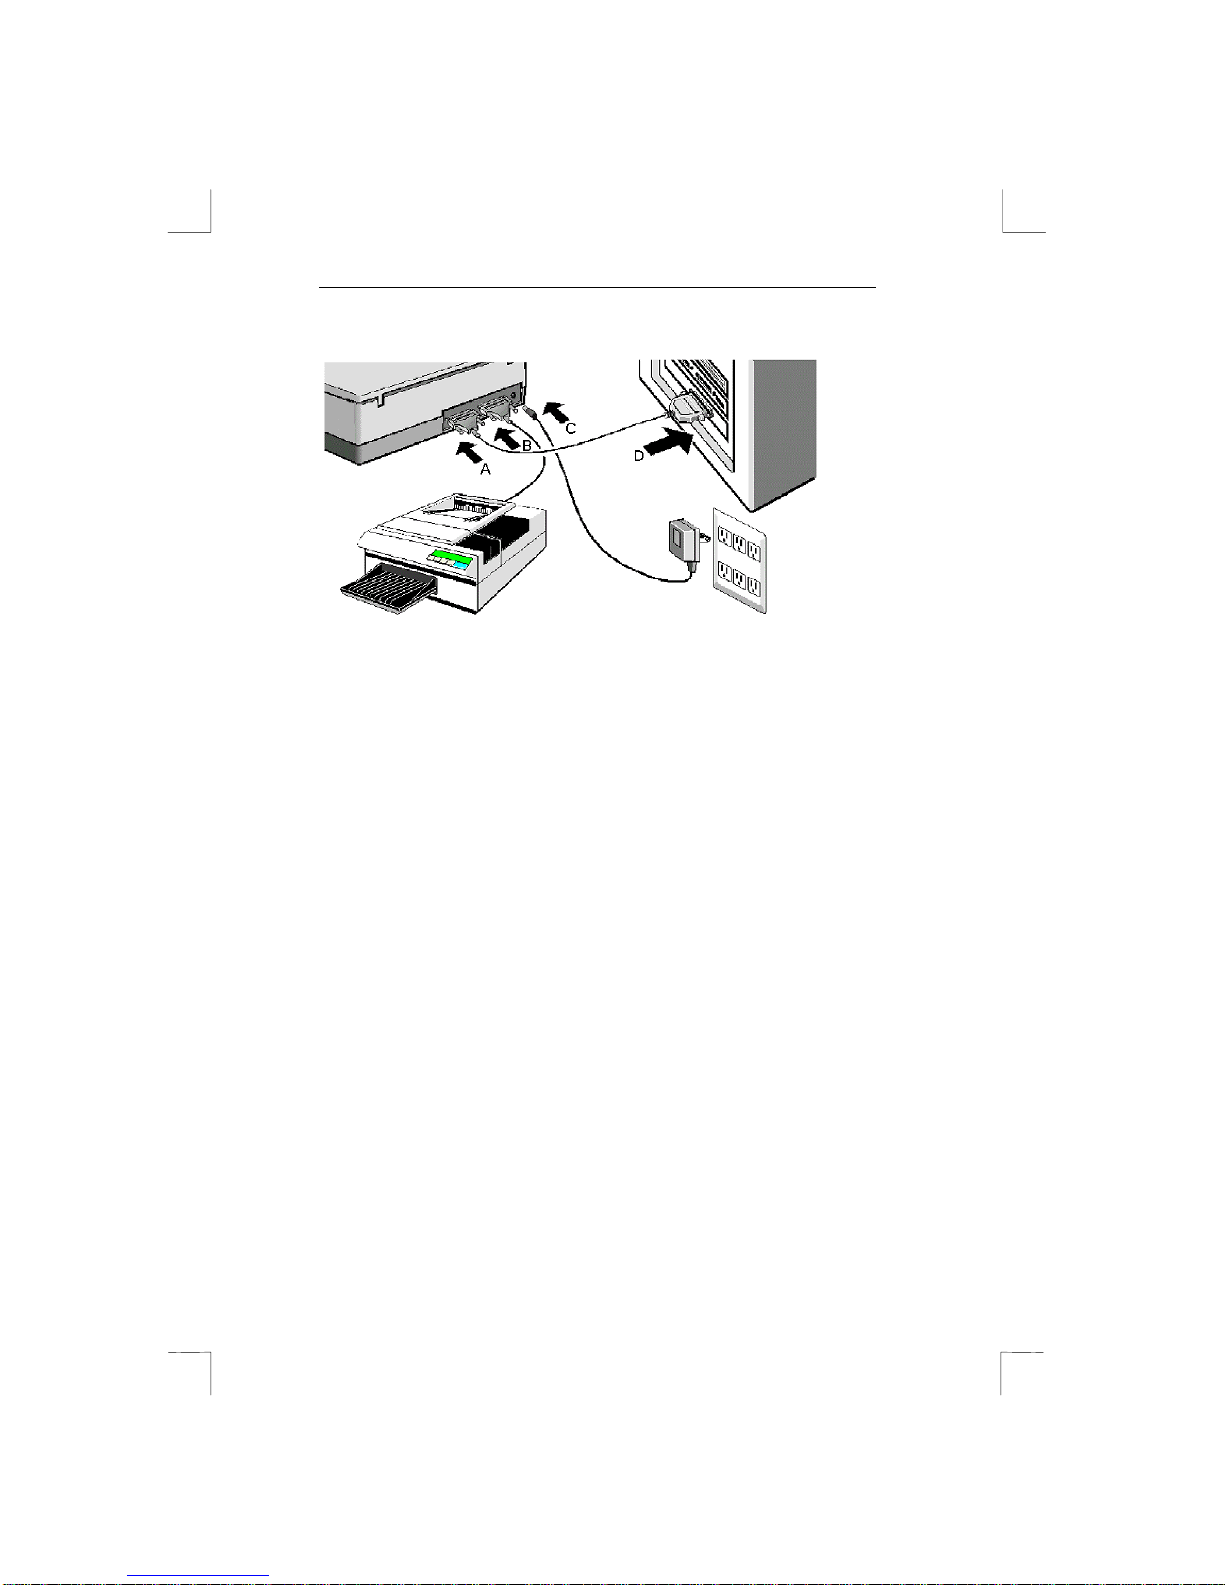
to the host port on t he scanner and screw the plug tight. ( see
figur e 1, connector A).
4. Connect the other end of the cable to the printer c onnec tion
on the comput er . If a printer is already c onnec ted,
disconnect the printer cable from the c omputer. Then
connect your printer to the printer connecti on on the scanner
(see figure 1, connector B). Screw the pl ugs hom e.
5. Connect the alternating current (AC) adapter to t he adapter
port (see figure 1, connector C). Your scanner is ready f or
use. The scanner is autom aticall y switc hed on and off, whic h
is why it does not have an on/off switch.
Page 12
7230 Easy Connect
6
Figure 1: Connecting the scanner to t he PC
A Host connection on t he scanner
B Printer c onnec tion
C Adapter connection
D Computer printer connec tion
Page 13
7230 Easy Connect
7
4. Installation S o ftware
4.1 TWAIN driver and application software
4.1.1 Installation in Windows 3.1x
1. Start Windows.
2. Insert the CD-ROM suppl ied with the application in y our CDROM drive and insert disk 1 in drive A. It is assumed in the
examples that the let ter ‘D’ has been assigned to your CDROM station on y our c omputer. If your com puter is using a
different letter, f or example ‘E ’, replace ‘D’ by ‘E’.
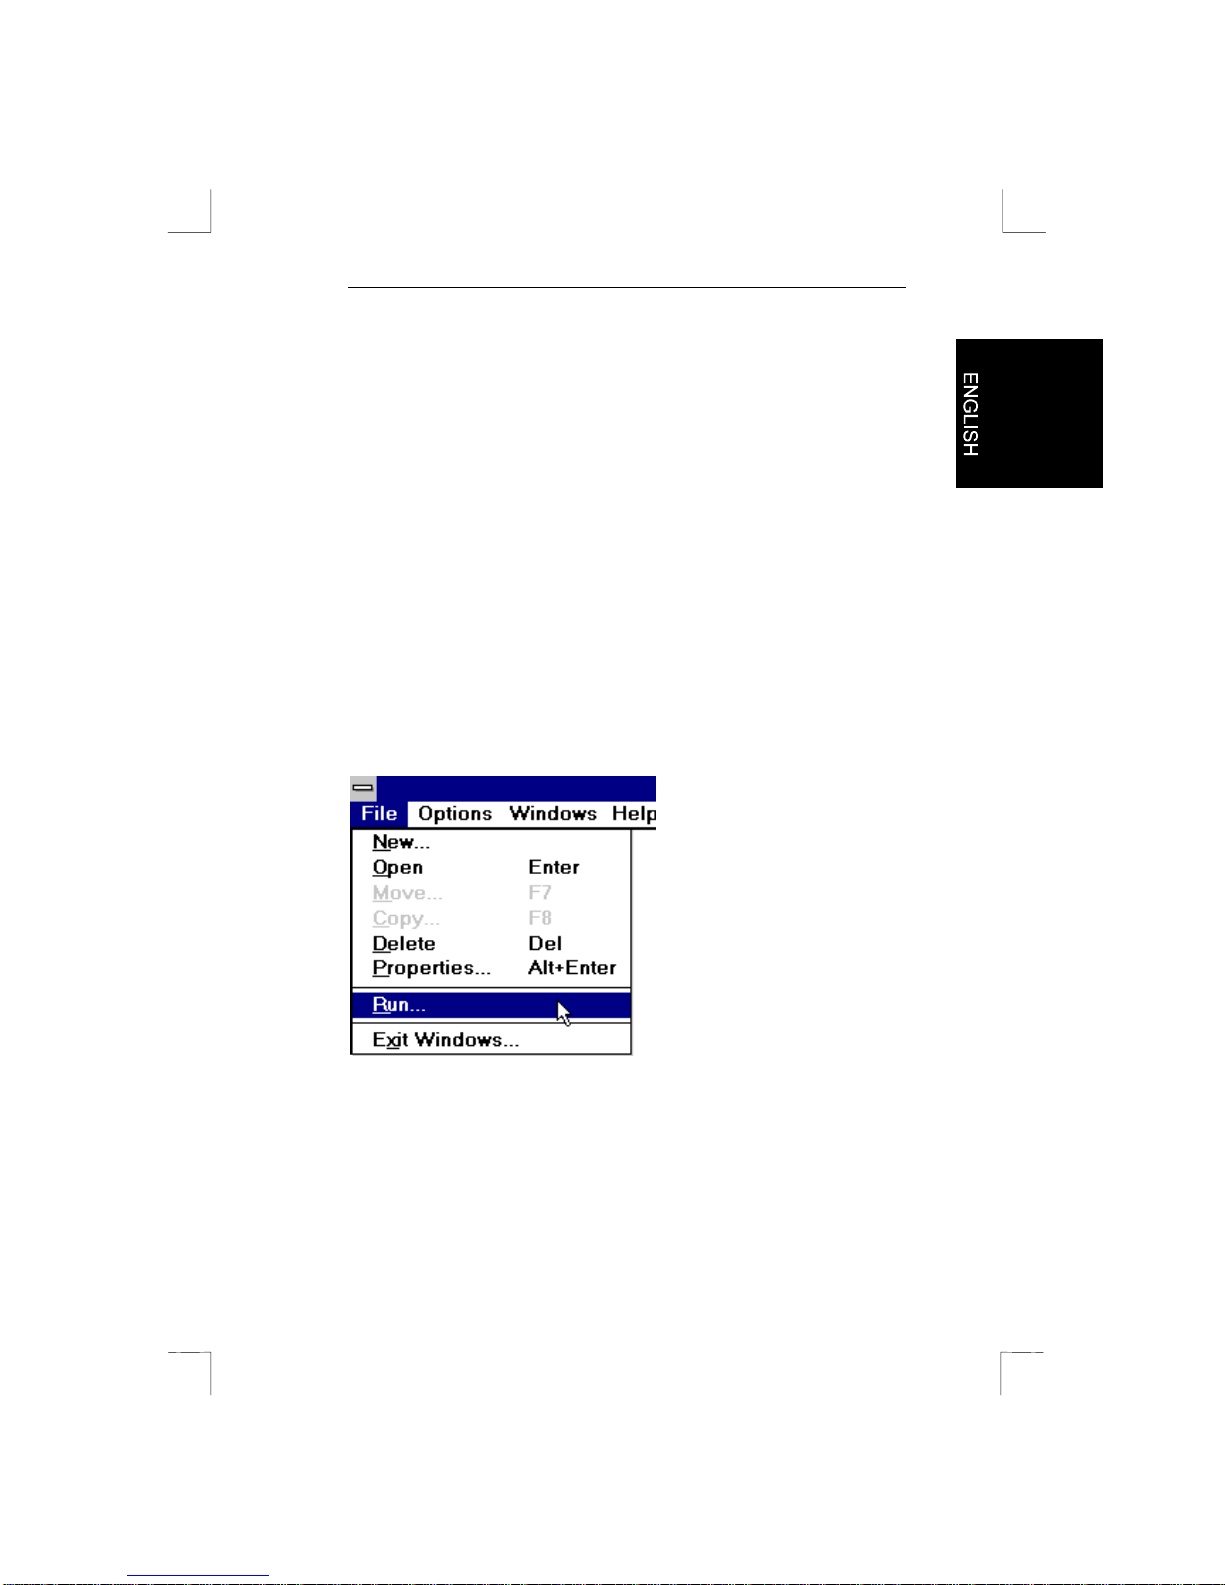
3. In ‘Program manager’ select ‘File’ and then the opt ion ‘Run’.
Figure 2: Installation in Windows 3.1x
Page 14
7230 Easy Connect
8
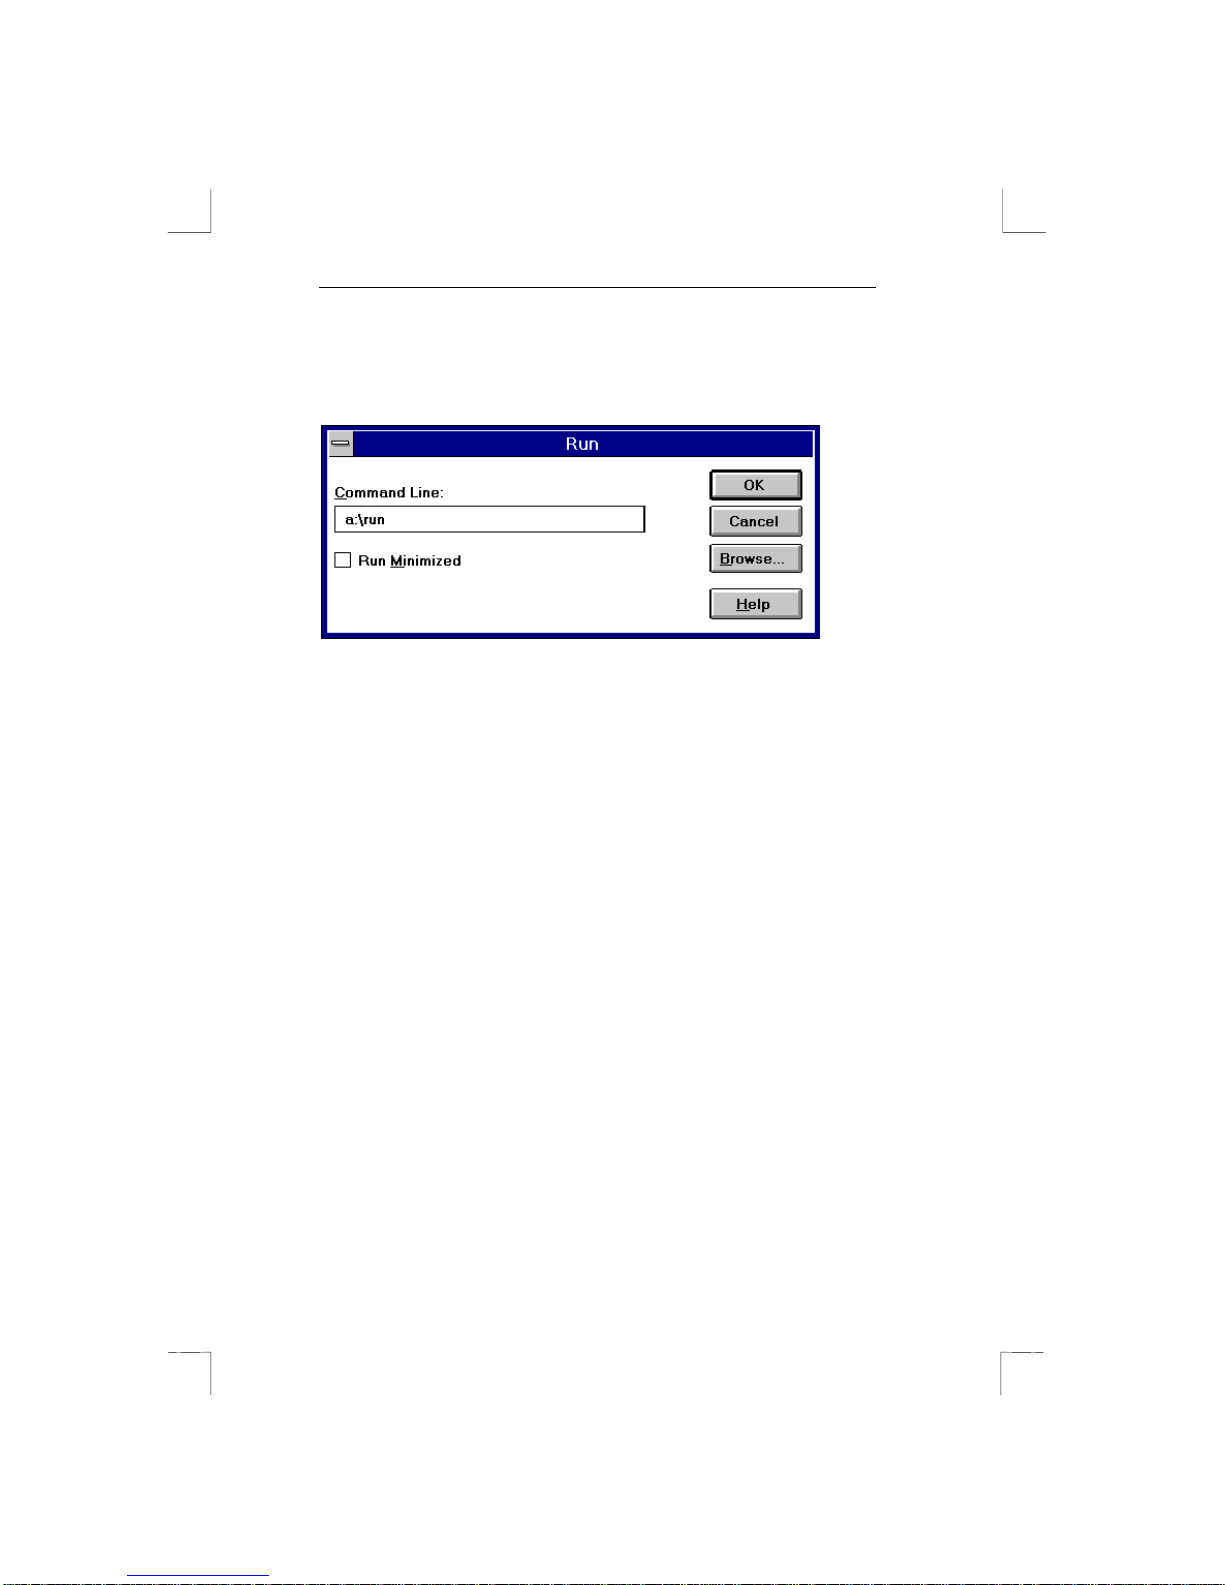
4. Type the command li ne A :\run. Then press <Enter >.
Figure 3: Installation in Windows 3.1x
5. In the menu sel ec t the language you want to use and f ollow
the instruct ions on screen during installation.
6. Now select the CD-ROM drive and follow the i nstr uc tions on
screen.
7. Select a directory to which the software is to be installed,
preferably ‘C:\MSCAN’.
8. The installation window (figure 6) appears. Here you can
select which applications are to be installed. You ar e advised
to select all applications.
9. Click ‘Next’ and follow the instruct ions on screen.
4.1.2 Installation in Windows 95/Windows NT 4.0
1. Start Windows.
2. Place the CD-ROM supplied with the applicati on in your CDROM drive and insert disk 1 into drive A.
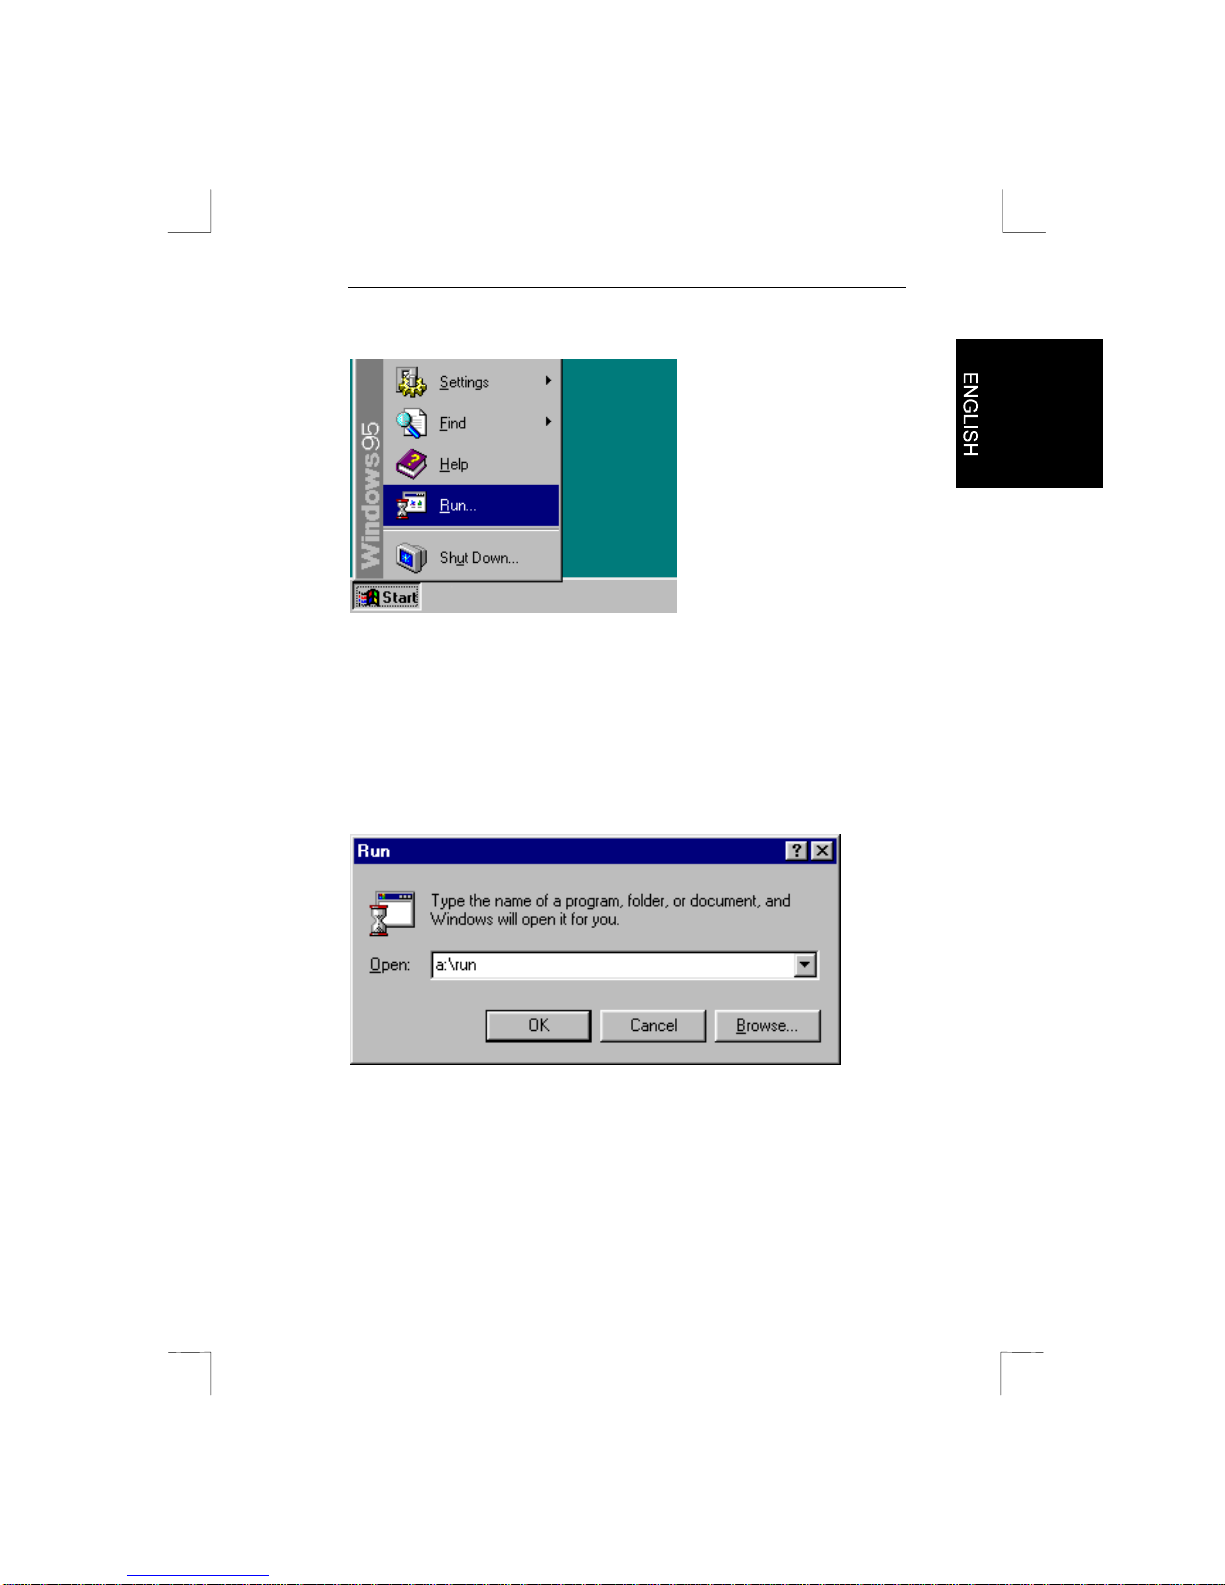
3. Click the mouse on the start button and select ‘Run’.
Page 15
7230 Easy Connect
9
Figure 4: Installation in Windows 95 and Windows NT
4.0
4. Type [A:\run] in the command line (see figure 5) . Then press
<Enter>.
Figure 5: Installation Windows 95 and Windows NT 4.0
5. In the menu sel ec t the language you want to use and f ollow
the instruct ions on screen for installation.
6. Now select your CD-ROM drive which is usually ‘D:\’ and
follow the instructi ons on the screen.
Page 16
7230 Easy Connect
10
7. Select t he directory i n whic h the software is to be installed,
preferably in ‘C:\MS CA N’.
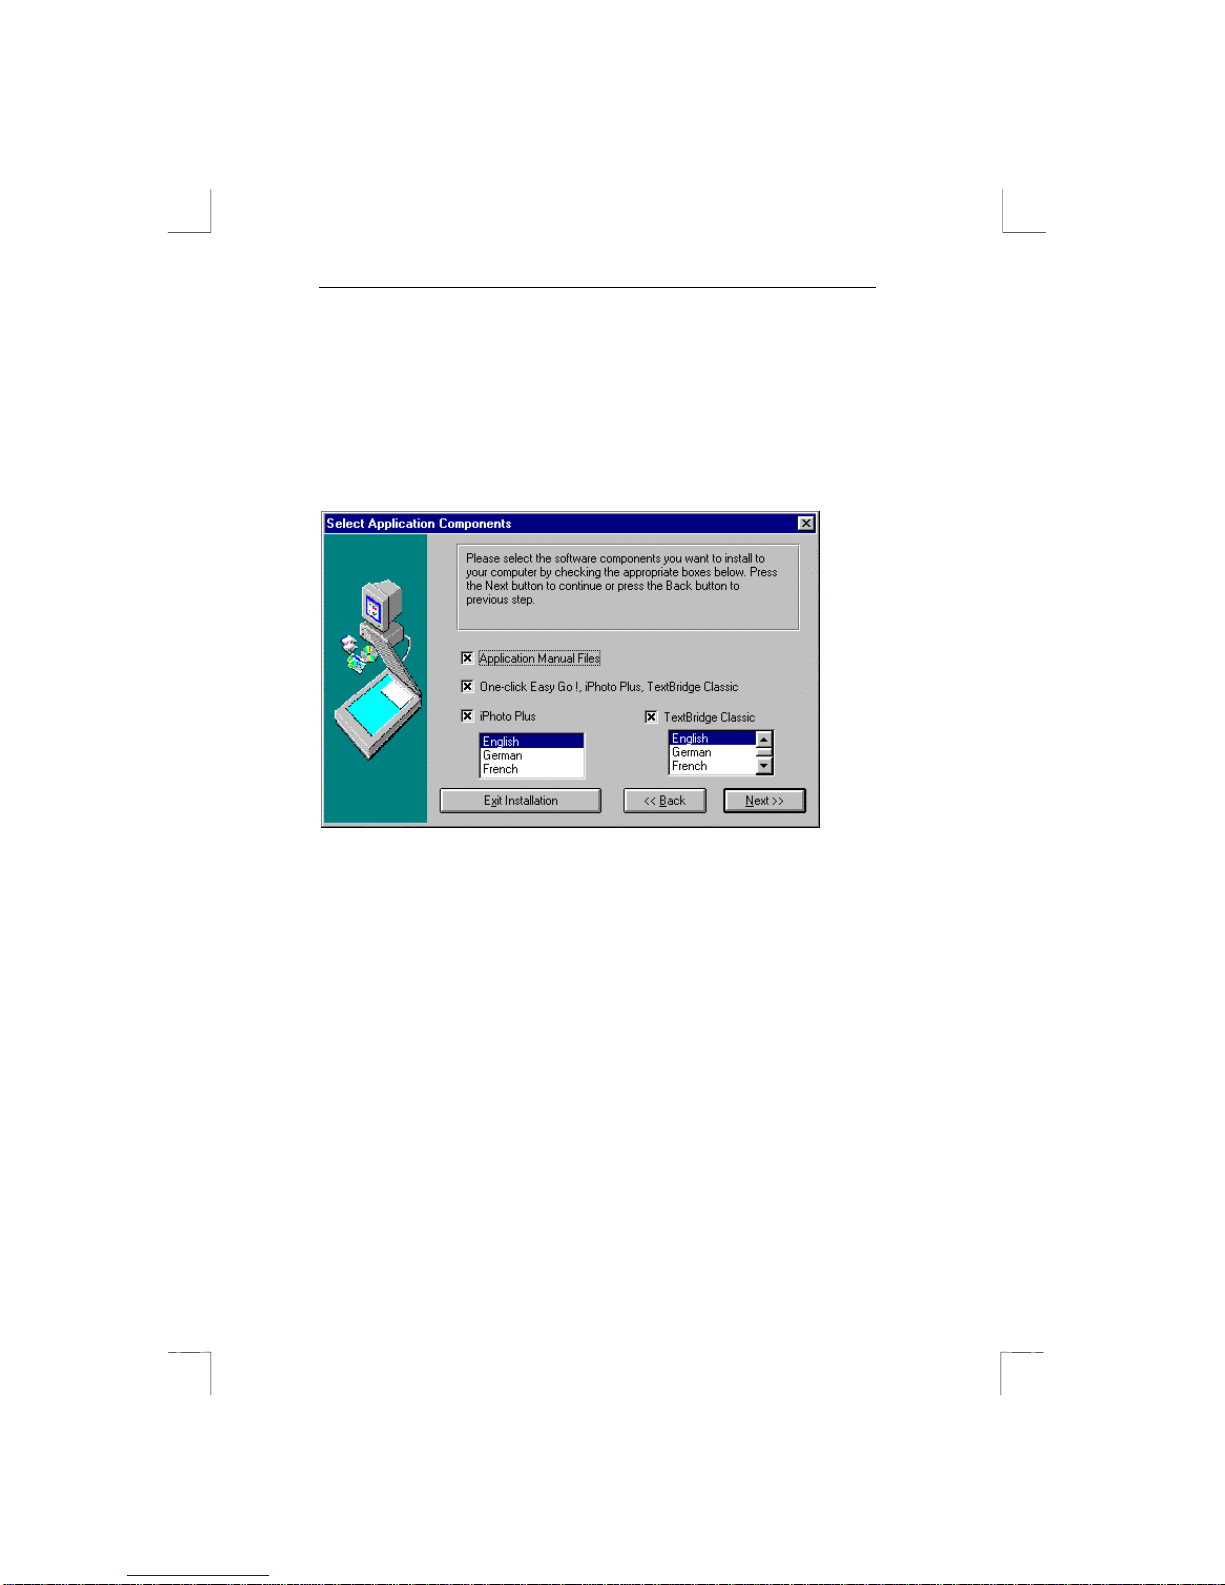
8. Installation window (figur e 6) appear s. Her e y ou c an sel ec t
the applic ations to install. You are advised to select all
applicat ions.
9. Click ‘Next’ and follow the instruct ions on screen.
Figure 6: Installation of TWAIN driver and application
software
4.2 Installing iPhoto Plus 4.0
iPhoto Plus 4.0 is a very user-friendl y pr ogr am for scanni ng and
editing images. For example, y ou c an use i t to create postcards
and calendars in a simple manner. iPhoto Pl us 4.0. is suitable for
Windows 3.1x, 95 and NT.
Note: First close down all outstanding applications .
Otherwis e, iPhoto Plus 4.0 cannot be ins talled!
Page 17

7230 Easy Connect
11
Note: The ‘iPhoto Plus 4. 0 Tour’ is also supplied. This
demonstration explains step-by-step what you can
actually do wit h the program.
1. Place the iPhoto Plus 4.0 CD-RO M in your CD-ROM drive.
On most system s with Windows 95 or Windows NT, the
installation program will start automatically within 30
seconds.
2. If t he installation program start s automatically, proceed wit h
step 5.
3. If t he installation program does not start automatic ally, click
the mouse on the ‘St ar t’ button and select t he ‘Run’ option
for Windows 95/ NT 4.0 or ‘File’ and ‘Run’ for Windows 3.1x.
4. Type [D:\ setup] on the command line. T hen pr ess <Ent er >.
5. Select t he language you want to use and follow the
instructions on screen. Follow the i nstr uc tions for standard
installation.
6. At the end of installation you are asked whether you want to
follow the iPhoto Pl us Tour , a sort of dem onstr ation of t he
features of the program. You are advised to follow this tour.
Page 18

7230 Easy Connect
12
Blank Page
Page 19
7230 Easy Connect
13
5. Working with One-Click Easy Go !
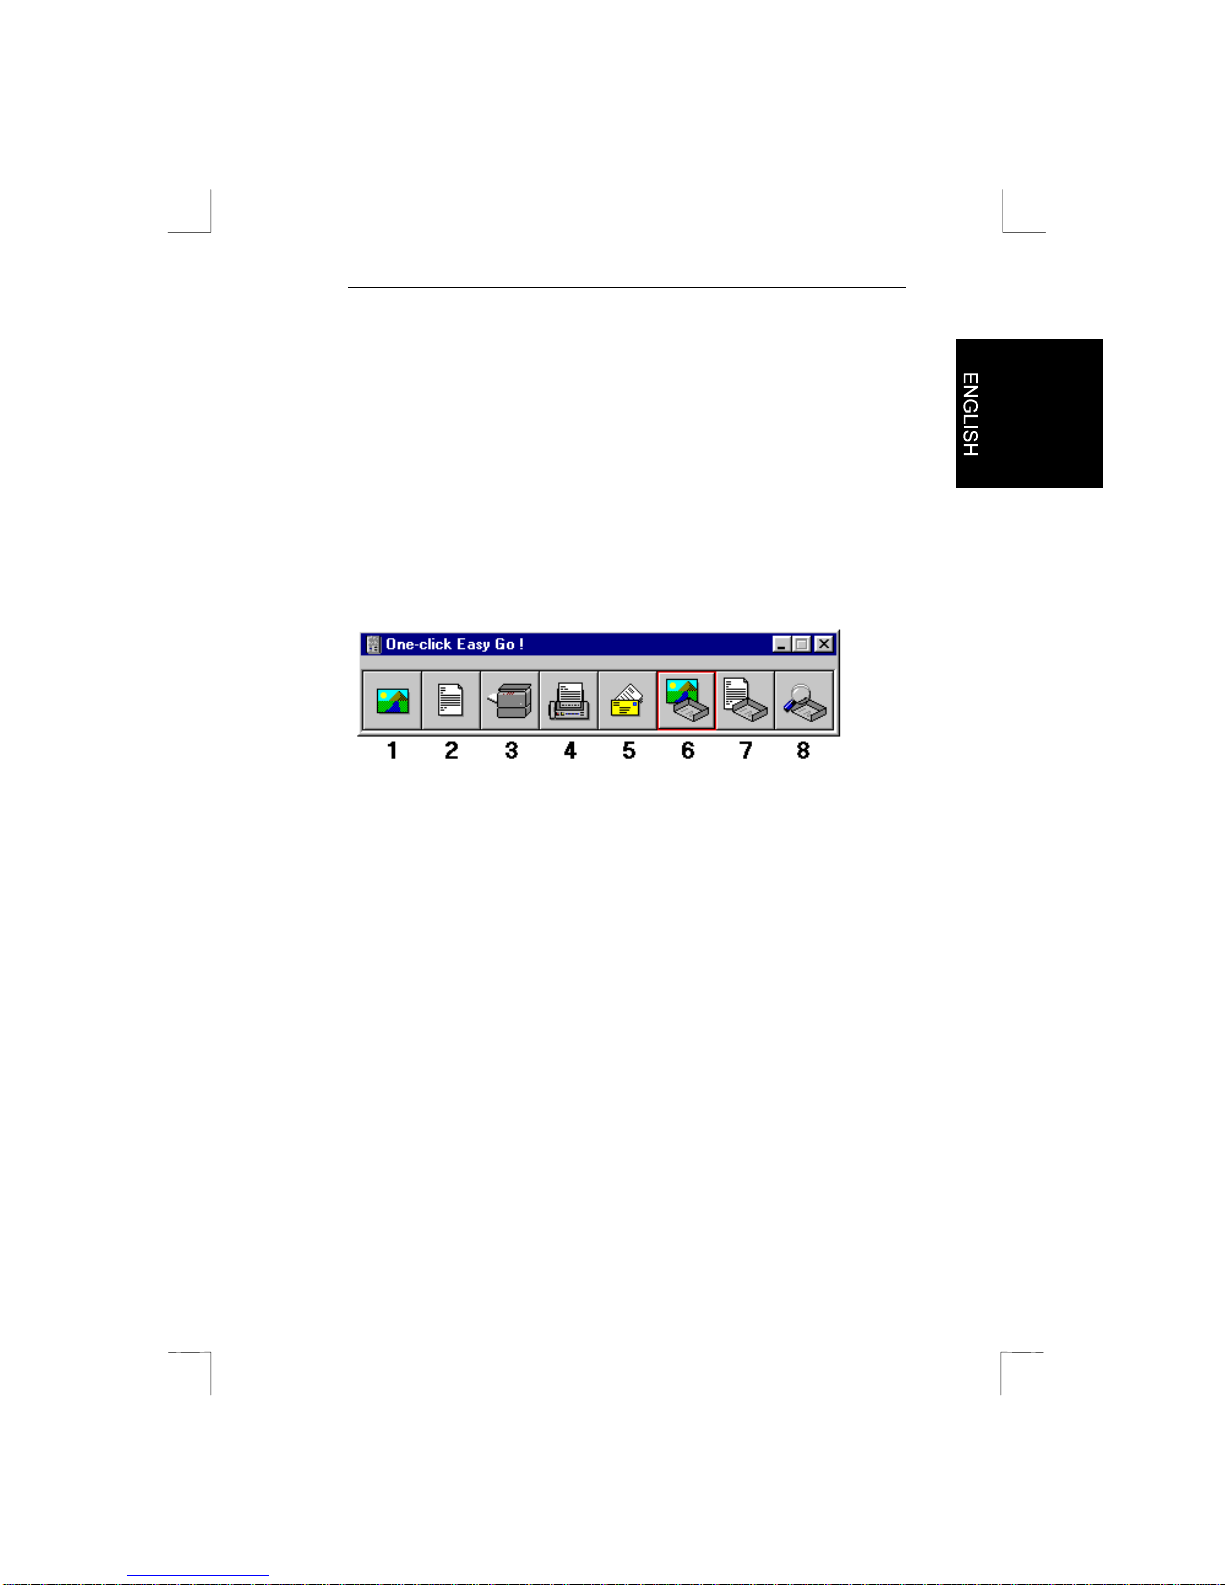
‘One-click Easy Go !’ is a program which allows you to readily
edit images such as photos and text f r om a single m enu.
Note: Before you can scan, the scanner has to warm up for
a few minutes as otherwise the images c om e out too
dark.
Figure 7: One-click Easy Go !
Use of the ic ons:
1. Scanning and editing photos;
2. Scanning and identifying text ( OCR, Optic al Character
Recogniti on) ;
3. Copying a docum ent;
4. Faxi ng a doc ument;
5. Sending as E-mail;
6. Scanning an image document;
7. Scanning a text document ;
8. Viewing the ’Inbox’.
Page 20
7230 Easy Connect
14
1. Scanning and processing photos
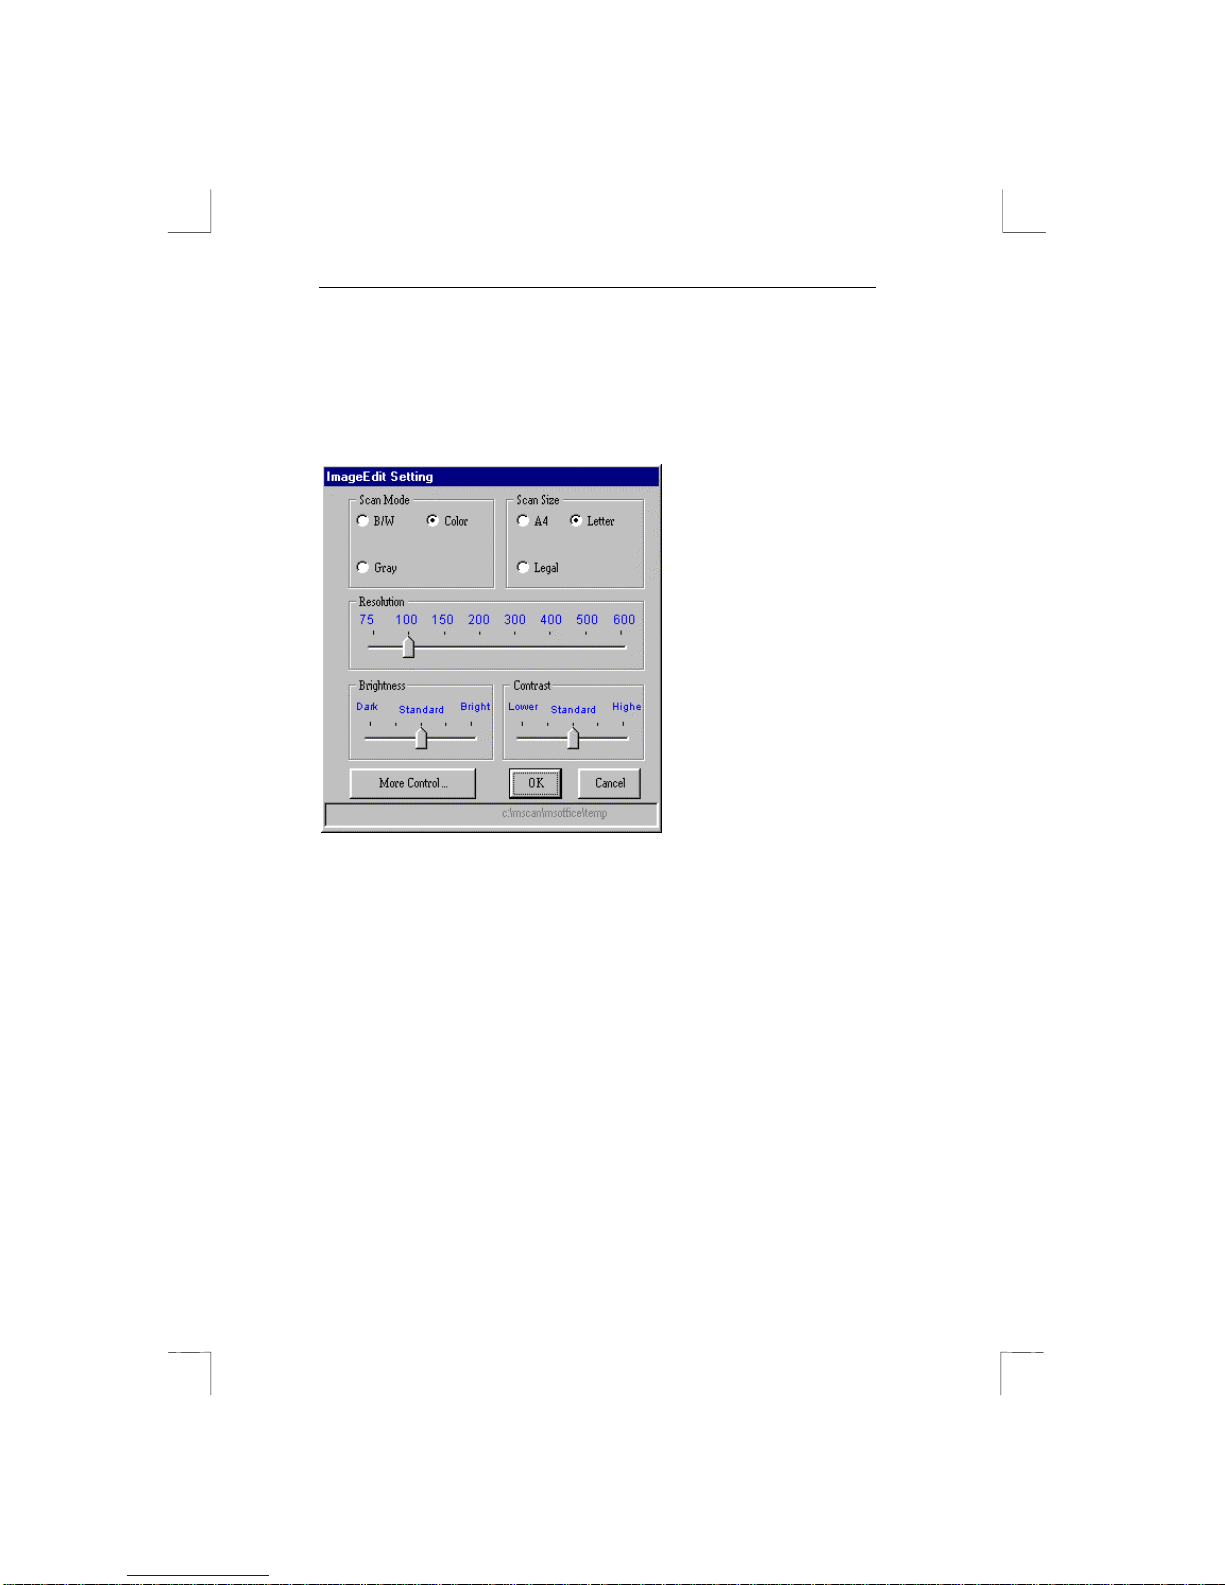
Scanning in and then editing an image. See figure 8.
Figure 8: Selection window for One-click Easy Go !
The ‘ImageE dit Setting’ window contains various settings for
scanning. For example, if you are going to scan a dark or li ght
image you c an c hange the brightness and contrast settings in
advance.
If you want t o scan wit h more than 600 dpi’s (dots per inch) you
can change this by clicking on t he ‘M or e Control’ button.
2. Scanning and identifying text
Scanning in and then editing a piece of text. In the ‘TextEdi t’
window you can change the settings for scanning text, such as
resolution and scan size.
Page 21

7230 Easy Connect
15
3. Copying a document
Scanning in an image or piec e of text and immediately sendi ng it
to the printer (copying). Y ou c an c hange the settings for the
printer, for example in the ‘Copy ’ window. Nat ur ally, the pr inter
must be connected to the scanner.
4. Faxing a document
Scanning in and image or a piec e of text and immediately faxi ng
it. T his does of course require fax or m odem.
5. Sending as e-mail
Scanning in an image or a piec e of text and sending it via e-m ail.
This does of course require a fax modem and an Int er net
subscription.
6. Scanning an image document
Scanning in an image and sending it to the ‘Inbox ’ ( the ‘Inbox’ is a
place where im ages and texts can be stored until they are sent to
the printer or the fax) . An image as shown in figure 8 is displayed.
7. Scanning a text document
Scanning in an image or a piec e of text and sending it to t he
‘Inbox’.
8. Viewing the ‘Inbox’
Looking at what is i n the ‘Inbox’ and if required sending it to the
fax or the printer.
Page 22

7230 Easy Connect
16
Blank Page
Page 23
7230 Easy Connect
17
6. W orking w i th iPhoto Plus 4.0
Note: Before you can scan, the scanner first has to warm up
for a few m inutes as otherwise the images come out
too dark.
Note: The manual is contained on t he CD- ROM supplied.
6.1 One-off installation
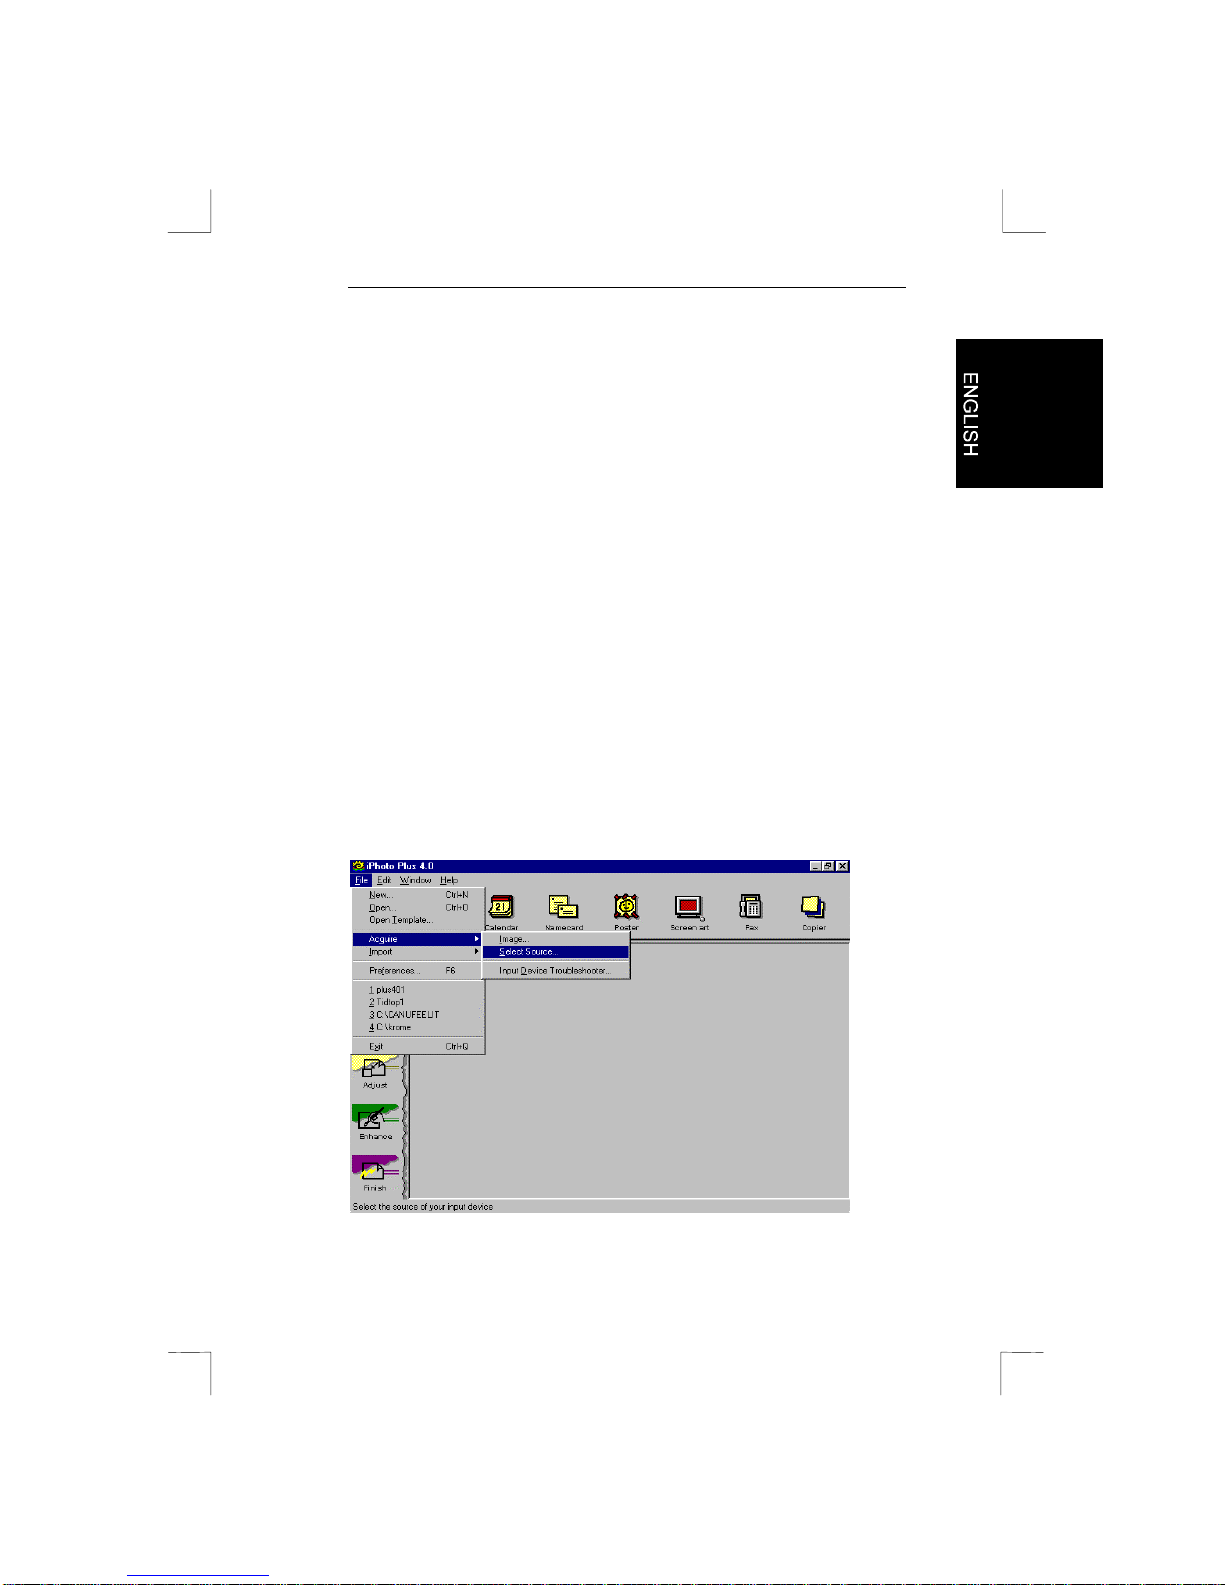
1. Start the iPhoto Plus program.
2. Select ‘File’.
3. Select ‘Ac quire’ (see figur e 9) .
4. Select ‘Select Source’ (see figure 9).
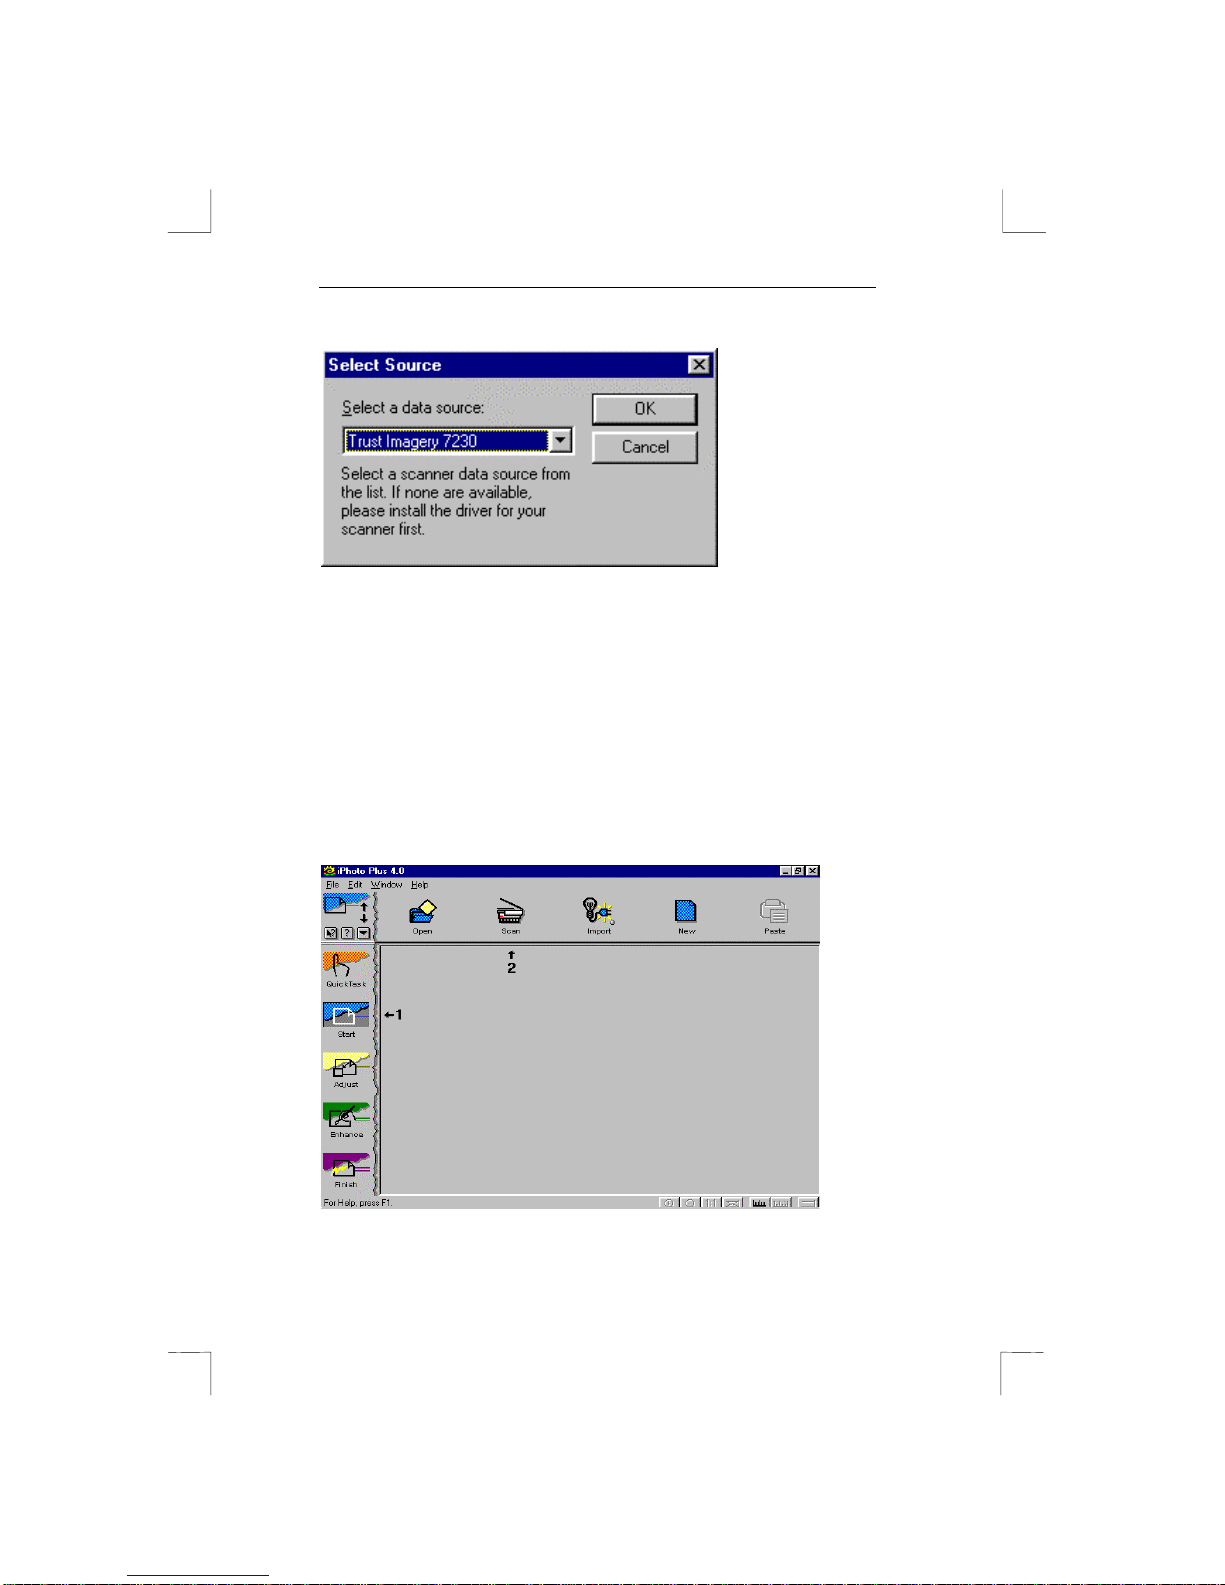
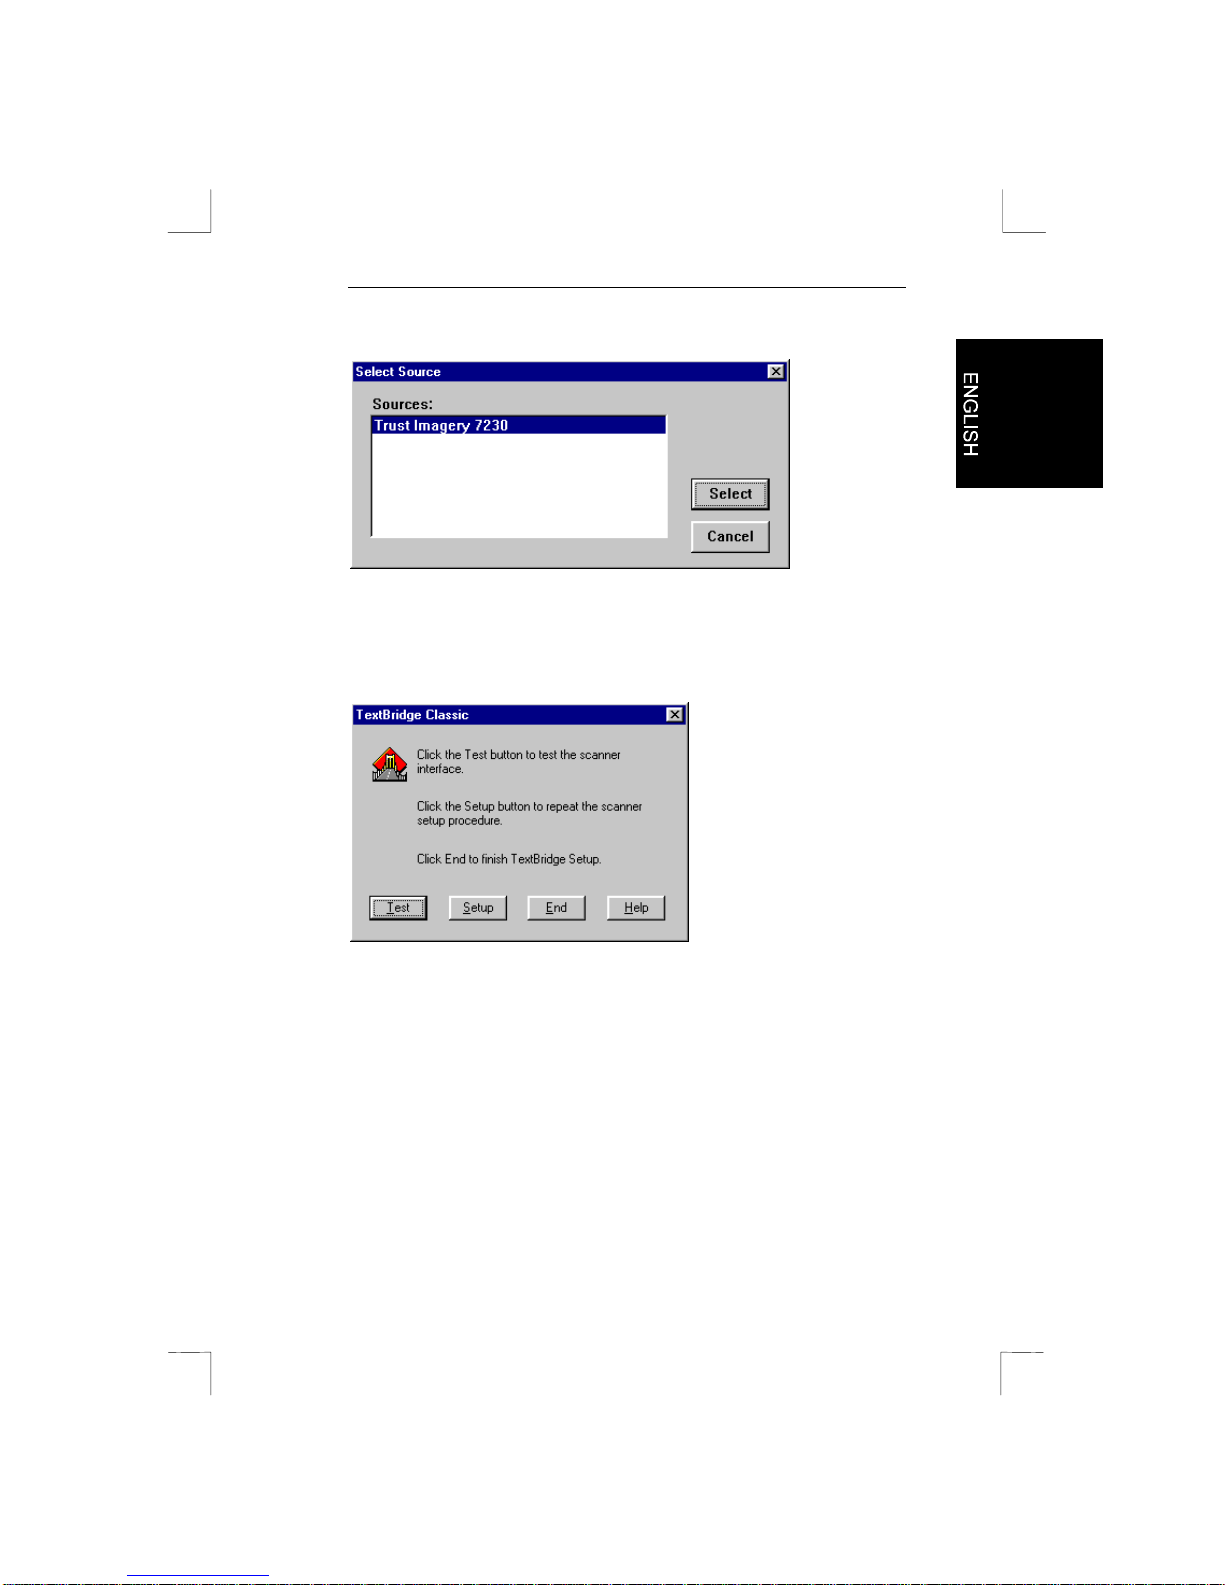
5. Select now ‘Trust I magery 7230’ (see figure 10).
iPhoto Plus 4.0 is now properly set for y our scanner.
Figure 9: The iPhoto Plus 4.0 selection window
Page 24
7230 Easy Connect
18
Figure 10: Selecting the Trust-scanner in iPhoto Plus 4.0
6.2 Scanning with iPhoto Plus 4.0
1. Start the iPhoto Plus program.
2. Click ‘S tart’ (see fi gur e 11, option1).
3. Click ‘S c an’ ( see figure 11, option 2).
4. Figure 12 now appears.
Figure 11: Scan iPhoto Plus 4.0 selection window
Page 25
7230 Easy Connect
19
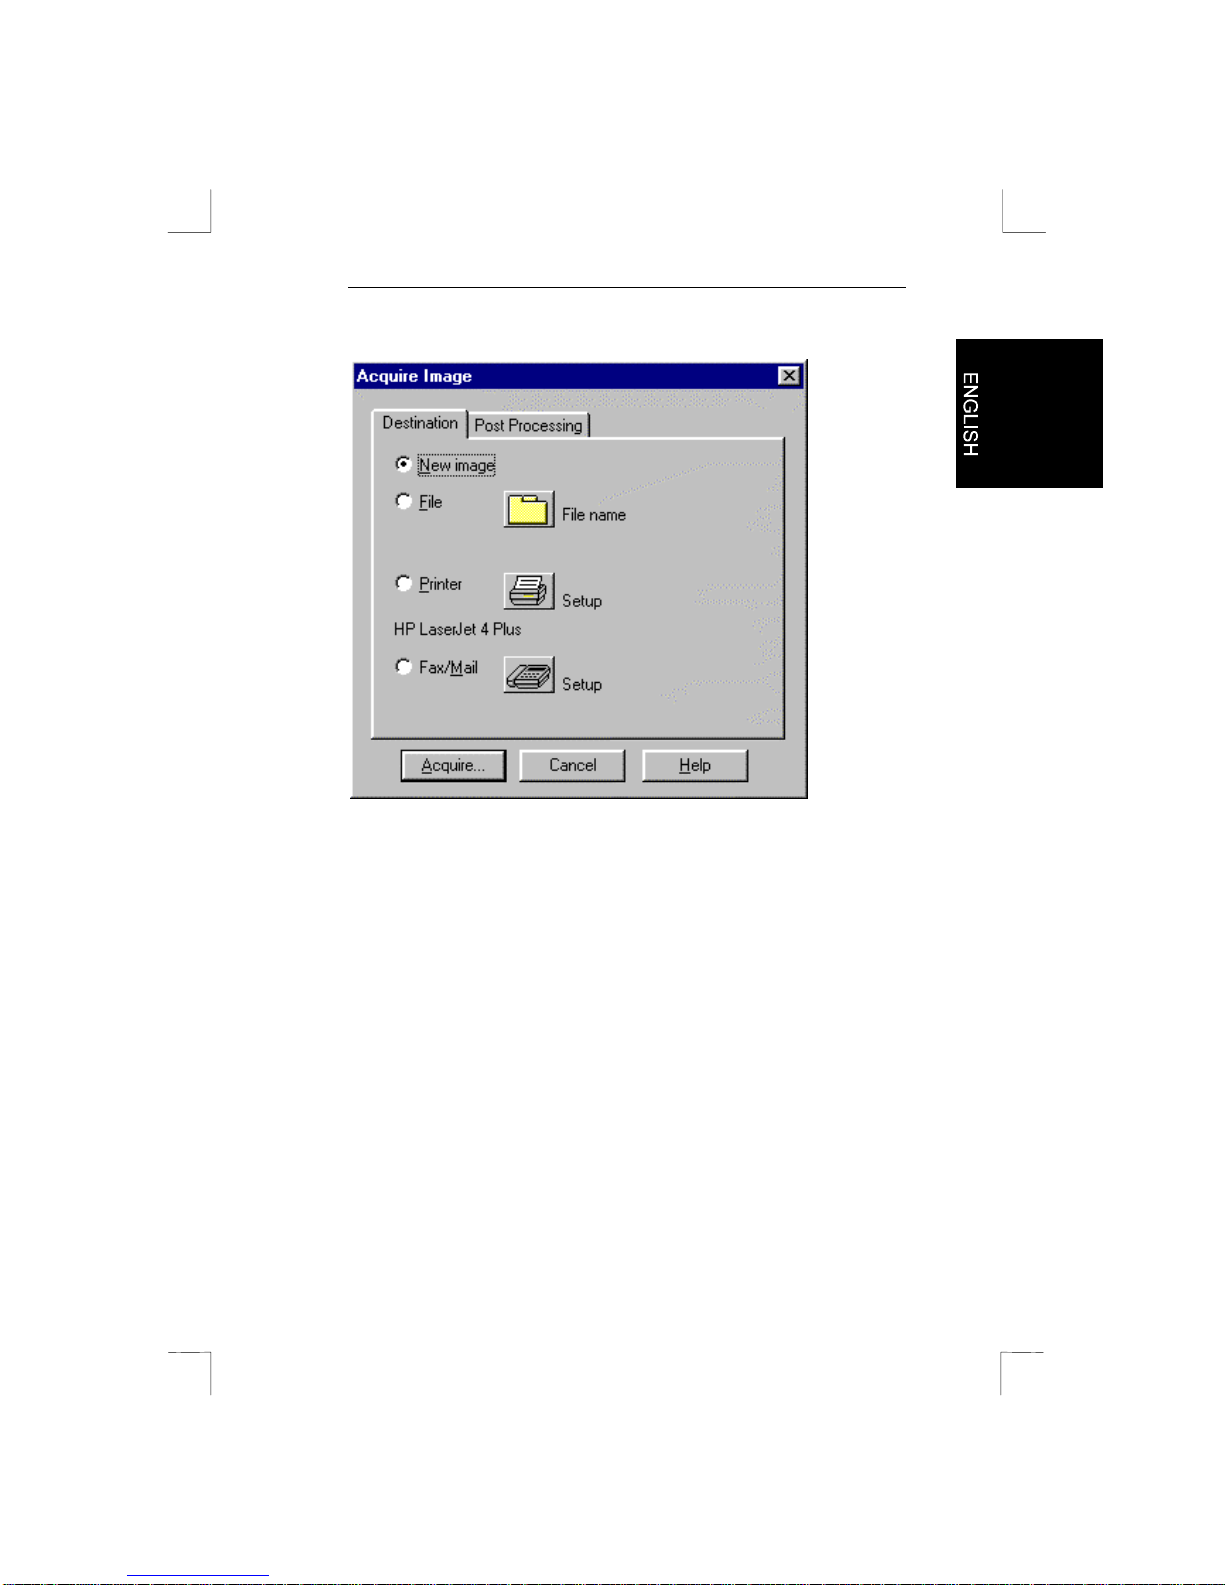
Figure 12: iPhoto Plus 4.0 scan selection window
In figure 12 you can select how the image is to be scanned in.
You have the following options:
New Image: The image is scanned in and may be be edited and then
stored.
File: The image is scanned in and then stored directly in a file
that you specify.
Printer: The image is scanned in and directly sent to the printer
(also referred to as the copy function).
Fax/Mail: The image is scanned in and sent directly to your
standard e-mail or fax program.
Make a selecti on by c licking on the circle of your choic e and then
on ‘Acquire’. Figure 13 is now displayed.
Page 26
7230 Easy Connect
20
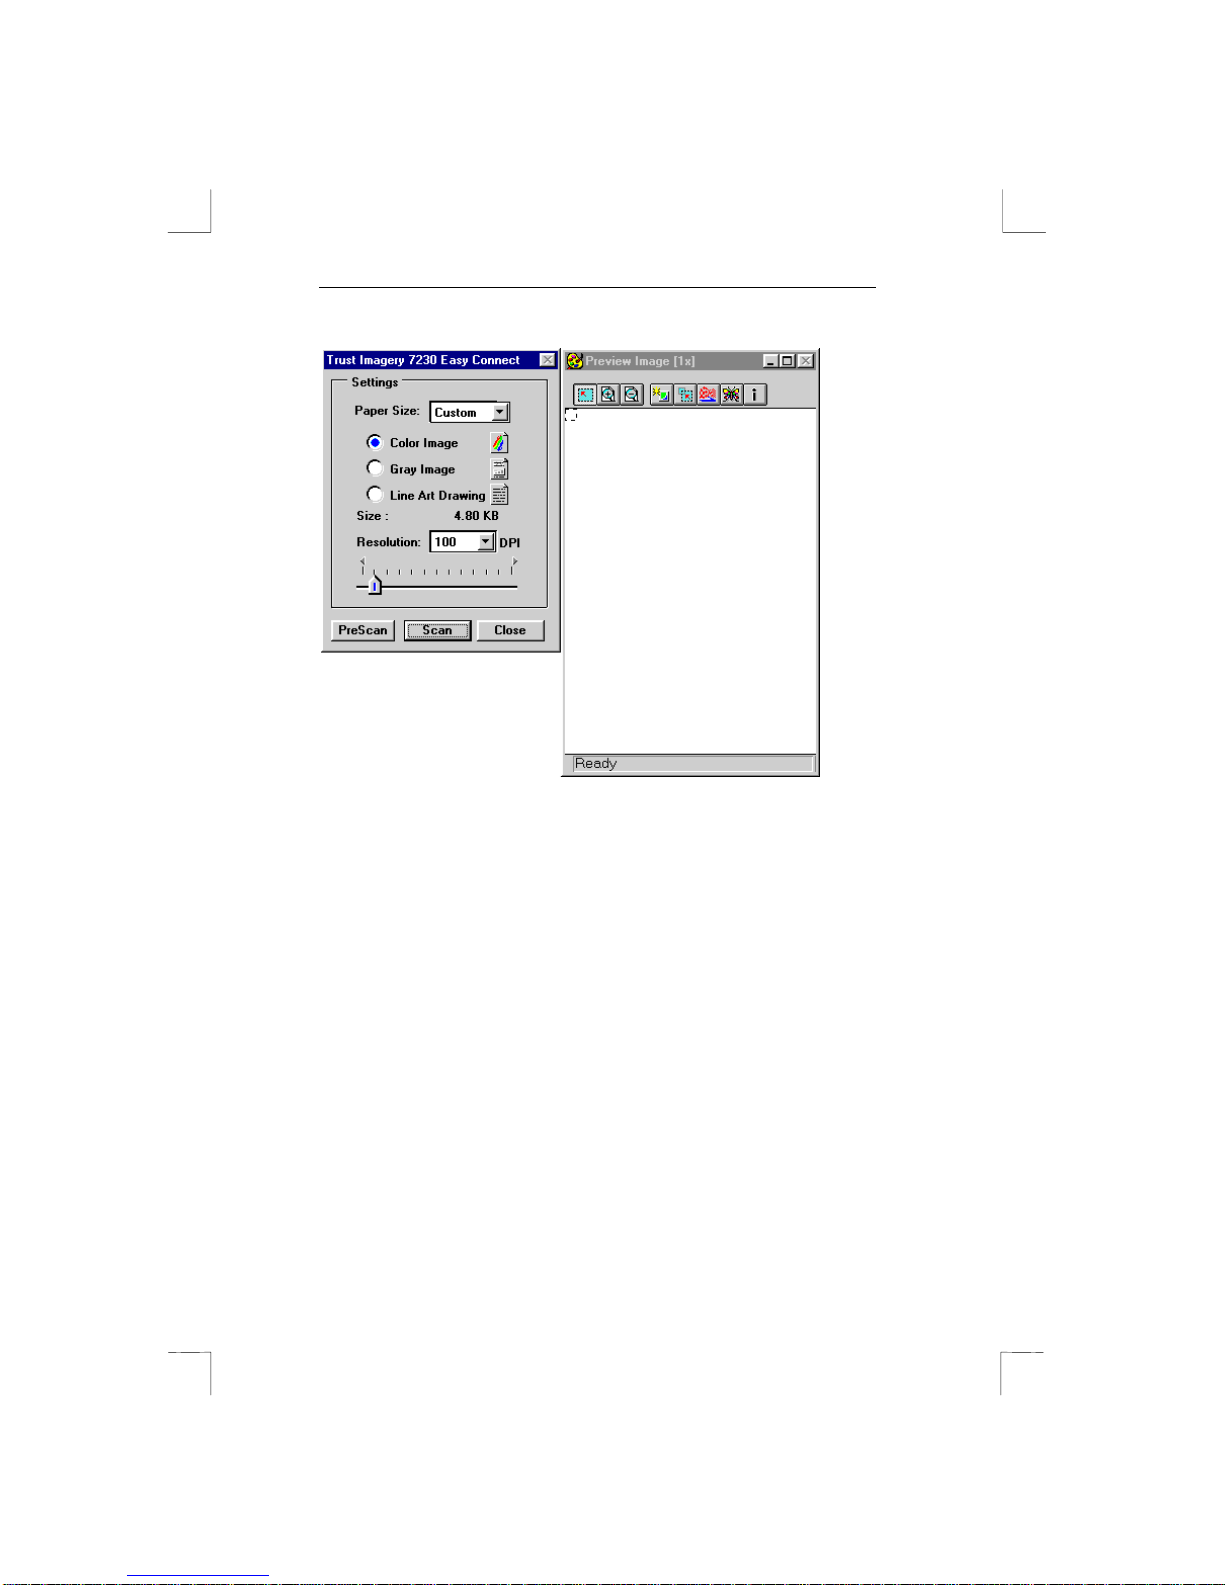
Figure 13: TWAIN driver window
Scanning the image
1. Place the image to scan on the scanner.
2. Click the ‘Prescan’ button to first mak e a test scan.
3. Wait until the scanner has warmed up. This will take about
10 seconds. The scanner will now produce a test scan of the
image on t he scanner, this is called the prescan. This may
take a few seconds. As soon as the scanner has finished
scanning, you will see the image at the right of your screen.
4. Select t he par t you want to scan with your mouse.
5. Set the resolut ion. The best resolution for most images is
300 dpi. The maximum f ile size for an image is 50 MB. This
can be seen in the TWAIN driver.
6. Set the num ber of colours using the three option ci r c les.
‘Color image’ or ‘Grey image’ for phot os, ‘Line Art Drawing’
for text.
Page 27

7230 Easy Connect
21
7. Click the ‘Scan’ button.
8. Wait until the scanner has warmed up. This will take about
10 seconds. The scanner will then produce a scan of the part
that you have selected. T his may take a few minutes,
depending upon the num ber of dpi and the siz e of the area
to scan.
9. Close the TWAIN window (figure 13) by clicking on ‘Close’.
You can now process and store the image as you wish.
Page 28

7230 Easy Connect
22
Blank page
Page 29

7230 Easy Connect
23
7. Working with TextBridge Classic
‘TextB r idge Classic’ is a program which is only suitable for
scanning pieces of text. I n other words, you cannot use it to scan
images. You c an later edit the text using a word processor. I n this
program you also need to predefine settings in order for you to
use your scanner.
Note: Before you can scan, the scanner has to warm up for
a few minutes as otherwise the images c om e out too
dark.
Note: The manual is contained on t he CD- ROM supplied.
7.1 One-off Setting
1. Start the TextBridge Classic program.
2. Click ‘File’.
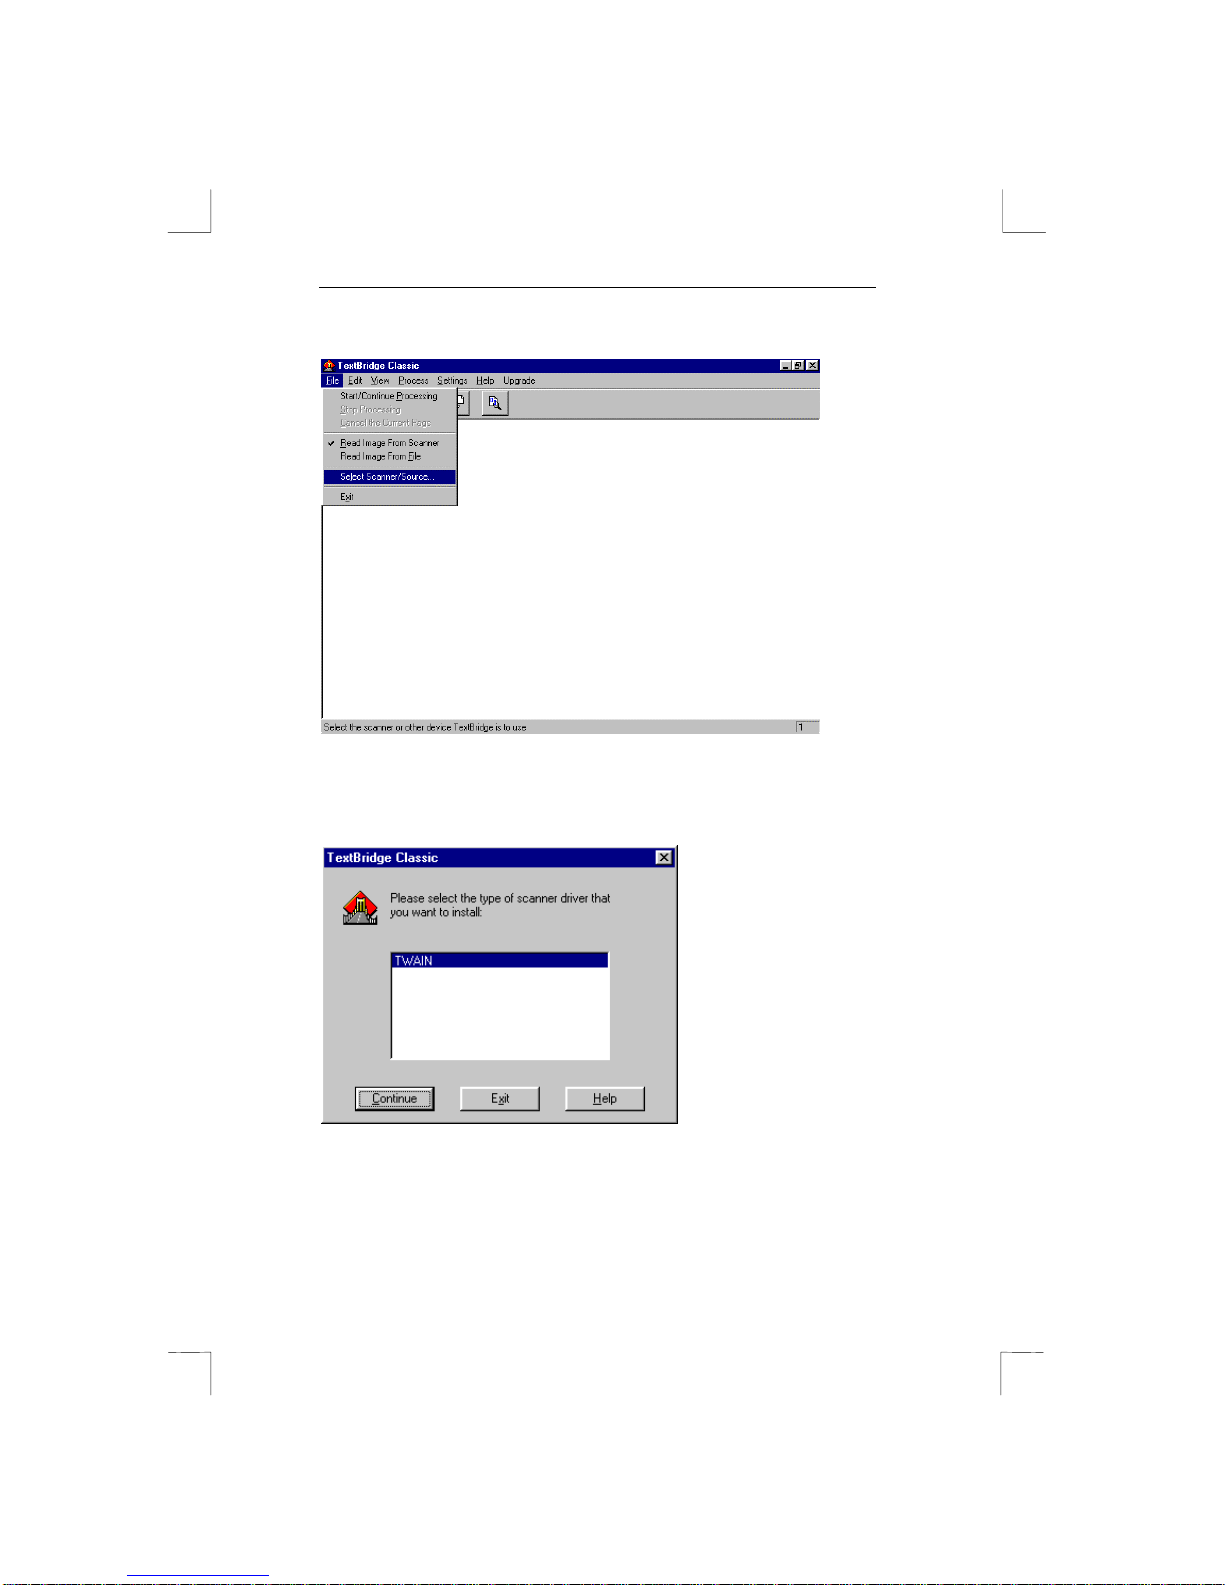
3. Click ‘S elect Scanner/S our c e’ ( see figure 14).
4. A window appears in which you are asked what type of
scanner driver you are using. The 7230 E asy Connect is a
‘TWAIN’ compat ible scanner. Click ‘Continue’ (see figure
15).
5. Click ‘Trust Imagery 7230’ ( see figure 16).
6. To set the scanner in T extBridge, you must f irst have
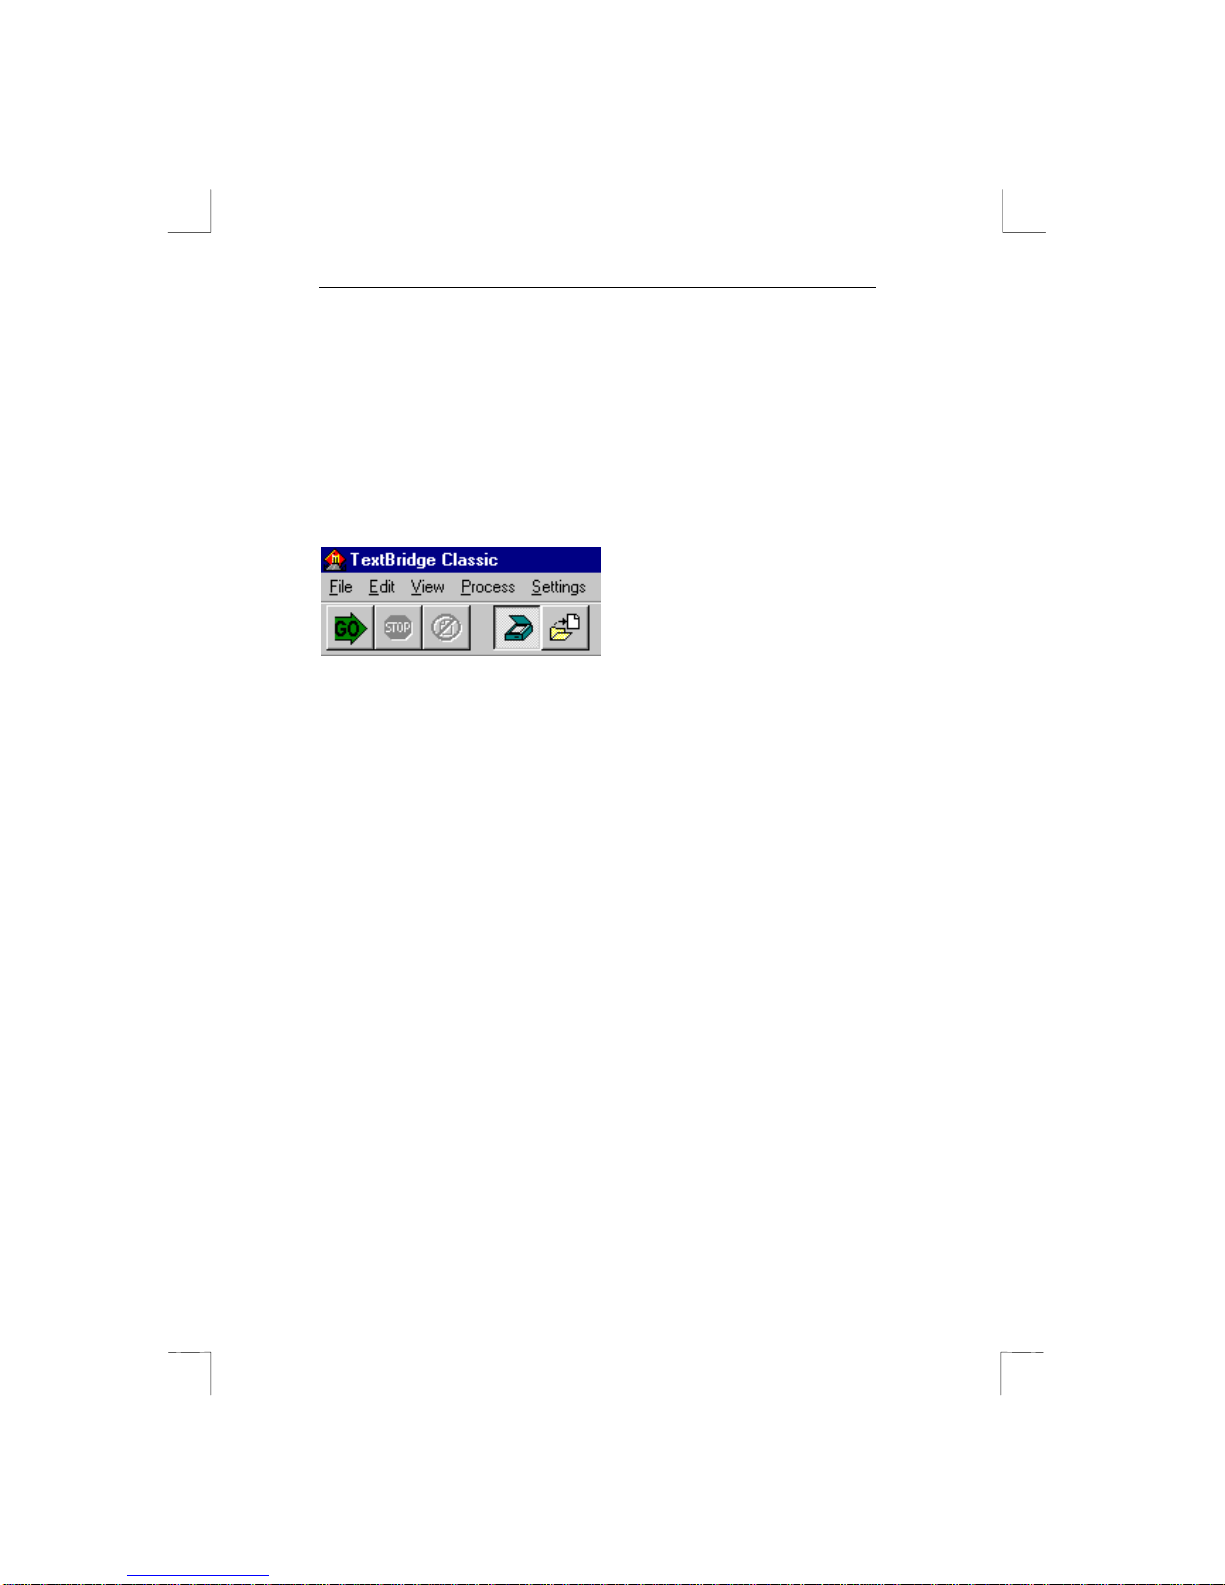
created a scan. Click the ‘Test’ button to do this (see figure
17).The TWAIN window again appears (figure 13). P lace a
sheet containi ng text on the scanner. A lways produce a test
scan first and then select the area to scan using the mouse.
Then make t he scan.
7. After the scan, TextB r idge Classic has been set for your
scanner.
Page 30
7230 Easy Connect
24
Figure 14: The TextBridge Classic selection window
Figure 15: Selecting the scanner driver in TextBridge
Classic
Page 31
7230 Easy Connect
25
Figure 16: Selecting the Trust-scanner in TextBridge
Classic
Figure 17: TextBridge Classic selection window
Page 32
7230 Easy Connect
26
7.2 Scanning with TextBridge Classic
1. Start the ‘TextBridge Classic’ program.
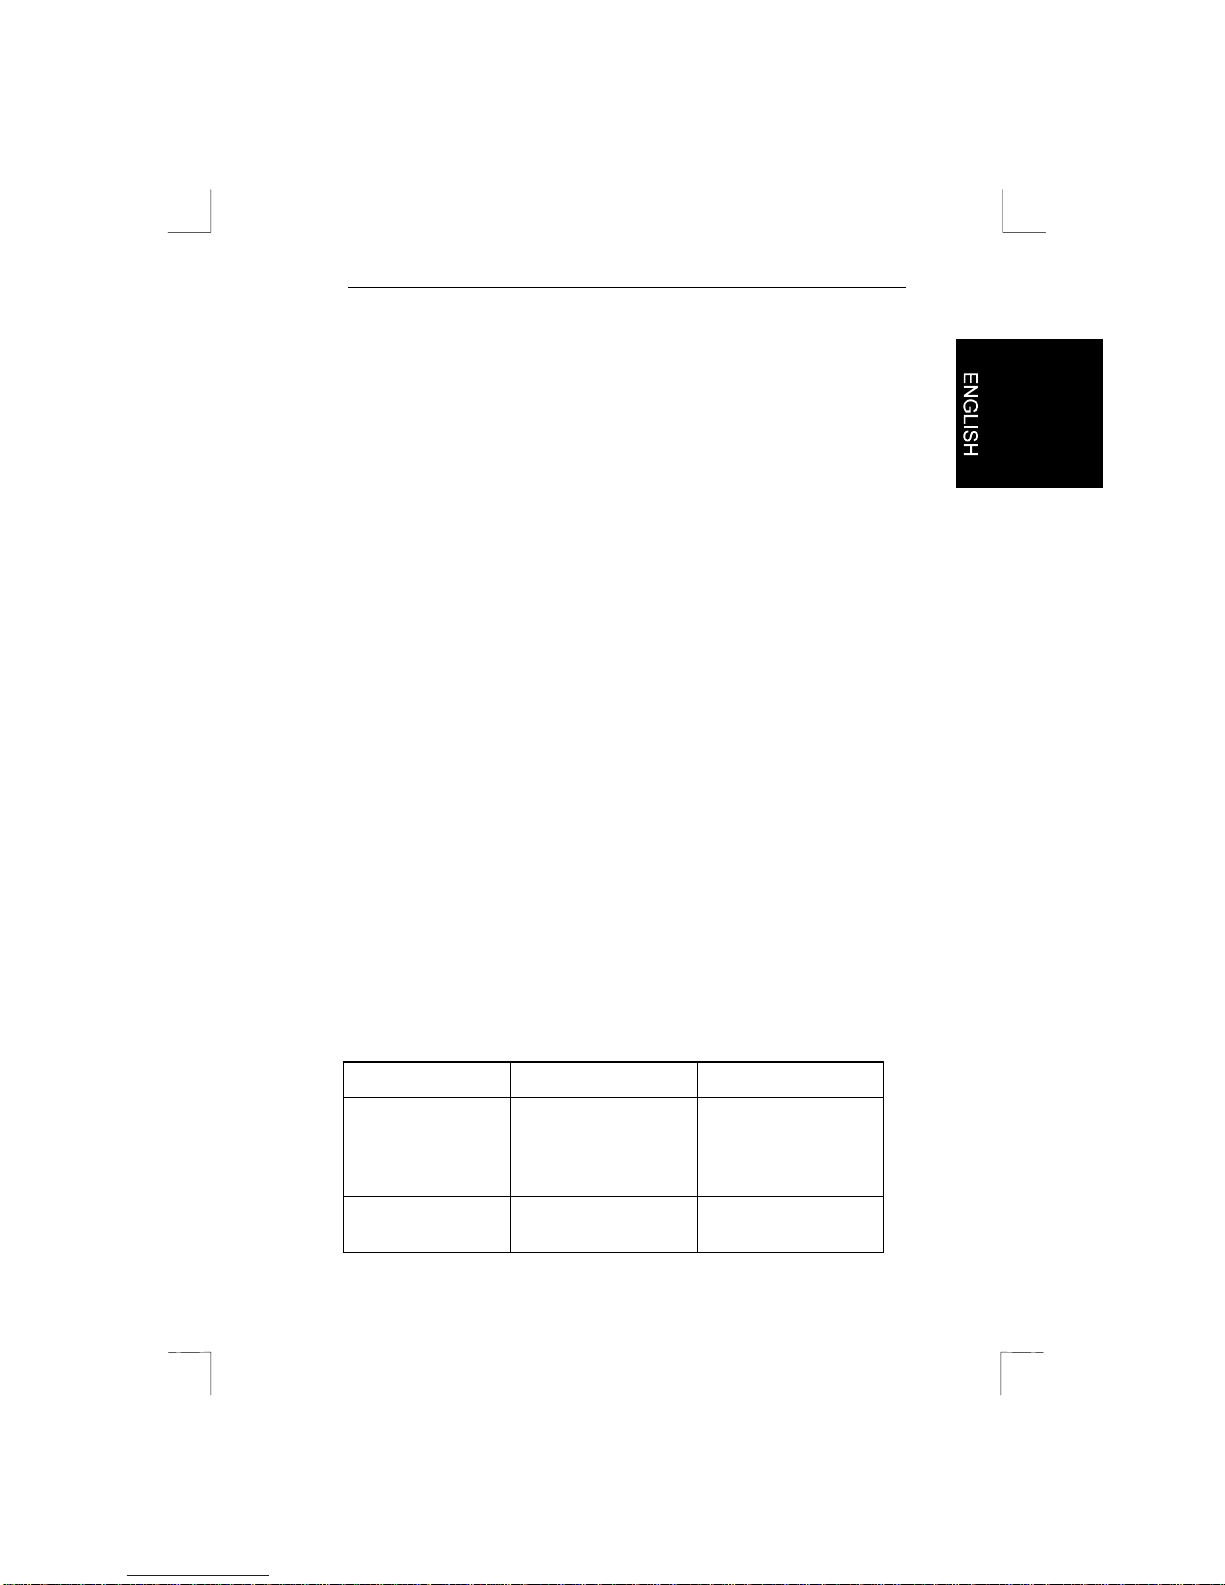
2. Place the object (tex t!) to scan on the scanner.
3. Click the arrow right button ( ‘GO’).
Figure 18: TextBridge Classic selection window
4. The ‘TWAIN’ window appears again. The best sett ings for
scanning the text are a mi nimum of 300 dpi and LineA r t.
5. First produce a test scan and then scan the relevant area.
6. Then cli c k ‘S c an’, the scanner is warmed up and the scan is
produced.
After scanning you can identi fy, edit and save the text.
Page 33
7230 Easy Connect
27
8. Troubleshooting
Tips on proper use of the printer
•
Do not use ‘Print Manager ’ or another print buffer to pr int. In
many cases they m ay not be compati ble with Easy Connect.
Set the pri nter so you print dir ec tly via the printer port. Consult
the printer manual f or further details.
•
Do not set your printer to bi-di r ec tional or ‘Enhanced
Capabilities Printerport’ (ECP). These positions are not
compatible with Easy Connect and must therefor e be switc hed
off. Consult the printer manual for fur ther details.
•
If your scanner and y our pr inter are still not properly set for
each other af ter the abov e tips, use a separate printer por t.
You can acquire t hese from your dealer. Easy Connect can
automatically r ec ognise a maxi mum of three printer por ts.
Naturall y y ou c an also choose to connect the scanner only
when you want to use it. Remove the pl ugs from the printer,
the scanner and the com puter from the socket befor e y ou
change the cables, ot her wise your equipment may become
damaged.
•
It is not necessary to leave t he power supply c able of the
scanner plugged in i f you want to print vi a the scanner.
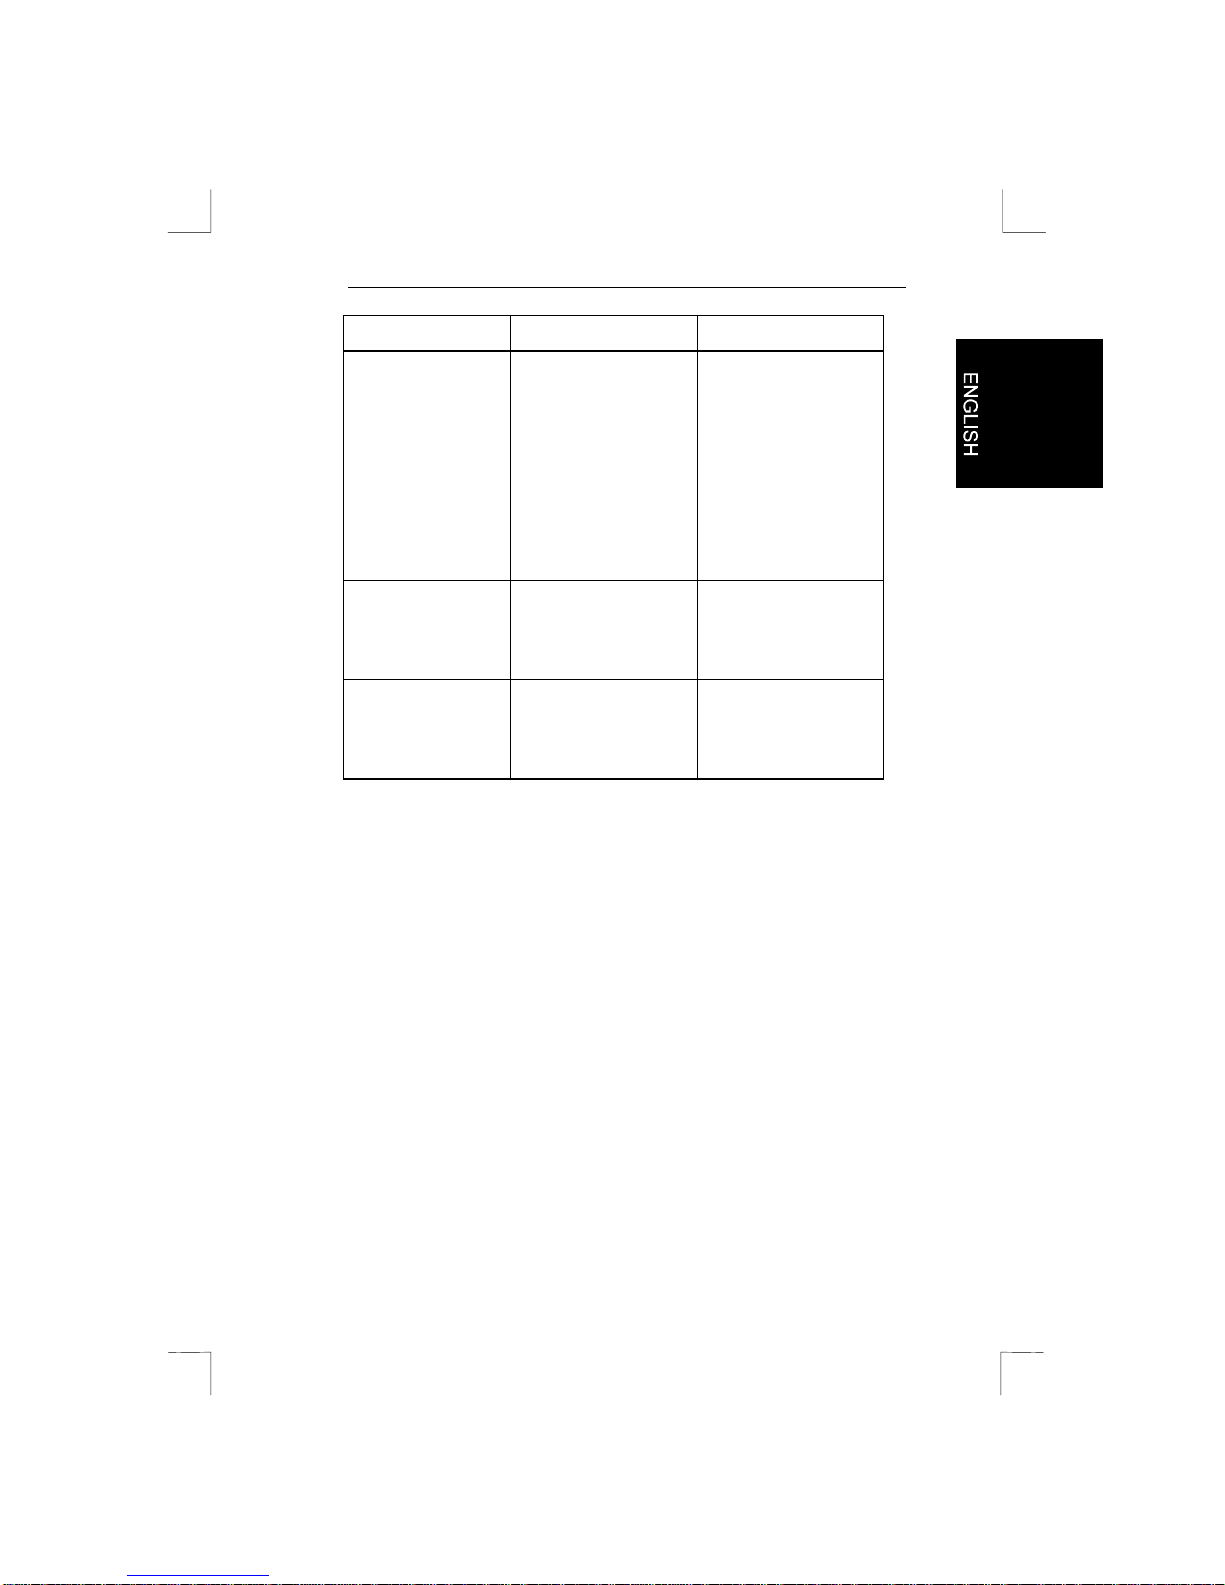
Errors and Solutions
Symptom Possible cause Solution
Scan too dark . Scanner not yet
warmed up.
Let the scanner
warm up for a few
minut es before
scanning.
Monitor t oo dar k . Change the monitor
brightness.
Page 34

7230 Easy Connect
28
Symptom Possible cause Solution
Number of colours
on VGA card too
low.
Set your screen
adapter to a
minimum of 65,535
(16 bit) colours.
Poor scan. Resolution too low. Set resolution in the
TWAIN driver to a
minimum of 300 dpi.
Number of colours
on VGA card set too
low.
Set your screen
adapter to a
minimum of 65,535
(16 bit) colours.
Glass dirty. All
irregular ities on the
glass plate will be
refl ec ted in the
image.
Thoroughly clean
the scanner glass.
Scanner working
very slowly.
Printer por t on the
computer not set to
EPP.
Set the pri nter port
on your comput er to
the EPP position via
the BIOS set up.
Consult your
computer manual.
High resolution set. In practi c e, a
resolution of a
maximum 300 dpi is
sufficient. Only use
high resolutions for
small originals.
Insufficient memory. You need at least 8
MB RAM. 16 MB is
recommended for
Windows 3.11 or 32
MB for Windows 95.
Page 35
7230 Easy Connect
29
Symptom Possible cause Solution
Error message
during the
scanning.
Hard disk full. You need 3 times
the space of the
image t o scan as
free space on the
hard disk. Space
required can be
seen in the TWAIN
window. Create free
space or select a
lower resolution.
Too high a
resolution set.
Select a maximum
of 300 dpi when
scanning an A4
area.
Too large an area
selected.
Select 4, 800 or
9,000 dpi for small
images only ( 5x5
mm).
Page 36

7230 Easy Connect
30
Blank Page
Page 37

7230 Easy Connect
31
Appendix A: Specifications
Resolution: 7200 x 7200 soft ware, 300 x 600 optical
Colours: 30 bit col our , 1,074 million colours
Grey scale: 10 bit, 1, 024 gr ey scales
OCR: 1 bit at 300 dpi and 400 dpi for standar d OCR
programs.
TWAIN: TWAIN32 control pr ogr am for Windows
95/Windows NT 4.0.
TWAIN control pr ogr am for Windows 3.1x.
Interface: Parallel port.
Interface modes: SPP (4 bit nibble), SPP (8 bit bi-directional)
and EPP (8 bit high speed).
Printer port: Connection for EPP/SPP printer. Does not
work with W indows Printing System (GUI)
printers.
Power: 220-250 volt (autom atic) 50/60 Hz, maximum
0.5 A.
Saving mode: Automat ic power saving.
Page 38

7230 Easy Connect
32
Blank Page
 Loading...