

Page 1
TRUST 632AV LCD POW ER VIDEO
1
UK
Instructions when using for the first time Chapter
1. Preparing the camera for use (4.1 to 4.5)
2. Photograph, video and sound recordings (4.6)
3. Playing recordings on the camera (4.7)
4. Installing the driver (5.2)
5. Installing the applications (6)
6. Connecting the camera (5.3)
7. Playing recordings and transferring them to a PC (7.1)
8. Editing recordings on a PC (7.2 to 7.5)
1 Introduction
This instruction manual is for users of the TRUST 632AV LCD POWER VIDEO. This
camera can take photographs with a maximum resolution of 1600 x 1200 (2M pixels)
and record videos in a quality almost equivalent to VHS quality. The camera has an
8 Mbyte internal memory, a webcam function, digital video recording, an automatic
exposure function and a lens with a macro setting for taking close-up pictures. The
camera’s memory can be increased up to a maximum of 512 Mbyte using a CF
memory card. Some models may include a CF card. See the side of the packaging
for more info rmation.
2 Safety
2.1 General information
Carefully read the following instructions before use.
- The TRUST 632AV LCD POWER VIDEO does not require any special
maintenance. Use a slightly damp, soft cloth to clean the camera.
- Do not use aggressive substances, such as white spirit, to clean the device.
These may harm the material.
- Do not submerge the device in liquid. This may be dangerous and will damage
the device. Do not use this device near water.
- Do not repair this device yourself.
- Do not look through the viewfinder if it is aimed directly at the sun, because this
may damage your eyes.
- Do not point the camera directly at the sun for a long period of time, because this
can damage the sensor.
2.2 Batteries
1. The batteries supplied with the camera are not rechargeable. Do not try to
recharge them, The batteries may explode.
2. Never throw the batteries onto an open fire. The batteries may explode.
3. Never drill holes int o the batteries.
4. Keep the batteries out of the reach of small children.
5. Only use AA alkaline or rechargeable AA NiMH batteries with this camera.
6. When the batteries are empty, ask your local authority where you can
dispose of them.
Note: Do not use old and new batteries at the same time, because the old
batteries may leak and cause damage.
Note: The batteries should be removed if the camera is not going to be used
for some time. This will save the battery capacity.
Note: Recordings saved in the internal 8 MB memory will be deleted wh en
the batteries are replaced or become empty. Use a CF card or transfer
Page 2

TRUST 632AV LCD POW ER VIDEO
2
the recordings to your computer before replacing the batteries or
before they become empty.
3 Description of the camera
3.1 Front of the camera
Use table 1 in combination with figure 1.
Item Description Function
1
Exposure button Takes a photograph.
2
Lens Records the image to be taken. Keep your
fingers off of the lens.
3
Macro setting switch Turns the macro setting on and off. The macro
setting is used to take close-up photographs.
4
Mirror For taking self-portraits.
5
Microphone Do not cover this. The sound recorded will not
be loud enough if you accidentally cover this
with your finger.
Table 1: Functions on the front of the camera
3.2 Rear of the camera
Use table 2 in combination with figure 1.
Item Description Function
6
Viewfinder For viewing the image to record. You can also
view the subject by looking at the built-in LCD
screen. The viewfinder is useful in bright light
if the LCD screen is difficult to see.
7
LCD screen For looking to see what the photograph will
look like. Also used to view the photographs
which have been taken and, if desired, to
delete them.
8
Video recording A video clip (with sound) is recorded after
pressing this button once. Press the button
again to stop recording.
9
Menu Turns the camera on and off (after pressing
for 5 seconds) and operates the menu (press
and move upwards or downwards).
10
USB connection For connecting the camera to your computer.
11
Slot for the (optional)
CF card.
Accepts standard Compact Flash (CF)
memory cards. Use a CF c ard to increase th e
number of photographs and the duration of
the video and sound clips.
12
AV connection For connecting the camera to your TV.
13
EJECT button For removing the CF card from the camera.
Table 2: Functions on the rear of the ca mera
Page 3

TRUST 632AV LCD POW ER VIDEO
3
UK
3.3 Right-hand side
Use table 3 in combination with figure 1.
Item Description Func tion
14
Fixing point for the wrist
strap.
For securing the wrist strap to the camera.
15
Speaker For emitting sound from video and sound
recordings.
16
Battery holder For two AA batteries. You can also use
rechargeable NiMH batteries.
17
Screw point for the stand For attaching the stand provided with the
camera or a larger stand. The stand is
useful when using the webcam function.
Table 3: Right-hand side of the camera
3.4 Left-hand side
Use table 4 in combination with figure 1.
Item Description Func tion
18
LCD switch Turns the LCD screen off. This saves the
battery power.
Table 4: Left-hand side of the camera
3.5 Menu system
Use table 5 in combination with figure 8.
Item Description Function
1
Turns the symbols on the LCD screen off.
2
This function selects the display menu for viewing
photographs and playing video and sound recordings.
3
Select this function to record sound in speaking quality.
4
Selects the resolution used to take photographs. High
for sharper pictures and low for more photographs.
5
Degree of data compression for the photographs taken.
Low quality doubles the maximum number of
photographs.
6
Takes a photograph after a time delay of 10 seconds.
Use this option to take photographs of yourself.
7
Deletes all the record ings.
8
Deletes the recordings on the CF card and prepares it
for new record ings.
9
Selects the TV system. This must be set to PAL fo r
Europe.
10
Indicates the condition of the batteries.
Table 5: LCD screen
Page 4

TRUST 632AV LCD POW ER VIDEO
4
4 Using the camera
4.1 Attaching the wrist strap and the sticker
A wrist strap is supplied with the camera. Attach the wrist strap as follows.
1. Insert the thin end of the wrist strap through the eye (14 in figure 1).
2. Make a loop with the string of the wrist strap which has been inserted through
the eye (14).
3. Thread the other end of the wrist strap through the loop made in point 2.
A transparent sticker with brief instructions is also supplied with the camera. Attach
the sticker as follows.
1. Find the sticker printed in the language you prefer. The sticker is printed in a
number of different languages.
2. Fold open the camera’s LCD screen.
3. Remove the back from the sticker to expo se the sticky side.
4. Stick the sticker under switch 18 (see figure 1), i.e. in the space on the
housing which is covered when the LCD screen is folded closed. Do not stick
the sticker over the switch.
Note: Be careful. The sticker cannot be removed at a later date. Any
attempt to remove it may damage the housing.
4.2 Inserting an optional Compact Flash card
A Compact Flash card is supplied with some models. See the contents of the
packaging printed on the box to see whether a Compact Flash card is included with
your camera. You can also purchase these cards separately to increase the number
of recordings that the camera can save.
1. Hold the camera with the lens of the camera facing forwards (see figure 3).
2. Insert the CF card into the camera with the top of the card facing to the left.
3. Press the card firmly into place. The card must not protrude from the camera.
Do not use excessive force to insert the card into the camera.
If you save recordings (without the CF card) in the camera’s internal memory and
insert a CF card into th e camera after th at, the recording s in the internal memo ry will
no longer be visible. Remove the CF card from the camera to view the recordings in
the internal memory. It is not recommended to use the internal memory if you have a
CF card, because the internal memory is deleted if the batteries are replaced or
become empty.
Note: External card reader: use the camera, not the card reader, to format the
card. The camera cannot process the FAT32 or NTFS formats.
Note: Make a back-up of your photographs before using Windows Explorer in
Windows XP. This program may alter your photographs and this cannot
be undone.
Note: After taking a photograph, wait at least 5 seconds before opening the
battery compartment . If the camera is still writin g data to the card w hen
the batteries are removed, all the photographs on the card may be
deleted.
Note: Keep the CF card where it is free of dust. Dust and sand can enter the
holes in the card’s connection point and damage the camera or the card.
Page 5
TRUST 632AV LCD POW ER VIDEO
5
UK
4.3 Inserting the batteries
Also see figure 4.
1. Open the battery flap.
2. Insert the two AA batteries into the camera as shown above the battery
holder.
3. Close the battery flap by sliding it closed.
4. The TRUST 632AV LCD POWER VIDEO is now ready for use.
Note: Only use non-rechargeable alkaline batteries or NiMH 1600 mA, or
higher, rechargeable batteries. Other types of batteries do not work
correctly in this came ra.
Note: Digital cameras use a lo t of power. The ba tteries will last
approximately one hour if the LCD screen is used. They may not last
as long if video is recorded continuously. The life span of the batteries
also depends on the make and type of batteries and the make and
capacity of the CF card. Use Duracell Ultra batteries or rechargeable
NiMH batteries for a longer life span. Turning off the LCD screen will
also make the batteries last longer.
Note: Recordings saved in the internal 8 MB memory will be deleted wh en
the batteries are replaced or become empty. Use a CF card or transfer
the recordings to your computer before replacing the batteries or
before they become empty.
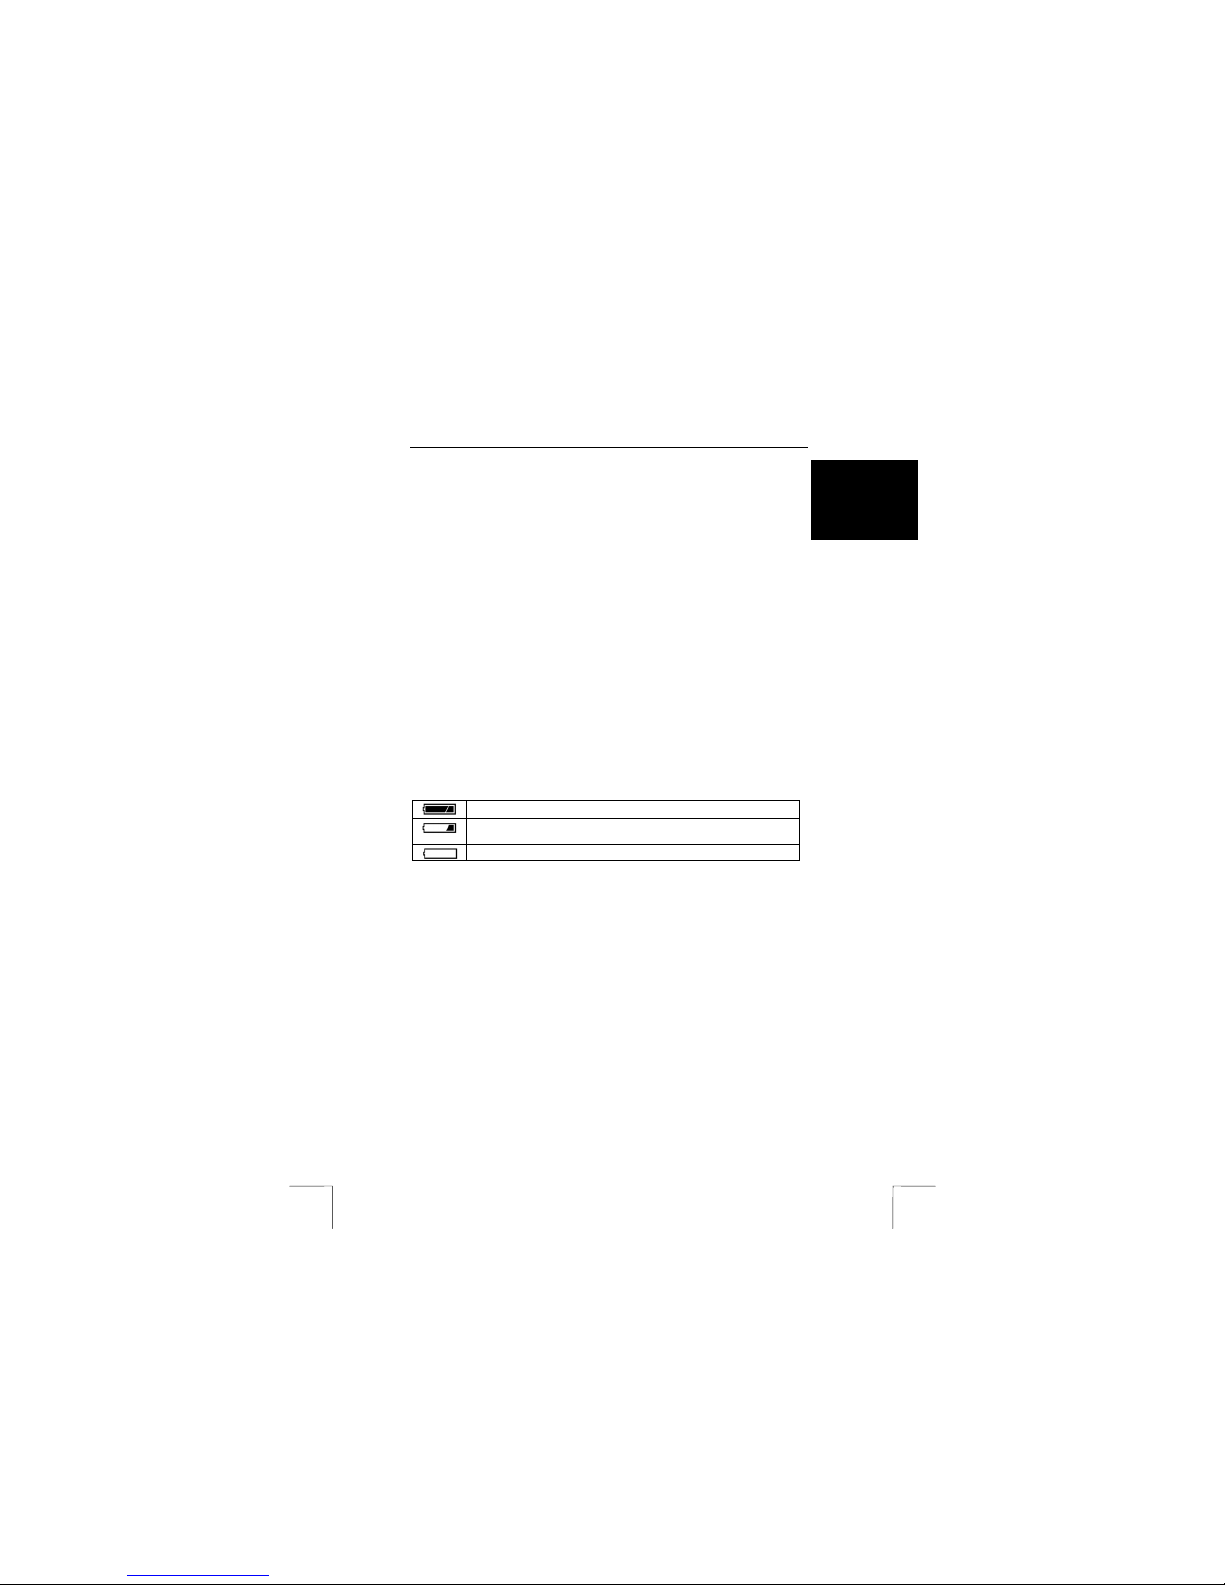
The battery condition is shown on the LCD screen (10, figure 2) as follows.
The batteries are full.
The battery capacity is low. Only a few more photographs can be
taken.
The batteries are empty.
Table 6: Battery conditions
4.4 Turning the camera on and off
See figure 1 on the first page of this instruction manual. The camera does not have
a separate ON/OFF switch. Turn the camera on using the menu button (9) as
follows.
1. Unfold the LCD screen.
2. Press the menu button and keep it pressed. The red LED on the rear of the
camera will be lit.
3. Wait 5 seconds whilst keeping the button pressed. A noise will be heard. The
camera has now been turned on.
4. In order to use the LCD screen, check whether the LCD switch (18) is
pointing upwards. The LCD screen is turned off if this switch points
downwards. Turning the LCD screen off will increase the lif e span of the
batteries.
Turning the camera off
1. Press the menu button and keep it pressed.
2. Wait 5 seconds whilst keeping the button pressed. The LCD screen will turn
off. The camera has now been turned off.
Page 6

TRUST 632AV LCD POW ER VIDEO
6
Tip: The camera turns off automatically if it is not used for approximately 1
minute.
4.5 Menu system
See figure 1. Most settings are available on the LCD screen via the menu. Use the
menu as follows.
1. Turn the camera on (see chapter 4.4).
2. Press the menu button for a short period. The menu will be displayed. A
short description of the symbols is given in figure 2 and table 5.
3. Push the menu button downwards to move down items and push the menu
button upwards to move up items.
4. Press the menu button for a short period to select an item.
Select option 1 (see figure 2) to turn off the symbols.
Tip: The menu can also be viewed on a TV screen if the camera is connected to
the TV using the AV cable.
4.6 Settings
4.6.1 LCD screen
The LCD screen can be turned off to save the batteries. The LCD switch is button 18
in figure 1. Slide the button:
- Upwards to turn the LCD screen on.
- Downwards to turn the LCD screen off.
4.6.2 Resolution
You can take photographs in three different resolutions using the TRUST 632AV
LCD POWER VIDEO, namely 1600 x 1200, 1280 x 1024 and 640 x 480. The default
resolution when the camera is turned on is 1280 x 1024 (1.3M). Carry out the
following if you wish to set the camera to a higher or lower resolution.
1. Make the menu visible using the menu button.
2. Scroll to the resolution symbol (4 in figure 2).
3. Press the menu button for a short period to change the resolution to a
different resolution. If the camera was already in the highest resolution, the
resolution will be changed to the lowest resolution (see table 7).
L Low Resolution is 640 x 480 (VGA).
N Normal Resolution is 1280 x 1024 (1.3M pixel).
H Maximum Resolution is 1600 x 1200 (2.0M pixel).
Table 7: Summary of the symbols used on the LCD screen to indicate the
photograph resolution
4.6.3 Quality
You can take photographs in a high and a low quality using the TRUST 632AV LCD
POWER VIDEO. The resolution remains the same, but twice as many photographs
can be saved in the memory by using a higher compression. However, a higher
compression may cause distortion in the image. When the camera is turned on, it is
set to high quality. Carry out the following if you wish to set the camera to the low
quality.
1. Make the menu visible using the menu button.
2. Scroll to the quality symbol (5 in figure 2).
Page 7

TRUST 632AV LCD POW ER VIDEO
7
UK
3. Press the menu button for a short period. The quality will be set to low. If the
quality was already set to low (small star), the quality will now be set to high
(large star).
If the camera is turned off, it will be set to the high quality again when it is turned
back on.
4.6.4 Video standard
The TRUST 632AV LCD POWER VIDEO has a video output. The default setting is
for use in Europe (PAL). If you wish to connect the camera to a TV in the USA, set
the output to NTSC.
1. Make the menu visible using the menu button.
2. Scroll to the TV symbol (9 in figure 2).
3. Press the menu button for a short period. The camera will be set to NTSC
and will restart. The image on the LCD screen may flash.
Repeat the procedure to return the camera to the PAL setting. The setting will
remain the same when the camera is turned off. This setting can also affect the
video and webcam image. Leave this option set to the PAL standard if you use the
camera in Europe or other countries which use the PAL standard. The camera
cannot be configured for the French SECAM system.
Tip: Video clips can only be recorded in one quality. Therefore, no resolution
or quality can be selected.
4.6.5 Macro setting
Objects photographed at a distance of less than 2.5 metres are not sharp. Use the
macro setting to make these photographs sharp. This setting works up to a minimum
distance of 40 cm. Objects photographed at a distance greater than 2.5 metres will
not be sharp when the macro setting is selected. Select the macro setting as follows.
Macro setting
1. Direct the camera towards the object that you wish to photograph.
2. Rotate the len s ring anticlockwise. You will fe el two clicks, one when it exits
the normal setting and one when the macro setting is reached. The arrow on
the lens ring will now b e pointing at the flower symbol.
Normal setting
1. Direct the camera towards the object that you wish to photograph.
2. Rotate the len s ring clockwise. You will feel two clicks, one when it exits the
macro setting and one when the normal setting is reached. The arrow on the
lens ring will now be p ointing at the mountain symbol.
Note: Do not forget to return the camera to the normal setting after taking
photographs in the macro setting. When in the macro setting, normal
photographs are not sharp. This will be difficult to notice on the L CD
screen or through the viewfinder.
Note: The viewfinder may be inaccurate when the macro setting is selected.
Record a slightly large frame to avoid having parts of the object not
being included in the photograph. You can also use the LCD screen,
because this is always more accurate.
Page 8
TRUST 632AV LCD POW ER VIDEO
8
4.7 Making recordings
4.7.1 The first photograph
Comment: To save the batteries, the camera will turn off auto matically when it
has not been used for 1 minute.
See figure 1.
1. Turn the camera on (see chapter 4.4).
2. Fold the LCD screen open.
3. You can turn on the LCD screen using the LCD switch (18) or you can use
the viewfinder (6).
4. Turn the menu off if it is visible. You cannot take photographs if the menu is
visible.
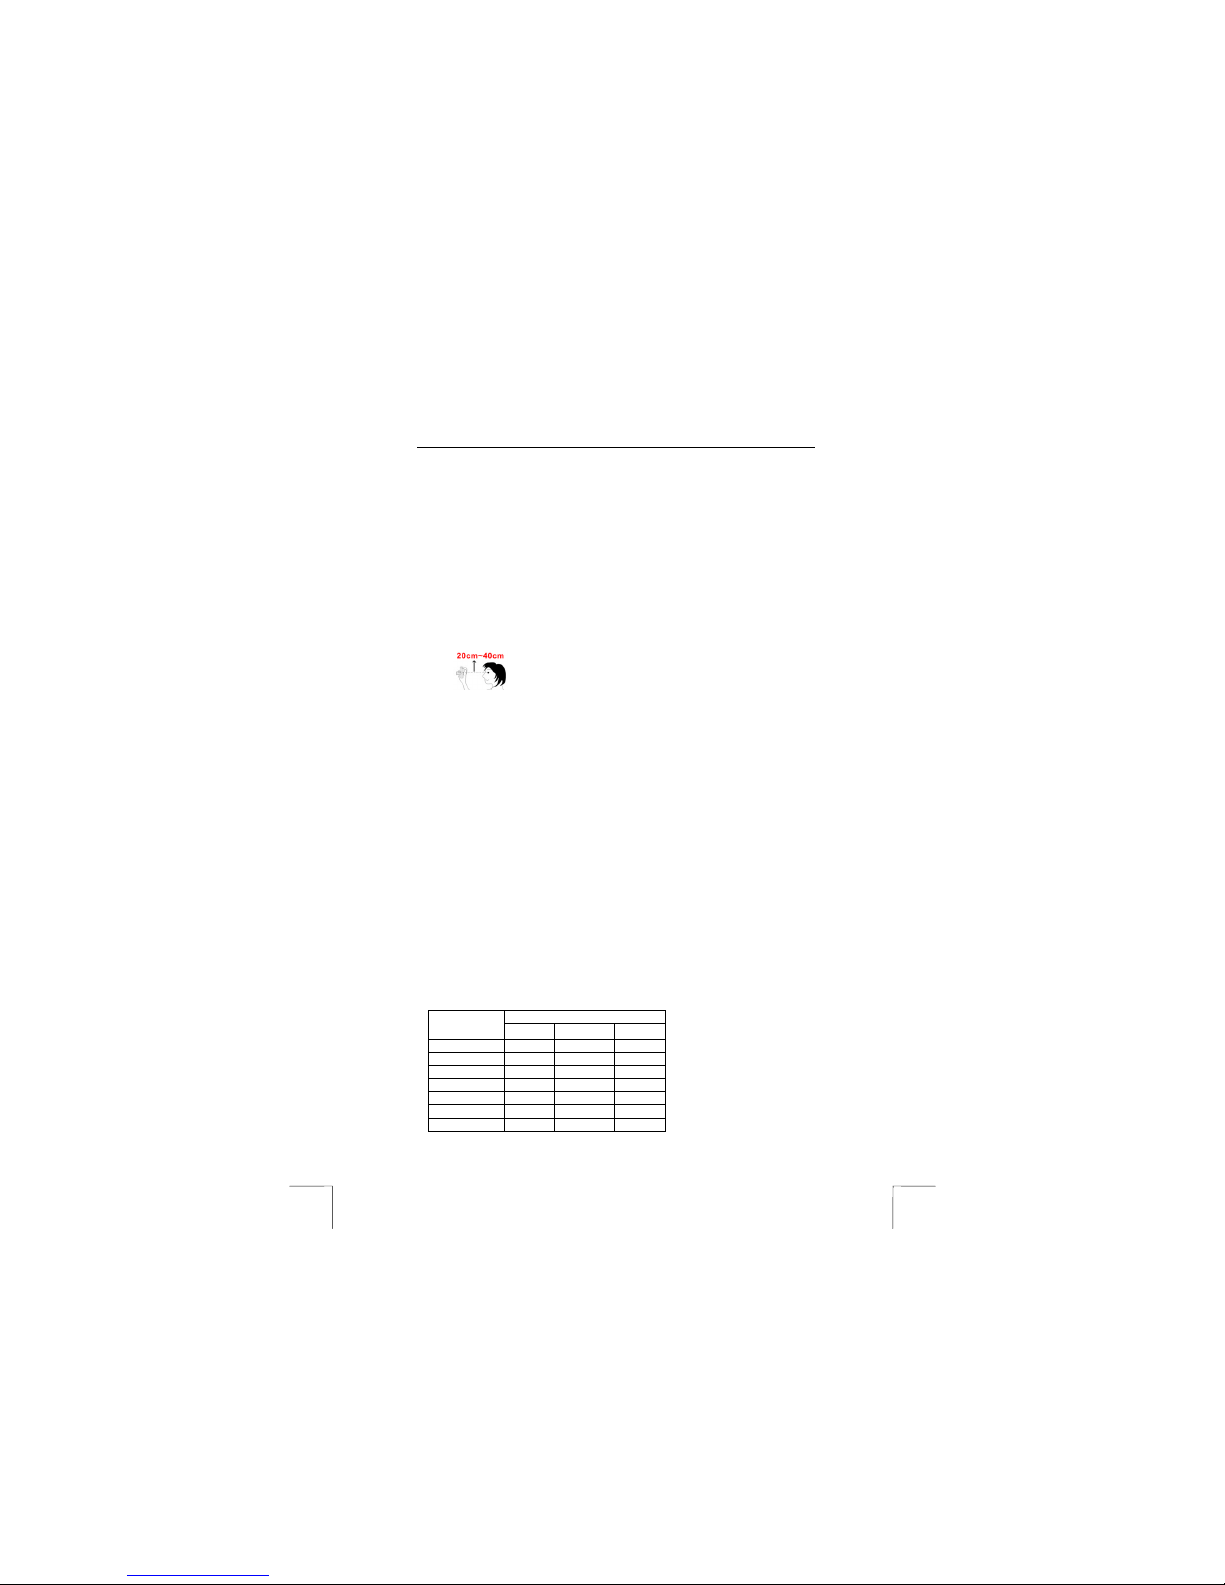
5. If you use the viewfinder, hold it in front of you 20 to 40 cm from your eyes.
The viewfinder has been designed to be used this way because there is no
space for your face close to the camera.
6. Focus the object to be photographed. If necessary, use the macro setting
(see chapter 4.6.5).
7. Hold the camera st ill.
8. Press the exposure button (1). The photograph will now be taken. The image
on the LCD screen will disappear for a short period of time and the LED
indicator (above the video button) will be lit.
9. Wait until the camera is ready. The camera is ready to take another
photograph when a noise is heard and the LED is turned off.
Note: Keep the glass of the lens clean. Use a cotton bud to clean the lens.
If necessary, use special cleaning liquid for camera lenses. Do not
use a different cleaning product.
Note: All the recordings in the camera’s internal memory are deleted when
the batteries are replaced or when they become empty. Transfer the
photographs to your computer before replacing the batteries or use a
CF card. A CF card saves recordings even without batteries.
Tip: The quality of the photograph depends on the surrounding light. More
light will result in a b etter picture.
Tip: The number of photographs that can be taken depends on the
number of details of the object to be photographed. The specifications
are an approximation.
Tip: The image viewed through the viewfinder may be slightly different to
what is recorded through the lens. You can use the LCD screen for
greater accuracy.
Resolution/photographs
CF memory
card
High Normal Low
None 11 24 88
16 MB 18 37 150
32 MB 36 75 352
64 MB 74 150 585
128 MB 140 290 1100
256 MB 270 550 2100
512MB 525 1100 2400
Page 9
TRUST 632AV LCD POW ER VIDEO
9
UK
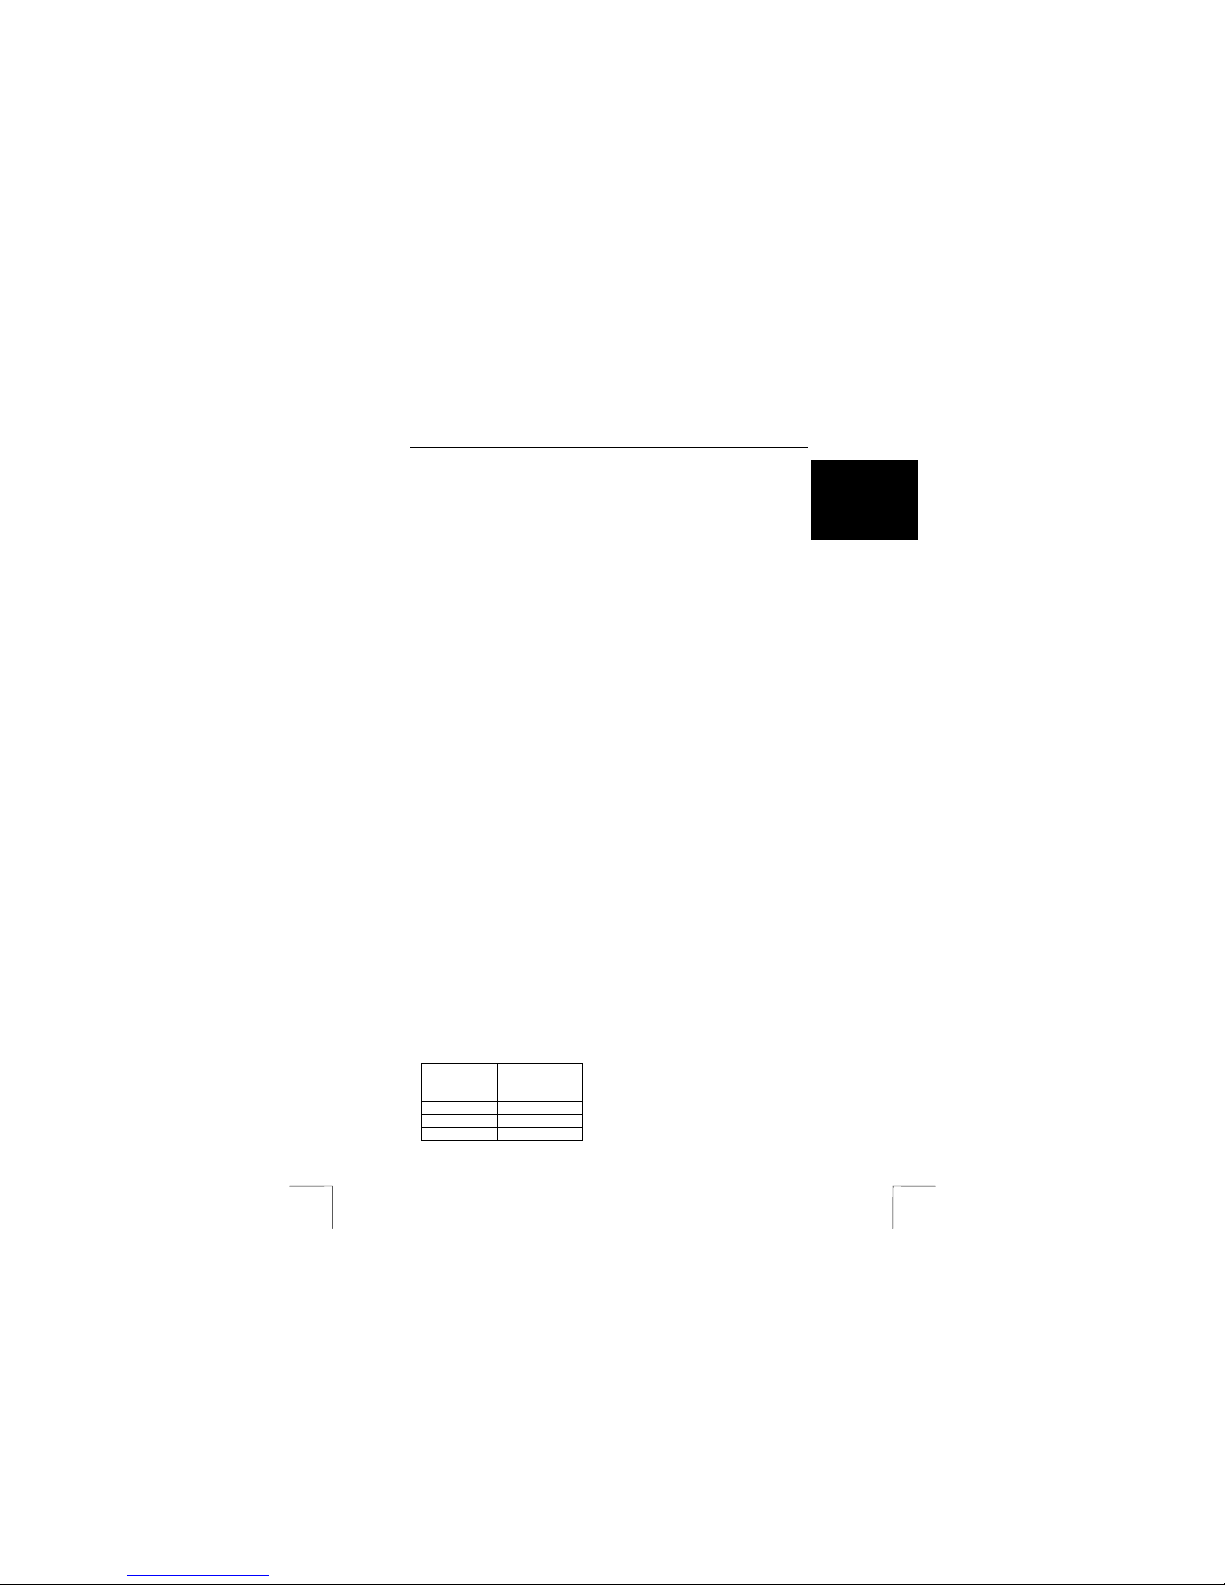
Table 8: Maximum number of photos. This number can be doubled by changing
the quality to ‘Low’. If the CF card is full, it can be r emoved and
recordings can then be saved in the internal memory.
4.7.2 Taking photographs using the automatic exposure function
Also see figures 1 and 2. You can take a photograph of yourself using the automatic
exposure function. The camera has a built-in mirror on the front (4, figure 1) which is
used to see approximately what will be photographed. Another use for this mirror is
to make a recording in poor lighting without affecting the sharpness.
1. Place the camera on the stand.
2. Turn the camera on (see chapter 4.4).
3. Direct the camera at the subject to be photographed. If necessary, use the
LCD screen.
4. Select the automatic exposure function using the menu button. This is
symbol 6 in figure 2.
5. Press the exposure button (button 1 , figure 1). The LED will sta rt to flash
slowly. The LED will flash mo re quickly just before the photograph is taken. A
signal will be heard. The photograph has been taken when the LED is no
longer lit.
6. Exit the menu to turn off the automatic exposure function.
4.7.3 Recording video clips
See figure 1. Carry out the following to record a video clip.
1. Turn the camera on (see chapter 4.4).
2. Turn the menu off if it is visible. You cannot record a video clip if the menu is
visible.
3. Direct the camera at the subject. If necessary, use the LCD screen.
4. Press the video button (button 8, figure 1). The camera will now start
recording. The LED above the video button will flash. The counter for the
elapsed time will be visible on the LCD screen.
5. Press the video button to stop recording. A sound will be heard and the
recording will be stopped.
Tip: The quality of the video recording depends on the surrounding light.
More light will result in a better image.
Tip: The maximum duration of a video recording depends on the camera’s
memory. An approximation is given in table 9.
Tip: The result will be b etter if you move the ca mera slowly or hold it still
whilst recording. Quick movements may lead to jerky images,
because the video clip is recorded at 10 images per second, which is
less than the standard 25 images per second.
Tip: The batteries w ill last longer if you turn off the LCD screen and use
the viewfinder.
Comment: The camera makes a new video clip each time a video recording is
started. These clips can be edited together to make a film at a later
date using the software supplied with the camera. Many short clips
are more difficult to edit than less, but longer clips.
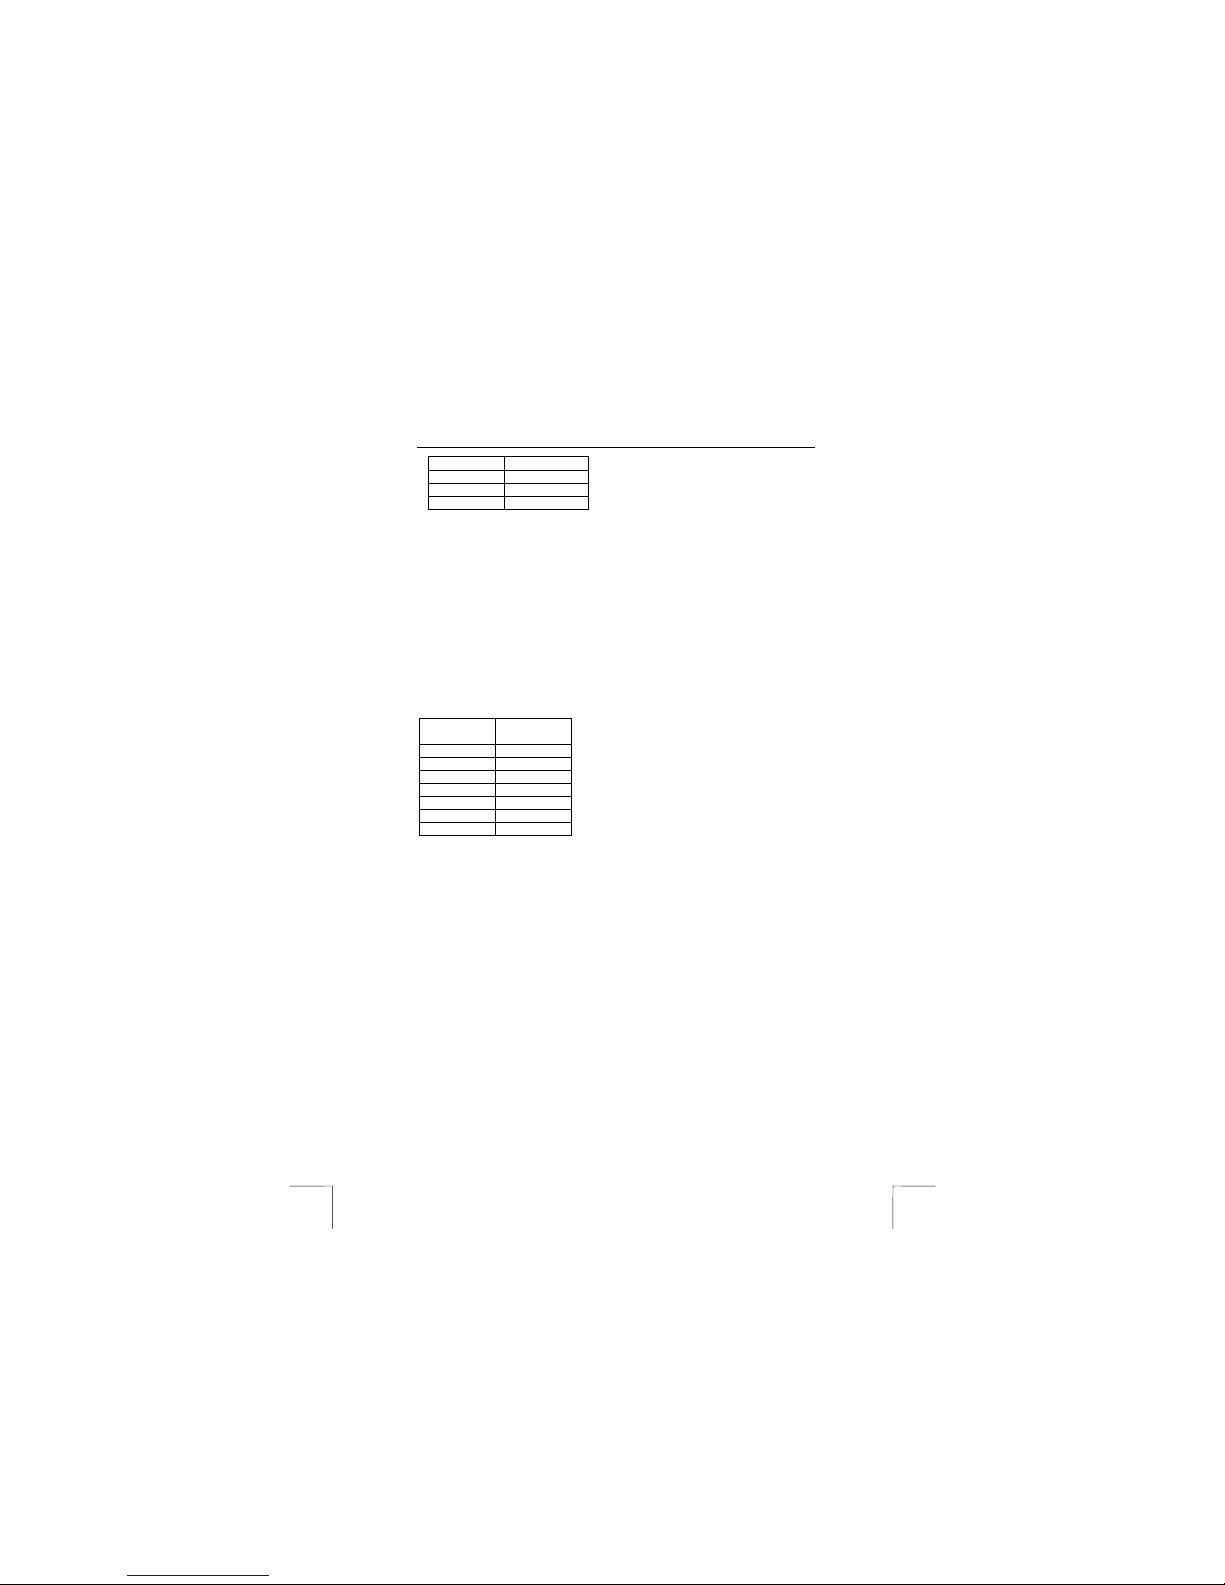
CF memory
card
Recording
time
(minutes)
None 1.5
16 MB 4
32 MB 6
Page 10
TRUST 632AV LCD POW ER VIDEO
10
64 MB 20
128 MB 24
256 MB 48
512 MB 96
Table 9: Total time duration of video clips. The actual duration depends on the
subject and can be up to 40% longer. The CF card can be removed when it is
full. You can then save recordings in the camera’s internal memory.
4.7.4 Memo recorder (audio recordings)
See figure 1.
Carry out the following to make audio recordings.
1. Turn the camera on (see chapter 4.4).
2. Select the audio recording function using the menu button. This is symbol 3
in figure 2. The camera will immediately make an audio recording. The LED
will flash. The counter for the elapsed time will be visible on th e LCD screen.
3. Press the menu button to stop recording. A sound will be heard and you will
return to the menu.
The maximum time duration for audio recordings depends on the CF card inserted
into the camera (see table 10).
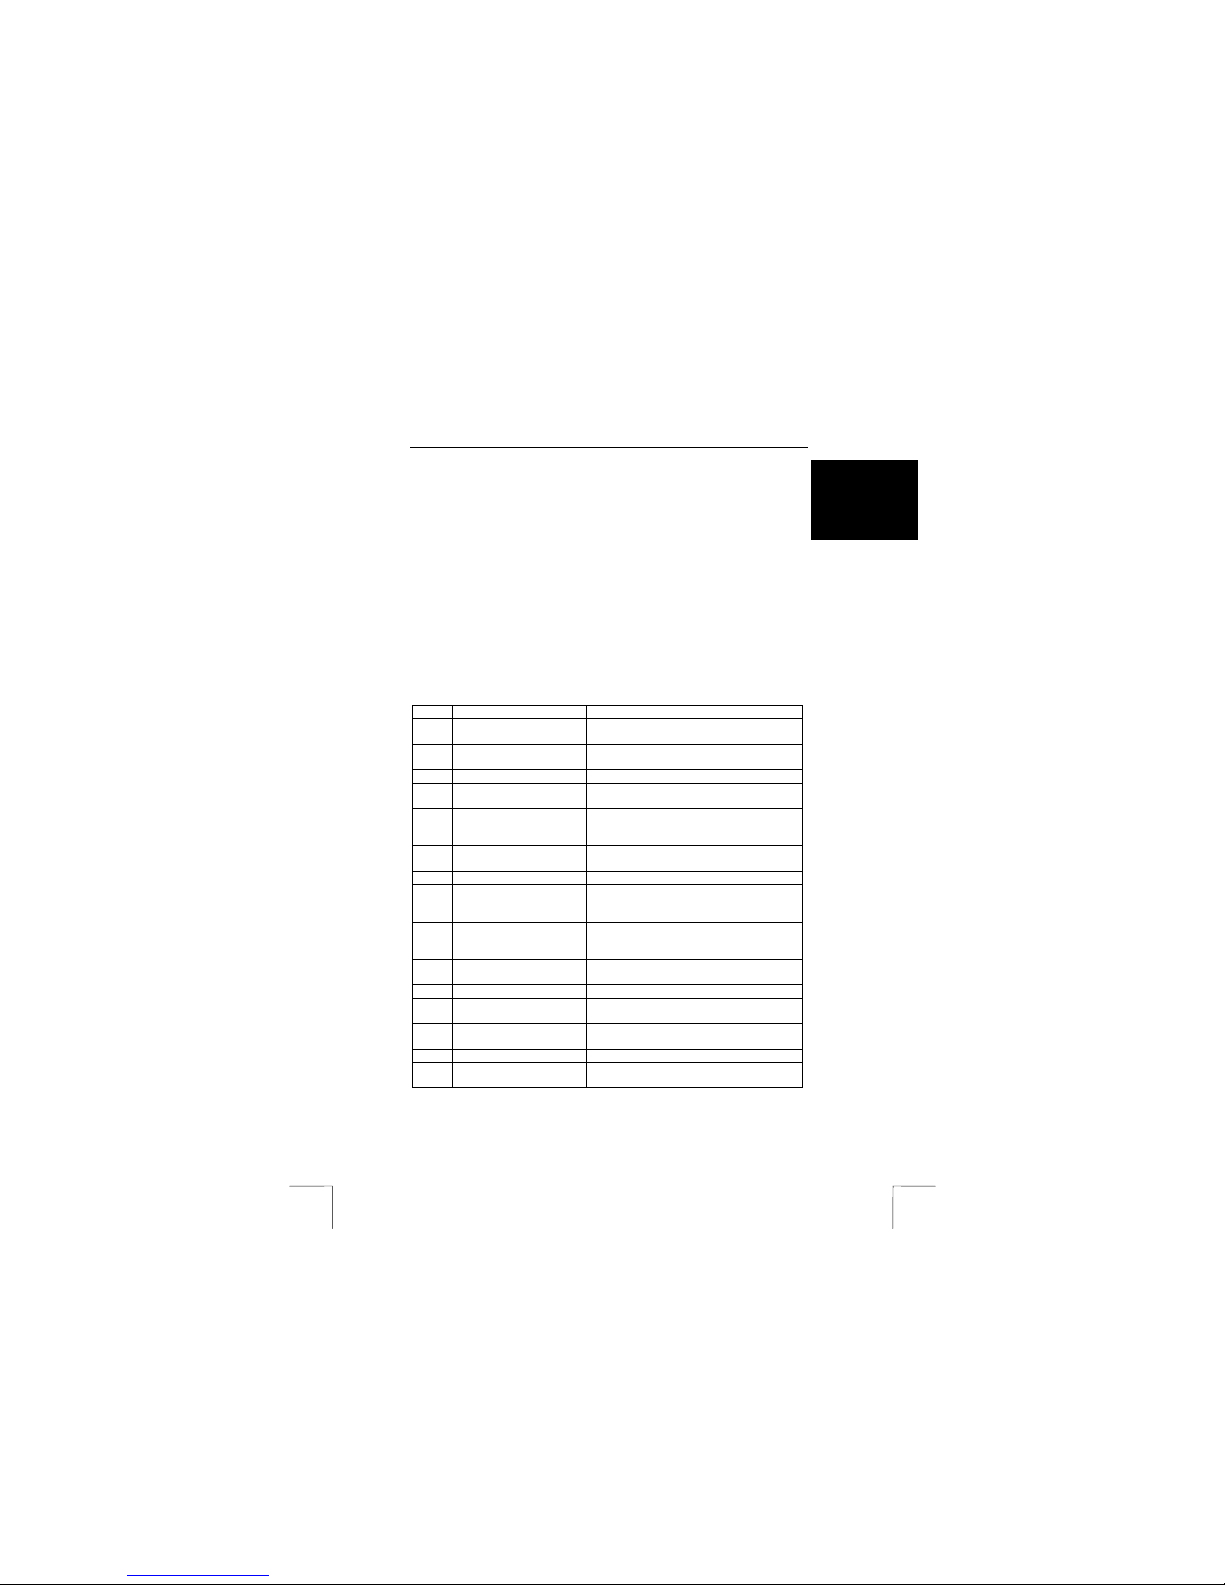
CF memory
card
Recording
time (hours)
None 0.5
16 MB 1
32 MB 2
64 MB 4
128 MB 8
256 MB 16
512 MB 32
Table 10: Total time duration of audio recordings. The CF card c an be removed
when it is full. You can then save recordings in the camera’s internal memory.
4.8 Viewing and deleting recordings
4.8.1 Viewing
Recordings are played via the PLAY menu. All the recordings (video, photo or
sound) which can be viewed from this menu are displayed as icons. The files can
only be played one at a time on the camera. You can connect a TV to the camera
via the AV output so that you can view and listen to the recordings on your TV. Carry
out the following to go to the PLAY menu.
1. Make sure the camera is turned on.
2. Make the menu visible by pressing the menu button once.
3. Scroll to the play symbol (2, figure 2).
4. Press the menu button for a short period. You will now be in the play menu.
All the photographs, video recordings and audio recordings will be visible as
icons.
5. Scroll to the file that you wish to play.
6. Press the menu button for a short period. The recording will be played.
7. Press the menu button for a short period to stop playing the recording.
8. Press the video button to exit the play menu. You will return to the ma in
menu.
When playing a recording, you can play the next or the previous recording by
moving the menu button upwards or downwards.
Page 11

TRUST 632AV LCD POW ER VIDEO
11
UK
4.8.2 Deleting selected recordings
Delete files that you no longer require.
1. Open the play menu (chapter 4.8.1, points 1 to 4).
2. Scroll to the file you wish to delete.
3. Play the file if you are not sure whether you have selected the correct file.
4. Press the exposu re button (1, figu re 1). The file’s icon will change into a
dustbin icon. If, after further inspection, you do not wish to delete this file,
scroll to another file and press the exposure button.
5. Press the exposure button again to delete the recording. The file will be
deleted.
6. Repeat points 2 to 5 until all the files you wish to delete have been deleted.
7. Press the video button to exit the play menu.
4.8.3 Deleting all the recordings
1. Make sure the camera is turned on.
2. Make the menu visible by pressing the menu button once.
3. Scroll to the delete symbol (7, figure 2).
4. Press the menu button for a short period. The symbol will start to flash.
5. Consider whether you wish to delete all the recordings. Scroll to another item
to cancel the deletion.
6. Press the menu button for a short period again. The contents of the memory
will now be deleted .
Tip: Instead of deleting all the recordings from a CF card, you can also
choose ‘Format’ (symbol 8, figure 2). The result will be the same, i.e.
all the files will be d eleted. Formatting is recommended when using a
new memory card or if the memory card can no longer be used.
Note: Deleted files cannot be retrieved. Your recordings will be deleted for
good after carrying out the instructions given above.
4.8.4 Connecting the camera to a TV
The camera can be connected to a TV. You will then be able to play all the
recordings (including audio recordings) on the TV. The LCD screen will be turned
off. A standard RCA AV cable is supplied with the camera.
1. Connect one end of the AV cable to the camera (12, figure 1).
2. Connect the other end of the AV cable to your TV. Your TV must have a
video input. The yellow plug is for the image signal and the white plug is for
the sound signal. You will need an adapter if your TV only has a SCART
plug. This can be purchased from most TV and radio shops.
3. Set your TV to display the video input.
4. Turn the camera on (see chapter 4.4). The camera image will now be visible
on your TV. You can also use the menu according to figure 2.
Note: The camera’s AV output is not suitable for connecting to the aerial
connection on your TV. Your TV must have a video input.
Tip: If you do not see an image and hear a loud humming sound through
the speakers, then you may have connected the image and audio
plugs to the wrong connections. Swap the image and audio plugs and
try again.
Page 12

TRUST 632AV LCD POW ER VIDEO
12
5 Installing the software
5.1 Removing old drivers and devices
The most common cause of faults during installation is the presence of a driver for a
similar, old device. The best solution is to first remove all drivers related to old
devices before installing the new driver. Make sure you only delete programs for old,
unused (similar) devices.
Old drivers for webcams, TV cards and video editing cards can affect with the
webcam function (live image).
1. Enter the Windows ‘Safe Mode’ (press F8 when starting Windows and then select
‘Safe Mode’ from the menu which will be displayed).
2. Click on ‘Start – Settings – Control Panel’ and double-click on the ‘Add/Remove
Programs’ icon.
3. Find all the programs for similar, old devices and remove these by clicking on the
‘Add/Remove’ button. When in the ‘Safe Mode’, it is possible for some programs
to appear twice. In that case, remove all the programs which appear twice.
4. Restart the computer.
5.2 Installing the driver in Windows 98SE / Windows ME /
Windows 2000 / Windows XP
Note: Windows XP and Windows 2000 users: The instructions given below can
only be carried out if you are logged on as ‘Administrator’.
Note: This device has not been designed to work in Windows 98 (Windows 98
SE not included). Although some functions will work, stable operation is
not guaranteed. The device does not work in any versions of Windows
95.
Tip: The latest driver can be downloaded from www.trust.com/13339. Check
whether a new driver is available and use this for the installation. The
current version of the driver is included on the Trust Installation CDROM.
Note: Make sure all other programs are closed during the installation.
Note: During installation in Windows 2000 and Windows XP, you may receive
a message saying that the driver has not been signed. This does not
cause a problem for the functionality.
Note: In the example, ‘D:\’ is used to indicate the CD-ROM drive. This may be
different for your computer.
1. Insert the CD-ROM from the CD-ROM set into your computer’s CD-ROM
drive. The installation program will start automatically. If it does not start
automatically, carry out the following:
a) Select ‘Run’ from the Start menu.
b) Type [D:\SETUP.EXE] and click on 'OK' to start the Trust Software
Installer.
2. The Trust Software Installer window will appear See figure 11.
3. Select the language you wish to use for the installation.
4. Click on ‘TRUST 632AV LCD P OWER VIDEO‘ to start the installation of the
camera.
5. Follow the on-screen instructions.
The installation of the driver and software for the TRUST 632AV LCD POWER
VIDEO has now been completed. The installation of the other programs is described
later in this instruction manual.
Page 13

TRUST 632AV LCD POW ER VIDEO
13
UK
5.3 Connecting the camera
1. Make sure your computer is turned on.
2. You will also need your original Windows installation CD-ROM. Make sure
you have this available.
3. Connect the USB cable to the camera’s USB port (10, figure 1). Connect the
other end of the USB cable to your computer. Windows will detect and install
the camera. Follow the on-screen instructions. The camera has been
installed correctly once all the windows are closed. The drivers for the
camera’s storage device have now been installed.
4. Select the ‘Live’ option from the camera menu (see figure 8). Windows will
detect and install the webcam component of the camera.
5. Follow the on-screen instructions. You require your original Windows
installation CD-ROM for th e installation.
6. After the installation, insert the Trust CD-ROM back into your CD-ROM drive.
You will receive an error mess age if you try to continue without having the
Trust CD-ROM in your CD-ROM drive.
7. The camera has been installed correctly once all the windows are closed. It is
now possible to download photographs from the camera onto your computer
and to use the camera as a webcam. See chapter 7 for more information.
Tip: The above can also be carried out without any batteries being inserted
into the camera.
5.4 Checking after the installation
After installing the device and the drivers, the following are installed on your
computer and can be checked (connect the camera and turn it on).
‘Start – Settings – Control Panel’. Double-click on the ‘System’ icon and select the
‘Device Manager’ tab.
If used as a webcam (‘Live’ option):
- Imaging device – TRUST 632AV LCD PV(Video)
– TRUST 632AV LCD PV(S till)
If used to download photographs:
- Disk drives – TRUST 632AV LCD PV
- Harddisk controllers – TRUST 632AV LCD PV
And in the Start menu:
- TRUST 632AV LCD Power Video -> Power Video Manager
The information given above is an indication. Different versions of the driver and
different operating systems may give a different result.
6 Installing the application software
A number of different applications are supplied with the camera. These applications
do not have to be installed to use the camera. However, it is recommended to install
these programs in order to use all the extra options available with the camera.
Note: Windows XP and Windows 2000 users: The instructions given below can
only be carried out if you are logged on as ‘Administrator’.
Note: Make sure all other applications are closed during the installation.
6.1 Photo Express 4
Photo Express is included on the second CD-ROM, entitled ULEAD Photo Express
4.0. Photo Express 4.0 is an application that can be used to load and edit the
photographs on your PC which you have taken using your TRUST 632AV LCD
POWER VIDEO. This program requires 500 MB free hard disk space. Follow the
Page 14

TRUST 632AV LCD POW ER VIDEO
14
instructions below to install Photo Express 4.0. This installation can take longer than
10 minutes.
1. Insert the Photo Express 4.0 CD-ROM into your computer’s CD-ROM drive.
The installation prog ram will start automatically. If it does not start
automatically, carry out the following:
a) Select ‘Run’ from the Start menu.
b) Type [D:\SETUP.EXE] and click on 'OK' to start the installation program.
2. Select ‘Photo Express’.
3. Select the language you wish to use.
4. Follow the on-screen instructions.
6.2 Photo Explorer 7
Ulead Photo Explorer 7 SE is a program which you can use to organize your
photographs. Simple processes can be carried out, such as rotating, printing and
viewing the photographs. Photo Explorer is useful if you wish to download
photographs and save them on your computer. Follow the instructions below to
install Photo Explorer 7.0.
1. Start the Trust Software Installer (see chapter 5.2, points 1 – 3). Figure 11
will appear.
2. Select ‘Photo Explorer’.
3. Select the language you wish to use.
4. Follow the on-screen instructions.
6.3 DVD Movie Factory
DVD Movie Factory is a program which you can use to compose a video film from
the various video clips (fragments) on the camera. If your computer has a suitable
DVD-writer or CD-writer, this video film can be saved on a CD-ROM or a DVD.
Follow the instructions given below to install the program.
1. Start the Trust Software Installer (see chapter 5.2, points 1 – 3). Figure 11
will appear.
2. Select ‘DVD Movie Factory’.
3. If asked, select the PAL video system.
4. If asked, choose to install QuickTime. You can skip the registration.
5. Follow the on-screen instructions.
6.4 VideoLive Mail
You can use VideoLive Mail to send e-mails which include audio and video
recordings. The recipient does not require any special software to view or listen to
these e-mails. In order to use the application successfully, you need to have an
Internet connection and a sound card with speakers.
1. Start the Trust Software Installer (see chapter 5.2, points 1 – 3). Figure 11
will appear.
2. Select ‘VideoLive Mail’.
3. Follow the on-screen instructions. You will need the serial number to
complete the installation. This is printed on the CD box or the CD envelope.
7 Using the software
7.1 Obtaining images from the camera
7.1.1 Trust DV Power Video Utility
The TRUST Power Video Manager is the main program to play the recordings made
using the camera and to save them on your computer. You can also use the camera
as a PC camera so that you can make video recordings and take photographs via
your computer. These can then be saved on your computer.
Page 15
TRUST 632AV LCD POW ER VIDEO
15
UK
7.1.2 Loading and saving photographs
1. Connect the camera as described in chapter 5.3.
1. Check whether the DV Disk option has been selected on the camera (see
figure 7).
2. Click on ‘Start -> Programs -> TRUST 632AV LCD Power Video -> Power
Video Manager’.
3. Figure 9 will appear. The camera has now been configured so that you can
edit the video clips, photographs and audio recordings which you have
previously made.
4. Click on ‘:DV folder’ (13).
5. Click on the ‘DCIM’ folder. The ‘100media’ folder will appear.
6. Click on the ‘100media’ folder. The recordings will be displayed as icons (14).
If you have taken a large number of photographs, these will be saved in
different folders, such as 100media, 101media, 102media, etc.
7. Double-click on a recording to play it.
8. Select all the recordings to save them on your computer by clicking on
‘Select All’. This is butto n 3.
9. Click on the copy button (4) to save the recording(s) on your computer.
10. Wait. All th e selected recordings will be transferred to the album.
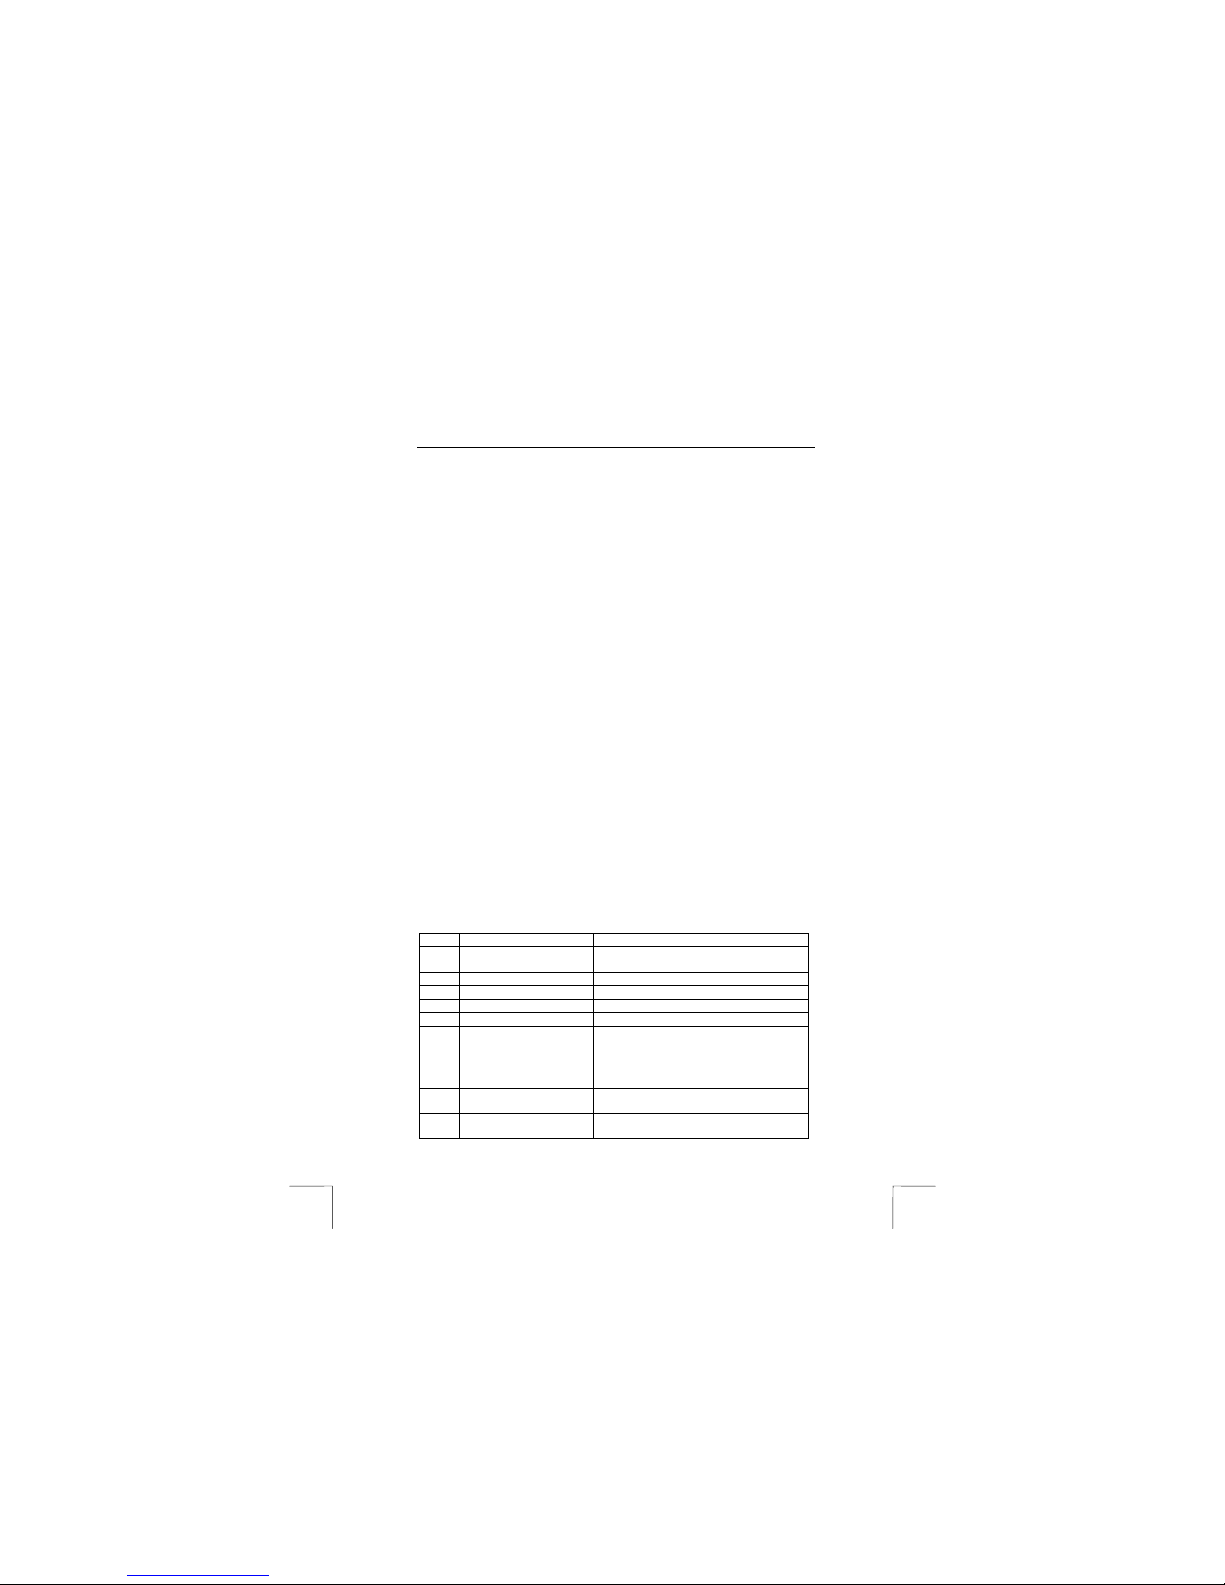
Item Description Func tion
1
Delete Deletes the selected recording(s). Se lected
recordings have a red frame.
2
Status detector Gives tips and indicates what the program
is doing.
3
Select all Selects all the recordings.
4
Make a copy Copies the selected recording(s) to the
computer.
5
Send mail Sends the selected recordings by e-mail.
Note: video recordings take a long time to
send by e-mail.
6
Start slide show Starts the slide show and activates buttons
7, 8, 9, 10 and 11.
7
Previous recording The previous photograph will be visible.
8
Start. Start playing Starts the slide show. You will be aske d
how long you wish to show each
photograph.
9
Stop the show Stops the slide show. Buttons 7, 8, 9, 10
and 11 are deactivated. The contact sheet
will be visible again.
10
Pause Pauses the slide show. It can be restarted
from the same position by pressing start.
11
Next recording The next photograph will be displayed.
12
Photo album This contains all the recordings which have
been saved on the computer.
13
Camera memory This contains all the recordings which are
saved on the camera.
14
Contact sheet Here, you can select recordings for editing.
15
Resolution button For activating the enlargement function to
3.3 Mpixel.
Table 11: Trust DV Power Video Manager used as a storage device. Use this
table together with figure 9.
Page 16
TRUST 632AV LCD POW ER VIDEO
16
7.1.3 Saving 3.3 Mpixel photographs
1. If you wish to save photographs with a resolution of 3.3 Mpix, follow the
instructions given in chapter 7.1.2. Press the settings button (15, figure 9)
before transferring the photographs to your computer.
2. A window will appear in which you can choose to enlarge the photographs.
3. Select ‘Enlargement’ and click on ‘OK’.
4. When the photographs are transferred to your computer, they will be saved
with a resolution of 3.3 Mpix.
You can only enlarge photographs taken in a resolution of 2 Mpix in this way. You
cannot enlarge video recordings or photographs taken in a resolution of less than 2
Mpix. This function is intended for improving the quality of photographs printed in a
format greater then 10 x 15 cm. Since the photograph is enlarged, it may appear as
if the photograph is not as sharp on the computer monitor. The result of the printed
photograph is often better. Although the resolution of the photographs is 3.3 Mpix,
they are not as sharp as photographs taken with a (much more expensive) 3.3 Mpix
resolution came ra.
7.1.4 Using the camera’s live function
See figure 10 and the table below for more information.
1. Connect the camera to your computer.
2. Select ‘Live’ from the camera’s menu (see figure 8).
3. Click on ‘Start -> Programs -> TRUST 632AV LCD Power Video -> Power
Video Manager’.
4. Figure 10 will appear. The image will be displayed on the screen.
5. If necessary, use buttons 5 and 6 to alter the settings. The frequency in
Europe is 50 Hz. The image is less distorted when the ‘Flicker filter’ function
is enabled. The best setting for ‘Bandwidth’ is 6.
6. Press the record button (1, figure 10).
7. A window will appear in which you can specify whether the recording should
have a time limit and how long this time limit should be. You can also alter
the location and the file name.
8. Click on ‘Save’. A window will appear which indicates that the camera is
ready for use (‘Capture’).
9. Click on 'OK'. The re cording will now start. If you have set a time limit, the
recording will be stopped once the time limit has elapsed.
10. Press button 2 (see figure 10) to stop the recording. The recording has now
been successfully made.
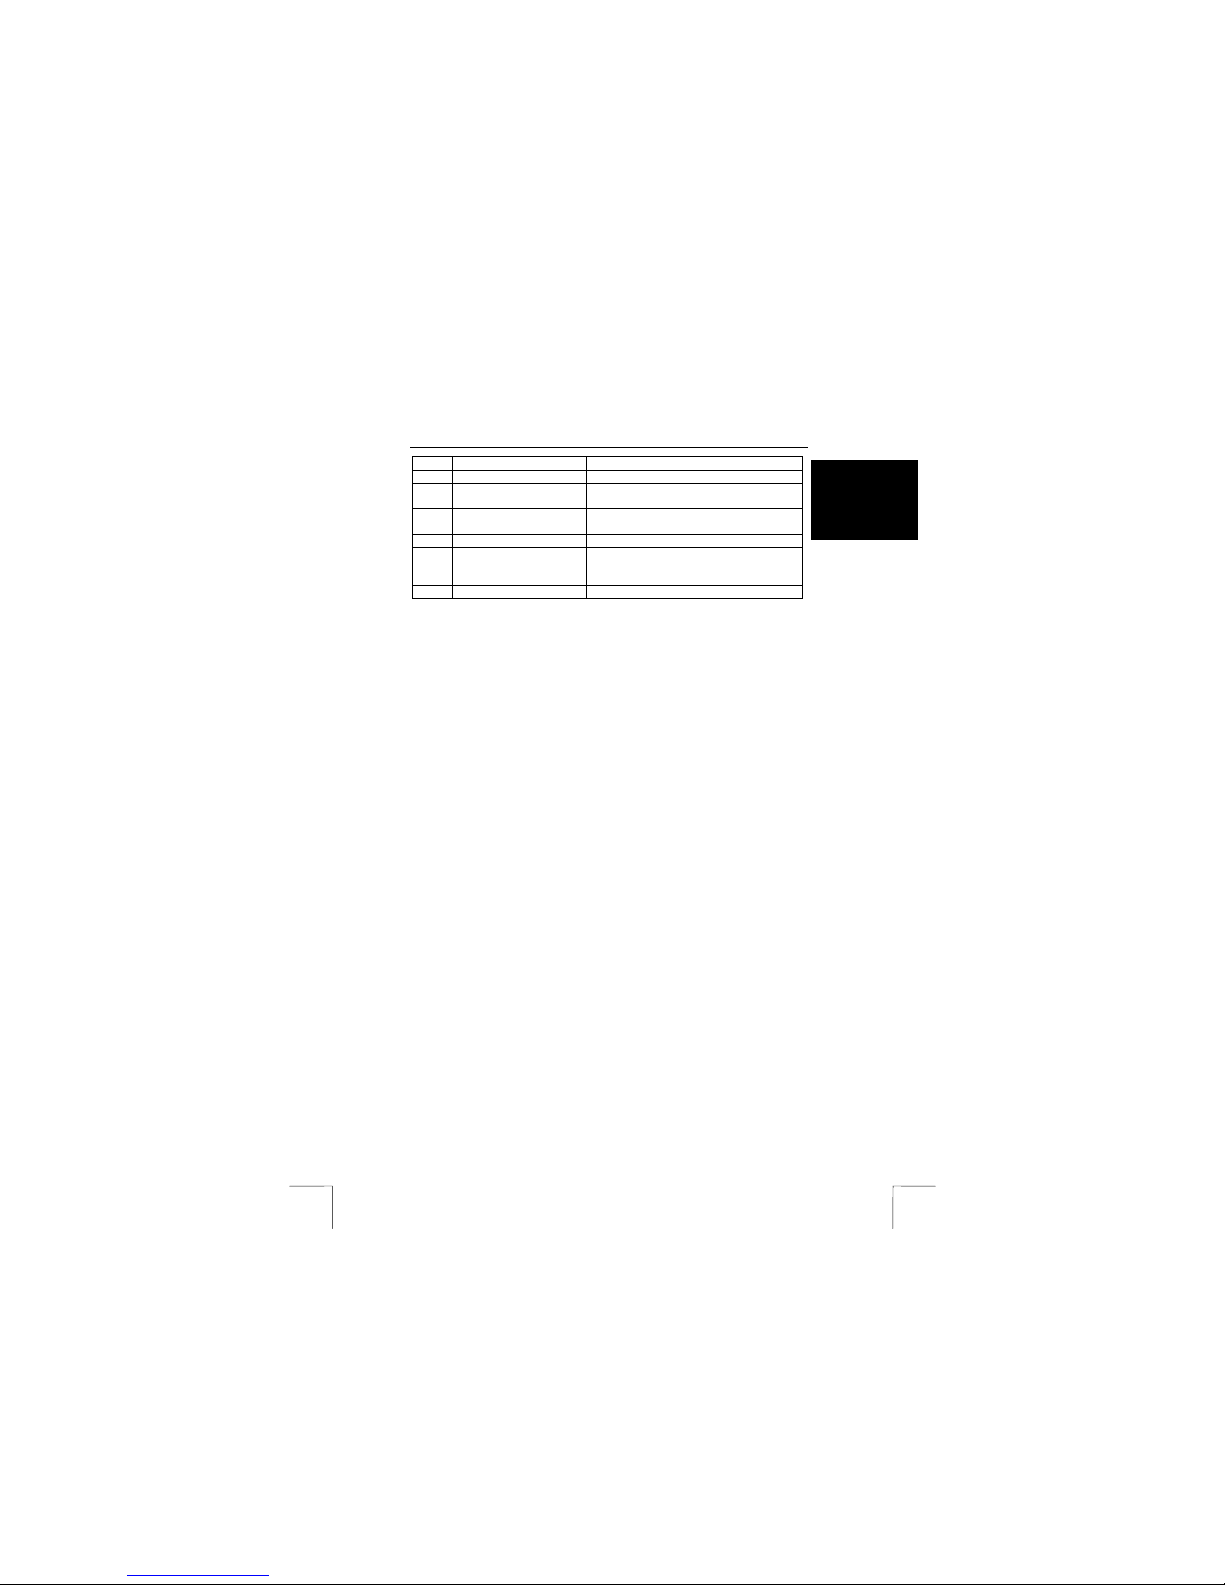
Item Description Func tion
1
Start recording Starts recording the image which is visible
on the screen (11).
2
Stop recording Stops the recording.
3
Status screen Indicates what the program is doing.
4
Take a snapshot A photograph is taken of the current image.
5
Video format Alters the resolution of the video image.
6
Video settings Alters the image (for example, the
brightness). Set the filter to 50 Hz for use in
Europe. The setting for the bandwidth can
be reduced to improve the response of the
computer (gives a poorer image quality).
7
Start or stop playing the
recording
Press this to stop playing the recording if
you wish to transfer to the save mode.
8
More settings Here, you can turn the ‘Flicker filter’ on and
off. Turn the filter on if parts of the image
Page 17
TRUST 632AV LCD POW ER VIDEO
17
UK
Item Description Func tion
flicker.
9
Indicator for the save
mode
This indicator is lit when the camera is in
the save mode.
10
Indicator for the live
mode.
This indicator is lit when the camera is in
the live mode.
11
Video screen Shows the image viewed by the camera.
12
Hide screen Hides the screen, but does not close the
program. It is recommended to first stop the
image using button 7.
13
Close Closes the program.
Table 12: Trust DV Power Video Manager used in the live mode. Use this table
together with figure 10.
7.1.5 Opening saved photographs or video clips
1. If you wish to connect the camera (this is not necessary), select the ‘DV disk’
mode (see figure 7).
2. Click on ‘Start -> Programs -> TRUST 632AV LCD Power Video -> Power
Video Manager’.
3. In the left-hand side of the screen (12), scroll to the location where you have
saved the photographs and video recordings.
4. The recordings will b e visible as icons.
5. Double-click on one of the recordings. The recording will now be opened in
your default editing program or media player program.
Tip: See the Help function provided with this program for more detailed
information.
7.1.6 Alternative method for transferri ng recordings f rom the
camera
The TRUST 632AV LCD POWER VIDEO is visible in Windows as an extra
removable disk when it is in the ‘Storage medium’ mode (see figure 7). Its use is as
easy as moving a file. In contrast to other cameras, this camera, therefore, does not
require a separate (TWAIN) driver. Download photographs using ‘File – Open’ or
copy them to your hard disk.
1. Take some photographs.
2. Connect the camera to your computer’s USB port using the USB cable
provided.
3. Wait a couple of seconds. The computer will detect the camera and the LCD
screen will be turned on.
4. Check whether the ‘Storage medium’ mode has been selected (see figure 7).
This should already have been selected.
5. Open ‘My Computer’.
6. Search for ‘Removable Disk’ and open it. A folder entitled ‘DCIM’ will be
visible. If not, find a second ‘Removable Disk’ and open it.
7. Double-click on the ‘DCIM’ folder. A fo lder entitled ‘100media’ will be visible.
If you have taken a large number of recordings, these will be saved in
different folders, such as 100media, 101media, 102media, etc.
8. Double-click on the ‘100media’ folder. The files will now be visible.
9. Copy all the files to a suitable location on your hard disk (for example C:\My
Recordings).
10. You can now edit these recordings as required.
Page 18

TRUST 632AV LCD POW ER VIDEO
18
Note: If you wish to enlarge photographs from the camera to a resolution of
3.3 Mpix, use the method described in chapters 7.1.2 and 7.1.3. The
method described above only produces a maximum resolution of 2
Mpix.
7.2 Ulead Photo Express 4
You can use this application to solve problems with the pictures, such as the red-eye
effect, coloured photographs, photographs which are too bright or too dark, remove
undesirable objects from the background, etc. You can also use this application to
design calendars and cards.
Follow the instructions given below:
1. Copy your photographs to your hard disk as described in chapter 7.1.2 or
7.1.6.
2. Click on ‘Start – Programs – Ulead Photo Express 4.0 SE – Ulead Photo
Express 4.0 SE’. Figure 1 2 will appear. You will be in the ‘Browse’ mode.
3. Find the folder containing your photographs in the left-hand side of the
window.
4. Click on this folder to view the contents. Your photographs will be visible in
the main window as thumbnails.
5. Select a photograph that you wish to edit and double-click on it. After a
couple of seconds, the photograph will become visible in the main window.
You can now edit the photograph.
6. Click on ‘Edit’ at the top of the window and select an option. The most
common options are included here.
7. Click on ‘Save’ after editing the photograph to save the finished result.
See this program’s instruction manual and Help function for more information.
Note: The photographs are saved in JPEG format to save space. JPEG
reduces the size of the file by removing small details from the
photograph. If you wish to edit the photographs during different
sessions, use a different file format to JPEG (for example, TIFF) to
prevent the loss of quality as a result of constant loading and saving in
the JPEG format.
Note: Since editing cannot be undone, it is recommended to make a copy of
the photographs and to only edit the copies. You can then always return
to the original photographs. It is strongly recommended to make a backup on a CD-ROM using a CD-writer for protection against computer
faults.
7.3 Ulead Photo Explorer 7
You can use Ulead Photo Explorer 7.0 to easily download photographs onto your
computer. A short description of how to use Photo Explorer is given below. For a
detailed description of Photo Explorer, see the program's Help function. Follow the
instructions below to use the TRUST 632AV LCD POWER VIDEO in Photo Explorer.
1. Connect the camera to the computer using the USB cable.
2. Select the ‘Save’ mode in the camera’s menu (see figure 7).
3. Start Ulead Photo Explorer.
4. The main window will appear. The 'Set-up Internet Connection' window may
also appear. Click on the 'Skip for now' button to close this window if it
appears. The Trust camera will be visible as a ‘Removable disk’ in the list on
the left-hand side of the window.
Page 19

TRUST 632AV LCD POW ER VIDEO
19
UK
5. Double-click on this. The ‘DCIM’ folder will be visible.
6. Double-click on this. The ‘100media’ folder will be visible. This folder contain s
your photographs.
7. Double-click on this. Your photographs will slowly become visible. The
window will now look like figure 13.
8. Click on one of the thumbnails in the main window to edit, print, etc. the
photograph. Note: you will edit the original photograph and changes cannot
be undone.
9. Use the ‘Digital Came ra Wizard’ (8
th
option from the left, camera symbol) to
transfer your photographs to your computer. You will have to use the
‘Configure..’ button once to indicate where the photographs must be saved
and whether these must be renumbered.
10. See the program’s Help function for more information.
Note: The program has the option to publish the photographs on the Internet (if
you have a connection to the Internet). This is useful if you wish to show
your photographs to friends. Remember that anybody will then be able to
see your photographs and the company that administers the site has the
right to use your photographs in advertisements. This is also often the
case with other photograph sharing websites and is partly the reason
that they are free. Read the conditions for use first. Photograph share
sites such as www.pbase.com and www.photo.net do not use your
photographs for advertisements or other uses.
7.4 VideoLive Mail
Use figure 14 and table 13 c with these instructions. To send multimedia e-mails,
you must have a sound card, speakers and an Internet connection with an e-mail
program. A video e-mail can be easily made and sent using the VideoMail Wizard.
1. Start the program by clicking on ‘Start -> Programs -> Cyberlink VideoLive
Mail 4.0 -> VideoLive Mail’. Figure 14 will appear.
2. Click on the ‘Recording wizard’ button (button 1). The ‘Select Mail Type’
window will appear.
3. Select ‘Message Containing Video and Audio’ and click on ‘Next’ to
continue. The ‘Video Quality Control’ window will appear.
4. Select ‘Video Quality’ and click on ‘Next’ to continue. Use the value
recommended by the program.
5. The ‘Recording wizard – Audio Quality’ window will appear. Adjust the audio
quality and click on ‘Next’ to continue. Use the value recommended by the
program.
6. The ‘Start to Record Video Mail’ window will appear.
7. Click on the ‘Record’ button to start recording.
8. Speak the text for the recording.
9. Click the ‘Stop’ button to finish the recording.
10. Click the 'Next’ button to continue. The ‘Complete VideoLive Mail’ window
will appear. In this window, select the following:
‘Play’ to play the recording,
‘Save’ to save the recording,
‘Mail’ to send the recording by e-mail. An *.exe file will be created which
also contains the code to play the file. This is necessary to be sure that the
recipient can view the message without having to install any extra
programs.
11. The e-mail window will appear. You must fill in an e-mail address.
12. Click on ‘Send’.
13. Click on ‘Finish’ to close the Wizard.
Page 20

TRUST 632AV LCD POW ER VIDEO
20
Tip: This program has many more functions and possibilities. For more
information, please see this program’s Help function.
1 Start Reco rding
Wizard
A useful tool to easily compose a video mail.
2 Settings For altering the settings of the video camera
and the microphone.
3 Start recording Starts recording audio and video.
4 Play recording Plays the recording so that you can check it.
5 Pause Stops playing the recording. The recording can
be restarted from the same point.
6 Stop Stops playing the record ing. The recording will
start from the beginning when the play button is
pressed again.
7 Send mail Sends the message by e-mail.
8 Open video file Opens a previously recorded file.
9 Save video file Saves the current video recording on your
computer.
10 Speaker volume Adjusts the volume whilst playing.
11 Microphone sensitivity Adjusts the sensitivity of the microphone. The
sensitivity cannot be adjusted when using the
camera as a microphone. This is then set
automatically.
12 Close Closes VideoLive Mail.
13 Minimize Hides the window, although the program
remains active.
14 Help Starts the Help function. Gives information
about how to use the program.
Table 13: Meaning of the components included in the program
7.5 DVD MovieFactory
This program can be used to quickly compose a video film and make it suitable for
saving on a CD-ROM or DVD. You require a CD-writer or a DVD-writer to save the
video on disk. You can also send the file via the Internet. If you have a CD-writer or
a DVD-writer, you can create CD-ROM’s and DVD’s which can be played on most
home DVD players.
1. Start the program by clicking on ‘Start -> Programs -> ULEAD DVD
MovieFactory SE -> ULEAD DVD MovieFactory SE’. A window will appear
once in which you must input the country you are located in or the video
system.
2. Select the bottom option and then select ‘PAL’.
3. Click on 'OK'. The main window will appear. Here you can select ‘Capture
Video’ to record directly from a camcorder, ‘Author Menu’ to compose the
video film and ‘Burn Disc Images’ to save the final result on a CD-ROM or a
DVD (see figure 15).
4. Select ‘Capture Video’. A new window will appear.
5. Select the ‘Edit’ tab. The video clips on the camera can now be added.
6. Click on the folder icon in the bottom left-hand corner of the window. Find the
files you wish to include in the video film. These can also be read directly
Page 21

TRUST 632AV LCD POW ER VIDEO
21
UK
from the camera. To do so, connect the camera and select ‘DV disk’ (see
figure 7).
7. Select the video files to be used and click on ‘Open’. The video clips will be
visible in the window as icons.
8. Select a video clip by clicking on it and play it to see if it is the correct video
clip.
9. If you wish, shorten the fragments by decreasing the length of the green line
under the video using the slide bars.
10. Place all the fragments in the correct order by clicking on them and dragging
them to the correct location. You have now completed the editing.
11. Select all the fragments to be included in the final film by clicking on them
whilst pressing the CTRL key on your keyboard.
12. Click on the ‘Make Movie’ button (bottom button of the 4 buttons in the top
left-hand corner). A list of video formats will appear (see figure 16). The
choice of video format depends on the use. Select VCD 352 x 288 (PAL) if it
is to be saved on a CD-ROM which is to be played on a home player or
select DVD 720 x 567 low quality (PAL) if it is to be saved on a DVD. Select
one of the WMV formats if the video film is to be used on a website. Consider
selecting MPEG-2 352 x 240 low quality NTSC if the video film is only to be
played on a computer. After selecting a format, a window will appear in which
you can specify a file name and a location for the final result.
13. Input a name and specify a folder to save the file in.
14. Click on ‘Save’. All the video fragments will be joined together and converted
into the chosen format.
15. Wait until the file conversion has been completed. This can take a lot longer
than it takes to play the video film (particularly for the MPEG-2 / DVD format).
After the file has been converted, an extra clip will be visible with a CD icon
above it. This is the whole film. The ‘Export’ window will now be visible.
16. Play the entire file to check whether it is correct.
17. If it was only the intention to create a video file, you have now finished.
Continue if it is to be saved on a CD-ROM or DVD, or if it is to be sent via email.
18. Select the option for which the video film is intended. The following
instructions assume you wish to make a VCD (VideoCD).
19. Click on ‘Create VCD title’. A new window will appear.
20. Unselect ‘Create scene selection menu’ to make a simple standard VideoCD.
21. Click on ‘Next’. A test window will appear in which you can test the title to see
whether it is all displayed and whether it works.
22. Click on ‘Next’. A window will appear in which you can copy the file to a CDROM.
23. Follow the on-screen instructions to copy the file to a CD-ROM.
Tip: The instructions given above are only a very brief description of the
program’s options. See the Help file for more detailed information
(press F1). For example, it is possible to make your VCD more
accessible with an extra selection menu (VCD 2.0 format).
7.6 Using the camera as a webcam (NetMeeting)
This is included in your version of Windows. You can download the latest version of
NetMeeting by going to www.microsoft.com and searching under the headwords
‘download netmeeting’. Version 3 is also included on the CD-ROM (\netmeeting).
1. Make sure you have an Internet account installed and your speakers and
microphone are connected before starting NetMeeting.
2. Connect the camera to your computer.
3. Select the ‘Live’ mode in the camera’s menu (see figure 8).
Page 22

TRUST 632AV LCD POW ER VIDEO
22
4. Start NetMeeting (Start -> Programs -> Accessories -> Internet Tools ->
NetMeeting)
5. Two windows will be opened, namely NetMeeting and your Dial-up
connection
6. Fill in your user name and password and click on 'Connect' to connect to the
Internet. A ‘Dial Up Connection’ window will appear if you use an external
gateway, a cable modem or ADSL.
7. Once a connection has been made with the Internet, only the NetMeeting
window will remain visible. The ‘Dial-up Connection’ window will disappear.
8. A number of settings should be made only once.
Go to ‘Tools -> O
ptions…’ and click on the ‘Video’ tab
9. To prevent a mirror image of your camera, do not select
‘Show mirror image in preview video window’. Image settings, such as the
image size and quality, can also be changed in this window. Click on 'OK' to
save the new settings and return to the start window of NetMeeting. The
once-only settings have now been completed.
10. Click on 'View' in the NetMeeting window and select 'My Video (New
Window)'. An extra window ('My Video') will now be opened
11. Click on the ‘Play’ button (
) to turn on your current video image. This
image will also be seen by the person you make a NetMeeting connection
with.
12. You are now ready to make a NetMeeting connection. Click on NetMeeting’s
telephone book icon. A new window will appear.
13. In the address bar, type an ‘ils server name’ (for example, ils.worldonline.nl)
and click on ‘Enter’.
14. Double-click on a person in the list. A NetMeeting connection will be made.
The person may not wish to make a connection with you, because this person may
be communicating with somebody else. If this is the case, select somebody else
from the list. You can f ind other ‘ils servers’ on the Internet. An example is:
http://www.netme etinghq.com. For more information or solutions to problems, click
on ‘Help’ in NetMeeting’s start window. This contains a description of all the
functions available with NetMeeting.
Microsoft has started closin g down its ILS servers. This will mean that you will only
be able to use NetMeeting via MSN Messenger (an instant message program) which
is included with most versions of Windows. You must register with Microsoft (to
obtain a passport) b efore this program will work. S ee the MSN Messenger Help
function for instructions on how to register. Other organizations have active ILS
servers which can also be used.
Note: When using NetMeeting and MSN Messenger, you may contact
people who have different options to yourself. Do not allow children to
use these programs unsupervised.
Tip: The image is usually sharper if the macro setting is turned on when
using the camera for video conferencing (see chapter 4.6.5).
7.7 Webcam & Internet
The camera can also be used as a webcam, for example, on your Internet page.
A number of informative sites about webcams are given below:
http://www.camarades.com
http://www.teveo.com
At these sites, you can download software that you can use to send live video
images over the Internet.
Please refer to the sites concerned for information on how to install and use the
software.
Page 23
TRUST 632AV LCD POW ER VIDEO
23
UK
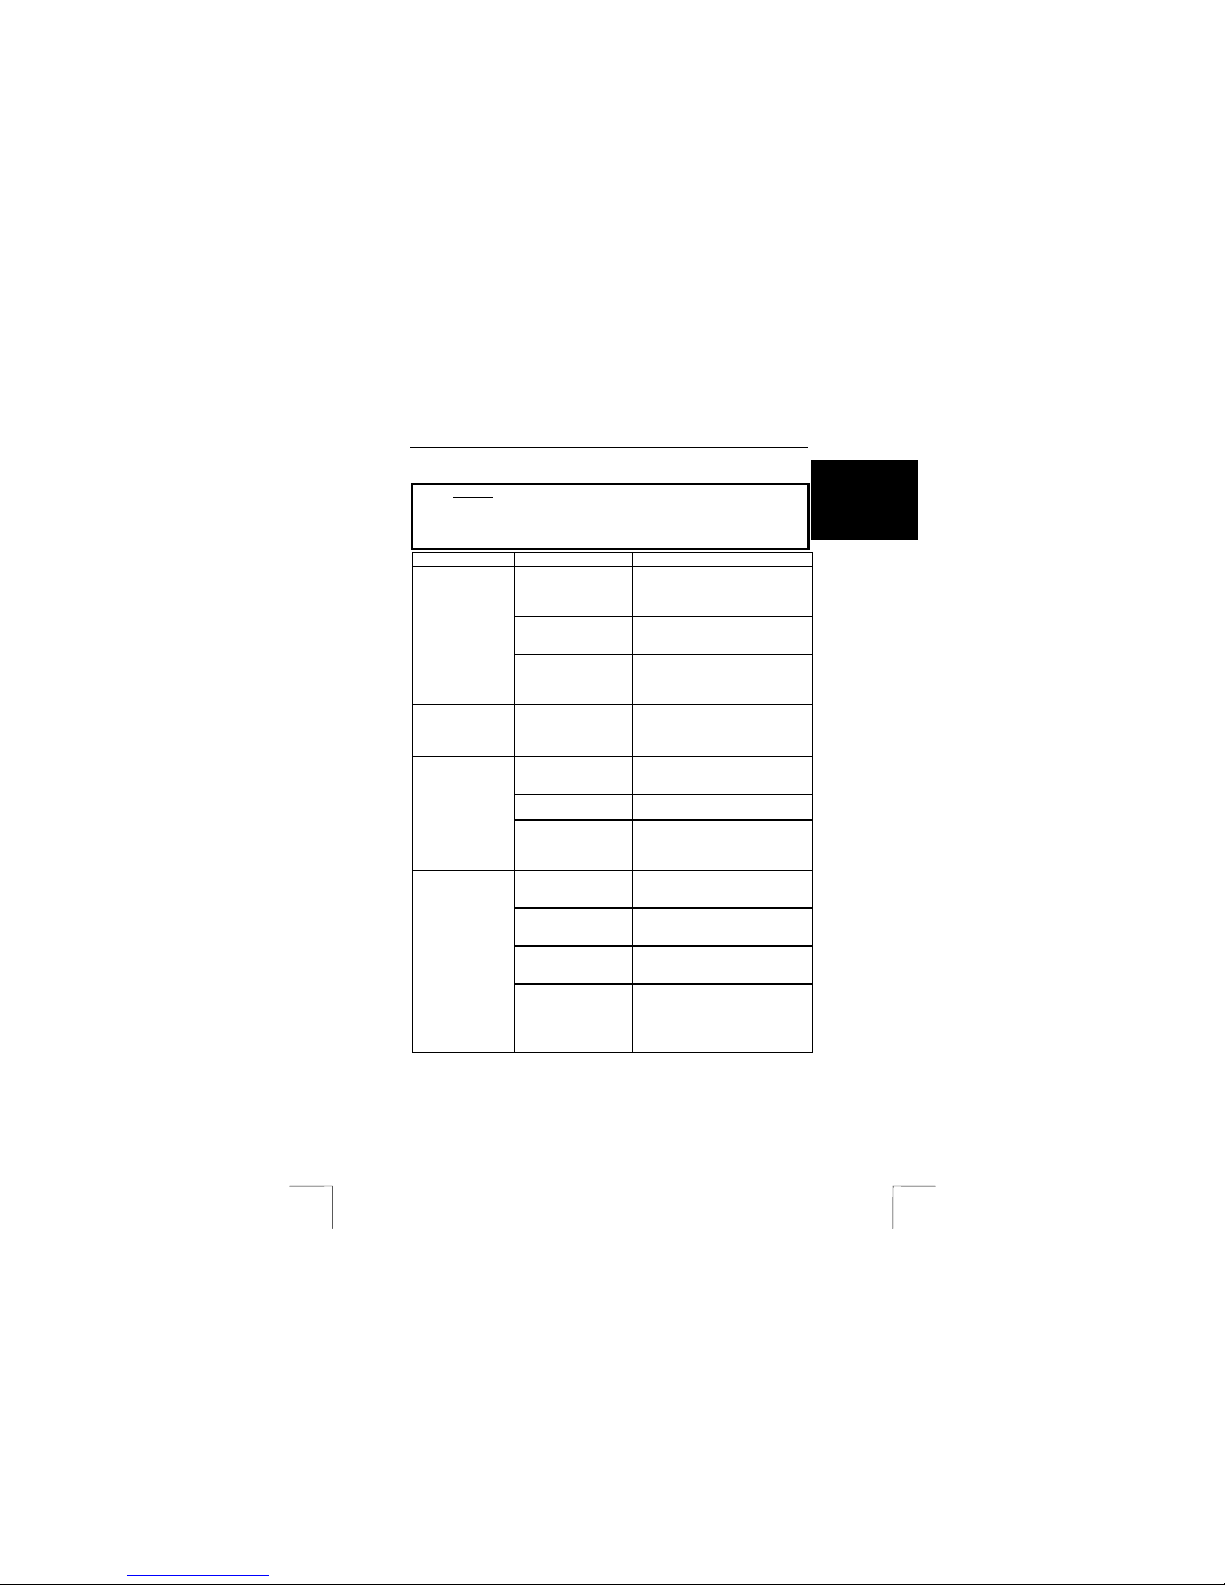
8 Troubleshooting
Method
1. Read the solutions given below.
2. Check for up-to-date FAQ’s, drivers and instruction
manuals on the Internet (www.trust.com/13339)
Problem Cause Possible solution
The computer's USB
port does not work.
Check the settings of your USB
port. For more inf ormation, see
www.trust.com/customercare/help/u
sb.
The camera has not
been connected to a
USB port.
Connect the camera to a USB port
Windows does
not detect a new
device after
connecting the
camera.
The camera has been
connected to a USB
hub which does not
have a power supply.
Connect the camera to a USB hub
which has a power supply or to a
USB port on your computer.
Where can I find
the serial number
for VideoLive
Mail?
This is printed on the
CD box or the CD
envelope.
Find the original CD-ROM and look
at the box or the envelope.
The camera has not
been connected to a
USB port.
Connect the camera to a USB port
The camera is in the
‘DV disk’ mode.
Set the camera to the ‘Live’ mode
(see figure 8).
Error message
‘Capture device
was not detected’
is displayed.
The camera has been
connected to a USB
hub which does not
have a power supply.
Connect the camera to a USB hub
which has a power supply or to a
USB port on your computer.
Windows 98 or
Windows 95 is used.
The software only works correctly in
Windows 98 SE, Windows ME,
Windows 2000 and Windows XP.
The USB port does
not work correctly.
Test the USB port using a different
device or see the USB
troubleshooter at www.trust.com.
The camera has not
been connected to the
computer.
Connect the USB cable.
The error
message ‘Fail
connect to
device, please try
again’ is
displayed afte r
opening the
Camera Manager.
The window
opens, but I
cannot obtain
files from the
camera’s
memory.
The drivers have not
been installed
correctly.
Uninstall the drivers, remo ve the
USB cable and reinstall the drivers.
Page 24

TRUST 632AV LCD POW ER VIDEO
24
The drivers have not
been installed
correctly.
Install the drivers before connecting
the camera.
The USB port does
not work correctly.
Test the USB port using a different
device or see the USB
troubleshooter at www.trust.com.
The camera is
marked with an
exclamation mark
‘!’ in the Device
Manager.
The camera has been
connected to a USB
hub which does not
have a power supply.
Connect the camera to a USB hub
which has a power supply or to a
USB port on your computer.
The camera’s
webcam mode
does not work.
The PC has a TV
capture card.
There is a conflict
between the camera
and the TV card.
Carry out the following.
1) Remove the TV capture card.
2) Reinstall the camera .
3) Reinstall the TV capture card.
If this does not work, try to reinstall
the drivers for the TV card.
The batteries have
been inserted
incorrectly.
Reinsert the batteries (see chapter
4.3).
The camera is still
connected to your
computer.
Disconnect the USB cable. The
camera cannot be operated when it
is connected to a computer.
The camera is turned
off.
Turn the camera on (see chapter
4.4).
The camera does
not do anything.
The batteries are
empty.
Replace the batteries. This can be
tested by connecting the camera to
the USB port. Something must
appear on the camera’s LCD
screen.
The camera does
not react,
although the
batteries are full.
The camera must b e
reset.
Disconnect the USB cable and
remove the batteries from the
camera. Reinsert the batteries after
approximately 10 minutes.
NiCd batteries are
used.
Use Alkaline or rechargeable NiMH
batteries.
The camera has not
been used for more
than 1 minute.
Turn the camera on again.
The camera
suddenly turns
itself off.
The power in the
batteries is low.
Replace the batteries.
The mode button has
not been pressed for
long enough.
Press the button for at least 5
seconds.
The camera
cannot be turned
on or turns off
immediately.
The batteries are
empty.
Replace the batteries.
Page 25
TRUST 632AV LCD POW ER VIDEO
25
UK
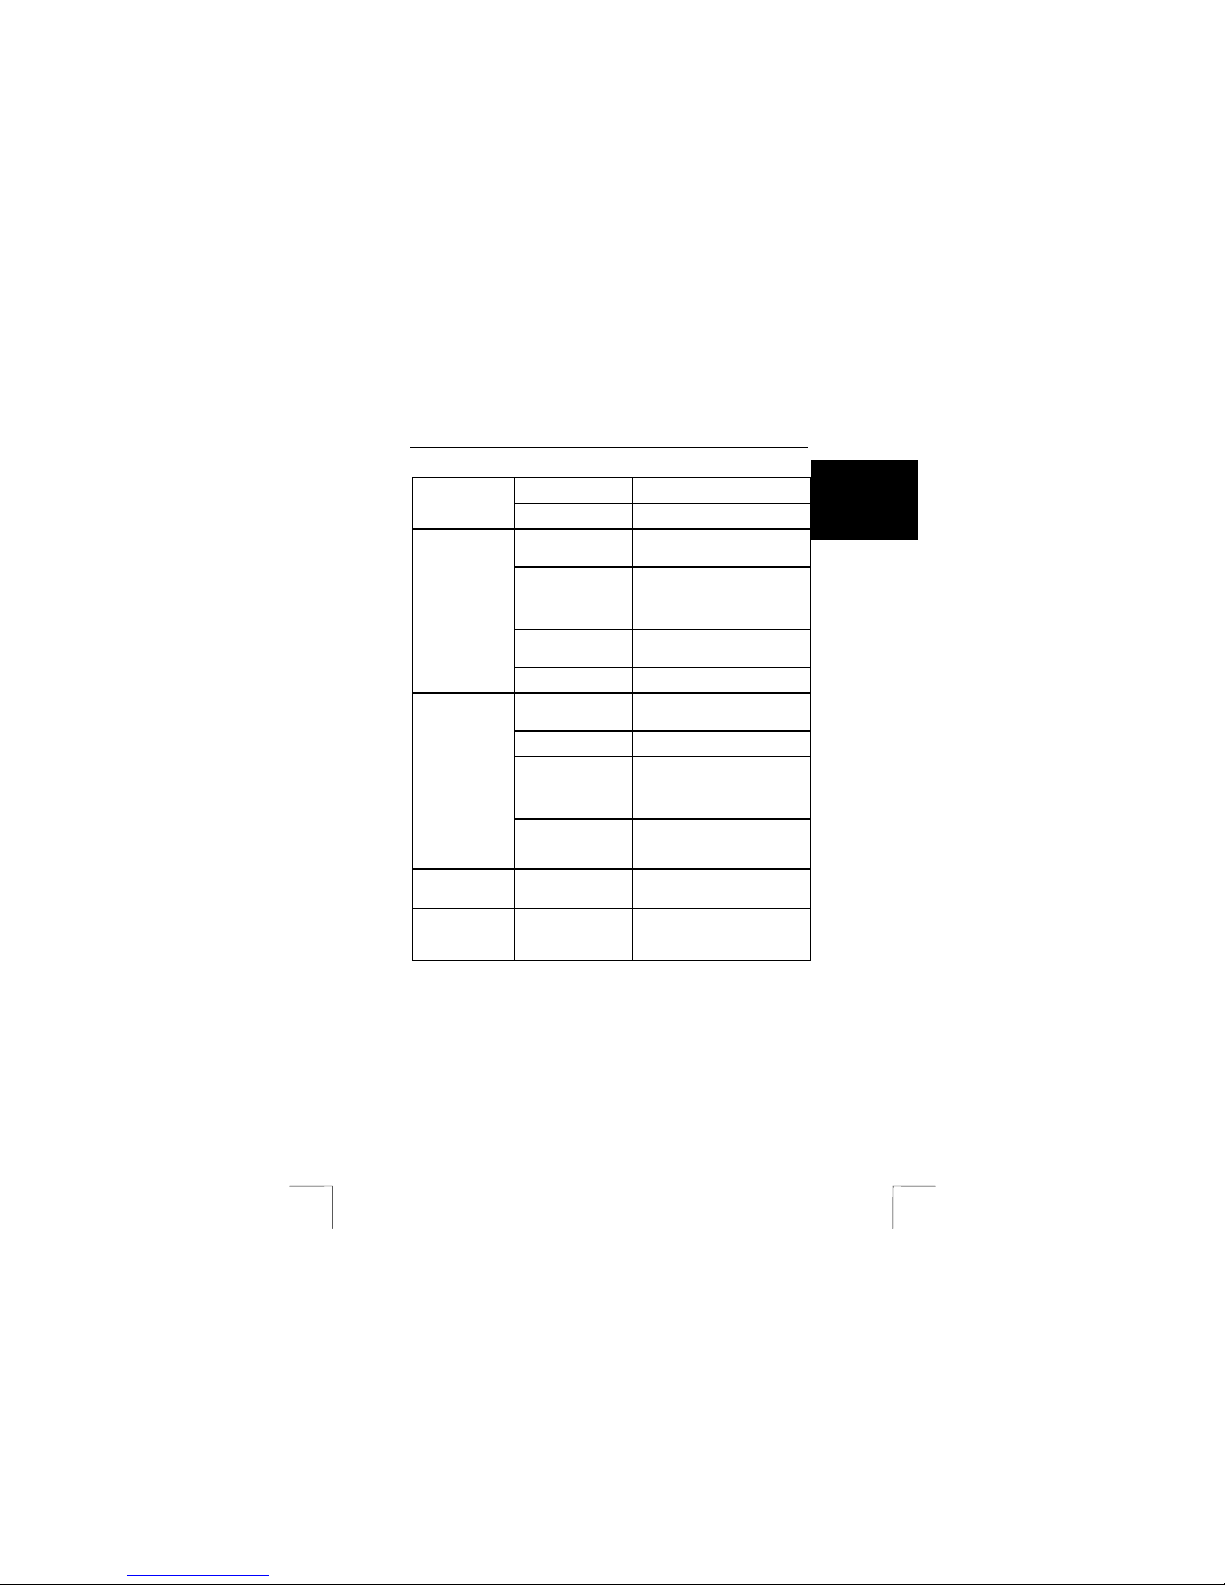
A low resolution is
used.
Select the video format (320 x 200)
(see chapter 7.1.4).
The webcam
image is not
clear.
The subject being
filmed is very close by.
Select the macro setting (see
chapter 4.6.5).
The camera was
moved when
recording.
Try to hold the camera still or use
the stand.
The macro setting is
still selected whilst the
distance to the object
is a number of metres
away.
Turn off the macro setting (see
chapter 4.6.5).
The distance to the
subject is too short.
Increase the distance to the object
to be photographed or select the
macro setting (see chapter 4.6.5).
The recordings
are not clear
(hazy).
There is insufficient
light.
Improve the lighting.
The camera is busy
recording video or
audio.
Stop recording.
The camera menu is
active.
Turn the menu off (see chapter
4.5).
The memory is full. Transfer photographs to your
computer and delete them from the
memory. You can ta ke many more
photographs using a (larger) CF
card. Ask your dealer.
No photograph is
taken when the
exposure button
is pressed.
The camera is still
busy saving the
previous photograph.
The LED is lit.
Wait until the LED goes out.
There is no
connection with
the computer.
The camera has been
connected incorrectly.
Reconnect the cables.
The camera does
not give an image
in the application
(webcam).
Another application is
open and is using the
camera image.
Close the other application first
before starting the test program.
Page 26

TRUST 632AV LCD POW ER VIDEO
26
An old version of
DirectX is installed.
DirectX 8.0 is included on the Trust
CD-ROM. This is installed
automatically when the drivers are
installed. Reinstall the drivers.
Drivers for an old
webcam are still
installed.
Find these drivers and uninstall
them (see chapter 5.1).
More than one monitor
has been configured
for use on the
desktop.
Select one monitor (Windows
monitor settings) and try again.
The VGA drivers need
to be updated.
Download new VGA card drivers or
contact the supplier of your VGA
card.
A live recording
gives a displaced
image and the
wrong colours.
If a too high VGA
resolution is used (for
example, 1600 x
1200), it is possible
that there is
insufficien t memory
for the video overlay.
Set your VGA card to a lower
resolution and colour depth (for
example, 800 x 600 / 16 bits
colours).
The background
lighting is not white.
Change the lighting. If this does
not help, use Photo Express to edit
the colour.
The monitor has not
been set correctly.
Compare the photograph to other
photographs (for example, on the
Internet) where you known the
colour is correct. Adjust your
monitor correctly (se e the
instruction manual provided with
your monitor).
The printer has been
set incorrectly.
If the photographs look good on
your monitor, check your printer
settings.
An inkjet printer has a
blocked ink cartridge.
See the instruction manual
provided with your printer for
instructions on how to test the
printer and solve any problems.
Photographs are
discoloured on
the monitor or
when printe d.
The paper used is
unsuitable for printing
photographs.
Use original paper from your printer
manufacturer for the most reliable
result.
Video images are
jerky.
The camera record s
10 images per
second. This is less
than a camcorder.
Move the camera slowly or use a
stand. The recordings will then be
more stable.
Page 27
TRUST 632AV LCD POW ER VIDEO
27
UK
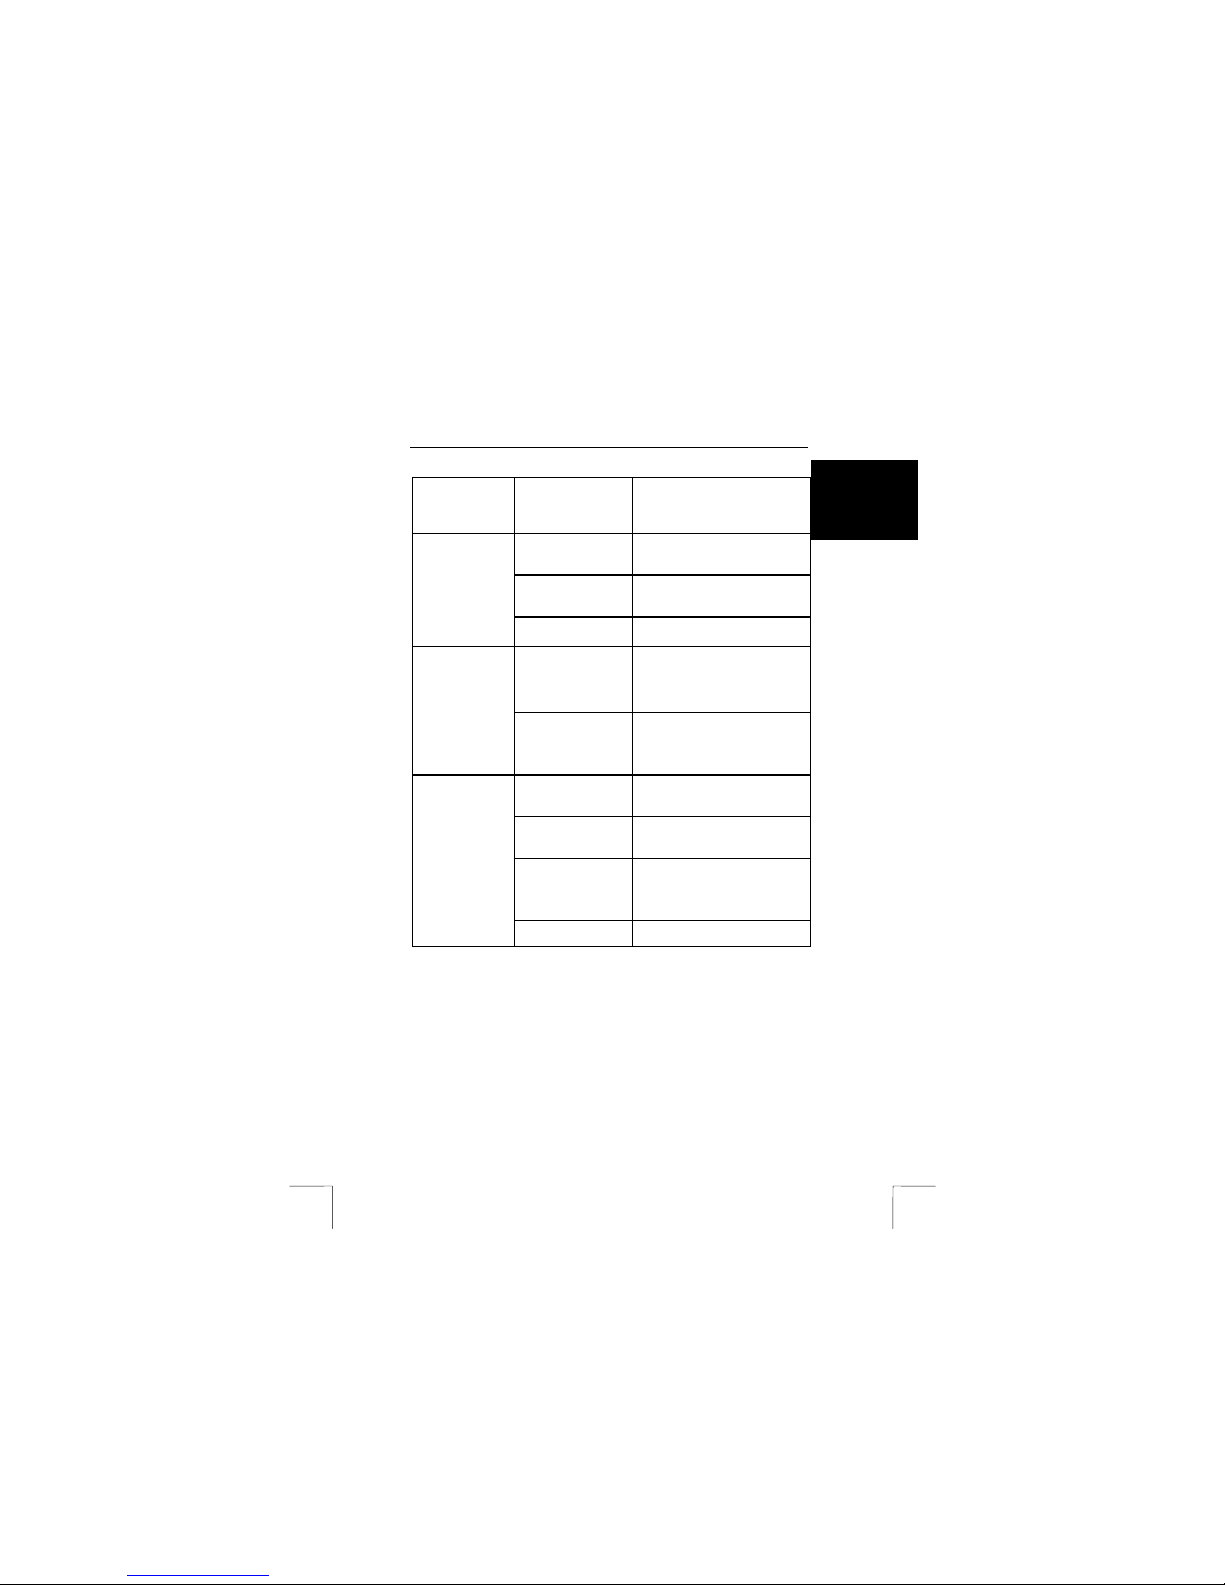
The video
recordings
contain a lot of
noise (snow).
There is insufficient
light.
Improve the lighting or select a
different location.
The distance to the
sound source is too
great.
Move closer.
The volume of the
computer’s speakers
is set very low.
Increase the speaker’s volume.
The sound is very
low.
The microphone is
blocked.
Make sure your fingers do not
cover the microphone (5, figure 1).
The card was not
empty. The CF card
already contains
recordings from other
cameras.
Format the CF card so that it is
completely empty (Camera menu
8, figure 2).
Less recordings
can be saved on
the CF card than
expected.
The recordings
contain a lot of detail
or noise.
If they contain noise, select a
location with more light. If they
contain a lot of detail, it is normal
that less photographs or video clips
can be taken.
The CF card has been
formatted in the wrong
format.
Format the CF card in t he camera.
(Camera menu 8, figure 2). Do not
format it in a card reader.
The card has not been
pressed into the slot
firmly enough.
Press it firmly into the slot. The
card must not protrude from the
camera.
The camera works,
but is not visible.
Take some photographs. Remove
the card from the camera. If the
number of recordings on the
display is zero, then the CF works
correctly.
The CF card
cannot be used.
The card is faulty.
Try to use the card in a different
camera or use a different card.
Page 28
TRUST 632AV LCD POW ER VIDEO
28
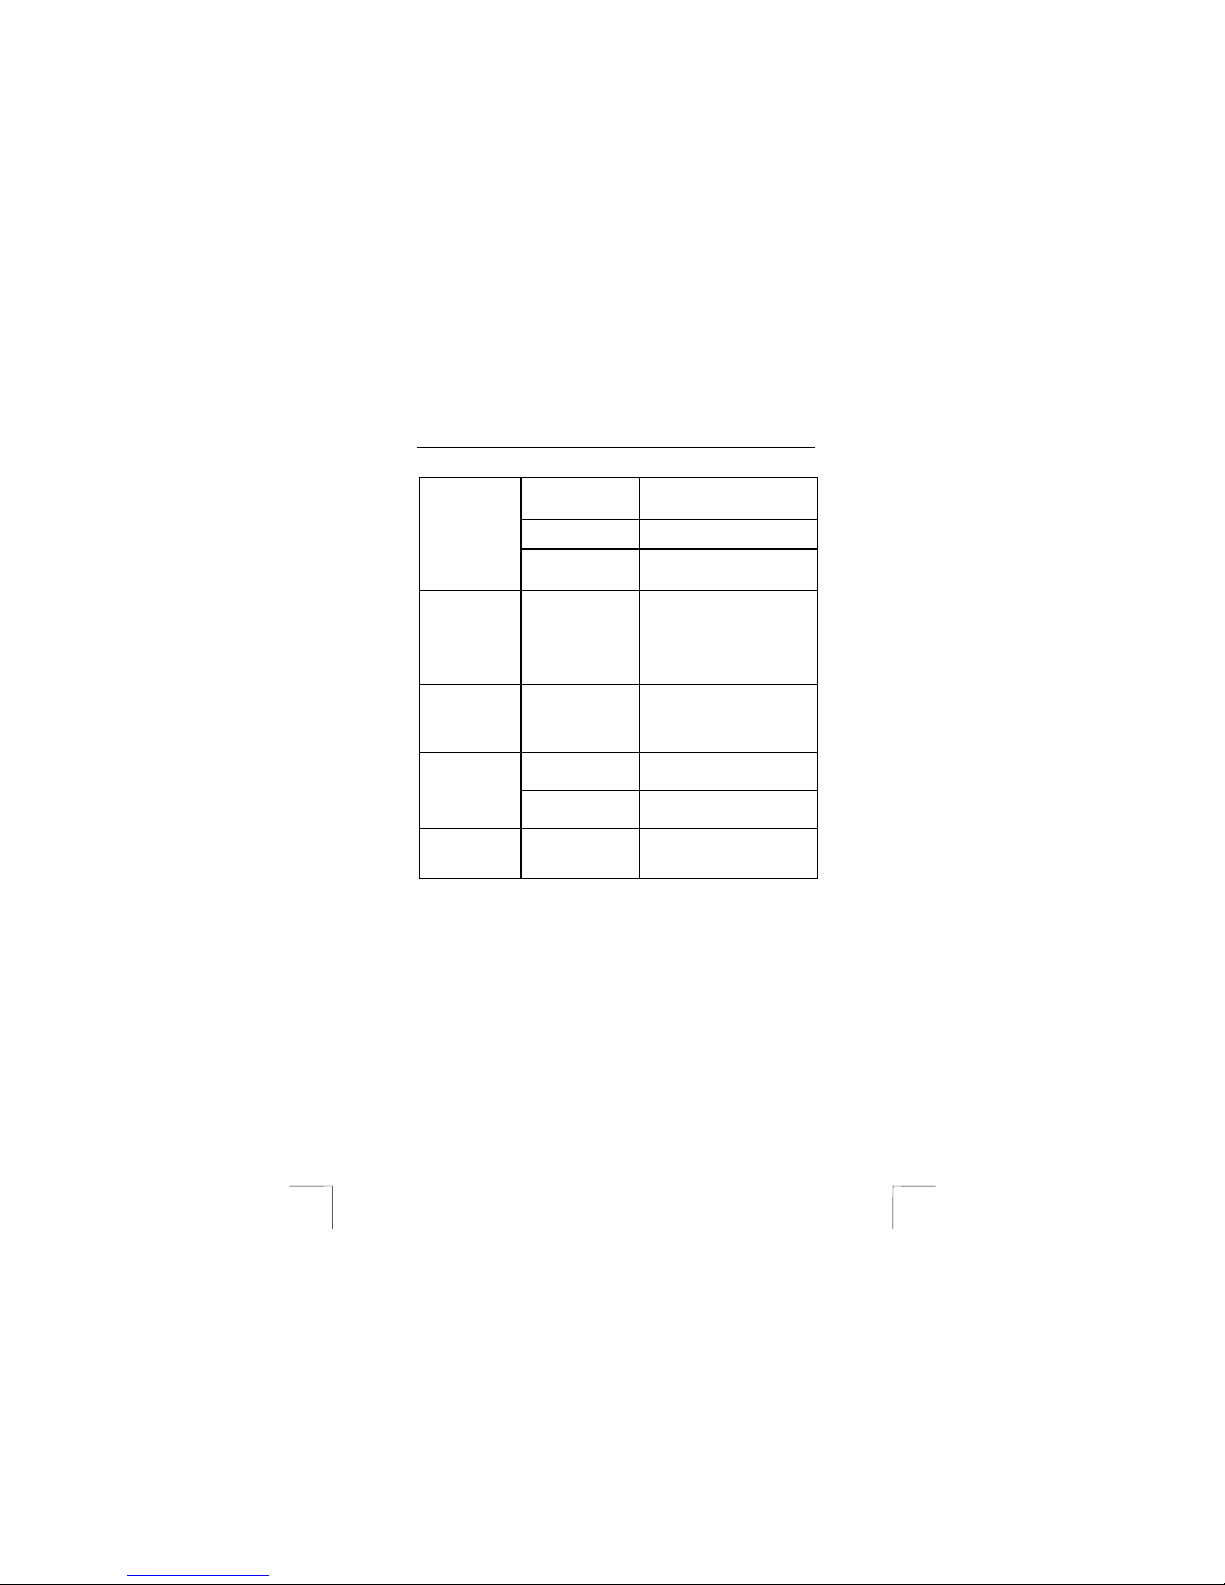
The cables have not
been connected
correctly.
Connect the cables correctly:
yellow is for the image signal and
white is for the sound signal.
The camera is turned
off.
Turn the camera o n.
The TV
connection does
not work.
The camera has been
connected to the
computer.
Disconnect the camera from the
computer.
The photographs
do not fit
correctly into the
photograph
frame. White bars
are always
visible.
Most photograph
frames are made for a
3:2 format used with
traditional
photographs. Digital
cameras use a 4:3
format.
Select a different photograph
frame or use the ‘Crop’ function in
Photo Express supplied with the
camera to alter the size to fit the
frame.
There is noise in
the photographs
or the
photographs are
too dark.
The photographs are
taken in dark
surroundings.
Make sure there is enough light.
The contrast in the
subject is too great.
Change the lighting or take the
photograph closer by or further
away.
The photographs
are overexposed.
The photographs were
taken in bright
sunlight.
Take photographs in shadow.
The problem is
not listed here.
Check the Internet for
the latest update of
the camera
Troubleshooter.
Go to
www.trust.com/customercare/help/
camera
If you still have problems a fter trying these solu tions, please contact one of the Trust
Customer Care Centers. You can find more information at the back of this instruction
manual. Please have the following information available:
• The article number. This is 13339.
• A good description of what does not work.
• A good description of when the problem occurs.
• Information about your computer: the Windows version and the language.
• Information about other devices which have been installed, such as scanners,
other cameras, webcams, TV cards, video editing devices, etc.
 Loading...