

Page 1
L I F E I S M O R E ! T R U S T U S T R U S T . C O M
T R U S T . C O MT R U S T . C O M
T R U S T . C O M
500F SPYC@M FLASH
UK
DE
FR
IT
ES
NL
PL
User’s manual
Page 2
500F SPYC@M FLASH
L I F E I S M O R E ! T R U S T U S T R U S T . C O M
T R U S T . C O MT R U S T . C O M
T R U S T . C O M
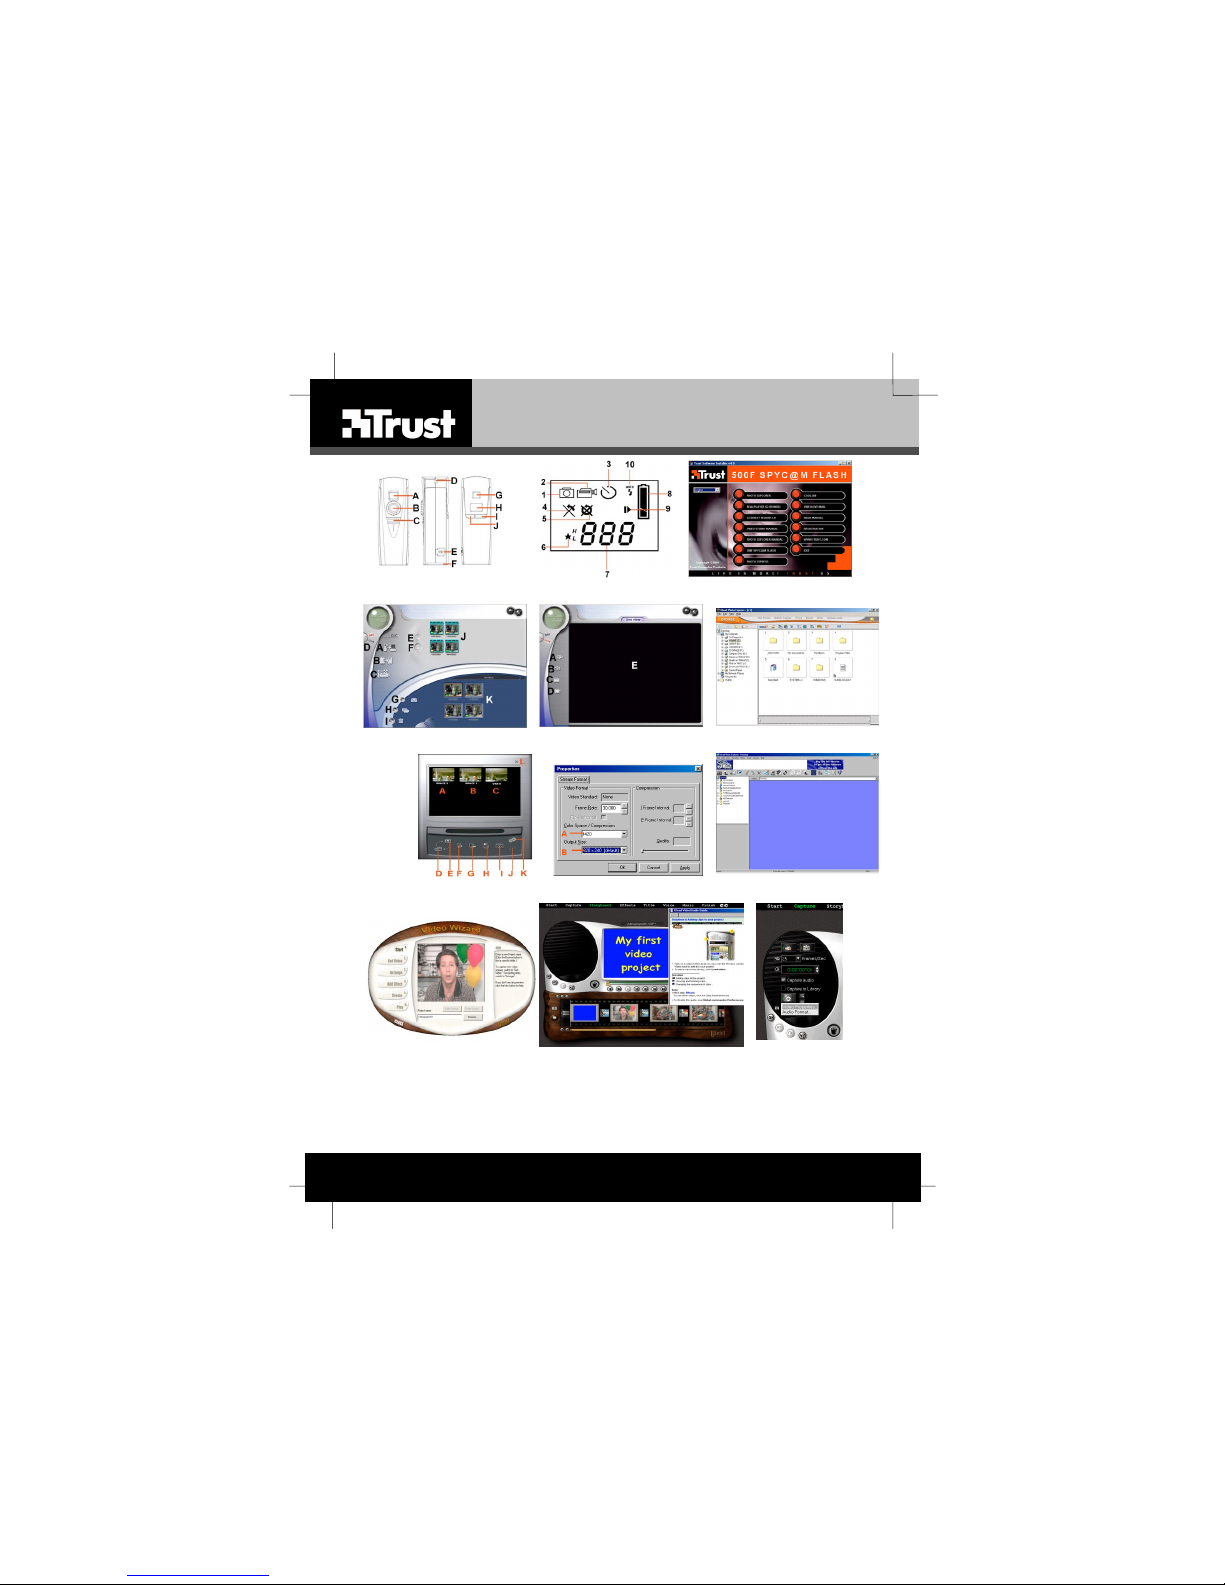
Fig. 1 Fig. 2 Fig. 3
Fig. 4 Fig. 5 Fig. 6
Fig. 7 Fig. 8 Fig. 9
Fig. 10 Fig. 11 Fig. 12
Page 3

TRUST 500F SPYC@M FLASH
1
UK
Thank you for your purchase. Register your product via our Internet site at
www.trust.com, so that you will be eligible for optimal guarantee and service
support. You will also be automatically informed of the development of your and
other Trust products.
Vielen Dank, dass Sie unser Produkt gekauft haben. Registrieren Sie jetzt ihr
Produkt auf unserer Website, www.trust.com, so dass Sie unsere optimale
Garantie- und Serviceunterstützung in Anspruch nehmen können. Außerdem
werden Sie automatisch über die Entwicklung Ihres und anderer Produkte auf dem
Laufenden gehalten.
Nous vous remercions de votre achat. Enregistrez-le maintenant sur notre site
Internet, www;.trust.com. et vous aurez droit à une garantie et un soutien de
service optimaux. En outre, vous serez informé automatiquement des mises à jour
de votre produit et des autres produits de Trust.
Grazie per aver acquistato un prodotto Trust. Registri l' acquisto effettuato presso il
sito internet Trust (www.trust.com), in questo modo potrà usufruire dell’ assistenza
e della garanzia. Inoltre potrà ottenere informazioni aggiornate sulle novi tà
riguardanti il suo prodotto ed anche gli altri prodotti Trust.
Muchas gracias por su adquisición. Registre ahora su adquisición a través de
nuestro sitio en Internet, www.trust.com, de modo que tenga derecho al soporte de
garantía y de servicio óptimo. Se mantendrá, además, automáticamente al
corriente de los desarrollos de su producto y de los demás productos de Trust.
Serdecznie dziękujemy za zakup naszego produktu. Rejestrując już teraz swój
zakup na stronie internetowej firmy Trust, www.trust.com, uzyskacie Państwo
optymalne wsparcie gwarancyjne i serwisowe. Ponadto będziecie Państwo
automatycznie informowani o wszelkich zmianach odnośnie tego i innych
produktów firmy Trust.
Hartelijk dank voor uw aankoop. Registreer nu uw aankoop via onze internet site,
www.trust.com, zodat u in aanmerking komt voor optimale garantie- en service
ondersteuning. Bovendien wordt u automatisch op de hoogte gehouden van de
ontwikkeling van uw en andere Trust producten.
Page 4

TRUST 500F SPYC@M FLASH
2
www.trust.com
Residents in the UK and Ireland should contact: .............................................................
From
8:00 - 16:00
UK Office
Phone +44-(0)0845-6090036
Fax +44-(0)1376-514633
I residenti in Italia possono contattare:
Orario:
9:00 - 13:00 /
14:00 -18:00
Ufficio italian o
Telefono +39-051-6635947
Fax +39-051-6635843
Les habitants de la France et de l’Afrique du Nord peuvent contacter :
De
9:00 à 17:00
Bureau français
Téléphone +33-(0)825-083080
Fax +33-(0)1-48630261
Kontaktadresse für Einwohner Deutschlands:
Erreichbar:
9:00 - 17:00
Deutsche Geschäftsstelle
Telefon 0800-00TRUST (0800-0087878)
Fax +44-(0)2821-58873
Los habitantes de España pueden ponerse en contacto con:
De las
9:00 a las 17:00
horas
Oficina española
Teléfono +34-(0)902-160937
Fax +31-(0)78-6543299
Inwoners van Nederland kunnen contact opnemen met:
Van
9:00 - 17:00 uur
Kantoor Nederland
Telefoon 0800-BELTRUST (0800-23587878)
Fax +31-(0)78-6543299
All other countries / Alle anderen Länder / Tous les autres pays
Tutti gli altri paesi / Todos los demás países / Alle andere landen
From:
9:00 - 17:00
European Head Office
Phone +31-(0)78-6549999
Fax +31-(0)78-6543299
Page 5

TRUST 500F SPYC@M FLASH
3
UK
Instructions when using for the first time Chapter
1. Inserting the batteries (3)
2. Taking photographs (5)
3. Installing the driver (6.2)
4. Connecting the camera (6.3)
5. Loading photographs (8.1)
1 Introduction
This instruction manual is for users of the TRUST 500F SPYC@M FLASH. This
camera is suitable for making a maximum of 160 recordings. The camera has a 16
MB = 128 Mbit internal flash memory, webcam function, video function, automatic
exposure, lens with a fixed focal length, an extra macro option and a flash function.
2 Safety
2.1 General information
Carefully read the following instructions before use:
- The TRUST 500F SPYC@M FLASH does not require any special
maintenance. Use a slightly damp, soft cloth to clean the camera.
- Do not use aggressive substances, such as petrol or white spirit, to clean the
device. These may harm the material.
- Do not submerge the device in liquid. This may be dangerous and will
damage the device. Do not use this device near water.
- Make sure nothing is placed on the cable. Do not use this device in an area
where the cable can become worn or damaged as a result of people walking
over it.
- Do not repair this device yourself.
2.2 Batteries
1. The alkaline batteries supplied are not rechargeable. Do not try to recharge
them, because this may cause them to explode.
2. Never throw the batteries onto an open fire. The batteries may explode.
3. Ne ver drill holes into the batteries.
4. Keep the batteries out of the reach of small children.
5. Only use AA alkaline or rechargeable AA NiMh/1600 mA batteries with this
camera.
6. W hen the batteries are empty, ask your local authority where you can
dispose of them.
Note: Do not use old and new batteries at the same time, because the old
batteries may deplete the new ones.
Note: The batteries should be removed if the camera is not going to be used
for some time. This will save the battery capacity.
Page 6
TRUST 500F SPYC@M FLASH
4
3 Batteries
3.1 Inserting the batteries
1. Open the battery flap.
2. Insert the two AA batteries as shown on the battery flap.
3. Close the battery flap again by pushing it downwards slightly and sliding it
closed.
4. The camera will turn o n automatically.
5. The TRUST 500F SPYC@M FLASH is now ready for use.
Note: Inserting the batteries incorrectly may damage the camera.
Note: If you wish to replace the batteries with other non-rechargeable
batteries, only use alkaline batteries.
Note: If you wish to use rechargeable batteries, only use rechargeable Ni-
MH/1600 mA batteries.
Note: The camera cannot be turned off manually. It will turn off automatically
after 60 seconds.
3.2 Battery status
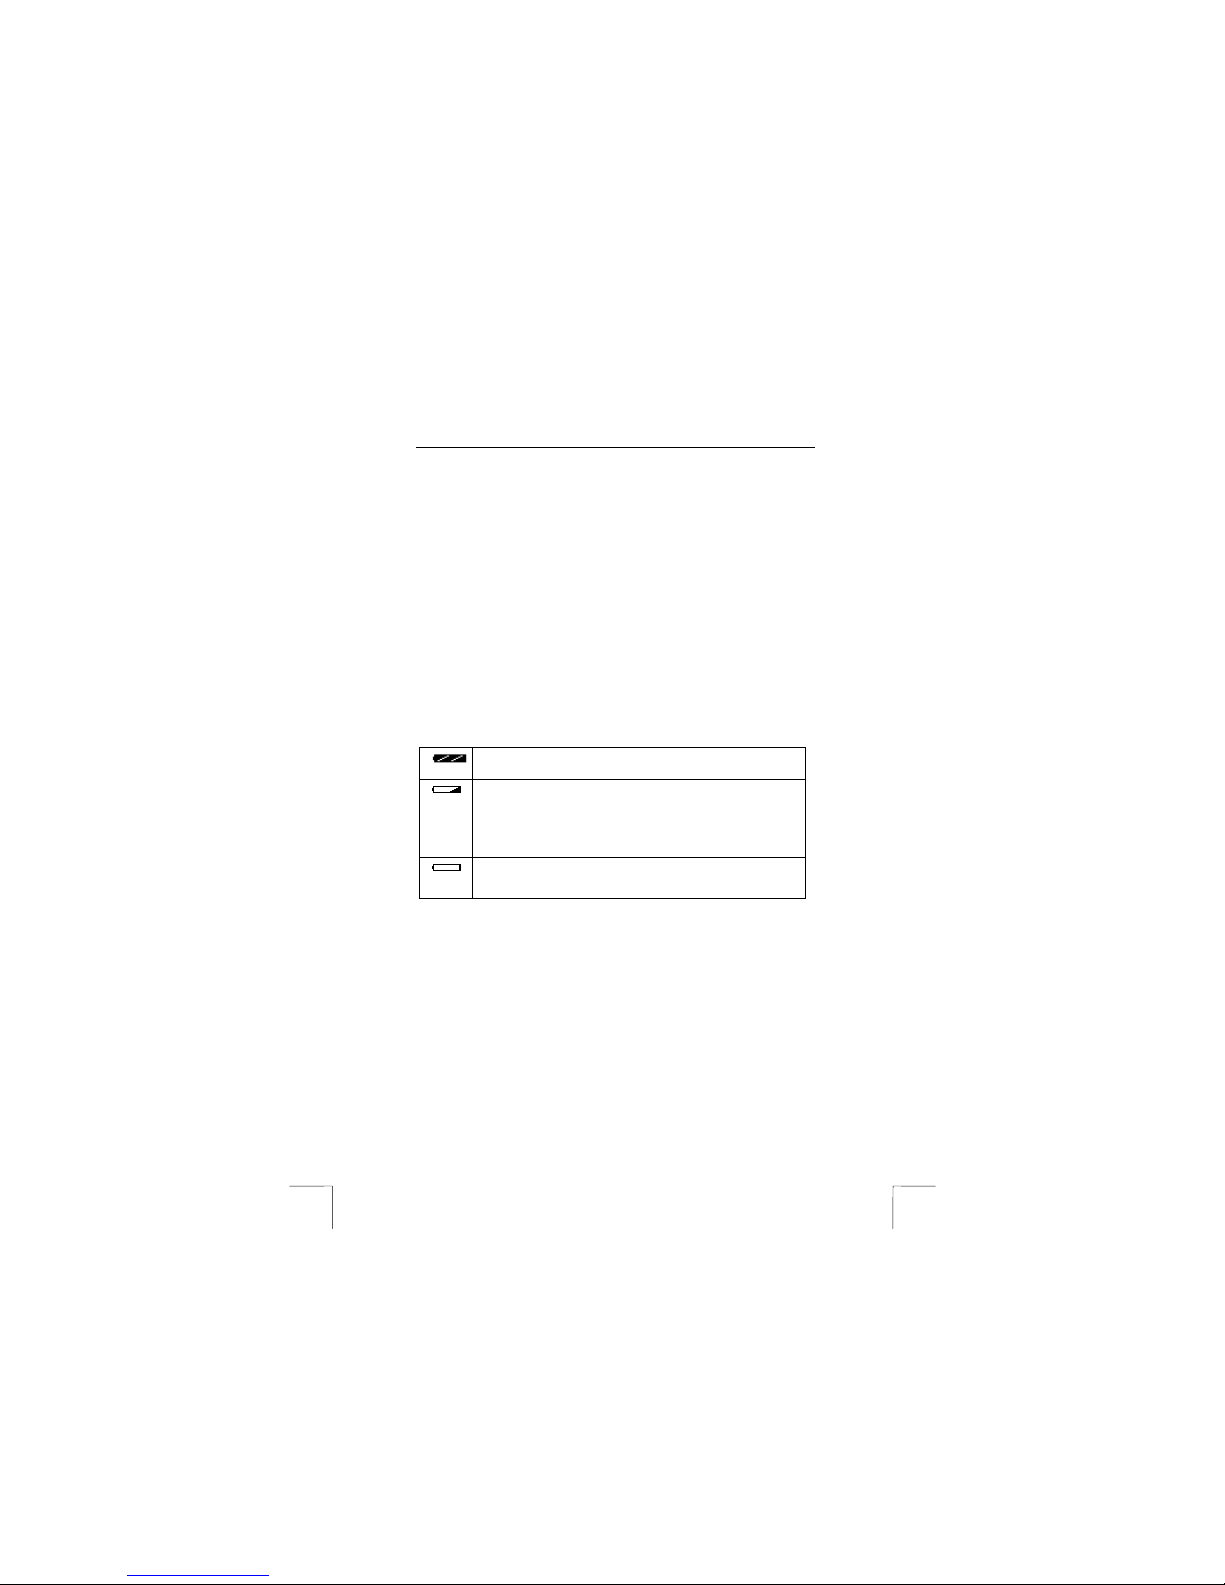
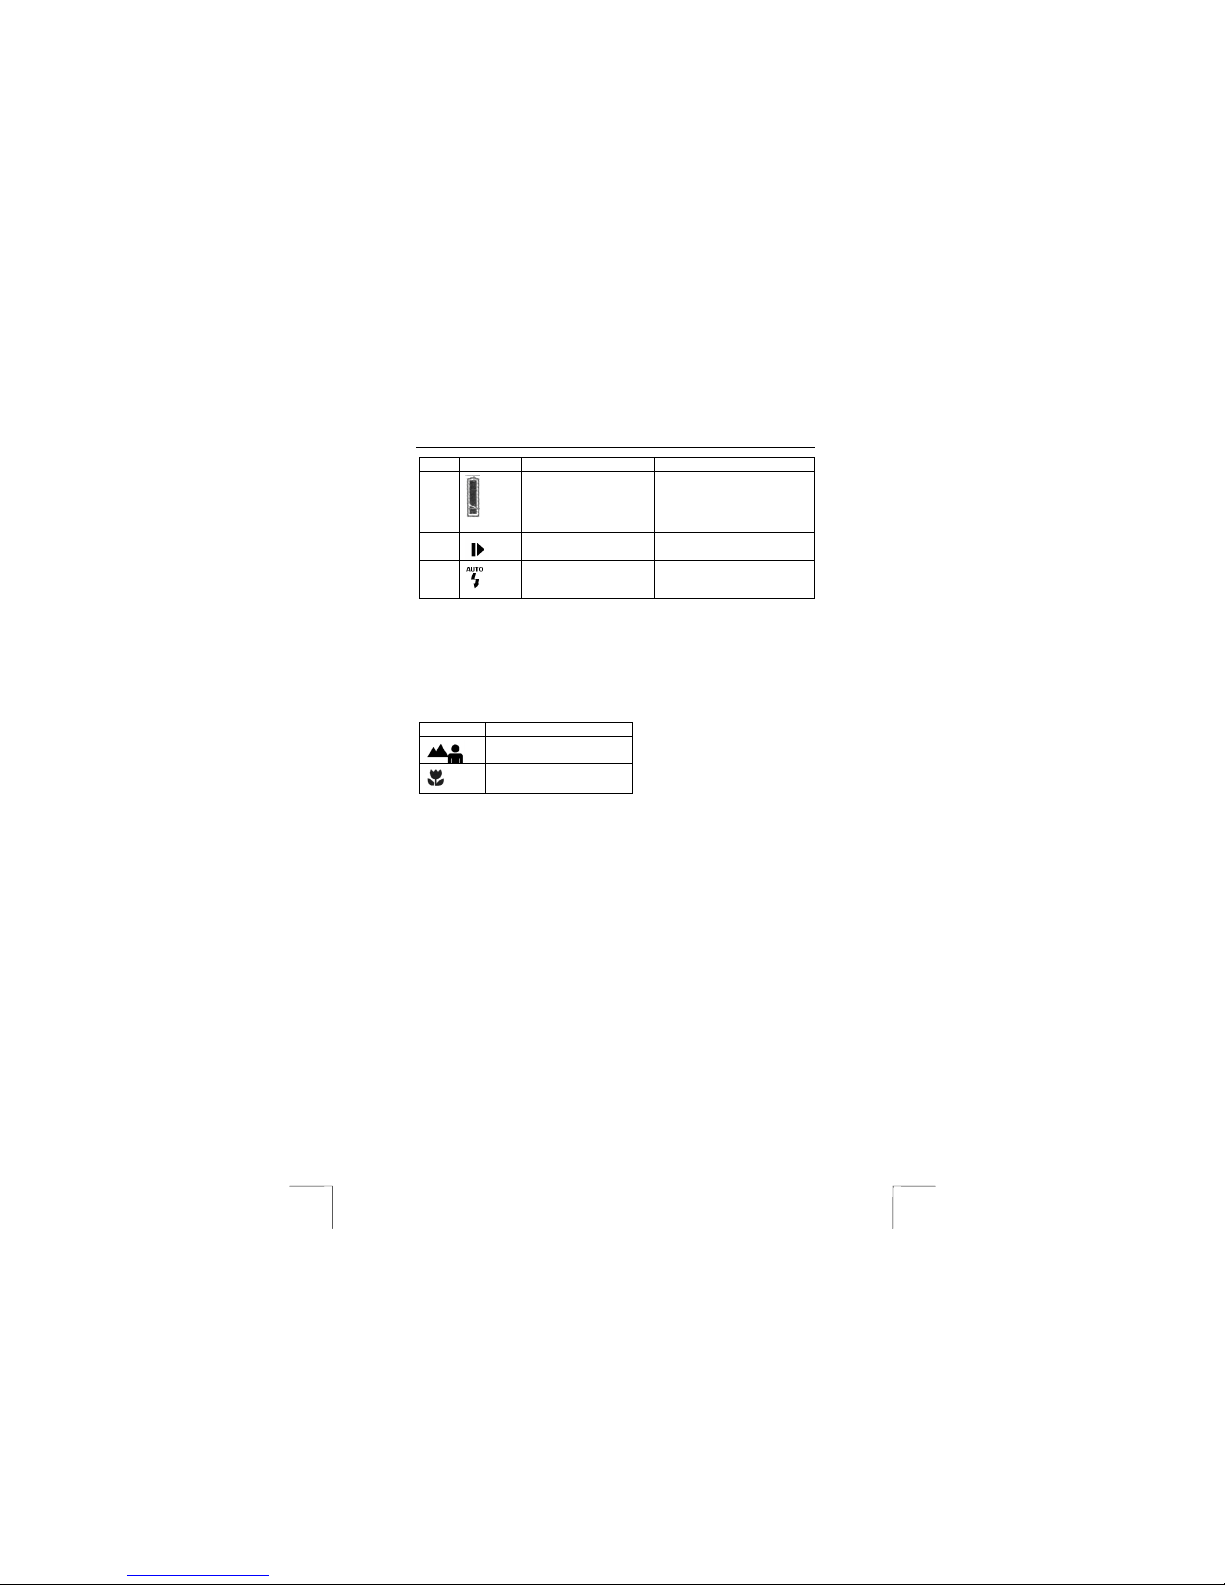
The battery condition is shown on the LCD screen as follows:
The batteries are full.
The battery capacity is low. When the camera is turned on, the
symbol will flash three times and the camera will make a sound to
indicate that the batteries should be replaced. Only a few more
photographs can be taken. To avoid loosing the photographs, all the
photographs should be downloaded onto your computer before
replacing the batteries.
The batteries are empty. When the camera is turned on, this symbol
will flash five times and the camera will turn itse lf off au tomatically.
Replace the batteries.
Table 1: Battery conditions
Note: The TRUST 500F SPYC@M FLASH has an internal battery for
saving the camera’s memory when replacing the batteries. This
battery has a back-up time of 5 minutes and is charged by the
USB port and the replaceable batteries.
Note: To avoid losing photographs, make sure the internal battery is
charged when replacing the batteries.
Note: Do not use old and new batteries at the same time, because the
old batteries may deplete the new ones.
Page 7
TRUST 500F SPYC@M FLASH
5
UK
4 Camera functions
4.1 Buttons
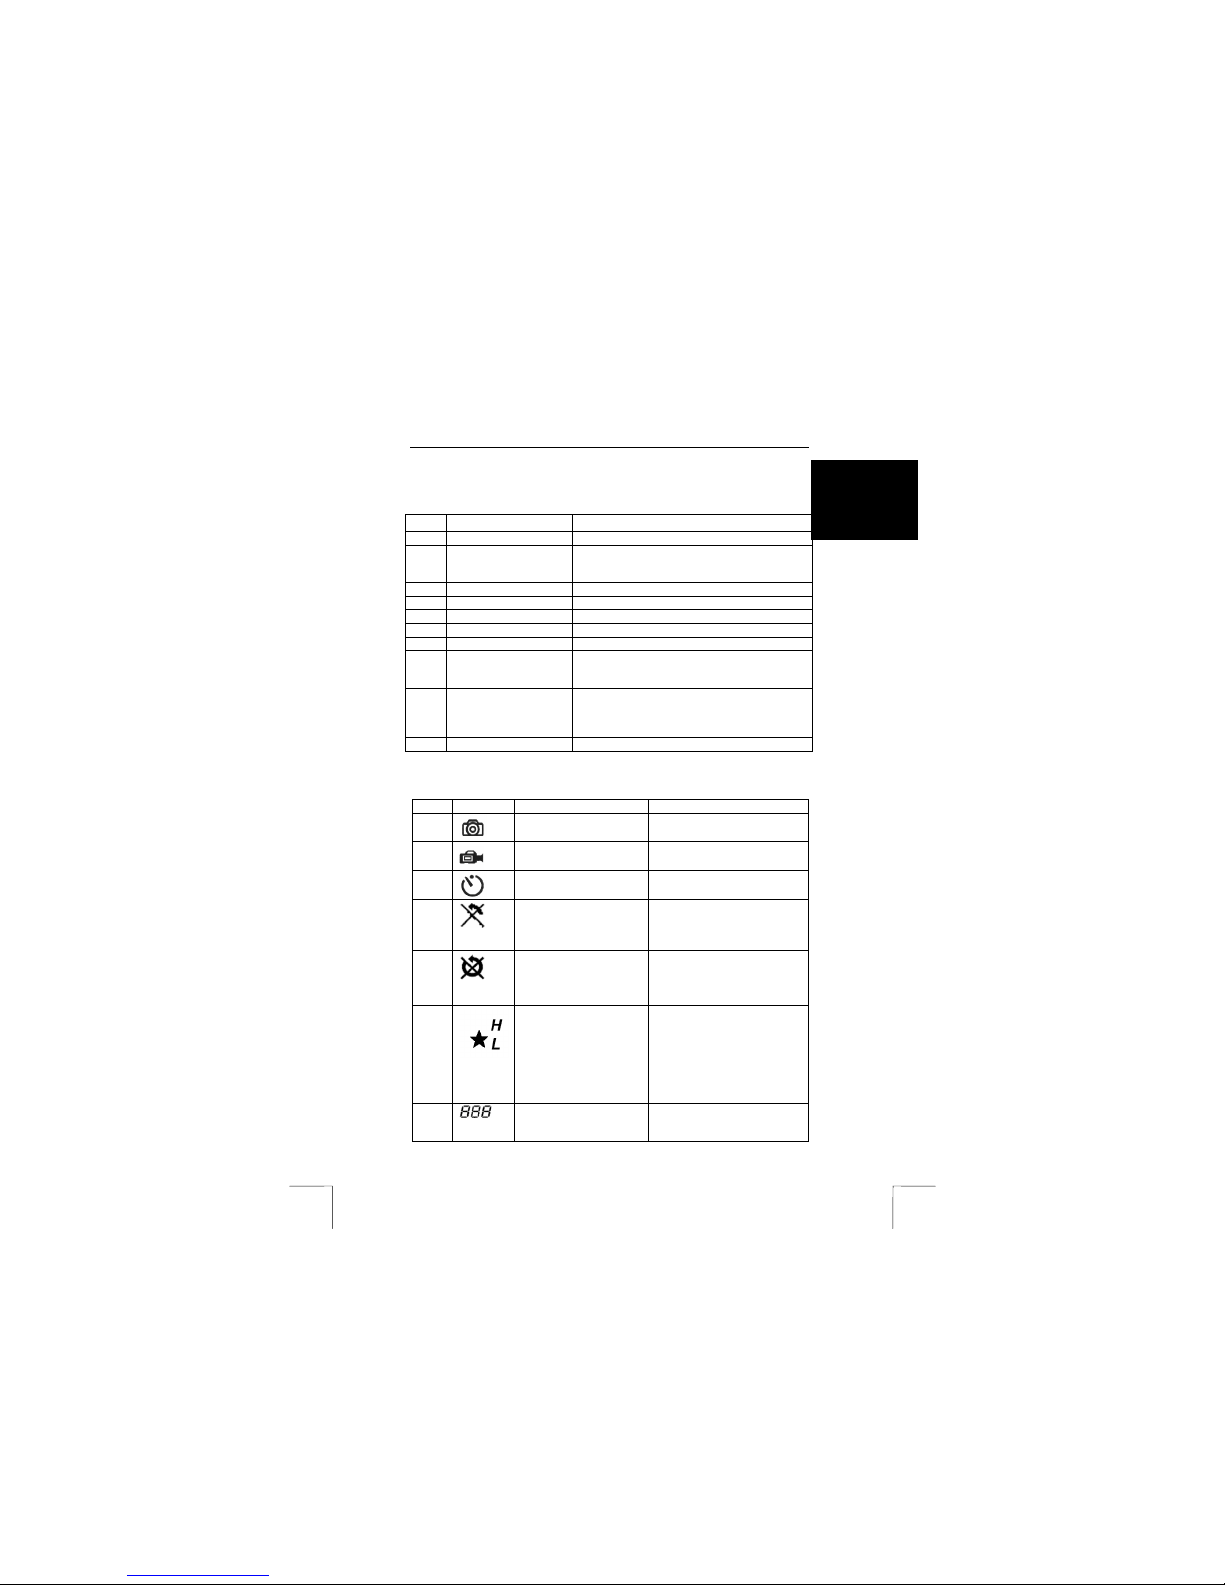
Use table 2 in combination with figure 1.
Item Description Function
A
Viewfinder For viewing the image to record.
B
LENS + Focus ring Records the images to be photographed and
can be used to set the image to the normal or
macro mode.
C
Exposure button Takes a photograph.
D
Wrist strap attachment Attach the wrist strap here.
E
USB connection Connect the USB cable here.
F
Battery cover Closes the battery compartment.
G
Viewfinder For viewing the image to record.
H
LCD screen Displays the life span of the battery, the number
of photographs, the photograph number and the
photograph quality
I
MODE (menu) button +
ON button
Changes the camera mode.
The camera is turned ON using this button. The
camera is turned off automatically after 60
seconds.
J
‘AUTO’ button This button turns on the automatic flash.
Table 2: Camera functions
4.2 LCD screen
Use table 3 in combination with figure 2.
Item Symbol Description Function
1
Photo function One photograph is taken at a
time.
2
VIDEO Records a video.
3
Automatic exposure Takes photographs after a time
delay of 10 seconds.
4
Delete last photograph Deletes the last photograph
from the memory .
5
Delete all the
photographs
Deletes all the photographs
from the memory .
6
Resolution choice Photo:
H = 1248x960 resolution
L = 624x480 resolution
Video (AVI):
H = 624x480 resolution
L = 304x240 resolution
(See chapter 8.1.1 for 3.3Mpix
photographs.)
7
Number of photographs Indicates the number of
photographs which have
already been taken.
Page 8
TRUST 500F SPYC@M FLASH
6
Item Symbol Description Function
8
Battery capacity Shows the amount of energy
remaining in the batteries. If
this is black, then the batteries
are full. If this is empty, then
the batteries are empty.
9
USB indicator The USB cable is connected
when this symbol is visible.
10
Flash indicator Indicates that the flash is
turned on. Flashes when the
flash is being charged.
Table 3: LCD functions
5 Using the camera
5.1 Making recordings
5.1.1 Adjusting the focus
Before taking a photograph, you must set the distance from the object to be
photographed to the camera using the focus ring (B, figure 1). You can choose
between two different settings. The distance can be set from 40 cm to infinity. The
table below shows which symbol corresponds to which distance.
Symbol Description
For distant objects (180 cm
– infinity).
For close by objects (40 cm
– 180 cm).
Table 4: Distances
5.1.2 Setting the resolution
The TRUST 500F SPYC@M FLASH allows you to take photographs and to make
videos in two different resolutions. For photographs: high (1248 x 960) and low (624
x 480). For videos clips: high (624 x 480) and low (304 x 240). The default setting
when the camera is turned on is the high resolution. When in this resolution, you can
take 40 photographs and record 10 seconds of video. In the low resolution, you can
take 160 photographs and records 30 seconds of video. Carry out the following to
change the camera to the low resolution:
1. Turn the camera on by pressing the mode button (I, figure 1) for a couple of
seconds.
2. Next, press the mode button (I, figure 1). A number of times until a star is
visible on the LCD screen (6, figure 2).
3. If you now press the exposure button (C, figure 1), you can choose between
the high and low resolutions.
4. ‘H’ indicates the hig h resolution and ‘L’ indicates the low resolution.
5. Once you have made a choice, press the mode button again to confirm your
choice.
Note: The camera is automatically placed in the sleep setting when it is not
used for 60 seconds.
Page 9

TRUST 500F SPYC@M FLASH
7
UK
5.1.3 Setting the flash
The flash can work automatically or be turned off. When the flash is set to
automatic, it will go of f when there is insufficient light. Carry out the following:
1. Press the ‘Auto’ button (J, figure 1).
2. Icon 10 in fig ure 2 will flash.
3. Once this icon stops flashing, the flash is charged and is ready for use.
4. It is not possible to take photographs whilst the flash is being charged.
5. Press the ‘Auto’ button again if you wish to turn off the automatic flash.
Note: Using the fla sh will cause the ba tteries to become emp ty more quickly,
because the flash uses a lot of energy. It is also possible that the
charging time will take longer the more the flash is used.
Note: The flash w ill only work when it is too dark.
5.1.4 Taking a photograph
1. The camera’s default setting is the photograph function. If this is not the
case, press the mode button (I, figure 1) until a photographic camera is
shown in the top left-hand corner of the LCD screen (1, figure 2).
2. The camera is now ready to take a photograph.
3. Direct the camera towards the object that you wish to photograph.
4. Press the exposu re button (C, fig ure 1). The camera will beep and the photo
counter will flash.
5. The next photograph can be taken when the photo counter no longer flashes.
6. The photographs will be saved in JPG fo rmat in the camera’s f lash memory.
Note: The quality of the photograph depends on the amount of light. The
more light, the better the quality of the photograph.
Note: The number of photographs that can be taken depends on the
number of colours and the brightness of the object to be
photographed. A photograph of a colourful, bright object requires
more memory than a photograph of a dark object in dark
surroundings.
Note: Keep the glass lens clean so as not to affect the quality of the
photographs. Use a soft, dry cloth or a cotton bud to clean the lens.
NEVER use (aggressive) cleaning products.
Note: The image viewed through the viewfinder may be slightly different to
what is recorded through the lens.
5.1.5 Recording a video
1. Press the mode button (I, figure 1) until the video camera appears in the top
left-hand corner of the LCD screen (2, figure 2).
2. Press the exposure button once to start recording.
3. Press the exposure button again to stop recording.
4. The video will be saved in AVI forma t in the temporary S DRAM memory.
Note: Video recordings are saved in the SDRAM memory. The recording will
be deleted when you remove the batteries. The video recording is not
deleted when the camera is placed in the standby setting.
Note: Video recordings do not contain sound.
Page 10

TRUST 500F SPYC@M FLASH
8
5.1.6 Using the automatic exposure
1. You can take a photograph of yourself using the automatic exposure
function.
2. Use the mode button (I, figure 1) to select the automatic exposure icon (3,
figure 2) in the LCD screen.
3. Press the exposure button (C, figure 1) to activate the automatic exposure.
4. The camera will make a slo w beeping noise.
5. The camera will start to beep more quickly just before the photograph is
taken.
6. The photograph has been taken once the camera no longer beeps and the
photo counter no longer flashes.
5.2 Deleting photographs
5.2.1 Deleting the last recording
1. To delete the last photograph, press the mode button (I, figure 1) until icons 1
and 4 in figure 2 are displayed.
2. Press the exposure button (C, figure 1) twice.
3. The last photograph will be deleted.
4. To delete the last video, press the mode button (I, figure 1) until icons 2 and
4 in figure 2 are displayed.
5. Press the exposure button (C, figure 1) twice.
6. The last video recording will be deleted. The screen will continue to flash to
indicate that the camera is ready to delete another recording.
7. Press the mode button (I, figure 1) when you have finished deleting
recordings.
5.2.2 Deleting all the recordings
1. To delete all the photographs, press the mode button (I, figure 1) until icons 1
and 5 in figure 2 are displayed.
2. Press the exposure button (C, figure 1) twice.
3. All the photographs will be deleted.
4. To delete all the video recordings, press the mode button (I, figure 1) until
icons 2 and 5 in figure 2 are displayed.
5. Press the exposure button (C, figure 1) twice.
6. All the video recordings will be deleted.
Page 11

TRUST 500F SPYC@M FLASH
9
UK
6 Installation
6.1 Uninstalling old drivers and devices
The most common cause of faults during installation is the presence of a driver for a
similar, old product. The best solution is to first remove all drivers related to old
devices before installing the new driver. Make sure you only delete programs for old,
unused (similar) products.
1. Enter the Windows ‘Safe Mode’ (press F8 when starting Windows and then
select ‘Safe Mode’ from the menu which is displayed).
2. Click on ‘Start – Settings – Control Panel’ and double-click on the
‘Add/Remove Programs’ icon.
3. Find all the programs for similar, old devices and remove these by clicking on
the ‘Add/Remove’ button. When in the ‘Safe Mode’, it is possible for some
programs to appear twice. In that case, remove all the programs which
appear twice.
4. Restart the computer.
6.2 Installing the driver in Windows 98SE / Windows ME /
Windows 2000 / Windows XP
Note: The latest driver can be downloaded from www.trust.com/12932. Check
whether a new driver is available and use this for the installation. The
current version of the driver is included on the Trust Installation CD-ROM.
Note: Make sure all other programs are closed during the installation.
Note: During installation in Windows XP, you may receive a message saying
that the driver has not been signed. This does not cause a problem for
the functionality.
Note: In the example, ‘D:\’ is used to indicate the CD-ROM drive. This may be
different for your computer.
1. Insert the CD-ROM into your computer’s CD-ROM drive. The Trust Software
Installer will start automatica lly. If it does not start automatically, carry out
the following:
a) Select 'Run' from the Start menu.
b) Type [D:\SETUP.EXE] and click on 'OK' to start the Trust Software
Installer.
2. The Trust Software Installer window will appear (see figure 3).
3. Select the language you wish to use for the installation.
4. Click on ‘500F SPYC@M FLASH‘ to start the installation of the camera.
5. Follow the on-screen instructions.
The driver and software for the 500F SPYC@M FLASH has now been completed.
The installation of the other programs is described later in this instruction manual.
6.3 Connecting the camera
1. Make sure your computer is turned on.
2. Connect the USB cable to the camera’s USB port (E, figure 1).
3. Connect the other end of the USB cable to your computer.
4. Windows will detect and install the camera. If Windows starts the installation
Wizard, follow the on-screen instructions.
5. It is now possible to load the recordings in the camera onto your computer.
See chapter 8.1.1 for a description of the Trust Spyc@m Manager.
Note: The camera cannot be turned off whilst it is connected to the computer’s
USB port. The camera uses the power from the computer’s USB port.
The batteries will n ot be used.
Page 12

TRUST 500F SPYC@M FLASH
10
6.4 Checking after the installation
After installing the device and the driver, the following are installed on your computer
and can be checked:
‘Start – Settings – Control Panel’. Double-click on the ‘System’ icon and select the
‘Device Manager’ tab.
- Imaging device – TRUST 500F SPYC@M FLASH, WDM Video Capture
- Universal Serial Bus controllers - TRUST 500F SPYC@M FLASH, USB Camera
- TRUST 500F SPYC@M FLASH, WDM DSC I/O driver
‘Start – Settings – Control Panel’ and then double-click on the ‘Add/Remove
Programs’ icon.
- TRUST 500F SPYC@M FLASH
Start - Programs - Trust - 500 SPYC@M
- TRUST 500F SPYC@M FLASH
- Uninstall TRUST 500F SPYC@M FLASH
Note: The information given above will vary when the installation has been
altered by the user (for example, not everything has been installed or
locations other than the default locations have been selected).
Note: Deviations may also occur as a result of using new drivers available on
the Internet.
Note: The location or name may vary in the ‘Control Panel’ for different
operating systems.
7 Installing the application software
A number of programs are supplied with the camera. These programs can be used
for different applications. These programs are not required to use the camera,
although it is recommended to install these to enjoy full use of all the options
available concerning editing and processing photographs and video clips.
Note: Make sure all other programs are closed during the installation.
7.1 Photo Express
Photo Express 4.0 is an image editing program that can be used to load and edit the
photographs on your PC which you have taken using your 500F SPYC@M FLASH.
This program requires 500 MB free hard disk space. Follow the instructions below to
install Photo Express 4.0.
1. Start the Trust Software Installer (see figure 3).
2. Select ‘Photo Express’.
3. Select the language you wish to use.
4. Follow the on-screen instructions.
7.2 Photo Explorer
Ulead Photo Explorer 6 is an image explorer/editing program that can be used to
load and edit the recordings on your PC which you have taken using your 500F
SPYC@M FLASH. Follow the instructions below to install Photo Explorer 6.0.
1. Start the Trust Software Installer (see figure 3).
2. Select ‘Photo Explorer’.
3. Select the language you wish to use.
4. Follow the on-screen instructions.
Page 13

TRUST 500F SPYC@M FLASH
11
UK
7.3 Video Studio
Ulead Video Studio is video editing program which you can use to load the video
recording onto your computer, make live recordings and edit them. Follow the
instructions below to install Video Studio.
1. Insert the Ulead VideoStudio CD-ROM into your CD-ROM drive.
2. The installation will st art.
3. If the installation does not start, select ‘Run’ from the ‘Start’ menu.
4. Type [D:\SETUP.EXE] and click on ‘OK’.
5. Select the language you wish to use.
6. Follow the on-screen instructions.
7.4 COOL 360
COOL 360 is an image editing program that can be used to change the photographs
you have taken using the Trust 500F SPYC@M FLASH into panoramic photographs.
Follow the instructions below to install COOL 360.
1. Start the Trust Software Installer (see figure 3).
2. Select ‘Cool 360’.
3. Follow the on-screen instructions.
7.5 Video Live Mail
VideoLive Mail 4.0 can be used to send video and audio multimedia e-mails. To be
able to use this ap plication, you will need a modem, an ISDN modem or a
broadband connection, a sound card with speakers, a microphone and an Internet
connection.
1. Start the Trust Software Installer (see figure 3).
2. Select ‘VideoLive Mail’.
3. Select the language you wish to use.
4. Follow the on-screen instructions.
7.6 Microsoft ® NetMeeting (Windows 98/ Windows ME/
Windows 2000)
NetMeeting is a program that is supplied with Windows 98 / Windows ME / Windows
2000. With this program, you can use the Trust 500F SPYC@M FLASH as a
webcam (video conferencing).
Windows XP does not have NetMeeting, but has Windows Messenger instead. To
install this program, refer to your Windows XP instruction manual which is included
with your Windows XP CD-ROM.
NetMeeting is installed as follows:
1. Click on the ‘Start’ button in the bottom left-hand corner of your desktop.
Point to Programs -> Accessories -> Internet Tools and left-click on
NetMeeting.
2. Click on 'Next' to continue.
3. Fill in your details, such as your Christian name, you r surname, your e-mail
address, your country and a comment that you would like to be displayed in
the list. Next, click on ‘Next’
4. If you do not want to be displayed in the NetMeeting list, select 'Do not list my
name in the directory'. Click on ‘Next’ to continue with the installation. Follow
the on-screen instructions.
5. You must select a camera during the installation. Select the Trust 500F
SPYC@M FLASH as the camera you wish to use for NetMeeting and click on
'Next' to continue.
6. Select 'Put a shortcut to NetMeeting on my desktop' if you wish to have a
shortcut to NetMeeting on your desktop.
Select 'Put a shortcut to NetMeeting on My Quick Launch bar' if you wish to
Page 14

TRUST 500F SPYC@M FLASH
12
have a shortcut to NetMeeting on your Windows taskbar. You do not have to
select either option if you do not wish to.
7. Click on ‘Next’ to continue with the installation. Follow the on-screen
instructions to configure the sound and image settings.
8. At the end of the installation process, click on ‘Finish’ to complete the
installation of Ne tMeeting. NetMeeting will no w start automatically. Se e
chapter 8.7 for instructions on how to use NetMeeting.
If you are not able to set or configure your audio settings, check whether the sound
card and the devices satisfy the system requirements for NetMeeting and/or whether
these have been correctly connected and installed.
7.7 Installing Windows Messenger (Windows XP)
As described in the installation of Microsoft ® NetMeeting, NetMeeting is not
included with Windows XP. Windows Messenger is included instead.
To use Windows Messenger, see the Windows XP instruction manual which is
included with your Windows XP installation CD-ROM.
You can also download NetMeeting 3.01 from the Microsoft® website and install it.
Windows Messenger is already installed in the Windows XP operating system. You
can select Windows Messenger from the ‘Start’ menu to start the program. Follow
the instructions to input your personal settings.
8 Using the software
8.1 500F SPYC@M FLASH Manager software
8.1.1 Loading, saving and opening 3.3 Mpix photographs
Note: Only photographs taken in the highest resolution can be converted to
3.3 Mpix.
1. Make sure the camera is connected and turned on.
2. Click on ‘Programs– Trust – 500F SPYC@M FLASH – Trust 500F SPYC@M
FLASH’.
3. Figure 4 will appear.
4. Click on icon A in figure 4.
5. The ‘Load DSC’ window with appear containing a list of files. These files are
the photographs and video clips which you have made using the camera.
6. You can also take photographs in this window as follows:
• Select the image format: VGA (624x480) or SXGA (1248x960).
• Select: Adjust format.
• Select: Take a photograph.
• The photograph is now in the camera’s memory.
• Click on the refresh button to add the photograph to the list of other
photographs.
7. Select the files which you wish to load onto your computer. A thumbnail of
the selected file will be displayed in the bottom right-hand corner.
8. Select ‘Enhanced’ to load the photograph onto your computer in 3.3 Mpix.
This option is located in the top right-hand corner of the window.
9. Next, click on ‘Load’.
10. The photographs will now be loaded from the camera’s memory into the
Camera Manager program (see J, figure 4).
11. Left-click on the photograph that you wish to load. If you wish to load all the
photographs, click on E in figure 4.
12. Next, right-click on the photograph and select ‘Save As’.
13. A standard Windows window will appear in which you can type a file name
and location for the file you wish to save.
14. Click on ‘OK’ to save the file.
Page 15

TRUST 500F SPYC@M FLASH
13
UK
15. Close the Camera Manager and go to the location where you have saved the
photograph.
16. Open the file by double-clicking on it. The file will be opened in your default
editing program.
Note: Do not select ‘Enhanced’ if you do not wish to load the photograph with a
resolution of 3.3 Mpix.
Note: Do not remove the USB cable whilst loading photographs.
8.1.2 Loading video recordings
1. Carry out points 1 to 6 in chapter 8.1.1.
2. Click on ‘Load’.
3. Select the AVI format. Standard AVI files are large files. Original AVI files,
also called compressed AVI files, a re smaller files.
8.1.3 Sending a recording via e-mail
1. Carry out points 1 to 9 in chapter 8.1.1.
2. Next, click on B in figure 4.
3. Select a recording from location K in figure 4 by left-clicking on it.
4. Click on G in figure 4 to send the recording via e-mail.
8.1.4 Making a live recording
1. Click on ‘Live’ (button D in figure 4).
2. Figure 5 will appear.
3. Click on D in figure 5. A ‘Properties’ window will appear.
4. You can change the image settings in this window.
5. The ‘Video Settings’ tab contains a ‘Banding filter’ option which you can use
to set the frequency of the electrical mains. In Europe, this is usually 50 Hz. If
necessary, contact your energy company. This prevents a flickering image
when using indoor lighting.
6. You can also alter the brightness, contrast and colour settings in the ‘Video
Proc. Amp’ tab.
7. Once you have made the desired settings, click on ‘Apply’ and then ‘OK’.
8. Click on C in figure 5.
9. Figure 8 will appear. Here, you can alter the colour settings, the image size
and the frames per second (see table 5 and figure 8).
10. Once you have made the desired settings, click on ‘Apply’ and then ‘OK’.
11. Click on A in figure 5 to make a video recording or click on B in figure 5 to
take a photograph.
12. The recording s will appear immediately in the SPYCAM Manager.
13. You can save the recordings or send them via e-mail as described in
chapters 8.1.1 to 8.1.3.
Page 16

TRUST 500F SPYC@M FLASH
14
8.2 Ulead Photo Express
8.2.1 Loading photographs
1. Click on ‘Start – Programs – Ulead Photo Express 4.0 SE – Ulead Photo
Express 4.0 SE’. Figure 6 will appear.
2. In the main Photo Express menu, select ‘Get Photo’ and then select ‘Digital
Camera’
3. The TRUST 500F SPYC@M FLASH is visible in this window. Select ‘Digital
camera’ and click on ‘OK’.
4. TRUST 500F SPYC@M FLASH will now be seen for ‘Select data source’ in
the top left-hand corner of the window. You may have other cameras
installed on your computer. If this is the case, a different model may be
visible. Select the TRUST 500F SPYC@M FLASH.
5. Click on ‘Acquire’. The TWAIN window will appear (see figure 7).
Function Description
A Photo Photograph taken in the highest resolution (1248x960).
B Photo Photograph taken in the lowest resolution (624 x 480).
C Videoclip Can be recognized by VIDEOXXXX.
D Video mode Live image.
E Camera mode The photographs in the camera’s memory.
F Transfer Transfers the chosen recording to the application.
G Transfer All Transfers all the recordings to the application.
H SAVE AVI Saves the video clip (B) on the computer.
I Snap Shot Takes a photograph.
J Format The camera settings can be changed (colour, contrast,
brightness, etc.).
K Settings Camera settings.
L EXIT Closes the TWAIN window.
Table 5: Explanation of the TWAIN window for the TRUST 500F SPYC@M
FLASH
6. Select the photograph (A or B) that you wish to transfer to Photo Express by
clicking on it with the mouse.
7. Click on ‘Transfer’ (F) to transfer the photograph to Photo Express 4.0. The
photograph which has been selected in the TWAIN window will now appear
in figure 6.
8. Double-click on the photograph. The photograph will now appear in the
window.
9. This photograph can now be edited and/or saved on the computer.
8.2.2 Loading video clips
1. Please refer to figure 7 for loading video clips.
2. Click on the video clip (C).
3. Click on ‘SAVE AVI’ (H) to save the video clip. A standard Windows ‘Save As’
window will appear.
4. Select a location and give the file a name. Click on ‘Open’.
5. The video clip will now be saved in the chosen loca tion. Depending on the
size of the recording, this may take some time.
6. To play the video clip, go to the location where it was saved and double-click
on the file. The video clip will now be played, for ex ample, in Windows Media
Player.
Page 17

TRUST 500F SPYC@M FLASH
15
UK
8.2.3 Live video images
1. Click on ‘Video mode’ (D) (see figure 7).
2. Click on ‘Format’ (J) to alter the camera’s image settings. Figure 8 will
appear.
A
Colour settings (I420 / RGB 24)
B
Image size (640x480 / 320x240)
Table 6: Image settings
3. Adjust the colours and image size as required. Click on ‘Apply’ and then on
‘OK’. Figure 8 will now close .
4. Click on ‘Snap Shot’ (I) to take a photograph of the live video image.
5. The photograph will be automatically loaded into Photo Express as a
thumbnail.
6. Double-click on the photograph. The photograph will now appear in the
window.
7. This photograph can now be edited and/or saved on the computer.
Note: For more detailed information on how to edit photographs in Photo
Express, please refer to this program’s instruction manual. Click on ‘Start
– Programs - Ulead Photo Express 4.0 – Screenbook’ to read this.
Acrobat Reader must be installed on your computer to be able to read
this. The instruction manual is available in English, German, Spanish,
French, Portuguese and Italian.
8.3 Ulead Photo Explorer
You can use the Ulead Photo Explorer photo editing software to open the TWAIN
window for the 500F SPYC@M FLASH. A brief description of how to use the Trust
500F SPYC@M FLASH in Ulead Photo Explorer 6.0 is given below. For a detailed
description of Photo Explorer, see the program's help function. Follow the
instructions below to use the 500F SPYC@M FLASH in Photo Explorer:
1. Turn the camera on.
2. Start Ulead Photo Explorer.
3. The 'Device Type' window will appear only once. Choose the 'Camera' option
to select the Trust 500F SPYC@M FLASH and click on 'OK'.
4. The main window will appear as well as the 'Set-up Internet Connection'
window. Click on the 'Skip for now' button to close this window.
5. In the main window, click on 'File - TWAIN Acquire' and select the 'Select
source...’ option from the list.
6. Select the ‘Trust 500F SPYC@M FLASH’ from the list and click on 'Select'.
7. Click on the 'TWAIN Acquire' button on the taskbar in the main window.
8. The TWAIN window for the Trust 500F SPYC@M FLASH will appear. Click
on ‘Capture Still Image’ to take a photograph.
9. The photograph will be immediately saved on yo ur hard disk and be will
displayed as a thumbnail in Photo Explorer.
10. Double-click on the thumbnail in the main window to edit the photograph in
Photo Explorer (see figure 5).
Note: For more detailed information about Ulead Photo Explorer, see this
program’s detailed instruction manual. You can easily access this via the
Trust Software Installer menu on the installation CD-ROM. The Trust
Software Installer starts automatically when the CD-ROM is inserted into
your CD-ROM drive (see figure 3). Click on the 'PHOTO EXPLORER
MANUAL' button to open the manual directly from the CD-ROM. The
instruction manual is only available in English.
Page 18

TRUST 500F SPYC@M FLASH
16
8.4 Ulead Video Studio
The Ulead VideoStudio video editing software can be used to edit your video and
audio recordings by adding text, sound or various visual effects. You can then save
these in AVI or MPEG format, for example, on your hard disk or CD-R, or publish
them on the Internet in QuickTime MOV or RealMedia RM streaming media format.
A short description of how to use the Trust 500F SPYC@M FLASH in Ulead
VideoStudio 4.0 is given below. For a detailed description of VideoStudio, see the
program's Help fun ction. This will take you th rough the whole editing process stepby-step.
Ulead VideoStudio 4.0 has 2 components, namely the 'Video Wizard' and the main
program. A short description of the Video Wizard is given below.
8.4.1 Ulead Video Wizard
You can use the Ulead Video Wizard component of VideoStudio to make a complete
video, including sound, special effects and text, in 6 easy steps. Follow the
instructions below:
1. Click on 'Start - Programs - Ulead VideoStudio 4.0 SE' and select 'Ulead
Video Wizard' from the menu to start this program. The Video Wizard window
will appear displaying your camera image (see figure 8).
2. Under 'Project name', enter a name for the new video project.
3. Continue with step 2 'Get Video' to make new video recordings
4. Click on the 'Begin' button to start recording. Click on the button again to stop
recording. Keep doing this until you have all the desired video recordings.
5. Continue with step 3 'Arrange'. Here you can arrange the video recordings in
the order desired by selecting a video clip and dragging it to the desired
location.
6. Select a video clip and click on the 'Trim' button to indicate the start and end
point of the video clip. Here you can cut bits from the beginning and end so
that only the desired video fragment remains
7. Move the slide bar to the start point of the desired video fragment and click
on the 'Start Trim' button. Next, move the slide bar to the end point of the
desired video fragment and click on the 'Stop Trim' button. Next, return to the
Video Wizard window.
8. Click on the 'Add Video' button if you want to add existing saved video
recordings to the video project
9. Continue with step 4 'Add Effect' to add transition effects, background audio
and a title to the video project
10. Under 'Transition effect', select the desired transition effect between the
video clips.
11. Under 'Audio file', enter the location of a saved WAV audio file that you
would like to use as background audio for this video project.
12. Under 'Title', enter a title that will be displayed at the beginning of the video
project. Here, you can adjust the colour of the text, the background colour
and the font.
13. Continue with step 5 'Create' to finish the video project. All video recordings,
effects, sound and the title will be compiled into a f ilm
14. Click on the 'Create Video File' button to complete the film, or the 'Open In
VideoStudio' button to open the video project in the Ulead VideoStudio main
program. Here you have many options for making a video project (see figure
9).
15. If you have clicked on 'Create Video File', go to step 6 'Play' to view the film
you have made
You have now completed your video project.
Page 19

TRUST 500F SPYC@M FLASH
17
UK
8.4.2 Main program of Video Studio
Ulead Video Studio’s main program has many options for editing video and sound in
your video project. Just as with the Video Wizard, you are led step-by-step through
the entire editing process.
You can start the main program by clicking on ‘Start – Programs – Ulead
VideoStudio 4.0 SE’ and then selecting ‘Ulead VideoStudio 4.0 SE’ from the menu,
or by starting it from the Video Wizard (see figure 9).
The 8 steps for editing a video from start to finish are shown at the top of the main
window. You can use this menu to easily switch between the various steps in the
process. A short summary of the various steps is given below:
1. Start: Start a new project and give the project name, file location, video
format, etc, or select an existing project that you want to alter.
2. Capture: Start new video recordings. You can also select the Trust 500F
SPYC@M FLASH and alter the video and audio settings. The video image
from your connected camera will now be visible in the main window. Click on
‘Video menu’ and select ‘Video Properties’. If desired, you can alter the same
audio and video settings here (see figure 10). Click on the ‘Capture Video’
button to start recording and click on it again to stop recording. Select
‘Capture Audio’ if you also wish to record sound with the video.
Note: The sound cannot be heard whilst recording after selecting ‘Capture
Audio’, but it can be heard when playing the video.
Note: To record audio, you must have a sound card installed to which you
can connect a microphone.
3. Storyboard: Add existing video clips to the project. Change the order of the
video clips and trim the video clips so that you only have the video fragments
that you require.
4. Effects: Add various transition effects between the video clips. You can
choose from a hundred different effects.
5. Title: Add a title to the video. You can alter the text colour, letter font, size,
etc. and also select various text effects, such as text which scrolls from the
bottom to the top.
6. Voice: Add new sound recordings to the video project or select existing
sound fragments from the menu.
7. Music: Add background music to the video project directly from your music
CD or from saved music files (also MP3 support).
8. Finish: Save your video project in Ulead VSP format. Click on the 'Make
movie’ button to make the final video and export it to the desired video
format. You can choose from the following video formats:
- Microsoft AVI (*.avi)
- Advanced Streaming Format (*.asf)
- Autodesk Animation Files (*.flc)
- Autodesk Animatio n Files (*.fli)
- Autodesk 16-bit Animation Files (*.flx)
- QuickTime Movie Files (*.mov, *.qt)
- MPEG Files (*.mpg)
- RealNetworks RealVideo Files (*.rm)
- Ulead Image Sequence Files (*.uis)
9 If desired, you can click on the 'Make Sound' button to record the sound
separately as a Microsoft Wave (.wav) file or an MPEG Audio File (.mpa).
Note: For more information, see the extensive Help function in Ulead Video
Studio 4.0 and the instruction manual. You can easily access this via
the Trust Software Installer menu on the installation CD-ROM. The
Page 20

TRUST 500F SPYC@M FLASH
18
Trust Software Installer starts automatically when the CD-ROM is
inserted into your CD-ROM drive (see figure 3). Click on the
'VIDEOSTUDIO MANUAL' button to open the manual directly from the
CD-ROM. The instruction manual is available in English, German,
Spanish, French and Italian.
8.5 VideoLive Mail
This chapter explains the most commonly used components of VideoLive Mail. For
more information, refer to the Help function of VideoLive Mail.
8.5.1 Once-only settings
When you start the VideoLive Mail program for the first time, a Set-up Wizard will
appear to configure the program. It is recommended to complete this Wizard. During
the Wizard, yo u will be asked:
• Your name; fill in your own name.
• Your e-mail address; fill in your e-mail address.
• Your mail server; fill in your ‘Mailhost’ or ‘stmp server’ provided by your
Internet Service Provider.
• Your account name; fill in the user name given to you by your Internet
Service Provider.
Note: You should have your Internet Service Provider’s information available
when setting up your mail server.
1. Click on ‘Yes’ to continue.
2. Click on 'Next' to continue. Figure 4 will appear.
3. Fill in your first name, last name and e-mail address and then click on ‘Next’.
4. Select ‘Built-in Mail Utility’ and f ill in your ‘Mail Server’ info rmation (given to
you by your ISP) and your ‘account name’. Click on 'Next' to continue.
5. Select ‘Trust 500F SPYC@M FLASH Video Capture’ as the ‘Video capture
device’ and select the desired frames per second (fps). Click on ‘Test It?’ to
compare the image. Click on the square stop button to stop the test.
6. Click on ‘Set-up’ if you wish to alter the camera settings. Select ‘Format’ to
set your camera’s image format. Select ‘Source’ from the menu if you wish to
alter the settings. Here, it is also possible to set the electric mains frequency.
This is 220V/50 Hz for Europe.
7. Click on ‘Next’ after you have adjusted all the settings as required.
8. Click on ‘Next’ to configure the audio settings. The ‘Audio Configuration’
window will appear.
9. Click on ‘Press Here to Test Speaker’ to test the output volume of your
speakers. Move the slide bar to adjust the volume.
10. Click on ‘Next’ once the settings are correct and you wish to continue with the
configuration.
11. Click on the red button to make a recording. Click on the black square to stop
the recording. Click on the black triangle to listen to the recording. The
recording level can be altered using the slide bar.
12. Click on ‘Next’ once the settings are correct and you wish to continue with the
configuration.
13. Click on 'Finish' to complete the configuration of VideoLive Mail.
14. You have now completed setting up VideoLive Mail. You can now use the
program. If you wish to change the settings, you can do so using the ‘Setup
Wizard’ (‘Start - Programs - Cyberlink VideoMail 4.0’).
Note: You must have a sound card and a microphone installed to be able to
use the audio settings.
Page 21

TRUST 500F SPYC@M FLASH
19
UK
8.5.2 Recording and sending videos
Now you have completed the once-only settings in chapter 8.5.1 concerning your
Internet Service provider. An explanation is given below of how you can easily
record a short film and send it immediately via e-mail.
1. Click on ‘Start – Programs – Cyberlink VideoLive Mail 4.0 – VideoLive Mail’.
2. Video Live Mail will start.
3. Click on the round ‘Record’ button to start recording.
4. Click on the square ‘Stop’ button when you wish to stop the recording.
5. Click on the ‘E-mail’ bu tton to send the recording immediately.
6. The ‘Summary’ window will appear.
7. Here, you can include the desired information with your recording. Next, click
on ‘OK’.
8. The recording will n ow be automatically linke d to your defa ult e-mail program.
9. Send the e-mail as you would any other e-mail using this program.
8.5.3 Saving a video recording
1. Click on ‘Start – Programs – Cyberlink VideoLive Mail 4.0 – VideoLive Mail’.
2. Click on the round ‘Record’ button to start recording.
3. Click on the square ‘Stop’ button when you wish to stop the recording.
4. Click on ‘Save Video File’.
5. The ‘Summary’ window will appear.
6. Here, you can include the desired information with your recording. Next, click
on ‘OK’.
7. A standard Windows ‘Save As’ window will appear. In this window, you can
indicate which folder you wish to save the video file in, you can give the file a
name and indicate which format you wish to save the file in.
8.5.4 Opening a video recording
1. Click on ‘Start – Programs – Cyberlink VideoLive Mail 4.0 – VideoLive Mail’.
2. Click on ‘Open file’ (F).
3. Select a video file from the location where you have saved the video files.
8.5.5 Taking a photograph
1. Click on ‘Start – Programs – Cyberlink VideoLive Mail 4.0 – VideoLive Mail’.
2. Click on ‘Snap shot’.
3. The photograph will be sent to your def ault editing prog ram.
You can save, open and edit the photograph via your editing program.
Note: For more detailed information, see the Help function of VideoLive Mail.
Click on ‘Start – Programs – Cyberlink VideoMail Live 4.0 - VideoLive
Mail help’. The help function is available in English, German, Spanish,
French and Italian.
8.6 COOL 360
For instructions on how to use COOL 360, please refer to the instruction manual
included on the CD-ROM. The manual can be found at the following location:
D:\Software\Cool360\Manual\C360.pdf
Acrobat Reader has to be installed on your computer to be able to read this manual.
8.7 Using the camera as a webcam (NetMeeting)
1. Make sure you have an Internet account installed and your speakers and
microphone are connected before starting NetMeeting.
2. Start NetMeeting (Start -> Programs -> Accessories -> Internet Tools ->
NetMeeting).
3. Two windows will be opened, namely NetMeeting and your Dial-up
connection.
Page 22

TRUST 500F SPYC@M FLASH
20
4. Fill in your user name and password and click on 'Connect' to connect to the
Internet.
5. Once a connection has been made with the Internet, only the NetMeeting
window will remain visible. The Dial-up Connection window will disappear.
6. A number of settings should be made only once.
Go to ‘Tools -> O
ptions…’ and click on the ‘Video’ tab.
7. To prevent a mirror image of your camera, do not select
‘Show mirror image in preview video window’. Image settings, such as the
image size and quality, can also be changed in this window. Click on 'OK' to
save the new settings and return to the start window of NetMeeting. The
once-only settings have now been completed.
8. Click on 'View' in the NetMeeting window and select the 'My Video (New
Window)' option. An extra window ('My Video') will now be opened
9. Click on the ‘Play’ button (
) to turn on your current video image. This
image will also be seen by the person you make a NetMeeting connection
with.
10. You are now ready to make a NetMeeting connection. Click on NetMeeting’s
telephone book icon. A new window will appear.
11. In the address bar, type an ‘ils server name’ (for example, ils.worldonline.nl)
and click on ‘Enter’.
12. Double-click on a person in the list. A NetMeeting connection will be made.
The person may not wish to make a connection with you, because this person may
be communicating with somebody else. If this is the case, select somebody else
from the list.
You can find othe r ‘ils servers’ on the Internet. A n example is:
http://www.netme etinghq.com
For more information or solutions to problems, click on ‘Help’ in NetMeeting’s start
window. This contains a description of all the functions available with NetMeeting.
8.8 Webcam & Internet
The Trust 500F SPYC@M FLASH can also be used as a webcam, for example, on
your Internet page.
A number of informative sites about webcams are given below:
http://www.camarades.com
http://www.teveo.com
At these sites, you can download software that you can use to send live video
images over the Internet.
Please refer to the sites concerned for information on how to install and use the
software.
9 Troubleshooting
Method
1. Read the solutions given below.
2. Check for up-to-date FAQ’s, drivers and instruction manuals on
the Internet (www.trust.com/12932).
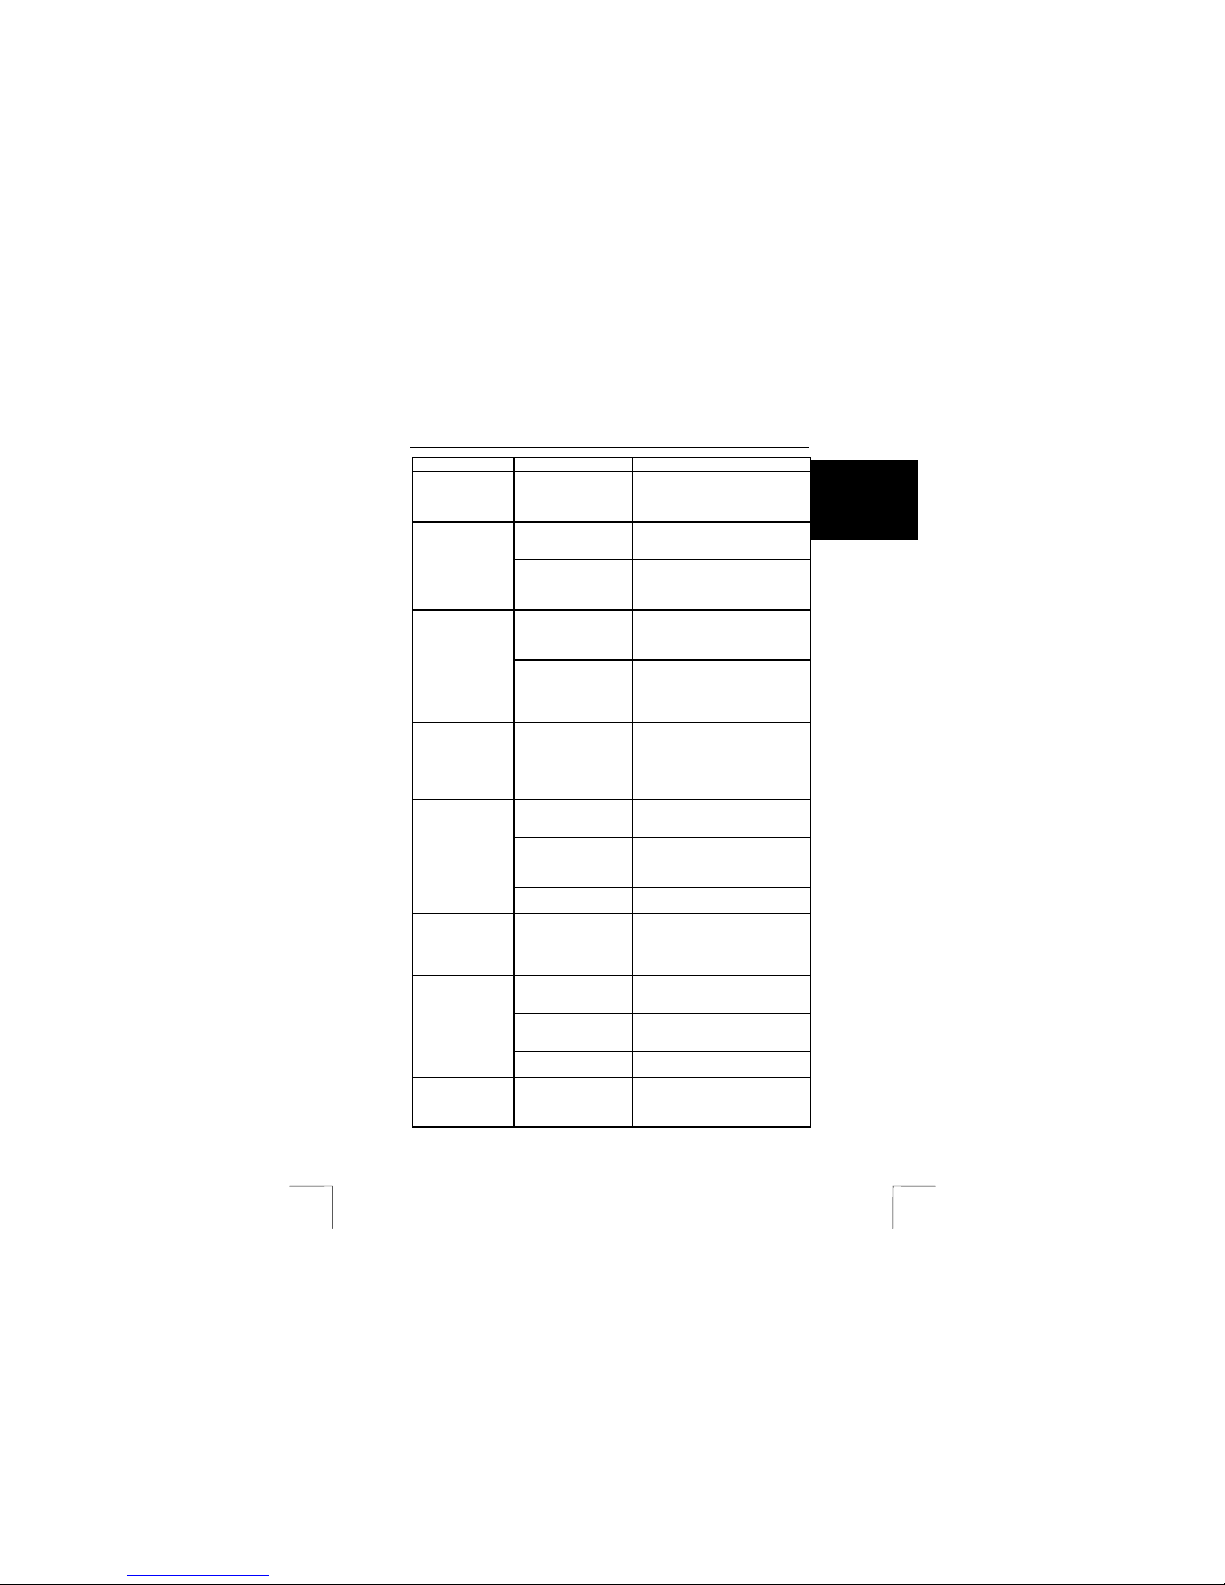
Problem Cause Possible solution
The computer's USB
port does not work.
Check the settings of your USB
port. See
www.trust.com/customercare/help/
usb
Windows does
not detect a new
device after
connecting the
camera.
The camera is not
connected to the USB
port.
Connect the camera to a USB port
Page 23
TRUST 500F SPYC@M FLASH
21
UK
Problem Cause Possible solution
The camera is
connected to a USB
hub which does not
have a power supply.
Connect the camera to a USB hub
which has a power supply or to a
USB port on your computer.
The camera is not
connected to the USB
port.
Connect the camera to a USB port.
Error message
‘Capture device
was not detected’
is displayed.
The camera is
connected to a USB
hub which does not
have a power supply.
Connect the camera to a USB hub
which has a power supply or to a
USB port on your computer.
The camera is
connected to a USB
hub which does not
have a power supply.
Connect the camera to a USB hub
which has a power supply or to a
USB port on your computer.
The TRUST 500F
SPYC@M FLASH
is marked with an
exclamation mark
‘!’ in the ‘Device
Manager’.
The camera has an
IRQ conflict with a
different device in
your computer.
Make IRQ addresses free. Also
see:
www.trust.com/customercare/help/
general
The TRUST 500F
SPYC@M FLASH
does not work in
combination with
the TV/capture
card.
There is a conflict
between the camera
and the TV card.
Carry out the following:
1) Remove the TV Capture card.
2) Install the 500F SPYC@M
FLASH.
3) Install the TV capture card.
The batteries have
been inserted
incorrectly.
Reinsert the batteries (see chapter
3).
The camera is turned
off or is in the sleep
setting.
Turn the camera on or take it out of
the sleep setting by pressing the
‘Mode’ button for a couple of
seconds.
The camera does
not do anything.
The batteries are
empty.
Replace the batteries (see chapter
3).
The camera does
not react,
although the
batteries are full.
The camera must b e
reset.
Remove the USB cable and the
batteries for at least 1 minute to
reset the camera . Reinsert the
batteries into the camera. The
camera should now work.
NiCd batteries are
used.
Use alkaline batteries (Duracell
Ultra are recommended) or
rechargeable NiMH batteries.
The camera is in the
‘Standby’ setting.
Turn the camera back on by
pressing the ‘Mode’ button for a
couple of seconds.
The camera
suddenly turns
itself off.
The power in the
batteries is low.
Replace the batteries.
The battery
indicator on the
display flashes.
The batteries are
empty.
Replace the batteries.
Page 24

TRUST 500F SPYC@M FLASH
22
Problem Cause Possible solution
Increase the distance to the object
to be photographed.
The recordings
are not clear
(hazy).
The focus (distance to
the object) is not
correct.
Set the camera’s focus ring to the
correct position (see chapter
5.1.1).
No photograph is
taken when the
exposure button
is pressed.
The camera is still
busy saving the
previous photograph.
The photograph
counter flashes.
Wait until the photograph counter
no longer flashes. The camera will
then be ready.
The camera has been
connected incorrectly.
Reconnect the cables
There is no
connection with
the computer.
The camera is in the
‘Standby’ setting.
Turn the camera back on by
pressing the mode button.
The camera does
not give an image
in the application.
Another application is
open and is using the
camera image.
Close the other application first
before starting the test program.
Use the software to adjust the
surrounding lighting to 220V/50 Hz
(see chapter 8.1.4).
The image is
distorted; there
are waves
through the
image.
The indoor lighting is
affecting the
recording.
Reduce the camera’s number of
frames per second (see chapter
8.1.4).
Page 25

TRUST 500F SPYC@M FLASH
23
UK
Problem Cause Possible solution
An old version of
DirectX is installed.
Download the latest version of
DirectX from www.microsof t.com
Set your VGA card to a lower
resolution and colour depth (for
example, 800 x 600 / 16 bits
colours).
A live recording
gives a displaced
image and the
wrong colours.
For a too high VGA
resolution (for
example, 1600x1200),
it is possible that there
is insufficie nt memory
for the video overlay.
Updating your VGA driver may also
solve the problem.
There is
interference in
the photographs.
The photographs are
taken in dark
surroundings.
Make sure there is enough light.
Video recordings
are lost when
changing the
batteries.
Video recordings are
saved in the SDRAM
memory.
Connect the camera to your
computer’s USB port when
changing the batteries.
No more
recordings are
made.
The camera’s memory
is full. The recordin g
counter in the LCD
screen flashes.
Load the recordings onto your
computer and then delete them all
from the came ra’s memory.
The problem is
not listed here.
Check the Internet for
the latest update of
the camera
Troubleshooter.
Go to
www.trust.com/customercare/help/
camera
If you still have problems a fter trying these solu tions, please conta ct one of the Trust
Customer Care Centers. You can find more information at the back of this instruction
manual. Please have the following information available:
• The article number. This is 12932.
• A good description of what does not work.
• A good description of when the problem occurs.
 Loading...