

Page 1
L I F E I S M O R E ! T R U S T U S T R U S T . C O M
450LR MOUSE WIRELESS OPTICAL OFFICE
UK
PT
User’s manual
Page 2

L I F E I S M O R E ! T R U S T U S T R U S T . C O M
450LR MOUSE WIRELESS OPTICAL OFFICE
UK
PT
Thank you for your purchase. Register your product via our Internet site at
www.trust.com/register, so that you will be eligible for optimal guarantee and service support.
You will also be automatically informed of the development of your and other Trust products.
Page 3
450LR MOUSE WIRELESS OPTICAL OFFICE
L I F E I S M O R E ! T R U S T U S T R U S T . C O M
Fig. 1 Fig. 2
Fig. 3 Fig. 4
Fig. 5 Fig. 6
Page 4
L I F E I S M O R E ! T R U S T U S T R U S T . C O M
450LR MOUSE WIRELESS OPTICAL OFFICE
UK
DE
FR
IT
ES
NL
PL
PT
Fig. 7 Fig. 8
Fig. 9 Fig. 10
Fig. 11 Fig. 12
Page 5
450LR MOUSE WIRELESS OPTICAL OFFICE
L I F E I S M O R E ! T R U S T U S T R U S T . C O M
Fig. 13 Fig. 14
Fig. 15
Page 6
TRUST 450LR MOUSE WIRELESS OPTICAL OFFICE
Instructions when usin g for the first time Chapt er
1. Setting the channels (4)
2. Connecting the receiver (5)
3. Charging and inserting the batteries (6)
4. Uninstalling old drivers (7.1)
5. Installation in Windows (7.2)
6. Checking after the installation (8)
1 Introduction
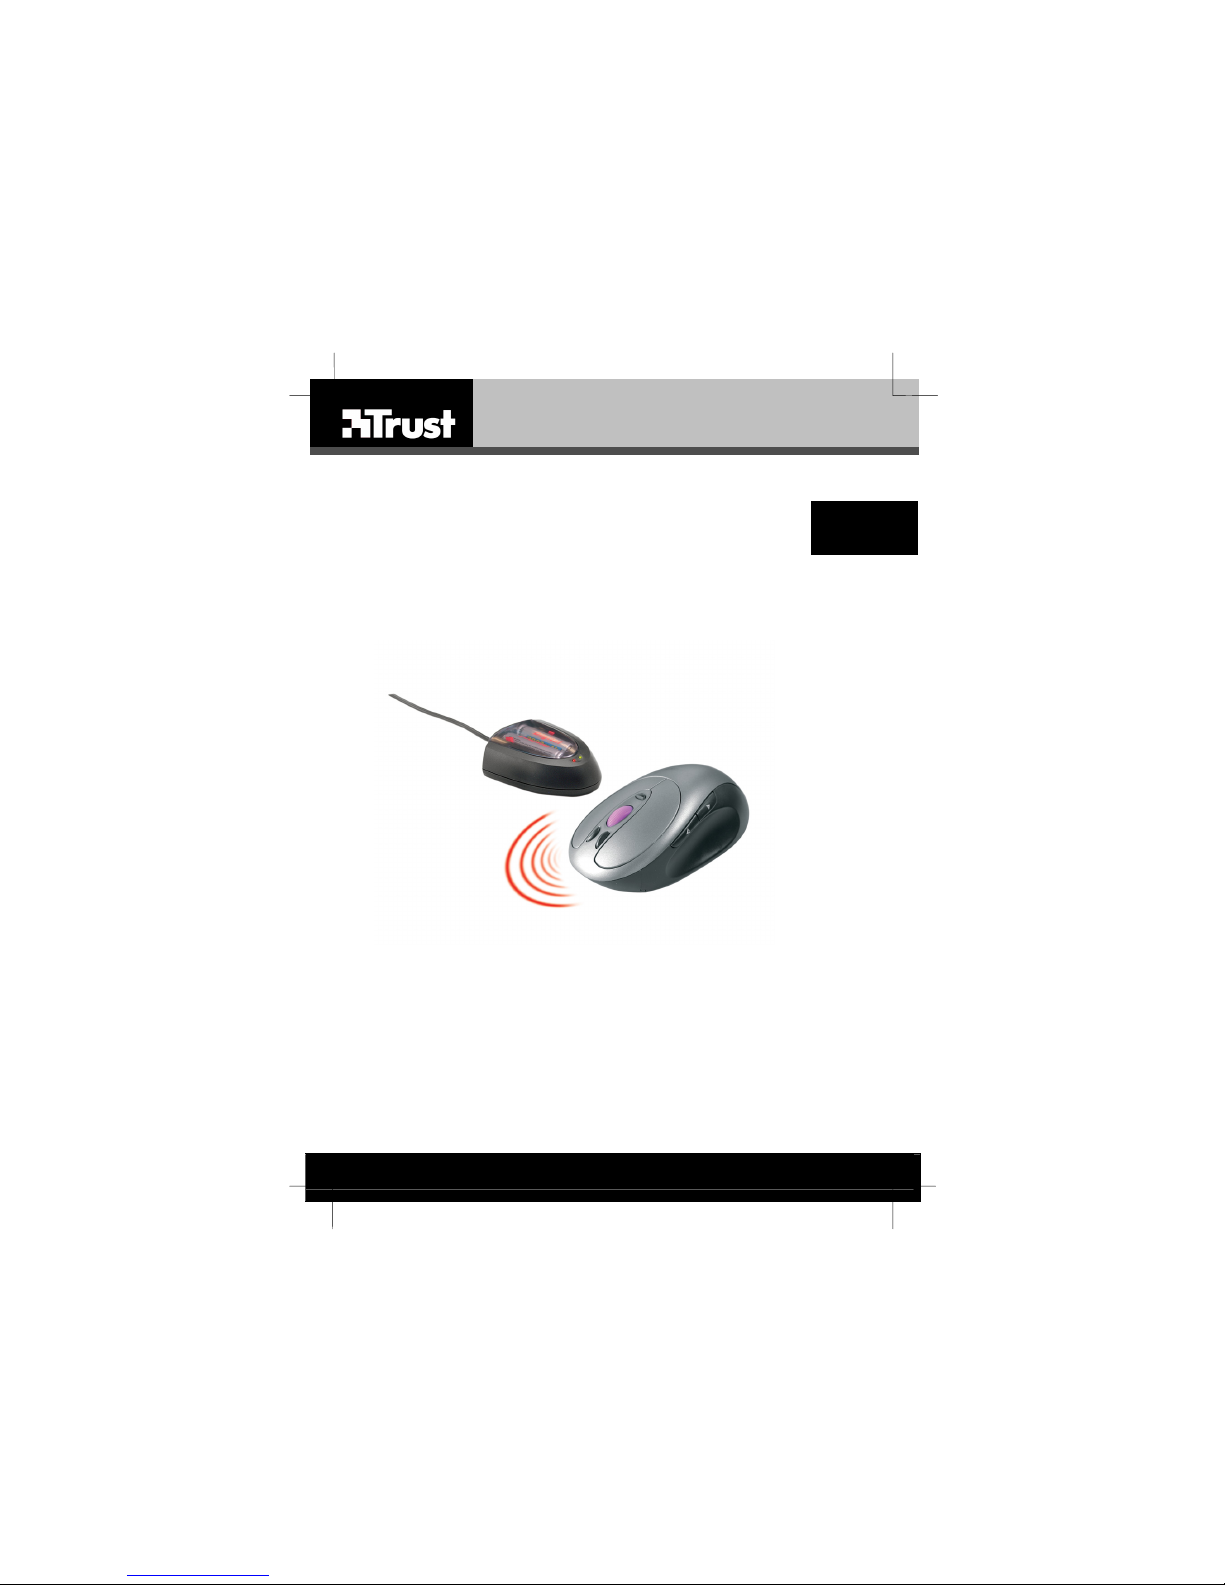
This instruction manual is for users of the TRUST 450LR MOUSE WIRELESS
OPTICAL OFFICE. This mouse works without the use of wires to provide greater
OPTICAL OFFICE. This mouse works without the use of wires to provide greater
freedom of movement when using your computer. The four NiMH batteries provided
freedom of movement when using your computer. The four NiMH batteries provided
with the mouse are rechargeable. Two batteries can be recharged in the receiver
with the mouse are rechargeable. Two batteries can be recharged in the receiver
(battery charger) whilst the mouse is being used. The mouse als o has three Office
(battery charger) whilst the mouse is being used. The mouse als o has three Office
buttons which can be used to quickly open certain Microsoft© Office functions.
buttons which can be used to quickly open certain Microsoft© Office functions.
2 Safety 2 Safety
Carefully read the following instructions before use. Carefully read the following instructions before use.
- The mouse does not require any special maintenance. Use a slightly damp, soft
- The mouse does not require any special maintenance. Use a slightly damp, soft
cloth to clean the mouse.
cloth to clean the mouse.
- Do not use aggressive substances, such as white spirit, to clean the device. These
- Do not use aggressive substances, such as white spirit, to clean the device. These
may harm the material.
may harm the material.
- Do not submerge the device in liquid. This will damage the device. Do not use the
- Do not submerge the device in liquid. This will damage the device. Do not use the
device near water.
device near water.
- Make sure nothing is placed on the receiver’s cable. - Make sure nothing is placed on the receiver’s cable.
- Do not repair the device yourself. - Do not repair the device yourself.
-
-
Nowadays, there are an increasing number of wireless products (video, audio,
Nowadays, there are an increasing number of wireless products (video, audio,
convenience, computer, etc.) which work in the same frequency range as this
convenience, computer, etc.) which work in the same frequency range as this
device. It may, therefore, be possible that the functionality of this device is limited
device. It may, therefore, be possible that the functionality of this device is limited
by or is limiting for other wireless devices. This c an only be avoided by paying
by or is limiting for other wireless devices. This c an only be avoided by paying
attention to the distance between devices and, where possible, by changing
attention to the distance between devices and, where possible, by changing
channels.
channels.
- Be careful when using wireless devices if you have a pacemaker or are dependent
- Be careful when using wireless devices if you have a pacemaker or are dependent
on other life-saving, sensitive electronic equipment, because this product transm its
on other life-saving, sensitive electronic equipment, because this product transm its
radio signals.
radio signals.
UK
1
Page 7

TRUST 450LR MOUSE WIRELESS OPTICAL OFFICE
3 Approval
0678
This device meets the essential requirements and other relevant conditions of the
applicable European directives. The Declaration of Conformity (DoC) is available
at www.trus t.com/13708/ce.
- This wireless device works at a frequency of 27 MHz. It meets the essential
requirements and other relevant conditions of R&TTE Directive 1999/5/EC and
can be used in the following EU countries: Great Britain, Germany, France, Spain,
Italy, Portugal, Greece and the Netherlands. There are no limitations for the use of
the device in the above-mentioned countries.
- There may be limitations for the use of t his device outside of the EU. If this device
is used outside of the EU, check whether this device meets local regulations.
Mouse frequency: CH1: 27.045 MHz +2.5 KHz, CH2: 27.145 MHz +2.5 KHz
Bandwidth: 17 kHz, Power: 0.1 mW.
4 Selecting the channels
Note: Your mouse may only have one channel instead of two. If t hat is the
All the channels must be selected correctly before connecting the receiver and
inserting the batteries. Carry out the following:
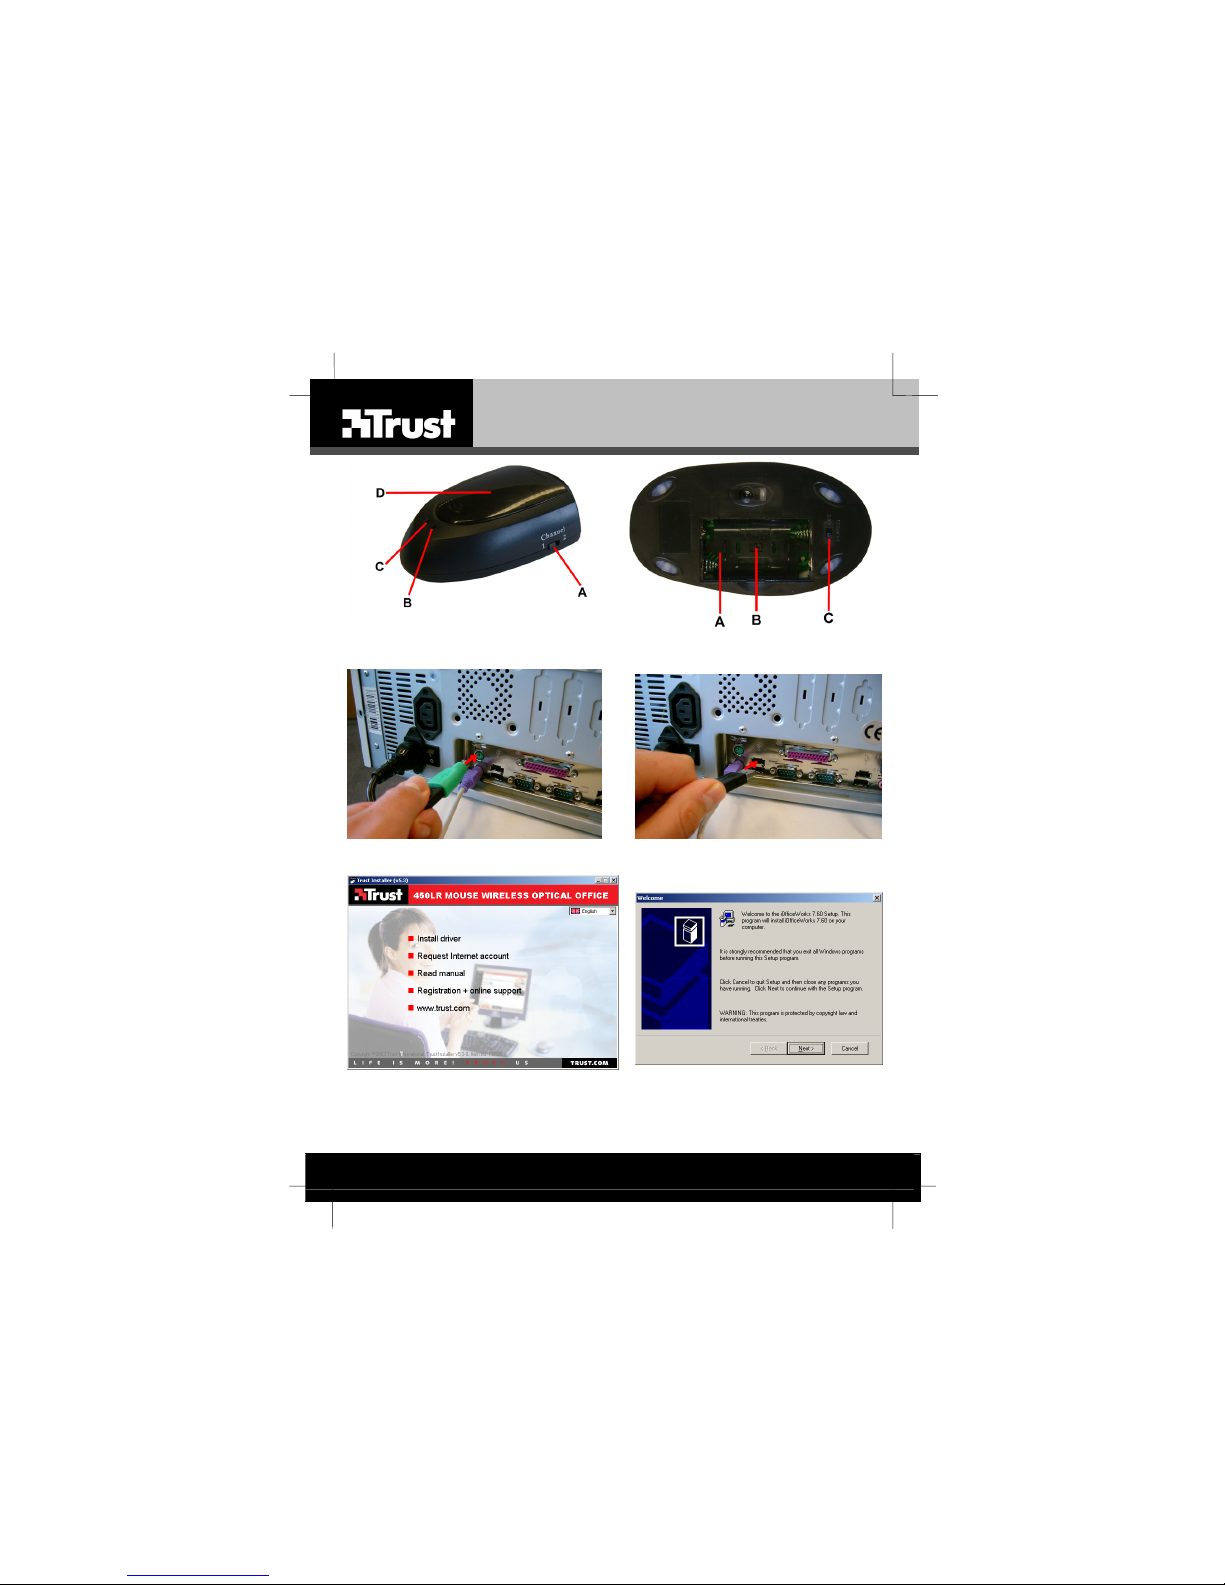
1. Set the receiver’s channel selection switch (A, figure 1) to one of the
2. Open the battery compartment (A, figure 2) on the bottom of the mouse.
3. Use a pointed object to set the switch (B, figure 2) on the mouse to the same
The channels have now been selected correctly. See chapter 5 for instructions on
how to connect the receiver.
5 Connecting the receiver
The receiver can be connected to either a PS/2 port or a USB port on your computer.
The channels must be selected as described in chapter 4 before connecting the
receiver to your computer.
Tip: If your computer has a PS/2 port, then connect the receiver to this port.
5.1 Via a PS/2 port
This chapter explains how to connect the receiver to a PS/2 port. If you wish to
connect the mouse to a PS/2 port, then the green adapter (USB-to-PS/2) must be
used.
1. Make sure the computer is turned off.
2. Make sure the USB-to-PS/2 adapter is connected to the receiver’s USB plug.
3. Connect the receiver to a PS/2 port on your computer (see figure 3).
4. Turn the computer on.
The receiver has now been successfully connected to your computer. See chapter 6
for instructions on how to charge the batteries and how to insert them into the mouse.
case, please ignore this chapter and continue from chapter 5.
channels.
channel as the receiver.
This will keep your USB ports free for other USB devices.
2
Page 8

TRUST 450LR MOUSE WIRELESS OPTICAL OFFICE
5.2 Via a USB port
Note: If you use Windows 98, you may be required to inser t your Windows
Note: If you use Windows 98, it is possible that Windows will not detect a
1. Make sure the USB-to-PS/2 adapter is not connected to the receiver’s USB
2. Connect the receiver to a USB port on your computer.
3. Windows will detect the mouse and, in most cases, will automatically install
The receiver has now been successfully connected to your computer. See chapter 6
for instructions on how to charge the batteries and how to inser t them into the mouse.
6 Charging and inserting the batteries
This chapter explains how to charge the batteries and how to insert them into the
mouse.
6.1 Charging the batteries
Tip: For the best result, the rechargeable NiMH batteries provided should
For the best result, charge the mouse’s batteries in the battery charger for 14 hours
before using the mouse for the first time. Carry out the following:
1. Make sure everything has been connected as explained in chapter 5.
2. Make sure the computer is turned on.
3. Open the receiver’s flap.
4. Insert two rechargeable NiMH batteries into the receiver as shown in the
5. The indicator (B, figure 1) will be lit red.
6. After 14 hours, the batteries will be fully charged and ready for use.
Tip: When you use the mouse, place the other two NiMH batt eries in the
Tip: The batteries work for 40 hours wit h continuous use.
Tip: If you wish to use the mouse for the first time before the batteries are
Note:
6.2 Inserting the batteries into the mouse
1. Open the battery compartment (A, figure 2) on the bottom of the mouse.
2. Insert the two rechargeable NiMH batteries into the mouse as indicated inside
3. Close the battery compartment.
Note: Inserting the batteries incorrectly w ill damage the device.
If the mouse has been configured and connected correctly as described in chapter 5,
the mouse should now work as a standard mouse with a scroll wheel and 5 mouse
buttons. See chapter 7 if you wish to make full use of the extra Office buttons on the
mouse.
98 CD-ROM into your CD-ROM drive after the mouse has been
connected. Make sure you have your Windows 98 CD-ROM at hand.
mouse after it has been connected. In that case, use the Alt and Tab
keys on the keyboard to run the Wizard. It is usually sufficient to press
Enter a number of times to select ‘Next’.
plug.
the Windows default USB mouse driver. If it is not installed automatically,
follow the on-screen instructions.
be charged for 14 hours before use.
battery compartment.
receiver’s battery charger. This will ensure that you always have two
fully charged batteries.
fully charged, you may use normal batteries (DO NOT PLACE
NORMAL BATTERIES IN THE BATTERY CHARGER!).
Only place rechargeable NiMH batteries in the battery charger.
the battery compartment.
UK
3
Page 9

TRUST 450LR MOUSE WIRELESS OPTICAL OFFICE
7 Installing the software
This chapter explains how to install the driver. The drivers for your old mouse must
be removed before installing the driver (see chapter 7.1).
7.1 Uninstalling old drivers and devices
The most common cause of faults during installation is the presence of a driver for a
similar, old device. The best solution is to first remove all drivers related to old
devices before installing the new driver. Make sure you only delete drivers for old,
unused (similar) devices.
1. Enter the Windows ‘Safe Mode’ (press F8 when starting Windows and then select
‘Safe Mode’ from the menu which is displayed).
2. Click on ‘Start – Settings – Control Panel’ and double-click on the ‘Add/Remove
Programs’ icon.
3. Find all the programs for similar, old devices and remove these by clicking on the
‘Add/Remove’ button. When in the ‘Safe Mode’, it is possible for some programs to
appear twice. In that case, remove all the programs which appear twice.
4. Restart the computer.
7.2 Installing the driver in Windows 98 / Windows ME /
Windows 2000 / Windows XP
The latest drivers can be downloaded from www.trust.c om/13708. Check
Note:
whether a new driver is available and use this for the installation.
Note: Make sure all other programs are closed during the installation.
During installation in Windows XP, you may r eceive a message saying
Note:
that the driver has not been signed. This does not cause a problem for
the functionality. Continue with the installation.
Note: In the example, ‘D:\’ is used to indicate the CD-ROM drive. This may be
different for your computer.
1. Insert the CD-ROM into your computer’s CD-ROM drive. The installation
program will start automatically. If it does not start automatically, carry out
the following:
a) Select 'Run' from the Windows Start menu.
b) Type [D:\SETUP.EXE] and click on 'OK' to start the Trust Software
2. The Trust Software Installer will appear (see figure 5).
3. Select the language you wish the Trust Software Installer to be displayed in.
4. Click on ‘Install driver‘ to start the installation of the mouse driver. Figure 6
5. Follow the on-screen instructions.
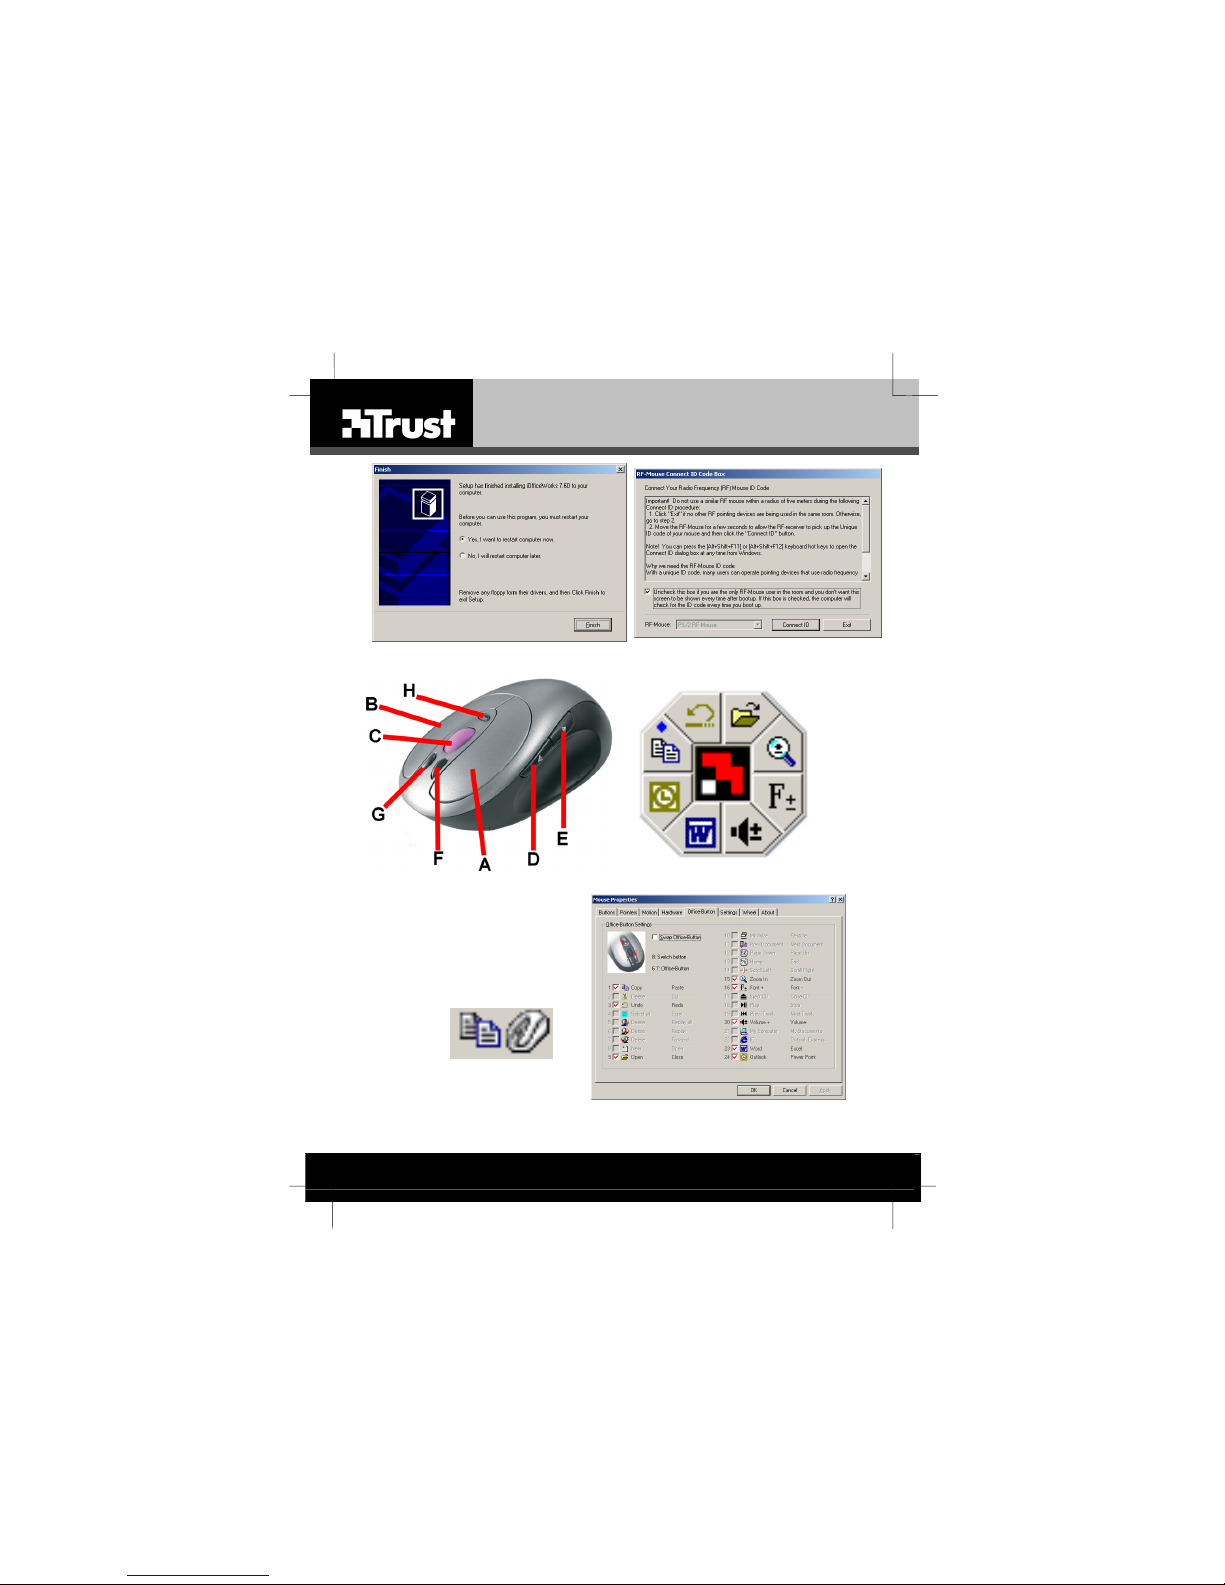
6. Figure 7 will appear at the end of the installation procedure. Click on 'Finish'.
7. Figure 8 will appear after Windows has restarted.
8. Click on ‘Connect ID’.
The driver for the mouse has now been fully installed.
Installer.
will appear.
The computer will be restarted.
4
Page 10

TRUST 450LR MOUSE WIRELESS OPTICAL OFFICE
8 Checking after the installation
After installing the device and the programs, the following are installed on your
computer and can be checked.
Taskbar
– Icon in the right-hand corner
Start - Programs - Trust - 450LR MOUSE W IRELESS OPTICAL OFFICE
- 450LR Office mouse utility
- Uninstall Office utility
‘Start – Settings – Control Panel’. Double-click on the ‘System’ icon and select the
‘Device Manager’ tab.
- Mice and other pointing devices – 450LR MOUSE WIRELESS OPTICAL OFFICE
‘Start – Settings – Control Panel’ and then double-click on the ‘Add/Remove
Programs’ icon.
- TRUST 450LR MOUSE WIRELESS OPTICAL OFFICE
Note: The information given above will vary when the installation has been
altered by the user (for example, not everything has been installed or
locations other than the default locations have been selected).
Deviations may also occur as a result of using new drivers available on
Note:
the Internet.
Note: The location or name may vary in the Control Panel for different operating
systems.
9 Standard use of the mouse and receiver
This chapter explains how to use the extra buttons on the mouse
9.1 Top of the mouse
Use table 1 in combination with figure 9 for an explanation of all the mouse buttons.
Name Function
Button 1, left mouse button Windows left mouse button.
A
Button 2, right mouse button W indows right mouse button.
B
Button 3, scroll button Third mouse button + scroll function
C
Button 4, extra mouse button Default function: ‘Back’ in Internet
D
Button 5, extra mouse button Default function:’Next’ in Internet
E
Button 6, Office button For opening an Office function or another
F
Button 7, Office button For opening an Office function or another
G
Button 8, Office menu button For selecting the desired function for
H
Table 1: Top of the mouse
9.2 Bottom of the mouse
Use table 2 in combination with figure 2.
Name Function
Battery compartment Insert the batteries here.
A
Channel selection switch For selecting channel 1 or channel 2.
B
On/Off switch Switch for manually turning the mouse
C
Table 2: Bottom of the mouse
.
Explorer. This button is also
programmable.
Explorer. This button is also
programmable.
command.
command.
Office buttons 6 and 7.
off when transporting it, for example, in a
bag so as to save the battery power.
UK
5
Page 11

TRUST 450LR MOUSE WIRELESS OPTICAL OFFICE
9.3 Receiver
Use table 3 combination with figure 1 for an explanation of t he functions of the
buttons.
Name Function
Channel selection switch Channel selection switch. Two
A
Battery indicator Is lit red when the batteries are being
B
Activity indicator Detects mouse activity by flashing
C
Battery compartment Compartment for recharging the two
D
Table 3: Receiver components
10 Using the Office buttons
The driver provides extra functions for the Office buttons 6, 7 and 8 (F, G and H,
figure 9) and for buttons 4 and 5 (D and E, figure 9).
10.1 Office buttons 6, 7 and 8
1. Press button 8 (H, figure 9). The menu shown in figure 10 will appear.
2. W hen placing the mouse cursor over a menu option, a short description of the
function will be displayed.
3. Click on the desired function.
4. The selected option will be displayed in the right-hand corner of the task bar
next tot he mouse icon (see figure 11).
5. Next, click on button 6 or button 7 (F or G, figure 9) to assign the option which
has just been selected.
10.2 Altering the Office menu
1. Double-click on the mouse icon (see figure 11) in the right-hand corner of the
taskbar.
2. Fig ure 12 will appear.
3. Unselec t a function and select a new function.
4. Click on ‘Apply’.
5. Click on 'OK'.
The Office menu has now been altered. See chapter 10.1 for instructions on how to
use the altered menu.
positions are possible.
charged.
green when the mouse is moved.
extra batteries.
11 Using the extra mouse buttons
11.1 Assigning a function to an extra mouse button
1. Double-click on the Trust icon in the right-hand corner of the taskbar.
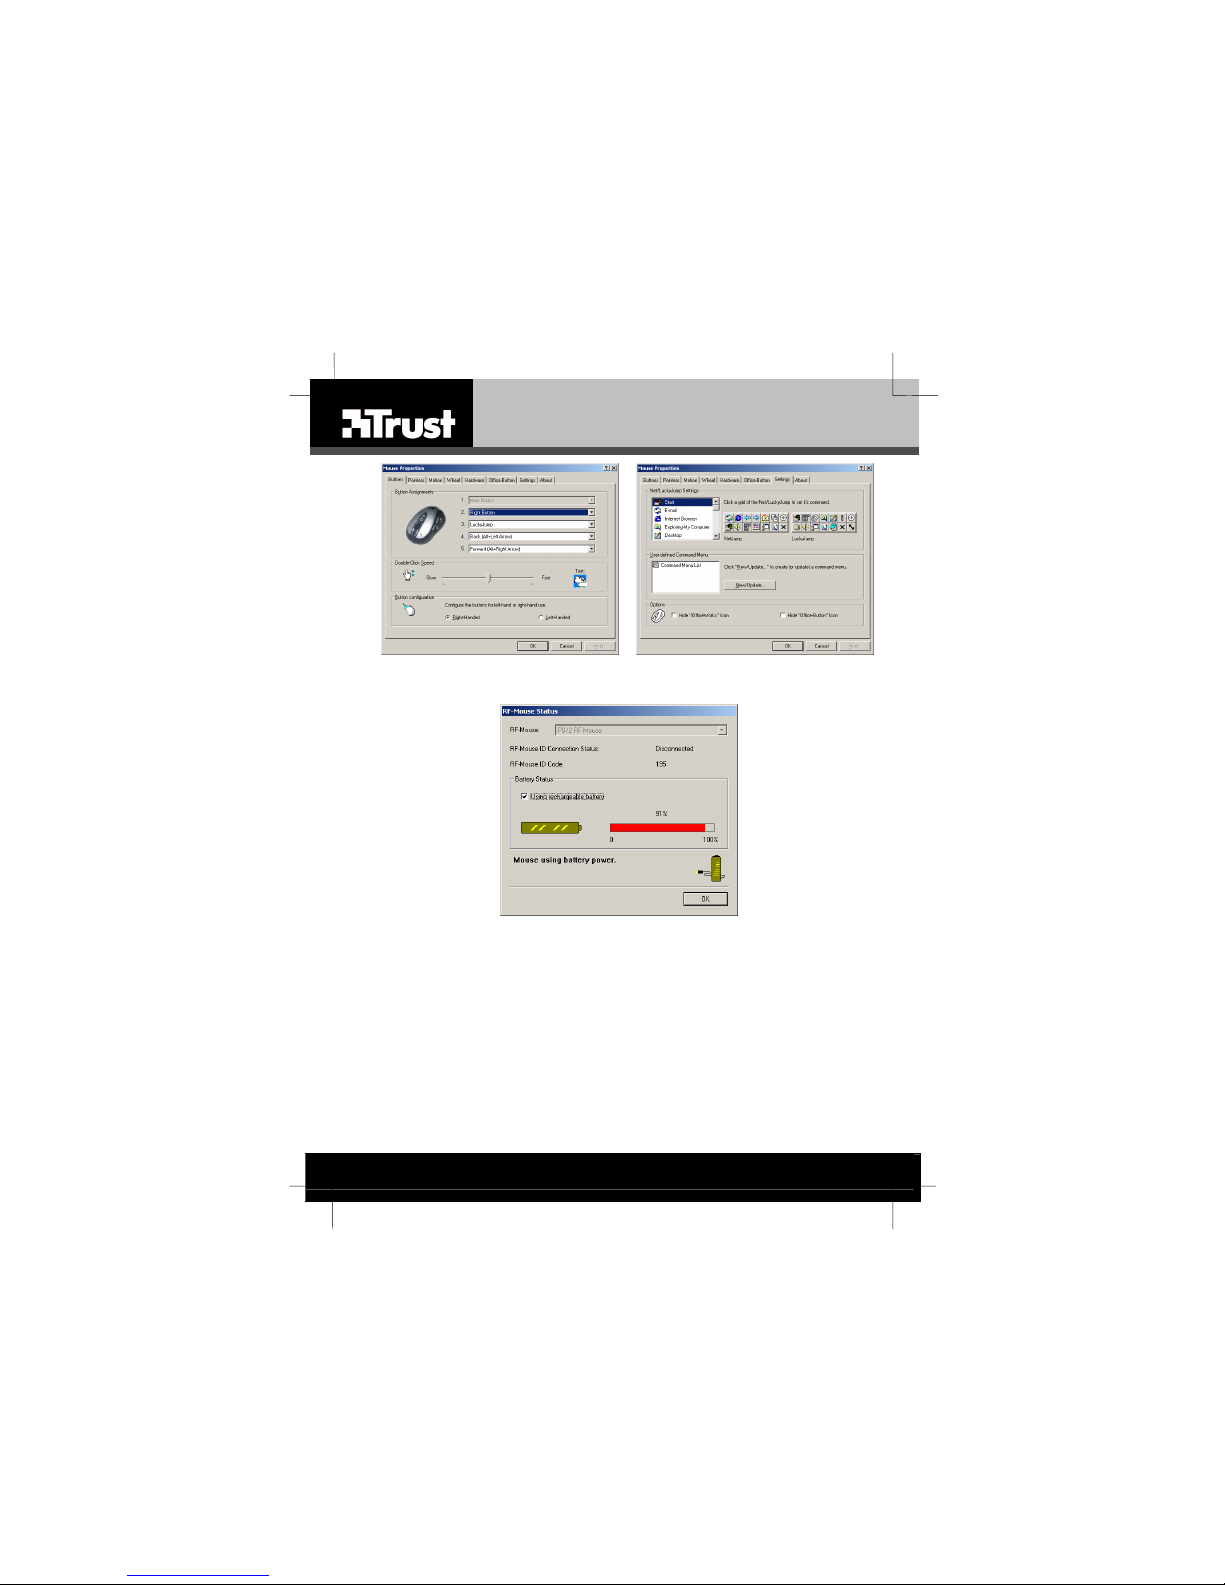
2. Fig ure 13 will appear.
3. Select the button (2, 3, 4 or 5) that you wish to configure.
4. Click on the drop-down menu and select a function.
5. Click on 'Apply’ to apply the selection.
6. Click on 'OK'.
One function has now been assigned to the desired button.
11.2 Assigning the Net Jump or Lucky Jump menu
Tip: The default setting is for the Lucky Jump menu to be configured as the
See chapter 11.1 for instructions on how to assign the NetJump or LuckyJump menu
to one of the mouse buttons.
You have now assigned the Net Jump or Lucky Jump menu to one of the buttons. A
menu containing icons will appear if you press this button whilst using the mouse.
Click on the correct icon to activate the desired function.
11.2.1 Altering the Net Jump or Lucky Jump menu
Carry out the following to alter the Net Jump or Luck Jump menu:
6
third mouse button function.
Page 12

TRUST 450LR MOUSE WIRELESS OPTICAL OFFICE
1. Double-click on the mouse icon in the right-hand corner of the taskbar.
2. Figure 13 will appear.
3. Select the ‘Settings’ tab (see figure 14).
4. Select a function on the left-hand side of the 'Settings' tab window (see figure
14).
5. A function is added to the desired menu by right-clicking on one of the icons
from the NetJump menu or the LuckJump menu.
6. Click on ‘Apply’ to confirm the selection of the function. Click on 'OK'.
11.3 Checking the battery power
The mouse software allows you to see how much power the batteries still have.
Right-click on the mouse icon (see figure 16).
1. A menu will appear.
2. Click on ‘Check RF-mouse status’.
3. A window will appear containing:
- ‘RF Mouse ID connection status’ = Whether the ID code has been
connected or not.
- ‘RF mouse ID code’ = The mouse ID code.
- ‘Battery status’ = The battery power (as a percentage). 100% = f ull
12 Mouse ID code
If the instructions given in chapter 7 have been followed correctly, then the mouse ID
has been linked to the receiver. This will produce less interference from other RF
devices which work at the same frequency and will allow more than two mice to be
used in the same room.
The window shown in figure 8 can be opened again by pressing “Alt + Shift + F11“ or
“Alt + Shift + F12 “. The “Connect ID” button can then be pressed, if necessary, to
link the mouse ID to the receiver.
UK
7
Page 13
TRUST 450LR MOUSE WIRELESS OPTICAL OFFICE
13 Removing the mouse driver
See chapter 7.1 for instructions on how to remove the driver for the mouse. To do so,
search for "Trust 450LR MOUSE WIRELESS OPTICAL OFFICE”.
14 Troubleshooting
Method
1. Read the solutions given below.
2. Check for up-to-date FAQ’s, drivers and instruction
manuals on the Internet (
Problem Cause Possible solution
The optical unit on t he
bottom of the mouse
does not light up af ter
inserting the batteries.
The batteries are not
recharged when the
computer is turned off.
The receiver does not
detect the mouse. The
activity indicator does
not flash when the
mouse is moved.
The batteries have
been inserted
incorrectly.
The batteries are
empty.
‘PS/2 Power On’ has
not been enabled on
the computer or the
computer does not
support this.
The power supply to
the computer has
been disconnected.
The mouse and the
receiver have not
been set to the same
channel.
The batteries have
been incorrectly
inserted into the
mouse.
The batteries in the
mouse are empty.
The selected channel
is disrupted by another
RF signal.
The distance between
the receiver and the
mouse is too great.
www.trust. com/13708
)
Insert the batteries into the
battery compartment as
indicated (see chapter 6.1).
Place the batteries in the
battery charger (see chapter
6.2).
See the instruction manual
provided with the computer
for instructions on how to
provide the PS/2 port with
power whilst the computer
is turned off.
The batteries cannot be
recharged if the power
supply has been
disconnected from the
computer. Make sure the
power supply is connected
to the computer.
Select the correct channel
(see chapter 4).
Insert the batteries into the
battery compartment as
indicated (see chapter 6.2).
Charge the batteries for 14
hours before using the
mouse for the first time (see
chapter 6.1).
Select a different channel
for both the receiver and the
mouse (see chapter 4).
Connect the mouse ID code
to the receiver (see chapter
12).
The distance must not be
greater than 2 metres
(unobstructed).
8
Page 14
TRUST 450LR MOUSE WIRELESS OPTICAL OFFICE
Problem Cause Possible solution
The receiver is not
detected by Windows.
The mouse movements
are jerky.
The mouse arrow on the
monitor does not move.
Windows displays an
error message
concerning the mouse
when the computer is
started.
The scroll function does
not work.
If you still have problems after trying these solutions, please contact one of the Trust
Customer Care Centers. You can find more information on the back of this instruction
manual. Please have the following information available:
The item number. This is 13708.
•
A good description of what does not work.
•
A good description of when the problem occurs.
•
The receiver has not
been connected
correctly
Software for your
previous mouse is still
installed.
The batteries in the
mouse are empty.
The distance between
the receiver and the
mouse is too great.
The mouse is used on
a shiny surface.
is disrupted by another
RF signal.
The distance between
the receiver and the
mouse is too great.
The receiver has not
been connected or has
not been connected
correctly.
The software for your
previous mouse is still
active.
The software has not
been installed.
The application is not
fully compatible with
Windows.
Connect the receiver
correctly (see chapter 5).
Remove the old software
(see chapter 7.1).
Charge the batteries for 14
hours before using the
mouse for the first time (see
chapter 6.1).
The distance must not be
greater than 2 metres
(unobstructed).
Use the mouse on a
different surface.
Select a different channel. The selected channel
Connect the mouse ID code
to the receiver (see chapter
12).
The distance must not be
greater than 2 metres
(unobstructed).
Connect the receiver
correctly and restart the
computer (see chapter 5).
Remove the software for
your previous mouse before
installing the Trust software
(see chapter 7.1).
Install the mouse software
(see chapter 7.2).
Use an application that is
compatible with Windows.
UK
9
Page 15

TRUST 450LR MOUSE WIRELESS OPTICAL OFFICE
15 Warranty conditions
- Our products have a two-year manufacturer's warranty which is eff ective from the
date of purchase.
- If there is a fault, return the product to your dealer and include a description of the
fault, the proof of purchase and all the access ories.
- During the warranty period, you will receive a similar model, if one is available. If
no similar product is available, your product will be repaired.
- Please contact our help desk for missing components, s uch as the instruction
manual, software or other components.
- The warranty becomes invalid if the product has been opened, if there is
mechanical damage, if the product has been misused, if alterations have been
made to the product, if the product has been repaired by a third party, in the case
of negligence or if the product has been used for a purpose other than that
originally intended.
- Excluded from the warranty:
Damage caused by accidents or disasters, such as fire, f lood, earthquakes,
•
war, vandalism or theft.
Incompatibility with hardware/software which is not stated in the minimum
•
system requirements.
Accessories, such as batteries, fuses (if applicable).
•
-
Under no circumstances will the manufacturer be held responsible for any
incidental or consequential damage, including the loss of income or other
commercial losses resulting from the use of this product.
10
Page 16
L I F E I S M O R E ! T R U S T U S T R U S T . C O M
CUSTOMER CARE CENTERS
24 HOURS free service: www.trust.com
Residents in the UK and Ireland should contact:
Mon - Fri
From 8:00 - 16:00
UK Office
Phone +44-(0)845-6090036
Fax +31-(0)78-6543299
I residenti in Italia possono contattare:
lun - ven
9:00 - 13:00 /
14:00 -18:00
Ufficio italiano
Telefono +39-051-6635947
Fax +39-051-6635843
Les habitants de la France et de l’Afrique du Nord peuvent contacter :
Lundi-vendredi
De 9:00 à 17:00
Bureau français
Téléphone +33-(0)825-083080
Fax +31-(0)78-6543299
Kontaktadresse für Einwohner Deutschlands:
Mo – Fr
9:00 - 17:00
Deutsche Geschäftsstelle
Telefon 0800-00TRUST (0800-0087878)
Fax +31-(0)78-6543299
Los habitantes de España pueden ponerse en contacto con:
lun – viernes
De las 9:00 a las
17:00 horas
Oficina española
Teléfono +34-(0)902-160937
Fax +31-(0)78-6543299
Osoby mieszkające na terytorium Polski powinny skontaktować się:
Od pon. do pt.
w godz 09:00-17:00
Biuro w Polska
Tel +48-(0)22-8739812
Fax +31-(0)78-6543299
Inwoners van Nederland kunnen contact opnemen met:
ma – vr
9:00 - 17:00 uur
Kantoor Nederland
Telefoon 0800-BELTRUST (0800-23587878)
Fax +31-(0)78-6543299
All other countries / Alle anderen Länder / Tous les autres pays
Tutti gli altri paesi / Todos los demás países / Alle andere landen
Mon - Fri
From 9:00 - 17:00
European Head Office
Phone +31-(0)78-6549999
Fax +31-(0)78-6543299
 Loading...