

Page 1
L I F E I S M O R E ! T R U S T U S T R U S T . C O M
T R U S T . C O MT R U S T . C O M
T R U S T . C O M
350SX CRADLE MOUSE WIRELESS OPTICAL
UK
DE
FR
IT
ES
NL
PL
User’s manual
Page 2
350SX CRADLE MOUSE WIRELESS OPTICAL
L I F E I S M O R E ! T R U S T U S T R U S T . C O M
T R U S T . C O MT R U S T . C O M
T R U S T . C O M
Fig. 1 Fig. 2
Fig. 3 Fig. 4
Fig. 5 Fig.6
Page 3

TRUST 350SX CRADLE MOUSE WIRELESS OPTICAL
1
UK
Thank you for your purchase. Register your product via our Internet site at
www.trust.com, so that you will be eligible for optimal guarantee and service
support. You will also be automatically informed of the development of your and
other Trust products.
Vielen Dank, dass Sie unser Produkt gekauft haben. Registrieren Sie jetzt ihr
Produkt auf unserer Website, www.trust.com, so dass Sie unsere optimale
Garantie- und Serviceunterstützung in Anspruch nehmen können. Außerdem
werden Sie automatisch über die Entwicklung Ihres und anderer Produkte auf dem
Laufenden gehalten.
Nous vous remercions de votre achat. Enregistrez-le maintenant sur notre site
Internet, www;.trust.com. et vous aurez droit à une garantie et un soutien de
service optimaux. En outre, vous serez informé automatiquement des mises à jour
de votre produit et des autres produits de Trust.
Grazie per aver acquistato un prodotto Trust. Registri l' acquisto effettuato presso il
sito internet Trust (www.trust.com), in questo modo potrà usufruire dell’ assistenza
e della garanzia. Inoltre potrà ottenere informazioni aggiornate sulle novi tà
riguardanti il suo prodotto ed anche gli altri prodotti Trust.
Muchas gracias por su adquisición. Registre ahora su adquisición a través de
nuestro sitio en Internet, www.trust.com, de modo que tenga derecho al soporte de
garantía y de servicio óptimo. Se mantendrá, además, automáticamente al
corriente de los desarrollos de su producto y de los demás productos de Trust.
Serdecznie dziękujemy za zakup naszego produktu. Rejestrując już teraz swój
zakup na stronie internetowej firmy Trust, www.trust.com, uzyskacie Państwo
optymalne wsparcie gwarancyjne i serwisowe. Ponadto będziecie Państwo
automatycznie informowani o wszelkich zmianach odnośnie tego i innych
produktów firmy Trust.
Hartelijk dank voor uw aankoop. Registreer nu uw aankoop via onze internet site,
www.trust.com, zodat u in aanmerking komt voor optimale garantie- en service
ondersteuning. Bovendien wordt u automatisch op de hoogte gehouden van de
ontwikkeling van uw en andere Trust producten.
Page 4

TRUST 350SX CRADLE MOUSE WIRELESS OPTICAL
2
www.trust.com
Residents in the UK and Ireland should contact: .............................................................
From
8:00 - 16:00
UK Office
Phone +44-(0)845-6090036
Fax +44-(0)1376-514633
I residenti in Italia possono contattare:
Orario:
9:00 - 13:00 /
14:00 -18:00
Ufficio italian o
Telefono +39-051-6635947
Fax +39-051-6635843
Les habitants de la France et de l’Afrique du Nord peuvent contacter :
De
9:00 à 17:00
Bureau français
Téléphone +33-(0)803-083080
Fax +33-(0)1-48630261
Kontaktadresse für Einwohner Deutschlands:
Erreichbar:
9:00 - 17:00
Deutsche Geschäftsstelle
Telefon 0800-00TRUST (0800-0087878)
Fax +44-(0)2821-58873
Los habitantes de España pueden ponerse en contacto con:
De las
9:00 a las 17:00
horas
Oficina española
Teléfono +34-(0)902-160937
Fax +31-(0)78-6543299
Inwoners van Nederland kunnen contact opnemen met:
Van
9:00 - 17:00 uur
Kantoor Nederland
Telefoon 0800-BELTRUST (0800-23587878)
Fax +31-(0)78-6543299
All other countries / Alle anderen Länder / Tous les autres pays
Tutti gli altri paesi / Todos los demás países / Alle andere landen
From:
9:00 - 17:00
European Head Office
Phone +31-(0)78-6549999
Fax +31-(0)78-6543299
Page 5

TRUST 350SX CRADLE MOUSE WIRELESS OPTICAL
3
UK
Method when using for the first time Chapter
1. Connecting (3.1)
2. Charging the batteries (3.2)
3. Uninstalling old drivers and devices (3.3)
4. Installation in Wi ndows (3.4)
5. Checking after the installation (3.5)
1 Introduction
This instruction manual is for users of the TRUST350SX CRADLE MOUSE
WIRELESS OPTICAL. This mouse allows you to work optically without the use of
wires. The mouse has two channels and 5 buttons. It is not necessary to replace the
batteries. You can simply recharge the NiMH batteries provided by placing the
mouse, including the batteries, into the recharger.
2 Safety
Carefully read the following instructions before use:
- The TRUST 350SX CRADLE MOUSE WIRELESS OPTICAL does not require
any special maintenance. Use a slightly damp, soft cloth to clean the mouse.
- Do not use aggressive substances, such as petrol or white spirit, to clean the
device. These may harm the material.
- Do not su bmerge the device in liquid. This will damage the device. Do not
use this device near water.
- Make sure nothing is placed on the cable. Do not use this device in an area
where the cable can become worn or damaged as a result of people walking
over it.
- Do not repair this device yourself.
- This product works at a frequency of 27 MHz. It is approved according to the
European R&TEE guidelines and, therefore, meets the harmonized
standards for use within the EU. There may be limitations for the use of this
device outside of the EU. In that case, check whether this device meets local
regulations. Frequency: 27,500~27,555 MHz / 27,045~27,100 MHz,
Bandwidth: 10 kHz, Power: -20dBm.
- Nowadays, there are an increasing number of wireless products (video,
audio, convenience, computer, etc.) which work in the same frequency range
as this device. It may, therefore, be possible that the functionality of this
product is limited by or is limiting for other wireless products. This can only be
avoided by paying attention to the distance between products and, where
possible, by changing channels.
- Be careful when using wireless devices if you have a pacemaker or are
dependent on other life-saving, sensitive electronic equipment. This product
transmits radio signals.
Page 6

TRUST 350SX CRADLE MOUSE WIRELESS OPTICAL
4
3 Installation
3.1 Connecting and making a wireless connection
Note: Make sure you have your Windows CD-ROM available. Certain
versions of Windows may request you to insert your Windows CDROM into your CD-ROM drive.
1. Make sure the computer is turned off.
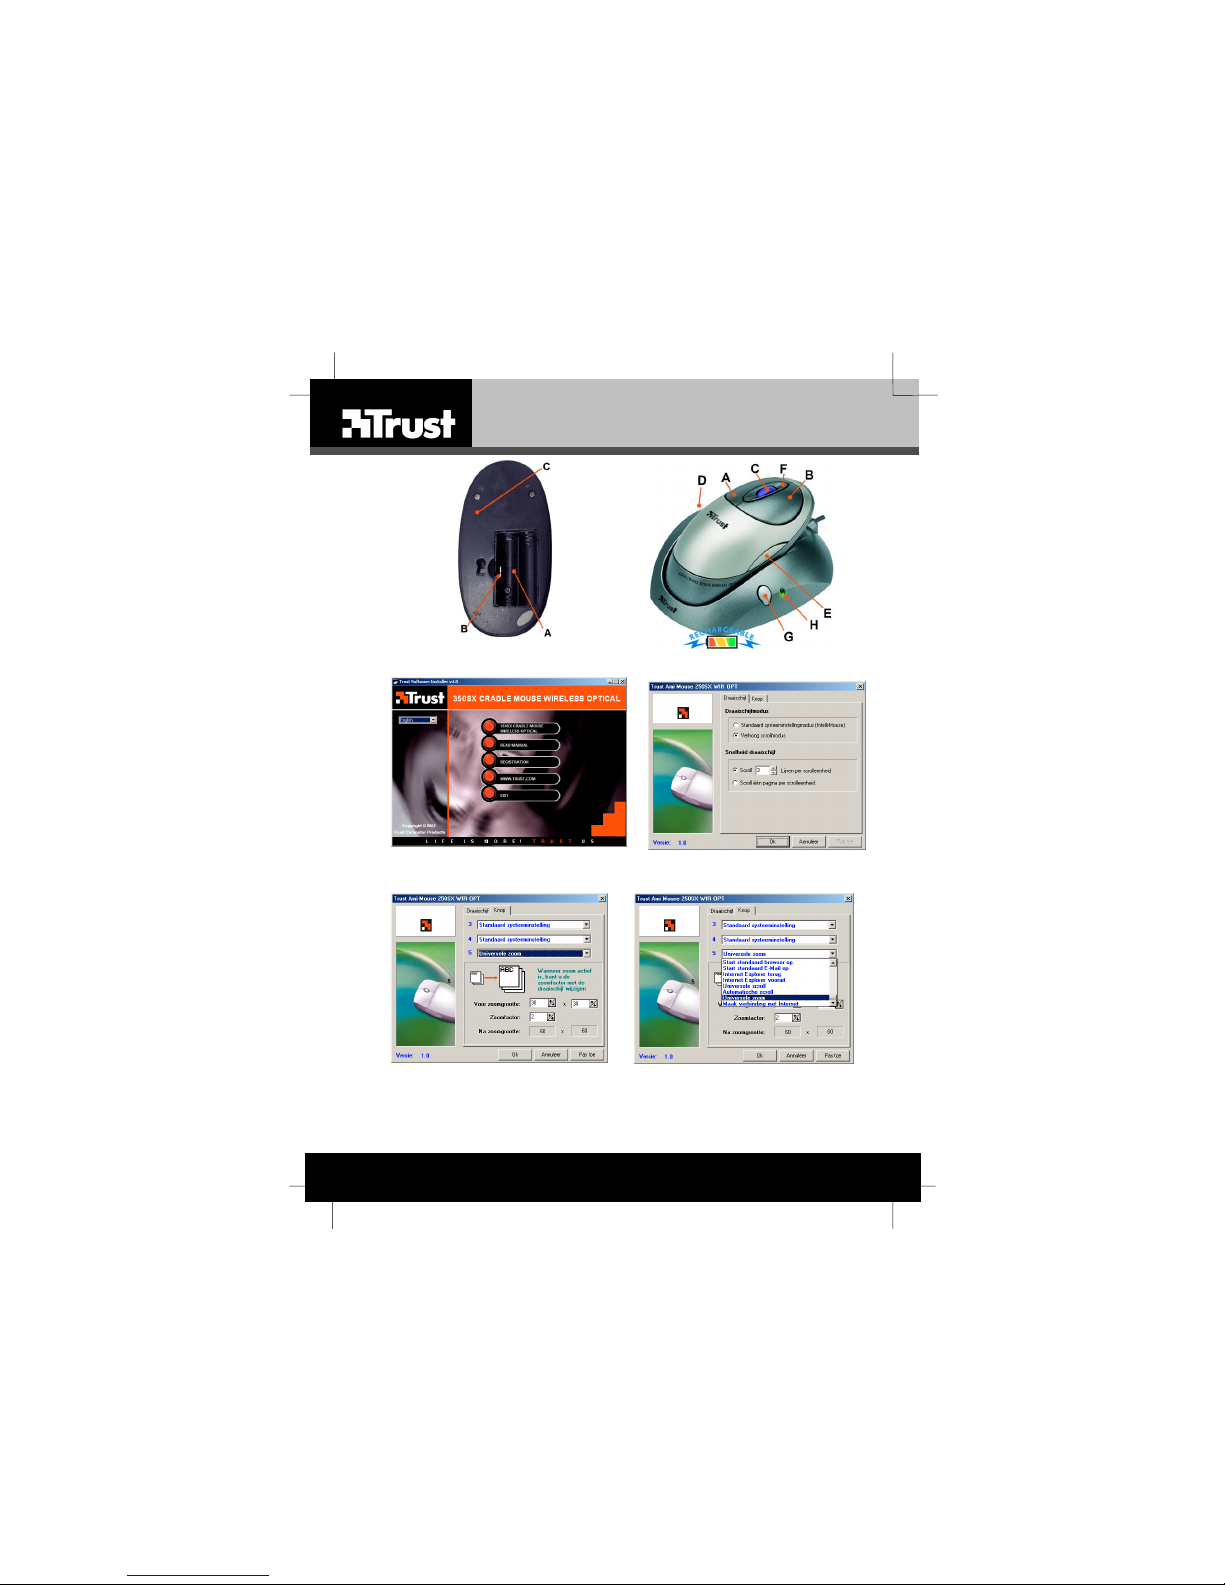
2. Open the battery cover (A, figure 1) on the bottom of the mouse.
3. Use the channel selector switch on the inside of the mouse’s battery
compartment to select a channel (CH1 or CH2).
4. Insert the batteries into the battery compartment. The diagram inside the
battery compartment shows how the batteries should be inserted.
5. Connect the RF receiver to your computer’s PS/2 port.
6. Turn the computer on.
7. The green indicator (H, figure 2) on the RF receiver will be lit.
8. Press the detection button (G, figure 2) on the receiver. The green indicator
on the RF receiver will start to flash.
9. Next, press the detection button (C, figure 1) on the bottom of the mouse
once.
10. The green indicator on the RF receiver will start to flash more qu ickly.
11. A connection has been made once the green indicator remains continuously
lit.
12. The mouse will be detected and installed automatically in Windows ME,
Windows 2000 and Windows XP. In Windows 95 and Windows 98, you may
be asked by Windows to insert your Windows CD-ROM into your CD-ROM
drive. In that case, insert your Windows CD-ROM into your CD-ROM drive
and follow the on-screen instructions.
The mouse is now ready for use. The software supplied should be installed for full
use of the extra buttons on your mouse.
Note: Insertin g the batteries inco rrectly will cause damage.
Note: The NiMH batteries provided are rechargeable. The batteries will be
recharged when the mouse is placed in the RF receiver. The batteries
will only be recharged if the RF receiver has been connected to the
power supply using the power adapter provided.
3.2 Charging the batteries
The mouse batteries are almost empty when the red indicator on the mouse is lit. It
is recommended to regularly place the mouse in the RF receiver, so that the
batteries are always fully charged. The batteries are recharged as follows.
1. Connect the adapter to the connection (A, figure 1) on the RF receiver.
2. Insert the adapter into the plug socket.
3. Place the mouse in the RF receiver.
4. Leave the mouse in the RF receiver for 8 hours before it is used for the first
time.
Note: Most computers have a PS/2 port to which voltage is applied, even
when the computer is turned off. This allows the batteries to be
recharged when the computer is turned off. See the instruction manual
provided with your computer to see whether your computer has such a
PS/2 port.
Page 7

TRUST 350SX CRADLE MOUSE WIRELESS OPTICAL
5
UK
Note: Insert the mouse into the RF receiver when it is not in use.
Note: The batteries will la st for 8 to 10 hours with continuous use without the
mouse being placed in the sleep setting. The batteries work for 2 weeks
with normal use.
Note: For the best result, charge the batteries for 8 hours before use
Note: Only use rechargeable NiMH batteries.
Note: To save the batterie s, the mouse will be p laced in the sleep setting if it
is not used for 10 minutes. The mouse can be reactivated by pressing
the left or right mouse button.
3.3 Uninstalling old drivers and devices
The most common cause of faults during installation is the presence of a driver for a
similar, old product. The best solution is to first remove all drivers related to old
devices before installing the new driver.
1. Enter the Windows ‘Safe Mode’ (press F8 when starting Windows and then
select ‘Safe Mode’ from the menu which is displayed).
2. Click on ‘Start – Settings – Control Panel’ and double-click on the
‘Add/Remove Programs’ icon.
3. Find all the programs for similar, old devices and remove these by clicking on
the ‘Add/Remove’ button. When in the ‘Safe Mode’, it is possible for some
programs to appear twice. In that case, remove all the programs which
appear twice.
4. Restart the computer.
3.4 Installing the software in Windows 95 / Windows 98 /
Windows ME / Windows 2000 / Windows XP
Note: The latest driver can be downloaded from www.trust.com/13019. Check
whether a new driver is available and use this for the installation. The
driver version is printed on the CD-ROM.
Note: Make sure all other programs are closed during the installation.
Note: During installation in Windows XP, you may receive a message saying
that the driver has not been signed. This does not cause a problem for
the functionality.
Note: In the example, ‘D:\’ is used to indicate the CD-ROM drive. This may be
different for your computer.
1. Insert th e CD-ROM into your CD-ROM drive. The Trust Software Installer
will start automatically.
If it does not start automatically, carry out the following:
a) Select 'Run' from the Start menu.
b) Type [D:\SETUP.EXE] and click on 'OK' to start the Trust Software
Installer.
2. Figure 5 will appear. Select the language you wish to use during the
installation.
3. Click on 'Trust 350SX CRADLE MOUSE WIRELESS OPTICAL‘ to start the
installation.
4. Follow the on-screen instructions.
Page 8

TRUST 350SX CRADLE MOUSE WIRELESS OPTICAL
6
3.5 Checking after the installation
After installing the device and the driver, the following are installed on your computer
and can be checked
Taskbar
– The Trust icon is visible in the right-hand corner of the taskbar.
‘Start – Settings – Control Panel’. Double-click on the ‘System’ icon and select the
‘Device Manager’ tab.
- Mouse - PS/2 Compatible Mouse Port
‘Start – Settings – Control Panel’ and then double-click on the ‘Add/Remove
Programs’ icon.
- Trust 350SX CRADLE MOUSE WIRELESS OPTICAL 1.2
Start - Programs - Trust - …
- Register (Here, you can register at the Trust site)
- Trust 350SX CRADLE MOUSE WIRELESS OPTICAL 1.2 (This opens the
mouse properties window)
- Uninstall Trust 350SX CRADLE MOUSE WIRELESS OPTICAL 1.2 (This
removes the mouse software)
Note: The information given above will vary when the installation has been
altered by the user (for example, not everything has been installed or
locations other than the default locations have been selected).
Note: Deviations may also occur as a result of using new drivers available on
the Internet.
Note: The location or name may vary in the ‘Control Panel’ for different
operating systems.
4 Use
4.1 Mouse / receiver
In table 1 below, a description is given of the function of the mouse buttons. Use
table 1 in combination with figure 2.
Item Name Function
A
Left mouse button Left mouse click.
B
Right mouse button Right mouse click.
C
Scroll and third mouse button Scroll button and programmable third
mouse button.
D
Left side button Programmable button.
E
Right side button Right mouse click.
F
Red indicator Lights up when the batteries are almost
empty to indicate that they must be
recharged.
G
Detection button Button for making a wireless connection
with the mouse.
H
Green indicator Indicates a wireless connection.
Table 1: Explanation of the buttons
Page 9

TRUST 350SX CRADLE MOUSE WIRELESS OPTICAL
7
UK
4.2 Software
1. Double-click on the Trust icon in the taskbar
2. The mouse properties window will appear (see figure 4).
3. The scroll wheel mode can be selected in the ‘Scroll wheel’ tab.
4. There are two options:
• Increased scroll mode; has all the advantages of the MS-Intellimouse
and scrolls in Windows 95, Windows 98, Windows ME, Windows
2000, Windows XP and Windows NT4.
• Intellimouse mode; works as an MS-Intellimouse.
5. Select the scroll speed.Select the ‘Buttons’ tab. The buttons 3, 4 and 5 can
be programmed in the ‘Buttons’ tab (see figure 5).
7. Select a button and click on the arrow on the right-hand side. A drop-down
menu will appear (see figure 6).
8. Select the function you wish to use.
9. Click on ‘Apply’.
The mouse has now been programmed.
5 Selecting a new channel
You may wish to change the channel or to have the RF receiver and the mouse
detect each other again. If so, carry out the following:
1. Open the battery compartment on the mouse (A, figure 1) and remove the
batteries
2. Use the channel selector switch on the inside of the mouse’s battery
compartment to select a channel (CH1 or CH2).
3. Reinsert the batteries and close the battery compartment.
4. Press the detection button (G, figure 2) on the RF receiver.
5. The green indicator (H, figure 2) will start to flash.
6. Next, press the detection button (C, figure 1) on the bottom of the mouse.
7. The green indicator on the RF receiver will start to flash more qu ickly and will
then stop flashing.
8. The mouse is now ready for use again.
Page 10

TRUST 350SX CRADLE MOUSE WIRELESS OPTICAL
8
6 Troubleshooting
Method
1. Read the solutions given below.
2. Check for up-to-date FAQ’s, drivers and instructi on
manuals on the Internet (www.trust.com/13019).
Problem Cause Possible solution
The batteries have been
inserted incorrectly.
Insert the batteries into the
battery compartment as
indicated.
The optical unit on
the bottom of the
mouse does not
light up after
inserting the
batteries.
The batteries are empty. Place the mouse in the
recharger for 8 hours to fully
charge the batteries.
The red indicator on
the mouse is lit.
The batteries are empty. Place the mouse in the
recharger for 8 hours to fully
charge the batteries.
The RF receiver has not
been connected to the
computer correctly.
Check the PS/2 connection.
The green LED on
the RF receiver
does not light up.
The computer is turned
off.
Turn the computer on.
The mouse’s detection
button has not been
pressed for long enough.
Keep the detection button
pressed until the green LED on
the RF receiver stops flashing.
The batteries have been
incorrectly inserted into
the mouse.
Insert the batteries into the
battery compartment as
indicated.
The batteries are empty. Place the mouse in the
recharger for 8 hours to fully
charge the batteries.
The RF receiver
does not detect the
mouse and the
green light
continues to flash
quickly.
The selected channel is
disrupted by another RF
signal.
Select a different channel and
have the RF receiver and
mouse detect each other again
(see chapter 5).
It has not been connected
correctly.
Connect the mouse correctly
(see chapter 3.1).
The mouse is not
detected by
Windows.
Software for your
previous mouse is still
installed.
Remove the old software (see
chapter 3.3).
Page 11

TRUST 350SX CRADLE MOUSE WIRELESS OPTICAL
9
UK
Problem Cause Possible solution
The batteries in the
mouse are empty.
Place the mouse in the
recharger for 8 hours to fully
charge the batteries.
The distance between the
RF receiver and the
mouse is too great.
The distance must not be
greater than 1 metre.
The mouse
movements a re
jerky.
The mouse is used on a
shiny surface.
Use the mouse on a
different surface.
The selected channel is
disrupted by another RF
signal.
Select a different channel.
The mouse is in the
‘Sleep’ setting.
Remove the mouse from the
‘Sleep’ setting by pressing
one of the mouse buttons.
The distance between the
RF receiver and the
mouse is too great.
The distance must not be
greater than 1 metre.
The mouse arrow
on the monitor does
not move.
Contact between the RF
receiver and the mouse
has been broken, for
example, due to a power
failure.
Have the mouse and the RF
receiver detect each other
again (see chapter 5).
Software for your
previous mouse is still
installed.
Remove the old software
(see chapter 3.3).
A function cannot
be assigned to
mouse buttons 3, 4
and 5. The mouse
icon is not visible in
the taskbar.
The Trust software has
not been installed.
Install the software (see
chapter 3.4).
The mouse is
marked with an
explanation mark in
the Windows
‘Device Manager’.
Your computer has not
been correctly configured,
which causes the mouse
to have a conflict with
another device in your
computer.
Reconfigure your computer.
See
www.trust.com/customercare
/help/general for more
information.
If you still have problems a fter trying these solu tions, please conta ct one of the Trust
Customer Care Centers. You can find more information at the back of this instruction
manual. Please have the following information available:
• The article number. This is 13019 or 13021 (UK model).
• A good description of what does not work.
• A good description of when the problem occurs.
 Loading...