

Page 1
L I F E I S M O R E ! T R U S T U S T R U S T . C O M
TRUST 350FS POWERC@M FLASH
UK
DE
FR
IT
ES
NL
PL
PT
User’s manual
Ver. 13137-02
Page 2

L I F E I S M O R E ! T R U S T U S T R U S T . C O M
TRUST 350FS POWERC@M FLASH
UK
DE
FR
IT
ES
NL
PL
PT
Thank you for your purchase. Register your product via our Internet site at
www.trust.com/register, so that you will be eligible for optimal guarantee and service support.
You will also be automatically informed of the development of your and other Trust products.
Page 3
TRUST 350FS POWERC@M FLASH
L I F E I S M O R E ! T R U S T U S T R U S T . C O M
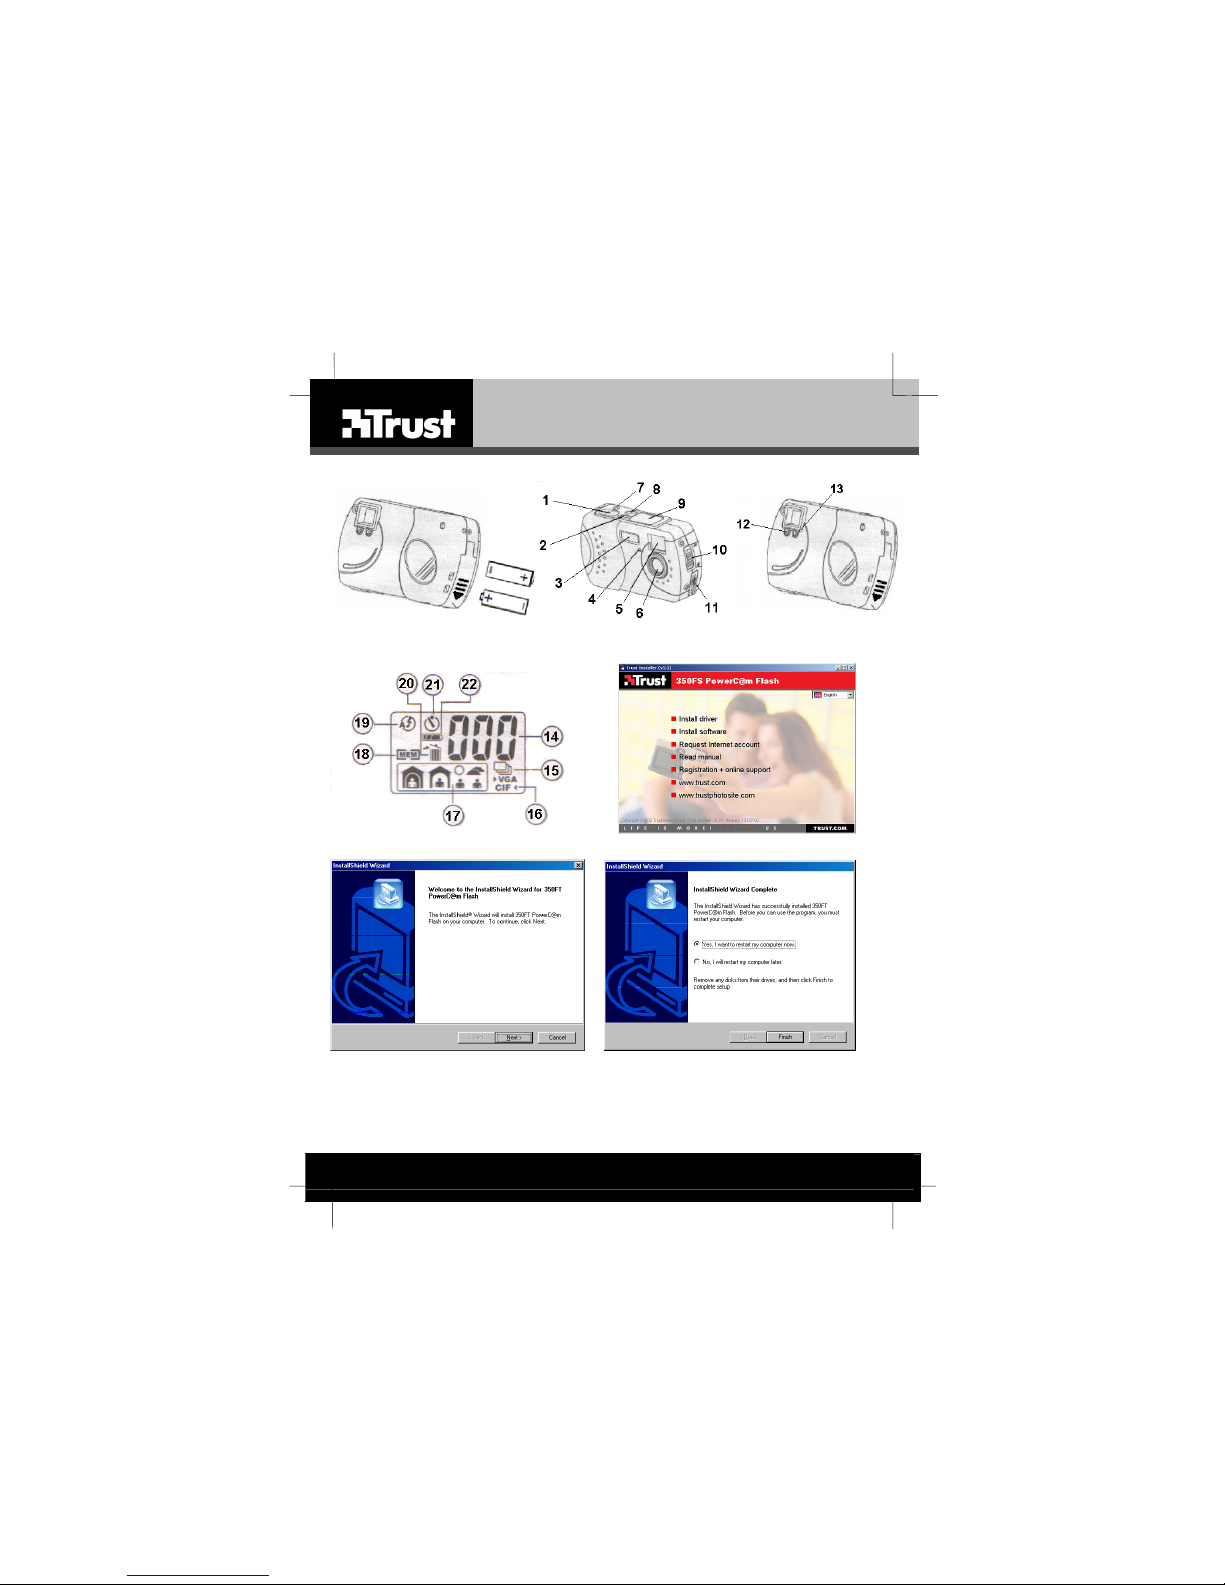
Figures
Fig. 1
Fig. 2 Fig. 3
Fig. 4 Fig. 5
Page 4
L I F E I S M O R E ! T R U S T U S T R U S T . C O M
TRUST 350FS POWERC@M FLASH
UK
DE
FR
IT
ES
NL
PL
PT
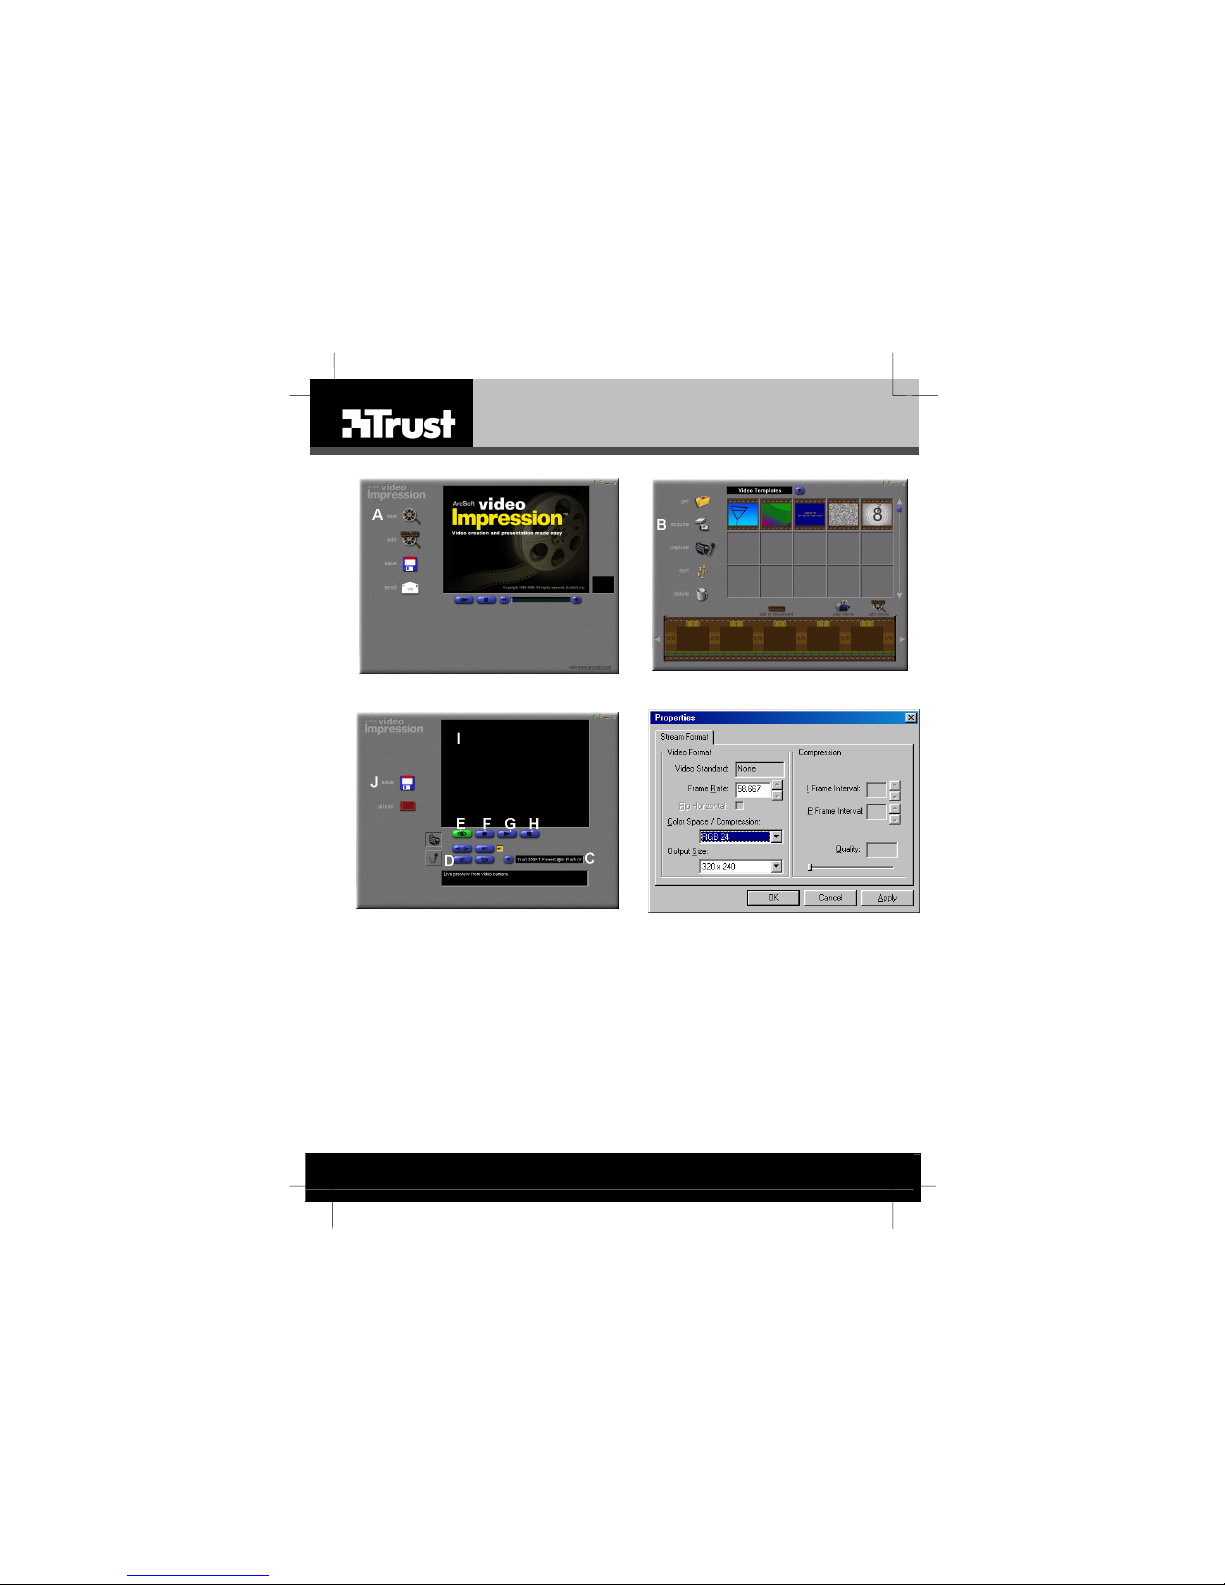
Fig. 6 Fig. 7
Fig. 8 Fig. 9
Page 5

TRUST 350FS POWERC@M FLASH
Instructions when usin g for the first time Chapt er
Place battery (4)
1.
Take photograph (6.1)
2.
Install driver (7)
3.
Connect to computer (10)
4.
Download photographs (13)
5.
1 Introduction
This instruction manual is for users of the Trust 350FS PowerC@m Flash. Basic
This instruction manual is for users of the Trust 350FS PowerC@m Flash. Basic
knowledge of computers is necessary to be able to install this product.
knowledge of computers is necessary to be able to install this product.
2 Safety 2 Safety
2.1 General information 2.1 General information
Carefully read the following instructions before use. Carefully read the following instructions before use.
- The Trust 350FS PowerC@m Flash does not require any special
- The Trust 350FS PowerC@m Flash does not require any special
maintenance. Use a slightly damp, soft cloth to clean the camera.
maintenance. Use a slightly damp, soft cloth to clean the camera.
- Do not use aggressive substances, such as petrol or white spirit, to clean the
- Do not use aggressive substances, such as petrol or white spirit, to clean the
device. These may harm the material.
device. These may harm the material.
-
-
Do not submerge the device in liquid. This may be dangerous and will
Do not submerge the device in liquid. This may be dangerous and will
damage the device. Do not use this device near water.
damage the device. Do not use this device near water.
- Do not repair this device yourself. - Do not repair this device yourself.
2.2 Batteries 2.2 Batteries
Digital cameras are compact devices that use complex technology. As a result, high
Digital cameras are compact devices that use complex technology. As a result, high
demands are placed on the batteries, which must also be compact. Guidelines for the
demands are placed on the batteries, which must also be compact. Guidelines for the
effective use of batteries:
effective use of batteries:
Some cameras require a voltage (energy) to store the photographs in the
Some cameras require a voltage (energy) to store the photographs in the
•
•
memory. It is, therefore, always better to download the photographs onto a
memory. It is, therefore, always better to download the photographs onto a
PC as quickly as possible and to remove the batteries from the camera when
PC as quickly as possible and to remove the batteries from the camera when
it is not used.
it is not used.
Cameras with a flash use a lot of energy when the flash is used. If the camera
Cameras with a flash use a lot of energy when the flash is used. If the camera
•
•
has a flash, limit its use and take this into consideration with regard to the life
has a flash, limit its use and take this into consideration with regard to the life
span of the batteries. The flash shortens the lif e span of the batteries.
span of the batteries. The flash shortens the lif e span of the batteries.
Better quality batteries, such as Duracell Ultra, are often mor e effective in the
Better quality batteries, such as Duracell Ultra, are often mor e effective in the
•
•
long run and work for a much longer period of time.
long run and work for a much longer period of time.
Rechargeable batteries are also useful if the camera is used a lot. Only use
Rechargeable batteries are also useful if the camera is used a lot. Only use
•
•
NiMH batteries, preferably at least 1,800 mA (the maximum power can vary
NiMH batteries, preferably at least 1,800 mA (the maximum power can vary
per battery type and size). Never use rechargeable NiCd batteries, because
per battery type and size). Never use rechargeable NiCd batteries, because
the output voltage is too low for this type of camera. Also, never recharge the
the output voltage is too low for this type of camera. Also, never recharge the
alkaline batteries provided with the camera, because this may cause them to
alkaline batteries provided with the camera, because this may cause them to
explode.
explode.
1. Never throw the batteries onto an open fire. The batteries may explode.
1. Never throw the batteries onto an open fire. The batteries may explode.
2. Never drill holes into the batteries.
2. Never drill holes into the batteries.
3. Keep the batteries out of the reach of small children. 3. Keep the batteries out of the reach of small children.
4. Only use AA alkaline batteries with this camera. It is recommended to use
4. Only use AA alkaline batteries with this camera. It is recommended to use
When the batteries are empty, ask your local authority where you can dispose of
When the batteries are empty, ask your local authority where you can dispose of
them.
them.
Duracell Ultra or NiMH batteries.
Duracell Ultra or NiMH batteries.
UK
1
Page 6

TRUST 350FS POWERC@M FLASH
NOTE: Standard NiCd batteries are unsuitable for use with this camera.
NOTE: Do not use old and new batteries at the same time, because t he old
batteries may deplete the new ones.
NOTE: The batteries should be removed if the camera is not going to be used f or
some time. This will save the battery capacity.
2.3 Camera Memory
The camera uses SDRAM memory. This type of memory requires batteries to
keep/save the recordings and you have about 90 ~ 100 seconds to replace the
batteries without losing your recordings.
When the camera is not used for a long period of time, it is recommended to transfer
the recordings from the camera memory to a computer; which will prevent the
recordings from being lost because of no power.
Tips: You can connect the camera to a powered-on computer while you
Caution: You have only 20~30 seconds to replace batteries, when the camera is
don’t have batteries or during replacing batteries, so the recordings
can still be saved by power supplied from the USB port in your system.
not normally powered off; this is not defect.
3 Approval
This device meets the essential requirements and other relevant conditions of the
applicable European directives. The Declaration of Conformity (DoC) is available at
www.trust. com/13137/ce.
4 Place batteries
1. Open the battery flap by sliding it downwards The direction is also indicated
by the arrow on the battery flap (see figure 1).
2. Insert the two AA batteries as shown in figure 1. The position is also shown on
the inside of the battery flap.
NOTE: Inserting the batteries incorrectly may cause damage to the camera.
NOTE: The camera will m ake a noise when the battery voltage becomes too
3. Close the battery f lap again by gently pushing it and sliding it upwards.
4. The Trust 350FS PowerC@m Flash is now ready for use.
The warranty will then no longer be valid.
low.
2
Page 7
TRUST 350FS POWERC@M FLASH
5 Camera functions
NOTE: The model of the camera shown below may be different from your
camera. The functionality and the position of the buttons and display ar e,
however, the same.
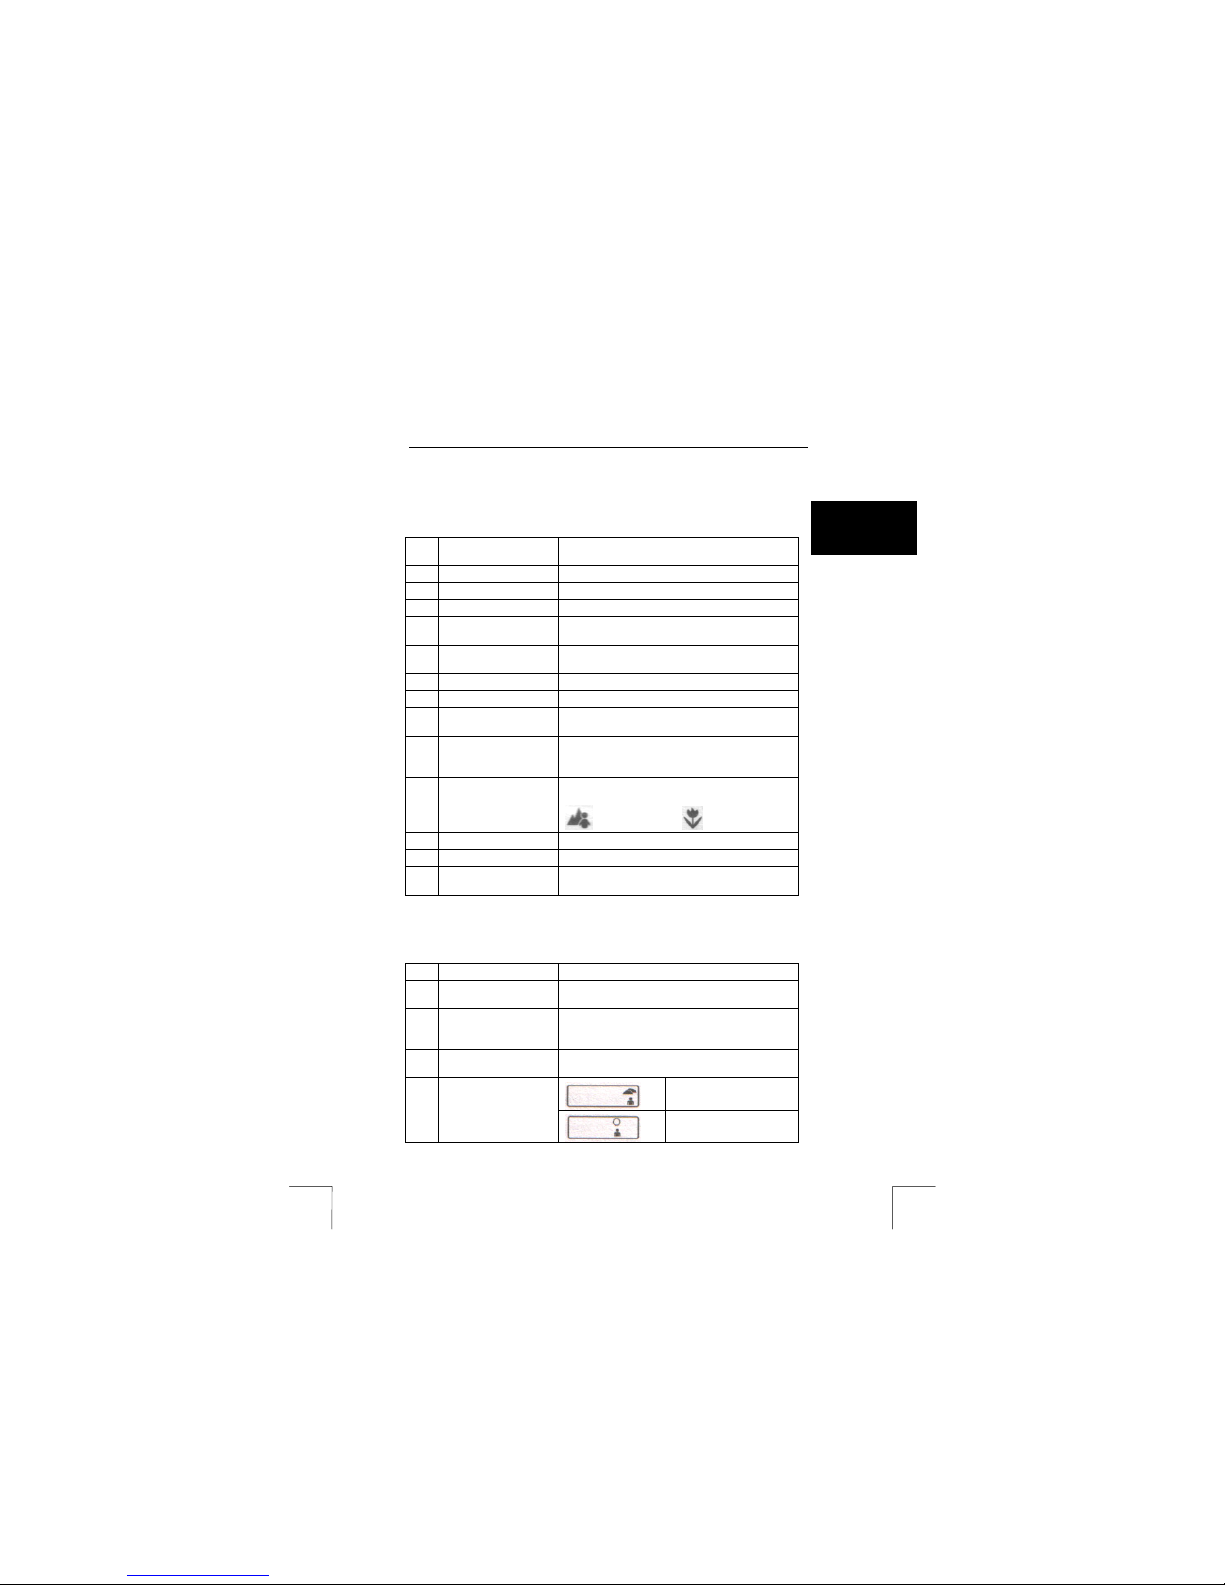
Function Description
Exposure button Takes a photograph.
1
Mode button Changes the camera mode.
2
Flash Gives extra lighting.
3
LED for the automatic
4
exposure
Viewfinder Look through this to view the object to be
5
Lens Records the image to be taken.
6
ON / OFF button Turns the camera on and off.
7
Select button Sets the new settings (resolution, flash,
8
LCD screen Displays the life span of the battery, the number
9
MACRO button For setting the distance to the object to be
10
USB connection Connection for the cable to the PC.
11
Busy Is lit when the camera is processing recordings.
12
Macro LED Is lit when the camera is set to the MACRO
13
Table 1: Camera functions
5.1 LCD screen
Function Description
Counter Indicates how many photographs have been
14
Continuous mode Appears when the camera is set to the
15
Resolution Shows which resolution the camera is set to.
16
Setting for m aking
17
recordings in certain
surroundings.
Flashes when a recording is made using the
automatic exposure.
photographed.
automatic exposure, etc.).
of photographs, the photograph number and the
photograph quality
photographed.
= 90 cm – infinity / = 25 cm ~ 30 cm
function by pressing the MACRO button (10).
taken.
continuous mode (film recording).
This only works in the CIF (320 x 240) resolution.
VGA=640 x 480 / CIF=320 x 240.
Outside (default setting).
Outside (sunny).
UK
3
Page 8

TRUST 350FS POWERC@M FLASH
Function Description
Memory Appears when the camera’s memory is full.
18
Flash mode Automatic. If this is not shown on the LCD
19
Delete recordings ALL = Deletes all the recordings from the
20
Automatic exposure Takes photographs after a time delay of 10
21
Battery capacity Shows the amount of energy remaining in the
22
screen, then the flash is turned off.
camera’s memory.
LST = Deletes the last recording from the
camera’s memory.
seconds.
batteries. Flashes when the batteries are almost
empty.
Inside (bright).
Inside (dark).
6 Using the camera
6.1 Taking photographs
1. Put bat teries into camera. (refer on chapter 4)
2. Use viewfinder to locate the object you want to photograph.
3. Push exposure button (Fig. 1, 1) and hear a beep.
You see the number on the display is increased by ‘1’ so one photograph is taken.
6.2 Setting the resolution
The Trust 350FS PowerC@m Flash can be used to take photographs in two different
resolutions, i.e. VGA (640 x 480, approx. 60 recordings) and CIF (320 x 240, approx.
190 recordings).
The default setting is the VGA (640 x 480) resolution, which can be used to take
approximately 60 photographs.
If you wish to set the camera to the low (CIF) resolution, carry out the following.
See figure 1 and figure 2 with the corresponding t ables.
1. Turn the camera on by pressing the ON/OFF button (7). A beep will be heard
when the camera is turned on.
2. Press the MODE button (2) twice until the letters CIF start to flash on the LCD
screen (9).
A beep will be heard each time the MODE button is pressed.
3. Press the SELECT button (8) until 2 beeps are heard.
The camera is now in the low resolution mode (CIF), which can be used to take
approximately 190 photographs.
4. Press the EXPOSURE button (1) to take a photograph.
NOTE: When the camera is turned off, either by using the ON/OFF button or
4
when it turns off automatically, the camera will return t o the high
resolution when it is turned back on again. You will then have to select
the low resolution as described in chapter 6.2.
Page 9
TRUST 350FS POWERC@M FLASH
6.3 Setting the recording surroundings
The Trust 350FS PowerC@m Flash can be adjusted to suit the conditions of the
surroundings.
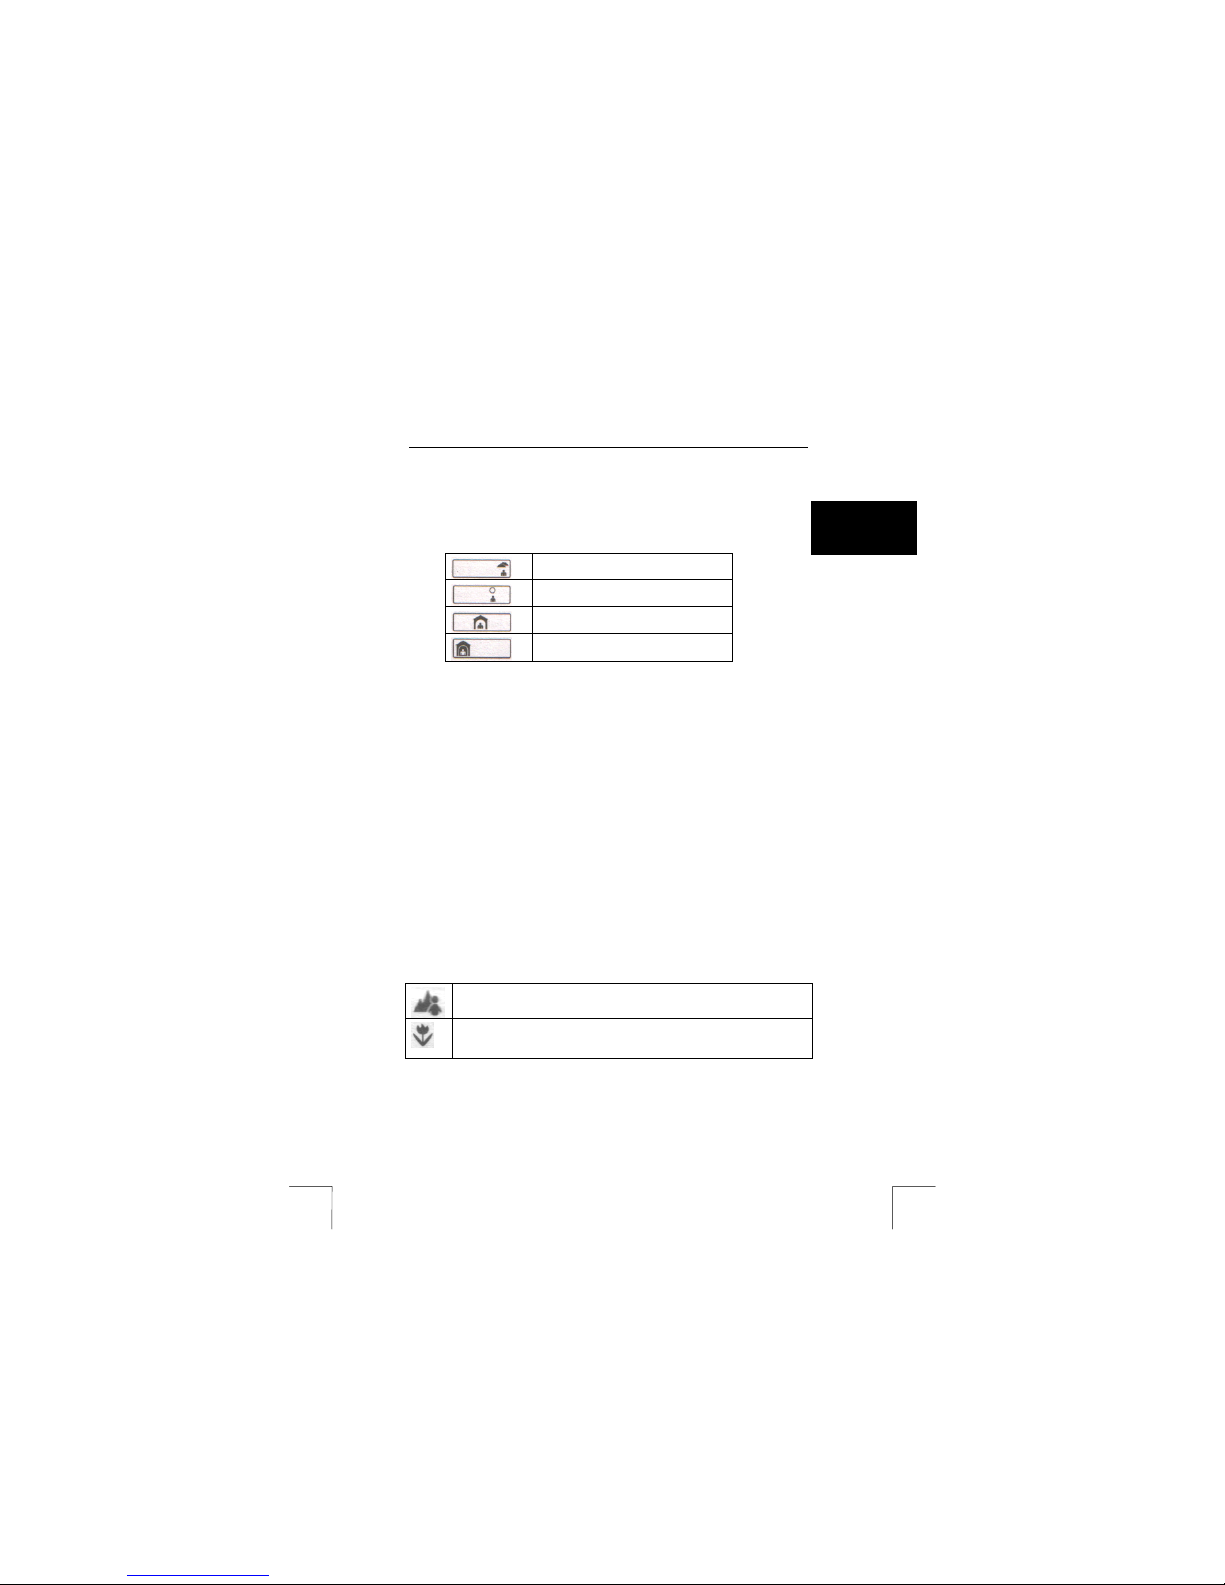
The table below gives the four different possibilities which can be selected.
The default setting when the camera is turned on is the firs t resolution.
If you wish to change the camera to a different setting, carry out the following.
Use figure 1 and figure 2 with the corresponding tables.
1. Turn the camer a on by pressing the ON/OFF button (7). A beep will be heard
when the camera is turned on.
2. Press the MODE button (2) three times until picture 2 (table 2) starts to flash
on the LCD screen (9).
For picture 3 or picture 4, press the MODE button (2) four or f ive times
respectively.
A beep will be heard each time the MODE button is pressed.
3. Once the desired setting has been found, press the SELECT button (8) until
two beeps are heard.
The camera has now been set to the desired setting.
When the camera is turned of f, either by using the ON/OFF button or
NOTE:
when it turns off automatically, the camera will return to the first
position (picture 1 in table 2) when it is turned back on again. You will
then have to adjust the camera as described in chapter 6.3.
Outside (default setting)
Outside (sunny)
Inside (bright)
Inside (dark)
Table 2: Setting the recording surroundings
6.4 Setting the Macro button
The Trust 350FS PowerC@m Flash has a Macro function which is set by sliding the
MACRO button (10) upwards or downwards.
The functions are described in the table below.
Default setting (90 cm to infinity).
Macro mode (25 cm ~ 30 cm). For taking close-up photographs. The
MACRO LED (13) is lit when the camera is set to this function using the
MACRO button (10).
Table 3: Macro function
The optical sensor has a certain degree of light sensitivity. In less light, it can cause
more noise to be visible in the darker parts of your photograph. This is standard for
this type of sensor and will, therefore, produce a result which is fully comparable to
other types or brands. Take this into consideration, where possible. T he best result is
UK
5
Page 10

TRUST 350FS POWERC@M FLASH
obtained with sufficient light. Also make sure that a specific subject is not fully
illuminated by, for example, a bright sun, whilst the rest of the photograph is less
illuminated. This can result in overexposure. The best solution is to take test
photographs of various situations and subjects and to look at these so that you get a
feeling of which situations produce a photograph which is acceptable to you.
6.5 Setting the flash
The flash of the Trust 350FS PowerC@m Flash has two settings, i.e.
OFF
The default setting when the camera is turned on is OFF.
The flash is set to AUTO as follows.
1. Turn the camera on by pressing the ON/OFF button (7). A beep will be heard
2. Press the MODE button (2) seven times until
3. Once the desired setting has been found, press the SELECT button (8) until
The camera has now been set to the desired flash setting.
NOTE: When the camera is turned off, either by using the ON/OFF button or
You can repeat the procedure given above to turn the flash off again.
NOTE: Using the flash w ill cause the batteries to become empty more quickly,
NOTE: The flash on your c amera gives the best result at a distance of
NOTE: You may get the ‘Red Eye’ effect in your photographs when using the
and Auto .
when the camera is turned on.
LCD screen (9). A beep will be heard each time the MODE button is pressed.
two beeps are heard.
when it turns off automatically, the flash will return to the OFF setting
when the camera is turned back on. You will then have to set t he flash
as described in chapter 6.5.
because the flash uses a lot of energy. It is also possible that the
charging time will take longer the more the flash is used. The flash will
be automatically deactivated a couple of minutes after the flash can no
longer be charged as a result of the batteries having insufficient power.
You can take approximately 1500 photographs using the flash with
new Duracell Ultra batteries (type AA).
between 1 and 2.5 metres. This is due to the light sensitivity of the
optical sensor and because it is not an active flash (the light strength
cannot be controlled). Shorter or longer distances may cause
overexposure or underexposure respectively. Try to take this into
consideration as much as possible when using the flash.
flash. This is when people in photographs have red eyes when the
flash is used.
This problem can be solved by using an image editing program to alter
the colour of the eyes.
starts to flash on the
6.6 Automatic exposure
The Trust 350FS PowerC@m Flash has an automatic exposure function which can
be used to take photographs with a time delay of 10 seconds.
When the camera is turned on, the default setting for this function is OFF .
The automatic exposure function can be turned on as follows.
6
Page 11

TRUST 350FS POWERC@M FLASH
1. Turn the camer a on by pressing the ON/OFF button (7). A beep will be heard
when the camera is turned on.
2. Press the MODE button (2) t welve times until starts to flash on the
LCD screen. A beep will be heard each time the MODE button is pressed.
3. Once the desired setting has been found, press the SELECT button (8) until
two beeps are heard.
The automatic exposure function has now been turned on.
Press the EXPOSURE button (1) to activate the automatic exposure.
Whilst counting down (10 seconds), a beep will be heard which will become faster as
the time elapses. Whilst the camera m akes a beeping noise, the LED for the
automatic exposure function (4) on the front of the camera will flash at the same
tempo as the beep signal.
NOTE: When the camera is t urned off, either by using the ON/OFF button or
You can repeat the procedure given above to turn the automatic exposure function
off again.
Press the MODE button (2) a number of times until
LCD screen (9).
Once the desired setting has been found, press the SELECT button (8) until two
beeps are heard.
The automatic exposure function has now been turned off.
when it turns off automatically, the automatic exposure function will
return to the OFF setting when the camera is turned back on again.
You will then have to adjust the camera as described in chapter 6.6.
starts to flash on the
6.7 Continuous mode
The video function only works in the low (CIF) resolution.
NOTE:
The TRUST 350FS POWERC@M can be used to take a number of photographs,
one after another, using the CONTINUOUS mode.
1. Turn the camer a on by pressing the ON/OFF button (7). A beep will be heard
when the camera is turned on.
2. Press the MODE button (2) nine times until
screen (9). A beep will be heard each time the MODE button is pressed.
3. Once the desired setting has been found, press the SELECT button (8) until
two beeps are heard.
The camera has now been set to the CONTINUOUS mode.
To use the CONTINUOUS mode, press the EXPOSURE button (1) and keep it
pressed whilst recording.
The recording will stop once the EXPOSURE button (1) is released.
During recording, a beep will be heard each time a photograph is taken. The counter
(14) in figure 2 will also increase.
When the camera is turned off, either by using the ON/OFF button or
NOTE:
when it turns off automatically, the camera will turn off the
CONTINUOUS mode and return to the PHOTO mode. If you wish to
use the CONTINUOUS mode, the camera will have to be s et as
described in chapter 6.7.
starts to flash on the LCD
UK
7
Page 12

TRUST 350FS POWERC@M FLASH
6.8 Deleting recordings
To delete recordings, you can either choose to delete all the recordings or only the
last recording. You must delete recordings when the memory is full or if you do not
wish to keep the last recording.
6.8.1 Deleting the last recording
1. If you have not already done so, turn the camera on by pressing the ON/OFF
button (7). A beep will be heard when the camera is turned on.
2. Press the MODE button (2) a number of times until
in the LCD screen (9). A beep will be heard each time the MODE button is
pressed.
3. Once the desired setting has been found, press the SELECT button (8) until
two beeps are heard and the last recording has been deleted.
6.8.2 Deleting all the recordings
1. If you have not already done so, turn the camera on by pressing the ON/OFF
button (7). A beep will be heard when the camera is turned on.
2. Press the MODE button a number of times until
the LCD screen (9). A beep will be heard each time the MODE button is
pressed.
3. Once the desired setting has been found, press the SELECT button (8) until
two beeps are heard and all the recordings have been deleted.
starts to flash
starts to flash in
7 Installing the driver in Windows
98/Me/2000/XP
The recordings you have made can be downloaded onto your computer. To do this,
the driver and the software must be installed on your computer. Follow the
instructions below to do this.
NOTE: This camera only works with this driver on a system using Windows
NOTE: Make sure all other programs are closed during the installation.
NOTE: During installation in Windows XP, you may receive a message
NOTE: In the examples, the CD-ROM drive is indicated by “D:\”. This may
1. Insert the CD-ROM into your CD-ROM drive. The T rust Software Installer will
2. Click on ‘350FS PowerC@m Flash’ to start the installation. Figure 4 will
3. Click on ‘Next’ to start the installation and follow the on-screen instructions.
4. Click on ‘Next’ to continue with the installation. Figure 5 will appear after the
8
98 or later versions. This camera works as a USB mass storage
device on an Apple Mac with OS 9.2 and higher.
saying that the driver has not been signed. This does not cause a
problem for the functionality. Continue with the installation.
be different for your computer.
start automatically. If the installation program does not start automatically, run
'Setup.exe' on the CD-ROM. Figure 3 will appear. The Trust Software Installer
will appear in Windows 98, Windows ME, Windows 2000 and W indows XP.
appear.
installation.
Page 13

TRUST 350FS POWERC@M FLASH
5. Select the option to r estart your computer and click on 'Finish'.
6. Start the Trust Software Installer again (see figure 3) af ter your computer has
been restarted so that you can install the other software. See chapter 6 f or
instructions on how to install the other software.
8 Installing the software
ArcSoft PhotoImpression 3.0 is a 3rd party software program helps you on editing,
managing and organizing your photographs and video clips.
Follow steps below to install:
1. Insert the CD- ROM into your computer’s CD-ROM drive. The installation
program will start automatically. If it does not start automatically, carry out the
following:
a. Select 'Run' f rom the Windows Start menu.
b. Type [D:\SETUP.EXE] and click on 'OK' to start the Trust Software
2. The Trust Software Installer will appear (see Fig. 3).
3. Select ‘Install sof tware’.
4. Select ‘Photo Impression 3’.
Follow the on-screen instructions to complete the installation.
Installer.
9 Connecting the camera to computer
NOTE: The driver must be installed on your system before connecting the
1. Start Windows.
2. Connect the USB cable to connection 11 (see figure 1) on the camera.
3. Connect the other end of the USB cable to a free USB port on your computer.
The camera will turn on automatically and be detected by Windows. The driver will be
automatically found and the camera will then be ready for use to download recordings
onto your computer.
NOTE:
camera (see chapter 6).
A beep will be heard from the camera and you’ll see ‘HDD’ displayed on the
camera.
You can only download recordings from the camera’s memory when
the camera is connected to your computer’s USB port. You will not be
able to take any photographs. It is possible, however, to t ake a
snapshot and to use the camera as a webcam. The other camera
functions will not be available.
10 Using as a web cam
If you wan to connect your camera to your PC and use it as a web cam, please follow
steps below:
1. Start Windows.
2. Connect the USB cable to connection 11 (see figure 1) on the camera.
3. Keep pressing the SELECT button down and do not release it.
4. Connect the other end of the USB cable to a free USB port on your
computer.
5. A beep will be heard from the camera and you’ll see ‘PC’ displayed on the
camera.
UK
9
Page 14

TRUST 350FS POWERC@M FLASH
Note: The SELECT button must be pressed until you see ‘PC’ and hear the
Note: It’s normal that the camera will be powered off when you unplug the
Note: When you connect the camera as a web cam, you cannot download
beep sound on/from the camera.
camera from the PC and hear two beeps.
the pictures from the camera.
11 Checking after the installation
After installing the device and the driver, the following are installed on your computer
and can be checked:
‘Start – Settings – Control Panel’. Double-click on the ‘System’ icon and selec t the
‘Device Manager’ tab.
- Imaging Device - Trust 350FS PowerC@m Flash(Still camera)
Trust 350FS PowerC@m Flash(video camera)
‘Start – Settings – Control Panel’ and then double-click on the ‘Add/Remove
Programs’ icon.
- 350FS PowerC@m Flash
NOTE: The information given below will vary when the installation has been
NOTE:
NOTE: The location or name may vary in the ‘Control Panel’ for different
altered by the user (for example, not everything has been installed or
locations other than the default locations have been selected).
Deviations may also occur as a result of using new drivers available on
the Internet.
operating systems.
12 Downloading photographs to computer
1. Open My Computer.
2. Double click on Removable drive.
3. Open folder ‘DCIM’.
4. Open folder ‘100Media’.
5. Double click to open the photographs or video clips that you want to open.
6. Save the photographs or video clips onto your computer f rom your default
photo editing software.
13 Trust Photo Site
13.1 Installing Trust Photo Site
Trust offers you the possibility to publish your photographs on the Internet at
www.trustphot osite.com. There are a number of conditions attached to the use of this
site. The conditions can be found at www.trustphotosite.com.
This software can be used to upload your photographs to the Trust Photo Site.
Note: The latest version of the Trust Photo Upload software can always be
1. Start the Trust Software Installer.
2. Select ‘Install software’.
3. Select ‘Trust Photo Upload Sof tware’.
4. Follow the on-screen instructions to com plete the installation.
10
downloaded from the Trust website.
Page 15

TRUST 350FS POWERC@M FLASH
13.2 Using Trust Photo Site
You must first register with Trust before you can upload photographs to the Trust
Photo Site.
13.2.1 Registeration and create your Trust user account
13.2.1.1 Register first
1. Go to Trust web site (www.tr ust.com) to regist er yourse lf and your camera.
After registering, you will receive a confirmation e-mail.
2. Sign in using the confirmation code which is sent to you.
3. Next, follow the instructions below to create your own account.
13.2.1.2 After registered
1. Go to the Trust Customer Care section of the website
(www.trust .com/cu stomerca re). Reg ister usi ng your e- mail address and
password (the password for the Trust website).
2. Enter the item number of your digital camera and click on ‘Search’ to go to
the support page for your camera
3. To create an account, click on ‘Create account’ on the right-hand side of the
Trustphotosite.com banner.
4. Click on the ‘Create trust photosite.com account’ button. It may take a while
before the next window appears.
5. Click on ‘Continue’. In the window that appears, you can download software
for uploading your photographs to the Trust Photo Site. You can download
the latest version of the software here. (The Trust Photo Upload software is
also included on the CD-ROM supplied with the camera.)
13.2.2 Using the Trust Photo Upload software
1. Start Trust Photo Upload from the W indows Start menu (Start – Programs –
Trust – Trust Photo Upload).
2. Use the ‘Explorer’ to select t he photographs you wish to upload. You can use
the buttons on the right-hand side of the Explorer to select photographs,
unselect photographs, view photographs, etc.
3. Click on ‘Upload’.
4. Enter your e-mail address and t he password for your Trust registration (not
the password for your e-mail account).
5. Click on ‘Next’. Your login information will be checked. This may take some
time.
6. Select the photo album where you wish to upload the photographs to or create
a new album.
7. Click on ‘Next’. The phot ographs will now be uploaded. The progress will be
displayed on your monitor. This may take a long time if you use an analogue
modem.
8. Click on ‘Close’ to close the window.
9. Go to the webs ite www.tru stphotosite.com and sign in.
You can now view your photographs, arrange them, etc. See the Help section on the
website for more information.
UK
11
Page 16

TRUST 350FS POWERC@M FLASH
14 Using the software
14.1 Photo Impression
1. Turn on the computer
2. Connect the camera to the PC by the USB cable
3. Turn on the camera
4. Launch Photo Impression
5. Select “from folder”, you can find your camera as a new disk to upload your
images to edit
6. Shortly, follow the prompts and the images will start be downloaded from your
camera.
NOTE: For the usage of Photo Impression, please refer on the Help of the
14.2 Video Impression 1.6
Video Impression 1.6 can be used to make video recordings with your TRUST 350FS
POWERC@M FLASH.
NOTE: This function only works if the camera has been connected to your PC
1. Click on the ArcSof t Video Impression icon on your Windows desktop. Figur e
2. Click on the ‘New’ icon (A). Figure 7 will appear.
3. Click on the ‘acquire’ icon (B). Figure 8 will appear.
4. Select ‘Trust 350FS PowerC@m Flash’ for C.
5. Click on button D to view the camera’s settings. Figure 9 will appear.
6. For ‘C
7. If desired, select the image format for ‘Output S
8. Click on 'Apply' followed by 'OK' to save the new settings. Figure 8 will appear
9. Click on button E to view a live video image. The live video image will be
10. Click on but ton F to start recording a video.
11. To st op recording a video, click on button H or the Esc button on your
12. You can view the recording by clicking on button G.
13. The recording can be saved by clicking on the Diskette icon J.
This was a short description of Video Impression 1.6.
See the program’s Help function for more detailed information.
You can view this by clicking on the program’s question mark icon.
The Help function contains information concerning all the prog ram’s functions.
software or check the manual on the product CD.
using the USB cable provided with the camera.
6 will appear.
olor Space / Compression:’, select the RGB 24 format.
again.
visible in window I.
keyboard.
You can select the location where you wish to save the recording.
ize’.
12
Page 17
TRUST 350FS POWERC@M FLASH
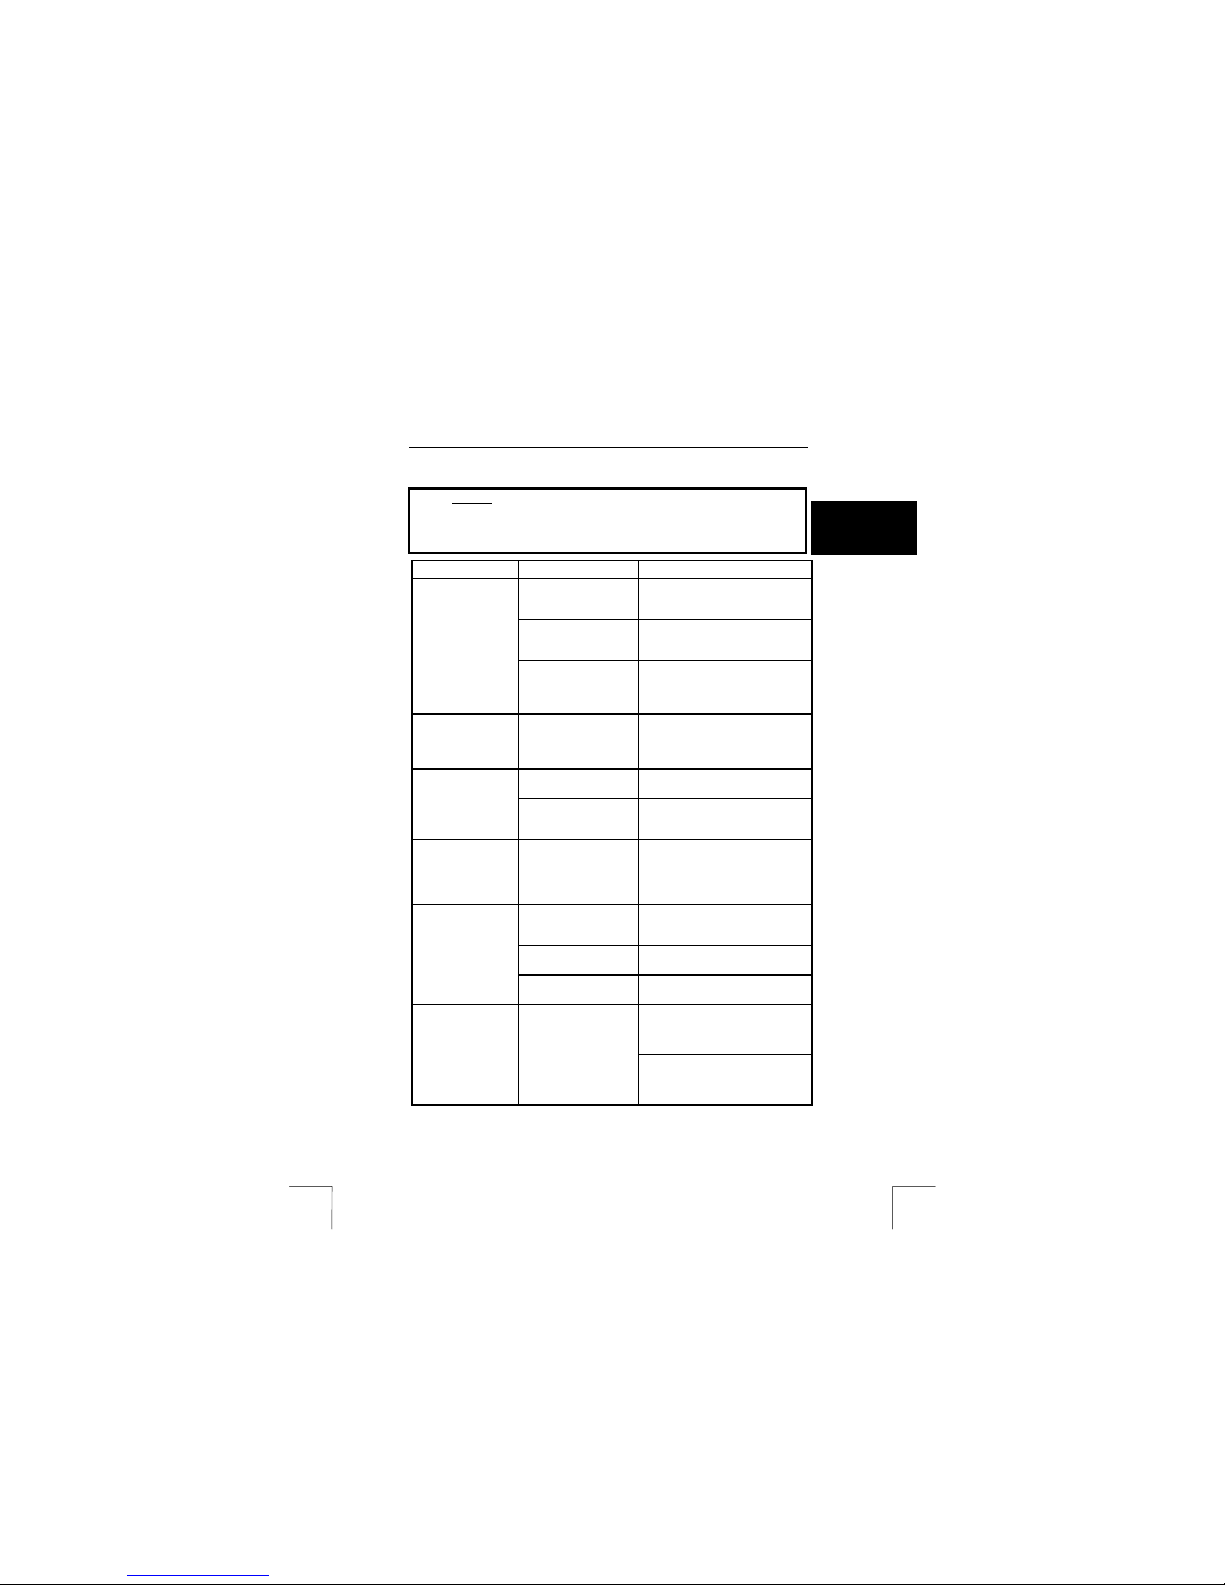
15 Troubleshooting
Method
1. Read the solution s given below.
2. Check for up-to-date FAQ’s, drivers and instruction
manuals on the Internet (www.trust.com/13137).
Problem Cause Possible solution
Windows does not
detect a new
device after
connecting the
camera.
The computer
becomes jammed
when using the
USB connection.
The camera does
not do anything.
The camera does
not react,
although the
batteries are full.
The camera
suddenly turns
itself off.
The batteries
become empty
quickly.
The computer's USB
port does not work.
The camera has not
been connected to a
USB port.
The camera is
connected to a USB
hub which does not
have a power supply.
The USB port has
shared an IRQ with
another device.
The batteries are
empty.
The batteries have
been inserted
incorrectly.
There is a fault with
the camera.
The power in the
batteries is low.
NiCd or NiMH batteries
are used.
The 'Auto-off' function
is turned on.
Using the flash causes
the batteries to
become empty more
quickly.
Try a different USB port or
connect the device to a different
computer.
Connect the camera to a USB port
(see chapter 9).
Connect the camera to a USB hub
which has a power supply or to a
USB port on your computer.
Check your computer’s USB
settings.
Replace the batteries (see chapter
4).
Reinsert the batteries (see chapter
4). Duracell Ultra batteries are
recommended.
Remove the batteries from the
camera for at least 1 minute to
reset the camera. Reinsert the
batteries into the camera. The
camera should now work.
Replace the batteries (see chapter
4). Duracell Ultra batteries are
recommended.
Use alkaline batteries (Duracell
Ultra batteries are recommended).
Turn the camera on again.
Only use the flash when
necessary.
Replace the batteries (see chapter
4). Duracell Ultra batteries are
recommended.
UK
13
Page 18

TRUST 350FS POWERC@M FLASH
Problem Cause Possible solution
The USB symbol
flashes together
with the counter in
the display.
The USB symbol
flashes together
with the battery
indicator in the
display.
The recordings are
not clear (hazy).
No photograph is
taken when the
exposure button is
pressed.
There is no
connection with
the computer.
The problem is not
listed here.
If you still have problems after trying these solutions, please contact one of the Trust
Customer Care Centers. You can find more information at the back of this instruction
manual. Please have the following information available:
The article number. This is 13137.
•
A good description of what does not work.
•
A good description of when the problem occurs.
•
The camera’s memory
is full.
The batteries are
empty.
The focus (distance to
the object) is not
correct.
The camera is still
busy saving the
previous photograph.
There is a bad cable
connection.
The 'Auto-off' function
is turned on.
The latest FAQ update
is available on the
Internet.
Save the recordings in the
camera’s memory on your
computer and delete the images
from the camera’s memory (see
chapter 12).
Replace the batteries (see chapter
4). Duracell Ultra batteries are
recommended.
Turn the Macro function on as
described in chapter 6.4.
Wait until the camera is ready.
Reconnect the cables (see
chapter 9).
Turn the camera on again.
Visit www.tr ust.com /13137 for
FAQ’s and other product
information.
14
Page 19

TRUST 350FS POWERC@M FLASH
16 Warranty conditions
- Our products have a two-year manufacturer's warranty which is effective f rom
the date of purchase.
- If there is a fault, return the product to your dealer and include an explanation
of the fault, the proof of purchase and all the accessories.
- During the warranty period, you will receive a similar model, if one is available.
If no similar product is available, your product will be repaired.
- Please contact our help desk for m issing components, such as the instruction
manual, software or other components.
- The warranty becomes invalid if the product has been opened, if there is
mechanical damage, if the product has been misused, if alterations have been
made to the product, if the product has been repaired by a third party, in the
case of negligence or if the product has been used for a purpose other than
that originally intended.
- Excluded from the warranty:
- Under no circumstances will the manufacturer be held responsible for any
Damage caused by accidents or disasters, such as fire, flood,
•
earthquakes, war, vandalism or theft.
Incompatibility with other hardware/software which is not stated in the
•
minimum system requirements.
Accessories, such as batteries, fuses (if applicable).
•
incidental or consequential damage, including the loss of income or other
commercial losses resulting from the use of t his product.
UK
15
Page 20
L I F E I S M O R E ! T R U S T U S T R U S T . C O M
CUSTOMER CARE CENTERS
24 HOURS free service: www.trust.com
Residents in the UK and Ireland should contact:
Mon - Fri
From 8:00 - 16:00
UK Office
Phone +44-(0)845-6090036
Fax +31-(0)78-6543299
I residenti in Italia possono contattare:
lun - ven
9:00 - 13:00 /
14:00 -18:00
Ufficio italiano
Telefono +39-051-6635947
Fax +39-051-6635843
Les habitants de la France et de l’Afrique du Nord peuvent contacter :
Lundi-vendredi
De 9:00 à 17:00
Bureau français
Téléphone +33-(0)825-083080
Fax +31-(0)78-6543299
Kontaktadresse für Einwohner Deutschlands:
Mo – Fr
9:00 - 17:00
Deutsche Geschäftsstelle
Telefon 0800-00TRUST (0800-0087878)
Fax +31-(0)78-6543299
Los habitantes de España pueden ponerse en contacto con:
lun – viernes
De las 9:00 a las
17:00 horas
Oficina española
Teléfono +34-(0)902-160937
Fax +31-(0)78-6543299
Osoby mieszkające na terytorium Polski powinny skontaktować się:
Od pon. do pt.
w godz 09:00-17:00
Biuro w Polska
Tel +48-(0)22-8739812
Fax +31-(0)78-6543299
Inwoners van Nederland kunnen contact opnemen met:
ma – vr
9:00 - 17:00 uur
Kantoor Nederland
Telefoon 0800-BELTRUST (0800-23587878)
Fax +31-(0)78-6543299
All other countries / Alle anderen Länder / Tous les autres pays
Tutti gli altri paesi / Todos los demás países / Alle andere landen
Mon - Fri
From 9:00 - 17:00
European Head Office
Phone +31-(0)78-6549999
Fax +31-(0)78-6543299
 Loading...