

Page 1

TRUST WIRELESS OPTICAL DESKSET 310KD
1
UK
Method when using for the first time Chapter
1. Inserting the batteries (3.1)
2. Selecting the channel (3.2)
3. Uninstalling old drivers and devices (3.3)
4. Installing the software (3.4)
5. Checking after the installation (3.5)
1 Introduction
This manual is for users of the TRUST W IRELESS OPTICAL DESKSET 310KD. The
mouse has three buttons. The keyboard and mouse connect to your computer via a
radio frequency. The keyboard and mouse use 2 channels and 256 different
identification codes, so that a number of sets can be used in the same room.
2 Safety
Carefully read the following instructions before use:
- The TRUST W IRELESS OPTICAL DESKSET 310KD does not require any
special maintenance. Use a slightly damp, clean cloth to clean the device.
- Do not use aggressive substances, such as petrol or white spirit, to clean the
device. These may harm the material.
- Do not submerge the device in liq uid. This may be dangerous and will
damage the device. Do not use this device near water.
- Make sure nothing is placed on the power cable. Do not use this device in an
area where the cable can become worn or damaged as a result of people
walking over it.
- Do not repair this device yourself. If you open this device, you may touch live
components. This device must only be repaired by qualified personnel.
- Under the following circumst ances, have the device repaired by qualified
personnel:
- The cable or plug is damag ed or worn.
- The device has come into contact with rain, water or anot her liquid.
0678
- This device operates at a fr equency of 27.042 ~ 27,20 MHz. It has been
approved according to the European R&TTE guidelines and meets the
essential requirements and other relevant conditions of Directive 1999/5/EC.
This device may be used in all EU countries, NO, CH, PL. The Declaration of
Conformity (DoC) is available at www.trust.com/12749/ce
- There may be limitations f or the use of this device outside of the EU. If this
device is used outside of the EU, check whether this device meets local
regulations. Frequency: 27.042 ~ 27,20 MHz, Bandwidth: 5 KHz, Capacity: 0,2
mW.
- Nowadays, there are an increasing number of wireless products (video, audio,
convenience, computer, etc.) which work in the same frequency range as this
device. It may, therefore, be possible that the functionality of this product can
be limited by or be limiting for other wireless products. This can only be
avoided by paying attention to the distance between products and, where
possible, by changing channels.
- Be careful when using wireless devices if you have a pacemak er or are
dependant on other life-saving, sensitive electronic equipment. This pr oduct
transmits radio signals!
Page 2

TRUST WIRELESS OPTICAL DESKSET 310KD
2
3 Installation
3.1 Inserting the batteries
1. Remove the cover from the battery compartment on the bottom of the
keyboard.
2. Insert the two AA batteries into the battery compartment as shown on the
diagram inside the compartment.
3. Remove the cover from the battery compartment on the bottom of the mouse.
4. Insert the two AAA batteries into the battery compartment as shown on the
diagram inside the compartment.
The batteries for the mouse are rechargeable and last for approximat ely 1 week. The
batteries for the keyboard are not rechargeable and last for approximat ely 6 months.
Note: Inserting the batteries incorrectly may cause damage.
Note: Only replace the batteries for the keyboard with the same t ype of alkaline
batteries or with rechargeable NiMH batteries.
Note: Only replace the batteries for the mouse with NiMH batt eries.
Note: For the best result, charge the batteries for the m ouse for 3 hours before
use (see chapter 6.4).
3.2 Selecting the channel
1. Open the battery compartment on the bottom of the mouse.
2. Use a pointed object to set the channel selection switch in the mouse to the
desired channel. The channel can be read next to this switch.
3. Close the battery compartment.
4. Set the channel selection switch on the bottom of the keyboard to the desired
channel.
5. Use the two channel switches (for the mouse and the keyboard) on the
receiver to select the same channel as you have just selected for the mouse
and the keyboard.
3.3 Connecting
Note: Make sure that you have your Windows CD-ROM available. Certain
versions of Windows may request you to insert your Windows CD-ROM
into your CD-ROM drive.
1. Turn the computer off.
2. Connect the receiver’s green plug to the green PS/2 mouse connection on
your computer.
3. Connect the receiver’s purple plug to the purple PS/2 keyboard connection on
your computer.
The mouse and keyboard are now ready for (standard) use. If you wish to use the
special function buttons on the WIRELESS OPTICAL DESKSET 310KD, continue
from chapter 3.4.
3.4 Uninstalling old drivers and devices
The most common cause of faults during installation is the presence of a driver for a
similar, old product. The best solution is to first remove all drivers related t o old
devices before installing the new driver.
1. Enter the Windows ‘Safe Mode’ (press F8 when starting Windows and then
select ‘Safe Mode’ from the menu which is displayed).
2. Go to ‘Start – Settings – Control Panel’ and double-click on the ‘Add/Remove
Programs’ icon.
3. Find all the programs for similar, old devices and remove these by clicking on
the ‘Add/Remove’ button. When in the ‘Safe Mode’, it is possible for some
Page 3

TRUST WIRELESS OPTICAL DESKSET 310KD
3
UK
programs to appear twice. In that case, remove all the programs which appear
twice.
4. Restart the computer.
3.5 Installing the software in Windows 95 / Windows 98 /
Windows ME / Windows 2000 / Windows XP
Note: The latest driver can be downloaded from www.trust.com/12749. Check
whether a new driver is available and use this for the installation.
Note: Make sure all other programs are closed during the installation.
Note: During installation in Windows XP, you may receive a message saying
that the driver has not been signed. This does not cause a problem for
the functionality.
Note: In the example, ‘D:\’ is used to indicate the CD-ROM drive. This may be
different for your computer.
1. Insert the CD-ROM into your CD-ROM drive. The Trust Software Installer will
start automatically. If it does not start automatically, carry out t he following:
a) Select 'Run' from the Start menu.
b) Type [D:\SETUP.EXE] and click on 'OK' to start the T rust Software
Installer.
2. Figure 1 will appear.
3. Click on the language you wish to use for the installation.
4. Click on ‘WIRELESS OPTICAL DESKSET 310KD‘ to start the installation.
5. Follow the on-screen instructions.
6. Once the installation has been completed, your computer will be restarted
and the ‘Wireless Mouse’ window will appear (see figure 2).
7. Continue to chapter 4 to continue with the installation and for instructions on
how to select the ID code.
4 Assigning ID codes
4.1 ID codes
During production, a unique ID code is assigned to every keyboard and every mouse.
The receiver only receives the signal from your keyboard and mouse and prevents
radio signals from other wireless keyboards and mice from being received by your
computer. There are 256 unique codes. Follow the procedure described in the next
chapter to select these unique ID codes for both the mouse and the keyboard. The ID
code for the keyboard is selected by the receiver and the ID code for the mouse is
selected by the software. The ID code is not displayed, but if you move another
WIRELESS OPTICAL DESKSET 310KD close by, you will see that there is no
interference. This function can also be switched off, so that it is possible to use other
pointing devices on your computer. This function is not a safety device.
Page 4

TRUST WIRELESS OPTICAL DESKSET 310KD
4
4.1.1 Assigning an ID code to the mouse
You can choose from 2 options:
1. Assign an ID code: the unique mouse ID code will be recognized and any
other pointing device which works via radio frequencies will not have access
to your computer. Move the wireless mouse for a couple of seconds to make
a connection and then click on ‘Connect ID’.
2. Do not assign an ID code: Select this option if there are no other pointing
devices within a distance of 3 metres which work via radio frequencies or if
you wish other pointing devices which work via radio frequencies to have
access to your computer. Click on ‘Close’.
4.1.2 Changing the mouse ID code
You can use a new wireless mouse on your computer without changing the receiver.
You only need to change the ID code. This is carried out as follows:
1. Press [Shift + Alt + F11] or [Shift + Alt + F12]. The wireless mouse ID code
window will then appear.
2. Move the wireless mouse for a couple of seconds to make a connection and
then click on ‘Connect ID’.
3. The new ID will be connected and the wireless mouse window will close.
4. Click on ‘Close’ to close the window without changing the ID code.
4.1.3 Assigning an ID code to the keyboard
Carry out the following to manually connect the receiver and the keyboard.
1. Press a key on the keyboard.
2. Press the ‘ID connect’ button on the receiver
3. The green LED above the ‘ID connect’ button will be lit to indicate that the
keyboard has been assigned an ID code.
If the green light is not lit, the keyboard has not been assigned an ID code.
5 Checking after the installation
After installing the device and the driver, the following are installed on your computer
and can be checked:
Taskbar
- An icon will be visible on the right-hand side of the taskbar.
‘Start – Settings – Control Panel’. Double-click on the ‘System’ icon and select the
‘Device Manager’ tab.
- Keyboard – Standard 101/102-Key or Microsoft Natural Keyboard
- Mouse – Trust Ami Mouse Wireless Optical Single Scroll
‘Start – Settings – Control Panel’ and then double-click on the ‘Add/Remove
Programs’ icon.
- Trust iKeyWorks Office 6.0
- C:\PROGA~1\TRUST\WIRELE~1\MOUSE\AMOUMAIN.EXE
Start - Programs - Trust - W ireless Optical Deskset 310KD
- Keyboard – iKeyworks Office 6.0 – Uninstall iKeyworks Office 6.0
- Mouse – Trust Mouse Button Assign Software 1.0 – Uninstall Trust Mouse Button
Assign Software 1.0
Note: The information given above will vary when the installation has been
altered by the user (for example, not everything has been installed or
locations other than the default locations have been selected).
Note: Deviations may also occur as a result of using new drivers available on
the Internet.
Note: The location or name in the ‘Control Panel’ may vary for different
operating systems.
Page 5

TRUST WIRELESS OPTICAL DESKSET 310KD
5
UK
6 Use
6.1 Keyboard software
1. Double-click on the keyboard icon in the system tray.
2. The window with the menu for shortcut keys will be displayed (see figure 3).
3. In the ‘Shortcut key’ menu, you can:
• Set shortcut k eys by selecting a button and assigning a function to it.
If you select ‘iKeyWorksOffice’, the shortcut keys will be configured for
MS Office tasks. The ‘Office mode’ overlay should then be used. If you
select ‘Shortcut keys for standard mode’, the shortcut keys will be
configured for multimedia tasks. You will then not have to select an
overlay.
A function can also be manually selected by using the ‘Personal’
overlay.
Select the button that you wish to alter. Next, select ‘Custom’ and click
on ‘Select’. Next, select ‘Command type’:
Shell execute; if you wish to execute a *.exe file with a specific button.
Keystrokes; if you wish to use one keystroke for a certain combination
of keystrokes.
Office shortcut; if you wish to select a standard Office application.
Generic command; if you wish to select a standard Windows
command.
4. In the ‘Options’ menu (see figure 4), you can:
• Set Ctrl + volume for zooming in and out in Microsoft Office.
• Set ‘Caps Lock,’ ‘Num Lock ’ and ‘Scroll Lock’ in the system tray if
these are activated.
• Hide the keyboard icon in the system tr ay.
5. In the ‘Window display’ menu (see figure 5), you can:
• Alter the way in which the window is displayed on your monitor.
6.2 Mouse software
1. Double-click on the Trust icon in the system tray.
2. A window will appear which shows the ‘Buttons’ menu (see figure 6).
3. You can carry out the following using this menu:
• Assign buttons by selecting a but ton and then assigning a function to it
using the menu which then appears.
• Adjust the double-click speed by moving the slide bar towards faster or
slower.
• Configur e the buttons for left-hand or right-hand use by selecting
‘Right-handed’ or ‘Left-handed’.
• Click on ‘Apply’ after you have progr ammed the selected settings.
4. In the ‘Wheel’ menu (see figure 7), you can carry out t he following:
• Set the wheel mode; select ‘Enhanced dual wheel function m ode’,
which uses all the functions of the MS IntelliMouse plus vertical and
horizontal scrolling in Windows 95, Windows 98, W indows 2000 and
Windows NT, or select ‘MS-IntelliMouse compatible mode’, which only
uses vertical scrolling and has the same functions as the MS
IntelliMouse. If you select ‘Swap Vertical and Horizontal Wheel’, the
functions of both wheels will be swapped.
• Setting the hor izontal and vertical scroll speed; select the number of
lines per scroll or one page per scroll.
• Turn on the zoom f unction in Office 97/2000.
5. In the ‘Settings’ tab (see figure 8), you can set the ‘NetJump’ and ‘LuckyJump’
menus as desired.
Page 6

TRUST WIRELESS OPTICAL DESKSET 310KD
6
6. Click on ‘New/Update’ to create new functions. Follow the on-screen
instructions.
Note: The ‘NetJump’ and ‘LuckyJump’ menus can be assigned to one of the
mouse buttons using the ‘Buttons’ menu.
6.3 Keyboard
6.3.1 Multimedia keys
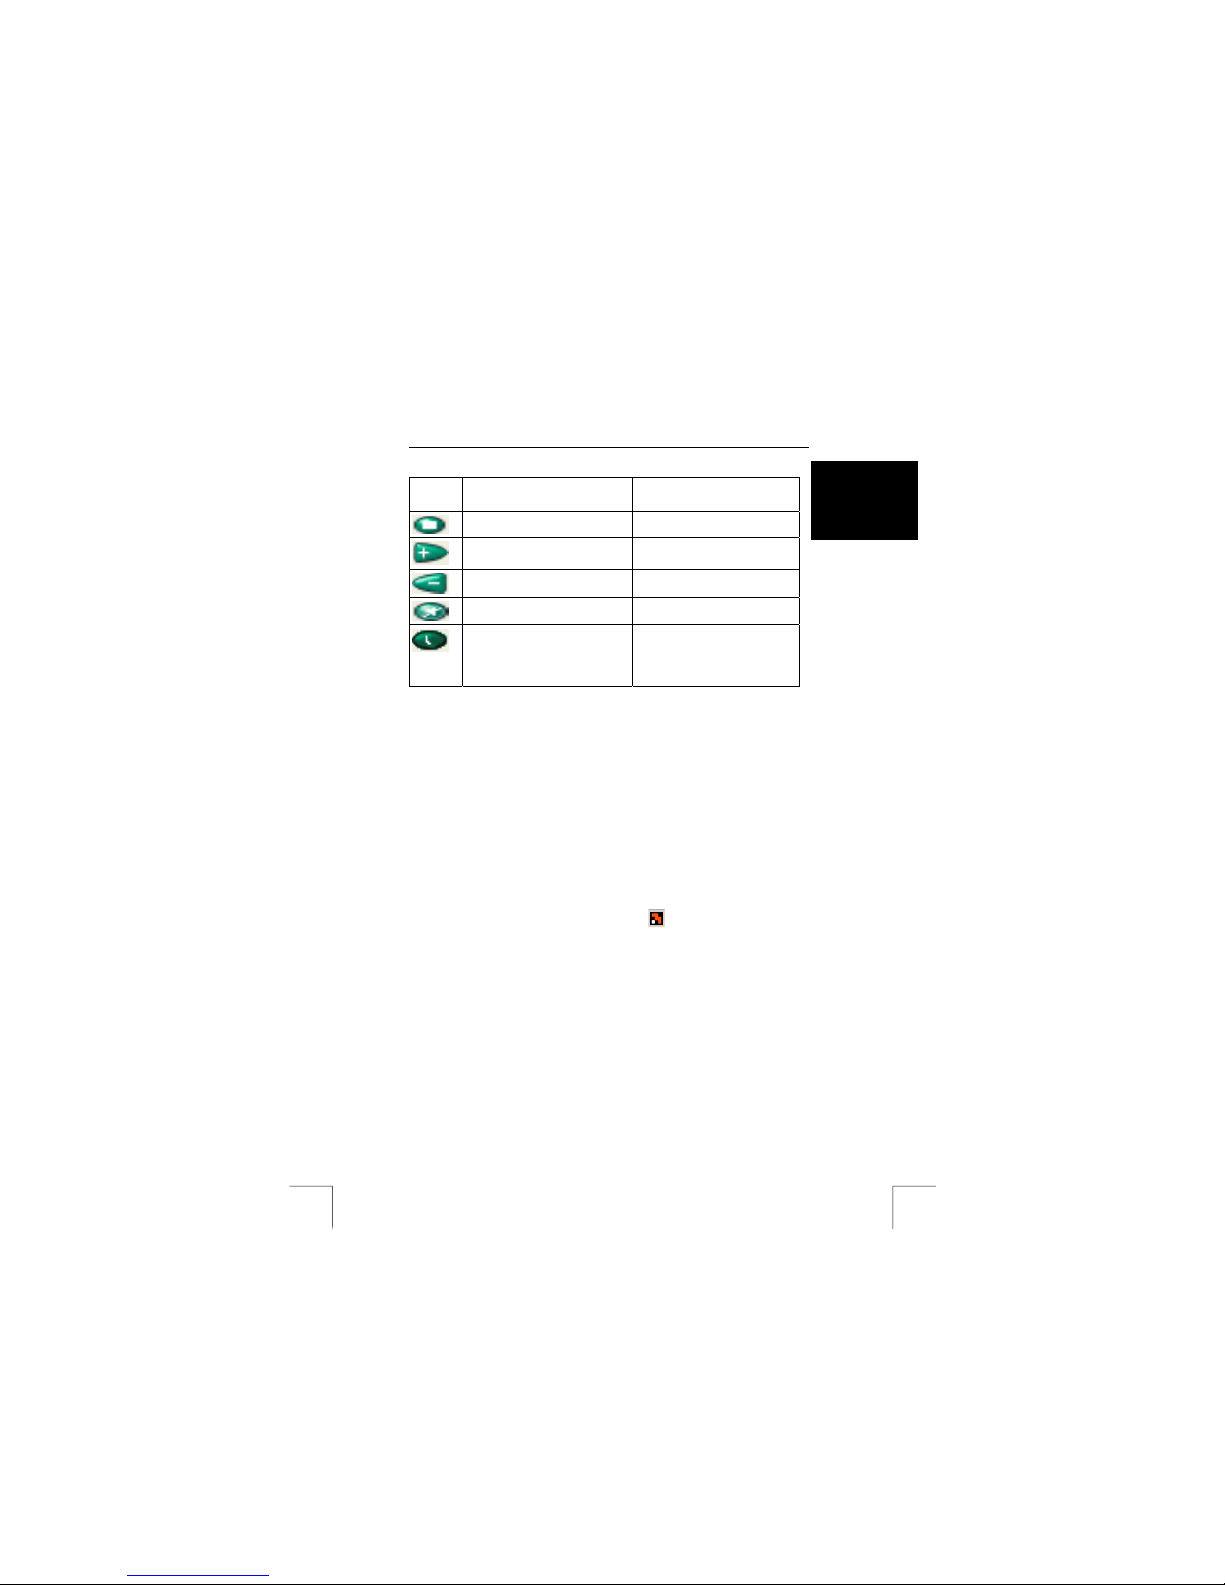
The functions for the ‘iKeyWorksOf fice’ mode and the ‘Standard functions’ mode are
given in the table below.
Shortcut
key
Standard functions IKeyWorksOffice functions
My Home key: Access to your
Internet homepage for your
favourite Internet address.
Word: Access to Microsoft Word.
E-mail key: Activates your e-mail
application.
E-mail key: Activates your e-mail
application.
Favourite key: Starts an
application for access to one or
more websites.
+ Font size: Increases the font
size.
Search key: Displays a menu of
search machines on the Internet.
- Font size: Decreases the size of
the font.
Previous track key: Plays the
previous track.
Next Doc: Opens the next
document.
Next track key: Plays the next
track.
Previous Doc: Opens the
previous document.
Play/Pause key: For playing or
pausing a CD or DVD.
Excel: Access to Microsoft Excel.
Page 7
TRUST WIRELESS OPTICAL DESKSET 310KD
7
UK
Shortcut
key
Standard functions Microsoft Office functions
Stop key: Stops playing a CD or
DVD.
Open document: For access to
documents.
Increase volume key: Increases
the volume.
Zoom in: Increases the size of the
document.
Decrease volume key: Decreases
the volume.
Zoom out: Decreases the size of
the document.
Suppression key: Mutes the
volume.
My documents: For access to the
My Documents function.
Sleep key: For access to the Shut
Down Windows dialogue window,
in which you can place you
computer in the sleep mode or can
close windows.
Office Tools: Displays the Office
tools.
Table 1: Button functions
6.3.2 Overlay
Two overlays are included with the keyboard. These can be used to specify the
functions of the buttons, depending on whether the iKeyWork sOffice’ mode or
‘Standard mode’ has been selected. See chapter 6.1 for more information concer ning
the layout which can be used for a certain mode.
6.3.3 Pen holder
There is a hole in the top right-hand side of the keyboard which can be used as a pen
holder.
6.4 Mouse
6.4.1 Battery status
There are two ways to check the batteries in the mouse.
Either:
Right-click on the Trust icon in the taskbar.
A menu will appear. Select “Check RF mouse status”.
Figure 9 will appear. The battery status can be viewed in this window. 100% means
that the batteries are full and 0% means that the batteries are empty.
Or:
There is a red indicator behind transparent plastic on the left-hand side of the m ouse.
If this indicator flashes quickly, then the batteries are low. The batt eries then need
recharging (see chapter 6.4.2).
6.4.2 Recharging
1. Connect the USB recharge cable to your computer’s USB port.
2. Connect the other end to the recharge connection on the front of the m ouse.
3. The red indicator on the left-hand side of the mouse will flash slowly. This
means that the batteries are being recharged.
4. The batteries are full once the red indicator remains lit.
5. It takes approximately 2½ hours to recharge the batteries.
Page 8

TRUST WIRELESS OPTICAL DESKSET 310KD
8
6.4.3 Deskclip
The plastic deskclip can be used so that you do not loose the USB recharge cable
behind your desk when it is not being used. Stick the deskclip to your table so that
the plug can hang behind the clip when the cable is not used.
7 Troubleshooting
Method
1. Read the solutions given below.
2. Check for up-to-date FAQ’s, drivers and instruction
manuals on the Internet (www.trust.com/12749)
Problem Cause Possible solution
The software has not
been (correctly)
installed.
Remove the driver and
reinstall it (see chapter
3.4).
The multimedia
buttons do not react.
The software for your
old keyboard is still
active.
Remove the old software
(see chapter 3.4).
The keyboard layout is
not correct.
The layout has been
configured incorrectly.
Change the layout of the
keyboard using the
keyboard software (see
chapter 6.1).
No batteries have been
inserted.
Insert the batteries.
The keyboard does not
react.
The batteries are empty. Replace the batteries
Page 9

TRUST WIRELESS OPTICAL DESKSET 310KD
9
UK
Problem Cause Possible solution
The cable has not been
connected correctly.
Connect the cable
correctly.
The distance between the
wireless receiver and the
keyboard is too great.
Place the keyboard
closer to the wireless
receiver.
The keyboard does not
react.
Another device close by
uses the same frequency
as the keyboard.
Place the keyboard
closer to the wireless
receiver.
The mouse has not been
connected or has not been
connected correctly.
Connect the wireless
receiver correctly to
the PS/2 port and
restart your computer.
No batteries have been
inserted.
Insert the batteries.
The batteries are empty or
are almost empty.
Use the recharge
cable to recharge the
batteries in the mouse.
Change the channel
(see chapter 3.2).
Another device close by
uses the same frequency
as the mouse.
Place the mouse
closer to the wireless
receiver.
The mouse is used on a
surface which is too shiny.
Use the mouse on a
different surface.
The mouse arrow on
the monitor screen
does not move or
moves erratically.
The distance between the
wireless receiver and the
mouse is too great.
Place the mouse
closer to the wireless
receiver.
Windows displays an
error message
concerning the
keyboard or mouse
when the computer is
started.
The mouse has not been
connected or has not been
connected correctly.
Connect the mouse
correctly and restart
the computer.
The scroll function
does not work.
The software for your
previous mouse is still
active.
Remove the software
for your previous
mouse before installing
the Trust software (see
chapter 3.4).
Page 10

TRUST WIRELESS OPTICAL DESKSET 310KD
10
Problem Cause Possible solution
The software has not been
installed.
Install the mouse
software.
The software has not been
configured correctly.
Configure the software
correctly.
The scroll function
does not work.
The application is not fully
compatible with Windows.
Use an application that
is compatible with
Windows.
If you still have problems after trying these solutions, please contact one of the T rust
Customer Care Centers. You can find more information at the back of this instruction
manual. Please have the following information available:
• The article number. This is 12749(US); 12750(FR); 12751(IT); 12752( GM);
12753(UK); 12754(SP).
• A good description of what does not work.
• A good description of when the problem occurs.
Warranty conditions
- Our products have a two-year manufactur er's warranty which is effective from
the date of purchase.
- If there is a f ault, return the product to your dealer and include an explanation
of the fault, the proof of purchase and all the accessories.
- During the warranty period, you will receive a similar model, if one is available.
If no similar product is available, your product will be repaired.
- Please contact our help desk f or missing components, such as the instruction
manual, software or other components.
- The warranty becomes invalid if the product is opened, if there is mechanical
damage, if the product has been misused, if alterations have been made to
the product, if the product has been repaired by a third party, in the case of
negligence or if the product has been used for a purpose other than that
originally intended.
- Excluded from the warranty:
• Damage caused by accidents or disasters, such as fire, flood, earthquakes,
war, vandalism or theft.
• Incompatibility with other hardware/software which is not stated in the
minimum system requirements.
• Accessories, such as batteries, fuses (if applicable).
- Under no circumstances will the manuf acturer be held responsible for any
incidental or consequential damage, including the loss of income or other
commercial losses resulting from the use of this product.
 Loading...