

Page 1
SPEEDSHARE TURBO PRO WIRELESS PCI ADAPTER
User’s manual
Version 2.0
UK
L I F E I S M O R E ! T R U S T U S T R U S T . C O M
L I F E I S M O R E ! T R U S T U S T R U S T . C O M
Page 2

SPEEDSHARE TURBO PRO WIRELESS PCI ADAPTER
Thank you for your purchase. Register your product via our Inter net site at
www.trust.com/register, so that you will be eligible for optimal guarantee and service support.
You will also be automatically informed of the development of your and other Trust products.
UK
L I F E I S M O R E ! T R U S T U S T R U S T . C O M
Page 3
SPEEDSHARE TURBO PRO WIRELESS PCI ADAPTER
Fig. 1 Fig. 2
Fig. 3 Fig. 4
L I F E I S M O R E ! T R U S T U S T R U S T . C O M
Fig. 5 Fig. 6
Page 4
SPEEDSHARE TURBO PRO WIRELESS PCI ADAPTER
Fig. 7 Fig. 8
Fig. 10
Fig. 9a Fig.9b
Fig. 12 Fig. 11 Fig. 13
UK
IT
NL
PT
L I F E I S M O R E ! T R U S T U S T R U S T . C O M
Page 5

SPEEDSHARE TURBO PRO W IRELESS PCI ADAPTER
Instructions when usin g for the first time Chap ter
Installation (5)
1.
Checking after installation (6)
2.
Connecting to network (7)
3.
1 Introduction
This instruction manual is for users of the TRUST SPEEDSHARE TURBO PRO
WIRELESS PCI ADAPTER. This PCI adapter allows you to connect your PC to
WIRELESS PCI ADAPTER. This PCI adapter allows you to connect your PC to
wireless networks working according to the 802.11b and 802.11g standard. In
wireless networks working according to the 802.11b and 802.11g standard. In
addition, performance enhancement modes are available for speeds up to 108Mpbs.
addition, performance enhancement modes are available for speeds up to 108Mpbs.
2 Safety 2 Safety
Carefully read the following instructions before use. Carefully read the following instructions before use.
Turn the computer off and remove the plug from the plug socket before
Turn the computer off and remove the plug from the plug socket before
−
−
opening the computer.
opening the computer.
Make sure the components you wish to add are compatible with your
Make sure the components you wish to add are compatible with your
−
−
computer system.
computer system.
Always hold the TRUST SPEEDSHARE TURBO PRO WIRELESS PCI
Always hold the TRUST SPEEDSHARE TURBO PRO WIRELESS PCI
−
−
ADAPTER by the edges to prevent damage caused by static electricity.
ADAPTER by the edges to prevent damage caused by static electricity.
Nowadays, there are an increasing number of wireless products (video, audio,
Nowadays, there are an increasing number of wireless products (video, audio,
−
−
convenience, computer, etc.) which work in the same frequency range as this
convenience, computer, etc.) which work in the same frequency range as this
device. It may, therefore, be possible that the functionality of this product is
device. It may, therefore, be possible that the functionality of this product is
limited by or is limiting for other wireless products. This can only be avoided
limited by or is limiting for other wireless products. This can only be avoided
by paying attention to the distance between products and, where possible, by
by paying attention to the distance between products and, where possible, by
changing channels.
changing channels.
Be careful when using wireless devices if you have a pacemaker or are
Be careful when using wireless devices if you have a pacemaker or are
−
−
dependent on other life-saving, sensitive electronic equipment, because this
dependent on other life-saving, sensitive electronic equipment, because this
product transmits radio signals.
product transmits radio signals.
3 Approval 3 Approval
0560
This device meets the essential requirements and other relevant conditions of
−
the applicable European directives. The Declaration of Conformity (DoC) is
available at www.trust.c om/ce/13645
This wireless device works at a frequency of 2400 ~ 2483.5 MHz in the ISM
−
band. It meets the essential requirements and other relevant conditions of
R&TTE Directive 1999/5/EC and can be used in the following EU countries:
United Kingdom, Germany, Belgium, France, Spain, Portugal, Italy,
Switzerland, Austria, Denmark, Norway, Sweden, Finland, the Netherlands,
Iceland, Ireland, Greece and Luxembourg.
The following limitations are applicable for certain countries.
−
France
: Only channels 10 to 13 (2446.5 MHz ~ 2483.5 MHz) may be used
without restrictions, the use of the additional channels are restricted in some
area’s. Check the regulations with your local government.
This product is designed for indoor use only. Outdoor use might violate local
−
regulations.
There may be limitations for the use of this device outside of the EU. If this
−
device is used outside of the EU, check whether this device meets local
regulations. Frequency: 2400 ~ 2483 MHz, Power: 100mW (+20dBm) max.
Do not replace or modify the antenna, this might violate local regulations.
−
UK
1
Page 6

TRUST SPEEDSHARE TURBO PRO W IRELESS PCI ADAPTER
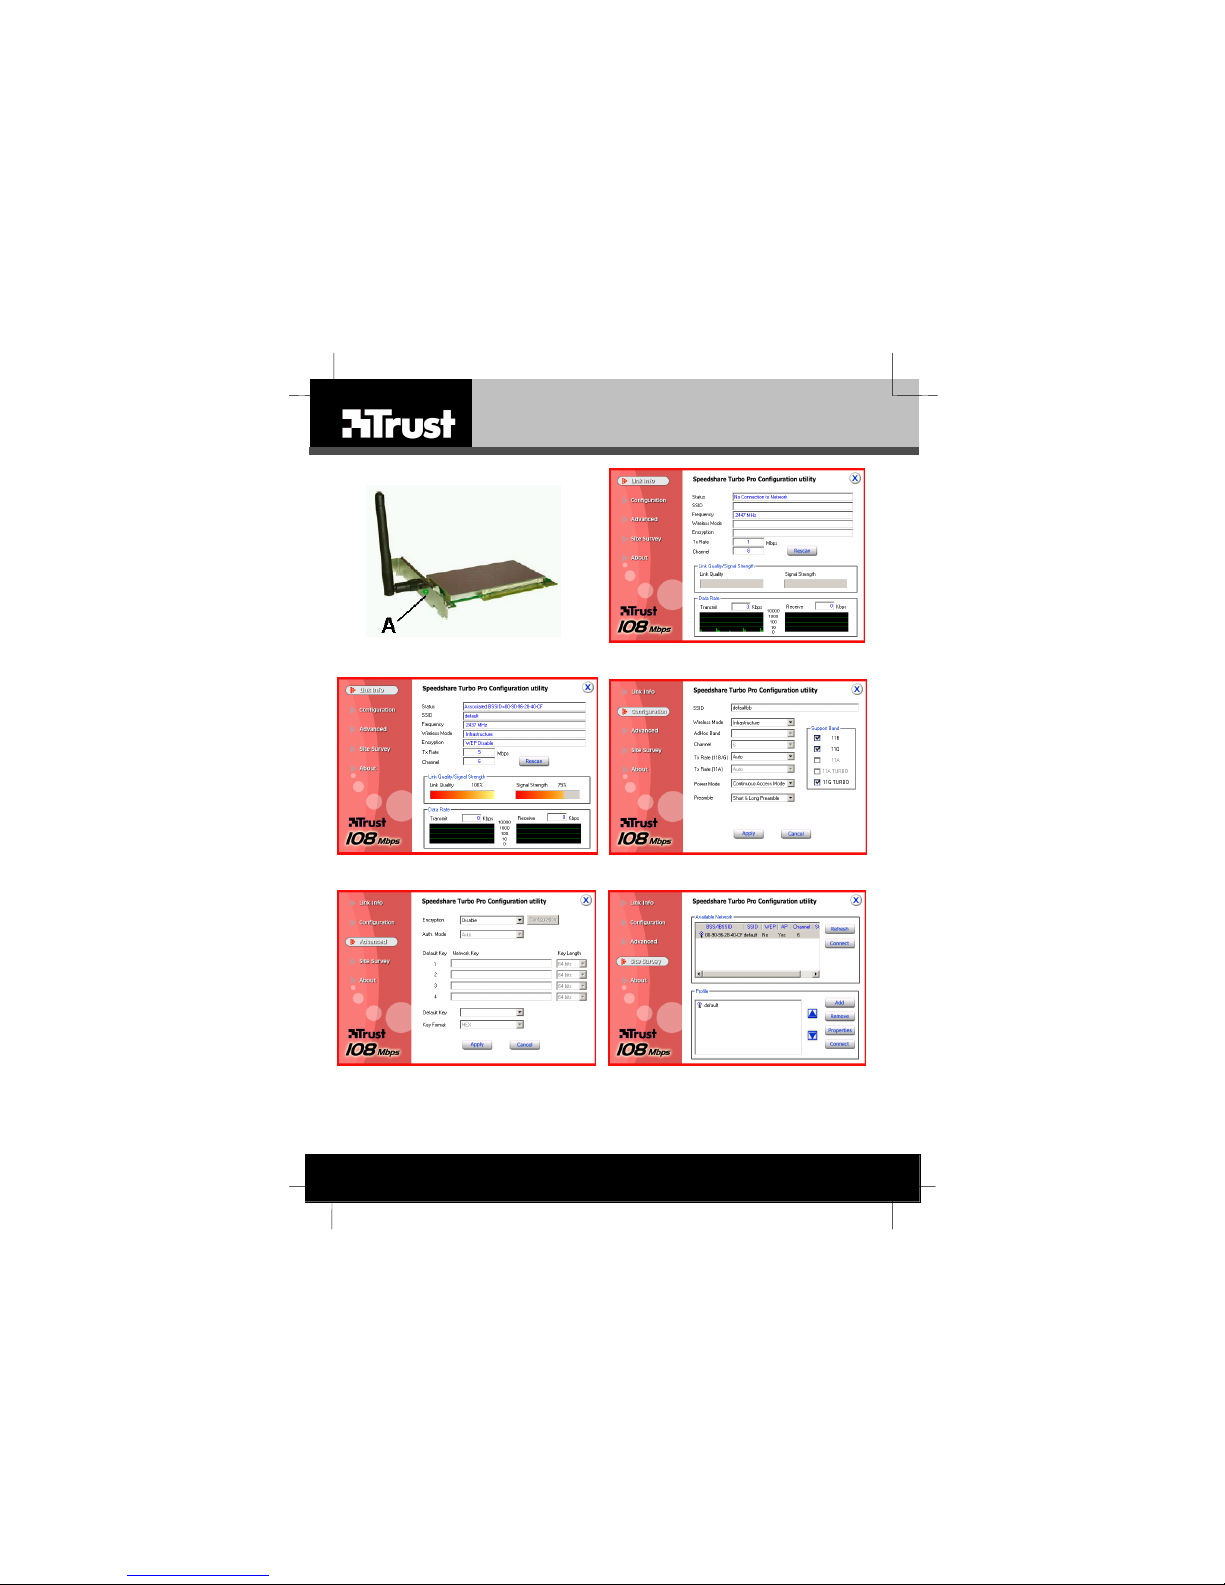
4 LED functions
The Trust Speedshare Turbo Pro Wireless PCI adapter has one LED, as shown in
figure 1 on the foldout page.
LED: Blinks when the card is active and ready for data.
5 Installation
5.1 Uninstalling old drivers and devices
The most common cause of faults during installation is the presence of a driver for a
similar, old device. The best solution is to first remove all drivers related to old
devices before installing the new driver. Make sure you only delete programs for old,
unused (similar) devices.
1. Click on ‘Start – Settings – Control Panel’ and double-click on the ‘Add/Remove
Programs’ icon.
2. Find all the programs for similar, old devices and remove these by clicking on the
‘Add/Remove’ button.
3. Restart the computer.
5.2 Installation in Windows 98 / Windows M E / Windows
Follow the instructions from the Quick Installation Guide to install the TRUST
Speedshare Turbo Pro Wireless PCI adapter.
Note: Have your Windows CD-ROM available during the installation. When
Note: In a very limited number of cases, W indows 98 or Me hangs during
Note: Windows may display a message saying than the driver has not been
6 Checking after the installation
After installing the device and the programs, the following items are installed on your
computer and can be checked.
Taskbar
– Icon in the right-hand corner, such as
Note: The icon shown above can be displayed in three different colours: green,
2000 / Windows XP
Widows prompt you if you want to keep an already installed newer file,
answer ‘Yes’.
installation of drivers for new network adapters. When your computer
does not respond within a few minutes, restart, go to the network
properties and remove the adapter from the list. Restart and try to install
again. This is not a problem in the product or its drivers, but is caused by
Windows.
signed. Since this does not affect the installation or functionality of the
device, click on ‘Continue Anyway’.
yellow and white.
Chapter 7.2.1 explains the meaning of these different colours.
2
Page 7

SPEEDSHARE TURBO PRO W IRELESS PCI ADAPTER
‘Start – Settings – Control Panel’. Double-click on the ‘System’ icon and select the
‘Device Manager’ tab.
- Network Adapters – Trust Speedshare Turbo Pro Wireless LAN ADAPTER
‘Start – Settings – Control Panel’ and then double-click on the ‘Add/Remove
Programs’ icon.
- Trust Speedshare Turbo Pro Wireless LAN ADAPTER Utility and Driver
Start - Programs - Trust - …
- Trust Speedshare Turbo Pro Wireless LAN ADAPTER Utility
- Uninstall
Note: The information given above will vary when the installation was altered
(for example, not everything has been installed or locations other than
the default locations have been selected).
Note: Deviations may also occur as a result of using new drivers available on
the Internet.
Note: The location or name may vary in the ‘Control Panel’ for different
operating systems.
7 Connecting to network
7.1 Types of wireless networks
Two different types of network are possible for a wireless LAN, namely Ad Hoc and
infrastructure. As implied by the names, the first is intended for quickly making a
connection between two or more systems. The second is used to replace a normal,
fixed network with a permanent connection between one computer and the rest of t he
network.
Ad Hoc
Point to point connection between two computers directly. There is no central point
(access point) to control the wireless traffic. An ad-hoc network is easy to set up, but
only suitable for a limited number of users.
Infrastructure
All users need to connect trough a central point (access point). This network is more
complex to set up and there is an access point or wireless router is needed. However,
such a network is better suited for larger amounts of users and easier to manage.
The maximum working distance of an infrastructur e network is often longer.
7.2 Connecting for Windows 98SE, Me, 2000
Note: Read chapter 7.3 first when using Windows XP.
7.2.1 Status icon.
As explained in chapter 6, an icon will be added to the right-hand side of the task bar.
This icon can appear in three different colours: green, yellow and white.
See the table below for the meaning of these different colours.
UK
3
Page 8

TRUST SPEEDSHARE TURBO PRO W IRELESS PCI ADAPTER
Colour Status
Green
Yellow
White
White
Table 1: Network status indicator
Click on the icon
when there is no connection. During connection, it looks like figure 3. The window
that appears contains information about the PCI adapter and the connections made
with the network. The table below explains the terms used in figure 2 and 3.
Item Description
Status Indicates which device the PCI adapter has a wireless
SSID The name of the network with which the connection has
Frequency The central frequency used at the moment. Depends on the
Wireless Mode For the currently active connection: Ad-hoc (connected with
Encryption Indicates what encryption is used.
Tx Rate Connection speed of the network. This speed is chosen
Channel The channel which is used by the product.
Link Quality Quality of the connection. Depends on the signal streng th
Signal Strength Signal strength. Indicator only works in Infrastructure
Data rate Transmit The current speed (in kbits/sec) of data being sent.
Date rate Receive The current speed (in kbits/sec) of data being received.
Table 2: PCI adapter settings
Connection with the network.
Poor connection with the network. Low signal
or much interference.
No connection.
Driver not installed, product not present or
driver disabled in Windows.
on the right-hand side of the taskbar. Fig ure 2 will appear
connection with.
been made.
channel number.
other computer) or Infrastructure (connected with Access
Point)
dynamically, depending on the demand for bandwidth and
the signal strength.
and if there are other signals in the area. Indicator only
works in Infrastructure networks.
networks.
4
Page 9

SPEEDSHARE TURBO PRO W IRELESS PCI ADAPTER
7.2.2 First time connect to existing network
Note: When you don’t have any wireless network yet, set up your access
When an existing wireless network is already present, you need to follow the settings
this network, otherwise the connection will not work. Follow these steps:
1. Power-up the other stations and/or Access Points.
2. Open the utility by clicking the
3. In the utility screen, click on ‘SiteSurvey’ (see figure 6).
4. Press the ‘Ref resh’ button to display all the available networks.
5. W ait until the ‘Refresh’ button turns blue again.
6. Click the network item from the list you want to connect with. Be careful to
7. Click the ‘Connect’ button. A new window will be shown.
8. Check / fill in the required info (see figure 7):
9. Click ‘Apply’ to connect.
10. When the connection is made, the settings are automatically saved. The next
The settings for this connection are saved in the list of available profiles (SiteSurvey
screen). When later you connect to a dif ferent network and further on you want to
reconnect to the first network, you can click the entry with the network name from the
list and click the ‘Connect Button’ next to it. In this way, you don’t have to k ey-in the
settings again while roaming between networks.
The wireless part of the network is now completed. In order to use your new network
connection, you might need to set up additional things. See the included Internet
Sharing Guide book for more info.
When you connection does not work or you want to create a new ad-hoc net work
keep on reading.
point / wireless router or start an Ad-hoc network first .
icon.
connect to the right network. Connecting to an unknown network might
compromise the security of your computer. W hen the list is empty, check the
wireless network or set up a station as Ad-Hoc network first.
Open networks (Data Encryption tick box is open):
−
−
−
time your computer is started it will automatically try to connect to this network
again.
There is nothing to set up. Continue at step 9.
−
WEP encrypted networks:
Choose the key length (64 or 128 bits). Use same setting as
−
used in the wireless router or first Ad-Hoc station.
Type the key. Use same key as used in the wireless router or
−
first Ad-Hoc station.
Continue at step 9.
−
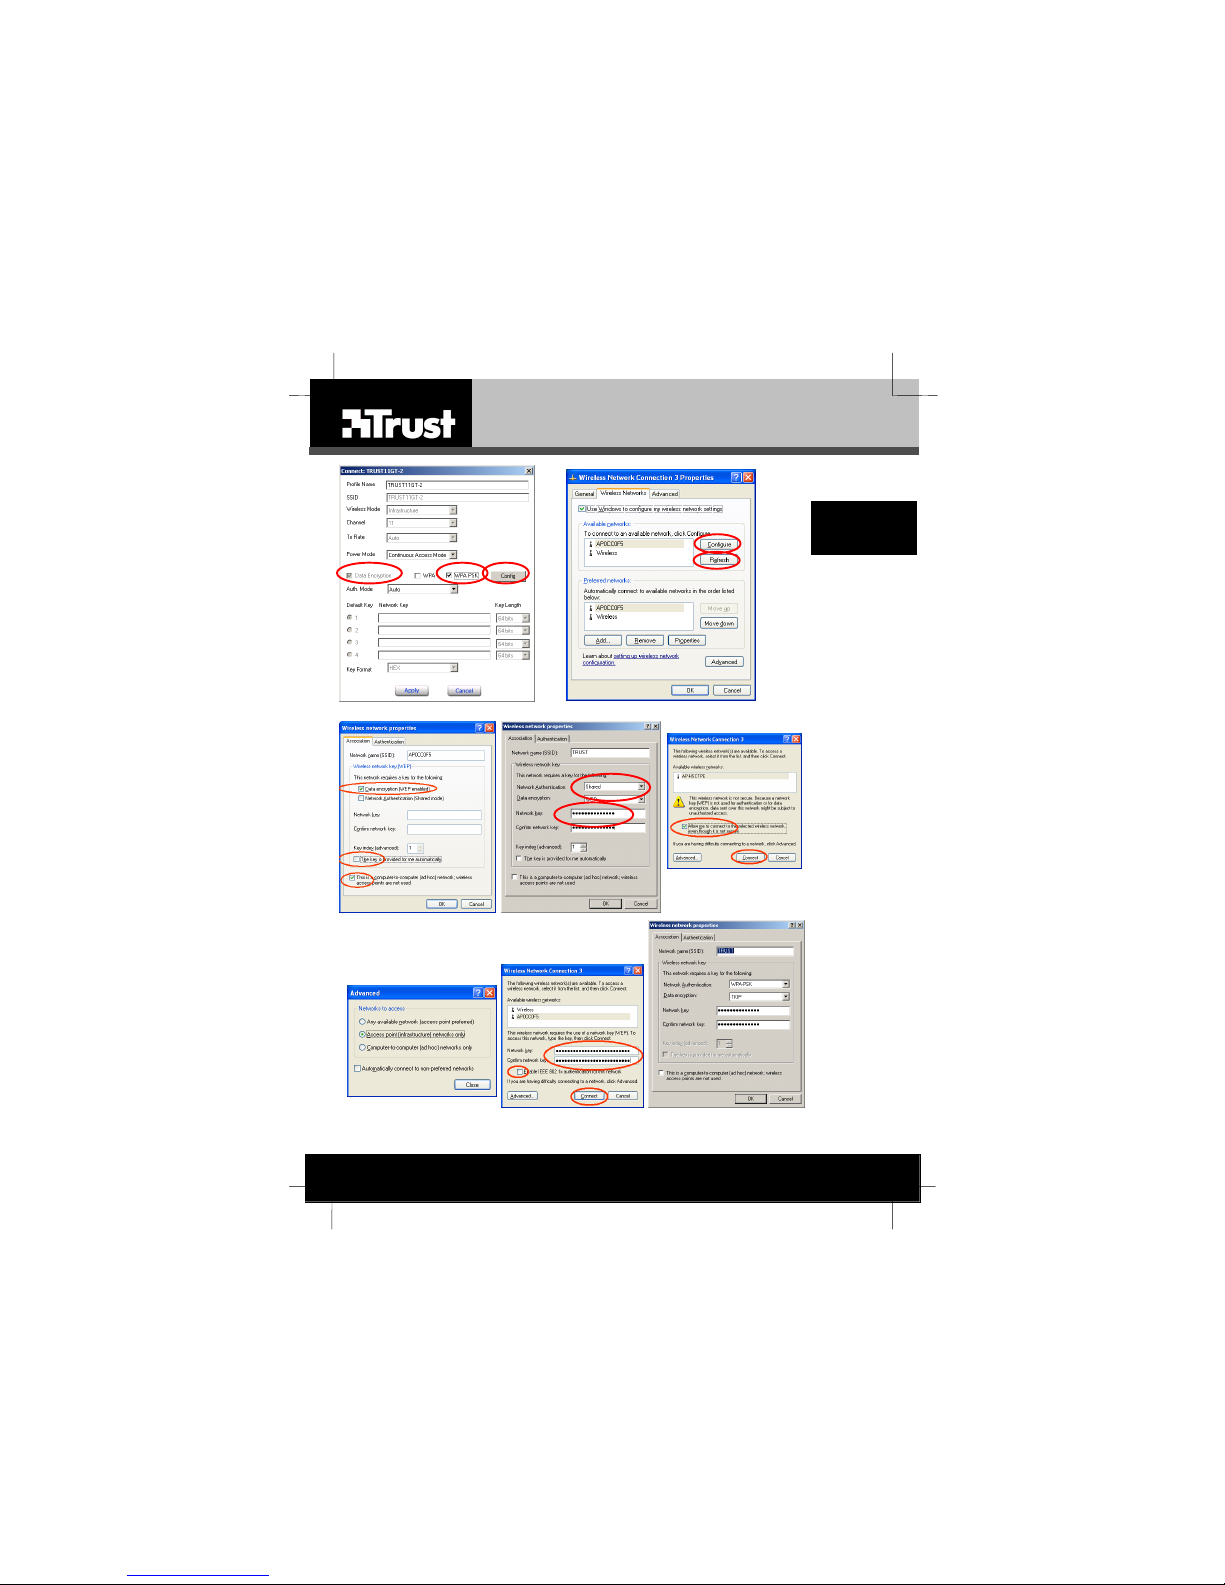
Simple WPA secured networks:
Click (select) the tick box ‘WPA-PSK’.
−
Click the ‘Config’ button.
−
In the new window, type the password. This is the same
−
password as used to set up WPA in the wireless router.
Click ‘OK’ to confirm the password.
−
UK
5
Page 10

TRUST SPEEDSHARE TURBO PRO W IRELESS PCI ADAPTER
Note: When using WEP encryption with an Access Point and the network
connection keeps flashing between connect and non-connect, the
‘Authentication’ and/or ‘Encryption’ settings are probably set wrong.
Note: W PA works only in infrastructure networks with access points or wireless
routers, not Ad-hoc. Use WEP to secure Ad-hoc networks. For small
wireless networks, use WPA-PSK, as the full version of WPA requires a
special server and specialised knowledge.
Caution: When you disable ‘encryption’, everybody with a wireless card can
connect to your PC. Therefore, it’s strongly recommended use at least
WEP encryption.
When setting up a non-standard wireless connection or you are the first station
in an Ad-Hoc network:
1. Click on ‘Configuration’ to configure the PCI adapter for the network. Figure 4
will appear.
2. Enter the following information:
SSID: The name of the network with which you wish to make a
Wireless mode: T he type of network that you wish to use (Ad Hoc /
Infrastructure).
Ad-Hoc band: For Ad-Hoc networks only: Choose 11g for the highest
Channel: The channel for Ad-Hoc mode. W hen the system is set
Tx Rate(11B/G): The speed you wish to use. It’s recommended t o set it to
Tx Rate(11A): This setting is not in use as this product does not
Power mode: Options for power saving. Is only useful for battery
Preamble: Length of the data packets. Leave the default set ting
Support band: Restrict the type of connections the card will accept. If
For the first station in Ad-Hoc networks, these additional steps are needed:
1. Set the encryption needed. See t he next chapter. Recommended is to use
WEP for more security. Remember that WPA cannot be used for Ad-Hoc
networks.
6
connection. If you are using Ad-Hoc mode and this is
the first station to be installed, this will become the name
of your network.
speed or 11b when connection is needed with older 11b
(11 Mbits) products. When only Trust Turbo wireless
cards will be used, you can double the throughput by
using the 11g Turbo mode. In turbo mode, you can only
use channel 6.
to Ad-Hoc mode, this will be the channel your wireless
network is going to use. This setting is not used when
connecting to an existing network as the channel is
chosen automatically then. Is locked to channel 6 when
using Turbo mode.
‘Auto’ and let the product choose the optimum speed.
support the 802.11a standard.
powered devices. Set to ‘Continuous Access Mode’.
here (Short & Long Preamble).
you not sure what to do, leave it in the default setting (all
connection speeds allowed). 11A cannot be selected, as
this product does not support 802.11a.
Page 11

SPEEDSHARE TURBO PRO W IRELESS PCI ADAPTER
2. Go to the ‘Link Info’ screen. Your Ad-Hoc network should show ‘Joined ….’ in
the status and your own SSID should be in the SSID field. When the card is
still searching and the status shows ‘Not connected to network’, check t he
following:
- Wait about 20 seconds, it takes some t ime for internal set up.
- Did you set the Wireless Mode to ‘Ad-Hoc’ in the Configuration
Screen?
-
Did you select an Ad-Hoc band? Recommended is to set to 11g.
- Did you fill in a SSID? When unsure what to choose, use MSHOME1.
Be careful not to choose a name already in use by another wireless
network (use SiteSurvey to check this).
-
Did you press the ‘Apply’ button to save these settings?
- Did you set the encryption to ‘Enable’ or ‘Disable’? WPA does not work
in Ad-Hoc mode. When others have trouble connecting to your
3. You need to set a fixed IP address for your computer or enable Internet
Note 1: your Ad-Hoc network will have the ‘Connect’ status and will be shown in the
list of available networks, even if nobody is connected to your computer yet.
Note 2: The indicators for signal quality and signal strength are not available in AdHoc networks.
7.2.3 Advanced menu to set up the encryption
Click on ‘Advanced’ (see figure 2 and 3). Figure 5 will appear. If you already are
connected to a wireless network, the current settings are shown here.
This screen is mostly used to set up the first computer in an ad-hoc network. When
you want to connect to an existing network, use the ‘Site Survey’ screen as this is
much easier.
The Wired Equivalent Privacy (WEP) can be configured in this window. This code
ensures that your information is sent and received securely over the network.
1. Set ‘Encryption’ to ‘enable’ to enable W EP.
2. For ‘Key Format’, set to ‘HEX’.
3. Set the ‘Auth.Mode’ to ‘Shared Authentication’.
4. For ‘Key Length’, select the number of bits you wish to use. For new
5. Enter the key under KEY 1 consisting of both numbers and the letters (A-F)
6. Set the ‘Default key’ to ‘1’.
7. Click on 'Apply' to s ave the new settings.
Note: You may receive the following error m essage: ‘WEP key 1 size
computer try to set the encryption to ‘Disable’ first to tes t.
sharing on it to make the network usable. See the Internet Sharing Guide.
networks, use 128 bits for maximum security. The product supports higher
then 128 bits, but this is not recommended as it’s outside the standard.
as the ‘Network Key’. This is a kind of password.
mistake!’ This means that you have not input enough characters.
7.3 Connecting for Windows XP
Windows XP uses an internal administrator program to control wireless connections.
In this way, products of different vendors will behave the same in Windows XP.
You can choose to use the Windows internal administrator (called Zero
Configuration) or the products included utility. The utility method allows you more
UK
7
Page 12

TRUST SPEEDSHARE TURBO PRO W IRELESS PCI ADAPTER
control over the behaviour of the card. Under XP’s Zero Configuration, the card will
use the defaults of the wireless network. When setting up the first computer in an AdHoc network, you cannot use the Turbo mode. If you still want to use Zero
Configuration, start reading at chapter 7.3.1.
To enable the utility method as described in chapter 7.2, follow these steps:
Click the
it) the option ‘Use Windows to configure m y wireless network setting’ on top of the
window and click ‘OK’. The window will disappear.
When you click the
7.2.
7.3.1 Introduction
After installation of the product, W indows XP will start searching for other wireless
stations to connect with. The connection will not yet be made, just a list of possible
connections is built.
When windows does not find any other wireless station to connect to, the network
icon with the red cross ( ) remains visible and nothing else happens.
When other wireless stations are found, Windows will prompt for user action. When
Windows is already connected to a wireless network, the icon will look like this:
(
not properly installed.
7.3.2 Setting up your own Ad-Hoc network.
Note: WPA is not available for Ad-Hoc networks, use WEP to secure.
Use this chapter when you want to start building your own Ad-Hoc (computer to
computer) wireless network. This needs to be set up for the first computer of your Adhoc network. All other computers will follow the settings made for the first computer.
When you’re building a wireless network with one or more Access Points
(Infrastructure Network), this chapter is not usef ul for you. First install the Access
Points and then follow the instructions of chapters 7.3.3 till 7. 3.6 instead.
When you want to connect to an existing Ad-Hoc network also follow the instructions
of chapters 7.3.3 till 7.3.5 instead.
Follow these steps:
1. Click the (
2. Click the ‘Advanced’ button. A window like figure 8 will be shown. When the
3. Look at the ‘Preferred Networks’ list on the lower part of the screen. This list
icon. The Windows screen opens. See figure 8. De-select (by clicking
icon again, the software will behave like descibed in chapter
). When there is completely no icon displayed, most probably the drivers are
When there is no such icon in the system tray, check if the drivers where
installed properly.
normal ‘Windows network connections’ window is shown instead, you’re
probably already connected to a wireless network. Click the ‘properties’
button. A new window will be visible. Click the ‘Wireless Networks’ tab. The
window should look like figure 8 now.
should be empty. If not, make it empty by removing the items one by one.
) icon or ( ) on the system tray. A new window will be shown.
8
Page 13

SPEEDSHARE TURBO PRO W IRELESS PCI ADAPTER
4. Click the ‘Add’ button to add a wireless connection. A window like figure 9 will
be shown.
5. Choose a word for the SSID, and add it in the ‘SSID’ field. This is the name
for your network. If you unsure what name to choose, use MSHOME1 as
name.
6. Click (activate) the ‘T his is an computer-to-computer (Ad-Hoc) network,
wireless access points are not used’ checkbox.
7. Uncheck the ‘The key is provided for me automatically’ checkbox.
8. Now you have the choice to make your network more secure or more
convenient:
- Easy but not secure -> uncheck (by clicking it) the ‘Data encryption
(WEP enabled)’ checkbox.
- Click the ‘OK’ button to close the window. The created network gives
everyone easy access to your computer in a 100 meters radius.
Or
- Less convenient, but more secure: choose a WEP key. The key can
contain any number 0-9 and in additional the letters A-F. Example
7366456EFA (64 bit key). This is the key needed to connect to your
computer. Fill in the same key in both the ‘Network Key’ and the
‘Confirm Network Key’ field. Click ‘OK’. Others need to know your key
9. Click OK on all open windows to close them and save the settings.
When your computer was connected to an existing wireless network, t his connection
will be closed. The computer is now ready to receive connections at your newly set
up Ad-Hoc network.
When others have trouble connecting to your network, cons ider to first set up a nonsecure network to test if it works and convert it later to a secure one by adding a
WEP key.
When you want to share data to others connecting t o your computer, you need to
have the ‘File and Printer Sharing’ active and give permission to share one or more
folders. In addition, you might need to create one or more extra user accounts to let
them login into your computer. Do set a password on such accounts, W EP alone is
not enough as protection.
7.3.3 Connecting to existing networ k: nothing seems to be foun d
When Windows did not find any network, try waiting for a couple of minutes. It might
take up to 2 minutes to scan for wireless stations. When windows already is
connected to a network (because it was set before), the icon will show a network
without a red cross.
When still no network found:
1. Click the (
2. Click the ‘Advanced’ button. A window like figure 8 will be shown. When the
(and install it) to access your network.
there is no such icon in the system tray, check if the drivers where inst alled
properly.
normal ‘Windows network connections’ window is shown instead, you’re
probably already connected to a wireless network. Click the ‘properties’
button. A new window will be visible. Click the ‘Wireless Networks’ tab. The
window should look like figure 8 now.
) icon on the system tray. A new window will be shown. When
UK
9
Page 14

TRUST SPEEDSHARE TURBO PRO W IRELESS PCI ADAPTER
3. Click ‘refresh’ in the window like figure 8. Windows will try to find other
stations. When nothing found, chec k if the other station is plugged in and
ready for connection. Move closer to it might help.
4. Select the wireless network f rom the list by clicking it. Be careful to connect to
the right network. Connecting to an unknown network might compromise the
security of your computer.
5. Click the ‘Configure’ button to connect to this network. A new window will be
shown. See figure 9a when you have XP version SP1 or lower. See figure 9b
for XP version SP2 or when the WPA update was installed before. W hen the
network uses WEP or WPA, enter t he key. Without the correct key t he
connection will fail.
6. Read the rest of this chapter to get more inform ation how to set up various
types of connections.
7.3.4 Connecting to existing network: no WEP is used
Connection to such a network is very straightforward after Windows detects it.
1. A prompt will be visible in the system tray. Click it. A new window with a
warning will be shown. See figure 10.
2. Click (activate) the ‘Allow me to connect….’ option. The ‘Connect’ button will
become active now.
3. Click the ‘Connect’ button. The window will disappear. After a while, Windows
will inform you the connection is active.
4. When t he connection cannot be made for some reason, the system will
prompt again (like in step 1) or keep showing a red cross trough the icon, click
the icon and click then the ‘Advanced’ button and check the settings. See also
chapter 7.3.3.
Most common reasons for failed connection:
Signal strength too low, move closer to the other station.
−
Interference. Try to connect again.
−
Network uses a non-standard set-up (like SSID broadcast disabled). Obtain
−
all information for this network from its operator and try to use the advanced
settings to add the required special setting needed. W hen all network
equipment is to be set up by you, avoid using non-standard settings as they
are far more difficult to manage / troubleshoot.
Note: You are now connected to an unsafe network. This is OK for browsing
7.3.5 Connecting to existing encrypted network (WEP)
Connection to such a network requires a key. You cannot connect without it.
1. A prompt will be visible in the system tray. Click it. A new window will be
2. Fill in the encryption (shared) key in the first line. Be sure to exactly key in all
3. Fill in the same encryption (shared) key in the 2
10
the Internet in a public place like airports, but unsafe for any ot her use.
Be sure to have ‘file and printer sharing’ switched off if you don’t want
to share your folders.
shown. See figure 11.
the characters correctly, any difference will make the connection fail.
nd
line for confirmation.
Page 15

SPEEDSHARE TURBO PRO W IRELESS PCI ADAPTER
4. Click the ‘connect ’ button. The window will disappear. After a while, Windows
will inform you the connection is active.
When the connection cannot be made for some reason, the system will prompt again
(like in step 1), use then the ‘Advanced’ button and check the settings. Most common
reasons:
Shared key typed wrongly.
−
Need to enable ‘Shared Key Access control’ in the advanced setting to make
−
the connection. In general, match the settings of both ends of the connection
closely to make it work.
Signal strength too low, move closer to the other station.
−
Interference. Try to connect again.
−
The 802.1x authentication must be usually switched off as this is only used in
−
some corporate networks.
7.3.6 Wireless Protected Access (WPA)
The Wireless Protected Access (WPA) standard is a more secure version of W EP.
When planning to use W PA, keep the following in mind:
- First test the network without WPA to know for sure all hardware is working
properly.
- WPA only works in infrastructure networks.
- WPA requires a WPA compatible access point or access point router.
- All planned network stations need to support WPA, its not recommended to
mix WPA and WEP secured computers.
- For Windows XP SP1, you need to download an update from
www.microso ft.com
need to be updated to SP1 prior to installing the W PA update. When you don’t
want to update Windows, use the utility method (see chapter 7.3)
- There are 2 versions of WPA: A corporate version, just called W PA and a
simpler home version, called WPA-PSK. Use WPA-PSK as the corporate
version requires a special authentication server in your network such as
RADIUS.
Setup:
1) The card will find the network. Click the alert balloon in the corner of the
screen. A new window like figure 11 will show.
2) Fill in the same key as used when setting up the access point.
3) Click the ‘connect’ button. The connection should be made now.
When the connection cannot be made or there cannot be any data transferred:
4) Restart Windows.
5) Open the wireless connection windows by clicking the alert in the corner of the
screen. Figure 11 will be displayed. If no alert was shown, follow the steps 1
till 5 from chapter 7.3.3. In a WPA capable Windows XP version, the screen
should look like figure 13, not figure 9a.
6) Click the ‘Advanced’ button.
7) Select ‘WPA-PSK’ as authentication.
8) Select ‘TKIP’ as data encryption.
to enable WPA. Previous versions of Windows XP first
UK
11
Page 16

TRUST SPEEDSHARE TURBO PRO W IRELESS PCI ADAPTER
9) Type the network key. This will work like a password and must be the same
key as typed when setting up the access point.
10) Click ‘OK’.
11) Wait. After a while a confirmation message will pop-up and you are
connected. When an error is shown, check the net work key and the rest of the
settings.
7.4 Using the wireless connection after successful set up
When windows informs you the connection is made, its still needed to set-up the
basic network settings to actually use the network connection.
Check the separate ‘Internet Sharing Guide’ for more det ails.
However, as Windows sets up with the most common settings , these settings are
usually correct when connecting to an Internet router and your network is ready for
use.
For an ad-hoc network (without access point or router), you might need to set the IP
address manually for every station as the normal ‘automatic’ setting will not work in
this case. Use 192.168.1.100 for the first station, 192.168.1.101 for the next and so
on.
Note that Windows XP and later are not supporting t he NETBEUI protocol anymore,
so you need to set up TCP/IP, even if you don’t want to connect to the Internet at all.
8 Connection speed and compatibility
The TRUST Speedshare Turbo Pro Wireless PCI adapter can work at speeds of 108,
54, 48, 32, 24, 18, 12 Mbps. In addition, speeds offered by the older 802.11b
standard.
This product can be combined with Trust products from t he 22M/44M series and Qtec
802.11b products, with the following limitations:
1. Ad-Hoc connections will work on 11Mbps only. Other Ad-hoc stations in the
same network will be forced into 11 Mbps as well.
2. Infrast ructure networks based on Qtec 802.11b access points will work on 11
Mbps only.
3. Infrastruct ure networks with Trust Home Wireless access points (22M/44M)
needs to be set to 11 Mbps to work.
4. W hen using a 54Mbps (802.11g) access point from the Speedshare T urbo
Pro series, both 54Mbps stations and 11Mbps stations can connect at there
own speed. However, excessive 11Mbps traffic will slow down the 54Mbps
traffic considerably. Use the 802.11g product at t he computer that will
probably generate the most traffic for best performance.
5. 108Mbps Turbo mode use 2 channels bundled t ogether. This function only
works with other Speedshare Turbo Pro products.
Note on 11g standard / 54 Mbps maximum speed:
The real speed when 2 devices using the 11g standard are connected is dynamically
controlled by the products drivers and depends on the network traffic (the speed is
set lower when there is hardly any traffic), signal strength and interf erence from
reflections (see below) and interference caused by other wireless products. As the
signal strength is important and gets lower when the signal has to travel a longer
way, a longer distance usually means lower speed.
12
Page 17

SPEEDSHARE TURBO PRO W IRELESS PCI ADAPTER
The above are partly fundamental technical limitations and partly required by
European law. The R&TTE rules do not allow (almost) idle devices to use high
bandwidth in the 2.4 GHz band.
Note on location:
Concrete floors often contain metal, which can cause interference.
Try a different location with less obstacles which can cause interference, so that there
is good communication between the devices.
9 Performance enhancement modes
When combined with other Trust wireless network products fr om the Speedshare
Turbo Pro series, there is the option to more then double t he throughput by enabling
the performance enhancement modes.
Super-G Inf rastructure networks only. When enabled, data compression is used
Turbo Both Ad-hoc and Infrastructure networks. Must be enabled in the
Turbo and Super-G can be combined for even higher performance. For existing
networks, the product automatically detects when these options are enabled in the
access point or wireless router. See the manual for these products for more
information.
Performance enhancement will be limited in areas with heavy interference and at
longer distances.
for higher throughput. Limitations: Only works in combination with
Turbo Pro series wireless routers. Performance improvement maximal
50% compared to standard 802.11g.
wireless router or the first station in the Ad-Hoc network. W hen
enabled, 2 channels are used in parallel for double throughput.
Limitations: Works only in combination with Turbo Pro series wireless
products. Channel 6 only. Transmission range might be shorter.
Performance improvement maximal double compared to standard
802.11g products.
10 Technical specifications
Approved countries United Kingdom, Germany, Belgium, France, Spain,
Radio frequencies used
(RF)
Number of channels used 13
Data security 64 + 128 bits WEP encryption, 802.1x access
Data modulation speed 108 / 54 / 48 / 36 / 24 / 18 / 12 / 11 / 5.5 / 2 / 1 Mbps
Supported Ethernet frame
type(s):
Speed v. distance in an 108Mbps 20M, 54Mbps 30M, 24Mbps 40M, 11Mbps
Portugal, Italy, Switzerland, Austria, Denmark,
Norway, Sweden, Finland, the Netherlands, Iceland,
Ireland, Greece, Luxembourg.
2400 MHz – 2483.5 MHz – Europe
2446.5 MHz – 2483.5 MHz – France (some areas)
control (via Windows XP & RADIUS Server),
Wireless Protected Access (WPA) and W PA with
PreShared Key (WPA-PSK). WPA is supported in
Windows 98, Me, 2000 and XP.
with auto fallback
IEEE 802.11b (1/2/5.5/11Mbps), IEEE 802.11g
(54Mbps), Atheros Super-G & Turbo (108 Mbps).
UK
13
Page 18

TRUST SPEEDSHARE TURBO PRO W IRELESS PCI ADAPTER
open area without
obstacles
Memory (PCI-Card) 8kbit EEPROM
Windows support Windows 98 / Windows ME / Windows 2000 /
MAC OS compatible No
Table 3: Technical specifications
11 Troubleshooting
This chapter is intended to help solve any problems you may encounter.
50M, lower then 11 Mbps till 100M
Windows XP.
11.1 It is not possible to make a connection
If the computer cannot make a connection with the server or another computer, first
check the following points.
1. Have the drivers for the Trust Speedshare Turbo Pro Wireless PCI adapter
been installed correctly? The drivers cannot be installed if the card is faulty
or has not been inserted into the slot correctly.
2. Have the settings been configured correctly?
3. Have the correct drivers been selected for the network that you wish to use?
Ask your Network Administrator for more information about t he network.
4. Have the correct values for the type of package and t he IP-address been
entered?
5. For ad-hoc networks: did you set an IP address for every station?
11.2 Cannot make a connection in Windows 98 / Windows
ME / Windows 2000 / Windows XP
Also see the instruction manual provided with Microsoft Windows for more
information.
Check the following:
1. Have the TCP/IP protocol and ‘Client for Microsoft networks’ been installed?
Check the network properties. These components are necess ary to make a
connection. If necessary, add these components by clicking on ‘Add’.
2. Do both systems have the same workgroup name? The workgroup name
must be known by the server. If necessary, change the name. Contact the
Network Administrator if you do not know the name of your workg roup. The
name of a workgroup may not be the same as another computer name in
the same network. When you are not sure what name to use, use
MSHOME as workgroup name.
11.3 Troubleshooting ‘problem – cause’ list
Method
1. Read the solutions given below.
2. Check for up-to-date FAQ’s, drivers and instruction manuals on
the Internet (www.trust.com/13645).
14
Page 19

Problem
No ‘Network
Neighborhood’
icon is displayed
on the desktop.
The adapter
cannot find a
network.
The other
computers are not
visible on the
network.
The network card
connects, but no
data can be
transferred.
DHCP is setup
properly in the
router, but the
wireless client
does not get an IP
address.
The connection is
slow.
SPEEDSHARE TURBO PRO W IRELESS PCI ADAPTER
Cause
The drivers have not been
(correctly) installed.
The network protocols
have not been installed
correctly.
The wrong network name
has been chosen in the
Utility program.
The wrong type of network
has been selected (for
example, Ad Hoc instead
of infrastructure).
There is a lot of
interference between the
wireless devices due to
(metal) objects affecting
the radio signal.
No stations or printers
have been shared with
other computers in the
network.
The network card or USB
adapter has not logged
onto the network correctly.
The PC workgroup name
is not the same as the
workgroup name for the
other computers in the
network.
The product is faulty. Return the device to your
The Access Point cable
has not been connected or
has not been connected
correctly.
Encryption / authentication
set up wrongly, password
wrong or WEP/WPA key
wrong.
Encryption / authentication
set up wrongly, password
wrong or WEP/WPA key
wrong.
Interference from other
equipment using the
2.4GHz band.
Possible solution
Reinstall the drivers.
See the Internet Sharing
Guide.
Give the correct network
name (SSID) in the program
(see chapter 7.2).
Select a different type of
network (see chapter 7).
Try a different location with
less obstacles which can
cause interference, so that
there is good communication
between both devices.
Share at least 1 station or 1
printer to make the computer
visible in the network.
Wait approximately 20
seconds and try again.
Change the workgroup in the
‘Network properties’.
dealer.
Set up the Access Point
correctly. See the instruction
manual provided.
Make sure to match the same
settings on both sides of the
connection.
Make sure to match the same
settings on both sides of the
connection.
Decrease the distance, move
to a different location.
UK
15
Page 20

TRUST SPEEDSHARE TURBO PRO W IRELESS PCI ADAPTER
Problem
Turbo mode is not
working or very
slow.
The problem is not
listed here.
Table 4: Troubleshooting
Check the F AQ's on th e Interne t (www.trus t.com). You can re gister you r product at
www.trust. com, so t hat you can r eceive opt imal gua rantee and service support. You
16
Cause
Other network using the
same channel.
802.11b and 802.11g
products are mixed.
A connection is made with
an 11 Mbps network or an
even slower network.
The distance between the
computer and the Access
point is too great.
Its switched off. Check the connection speed
Infrastructure network only:
there are users around
with older 802.11b
products.
Distance too great,
interference, channel
already in use.
Some or all stations have
Turbo switched off or do
not support it.
The latest FAQ’s are
available on the Internet.
In general: Wireless
networking is continuously
being developed.
Other network problems. See the Troubleshooter:
Possible solution
Infrastructure: change the
channel number in the
wireless router.
Ad-hoc: shutdown all stations
except one, change the
channel for this one and
power up the others again.
Upgrade the wireless network
to 802.11g compatible
products.
In a network with a slower
connection, the speed will
always be as fast as the
slowest link.
A greater distance reduces
the connection speed. Try to
move closer to the Access
Point to increase the
connection speed.
in the Windows network
properties. Should be
108Mbps. The utility should
report a speed in excess of
54Mpbs.
Disable 802.11b support by
enabling the ‘802.11g only’
mode in the wireless router.
Move around for better
reception.
Check if all products are
supporting the Turbo Mode
and this is enabled in all of
them.
See www.trus t.com/13645 f or
FAQ’s and other product
information.
Check frequently for updates.
See www.trus t.com/13645
www.trust. com> Cus tomer
Care > Troubleshooters >
Network.
Page 21

SPEEDSHARE TURBO PRO W IRELESS PCI ADAPTER
will be automatically informed of developments to your product and other Trust
products.
If you still have problems after trying these solutions, please contact one of the Trust
Customer Care Centers. Please have the following information available:
The item number. This is 13645.
•
A good description of what does not work.
•
A good description of when the problem occurs.
•
Utility and Driver version number of the software (use the About button in the
•
Utility screen to read this).
UK
17
Page 22

TRUST SPEEDSHARE TURBO PRO W IRELESS PCI ADAPTER
12 Warranty conditions
1. Our products have a two-year manufacturer's warranty which is ef fective from
the date of purchase.
2. If there is a fault, ret urn the product to your dealer and include an explanation
of the fault, the proof of purchase and all the accessories.
3. During the warranty period, you will receive a similar model, if one is available.
If no similar product is available, your product will be repaired.
4. Please contact our help desk for missing components, such as the instruction
manual, software or other components.
5. The warranty becomes invalid if the product has been opened, if there is
mechanical damage, if the product has been misused, if alterations have been
made to the product, if the product has been repaired by a third party, in the
case of negligence or if the product has been used for a purpose other than
that originally intended.
6. Excluded from the warranty:
7. Under no circumstances will the manuf acturer be held responsible for any
Damage caused by accidents or disasters, such as fire, flood,
−
earthquakes, war, vandalism or theft.
Incompatibility with other hardware/software which is not stated in the
−
minimum system requirements.
Accessories, such as batteries, fuses (if applicable).
−
incidental or consequential damage, including the loss of income or other
commercial losses resulting from the use of this product.
18
Page 23

CUSTOMER CARE CENTERS
24 HOURS free service: www.trust.com
Residents in the UK and Ireland should contact:
Mon - Fri
From 8:00 - 16:00
I residenti in Italia possono contattare:
lun - ven
9:00 - 13:00 /
14:00 -18:00
Les habitants de la Franc e et de l’Afrique du Nord peuvent contac ter :
Lundi-vendredi
De 9:00 à 17:00
Kontaktadresse für Einwohner Deutschlands:
Mo – Fr
9:00 - 17:00
Los habitantes de Espa ña pueden ponerse en con tacto con:
lun – viernes
De las 9:00 a las
17:00 horas
Osoby mieszkające na terytorium Polski powinny skontaktować si ę:
Od pon. do pt.
w godz 09:00-17:00
Inwoners van Nederland kunnen contact opnemen met:
ma – vr
9:00 - 17:00 uur
All other countries / Alle anderen Länder / Tous les autre s pays
Tutti gli altri paesi / Todos lo s demás países / Alle andere l anden
Mon - Fri
From 9:00 - 17:00
UK Office
Phone +44-(0)845-6090036
Fax +31-(0)78-6543299
Ufficio italiano
Telefono +39-051-6635947
Fax +39-051-6635843
Bureau français
Téléphone +33-(0)825-083080
Fax +31-(0)78-6543299
Deutsche Geschäftsstelle
Telefon 0800-00TRUST (0800-0087878)
Fax +31-(0)78-6543299
Oficina española
Teléfono +34-(0)902-160937
Fax +31-(0)78-6543299
Biuro w Polska
Tel +48-(0)22-8739812
Fax +31-(0)78-6543299
Kantoor Nederland
Telefoon 0800-BELTRUST (0800-23587878)
Fax +31-(0)78-6543299
European Head Office
Phone +31-(0)78-6549999
Fax +31-(0)78-6543299
L I F E I S M O R E ! T R U S T U S T R U S T . C O M
 Loading...