

Page 1
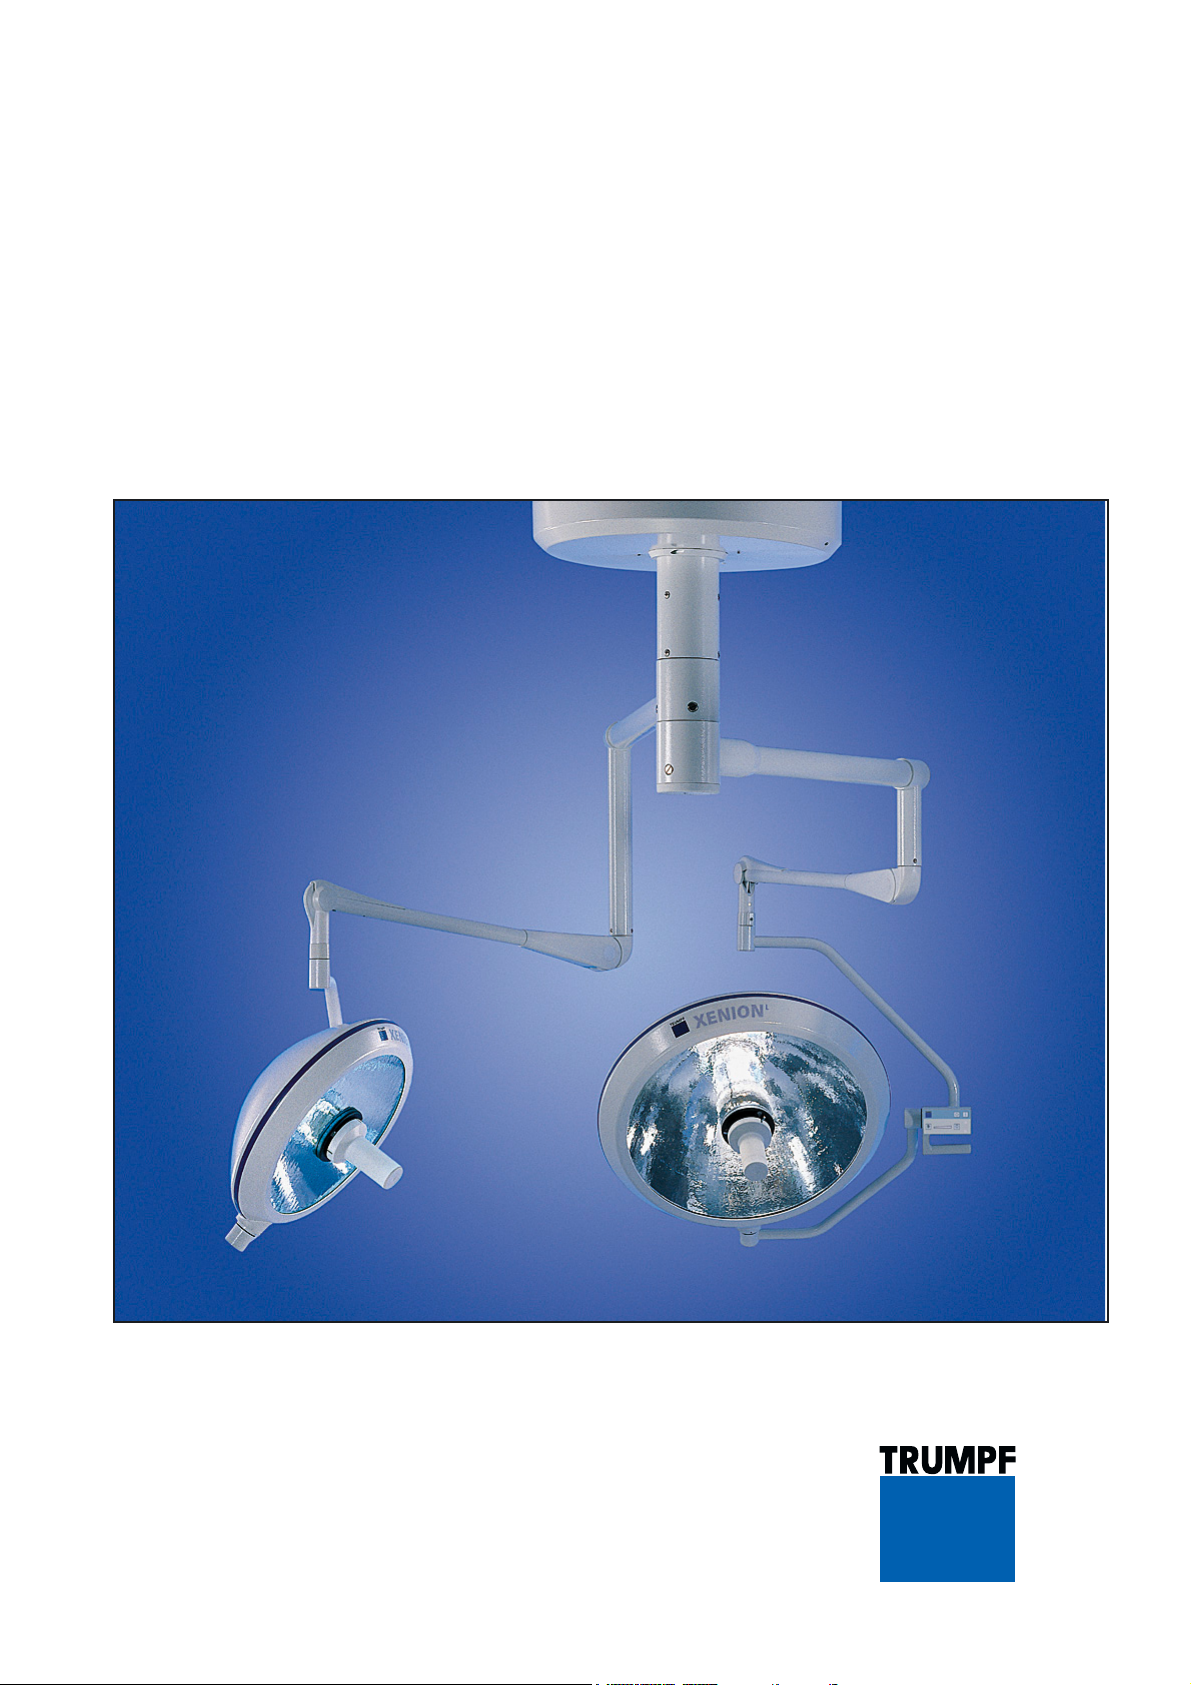
XENION® HELION® Surgical Lighting System
Service Manual
Page 2

To the Service technician,
Please read through this service manual with great care and comply with the safety information and requirements for servicing.
CE markingCE marking
CE marking
CE markingCE marking
This item of equipment is a Class I medical device as defined by
the European Medical Device Directive (MDD) 93/42/EEC, June
1993, Appendix IX.
Conformity
The manufacturer declares that this product conforms to the fundamental requirements according to MDD Appendix I and documents this by means of the CE marking.
What equipment forms the subject of this service manual?What equipment forms the subject of this service manual?
What equipment forms the subject of this service manual?
What equipment forms the subject of this service manual?What equipment forms the subject of this service manual?
The surgical lighting system with the following variants:
• 1 to 4-fold suspension with the following types of lamp:
HELION
®
with halogen lamp:
• HELION S; HELION M/M+; HELION L/L+.
XENION
®
with metal vapour lamp:
• XENION M/M+; XENION L/L+.
And the following optional equipment:
• TFT flat screens 15
“ and 19“,
• HELION M/M+; L/L+; XENION M+ with fixed focus camera.
• TruVidia camera system.
TT
echnical Customer Service is at your disposal,echnical Customer Service is at your disposal,
T
echnical Customer Service is at your disposal,
TT
echnical Customer Service is at your disposal,echnical Customer Service is at your disposal,
• if you have any questions on disassembly, repairs or settings,
or
• if you would like to re-order spare parts.
2
Sales
Service
Visit us on the Internet
How to contact usHow to contact us
How to contact us
How to contact usHow to contact us
• TRUMPF KREUZER Medizin Systeme GmbH + Co. KG
• Benzstrasse 26
• 82178 Puchheim, Germany
• Telephone: +49 / (0)89 / 8 09 07 - 0
• Fax: +49 / (0)89 / 8 09 07 - 2 22
• Telephone: +49 / (0) 180 / 2 25 41 35
• Fax: +49 / (0) 36 71 / 58 61 75
© TRUMPF KREUZER, 2004
• Edition: 03/2005, Version 1 (15.03.2005)
www.Trumpf-med.com
7200791 Service Manual for the HELION® XENION® Surgical Lighting System GB
Page 3

Notes relating to this documentation
Copyright
We reserve the right to
make changes
Copyrights
Translations
Trademarks
• The information contained in this service manual and parts
thereof are the intellectual property of TRUMPF KREUZER
Medizin Systeme GmbH + Co. KG and is protected by national and international copyright and other laws for the protection of intellectual property.
• Any duplication, reproduction, translation, microfilming storage - in either electronic or magnetic form - processing as
electronically or magnetically stored data, copying or distribution of these documents and/or the information contained
herein or parts thereof without the prior written approval of
TRUMPF KREUZER Medizin Systeme GmbH + Co. KG is hereby
strictly prohibited.
TRUMPF KREUZER Medizin Systeme GmbH + Co. KG shall
assume no liability whatsoever on the basis of, or in association with, the use of said information prohibited in this manner
by any person or company.
• TRUMPF KREUZER Medizin Systeme GmbH + Co. KG reserves
the right to amend, delete or modify in any other manner all
information contained herein at any time and on any grounds
without prior notice.
We are constantly engaged on the further development of our
products and reserve the right to make changes to the scope
of supply in terms of design, equipment or technology.
• TRUMPF KREUZER Medizin Systeme GmbH + Co. KG explicitly reserves all rights under the copyright laws.
• The German-language version of this service manual shall be
binding as regards translations into foreign languages.
• The HELION
®
and XENION® lamps are registered trademarks
of TRUMPF KREUZER Medizin Systeme GmbH + Co. KG.
• All trademarks mentioned in this service manual are the sole
property of the respective manufacturers.
7200791 Service Manual for the HELION® XENION® Surgical Lighting System GB 3
Page 4

Contents
11
Important Information for the Service TImportant Information for the Service T
1
Important Information for the Service T
11
Important Information for the Service TImportant Information for the Service T
1.1 Information for the service technician .......................... 8
1.2 Tools and equipment required .................................... 8
1.3 Proper servicing ........................................................ 9
1.4 Warranty and liability ................................................. 9
1.5 Disposal ................................................................... 9
22
YY
our Safety is Important to Usour Safety is Important to Us
2
Y
our Safety is Important to Us
22
YY
our Safety is Important to Usour Safety is Important to Us
2.1 Symbols used in this service manual ......................... 10
2.2 Symbols on the equipment ....................................... 10
2.3 Overview of the most important safety information ..... 11
33
Observe these WObserve these W
3
Observe these W
33
Observe these WObserve these W
44
TT
able - Table - T
4
T
able - T
44
TT
able - Table - T
55
Changing the LChanging the L
5
Changing the L
55
Changing the LChanging the L
roubleshooting and Proubleshooting and P
roubleshooting and P
roubleshooting and Proubleshooting and P
ork Rork R
ulesules
ork R
ules
ork Rork R
ulesules
ampamp
..........................................................................................
amp
.............................................
ampamp
..........................................................................................
..............................................................
...............................
..............................................................
........................................................................
....................................
........................................................................
ossible Rossible R
ossible R
ossible Rossible R
echnicianechnician
echnician
echnicianechnician
emediesemedies
emedies
emediesemedies
............
......
............
............
......
............
1010
10
1010
1313
13
1313
1414
14
1414
1717
17
1717
88
8
88
5.1 Changing the lamp of the HELION S ........................ 17
5.2 Changing the lamp of the HELION M/M+ / L/L+ ..... 17
5.3 Changing the lamp of the XENION M/M+ ...............18
5.4 Changing the lamp of the XENION L/L+ ..................19
66
Setting the LSetting the L
6
Setting the L
66
Setting the LSetting the L
6.1 Setting the luminous field for the
HELION M/M+ / L/L+ ........................................... 20
6.2 Setting the luminous field for the XENION M/M+ ...... 21
6.3 Setting the luminous field for the XENION L/L+ ......... 22
6.4 Setting the luminous field for the XENION M
with fixed focus camera ........................................... 22
77
RR
eplacing the Feplacing the F
7
R
eplacing the F
77
RR
eplacing the Feplacing the F
88
TT
esting the Servomotor for theesting the Servomotor for the
8
T
esting the Servomotor for the
88
TT
esting the Servomotor for theesting the Servomotor for the
HELION M/M+ L/L+HELION M/M+ L/L+
HELION M/M+ L/L+
HELION M/M+ L/L+HELION M/M+ L/L+
8.1 Testing the polarity of the servomotor ........................ 24
8.2 Testing the servomotor ............................................. 25
99
TT
esting the Input Vesting the Input V
9
T
esting the Input V
99
TT
esting the Input Vesting the Input V
uminous Fuminous F
uminous F
uminous Fuminous F
ilter Glass Assemblyilter Glass Assembly
ilter Glass Assembly
ilter Glass Assemblyilter Glass Assembly
ieldield
........................................................................
ield
....................................
ieldield
........................................................................
....................................................................................
..........................................
....................................................................................
oltagesoltages
oltages
oltagesoltages
..........................................................................
.....................................
..........................................................................
............................................
......................
............................................
2020
20
2020
2323
23
2323
2424
24
2424
2626
26
2626
4
9.1 Testing the input voltage of the transformer ............... 26
9.2 Testing the mains fuse for the building
power supply .......................................................... 26
7200791 Service Manual for the HELION® XENION® Surgical Lighting System GB
Page 5

Contents
1010
TT
esting the Electrics of the Support Systemesting the Electrics of the Support System
10
T
esting the Electrics of the Support System
1010
TT
esting the Electrics of the Support Systemesting the Electrics of the Support System
10.1 Testing the voltage at the sliding contact in the extension
arm........................................................................ 27
10.2 Replacing the sliding contact in the extension arm/
Testing the slip ring on the central column ................. 28
10.3 Dismantling the light head ....................................... 29
10.4 Testing the cables in the spring arm that lead to the
contact block
in the extension arm ................................................29
10.6 Testing the cables in the extension arm...................... 30
10.7 Replacing the cables in the extension arm .................31
10.8 Dismantling the central column ................................31
10.9 Replacing the slip ring ............................................. 32
1111
TT
esting the Electrics of theesting the Electrics of the
11
T
esting the Electrics of the
1111
TT
esting the Electrics of theesting the Electrics of the
..........................
.............
..........................
2727
27
2727
HELION M / L LHELION M / L L
HELION M / L L
HELION M / L LHELION M / L L
11.1 Testing the voltage at the focus unit .......................... 33
11.2 Testing the voltages and cables in the lamp ............... 34
1212
TT
esting the Electrics of theesting the Electrics of the
12
T
esting the Electrics of the
1212
TT
esting the Electrics of theesting the Electrics of the
HELION M+ / L+ LHELION M+ / L+ L
HELION M+ / L+ L
HELION M+ / L+ LHELION M+ / L+ L
12.1 Testing the voltage at the focus unit .......................... 36
12.2 Testing the operating voltages, fuse and
cables in the lamp ................................................... 37
12.3 When the dimmer is defective .................................. 39
1313
TT
esting the Electrics of theesting the Electrics of the
13
T
esting the Electrics of the
1313
TT
esting the Electrics of theesting the Electrics of the
XENION M/M+ / L/L+ LXENION M/M+ / L/L+ L
XENION M/M+ / L/L+ L
XENION M/M+ / L/L+ LXENION M/M+ / L/L+ L
13.1 Testing the operating voltages, fuses and
cables in the lamp ................................................... 40
13.2 When the dimmer is defective .................................. 42
1414
FF
unctional Check, Hand-unctional Check, Hand-
14
F
unctional Check, Hand-
1414
FF
unctional Check, Hand-unctional Check, Hand-
ampamp
........................................................................................
amp
............................................
ampamp
........................................................................................
ampamp
............................................................................
amp
......................................
ampamp
............................................................................
ampamp
............................................................
amp
..............................
ampamp
............................................................
Over and CustomerOver and Customer
Over and Customer
Over and CustomerOver and Customer
3333
33
3333
3636
36
3636
4040
40
4040
InstructionInstruction
Instruction
InstructionInstruction
14.1 Important Information .............................................. 43
14.2 Inspection intervals and authorised staff ....................43
14.3 Monitoring activities ................................................ 44
14.4 Testing the function of the lamps............................... 48
7200791 Service Manual for the HELION® XENION® Surgical Lighting System GB 5
......................................................................................................................
...........................................................
......................................................................................................................
4343
43
4343
Page 6

Contents
15 T15 T
15 T
15 T15 T
15.1 Data sheets ............................................................ 50
15.2 Circuit diagrams and set values ................................ 52
echnical Descriptionechnical Description
echnical Description
echnical Descriptionechnical Description
15.2.1 HELION M/M+; HELION L/L+; HELION XL+ ..52
15.2.2 XENION M/M+; XENION L/L+........................ 53
15.2.3 XENION M / M+ ............................................ 54
15.2.4 XENION L/L+ ................................................. 55
15.2.5 HELION M+; HELION L+
with wall control panel ..................................... 56
15.2.6 XENION M/M ; XENION L/L+
with wall control panel ..................................... 57
15.2.7 24 V power supply AC/DC HELION M/M+;
HELION L/L+ ; HELION XL+;
XENION M/M+; XENION L/L+........................ 58
15.2.8 TruVidia combination
with HELION M/M+; HELION L/L+; HELION XL+;
XENION M/M+; XENION L/L+ lamps ...............59
15.2.9 7-pole plug -> cardanic suspension
TruVidia 8-pole DIN socket ...............................60
15.2.10 5-pole plug TFT LCD monitor with cardanic suspen-
sion; (optional DC/DC converter) ...................... 61
15.2.11 TFT LCD monitor .............................................. 62
15.2.12 TFT LCD monitor
with monitor power supply unit .......................... 63
15.2.13 Plug connector -> TruVidia spring arm .............. 64
15.2.14 Plug connector -> spring arms
3-pole / 5-pole / 7-pole................................... 65
15.2.15 HELION M/L light head ....................................66
15.2.16 HELION M/L light head
with fixed focus camera .................................... 67
15.2.17 HELION M/L light head
with TruVidia .................................................... 68
15.2.18 HELION M+/L+ light head .............................. 69
15.2.19 HELION M+/L+ light head
with wall control panel ..................................... 70
15.2.20 HELION M+/L+ light head
with fixed focus camera .................................... 71
15.2.21 HELION M+/L+ light head
with TruVidia .................................................... 72
15.2.22 HELION M+/L+ light head
with fixed focus camera and wall control panel... 73
....................................................................................
..........................................
....................................................................................
5050
50
5050
6
7200791 Service Manual for the HELION® XENION® Surgical Lighting System GB
Page 7

Contents
15.2.23 XENION M light head ...................................... 74
15.2.24 XENION M light head
with wall control panel ..................................... 75
15.2.25 XENION M light head
with fixed focus camera .................................... 76
15.2.26 XENION M light head
with TruVidia .................................................... 77
15.2.27 XENION L light head ........................................78
15.2.28 XENION L light head
with wall control panel ..................................... 79
15.2.29 XENION L light head
with TruVidia .................................................... 80
15.2.30 XENION M+ light head.................................... 81
15.2.31 XENION M+ light head
with wall control panel ..................................... 82
15.2.32 XENION M+ light head
with fixed focus camera .................................... 83
15.2.33 XENION M+ light head
with TruVidia .................................................... 84
15.2.34 XENION M+ light head
with fixed focus camera and wall control panel... 85
15.2.35 XENION L+ light head .....................................86
15.2.36 XENION L+ light head
with wall control panel ..................................... 87
15.2.37 XENION L+ light head
with TruVidia .................................................... 88
15.2.38 HELION/XENION transformer connector ........... 89
15.3 Test report .............................................................. 90
16 T16 T
16 T
16 T16 T
echnical Dataechnical Data
echnical Data
echnical Dataechnical Data
........................................................................................................
....................................................
........................................................................................................
9191
91
9191
7200791 Service Manual for the HELION® XENION® Surgical Lighting System GB 7
Page 8

1 Important Information for the Service Technician
Only for trained and authorised
fitters
Servicing in accordance with
this service manual
Use original parts only
In case of problems
Defective parts
Repairs outside the scope of
the repair order
No unauthorised or
temporary repairs
1.11.1
1.1
1.11.1
This service manual is intended only for service technicians
trained and authorised by TRUMPF KREUZER Medizin Systeme GmbH + Co. KG.
Information for the service technicianInformation for the service technician
Information for the service technician
Information for the service technicianInformation for the service technician
• Servicing must be carried out in steps according to this service
manual.
• The safety, reliability and performance of the equipment is only
ensured where TRUMPF KREUZER original parts are used.
• If, when dismantling, making repairs or settings, you encounter problems which are not covered by this service manual or
not covered in sufficient detail, you should immediately contact your nearest TRUMPF KREUZER Customer Service Centre
for your own safety and that of the hospital staff and patients.
Only carry out repairs that you are familiar with from your
training and which are included in this service manual.
• Replace any defective parts with TRUMPF KREUZER original
parts.
If it should be necessary to replace parts outside the scope of
the repair order, discuss this work with the customer first.
• Unauthorised or temporary repairs are not permitted even if
requested by the customer.
Comply with all the requirements from the current laws, regulations and standards.
• For information and to order spare parts please contact
TRUMPF KREUZER Service
(Telephone: +49 / (0) 180 / 225 4135).
1.21.2
1.2
1.21.2
TT
ools and equipment requiredools and equipment required
T
ools and equipment required
TT
ools and equipment requiredools and equipment required
• Basic equipment:
- fitter’s tool set,
- cordless screwdriver
• Measuring instruments:
- luxmeter (for measuring light intensity),
- voltmeter (for making electrical measurements).
• For fitting/dismantling heavy components:
- Lifting equipment with a permitted load of at least 200 kg. The
lift must correspond at least to the height of the ceiling.
- Ladder with necessary length.
• Accessories:
- cable ties
8
7200791 Service Manual for the HELION® XENION® Surgical Lighting System GB
Page 9

1 Important Information for the Service Technician
Check the installation position
of the cables
Installing safety devices
Before the functional check
Check the PE connections
Carry out functional check
1.31.3
1.3
1.31.3
Observe the following rules when carrying out service work:
• Put the cables back in their original installation position.
• Install or renew all safety devices such as covers, cable ties,
• Check cables that have been detached or been renewed against
• Check that the earth connections comply with the current stand-
• Carry out a functional check according to Chapter 14:
1.41.4
1.4
1.41.4
TRUMPF KREUZER Medizin Systeme GmbH + Co. KG assumes
no liability for the reliable and proper functioning of the
surgical lighting system if:
• installation, modifications and repairs are not performed by
• The electrical installation of the respective equipment does not
• The surgical lighting system is used other than for its intended
PP
roper servicingroper servicing
P
roper servicing
PP
roper servicingroper servicing
Check the cables when positioning the lamp etc. to ensure
they are not severed or squashed.
cable holders, cable shields, ground, equipotential bonding
and earth connections.
the circuit diagrams in this service manual to ensure they have
been properly connected.
ards in your country.
“Functional Check, Hand-Over and Customer Instruction”.
WW
arranty and liabilityarranty and liability
W
arranty and liability
WW
arranty and liabilityarranty and liability
TRUMPF KREUZER service technicians or persons authorised
by TRUMPF KREUZER.
comply with the regulations currently applicable.
purpose as stated in the operating instructions.
1.51.5
1.5
1.51.5
• Please dispose of the packaging materials according to the
• Observe that it is compulsory to recycle removed components,
DisposalDisposal
Disposal
DisposalDisposal
applicable guidelines for disposal.
particularly electronic components and cables.
7200791 Service Manual for the HELION® XENION® Surgical Lighting System GB 9
Page 10
2 Your Safety is Important to Us
DANGER
WARNING
CAUTION
NOTE
2.12.1
2.1
2.12.1
Important information is shown in this service manual and
on the equipment using symbols and key words.
Signal words such as DANGER, WARNING or CAUTION indicate the level of risk. This is visually emphasised by the
different triangle symbols.
The signs have the following meanings:
Symbols used in this service manualSymbols used in this service manual
Symbols used in this service manual
Symbols used in this service manualSymbols used in this service manual
Failure to comply will certainly result in
severe or even fatal injury.
Failure to comply may result in
severe or even fatal injury.
Failure to comply may result in
minor or moderate injury or damage to property.
Offers tips on usage and handy information.
Electric shock
Falling load
Sudden release
of spring arm
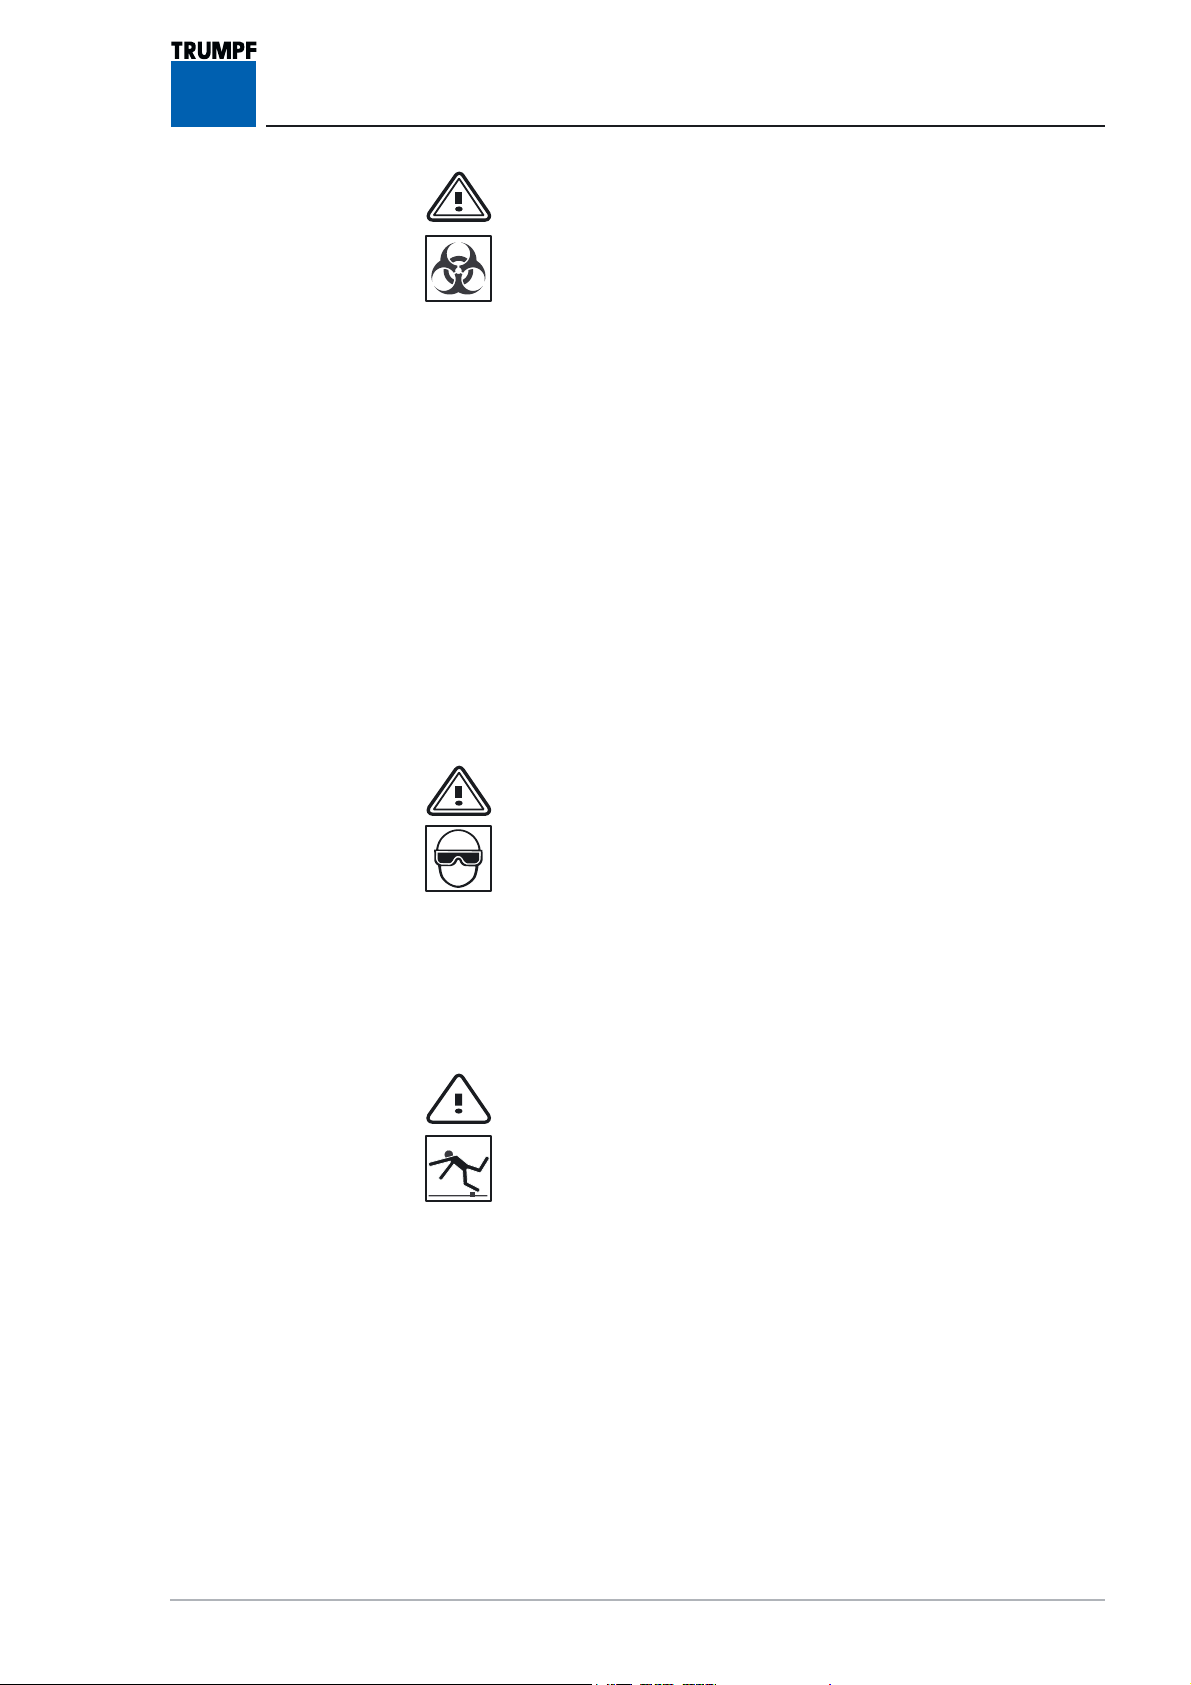
Biohazard
Laser radiation
Danger of
tripping
Danger of an electric shock which may result in severe or even
fatal injury.
Danger of a falling load when in the installation area under a light
system or following incorrect installation.
Danger of sudden release of the spring arm when dismantling the
lamps.
Danger of infection due to the lighting system not being cleaned
and disinfected.
Danger of eye damage due to the optional laser (Class 2) in the
central hand grip.
Danger of tripping and falling over tools or components in the
hospital staff’s path.
2.22.2
2.2
2.22.2
Symbols on the equipmentSymbols on the equipment
Symbols on the equipment
Symbols on the equipmentSymbols on the equipment
10
ATTENTION! Comply with operating instructions.
CE conformity marking with
number 0123 of notified body.
7200791 Service Manual for the HELION® XENION® Surgical Lighting System GB
Page 11
2 Your Safety is Important to Us
2.32.3
2.3
2.32.3
Hazards from electric shockHazards from electric shock
Hazards from electric shock
Hazards from electric shockHazards from electric shock
DANGER – power supply and emergency power supply:
During all servicing the building power supply and the emergency
power supply must be de-energised all-pole disconnection and
prevented from being switched back on again.
DANGER – Electric shock - High voltage 300 V:
The ballast in XENION lamps produces a starting voltage of
300 V:
When carrying out measurements in the lamps and when the power
is switched on:
• cordon off the installation site,
• avoid all contact with conductive parts.
Overview of the most important safety informationOverview of the most important safety information
Overview of the most important safety information
Overview of the most important safety informationOverview of the most important safety information
FF
alling lighting system partsalling lighting system parts
F
alling lighting system parts
FF
alling lighting system partsalling lighting system parts
DANGER – Falling lighting system parts:
During servicing it is not permitted to stand under the lighting system.
Sudden release of spring armSudden release of spring arm
Sudden release of spring arm
Sudden release of spring armSudden release of spring arm
WARNING - Sudden release of spring arm:
• The spring arm is under high tension. If the lamp is not removed in the uppermost spring arm position, the spring arm
releases suddenly, springing upwards, and can cause serious
injury.
• Only dismantle the lamp when the spring arm is in the uppermost position.
Eye damage due to the optional laserEye damage due to the optional laser
Eye damage due to the optional laser
Eye damage due to the optional laserEye damage due to the optional laser
WARNING – Laser radiation (LASER CLASS 2) -
Do not look directly at the beam from the central hand grip:
Laser radiation does not constitute a danger to persons who are
not anaesthetised, due to the blink reflex.
Nevertheless, to avoid damaging your eyes you should not look
directly at the laser beam.
7200791 Service Manual for the HELION® XENION® Surgical Lighting System GB 11
Page 12
2 Your Safety is Important to Us
2.32.3
2.3
2.32.3
FF
F
FF
WARNING – Failure of the spare lamp:
Always change both lamps. When replacing the lamp always replace the entire lamp unit.
In the case of HELIUM models, the lamp base must also be replaced.
Damage to components of the lighting systemDamage to components of the lighting system
Damage to components of the lighting system
Damage to components of the lighting systemDamage to components of the lighting system
CAUTION – Damage to lamps:
Handle and insert new lamps by the packaging film/using a soft
cloth only.
Overview of the most important safety informationOverview of the most important safety information
Overview of the most important safety information
Overview of the most important safety informationOverview of the most important safety information
(cont(cont
’d)’d)
(cont
’d)
(cont(cont
’d)’d)
ailure of the lamps during an operationailure of the lamps during an operation
ailure of the lamps during an operation
ailure of the lamps during an operationailure of the lamps during an operation
Before initial operation of the lighting systemBefore initial operation of the lighting system
Before initial operation of the lighting system
Before initial operation of the lighting systemBefore initial operation of the lighting system
WARNING – Malfunction:
Before the initial operation of the lighting system the electrical
supply has to be checked and approved by qualified staff.
12
7200791 Service Manual for the HELION® XENION® Surgical Lighting System GB
Page 13
3 Observe these Work Rules
WARNING – Risk of infection:
Ask a doctor about the possible risks (e.g. hepatitis B) of
being a service technician.
After consulting a doctor, get yourself vaccinated against
hepatitis B. A booster is required every 10 years.
Disinfection of the equipment must be organised in good
time before servicing and must be carried out by the operator.
• Servicing must only be carried out on lighting systems which
have been cleaned and disinfected,
• Comply with hygiene guidelines concerning cleaning, disinfection and clothing,
• Only work in the operating theatre with the permission of the
user,
• Observe the code of practice in force at the medical facility,
particularly in the operating theatre,
• If you have any symptoms, consult a doctor immediately.
Inform your doctor that you have worked in hazardous areas –
even after several months.
WARNING – Wear protective eyewear:
Wear protective eyewear in case of a possible risk to eyes,
in particular when carrying out the following work:
• hammering pins or similar components in/out,
• removing tensioned springs and fuses,
• when drilling,
• when soldering,
• when using solvents, cleaning agents or other chemicals.
CAUTION – Tripping and falling:
• Put dismantled components or tools somewhere that nobody
can trip and fall over them.
• Keep your work place clean and tidy during and after servicing.
7200791 Service Manual for the HELION® XENION® Surgical Lighting System GB 13
Page 14

4 Table – Troubleshooting and Possible Remedies
Fault Possible causes Possible remedy Section
LED lamp indicator lit up Lamp defective Change lamp 5
Luminous field too small/
luminous intensity too low
Noises in the light head Loose parts in the light
HELION light head Possible causes Possible remedy Section
Inconsistent, off-centre luminous
field with HELION
M / M+/ L / L+ only
No light No input voltage Check building power supply 9.1
Maladjusted limit stops Adjust luminous field 6
Check light head/focus unit/ replace
head/focus unit
Servomotor polarity incorrect/
servomotor defective
Mains fuse of building power
supply defective
Electrical connections for lamp,
cardanic suspension, spring arm
or extension arm interrupted
Defective sliding contact in
extension arm
Defective cable in light
head/cardanic suspens ion
Defective cable in spring arm Check/replace internal electrical
filter glass assembly or defective
parts
Check polarity of
servomotor/replace focus unit
Check mains fuse at automatic circuit
breaker
Check internal electrical supply lines
of lamp, cardanic suspension, spring
arm or extension arm
Replace sliding contact in extension
arm/check slip ring on central column
Check/replace internal electrical
supply line in light head/
replace cardanic suspension
supply line in spring arm
7 ff.
8
9.2
10
10.1
10.2
10.3
10.4
10.4
10.5
Defective cable in extension arm Check/replace internal electrical
supply line in extension arm
Defective slip ring on central
column
Contact areas burnt/damaged HELION M / M+ / L / L+:
Line contact on PCB in light head
defective/
PCB defective/fuse on PCB
defective/cables in light head
defective
Line contact on PCB in light head
defective/
PCB defective/fuse on PCB
defective/cables in light head
defective
Replace slip ring on central column 10.8
Check operating voltage on focus
unit/replace unit
HELION M / M+ / L / L+:
Check positioning of cables on PCB
and control panel/
replace PCB/replace lamp supply
lines
HELION M / L:
Check positioning of cables on PCB
and control panel/
replace PCB/replace cables in light
head
10.6
10.7
10.9
11.1
12.1
11.1
12.1
11.2
14
7200790 Service Manual for the HELION® XENION® Surgical Lighting System GB
Page 15
4 Table – Troubleshooting and Possible Remedies
Fault Possible cause Possible remedy Section
No light Line contact on PCB in light head
defective/
PCB defective/
fuse on PCB defective
Check positioning of cables on PCB
and control panel/
replace PCB/replace fus e/
replace cables in light head
12.2
Line contact on PCB in light head
defective/
PCB defective/
fuse on PCB defective
No dimmer function Line contact on PCB/control
panel in light head defective
Check positioning of cables on PCB
and control panel/
replace PCB/replace fus e
Check positioning of cables on PCB
and control panel
13.1
13.2
®
XENION® Surgical Lighting System GB
157200790 Service Manual for the HELION
Page 16
4 Table – Troubleshooting and Possible Remedies
XENION light head
No light No input voltage Check building power supply 9.1
Mains fuse for building power
supply defective
Electrical connection for lamp,
cardanic suspension, spring arm
or extension arm interrupted
Defective sliding contact in
extension arm
Defective cable in light
head/cardanic suspension
Defective cable in spring arm Check/replace internal electrical
Defective cable in extension arm Check/replace internal electrical
Defective slip ring on central
column
Contact areas burnt/damaged Check operating voltage at focus
Check mains fuse at automatic circuit
breaker
Check internal electrical supply lines
for lamp, cardanic suspension, spring
arm or extension arm
Replace sliding contact in extension
arm/check slip ring on central column
Check/replace internal electrical
supply line in light head/
replace cardanic suspension
supply line in spring arm
supply line in extension arm
Replace slip ring on central column 10.8
unit/replace unit
9.2
10
10.1
10.2
10.3
10.4
10.4
10.5
10.6
10.7
10.9
13.1
Line contact on PCB in light head
defective/
PCB defective/fuse on PCB
defective/cables in light head
defective/ballast defective
The halogen lamp does not light
up when switched on
Only the halogen lamp lights up Metal vapour lamp
No dimmer function Line contact on
Dimmer functioning incorrectly Reversed potentiometer polarity Change potentiometer polarity
Halogen lamp defective/no
power supply available
defective/power supply to
electronics too low/high
PCB/potentiometer/ballast in
light head defective
Check positioning of cables on PCB
and control panel/replace PCB/
replace fuse on PC B/
replace cables in light head
XENION L / L+ only:
Replace lamp/check voltage of
electronics
XENION L / L+ only:
Replace lamp/check LED indicator on
the electronics/check voltage
Check positioning of cables on
PCB/potentiometer/control
panel/replace potentiometer
13.1
5.4
13.2
16
7200790 Service Manual for the HELION® XENION® Surgical Lighting System GB
Page 17
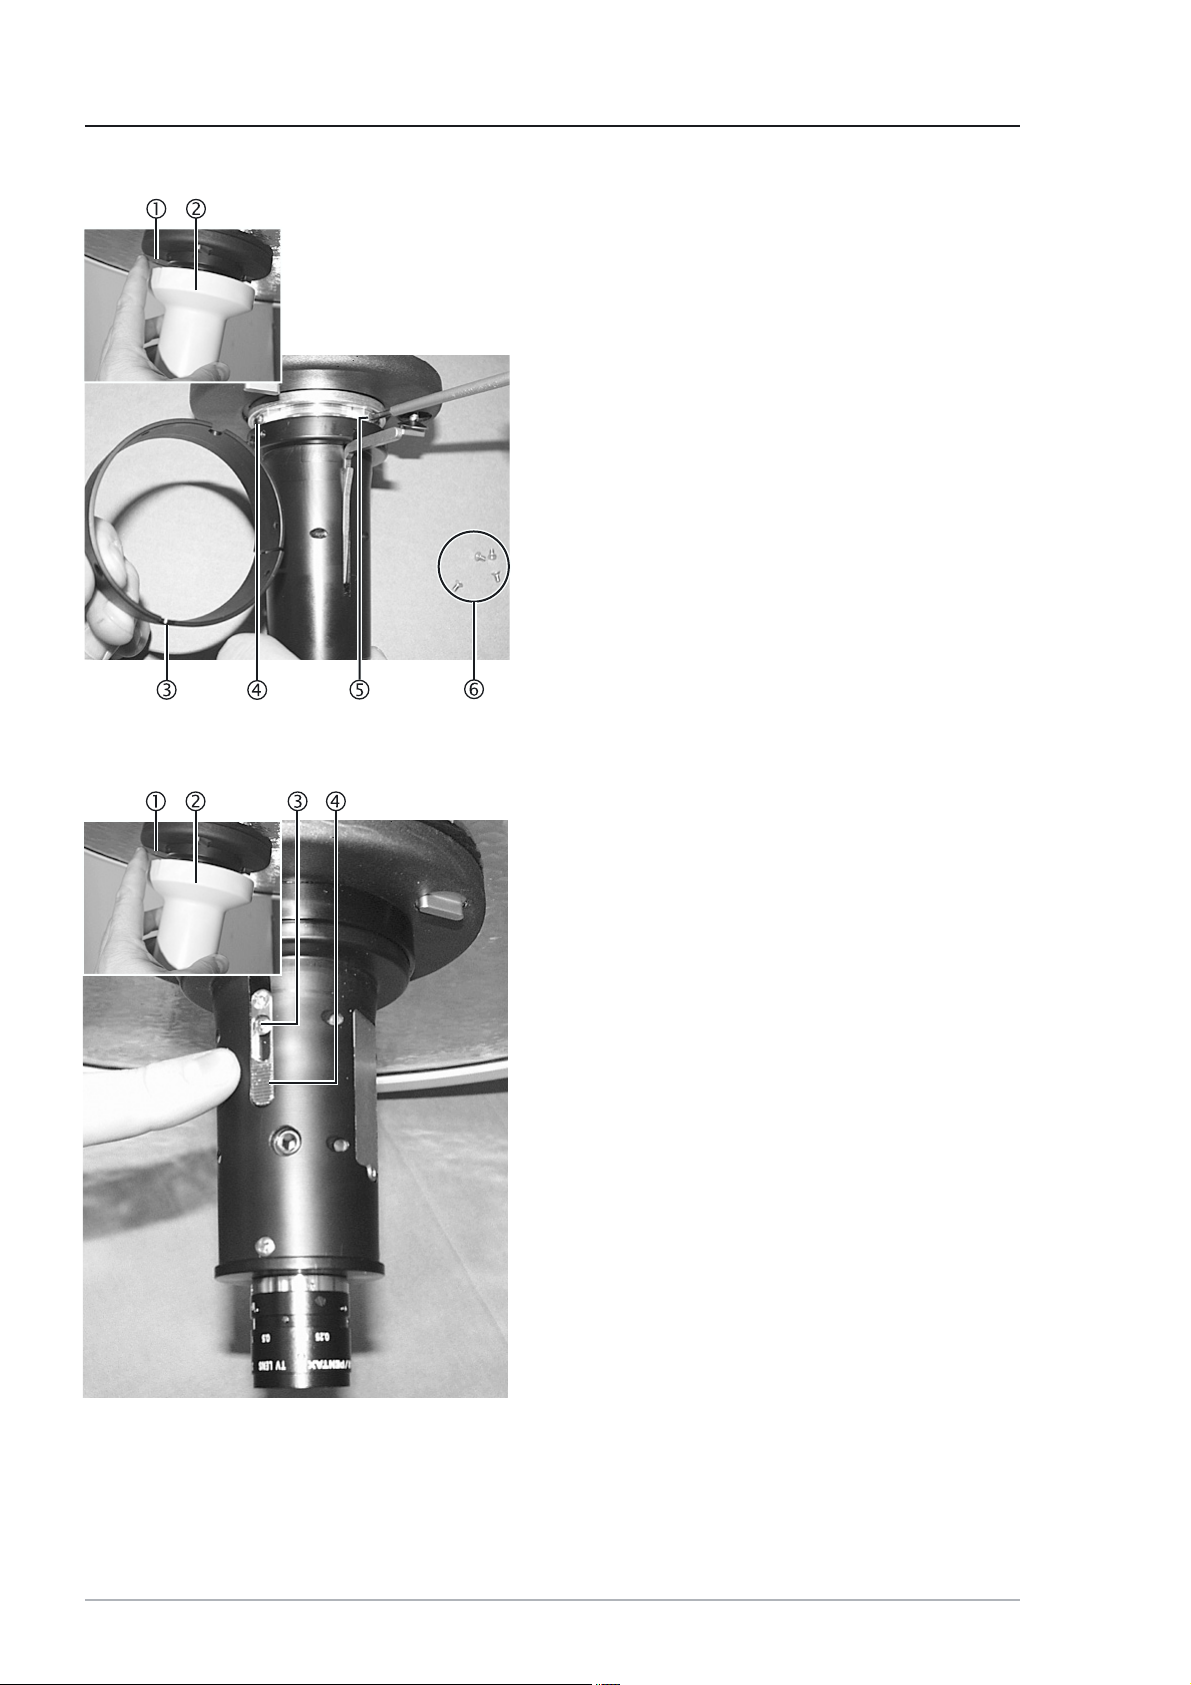
5 Changing the Lamp
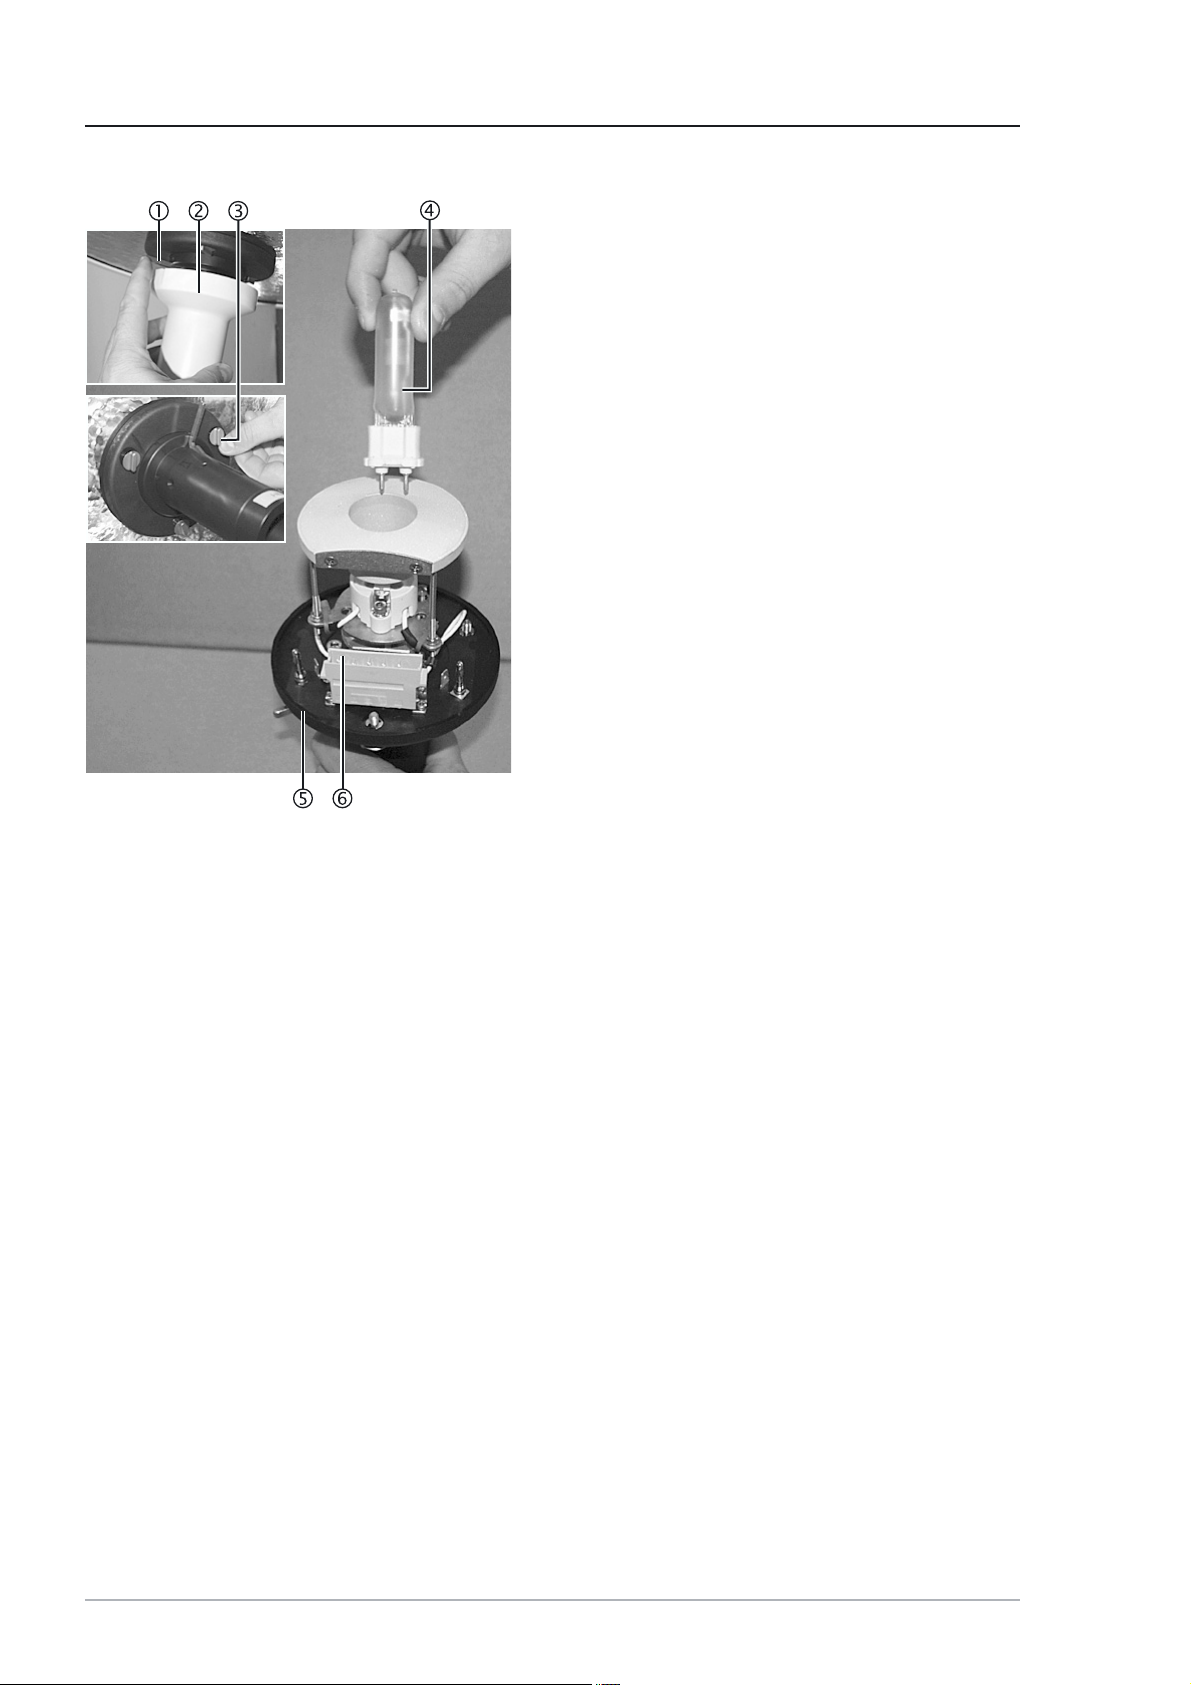
Figure 01
Figure 02
5.15.1
5.1
5.15.1
Changing the lamp of the HELION SChanging the lamp of the HELION S
Changing the lamp of the HELION S
Changing the lamp of the HELION SChanging the lamp of the HELION S
The lamp does not light up.
Removal:
1. Carefully turn the lamp holder 2 and remove it
from the HELION S lamp 3.
2. Carefully remove the old lamp 1 from the lamp
holder 2 and dispose of it in the appropriate
manner.
Installation:
3. Fit the new lamp 1 holding it by the packaging
film/using a soft cloth and fit the components as
described above, but in the reverse order.
5.25.2
5.2
5.25.2
Changing the lamp of the HELION M/Changing the lamp of the HELION M/
Changing the lamp of the HELION M/
Changing the lamp of the HELION M/Changing the lamp of the HELION M/
M+ / L/L+M+ / L/L+
M+ / L/L+
M+ / L/L+M+ / L/L+
The display 8 is lit up. The lamp is defective.
Removal:
1. Unlock the central hand grip 2 by means of the
unlocking device 1 and remove it.
WARNING – Failure of the spare lamp:
• Always change both lamps.
• When replacing the lamp always replace the
lamp base too.
2. Undo the three screws 3 and remove the focus
unit 4.
3. Unscrew the two cross-recessed head screws 5
and remove the old lamp 6 together with the
base 7 by pulling it upwards and dispose of it in
an appropriate manner.
Installation:
4. Fit the new lamp 6 together with the base 7
holding it by the packaging film/using a soft cloth
and fit the components as described above, but
in the reverse order.
5. Insert the focus unit 4 into the lamp so that both
the plug connectors 9 are aligned.
6. Tighten the three screws 3 by hand.
7. Attach the central hand grip 2.
®
XENION® Surgical Lighting System GB
177200790 Service Manual for the HELION
Page 18
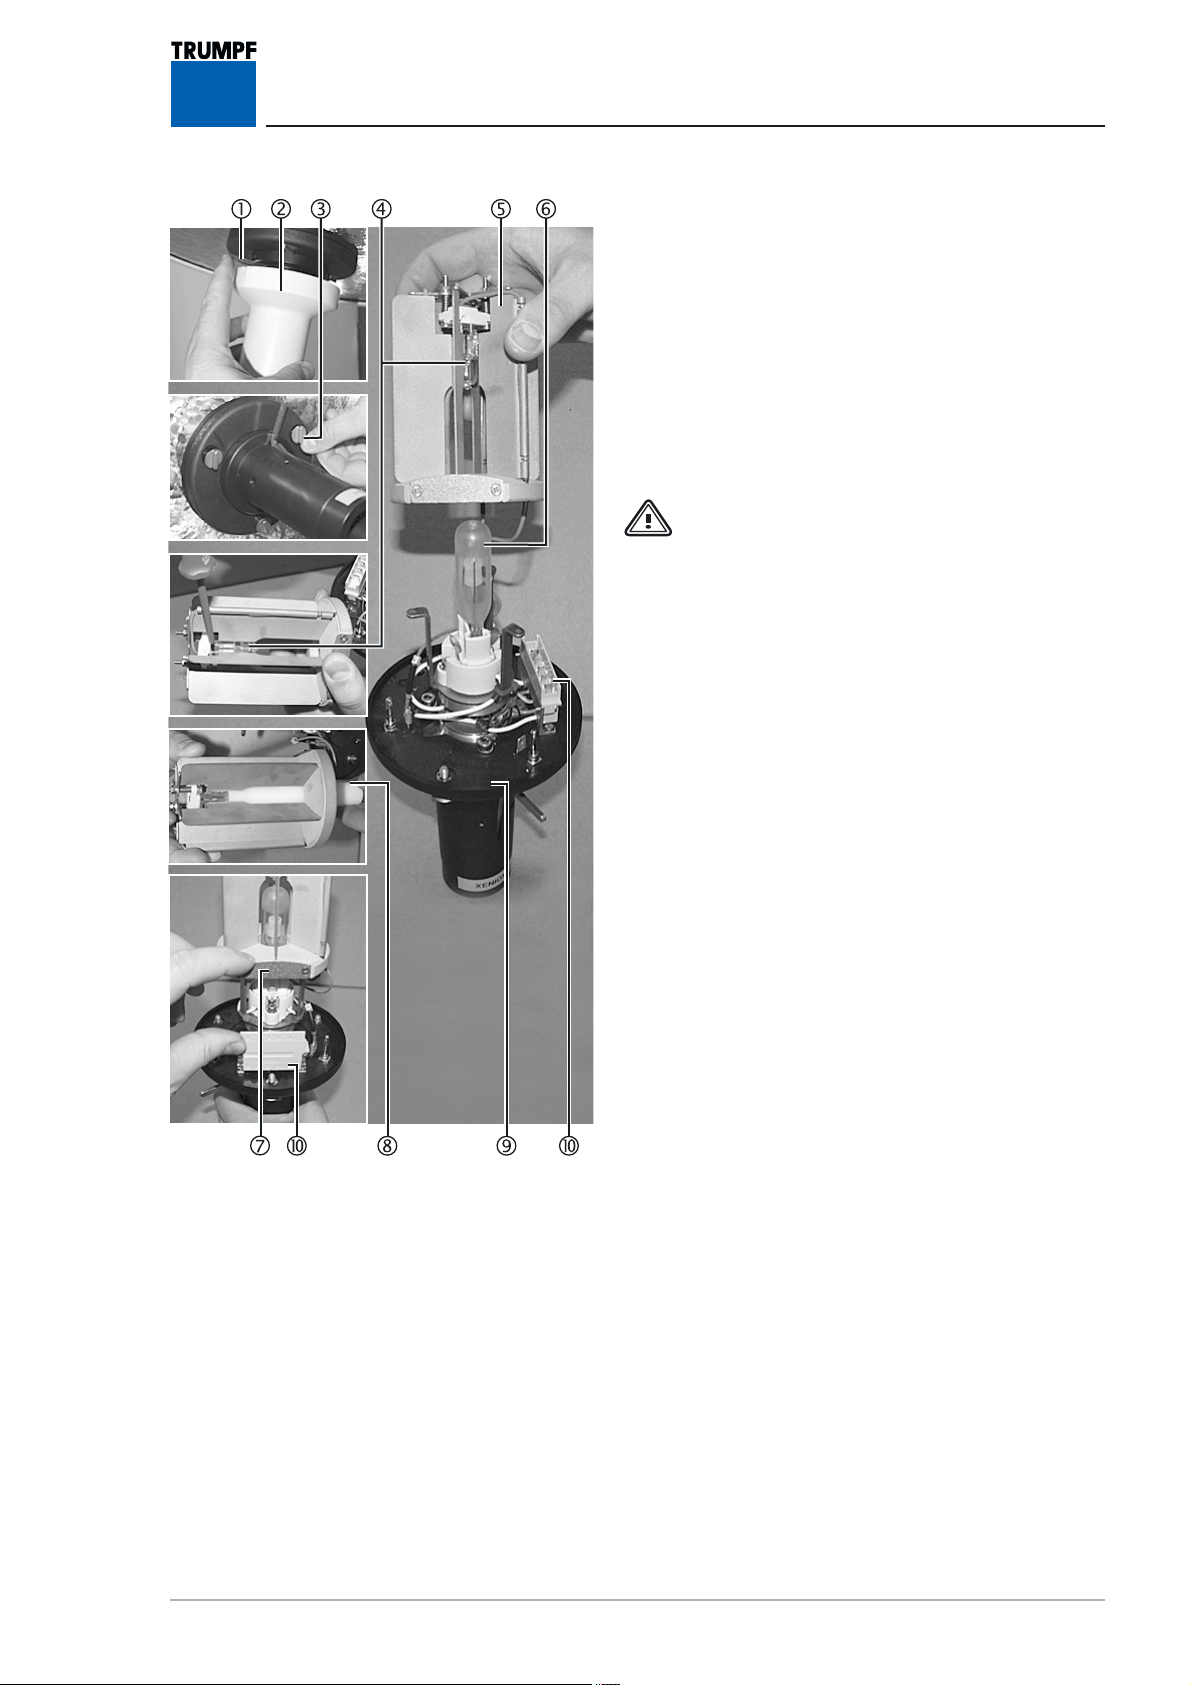
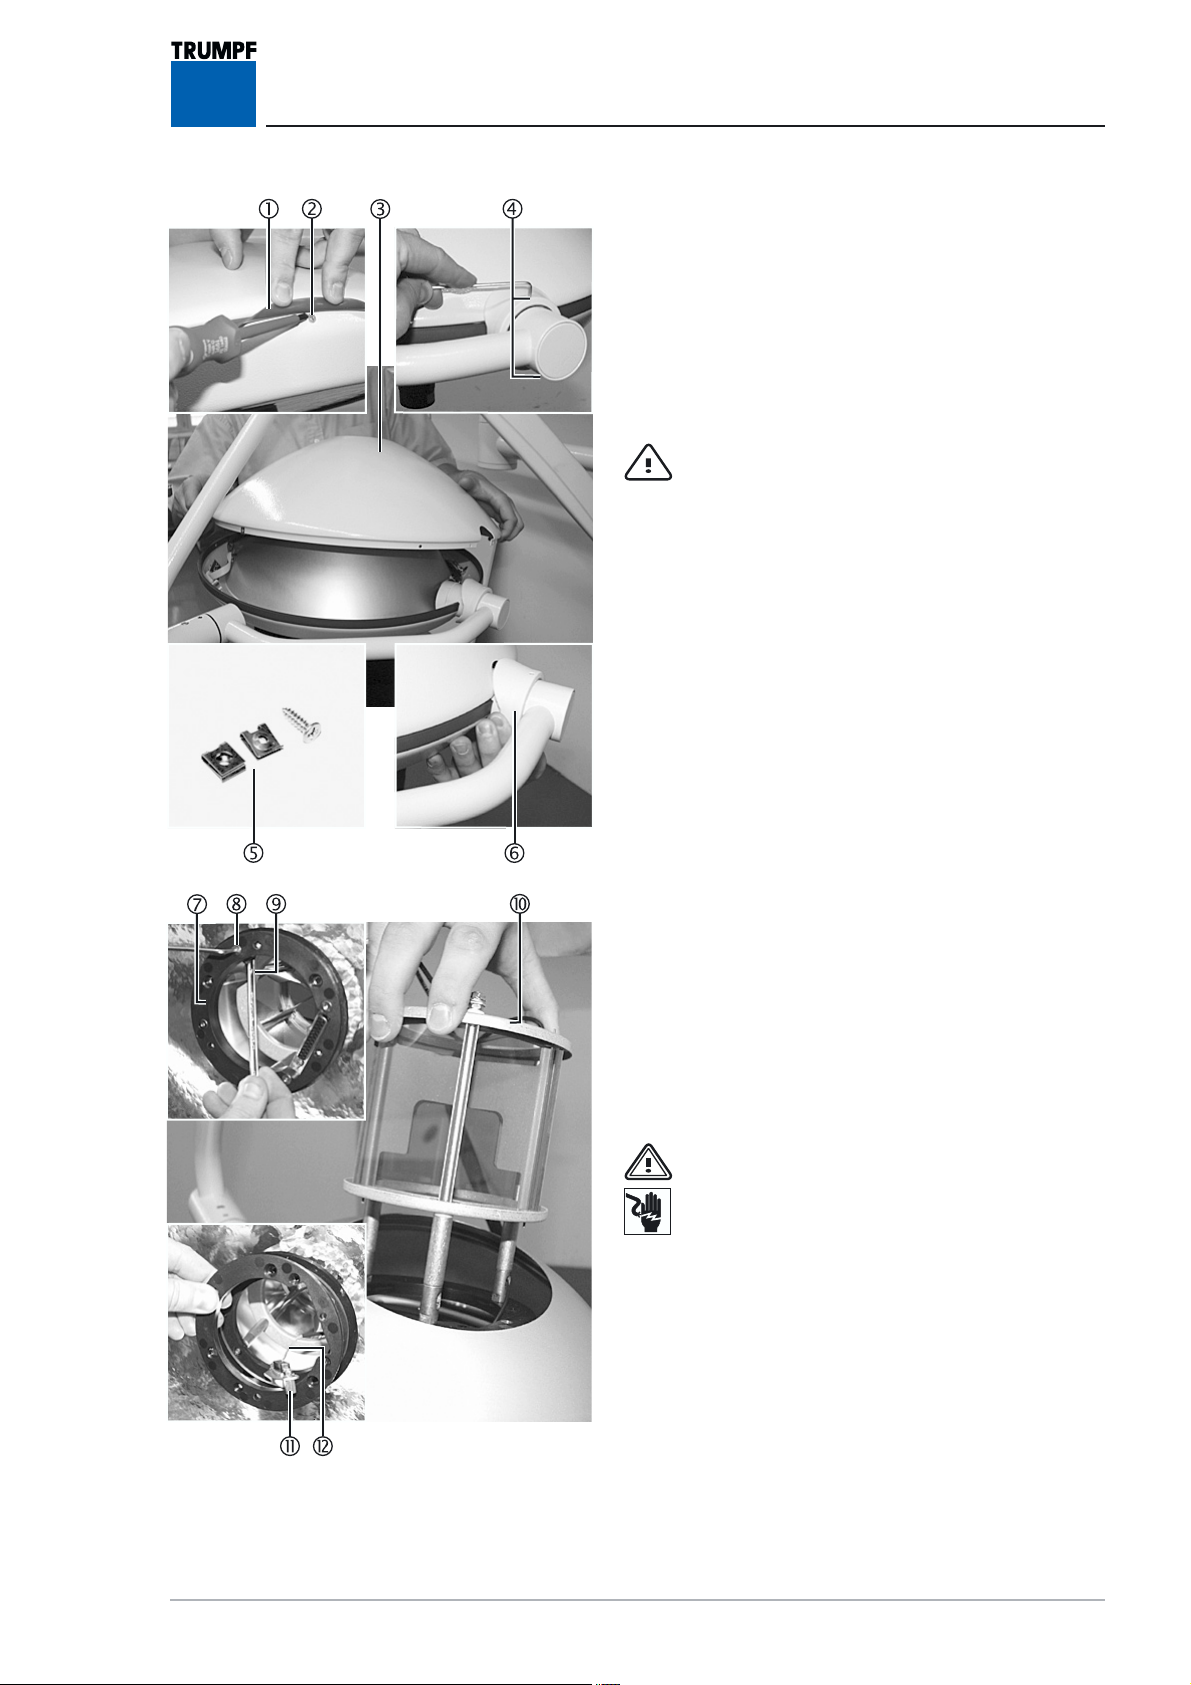
5 Changing the Lamp
Figure 03
5.35.3
5.3
5.35.3
Removal:
1. Unlock the central hand grip 2 by means of the
2. Undo the three screws 3 and remove the focus
3. Remove the old metal vapour lamp 4 by pulling
Installation:
4. Fit the new metal vapour lamp 4 holding it by
5. Insert the focus unit 5 into the lamp so that both
6. Tighten the three screws 3 by hand.
7. Attach the central hand grip 2.
Changing the lamp of the XENION M/Changing the lamp of the XENION M/
Changing the lamp of the XENION M/
Changing the lamp of the XENION M/Changing the lamp of the XENION M/
M+M+
M+
M+M+
unlocking device 1 and remove it.
unit 5.
it upwards and dispose of it in an appropriate manner.
the packaging film/using a soft cloth and assemble
the components as described above, but in the
reverse order.
the plug connectors 6 are aligned.
18
7200790 Service Manual for the HELION® XENION® Surgical Lighting System GB
Page 19
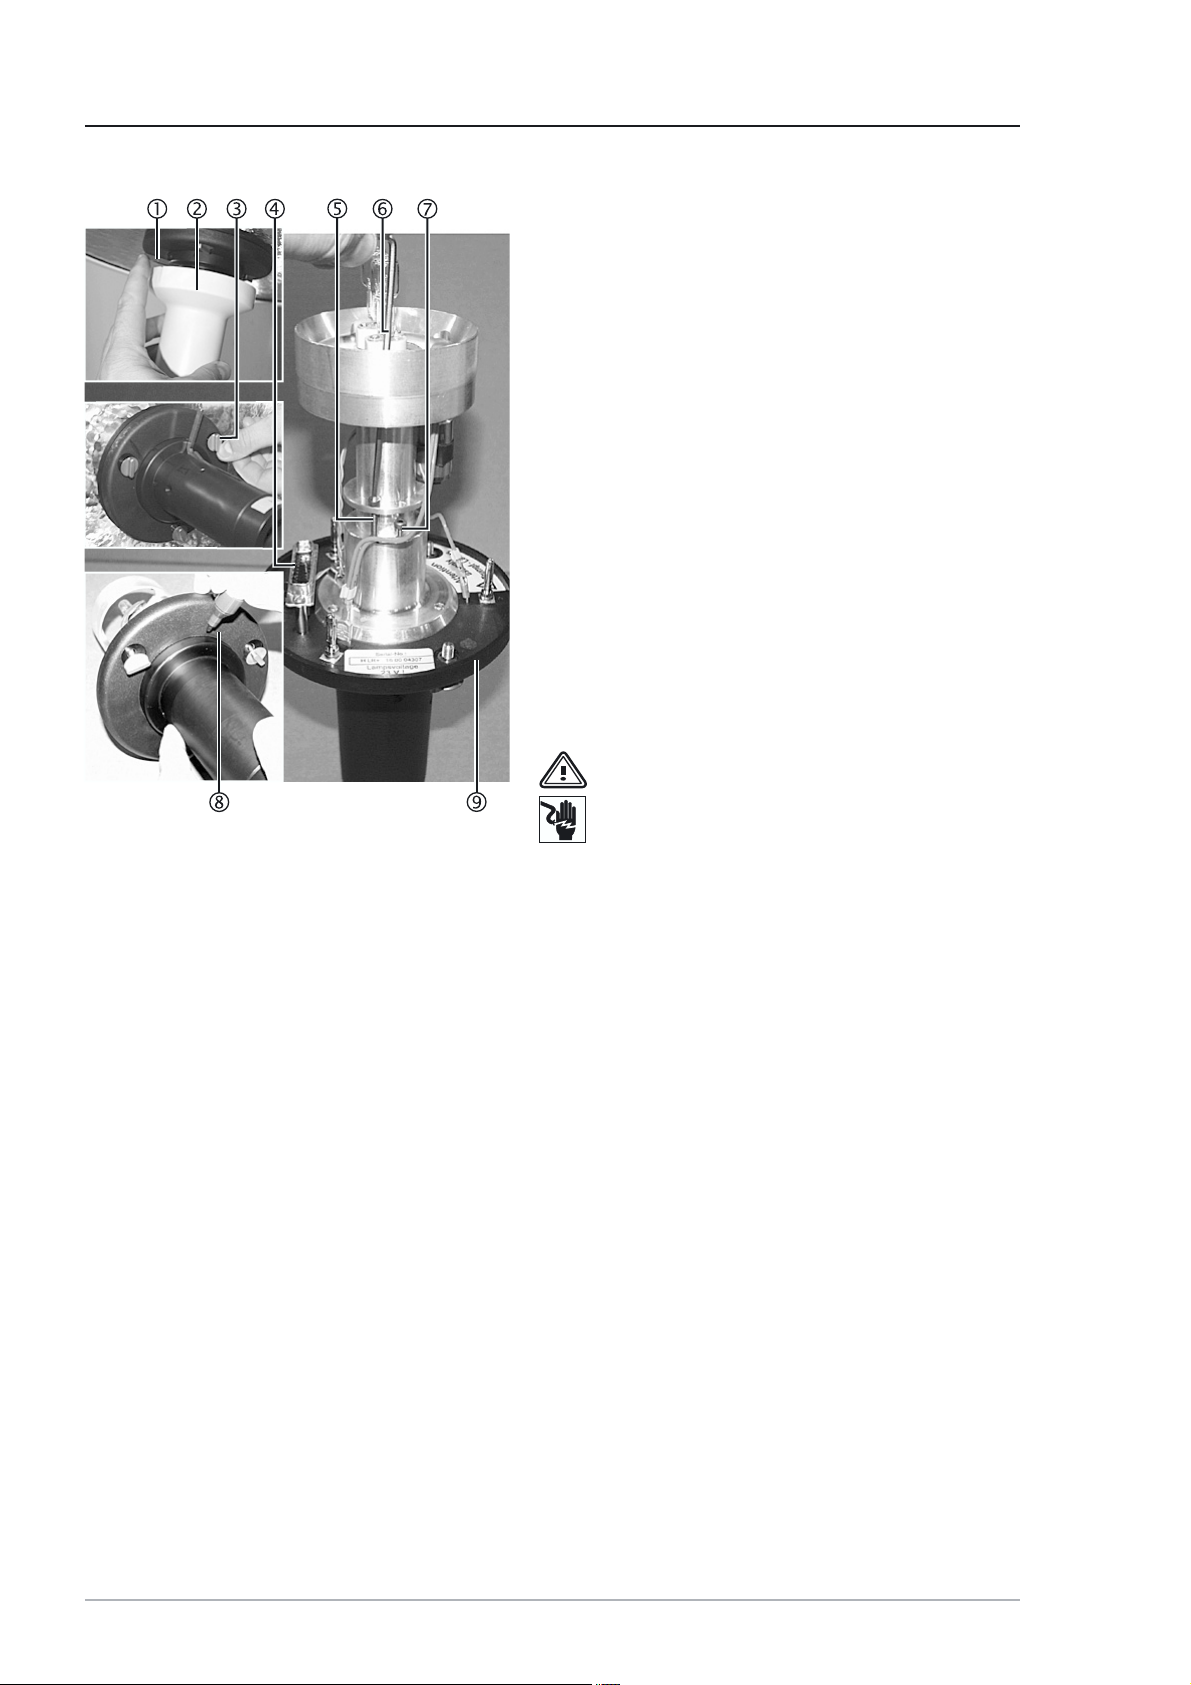
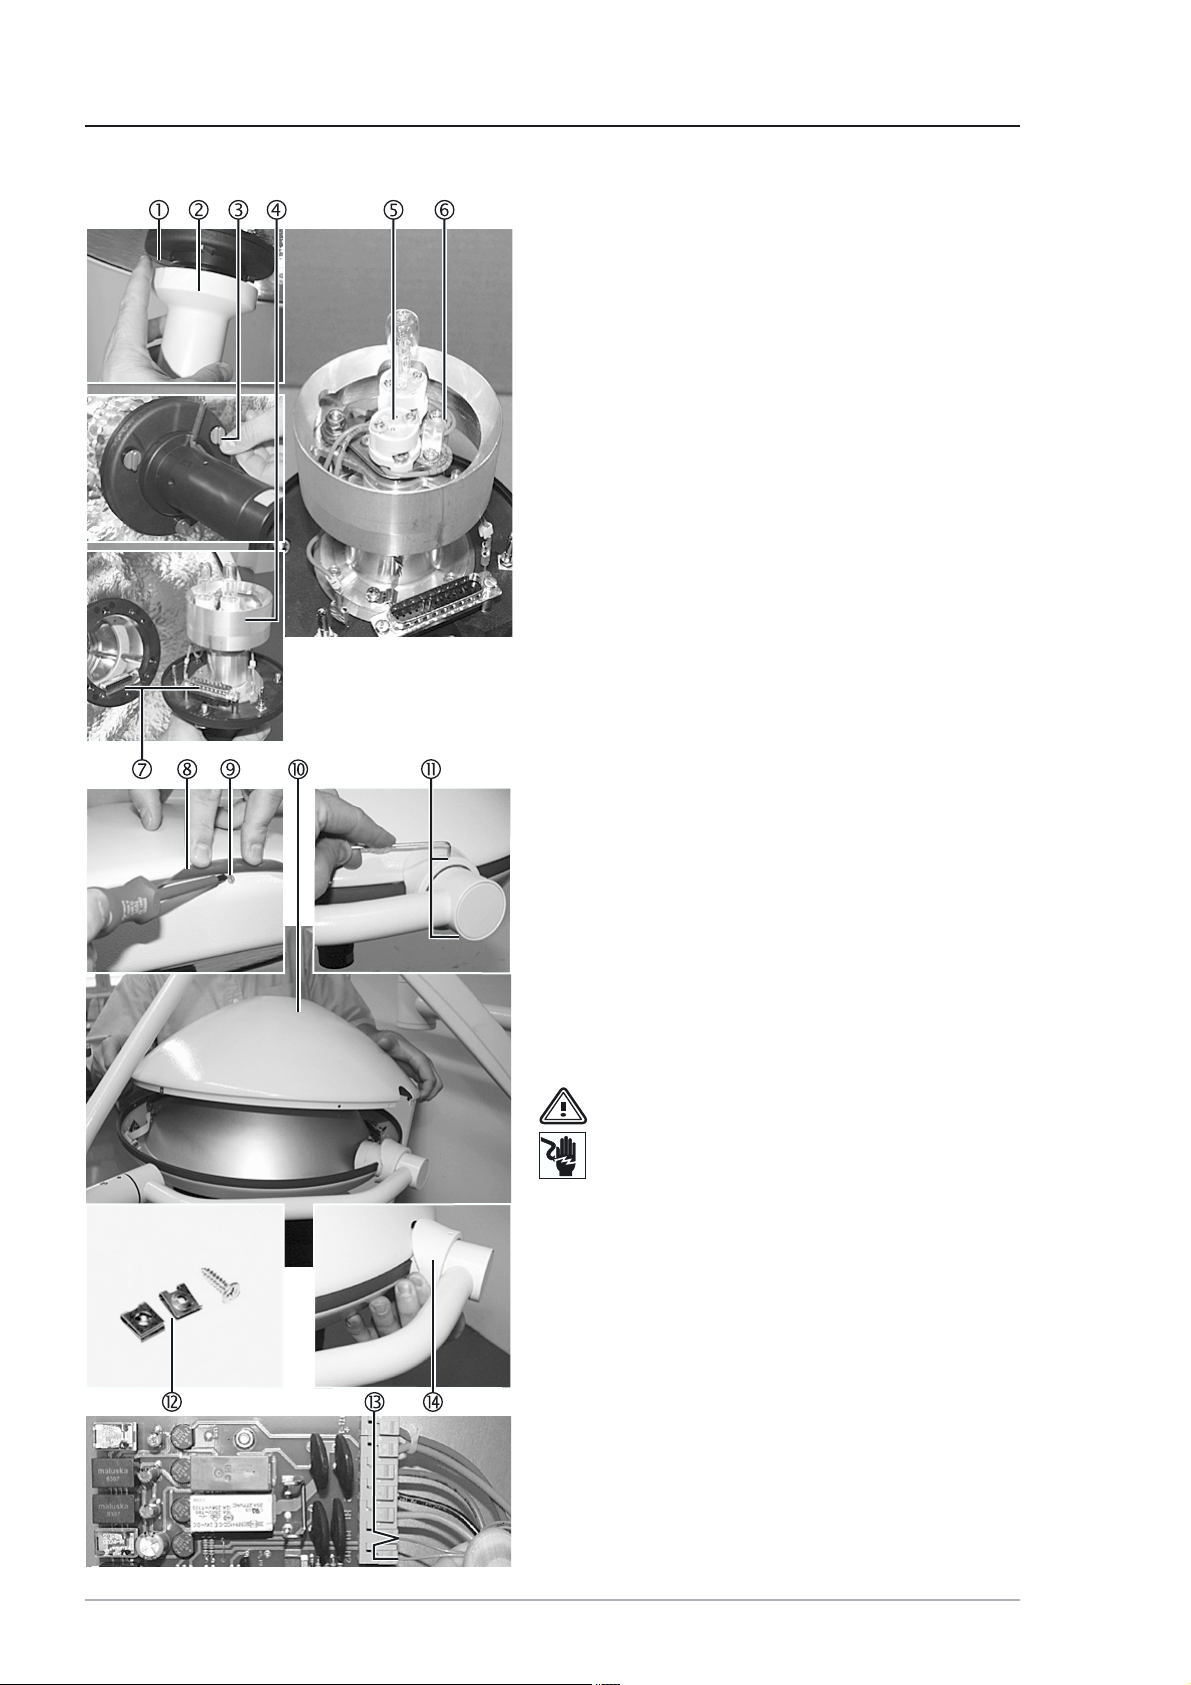
5 Changing the Lamp
Figure 04
5.45.4
5.4
5.45.4
Removal:
Changing the lamp of the XENION L/Changing the lamp of the XENION L/
Changing the lamp of the XENION L/
Changing the lamp of the XENION L/Changing the lamp of the XENION L/
L+L+
L+
L+L+
1. Unlock the central hand grip 2 by means of the
unlocking device 1 and remove it.
2. Undo the three screws 3 and remove the focus
unit 9.
3. Turn the aperture attachment 5 45 degrees to
the left (anti-clockwise) and remove by pulling upwards.
WARNING – Failure of the spare lamp:
• Always change both lamps (supplied as a
set).
4. Using a screwdriver, push out the old halogen lamp
4, remove it from the aperture attachment 5
and dispose of it in an appropriate manner.
5. Remove the old metal vapour lamp 6 by pulling
it upwards and dispose of it in an appropriate manner.
Installation:
6. Insert the halogen lamp 4 together with the accompanying plastic mount 8 into the aperture
attachment 5.
7. Insert new metal vapour lamp 6 holding it by the
packaging film/using a soft cloth.
8. Insert the aperture attachment 5 so that the surface 7 and the connector A are aligned.
9. Assemble the components as described above, but
in the reverse order.
10.Insert the focus unit 9 so that both the plug connectors A are aligned.
11.Attach the central hand grip 2.
®
XENION® Surgical Lighting System GB
197200790 Service Manual for the HELION
Page 20
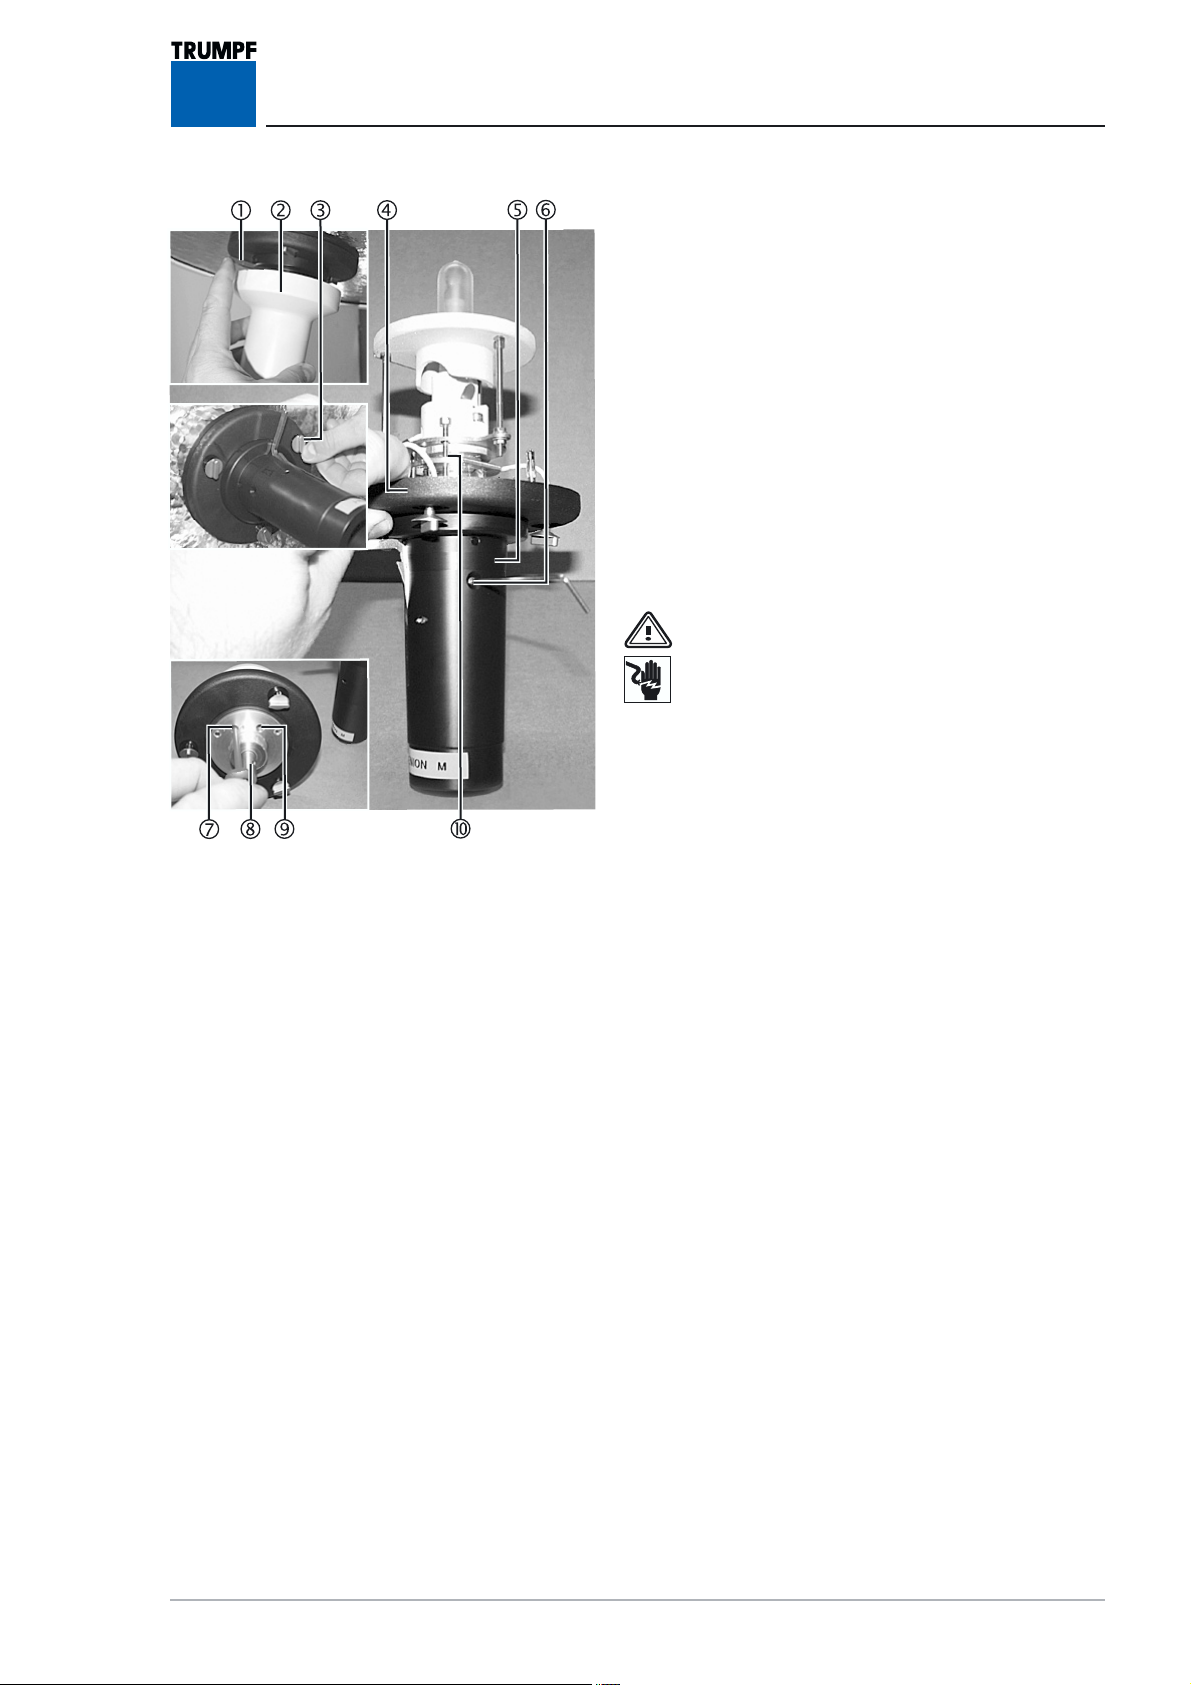
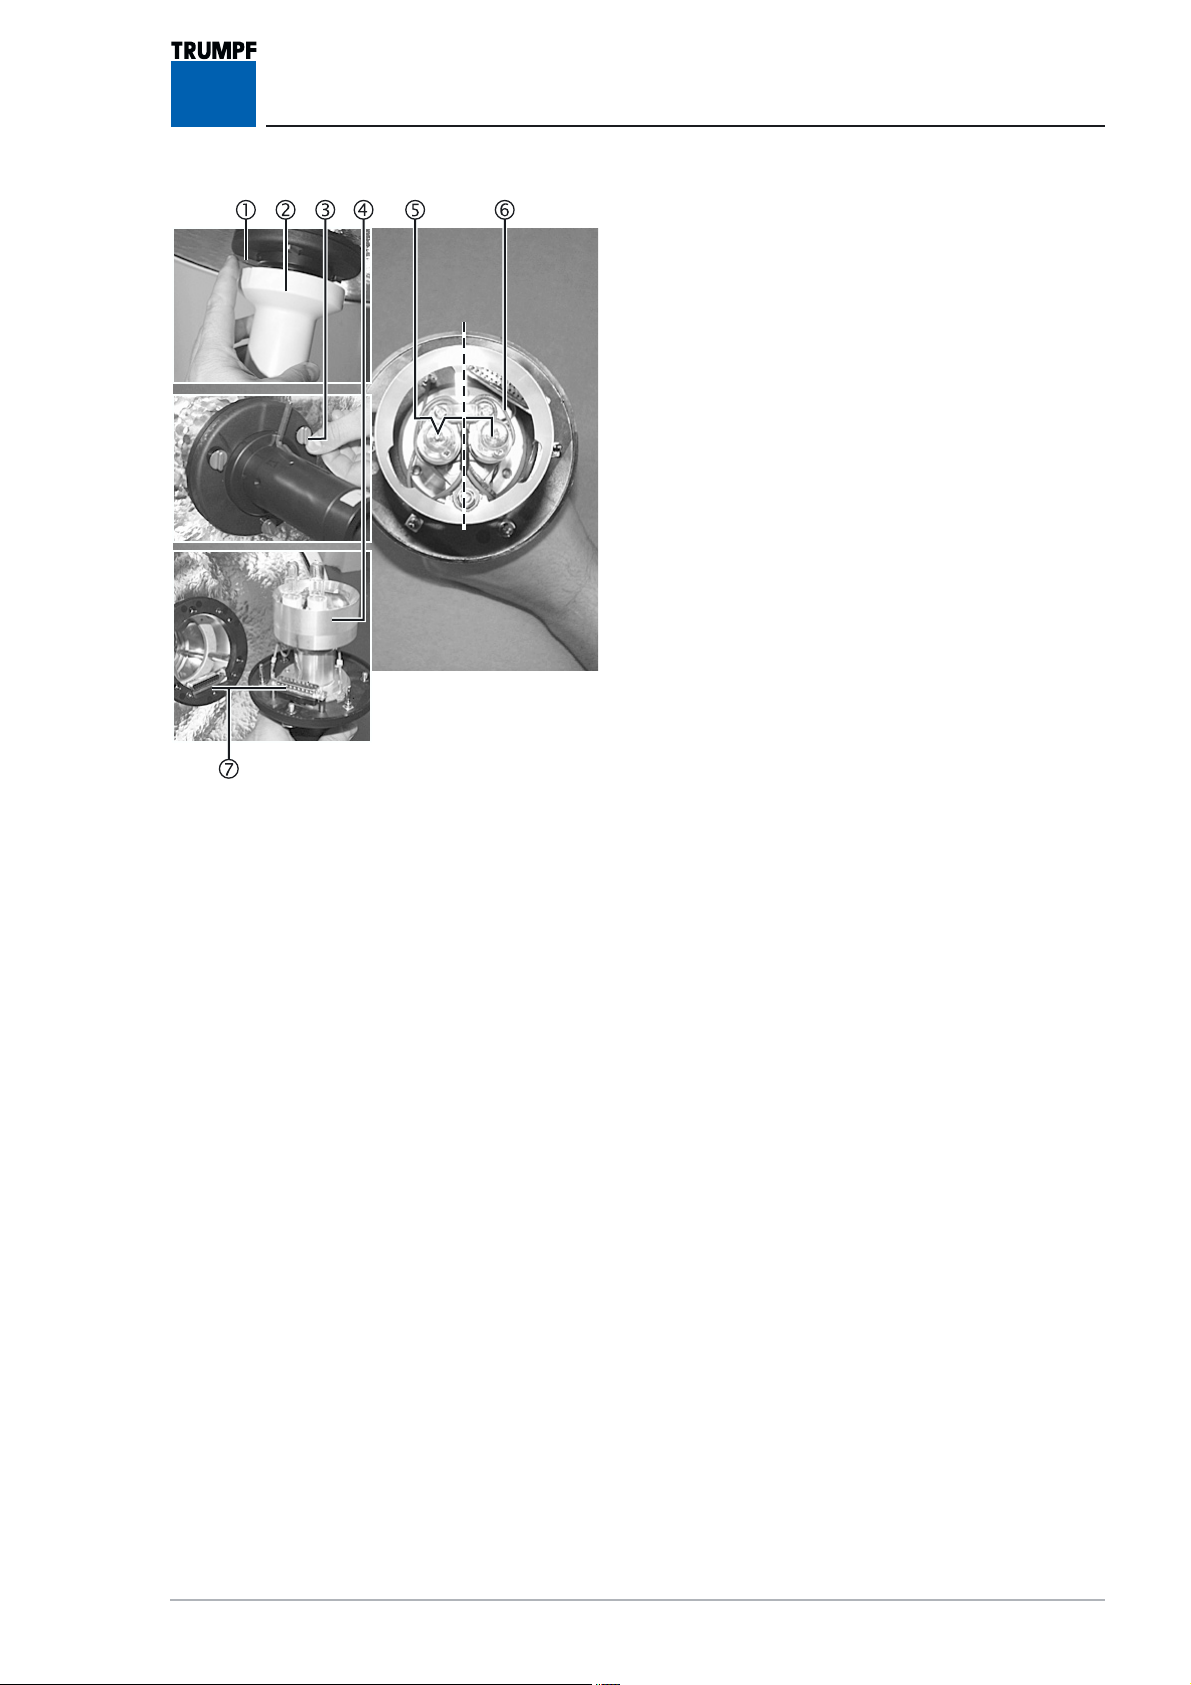
6 Setting the Luminous Field
Figure 01
6.16.1
6.1
6.16.1
Setting is described using the HELION L as an example.
Removal:
Setting the luminous field for the HELI-Setting the luminous field for the HELI-
Setting the luminous field for the HELI-
Setting the luminous field for the HELI-Setting the luminous field for the HELION M/M+ / L/L+ON M/M+ / L/L+
ON M/M+ / L/L+
ON M/M+ / L/L+ON M/M+ / L/L+
1. Unlock the central hand grip 2 by means of the
unlocking device 1 and remove it.
2. Undo the three screws 3 and remove the focus
unit 9.
3. Using an Allen key size 25 6:
- unscrew the long cheese head screw 5 a short
way,
- screw the short cheese head screw 7 in a short
way.
Installation:
4. Fit the components as described above, but in the
reverse order.
WARNING – Electric Shock:
The following adjustments must be made
with the power supply switched on.
Cordon off installation site and proceed
with great care.
5. Switch on the power supply and the lamp.
6. Mark the maximum and minimum luminous field
diameters on the hand grip according to the lamp
specification 8.
Removal:
7. Switch on the power supply and the lamp.
8. Undo the three screws 3 and remove the focus
unit 9.
9. With an Allen key size 2.5 6 adjust the long cheese head screw 5 and the short cheese head screw
7 according to the markings.
Installation:
10.Fit the components as described above, but in
reverse order.
20
Functional test:
11. Carry out functional test.
12. Repeat procedure if necessary.
13. Fix the long cheese head screw 5 and the short
cheese head screw 7 with screw-locking varnish.
7200790 Service Manual for the HELION® XENION® Surgical Lighting System GB
Page 21
6 Setting the Luminous Field
Figure 02
6.26.2
6.2
6.26.2
Removal:
Setting the luminous field for the XENI-Setting the luminous field for the XENI-
Setting the luminous field for the XENI-
Setting the luminous field for the XENI-Setting the luminous field for the XENION M/M+ON M/M+
ON M/M+
ON M/M+ON M/M+
1. Unlock the central hand grip 2 by means of the
unlocking device 1 and remove it.
2. Unscrew the set screw 6 and remove the focus
hand grip 5.
3. Using a screwdriver for cross-recessed head
screws:
- unscrew the recessed head screw 7 a short way,
- screw the cross-recessed head screw 9 in a short
way.
Setting:
WARNING – Electric Shock:
The following test must be carried out with
the power supply switched on.
Cordon off installation site and proceed
with great care.
4. Switch on the power supply and the lamp.
5. Set the maximum and minimum luminous field diameters according to the lamp specification (see
Technical Data), and pull the pivot 8 outwards
while turning it.
6. Attach the focus hand grip 6 and tighten the set
screw 5.
Functional test:
7. Carry out functional test.
8. Repeat procedure if necessary.
Removal:
9. Switch on the power supply and the lamp.
10.Undo the three screws 3 and remove the focus
unit 4.
11.Fix set screws 7/9 in each of the threads of the
adjusting plate A with screw-locking varnish.
Installation:
12.Fit the components as described above, but in
reverse order.
Functional test:
13.Carry out functional test.
®
XENION® Surgical Lighting System GB
217200790 Service Manual for the HELION
Page 22
6 Setting the Luminous Field
Figure 03
Figure 04
6.36.3
6.3
6.36.3
Removal:
1. Unlock the central hand grip 2 by means of the
2. Unscrew the four cross-recessed head screws 6
3. Set the maximum and minimum luminous field
Functional test:
4. Carry out functional test.
5. Repeat procedure if necessary.
6. Fix the cross-recessed head screws 4/5 with
Installation:
7. Fit the components as described above, but in
6.46.4
6.4
6.46.4
Setting the luminous field for the XENI-Setting the luminous field for the XENI-
Setting the luminous field for the XENI-
Setting the luminous field for the XENI-Setting the luminous field for the XENION L/L+ON L/L+
ON L/L+
ON L/L+ON L/L+
unlocking device 1 and remove it.
and remove the trim ring 3.
diameters on the two cross-recessed head screws
according to the lamp specification 4/5.
screw-locking varnish.
reverse order.
Setting the luminous field for the XENI-Setting the luminous field for the XENI-
Setting the luminous field for the XENI-
Setting the luminous field for the XENI-Setting the luminous field for the XENION M with fixed focus cameraON M with fixed focus camera
ON M with fixed focus camera
ON M with fixed focus cameraON M with fixed focus camera
Removal:
1. Unlock the central hand grip 2 by means of the
unlocking device 1 and remove it.
2. Unscrew the cross-recessed head screw 3.
3. Set the maximum and minimum luminous field
diameters according to the lamp specification by
adjusting the ribbed surface 4.
4. Tighten the cross-recessed head screw 3.
Functional test:
5. Carry out functional test.
6. Repeat procedure if necessary.
7. Fix the cross-recessed head screw 3 with screwlocking varnish.
Installation:
8. Fit the components as described above, but in
reverse order.
22
7200790 Service Manual for the HELION® XENION® Surgical Lighting System GB
Page 23
7 Replacing the Filter Glass Assembly
Figure 01 Dismantling the lamp cover:
1. Lift the sealing lip 1, unscrew the sheet-metal
screws 2 and put the sheet-metal clips 5 in a
safe place.
2. Unscrew the two set screws 4 and push back the
plastic cover 6 from the lamp.
3. Remove the lamp cover 3.
Dismantling the filter glass assembly:
CAUTION – Damage to reflector:
• Do not touch the reflector on the inside of
the lamp,
• When unscrewing the four countersunk Allen screws 8 hold on to the SUB-D connector (HEL)/high-voltage contact plug
(XEN) B.
4. Hold the internal hexagon nut 9 securely with a
fork wrench and unscrew the four countersunk Allen screws 8.
5. Remove the plastic ring 7.
6. Lift the filter glass assembly A and SUB-D connector (HEL)/high-voltage contact plug (XEN) B
carefully up and out of the lamp.
7. Disconnect the connecting lines C from the electronics.
Installing the filter glass assembly:
8. Fit the new filter glass assembly (the connecting
lines are also supplied) as described above, but
in reverse order.
Functional test:
WARNING – Electric Shock:
The following test must be carried out with
the power supply switched on.
Cordon off installation site and proceed
with great care.
9. Switch on the power supply and the lamp.
10.Carry out functional test.
Installing the lamp cover:
11.Insert the sheet-metal clips 5 into the lamp cover
3 and install the lamp cover 3 as described
above, but in reverse order.
12.Check the secure positioning of the lamp cover
3.
®
XENION® Surgical Lighting System GB
237200790 Service Manual for the HELION
Page 24
8 Testing the Servomotor for the HELION M/M+ / L/L+
Figure 01
8.18.1
8.1
8.18.1
Dismantling the focus unit:
TT
esting the polarity of the servomotoresting the polarity of the servomotor
T
esting the polarity of the servomotor
TT
esting the polarity of the servomotoresting the polarity of the servomotor
1. Unlock the central hand grip 2 by means of the
unlocking device 1 and remove it.
2. Undo the three screws 3 and remove the focus
unit 4.
3. Remove the central lamp 5 using a soft cloth.
Fitting the focus unit:
4. Insert the focus unit 4 into the lamp so that both
the plug connectors 7 are aligned.
5. Switch on the power supply and the lamp.
Functional test:
6. Remove the focus unit 4 from the lamp again.
If the remaining lamp 5 is not in the centre:
• check if the position of the cables 6 is preventing
the lamp 5 from swivelling,
• change the polarity of the servomotor.
Changing the polarity:
7. Lift the sealing lip 8, unscrew the sheet-metal
screws 9 and put the sheet-metal clips C in a
safe place.
8. Unscrew the two screws B and push back the
plastic cover E from the lamp.
9. Remove the lamp cover A.
10.Change the cables of the servomotor D on the
PCB.
Functional test:
WARNING – Electric Shock:
The following test must be carried out with
the power supply switched on.
Cordon off installation site and proceed
with great care.
11.Switch on the power supply and the lamp.
12.Carry out functional test. If the remaining lamp 5
is not in the centre:
• test the servomotor according to Chapter 8.2:
24
Installing the lamp cover:
13.Insert the sheet-metal clips C into the lamp cover
A and fit the lamp cover A as described above,
but in reverse order.
14.Check the secure positioning of the lamp cover
A
7200790 Service Manual for the HELION® XENION® Surgical Lighting System GB
Page 25
8 Testing the Servomotor for the HELION M/M+ / L/L+
Figure 02
8.28.2
8.2
8.28.2
Dismantling the focus unit:
TT
esting the servomotoresting the servomotor
T
esting the servomotor
TT
esting the servomotoresting the servomotor
1. Unlock the central hand grip 2 by means of the
unlocking device 1 and remove it.
2. Undo the three screws 3 and remove the focus
unit 4.
3. Swivel the two lamps 5 onto the middle axis represented by the dashed line.
Fitting the focus unit:
4. Insert the focus unit 4 into the lamp so that both
the plug connectors 7 are aligned, then activate
the lamp.
Functional test:
5. Remove the focus unit 4 from the lamp again.
If the two lamps 5 are still on the middle axis
represented by the dashed line:
• check if the position of the cables 6 is preventing
the lamps 5 from swivelling,
• Test the connection of the servomotor to the electronics.
Replacing the focus unit (servomotor):
6. If the two lamps 5 are still on the middle axis
represented by the dashed line:
• the servomotor is defective.
• Replace the entire focus unit 4.
®
XENION® Surgical Lighting System GB
257200790 Service Manual for the HELION
Page 26
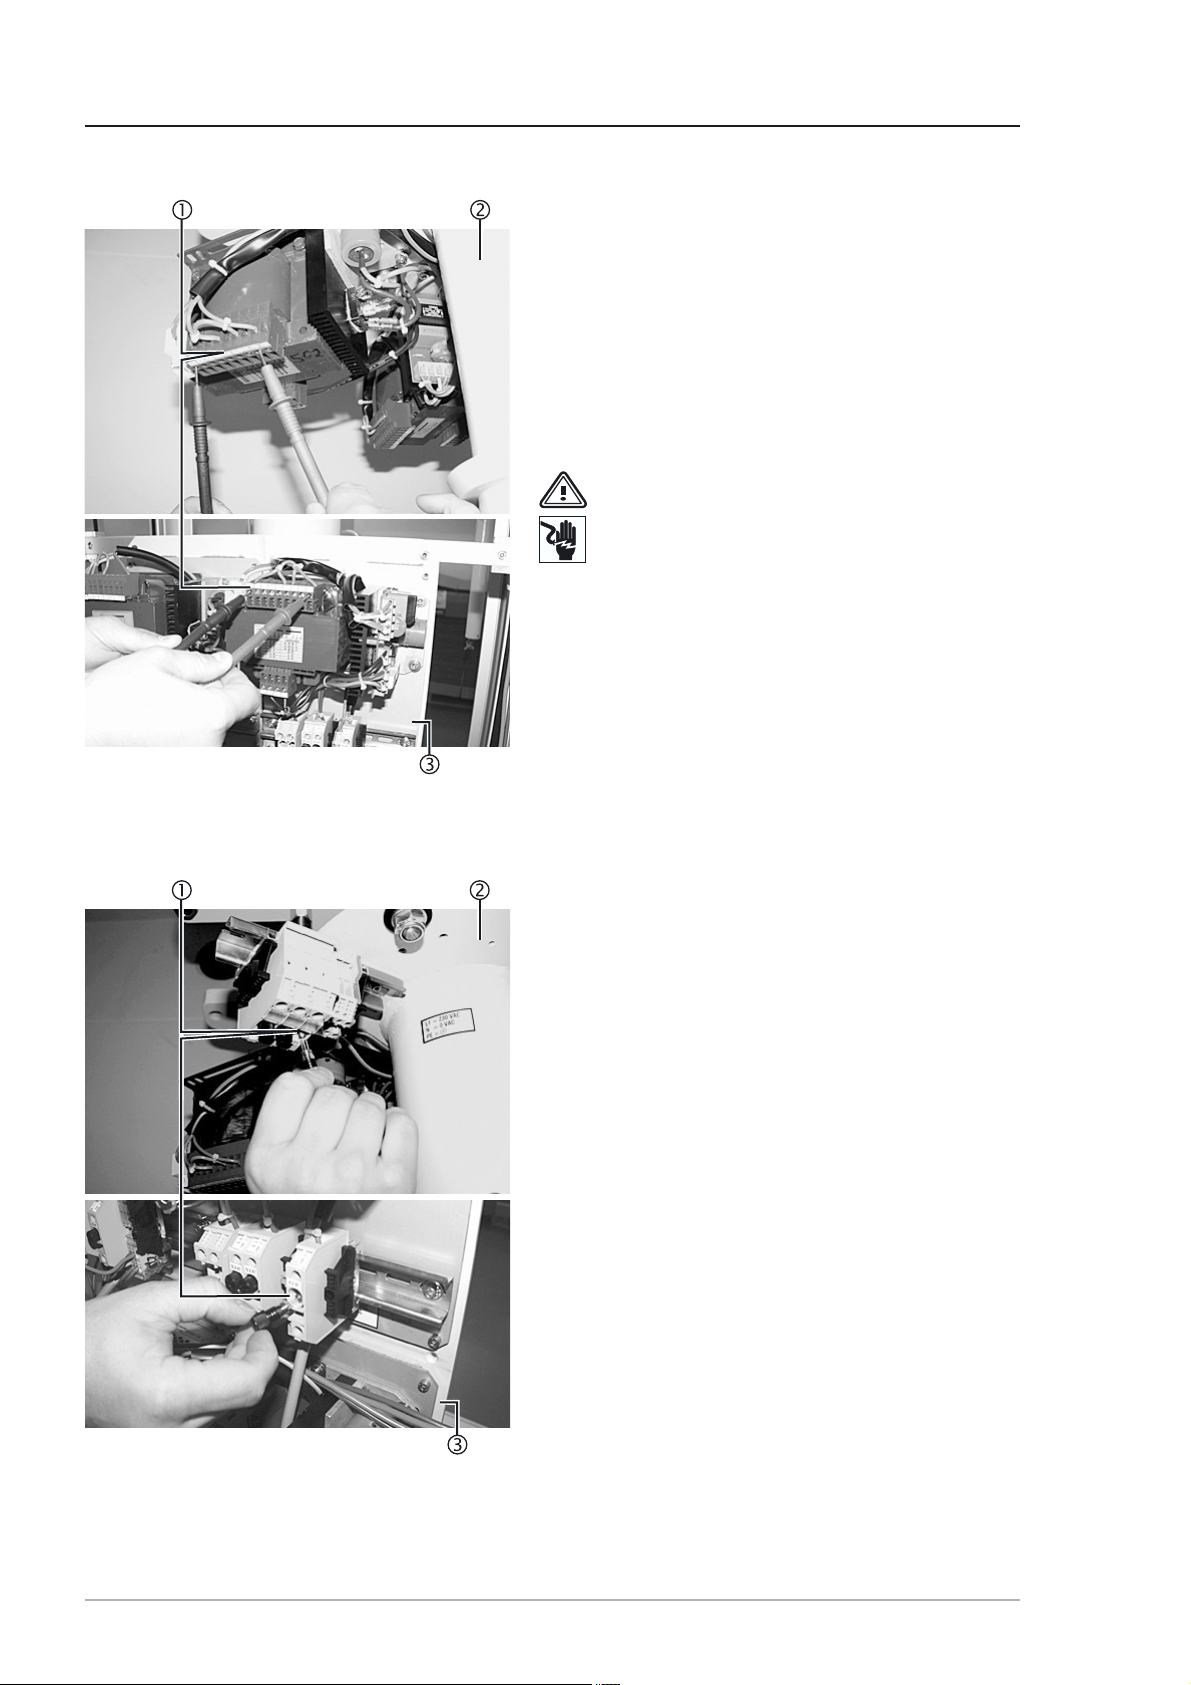
9 Testing the Input Voltages
Figure 01
9.19.1
9.1
9.19.1
The input voltage is measured at the transformer terminal 1. Depending on the installation location, the
transformer is installed on the ceiling tube 2, in the
control cabinet or on a mounting plate 3.
Testing the input voltage:
1. Remove covers etc, open the control cabinet.
2. Switch on the power supply.
3. Using a voltmeter, measure the input voltage at
• If there is no input voltage, inform the customer’s
TT
esting the input voltage of the transesting the input voltage of the trans
T
esting the input voltage of the trans
TT
esting the input voltage of the transesting the input voltage of the trans
formerformer
former
formerformer
WARNING – Electric Shock:
The following test must be carried out with
the power supply switched on.
Cordon off installation site and proceed
with great care.
the transformer terminal 1:
technicians.
--
-
--
Figure 02
9.29.2
9.2
9.29.2
The mains fuse is tested at the fuse terminal 1. Depending on the installation location, the fuse terminal
1 is installed on the ceiling tube 2, in the control
cabinet or on a mounting plate 3.
Testing the mains fuse:
1. Switch off the power supply.
2. Remove covers etc, open the control cabinet.
3. Remove the mains fuse at the fuse terminal 1,
TT
esting the mains fuse for the buildingesting the mains fuse for the building
T
esting the mains fuse for the building
TT
esting the mains fuse for the buildingesting the mains fuse for the building
power supplypower supply
power supply
power supplypower supply
test it and replace if necessary.
26
7200790 Service Manual for the HELION® XENION® Surgical Lighting System GB
Page 27
10 Testing the Electrics of the Support System
Figure 01
10.110.1
10.1
10.110.1
TT
esting the voltage at the sliding con-esting the voltage at the sliding con-
T
esting the voltage at the sliding con-
TT
esting the voltage at the sliding con-esting the voltage at the sliding con-
tact in the extension armtact in the extension arm
tact in the extension arm
tact in the extension armtact in the extension arm
The input voltage is measured at the contact block 3
in the extension arm 2.
1. Remove the cover 1 from the extension arm 2.
Testing the input voltage at the contact block:
WARNING – Electric Shock:
The following adjustments must be made
with the power supply switched on.
Cordon off installation site and proceed
with great care.
2. Switch on the power supply and the lamp.
3. Using a voltmeter, measure the input voltage at
the contact block 3:
• check the proper positioning of the cables,
• if there is still no input voltage, the sliding contact
in the extension arm 2 must be tested according
to Section 10.2 and replaced if necessary.
®
XENION® Surgical Lighting System GB
277200790 Service Manual for the HELION
Page 28
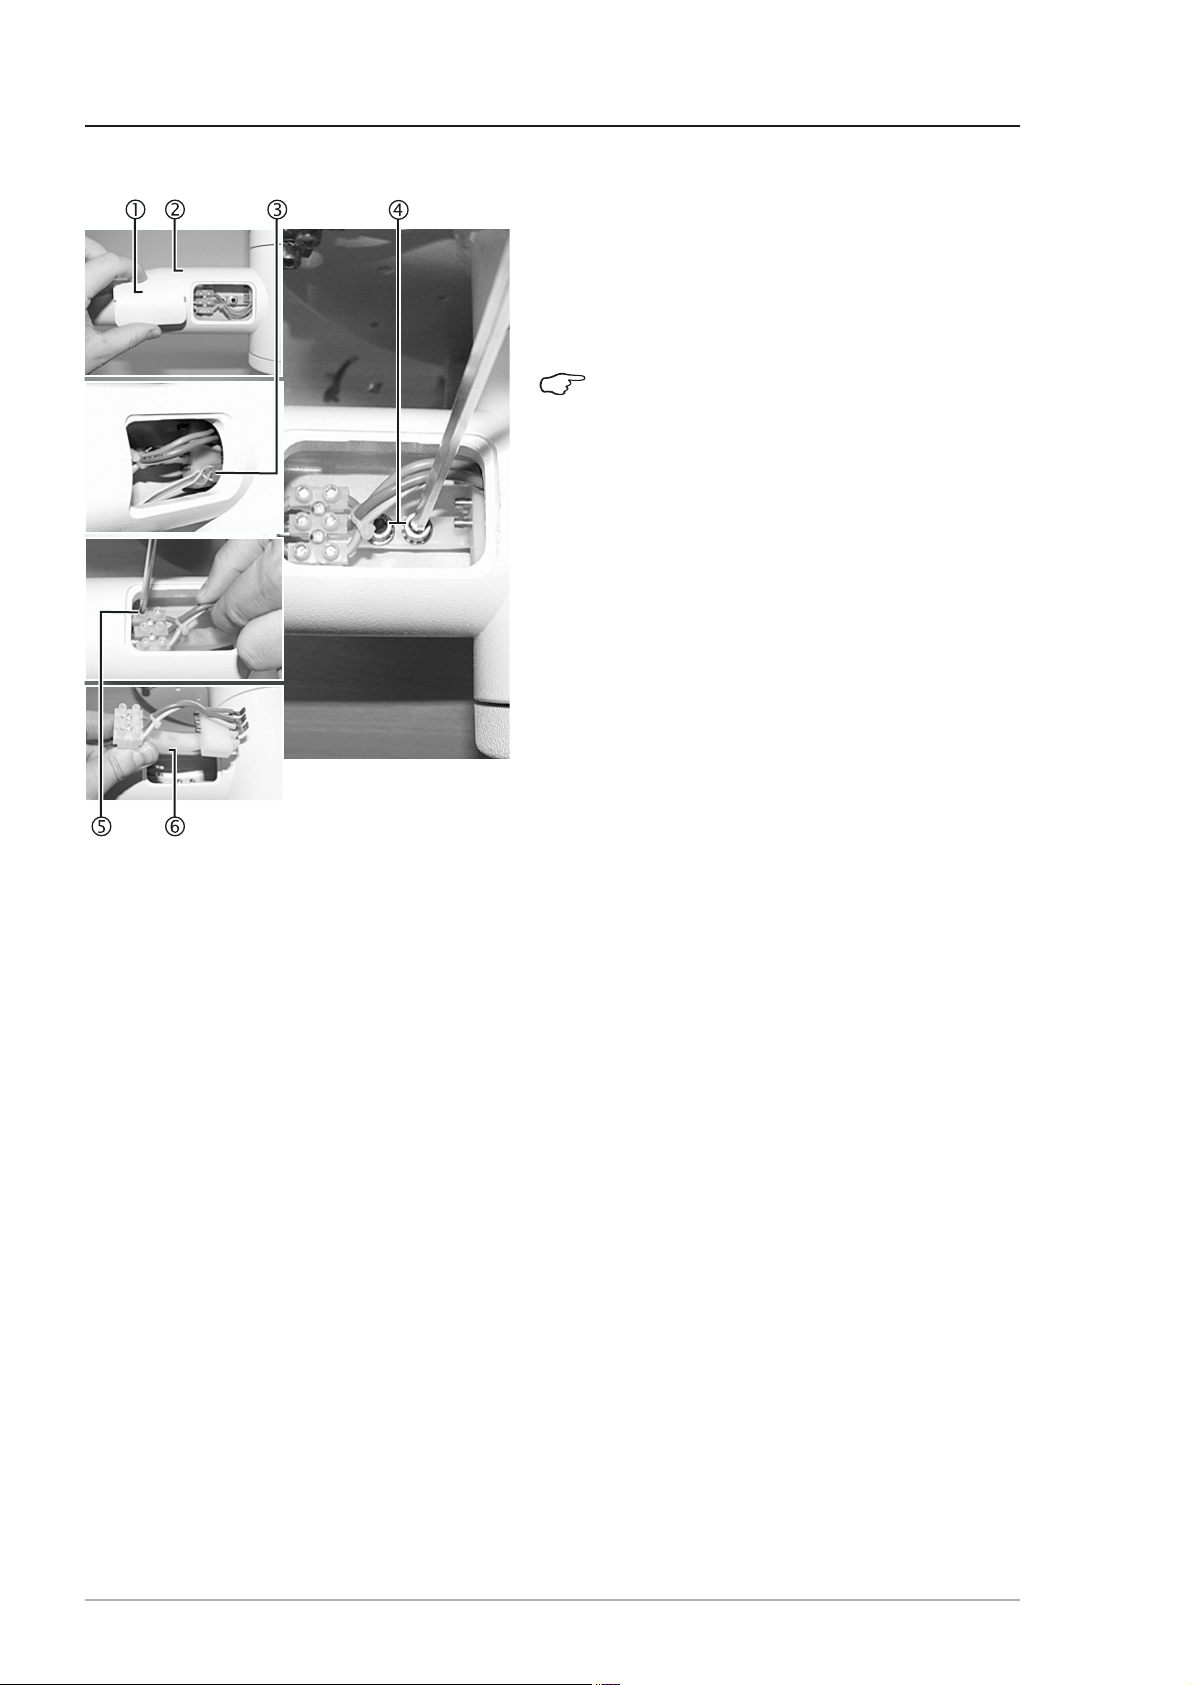
10 Testing the Electrics of the Support System
Figure 02
10.210.2
10.2
10.210.2
Removal:
1. Remove the cover 1 from the extension arm 2.
2. Unscrew the two socket head cap screws size 5 4
3. Disconnect the cables at the terminal block 5
Testing the slip ring on the central column:
4. Before fitting a new sliding contact 6 check that
5. Carry out a contact resistance test between the
• If the resistance is infinite, the slip ring must be
- 10.3 Dismantling the light head,
- 10.5 Dismantling the spring arm,
- 10.8 Dismantling the central column,
- 10.9 Changing the slip ring.
RR
eplacing the sliding contact in the exeplacing the sliding contact in the ex
R
eplacing the sliding contact in the ex
RR
eplacing the sliding contact in the exeplacing the sliding contact in the ex
tension arm/testing the slip ring on thetension arm/testing the slip ring on the
tension arm/testing the slip ring on the
tension arm/testing the slip ring on thetension arm/testing the slip ring on the
central columncentral column
central column
central columncentral column
NOTE – in the case of 7-pole sliding contacts:
Disconnect the low-voltage plug connection
3.
and put them in a safe place.
and remove the sliding contact 6.
the slip ring on the central column is functioning
properly:
terminal block on the transformer and the slip ring
in the extension arm:
replaced in accordance with the following sections:
--
-
--
28
Installation:
5. Fit the new sliding contact 6 as described above,
but in reverse order.
6. Fit the cover 1.
7200790 Service Manual for the HELION® XENION® Surgical Lighting System GB
Page 29
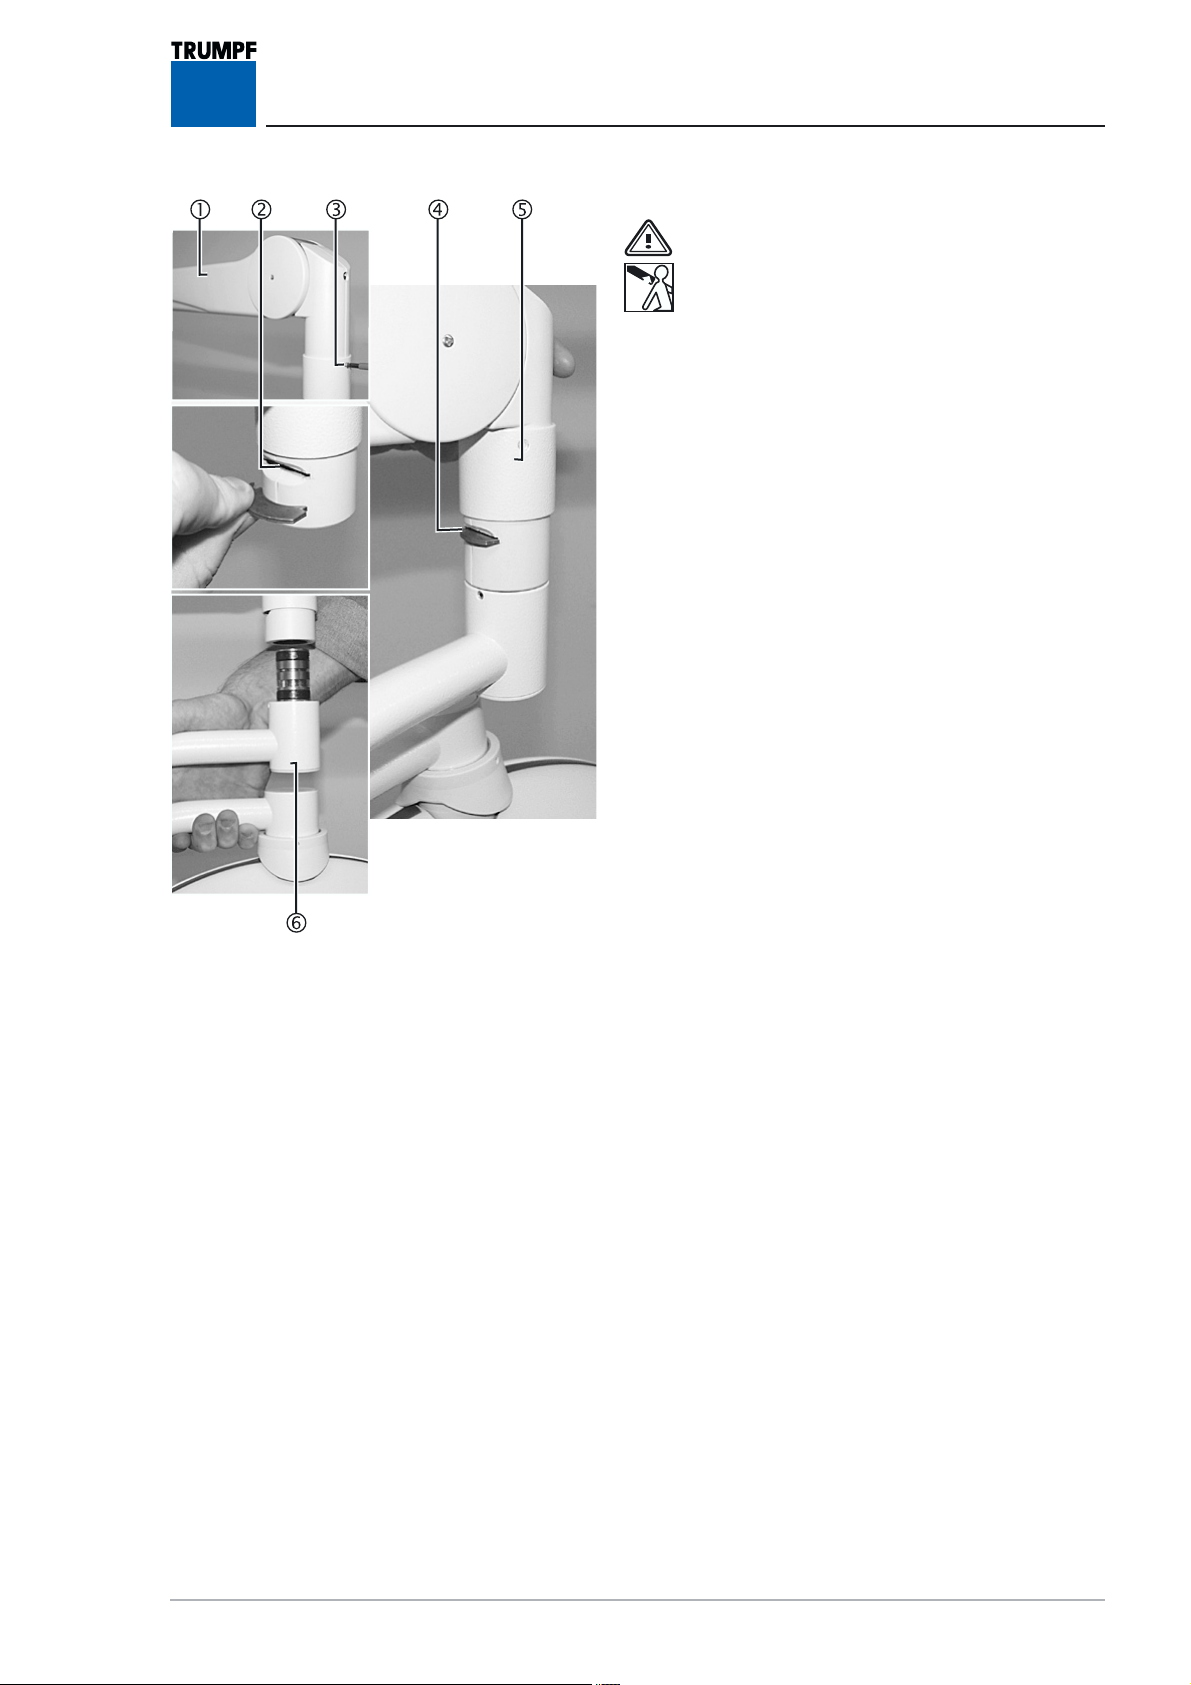
10 Testing the Electrics of the Support System
Figure 03
10.310.3
10.3
10.310.3
1. Place the spring arm 1 (in the example: Acrobat
2. Unscrew the cross-recessed head screw 3 and
3. Using a small screwdriver, remove the locking seg-
4. Remove the light head 6 with cardanic suspensi-
Dismantling the light headDismantling the light head
Dismantling the light head
Dismantling the light headDismantling the light head
WARNING - Sudden release of spring arm:
• The spring arm 1 is under high tension. If
the lamp 6 is not removed in the uppermost spring arm position, the spring arm
1 releases suddenly, springing upwards,
and can cause serious injury.
• Only dismantle the lamps 6 when the spring arm 1 is in the uppermost position.
2000) in the uppermost position.
push the sleeve 5 up.
ment 4 from the slot 2 and put it in a safe place.
on from the spring arm 1 and carefully put it
aside.
10.410.4
10.4
10.410.4
1. Carry out an all-pole contact resistance test bet-
• If the resistance is infinite, the spring arm must be
• If the resistance is almost zero, the cables in the
- Carry out a contact resistance test between the
TT
esting the cables in the spring armesting the cables in the spring arm
T
esting the cables in the spring arm
TT
esting the cables in the spring armesting the cables in the spring arm
that lead to the contact block in the exthat lead to the contact block in the ex
that lead to the contact block in the ex
that lead to the contact block in the exthat lead to the contact block in the ex
tension armtension arm
tension arm
tension armtension arm
ween the spring arm (sliding coupling) and the
contact block in the extension arm:
replaced in accordance with Section 10.5.
light head and the cardanic suspension must be
tested:
input terminal of the electronics and the sliding
connector on the cardanic suspension (replace
entire cabled cardanic suspension if necessary).
--
-
--
®
XENION® Surgical Lighting System GB
297200790 Service Manual for the HELION
Page 30

10 Testing the Electrics of the Support System
Figure 04
10.510.5
10.5
10.510.5
1. Unscrew the four recessed countersunk head
2. Carefully remove the spring arm 5 from the ex-
Only if there are additional cables in the spring
arm:
3. Remove the lateral covering on the spring arm.
4. Undo the cable fixtures and carefully remove the
5. Unscrew the two cross-recessed head screws 1
6. Carefully put the spring arm 5 aside.
10.610.6
10.6
10.610.6
Dismantling the spring armDismantling the spring arm
Dismantling the spring arm
Dismantling the spring armDismantling the spring arm
screws M5 x 8 mm 3.
tension tube 2.
cables from the spring arm.
and carefully remove the plug-in connector 4
from the spring arm 5.
TT
esting the cables in the extension armesting the cables in the extension arm
T
esting the cables in the extension arm
TT
esting the cables in the extension armesting the cables in the extension arm
1. Carry out an all-pole contact resistance test between the extension arm (sliding connector) and
the contact block in the extension arm:
• If the resistance is infinite, the cables in the exten-
sion arm must be replaced in accordance with
Section 10.7.
• If the resistance is almost zero, the cables in the
spring arm must be tested:
- Carry out an all-pole contact resistance test between the two sliding couplings of the spring arm
(replace the entire cabled spring arm if necessary).
30
7200790 Service Manual for the HELION® XENION® Surgical Lighting System GB
Page 31

10 Testing the Electrics of the Support System
Figure 05
10.710.7
10.7
10.710.7
RR
eplacing the cables in the extensioneplacing the cables in the extension
R
eplacing the cables in the extension
RR
eplacing the cables in the extensioneplacing the cables in the extension
armarm
arm
armarm
After the lamp and the spring arm have been dismantled, the cables in the extension arm can be replaced.
Removal:
1. Remove the cover 1 from the extension arm 2.
NOTE – in the case of 7-pole sliding contacts:
Disconnect the low-voltage plug connection
3.
2. Unscrew the two socket head cap screws size 5 5
and put them in a safe place.
3. Disconnect the cables at the terminal block 6
and remove the sliding contact 7.
4. Provide the cables 4 with a wire pull and pull
them through the extension arm 2.
Installation:
5. Install the new cables 4 with pre-assembled sliding connector as described above, but in reverse
order.
6. Fit the spring arm and the lamp in accordance
with the current assembly instructions.
7. Carry out functional test.
Figure 06
10.810.8
10.8
10.810.8
Dismantling the central columnDismantling the central column
Dismantling the central column
Dismantling the central columnDismantling the central column
WARNING – Heavy weight:
Two people are needed to dismantle a cen-
tral column with 2 - 4 extension arms.
1. Unscrew the six recessed countersunk head screws
M8 x 15 mm 4.
2. Carefully remove the central column 1 from the
ceiling tube 2.
3. Undo the plug connections 3 and carefully lay
down the central column 1.
®
XENION® Surgical Lighting System GB
317200790 Service Manual for the HELION
Page 32

10 Testing the Electrics of the Support System
Figure 07
10.910.9
10.9
10.910.9
RR
eplacing the slip ringeplacing the slip ring
R
eplacing the slip ring
RR
eplacing the slip ringeplacing the slip ring
1. Unscrew the cross-recessed head screw 3 and
remove the cover 4 of the central column 5.
2. Unscrew the two brake screws 2.
3. Dismantle the sliding contact in accordance with
Section 10.2.
4. Undo the self-locking groove nut 1 with a hook
spanner and twist off from the central column 5.
5. Remove the extension arm 9 from the central column 5.
6. Disconnect all electrical cables of the slip ring 8
concerned.
7. Unscrew the cross-recessed head screw 6 on the
slip ring 8.
8. Remove the slip ring 8 from the central column
by feeding the electrical cables 7 into the central
column 5.
Installation:
WARNING – Falling lighting system:
The self-locking groove nut 1 must be replaced with a new one.
9. Fit the new slip ring 8 as described above, but in
reverse order.
10.Fit the extension arm as described above, but in
reverse order.
Functional check:
WARNING – Electric Shock:
The following adjustments must be made
with the power supply switched on.
Cordon off installation site and proceed
with great care.
11.Switch on the power supply.
12.Testing the voltage at the contact block in the extension arm.
32
Installation:
13.Fit the spring arm and the lamp in accordance
with the current assembly instructions.
7200790 Service Manual for the HELION® XENION® Surgical Lighting System GB
Page 33

11 Testing the Electrics of the HELION M / L Lamp
Figure 01
11.111.1
11.1
11.111.1
The test is described using the HELION L as an example.
Removal:
TT
esting the voltage at the focus unitesting the voltage at the focus unit
T
esting the voltage at the focus unit
TT
esting the voltage at the focus unitesting the voltage at the focus unit
1. Unlock the central hand grip 2 by means of the
unlocking device 1 and remove it.
2. Undo the three screws 3 and remove the focus
unit 5.
Preparing for measurement:
3. Place three test prods 4 on the contacts of the
focus unit 5.
4. Insert the focus unit 5.
Carrying out measurement.
WARNING – Electric Shock:
The following adjustments must be made
with the power supply switched on.
Cordon off installation site and proceed
with great care.
5. Switch on the power supply and the lamp.
6. Measure the voltage with a voltmeter:
• The voltage must be 23 V +/- 0.3 V.
• In the case of voltage deviations, reset the voltage on the transformer in accordance with the specified values in the table.
7. Remove the three test prods 4.
Installation:
8. Insert the focus unit 5 into the lamp so that both
the plug connectors 6 are aligned, then activate
the lamp.
Functional test:
9. Carry out functional test.
®
XENION® Surgical Lighting System GB
337200790 Service Manual for the HELION
Page 34

11 Testing the Electrics of the HELION M / L Lamp
Figure 02
11.211.2
11.2
11.211.2
Dismantling the lamp cover:
1. Lift the sealing lip 1, unscrew the sheet-metal
2. Unscrew the two set screws 4 and push back the
3. Remove the lamp cover 3.
Check the cables on the PCB and control panel:
4. Check the secure positioning of the cables 7/8
Checking the voltages at the PCB:
TT
esting the voltages and cables in theesting the voltages and cables in the
T
esting the voltages and cables in the
TT
esting the voltages and cables in theesting the voltages and cables in the
lamplamp
lamp
lamplamp
screws 2 and put the sheet-metal clips 5 in a
safe place.
plastic cover 6 from the lamp.
on the PCB and the control panel.
WARNING – Electric Shock:
The following measurements must be made
with the power supply switched on.
Cordon off installation site and proceed
with great care.
5. Switch on the power supply and the lamp.
6. Testing the input voltage on the electronics with a
voltmeter.
7. Using a voltmeter, measure the voltage of:
- 5.1 V DC (designated +5.1 V to GNDB) and
- 12 V DC (designated +12 V to GNDB) and
measure at the measuring points 9 on the PCB:
• If there is no voltage to measure:
- test the cables according to Chapter 10:
• If the voltage is correct, change the PCB:
- remove all cable connectors from the PCB,
- take off the hexagon nut A and remove the PCB,
- fit the PCB as described above, but in reverse order, and attach the cable connector.
Continued on next page.
34
7200790 Service Manual for the HELION® XENION® Surgical Lighting System GB
Page 35

11 Testing the Electrics of the HELION M/M+ / L/L+ Lamp
Figure 03
11.211.2
11.2
11.211.2
TT
esting the voltages and cables in theesting the voltages and cables in the
T
esting the voltages and cables in the
TT
esting the voltages and cables in theesting the voltages and cables in the
lamps (cont.)lamps (cont.)
lamps (cont.)
lamps (cont.)lamps (cont.)
WARNING – Electric Shock:
The following measurements must be made
with the power supply switched on.
Cordon off installation site and proceed
with great care.
8. Switch on the power supply and the lamp and, if
necessary, set the lamp to maximum brightness.
Measure the voltage at the contacts of the filter glass
assembly:
9. Using a voltmeter, measure the voltage at the contacts B:
• The voltage must be 23 V +/- 0.3 V.
- In the case of voltage deviations, set the voltage
in accordance with Section 11.1.
If there is no voltage:
• Check the proper positioning of the cables:
• Check the cables for breaks:
- Replace defective cables/components and fit as
described above, but in reverse order.
Installing the lamp cover:
10.Insert the sheet-metal clips 5 into the lamp cover
3 and fit the lamp cover 3 as described above,
but in reverse order.
11.Check the secure positioning of the lamp cover
3.
®
XENION® Surgical Lighting System GB
357200790 Service Manual for the HELION
Page 36

12 Testing the Electrics of the HELION M+ / L+ Lamp
Figure 01
12.112.1
12.1
12.112.1
The test is described using the HELION L+ as an example.
Removal:
TT
esting the voltage at the focus unitesting the voltage at the focus unit
T
esting the voltage at the focus unit
TT
esting the voltage at the focus unitesting the voltage at the focus unit
1. Unlock the central hand grip 2 by means of the
unlocking device 1 and remove it.
2. Undo the three screws 3 and remove the focus
unit 5.
Prepare for measurement:
3. Place three test prods 4 on the contacts of the
focus unit 5.
4. Insert the focus unit 5.
Carry out measurement.
WARNING – Electric Shock:
The following adjustments must be made
with the power supply switched on.
Cordon off installation site and proceed
with great care.
5. Switch on the power supply and the lamp.
6. Measure the voltage with a voltmeter:
• The voltage must be 23 V +/- 0.3 V.
• In the case of voltage deviations, reset the voltage on the transformer in accordance with the specified values in the table.
7. Remove the three test prods 4.
Installation:
8. Insert the focus unit 5 into the lamp so that both
the plug connectors 6 are aligned, then activate
the lamp.
Functional test:
9. Carry out functional test.
36
7200790 Service Manual for the HELION® XENION® Surgical Lighting System GB
Page 37

12 Testing the Electrics of the HELION M+ / L+ Lamp
Figure 02
12.212.2
12.2
12.212.2
The test is described using the HELION L+ as an example.
Dismantling the lamp cover:
TT
esting the operating voltages, fuseesting the operating voltages, fuse
T
esting the operating voltages, fuse
TT
esting the operating voltages, fuseesting the operating voltages, fuse
and cables in the lampand cables in the lamp
and cables in the lamp
and cables in the lampand cables in the lamp
1. Lift the sealing lip 1, unscrew the sheet-metal
screws 2 and put the sheet-metal clips 5 in a
safe place.
2. Unscrew the two set screws 4 and push back the
plastic cover 6 from the lamp.
3. Remove the lamp cover 3.
Check the cables on the PCB and control panel:
4. Unscrew the four recessed countersunk head
screws 7 and remove the housing on the control
panel.
5. Check the secure positioning of the cables 8/
C/D on the PCB and the control panel.
Checking the fuse and the voltage at the PCB:
6. Check the fuse A and replace if necessary.
Fuse type: T1L 250 V (1 A slow-blow)
WARNING – Electric Shock:
The following measurements must be made
with the power supply switched on.
Cordon off installation site and proceed
with great care.
7. Switch on the power supply and the lamp and set
the lamp to maximum brightness.
8. Using a voltmeter, measure the voltage at the terminal strip 9:
• The voltage must be between 23 V and 30 V DC.
- In the case of voltage deviations, reset the voltage on the transformer in accordance with the
specified values in the table.
• If there is no voltage to measure:
- Test the cables according to Section 10.
• If the voltage is correct, change the PCB:
- remove all cable connectors from the PCB,
- unscrew the two Allen screws B and remove the
PCB,
- fit the PCB as described above, but in reverse order, and attach the cable connector.
Continued on next page.
®
XENION® Surgical Lighting System GB
377200790 Service Manual for the HELION
Page 38

12 Testing the Electrics of the HELION M+ / L+ Lamp
Figure 03
12.212.2
12.2
12.212.2
9. Switch on the power supply and the lamp and, if
Measure the voltage at the contacts of the filter glass
assembly:
10.Using a voltmeter, measure the voltage at the con-
• The voltage must be 23 V +/- 0.3 V.
- In the case of voltage deviations, reset the volta-
• If there is no operating voltage:
- Check the proper positioning of the cables:
- Check the cables for breaks:
- Replace defective cables/components and assem-
TT
esting the operating voltages, fusesesting the operating voltages, fuses
T
esting the operating voltages, fuses
TT
esting the operating voltages, fusesesting the operating voltages, fuses
and cables in the lamp (cont.)and cables in the lamp (cont.)
and cables in the lamp (cont.)
and cables in the lamp (cont.)and cables in the lamp (cont.)
WARNING – Electric Shock:
The following measurements must be made
with the power supply switched on.
Cordon off installation site and proceed
with great care.
necessary, set the lamp to maximum brightness.
tacts E:
ge on the transformer in accordance with the specified values in the table.
ble as described above, but in reverse order.
Installing the lamp cover:
11.Insert the sheet-metal clips 5 into the lamp cover
3 and fit the lamp cover 3 as described above,
but in reverse order.
12.Check the secure positioning of the lamp cover
3.
38
7200790 Service Manual for the HELION® XENION® Surgical Lighting System GB
Page 39

12 Testing the Electrics of the HELION M+ / L+ Lamps
Figure 04
12.312.3
12.3
12.312.3
Dismantling the lamp cover:
If the dimmer is defectiveIf the dimmer is defective
If the dimmer is defective
If the dimmer is defectiveIf the dimmer is defective
1. Lift the sealing lip 1, unscrew the sheet-metal
screws 2 and put the sheet-metal clips 5 in a
safe place.
2. Unscrew the two set screws 4 and push back the
plastic cover 6 from the lamp.
3. Remove the lamp cover 3.
Checking the cables from the PCB that lead to the
control panel:
4. Unscrew the four recessed countersunk head
screws 7 and remove the housing on the control
panel.
5. Check the secure positioning of the cables 8/
A/Bon the PCB and the control panel.
Replacing the control panel:
6. Disconnect the cable connectors from the control
panel.
Installation:
7. Fit the control panel as described above, but in
reverse order.
Replacing the PCB:
8. Remove all cable connectors and cables from the
PCB.
9. Unscrew the two Allen screws 9 and remove the
PCB.
Installation:
10.Fit the PCB as described above, but in reverse
order.
Installing the lamp cover:
11.Insert the sheet-metal clips 5 into the lamp cover
3 and fit the lamp cover 3 as described above,
but in reverse order.
12.Check the secure positioning of the lamp cover
3.
®
XENION® Surgical Lighting System GB
397200790 Service Manual for the HELION
Page 40

13 Testing the Electrics of the XENION M/M+ / L/L+ Lamp
Figure 01
13.113.1
13.1
13.113.1
Dismantling the lamp cover:
1. Lift the sealing lip 1, unscrew the sheet-metal
2. Unscrew the two set screws 4 and push back the
3. Remove the lamp cover 3.
Checking the cables on the PCB and control panel:
4. Unscrew the four recessed countersunk head
5. Check the secure positioning of the cables 8/
Checking the voltage at the PCB and the fuses:
6. Check the fuses 9 and replace if necessary. Fuse
TT
esting the operating voltages, fusesesting the operating voltages, fuses
T
esting the operating voltages, fuses
TT
esting the operating voltages, fusesesting the operating voltages, fuses
and cables in the lampand cables in the lamp
and cables in the lamp
and cables in the lampand cables in the lamp
screws 2 and put the sheet-metal clips 5 in a
safe place.
plastic cover 6 from the lamp.
screws 7 and remove the housing on the control
panel.
B/Con the PCB and the control panel.
type: T6L 250 V (6 A slow-blow)
DANGER – Electric Shock – High Voltage:
The ballast in XENION lamps produces a
starting voltage of 300 V:
When carrying out measurements in the
lamp with the power switched on:
• cordon off the installation site,
• avoid all contact with conductive parts.
7. Switch on the power supply and the lamp and set
the lamp to maximum brightness.
Continued on next page.
40
7200790 Service Manual for the HELION® XENION® Surgical Lighting System GB
Page 41

13 Testing the Electrics of the XENION M/M+ / L/L+ Lamp
Figure 02
13.113.1
13.1
13.113.1
Checking the voltage at the PCB and the transformer:
TT
esting the operating voltages, fusesesting the operating voltages, fuses
T
esting the operating voltages, fuses
TT
esting the operating voltages, fusesesting the operating voltages, fuses
and cables in the lamp (cont.)and cables in the lamp (cont.)
and cables in the lamp (cont.)
and cables in the lamp (cont.)and cables in the lamp (cont.)
8. Using a voltmeter, measure the voltage at the contacts A:
• The additional LED displays D/E mean:
- Green LED display D is lit up = undervoltage
- Red LED display E is lit up = overvoltage
• The voltage must be 24 V +/-0.5 V.
- In the case of voltage deviations, reset the voltage on the transformer in accordance with the
specified values in the table.
• If there is no voltage to measure:
- Test the cables according to Section 10.
• If the voltage is correct, change the PCB:
- remove all cable connectors from the PCB,
- unscrew the two Allen screws F and remove the
PCB,
- fit the PCB as described above, but in reverse order and attach the cable connectors.
Installing the lamp cover:
9. Insert the sheet-metal clips 5 into the lamp cover
3 and fit the lamp cover 3 as described above,
but in reverse order.
10.Check the secure positioning of the lamp cover
3.
®
XENION® Surgical Lighting System GB
417200790 Service Manual for the HELION
Page 42

13 Testing the Electrics of the XENION M/M+ / L/L+ Lamp
Figure 03
13.213.2
13.2
13.213.2
Dismantling the lamp cover:
If the dimmer is defectiveIf the dimmer is defective
If the dimmer is defective
If the dimmer is defectiveIf the dimmer is defective
1. Lift the sealing lip 1, unscrew the sheet-metal
screws 2 and put the sheet-metal clips 5 in a
safe place.
2. Unscrew the two set screws 4 and push back the
plastic cover 6 from the lamp.
3. Remove the lamp cover 3.
Checking the cables from the PCB that lead to the
control panel:
4. Unscrew the four recessed countersunk head
screws 7 and remove the housing on the control
panel.
5. Check the secure positioning of the cables 8/9
on the PCB and the control panel.
Checking the cables from the PCB that lead to the
motor/potentiometer:
6. Check the secure positioning of the cables A/D
and the plug C on the PCB and the ballast.
Replacing the ballast:
7. Remove all cable connectors from the motor/potentiometer.
8. Remove all cables from the ballast.
9. Take off the hexagon nut B and remove the ballast.
Installation:
10.Fit the ballast as described above, but in reverse
order.
Installing the lamp cover:
11.Insert the sheet-metal clips 5 into the lamp cover
3 and fit the lamp cover 3 as described above,
but in reverse order.
12.Check the secure positioning of the lamp cover
3.
42
7200790 Service Manual for the HELION® XENION® Surgical Lighting System GB
Page 43

14 Functional Check, Hand-Over and Customer Instruction
Hand-over to the customer
Check the earth connections
Acceptance protocol
according to the current standards
Demonstration on hand-over
14.114.1
14.1
14.114.1
Important InformationImportant Information
Important Information
Important InformationImportant Information
WARNING - Malfunction:
Before the initial operation of the light system the electrical supply has to be checked and approved by qualified staff.
• A functional check has to be performed after servicing has
been completed.
• Check that the earth connections comply with the current standards in your country.
• The lighting system must not be handed over to the customer
until it has been tested. The hand-over must be documented
in writing in accordance with the acceptance protocol in this
service manual and verified by the customer.
• The hand-over must comply with the standards DIN EN 606012-41 “Particular requirements for the safety of surgical luminaires and luminaires for diagnosis“ and VDE 0751-1 “Repeat tests/inspections of medical electrical devices or systems”
and be documented in writing in accordance with the acceptance protocol and verified by the customer.
• The equipment must be demonstrated to the customer on handover.
Inspection intervals
By authorised staff only
14.214.2
14.2
14.214.2
Inspection intervals and authorised staffInspection intervals and authorised staff
Inspection intervals and authorised staff
Inspection intervals and authorised staffInspection intervals and authorised staff
During and/or after all work on a surgical lamp and/or lamp combination, such as initial installation, repairs or maintenance, but
at least every 12 months, a safety check is to be carried out by an
authorised person! In addition, in the case of initial installation,
the monitoring activities listed in this appendix must be carried out
comprehensively and conscientiously, and recorded!
Following subsequent maintenance or repairs and/or every 12
months, these monitoring activities, in the form of safety checks or
intensive maintenance, should be repeated and confirmed.
In the case of initial installation, the safety checks or monitoring
activities must only be carried out by persons who, due to their
training, knowledge and practical experience, are able to carry
out such checks properly and are not under any other obligations
as regards these monitoring activities!
This knowledge, capabilities and requirements are only met by
staff of the TRUMPF Medizin Systeme GmbH Technical Customer
Service or specially trained persons authorised by them!
7200791 Service Manual for the HELION® XENION® Surgical Lighting System GB 43
Page 44

14 Functional Check, Hand-Over and Customer Instruction
Figure 01
14.314.3
14.3
14.314.3
Checking the wall/ceiling construction
Monitoring activities Monitoring activities
Monitoring activities
Monitoring activities Monitoring activities
Confirm the secure grip of all the heavy load anchors
and fastening nuts on the ceiling anchor plate and,
where applicable, on the intermediate plate.
When doing so observe the following points.
Checking the torques for heavy load anchors
• HELION S / M types (solo suspension):
heavy load anchor HSL-M10/20,
pull-out torque T
= 50 Nm,
inst
is used for round ceiling anchor plates.
• Types: HELION, XENION (multiple suspension):
heavy load anchor HSL-M12/25,
pull-out torque T
= 80 Nm,
inst
is used for square ceiling anchor plates.
Checking the torques of heavy load anchors
Figure 02
1 Ceiling anchor plate
2 M 16 fastening nuts
3 Intermediate plate
If the given torque is not reached for one or more
heavy load anchors, the ceiling anchor plate must be
reattached using the appropriate measures (e.g. drilling the mounting holes, relocating the ceiling anchor
plate)!
Check the torque of the intermediate ceiling construction
Check the secure grip of all the M 16 fastening nuts
on the ceiling anchor plate and the intermediate
plate with a torque wrench set to 170 Nm.
44
7200790 Service Manual for the HELION® XENION® Surgical Lighting System GB
Page 45

14 Functional Check, Hand-Over and Customer Instruction
Figure 03
1 Insulation rings
2 Washers
3 Spring lock washer
4 M 12 nuts
Checking the ceiling tube bolt connection
• Checking the ceiling tube alignment:
- Check the correct (vertical) alignment of the ceiling tube using a spirit level.
• Checking the insulation rings, washers and spring
lock washers:
- Check that all bolt connections on the ceiling tube
have insulation rings (1), washers (2) and spring
lock washers (3).
• Checking the ceiling tube bolt connection:
- Check the secure grip of the fastening bolts (4) on
the ceiling tube bolt connection (torque: 45 Nm).
• Checking the electrical connections. Cables, connections and PCBs:
- Check the proper state and strength of the screw
and clamp connections on the electrical components (mains supply, transformer, changeover PCB
etc.) and the proper state of the electrical cables
and PCBs.
Figure 04
Checking the potential equalisation/earthed conductor resistance
A Mobile lamp
R
= 0.3 ohms
imax
- Measure the resistance between the earthed conductor contact of the power line and all metal parts
of the lamp.
- Enter the highest reading (max. 0.3 ohms) in the
test report.
1 Power line
2 Earthing contact
3 Measuring instrument
4 Instrument leads
®
XENION® Surgical Lighting System GB
457200790 Service Manual for the HELION
Page 46

14 Functional Check, Hand-Over and Customer Instruction
Figure 05
Figure 06
B Fixed lamp
RR
= 0.3 ohms
imax
The measuring method via the external earthed conductor should only be used if the ceiling connection is
later no longer accessible, e.g. in the case of a laminar flow ceiling system. The prerequisite for this is that
(initial installation) point 5 and the resistance value
between point 2 and 5 are documented at the first
acceptance. Thereafter, the following can be observed during each subsequent repeat measurement:
• If necessary, measure the resistance between the
main earthed conductor connection (2) and the
nearest earthed conductor connection (5).
• In this case, document the location of the externally accessible earthed conductor (5) and enter
the measurement between this place and the main
earthed conductor connection (2) in the test report.
• After assembly of the lamp or lamp combination,
measure the resistance between point 2 and/or
point 5 and all metal parts of the lamp and enter
the highest reading in the test report.
1 Mains supply
2 Main earthed conductor connection
3 Measuring instrument
4 Instrument leads
5 Externally accessible earthed conductor
Figure 07
Testing the support system
• Checking and securing the retaining screws
- Check the correct assembly and fixing of the six
retaining screws of the moving arm on the ceiling
tube and the four retaining screws of the spring
arm on the moving arm.
WARNING – Falling lighting system:
The moving and spring arms are very heavy
and can fall once the retaining screws
shown in Figure 7 have been unscrewed!
- If necessary, replace any missing retaining screws
and/or fix the screws consecutively with Loctite
screw-locking adhesive.
46
7200790 Service Manual for the HELION® XENION® Surgical Lighting System GB
Page 47

14 Functional Check, Hand-Over and Customer Instruction
Figure 08
1 Securing sleeve
2 Projecting segment
3 Securing screw
M4 x 8 as per DIN 7985
4 Plug contact
5 Plastic ring
Checking the securing sleeve
• Check the securing sleeve (1) for cracks and distortion and replace if necessary.
Checking the securing screw
• Check that there is a securing screw (3) and that it
is the correct length (8 mm).
Checking the projecting segment
• Check that the projecting segment (2) is at least
1.6 mm thick in the area of contact.
- If necessary, replace the projecting segment.
• Lubricate the projecting segment (e.g. with Molycote MOS 2).
Checking the brake screws
• Check the adjustment of the brake screws in the
extension arms and in the cardanic suspension.
• If necessary, tighten the brake screws so that the
extension arms and light heads can be moved
easily, but do not move by themselves.
When doing so, first read the information in the
corresponding assembly instructions.
Checking the adjustment of the spring arm
• Check that the tension is correctly adjusted and
check the height limitation of the spring arms.
When doing so, first read the information in the
corresponding assembly instructions.
Checking the rating plate and the warnings
• Check that the rating plate(s) is/are attached and
that they are legible.
• Check that the lamps with pilot lasers carry warnings (stickers) and that they are legible.
®
XENION® Surgical Lighting System GB
477200790 Service Manual for the HELION
Page 48

14 Functional Check, Hand-Over and Customer Instruction
14.414.4
14.4
14.414.4
Checking the emergency power changeover
• Check that the changeover PCB is functioning pro-
Functional check according to the operating instructions
• Carry out a functional check of all operating
Checking the lamp changeover
A HELION lamp versions:
TT
esting the functions of the lampsesting the functions of the lamps
T
esting the functions of the lamps
TT
esting the functions of the lampsesting the functions of the lamps
perly (if installed) e.g. by activating the building‘s
automatic circuit breakers for the lamp or lamp
combination concerned or by removing the fuse
holder on the terminal block of the ceiling tube.
functions of the lamp or lamp combination.
When doing so, read the operating instructions
that correspond to the lamp type for the optional
components (e.g. monitor, camera).
• With the unit switched off, remove the halogen
lamp in the centre of the focus unit and check the
proper functioning of the lamp switchover and the
error display on the control field after switch-on.
• Check the second error display (for the HELION
Standard plus lamp version only) by plugging the
halogen lamp into the other socket, with the unit
switched off, and then switching it on.
• Put the halogen lamp back and/or replace the
halogen lamp(s), with the unit switched off.
B XENION L lamp version:
• Check the switch-on and/or switchover response
of the lamp or lamp combination.
When doing so, first read the corresponding operating instructions.
Checking the luminous field
• Align the light head horizontally and check if, at a
distance of one metre from the surface, the lamp
produces a round luminous field.
48
7200790 Service Manual for the HELION® XENION® Surgical Lighting System GB
Page 49

14 Functional Check, Hand-Over and Customer Instruction
Testing the luminous intensity
• Measure the luminous intensity at the smallest luminous field and without dimming at a distance
of one metre from the surface.
• Luminous intensity setpoint ranges:
Designation E
- HELION S 30 to 40 K-Lux
- HELION M 70 to 95 K-Lux
- HELION L 120 to 140 K-Lux
- XENION L 145 to 160 K-Lux
- HELION XL 125 to 145 K-Lux
Enter the values recorded in the test report.
Testing the lamp voltage at rated load
• Measure the lamp voltage at rated load. Read the
descriptions of the two measuring methods that
are dependent on the lamp type in the corresponding assembly instructions.
• Take the data from the corresponding circuit diagrams.
c
If the surgical lamp and/or lamp combination
has safety defects, it must be shut down and secured against undesired activation using appropriate measures (e.g. removal of the mains fuses, erecting and/or attaching warning signs)!
®
XENION® Surgical Lighting System GB
497200790 Service Manual for the HELION
Page 50

15 Technical Description
15.115.1
15.1
15.115.1
Data sheetsData sheets
Data sheets
Data sheetsData sheets
Please refer to the following data sheets for the technical description of the lighting system.
Data sheets are available from your sales partner.
Lamp designation Technical data sheets
HELION XL+ D 7201017
HELION XL+ / M D 7201036
HELION XL+ / L+ D 7201039
HELION XL+ / L D 7201038
HELION XL+ / S D 7201035
HELION XL+ / M+ D 7201037
HELION XL+ / M / M D 7201053
Lamp designation Technical data sheets
HELION S Ceiling D 7201001
HELION S Mobile 100-127 V D 7201002
HELION S Wall D 7201004
HELION S Mobile 230 V D 7201002
HELION M+/M+ D 7201024
HELION M+ / M+ / M+ D 7201042
HELION M+ D 7201006
HELION M D 7201005
HELION M / M D 7201022
HELION M Wall D 7201008
HELION M/S D 7201020
HELION M+/S D 7201021
HELION M+/M D 7201023
HELION M / M / M D 7201040
HELION M+ / M / M D 7201041
HELION M+ Mobile D 7201010
HELION M Mobile D 7201009
HELION M+ Hospital D 7201019
HELION M Hospital D 7201018
HELION L+ Hospital D 7201055
HELION L Hospital D 7201054
50
7200790 Service Manual for the HELION® XENION® Surgical Lighting System GB
Page 51

15 Technical Description
15.115.1
15.1
15.115.1
Data sheets (cont.)Data sheets (cont.)
Data sheets (cont.)
Data sheets (cont.)Data sheets (cont.)
Please refer to the following data sheets for the technical description of the lighting system.
Data sheets are available from your sales partner.
Lamp designation Technical data sheets
HELION L+ / L+ D 7201032
HELION L+ D 7201012
HELION L+/ M+ D 7201029
HELION L+ / L+ / M+ D 7201048
HELION L D 7201011
HELION L+/M D 7201028
HELION L+ / L D 7201031
HELION L / M D 7201027
HELION L / L D 7201030
HELION L+ / L+ / L+ D 7201050
HELION L / L / L D 7201045
HELION L / M / M D 7201043
HELION L / L / M D 7201044
HELION L/S D 7201025
HELION L+ / M / M D 7201046
HELION L+ / M+ / M+ D 7201047
HELION L+ / L / L D 7201049
HELION L+/S D 7201026
Lamp designation Technical data sheets
HELION L+ Mobile D 7201014
HELION L Mobile D 7201013
Lamp designation Technical data sheets
XENIO N L+ / L+ / L+ D 7201052
XENIO N L+ / L+ / M+ D 7201051
XENION L+ / L+ D 7201033
XENIO N L+ D 7201015
XENIO N L+ / M+ D 7201034
XENIO N L+ Mobile D 7201016
XENION L+ / M+ / M+ D 7201056
®
XENION® Surgical Lighting System GB
517200790 Service Manual for the HELION
Page 52

15 Technical Description
15.215.2
15.2
15.215.2
15.2.1 HELION M/M+; HELION L/L+; HELION XL+15.2.1 HELION M/M+; HELION L/L+; HELION XL+
15.2.1 HELION M/M+; HELION L/L+; HELION XL+
15.2.1 HELION M/M+; HELION L/L+; HELION XL+15.2.1 HELION M/M+; HELION L/L+; HELION XL+
Circuit diagrams and set valuesCircuit diagrams and set values
Circuit diagrams and set values
Circuit diagrams and set valuesCircuit diagrams and set values
52
7200790 Service Manual for the HELION® XENION® Surgical Lighting System GB
Page 53

15 Technical Description
15.215.2
15.2
15.215.2
15.2.2 XENION M/M+; XENION L/L+15.2.2 XENION M/M+; XENION L/L+
15.2.2 XENION M/M+; XENION L/L+
15.2.2 XENION M/M+; XENION L/L+15.2.2 XENION M/M+; XENION L/L+
Circuit diagrams and set values (cont.)Circuit diagrams and set values (cont.)
Circuit diagrams and set values (cont.)
Circuit diagrams and set values (cont.)Circuit diagrams and set values (cont.)
®
XENION® Surgical Lighting System GB
537200790 Service Manual for the HELION
Page 54

15 Technical Description
15.215.2
15.2
15.215.2
15.2.315.2.3
15.2.3
15.2.315.2.3
Circuit diagramsCircuit diagrams
Circuit diagrams
Circuit diagramsCircuit diagrams
XENION M / M+ XENION M / M+
XENION M / M+
XENION M / M+ XENION M / M+
54
7200790 Service Manual for the HELION® XENION® Surgical Lighting System GB
Page 55

15 Technical Description
15.215.2
15.2
15.215.2
15.2.415.2.4
15.2.4
15.2.415.2.4
Circuit diagrams (cont.)Circuit diagrams (cont.)
Circuit diagrams (cont.)
Circuit diagrams (cont.)Circuit diagrams (cont.)
XENION L/L+ XENION L/L+
XENION L/L+
XENION L/L+ XENION L/L+
®
XENION® Surgical Lighting System GB
557200790 Service Manual for the HELION
Page 56

15 Technical Description
15.215.2
15.2
15.215.2
15.2.515.2.5
15.2.5
15.2.515.2.5
Circuit diagrams and set values (cont.)Circuit diagrams and set values (cont.)
Circuit diagrams and set values (cont.)
Circuit diagrams and set values (cont.)Circuit diagrams and set values (cont.)
HELION M+; HELION L+ with wall control panel HELION M+; HELION L+ with wall control panel
HELION M+; HELION L+ with wall control panel
HELION M+; HELION L+ with wall control panel HELION M+; HELION L+ with wall control panel
56
7200790 Service Manual for the HELION® XENION® Surgical Lighting System GB
Page 57

15 Technical Description
15.215.2
15.2
15.215.2
15.2.615.2.6
15.2.6
15.2.615.2.6
Circuit diagrams and set values (cont.)Circuit diagrams and set values (cont.)
Circuit diagrams and set values (cont.)
Circuit diagrams and set values (cont.)Circuit diagrams and set values (cont.)
XENION M/M+ ; XENION L/L+ with wall control panel XENION M/M+ ; XENION L/L+ with wall control panel
XENION M/M+ ; XENION L/L+ with wall control panel
XENION M/M+ ; XENION L/L+ with wall control panel XENION M/M+ ; XENION L/L+ with wall control panel
®
XENION® Surgical Lighting System GB
577200790 Service Manual for the HELION
Page 58

15 Technical Description
15.215.2
15.2
15.215.2
15.2.715.2.7
15.2.7
15.2.715.2.7
Circuit diagrams and set values (cont.)Circuit diagrams and set values (cont.)
Circuit diagrams and set values (cont.)
Circuit diagrams and set values (cont.)Circuit diagrams and set values (cont.)
24 V supply A 24 V supply A
24 V supply A
24 V supply A 24 V supply A
L/L+L/L+
L/L+
L/L+L/L+
C/DC HELION M/M+; HELION L/L+ ; HELION XL+; XENION M/M+; XENIONC/DC HELION M/M+; HELION L/L+ ; HELION XL+; XENION M/M+; XENION
C/DC HELION M/M+; HELION L/L+ ; HELION XL+; XENION M/M+; XENION
C/DC HELION M/M+; HELION L/L+ ; HELION XL+; XENION M/M+; XENIONC/DC HELION M/M+; HELION L/L+ ; HELION XL+; XENION M/M+; XENION
58
7200790 Service Manual for the HELION® XENION® Surgical Lighting System GB
Page 59

15 Technical Description
15.215.2
15.2
15.215.2
15.2.815.2.8
15.2.8
15.2.815.2.8
Circuit diagrams and set values (cont.)Circuit diagrams and set values (cont.)
Circuit diagrams and set values (cont.)
Circuit diagrams and set values (cont.)Circuit diagrams and set values (cont.)
Combination T Combination T
Combination T
Combination T Combination T
XENION L/L+ lampsXENION L/L+ lamps
XENION L/L+ lamps
XENION L/L+ lampsXENION L/L+ lamps
ruVidia with HELION M/M+; HELION L/L+; HELION XL+; XENION M/M+;ruVidia with HELION M/M+; HELION L/L+; HELION XL+; XENION M/M+;
ruVidia with HELION M/M+; HELION L/L+; HELION XL+; XENION M/M+;
ruVidia with HELION M/M+; HELION L/L+; HELION XL+; XENION M/M+;ruVidia with HELION M/M+; HELION L/L+; HELION XL+; XENION M/M+;
®
XENION® Surgical Lighting System GB
597200790 Service Manual for the HELION
Page 60

15 Technical Description
15.215.2
15.2
15.215.2
15.2.915.2.9
15.2.9
15.2.915.2.9
Circuit diagrams and set values (cont.)Circuit diagrams and set values (cont.)
Circuit diagrams and set values (cont.)
Circuit diagrams and set values (cont.)Circuit diagrams and set values (cont.)
7-pole plug -> cardanic suspension 8-pole DIN socket T 7-pole plug -> cardanic suspension 8-pole DIN socket T
7-pole plug -> cardanic suspension 8-pole DIN socket T
7-pole plug -> cardanic suspension 8-pole DIN socket T 7-pole plug -> cardanic suspension 8-pole DIN socket T
ruVidiaruVidia
ruVidia
ruVidiaruVidia
60
7200790 Service Manual for the HELION® XENION® Surgical Lighting System GB
Page 61

15 Technical Description
15.215.2
15.2
15.215.2
15.2.10 5-pole plug cardanic suspension TFT LCD monitor; (optional DC/DC converter)15.2.10 5-pole plug cardanic suspension TFT LCD monitor; (optional DC/DC converter)
15.2.10 5-pole plug cardanic suspension TFT LCD monitor; (optional DC/DC converter)
15.2.10 5-pole plug cardanic suspension TFT LCD monitor; (optional DC/DC converter)15.2.10 5-pole plug cardanic suspension TFT LCD monitor; (optional DC/DC converter)
Circuit diagrams and set values (cont.)Circuit diagrams and set values (cont.)
Circuit diagrams and set values (cont.)
Circuit diagrams and set values (cont.)Circuit diagrams and set values (cont.)
®
XENION® Surgical Lighting System GB
617200790 Service Manual for the HELION
Page 62

15 Technical Description
15.215.2
15.2
15.215.2
15.2.11 TFT LCD monitor15.2.11 TFT LCD monitor
15.2.11 TFT LCD monitor
15.2.11 TFT LCD monitor15.2.11 TFT LCD monitor
Circuit diagrams and set values (cont.)Circuit diagrams and set values (cont.)
Circuit diagrams and set values (cont.)
Circuit diagrams and set values (cont.)Circuit diagrams and set values (cont.)
62
7200790 Service Manual for the HELION® XENION® Surgical Lighting System GB
Page 63

15 Technical Description
15.215.2
15.2
15.215.2
15.2.12 TFT LCD monitor with monitor power supply unit15.2.12 TFT LCD monitor with monitor power supply unit
15.2.12 TFT LCD monitor with monitor power supply unit
15.2.12 TFT LCD monitor with monitor power supply unit15.2.12 TFT LCD monitor with monitor power supply unit
Circuit diagrams and set values (cont.)Circuit diagrams and set values (cont.)
Circuit diagrams and set values (cont.)
Circuit diagrams and set values (cont.)Circuit diagrams and set values (cont.)
®
XENION® Surgical Lighting System GB
637200790 Service Manual for the HELION
Page 64

15 Technical Description
15.215.2
15.2
15.215.2
15.2.13 Plug connector -> T15.2.13 Plug connector -> T
15.2.13 Plug connector -> T
15.2.13 Plug connector -> T15.2.13 Plug connector -> T
Circuit diagrams and set values (cont.)Circuit diagrams and set values (cont.)
Circuit diagrams and set values (cont.)
Circuit diagrams and set values (cont.)Circuit diagrams and set values (cont.)
ruVidia spring armruVidia spring arm
ruVidia spring arm
ruVidia spring armruVidia spring arm
64
7200790 Service Manual for the HELION® XENION® Surgical Lighting System GB
Page 65

15 Technical Description
15.215.2
15.2
15.215.2
15.2.14 Plug connector -> spring arms 3-pole / 5-pole / 7-pole15.2.14 Plug connector -> spring arms 3-pole / 5-pole / 7-pole
15.2.14 Plug connector -> spring arms 3-pole / 5-pole / 7-pole
15.2.14 Plug connector -> spring arms 3-pole / 5-pole / 7-pole15.2.14 Plug connector -> spring arms 3-pole / 5-pole / 7-pole
Circuit diagrams and set values (cont.)Circuit diagrams and set values (cont.)
Circuit diagrams and set values (cont.)
Circuit diagrams and set values (cont.)Circuit diagrams and set values (cont.)
®
XENION® Surgical Lighting System GB
657200790 Service Manual for the HELION
Page 66

15 Technical Description
15.215.2
15.2
15.215.2
15.2.15 HELION M/L light head15.2.15 HELION M/L light head
15.2.15 HELION M/L light head
15.2.15 HELION M/L light head15.2.15 HELION M/L light head
Circuit diagrams and set values (cont.)Circuit diagrams and set values (cont.)
Circuit diagrams and set values (cont.)
Circuit diagrams and set values (cont.)Circuit diagrams and set values (cont.)
66
7200790 Service Manual for the HELION® XENION® Surgical Lighting System GB
Page 67

15 Technical Description
15.215.2
15.2
15.215.2
15.2.16 HELION M/L light head with fixed focus camera15.2.16 HELION M/L light head with fixed focus camera
15.2.16 HELION M/L light head with fixed focus camera
15.2.16 HELION M/L light head with fixed focus camera15.2.16 HELION M/L light head with fixed focus camera
Circuit diagrams and set values (cont.)Circuit diagrams and set values (cont.)
Circuit diagrams and set values (cont.)
Circuit diagrams and set values (cont.)Circuit diagrams and set values (cont.)
®
XENION® Surgical Lighting System GB
677200790 Service Manual for the HELION
Page 68

15 Technical Description
15.215.2
15.2
15.215.2
15.2.17 HELION M/L light head with T15.2.17 HELION M/L light head with T
15.2.17 HELION M/L light head with T
15.2.17 HELION M/L light head with T15.2.17 HELION M/L light head with T
Circuit diagrams and set values (cont.)Circuit diagrams and set values (cont.)
Circuit diagrams and set values (cont.)
Circuit diagrams and set values (cont.)Circuit diagrams and set values (cont.)
ruVidiaruVidia
ruVidia
ruVidiaruVidia
68
7200790 Service Manual for the HELION® XENION® Surgical Lighting System GB
Page 69

15 Technical Description
15.215.2
15.2
15.215.2
15.2.18 HELION M+/L+ light head15.2.18 HELION M+/L+ light head
15.2.18 HELION M+/L+ light head
15.2.18 HELION M+/L+ light head15.2.18 HELION M+/L+ light head
Circuit diagrams and set values (cont.)Circuit diagrams and set values (cont.)
Circuit diagrams and set values (cont.)
Circuit diagrams and set values (cont.)Circuit diagrams and set values (cont.)
®
XENION® Surgical Lighting System GB
697200790 Service Manual for the HELION
Page 70

15 Technical Description
15.215.2
15.2
15.215.2
15.2.19 HELION M+/L+ light head with wall control panel15.2.19 HELION M+/L+ light head with wall control panel
15.2.19 HELION M+/L+ light head with wall control panel
15.2.19 HELION M+/L+ light head with wall control panel15.2.19 HELION M+/L+ light head with wall control panel
Circuit diagrams and set values (cont.)Circuit diagrams and set values (cont.)
Circuit diagrams and set values (cont.)
Circuit diagrams and set values (cont.)Circuit diagrams and set values (cont.)
70
7200790 Service Manual for the HELION® XENION® Surgical Lighting System GB
Page 71

15 Technical Description
15.215.2
15.2
15.215.2
15.2.20 HELION M+/L+ light head with fixed focus camera15.2.20 HELION M+/L+ light head with fixed focus camera
15.2.20 HELION M+/L+ light head with fixed focus camera
15.2.20 HELION M+/L+ light head with fixed focus camera15.2.20 HELION M+/L+ light head with fixed focus camera
Circuit diagrams and set values (cont.)Circuit diagrams and set values (cont.)
Circuit diagrams and set values (cont.)
Circuit diagrams and set values (cont.)Circuit diagrams and set values (cont.)
®
XENION® Surgical Lighting System GB
717200790 Service Manual for the HELION
Page 72

15 Technical Description
15.215.2
15.2
15.215.2
15.2.21 HELION M+/L+ light head with T15.2.21 HELION M+/L+ light head with T
15.2.21 HELION M+/L+ light head with T
15.2.21 HELION M+/L+ light head with T15.2.21 HELION M+/L+ light head with T
Circuit diagrams and set values (cont.)Circuit diagrams and set values (cont.)
Circuit diagrams and set values (cont.)
Circuit diagrams and set values (cont.)Circuit diagrams and set values (cont.)
ruVidiaruVidia
ruVidia
ruVidiaruVidia
72
7200790 Service Manual for the HELION® XENION® Surgical Lighting System GB
Page 73

15 Technical Description
15.215.2
15.2
15.215.2
15.2.22 HELION M+/L+ light head with fixed focus camera and wall control panel15.2.22 HELION M+/L+ light head with fixed focus camera and wall control panel
15.2.22 HELION M+/L+ light head with fixed focus camera and wall control panel
15.2.22 HELION M+/L+ light head with fixed focus camera and wall control panel15.2.22 HELION M+/L+ light head with fixed focus camera and wall control panel
Circuit diagrams and set values (cont.)Circuit diagrams and set values (cont.)
Circuit diagrams and set values (cont.)
Circuit diagrams and set values (cont.)Circuit diagrams and set values (cont.)
®
XENION® Surgical Lighting System GB
737200790 Service Manual for the HELION
Page 74

15 Technical Description
15.215.2
15.2
15.215.2
15.2.23 XENION M light head15.2.23 XENION M light head
15.2.23 XENION M light head
15.2.23 XENION M light head15.2.23 XENION M light head
Circuit diagrams and set values (cont.)Circuit diagrams and set values (cont.)
Circuit diagrams and set values (cont.)
Circuit diagrams and set values (cont.)Circuit diagrams and set values (cont.)
74
7200790 Service Manual for the HELION® XENION® Surgical Lighting System GB
Page 75

15 Technical Description
15.215.2
15.2
15.215.2
15.2.24 XENION M light head with wall control panel15.2.24 XENION M light head with wall control panel
15.2.24 XENION M light head with wall control panel
15.2.24 XENION M light head with wall control panel15.2.24 XENION M light head with wall control panel
Circuit diagrams and set values (cont.)Circuit diagrams and set values (cont.)
Circuit diagrams and set values (cont.)
Circuit diagrams and set values (cont.)Circuit diagrams and set values (cont.)
®
XENION® Surgical Lighting System GB
757200790 Service Manual for the HELION
Page 76

15 Technical Description
15.215.2
15.2
15.215.2
15.2.25 XENION M light head with fixed focus camera15.2.25 XENION M light head with fixed focus camera
15.2.25 XENION M light head with fixed focus camera
15.2.25 XENION M light head with fixed focus camera15.2.25 XENION M light head with fixed focus camera
Circuit diagrams and set values (cont.)Circuit diagrams and set values (cont.)
Circuit diagrams and set values (cont.)
Circuit diagrams and set values (cont.)Circuit diagrams and set values (cont.)
76
7200790 Service Manual for the HELION® XENION® Surgical Lighting System GB
Page 77

15 Technical Description
15.215.2
15.2
15.215.2
15.2.26 XENION M light head with T15.2.26 XENION M light head with T
15.2.26 XENION M light head with T
15.2.26 XENION M light head with T15.2.26 XENION M light head with T
Circuit diagrams and set values (cont.)Circuit diagrams and set values (cont.)
Circuit diagrams and set values (cont.)
Circuit diagrams and set values (cont.)Circuit diagrams and set values (cont.)
ruVidiaruVidia
ruVidia
ruVidiaruVidia
®
XENION® Surgical Lighting System GB
777200790 Service Manual for the HELION
Page 78

15 Technical Description
15.215.2
15.2
15.215.2
15.2.27 XENION L light head15.2.27 XENION L light head
15.2.27 XENION L light head
15.2.27 XENION L light head15.2.27 XENION L light head
Circuit diagrams and set values (cont.)Circuit diagrams and set values (cont.)
Circuit diagrams and set values (cont.)
Circuit diagrams and set values (cont.)Circuit diagrams and set values (cont.)
78
7200790 Service Manual for the HELION® XENION® Surgical Lighting System GB
Page 79

15 Technical Description
15.215.2
15.2
15.215.2
15.2.28 XENION L light head with wall control panel15.2.28 XENION L light head with wall control panel
15.2.28 XENION L light head with wall control panel
15.2.28 XENION L light head with wall control panel15.2.28 XENION L light head with wall control panel
Circuit diagrams and set values (cont.)Circuit diagrams and set values (cont.)
Circuit diagrams and set values (cont.)
Circuit diagrams and set values (cont.)Circuit diagrams and set values (cont.)
®
XENION® Surgical Lighting System GB
797200790 Service Manual for the HELION
Page 80

15 Technical Description
15.215.2
15.2
15.215.2
15.2.29 XENION L light head with T15.2.29 XENION L light head with T
15.2.29 XENION L light head with T
15.2.29 XENION L light head with T15.2.29 XENION L light head with T
Circuit diagrams and set values (cont.)Circuit diagrams and set values (cont.)
Circuit diagrams and set values (cont.)
Circuit diagrams and set values (cont.)Circuit diagrams and set values (cont.)
ruVidiaruVidia
ruVidia
ruVidiaruVidia
80
7200790 Service Manual for the HELION® XENION® Surgical Lighting System GB
Page 81

15 Technical Description
15.215.2
15.2
15.215.2
15.2.30 XENION M+ light head15.2.30 XENION M+ light head
15.2.30 XENION M+ light head
15.2.30 XENION M+ light head15.2.30 XENION M+ light head
Circuit diagrams and set values (cont.)Circuit diagrams and set values (cont.)
Circuit diagrams and set values (cont.)
Circuit diagrams and set values (cont.)Circuit diagrams and set values (cont.)
®
XENION® Surgical Lighting System GB
817200790 Service Manual for the HELION
Page 82

15 Technical Description
15.215.2
15.2
15.215.2
15.2.31 XENION M+ light head with wall control panel15.2.31 XENION M+ light head with wall control panel
15.2.31 XENION M+ light head with wall control panel
15.2.31 XENION M+ light head with wall control panel15.2.31 XENION M+ light head with wall control panel
Circuit diagrams and set values (cont.)Circuit diagrams and set values (cont.)
Circuit diagrams and set values (cont.)
Circuit diagrams and set values (cont.)Circuit diagrams and set values (cont.)
82
7200790 Service Manual for the HELION® XENION® Surgical Lighting System GB
Page 83

15 Technical Description
15.215.2
15.2
15.215.2
15.2.32 XENION M+ light head with fixed focus camera15.2.32 XENION M+ light head with fixed focus camera
15.2.32 XENION M+ light head with fixed focus camera
15.2.32 XENION M+ light head with fixed focus camera15.2.32 XENION M+ light head with fixed focus camera
Circuit diagrams and set values (cont.)Circuit diagrams and set values (cont.)
Circuit diagrams and set values (cont.)
Circuit diagrams and set values (cont.)Circuit diagrams and set values (cont.)
®
XENION® Surgical Lighting System GB
837200790 Service Manual for the HELION
Page 84

15 Technical Description
15.215.2
15.2
15.215.2
15.2.33 XENION M+ light head with T15.2.33 XENION M+ light head with T
15.2.33 XENION M+ light head with T
15.2.33 XENION M+ light head with T15.2.33 XENION M+ light head with T
Circuit diagrams and set values (cont.)Circuit diagrams and set values (cont.)
Circuit diagrams and set values (cont.)
Circuit diagrams and set values (cont.)Circuit diagrams and set values (cont.)
ruVidiaruVidia
ruVidia
ruVidiaruVidia
84
7200790 Service Manual for the HELION® XENION® Surgical Lighting System GB
Page 85

15 Technical Description
15.215.2
15.2
15.215.2
15.2.34 XENION M+ light head with fixed focus camera and wall control panel15.2.34 XENION M+ light head with fixed focus camera and wall control panel
15.2.34 XENION M+ light head with fixed focus camera and wall control panel
15.2.34 XENION M+ light head with fixed focus camera and wall control panel15.2.34 XENION M+ light head with fixed focus camera and wall control panel
Circuit diagrams and set values (cont.)Circuit diagrams and set values (cont.)
Circuit diagrams and set values (cont.)
Circuit diagrams and set values (cont.)Circuit diagrams and set values (cont.)
®
XENION® Surgical Lighting System GB
857200790 Service Manual for the HELION
Page 86

15 Technical Description
15.215.2
15.2
15.215.2
15.2.35 XENION L+ light head15.2.35 XENION L+ light head
15.2.35 XENION L+ light head
15.2.35 XENION L+ light head15.2.35 XENION L+ light head
Circuit diagrams and set values (cont.)Circuit diagrams and set values (cont.)
Circuit diagrams and set values (cont.)
Circuit diagrams and set values (cont.)Circuit diagrams and set values (cont.)
86
7200790 Service Manual for the HELION® XENION® Surgical Lighting System GB
Page 87

15 Technical Description
15.215.2
15.2
15.215.2
15.2.36 XENION L+ light head with wall control panel15.2.36 XENION L+ light head with wall control panel
15.2.36 XENION L+ light head with wall control panel
15.2.36 XENION L+ light head with wall control panel15.2.36 XENION L+ light head with wall control panel
Circuit diagrams and set values (cont.)Circuit diagrams and set values (cont.)
Circuit diagrams and set values (cont.)
Circuit diagrams and set values (cont.)Circuit diagrams and set values (cont.)
®
XENION® Surgical Lighting System GB
877200790 Service Manual for the HELION
Page 88

15 Technical Description
15.215.2
15.2
15.215.2
15.2.37 XENION L+ light head with T15.2.37 XENION L+ light head with T
15.2.37 XENION L+ light head with T
15.2.37 XENION L+ light head with T15.2.37 XENION L+ light head with T
Circuit diagrams and set values (cont.)Circuit diagrams and set values (cont.)
Circuit diagrams and set values (cont.)
Circuit diagrams and set values (cont.)Circuit diagrams and set values (cont.)
ruVidiaruVidia
ruVidia
ruVidiaruVidia
88
7200790 Service Manual for the HELION® XENION® Surgical Lighting System GB
Page 89

15 Technical Description
15.215.2
15.2
15.215.2
15.2.38 HELION/XENION transformer connector15.2.38 HELION/XENION transformer connector
15.2.38 HELION/XENION transformer connector
15.2.38 HELION/XENION transformer connector15.2.38 HELION/XENION transformer connector
Circuit diagrams and set values (cont.)Circuit diagrams and set values (cont.)
Circuit diagrams and set values (cont.)
Circuit diagrams and set values (cont.)Circuit diagrams and set values (cont.)
®
XENION® Surgical Lighting System GB
897200790 Service Manual for the HELION
Page 90

15 Technical Description
15.315.3
15.3
15.315.3
TT
est reportest report
T
est report
TT
est reportest report
TECHNICAL SAFETY INSPECTION / REPAIR
PROTOCOL OP-LIGHTS
F 10.M41-00
Seite 1 / 1
TMS911li
2004-08-31
project
com.-nr:
date: page of
repair
technical safety inspection
number of axis positions
room:
1 2 3 4
pos product type hardware software
1
2
3
4
input
pos
V AC
1 n. i. O.
2 n. i. O.
3 n. i. O.
4 n. i. O.
input
V DC
R
in
i
Ohm
V (DC)
contactblock
constr.
year
V (DC)
Focus
version ser.-nr. light intensity
emergency
switch over
default value rem.
technical specifications rem. technical specifications rem.
power loss
transformer Æ contactblock
all functions o.k.
additional accessories - function
air-handling ceiling
Check mounting stability
Mounting place of
transformer
on ceiling tube on mounting plate electrical cabinet other
V
programming checked
cross section [mm²]
bulb checked
control with operator panel
(only on / off)
with control panel (dimming)
remarks on positions
performed on customer signature
field service name department
Gültige Ausgabe im TDM! Kein Änderungsdienst für Papierausdruck.
90
7200790 Service Manual for the HELION® XENION® Surgical Lighting System GB
Page 91

16 Technical Data
Lighting data
Central luminous intensity at a defined distance
electrically dimmable from/to [%]
HELION S
HELION M HELION M+
No External dimmer
required
40 - 100
Central luminous intensity at a defined distance [lx] 40.000 40.000 - 90.000 40.000 - 90.000
Focusable luminous field size d10 at distance of 1 m [mm] 180 140 - 200 140 - 200
Focusable luminous field size d50 at distance of 1 m [mm] 100 80 - 130 80 - 130
Colour temperature [K] 4.300 4.300 4.300
Colour rendering index [Ra (1-8)] 93 93 93
Red rendering index [R9] approx. 45 approx. 60 approx. 60
Total radiation intensity at 100,000 Lux [W/m²] 343 350 350
Luminous efficacy of radiation [lm/m²] 290 285 285
Illumination depth without refocusing [L1 / L2] 730 / 730 320 / 880 320 / 880
Brightness of reserve light [%] no reserve light 100 100
MODELLING: residual illumination with 1 shutter [%] no stand. req. 10 10
MODELLING: residual illumination with 2 shutters [%] no stand. req. 41 41
MODELLING: residual illumination with tube [%] no stand. req. 100 100
MODELLING: residual illumination with tube and 1 shutter [%] no stand. req. 10 10
MODELLING: residual illumination with tube and 2 shutters [%] no stand. req. 41 41
Leneman laminar flow index 26 29 29
Oostlander laminar flow index 28 32 32
Electrical data
HELION S
HELION M HELION M+
Transformer [mm/L x W x H] 78 x 68 x 93 105 x 99 x 109 105 x 99 x 109
Rated output of transformer [VA] 65 168 168
Supply voltage at transformer [V] 115/120/230/240 115/120/230/240 115/120/230/240
Maximum current consumption at 24 V DC [A] 4,2 5,5 6
Maximum current consumption at 230 V [A] 0,4 0,7 0,7
Maximum transformer permanent output [W] 75
Voltage at ceiling fixture point [V] 13,2 (AC/DC) 24-26 (AC/DC) 24-30 (DC)
Ultimate voltage at lamp [V] 13,2 23 23
Rated output of lamp [W] 50 120 120
Rated voltage of lamp [V] 12 24 24
Effective service life of lamp [h] 2000 600-1000 600-1000
Power input of complete lamp [VA] 85 152 208
Voltage stability (corrected electronically) none yes ±0,1
Lamp-friendly soft start no yes yes
Focus/luminous field memory no no yes
Automatic lamp changeover no yes yes
Electrics as per VDE and IEC yes yes yes
Protection class as per MPG (Medical Devices Law) I I I
Data for spare lamp 12V/50W 24V/120W 24V/120W
Spare lamp 8800097
[1 lamp]
8800200
[pack of 6 lamps]
8800200
[pack of 6 lamps]
Certification mark CE · UL/CSA CE · UL/CSA CE · UL/CSA
Technical data
The technical data can be found in the data sheets in Section 15.1.
®
XENION® Surgical Lighting System GB
917200790 Service Manual for the HELION
Page 92

16 Technical Data (cont.)
Lighting data HELION L HELION L+ HELION XL+
Central luminous intensity at a defined distance
electrically dimmable from/to [%]
Central luminous intensity at a defined distance [lx] 50.000 - 140.000 50.000 - 140.000 60.000 - 145.000
Focusable luminous field size d10 at distance of 1 m [mm] 160 - 250 160 - 250 200 - 350
Focusable luminous field size d50 at distance of 1 m [mm] 83 - 165 83 - 165 104 - 175
Colour temperature [K] 4.300 4.300 4.300
Colour rendering index [Ra (1-8)] 93 93 93
Red rendering index [R9] ca. 60 ca. 60 ca. 60
Total radiation intensity at 100,000 Lux [W/m²] 355 355 355
Luminous efficacy of radiation [lm/m²] 282 282 282
Illumination depth without refocusing [L1 / L2] 430 / 750 430 / 750 340 / 900
Brightness of reserve light [%] 100 100 100
MODELLING: residual illumination with 1 shutter [%] 40 40 64
MODELLING: residual illumination with 2 shutters [%] 41 41 53
MODELLING: residual illumination with tube [%] 100 100 87
MODELLING: residual illumination with tube and 1 shutter [%] 40 40 50
MODELLING: residual illumination with tube and 2 shutters [%] 41 41 42
Leneman laminar flow index 28 28 93
Oostlander laminar flow index 32 32 119
External dimmer
required
40 - 100 40 - 100
Electrical data HELION L HELION L+ HELION XL+
Transformer [mm/L x W x H] 120 x 103 x 118 120 x 103 x 118 120 x 135 x 118
Rated output of transformer [VA] 220 220 410
Supply voltage at transformer [V] 115/120/230/240 115/120/230/240 115/120/230/240
Maximum current consumption at 24 V DC [A] 6,6 7,5 13,5
Maximum current consumption at 230 V [A] 0,9 1,2 1,6
Maximum transformer permanent output [W] 185 195 375
Voltage at ceiling fixture point [V] 24-26 (AC/DC) 24-30 (DC) 24-30 (DC)
Ultimate voltage at lamp [V] 23 23 23
Rated output of lamp [W] 150 150 250
Rated voltage of lamp [V] 24 24 24
Effective service life of lamp [h] 600-1000 600 - 1000 600-1000
Power input of complete lamp [VA] 205 210 310
Voltage stability (corrected electronically) yes ±0,1 ±0,1
Lamp-friendly soft start yes yes yes
Focus/luminous field memory no yes yes
Automatic lamp changeover yes yes yes
Electrics as per VDE and IEC yes yes yes
Protection class as per MPG (Medical Devices Law) I I I
Data for spare lamp 24V/150W 24V/150W 24V/250W
Spare lamp 8800100
[pack of 6 lamps]
Certification mark CE · UL/CSA CE · UL/CSA CE · UL/CSA
Technical data
The technical data can be found in the data sheets in Section 15.1.
8800100
[pack of 6 lamps]
8800250
[pack of 6 lamps]
92
7200790 Service Manual for the HELION® XENION® Surgical Lighting System GB
Page 93

16 Technical Data (cont.)
Lighting data XENION M+ XENION L+
Central luminous intensity at a defined distance
electrically dimmable from/to [%]
Central luminous intensity at a defined distance [lx] 60.000 - 120.000 60.000 - 160.000
Focusable luminous field size d10 at distance of 1 m [mm] 180 - 240 190 - 270
Focusable luminous field size d50 at distance of 1 m [mm] 90 - 180 95 - 150
Colour temperature [K] 4.300 4.300
Colour rendering index [Ra (1-8)] 94 94
Red rendering index [R9] ca. 65 ca. 65
Total radiation intensity at 100,000 Lux [W/m²] 342 344
Luminous efficacy of radiation [lm/m²] 291 291
Illumination depth without refocusing [L1 / L2] 365 / 935 410 / 1010
Brightness of reserve light [%] none 81
MODELLING: residual illumination with 1 shutter [%] 10 40
MODELLING: residual illumination with 2 shutters [%] 41 41
MODELLING: residual illumination with tube [%] 100 100
MODELLING: residual illumination with tube and 1 shutter [%] 10 40
MODELLING: residual illumination with tube and 2 shutters [%] 41 41
Leneman laminar flow index 9 10
Oostlander laminar flow index 10 11
60 - 100 60 - 100
Electrical data XENION M+ XENION L+
Power supply unit [mm/L x W x H] 199 x 110 x 50 125,5 x 125,2 x 100
Rated output of power supply unit [VA] 156 240
Supply voltage at power supply unit [V] 88 - 132 / 176 - 240 85 - 240
Maximum current consumption at 24 V DC [A] 6,5 (start phase) 10 (start phase)
Maximum current consumption at 230 V [A] 3,2 (start phase) 3,5 (start phase)
Maximum trans former permanent output [W] 156 240
Voltage at ceiling fixture point [V] 24-26 (DC) 24-26 (DC)
Ultimate voltage at lamp [V] 70 70/24
Rated output of lamp [W] 70 70/120
Rated voltage of lamp [V] 90 90/24
Effective service life of lamp [h] 5000 5000
Power input of complete lamp [VA] 170 170
Voltage stability (corrected electronically) none none
Lamp-friendly soft start yes yes
Focus/luminous field memory yes yes
Automatic lamp changeover no yes
Electrics as per VDE and IEC yes yes
Protection class as per MPG (Medical Devices Law) I I
Data for spare lamp 90V/70W 90V/70W + 24V/120W
Spare lamp 8800095
[1 lamp]
Certification mark CE · UL/CSA CE · UL/CSA
Technical data
The technical data can be found in the data sheets in Section 15.1.
8800095
[1 lamp]
®
XENION® Surgical Lighting System GB
937200790 Service Manual for the HELION
Page 94

16 Technical Data (cont.)
Noise level acc. to EN 793: 1998
Sound energy levels > 30 db(A) (EN ISO 3744) are not exceeded
Classification acc. to EC Medical Device Directive dated 14 June 1993: 93/42/EEC:
Protection class: I
Protection level: Type B
Protection type: covered design
Standard device (clos ed device without protection from ingress of water)
The lighting system is not designed for operation in potentially explosive atmospheres.
The lighting system is suitable for continuous operation.
Applicable regulations
DIN EN 60601-1 (VDE 0750 part 1)
DIN EN 60601-1:1998 + A1:1991 + A2:1995
DIN EN 793: 1998 (VDE 0750 part 211)
UL60601-1 1st: "CSA C22.2 No. 601.1"
Approvals for standard version
The product has been tes ted and certified by the Testing and Certification Institute (EU code no. 0123).
The marks licensing certificate entitles the device to bear the CE mark showing the number of the notified body 0123.
EC C onform ity
The HELION
Directive).
If other lamps are connected to the TRUMPF KREUZER lighting sytem a new conformity assessment must be issued.
Installation of the lamps on a lighting system not specified above must be clarified with TRUMPF KREUZER. A new conformity
assessment must be issued.
Combination with other medical devices
The ceiling-mounted support system is provided with equipment (e.g. monitor, etc) from other manufacturers. Please refer to
the operating instructions of these manufacturers for the information necessary for operation.
CE 0123
TÜV Product Service, Munich, Germany, EC code number: 0123
®
and XENION® lighting systems comply with the provisions of the Directive 93/42/EEC (Medical Device
94
7200790 Service Manual for the HELION® XENION® Surgical Lighting System GB
Page 95

Notes
®
XENION® Surgical Lighting System GB
957200790 Service Manual for the HELION
Page 96

TRUMPF KREUZER Medizin Systeme GmbH + Co. KG
Benzstrasse 26
82178 Puchheim, Germany
Telephone: +49 / (0) 89 / 8 98 07-0 e-mail: info@de.trumpf-med.com
Fax: +49 / (0) 89 / 8 09 07-20 www.trumpf-med.com
Surgical Lighting System GB
®
XENION
®
7200791 Service Manual for the HELION
 Loading...