

Page 1
INSTALLATION SPECIFICATIONS - SOLID PANEL READY
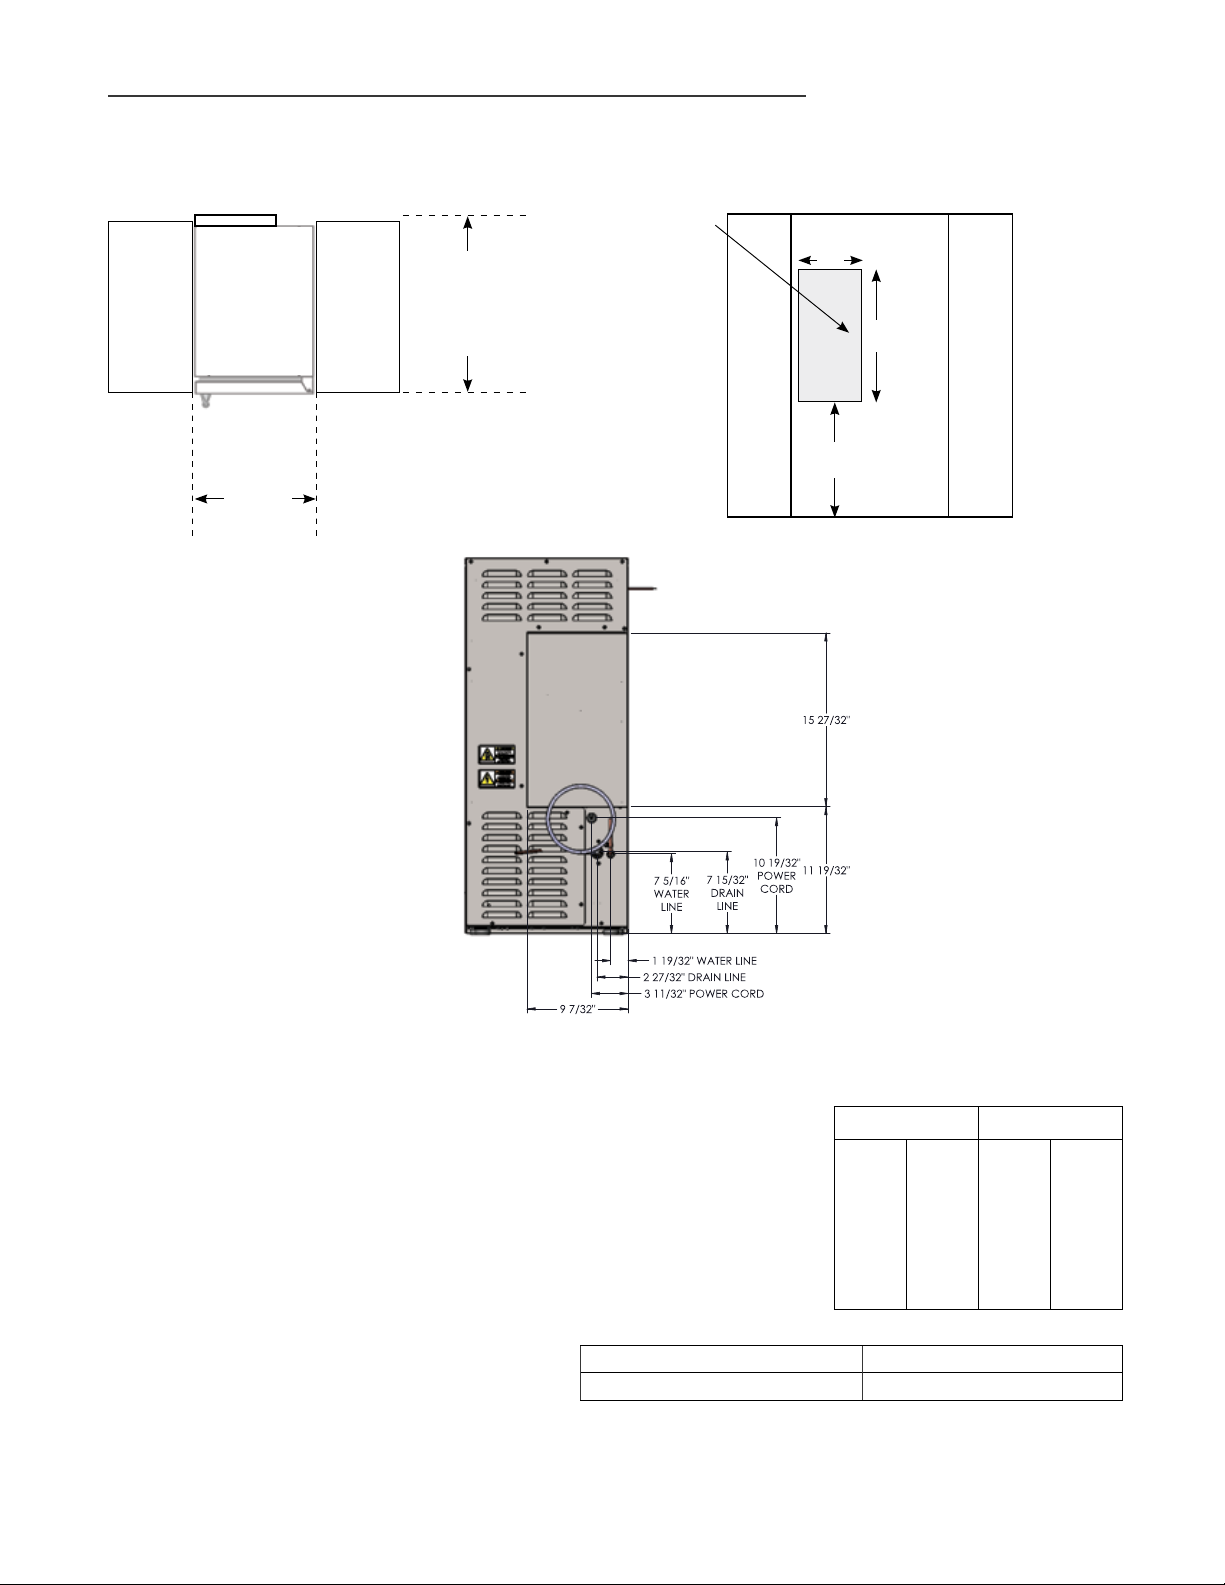
True’s Solid Panel Ready Door units are designed to be inserted into a cabinet opening or free standing.
Below are recommended minimum dimensions for rough opening.
Avoid running
TOP VIEW
OF UNIT
BETWEEN
CABINETRY
ROUGH
OPENING
WIDTH
15"(min.)
ROUGH
OPENING
DEPTH
24" (min..)
wires or
plumbing in
this area.
SURROUNDING CABINETRY
BACK VIEW
OF
ICE MACHINE
9"
11½"
16"
FRONT
VIEW OF
CABINETRY
OPENING
SURROUNDING CABINETRY
CAUTION: DO NOT ALLOW THE ICE MACHINE
TO BE EXPOSED TO TEMPERATURES
BELOW 32°F (0°C) AS THIS WILL CAUSE
ANY WATER IN THE MACHINE TO FREEZE.
FAILURES CAUSED BY EXPOSURE TO
FREEZING TEMPERATURES ARE NOT
COVERED BY THE WARRANTY.
ALLOWABLE TEMPERATURES AND PRESSURES
MINIMUM MAXIMUM
AIR TEMPERATURE 40˚ F 4˚ C 100˚ F 38˚ C
WATER TEMPERATURE 40˚ F 4˚ C 100˚ F 38˚ C
WATER PRESSURE
* Max Ice Production 70 lbs/day
** Rated Ice Production 57 lbs/day
* Performance Rated at 70°F air / 50°F water / 30 psig water pressure.
Performance Rated at 90°F air / 70°F water / 30 psig water pressure.
**
20
PSI
15 INCH ICE MAKER INSTALL GUIDE
1.4
BAR
80
PSI
5.5
BAR
1
Page 2
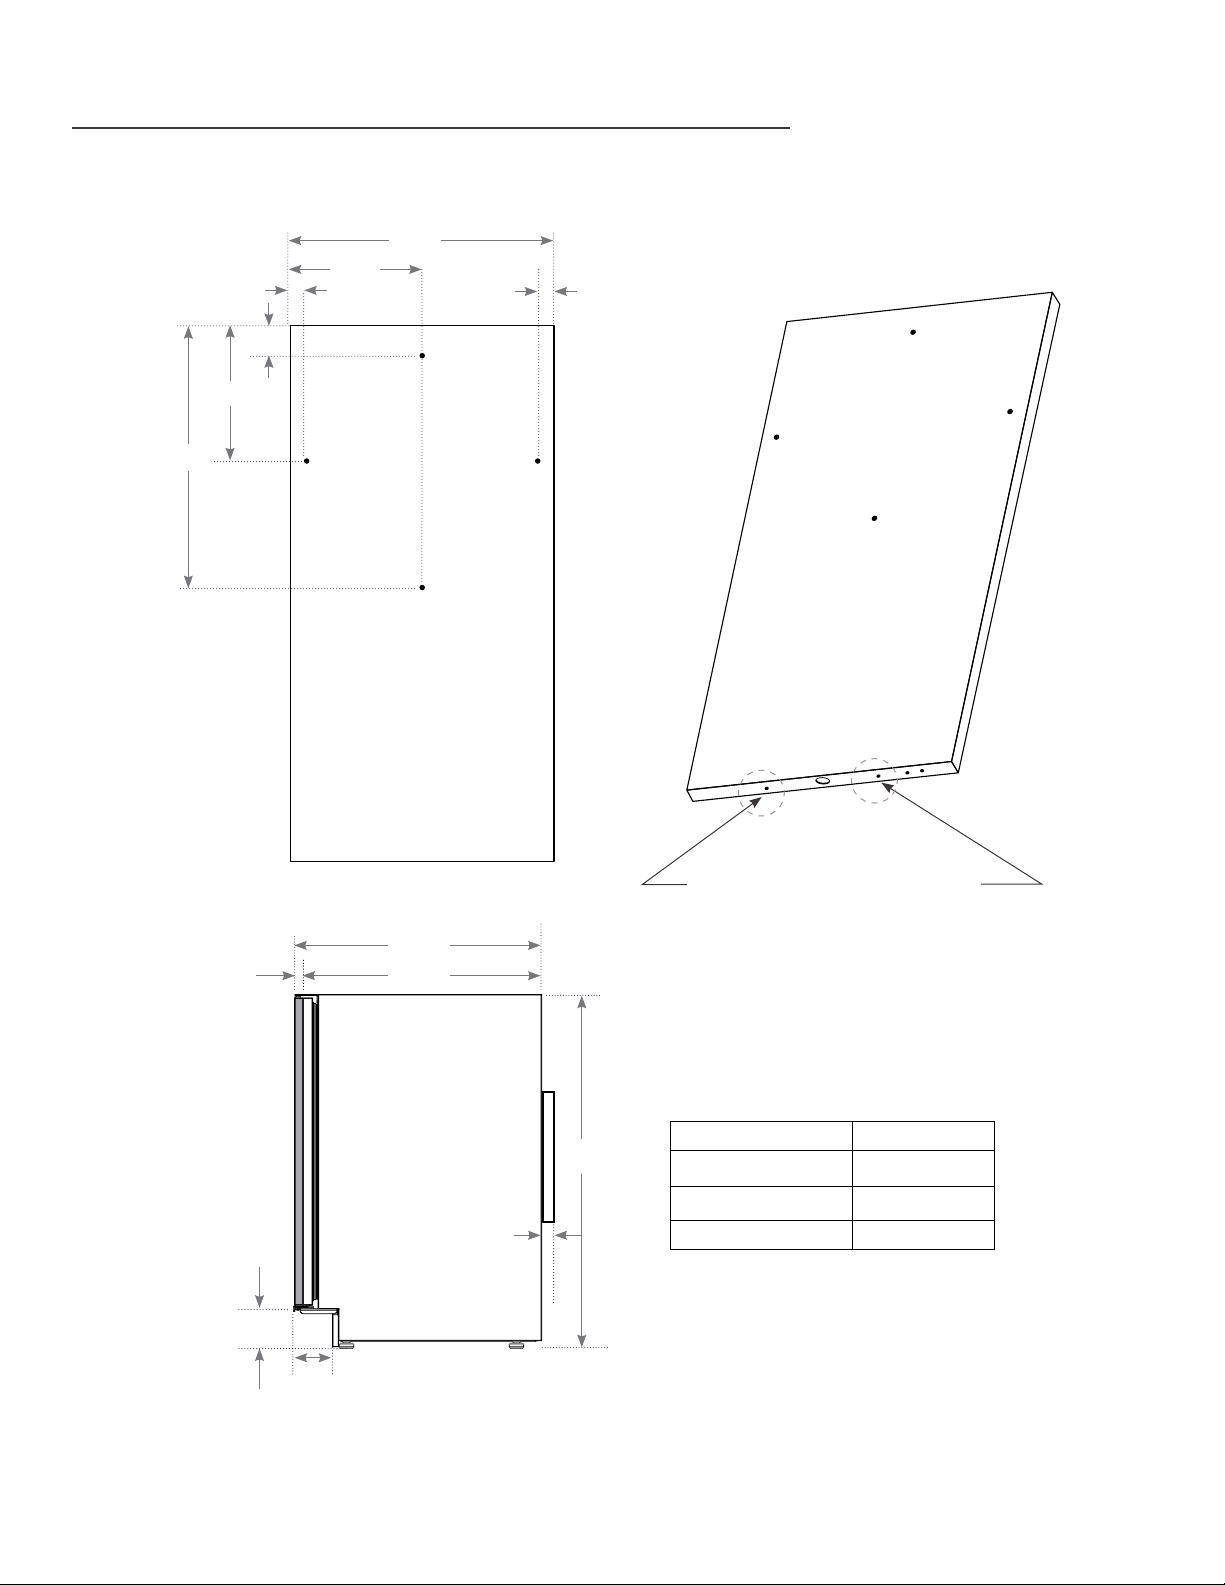
INSTALLATION SPECIFICATIONS - SOLID PANEL READY
CUSTOM PANEL INSTALLATION
5/8
"
SOLID DOOR
29/32
½
"
7
5/32
"
13
1
"
21/32
7
"
14
5/16
"
BACK VIEW OF SOLID
OVERLAY PANEL
29/32
"
PANEL BRACKETS (988675) MOUNT
IN THESE TWO LOCATIONS TO
HOLD BOTTOM OF OVERLAY PANEL
7/8
"
23
¾
"
23
1/8
"
SOLID DOOR PANEL DIMENSIONS
SIDE
VIEW
34
¼
"
Door Panel Width 14 5/8
Door Panel Height 29 23/32
Door Panel Depth 3/4" max
½
"
1
1/8
"
4
¾
*3
"
Door Panel Weight 10 lb. max.
"
"
TRUE RESIDENTIAL LINE
2
*Including 3/4" thick panel (provided by others)
Page 3

OVERLAY PANEL INSTALLATION
Required Tools:
•
Phillips Screwdriver
•
3/ 8" Wrench
•
1/8" Drill Bit
•
Three (3) Screws #6
SEE PAGE 16 FOR OVERLAY PANEL DIMENSIONS
BEFORE INSTALLING.
FOR EASY OVERLAY INSTALLATION, ICE MACHINE
DOOR REMOVAL IS REQUIRED.
1. Open front door and pull kickplate forward
to remove.
2. To remove door, back out two bottom hinge
screws with a 3/8" wrench. Secure door while
removing screws. Remove two Phillips screws
from the top hinge. Save all these screws for later
reinstall.
1
2
Remove screws
from top and
bottom hinge
3. Lay door on a safe solid surface. Lay cardboard
or other safe material down before working on
th e door.
4. Remove door gasket from the inside of the door
frame. Place gasket to the side for later reinstall.
5. There are pre-marked areas on the front of the
door. Drill these pre-marked holes with 1/8" drill
bit. Make sure to drill all the way through the
do o r.
NOTE: IF HANDLE IS BEING USED ON OVERLAY,
INSTALL IT BEFORE STEP 8 (SEE IMAGE A ON
PAGE 22). FOR BEST INSTALLATION, SCREWS
ATTACHING HANDLE SHOULD BE RECESSED.
6. It is recommended to clamp the door front on
top of the overlay before drilling pilot holes and
installing anchor screws. The clamp ensures the
overlay panel and door stay aligned with each
other while installing. Once panel is clamped in
place, pilot holes may be drilled into the panel
from the rear side of the door. Mark to only drill
1/2" into rear side of door.
3 & 4
5
6
15 INCH ICE MAKER INSTALL GUIDE
3
Page 4

OVERLAY PANEL INSTALLATION
7. O nce all holes are pre-drilled, use the appropriate
specified screws to secure the overlay panel onto
the front of the ice machine door. Be sure to
attach the bottom of the panel to the door using
the brackets.
8. Reinstall all components in reverse order. Door
gasket snaps back into place. Overlay panel and
door stay aligned with each other while installing.
IMAGE A
Door Layers - General View
DOOR
OVERLAY PANEL
7
8
Reinstall screws
on top and
bottom hinge
GASKET
HANDLE
TRUE RESIDENTIAL LINE
4
OVERLAY PANEL
 Loading...