

Page 1
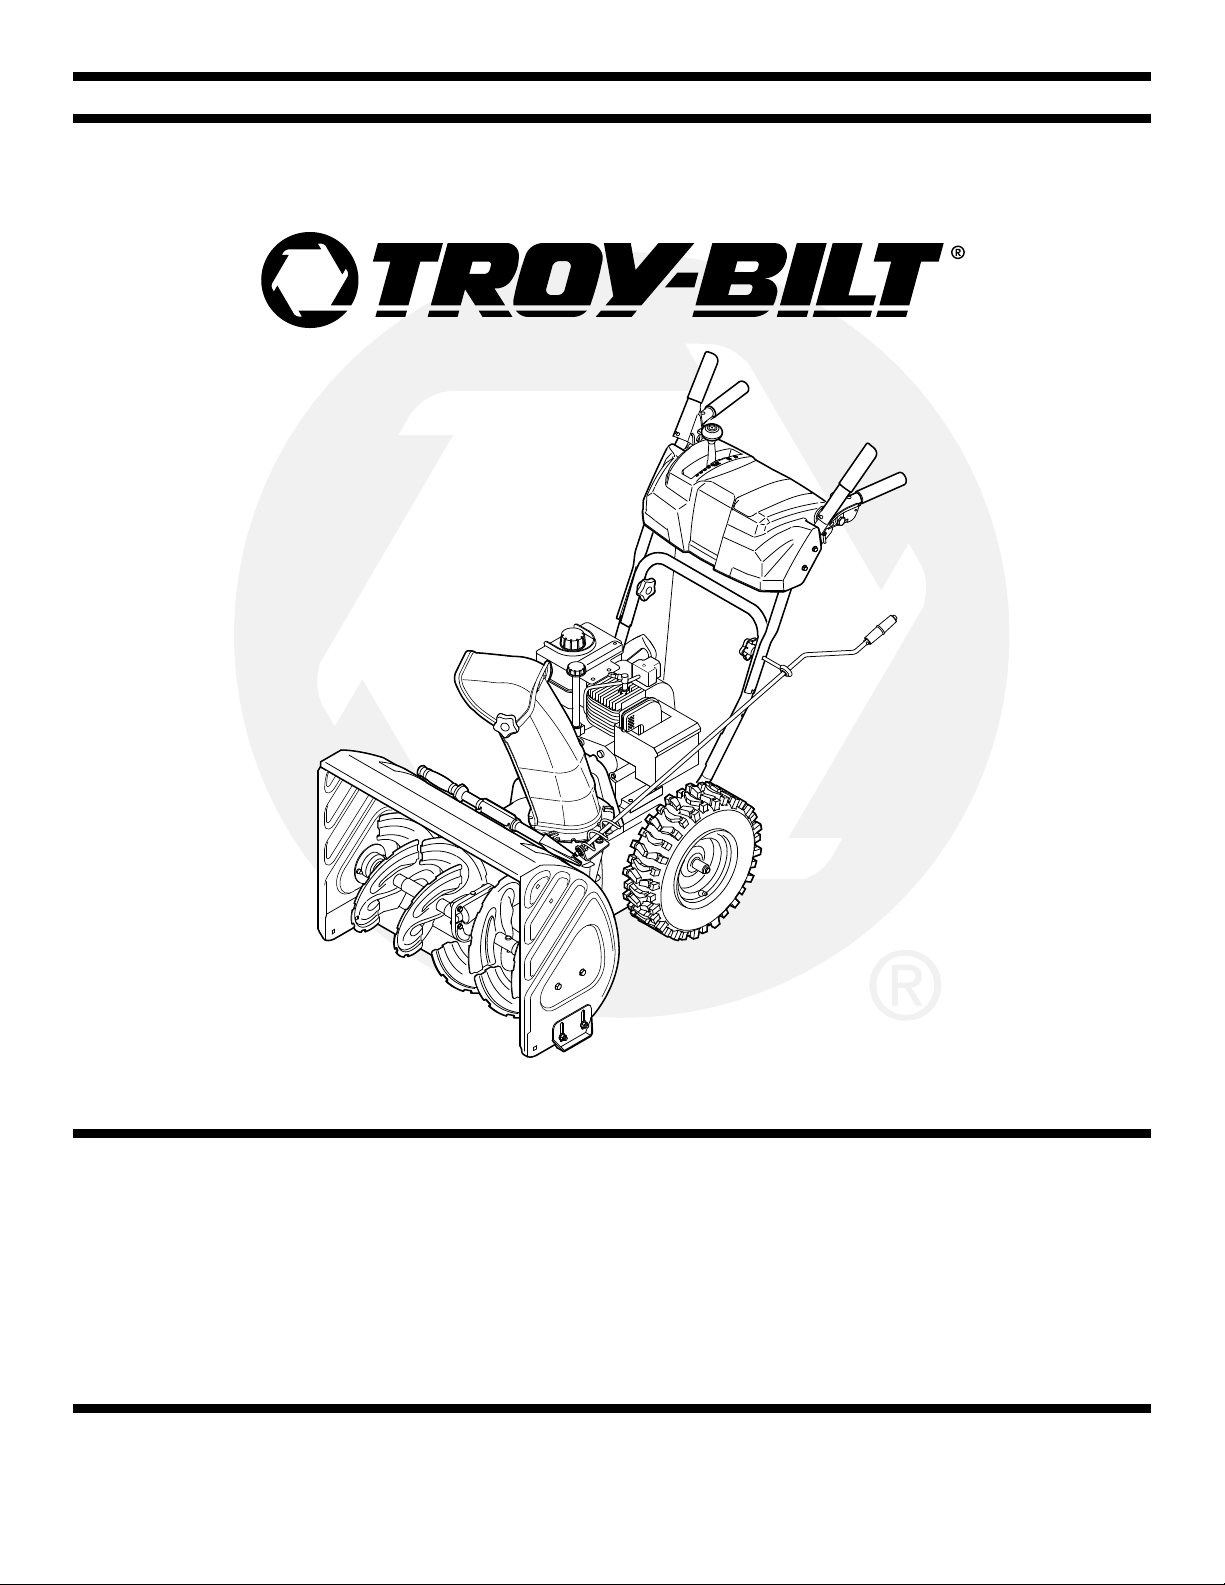
Safety • Assembly • Operation • Adjustments • Maintenance • Troubleshooting • Parts Lists • Warranty
OPERATOR’S MANUAL
Two-Stage Snow Thrower — STORM Series
IMPORTANT
READ SAFETY RULES AND INSTRUCTIONS CAREFULLY BEFORE OPERATION
Warning: This unit is equipped with an internal combustion engine and should not be used on or near any unimproved forest-covered, brush-
covered or grass-covered land unless the engine’s exhaust system is equipped with a spark arrester meeting applicable local or state laws (if any).
If a spark arrester is used, it should be maintained in effective working order by the operator. In the State of California the above is required by law
(Section 4442 of the California Public Resources Code). Other states may have similar laws. Federal laws apply on federal lands. A spark arrester
for the muffler is available through your nearest engine authorized service dealer or contact the service department, P.O. Box 361131 Cleveland,
Ohio 44136-0019.
MTD LLC, P.O. BOX 361131 CLEVELAND, OHIO 44136-0019
PRINTED IN U.S.A
FORM NO. 769-01278D
7/10/2006
Page 2
This Operator’s Manual is an important part of your new snow thrower. It will help you assemble,
prepare, and maintain the unit for best performance. Please read and understand what it says.
Table of Contents
Safety Labels ...................................................... 3
Safe Operation Practices ................................... 4
Setting Up Your Snow Thrower .......................... 6
Operating Your Snow Thrower ........................... 8
Making Adjustments ........................................ 12
Specifications are subject to change without notification or obligation. Images may not reflect your exact model and are for reference purposes only.
Finding and Recording Model Number
BEFORE ASSEMBLING YOUR NEW EQUIPMENT,
please locate the model plate on the equipment
and copy the information to the sample model plate
provided to the right. You can locate the model plate
by standing at the operating position and looking
down at the rear of the deck. This information will
be necessary to use the manufacturer’s web site, or
when obtaining assistance from the Customer Support Department or an authorized service dealer.
Maintaining Your Snow Thrower ...................... 14
Off-Season Storage .......................................... 18
Troubleshooting ................................................ 19
Illustrated Parts List ......................................... 20
Warranty .............................................Back Cover
TROY-BILT LLC
P. O. BOX 36 1 13 1
www.tro
ybilt.com
CLEVELAND, OH 44136
330-558-7220
1-800-520-5520
Customer Support
Please do
If you have difficulty assembling this product or have any questions regarding the controls, operation or maintenance of this unit,
you can seek help from the experts. Choose from the options below:
• Visit www.troybilt.com
• Call a Customer Support Representative at
• The engine manufacturer is responsible for all engine-related issues with regard to performance, power-rating, specifications,
warranty, and service. Please refer to the engine manufacturer’s Owner’s/Operator’s Manual, packed separately with your
unit, for more information.
NOT
return the unit to the retailer from which it was purchased,
without first contacting Customer Support.
1-800-520-5520.
2
Page 3
#HUTE#LEANOUT4OOL
+%%0!7!9&2/-2/4!4).')-0%,,%2
!.$!5'%2#/.4!#47)4()-0%,,%2/2
!5'%2#!.!-054!4%(!.$3!.$&%%4
53%#,%!./544//,4/5.#,/'
$)3#(!2'%#(54%
$)3%.'!'%#,54#(,%6%2334/0%.').%
!.$2%-!)."%().$(!.$,%35.4),!,,
-/6).'0!243(!6%34/00%$"%&/2%
5.#,/'').'/23%26)#).'-!#().%
4/!6/)$4(2/7./"*%#43).*52)%3
.%6%2$)2%#4$)3#(!2'%!4"934!.$%23
53%%842!#!54)/.7(%./0%2!4).'/.
'2!6%,352&!#%3
2%!$/0%2!4/2g3-!.5!,
$!.'%2
#,%!. /54 4//,
$!.'%2
!6/)$).*529&2/2/4!4).'!5'%2
+%%0(!.$3&%%4
!.$#,/4().'!7!9
$!.'%2
.%6%2054(!.$).#(54%#/.4!#47)4(
2/4!4).'0!243#!.!-054!4%&).'%23
!.$(!.$3
3( 54/&&%.') .%!.$ 7!) 45.4) ,!,,
-/6).' 0!243(!6 %34/ 00%$"%&/2%
5.#,/'').'
53%#,%!./544//,/27//$%.
34)#+4/
5.#,/'$)3#(!2'%#(54%
1
Safety
Labels
WARNING
This symbol points
out important safety
instructions which, if
not followed, could
endanger the personal
safety and/or property
of yourself and others.
Read and follow all
instructions in this
manual before attempting to operate
this machine. Failure
to comply with these
instructions may result
in personal injury. When
you see this symbol.
HEED ITS WARNING!
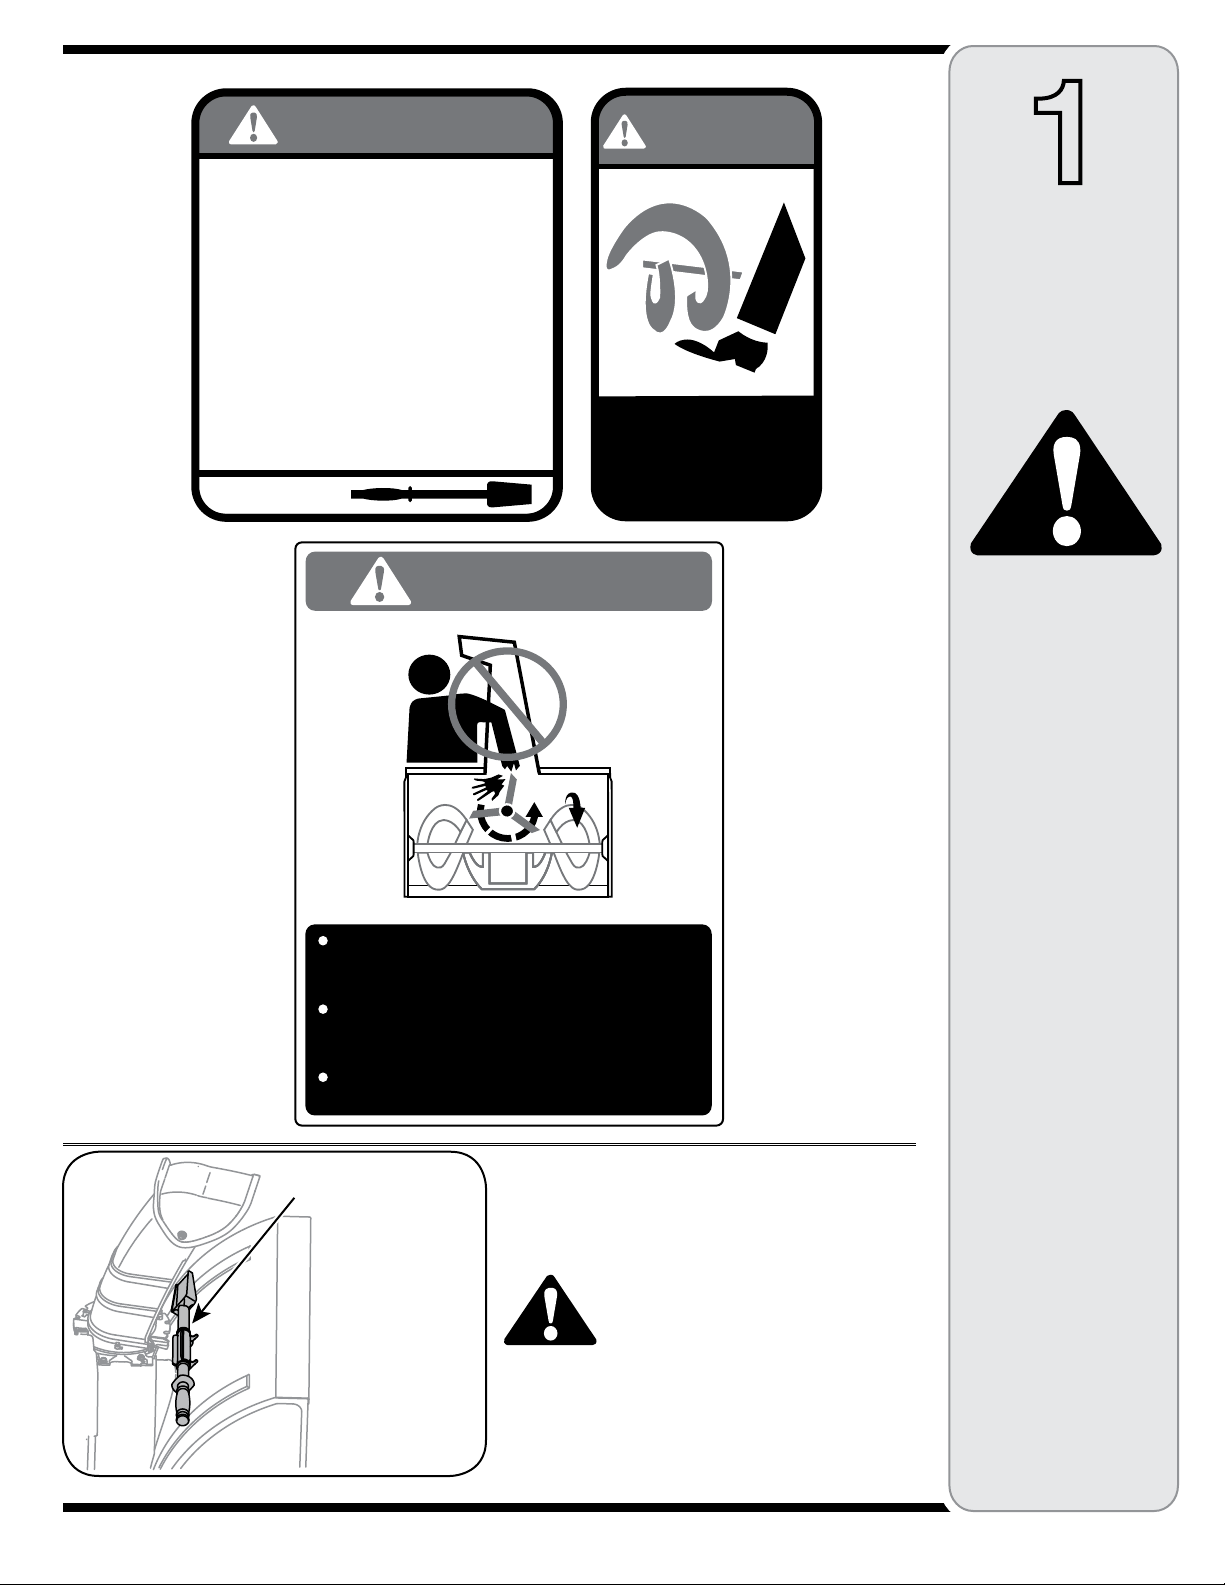
A chute clean-out tool is fastened to the top of the
auger housing with a mounting clip. The tool is designed
to clear a chute assembly of ice and snow.
This item is fastened with a cable tie at the factory. Cut
the cable tie before operating the snow thrower.
3
WARNING: Never use your
hands to clear a clogged chute
assembly. Shut off engine and
remain behind handles until
all moving parts have stopped
before using the clean-out tool
to clear the chute assembly.
Your Responsibility
Restrict the use
of this power machine
to persons who read,
understand
and follow the warnings
and instructions
in this manual
and on the machine.
Page 4

WARNING: Engine Exhaust, some of its constituents, and certain vehicle components contain or emit chemicals known to State of California to cause cancer and
birth defects or other reproductive harm.
2
Safe
Operation
Practices
WARNING
This symbol points
out important safety
instructions which, if
not followed, could
endanger the personal
safety and/or property
of yourself and others.
Read and follow all
instructions in this
manual before attempting to operate
this machine. Failure
to comply with these
instructions may result
in personal injury. When
you see this symbol.
HEED ITS WARNING!
Your Responsibility
Restrict the use
of this power machine
to persons who read,
understand
and follow the warnings
and instructions
in this manual
and on the machine.
DANGER: This machine was built to be operated according to the rules for safe operation in this
manual. As with any type of power equipment, carelessness or error on the part of the operator can
result in serious injury. This machine is capable of amputating hands and feet and throwing objects.
Failure to observe the following safety instructions could result in serious injury or death.
Training
1. Read, understand, and follow all instructions on the
machine and in the manual(s) before attempting to
assemble and operate. Keep this manual in a safe place for
future and regular reference and for ordering replacement
parts.
2. Be familiar with all controls and their proper operation.
Know how to stop the machine and disengage them quickly.
3. Never allow children under 14 years old to operate this
machine. Children 14 years old and over should read and
understand the operation instructions and safety rules in
this manual and should be trained and supervised by a
parent.
4. Never allow adults to operate this machine without proper
instruction.
5. Thrown objects can cause serious personal injury. Plan
your snow-throwing pattern to avoid discharge of material
toward roads, bystanders, and the like.
6. Keep bystanders, helpers, pets, and children at least 75
feet from the machine while it is in operation. Stop machine
if anyone enters the area.
7. Exercise caution to avoid slipping or falling, especially
when operating in reverse.
1. Thoroughly inspect the area where the equipment is to be
used. Remove all doormats, newspapers, sleds, boards,
wires, and other foreign objects, which could be tripped over
or thrown by the auger/impeller.
2. Always wear safety glasses or eye shields during operation
and while performing an adjustment or repair to protect your
eyes. Thrown objects which ricochet can cause serious
injury to the eyes.
3. Do not operate without wearing adequate winter outer
garments. Do not wear jewelry, long scarves, or other
loose clothing which could become entangled in moving
parts. Wear footwear which will improve footing on slippery
surfaces.
4. Use a grounded three-wire extension cord and receptacle
for all units with electric start engines.
5. Adjust collector housing height to clear gravel or crushed
rock surfaces.
6. Disengage all control levers before starting the engine.
7. Never attempt to make any adjustments while engine is
running, except where specifically recommended in the
operator’s manual.
8. Let engine and machine adjust to outdoor temperature
before starting to clear snow.
9. To avoid personal injury or property damage use extreme
care in handling gasoline. Gasoline is extremely flammable
and the vapors are explosive. Serious personal injury can
occur when gasoline is spilled on yourself or your clothes,
which can ignite. Wash your skin and change clothes
immediately.
a. Use only an approved gasoline container.
b. Extinguish all cigarettes, cigars, pipes and other sources
of ignition.
c. Never fuel machine indoors.
d. Never remove gas cap or add fuel while the engine is hot
or running.
e. Allow engine to cool at least two minutes before refuel
ing.
f. Never over fill fuel tank. Fill tank to no more than ½-inch
below bottom of filler neck to provide space for fuel
expansion.
g. Replace gasoline cap and tighten securely.
h. If gasoline is spilled, wipe it of f the engine and equip
ment. Move machine to another area. Wait five minutes
before starting the engine.
i. Never store the machine or fuel container inside where
there is an open flame, spark or pilot light (e.g. furnace,
water heater, space heater, clothes dr yer etc.).
j. Allow machine to cool at least five minutes before
storing.
Preparation
-
-
4
Page 5
Operation
1. Do not put hands or feet near rotating parts, in the
auger/impeller housing or chute assembly. Contact with the
rotating parts can amputate hands and feet.
2. The auger/ impeller control lever is a safety device. Never
bypass its operation. Doing so makes the machine unsafe
and may cause personal injury.
3. The control levers must operate easily in both directions
and automatically return to the disengaged position when
released.
4. Never operate with a missing or damaged chute assembly.
Keep all safety devices in place and working.
5. Never run an engine indoors or in a poorly ventilated area.
Engine exhaust contains carbon monoxide, an odorless and
deadly gas.
6. Do not operate machine while under the influence of alcohol
or drugs.
7. Muffler and engine become hot and can cause a burn. Do
not touch.
8. Exercise extreme caution when operating on or crossing
gravel surfaces. Stay alert for hidden hazards or traffic.
9. Exercise caution when changing direction and while operat
ing on slopes.
10. Plan your snow-throwing pattern to avoid discharge towards
windows, walls, cars etc. Thus, avoiding possible property
damage or personal injury caused by a ricochet.
11. Never direct discharge at children, bystanders, and pets or
allow anyone in front of the machine.
12. Do not overload machine capacity by attempting to clear
snow at too fast of a rate.
13. Never operate this machine without good visibility or light.
Always be sure of your footing and keep a firm hold on the
handles. Walk, never run.
14. Disengage power to the auger/impeller when transporting or
not in use.
15. Never operate machine at high transpor t speeds on slippery
surfaces. Look down and behind and use care when
backing up.
16. If the machine should start to vibrate abnormally, stop the
engine, disconnect the spark plug wire and ground it against
the engine. Inspect thoroughly for damage. Repair any
damage before starting and operating.
17. Disengage all control levers and stop engine before you
leave the operating position ( behind the handles). Wait
until the auger/impeller comes to a complete stop before
unclogging the chute assembly, making any adjustments, or
inspections.
18. Never put your hand in the discharge or collector openings.
Always use the clean-out tool provided to unclog the dis-
charge opening. Do not unclog chute assembly while engine
is running. Shut off engine and remain behind handles until
all moving parts have stopped before unclogging.
19. Use only attachments and accessories approved by the
manufacturer (e.g. wheel weights, tire chains, cabs etc.).
20. If situations occur which are not covered in this manual, use
care and good judgment. Contact your dealer or call the
customer service number found on page two.
Maintenance & Storage
1. Never tamper with safety devices. Check their proper
operation regularly. Refer to the maintenance and adjust-
ment sections of this manual.
2. Before cleaning, repairing, or inspecting machine disen
gage all control levers and stop the engine. Wait until the
auger/impeller come to a complete stop. Disconnect the
spark plug wire and ground against the engine to prevent
unintended starting.
3. Check bolts and screws for proper tightness at frequent
intervals to keep the machine in safe working condition.
Also, visually inspect machine for any damage.
4. Do not change the engine governor setting or over-speed
the engine. The governor controls the maximum safe
operating speed of the engine.
5. Snow thrower shave plates and skid shoes are subject to
wear and damage. For your safety protection, frequently
check all components and replace with original equipment
manufacturer’s (OEM) par ts only. “Use of parts which do
not meet the original equipment specifications may lead to
improper per formance and compromise safety !”
6. Check controls periodically to verify they engage and
disengage properly and adjust, if necessary. Refer to the
adjustment section in this operator’s manual for instructions.
7. Maintain or replace safety and instruction labels, as neces
sary.
8. Observe proper disposal laws and regulations for gas, oil,
etc. to protect the environment.
9. Prior to storing, run machine a few minutes to clear snow
from machine and prevent freeze up of auger/impeller.
10. Never store the machine or fuel container inside where
there is an open flame, spark or pilot light such as a water
heater, furnace, clothes dryer etc.
11. Always refer to the operator’s manual for proper instructions
on off-season storage.
Do not modify engine
To avoid serious injury or death, do not modify engine in any
way. Tampering with the governor setting can lead to a runaway
engine and cause it to operate at unsafe speeds. Never tamper
with factory setting of engine governor.
Notice regarding Emissions
Engines which are certified to comply with California and federal
EPA emission regulations for SORE (Small Off Road Equipment)
are certified to operate on regular unleaded gasoline, and may
include the following emission control systems: Engine Modification (EM) and Three Way Catalyst (TWC) if so equipped.
Your Responsibility
Restrict the use of this power machine to persons who read, understand and follow the warnings and instructions in this manual
and on the machine.
-
2
Safe
Operation
Practices
WARNING
-
This symbol points
out important safety
instructions, which if
not followed, could
endanger the personal
safety and/or property
of yourself and others.
Read and follow all
instructions in this manual before attempting to
operate this machine.
Failure to comply with
these instructions may
result in personal injury.
When you see this
symbol.
HEED IT’S WARNING!
Your Responsibility
Restrict the use
of this power machine
to persons who read,
understand
and follow the warnings
and instructions
in this manual
and on the machine.
5
Page 6
3
Setting Up
Your Snow
Thrower
References to the right
or left side of the snow
thrower are determined
from behind the unit in
the operating position
(standing directly behind
the snow thrower, facing
the handle panel) .
Two replacement auger
shear pins are included
with this manual (or
stowed in the plastic
handle panel). Refer to
Augers in Maintenance
section for more information regarding shear pin
replacement.
This Operator’s Manual
may cover a range of
product specifications
for various models.
Characteristics and features discussed and/or
illustrated in this manual
may not be applicable to
all models.
Figure 3-1
This Operator’s Manual may cover a range of product
specifications for various models. Characteristics and
features discussed and /or illustrated in this manual may
not be applicable to all models.
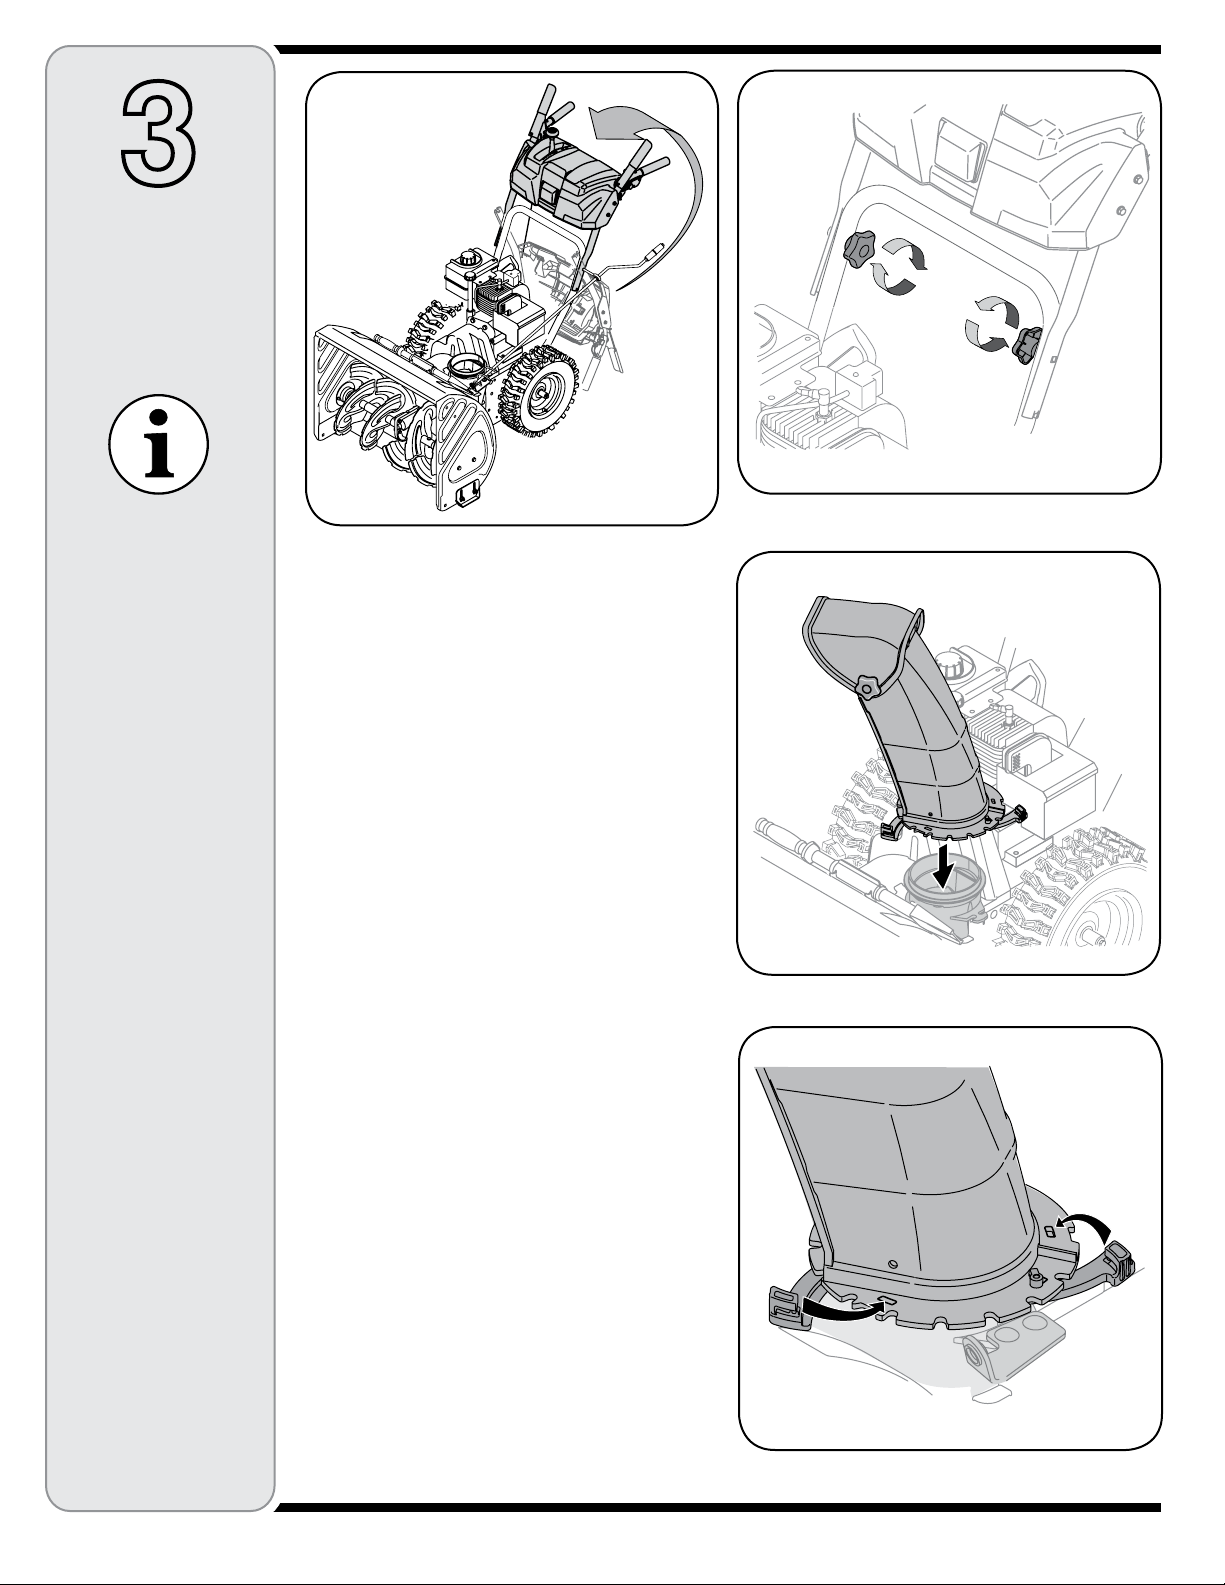
1. Remove the unit from the crate or carton.
2. Observe the lower area of the snow thrower to be
sure cables are aligned with roller guides before
pivoting handle upward.
a. Pull up and back on upper handle as shown in
Figure 3-1. Align upper handle with the lower
handle.
b. Tighten star knobs to secure upper handle to
lower handle, Figure 3-2.
c. Remove and discard any rubber bands, if
present. They are for packaging purposes only.
3. Certain units may require assembly of the chute. If
this is the case, follow steps 4-6 to install the chute.
4. Position the chute assembly over the base, see
Figure 3-3.
5. Close the flange keepers to secure the chute
assembly to the chute base. The flange keepers will
click into place when properly secure, Figure 3-4.
NOTE: If the flange keepers will not easily click into
place, use the palm of your hand to apply swift, firm
pressure to the back of each.
Figure 3-2
Figure 3-3
Figure 3-4
6
Page 7
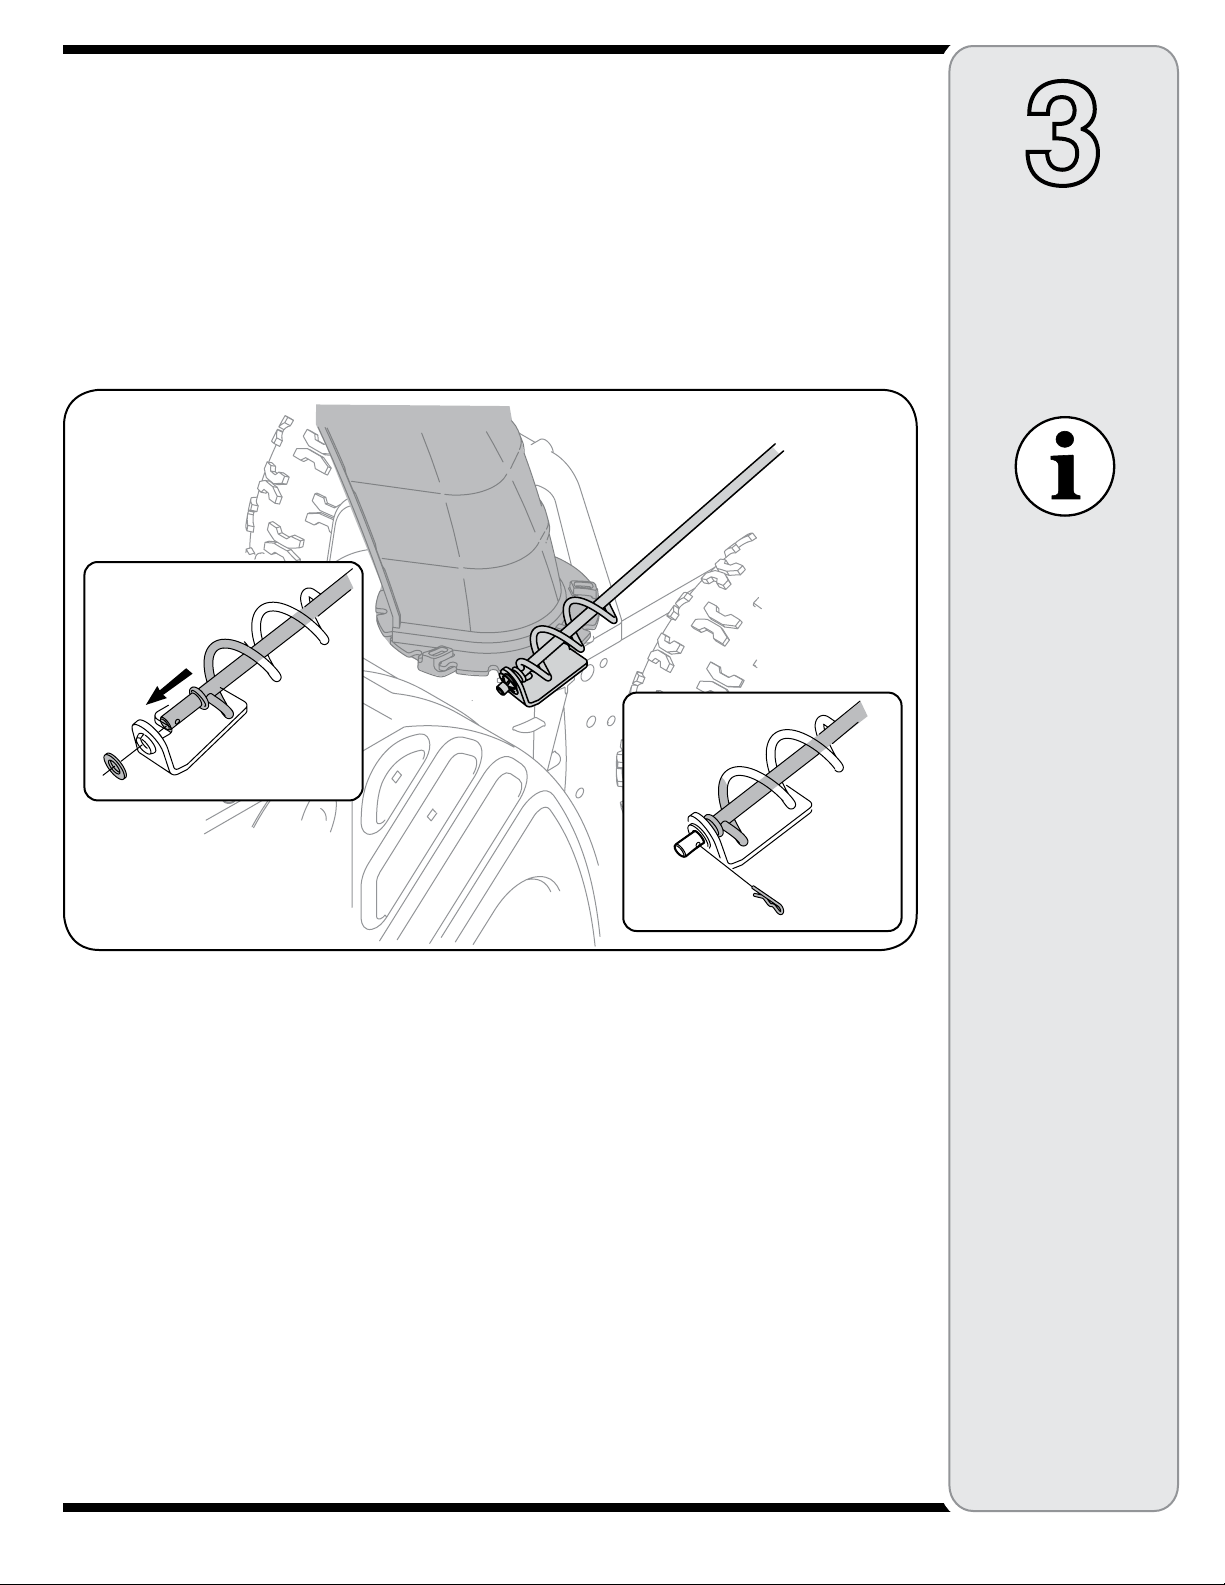
6. Remove the flat washer and hairpin clip from the end
of the chute directional control, Figure 3-5.
Insert the end of the chute directional control into the
lower bracket and secure with the flat washer and hairpin clip just removed. If necessary, the lower bracket
can be adjusted. Refer to Chute Bracket Adjustment in
the “Making Adjustments” section.
Tire Pressure
Before operating, check tire pressure and reduce
pressure in both tires to between 15 psi and 20 psi.
NOTE: If the tire pressure is not equal in both tires, the
unit may not travel in a straight path and the shave plate
may wear unevenly.
3
Setting Up
IMPORTANT: Prior to operating your snow thrower, refer to Auger Control Test in the “Operating your Snow
Thrower” section. Read and follow all instructions carefully and perform all adjustments to verify your snow
thrower is operating safely and properly.
Your Snow
Thrower
IMPORTANT: Prior to operating your snow thrower,
refer to the Auger Control
Test in the Operations
section. Read and follow all
instructions carefully and
perform all adjustments to
verify your snow thrower
is operating safely and
properly.
Figure 3-5
7
Page 8

Know Your Snow Thrower
34/0
4
Operating
Your Snow
Thrower
WARNING
Read, understand, and
follow all instructions and
warnings on the machine
and in this manual before
operating.
Chute Assembly
Clean Out Tool
Drive Control
Electric Start button
Gas Cap
Oil Fill
Augers
Shift Lever
Auger Control
Chute Directional Control
Engine Controls
Recoil Starter
Handle
Electric Starter Outlet
Primer
Ignition
Key
Choke
Control
Skid Shoe
Throttle
Control
Use extreme care when
handling gasoline.
Gasoline is extremely
flammable and the vapors
are explosive. Never fuel
the machine indoors or
while the engine is hot
or running. Extinguish
cigarettes, cigars, pipes
and other sources of
ignition.
This Operator’s Manual
may cover a range of
product specifications
for various models.
Characteristics and features discussed and/or
illustrated in this manual
may not be applicable to
all models.
Figure 4-1
Now that you have setup your snow thrower, it’s
important to become acquainted with its controls and
features.
NOTE: For detailed starting instructions and more
information on all engine controls, refer to the Tecumseh
Engines manual packed separately.
Shift Lever
The shift lever is located on the right
side of the handle panel. Place the
shift lever into any of eight positions
to control the direction of travel and
ground speed.
Forward
There are six forward (F) speeds.
Position one (1) is the slowest and
position six (6) is the fastest.
Reverse
There are two reverse (R) speeds.
One (1) is the slower and two (2) is the
faster.
Choke Control
The choke control is found on the rear of the engine and
is activated by rotating the knob clockwise. Activating the
choke control closes the choke plate on
the carburetor and aids in starting the
engine.
Throttle Control
The throttle control is located on the
engine. It regulates the speed of the
engine and will shut off the engine when
pushed down completely.
Primer
Depressing the primer forces fuel directly
into the engine’s carburetor to aid in
cold-weather starting.
Oil Fill
Engine oil level can be checked and oil
added through the oil fill.
8
Page 9
Auger Control
!5'%2
#/.42/,
'/
$2)6%
#/.42/,
'/
#(54%$)2%#4)/.!,#/.42/,
$)3#(!2'%
,%&4
$)3#(!2'%
2)'(4
!$*534!",%
#(54%4),4
Chute Directional Control
4
Operating
Your Snow
Thrower
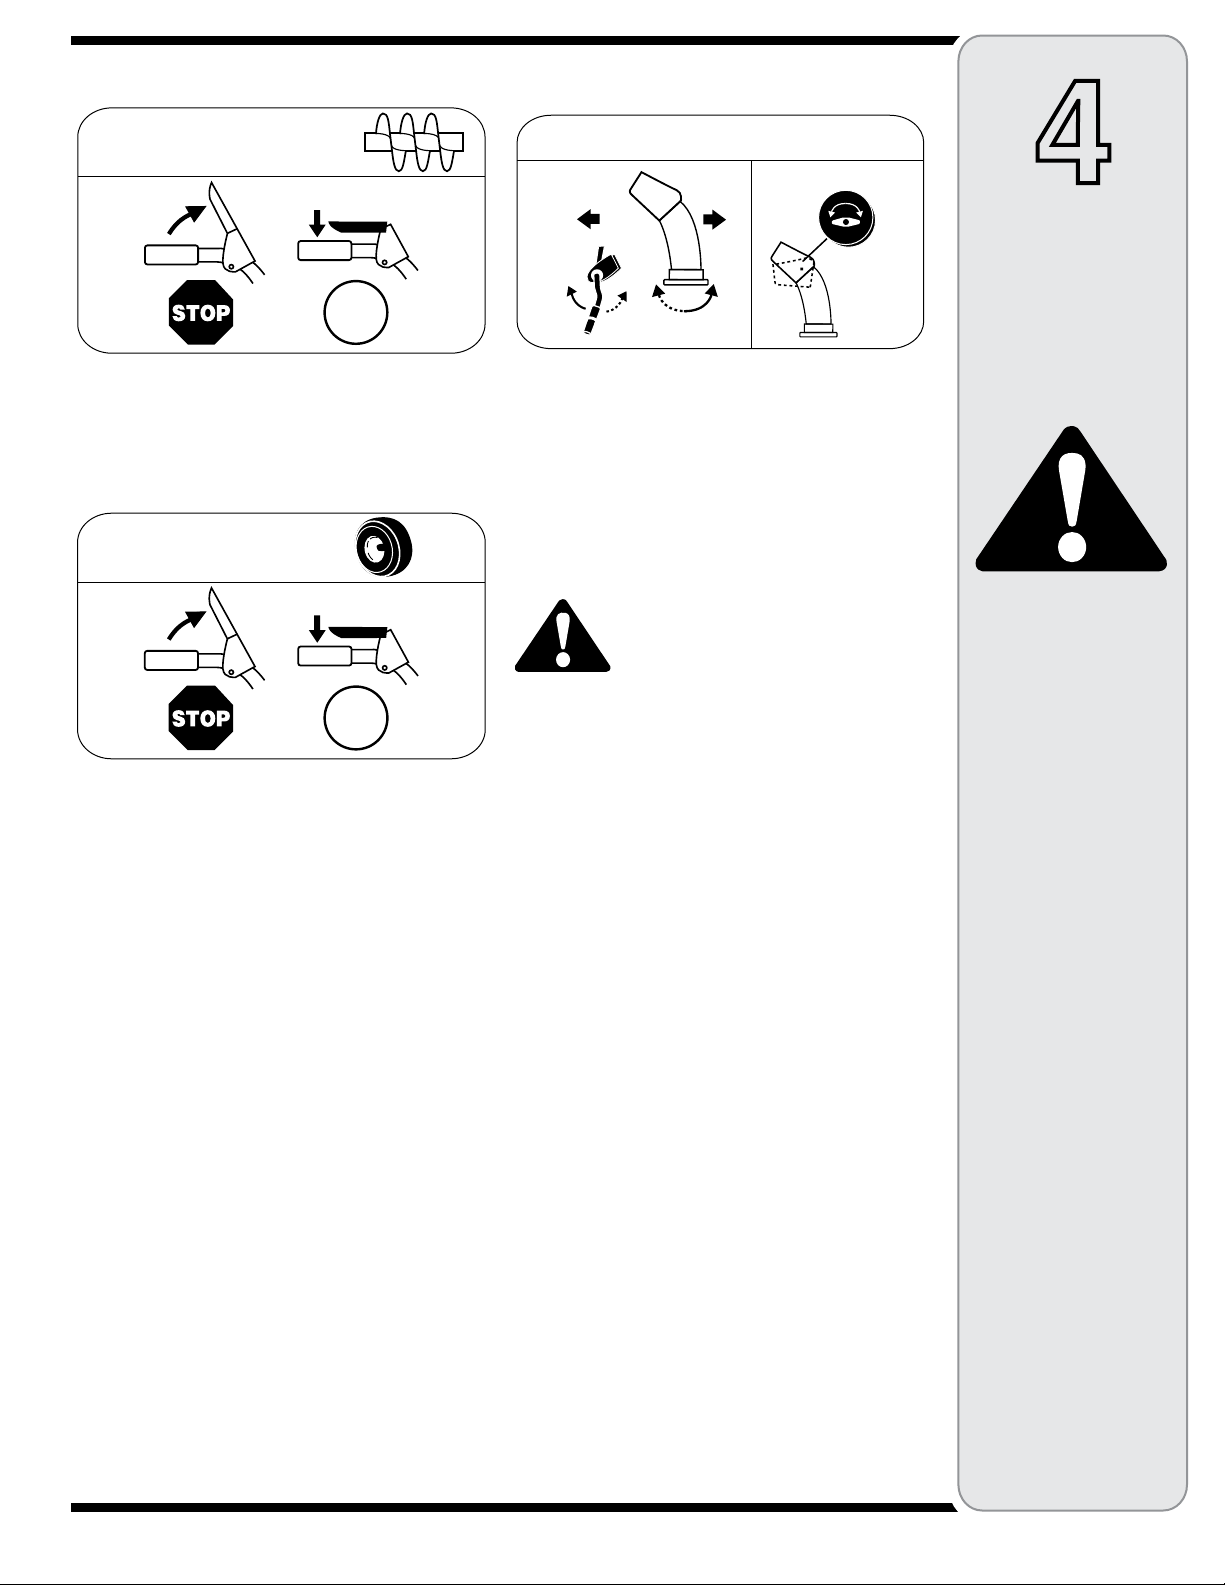
The auger control is located on the left handle. Squeeze
the control grip against the handle to engage the augers
and start snow throwing action. Release to stop.
Drive Control / Auger Clutch Lock*
The drive control is located on the right handle. Squeeze
the control grip against the handle to engage the wheel
drive. Release to stop.
*On select models, the drive control also locks the auger
control so that you can operate the chute directional
control without interrupting the snow throwing process.
If the auger control is engaged simultaneously with the
drive control, the operator can release the auger control
(on the left handle) and the augers will remain engaged.
Release both controls to stop the augers and wheel
drive.
IMPORTANT: Always release the drive control before
changing speeds.
Ignition Key
The ignition key is a safety devise. It must be fully
inserted in order for the engine to start. Remove the
ignition key when the snow thrower is not in use.
Do not turn the ignition key in an attempt to start the
engine. Doing so may cause it to break.
Recoil Starter Handle
This handle is used to manually start the engine.
Electric Starter Button
Pressing the electric starter button engages the engine’s
electric starter when plugged into a 120V power source.
The chute directional control is located on left side of the
snow thrower.
To change the direction in which snow is thrown, turn
chute directional control as follows:
• Crank clockwise to discharge to the left.
• Crank counterclockwise to discharge to the right.
Clean-Out Tool
WARNING: Never use your
hands to clear a clogged chute
assembly. Shut off engine and
remain behind handles until
all moving parts have stopped
before unclogging.
The chute clean-out tool is fastened to the top of the
auger housing with a mounting clip. The tool is designed
to clear a clogged chute assembly.
NOTE: This item is fastened with a cable tie to the rear
of the auger housing at the factory. Cut the cable tie
before operating the snow thrower.
Skid Shoes
Position the skid shoes based on surface conditions.
Adjust upward for hard-packed snow. Adjust downward
when operating on gravel or crushed rock surfaces.
Electric Starter Outlet
Requires the use of a three-prong outdoor extension cord
and a 120V power source/wall outlet.
Augers
When engaged, the augers rotate and draw snow into the
auger housing.
Chute Assembly
Snow drawn into the auger housing is discharged out the
chute assembly.
Gas Cap
Unthread the gas cap to add gasoline to the fuel tank.
WARNING
The operation of any
snow thrower can result
in foreign objects being
thrown into the eyes,
which can damage your
eyes severely. Always
wear safety glasses
while operating the snow
thrower, or while performing any adjustments or
repairs on it.
Be sure no one other than
the operator is standing
near the snow thrower
while starting engine or
operating snow thrower.
Never run engine indoors
or in enclosed, poorly
ventilated areas. Engine
exhaust contains carbon
monoxide, an odorless
and deadly gas. Keep
hands, feet, hair and loose
clothing away from any
moving parts on engine
and snow thrower.
9
Page 10
4
Operating
Your Snow
Thrower
WARNING
Read, understand, and
follow all instructions and
warnings on the machine
and in this manual before
operating.
Use extreme care when
handling gasoline.
Gasoline is extremely
flammable and the vapors
are explosive. Never fuel
the machine indoors or
while the engine is hot
or running. Extinguish
cigarettes, cigars, pipes
and other sources of
ignition.
If your home’s wiring
system is not a three-wire
grounded system, do not
use this electric starter
under any conditions.
If your home electrical
system is grounded, but
a three-hole receptacle
is not available, do not
use your snow thrower’s
electric starter.
Gas & Oil Fill-Up
Service the engine with gasoline and oil as instructed in
the Tecumseh Engines manual packed separately with
your snow thrower. Read instructions carefully.
Starting The Engine:
1. Attach spark plug wire to spark plug. Make certain
the metal loop on the end of the spark plug wire
(inside the rubber boot) is fastened securely over the
metal tip on the spark plug.
2. Make certain both the auger control and drive control
are in the disengaged (released) position.
3. Move throttle control up to FAST position. Insert
ignition key into slot. Make sure it snaps into place.
Do not attempt to turn the key.
NOTE: The engine cannot start unless the key is
inserted into ignition switch.
Electric Starter
1. Determine that your home’s wiring is a three-wire
grounded system. Ask a licensed electrician if you
are not certain.
WARNING: The optional electric starter
is equipped with a grounded three-wire
power cord and plug, and is designed
to operate on 120 volt AC household current. It
must be used with a properly grounded three-prong
receptacle at all times to avoid the possibility of
electric shock. Follow all instructions carefully prior
to operating the electric starter.
If you have a grounded three-prong receptacle, proceed
as follows:
1. Plug the extension cord into the outlet located on
the engine’s surface. Plug the other end of extension
cord into a three-prong 120-volt, grounded, AC outlet
in a well-ventilated area.
2. Rotate choke control to FULL choke position (for a
cold engine start).
NOTE: If the engine is already warm, place choke
control in the OFF position instead of FULL.
3. Push the primer two or three times for cold engine
start, making sure to cover vent hole in the center of
the primer when pushing.
NOTE: DO NOT use primer to restart a warm engine
after a short shutdown.
4. Push starter button to start engine.
5. Once the engine starts, immediately release starter
button.
6. As the engine warms, slowly rotate the choke control
to the OFF position. If the engine falters, quickly
rotate the choke control back to FULL and then
slowly into the OFF position again.
7. When disconnecting the extension cord, always
unplug the end at the three-prong wall outlet before
unplugging the opposite end from the snow thrower.
Recoil Starter
1. Rotate choke control to FULL choke position (cold
engine start).
NOTE: If the engine is already warm, place choke
control in the OFF position instead of FULL.
2. Push the primer two or three times for cold engine
start, making sure to cover vent hole in the center of
the primer when pushing.
NOTE: DO NOT use primer to restart a warm engine
after a short shutdown.
NOTE: Additional priming may be necessary if the
temperature is below 15° Fahrenheit.
3. Grasp the recoil starter handle and slowly pull the rope
out. At the point where it becomes slightly harder to
pull the rope, slowly allow the rope to recoil.
4. Pull the starter handle with a firm, rapid stroke.
release the handle and allow it to snap back. Keep a
firm hold on the starter handle and allow it to slowly
recoil.
5. As the engine warms, slowly rotate the choke control
to the OFF position. If the engine falters, quickly rotate
the choke control back to the FULL position and then
slowly into the OFF position again.
NOTE: Allow the engine to warm up for a few minutes
after starting. The engine will not develop full power
until it reaches operating temperatures.
Do not
Stopping The Engine
Run engine for a few minutes before stopping to help dry
off any moisture on the engine.
Chute Clean-Out Tool
The chute clean-out tool is conveniently fastened to the
rear of the auger housing with a mounting clip. Should
snow and ice become lodged in the chute assembly
during operation, proceed as follows to safely clean the
chute assembly and chute opening:
1. Release both the Auger Control and the Drive Control.
2. Stop the engine by removing the ignition key.
3. Remove the clean-out tool from the clip which secures
it to the rear of the auger housing.
4. Use the shovel-shaped end of the clean-out tool to
dislodge and scoop any snow and ice which has
formed in and near the chute assembly.
5. Refasten the clean-out tool to the mounting clip on the
rear of the auger housing, reinsert the ignition key and
start the snow thrower’s engine.
6. While standing in the operator’s position (behind the
snow thrower), engage the auger control for a few
seconds to clear any remaining snow and ice from the
chute assembly.
10
Page 11
To Engage Drive
1. With the throttle control in the Fast (rabbit) position,
move shift lever into one of the six forward (F)
positions or two reverse (R) positions. Select a speed
appropriate for the snow conditions and a pace you’re
comfortable with.
2. Squeeze the auger control against the handle and the
augers will turn. Release it and the augers will stop.
3. Squeeze the drive control against the handle the snow
thrower will move. Release it and drive motion will
stop.
To Engage Augers
1. To engage the augers and start throwing snow,
squeeze the auger control against the left handle.
Release to stop the augers.
4
Operating
Your Snow
Thrower
Auger Control Test
Perform the following test before operating your snow
thrower for the first time and at the start of each winter.
Check the adjustment of the auger control as follows:
1. When the auger control is released and in the
disengaged “up” position, the cable should have very
little slack. It should NOT be tight.
2. In a well-ventilated area, start the snow thrower engine
as instructed on the previous page. Make sure the
throttle is set in the FAST position.
3. While standing in the operator’s position (behind the
snow thrower), engage the auger.
4. Allow the auger to remain engaged for approximately
ten (10) seconds before releasing the auger control.
Repeat this several times.
5. With the throttle control in the FAST (rabbit) position
and the auger control in the disengaged “up” position,
walk to the front of the machine.
6. Confirm that the auger has completely stopped
rotating and shows NO signs of motion. If the auger
shows ANY signs of rotating, immediately return to the
operator’s position and shut off the engine. Wait for
ALL moving parts to stop before re-adjusting the auger
control.
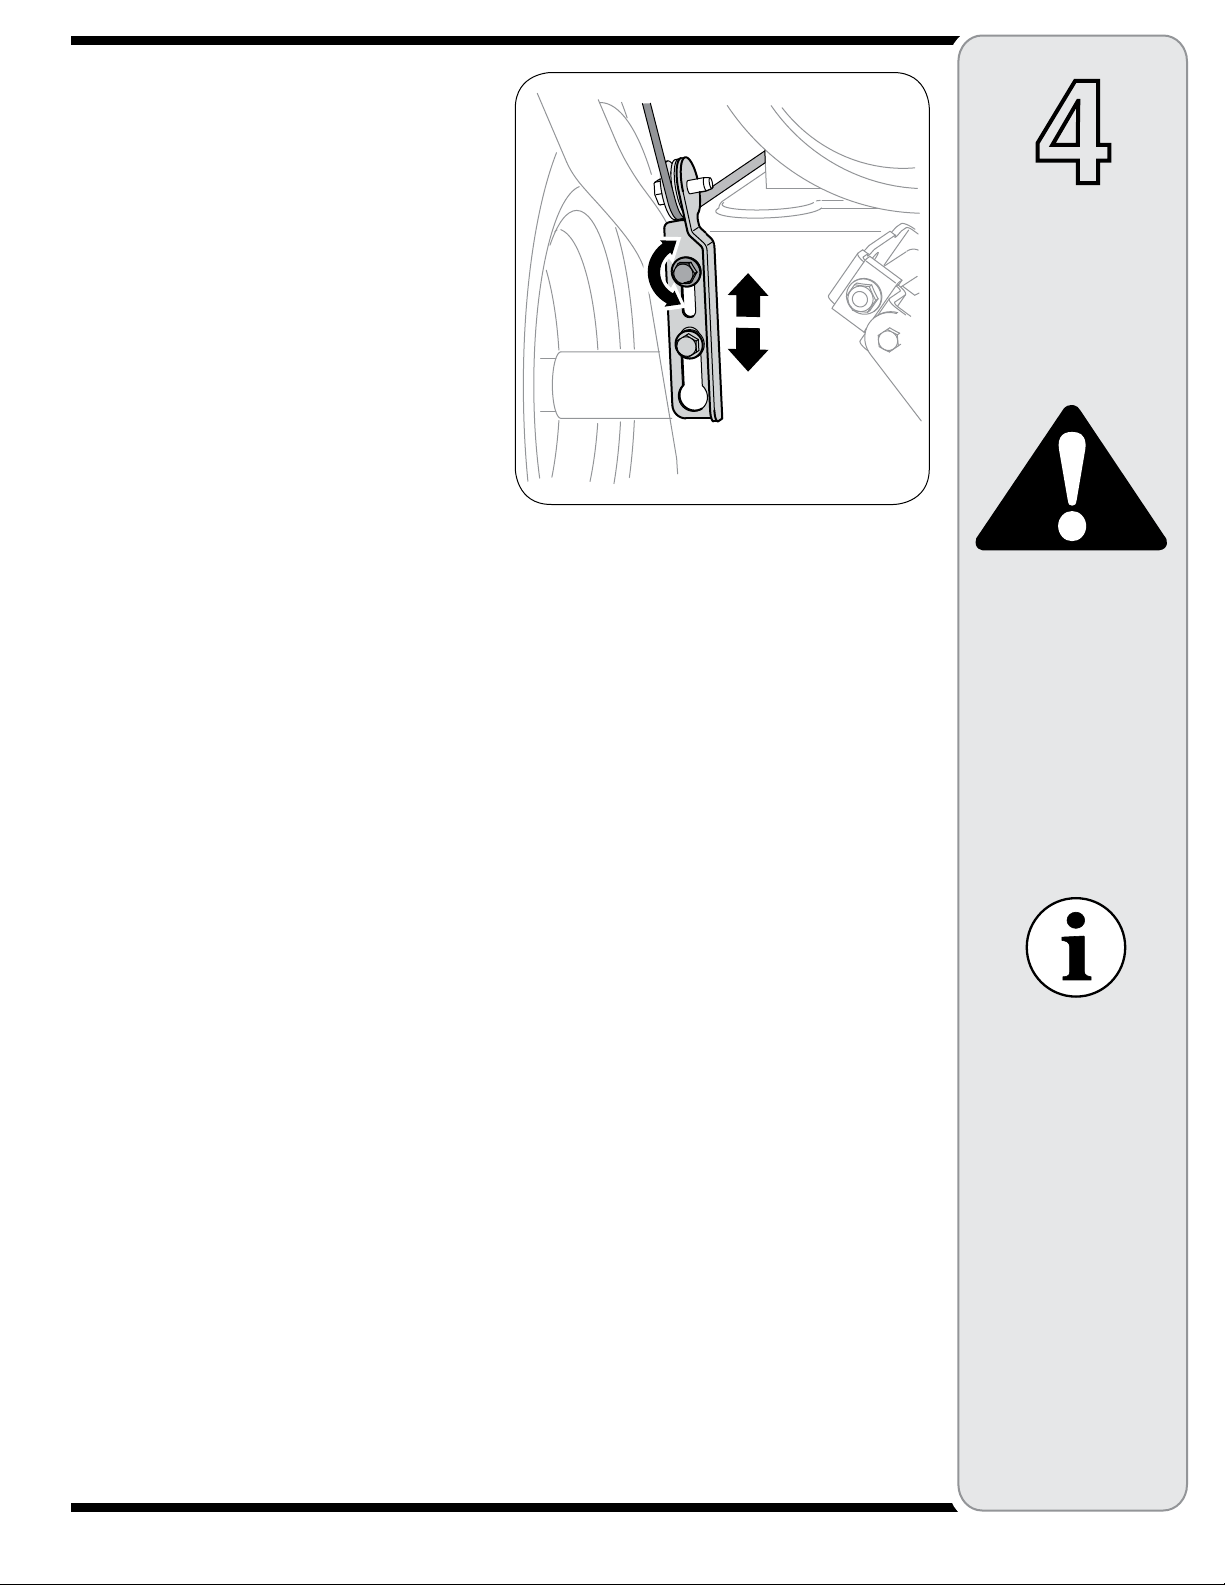
7. To readjust the control cable, loosen the upper hex
nut on the auger cable bracket.
8. Position the bracket upward to provide more slack (or
downward to increase cable tension). See Figure 4-2.
9. Retighten the upper hex nut.
10. Repeat Auger Control Test to verify proper adjustment
has been achieved.
Figure 4-2
WARNING
Never use your hands to
clean snow and ice from
the chute assembly or
auger housing.
The muffler, engine and
surrounding areas become hot and can cause
a burn. Do not touch.
When selecting a Drive
Speed, use the slower
speeds until you are
comfortable and familiar
with the operation of the
snow thrower.
NEVER reposition the
shift lever (change speeds
or direction of travel)
without first releasing the
drive control and bringing
the snow thrower to a
complete stop. Doing so
will result in premature
wear to the snow thrower’s
drive system.
11
Page 12
5
Making
Adjustments
Auger Control
Refer to Auger Control Test in Operation section to
adjust the auger control.
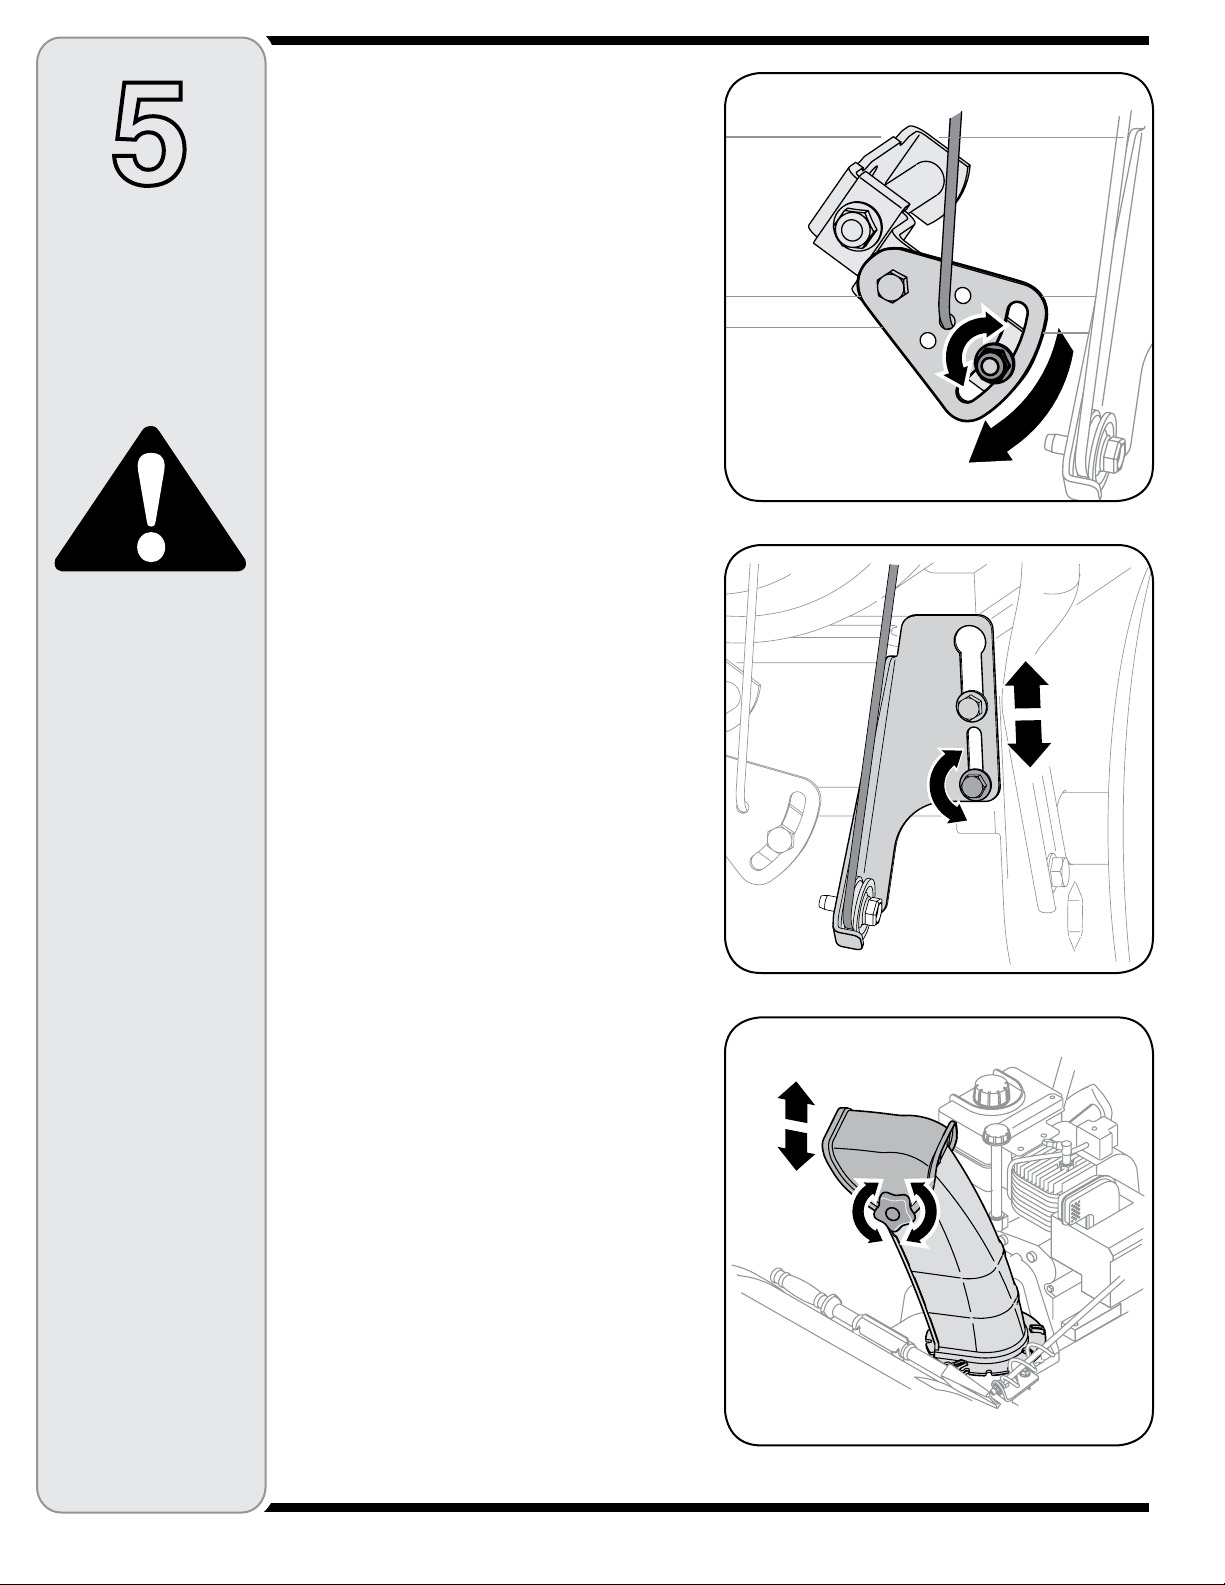
Shift Cable
If the full range of speeds (forward and reverse) cannot
be achieved, refer to the figures to the right and adjust
the shift cable as follows:
1. Place the shift lever in the fastest forward speed
position.
2. Loosen the hex nut on the shift cable index bracket,
Figure 5-1.
3. Pivot the bracket downward to take up slack in the
cable.
4. Retighten the hex nut.
WARNING
Read, understand, and
follow all instructions and
warnings on the machine
and in this manual before
operating.
Never attempt to make
any adjustments while
the engine is running,
except where specified in
operator’s manual.
Drive Control
When the drive control is released and in the disengaged “up” position, the cable should have very little
slack. It should NOT be tight.
Check the adjustment of the drive control as follows:
1. With the drive control released, push the snow
thrower gently forward. The unit should roll freely.
2. Engage the drive control and gently attempt to push
the snow thrower forward. The wheels should not
turn. The unit should not roll freely.
3. With the drive control released, move the shift lever
back and forth between the R2 position and the F6
position several times. There should be no resistance
in the shift lever.
4. If any of the above tests failed, the drive cable is in
need of adjustment. Proceed as follows:
5. Loosen the lower hex nut on the drive cable bracket,
Figure 5-2.
6. Position the bracket upward to provide more slack (or
downward to increase cable tension).
7. Retighten the hex nut.
Chute Assembly
The distance snow is thrown can be adjusted by changing the angle of the chute assembly. To do so:
Figure 5-1
Figure 5-2
1. Stop the engine by removing the ignition key and
loosen the plastic wing knob found on the left side of
the chute assembly.
2. Pivot the chute upward or downward before retight
ening the wing knob, Figure 5-3.
-
Figure 5-3
12
Page 13
Skid Shoes
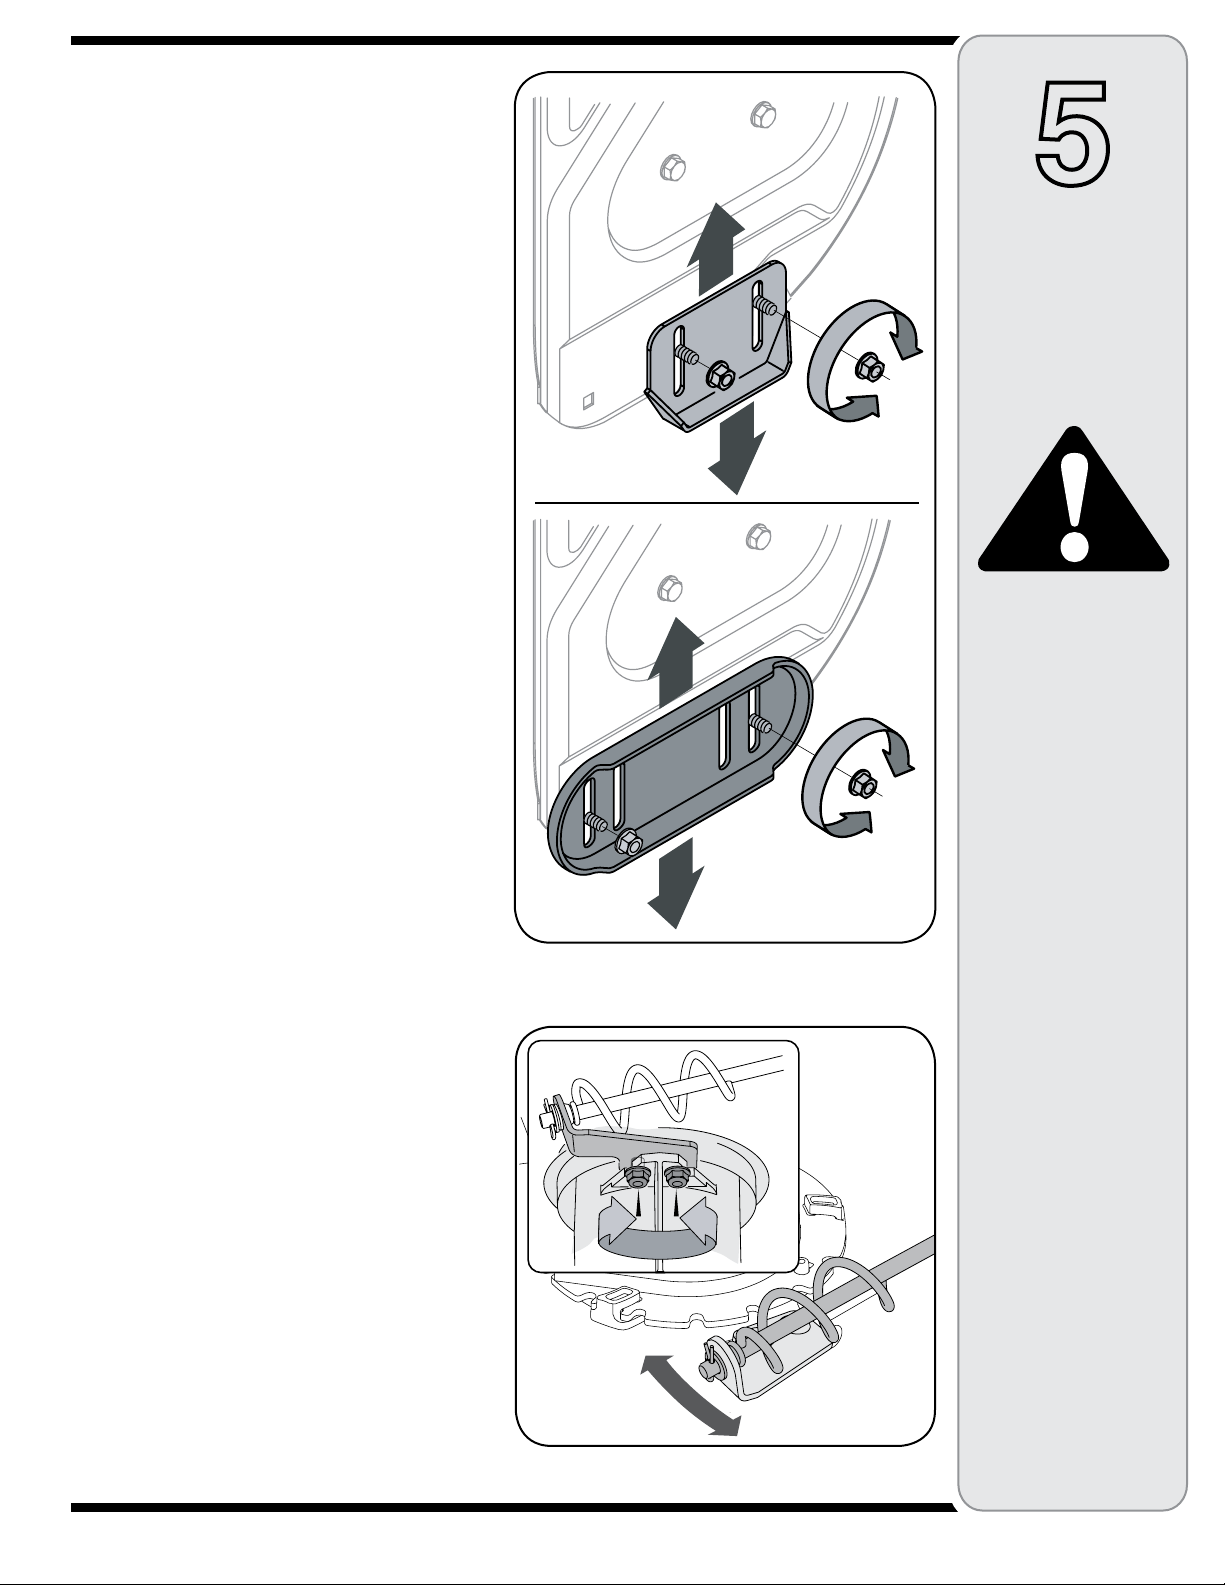
The space between the skid shoes and the ground can
be adjusted, Figure 5-4.
• For close snow removal on a smooth surface, raise
skid shoes higher on the auger housing.
• Use a middle or lower position when the area to be
cleared is uneven, such as a gravel driveway.
To adjust the skid shoes:
1. Loosen the four hex nuts (two on each side) and
carriage bolts. Move skid shoes to desired position.
2. Make certain the entire bottom surface of skid shoe is
against the ground to avoid uneven wear on the skid
shoes.
3. Retighten nuts and bolts securely.
Chute Bracket
Adjustment
If the spiral at the bottom of the chute directional control
is not fully engaging with the chute assembly, the chute
bracket can be adjusted. To do so:
1. Loosen the two nuts which secure the chute bracket
and reposition it slightly, Figure 5-5.
2. Retightening the nuts.
Tire Pressure
Before operating, check tire pressure and reduce pressure to between 15 psi and 20 psi.
If the tire pressure is not equal in both tires, the unit may
pull to one side or the other.
5
Making
Adjustments
WARNING
Loose gravel can be
picked up and thrown by
the auger, causing injury
to the operator and bystanders and/or damage
to the snow thrower and
surrounding property.
13
Figure 5-4 (two types shown)
Figure 5-5
Page 14
6
3HEAR0IN
"EARING
3PACERS
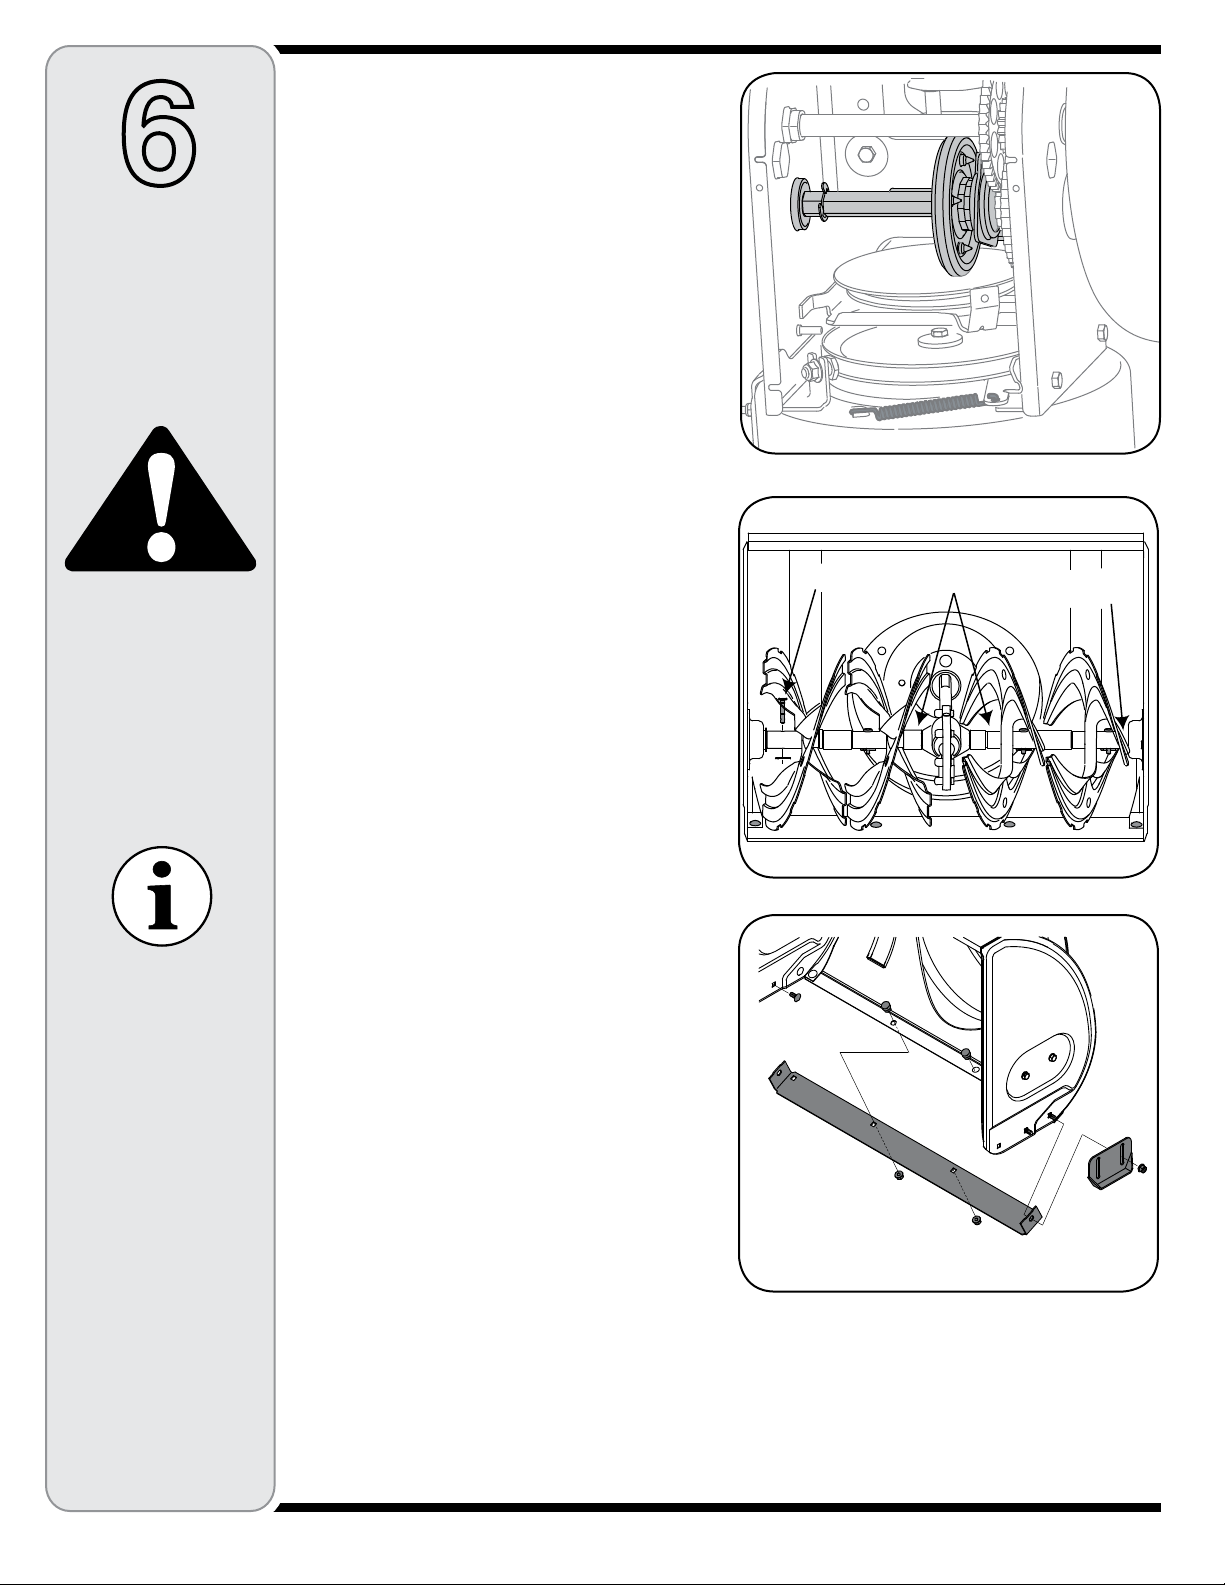
./4%!UGERSNOTSHOWNFORCLARITY
Engine
Refer to the separate Tecumseh Engines manual
packed with your unit for all engine maintenance.
Lubrication
Maintaining
Your Snow
Thrower
WARNING
Before lubricating,
repairing, or inspecting,
disengage all controls and
stop engine. Wait until all
moving parts have come
to a complete stop.
Avoid oil spillage on
rubber friction wheel and
aluminum drive plate.
Do not overfill the gear
case. Damage to the seals
could result.
This Operator’s Manual
may cover a range of
product specifications for
various models. Characteristics and features
discussed and /or
illustrated in this manual
may not be applicable to
all models.
Engine
Refer to the separate Tecumseh Engines manual
packed with your unit for all engine lubrication instructions.
Gear Shaft
The gear (hex) shaft should be lubricated at least once
a season or after every 25 hours of operation.
1. Remove the lower frame cover by removing the two
screws which secure it.
2. Apply a light coating of an all-weather multi-purpose
grease to the hex shaft, Figure 6-1.
Wheels
At least once a season, remove both wheels. Clean and
coat the axles with a multipurpose automotive grease
before reinstalling wheels.
Chute Directional Control
Once a season, the joystick should be lubricated with
petroleum jelly, linseed oil, mineral oil, paraffin wax, or
3-in-1 oil.
Auger Shaft
At least once a season, remove the shear pins on auger
shaft. Spray lubricant inside shaft, around the spacers.
Also lubricate the flange bearings found at either end of
the shaft, Figure 6-2.
Gear Case
The auger gear case has been filled with grease at the
factory. If disassembled for any reason, lubricate with
two ounces of grease (Part Number 737-0168).
NOTE: Do not overfill the gear case. Damage to the
seals could result. Be sure the vent plug is free of
grease in order to relieve pressure.
Shave Plate and
Skid Shoes
The shave plate and skid shoes on the bottom of the
snow thrower are subject to wear. They should be
checked periodically and replaced when necessary.
To remove skid shoes:
1. Remove the four carriage bolts and hex flange nuts
which secure them to the snow thrower.
2. Reassemble new skid shoes with the four carriage
bolts (two on each side) and hex flange nuts, Figure
6-3.
Figure 6-1
Figure 6-2
Figure 6-3
To remove shave plate:
1. Remove the carriage bolts and hex nuts which attach
it to the snow thrower housing.
2. Reassemble new shave plate, making sure heads of
carriage bolts are to the inside of housing. Tighten
securely.
14
Page 15
B
A
Figure 6-4
Figure 6-5
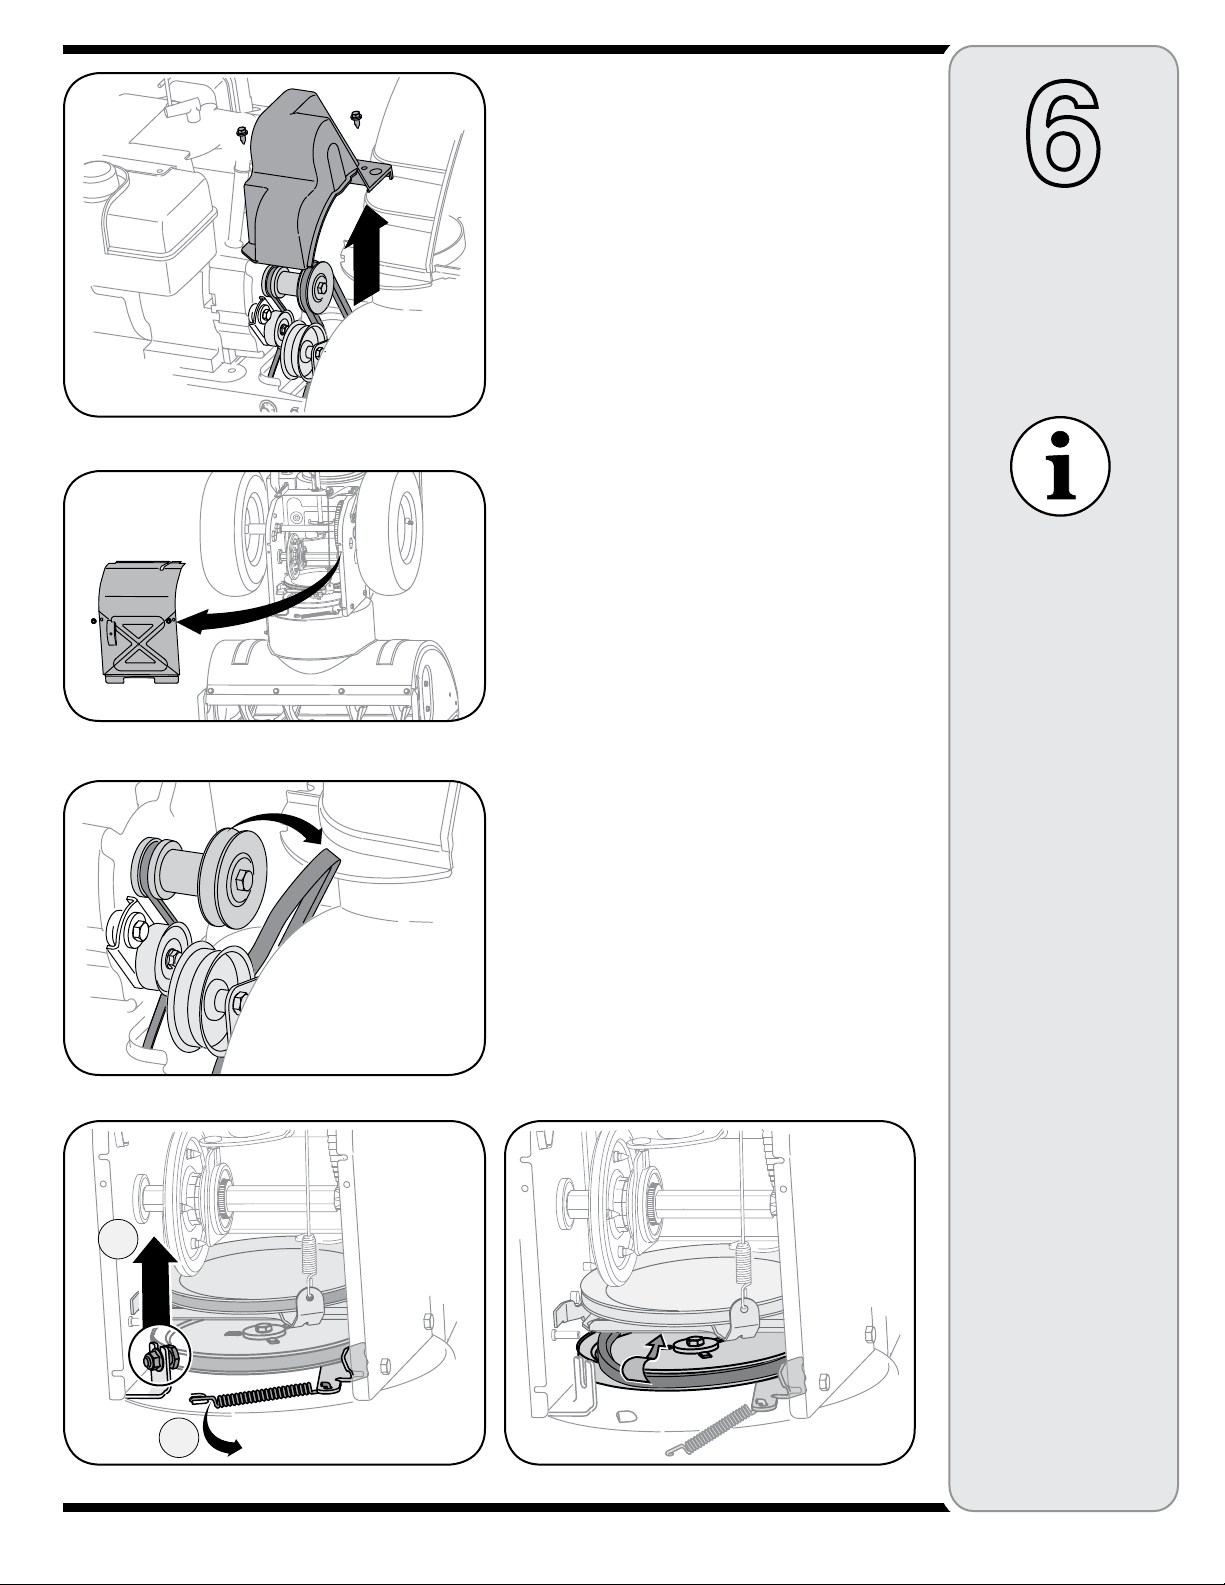
Auger Belt
Replacement
To remove and replace your snow thrower’s auger belt,
proceed as follows:
1. Remove the plastic belt cover on the front of the
engine by removing the two self-tapping screws,
Figure 6-4.
NOTE: Drain the gasoline from the snow thrower, or
place a piece of plastic under the gas cap.
2. Carefully pivot the snow thrower up and forward so
that it rests on the auger housing. Remove the frame
cover from the underside of the snow thrower by
removing four self-tapping screws which secure it,
Figure 6-5.
3. Roll the auger belt off the engine pulley, Figure 6-6.
4. a. Loosen and remove the shoulder screw which
acts as a belt keeper, Figure 6-7.
b. Unhook the support bracket spring from the
frame.
5. Remove the belt from around the auger pulley, and
slip the belt between the support bracket and the
auger pulley, Figure 6-8. Reassemble auger belt by
following instructions in reverse order.
NOTE: Do not forget to reinstall the shoulder screw
and reconnect the spring to the frame after installing a replacement auger belt.
6
Maintaining
Your Snow
Thrower
Although multi-viscosity
oils (5W30, 10W30 etc.)
improve starting in cold
weather, these multiviscosity oils also result
in higher oil consumption when used above
32ºF. Check your snow
thrower’s engine oil level
more frequently to avoid
possible engine damage
from running low on oil.
Do not sandblast spark
plug. Spark plug should
be cleaned by scraping or
wire brushing and washing with a commercial
solvent.
NEVER replace the auger
shear pins with standard
Figure 6-6
pins. Any damage to the
auger gearbox or other
components, as a result
of doing so, will NOT be
covered by your snow
thrower’s warranty.
Figure 6-7 Figure 6-8
15
Page 16
C
B
A
6
Augers
• The augers are secured to the spiral shaft with two
shear pins and cotter pins. If the auger should strike a
foreign object or ice jam, the snow thrower is designed
so that the pins may shear, Figure 6-2.
Maintaining
Your Snow
Thrower
NEVER replace the auger
shear pins with anything
other than OEM Part No.
738- 04124A replacement
shear pins. Any damage
to the auger gearbox or
other components as
a result of failing to do
so will NOT be covered
by your snow thrower’s
warranty.
Figure 6-9
• If the augers will not turn, check to see if the pins have
sheared. One set of replacement shear pins has been
provided with the snow thrower. When replacing pins,
spray an oil lubricant into shaft before inserting new
pins.
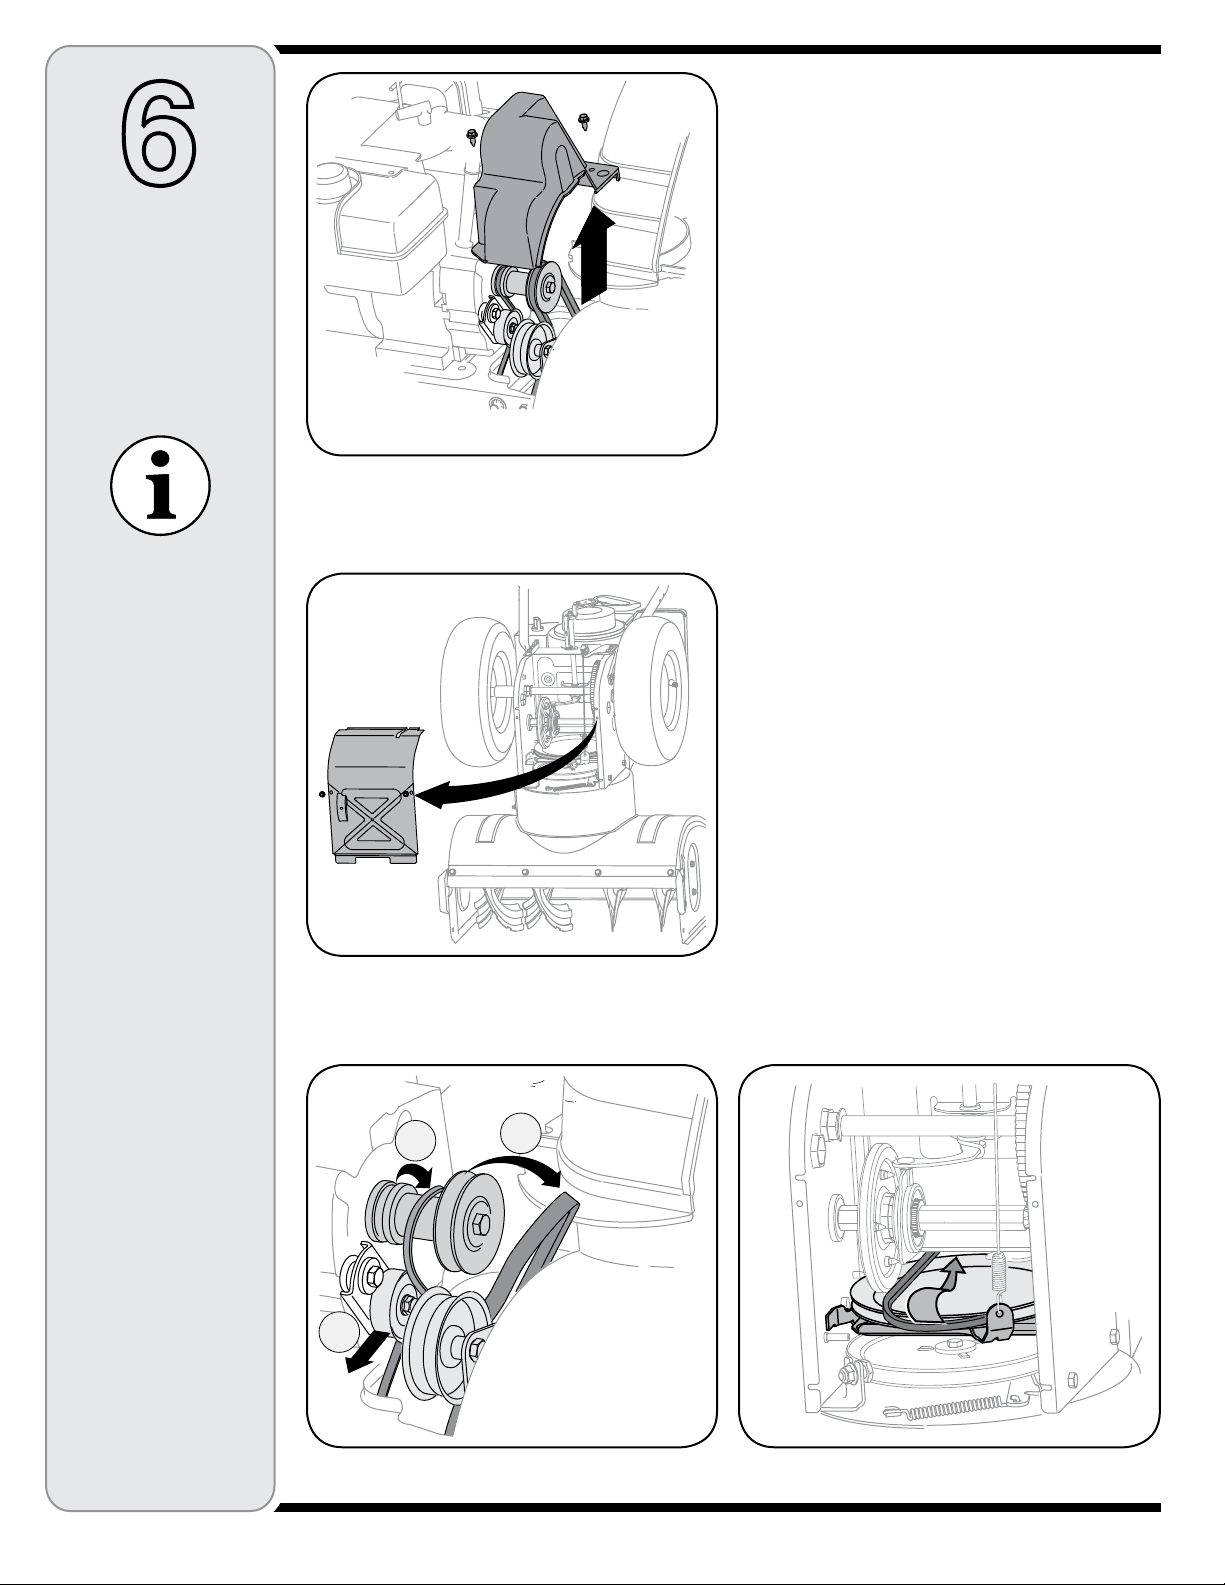
Drive Belt Replacement
To remove and replace your snow thrower’s auger belt,
proceed as follows:
1. Remove the plastic belt cover on the front of the
engine by removing the two self-tapping screws,
Figure 6-9.
• Drain the gasoline from the snow thrower, or place a
piece of plastic under the gas cap.
• Carefully pivot the snow thrower up and forward so
that it rests on the auger housing.
2. Remove the frame cover from the underside of the
snow thrower by removing four self-tapping screws
which secure it, Figure 6-10.
3. a. Grasp the idler pulley and pivot it toward the right,
Figure 6-11.
b. Roll the auger belt off the engine pulley.
c. Lift the drive belt off engine pulley.
4. Slip the drive belt off the pulley and between friction
wheel and friction wheel disc, Figure 6-12.
• Remove and replace belt in the reverse order.
Figure 6-10
Figure 6-11 Figure 6-12
16
Page 17
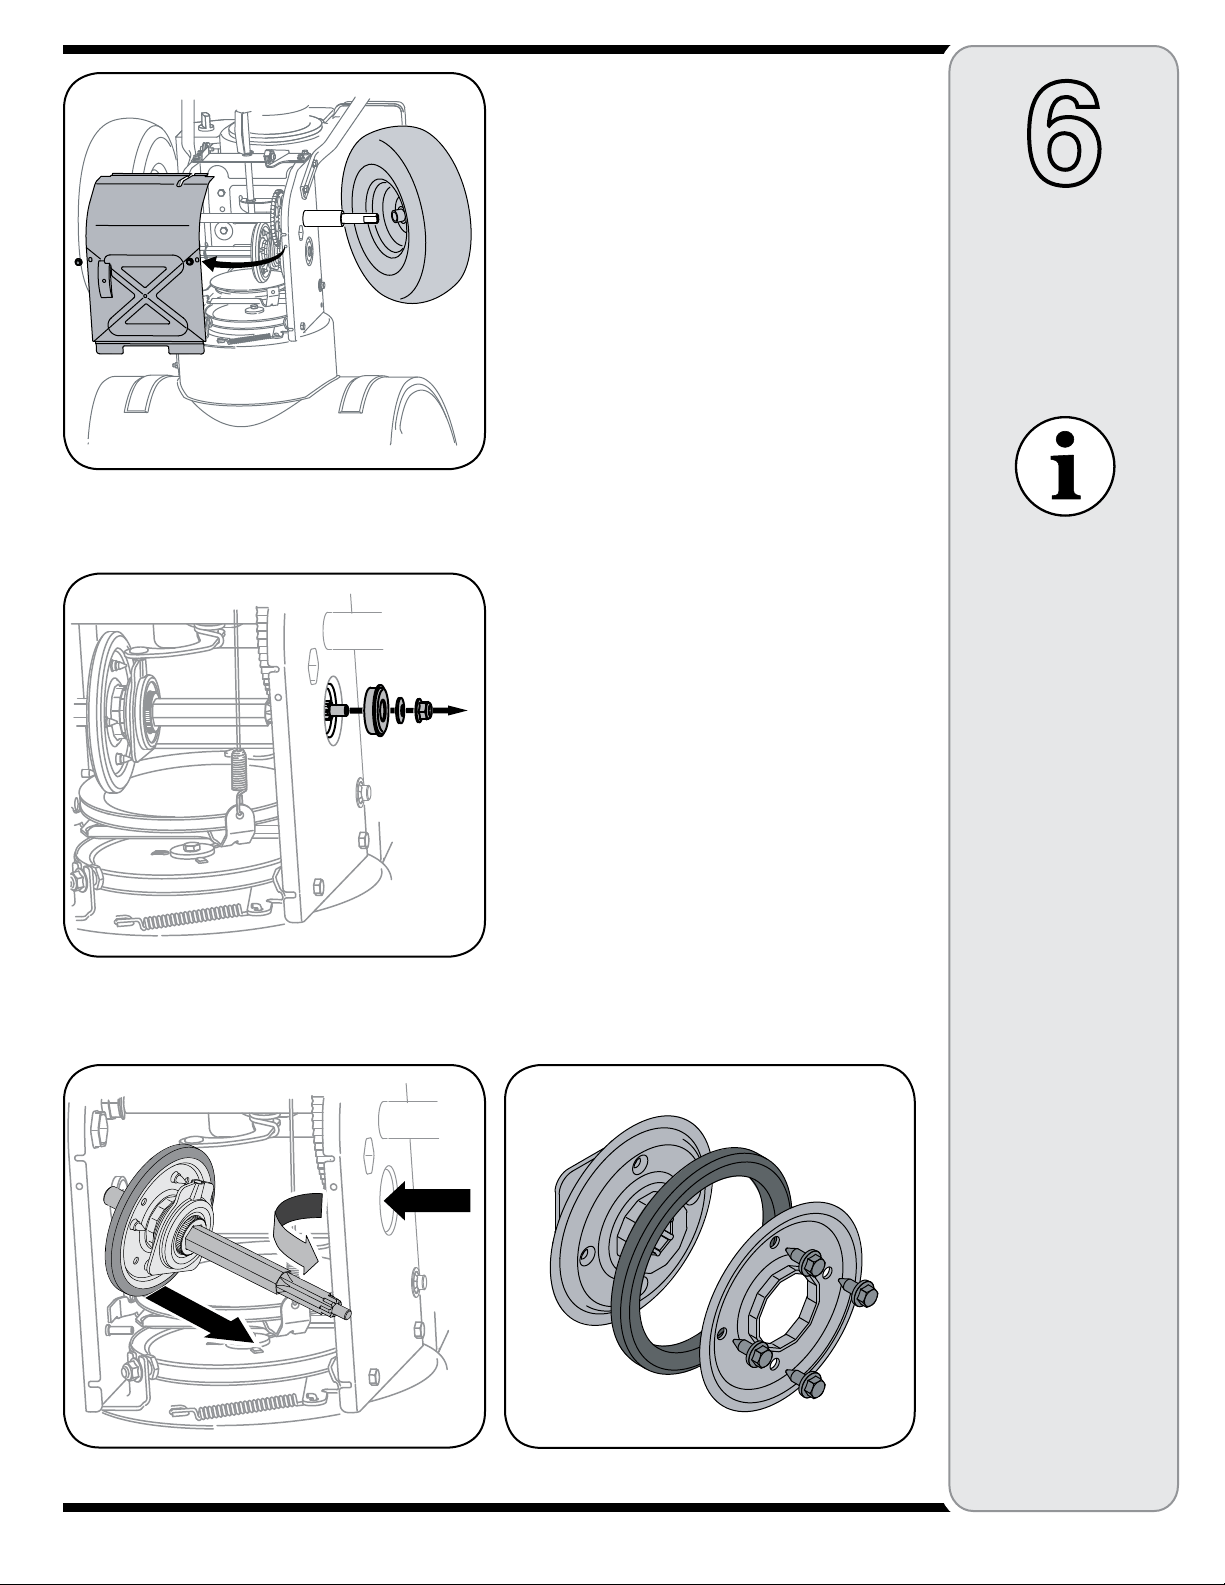
Figure 6-13
Figure 6-14
Friction Wheel Removal
If the snow thrower fails to drive with the drive control
engaged, and performing the drive control cable adjustment fails to correct the problem, the friction wheel may
need to be replaced. Follow the instructions below.
Examine the friction wheel for signs of wear or cracking
and replace if necessary
• Place the shift lever in third Forward (F3) position.
• Drain the gasoline from the snow thrower, or place a
piece of plastic under the gas cap.
• Carefully pivot the snow thrower up and forward so
that it rests on the auger housing.
1. a. Remove the frame cover from the underside of
the snow thrower by removing four self-tapping
screws which secure it, Figure 6-13.
b. Remove the right-hand wheel by removing the
screw and bell washer which secure it to the axle.
2. Carefully remove the hex nut and washer which
secures the hex shaft to the snow thrower frame and
lightly tap the shaft’s end to dislodge the ball bearing
from the right side of the frame, Figure 6-14.
3. Carefully position the hex shaft downward and to
the left before carefully sliding the friction wheel
assembly off the shaft, Figure 6-15.
NOTE: If you’re replacing the friction wheel assembly
as a whole, discard the worn part and slide the new part
onto the hex shaft. Follow the steps above in reverse
order to reassemble components. If you’re disassembling the friction wheel and replacing only the rubber
ring, proceed as follows:
4. Remove the four screws which secure the friction
wheel’s side plates together, Figure 6-16.
• Remove the rubber ring from between the plates.
• Reassemble the side plates with a new rubber ring.
• Slide the friction wheel assembly back onto the hex
shaft and follow the steps above in reverse order to
reassemble components.
6
Maintaining
Your Snow
Thrower
When reassembling the
friction wheel assembly,
tighten each screw only
one rotation before turning
the wheel clockwise and
proceeding with the next
screw. Repeat this process
several times to ensure
the plates are secured with
equal force.
NEVER replace the auger
shear pins with anything
other than OEM Part No.
738- 04124A replacement
shear pins. Any damage to
the auger gearbox or other
components as a result of
failing to do so will NOT
be covered by your snow
thrower’s warranty.
Figure 6-15 Figure 6-16
17
Page 18
If the snow thrower will not be used for 30 days or longer, or if it is the end of the snow season when the last possibility of snow is gone, the equipment needs to be stored properly. Follow storage instructions below to ensure top
performance from the snow thrower for many more years.
7
Off-Season
Storage
WARNING
Never store snow thrower
with fuel in tank indoors
or in poorly ventilated
areas, where fuel fumes
may reach an open flame,
spark or pilot light as on
a furnace, water heater,
clothes dryer or
gas appliance.
Fuel left in engine during
warm weather deteriorates
and will cause serious
starting problems.
Preparing Engine
NOTE: Refer to the engine manual for more detailed
information on preparing the snow thrower engine for
storage.
Short-Term Storage
It is important to prevent gum deposits from forming in
essential fuel system parts of the engine such as the
carburetor, fuel filter, fuel hose, or tank during short-term
storage (15-30 days). To prevent this, treat the fuel
system using a fuel stabilizer.
Fuel stabilizer (such as STA-BIL™ or ULTRA-FRESH™)
is an acceptable alternative in minimizing the formation
of fuel gum deposits during storage. Add stabilizer to
gasoline in fuel tank or storage container. Always follow
mix ratio found on stabilizer container. Run engine at least
10 minutes after adding stabilizer to allow it to reach the
carburetor.
WARNING: Never store snow thrower
with fuel in tank indoors or in poorly
ventilated areas, where fuel fumes may
reach an open flame, spark or pilot
light as on a furnace, water heater, clothes dryer or
gas appliance.
CAUTION: Alcohol blended fuels
(called gasohol or using ethanol or
methanol) can attract moisture which
leads to separation and formation of
acids during storage. Acidic gas can damage the fuel
system of an engine while in storage.
Preparing Snow Thrower
• When storing the snow thrower in an unventilated or
metal storage shed, care should be taken to rustproof
the equipment. Using a light oil or silicone, coat the
equipment, especially any chains, springs, bearings
and cables.
• Remove all dirt from exterior of engine and equipment.
• Follow lubrication recommendations.
• Store equipment in a clean, dry area.
Never use engine or carburetor cleaning products in
the fuel tank or permanent
damage may occur.
Long-Term Storage
To avoid engine problems, the fuel system should be
emptied before storage for 30 days or longer.
WARNING: Fuel left in engine during
warm weather deteriorates and will
cause serious starting problems.
1. Run the engine until the fuel tank is empty and it stops
due to lack of fuel. Do not attempt to pour fuel from the
engine.
WARNING: Never use engine or carburetor cleaning products in the fuel tank
or permanent damage may occur.
2. Remove the spark plug and pour one (1) ounce of
engine oil through the spark plug hole into the cylinder.
Cover spark plug hole with a rag and crank the engine
several times to distribute the oil. Replace spark plug.
18
Page 19
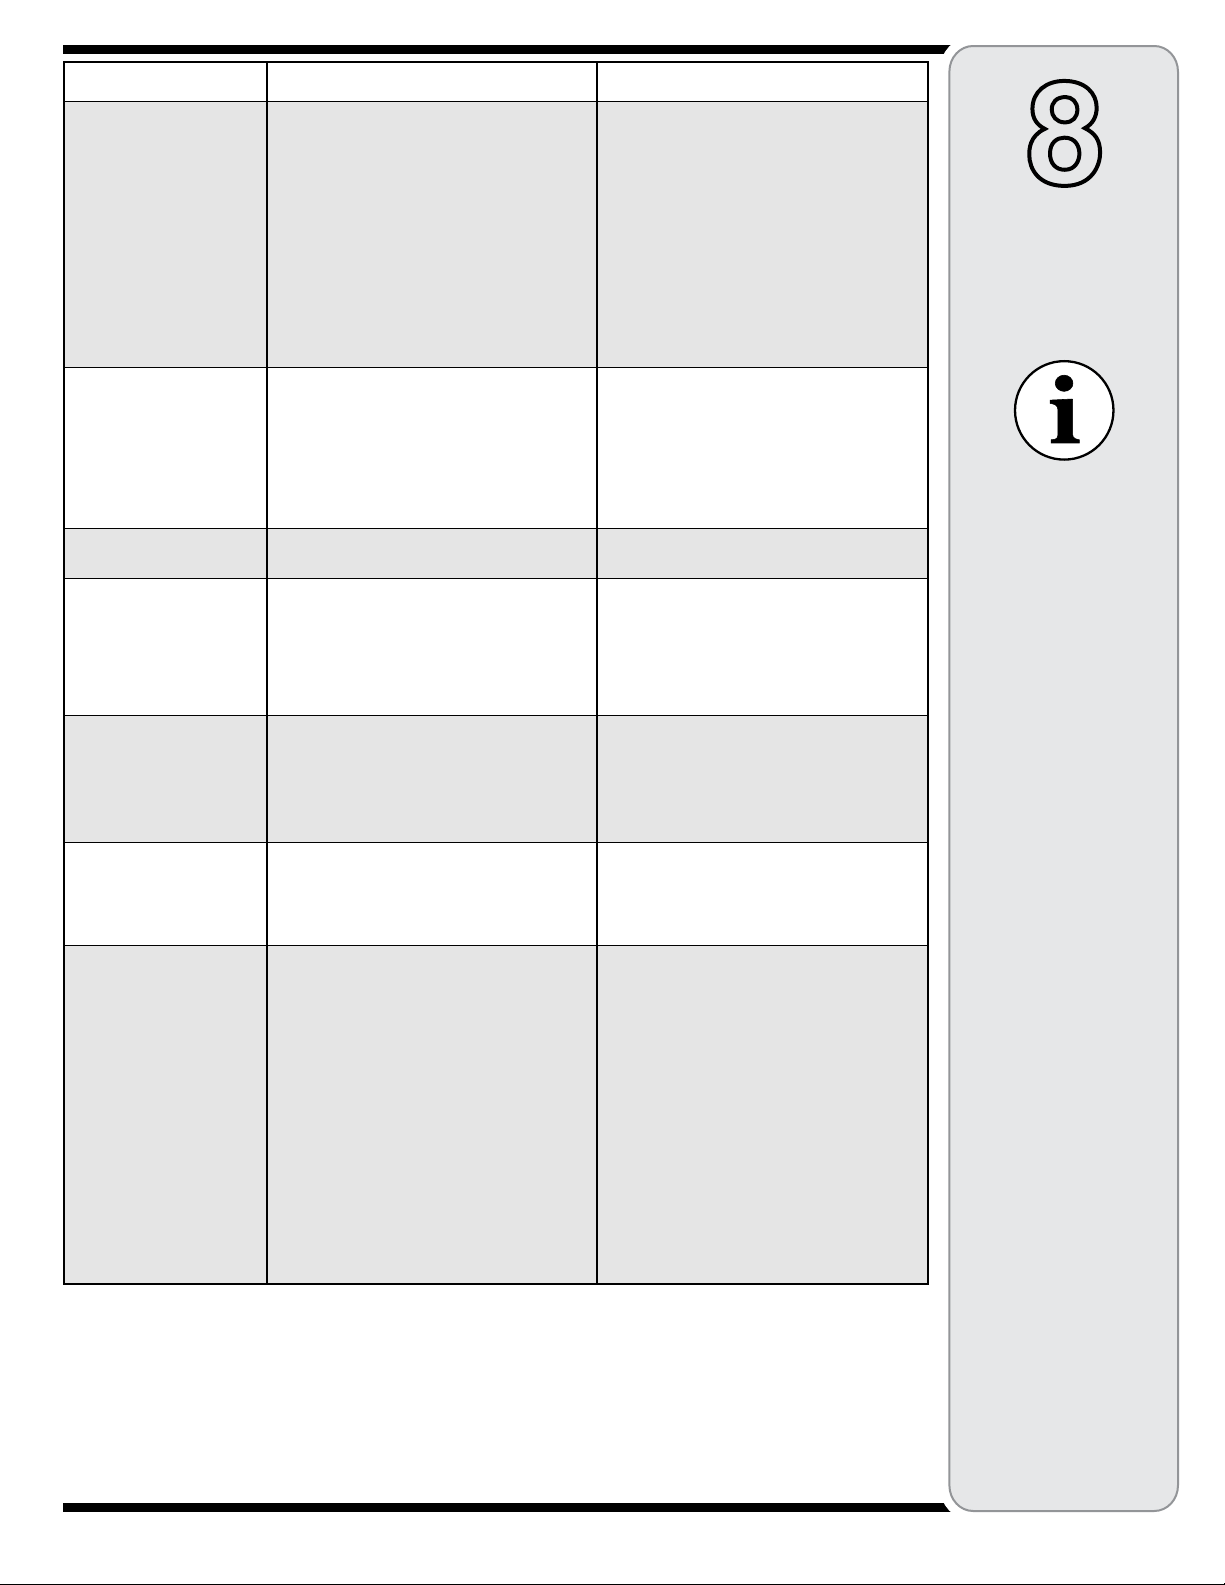
Problem
Engine fails to start
Cause
1. Choke not in ON position.
2. Spark plug wire disconnected.
3. Fuel tank empty or stale fuel.
4. Engine not primed.
5. Faulty spark plug.
6. Blocked fuel line.
7. Safety key not in ignition on engine.
Remedy
1. Move choke to ON position.
2. Connect wire to spark plug.
3. Fill tank with clean, fresh gasoline.
4. Prime engine as instructed in “Operat
ing Your Snow Thrower”.
5. Clean, adjust gap, or replace.
6. Clean fuel line.
7. Insert key fully into the switch.
8
-
Trouble-
shooting
Engine runs erratic
Engine overheats
Excessive
Vibration
Loss of power
Unit fails
to propel itself
Unit fails
to discharge snow
1. Unit running on CHOKE.
2. Blocked fuel line or stale fuel.
3. Water or dirt in fuel system.
4. Carburetor out of adjustment.
1. Loose parts or damaged auger.
1. Spark plug wire loose.
2. Gas cap vent hole plugged.
3. Exhaust port plugged.
1. Drive control cable in need of adjustment.
2. Drive belt loose or damaged.
1. Chute assembly clogged.
2. Foreign object lodged in auger.
3. Auger control cable in need of adjustment.
4. Auger belt loose or damaged.
5. Shear pin(s) sheared.
1. Move choke lever to OFF position.
2. Clean fuel line; fill tank with clean,
fresh gasoline.
3. Drain fuel tank. Refill with fresh fuel.
4. Contact an authorized Service Center.
1. Contact Service Center.1. Carburetor not adjusted properly.
1. Stop engine immediately and discon
nect spark plug wire. Tighten all bolts
and nuts. If vibration continues, have
unit serviced by an authorized Service
Center.
1. Connect and tighten spark plug wire.
2. Remove ice and snow from gas cap.
Be certain vent hole is clear.
3. Contact Service Center.
1. Adjust drive control cable. Refer to
“Making Adjustments”.
2. Replace drive belt.
1. Stop engine immediately and disconnect spark plug wire. Clean chute
assembly and inside of auger housing
with clean-out tool or a stick.
2. Stop engine immediately and disconnect spark plug wire. Remove object
from auger with clean-out tool or a
stick.
3. Refer to Auger Control Test.
4. Refer to Maintenance section.
5. Replace with new shear pin(s).
This section addresses
minor service issues.
For further details,
contact an authorized
-
service center.
23
Page 20
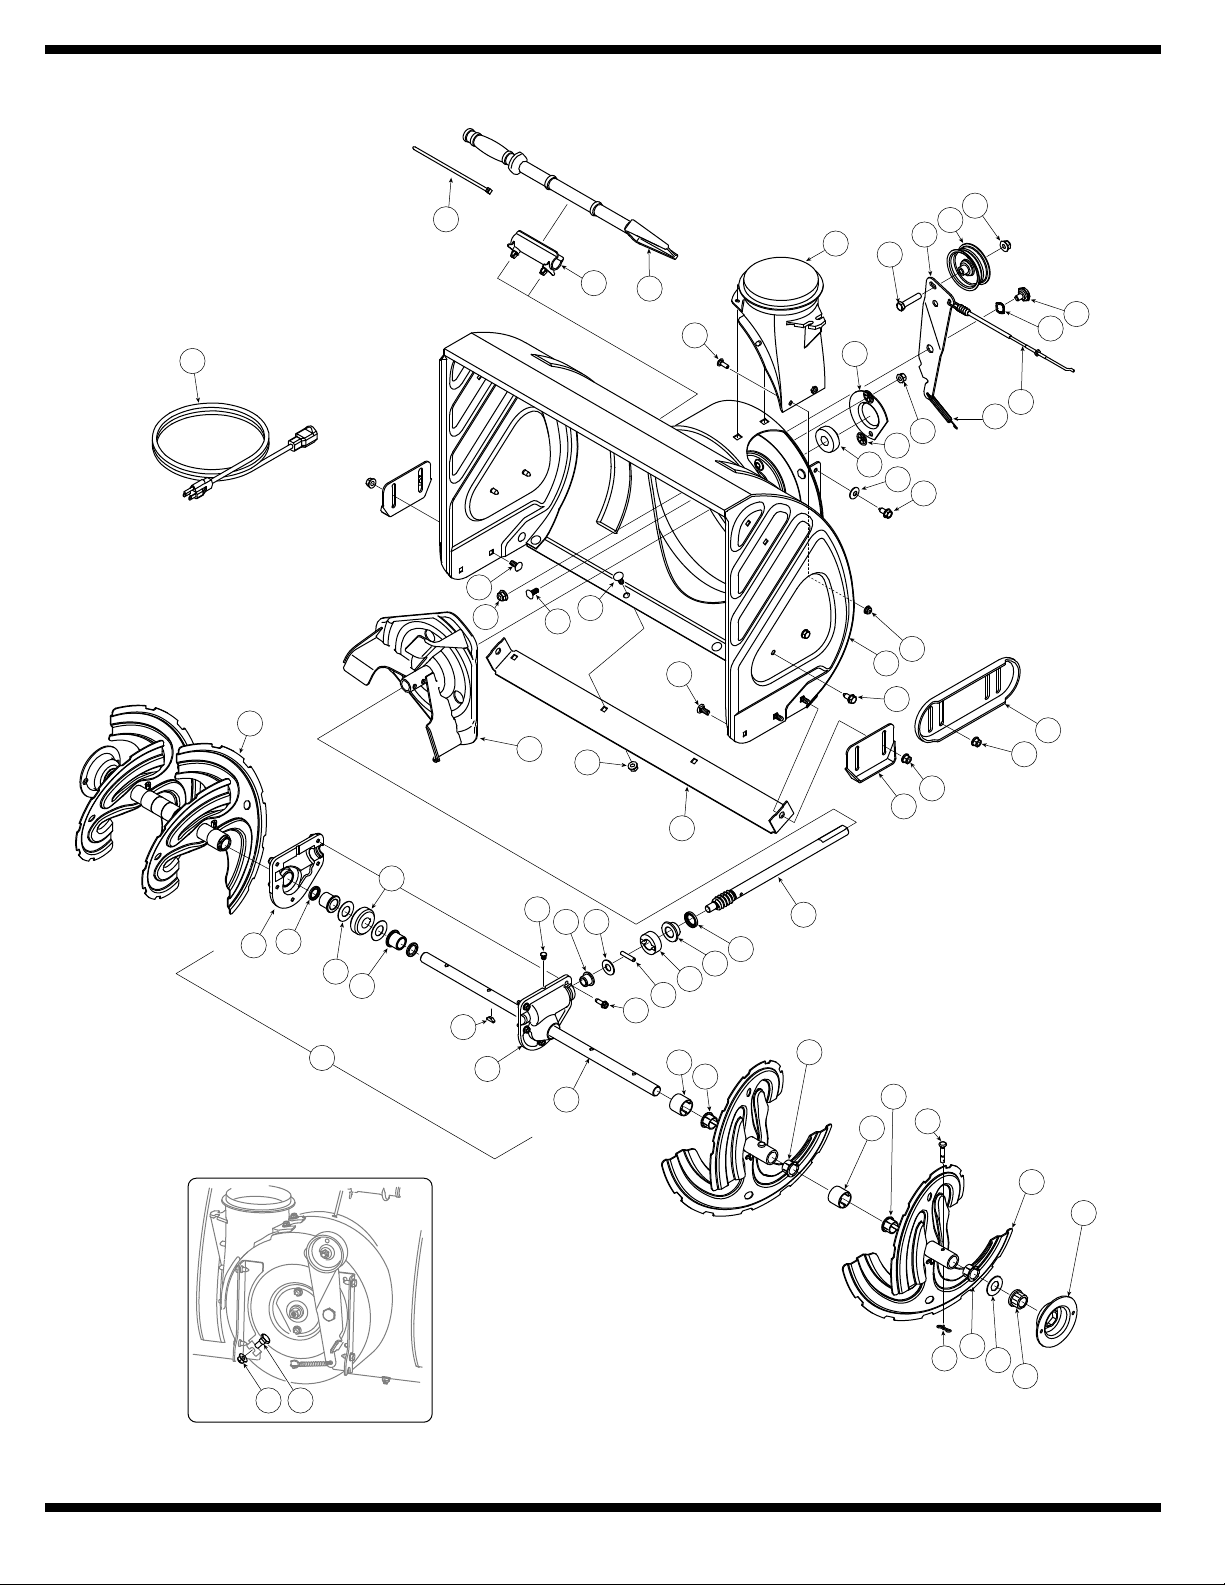
9 19
4
36
7
56
7
4
50
39
53
27
46
41
44
47
40
49
15
20
45
3
26
24
9
28
5
8
12
23
7
14
54
1
18
52
48
55
51
38
43
31
33
35
11
2
7
9
4
4
34
33
31
21
33
29
30
16
25
57
13
33
10
32
22
42
37
6
Style N
20
Page 21
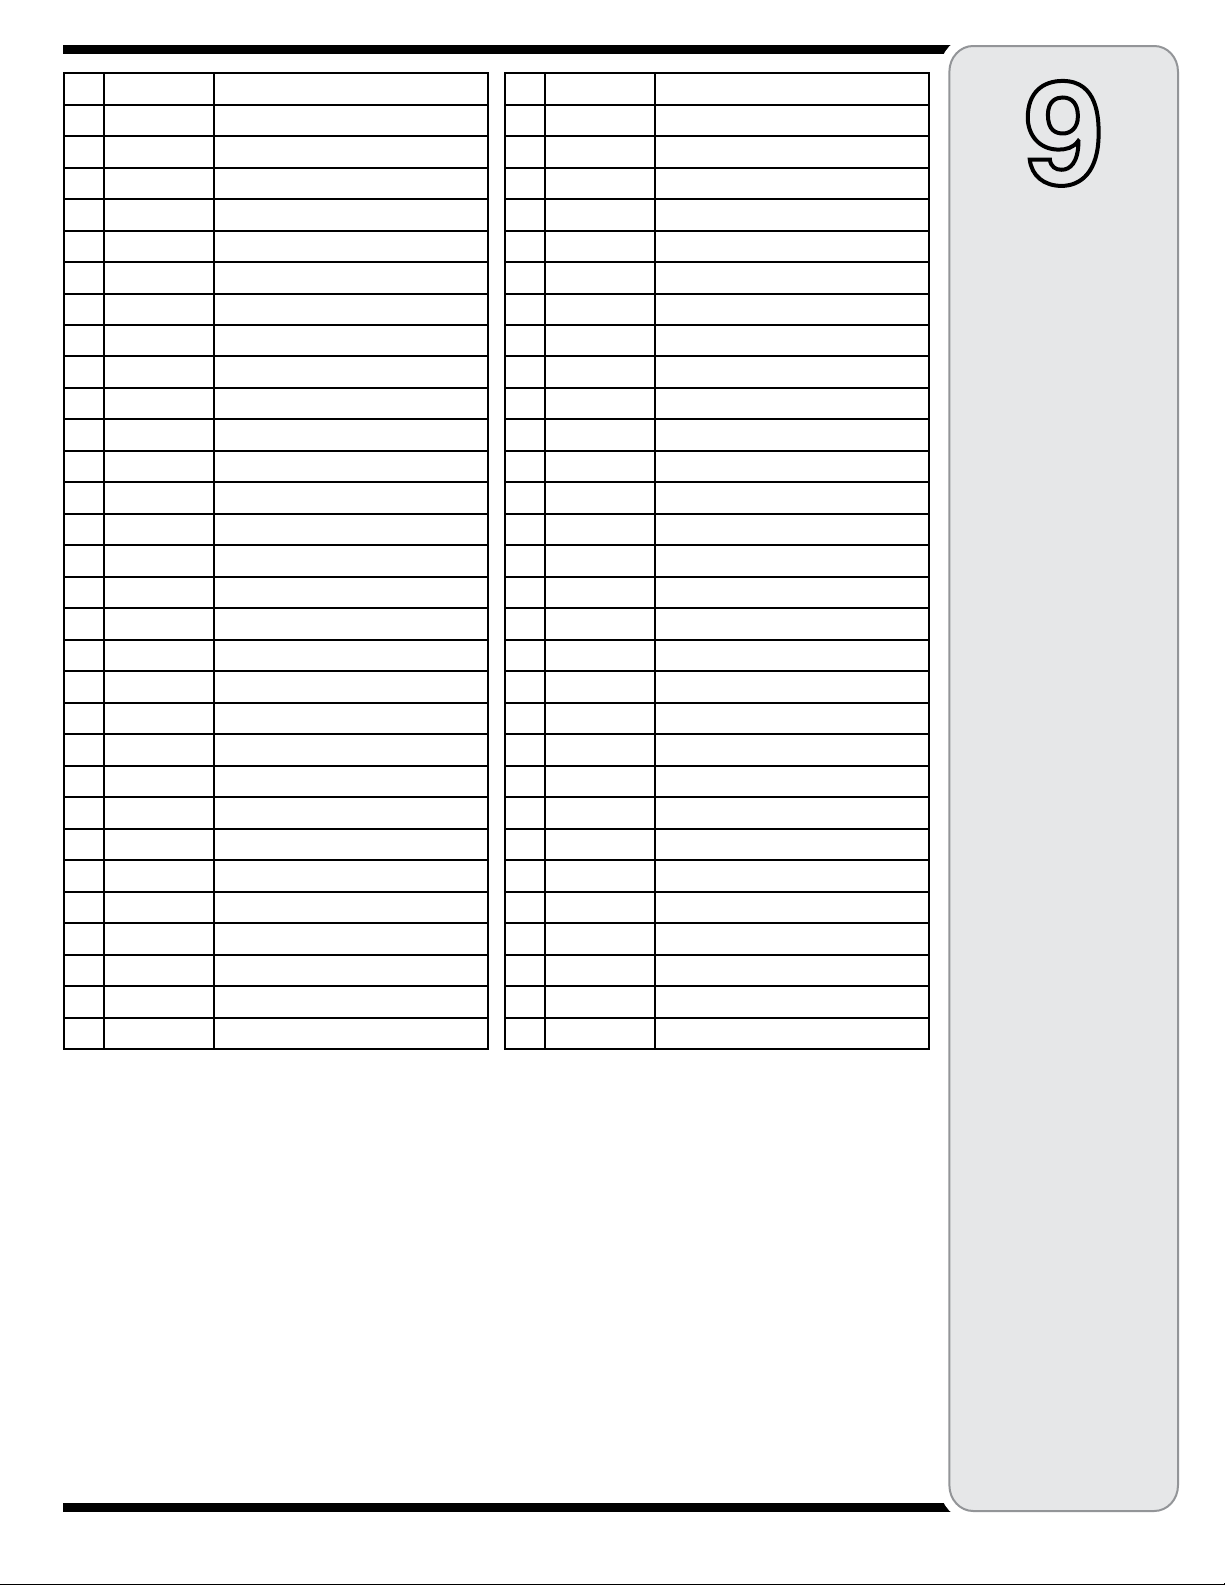
1. 731-2635 Snow Removal Tool Mount
2. 684-04057 Impeller Assembly, 12” Dia.
3. 710-0347 Hex Screw, 3/8-16, 1.75, Gr5
4. 710-0451 Bolt, Carriage, 5/16-18, .750 Gr1
5. 710-0604A Screw, 5/16-18, 0.625
6. 710-0703 Screw, Carriage, 1/4-20, .750, Gr5
7. 712-04063 Nut, Flange Lock, 5/16-18, Nylon
8. 712-04064 Nut, Flange Lock, 1/4-20, Nylon
9. 712-04065 Nut, Flange Lock, 3/8-16, Nylon
10. 714-04040 Cotter Pin, Bow-tie
11. 725-0157 Cable, Tie, 3/16 x .05 x 7.4
12. 726-04012 Nut, Push-on, .25 Dia
13. 731-04705 Chute, Adapter 5” Dia
14. 732-0611 Spring, Extension, .38 OD x 3.6
15. 736-0174 Washer, Wave, .625 x .885 x .015
16. 736-0242 Washer, Bell, .340 x .872 x .060
17. 736-0463 Washer, Flat, .25 x .630 x .0515
18. 731-2643 Snow Removal Tool
19. 738-0143 Screw, Shoulder, .498 x .34, 3/8-16
20. 738-0281 Screw, Shoulder, .625 x .17, 3/ 8-16
21. 738-04124A Shear Pin, .25 x 1.50
22. 741-0245 Bearing, Hex Flange x .75 ID
23. 741-0309 Bearing, Ball, .75 ID x 1.85 OD
24. 756-0981B Flat Pulley, Idler, 2.75 OD
25. 790-00075 Housing, Bearing, 1.85 ID
26. 790-00080A Bracket, Auger Idler w/ Brake
27. 918-04191 Gearbox Assembly, Auger, 24”
918-04192 Gearbox Assembly, Auger, 26”
28. 684-04077 Housing Assy Troy-Bilt, Auger 24”
684-04078 Housing Assy Troy-Bilt, Auger 26”
29. 684-04107 Spiral Assembly, LH
30. 684-04108 Spiral Assembly, RH
31. 731-04870* Spacer, 1.25 OD x .75 ID x 1.00
32. 736-0188 Washer, Flat, .76 x 1.49 x .06
33. 741-0493A Bushing, Flange, .80 ID x .91 OD
34. 790-00087A Bearing Housing
35. 790-00120 Shave Plate, 23.66 (24” auger)
790-00121 Shave Plate, 25.66 (26” auger)
36. 784-5580 Slide Shoe, Std.
37. 719-0319 Housing, Auger, RH Reduced
38. 719-0320 Housing, Auger, LH Reduced
39. 721-0327 Seal, Oil, .750 ID
40. 741-0662 Bearing, Flange, .75 x 1.0 x .59
41. 710-0642 Screw, Self-tapping, 1/4-20, 0.750
42. 711-04285 Axle, Auger, 24”
711-04284 Axle, Auger, 26”
43. 714-0161 Key, Hi-pro 3/16 x 5/8
44. 715-04021 Pin, Dowel, .25 OD x 1.2
45. 717-04126 Shaft, Worm .75 OD
46. 717-0528A Gear, Worm 20T
47. 718-04071 Collar, Thrust
48. 721-0325 Plug, 1/4 x .437
49. 721-0327 Seal, Oil, .75 x 1 x .131
50. 736-0351 Washer, Flat, .760 ID x 1.5 OD
51. 736-3084 Washer, Flat, .51 x 1.12
52. 741-0663 Bearing, Flange, .75 x 1.0 x .925
53. 741-0661A Bearing, Flange, .75 x 1.00 x .975
54. 746-04230 Clutch Cable, Auger, 47.23”
55. 629-0071 Extention Cord, 110V
56. 790-00091 Slide Shoe, Deluxe
57. 710-1260A Screw, 5/16-18, 0.75
9
Illustrated
Parts List
To order replacement
parts, call
1-800-648-6776
or visit
www.troybilt.com
This Operator’s Manual
may cover a range of
product specifications
for various models.
Characteristics and features discussed and/or
illustrated in this manual
may not be applicable to
all models.
* One found between spirals on models with 24-inch auger housing.
* Two found between spirals on models with 26-inch auger housing.
NOTE: Snow thrower features/components vary by model. NOT all parts listed above and pictured on the previous page are
standard equipment.
21
Page 22
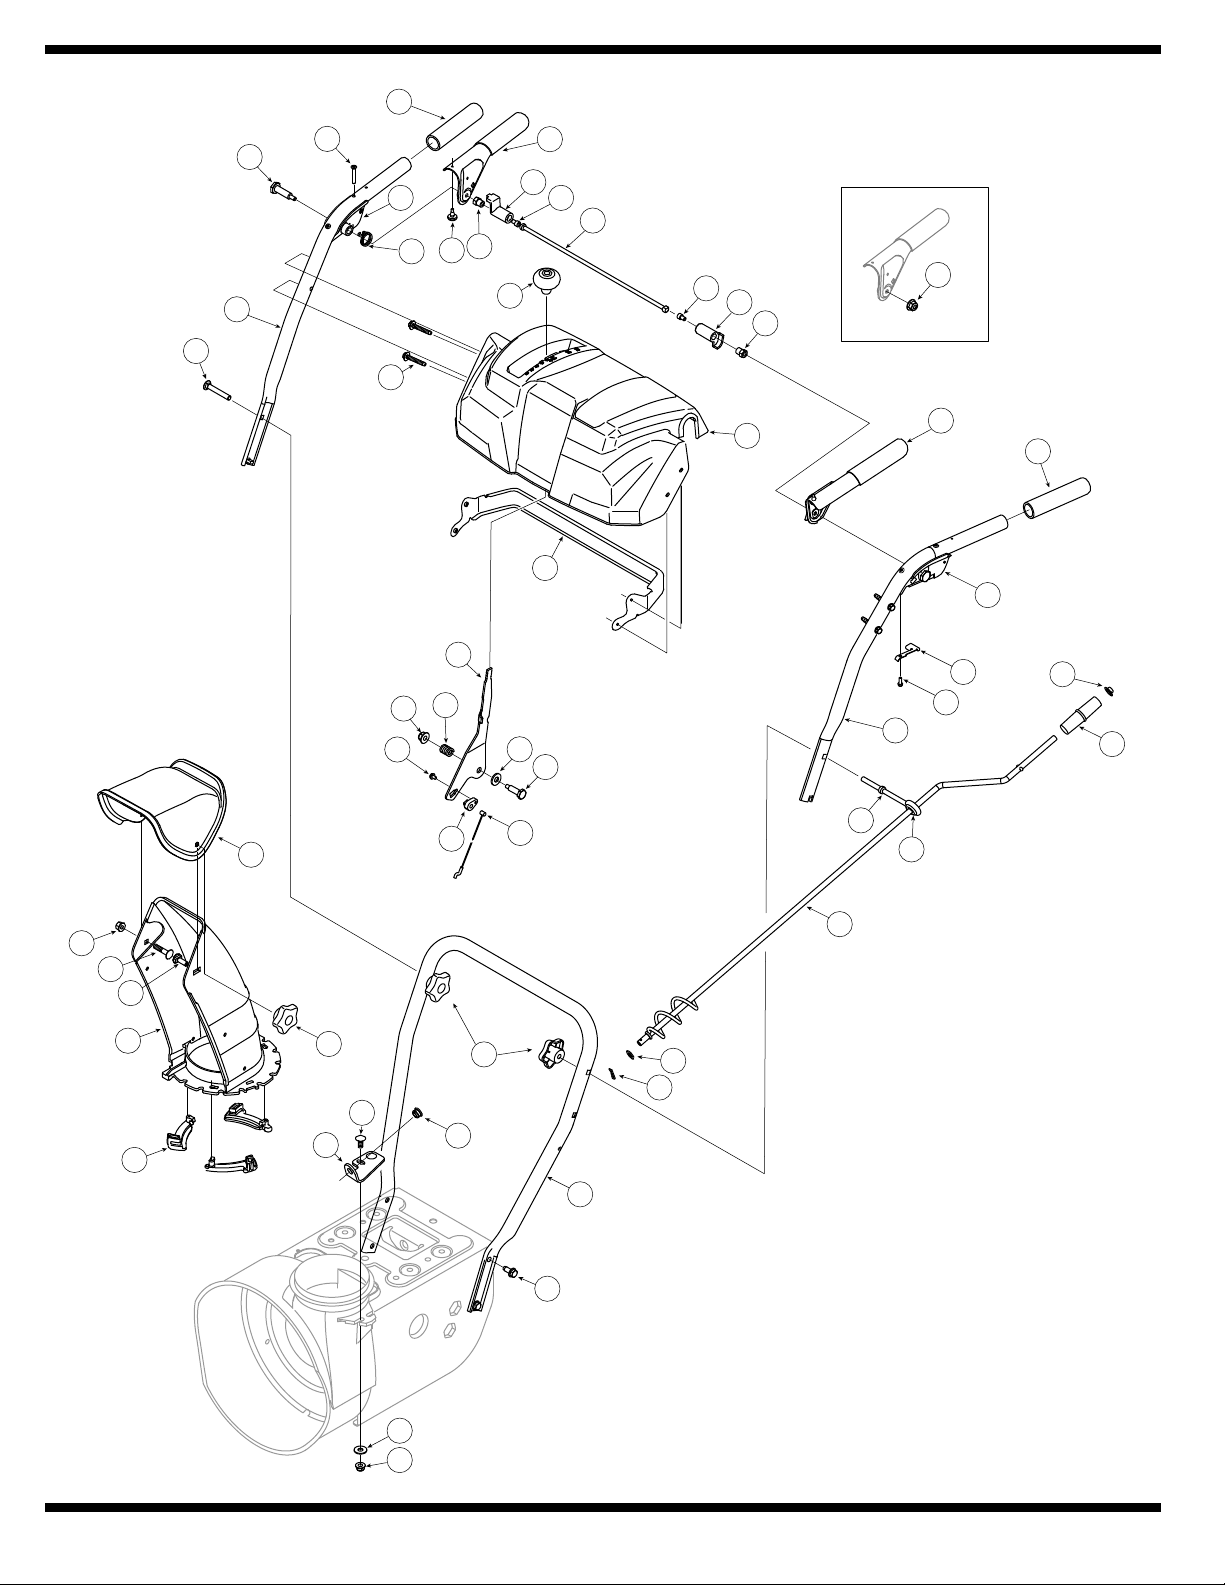
Style N
22
Page 23
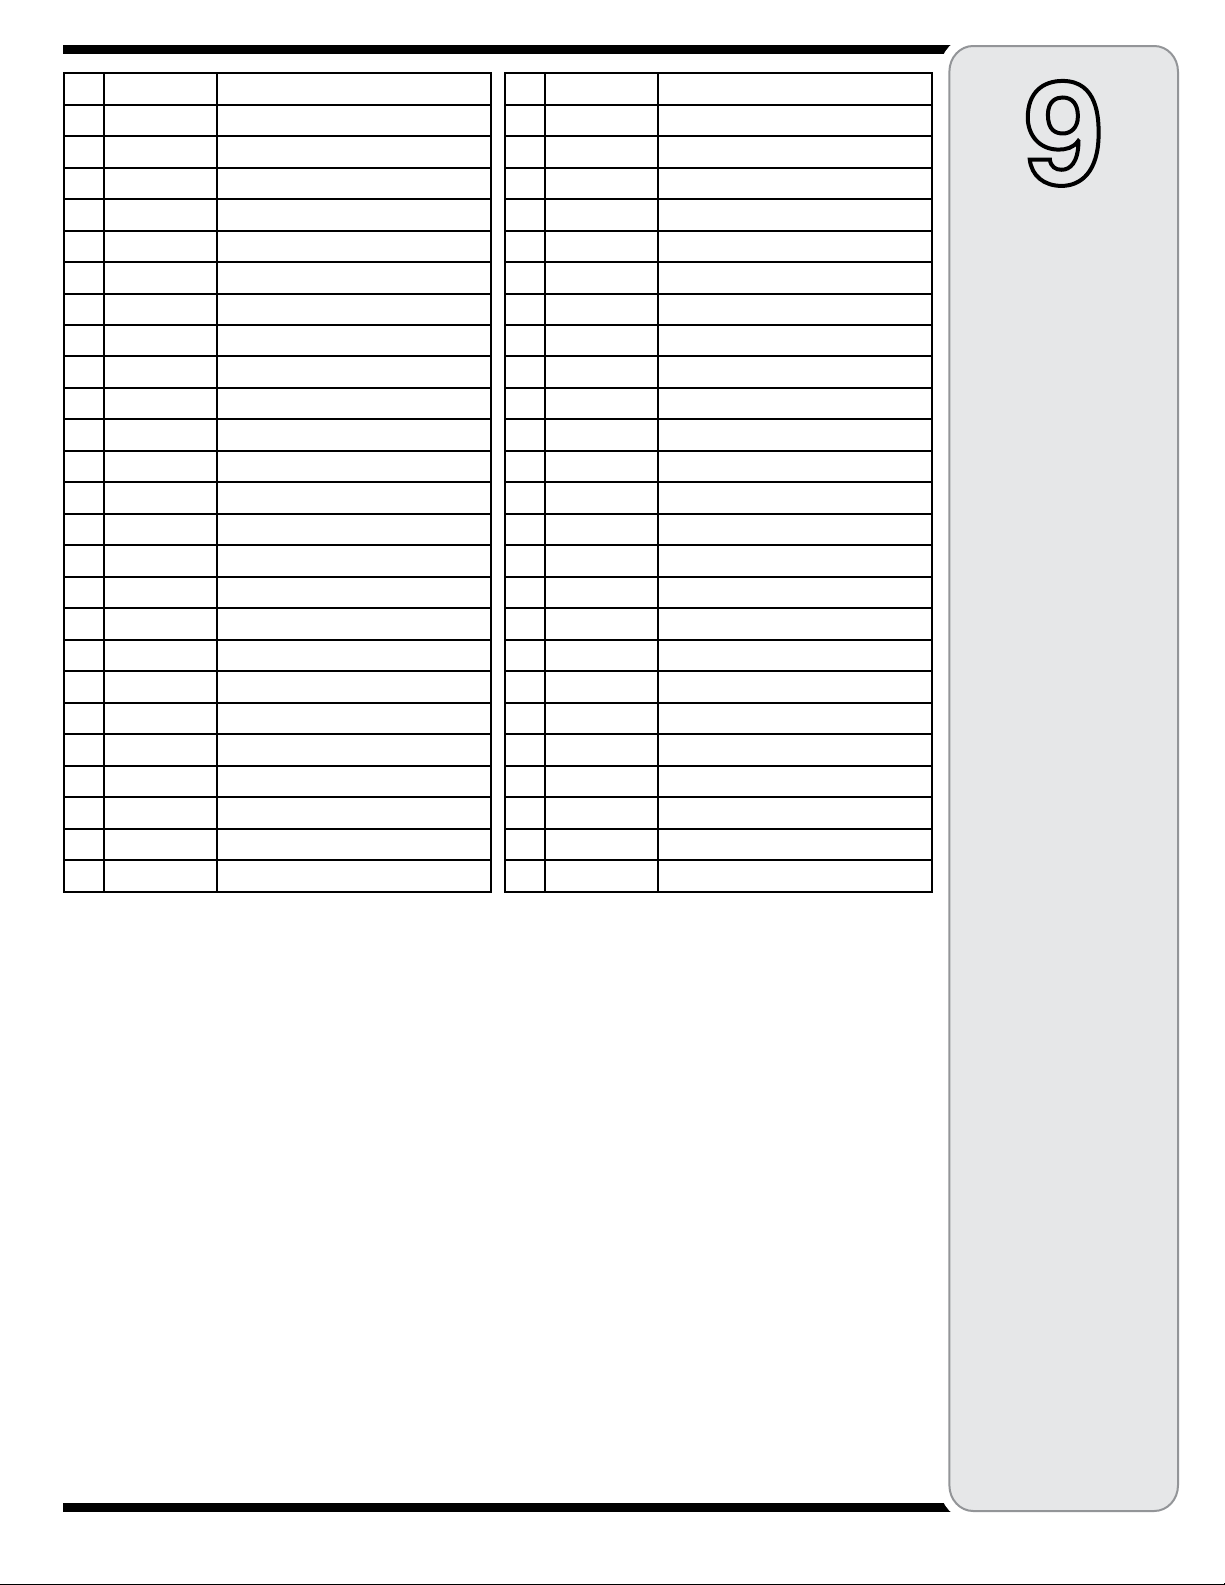
1. 631-04133 Handle Assembly, Lock, LH
2. 631-04134A Handle Assembly, Lock, RH
3. 684-04105A Handle Ass’ y, Engagement LH
4. 684-04106A Handle Ass’y, Engagement, RH
5. 710-0224 Screw, #10-16, 0.500
6. 710-04586 Screw, 1/4-20, 1.625
7. 710-1233 Screw, Machine, #10-24, 1.375
8. 712-04064 Nut, Flange Lock, 1/4-20, Nylon
9. 720-0274 Grip, 1.0 ID x 5.0
10. 720-04039 Knob, Shift
11. 731-05334 Handle Panel, N-Style
12. 732-0193 Spring, .39 x .60 x .88
13. 735-0199A Bumper, Rubber, .62 OD x .22
14. 736-0267 Washer, Flat, 385 x .87 x .06
15. 738-04122 Screw, Shoulder, .43 x 1.34, 1/4-20
16. 738-04125 Screw, Shoulder, .374 Dia. x 1.05
17. 746-04227A Cable, Speed Selector
18. 746-0605 Barrel Holder, Cable, LH
19. 790-00248 Bracket, Panel
20. 790-00203 Lever, Shift
21. 684-04104 Crank Assembly, Chute
22. 710-0449 Screw, Carriage, 5/16-18, 2.25
23. 710-1260A Screw, 5/16-18, 0.75, Gr5
24. 714-0104 Pin, Cotter, .072 x 1.13
25. 720-0201A Crank Knob, 1.0 Dia. x 3.2, Black
26. 720-04072 Star Knob
27. 726-0100 Cap, Push, 3/8 Rod
28. 735-0234 Grommet, .44 ID x .94 OD x .50
29. 736-0185 Washer, Flat, .375 x .738 x .063
30. 747-04263 Eye Bolt, Chute Crank
31. 749-04138 Handle, Lower
32. 749-04141 Handle, Upper, RH
33. 749-04142 Handle, Upper, LH
34. 731-04912A Chute, Lower, 5.0 Diameter
35. 710-0276 Bolt, Carriage, 5/16-18, 1.0
36. 712-04063 Nut, Flange Lock, 5/16-18, Nylon
37. 710-04071 Bolt, Carriage, 5/16-18, 1.0
38. 710-0451 Bolt, Carriage, 5/16-18, .750
39. 731-04426A Chute, Upper, w / Label
40. 736-0159 Washer.349 ID x .879 OD x .063
41. 741-0475 Bushing, Plastic, .380
42. 784-5647 Bracket, Chute Crank
43. 731-04869 Flange Keeper, Chute
44. 732-04238* Torsion Spring
45. 712-04081A* Nut, Hex, 1/4-20
46. 731-04894B* Lock Plate
47. 710-04354* Cap Screw 1/4-20 x .375
48. 711-04287* Pivot Rod
49. 731-04896A* Clutch Lock Cam
50. 732-04219A* Clutch Lock Spring
51. 710-04326* Screw #8-16 x .50
9
Illustrated
Parts List
To order replacement
parts, call
1-800-648-6776
or visit
www.troybilt.com
This Operator’s Manual
may cover a range of
product specifications
for various models.
Characteristics and features discussed and/or
illustrated in this manual
may not be applicable to
all models.
*Available on units equipped with clutch lock feature.
NOTE: Snow thrower features/components vary by model. NOT all parts listed above and pictured on the previous page are
standard equipment.
23
Page 24
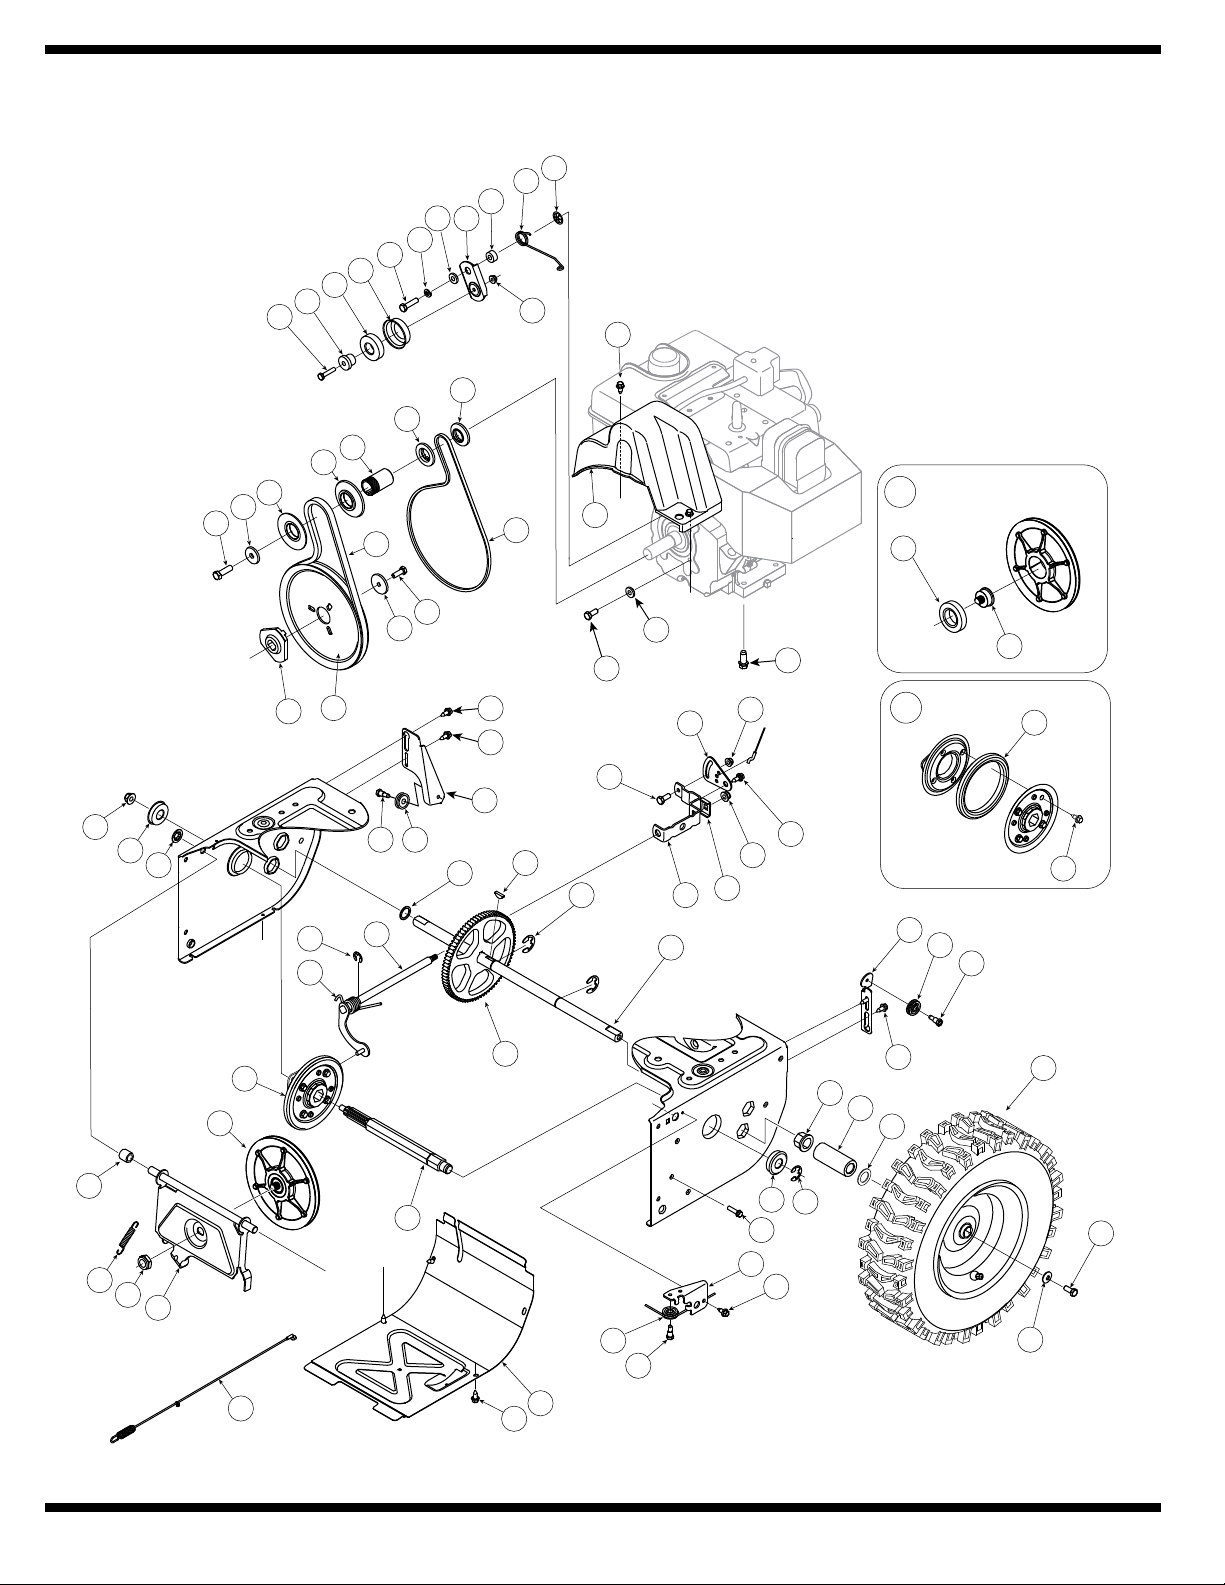
Style N
1
21
22
53
53
50
62
42
39
63
40
33
30
24
36
18
5
25
37
19
6
31
7
30
24
26
13
23
45
47
44
23
43
2
7
5
34
24 30
51
58
52
61
35
27
7
14
55
48
46
7
59
59
49
41
2
1
11
4
66
A
B
B
A
8
26
16
64
7
29
17
3
9
54
60
57
56
60
20
10
15
12
38
69
45
65
23
67
68
70
24
Page 25
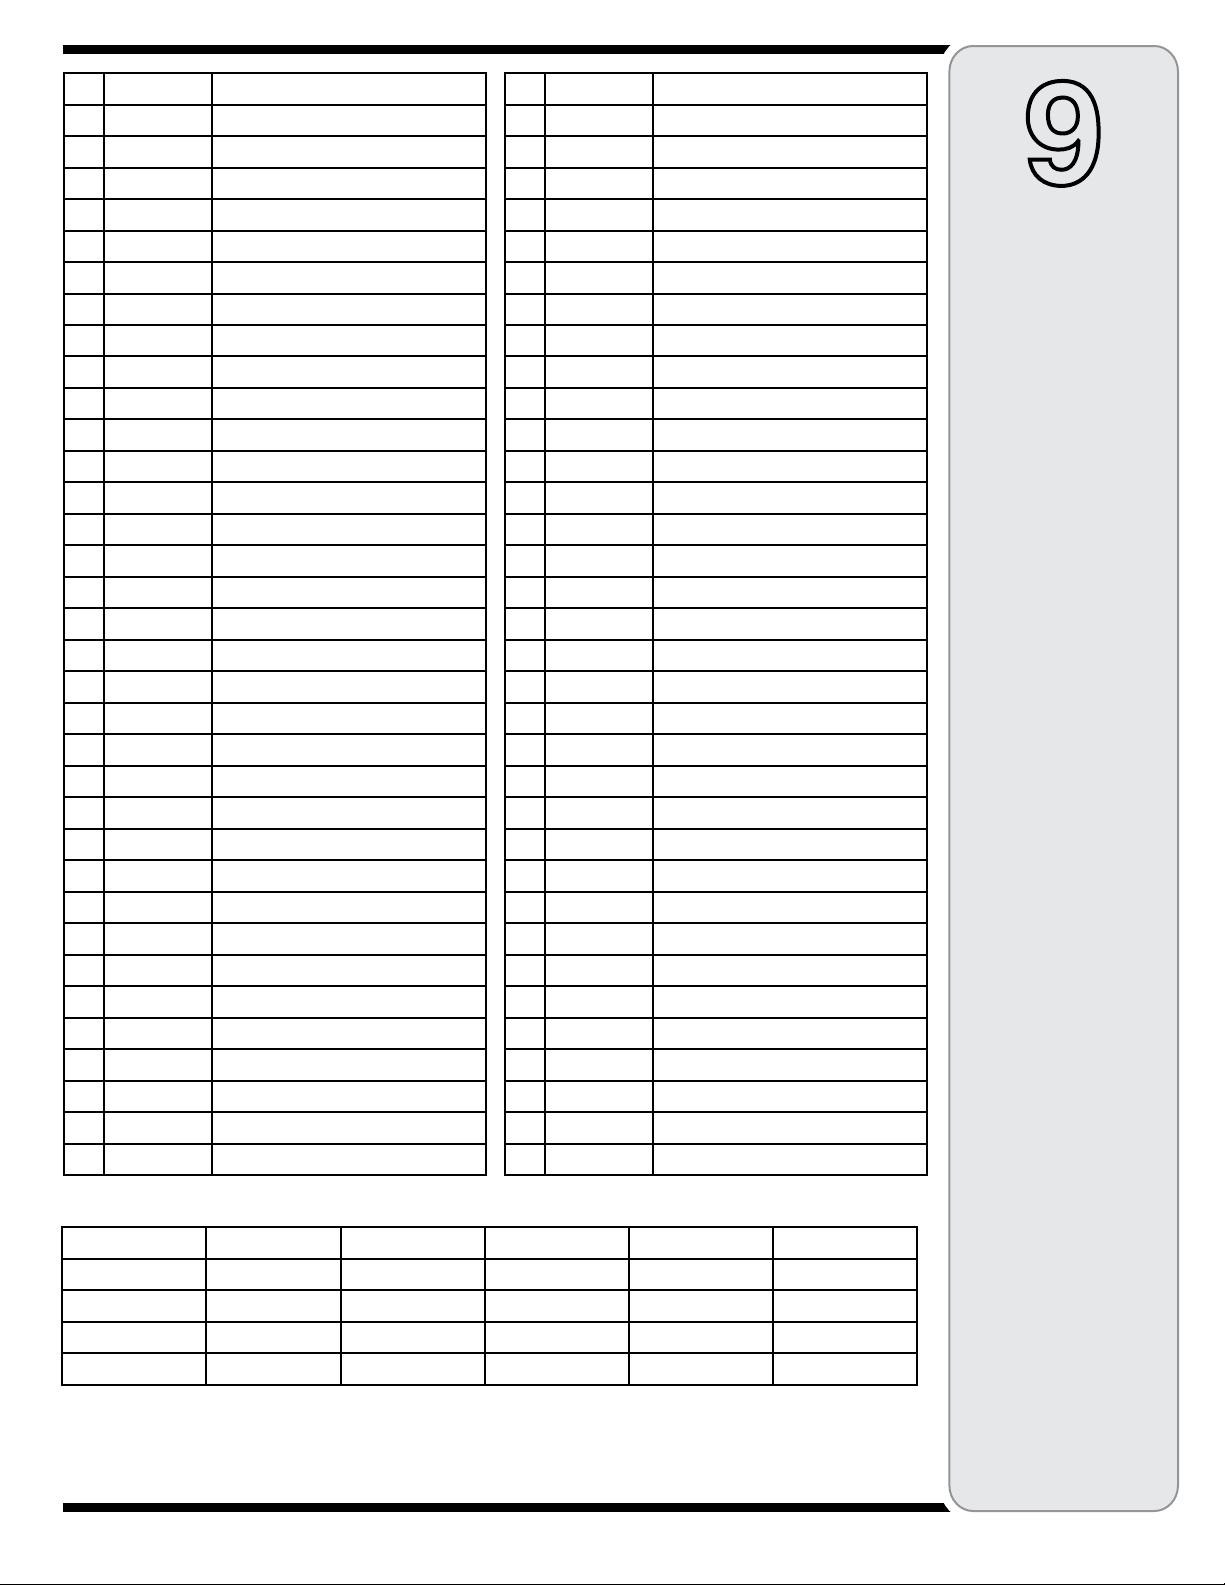
1. 656-04025A Disc Assembly, Friction Wheel
2. 684-04153 Friction Wheel Assembly, 5.5 OD
3. 684-04154 Support Bracket, Friction Wheel
4. 684-04156 Shift Assembly, Rod
5. 710-0627 Hex Screw, 5/16-24, .750, Gr5
6. 710-0788 Screw, 1/4-20, 1.000
7. 710-0896 Screw, 1/4-14 x .625
8. 712-04065 Nut, Flange Lock, 3/8-16, Nylon
9. 712-0413 Nut, Jam Lock, 5/8-18, Gr5, Nylon
10. 714-0126 Key, Hi Pro, 3/16 x 3/4 Dia.
11. 716-0104 E-ring, .500 Dia.
12. 716-0136 E-ring, Retaining, .875 Dia.
13. 716-0231 E-ring, .750 Dia.
14. 717-04209 Hex Shaft, .8125, 7-Tooth
15. 717-04230 Gear, 80-Tooth
16. 726-0221 Speed Nut, .500
17. 732-0264 Extension Spring
18. 736-0242 Washer, Bell, .340 x .872 x .060
19. 736-0287 Washer, Flat, .793 x 1.24 x .060
20. 736-04161 Washer, Flat, .75 x 1.00 x .060
21. 738-04164A Pin, Friction Disc
22. 741-04098 Ball Bearing, 30 x 55 x 13
23. 738-04184A Screw, Shoulder, .37 x .105, 1/4-20
24. 738-0924A Screw, 1/4-28, .375
25. 741-0245 Bearing, Hex Flange x .75 ID
26. 741-0563 Bearing, Ball, 17 x 40 x 12
27. 746-04229 Clutch Cable, Wheel, 44.95”
28. 746-04228 Cable, Speed Selector
29. 748-0190 Spacer, .508 ID x .75 OD x .68
30. 756-0625 Roller, Cable
31. 790-00096 Front Guide Bracket, Auger Cable
32. 790-00180 Frame
33. 790-00206A Guide Bracket, Auger Cable
34. 790-00207A Guide Bracket, Drive Cable
35. 790-00226 Cover, Frame
36. See Chart Wheel Assembly
37. 731-04873 Spacer, 1.25 x .75 x 3.0
38. 738-04168 Axle, .75 x 22”
39. 741-0919 Ball Bearing
40. 710-0106 Hex Screw, 1/4-20, 1.25, Gr5
41. 710-0191 Hex Screw, 3/8-24, 1.25, Gr8
42. 710-04520 Hex Screw, 5 /16-24, 1.25, Gr5
43. 710-0654A Screw, Sems, 3/8-16, 1.00
44. 710-1245B Hex Screw, 5/16-24, .875, Gr8
45. 712-04064 Nut, Flange Lock, 1/4-20, Nylon
46. 726-04012 Nut, Push-on, .25 Dia.
47. 731-04792A Cover, Belt
48. 732-04308 Spring, Torsion, .850 ID x .354
49. 736-0247 Washer, Flat, .406 x 1.25 x .157
50. 736-0119 Washer, Lock .3125
51. 736-0505 Washer, Flat, .34 x 1.50 x .150
52. 748-04053 Pulley, Adapter, .75 Dia.
53. 748-04112 Spacer, Shoulder, .317 x .50 x .102
54. 750-04303 Spacer, .875 ID x 1.185 OD
55. 750-04477 Spacer, .340 x .750 x .360
56. 754-04050 Belt, Auger Drive
57. 754-04088 Belt, Wheel Drive
58. 756-04109 Pulley, Auger Drive, 8.1 x .5
59. 756-04113 Pulley, Half, V x 2.600 OD
60. 756-04179 Pulley, Half, 1/4-V x 1.5 OD
61. 790-00208 Idler Bracket, Wheel Drive
62. 790-00230 Sleeve, Bearing Idler
63. 750-04571 Spacer, Shoulder, .26 x .79 x .538
64. 735-04054 Rubber, Friction Wheel, 5.5 OD
65. 710-0751 Hex Screw, 1/4-20, .620, Gr5
66. 732-04311 Spring, Torsion, .750 ID x .968
67. 712-04063 Nut, Flange Lock, 5 /16-18, Nylon
68. 790-00156 Bracket, Shift Spacer
69. 790-00217A Pivot Bracket, Speed Selector
70. 790-00218A Shift Bracket, Speed Selector
9
Illustrated
Parts List
To order replacement
parts, call
1-800-648-6776
or visit
www.troybilt.com
This Operator’s Manual
may cover a range of
product specifications
for various models.
Characteristics and features discussed and/or
illustrated in this manual
may not be applicable to
all models.
Wheel Assembly Side Wheel Size Rim Only Tire Only Valve Only
634-04167A Left-Hand 13.5 x 4 x 6 634-04151A 734-04128 734-0255
634-04168A Right-Hand 13.5 x 4 x 6 634-04151A 734-04128 734-0255
634-04147A Left-Hand 15 x 5 x 6 634-04151A 734-04012 734-0255
634-04148A Right-Hand 15 x 5 x 6 634-04151A 734-04012 734-0255
NOTE: Snow thrower features/components vary by model. NOT all parts listed above and pictured on the previous page are
standard equipment.
25
Page 26

NOTES
26
Page 27

NOTES
27
Page 28

MANUFACTURER’S LIMITED WARRANTY FOR
The limited warranty set forth below is given by Troy-Bilt LLC with respect
to new merchandise purchased and used in the United States and/or its
territories and possessions, and by MTD Products Limited with respect to
new merchandise purchased and used in Canada and /or its territories and
possessions (either entity respectively, “Troy-Bilt”).
“Troy-Bilt” warrants this product (excluding its normal wear parts as
described below) against defects in material and workmanship for a
period of two (2) years commencing on the date of original purchase and
will, at its option, repair or replace, free of charge, any part found to be
defective in materials or workmanship. This limited warranty shall only
apply if this product has been operated and maintained in accordance
with the Operator’s Manual furnished with the product, and has not been
subject to misuse, abuse, commercial use, neglect, accident, improper
maintenance, alteration, vandalism, theft, fire, water, or damage because
of other peril or natural disaster. Damage resulting from the installation or
use of any part, accessory or attachment not approved by Troy-Bilt for use
with the product(s) covered by this manual will void your warranty as to any
resulting damage.
Normal wear parts are warranted to be free from defects in material and
workmanship for a period of thirty (30) days from the date of purchase.
Normal wear parts include, but are not limited to items such as: batteries,
belts, blades, blade adapters, grass bags, rider deck wheels, seats, snow
thrower skid shoes, friction wheels, shave plates, auger spiral rubber and
tires.
HOW TO OBTAIN SERVICE: Warranty service is available, WITH PROOF
OF PURCHASE, through your local authorized service dealer. To locate
the dealer in your area:
In the U.S.A.
Check your Yellow Pages, or contact Troy-Bilt LLC at P.O. Box 361131,
Cleveland, Ohio 44136-0019, or call 1-866-840-6483 or 1-330-558-7220,
or log on to our Web site at www.troybilt.com.
In Canada
Contact MTD Products Limited, Kitchener, ON N2G 4J1, or call 1-800-6681238 or log on to our Web site at www.mtdcanada.com.
This limited warranty does not provide coverage in the following cases:
a. The engine or component parts thereof. These items may
carry a separate manufacturer’s warranty. Refer to applicable
manufacturer’s warranty for terms and conditions.
b. Log splitter pumps, valves, and cylinders have a separate one-
year warranty.
c. Routine maintenance items such as lubricants, filters, blade
sharpening, tune-ups, brake adjustments, clutch adjustments,
deck adjustments, and normal deterioration of the exterior finish
due to use or exposure.
d. Service completed by someone other than an authorized service
dealer.
e. Troy-Bilt does not extend any warranty for products sold or
exported outside of the United States and /or Canada, and
their respective possessions and territories, except those sold
through Troy-Bilt’s authorized channels of export distribution.
f. Replacement parts that are not genuine Troy-Bilt parts.
g. Transportation charges and service calls.
h. If Products are used commercially. (Troy-Bilt may separately
offer Limited Commercial Warranties on certain select products.
Ask your dealer or retailer for details or contact Troy-Bilt Service
for more information).
No implied warranty, including any implied warranty of merchantability of fitness for a particular purpose, applies after the applicable
period of express written warranty above as to the parts as identified. No other express warranty, whether written or oral, except as
mentioned above, given by any person or entity, including a dealer or
retailer, with respect to any product, shall bind Troy-Bilt. During the
period of the warranty, the exclusive remedy is repair or replacement
of the product as set forth above.
The provisions as set forth in this warranty provide the sole and
exclusive remedy arising from the sale. Troy-Bilt shall not be liable
for incidental or consequential loss or damage including, without
limitation, expenses incurred for substitute or replacement lawn care
services or for rental expenses to temporarily replace a warranted
product.
Some states do not allow the exclusion or limitation of incidental or
consequential damages, or limitations on how long an implied warranty
lasts, so the above exclusions or limitations may not apply to you.
In no event shall recovery of any kind be greater than the amount of the
purchase price of the product sold. Alteration of safety features of the
product shall void this warranty. You assume the risk and liability for
loss, damage, or injury to you and your property and/or to others and their
property arising out of the misuse or inability to use the product.
This limited warranty shall not extend to anyone other than the original
purchaser or to the person for whom it was purchased as a gift.
HOW STATE LAW RELATES TO THIS WARRANTY: This limited warranty gives you specific legal rights, and you may also have other rights
which vary from state to state.
IMPORTANT: Owner must present Original Proof of Purchase to obtain
warranty coverage.
Troy-Bilt LLC, P.O. BOX 361131 CLEVELAND, OHIO 44136-0019; Phone: 1-866-840-6483, 1-330-558-7220
MTD Canada Limited - KITCHENER, ON N2G 4J1; Phone 1-800-668-1238
 Loading...