

Page 1
INTRODUCTION
Thank you for buying the Horse Tiller Dozer/Snow Blade. This
blade is a versatile tool that helps to make your tiller an “all-season” machine. To ensure safe and proper installation of the
blade, please read and carefully follow all instructions.
UNPACK AND CHECK PARTS
Check the contents of the shipping carton against the Parts List
below.
ASSEMBLY STEPS
NOTE: Your unit must have the Bumper/Guard attachment
(OEM-290-255/290-255-081) installed before installing the
Dozer/Snow Blade. Refer to the separate Bumper/Guard Attachment kit for installation instructions.
To prevent personal injury or property damage, do not
start the engine until all assembly steps are complete and
you have read and understand the safety and operating
instructions in this Instruction and in the tiller Owner’s
Manual.
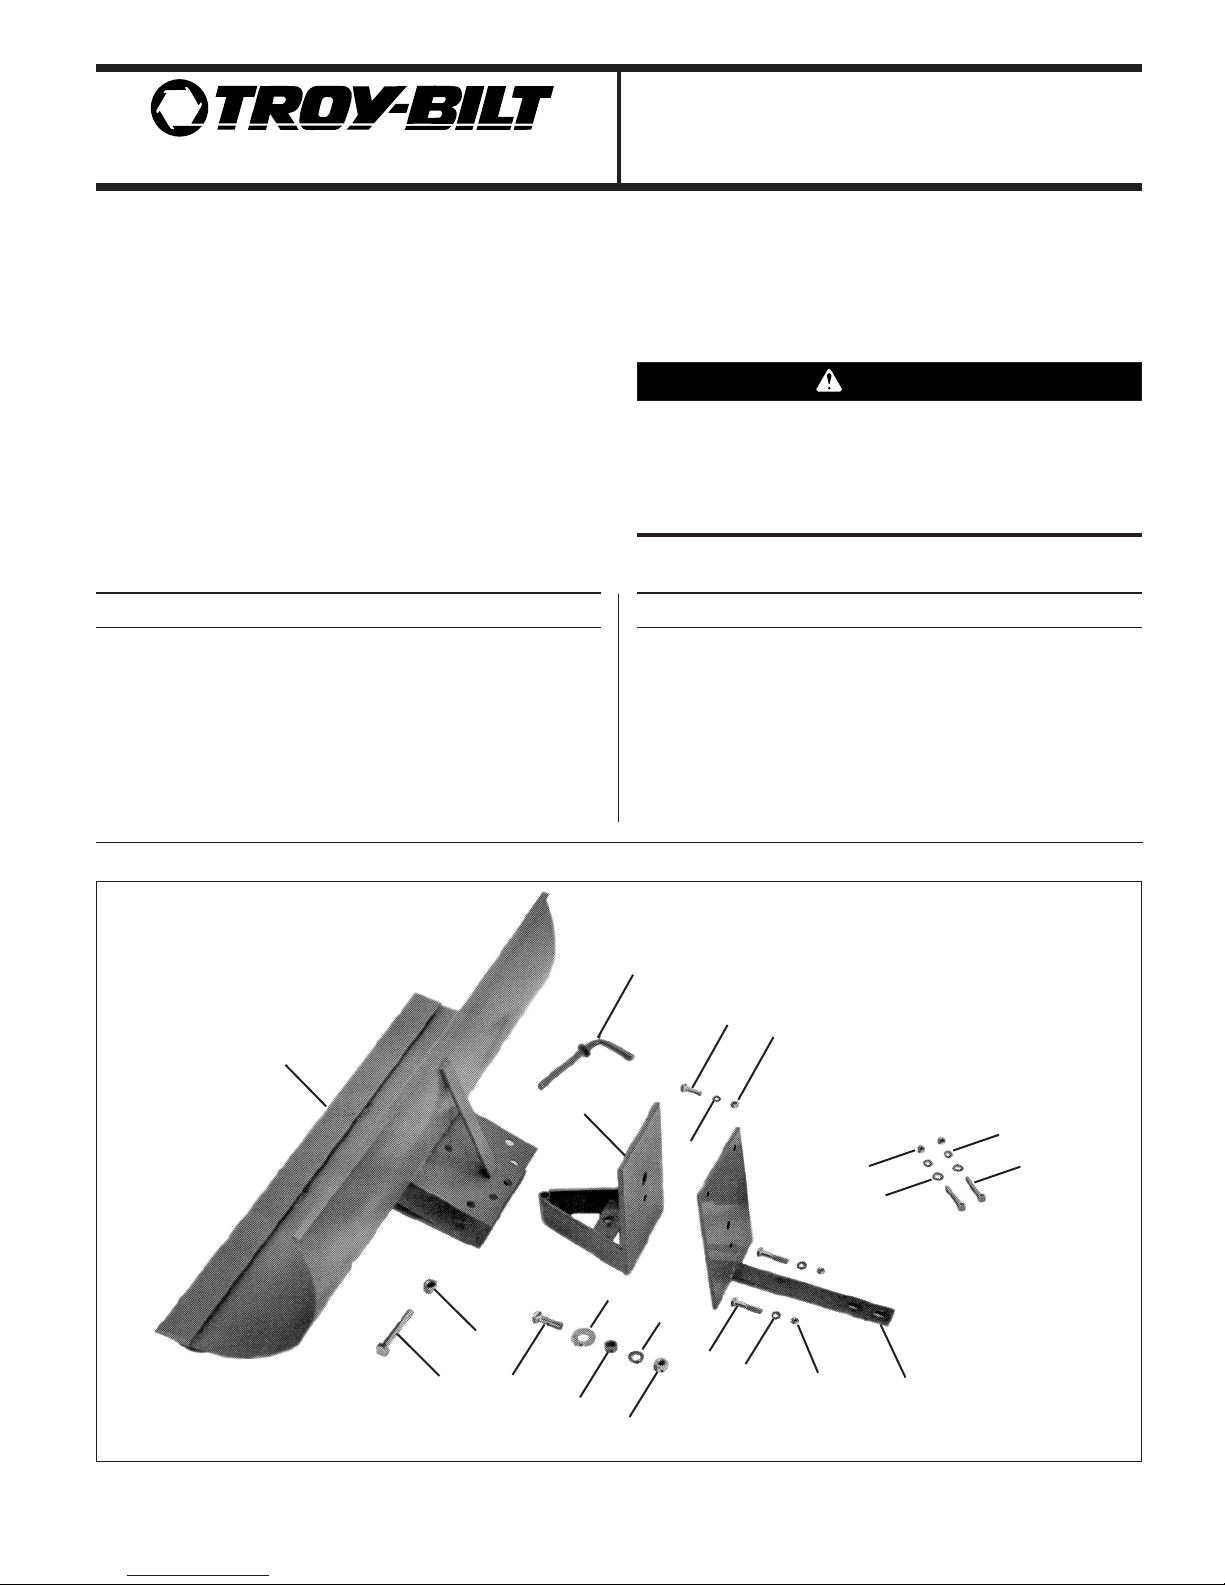
Ref. Part No. Description Qty.
1 GW-1157 Dozer/Snow Blade. . . . . . . . . . . . . . . . 1
2 1909773 Swivel Bracket, (A-Frame) . . . . . . . . . 1
3 736-0921 Lockwasher, 1/2". . . . . . . . . . . . . . . . . 1
4 710-3181 Hex Head Bolt, 1/2--13 x 1-1/2, . . . . . 1
5 1909774 Blade Mounting Brack. . . . . . . . . . . . . 1
6 712-0267 Hex Head Nut, 5/16-18 . . . . . . . . . . . . 5
7 736-0119 Lockwasher, 5/16 . . . . . . . . . . . . . . . . 5
8 736-0275 Washer, Plain, 5/16. . . . . . . . . . . . . . . 2
Ref. Part No. Description Qty.
9 1100779 Hex Head Screw, 5/16-18 x 1-3/4. . . . 4
10 1186233 Hex Nut, 1/2". . . . . . . . . . . . . . . . . . . . 1
11 GW-1416 Bushing . . . . . . . . . . . . . . . . . . . . . . . 1
12 1100257 Flat Washer, 1/2". . . . . . . . . . . . . . . . . 1
13 710-0874 Hex Head Screw, 5/16-18 x 1-1/4. . . . 1
14 1100057 Hex Head Screw, 1/2-13 x 3 . . . . . . . . 1
15 712-0384 Hex Locknut, 1/2 x 13. . . . . . . . . . . . . 1
16 GW-1158 Index Pin. . . . . . . . . . . . . . . . . . . . . . . 1
Dozer/Snow Blade Attachment
Model 290-259-081 / OEM-290-259
HORSE TILLER
®
1
13
16
15
4
5
6
7
9
8
7
6
12
3
11
10
9
7
10
14
2
Figure 1: PARTS LIST
WARNING
Page 2
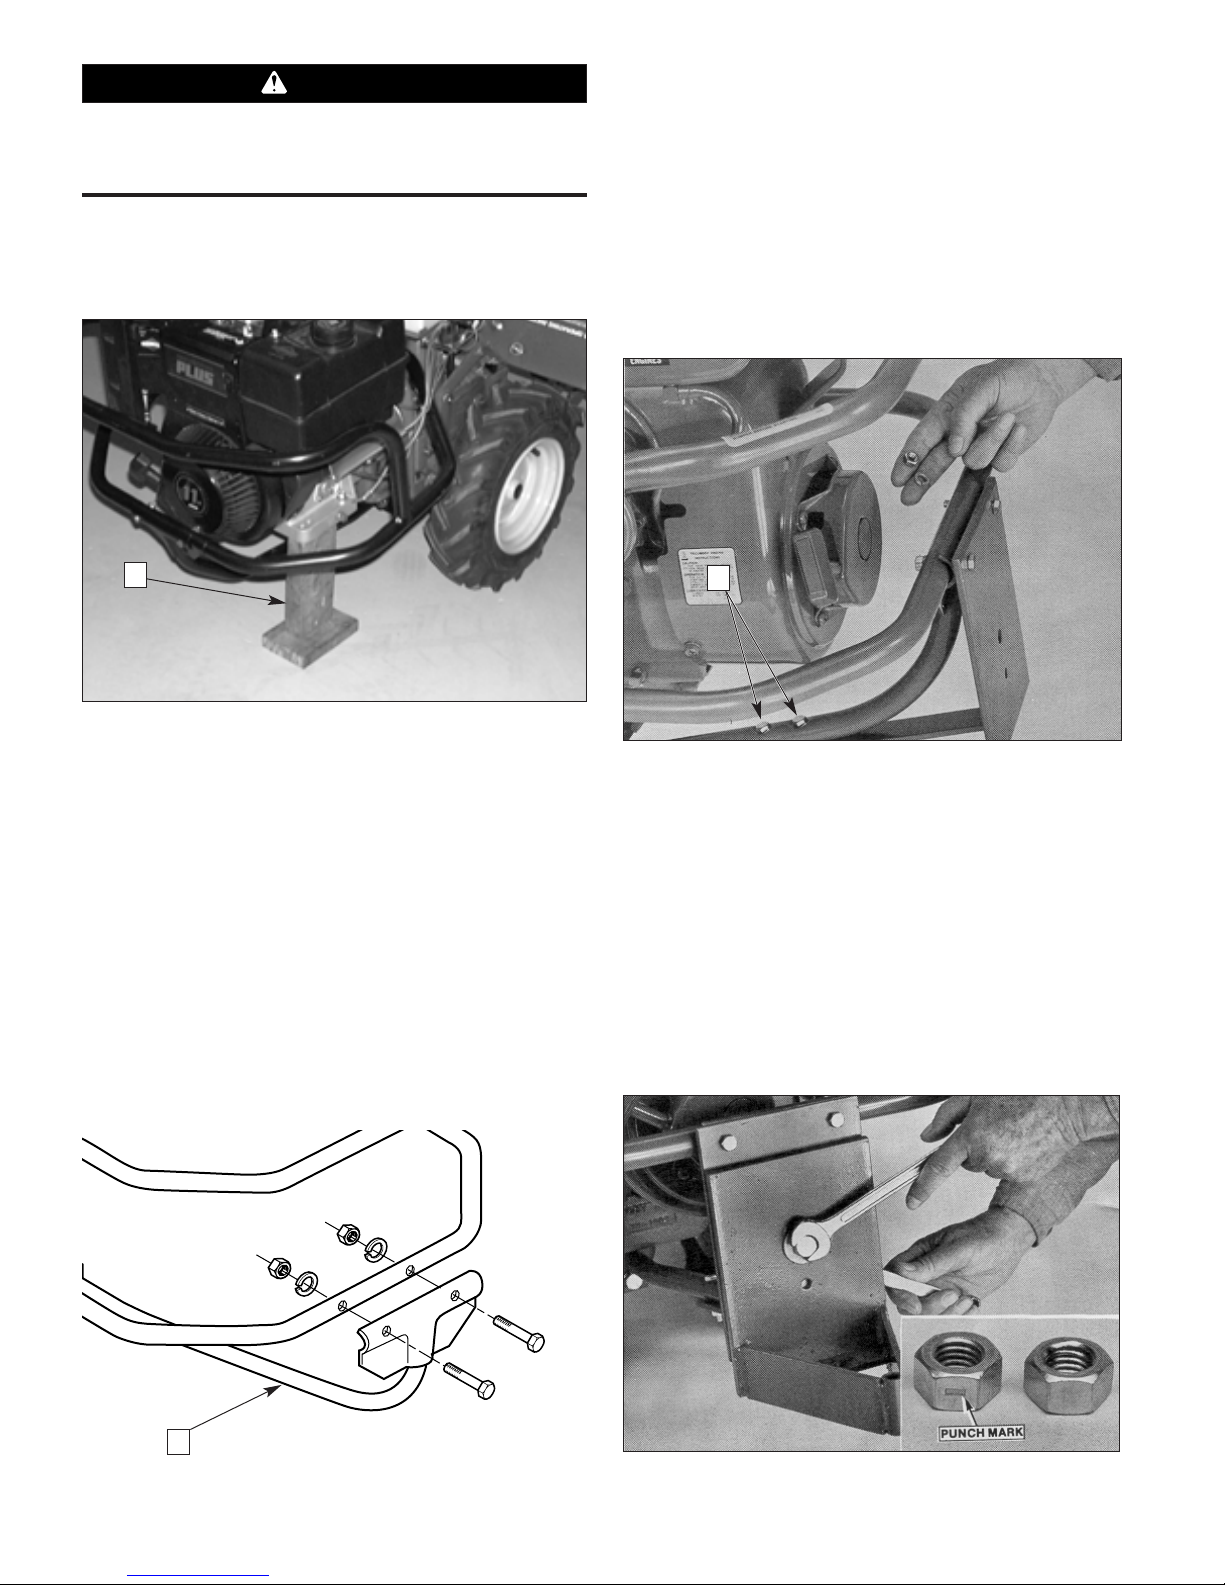
Step 1: Block the Tiller
Move the tiller to a level, hard surface. Place a block under the
engine (A, Figure 2) to prevent the tiller from tipping forward.
Step 2: Remove the Tines
Removing the tines has a functional purpose as well as a safety
purpose. Tine removal makes it possible to bank snow and dirt
because the rear of the tiller sets down further and the blade
can be raised higher off the ground.
Leave the tine holders on.
Their weight helps maintain tiller balance. Also, leave the drag
bar on–it prevents the bottom of the transmission from scraping the ground. Please refer to your Horse Tiller Operator’s
Manual for tine removal instructions.
Step 3: Install Blade Mounting Bracket
1. Remove and discard the two nuts, lock washers and 5/16"-18
x 1-1/2" screws which secure the bumper brace to the lower
bumper (B, Figure 3).
2. Using the hardware included in this attachment, install the
Blade Mounting Bracket (5, Figure 1) to the lower bumper
with two nuts (6, Figure 1), two lock washers (7, Figure 1),
two flat washers (8, Figure 1) and two 5/16"-18 x 1-3/4"
screws (9, Figure 1) included with this attachment.
NOTE: Place the flat washers between the Blade Mounting
Bracket and the Bottom Brace.
3. Secure the bottom portion of Blade Mounting Bracket to the
Bottom Brace with with two nuts (6, Figure 1), two lock washers (7, Figure 1) and two 5/16"-18 x 1-3/4" screws (9, Figure 1)
included with this attachment (C, Figure 4).
Step 4: Install Swivel Bracket (A-Frame)
1. Position the Swivel Bracket (2, Figure 1) in front of the Blade
Mounting Bracket and align the two large holes in each.
2. Secure the brackets together by inserting a 1/2-13 x 1-1/2"
screw (4, Figure 1) with flat washer (12, Figure 1) and bushing (11, Figure 1) through both large holes and fastening with
a lock washer (3, Figure 1) and a
plain 1/2” hex nut (10, Fig-
ure 1), and tighten securely. See Figure 5.
NOTE: Two different 1/2” nuts are included with this attachment
(10 & 15, Figure 1). One is a lock nut (with a punch mark) and
the other is a plain hex nut. See inset of Figure 5.
-2-
To help avoid serious personal injury, disconnect the spark
plug wire and move the wire away from the spark plug.
Remove isgnition key on units so equipped.
WARNING
Figure 2: TILLER BLOCKED (ELECTRIC-START MODEL SHOWN)
Figure 3: REMOVE BOTTOM BRACE HARDWARE
Figure 4: ATTACHING THE BLADE MOUNTING BRACKET
Figure 5: ATTACHING THE SWIVEL BRACKET (A-FRAME)
A
C
B
Page 3

-3-
3. Insert a 1-1/4" screw (13, Figure 1) through the lower, smaller hole in the swivel bracket. Add a lock washer (7, Figure 1)
and hex nut (6, Figure 1) and tighten securely. See Figure 6.
Step 7: Attach Blade to Swivel Bracket
Lift the blade onto the swivel bracket. and position the blade to
align the hole in the blade mounting bracket (D, Figure 7) with
the hole in the swivel bracket. Insert a 3" screw (14, Figure 1)
down through the holes then add a 1/2”
lock nut. Tighten
securely.
Step 8: Set Blade Angle
Move the blade to the desired angle, then align the holes in the
two blade mounting plates (E, Figure 8) with the hole in the
swivel bracket. Insert the index pin (16, Figure 1) down
through the three holes.
BEFORE USING THE DOZER/SNOW BLADE
Adjust Handlebars
When plowing or dozing, your handlebars should be set slightly
less than waist high. This enables more leverage when raising
the blade for banking, clearing obstacles and backing up.
Please refer to the Horse Tiller Owner’s Manual for handlebar
height setting instructions.
Wheel Traction
Good traction is essential when dozing dirt–and especially snow
plowing. Bar Tread tires are a tremendous help for moving dirt.
If you have standard tread tires, we highly recommend using
tire chains (Model OEM-390-991 / 390-991-081). Chains are
also very helpful for winter snowplowing jobs. They can be left
on year-round (for muddy or sandy conditions), or they can be
removed and replaced in minutes, as needed.
Winterize Before cold weather Use
When using your tiller during temperatures below 32o F, you
must drain the #30 weight motor oil and change to a lighter
weight oil. Consult the separate Engine Owner’s Manual for the
specific weight motor oil recommended by the engine manufacturer for lower temperatures. You should also change from
#140 to #90 weight gear oil in the tiller transmission before
operating your tiller in below freezing temperatures.
USING THE DOZER/SNOW BLADE
Snowplowing Tips
Your Dozer/Snow Blade can move large amounts for snow
quickly. Here are some snowplowing techniques to speed up
the job with a minimum of reverse maneuvering and blade
angle changing. Use the patterns described below and shown in
Figure 9 as a guide.
IMPORTANT: Winterize your tiller before using it in cold
weather. See Before Using the Dozer/Snow Blade, above.
Never run the engine indoors or in enclosed, poorly ventilated areas. Engine exhaust contains carbon monoxide, an
odorless and deadly gas.
Figure 6: ATTACHING THE SWIVEL BRACKET (A-FRAME)
Figure 7: ATTACHING THE BLADE TO THE SWIVEL BRACKET
D
Figure 8: SETTING THE BLADE ANGLE
E
CAUTION
Page 4

Figure 1
●
Warmup - In cold weather, always allow the engine five or 10
minutes to warmup before plowing (See the Horse Tiller
Operator’s Manual for starting and operating instructions.).
Running the engine before use heats the oil so that it flows
for proper engine lubrication. While warming up the engine,
leave the Wheel Speed Shift Lever in Free Wheeling position
and put the Forward/Reverse Lever in Forward position for
five minutes or more. This rotates the tine shaft and warms
the transmission gear oil. Before doing this, make sure that
the tines have been removed and that the Depth Regulator
Lever is pushed all the way down to the travel setting (top
notch engaged on lever). Later, when removing snow, pull
the drag bar all the way up to allow you to raise the blade as
high as possible for banking.
●
Plowing Deep Snow - It is best to remove a top layer several
inches thick in the first passes before attempting to remove
all the snow. Start near the end of the drive and gradually
work back up.
●
Plowing Light Snow - Make the first pass in the center of the
area being plowed, with the blade angled right (A, Figure 9).
The blade can remain in this position, until the last pass,
when the blade is angled away from the center for this portion
of the plowing operation. When you reach the end of the last
pass down the center, begin to follow the pattern for light
snow (A).
●
Wheel Speed When Banking Snow - Use the Slow Wheel
Speed and High Belt Range, throttle back the engine about 25
percent when banking snow. The slower throttle speed
enables better control and protect the wheel shaft and gears
from damage if the tiller should strike a hidden immovable
object.
NOTE: When using the High Speed Belt Range and Fast Wheel
Speed, throttle back the engine to approximately 70%.
IMPORTANT: Throttling back is very important! The resulting
slow down prevents too much build-up of momentum. If the
blade strikes an immovable object , the resulting shock could
damage the wheel shaft or transmission gears.
Dirt Dozing Tips
Your Dozer/Snow Blade is also handy during spring, summer
and fall for various dirt moving jobs. You can fill ditches,
spread mulch and manure over the garden, do light grading,
prepare land for a small swimming pool to name a few applications. Again, you’ll get the most work from your Blade if you
use these hints... then carefully experiment.
●
Hard Packed Soil - The Blade should be used for moving
loose dirt... it can’t dig into unbroken soil or hard-packed
piles like a bulldozer. Thoroughly loosen the soil with the
tines (before you take them off for safety) or use hand tools
to break-up hard-packed piles.
●
Soil Condition - The soil (or mulch, or manure) is best
moved when it’s dry. If it’s very wet, it can stick to the blade,
and the moisture’s extra weight means you’ll move less per
pass. Also, when the material is nearly dry, you can spread
the material more evenly–it doesn’t clump up.
●
Dozing Dirt Piles - Avoid trying to take too big a bite from a
pile at once Angle the blade away from the pile and start at
one side. Then, spread the load evenly, with the blade
straight ahead. In this manner, when you “cut away” at a pile,
the pile breaks itself up for you.
IMPORTANT: Check engine oil level frequently during snowplowing or earth dozing.
For customer assistance, visit www.troybilt.com, contact your nearest authorized dealer or:
TROY-BILT LLC, P.O. BOX 361131, CLEVELAND, OHIO 44136-0019, 1-866-840-6483
Printed in U.S.A. Form 769-00134 (03/2002)
 Loading...