

Page 1
Safe Operation Practices • Assembly & Set-Up • Operation • Service • Troubleshooting • Warranty
OperatOr’s Manual
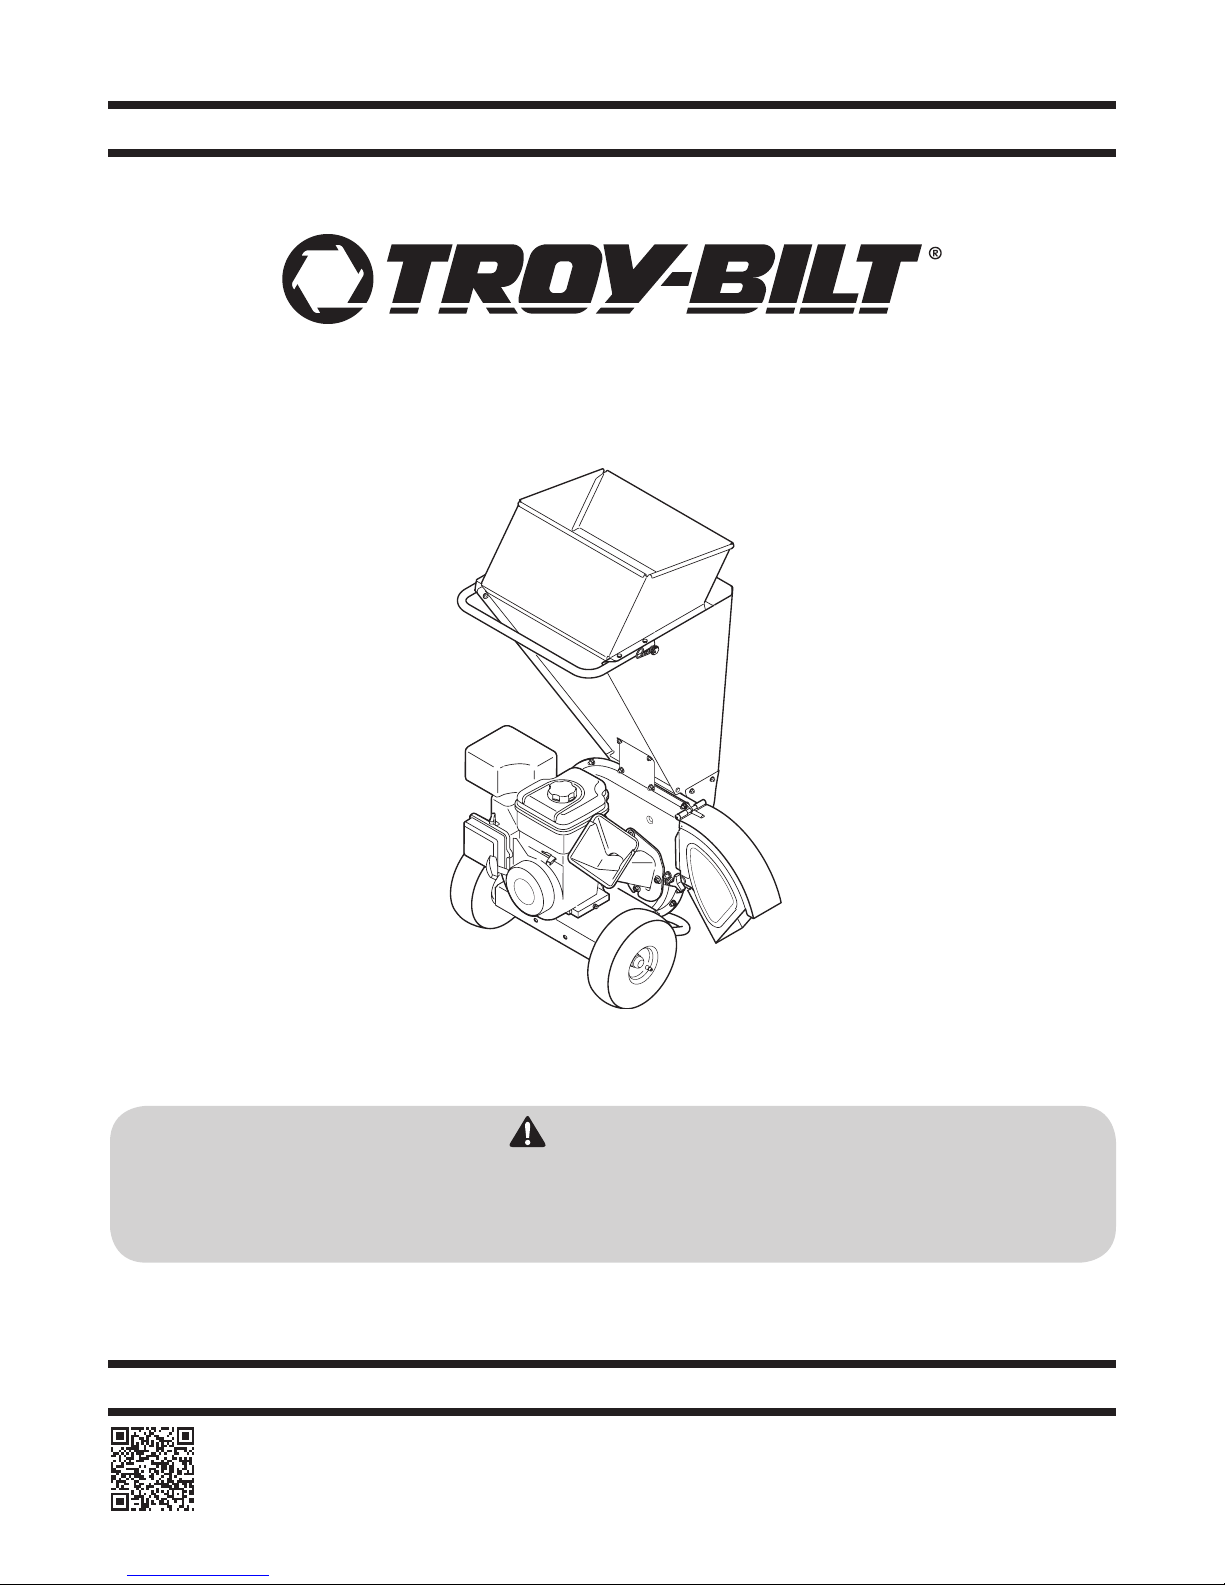
Chipper Shredder — Model Series CS 4265 & CS 4325
READ AND FOLLOW ALL SAFETY RULES AND INSTRUCTIONS IN THIS MANUAL
BEFORE ATTEMPTING TO OPERATE THIS MACHINE.
FAILURE TO COMPLY WITH THESE INSTRUCTIONS MAY RESULT IN PERSONAL INJURY.
NOTE: This Operator’s Manual covers several models. Features may vary by model. Not all features in this manual are applicable to all
models and the model depicted may differ from yours.
TROY-BILT LLC, P.O. BOX 361131 CLEVELAND, OHIO 44136-0019
Model CS 4265 Shown
WARNING
Form No. 769-11640
(May 10, 2016)
Page 2

To The Owner
Thank You
Thank you for purchasing this product. It was carefully engineered
to provide excellent performance when properly operated and
maintained.
Please read this entire manual prior to operating the equipment. It
instructs you how to safely and easily set up, operate and maintain
your machine. Please be sure that you, and any other persons who will
operate the machine, carefully follow the recommended safety practices
at all times. Failure to do so could result in personal injury or property
damage.
All information in this manual is relative to the most recent product
information available at the time of printing. Review this manual
frequently to familiarize yourself with the machine, its features and
operation. Please be aware that this Operator’s Manual may cover a
range of product specifications for various models. Characteristics
and features discussed and/or illustrated in this manual may not be
applicable to all models. We reserve the right to change product
specifications, designs and equipment without notice and without
incurring obligation.
Table of Contents
Safe Operation Practices ........................................ 3
Assembly & Set-Up .................................................. 5
Controls & Operation .............................................. 6
Service ...................................................................... 8
1
If applicable, the power testing information used to establish the power
rating of the engine equipped on this machine can be found at www.
opei.org or the engine manufacturer’s web site.
If you have any problems or questions concerning the machine, phone
your local Troy-Bilt dealer or contact us directly. Troy-Bilt’s Customer
Support telephone numbers, website and mailing address can be found
on this page. We want to ensure your complete satisfaction at all times.
Throughout this manual, all references to right and left side of the
machine are observed from the operating position
The engine manufacturer is responsible for all engine-related issues
with regards to performance, power-rating, specifications, warranty and
service. Please refer to the engine operator manual, packed separately
with your machine, for more information.
Troubleshooting .....................................................10
Replacement Parts .................................................11
Warranty ................................................................. 12
Record Product Information
Before setting up and operating your new equipment, please locate
the model plate on the equipment and record the information in the
provided area to the right. You can locate the model plate by standing
at the operator’s position and looking down at the frame below the
engine. This information will be necessary, should you seek technical
support via our web site, Customer Support Department, or with a local
authorized service dealer.
Model NuMber
Serial NuMber
Customer Support
Please do NOT return the machine to the retailer or dealer without first contacting our Customer Support Department.
If you have difficulty assembling this product or have any questions regarding the controls, operation, or maintenance of this machine,
you can seek help from the experts. Choose from the options below:
◊ Visit us on the web at www.troybilt.com
◊ Call a Customer Support Representative at (800) 828-5500 or (330) 558-7220
◊ Write us at Troy-Bilt LLC • P.O. Box 361131 • Cleveland, OH • 44136-0019
2
Page 3

Important Safe Operation Practices
WARNING: This symbol points out important safety instructions which, if not followed, could endanger the personal safety and/or property of yourself
and others. Read and follow all instructions in this manual before attempting to operate this machine. Failure to comply with these instructions may
result in personal injury.
When you see this symbol. HEED ITS WARNING!
CALIFORNIA PROPOSITION 65
WARNING: Engine Exhaust, some of its constituents, and certain vehicle components contain or emit chemicals known to State of California to cause
cancer and birth defects or other reproductive harm.
DANGER: This machine was built to be operated according to the safe operation practices in this manual. As with any type of power equipment,
carelessness or error on the part of the operator can result in serious injury. This machine is capable of amputating fingers, hands, toes and feet and
throwing debris. Failure to observe the following safety instructions could result in serious injury or death.
2
Training
1. Read, understand, and follow all instructions
on the machine and in the manual(s) before
attempting to assemble and operate.
Keep this manual in a safe place for future
and regular reference and for ordering
replacement parts.
2. Be familiar with all controls and their proper
operation. Know how to stop the machine and
disengage them quickly.
3. Never allow children under 16 years of age to
operate this machine. Children 16 and over
should read and understand the instructions
and safe operation practices in this manual
and on the machine and be trained and
supervised by an adult.
4. Never allow adults to operate this machine
without proper instruction.
5. Keep bystanders, pets, and children at least 75
feet from the machine while it is in operation.
Stop machine if anyone enters the area.
6. Never run an engine indoors or in a poorly
ventilated area. Engine exhaust contains
carbon monoxide, an odorless and deadly gas.
7. Do not put hands and feet near rotating parts
or in the feeding chambers and discharge
opening. Contact with the rotating impeller
can amputate fingers, hands, and feet.
8. Never attempt to unclog either the feed intake
or discharge opening, remove or empty bag,
or inspect and repair the machine while the
engine is running. Shut the engine off and
wait until all moving parts have come to a
complete stop. Disconnect the spark plug wire
and ground it against the engine.
Preparation
1. Thoroughly inspect the area where the
equipment is to be used. Remove all rocks,
bottles, cans, or other foreign objects which
could be picked up or thrown and cause
personal injury or damage to the machine.
2. Always wear safety glasses or safety goggles
during operation and while performing an
adjustment or repair, to protect your eyes.
Thrown objects which ricochet can cause
serious injury to the eyes.
3. Wear sturdy, rough-soled work shoes and
close-fitting slacks and shirts. Loose fitting
clothes or jewelry can be caught in movable
parts. Never operate this machine in bare feet
or sandals. Wear leather work gloves when
feeding material in the chipper chute.
4. Before starting, check all bolts and screws for
proper tightness to be sure the machine is in
safe working condition. Also, visually inspect
machine for any damage at frequent intervals.
5. Maintain or replace safety and instructions
labels, as necessary.
Safe Handling of Gasoline:
To avoid personal injury or property damage use
extreme care in handling gasoline. Gasoline is
extremely flammable and the vapors are explosive.
Serious personal injury can occur when gasoline is
spilled on yourself or your clothes which can ignite.
Wash your skin and change clothes immediately.
a. Use only an approved gasoline
container.
b. Never fill containers inside a vehicle or
on a truck or trailer bed with a plastic
liner. Always place containers on the
ground away from your vehicle before
filling.
c. When practical, remove gas-powered
equipment from the truck or trailer and
refuel it on the ground. If this is not
possible, then refuel such equipment
on a trailer with a portable container,
rather than from a gasoline dispenser
nozzle.
d. Keep the nozzle in contact with the rim
of the fuel tank or container opening at
all times until fueling is complete. Do
not use a nozzle lock-open device.
e. Extinguish all cigarettes, cigars, pipes
and other sources of ignition.
f. Never fuel machine indoors.
g. Never remove gas cap or add fuel while
the engine is hot or running. Allow
engine to cool at least two minutes
before refueling.
h. Never over fill fuel tank. Fill tank to
no more than ½ inch below bottom
of filler neck to allow space for fuel
expansion.
i. Replace gasoline cap and tighten
securely.
j. If gasoline is spilled, wipe it off the
engine and equipment. Move unit to
another area. Wait 5 minutes before
starting the engine.
k. To reduce fire hazards, keep machine
free of grass, leaves, or other debris
build-up. Clean up oil or fuel spillage
and remove any fuel soaked debris.
l. Never store the machine or fuel
container inside where there is an open
flame, spark or pilot light as on a water
heater, space heater, furnace, clothes
dryer or other gas appliances.
Operation
1. Do not put hands and feet near rotating parts
or in the feeding chambers and discharge
opening. Contact with the rotating impeller
can amputate fingers, hands, and feet.
2. Before starting the machine, make sure
the chipper chute, feed intake, and cutting
chamber are empty and free of all debris.
3. Thoroughly inspect all material to be shredded
and remove any metal, rocks, bottles, cans,
or other foreign objects which could cause
personal injury or damage to the machine.
4. If it becomes necessary to push material
through the shredder hopper, use a small
diameter stick. Do not use your hands or feet.
5. If the impeller strikes a foreign object or if your
machine should start making an unusual noise
or vibration, immediately shut the engine
off. Allow the impeller to come to a complete
stop. Disconnect the spark plug wire, ground it
against the engine and perform the following
steps:
a. Inspect for damage.
b. Repair or replace any damaged parts.
c. Check for any loose parts and tighten
to assure continued safe operation.
6. Do not allow an accumulation of processed
material to build up in the discharge area.
This can prevent proper discharge and result
in kickback of material through the feed
opening.
7. Do not attempt to shred or chip material
larger than specified on the machine or in this
manual. Personal injury or machine damage
could result.
8. Never attempt to unclog either the feed
intake or discharge opening while the engine
is running. Shut the engine off, wait until all
moving parts have stopped, disconnect the
spark plug wire and ground it against the
engine before clearing debris.
9. Never operate without the shredder hopper,
chipper chute, or chute deflector properly
attached to the machine. Never empty or
change discharge bag while the engine is
running.
10. Keep all guards, deflectors and safety devices
in place and operating properly.
11. Keep your face and body back and to the side
of the chipper chute while feeding material
into the machine to avoid accidental kickback
injuries.
12. Never operate this machine without good
visibility or light.
13. Do not operate this machine on a paved,
gravel or non-level surface.
14. Do not operate this machine while under the
influence of alcohol or drugs.
15. Muffler and engine become hot and can cause
a burn. Do not touch.
16. Never pick up or carry machine while the
engine is running.
17. If situations occur which are not covered in
this manual, use care and good judgement.
Contact Customer Support for assistance and
the name of the nearest service dealer.
3
Page 4
Maintenance & Storage
1. Never tamper with safety devices. Check their
proper operation regularly.
2. Check bolts and screws for proper tightness
at frequent intervals to keep the machine in
safe working condition. Also, visually inspect
machine for any damage and repair, if needed.
3. Before cleaning, repairing, or inspecting, stop
the engine and make certain the impeller and
all moving parts have stopped. Disconnect
the spark plug wire and ground it against the
engine to prevent unintended starting.
4. Do not change the engine governor settings
or overspeed the engine. The governor
controls the maximum safe operating speed of
the engine.
5. Maintain or replace safety and instruction
labels, as necessary.
6. Follow this manual for safe loading, unloading,
transporting, and storage of this machine.
7. Never store the machine or fuel container
inside where there is an open flame, spark
or pilot light such as a water heater, furnace,
clothes dryer, etc.
8. Allow machine to cool at least 5 minutes
before storing.
9. Always refer to the operator’s manual for
proper instructions on off-season storage.
10. If the fuel tank has to be drained, do this
outdoors.
11. Observe proper disposal laws and regulations
for gas, oil, etc. to protect the environment.
12. According to the Consumer Products
Safety Commission (CPSC) and the U.S.
Environmental Protection Agency (EPA), this
product has an Average Useful Life of seven
(7) years, or 60 hours of operation. At the end
of the Average Useful Life have the machine
inspected annually by an authorized service
dealer to ensure that all mechanical and
safety systems are working properly and not
worn excessively. Failure to do so can result in
accidents, injuries or death.
Do not modify engine
To avoid serious injury or death, do not modify
engine in any way. Tampering with the governor
setting can lead to a runaway engine and cause it to
operate at unsafe speeds. Never tamper with factory
setting of engine governor.
Notice Regarding Emissions
Engines which are certified to comply with California
and federal EPA emission regulations for SORE
(Small Off Road Equipment) are certified to operate
on regular unleaded gasoline, and may include
the following emission control systems: Engine
Modification (EM), Oxidizing Catalyst (OC), Secondary
Air Injection (SAI) and Three Way Catalyst (TWC) if so
equipped.
Spark Arrestor
WARNING: This machine is
equipped with an internal combustion
engine and should not be used on or
near any unimproved forest-covered,
brushcovered or grass-covered land
unless the engine’s exhaust system is
equipped with a spark arrestor
meeting applicable local or state laws
(if any).
If a spark arrestor is used, it should be maintained in
effective working order by the operator. In the State
of California the above is required by law (Section
4442 of the California Public Resources Code). Other
states may have similar laws. Federal laws apply on
federal lands.
A spark arrestor for the muffler is available through
your nearest engine authorized service dealer or
contact the service department, P.O. Box 361131
Cleveland, Ohio 44136-0019.
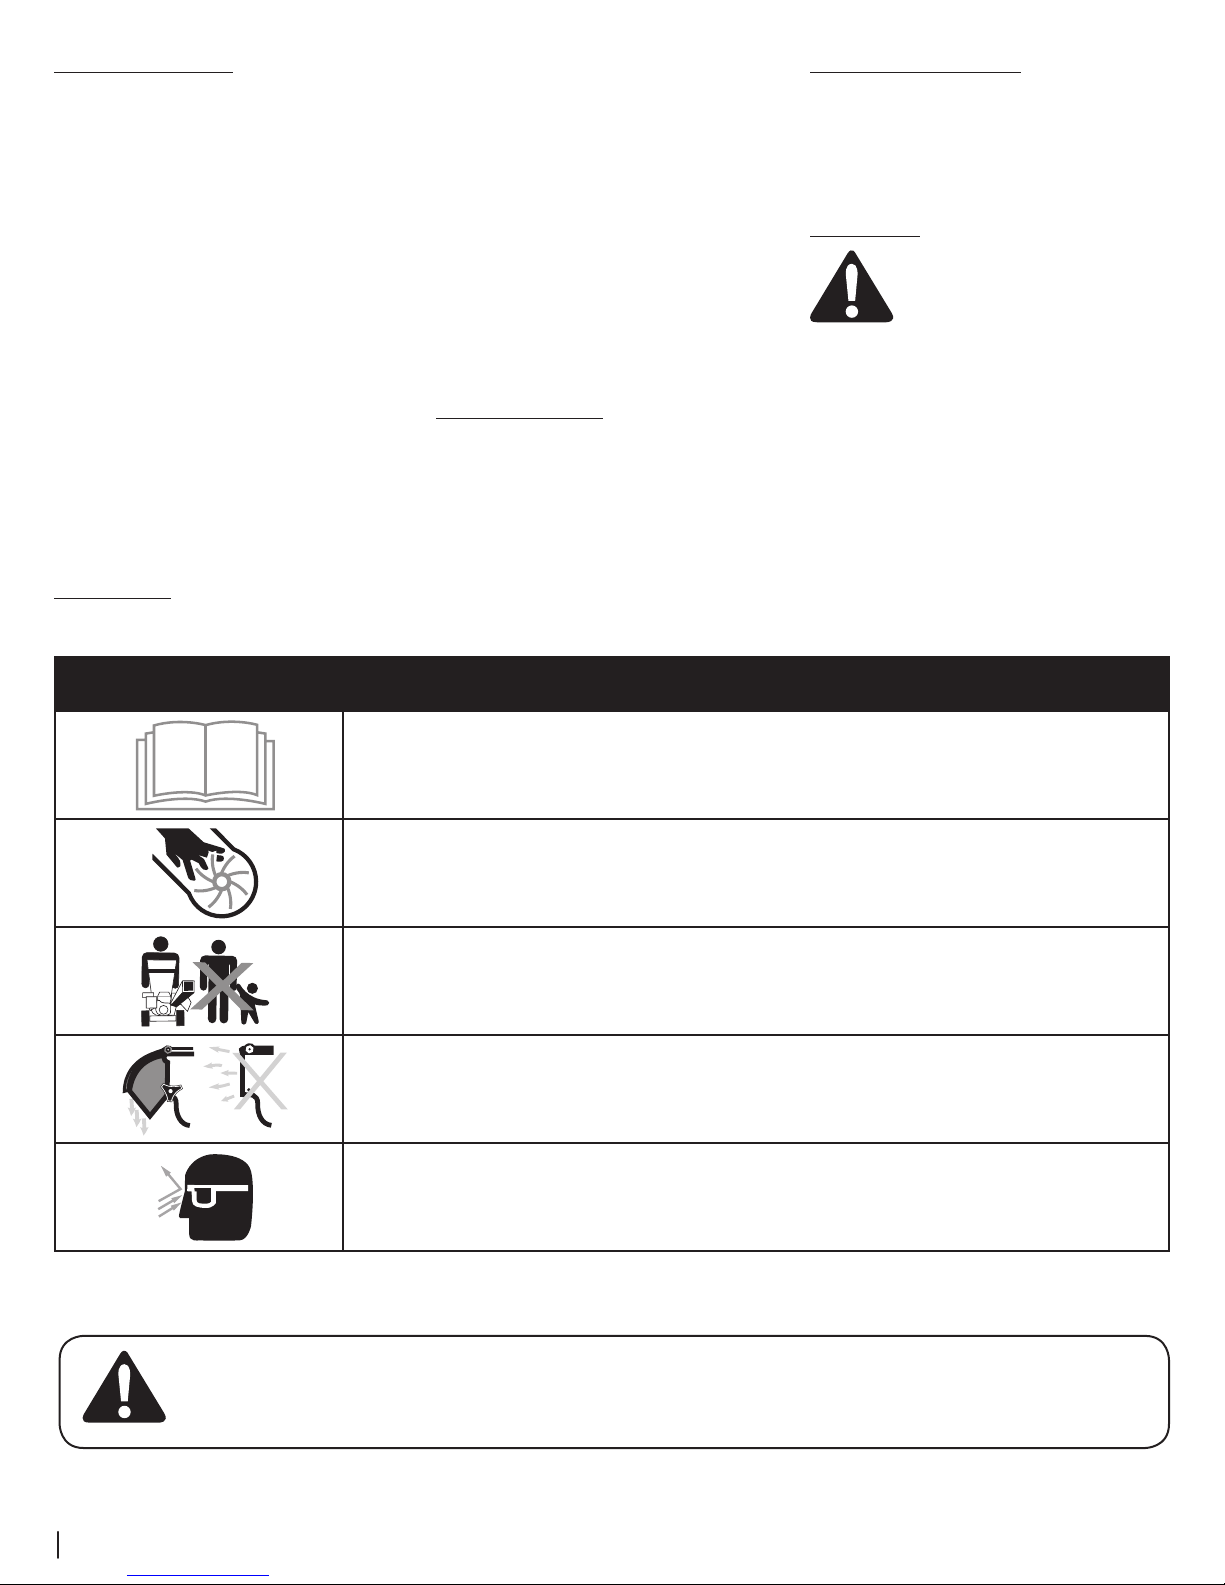
Safety Symbols
This page depicts and describes safety symbols that may appear on this product. Read, understand, and follow all instructions on the machine before attempting to
assemble and operate.
Symbol Description
READ THE OPERATOR’S MANUAL(S)
Read, understand, and follow all instructions in the manual(s) before attempting to assemble and operate
WARNING— ROTATING BLADES
Keep hands out of inlet and discharge openings while machine is running. There are rotating blades inside
BYSTANDER S
Keep bystanders, pets, and children at least 75 feet from the machine while it is in operation. Stop machine
if anyone enters the area.
WARNING— THROWN DEBRIS
Never operate without the chute deflector properly attached to the machine.
EYE PROTECTION
Always wear safety glasses or safety goggles when operating this machine.
WARNING: Your Responsibility—Restrict the use of this power machine to persons who read, understand and follow the warnings and
instructions in this manual and on the machine.
4 Section 2 — important Safe operation practiceS
SAVE THESE INSTRUCTIONS!
Page 5
Assembly & Set-Up
B
A
Contents of Carton
• Chipper Shredder (1) • Operator’s Manual (1) • Engine Operator’s Manual (1)
• Bottle of Oil (1) • Bag (1) • Safety Glasses (1)
3
Assembly
NOTE: This unit is shipped without gasoline or oil in
the engine. Fill up gasoline and oil as instructed in
the accompanying engine manual BEFORE operating
your chipper shredder.
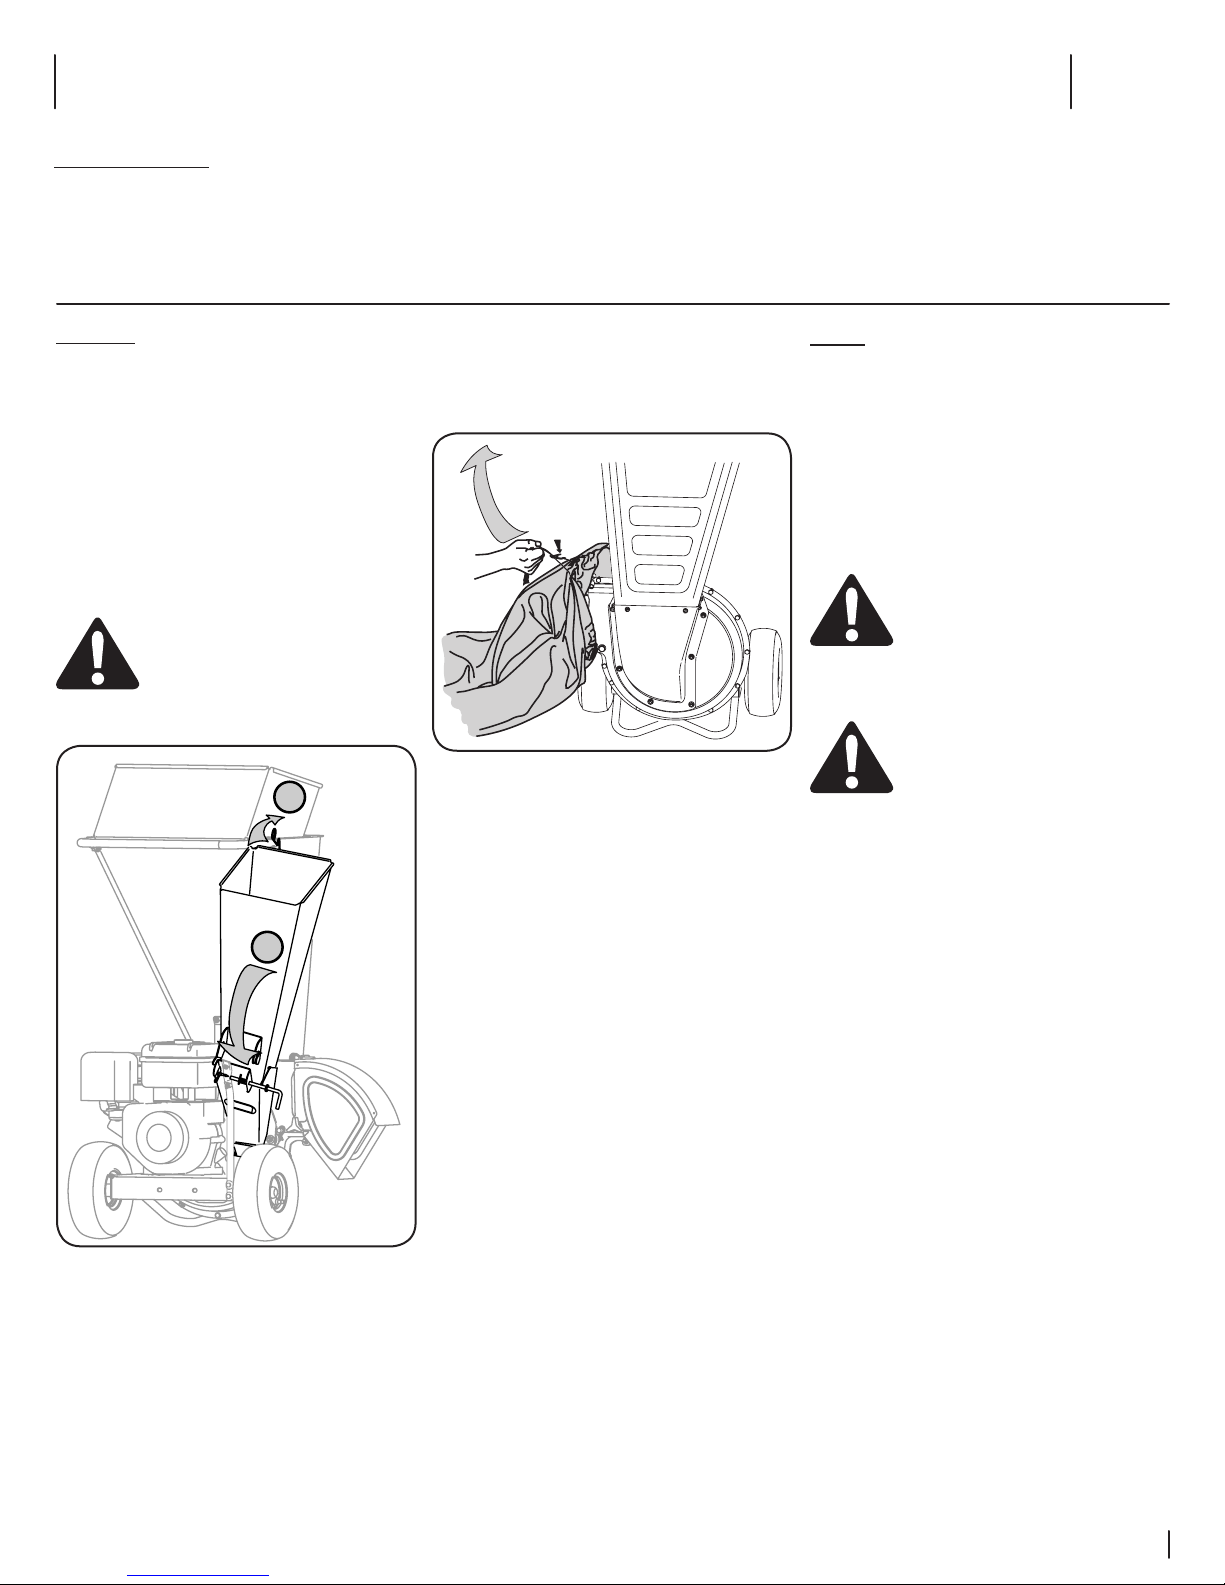
Chipper Chute (Model Series 4325 Only)
For shipping reasons, the unit is crated with its
chipper chute in a raised position. To pivot it
downward, proceed as follows:
1. Pull the spring latch upward.
2. Gently pivot the chipper chute down until it
clicks into the lock rod. See Figure 3-1.
WARNING: Never operate the
chipper shredder with the chipper
chute in the raised position. Doing so
may result in property damage or
serious injury to the operator or
bystanders.
Bag
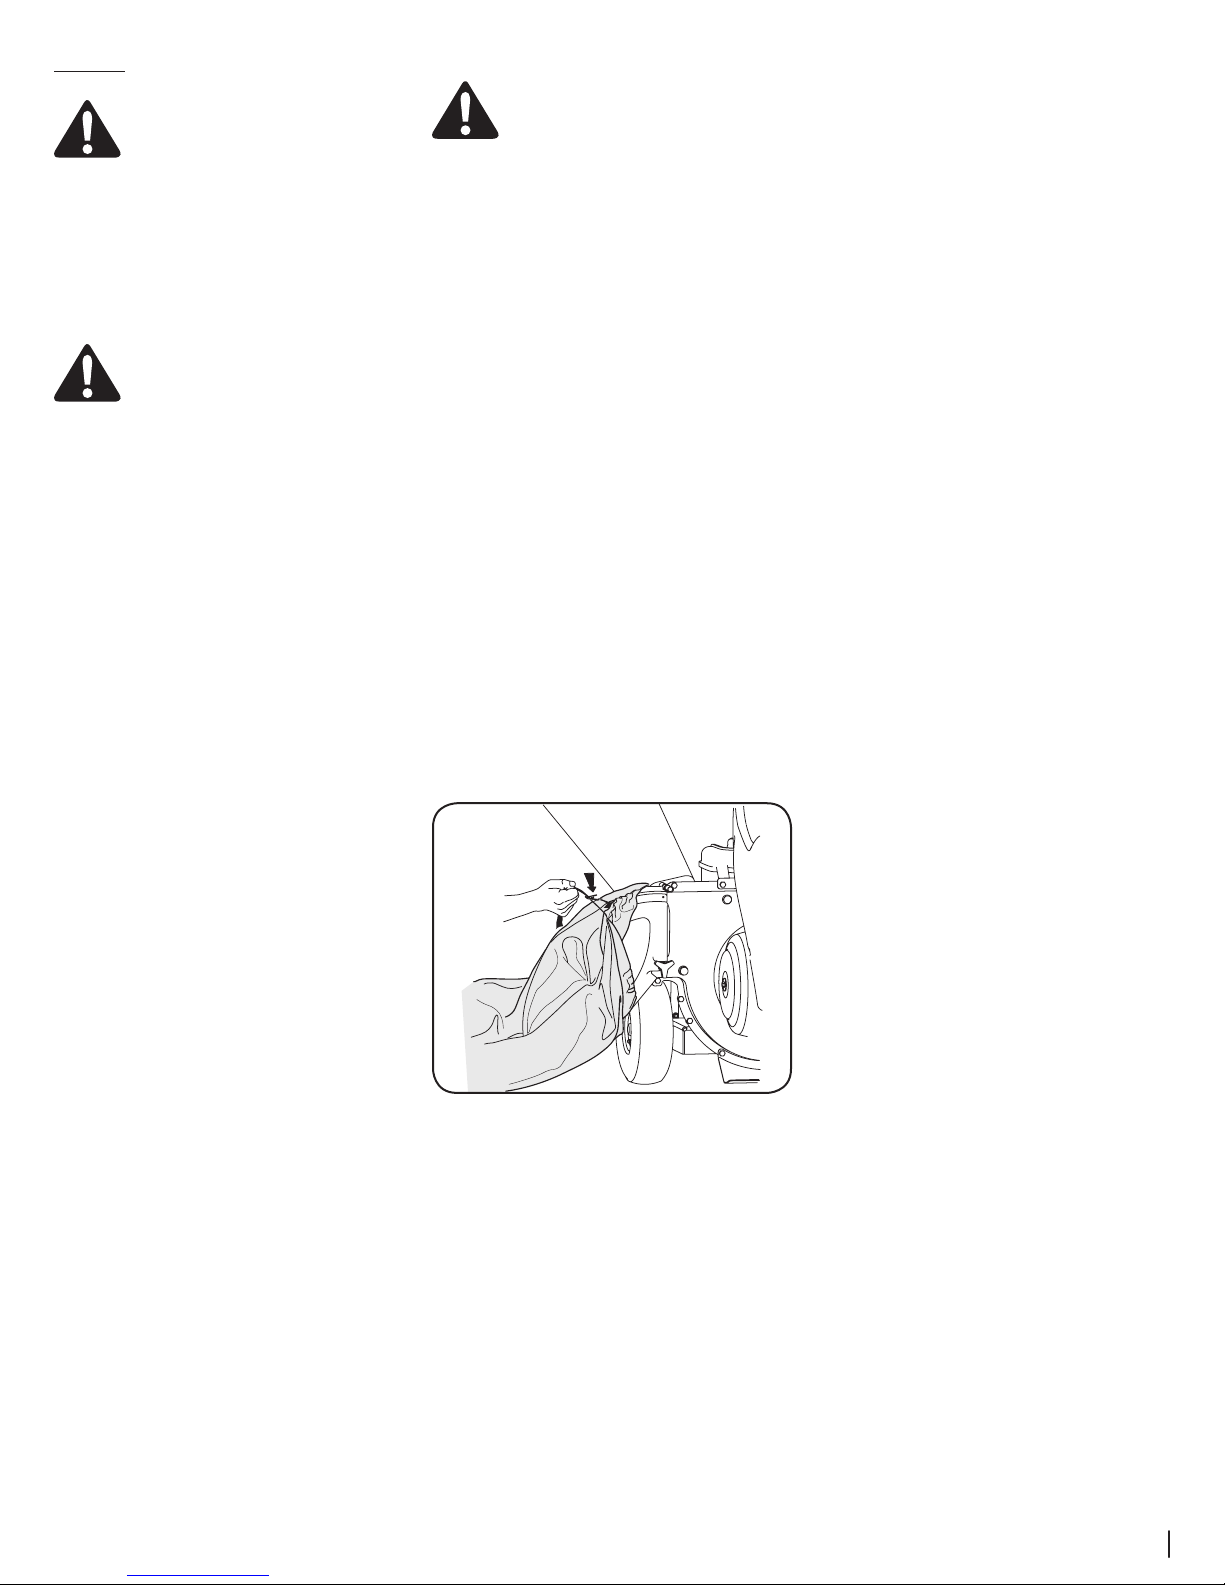
To attach the bag:
1. Place the opening of the bag completely over
the chute deflector. See Figure 3-2.
Figure 3-2
2. Position the bag so that the wing knobs which
secure the chute deflector to the impeller
housing are completely covered.
3. Pull on the draw-strap until the bag is tight
around chute deflector opening.
Set-Up
Gas and Oil Fill-Up
Refer to the separate engine owner’s manual for
additional engine information.
1. Add oil provided before starting unit for the
first time out of the box. Refer to the separate
engine owner’s manual for information
regarding adding and checking the oil.
2. Service the engine with gasoline as instructed
in the separate engine owner’s manual.
WARNING: Use extreme care when
handling gasoline. Gasoline is
extremely flammable and the vapors
are explosive. Never fuel the machine
indoors or while the engine is hot or
running. Extinguish cigarettes, cigars,
pipes and other sources of ignition.
WARNING: Never fill fuel tank
indoors with engine running. Before
fueling, turn engine off. Wait until the
engine has been allowed to cool for at
least two minutes after running before
fueling.
Figure 3-1
5
Page 6
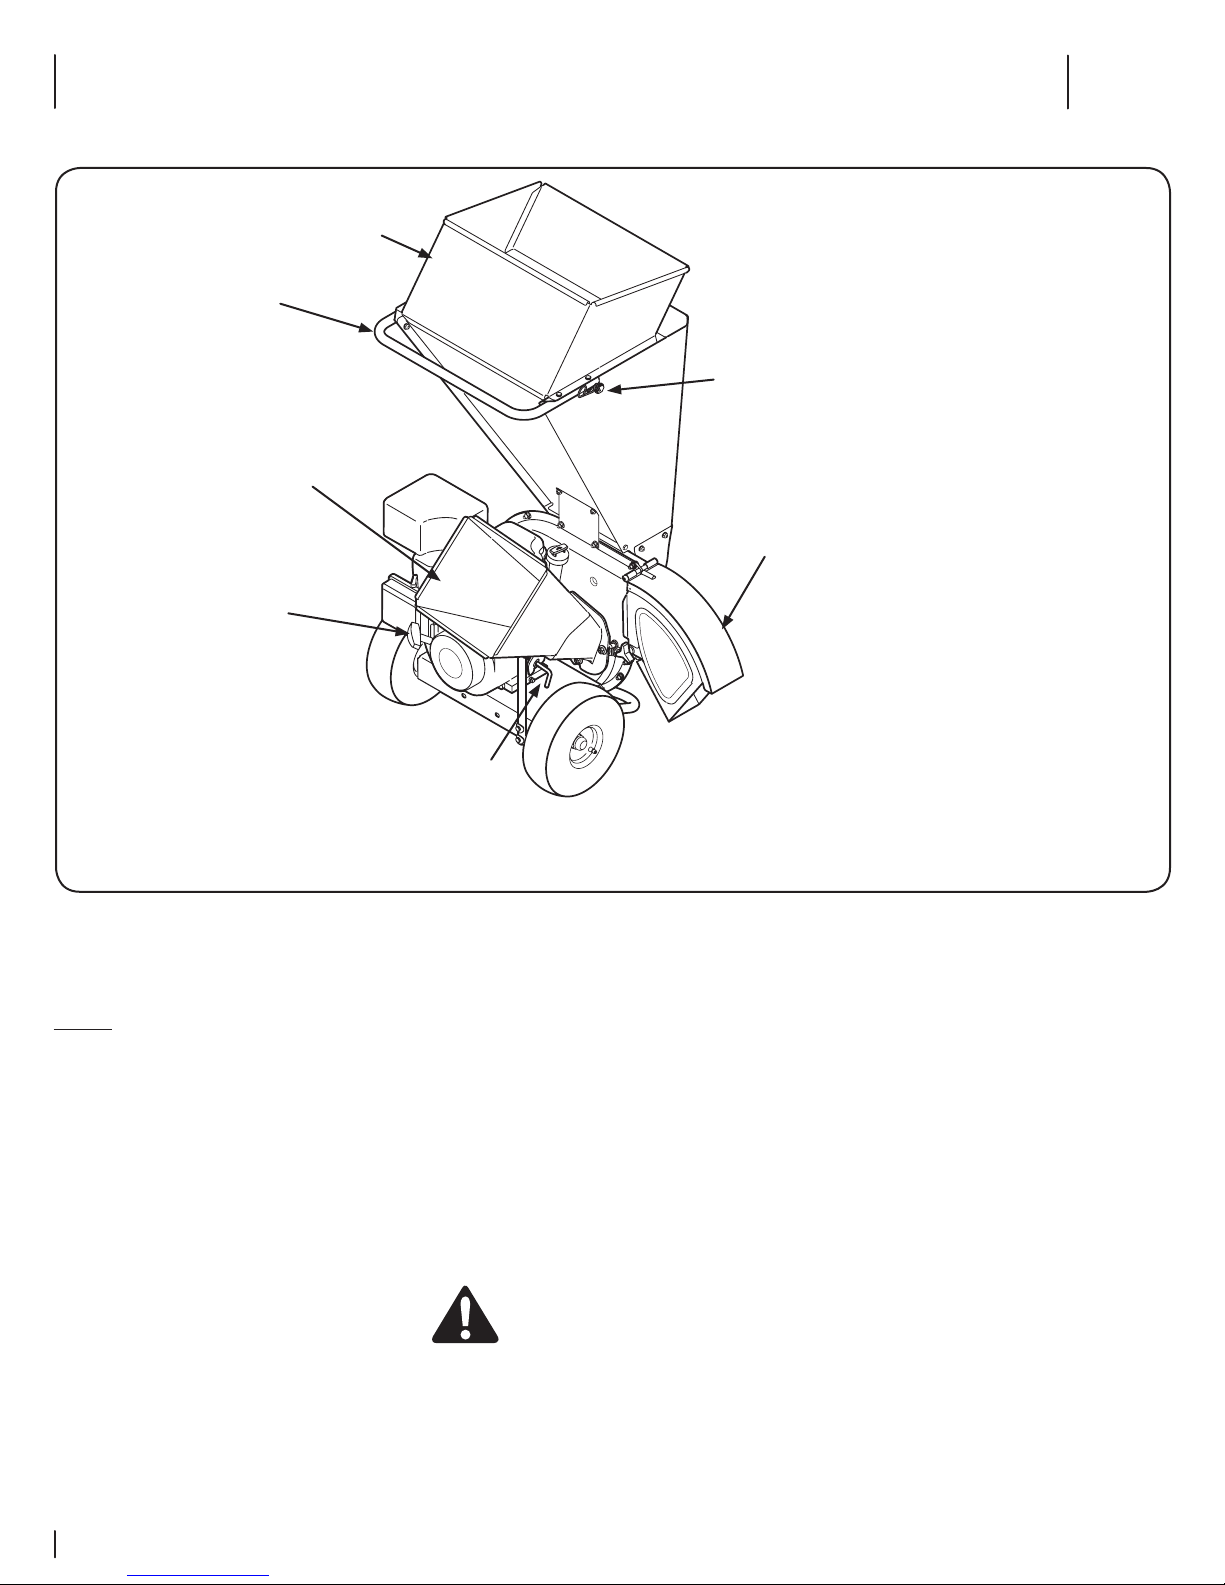
Controls and Operation
Chute
Deflector
Spring
Latch
Hopper
Chipper
Chute
Recoil
Starter
Handle
Lock Rod
Model Series CS 4325 Shown
4
Controls
Chipper Chute
Branches up to two inches (model series CS 4265) or
three inches (model series CS 4325) in diameter may
be fed into the chipper chute for chipping.
Hopper
Leaves, twigs, and branches up to 1/2-inch in
diameter may be placed into the hopper for
shredding.
IMPORTANT: Never place branches with a diameter
greater than 1/2-inch in the hopper. Doing so can
result in serious damage to your unit’s shredder
blade, flails or impeller.
Handle
Use the handle when manually transporting the
chipper shredder.
Figure 4-1
Recoil Starter
The recoil starter is located on the engine. Pull the
recoil starter to start engine.
Engine Controls
See the separate Engine Operator’s Manual packed
with your unit for the location and function of the
engine controls.
Spring Latch (Mode l Series CS 4325 Only)
The spring latch is located on the top of the hopper.
It is used to release or lock the chipper chute in a
raised position for storage or for transporting.
WARNING: Never operate the chipper
shredder with the chipper chute in the
raised position. Use the spring latch to
lower the chipper chute into the
operating position before starting the
engine.
Lock Rod (Model Series CS 4325 Only)
The lock rod is located on the chipper chute support.
It is used to release or lock the chipper chute in a
lowered position for operation.
Chute Deflector
Debris is discharged from the machine’s reduction
chamber through the chute deflector.
6
Page 7
Operation
WARNING: The operation of any
chipper shredder can result in foreign
objects being thrown into the eyes,
which can damage your eyes severely.
Always wear the safety glasses provided
with this unit or eye shields before
chipping or shredding and while
performing any adjustments or repairs.
Starting Engine
Refer to the engine operator’s manual for engine
starting instructions.
Shredding
WARNING: Never operate the chipper
shredder without chipper chute lowered
into the operating position.
Yard waste such as leaves and pine needles can be
placed in the hopper for shredding. After material
has been processed by the shredder blade and flails,
it will be forced out of the chute deflector, and, if
attached, into a debris collection bag.
Observe the following guidelines when shredding
yard debris:
• Never attempt to shred material other than
normal yard debris (leaves, twigs, pine cones,
etc.).
• Avoid shredding fibrous plants such as tomato
vines until they are thoroughly dried out.
Fresh vines do not shred well and tend to wrap
themselves around the impeller and flails.
• Place reasonable amounts of debris into the
hopper at a time. Do not overload the hopper.
• Allow the material in the hopper to be drawn
into the blades and shredded before adding
additional debris to the hopper. Failure to due
so may result in a clogged hopper, clogged
chute deflector or a stalled engine.
• Avoid placing twigs longer than 24 inches into
the hopper. Twigs longer than 24 inches may
result in a clogged hopper.
IMPORTANT: Never place branches with a
diameter greater than 1/2-inch in the hopper.
Doing so can result in serious damage to the
unit’s shredder blade, flails or impeller.
Clearing the Hopper
Should the hopper become clogged with debris
during operation, proceed as follows:
1. Grasp the handle with both hands and gently
agitate the chipper shredder to help loosen
debris, drawing it into the impeller.
If the clog does not clear, proceed as follows:
1. Stop engine.
2. Use your hands to remove any debris found
near the top of the hopper.
3. Use a branch (or other available device, i.e.
broomstick) to dislodge debris located toward
the base of the hopper.
4. Restart engine.
NOTE: If you’re unable to pull the starter
rope as a result of accumulated debris near
the impeller, follow instructions under the
heading Cleaning the Reduction Chamber in
the “Service” section of this manual.
Chipping
WARNING: Never operate the chipper
shredder without chipper chute lowered
into the operating position.
Branches up to two inches (model series CS4265) or
three inches (model series CS4325) in diameter can
be fed into the chipper chute. Observe the following
guidelines when chipping branches:
• Keep both hands firmly on the branch as you
feed it into the chipper chute.
• Never feed more than one branch into the
chipper chute at a time.
• Never feed anything other than branches (or
wood) into the chipper chute.
• Apply intermittent pressure (force, in short
pulses) while feeding larger branches into the
chipper chute, to avoid bogging or stalling the
engine.
IMPORTANT: Never feed branches with a
diameter greater than two (2) inches (Model
Series CS4265) or three (3) inches (model series
CS4325) into the chipper chute. Doing so can
result in serious damage to your unit’s chipper
blades, flails or impeller.
NOTE: For best performance, always operate
the unit with sharp chipper blades. If a
noticeable loss in performance is encountered
while chipping branches, the chipper blades
should be replaced.
Emptying the Bag
1. Stop engine.
2. Squeeze the locking buckle to release the
bag’s drawstrap before loosening it from the
chute deflector. See Figure 4-2.
Figure 4-2
3. Empty the bag and reattach to the chute
deflector opening. Refer to the “Assembly and
Setup” section of this manual.
7Section 4 — controlS an d operation
Page 8
Service
A
C
B
A
C
B
Model Serie s CS4325 Shown
5
Service
General Recommendations
• Always observe safety rules when performing
any maintenance.
• The warranty on this chipper shredder does
not cover items that have been subjected to
operator abuse or negligence. To receive full
value from warranty, operator must maintain
the equipment as instructed here.
• Changing of engine-governed speed will void
engine warranty.
• All adjustments should be checked at least
once each season.
• Periodically check all fasteners and make sure
these are tight.
WARNING: Always stop engine,
disconnect spark plug, and ground
against engine before, cleaning,
lubricating, or performing any type of
maintenance on your machine.
Lubrication
1. Lubricate the chipper chute hinge with a light
oil once a season.
2. Lubricate the pivot points on the chute
deflector with light oil once a season.
3. Follow the separate engine manual packed
with your unit for engine lubrication
instructions.
Equipment Care
• Clean the chipper shredder thoroughly after
each use.
• Wash bag periodically with water. Allow to dry
thoroughly in shade.
• If the reduction chamber becomes clogged,
remove and clean as instructed below.
• Allow the unit to run and clear out all debris
for a short time before shutting the unit down
before storage.
NOTE: Cleaning with a forceful spray of water
is not recommended as it could contaminate
the fuel system.
Engine Care
Refer to the Maintenance section of the Engine
Owner/ Operator manual packed with your unit.
Read and follow instructions carefully.
• Check engine oil level before each use as
instructed in the separate engine manual.
• Clean or replace air cleaner every 25 hours
under normal conditions. Clean every few
hours under extremely dusty conditions. To
service the air cleaner, refer to the engine
manual.
• The spark plug should be cleaned and the gap
reset once a season. Check engine manual for
correct plug type and gap specifications.
• Clean engine regularly with a cloth or brush.
Keep the top of the engine clean to permit
proper air circulation. Remove all grass, dirt,
and combustible debris from muffler area.
Cleaning The Reduction Chamber
WARNING: The impeller’s shredder
blade and chipper blades are sharp. Wear
leather work gloves to protect your hands
when cleaning out the reduction
chamber.
If the reduction chamber becomes clogged with
debris, the shredder screen can be pivoted upward
so that you can clean the surrounding area. To do so,
proceed as follows:
1. Stop engine, disconnect spark plug, and make
certain the chipper shredder has come to a
complete stop.
WARNING: The muffler and
surrounding area will be hot if the engine
has been running. Use caution and
protect your hands if working near the
muffler.
2. If attached, remove debris bag. Remove the
two wing knobs on either side of the chute
deflector and pivot the chute deflector
upward. See A in Figure 5-1.
Figure 5-1
3. Remove the hairpin clip from the clevis pin
which extends through the housing and
shredder screen. See B in Figure 5-1. Remove
clevis pin.
4. Pivot the shredder screen upward. See C in
Figure 5-1. Clean the surrounding area by
scraping away debris.
5. Confirm that the spark plug wire is
disconnected and away from the spark plug.
Pull on the starter rope two-to-three times to
clear any remaining debris from the reduction
chamber.
6. When the area is clean, pivot the shredder
screen downward and re-secure with the
clevis pin and hairpin clip removed earlier.
7. Reattach the debris collection bag to the chute
deflector, if desired.
Chipper Blade Care
WARNING: The impeller’s chipper
blades are sharp. Wear leather work
gloves to protect your hands.
1. Stop engine, disconnect spark plug, and make
certain the chipper shredder has come to a
complete stop.
2. Pivot the shredder screen upward as
instructed under the heading Cleaning the
Reduction Chamber.
3. Remove the chipper chute support brace from
the frame by removing the two hex bolts and
saddle washers which secure it. See A in Figure
5-2.
Figure 5-2
4. Remove the chipper chute by removing three
hex nuts and washers which secure it to the
impeller housing. See B in Figure 5-2.
5. Rotate the impeller by hand until one of the
two chipper blades is visible through the
impeller housing opening.
6. Remove the blade by removing the internal
hex screws, lock washers and hex nuts which
secure it to the impeller. See C in Figure 5-2.
Retain the hardware.
NOTE: Use a 3/16” hex key (Allen) wrench on
the outside of the blade and a 1/2” box (or
socket) wrench on the inside of the impeller.
Hold the Allen wrench stationary and rotate
the box (or socket) wrench to loosen the nut.
7. Install a replacement blade with the hardware
removed earlier or sharpen.
IMPORTANT: When sharpening the blade,
protect hands by using gloves. Follow the
original angle of grind and make sure to
remove an equal amount from each blade.
8. To replace the other blade, rotate the impeller
to expose the second blade and repeat the
steps above.
NOTE: Make certain blades are reassembled
with the sharp edge outward (toward the
chipper chute). Torque hardware to between
20 ft.-lbs and 25 ft.-lbs.
8
Page 9

Shredder Blade Care
A
C
B
WARNING: The shredder blade is
sharp. Wear leather work gloves to
protect your hands.
1. Stop engine, disconnect spark plug, and make
certain that all moving parts have come to a
complete stop.
2. Remove the two flange nuts (and hex bolts)
which secure the hopper support bracket to
the impeller housing. Retain the hardware. See
Figure 5-3.
Figure 5-3
3. Pivot the shredder screen upward as
instructed under the heading Cleaning the
Reduction Chamber.
4. Remove six flange nuts which secure hopper
inlet guide to impeller housing. See A in Figure
5-4.
IMPORTANT: If sharpening the blade for
reuse, follow the original angle of grind as
a guide. Make certain each cutting edge
receives an equal amount of grinding to
prevent an unbalanced blade. Remove metal
from the heavy side until it is balanced evenly.
IMPORTANT: When reassembling the blade,
tighten center bolt to between 45 ft.-lbs and
58 ft.-lbs and the two out bolts to between 20
ft.-lbs and 25 ft.-lbs.
Off-Season Storage
• Allow the unit to run and clear out all debris
for a short time before shutting the unit down
before storage.
• When storing the chipper shredder in an
unventilated or metal storage shed, care
should be taken to rustproof the non-painted
surfaces. Using a light oil or silicone, coat the
equipment, especially any springs, bearings,
and cables.
• Remove all dirt from exterior of engine and
equipment.
• Follow lubrication recommendations.
• Refer to engine manual for correct engine
storage instructions.
• Store equipment in a clean, dry area. Do not
store in an area where equipment is present
that may use a pilot light or has a component
that can create a spark.
9. Remove the hairpin clip from the clevis pin
which extends through the housing and
shredder screen. See B in Figure 5-1. Remove
clevis pin.
10. Pivot the shredder screen upward. See C in
Figure 5-1. Clean the surrounding area by
scraping away debris.
11. Confirm that the spark plug wire is
disconnected and away from spark plug. Pull
on the starter rope two-to-three times to
clear any remaining debris from the reduction
chamber.
12. When the area is cleaned, pivot the shredder
screen downward and re-secure with the
clevis pin and hairpin clip removed earlier.
13. Reattach the debris collection bag to the chute
deflector, if desired.
Figure 5-4
5. Carefully separate the hopper assembly from
the impeller housing and set it aside.
6. Insert a piece of wood into the chute deflector
opening to stabilize the impeller and prevent
it from rotating when removing the shredder
blade.
7. Remove the two internal hex screws, hex
lock nuts, and lock washers which secure the
shredder blade to the impeller. See B in Figure
5-4.
NOTE: Use a 3/16” hex key (Allen) wrench
on the outside of the shredder blade and a
1/2” box (or socket) wrench on the inside of
the shredder blade. Hold the Allen wrench
stationary and rotate the box (or socket)
wrench to loosen the nut.
8. Remove the hex bolt, lock washer, and flat
washer to completely free shredder blade. See
C in Figure 5-4.
9Section 5 — Service
Page 10

Troubleshooting
Problem Cause Remedy
6
Engine fails to start 1. Throttle lever (if equipped) not in correct starting
position.
2. Engine switch (if equipped) in OFF position.
3. Spark plug wire disconnected.
4. Choke not in CHOKE position (if equipped).
5. Fuel tank empty or stale fuel.
6. Fuel shut-off valve closed (if equipped).
7. Faulty spark plug.
Engine runs erratic 1. Spark plug boot loose.
2. Unit running on CHOKE (if equipped).
3. Blocked fuel line or stale fuel.
4. Low engine RPM.
5. Water or dirt in fuel system.
6. Dirty air cleaner.
7. Carburetor out of adjustment.
Engine overheats 1. Engine oil level low.
2. Dirty air cleaner.
1. Move throttle lever to FAST or START position.
2. Move engine switch to ON position.
3. Connect wire to spark plug.
4. Move choke lever to CHOKE position.
5. Fill tank with clean, fresh gasoline.
6. Turn on fuel shut-off valve.
7. Clean, adjust gap, or replace.
1. Connect and tighten spark plug boot.
2. Move choke lever to OFF position.
3. Clean fuel line; fill tank with clean, fresh
gasoline.
4. Always run engine at full throttle.
5. Drain fuel tank. Refill with fresh fuel.
6. Refer to engine manual.
7. See authorized service dealer.
1. Fill crankcase with proper oil.
2. Refer to engine manual.
Occasional skips
(hesitates) at
high speed
Excessive Vibration 1. Loose parts or damaged impeller. 1. See authorized service dealer.
Unit does not discharge 1. Discharge area clogged.
Rate of discharge slows
considerably or composition of
discharged material changes
1. Spark plug gap too close.
2. Carburetor idle mixture adjustment improperly set.
2. Foreign object lodged in impeller.
3. Low engine RPM.
1. Low engine RPM.
2. Chipper blade dull.
1. Remove spark plug and adjust gap. See Engine
Manual for gap specifications.
2. See authorized service dealer.
1. Stop engine immediately and disconnect
spark plug wire. Clean flail screen and inside of
discharge opening.
2. Stop engine and disconnect spark plug wire.
Remove lodged object.
3. Always run engine at full throttle.
1. Always run engine at full throttle.
2. Replace chipper blade or see your authorized
service dealer.
10
Page 11

Replacement Parts
Component Part Number and Description
7
951-10292 Spark Plug (MTD)
759-3336 Spark Plug (Briggs & Stratton)
951-10794 Air FIlter (MTD)
BS-491588S Air FIlter (Briggs & Stratton)
BS-493537S Pre-Cleaner (Briggs & Stratton)
951-12535 Fuel Cap Assembly (MTD)
BS-792647 Fuel Cap (Briggs & Stratton)
942-04050 Shredder Blade
942-0544B Chipper Blade
719-04308 Flail Blade (3 total)
934-04009 10 x 4.0 Pneumatic Wheel with Bearings
Phone (800) 828-5500 to order replacement parts or a complete Parts Manual (have your full model number and serial number ready).
Parts Manual downloads are also available free of charge at www.troybilt.com.
11
Page 12

MANUFACTURER’S LIMITED WARRANTY FOR
The limited warranty set forth below is given by Troy-Bilt LLC with
respect to merchandise purchased and used in the United States and/
or its territories and possessions (“Troy-Bilt”).
This warranty is in addition to any applicable emissions warranty
provided with your product.
Troy-Bilt warrants this product (excluding its Normal Wear Parts and
Attachments as described below) against defects in material and
workmanship for a period of two (2) years commencing on the date of
original purchase by the first purchaser of such product and will, at its
option, repair or replace, free of charge, any part found to be defective
in materials or workmanship (“Warranty Period”). This limited warranty
shall only apply if this product has been used for non-commercial
purposes and has been operated and maintained in accordance with
the Operator’s Manual furnished with the product, and has not been
subject to misuse, abuse, commercial use, neglect, accident, improper
maintenance, alteration, vandalism, theft, fire, water, or damage
because of other peril or natural disaster. Damage resulting from the
installation or use of any part, accessory or attachment not approved
by Troy-Bilt for use with the product(s) covered by this manual will void
your warranty as to any resulting damage.
Normal Wear Parts are warranted to be free from defects in material and
workmanship for a period of thirty (30) days from the original date of
purchase. Normal wear parts include, but are not limited to items such
as: batteries, belts, blades, blade adapters, tines, grass bags, wheels,
rider deck wheels, seats, snow thrower skid shoes, friction wheels,
shave plates, auger spiral rubber and tires.
Attachments — Troy-Bilt warrants attachments for this product against
defects in material and workmanship for a period of one (1) year,
commencing on the date of the attachment’s original purchase or
lease. Attachments include, but are not limited to items such as: grass
collectors and mulch kits.
HOW TO OBTAIN SERVICE: Warranty service is available, WITH
PROOF OF PURCHASE, through your local authorized service dealer.
Registering your product is not a requirement to obtain warranty
service. To locate the dealer in your area, check your Yellow Pages, or
contact Troy-Bilt LLC at P.O. Box 361131, Cleveland, Ohio 44136-0019, or
call 1-866-840-6483, 1-330-558-7220 or log on to our Web site at www.
troybilt.com.
This limited warranty does not provide coverage in the following cases:
a. Log splitter pumps, valves, and cylinders have a separate one-
year warranty. Routine maintenance items such as lubricants,
filters, blade sharpening, tune-ups, brake adjustments, clutch
adjustments, deck adjustments, and normal deterioration of
the exterior finish due to use or exposure.
b. Service completed by someone other than an authorized
service dealer.
c. Troy-Bilt does not extend any warranty for products sold
or exported outside of the United States and its respective
possessions and territories, except those sold through Troy-
Bilt’s authorized channels of export distribution.
d. Replacement parts that are not genuine Troy-Bilt parts.
e. Transportation charges and service calls.
f. Troy-Bilt does not warrant this product for commercial use.
No implied warranty, including any implied warranty of
merchantability or fitness for a particular purpose, applies after
the applicable period of express written warranty above as to the
parts as identified. No other express warranty, whether written or
oral, except as mentioned above, given by any person or entity,
including a dealer or retailer, with respect to any product, shall
bind Troy-Bilt. During the period of the warranty, the exclusive
remedy is repair or replacement of the product as set forth above.
The provisions as set forth in this warranty provide the sole and
exclusive remedy arising from the sale. Troy-Bilt shall not be liable
for incidental or consequential loss or damage including, without
limitation, expenses incurred for substitute or replacement lawn
care services or for rental expenses to temporarily replace a
warranted product.
Some states do not allow the exclusion or limitation of incidental
or consequential damages, or limitations on how long an implied
warranty lasts, so the above exclusions or limitations may not apply to
you.
In no event shall recovery of any kind be greater than the amount of
the purchase price of the product sold. Alteration of safety features
of the product shall void this warranty. You assume the risk and
liability for loss, damage, or injury to you and your property and/or to
others and their property arising out of the misuse or inability to use
the product.
This limited warranty extends to the original purchaser (i.e, the first
purchaser of a new product) and to a succeeding owner of the product
for non-commercial use for the duration of the warranty beginning
from the original date of purchase by the first purchaser of such
product. In the event that the original date of purchase by the first
purchaser of the product is indeterminable, the Warranty Period shall
be established as twenty-eight (28) months from the product’s date of
manufacture, as determined by Troy-Bilt. In no event shall a product’s
warranty extend beyond the established Warranty Period.
HOW STATE LAW RELATES TO THIS WARRANTY: This limited
warranty gives you specific legal rights, and you may also have other
rights which vary from state to state.
Troy-Bilt LLC, P.O. BOX 361131 CLEVELAND, OHIO 44136-0019; Phone: 1-866-840-6483, 1-330-558-7220
GDOC-100021 REV. A
www.troybilt.com
Page 13

Medidas de seguridad • Montaje • Funcionamiento • Servicio • Solución de problemas • Garantía
Manual del OperadOr
Chipper Shredder — Model Series CS 4265 & CS 4325
LEA Y CUMPLA TODAS LAS NORMAS E INSTRUCCIONES DE SEGURIDAD DE ESTE MANUAL
ANTES DE INTENTAR HACER FUNCIONAR ESTA MÁQUINA.
SI NO RESPETA ESTAS INSTRUCCIONES PUEDE PROVOCAR LESIONES PERSONALES.
NOTA: Este manual del operador cubre varios modelos. Las características técnicas pueden variar de acuerdo al modelo. No todas las
características incluidas en este manual se aplican a todos los modelos y el modelo ilustrado puede ser diferente al suyo.
TROY-BILT LLC, P.O. BOX 361131 CLEVELAND, OHIO 44136-0019
Se muestra el modelo Model CS 4265
ADVERTENCIA
Formulario No. 769-11640
(10 de mayo de 2016)
Page 14

Al propietario
Muchas gracias
Gracias por comprar este producto. Ha sido cuidadosamente diseñado
para brindar excelente rendimiento si se lo hace funcionar y se lo mantiene
correctamente.
Por favor lea todo este manual antes de hacer funcionar el equipo. El manual
le indica cómo configurar, hacer funcionar y mantener la máquina de manera
fácil y segura. Por favor asegúrese de que usted, y cualquier otra persona
que utilice la máquina, siga atentamente y en todo momento las medidas
de seguridad recomendadas. De lo contrario, se podrían producir lesiones
personales o daños materiales.
Toda la información contenida en este manual hace referencia a la más
reciente información de producto disponible en el momento de la impresión.
Revise el manual frecuentemente para familiarizarse con la máquina, sus
características y su funcionamiento. Por favor tenga en cuenta que este
Manual del Operador puede abarcar una variedad de especificaciones
para productos de diversos modelos. Es posible que las características y
funciones incluidas y/o ilustradas en este manual no se apliquen a todos los
modelos. Nos reservamos el derecho de modificar las especificaciones de los
productos, diseños y equipos sin previo aviso y sin generar responsabilidad
por obligaciones de ningún tipo.
Índice
Medidas de Seguridad ............................................ 3
Armado e Instalación ............................................. 5
Controles y Funcionamiento ................................. 6
Servicio ..................................................................... 8
1
Si corresponde, la información sobre las prueba de potencia utilizada para
determinar la potencia nominal del motor equipado en esta máquina se
puede consultar en www.opei.org o en el sitio web del fabricante del motor.
Si tiene algún problema o duda con respecto a la máquina, llame a su
distribuidor Troy-Bilt local o comuníquese directamente con nosotros. En
esta página encontrará los números de teléfono, el sitio web y la dirección
postal de la Atención al cliente de Troy-Bilt. Queremos garantizar su entera
satisfacción en todo momento.
En este manual, todas las referencias al lado derecho e izquierdo de la
máquina se hacen observándola desde la posición de operación.
El fabricante del motor es el responsable de todas las cuestiones relacionadas
con el rendimiento, potencia de salida, especificaciones, garantía y
mantenimiento del motor. Para obtener mayor información consulte el
manual del operador del motor, que acompaña a su máquina en un paquete
por separado.
Solución de Problemas ......................................... 10
Repuestos ............................................................... 11
Garantía ................................................................. 12
Registro de información de producto
Antes de instalar y hacer funcionar su equipo nuevo, por favor localice
la placa de modelo en el equipo y registre la información en el espacio
de la derecha. Encontrará la placa de modelo parándose en la posición
del operador y mirando la estructura debajo del motor. Necesitará esta
información si tiene que solicitar soporte técnico a través de nuestro sitio
web, el Servicio de Atención al Cliente, o de un distribuidor local de servicio
autorizado.
NúMero de Modelo
NúMero de Serie
Servicio de Atención al Cliente
Por favor, NO devuelva la máquina al minorista o distribuidor sin ponerse en contacto primero con el
Departamento de Atención al Cliente.
En caso de tener problemas para armar este producto o de tener dudas con respecto a los controles, el funcionamiento o el
mantenimiento de esta máquina, si desea pedir piezas/aditamentos/accesorios/complementos, o si desea ver un video instructivo en
línea, puede solicitar la ayuda de expertos. Debe tener a mano el número de modelo y el número de serie completos. Seleccione una
de las opciones siguientes:
◊ Web: www.troybilt.com
◊ Teléfono: (800) 828-5500 o (330) 558-7220
◊ Correo: Troy-Bilt LLC • P.O. Box 361131 • Cleveland, OH • 44136-0019
2
Page 15

Importantes Medidas de Seguridad
ADVERTENCIA: Este símbolo indica instrucciones de seguridad importantes que, de no cumplirse, pueden poner en peligro su seguridad personal y/o material y la
de otras personas. Lea y cumpla todas las instrucciones de este manual antes de intentar hacer funcionar esta máquina. Si no cumple estas instrucciones puede
provocar lesiones personales.
Cuando vea este símbolo. ¡TENGA EN CUENTA LAS ADVERTENCIAS!
PROPOSICIÓN 65 DE CALIFORNIA
ADVERTENCIA: El escape del motor de este vehículo, algunos de sus elementos y ciertos componentes del vehículo contienen o liberan sustancias químicas
que el Estado de California considera que pueden producir cáncer, defectos de nacimiento u otros problemas reproductivos.
PELIGRO: Esta máquina está diseñada para operar de acuerdo con las normas de seguridad contenidas en este manual. Al igual que con cualquier tipo de
máquina eléctrica, un descuido o error por parte del operador puede producir lesiones graves. Esta máquina puede amputar dedos, manos y pies y puede arrojar
residuos. Si no se respetan las siguientes instrucciones de seguridad, se pueden ocasionar lesiones graves o la muerte.
2
Capacitación
1. Lea, entienda y cumpla todas las instrucciones
incluidas en la máquina y en los manuales
antes de intentar armarla y hacerla funcionar.
Guarde este manual en un lugar seguro para
consultas futuras y periódicas, así como para pedir
repuestos.
2. Familiarícese con todos los controles y con el uso
adecuado de los mismos. Sepa cómo parar la
máquina y desactivar los controles rápidamente.
3. No permita nunca que los menores de 16 años
utilicen esta máquina. Los menores de 16 años en
adelante deben leer y entender las instrucciones
y las normas de seguridad contenidas en
este manual y sobre la máquina, y deben ser
capacitados y supervisados por un adulto.
4. Nunca permita que los adultos operen esta
máquina sin recibir antes la instrucción apropiada.
5. Mantenga a los observadores, mascotas y niños
a no menos de 70 pies de la máquina siempre
que esté funcionando. Pare la máquina si alguien
ingresa a la zona.
6. Nunca encienda el motor en espacios cerrados o
en una zona con poca ventilación. El escape del
motor contiene monóxido de carbono, un gas
inodoro y letal.
7. No acerque las manos o los pies a las piezas
rotatorias ni a las cámaras de alimentación o la
abertura de descarga. El contacto con el propulsor
giratorio puede amputar dedos, manos y pies.
8. Nunca intente destapar el alimentador o la
abertura de descarga, ni trate de sacar o vaciar la
bolsa ni revisar o reparar la máquina mientras el
motor está en marcha. Apague el motor y espere
hasta que todas las piezas móviles se hayan
detenido por completo. Desconecte el cable de la
bujía y póngalo a tierra contra el motor.
Preparativos
1. Inspeccione minuciosamente el área donde
utilizará el equipo. Retire todas las piedras,
botellas, latas y otros objetos extraños que
puedan ser levantados o arrojados causando
lesiones personales o daños a la máquina.
2. Para protegerse los ojos utilice siempre anteojos
o antiparras de seguridad mientras hace
funcionar la máquina o mientras le hace ajustes o
reparaciones. Los objetos arrojados que rebotan
pueden lesionar gravemente los ojos.
3. Utilice zapatos de trabajo resistentes, de suela
fuerte, así como pantalones y camisas ajustados.
Las prendas sueltas y las alhajas se pueden
enganchar en las piezas móviles. Nunca opere
esta máquina descalzo o con sandalias. Utilice
guantes de trabajo de cuero cuando introduzca
material en el canal de la astilladora.
4. Antes de encender la máquina controle que
todos los pernos y tornillos estén bien ajustados
para garantizar que la máquina se encuentra
en condiciones seguras de operación. Además,
realice inspecciones visuales de la máquina a
intervalos frecuentes buscando daños.
5. Mantenga o reemplace las etiquetas de seguridad
y de instrucciones según sea necesario.
Manejo seguro de la gasolina:
Para evitar lesiones personales o daños materiales tenga
mucho cuidado al manipular la gasolina. La gasolina es
sumamente inflamable y sus vapores son explosivos. Si
se derrama gasolina sobre el cuerpo o la ropa se puede
lesionar gravemente ya que podría prenderse fuego.
Lávese la piel y cámbiese de ropa de inmediato.
a. Utilice sólo recipientes para gasolina
autorizados.
b. Nunca llene los recipientes dentro de un
vehículo o de un camión o remolque con
recubrimiento plástico. Coloque siempre
los recipientes en el piso y lejos del
vehículo antes de llenarlos.
c. Cuando sea posible, saque el equipo a
gasolina del camión o remolque y llénelo
sobre el suelo. Si eso no es posible, llene el
equipo en un remolque con un recipiente
portátil, en lugar de hacerlo desde la
boquilla del surtidor de gasolina.
d. Mantenga la boquilla en contacto con el
borde del tanque de combustible o con la
abertura del recipiente en todo momento,
hasta terminar de cargar. No utilice un
dispositivo para mantener abierta la
boquilla.
e. Apague todos los cigarrillos, cigarros,
pipas y otras fuentes de combustión.
f. Nunca cargue combustible en la máquina
en interiores.
g. Nunca saque el tapón del combustible ni
agregue combustible mientras el motor
está caliente o en marcha. Deje que el
motor se enfríe por lo menos dos minutos
antes de cargar combustible.
h. Nunca llene en exceso el tanque de
combustible. Llene el tanque no más de ½
pulgada por debajo de la base del cuello
de llenado para dejar espacio para la
expansión del combustible.
i. Vuelva a colocar el tapón de combustible y
ajústelo bien.
j. Limpie el combustible que se haya
derramado sobre el motor y el equipo.
Traslade la unidad a otro lugar. Espere 5
minutos antes de arrancar el motor.
k. Para reducir el riesgo de incendio,
mantenga la máquina limpia de pasto,
hojas y residuos acumulados. Limpie
los derrames de aceite o combustible y
retire todos los residuos impregnados de
combustible.
l. Nunca guarde la máquina o el recipiente
de combustible en un espacio cerrado
donde haya una llama expuesta, chispas
o llama piloto, como por ejemplo de
calentadores de agua, calefactores de
ambientes, hornos, secadores de ropa y
otros aparatos a gas.
Funcionamiento
1. No acerque las manos o los pies a las piezas
rotatorias ni a las cámaras de alimentación o la
abertura de descarga. El contacto con el propulsor
giratorio puede amputar dedos, manos y pies.
2. Antes de encender la máquina compruebe que el
canal de la astilladora, el alimentador y la cámara
de corte están vacío y sin residuos.
3. Inspeccione minuciosamente todo el material
que desea triturar y saque los objetos metálicos,
piedras, botellas, latas u otros objetos extraños
que pueden ocasionar lesiones o dañar la
máquina.
4. Si es necesario empujar el material por la tolva de
la trituradora use un palo de poco diámetro. No
utilice las manos ni los pies.
5. Si el propulsor golpea un objeto extraño o si la
máquina empieza a producir un sonido poco
común o una vibración, apague el motor de
inmediato. Deje que el propulsor se detenga
por completo. Desconecte el cable de la bujía,
póngalo haciendo masa contra el motor y siga los
pasos siguientes:
a. Inspeccione la máquina para ver si está
dañada.
b. Repare o reemplace las piezas dañadas.
c. Controle si hay piezas flojas y ajústelas
para garantizar que la máquina continúe
funcionando de forma segura.
6. No permita que se acumule material procesado en
el área de descarga. El mismo puede obstaculizar
la descarga correcta y provocar el retorno del
material a través de la abertura del alimentador.
7. No intente triturar ni astillar material de mayor
tamaño al especificado en la máquina o en este
manual. Podría ocasionar lesiones personales o
daño a la máquina.
8. Nunca intente destapar el alimentador o la
abertura de descarga mientras el motor está
en marcha. Apague el motor y espere hasta
que todas las piezas móviles se hayan detenido
por completo, desconecte el cable de la bujía y
póngalo a tierra contra el motor antes de sacar los
residuos.
9. Nunca opere la máquina sin que la tolva de la
trituradora, el canal de la astilladora o el canal
deflector estén correctamente conectados a
la máquina. Nunca vacíe ni cambie la bolsa de
descarga mientras el motor está en marcha.
10. Mantenga todos los protectores, deflectores y
dispositivos de seguridad colocados y en buenas
condiciones.
11. Mantenga el rostro y el cuerpo detrás y hacia
un costado del canal de la astilladora mientras
introduce material dentro de la máquina para
evitar lesiones por retrocesos accidentales.
12. Nunca opere esta máquina si no tiene buena
visibilidad o luz.
13. No opere esta máquina en superficies
pavimentadas, con grava o desniveladas.
3
Page 16

14. No opere esta máquina estando bajo los efectos
del alcohol o de las drogas.
15. El silenciador y el motor se calientan y pueden
causar quemaduras. No los toque.
16. Nunca levante o cargue la máquina cuando el
motor esté encendido.
17. Si se presentan situaciones que no están previstas
en este manual, tenga cuidado y use el sentido
común. Póngase en contacto con Asistencia
al Cliente para solicitar ayuda y el nombre del
distribuidor de servicio más cercano.
Mantenimiento y Almacenamiento
1. Nunca altere los dispositivos de seguridad.
Controle periódicamente que funcionen
correctamente.
2. Controle frecuentemente que los pernos y
tornillos estén bien ajustados para mantener la
máquina funcionando con seguridad. Además,
realice inspecciones visuales de la máquina
buscando daños y si es necesario repárela.
3. Antes de limpiar, reparar o inspeccionar la
máquina, pare el motor y compruebe que el
propulsor y todas las partes móviles se hayan
detenido. Desconecte el cable de la bujía y
póngalo haciendo masa contra el motor para
evitar que se encienda accidentalmente.
4. No cambie los ajustes del regulador ni acelere
demasiado el motor. El regulador controla la
velocidad máxima de óptimo funcionamiento del
motor.
5. Mantenga o reemplace las etiquetas de seguridad
y de instrucciones según sea necesario.
6. Consulte este manual para cargar, descargar,
transportar y almacenar con seguridad esta
máquina.
7. Nunca almacene la máquina o el recipiente de
combustible en un espacio cerrado donde haya
una llama expuesta, chispas o llama piloto como
por ejemplo, de calentadores de agua, hornos,
secarropas, etc.
8. Deje que la máquina se enfríe al menos 5 minutos
antes de guardarla.
9. Consulte siempre el manual del operador
para obtener instrucciones correctas sobre el
almacenamiento fuera de temporada.
10. Si tiene que drenar el tanque de combustible,
hágalo al aire libre.
11. Cumpla con las normas y reglamentaciones sobre
la manera de eliminar gasolina, aceite, etc. para
proteger el medio ambiente.
12. Según la Comisión de Seguridad de Productos
para el Consumidor de los EE.UU. (CPSC) y la
Agencia de Protección Ambiental de los EE.UU.
(EPA), este producto tiene una vida útil media
de siete (7) años o 60 horas de funcionamiento.
Al finalizar la vida útil media haga inspeccionar
anualmente esta unidad por un distribuidor de
servicio autorizado para cerciorarse de que todos
los sistemas mecánicos y de seguridad funcionan
correctamente y no tienen excesivo desgaste. Si
no lo hace, puede ocasionar accidentes, lesiones
o la muerte.
No modifique el motor
Para evitar lesiones graves o la muerte, no modifique
el motor de ninguna manera. Si altera los ajustes del
regulador, el motor se puede desbocar y funcionar a
velocidades inseguras. Nunca altere los ajustes de fábrica
del regulador del motor.
Aviso sobre las Emisiones
Los motores certificados que cumplen con las normas
sobre emisiones federales de la EPA y de California para
SORE (Equipos pequeños todo terreno) pueden funcionar
con gasolina sin plomo común y pueden incluir los
siguientes sistemas de control de emisiones: Modificación
de motor (EM), catalizador oxidante (OC), inyección de
aire secundaria (SAI) y catalizador de tres vías (TWC) si
están instalados.
Amortiguador de Chispas
ADVERTENCIA: Esta máquina está
equipada con un motor de combustión
interna y no debe utilizarse en un terreno
agreste cubierto de bosque, malezas o
pasto o cerca de él salvo que el sistema de
escape del motor incluya un
amortiguador de chispas que cumpla con
la legislación local o estatal vigente (si
corresponde).
Si se utiliza un amortiguador de chispas el operador
lo debe mantener en buenas condiciones de uso. En
el Estado de California, las medidas anteriormente
mencionadas son exigidas por ley (Artículo 4442 del
Código de Recursos Públicos de California). Es posible
que existan leyes similares en otros estados. Las leyes
federales se aplican en territorios federales.
Puede conseguir el amortiguador de chispas para el
silenciador a través de su distribuidor autorizado de
motores más cercano o poniéndose en contacto con el
departamento de servicios, P.O. Box 361131 Cleveland,
Ohio 44136-0019.
Símbolos de Seguridad
En esta página se muestran y describen los símbolos de seguridad que pueden aparecer en este producto. Lea, comprenda y siga todas las instrucciones incluidas con la máquina
antes de intentar armarla y hacerla funcionar.
Símbolo Descripción
LEA LOS MANUALES DEL OPERADOR
Lea, entienda y siga todas las instrucciones incluidas en los manuales antes de intentar armarla y hacerla
funcionar.
ADVERTENCIA – CUCHILLAS GIRATORIAS
Mantenga las manos alejadas de las aberturas de alimentación y descarga cuando la máquina está
funcionando. Adentro hay cuchillas giratorias.
OBSERVADORES
Mantenga a los observadores, las mascotas y los niños por lo menos a 75 pies de la máquina siempre que
esté funcionando. Pare la máquina si alguien ingresa a la zona.
ADVERTENCIA – ARROJA DESECHOS
Nunca opere la máquina sin tener el canal deflector correctamente colocado en la máquina.
PROTECCIÓN OCULAR
Use siempre anteojos o antiparras de seguridad cuando opere esta máquina.
ADVERTENCIA: Su Responsabilidad. Esta máquina eléctrica sólo puede ser usada por personas que lean, comprendan y respeten las
advertencias e instrucciones que aparecen en este manual y sobre la máquina.
4 Sección 2 — importanteS medidaS de Seguridad
¡GUARDE ESTAS INSTRUCCIONES!
Page 17

Armado y Montaje
B
A
Contenido de la caja
• Trituradora Astilladora (1) • Manual del Operador (1) • Manual del Operador del Motor (1)
• Botella de aceite (1) • Bolsa (1) • Anteojos de seguridad (1)
3
Armado
NOTA: Esta unidad se despacha sin gasolina ni aceite en
el motor. Llene con gasolina y aceite como se indica en el
manual del motor adjunto ANTES de hacer funcionar la
trituradora astilladora.
Canal de la astilladora (modelo serie CS4325
únicamente)
Por razones de envío, la unidad se despacha en
una caja con el canal de la astilladora en posición
elevada. Para girarla hacia abajo proceda de la
siguiente manera:
1. Tire del pasador con resorte hacia arriba. Vea A en
la Figura 3-1.
2. Gire suavemente el canal de la astilladora hacia
abajo hasta que se trabe en la varilla de seguridad.
Vea B en Figura 3-1.
ADVERTENCIA: No opere nunca la
trituradora astilladora con el canal de la
astilladora en la posición elevada. De
hacerlo puede ocasionar daños
materiales o lesiones graves al
operador o a los observadores.
Bolsa
Para colocar la bolsa:
1. Ponga la abertura de la bolsa completamente
sobre el canal deflector. Vea la Figura 3-2.
Figura 3-2
2. Ubique la bolsa de manera que cubra totalmente
las perillas mariposa que sujetan el deflector del
canal a la caja del propulsor.
3. Jale de la tira de extracción hasta que la bolsa
quede ajustada alrededor de la abertura del canal
deflector.
Montaje
Llenado de gasolina y aceite
Consulte en el manual del propietario del motor
información adicional sobre el motor.
1. Agregue el aceite provisto antes de hacer arrancar
la unidad por primera vez luego de desembalarla.
En el manual del propietario del motor encontrara
las instrucciones para agregar aceite de motor.
2. Realice el mantenimiento del motor con gasolina
como se indica en el manual del propietario del
motor adjunto.
ADVERTENCIA: Tenga mucho
cuidado al trabajar con gasolina. La
gasolina es sumamente inflamable y
sus vapores son explosivos. Nunca
agregue combustible a la máquina en
espacios cerrados ni mientras el motor
está caliente o en marcha. Apague
cigarrillos, cigarros, pipas y otras
fuentes de combustión.
ADVERTENCIA: Nunca cargue el
tanque de combustible en espacios
cerrados con el motor en marcha o
hasta que haya dejado que se enfríe
por lo menos dos minutos después de
haber estado en marcha.
Figura 3-1
5
Page 18

Controles y Funcionamiento
Cerrejo de resorte
Tolva
Canal de la astilladora
Arrancar de
retroceso
Manija
Varilla de seguridad
Se muestra el modelo serie CS 4325
4
Controles
Canal de la astilladora
Se pueden introducir ramas de hasta dos pulgadas
(modelo serie CS 4265) o de tres pulgadas (modelo
serie CS 4325) de diámetro en el canal de la astilladora
para astillar.
Tolva
Las hojas, ramas pequeñas y ramas de hasta 1/2
pulgada de diámetro se pueden colocar dentro de la
tolva para ser trituradas.
IMPORTANTE: No coloque nunca en la tolva ramas
con un diámetro superior a 1/2 pulgadas. De hacerlo
se puede dañar gravemente la cuchilla trituradora, las
pantallas o el propulsor de la unidad.
eje de dirección
Use el receptor para asegurar la barra de remolque
a la trituradora astilladora cuando remolque la
trituradora astilladora con un tractor.
Figura 4-1
Manija
Use la manija cuando transporte manualmente la
trituradora astilladora.
Arrancador de retroceso
El arrancador de retroceso se encuentra sobre el
motor. Consulte el manual del operador del motor
aparte para ver las instrucciones de arranque del
motor.
Controles del motor
Consulte el manual del operador del motor
despachado con su unidad para ver la ubicación y
función de los controles del motor.
Cerrejo de resorte (Modelo serie CS 4325
únicamente)
El pasador con resorte está ubicado en la parte
superior de la tolva. Se usa para soltar o trabar el
canal de la astilladora en una posición elevada para
almacenarla o transportarla.
ADVERTENCIA: No opere nunca la
trituradora astilladora con el canal de la
astilladora en la posición elevada. Use el
pasador con resorte para bajar el canal de
la astilladora hasta la posición de
funcionamiento antes de arrancar el
motor.
Varilla de Seguridad (Modelo serie CS 4325
únicamente)
La varilla de seguridad está ubicada en el soporte del
canal de la cortadora. Se usa para soltar o trabar el
canal de la astilladora en una posición más baja para
funcionar.
6
Page 19

Funcionamiento
ADVERTENCIA: Al hacer funcionar
una trituradora astilladora es posible que
arroje objetos extraños a los ojos, lo cual
puede dañarlos seriamente. Utilice
siempre los anteojos de seguridad
provistos con esta unidad o protectores
para ojos antes de astillar o triturar o
mientras realiza ajustes o reparaciones.
Encendido del motor
Consulte las instrucciones para arrancar el motor en el
manual del operador del motor.
4. Vuelva a arrancar el motor.
NOTA: Si no puede tirar de la cuerda de
arranque por los desechos acumulados
cerca del propulsor, siga las instrucciones
incluidas bajo el título Limpieza de la Cámara
de Reducción en la sección “servicio” en este
manual.
Astillado
ADVERTENCIA: No utilice nunca la
trituradora astilladora sin haber bajado el
canal de la astilladora hasta la posición de
funcionamiento.
Triturado
ADVERTENCIA: No utilice nunca la
trituradora astilladora sin haber bajado el
canal de la astilladora hasta la posición de
funcionamiento.
Los desechos como hojas y agujas de los pinos se
pueden colocar en la tolva para triturarlos. Después
de procesar el material con la cuchilla trituradora y
los agitadores, es empujado fuera del deflector del
canal y, si está instalada, hacia el interior de la bolsa
recolectora de residuos.
Respete las siguientes pautas cuando triture los
desechos acumulados en el patio:
• Nunca intente triturar otra cosa que los
desechos normales acumulados en el patio
(hojas, ramas, piñas, etc.).
• Evite triturar plantas fibrosas como los tallos de
tomates hasta que estén totalmente secas. Las
plantas de tomates frescas no se trituran bien y
tienden a enroscarse alrededor del propulsor y
los agitadores.
• Coloque cantidades razonables de desechos en
la tolva por vez. No recargue la tolva.
• Deje que el material que se encuentra en la
tolva sea atraído por las cuchillas y triturado
antes de agregar más desechos dentro de la
misma. De lo contrario, se puede tapar la tolva,
el deflector del canal o calar el motor.
• Evite colocar en la tolva ramas cuya longitud
exceda las 24 pulgadas. Las ramas de más de 24
pulgadas de largo pueden tapar la tolva.
IMPORTANTE: No coloque nunca en la
tolva ramas con un diámetro superior a
1/2 pulgadas. De hacerlo se puede dañar
gravemente la cuchilla trituradora, los
agitadores o el propulsor de la unidad.
• Se pueden introducir ramas de hasta
dos pulgadas (modelo serie CS4265) o
de tres pulgadas (modelo serie CS4325)
de diámetro en el canal de la astilladora.
Respete las siguientes pautas cuando
astille ramas:
• Mantenga ambas manos firmemente en la
rama a medida que la coloca dentro del canal
de la astilladora.
• No ponga nunca más de una rama dentro del
canal de la astilladora por vez.
• En el canal de la astilladora sólo se pueden
colocar ramas (de madera).
• Aplique presión intermitente (fuerza, en
impulsos cortos) cuando coloque ramas más
largas dentro del canal de la astilladora para
evitar ahogar o calar el motor.
IMPORTANTE: Nunca coloque ramas con un
diámetro superior a dos (2) pulgadas (modelo
serie CS4265) o tres (3) pulgadas (modelo
serie CS4325) en la tolva de la astilladora. De
hacerlo se puede dañar gravemente la cuchilla
astilladora, los agitadores o el propulsor de la
unidad.
NOTA: Para mejor rendimiento, opere siempre
la unidad con cuchillas astilladoras afiladas.
Si se produce una reducción apreciable en
el rendimiento mientras astilla ramas, debe
reemplazar las cuchillas astilladoras.
Vaciado de la bolsa
1. Pare el motor.
2. Oprima la hebilla de seguridad para soltar la
tira de extracción de la bolsa antes de soltarla
del deflector del canal. Vea la Figura 4-2.
Limpieza de la tolva
Si la tolva se tapa con desechos durante el
funcionamiento, proceda de la siguiente manera:
1. Tome la manija con las dos manos y agite
suavemente la trituradora astilladora para
ayudar a aflojar los desechos, atrayéndolos
hacia el propulsor.
Si no se elimina el atascamiento proceda de la
siguiente manera:
1. Pare el motor.
2. Use las manos para sacar los desechos que se
encuentran cerca de la parte superior de la
tolva.
3. Use una rama (o algo similar, como una escoba)
para desalojar los desechos ubicados cerca de
la base de la tolva.
Figura 4-2
3. Vacíe la bolsa y vuelva a colocarla en la
abertura del deflector del canal. Consulte la
sección “Armado y Montaje” de este manual.
7Sección 4 — controleS y Funcionamiento
Page 20

Servicio
A
C
B
A
C
B
Se muestra el modelo serie CS4325
5
Servicio
Recomendaciones generales
• Respete siempre las normas de seguridad al
realizar tareas de mantenimiento.
• La garantía de esta trituradora astilladora no
cubre elementos que han estado sujetos al mal
uso o la negligencia del operador. Para recibir
el reembolso total de la garantía, el operador
deberá dar mantenimiento al equipo tal y
como se indica en este manual.
• El cambio de la velocidad controlada del motor
invalidará la garantía del motor.
• Todos los ajustes deben ser inspeccionados al
menos una vez por temporada.
• Revise periódicamente todos los sujetadores y
compruebe que estén bien ajustados.
ADVERTENCIA: Pare siempre el
motor, desconecte la bujía y haga tierra
contra el motor antes de limpiar, lubricar
o hacer cualquier tipo de mantenimiento
en su máquina.
Lubricación
1. Lubrique la bisagra del canal de la astilladora
con un aceite ligero una vez por temporada.
2. Lubrique los puntos pivotales del deflector
del canal con aceite liviano una vez por
temporada.
3. Siga las instrucciones para lubricar el motor del
manual del motor que acompaña a su unidad
en paquete aparte.
Cuidado del Equipo
• Limpie cuidadosamente la trituradora
astilladora después de cada uso.
• Lave la bolsa con agua periódicamente.
Permita que se seque bien a la sombra.
• Si la cámara de reducción se tapa, sáquela y
límpiela como se indica a continuación.
• Deje funcionar la unidad un rato hasta eliminar
todos los residuos antes de apagar y guardarla.
NOTA: No se recomienda limpiar con chorro
de agua a presión ya que el sistema de
combustible podría resultar contaminado.
Cuidado del Motor
Consulte la sección Mantenimiento del manual del
propietario/operador que acompaña a su unidad. Lea
y siga las instrucciones cuidadosamente.
• Verifique el nivel de aceite del motor antes
de cada uso como se indica en el manual del
motor que acompaña en paquete aparte.
• Limpie o reemplace el filtro de aire cada 25
horas en condiciones de uso normal. Limpie a
intervalos de pocas horas cuando haya mucho
polvo. Para realizar el mantenimiento del filtro
de aire, consulte el manual del motor.
• La bujía se debe limpiar y la separación se debe
reajustar una vez por temporada. Consulte
el manual del motor para ver el tipo de bujía
correcto y las especificaciones de la separación.
• Limpie periódicamente el motor con un trapo
o cepillo. Mantenga limpia la parte superior
del motor para permitir la circulación de aire
adecuada. Quite todo el césped, suciedad y
residuos combustibles del área del silenciador.
Limpieza del Canal de Reducción
ADVERTENCIA: Las cuchillas
trituradoras y astilladoras del motor están
afiladas. Use guantes de trabajo de cuero
para protegerse las manos cuando limpie
la cámara de reducción.
Si la cámara de reducción se tapa con residuos, la
pantalla de la trituradora se puede girar hacia arriba
para poder limpiar la zona circundante. Para ello,
proceda de la siguiente manera:
1. Pare el motor, desconecte la bujía y verifique
que la trituradora astilladora se ha detenido
por completo.
ADVERTENCIA: El silenciador y la
zona circundante están calientes si el
motor ha estado en funcionamiento. Sea
precavido y protéjase las manos si trabaja
cerca del silenciador.
2. Si está instalada, retire la bolsa de residuos.
Saque las dos perillas mariposa de ambos lados
del deflector del canal y gírelo hacia arriba. Vea
A en Figura 5-1.
Figura 5-1
3. Saque el broche de horquilla del pasador de
horquilla que se extiende a través de la caja del
motor y de la pantalla de la trituradora. Vea B
en Figura 5-1. Saque el pasador de horquilla.
4. Pivote hacia arriba la pantalla de la trituradora.
Vea C en Figura 5-1. Limpie los alrededores
barriendo los residuos.
5. Confirme que el cable de la bujía esté
desconectado y alejado de la bujía. Tire de la
cuerda del arrancador entre dos y tres veces
para purgar los residuos restantes de la cámara
de reducción
6. Una vez limpia la zona, gire la pantalla de la
trituradora y vuelva a afianzar con el pasador
de horquilla y el sujetador de horquillas que
retiró anteriormente.
7. Vuelva a colocar la bolsa de recolección de
residuos en el deflector del canal, si lo desea.
Cuidado de las Cuchillas Astilladoras
ADVERTENCIA: Las cuchillas
astilladoras del impulsor son filosas.
Utilice guantes de trabajo de cuero para
protegerse las manos.
1. Pare el motor, desconecte la bujía y verifique
que la trituradora astilladora se ha detenido
por completo.
2. Pivote la pantalla de la trituradora como se
indica bajo el título Limpieza de la cámara de
reducción.
3. Retire la traba que sujeta el canal de la
astilladora a la estructura. Para ello saque
los dos pernos hexagonales y las arandelas
cóncavas que la aseguran. Vea A en Figura 5-2.
Figura 5-2
4. Para sacar el canal de la astilladora saque las
tres tuercas hexagonales y las arandelas que
lo aseguran a la caja del motor. Vea B en Figura
5-2.
5. Gire el impulsor a mano hasta que una de las
dos cuchillas astilladoras sea visible a través de
la abertura de la caja del impulsor.
6. Para sacar la cuchilla saque los tornillos
hexagonales internos, las arandelas de
seguridad y las tuercas hexagonales que la
sujetan al motor. Vea C en Figura 5-2. Guarde
los accesorios.
NOTA: Use una llave hexagonal de 3/16”
(Allen) en el exterior de la cuchilla y una llave
de tubo de 1/2” (o cubo) en el interior del
motor. Sostenga la llave Allen firmemente y
gire la llave de tubo (o cubo) para aflojar la
tuerca.
7. Coloque una cuchilla de repuesto con los
accesorios extraídos anteriormente o afílela.
IMPORTANTE: Cuando afile la cuchilla,
protéjase las manos utilizando guantes. Siga
el ángulo original de afilado y asegúrese de
extraer una cantidad igual de cada cuchilla.
8. Para reemplazar la otra cuchilla, gire el motor
para exponer la segunda cuchilla y repita los
pasos anteriores.
NOTA: Compruebe que las cuchillas estén
montadas nuevamente con el borde afilado
hacia afuera (hacia el canal de la astilladora).
Ajuste los accesorios con una presión de entre
20 pies/libras y 25 pies/libras.
8
Page 21

Cuidado de la Cuchilla Trituradora
A
C
B
ADVERTENCIA: La cuchilla
trituradora es filosa. Utilice guantes de
trabajo de cuero para protegerse las
manos.
1. Pare el motor, desconecte la bujía y verifique
que todas las piezas móviles se hayan detenido
por completo.
2. Saque las dos tuercas con reborde (y los pernos
hexagonales) que sujetan el soporte de la tolva
a la caja del motor. Guarde los accesorios. Vea
la Figura 5-3.
Figura 5-3
3. Pivote la pantalla de la trituradora como se
indica bajo el título Limpieza de la cámara de
reducción.
4. Saque las seis tuercas con reborde que sujetan
la guía de ingreso de la tolva a la caja del
motor. Vea A en Figura 5-4.
IMPORTANTE: Cuando afile la cuchilla
para volver a usarla, siga el ángulo original
de molido como guía. Compruebe que cada
extremo de corte sea desbastado de igual
manera para evitar que la cuchilla quede
desequilibrada. Saque metal del lado pesado
hasta que quede bien balanceada.
IMPORTANTE: Al volver a armar la cuchilla,
ajuste el perno central con una torsión de entre
45 y 58 pies-libras y los dos pernos exteriores
con una torsión de entre 20 y 25 pies-libras.
Almacenamiento Fuera de Temporada
• Deje funcionar la unidad un rato hasta eliminar
todos los residuos antes de apagar y guardarla.
• Cuando guarde la trituradora astilladora en
un galpón de metal o sin ventilación, no
olvide hacerle un tratamiento antióxido a
las superficies no pintadas. Cubra el equipo
con una capa de aceite liviano o silicona,
especialmente los resortes, los cojinetes y los
cables.
• Elimine todo el polvo del exterior del motor y
del equipo.
• Siga las recomendaciones de lubricación.
• Consulte en el manual del motor las
instrucciones para el almacenamiento correcto
del mismo.
• Almacene el equipo en un área despejada y
seca. No lo almacene en un lugar donde se
encuentren equipos con piloto de encendido o
con componentes que pueden generar chispas.
1. Saque el broche de horquilla del pasador de
horquilla que se extiende a través de la caja del
motor y de la pantalla de la trituradora. Vea B
en Figura 5-1. Saque el pasador de horquilla.
2. Pivote hacia arriba la pantalla de la trituradora.
Vea C en Figura 5-1. Limpie los alrededores
barriendo los residuos.
3. Confirme que el cable de la bujía esté
desconectado y alejado de la bujía. Tire de la
cuerda del arrancador entre dos y tres veces
para purgar los residuos restantes de la cámara
de reducción
4. Una vez limpia la zona, gire la pantalla de la
trituradora y vuelva a afianzar con el pasador
de horquilla y el sujetador de horquillas que
retiró anteriormente.
5. Vuelva a colocar la bolsa de recolección de
residuos en el deflector del canal, si lo desea.
Figura 5-4
5. Separe con cuidado el montaje de la tolva de la
caja del motor y póngalo a un lado.
6. Coloque un trozo de madera dentro de la
abertura del deflector del canal para estabilizar
el impulsor y evitar que el mismo gire cuando
extraiga la cuchilla trituradora.
7. Saque los dos tornillos hexagonales internos,
las tuercas de seguridad hexagonales y
arandelas de seguridad que sujetan la cuchilla
de la trituradora al motor. Vea B en Figura 5-4.
NOTA: Use una llave hexagonal de 3/16”
(Allen) en el exterior de la cuchilla trituradora
y una llave de tubo de 1/2” (o cubo) en el
interior de la cuchilla trituradora. Sostenga la
llave Allen firmemente y gire la llave de tubo (o
cubo) para aflojar la tuerca.
8. Saque el perno hexagonal, la arandela de
seguridad y la arandela plana para liberar
totalmente la cuchilla trituradora. Vea C en
Figura 5-4.
9Sección 5 — Servicio
Page 22

Solución de Problemas
Problema Causa Solución
6
El motor no arranca 1. La palanca del acelerador (si está incluida) no está
en la posición de arranque correcta.
2. El interruptor del motor (si está incluido) está
apagado.
3. Se ha desconectado el cable de bujía.
4. El cebador no está en en la posición CEBADOR (si
está incluido).
5. El tanque de combustible está vacío o el
combustible se ha echado a perder.
6. La válvula de paso de combustible está cerrada (si
está incluida).
7. La bujía no funciona correctamente.
El funcionamiento del motor es
irregular
1. El capuchón de la bujía está flojo.
2. La unidad está funcionado con el CEBADOR (si está
incluido).
3. La línea del combustible está tapada o el
combustible se ha echado a perder.
4. Bajas RPM del motor.
5. Hay agua o suciedad en el sistema de combustible.
6. El depurador de aire está sucio.
7. Es necesario regular el carburador.
1. Mueva la palanca del acelerador a la posición
RÁPIDO o ARRANQUE.
2. Ponga el interruptor en la posición
ENCENDIDO.
3. Conecte el cable a la bujía.
4. Mueva la palanca del cebador a la posición
CEBADOR.
5. Llene el tanque con gasolina limpia y nueva.
6. Abra la válvula de paso de combustible.
7. Limpie, ajuste la separación, o cambie la bujía.
1. Conecte y ajuste el capuchón de la bujía.
2. Mueva la palanca del cebador a la posición
APAGADO.
3. Limpie la línea de combustible; llene el tanque
con gasolina limpia y nueva.
4. Siempre haga funcionar el motor con el
acelerador al máximo.
5. Vacíe el tanque de combustible. Vuelva a
llenar con combustible nuevo.
6. Consulte el manual del motor.
7. Consulte al distribuidor de servicio autorizado.
El motor recalienta 1. El nivel de aceite del motor está bajo.
2. El depurador de aire está sucio.
Saltos ocasionales
(titubea) a
alta velocidad
Demasiada vibración 1. Hay piezas flojas o el impulsor está dañado. 1. Consulte al distribuidor de servicio autorizado.
La unidad no descarga 1. El área de descarga está tapada.
La tasa de descarga se reduce de
manera considerable o cambia
la composición del material
descargado
1. La separación de la bujía es muy pequeña.
2. Ajuste de la mezcla del carburador incorrecta.
2. Hay un objeto extraño en el impulsor.
3. Bajas RPM del motor.
1. Bajas RPM del motor.
2. La cuchilla astilladora está desafilada.
1. Llene el cárter con el aceite adecuado.
2. Consulte el manual del motor.
1. Extraiga la bujía y regule la separación.
Consulte el manual del motor para ver las
especificaciones de la separación.
2. Consulte al distribuidor de servicio autorizado.
1. Pare el motor de inmediato y desconecte
el cable de la bujía. Limpie el agitador y el
interior de la abertura de descarga.
2. Detenga el motor y desconecte el cable de la
bujía. Extraiga el objeto extraño.
3. Siempre haga funcionar el motor con el
acelerador al máximo.
1. Siempre haga funcionar el motor con el
acelerador al máximo.
2. Cambie la cuchilla astilladora o consulte al
distribuidor de servicio autorizado.
10
Page 23

Replacement Parts
Component Part Number and Description
7
951-10292 Bujía (MTD)
759-3336 Bujía (Briggs & Stratton)
951-10794 Depurador de aire (MTD)
BS-491588S Filtro de aire (Briggs & Stratton)
BS-493537S Prefiltro (Briggs & Stratton)
951-12535 Conjunto del tapón de combustible (MTD)
BS-799719 Tapón de combustible (Briggs & Stratton)
942-04050 Cuchilla trituradora
942-0544B Cuchilla astilladora
719-04308 Cuchilla agitadora
934-04009 10 x 4.0 Rueda neumática
11
Page 24

GARANTÍA LIMITADA DEL FABRICANTE PARA
La siguiente garantía limitada es otorgada por Troy-Bilt LLC con respecto
a mercadería nueva adquirida y utilizada en los Estados Unidos, sus
posesiones y territorios (“Troy-Bilt”).
Esta garantía complementa cualquier garantía contra emisiones
suministrada que rige para su producto.
“Troy-Bilt" garantiza este producto (excluidas sus Piezas con Desgaste
Normal y Accesorios según se describe más abajo) contra defectos en
los materiales y la mano de obra durante un período de dos (2) años a
partir de la fecha de compra original por el primer comprador de dicho
producto y, a discreción, reparará o reemplazará, sin costo alguno,
cualquier pieza que presente defectos materiales o de mano de obra.
Esta garantía limitada sólo se aplicará si el producto se ha usado para
fines no comerciales y se ha utilizado y mantenido de acuerdo con las
instrucciones del Manual del Operador que se entrega con el producto y
no ha sido objeto de uso indebido, mal uso, uso comercial, negligencia,
accidente, mantenimiento inadecuado, modificación, vandalismo, robo,
incendio, inundación o daños debidos a otro peligro o desastre natural.
Los daños que resulten de la instalación o el uso de piezas, accesorios
o elementos no aprobados por Troy-Bilt para usar con los productos
incluidos en este manual anularán la garantía en lo que respecta a esos
daños.
Se garantiza que las piezas con desgaste normal están libres de defectos
materiales o de fabricación por un período de treinta (30) días a partir
de la fecha de compra original. Las piezas sujetas a desgaste normal
incluyen, entre otras, componentes como: baterías, correas, cuchillas,
adaptadores para cuchillas, dientes, bolsas para césped, ruedas, rueditas
de la plataforma del tractor, asientos, zapatas antideslizantes, ruedas de
fricción, placas de raspado, gomas helicoidales y neumáticos.
Accesorios — Troy-Bilt garantiza todos los accesorios para este producto
contra defectos en los materiales y la mano de obra por un período
de un (1) año, a partir de la fecha de alquiler o compra original del
accesorio. Los accesorios incluyen, entre otros, componentes como:
colectores de césped o kits de abono.
CÓMO OBTENER SERVICIO TÉCNICO: El servicio de la garantía está
disponible, CON COMPROBANTE DE COMPRA, a través de su distribuidor
local de servicio autorizado. Para obtener el servicio de la garantía no es
necesario registrar el producto. Para localizar un distribuidor en su área,
consulte las Páginas Amarillas o póngase en contacto con Troy-Bilt LLC
en P.O. Box 361131, Cleveland, Ohio 44136-0019, o llame al 1-866-8406483,
1-330-558-7220 o visite nuestro sitio web en www.troybilt.com.
Esta garantía limitada no suministra cobertura en los siguientes casos:
a. Los cilindros, válvulas y bombas de la máquina rompetroncos
tienen una garantía separada de un año. Los elementos de
mantenimiento de rutina como por ejemplo lubricantes,
filtros, afiladores de cuchillas, puesta a punto del motor,
ajustes de frenos, del embrague o de la plataforma, y el
deterioro normal del acabado exterior debido al uso o la
exposición.
b. Servicios no realizados por el distribuidor de servicio
autorizado.
c. Troy-Bilt no extiende ninguna garantía para los productos
vendidos o exportados fuera de los Estados Unidos y sus
posesiones y territorios, excepto para aquellos vendidos
a través de los canales autorizados de distribución de
exportaciones de Troy-Bilt.
d. Los repuestos que no son piezas originales de Troy-Bilt.
e. Gastos de transporte y visitas técnicas.
f. Troy-Bilt no garantiza este producto para uso comercial.
No se otorgan garantías implícitas, incluidas las garantías
implícitas de comerciabilidad o de adecuación para un propósito
determinado, después del período de garantía escrita expresa
aplicable antes mencionada para las piezas ya identificadas.
Ninguna otra garantía expresa, sea oral o escrita, excepto la
mencionada anteriormente, extendida por personas físicas o
jurídicas, incluidos los distribuidores o los minoristas con respecto
a los productos, obligará a Troy-Bilt. Durante el plazo de la garantía
el único recurso es la reparación o reemplazo del producto como se
indica anteriormente.
Las disposiciones de esta garantía cubren el recurso de reparación
única y exclusiva que surge de la venta. Troy-Bilt no se hará
responsable de las pérdidas o los daños indirectos o emergentes,
incluyendo sin limitación, los gastos incurridos para sustituir o
reemplazar los servicios de mantenimiento del césped, o para
reemplazar temporalmente un producto bajo garantía.
Algunos estados no permiten la exclusión o limitación de los daños y
perjuicios incidentales o directos, o las limitaciones sobre la duración de
las garantías implícitas, por lo que las exclusiones o limitaciones antes
mencionadas pueden no ser de aplicación en su caso.
En ningún caso se obtendrá una compensación mayor al monto del
precio de compra del producto vendido. La modificación de las
características de seguridad del producto anulará esta garantía.
Usted asume el riesgo y la responsabilidad por las pérdidas, daños o
lesiones personales o materiales propios o de terceros que surjan del
uso indebido o la incapacidad de usar este producto.
Esta garantía limitada se extiende al comprador original (es decir: el
primer comprador de un producto nuevo) y a al propietario siguiente
del producto para uso no comercial durante el período de garantía
desde la fecha original de compra por el primer comprador del
producto. En caso de que la fecha original de compra por el primer
comprador del producto es indeterminable, el período de garantía se
establecerá como veintiocho (28) meses desde la fecha de fabricación
del producto, según lo determine Troy-Bilt. En ningún caso la garantía
del producto se extenderá más allá del período de garantía establecido.
CÓMO AFECTA LA LEGISLACIÓN ESTATAL A ESTA GARANTÍA: Esta
garantía limitada le otorga derechos legales específicos, pero usted
podría gozar de otros derechos que varían de acuerdo a su lugar de
residencia.
Troy-Bilt LLC, P.O. BOX 361131 CLEVELAND, OHIO 44136-0019, Teléfono: 1-866-840-6483, 1-330-558-7220
GDOC-100021 REV. A
www.troybilt.com
 Loading...