

Page 1
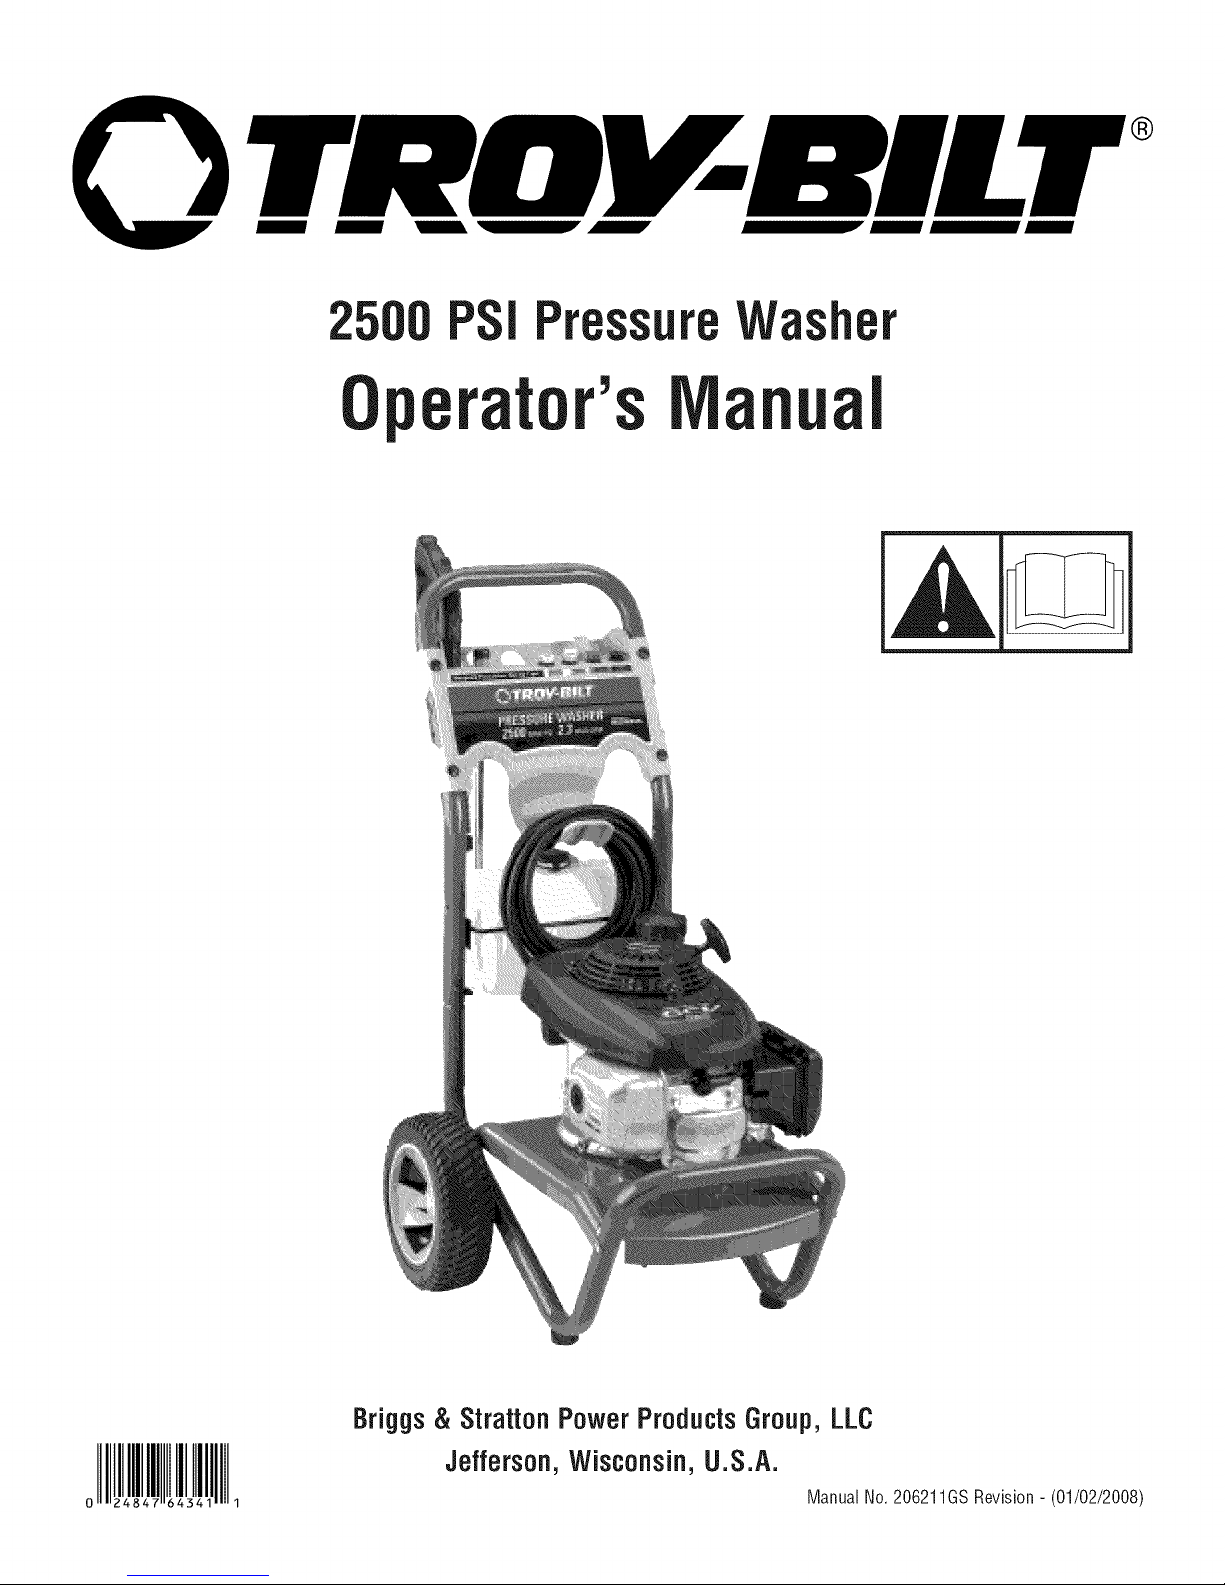
J rSSSgr8 Was Ir
erator'sManual
®
Briggs& Stratton PowerProductsGroup,LLC
Jefferson,Wisconsin,U.S.A.
ManualNo.206211GSRevision- (01/02/2008)
Page 2
Thankyoufor purchasing this quality-built Troy-Bilt pressurewasher. Weare pleasedthat you've placedyour confidence
in the Troy-Bilt brand.When operatedand maintained according to the instructions in this manual,your Troy-Bilt pressure
washer will provide manyyears of dependableservice.
Thismanual containssafety information to makeyou awareof the hazardsand risks associatedwith pressure washers and
how to avoid them. BecauseTroy-Bilt does not necessarilyknow all the applications this pressure washer could be used for, it
is important that you readand understandthese instructions thoroughly before attempting to start or operate this equipment.
Save these instructionsfor future reference.
This pressurewasher requires final assembly before use. Referto the Assembly section of this manual for instructions on
final assembly procedures.Follow the instructions completely.
Where to Find Us
You never have to look far to find Briggs & Stratton support and servicefor your pressure washer. Consult your Yellow
Pages.Thereare over 30,000 Briggs & Stratton authorizedservice dealersworldwide who provide quality service. You can
also contact Troy-Bilt Customer Service by phone at (888) 611-6708, or on the internet at www,troybilt,com, Forengine
related questions, call American HondaMotor Company, inc. at (800) 426-7701 or visit www.honda-engines.com for a dealer
Iocator.
Pressure Washer
Model Number
Revision
Serial Number
F
nFT-IIIII
DatePurchased
Briggs & Stratton PowerProducts Group, LLC
900 North Parkway
Jefferson, WI 53549
FT7 FT7
Copyright © 2007 Briggs & Stratton Power Products Group, LLC.
All rights reserved. No part of this material may be reproduced or
transmitted in anyform by any meanswithout the expresswritten
permission of Briggs & Stratton PowerProducts Group, LLC.
2 www.troybiit.com
Troy-Bilt® is a registered trademark of MTD
Products Inc and is used under license to
Briggs & Stratton Power Products.
Page 3
Tableof Contents
OperatorSafety.................................. 4
Equipment Description ........................................ 4
Safety Rules ................................................ 4
Assembly...................................... 7
Unpack PressureWasher ...................................... 7
Attach Handle and AccessoryTray ............................... 7
Attach Detergent Siphon Hoseto Pump........................... 8
Add Engine Oil and Fuel....................................... 8
Connect Hoseand Water Supply to Pump ......................... 8
FeaturesandControls ............................ 10
Operation..................................... 11
PressureWasher Location .................................... 11
How to Start Your PressureWasher............................. 12
How to Stop Your PressureWasher............................. 13
How to UseAccessory Tray ................................... 13
How to Use SprayTips ....................................... 14
Cleaningand Applying Detergent ............................... 14
PressureWasher Rinsing ..................................... 15
Automatic Cool Down System (Thermal Relief) .................... 15
3
o
Maintenance .................................. 16
GeneralRecommendations.................................... 16
PressureWasher Maintenance................................. 16
Engine Maintenance......................................... 18
After EachUse ............................................. 18
Storage................................................... 19
Troubleshooting................................ 20
Warranty ..................................... 21
PressureWasher OwnerWarranty .............................. 21
Specifications .................................. 22
Product Specifications ....................................... 22
Common Service Parts....................................... 22
-o
o
CD
o
if0
o
o
Espa_ol
Page 4
OperatorSafety
EquipmentDescription
_--r-_ Headthis manual carefully and becomefamiliar
with yourpressurewasher Knowitsapplications,
itshmltat_ons and any hazardsinvolved.
This pressurewasher operatesat a max of 2,500 PSI and a
flow rate of up to 2.3 gallons per minute. This high quality
residential system features 10" wheels, axialcam pump
with stainless steel pistons, automatic cool down system,
detergent siphoning system, quick connect spray tips, safety
goggles, heavy duty 25' hose, and more.
Everyeffort has been made to ensure that the information
in this manual is both accurateandcurrent. However,the
manufacturer reservesthe right to change, alter or otherwise
improve the product and this documentation at any time
without prior notice.
The Emission Control System for this pressure washer is
warranted for standards set by the Environmental Protection
Agency andthe CaliforniaAir ResourcesBoard.
Safety Rules
WARNING
The engine exhaustfrom this productcontains
chemicalsknown to the State of California to cause
cancer,birth defects,or other reproductiveharm.
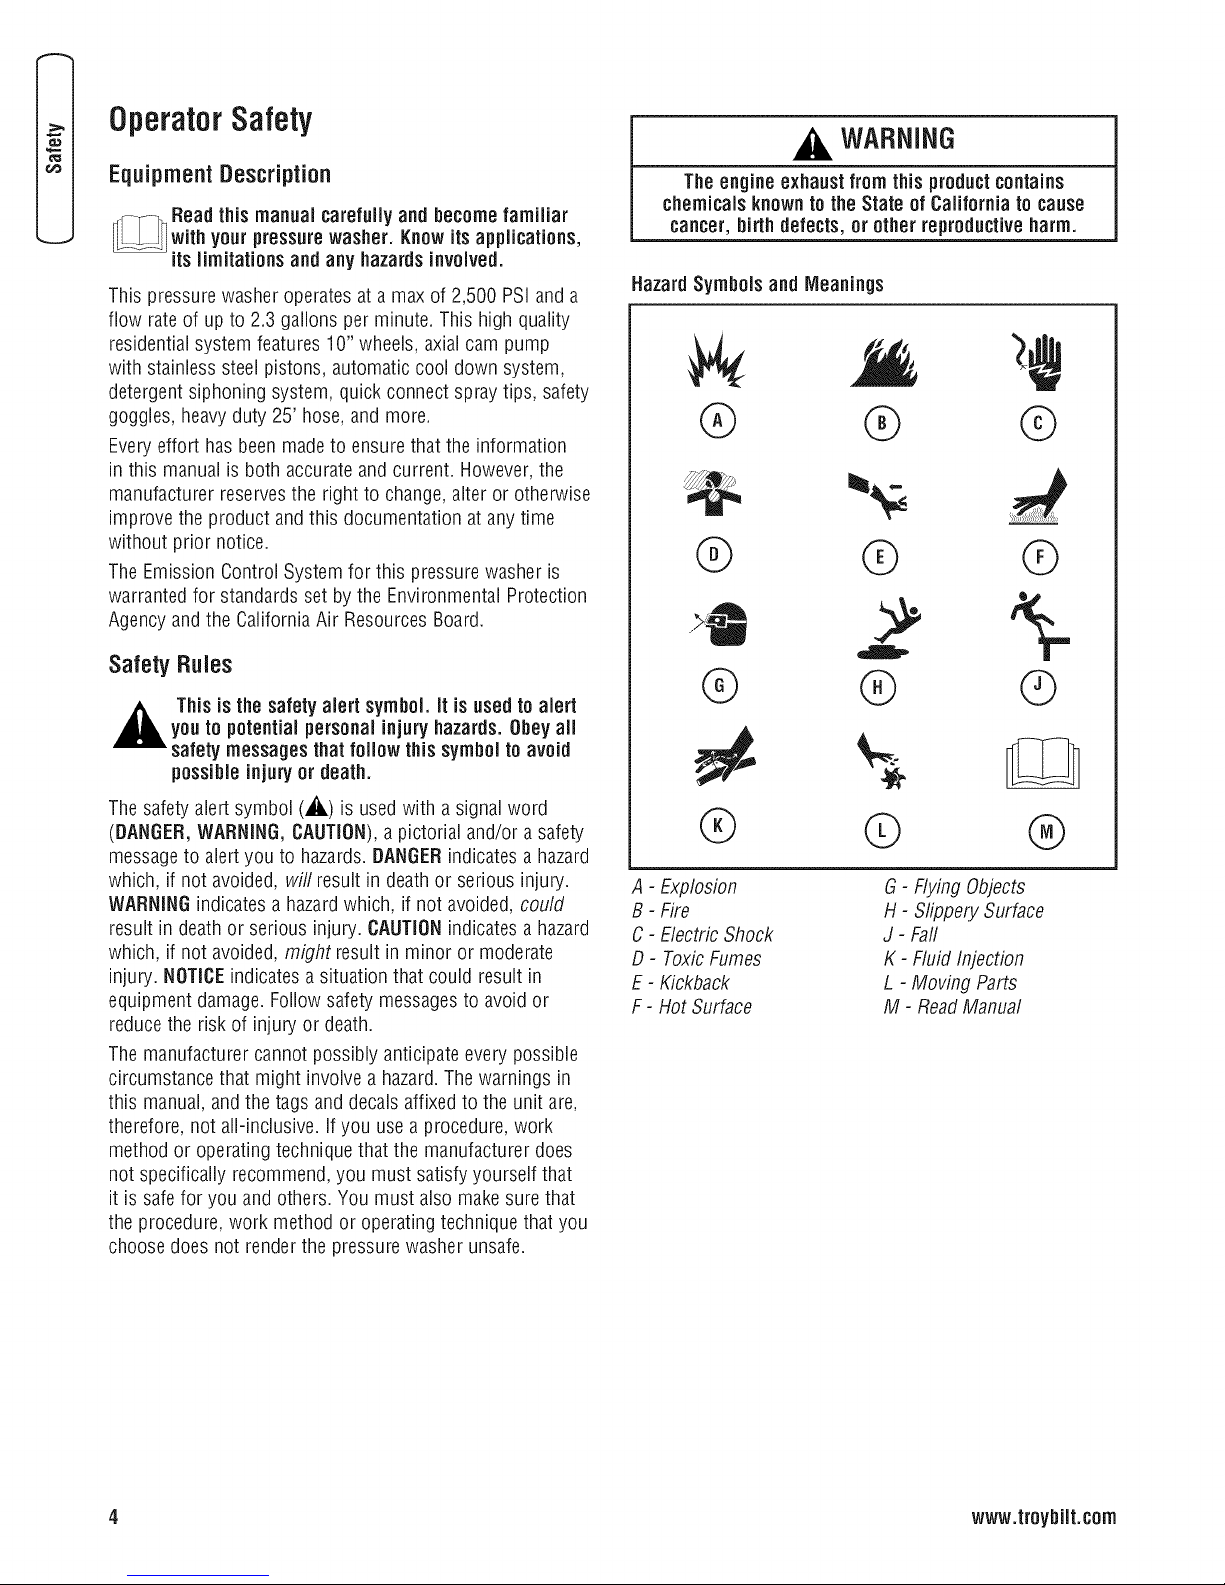
Hazard Symbols and Meanings
®
®
® ©
(9 ®
2 5-
®
® ®
youto potentialpersonal injuryhazards.Obeyall
,_ Thisis the safetyalert symbol. It isused to alert
safety messagesthat follow this symbolto avoid
possibleinjury or death.
Thesafety alert symbol (_.) is used with a signalword
(DANGER,WARNING, CAUTION),a pictorial and/or a safety
messageto alert you to hazards.DANGERindicatesa hazard
which, if not avoided, will result in death or serious injury.
WARNINGindicates a hazardwhich, if not avoided, could
result in death or serious injury. CAUTIONindicatesa hazard
which, if not avoided, might result in minor or moderate
injury. NOTICEindicatesa situation that could result in
equipment damage. Follow safety messagesto avoid or
reducethe risk of injury or death.
The manufacturer cannot possibly anticipate every possible
circumstance that might involve a hazard.The warnings in
this manual,and the tags and decals affixedto the unit are,
therefore, not all-inclusive. If you usea procedure, work
method or operating technique that the manufacturer does
not specifically recommend, you must satisfy yourself that
it is safe for you and others. You must also makesure that
the procedure, work method or operating technique that you
choose does not renderthe pressurewasher unsafe.
®
A - Explosion
B - Fire
C- ElectricShock
D - ToxicFumes
E - Kickback
F - Hot Surface
© ®
G- Flying Objects
H - Slippery Surface
J - Fail
K - Fluid Injection
L - Moving Parts
M - ReadManual
4 www.troybiit.com
Page 5

WARNING
Runningengine gives off carbon monoxide, an
odorless, colorless, poison gas.
Breathingcarbon monoxide can cause
headache,fatigue, dizziness,vomiting,
confusion, seizures, nausea,fainting or death.
Some chemicals or detergents may be harmful
if inhaled or ingested, causing severe nausea,
fainting, or poisoning.
• Operatepressure washer ONLYoutdoors.
• Keepexhaust gasfrom entering a confined areathrough
windows, doors, ventilation intakes,or other openings.
• DONOTstart or run engine indoors or in an enclosedarea,
evenif windows and doors are open.
• Usea respirator or mask wheneverthere is a chancethat
vapors may be inhaled.
• Readall instructions with mask so you are certain the mask
will provide the necessaryprotection against inhaling harmful
vapors.
WARNING
Use of pressure washer can create puddles and
"_ slippery surfaces.
Kickback from spray gun can cause you to fall.
• Operate pressurewasherfrom a stable surface.
• The cleaningarea should haveadequateslopes and drainageto
reducethe possibility of a fall due to slippery surfaces.
• Beextremely careful if you must usethe pressure washerfrom
a ladder, scaffolding, or any other similar location.
• Firmly grasp spray gun with both handswhen using high
pressure sprayto avoid injury when spray gun kicks back.
WARNING
Fueland its vapors are extremelyflammable and
explosive.
Fireor explosion can causesevereburns or
death.
WHEN ADDING OR DRAiNiNG FUEL
• Turn pressurewasher OFFand let it cool at least2 minutes
beforeremoving fuel cap. Loosen cap slowly to relievepressure
in tank.
• Fill or drainfuel tank outdoors.
• DONOToverfill tank. Allow spacefor fuel expansion.
• If fuel spills, wait until it evaporates beforestarting engine.
• Keepfuel away from sparks, openflames, pilot lights, heat,and
other ignition sources.
• DONOTlight a cigarette or smoke.
WHENSTARTINGEQUIPMENT
• Ensurespark plug, muffler, fuel cap, and air cleanerare in
place.
• DONOTcrank engine with spark plug removed.
WHENOPERATINGEQUIPMENT
• DONOTtip engineor equipment at anglewhich causesfuel to
spill.
• DONOTspray flammable liquids.
WHENTRANSPORTINGOR REPAIRINGEQUIPMENT
• Transport/repair with fuel tank EMPTYor with fuel shutoff valve
OFF.
• Disconnectspark plug wire.
WHENSTORINGFUELOR EQUIPMENTWITH FUELiN TANK
• Storeawayfrom furnaces, stoves, water heaters,clothes
dryers,or other appliancesthat have pilot light or other ignition
source becausethey can ignite fuel vapors.
WARNING
{D
WARNING
Starter cord kickback(rapid retraction) can result
in bodily injury. Kickbackwill pull handand arm
toward enginefaster thanyou can let go.
Brokenbones, fractures, bruises, or sprains
could result.
• NEVERpull starter cord without first relieving spray gun
pressure.
• When starting engine, pull cord slowly until resistanceis felt
andthen pull rapidly to avoid kickback.
• After eachstarting attempt, where enginefails to run, always
point spraygun in safe direction, press red button and squeeze
spray gun trigger to releasehigh pressure.
• Firmly grasp spray gun with both handswhen using high
pressure sprayto avoid injury when spray gun kicks back.
_¢ Risk of electrocution.Contact with power source can cause electric
shock or burn.
• NEVERspray nearpower source.
Page 6
WARNING
WARNING
Contact with muffler area can result in seriousburns.
Exhaust heat/gases can ignite combustibles,
structures or damage fuel tank causing a fire.
• DONOTtouch hot parts and AVOIDhot exhaustgases.
• Allow equipment to cool beforetouching.
• Keepat least 5 feet (1.5 m) of clearanceon all sides of
pressurewasher including overhead.
• Code of FederalRegulation (CFR)Title 36 Parks, Forests,and
Public Property requireequipment powered byan internal
combustion engine to havea spark arrester, maintained in
effective working order, complying to USDAForestservice
standard 5100-1Cor later revision. In the State of Californiaa
spark arrester is required under section 4442 of the California
Public resources code.Other states may have similar laws.
WARNING
Starter and other rotating parts can entangle
hands, hair, clothing, or accessories.
• NEVERoperatepressurewasher without protective housing or
covers.
• DONOTwear loose clothing, jewelry or anything that may be
caught in the starter or other rotating parts.
• Tie up long hair and removejewelry.
WARNING
The high pressure stream of water that this
equipment produces can cut through skin and
its underlying tissues, leading to serious injury
and possible amputation.
Spray gun traps high water pressure, even when
engine is stopped and water is disconnected,
which can cause injury.
• DONOTallow CHILDRENto operate pressure washer.
• NEVERrepair high pressure hose. Replaceit.
• NEVERrepair leakingconnections with sealant of any kind.
Replaceo-ring or seal.
• NEVERconnecthigh pressure hoseto nozzleextension.
• Keephigh pressure hose connectedto pump and spray gun
while system is pressurized.
• ALWAYS point spray gun in safe direction, press red button
and squeezespray gun trigger, to releasehigh pressure, every
time you stop engine.
• NEVERaim spray gun at people, animals, or plants.
• DONOTsecurespray gun in open position.
• DONOTleavespraygun unattended while machine is running.
• NEVERusea spray gun which does not havea trigger lock or
trigger guard in placeand in working order.
• Always be certain spraygun, nozzlesand accessories are
correctly attached.
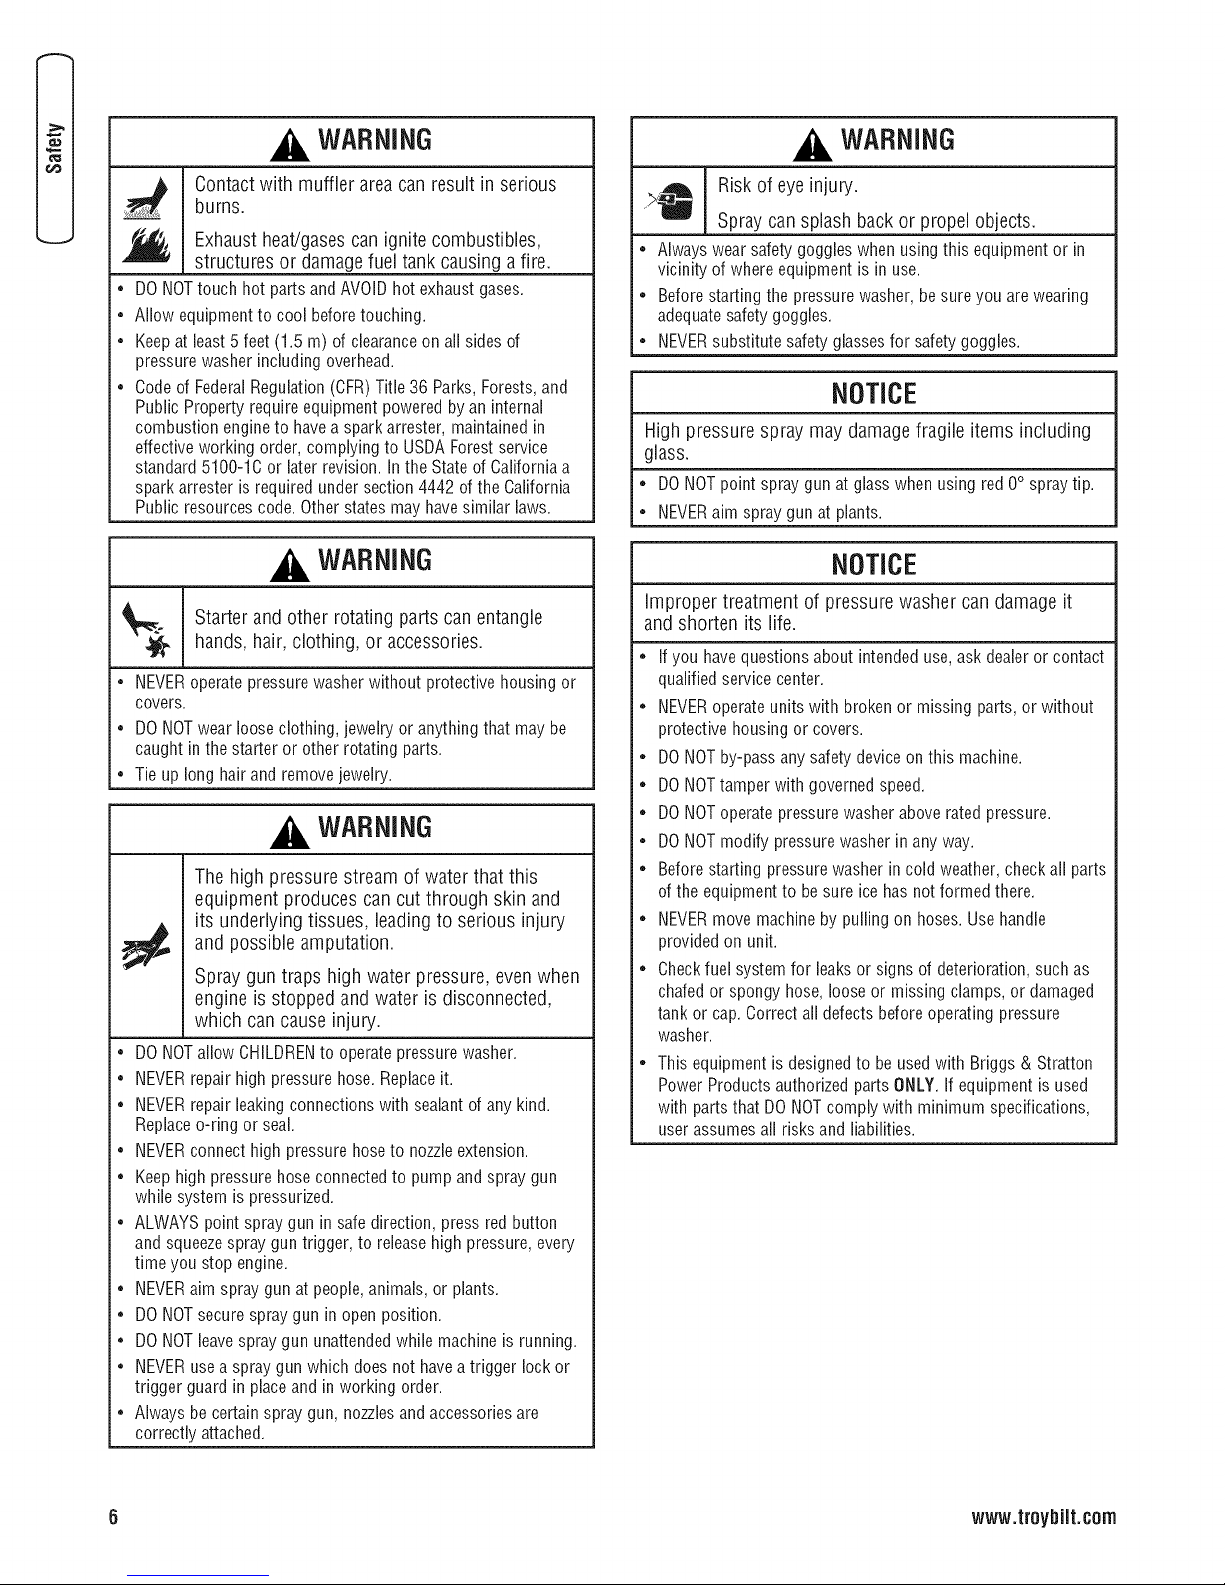
_,_-lj_ Riskof eyeinjury.
Spray can splash back or propel objects.
• Alwayswearsafetygoggleswhenusingthisequipmentor in
vicinityof whereequipmentis inuse.
• Beforestartingthepressurewasher,besureyouarewearing
adequatesafetygoggles.
• NEVERsubstitutesafetyglassesfor safetygoggles.
NOTICE
High pressure spray may damage fragile items including
glass.
• DONOTpoint spray gun at glass when using red 0° spray tip.
• NEVERaim spray gun at plants.
NOTICE
Improper treatment of pressure washer can damage it
and shorten its life.
• If you have questionsabout intendeduse, ask dealer or contact
qualifiedservice center.
NEVERoperateunits with broken or missing parts, or without
protective housing or covers.
e
DONOTby-pass anysafety deviceon this machine.
e
DONOTtamper with governed speed.
e
DONOToperate pressurewasher aboverated pressure.
e
DONOTmodify pressurewasher in anyway.
e
Beforestarting pressurewasher in cold weather, check all parts
ofthe equipment to be sure ice has not formed there.
NEVERmove machineby pulling on hoses. Use handle
providedon unit.
Checkfuel system for leaks or signs of deterioration, such as
chafedor spongy hose, loose or missing clamps, or damaged
tank or cap.Correct all defects before operating pressure
washer.
This equipment is designedto be usedwith Briggs & Stratton
Power Products authorizedparts ONLY. If equipment is used
with parts that DONOTcomply with minimum specifications,
userassumes all risks and liabilities.
6 www.troybiJt.corn
Page 7
Assembly
Your pressure washer requires some assembly and is
readyfor use after it has been properly servicedwith the
recommendedfuel and oil.
If you haveany problemswith the assemblyof your
pressure washer, pleasecallthe pressure washer helpline
at (888) 611-6788. If calling for assistance,pleasehavethe
model, revision,andserialnumber from the datatag available.
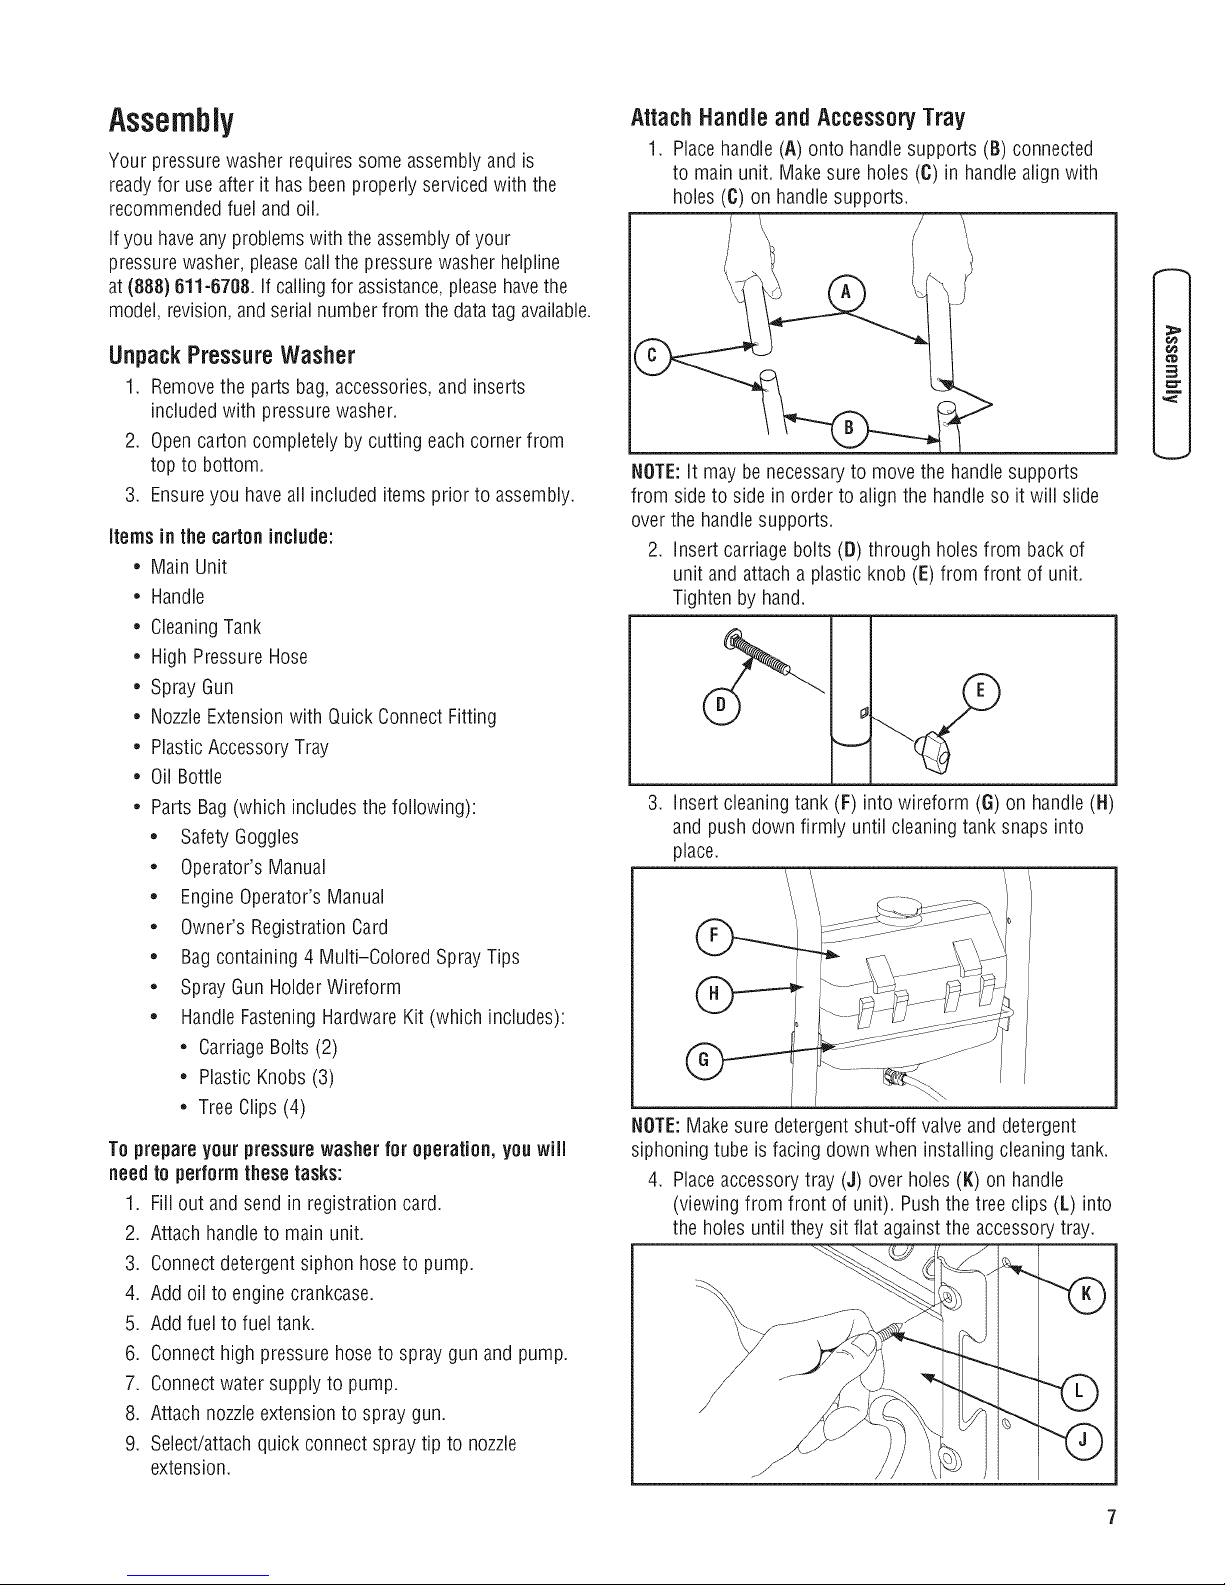
Attach Handleand Accessory Tray
1. Placehandle(A) onto handle supports (B) connected
to main unit. Make sure holes (C) in handlealign with
holes (C) on handlesupports.
J \
UnpackPressureWasher
1. Removethe parts bag,accessories,andinserts
included with pressure washer.
2. Opencarton completely by cutting eachcorner from
top to bottom.
3. Ensureyou haveall included items prior to assembly.
Items in the carton include:
• Main Unit
• Handle
• CleaningTank
• High Pressure Hose
• Spray Gun
• NozzleExtensionwith Quick ConnectFitting
• Plastic AccessoryTray
• Oil Bottle
• Parts Bag(which includes the following):
• Safety Goggles
• Operator's Manual
• Engine Operator'sManual
• Owner's Registration Card
• Bag containing 4 Multi-Colored SprayTips
• Spray Gun HolderWireform
• Handle FasteningHardwareKit (which includes):
• CarriageBolts(2)
• Plastic Knobs (3)
• TreeClips(4)
To prepareyourpressurewasher for operation, youwill
need to perform these tasks:
1. Fill out and send in registration card.
2. Attach handleto main unit.
3. Connect detergent siphon hoseto pump.
4. Add oil to engine crankcase.
5. Add fuel to fuel tank.
6. Connect high pressure hose to spray gun and pump.
7. Connect water supply to pump.
8. Attach nozzleextension to spray gun.
9. Select/attach quick connect spray tip to nozzle
extension.
3
NOTE:It may be necessaryto move the handle supports
from side to side in order to align the handle so it will slide
over the handle supports.
2. insert carriage bolts (D) through holesfrom back of
unit and attach a plastic knob (E)from front of unit.
Tighten by hand.
3. insert cleaning tank (F) into wireform (G) on handle(H)
and pushdown firmly until cleaningtank snaps into
place.
NOTE:Make sure detergentshut-off valve and detergent
siphoning tube is facing down when installing cleaning tank.
4. Place accessorytray (J) over holes (K) on handle
(viewing from front of unit). Pushthe tree clips (L) into
the holes until they sit fiat against the accessorytray.
Page 8
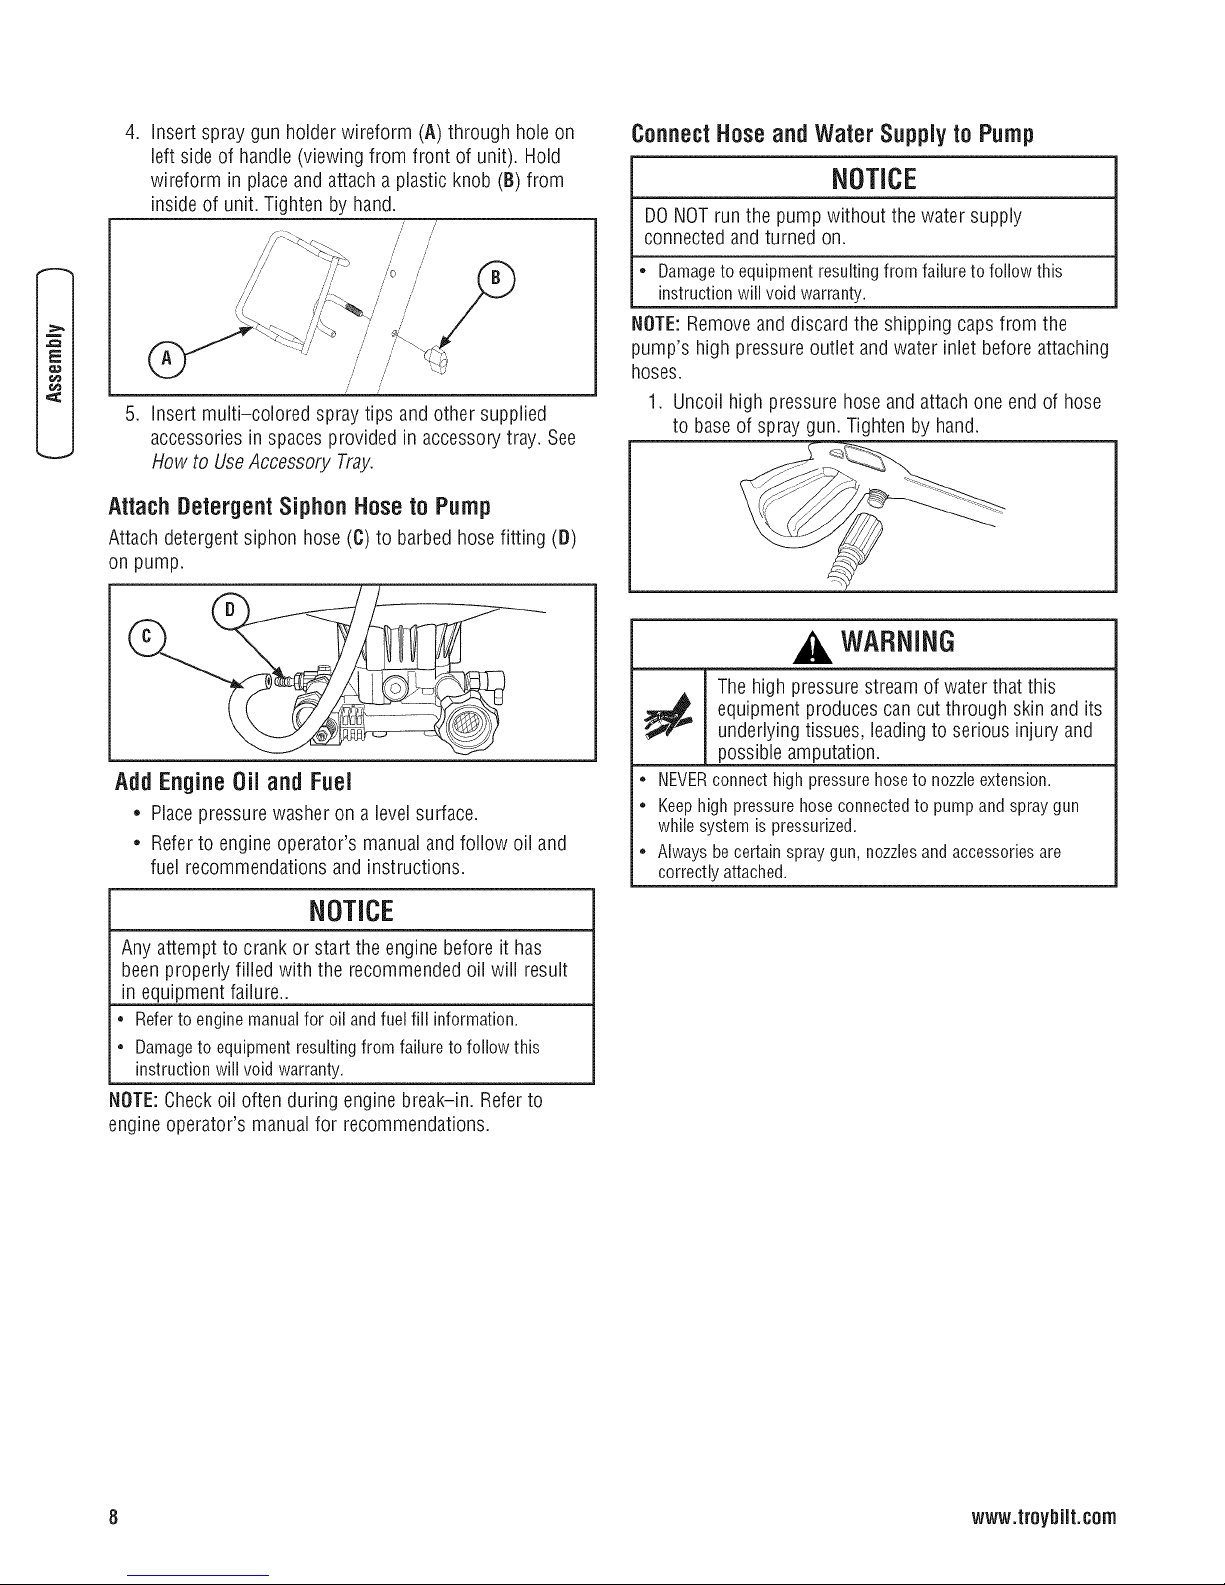
E
.
insert spray gun holder wireform (A) through hole on
left side of handle (viewing from front of unit). Hold
wireform in placeand attach a plastic knob (B) from
inside of unit. Tighten by hand.
/ /
/
/
/ J
/o /
,/ /
/
5. insert multi-colored spray tips and other supplied
accessoriesin spacesprovided in accessory tray. See
How to UseAccessory Tray.
Attach DetergentSiphon Hoseto Pump
Attach detergent siphon hose (C)to barbed hose fitting (D)
on pump.
Add EngineOil and Fuel
• Placepressure washer on a level surface.
• Referto engine operator's manual andfollow oil and
fuel recommendationsand instructions.
ConnectHoseandWater Supply to Pump
NOTICE
DONOTrun the pump without the water supply
connectedand turned on.
• Damageto equipmentresultingfromfailureto followthis
instructionwillvoid warranty.
NOTE:Remove and discard the shipping caps from the
pump's high pressure outlet and water inlet beforeattaching
hoses.
1. Uncoil high pressure hose and attachone end of hose
to baseof spray gun. Tighten by hand.
_, WARNING
The high pressure stream of water that this
equipment produces can cut through skin and its
underlying tissues, leading to serious injury and
possible amputation.
• NEVERconnecthigh pressure hoseto nozzleextension.
• Keephigh pressure hoseconnectedto pump and spray gun
while system is pressurized.
• Always be certain spraygun, nozzlesand accessoriesare
correctly attached.
NOTICE
Any attempt to crank or start the engine beforeit has
beenproperly filled with the recommendedoil will result
in equipment failure..
• Referto enginemanualfor oil andfuelfill information.
• Damageto equipmentresultingfromfailureto followthis
instructionwillvoid warranty.
NOTE:Checkoil often during engine break-in. Referto
engine operator's manual for recommendations.
8 www.troybilt.corn
Page 9
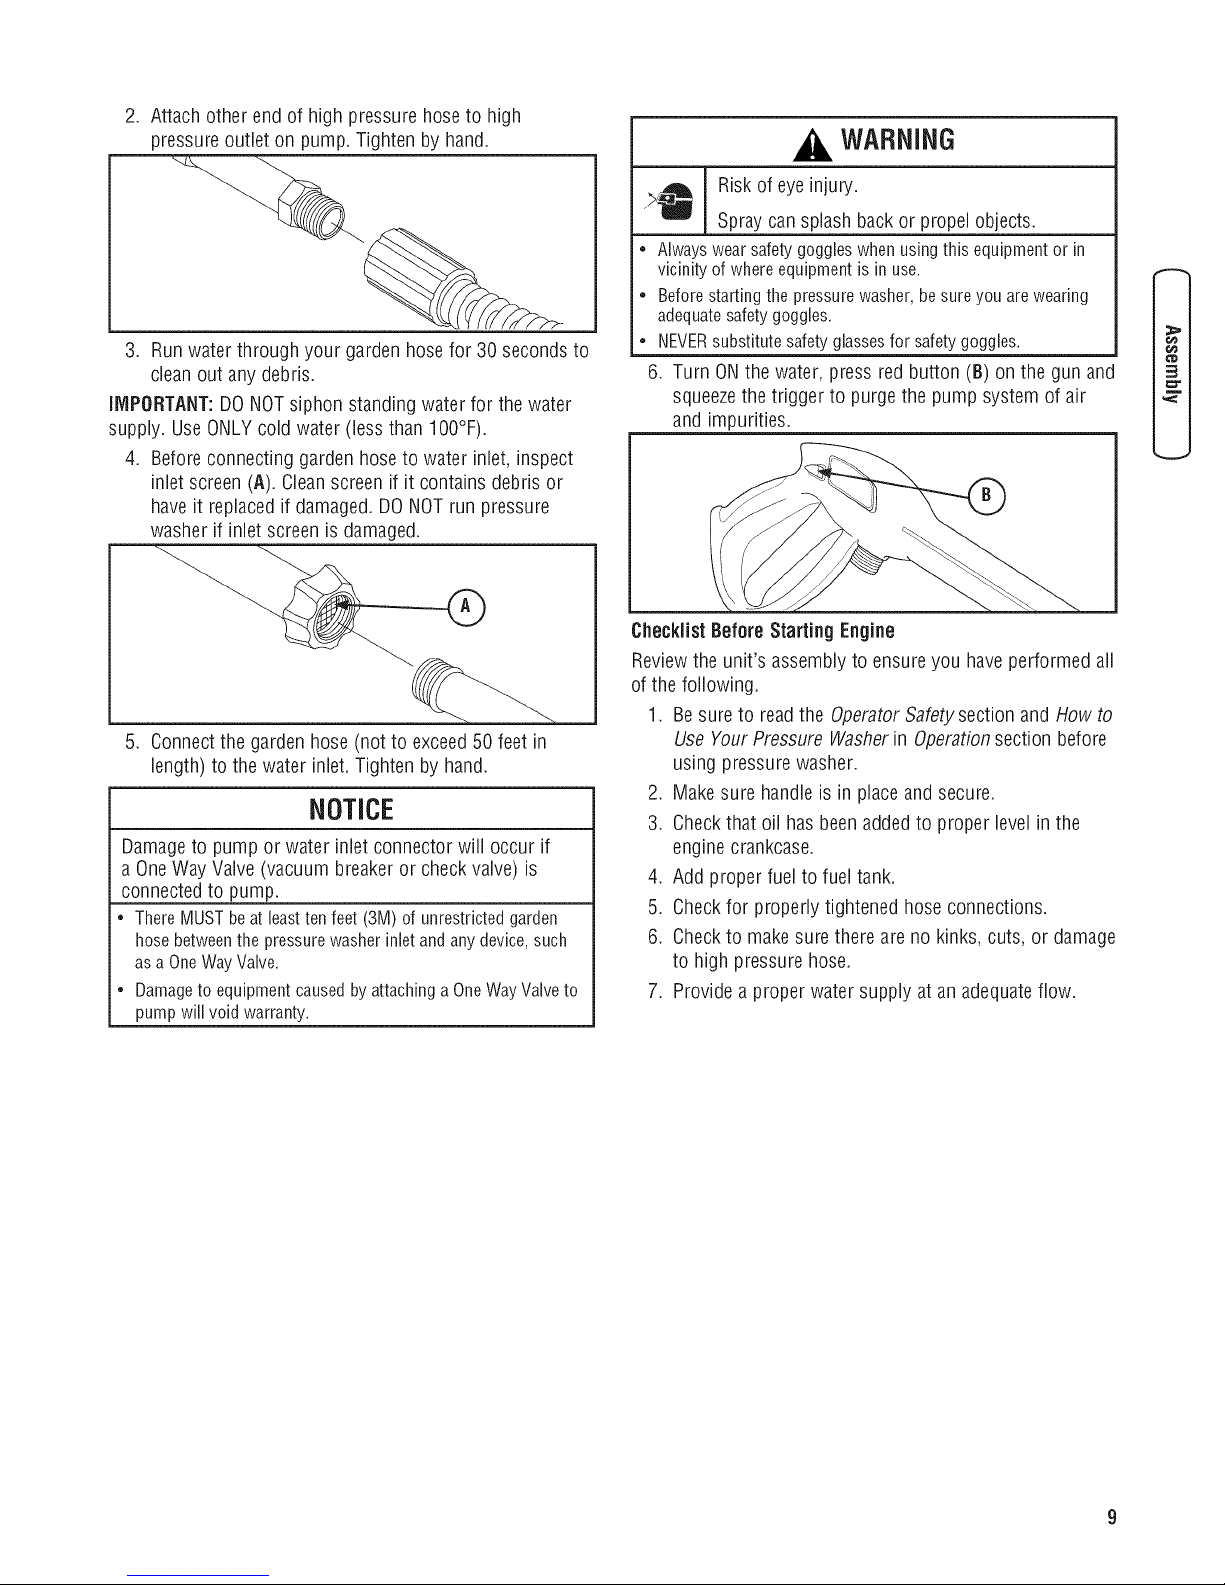
2. Attach other end of high pressure hose to high
pressure outlet on pump. Tighten by hand.
3. Runwater through your garden hose for 30 seconds to
clean out any debris.
IMPORTANT:DONOTsiphon standing water for the water
supply. Use ONLYcold water (less than 100°F).
4. Beforeconnecting garden hose to water inlet, inspect
inletscreen (A).Cleanscreen if it contains debris or
have it replaced if damaged. DONOTrun pressure
washer if inletscreen is damaged.
5. Connect the garden hose (not to exceed50 feet in
length) to the water inlet. Tighten by hand.
NOTICE
Damage to pump or water inlet connector will occur if
a One Way Valve (vacuum breaker or check valve) is
connected to pump.
• There MUSTbe at leastten feet (3M) of unrestricted garden
hosebetweenthe pressurewasher inlet and any device,such
as a OneWay Valve.
• Damageto equipment caused byattaching a OneWayValveto
pump will void warranty.
WARNING
s,_-lj_ Risk of eye injury.
Spray can splash back or propel objects.
• Alwayswearsafetygoggleswhenusingthisequipmentor in
vicinityof whereequipmentis inuse.
• Beforestartingthepressurewasher,besureyouarewearing
adequatesafetygoggles.
• NEVERsubstitutesafetyglassesfor safetygoggles.
6. Turn ONthe water, press red button (B) on the gun and
squeezethe trigger to purge the pump system of air
and impurities.
Checklist Before Starting Engine
Reviewthe unit's assembly to ensureyou have performed all
of the following.
1. Be sureto readthe OperatorSafetysection and How to
Use Your Pressure Washerin Operationsection before
using pressurewasher.
2. Make sure handle is in placeandsecure.
3. Checkthat oil hasbeen addedto proper level in the
engine crankcase.
4. Add proper fuel to fuel tank.
5. Checkfor properly tightened hoseconnections.
6. Checkto make sure there are no kinks, cuts, or damage
to high pressure hose.
7. Provide a proper water supply at an adequateflow.
t_
3
Page 10
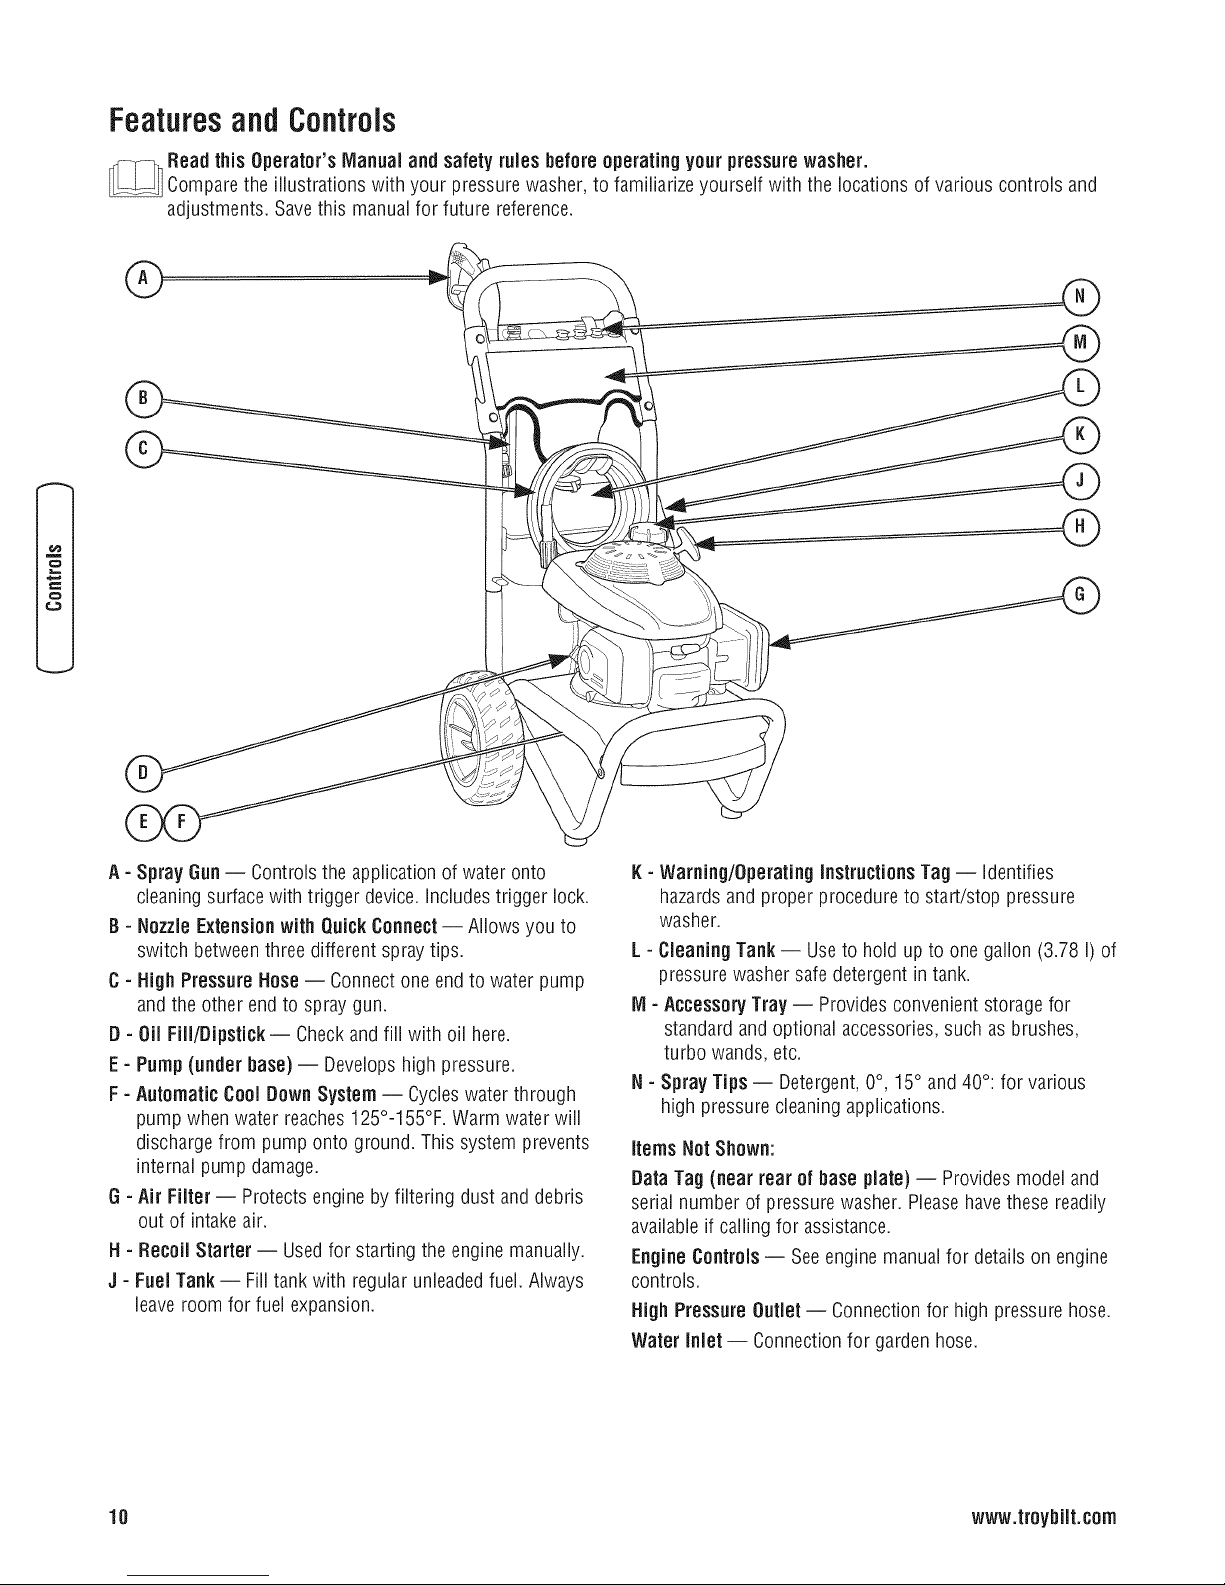
Featuresand Controls
Readthis Operator's Manual and safetyrulesbefore operating your pressure washer.
Comparethe illustrations with your pressurewasher, to familiarize yourself with the locationsof various controls and
adjustments. Savethis manualfor future reference.
®
o
A - Spray Gun-- Controlsthe application of water onto
cleaningsurface with trigger device,includestrigger lock.
B - Nozzle Extension with QuickConnect -- Allows you to
switch betweenthree different spray tips.
C- HighPressure Hose-- Connectone end to water pump
and the other end to spray gun.
D - Oil Fill/Dipstick- Checkand fill with oil here.
E - Pump (under base)-- Develops high pressure.
F - Automatic Cool DownSystem -- Cycleswater through
pump when water reaches125°-155°F. Warm water wiii
discharge from pump onto ground. This system prevents
internal pump damage.
G - Air Filter-- Protects engine by filtering dust and debris
out of intake air.
H - Recoil Starter -- Usedfor starting the engine manually.
J - Fuel Tank-- Filltank with regular unleadedfuel. Always
leaveroom for fuel expansion.
K- Warning/Operating instructionsTag-- identifies
hazardsand proper procedureto start/stop pressure
washer.
L- Cleaning Tank-- Useto hold up to one gallon (3.78 I) of
pressure washer safe detergent in tank.
M - Accessory Tray -- Provides convenient storagefor
standard and optional accessories, such as brushes,
turbo wands, etc.
N - Spray Tips- Detergent,0°, 15° and 40°: for various
high pressure cleaning applications.
Items Not Shown:
DataTag (near rear of baseplate) -- Provides model and
serial number of pressure washer. Pleasehavethese readily
availableif calling for assistance.
Engine Controls -- Seeengine manualfor details on engine
controls.
High Pressure Outlet -- Connectionfor high pressure hose.
Water Inlet -- Connectionfor garden hose.
10 www.troybiJt.com
Page 11
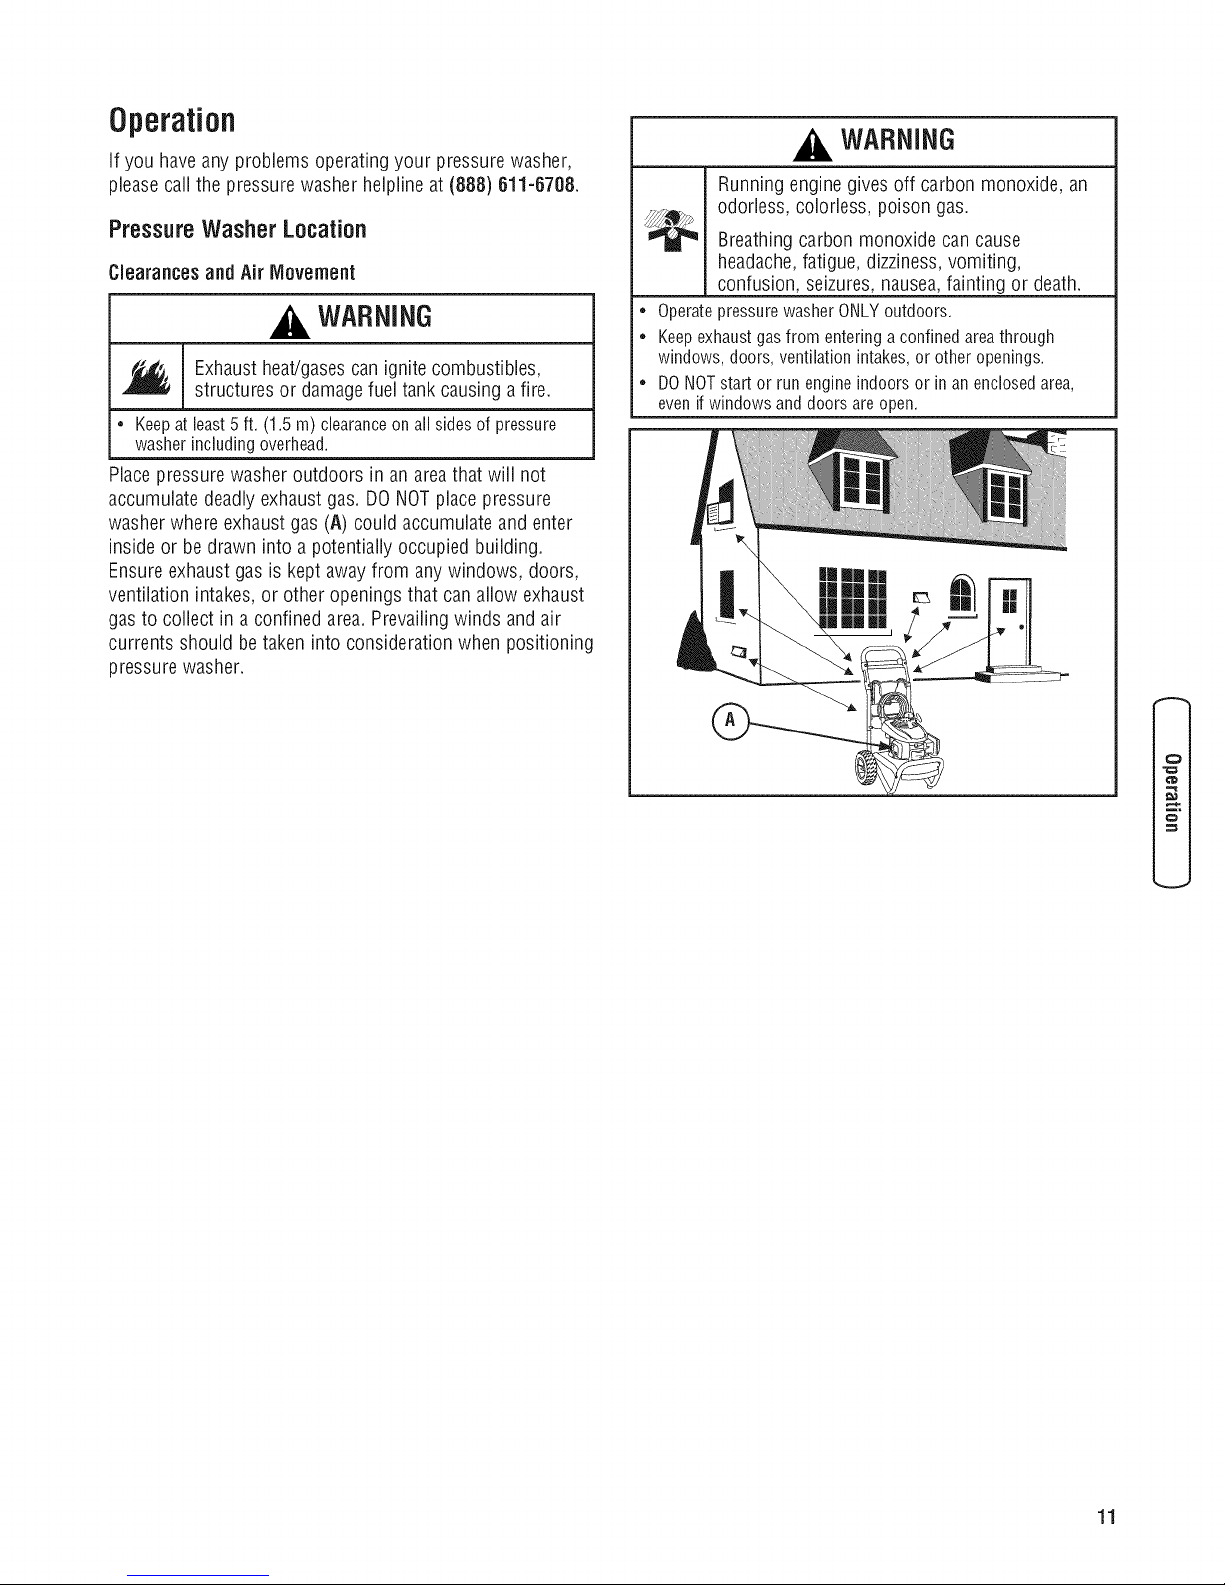
Operation
If you haveanyproblems operating your pressure washer,
pleasecall the pressure washer helpline at (888) 611-6788.
PressureWasherLocation
CJearancesandAir Movement
WARNING
Exhaustheat/gasescan ignite combustibles,
structures or damagefuel tank causing a fire.
• Keepat least5ft. (1.5m) clearanceonallsidesof pressure
washerincludingoverhead.
Placepressure washer outdoors in an areathat will not
accumulate deadlyexhaust gas. DONOTplacepressure
washer where exhaust gas (A) could accumulate and enter
inside or be drawn into a potentially occupied building.
Ensureexhaust gas is kept awayfrom any windows, doors,
ventilation intakes, or other openingsthat can allow exhaust
gasto collect in a confined area. Prevailingwinds and air
currents should be taken into consideration when positioning
pressure washer.
WARNING
Runningengine gives off carbon monoxide, an
odorless, colorless, poison gas.
Breathingcarbon monoxide can cause
headache,fatigue, dizziness,vomiting,
confusion, seizures, nausea,fainting or death.
• OperatepressurewasherONLYoutdoors.
• Keepexhaustgasfrom enteringaconfinedareathrough
windows,doors,ventilationintakes,or otheropenings.
• DONOTstartor runengineindoorsorinanenclosedarea,
evenifwindowsanddoorsareopen.
"o
o
11
Page 12
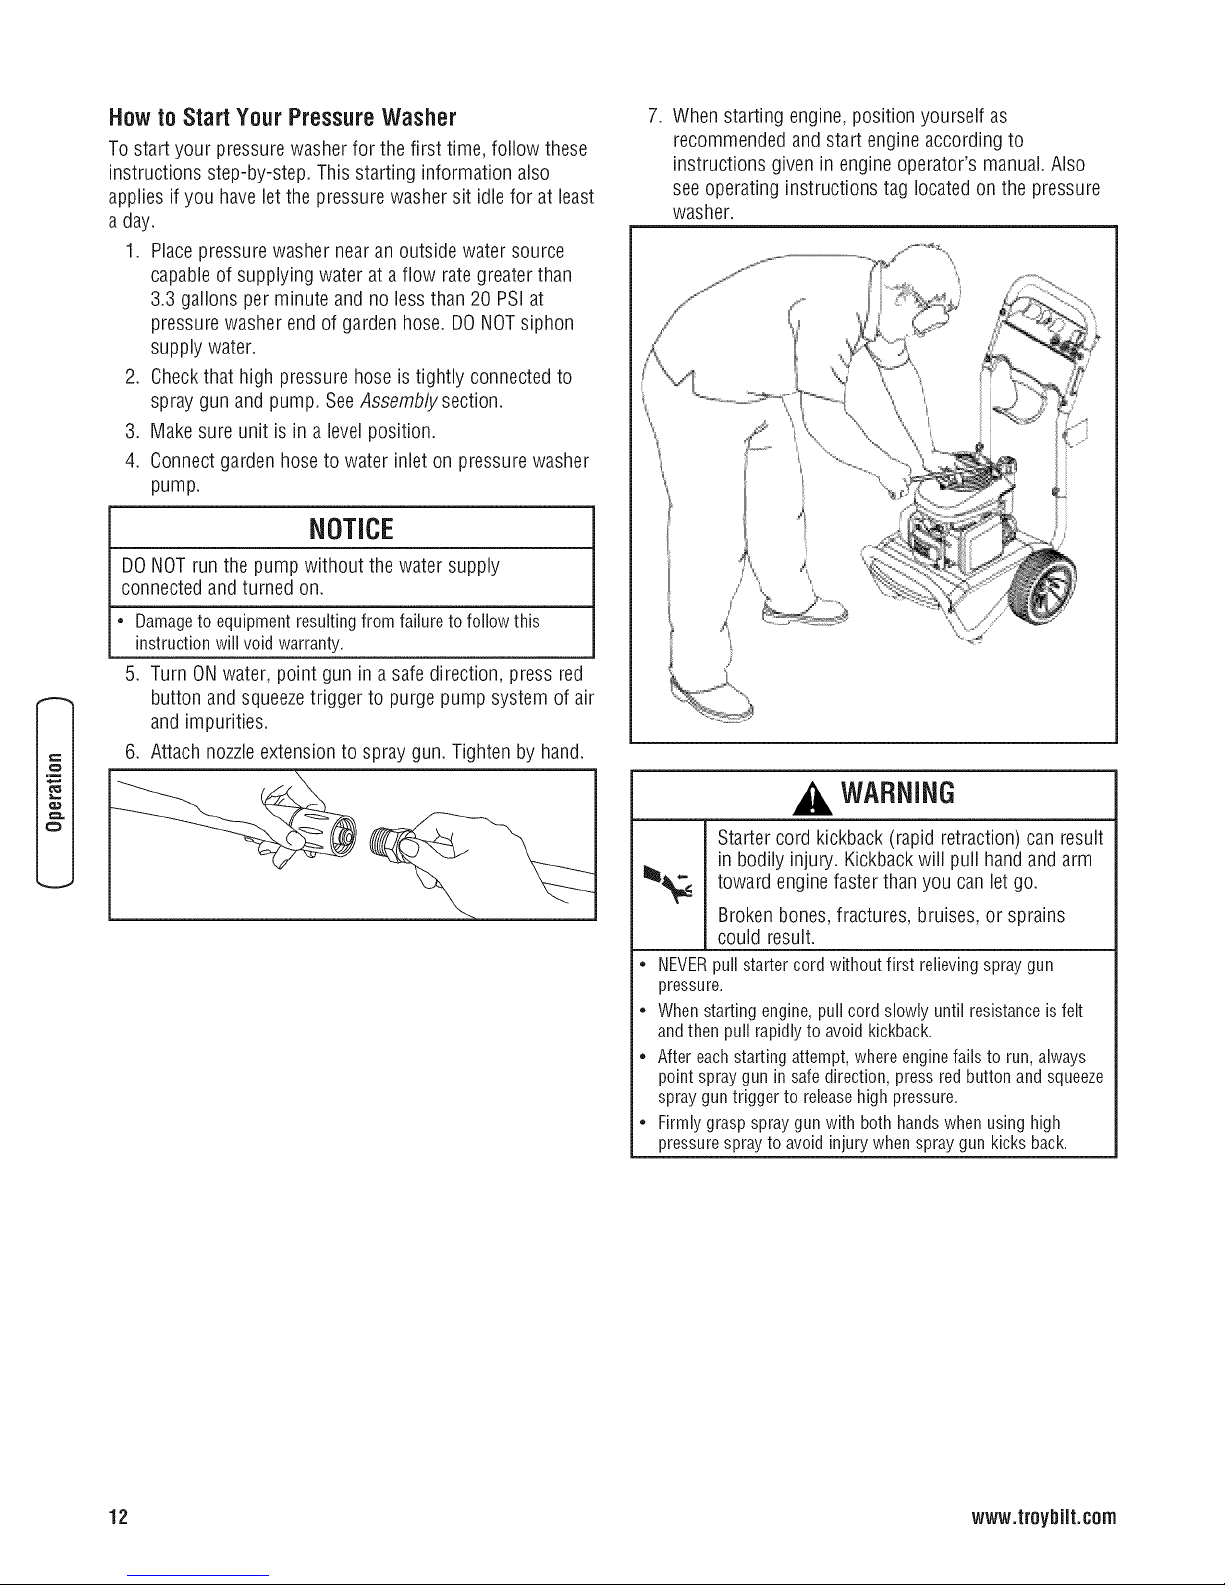
Howto StartYourPressureWasher
To start your pressure washer for the first time, follow these
instructions step-by-step. This starting information also
applies if you havelet the pressure washer sit idle for at least
a day.
.
Whenstarting engine, position yourself as
recommended and start engine according to
instructions given in engine operator's manual. Also
seeoperating instructions tag locatedon the pressure
washer.
1. Placepressure washer near an outside water source
capableof supplying water at a flow rate greaterthan
3.3 gallons per minute and no less than 20 PSi at
pressure washer end of garden hose. DONOTsiphon
supply water.
2. Checkthat high pressure hoseistightly connectedto
spray gun and pump. SeeAssembly section.
3. Make sure unit is in a level position.
4. Connect garden hoseto water inlet on pressure washer
pump.
NOTICE
DONOTrun the pump without the water supply
connected and turned on.
• Damageto equipmentresultingfromfailureto followthis
instructionwillvoid warranty.
5. Turn ON water, point gun in a safe direction, press red
button and squeezetrigger to purge pump system of air
and impurities.
o
=n
6. Attach nozzleextension to spray gun. Tighten by hand.
WARNING
Starter cord kickback(rapid retraction) can result
in bodily injury. Kickbackwill pull handand arm
toward enginefaster thanyou can let go.
Brokenbones, fractures, bruises, or sprains
could result.
• NEVERpull starter cord without first relieving spray gun
pressure.
• When starting engine, pull cord slowly until resistance is felt
andthen pull rapidly to avoid kickback.
• After eachstarting attempt, where engine fails to run,always
point spraygun in safe direction, press red button and squeeze
spraygun trigger to releasehigh pressure.
• Firmly grasp spray gun with both handswhen using high
pressurespray to avoid injury when spray gun kicks back.
12 www.troybiit.corn
Page 13

WARNING
The high pressure stream of water that this
equipment produces can cut through skin and
its underlying tissues, leading to serious injury
and possible amputation.
Spray gun traps high water pressure, even when
engine is stopped and water is disconnected,
which can cause injury.
* DONOTallow CHILDRENto operate pressure washer.
* Keep high pressure hoseconnectedto pump andspray gun
while system is pressurized.
* NEVERaim spray gunat people, animals, or plants.
, DONOTsecurespray gun in open position.
* DONOT leavespray gun unattended while machine is running.
* NEVERusea spray gun which does not haveatrigger lock or
trigger guard in placeand in working order.
* Always be certain spray gun, nozzlesand accessories are
correctly attached.
WARNING
,_ Contact with muffler area can result in serious
._ Exhaust heat/gases can ignite combustibles,
• DONOTtouch hot parts and AVOIDhot exhaustgases.
• Allow equipment to cool beforetouching.
• Keepat least 5 feet (1.5 m) of clearanceon all sides of
• Code of FederalRegulation (CFR)Title 36 Parks, Forests,and
burns.
structures or damage fuel tank causing a fire.
pressurewasher including overhead.
Public Property requireequipment powered byan internal
combustion engine to havea spark arrester, maintained in
effective working order, complying to USDAForestservice
standard 5100-1Cor later revision. In the State of Californiaa
spark arrester is required under section 4442 of the California
Public resources code.Other states may have similar laws.
Howto Stop YourPressureWasher
1. Releasespray gun trigger and let engine idle for two
minutes.
2. Turn engine off according to instructions given in
engine operator's manual.
3. ALWAYSpoint gun in a safe direction and press
red button and squeezespray gun trigger to release
retained high water pressure.
WARNING
The high pressure streamof water that this
equipment produces can cut through skin and
its underlying tissues, leading to serious injury
and possible amputation.
Spray gun traps high water pressure,even when
engine is stopped and water is disconnected,
which can cause injury.
e
Keephigh pressure hose connectedto pump and spray gun
while system is pressurized.
e
After eachstarting attempt, where engine fails to run, always
point spraygun in safe direction, press red button and squeeze
spraygun trigger to releasehigh pressure.
IMPORTANT:Spray gun traps high water pressure, even
when engine is stopped andwater is disconnected.
Howto UseAccessoryTray
Theunit is equipped with an accessorytraywith places to
store your spray gun, nozzleextension and quick connect
spray tips. Thereis also a hook atthe front of the accessory
tray to hold your high pressure hose.
NOTE:The extra hole in the tray is for storing a utility brush.
Theextra clip in the tray is for storing aturbo nozzle.The
brush andturbo nozzleare NOTincluded with your pressure
washer.You can buy these items as optional accessories.
1. Placenozzleextensionthrough hole on accessorytray,
as shown.
"o
€'D
O
13
Page 14
2. Placespraygun through hole on accessorytray on
right side of unit.
NOTE:You may alsouse the spray gun holder wireform
attachedto the handleto store your spray gun and nozzle
extension, as shown in FeaturesandControls section.
3. insert multi-colored spray tips in spaces provided in
accessorytray.
4. Hanghigh pressure hoseon hook attached to
accessorytray on front of tray, as shown.
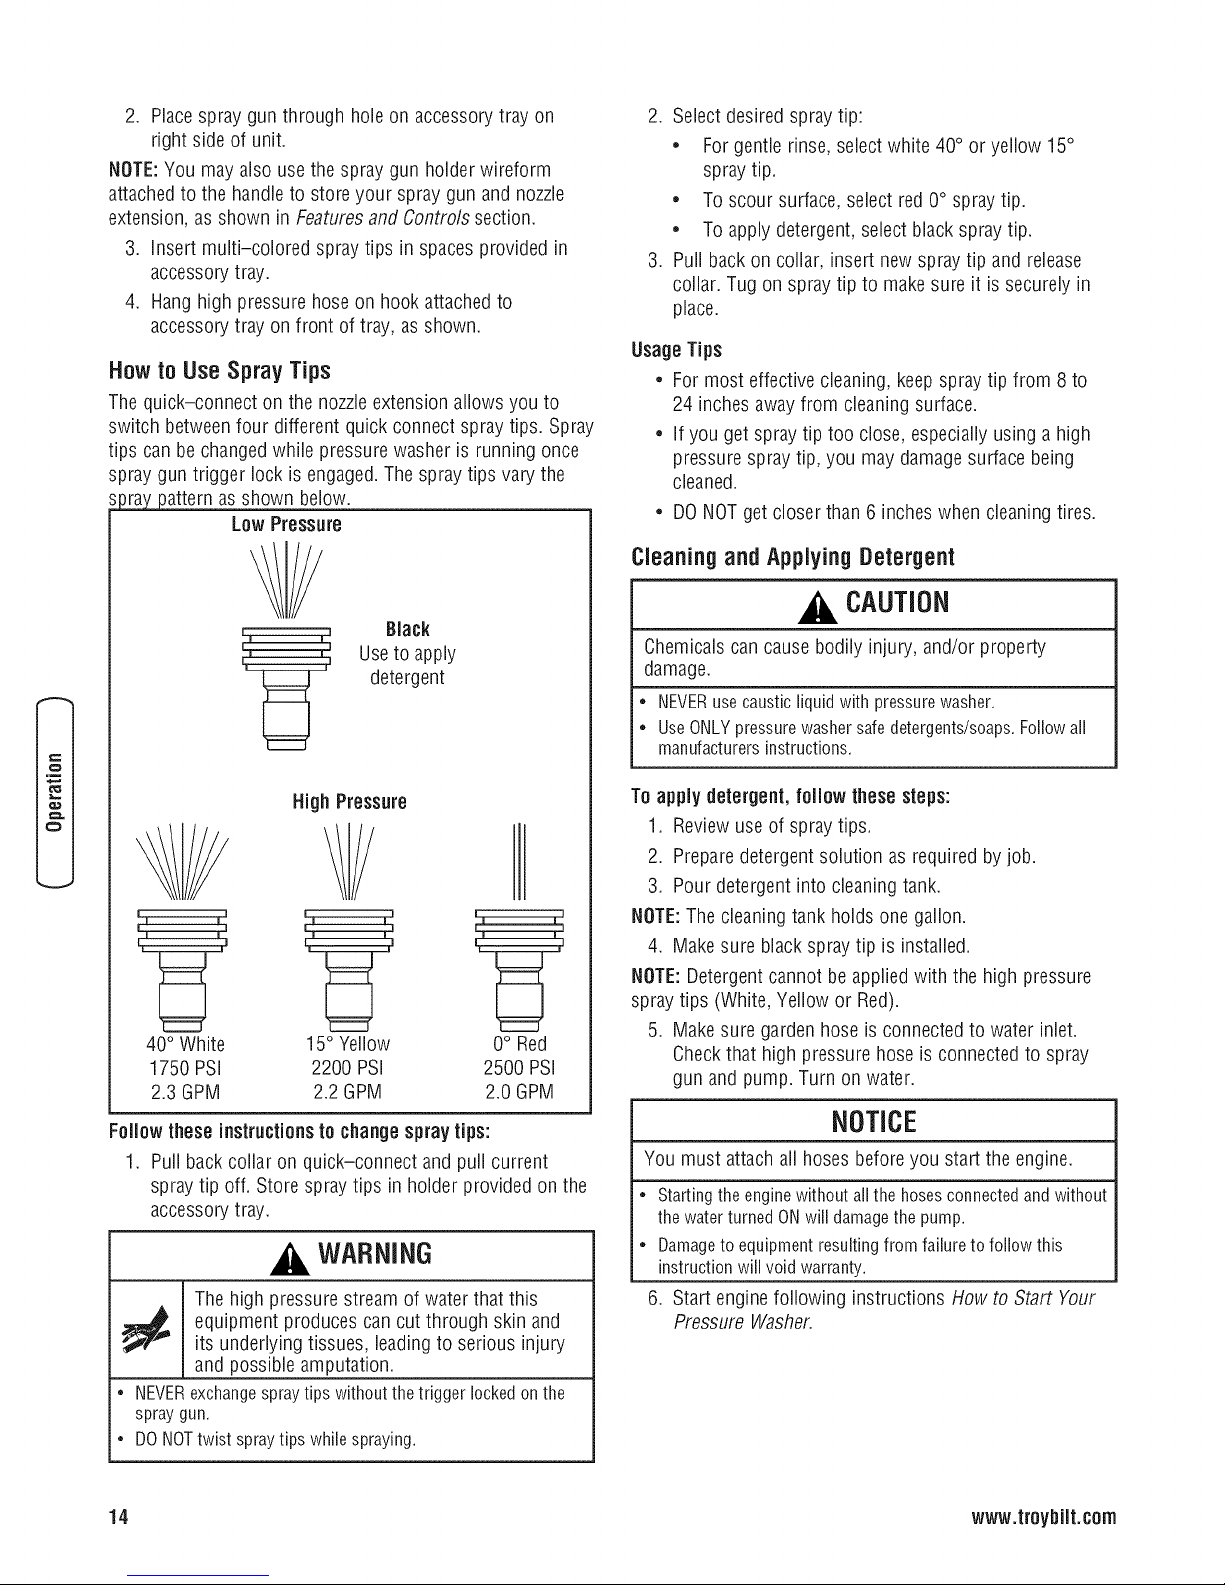
Howto Use Spray Tips
The quick-connect on the nozzleextension allows you to
switch betweenfour different quick connect spray tips. Spray
tips can be changedwhile pressurewasher is running once
spray gun trigger lock is engaged. Thespray tips vary the
_ra_attern asshown below.
LOwPressure
2. Select desiredspraytip:
• For gentle rinse, selectwhite 40° or yellow 15°
spray tip.
• To scour surface, select red 0° spray tip.
• To apply detergent,select black spray tip.
3. Pull backon collar, insert newspray tip and release
collar. Tug on spray tip to make sure it is securely in
place.
Usage Tips
• For most effective cleaning, keep spray tip from 8 to
24 inches away from cleaning surface.
• If you get spray tip too close, especiallyusing a high
pressure spray tip, you may damagesurface being
cleaned.
• DONOTget closer than 6 inches when cleaning tires.
Cleaning andApplying Detergent
, _ Black
CAUTION
w w
', ,J Useto apply
_' detergent
o
=n
High Pressure
mm i I
m !
I I i I
iI m
I M I I
i m 1
! I i !
U
40° White
1750 PSi
2.3 GPM
Follow these instructionsto changespraytips:
1. Pull back collar on quick-connect and pull current
spray tip off. Store spray tips in holder provided on the
accessorytray.
The high pressure stream of water that this
equipment produces can cut through skin and
its underlying tissues, leading to serious injury
and possible amputation.
= NEVERexchangespraytipswithoutthetriggerlockedonthe
spraygun.
• DONOTtwist spraytipswhilespraying.
15° Yellow 0° Red
2200 PSi 2500 PSi
2.2 GPM 2.0 GPM
WARNING
Chemicalscancause bodily injury, and/or property
damage.
• NEVERusecausticliquidwith pressurewasher.
• UseONLYpressurewashersafedetergents/soaps.Followall
manufacturersinstructions.
TOapply detergent, follow thesesteps:
1. Reviewuse of spray tips.
2. Preparedetergent solution as required by job.
3. Pour detergent into cleaning tank.
NOTE:The cleaningtank holds one gallon.
4. Make sure black spray tip is installed.
NOTE:Detergent cannot be appliedwith the high pressure
spray tips (White, Yellow or Red).
5. Make sure garden hose is connected to water inlet.
Checkthat high pressure hose is connected to spray
gun and pump. Turn on water.
NOTICE
You must attachall hoses beforeyou start the engine.
, Startingthe enginewithoutallthe hosesconnectedandwithout
thewaterturnedONwilldamagethepump.
* Damageto equipmentresultingfromfailureto followthis
instructionwillvoid warranty.
6. Start enginefollowing instructions How to Start Your
Pressure Washer.
14 www.troybiit.corn
Page 15

7. Rotatedetergentshut-off valve on cleaning tank to "On"
position (A).
8. Apply detergent to a dry surface, starting at lower
portion of areato bewashed andwork upward, using
long, even, overlapping strokes.
9. Allow detergent to "soak in" for 3-5 minutes before
washing and rinsing. Reapplyasneededto prevent
surfacefrom drying. DONOTallow detergent to dry on
(prevents streaking).
PressureWasherRinsing
.
Keepthe spray gun a safe distance from the areayou
plan to spray.
WARNING
Kickbackfrom spray gun cancauseyou to fall.
• Operatepressurewasherfrom astablesurface.
• Beextremelycarefulifyoumustusethepressurewasherfrom
a ladder,scaffolding,or anyothersimilarlocation.
• Firmlygraspspraygunwith bothhandswhenusinghigh
pressuresprayto avoidinjurywhenspraygunkicksback.
5. Apply a high pressure spray to a small area,then check
the surface for damage, if no damage is found, it is
okay to continue cleaning.
6. Start at the top of the areato be rinsed, working down
with same overlapping strokes as you usedfor washing
and applying detergent.
For Rinsing:
1. Turn detergent shut-off valveto "Off" position.
2. Remove black spray tip from nozzleextension.
3. Select and install desired high pressure spray tip
following instructions How to UseSpray Tips.
Automatic Cool DownSystem (Thermal Relief)
If you run the engineon your pressure washer for
3-5 minutes without pressing the trigger on the spray gun,
circulating water in the pump can reachtemperatures above
125°F.The system engagesto cool the pump by discharging
thewarm water onto the ground.
o
15
Page 16

Maintenance Pressurewasher Maintenance
GeneralRecommendations
Clean Debris
Regular maintenancewill improve the performance and
extend the life of the pressure washer. Seeany qualified
dealerfor service.
The pressurewasher's warranty does not cover items that
havebeen subjected to operator abuse or negligence.To
receivefull value from the warranty, the operator must
maintain the pressure washer as instructed in this manual
and in the engine manual, including proper storage as
detailed in WinterStorageand Long TermStorage.
NOTE:Should you have questions about replacing
components on your pressure washer, pleasecall
(888) 611-6708 for assistance.
• Some adjustmentswill needto be made periodically
to properly maintain your pressure washer. Checkthe
spray gun and nozzleextension assembly for wear.
• All maintenance in this manualand the engine
operator's manual should be madeat leastonce each
season.
• Onceayear you should cleanor replacethe spark plug,
cleanor replacethe air filter. A newspark plug and
cleanair filter assure proper fuel-air mixture and help
your engine run better and last longer. Please referto
your engineoperator's manual for more details.
Before EachUse
1. Checkengineoil level.
2. Cleandebris.
3. Checkwater inlet screen for damage.
4. Check high pressure hose for leaks.
5. Check detergent siphoning tube and tank for damage.
6. Check spray gun and nozzleextension assemblyfor
leaks.
.m
€_
7. Rinseout garden hoseto flush out debris.
Pump Oil
DONOTattempt anyoil maintenanceon this pump. The
pump is pre-lubricated and sealedfrom the factory, requiring
no additional maintenancefor the life of the pump.
Dailyor before use, cleanaccumulated debris from cleaning
system. Keeplinkage, spring and controls clean. Keep
areaaround and behind muffler free from any combustible
debris, inspect cooling air slots and openings on the
pressure washer.These openings must be kept cleanand
unobstructed.
Pressurewasher parts should be kept clean to reducethe
risk of overheatingand ignition of accumulated debris.
• Use a damp cloth to wipe exterior surfaces clean.
NOTICE
improper treatment of pressure washer can damageit
and shorten its life.
• DONOTinsertanyobjectsthroughcoolingdots.
• Use a soft bristle brush to loosen cakedon dirt, oil, etc.
• Use a vacuum cleanerto pick up loose dirt and debris.
Checkand Clean Inlet Screen
Examinethe screen on the pump's water inlet. Cleanit if the
screen is clogged or replaceit if screen is damaged.
CheckHigh Pressure Hose
Thehigh pressure hosecan developleaksfrom wear,
kinking, or abuse, inspect the hoseeach time before using it.
Checkfor cuts, leaks,abrasionsor bulging of cover, damage
or movement of couplings, if any of these conditions exist,
replacethe hose immediately.
WARNING
The high pressure streamof water that this
equipment produces can cut through skin and
its underlying tissues, leading to serious injury
and possible amputation.
e
NEVERrepairhighpressurehose.Replaceit.
e
ReplacementhoseratingMUSTexceedmaximumpressure
ratingof unit.
16 www.troybiJt.corn
Page 17

CheckDetergentSiphoningTube
Examinethe detergent tank and detergent siphoning tube
and clean if clogged. The tube should fit tightly on the
barbed fitting of the pump and detergent shut-off valve.
Examinethe tube for leaks or tears. Replacethe tank or tube
if either is damaged.
CheckSpray Gun
Examinethe hose connection to the spray gun and make
sure it is secure.Test the trigger by pressing the red button
and making sure the trigger "springs back" into place
whenyou releaseit. You should not be able to press the
trigger without pressing the red button. Replacespray gun
immediately if it fails any of these tests.
Nozzle IViaintenaace
A pulsing sensationfelt while squeezingthe spray gun
trigger may be caused by excessive pump pressure. The
principal causeof excessivepump pressure is a spray tip
clogged or restricted with foreign materials, such as dirt,
etc. To correct the problem, immediately clean the spray tip
following these instructions:
1. Shut off engine and turn off water supply.
2. ALWAYS point spray gun in a safe direction, press
red button and squeezespray gun trigger to release
retainedhigh water pressure.
.
Removenozzleextension from spray gun.
6.
Using a garden hose, remove additional debris by back
flushing water through nozzleextension. Backflush
between 30 to 60 seconds.
7. Reinstall spray tip into nozzleextension.
8. Reconnect nozzleextensionto spray gun.
9. Make sure garden hose is connected to water inlet.
Checkthat high pressure hose is connected to spray
gun and pump. Turn on water.
10. Start enginefollowing instructions How to Start Your
Pressure Washer.
11. Test pressurewasher by operatingwith eachquick
connect spray tip.
O-Ring Maintenance
Purchasean O-Ring/MaintenanceKit, model 6048, by
contacting the nearestauthorized service center. It is
not includedwith the pressure washer. This kit includes
replacemento-rings, rubber washer andwater inlet filter.
Referto the instruction sheet provided in the kit to service
'our unit's o-rings.
WARNING
The high pressure stream of water that this
equipment produces can cut through skin and
its underlying tissues, leading to serious injury
and possible amputation.
Spray gun traps high water pressure,evenwhen
engine is stopped and water is disconnected,
which can cause injury.
e
Keephigh pressure hose connectedto pump and spray gun
while system is pressurized.
e
ALWAYSpoint spray gun in safe direction, press red button
and squeezespray gun trigger, to releasehigh pressure, every
time you stop engine.
.
Removespray tip from end of nozzleextension.
4.
Usea small paper clip to free anyforeign material
clogging or restricting spray tip (A).
WARNING
The high pressure streamof water that this
equipment produces can cut through skin and
its underlying tissues, leading to serious injury
and possible amputation.
• NEVERrepairleakingconnectionswith sealantofanykind.
Replaceo-ringor seal.
CD
17
Page 18

EngineMaintenance
Seethe engine operator's manualfor instructions on how to
properly maintain the engine.
CAUTION
Avoid prolonged or repeatedskin contact with used
motor oil.
• Usedmotoroilhasbeenshownto causeskincancerincertain
laboratoryanimals.
• Thoroughlywashexposedareaswith soapandwater.
KEEPOUTOFREACHOFCHILDREN.DON'T
POLLUTE.CONSERVERESOURCES.RETURN
USEDOILTO COLLECTIONCENTERS.
After EachUse
Water should not remainin the unit for long periods of time.
Sedimentsor minerals can deposit on pump parts and freeze
pump action. Follow these procedures after every use:
1. Flush detergent system by turning its detergent shut-off
valveto "Off" position and run pressure washer with
black spray tip. Flush for one to two minutes.
2. Shut off engine,turn off water supply, point gun in a
safe direction, press red button and squeezetrigger to
relievetrapped pressure, and let engine cool.
3. Disconnect hosefrom spray gun and high pressure
outlet on pump. Drainwater from hose, spray gun, and
nozzleextension. Usea ragto wipe off the hose.
4. Place the spray gun, nozzleextensionand spray tips in
the accessory tray. Hanghigh pressure hose on hook
attachedto accessory tray.
5. Empty pump of all pumped liquids by pulling recoil
handle about six times. This should remove most liquid
in pump.
6. Store unit in a clean,dry area.
7. If storing for more than 30 days, see Long Term
Storageon next page.
WARNING
Fueland its vapors are extremelyflammable and
explosive.
Fireor explosion can causesevereburns or
death.
WHENSTORINGFUELOREQUIPMENTWITHFUELINTANK
• Storeawayfrom furnaces, stoves, water heaters,clothes
dryers,or other appliancesthat have pilot light or other ignition
source becausethey can ignite fuel vapors.
WARNING
The high pressure stream of water that this
equipment produces can cut through skin and
its underlying tissues, leading to serious injury
and possible amputation.
Spray gun traps high water pressure,evenwhen
engine is stopped and water is disconnected,
which can cause injury.
.m
€_
e
Keephighpressurehoseconnectedto pumpandspraygun
whilesystemispressurized.
e
ALWAYSpointsprayguninsafedirection,pressredbutton
andsqueezesprayguntrigger,to releasehighpressure,every
timeyoustopengine.
18 www.troybilt.corn
Page 19

Storage
Winter Storage
NOTICE
You must protect your unit from freezing temperatures.
• Failuretodo sowill permanentlydamageyourpumpand
renderyourunit inoperable.
• Freezedamageis notcoveredunderwarranty.
To protectthe unit fromfreezingtemperatures:
1. Empty cleaningtank asfollows:
a. Rotate detergent shut-off valve to "Off" position.
b. Disconnect hoseconnectedto barbed fitting on
pump. Placeend of hose into suitable container.
c. Rotatedetergent shut-off valve to "On" position
and open the tanks cover. Gravitywill empty tank
contents into container.
d. Reconnect hose to barbedfitting on pump. Add
1 pint (0.5 liter) of cleanfreshwater to cleaning
tank and close tanks cover.
2. Flush cleaning tank by turning its detergent shut-off
valveto "On" position and run pressurewasher with
black nozzle.Flushuntil tank is empty. Turn detergent
shut-off valveto "Off" position.
3. Follow steps 2-5 in the previous section AfterEach Use.
4. Use pump saver, Model 6039, to treat pump. This
minimizes freezedamageandlubricates pistons and
seals.
5. If pump saver is not available,connect a 3-foot (1 m)
section of garden hose to water inlet adapter. Pour RV-
antifreeze(antifreezewithout alcohol) into hose. Pull
recoil handletwice. Disconnect3-foot (1 m) hose.
6. Store unit in a clean, dry area.
LongTerm Storage instructions
Protect FuelSystem
Fuelcan becomestale when stored over 30 days. Stalefuel
causesacid and gum depositsto form in the fuel system or
on essentialcarburetor parts. To keep fuel fresh, use Briggs
& Stratton FRESHSTARTTM fuel stabilizer, availableas a
liquid additive or a drip concentrate cartridge.
Thereis no needto drain gasolinefrom the engine if a fuel
stabilizer is added according to instructions. Run the engine
for 2 minutes to circulate the stabilizer throughout the
fuel system. Theengine and fuel can then be stored up to
24 months.
If gasoline in the engine hasnot beentreated with a fuel
stabilizer, it must be drained into an approved container.
Run the engine until it stops from lack of fuel. Theuse of a
fuel stabilizer in the storage container is recommended to
maintain freshness.
Storing the Engine
Seethe engine operator's manualfor instructions on how to
properly preparethe engine for storage.
Protecting the Pump
To protect the pump from damage caused by mineral
deposits or freezing, use PumpSaver,Model 6039, to treat
pump. This prevents freezedamageand lubricates pistons
and seals.
NOTICE
You must protect your unit from freezing temperatures.
• Failuretodo sowill permanentlydamageyourpumpand
renderyourunitinoperable.
• Freezedamageis notcoveredunderwarranty.
NOTE:PumpSaveris availableas an optional accessory. It is
not includedwith the pressure washer. Contactthe nearest
authorized servicecenter to purchase PumpSaver.
To use PumpSaver,makesure the pressure washer is
turned off and disconnectedfrom supply water. Readand
follow aii instructions and warnings given on the PumpSaver
container.
Other Storage Tips
1. DONOTstorefuel from one seasonto another unless it
has beentreated as described in Protect Fuel System.
2. Replacefuel container if it starts to rust. Rustand/or
dirt in fuel can cause problems if it's usedwith this
unit.
3. Cover unit with a suitable protective cover that does not
retain moisture.
WARNING
Storage covers can be flammable.
• DONOTplacea storagecoveroverahotpressurewasher.
• Letequipmentcoolfor asufficienttimebeforeplacingthe
coverontheequipment.
4. Store unit in a cleanand dry area.
CD
19
Page 20

Troubleshooting
Problem
Pumphasfollowing
problems: failure to produce
pressure,erratic pressure,
chattering,loss of pressure,
low water volume..
Detergent fails to mix with
spray.
Enginerunsgood at no-load
but "bogs" whenload is
added.
EnginewiJJnot start; or starts
and runsrough.
Engineshutsdownduring
operation.
EngineJackspower.
CauSe
1. Low pressure spray tip installed.
2. Water inletis blocked.
3. Inadequatewater supply.
4. inlet hose iskinked or leaking.
5. Clogged inlethose screen.
6. Water supply is over IO0°F.
7. High pressure hose isblockedor leaks.
8. Spray gun leaks.
9. Spray tip is obstructed.
10. Pump is faulty.
1. Detergentshut-off valve is in the "Off"
position.
2. High pressure spray tip installed.
Enginespeed istoo slow.
Correction
1. Replacewith high pressure spray tip.
2. Clearinlet.
3. Provide adequatewater flow.
4. Straighten inlet hose, patch leak.
5. Checkand clean inlet hose screen.
6. Provide cooler water supply.
7. Clearblocks in outlet hose.
8. Replacespray gun.
9. Cleanspray tip.
10. Contactlocal service facility.
1. Rotate detergent shut-off valve to
"On" position.
2. Replacewith low pressure spray tip.
Movethrottle control to FASTposition.
If engine still "bogs down", contact local
service facility.
1. Low oil level.
2. Dirty air cleaner.
3. Out of fuel.
4. Stale fuel.
5. Spark plug wire not connectedto spark
1. Fill crankcaseto proper level.
2. Cleanor replace air cleaner.
3. Fill fuel tank.
4. Drain fuel tank; fill with fresh fuel.
5. Connectwire to spark plug.
plug.
6. Bad spark plug.
7. Water in fuel.
8. Excessivelyrich fuel mixture.
Outof fuel.
6. Replacespark plug.
7. Drain fuel tank; fill with fresh fuel.
8. Contactlocal service facility.
Fillfuel tank.
Dirty air filter. Replaceair filter.
o
J=:
o
20 www.troybiJt.corn
Page 21

EffectiveDecember1,2006 replacesall undatedWarrantiesandall WarrantiesdatedbeforeDecember1,2006
LIMITEDWARRANTY
Troy-Bilt® is a registered trademark of MTD Products Inc. and is used under license to Briggs & Stratton Power Products. Briggs & Stratton Power
Products Group, LLC will repair or replace, free of charge, any part(s) of the pressure washer that is defective in material or workmanship or both.
Transportation charges on product submitted for repair or replacement under this warranty must be borne by purchaser. This warranty is effective for
the time periods and subject to the conditions stated below. For warranty service, find the nearest Authorized Service Dealerin our dealer Iocator map at
BRIGGSandSTRATTON.COM.
THEREIS NOOTHEREXPRESSWARRANTY. IMPLIEDWARRANTIES,INCLUDINGTHOSEOFMERCHANTABILITYANDFITNESSFORA PARTICULAR
PURPOSE,ARELIMITED TOONEYEARFROM PURCHASE,ORTOTHEEXTENTPERMITTEDBY LAW. ANY ANDALL IMPLIED WARRANTIESARE
EXCLUDED.LIABILITY FORINCIDENTALORCONSEQUENTIALDAMAGESARE EXCLUDEDTO THEEXTENTEXCLUSIONIS PERMITTEDBYLAW. Some
states or countries do not allow limitations on how long an implied warranty lasts, and some states or countries do not allow the exclusion or limitation
of incidental or consequential damages, so the above limitation and exclusion may not apply to you. This warranty gives you specific legal rights and
you may also have other rights which vary from state to state or country to country.
* Second year parts only
The warranty period begins on the date of purchase by the first retail consumer or commercial end user, and continues for the period of time stated above.
"Consumer use" means personal residential household use by a retail consumer. "Commercial use" means all other uses, including use for commercial,
income producing or rental purposes. Onceequipment has experienced commercial use, it shall thereafter beconsidered as commercial usefor purposes of
this warranty.
NO WARRANTYREGISTRATIONIS NECESSARYTOOBTAINWARRANTYON BRIGGS& STRATTONPRODUCTS.SAVEYOURPROOFOF PURCHASE
RECEIPT.IF YOU DO NOTPROVIDEPROOFOFTHEINITIAL PURCHASEDATEAT THETIME WARRANTYSERVICEIS REQUESTED,THE MANUFACTURING
DATEOFTHE PRODUCTWILL BE USEDTO DETERMINETHEWARRANTY PERIOD.
We welcome warranty repair and apologize to you for being inconvenienced. Any Authorized Service Dealer may perform warranty repairs. Most warranty
repairs are handled routinely, but sometimes requests for warranty service may not beappropriate. For example,warranty service would not apply if
equipment damage occurred because of misuse, lack of routine maintenance, shipping, handling, warehousing or improper installation. Similarly, the
warranty is void if the manufacturing date or the serial number on the pressure washer or engine has been removed or the equipment has been altered
or modified. During the warranty period, the Authorized Service Dealer,at its option, will repair or replace any part that, upon examination, is found to be
defective under normal use and service. This warranty will not cover the following repairs and equipment:
NormalWear:OutdoorPowerEquipment,likeall mechanicaldevices,needsperiodicpartsandserviceto performwell.Thiswarrantyalsodoesnot
covernormalmaintenancesuchasairfilters,adjustments,fuel systemcleaningandobstruction(duetochemical,lime,dirt, andsoforth).
installation and Maintenance: This warranty does not apply to equipment or parts that have been subjected to improper or unauthorized installation or
alteration and modification, misuse, negligence, accident, overloading, overspeeding, improper maintenance, repair or storage so as, in our judgment,
to adversely affect its performance and reliability. This warranty also does not cover normal maintenance such as air filters, adjustments, fuel system
cleaning and obstruction (due to chemical, lime, dirt, and so forth).
Other Exclusions: This warranty excludes the engine. For engine warranty questions, call American Honda Motor Companyat 1-800-426-7701 or visit
www.honda-engines.com for a dealer Iocator.
This warranty also excludes wear items such as quick couplers, seals, o-rings, pumps that have beenrun without water supplied or damage or
malfunctions resulting from accidents,abuse, modifications, alterations, or improper servicing or freezing or chemical deterioration. Accessory parts,
such as guns, hoses, nozzleextensions (wands), and nozzles, are excluded from the product warranty. This warranty excludes used, reconditioned,
and demonstration equipment and failures due to acts of God and other force majeure events beyond the manufacturers control. 201605E,Rev.-,
10/16/2006
BRIGGS& STRATTONPOWERPRODUCTSGROUP,LLC
JEFFERSON,Wl, USA
=E
21
Page 22

O
Y®
PressureWas er
ProductSpecifications
Max Outlet Pressure............... 2,500 PSi (172.3 BARS)
Max Flow Rate ................... 2.3 GPM (8.7 liters/min)
Water Supply Temperature............... 100°F(38°0) MAX
Shipping Weight ........................ 73 Ibs. (33.1 kg)
CommonService Parts
PumpSaver..................................... 6039
O-Ring Maintenance Kit ........................... 6048
Water Inlet Screen ........................... B2384GS
Engine Oil Bottle ............................... 100005
FuelStabilizer .................................. 5041D
This pressurewasher is ratedin accordanceto the PressureWasher ManufactureAssociation (PWMA) standard PW101
(Testing and Rating Performanceof PressureWashers).
22 (888)611-6708 www.troybiJt.corn
Briggs& StrattonPowerProductsGroup,LLC
900N. Parkway
Jefferson,Wisconsin,53549 U.S.A.
Page 23

,®
0
m m /,_vm _m_m
Limpiadoraa Presi6n
IVlanualdel0
e
r
m
I
Briggs& Stratton PowerProducts Group,LLC
Jefferson,Wisconsin,U.S.A.
Page 24

Graciasper comprar esta limpiadora a presi6n de caHdadTroy-Bilt. Nos complace que hayadepositado su confianzaen la
marca Troy-Bilt. Si se utiliza y mantiene de acuerdo con las instrucciones de este manual, su limpiadora a presiOnTroy-Bilt le
proporcionar_ touches a_os de funcionamiento fiable.
EstemanualcontieneinformaciOn de seguridad para que usted conozca los peligros y riesgos propios de las limpiadoras a
presiOny come evitarios. Puesto que Troy-Bilt no conoce necesariamentetodas ias apiicacionesparalas que se puede usar
esta limpiadora a presiOn,es importante que leay comprenda perfectamenteestas instrucciones antes de poner en marcha o
utilizar este equipo. Gnardeestas instrnccionesparafntnras consnltas.
La limpiadora a presi6nrequiere un montaje final antes de usarla. Consulte ias instrucciones sobre los procedimientos de
montaje final en la secci6n Montaje del presente manual. Siga las instrucciones detalladamente.
D6ndeenconlrarnos
Usted no tendr_ que ir muy lejos paraencontrar el servicio t6cnico de Briggs & Stratton para su limpiadora a presi6n. Consulte
las P_ginas Amarillas. Hay m_s de 30.000 proveedores de Briggs & Stratton autorizados entodo el mundo, proporcionando
un servicio de calidad. Tambi6n puede ponerseen contacto con Atenci6n al Clientede Troy-Bilt Ilamando al (888) 011-6708
o per internet en www.treybilt.corn.Paratoda pregunta relativa a la motor, NameaAmerican HondaMotor Companyal
(800) 426-7701 o visite www.honda-engines.com para Iocalizarun concesionario.
Limpiadoraa Presi6n
NOmerode Modelo
Revisi6n
NOmerode Serie
FTq
Fechade compra
Briggs & Stratton PowerProducts Group, LLC.
900 North Parkway
Jefferson, WI 53549
Copyright © 2007 Briggs & Stratton Power Products Group,
LLC. Reservadostodos los derechos. Quedaprohibida la
reproducci6n o transmisi6n total o parcial de este material,
seacual seaiaforma y el medio empleados para ello, sin
ei permiso previo y per escrito de Briggs & Stratton Power
Products Group,LLC.
FTq FTq FTq
Troy-Bilt® es una marca registrada de MTD y se usaabajo
Ncenciaa Briggs & Stratton Power Products.
2 www.troybilt.corn
Page 25

Tablade Contenido
Seguridad de operario ............................. 4
Descripci6n del equipo ........................................ 4
Reglas de seguridad.......................................... 4
iVlontaje....................................... 7
Desembalela limpiadora a presi6n ............................... 7
Conecteel manubrio y bandejaaccesoria.......................... 7
IVlontajede manguerade sif6n dei detergentea la bomba............. 8
Agregar aceitey combustible al motor ............................ 8
Conectela mangueray el suministro de aguaa la bomba ............. 8
Controlesy caracteristicas......................... 10
Operando..................................... 11
Ubicaci6n del limpiadora a presi6n.............................. 11
COmodarle arranque a su m_quinaNmpiadoraa presiOn............. 12
COmodetenersu m_quina Nmpiadoraa presiOn ................... 13
UtilizaciOnde la bandejade accesorios........................... 13
C6mo usar las puntas de rocio ................................. 14
Limpiezay aplicaci6n del detergente ............................ 14
Enjuagede la m_quinalimpiadora a presi6n....................... 15
Sistemade enfriamiento autom_tico (alivio t6rmico) ................ 15
o
O
O
€1D
iVlantenimiento ................................. 16
Recomendacionesgeneraies................................... 16
Mantenimiento de la limpiadora a presi6n ........................ 16
Mantenimiento del motor ..................................... 18
Despuesde cada uso ........................................ 18
Almacenamiento............................................ 19
Resoluci6n de probiemas.......................... 20
Garantia...................................... 21
Garanfiaparael propietario de una limpiadora a presi6n............. 21
Especificaciones ................................ 22
Especificacionesdel producto.................................. 22
Servicio com0n despide ...................................... 22
w_
N
m.
O_
€1D
3
o
o
3
t_
m_
Espa_ol
Page 26

Seguridaddeoperario
=¢1
Descripci6ndei equipo
Leaesle manual de rnanera cuidadosay
farniliaricese consu lirnpiadoraa presi6n.Conozca
sus usos, suslirnilacionesy cualquier pelioro
relacionado con el misrno.
Este manualcontiene informaci6n sobre una limpiadora a
presi6n que funciona a 2.500 PSi con un caudalde8,7 litros
pot minuto (2.3 GPM).Este sistema residenciai de alto
poder y de altacalidad, poseeuna Ilanta de 10 puigadas,
una bombaequipadacon un sistema de enfriamiento, un
sistema de inyecci6n quimica, una extensi6n de lanzasque
se puedenconectar r@idamente, una variedadde puntas de
rocio, gafas de seguridad, una manguera de alta resistencia
de 25 piesy muchisimo m_s.
Se ha hecho cada esfuerzoposibie para asegurarseque
la informaci6n que apareceenestemanual esexactay se
encuentra actualizada.Sin embargo, nosotros se reserva
el derecho a cambiar, alterar o de otra maneramejorar,
el producto y este documento en cualquier momento, sin
previo aviso.
El Sistemade Control de Emisionesparaestegenerador
est_ garantizadopara juegos est_ndares pot la Agenciade
Protecci6n Ambiental y el Consejode recursosde aire de
California.
El escape del motor de este producto conliene
elernenlos quirnicos reconocidos en el Estado de
California pot producir c_ncer, defectos de nacirnienlo
uotros danos de tipo reproductivo.
Sirnbolos de peligroy sus significados
®
®
®
ADVERTENCIA
® ©
(9 ®
2 5-
® ®
Reglas de seguridad
,_ I_stees el sirnbolode alerta de seguridad.Sirve
para advertir al usuariode un posible riesgo para
su inlegridadfisica. Siga todos los rnensajes de
seguridad que figuren despu_s de este sirnbolo
para evilar lesiones o inclusola rnuerte.
El simbolo de alerta de seguridad (_) se utiiiza con
una palabrade se_aNzaci6n(PELIGRO,PRECAUCION,
ADVERTENCIA),una imageny/o un mensajede seguridad
para advertir al usuario de un riesgo. PELIGROindica un
riesgo que, de no evitarse, provocar_ la muerte o lesiones
de gravedad.ADVERTENCIAindica un riesgo que, de no
evitarse, puede provocar la muerte o lesiones de gravedad.
PRECAUCIONindica un riesgo que, de no evitarse, puede
provocar lesiones moderadas.Cuandoseutiliza sin ei
simbolo de aierta,AVISO indica una situaci6n que podria
producir da_os en ei equipo. Siga en todo momento los
mensajesde seguridad para evitar o reducir el riesgo de
lesiones y de muerte.
El fabricante no puedeanticipar todas las posibies
circunstancias que podrian conlievar peligro. Por io tanto,
las advertenciasde este manual, asi como las etiquetas
y placas de la unidad, no incluyen todo. Si usa un
procedimiento, m6todo de trabajo o t6cnica operativa que
no est6 especificamenterecomendadapot el fabricante,
debe asegurarsede que no entra_apeligro para usted ni
para otras personas.Tambi6ndebeasegurarsede que el
procedimiento, m6todo de trabajo o t6cnica operativa elegida
no hacequeel limpiadora a presi6n deje de set seguro.
®
A - Explosi6n
B - Fuego
C- DescargaEI6ctrica
D - GasesT6xicos
E- Contragolpe
F- Superficie Cafiente
© ®
G- Objetos Voladores
H - Superficies Resbalosas
J- Caer
K - Inyecci6n Lfquida
L - Partes en Movimiento
M - Manual del Operario
4 www.troybiit.corn
Page 27

ADVERTENCIA
AI motorfuncionar, seproducemonOxidode
carbono,un gasinodoroy venenoso.
RespirarmonOxidodecarbonopuedeprovocar
dolor decabeza,fatiga,mareos,vOmitos,
confusion,ataques,n_.useas,desmayoso incluso
la muerte.
Algunassustanciasquimicaso los detergentes
puedenser perjudicialessi inhaladoso ingeridos,
causandola nauseasevera,desmayandoo para
envenenar..
• Opereel limpiadoraa presi6nSOLAMENTEal airelibre.
• Aseg0resedeque los gasesde escapeno puedanentrarpor
ventanas,puertas,tomasdeaire deventilaci6nu otrasaberturas
en unespaciocerradoenel quepuedanacumularse.
• NOarranqueni dejefuncionarel motoren interioresni enzonas
cerradas,aunquehayaventanasy puertasabiertas.
• Utiliceun respiradoro m_.scarasiemprequeexistalaposibilidad
de inhalarvapores.
• Leatodaslas instruccionesdela m_.scaraparaasegurarsedeque
le brindar_,la protecci6nnecesariacontrala inhalaci6ndevapores
nocivos.
ADVERTENCIA
El uso de limpiadora a presiOn puede crear los
_ charcos y superficies resbalosas.
,_ El retroceso de la pistola rociadora puede provocar
o
o
• Extremelasprecaucionessi necesitautilizarla limpiadoraa presi6n
• Sujetefirmementela pistolarociadoraconambasmanoscuando
caidas.
Utilicela limpiadoraapresi6ndesdeunasuperficieestable.
El_.readelimpiezadeber_tenerinclinacionesy drenajesadecuados
paradisminuir la posibilidaddecaidasdebidoasuperficies
resbalosas.
desdeunaescalera,unandamiouotro lugar similar.
apliqueunrociadoaalta presi6nparaevitar lesionescuandose
produzcael retrocesodela pistola..
ADVERTENCIA
Lagasolinay susvaporessonextremadamente
inflamablesy explosivos.
Elfuegoo unaexplosionpuedencausar
quemadurasseveraseinclusivela muerte.
CUANDO ANADA COMBUSTIBLE0 VACIEELDEP6SITO
• Apagueellimpiadoraa presi6n(posici6nOFF)y dOjeloenfriaral
menospor 2 minutosantesderemoverlatapadela combustible.
Aflojela tapalentamenteparadejar quela presi6nsalgadeltanque.
• Lleneo vacieel dep6sitodecombustiblea la intemperie.
• NONenedemasiadoeltanque.Permitaal menosespacioparala
expansi6ndel combustible.
• Sisehaderramadocombustible,esperea queseevaporeantesde
arrancarel motor.
• Mantengalagasolinaalejadade chispas,llamasabiertas,pilotos,
calory otrasfuentesdeignici6n.
• NOenciendaun cigarrilloofume.
CUANDOPONGAENFUNCIONAMIENTOELEQUIPO
• Compruebeque la bujia,elsilenciador,eltap6n deldepOsitode
combustibley el filtro deaireest_.ninstalados.
• NOarranqueel motorsin la bujiainstalada.
CUANDOOPEREELEQUIPO
• NOinclineel motor oel equipo,detal maneraquela gasolinase
puedaderramar.
• NOrocie liquidosinflamables.
CUANDOTRANSPORTE0 REPAREEL EQUIPO
• Transporteorepareel equipoconel tanquede combustiblevacio,
oconlav_.lvulaparaapagarel combustible,apagada(posici6n
OFF).
• Uesconecteel cablede labujia.
CUANDO ALMACENE 0 GUARDE ELEQUIPOCON COMBUSTIBLEEN
ELTANQUE
• AImacenealejadodecalderas,estufas,calentadoresdeagua,
secadorasde ropauotros aparatoselectrodom_sticosqueposean
pilotosu otrasfuentesdeignici6n, porqueenospuedenencender
losvaporesdela combustible.
ADVERTENCIA
ADVERTENCIA
El retroceso(replieguer_.pido)delcabledel
arrancadorpuedeproducirlesiones.Elretroceso
impedir_,queel usuariosuelteel cablea tiempoy
tirar_,desumanoy brazohaciael motor.
Como resultado, podrian producirse fracturas,
contusiones o esguinces.
o
NUNCAtire del cabledelarrancadorsineliminarpreviamentela
presi6n delapistolarociadora.
o
Cuandoarranqueel motor, tire lentamentedelcablehastasentir
unaresistenciay,a continuaci6n,tire r_.pidamentede61paraevitar
su retroceso.
• Despu_sde cadaintentodearranque,cuandoel motorno consiga
arrancar,apunteconla pistola rociadorahaciaunadirecci6n
segura,pulseel bot6n rojoyaprieteel gatilloparadescargarla
presi6n.
• Sujetefirmementela pistolarociadoraconambasmanoscuando
apliqueunrociadoaalta presi6nparaevitar lesionescuandose
produzcael retrocesodela pistola.
_¢ Riesoode eleotrocuoiOn.
• NUNCArociecercade unafuentedeenergiael_ctrica.
El contacto con los cables elOctricos puede
provocar electrocuciOn y quemaduras.
ADVERTENCIA
enredar las manos, el pelo, la ropa, o los
Elarrancador y otras piezas que rotan pueden
accesorios.
• NUNCA utilice la limpiadora a presi6n sin sus carcasas o tapas de
protecci6n.
• NO use ropa suelta, joyas o elementos que puedan quedar
atrapados en el arranque o en otras partes rotatorias.
• Ate para arriba el pelo largo y quite la joyeria.
Espa_ol
Page 28

ADVERTENCIA
ADVERTENCIA
El contactoconla zonadelsilenciadorpuede
producirquemadurasgraves.
Los gasesy el calordeescapepuedeninflamarlos
materialescombustiblesy lasestructuraso dafiar
el dep0sitode combustibley provocarun incendio.
o
NOtoquelassuperficiescalientesy evitelos gasesdelescapea
altatemperatura.
o
Permitaqueel equiposeenfrieantesdetocarlo.
o
Dejeunespaciominimode 1.5m (5 pies)alrededordellimpiadora
apresi6n, incluidalapartesuperior.
o
ElC6digodeNormativaFederal(CFR,Titulo36: Parques,Bosques
y PropiedadRiblica) obligaainstalarunapantallaapagachispas
en los equiposcon motordecombusti6ninternoy a mantenerla
en buenascondicionesdefuncionamiento,conformeala
norma5100-1C(o posterior) delServicioForestaldelaUSDA.
Enel EstadodeCalifornia,la leyexigeel usode unapantalla
apagachispas(Secci6n4442 delC6digodeRecursosRiblicos de
California).Enotros estadospuedehaberleyessimilaresen vigor.
ADVERTENCIA
El chorrodeaguaa alta presiOnqueesteequipo
produce,puedeatravesarla piely los tejidos
subcut_.neos,provocandolesionesdegravedadque
podriandar lugara laamputaciOnde un miembro.
La pistola rociadoracontieneaguaa alta
presi0ninclusocon el motor paradoy el agua
desconectada,que puedecausarla herida.
NOpermitaen ningSnmomentoqueNINOSoperenla
m_.quinalimpiadoraa presiOn.
NUNCAreparela mangueradealta presiOn.Remplacela.
NUNCAutiliceningSntipo deselladorpararep.ararunafuga
en unaconexiOn.Sustituyalajuntatoncao lajuma.
NUNCAconectelamangueradealtapresiOnal prolongador
de la boquilla.
Mantengaconectadala mangueraa la m_.quinao a la pistola
de rociadocuandoel sistemaest_presurizado.
SIEMPREquepareel motor,apuntecon lapistola rociadora
haciaunadirecciOnsegura,pulseel botOnrojoy aprieteel
gatillo paradescargarlapresiOn.
NUNCAapuntelapistolaa la gente,animaleso plantas.
NOfije la pistolarociadoraenla posiciOnabierta.
NOabandonela pistolarociadoracuandola m_.quinaest6
en funcionamiento.
NUNCAutiliceunapistola rociadoracuyoseguroo
protecciOnparael gatillonoest6enperfectoestadode
funcionamiento.
AsegQreseentodo momentodeconectarcorrectamentela
pistolarociadora,lasboquillasy los accesorios.
.Q
o
seencuentracercadedondese est,.utilizando.
o
Antesde poneren marchala limpiadoraa presidn,aseg0resede
o
Riesgo de lesiones oculares.
Elagua rociada puede salpicar o propulsar objetos.
Utilicesiempregafasdeprotecci6ncuandoutilice esteequipoo si
Ilevargafasde proteccidnadecuadas.
UtiliceSIEMPRElas gafasdeseguridadapropiadas.
AVISO
El rociado de alta presi0n puede dafiar elementos fr_.giles,
incluyendo el vidrio.
• NOdirija lapistola rociadorahaciaun cristalcuandoutilicela punta
derocio derojade0°.
• NUNCAapuntela pistolaaplantas.
AVISO
Eltratamiento inadecuado del limpiadora a presi0n puede
dafiarlo y acortar su vida productiva.
Si ustedtienealgunapreguntaacercadelasfinalidadesde usodel
generador,preg0nteleasu concesionarioo contactea Briggs&
StrattonPowerProducts.
NUNCAdeber_.nser operadaslas unidadesconpartesrotaso
ausentes,o sin la cajao cubiertasdeprotecci6n.
o
NOeludaning[in dispositivodeseguridaddeestam_.quina.
o
NOintentealterarla velocidadcontrolada.
o
NOutilicela limpiadoraa presi6nporencimadesu presi6n
nominal.
• NOhaganingunamodificaci6nenla limpiadoraa presi6n.
Antesde porteren marchalam6,quinalimpiadoraa presi6nen
climafrio, revisetodaslas partesdelequipoy asegQresedequeno
sehayaformadohielosobreelias.
NUNCAmuevala m6,quinahalandola mangueradealta presi6n.
Utilicela manijaque vienecon la unidad.
Revisequeel sistemadecombustibleno presentefugasosignos
dedeterioro,como manguerasdesgastadaso porosas,sujetadores
flojos o ausentes,tapao tanqueda_ados.Corrijatodoslos
defectosantesdeoperarla m_.quinalimpiadoraa presi6n.
Elequipode altapresi6nest,.dise_adoparaser utilizado
UNICAMENTEcon laspartesautorizadasBriggs& StrattonPower
Products.Si utilizaesteequipocon partesqueno cumplanconlas
especificacionesminimas,el usuarioasumetodos los riesgosy
responsabilidades.
6 www.troybilt.corn
Page 29

IVlo.taje
Su limpiadora a presiOnrequierede ciertos procedimientos
de montaje y solo estar_ listo paraset utilizado despuOsde
haberle suministrado servicio con el combustible y aceite
recomendados.
Si usted tiene problemas con ei montaje de su limpiadora a
presi0n, pot favor iiame a ia iinea de ayuda paralimpiadora a
presiOnal (888) 611-6708. Si Ilamar para la ayuda,tiene por
favor el modelo, la revision y el n0mero de serie de etiqueta
de datos disponible.
Desembalela limpiadora a presi6n
1. Saquetodo el contenido de la caja de carton, a
excepci0nde la limpiadora a presi0n.
2. Abra completamente la caja de carton cortando cada
una de sus esquinas de arriba abajo.
3. Saquela limpiadora a presi0n de la cajade carton.
Losartfculosque se encue.tran en la caja son:
* Unidadprincipal
* Manguera de alta presiOn
, Manubrio
* Limpiar el tanque
, Pistola rociadora
, ExtensiOndela lanzacon las piezasde conexiOnr_pida
, BoteNade aceitepara motor
, Bolsade accesorios (incluye Io siguiente):
, Ganchode alambredesoporte de la pistola
* Manual del operario
* Manual del operario del motor
, Tarjetaderegistro del propietario
, Bolsacon 4 puntas de rociado de conexiones
r_pidas multicolores
, Gafasdeseguridad
, Piezasparalamanubrio (incluye Iosiguiente):
, Pernodel soporte (2)
, Perillapb]stica (3)
, Pinzasde _]rbol(4)
A prepara su arandela de la presi6n para la operaci6n,
ustednecesitar_a realiza estas tareas:
1. Lleney mandeen tarjeta de matricuia.
2. Conecte manubrio a unidad principal.
3. Conectelamanguerade sif0n del detergentea la bomba.
4. A_adaaceite al motor.
5. A_adagasolina al tanque de combustible.
6. Conecte mangueraa alta presi0n a pistola rociadora y a
bomba.
7. Conecteel suministro de agua a bomba.
8. Conecte boquilla la extension al pistola rociadora.
9. Selecto/conectar_pido conectapuntas de rocio a la
extensionde la boquilla.
Conecteel manabrio y bandeja accesoria
1. Coloqueel manubrio (A) sobre los soportes del mismo
(B) que ya est_n adheridosa la unidad principal.
Aseg0resede que los orificios (C) en ei manubrio
estOnalineadoscon los orificios (6) en los soportes del
mismo manubrio.
o
NOTA:Tal vezser_ necesariomover los soportes del
manubrio de un lado a otto para alinear el manubrio de tal
manera que puedadeslizarse sobre los soportes del mismo
manubrio.
2. Inserte el perno del soporte (D) a travOsde los orificios
desdefuera de la unidady sujete una perilla de pb]stico
(E) desde ei interior de la misma unidad. Apriete
manualmente.
3. Inserte ei dep0sito de limpieza (F) en la estructura de
alambre (G) del asa (H) y presi0nelo firmemente hacia
aba _osici0n.
NOTA:Aseg0resede que la v_ivula de paso de detergente
y el tubo de inyecci0nde detergente queden hacia abajo al
instalar el depOsitode limpieza.
4. Coloque ia bandejade accesorios (J) sobre los orificios
del manubrio (K) (vista desde la partedelantera de
la unidad). Presioneias pinzasde _rbol (L) para
introducirlas en los orificios hastaque quedena nivel
con la bandejade accesorios.
Espa_ol
Page 30

.
Inserteel gancho de alambrede soporte (A) de ia
pistola a trav6s del orificio situado justo encima dei
panel,en el lado izquierdodel asa(vista desdeia parte
delanterade la unidad). Sujete el gancho de aiambre en
su posici6n y coloque un pomo de pl_stico (B) desdeel
interior de la unidad.Apriete a mano.
/ /
/ /
i /
/
o
.
Inserteias puntas de rociado muiticoiores y ei resto de
los accesoriosen los espacioscorrespondientes de la
bandejade accesorios. Consulte C6mo Usarla Bandeja
deAccesorios.
Conecle ia mangueray ei suminislrode aguaa
ia bomba
AVISO
NOhagafuncionar la bomba si no tiene ei suministro
conectadoy abierto.
• Elda_oa lalimpiadoraa presi6n,resultadode ladesatenci6na
estaprecauci6n,noser_,cubiertoporla garantia.
NOTA:Antes de conectar las mangueras,retire y deseche
los tapones de transporte de la salida de alta presi6ny de la
entradade agua de la bomba.
1. Retrocedalamangueraa altapresi6n y conecte a la
basede la pistola rociadora. Aprietecon la mano.
iVlontajede manguera desif6n del detergente a
la bomba
Conectela manguera de sif6n de detergente (C) al
acoplamientodentado de la manguera (D) en la bomba.
,_ ADVERTENCIA
Agregar aceile y combuslibleal molor
* Coloque la limpiadora a presi6n en una superficie plana
y nivelada.
, Consulteel manualdel operario del motor paraa_adir
al motor el aceitey el combustible recomendado.
AVISO
Cuaiquierintento paraarancar ei motor antesde haberle
proporcionado el mantenimiento apropiado con el aceite
recomendado,podria ocasionar la falla del motor.
• Consulteelmanualdeloperariodelmotorparaa_adiral motor
ei aceitey elcombustiblerecomendado.
• Elda_oa iaiavadoraa presi6n,resultadodeladesatenci6na
estaprecauci6n,noser_,cubiertoporlagarantfa.
NOTA:Verifique el aceite del motor de manerafrecuente
cuando 6stese esfuercedemasiado.Consulteel manual
dei operario del motor para conocer curies son las
recomendacionesal respecto.
Elchorrodeaguaa alta presiOnqueesteequipo
produce,puedeatravesarla piely los tejidos
subcut_.neos,provocandolesionesdegravedadque
podriandar lugara laamputaciOnde un miembro.
• NUNCAconectela manguerade alta presiOnal prolongador
dela boquilla.
• Mantengaconectadala mangueraa la m_.quinao a la pistola
derociadocuandoel sistemaest6presurizado.
• Aseg0reseentodo momentode conectarcorrectamentela
pistolarociadora,lasboquillasy los accesorios.
8 www.troybiit.com
Page 31

2. Conecteel otro extremo de la mangueraa altapresi6n,
a la salidadealta presi6n de la bomba. Apriete con la
mano.
3. Hagacorrer el agua a trav6s de la manguera de
su jardin por 30 segundos para limpiarcualquier
escombro que se encuentre en ella. Corteel agua.
INPORTANTE:Haceno agua de parar de siphon para el
abastecimiento de agua. Useagua SOLOfria (menos que
100°F).
4. Antes de que conecte la manguera de jardin a la
entrada de agua, inspeccione el colador de la entrada
(A).Limpieelcolador si tiene residuos o solicitesu
remplazosi est_ da_ado. NO haga funcionarla m_quina
limpiadoraa presi6n si el colador de la entrada estA
da_ado.
5. Conecte la manguerade jardin (no exceder50 pies en
la Iongitud) a la entrada del agua. Aprietecon la mano.
AVlSO
Si se conecta a la bomba una v_lvula unidireccional
(igualador de presi6n o v_lvuia de retenci6n), se
producir_n da_os en la bomba o en el conector de
entrada de agua..
• DEBEhaber un mfnimo de3 metros (10 pies) de manguera
de riego fibre entre ia entradade ia limpiadora a presi6n y
cualquier dispositivo, como una vD,Ivula unidireccional.
• Lagarantfa quedarD,anulada si ei equipo presenta da_os
producidos por la conexi6n de una vD,Ivula unidireccional a la
bomba.
ADVERTENCIA
_,_-lj_ Riesgodelesionesoculares.
Elaguarociadapuedesalpicaro propulsarobjetos.
• Utilicesiempregafasdeprotecci6ncuandoutiliceesteequipoosi
seencuentracercadedondeseestD.utilizando.
* Antesde poneren marchala limpiadoraa presi6n,asegQresede
Ilevargafasde protecci6nadecuadas.
* UtiliceSIEMPRElasgafasdeseguridadapropiadas.
o
6. Abra el grifo, pulse el bot6n rojo (B) de la pistola
rociadoray apriete el gatillo paraeliminar el aire y las
impurezasdel sistema de bombeo.
Lista de revisionpreviaal arranque del motor
Reviseia unidad para asegurarseque ha Ilevado a cabo los
siguientes procedimientos:
1. AsegOresedeleer las secciones Reglas deseguridady
C6mo usarsu m6quina limpiadora a presi6n antes de
usar la m_quinalimpiadora a presi6n.
2. Cerci6reseei maneciiia esseguro.
3. Revisequehayasido depositado aceite y est6 al nivel
correcto en la cajadel cigfJe_aldel motor.
4. Deposite la gasolina adecuadaen el tanquedel
combustible.
5. Revisequetodas lasconexiones de las mangueras
(aita presi6n y suministro de agua) est6n apretadas
correctamentey que no existan dobleces,cortes o da_o
de la mangueradealta presi6n.
6. Proporcione el suministro de aguaadecuado.
Espa_ol
Page 32

o
x=,,=
t=
o
Controlesy caracteristicas
/--_ Leael IVlanualdel Operario y las reglasde seguridadantesde porteren marcha s. m_quina limpiadoraa presi6n.
Comparelas ilustraciones con m_quinalimpiadora a presi6n para familiarizarse con las ubicacionesde los
. . SU
d_ferentescontroles y aiustes. Guardeeste manualpara referenciasfuturas.
®
A - Pistola de Rociado -- Controla la aplicaci6n de agua
sobre ia superficie de limpieza con el gatillo. Incluye
cerrojo de seguridad.
B - Extensi6n para Boquillas conConexi6n R_pida - Le
permite usar tres puntas de rociado diferentes.
C- IVlanguerade AIta Presi6n -- Conecteun extremo a la
pistola de rociadoy el otto extremo a la toma de alta
presi6n.
D - Tapa del Dep6sitodel Aceite -- Llene el motor con
aceite aqui.
E - Bomba-- Desarrollaalta presi6n de agua.
F - Autom_tico se Enfria Sistema -- Los ciclos regan
pot bomba cuando agua alcanza125°-155°F.Entibiar
agua descargar_de la bomba en el suelo. Estesistema
previeneel da_o interno de bomba.
G - Filtro de Aire -- EIeiemento de fiitro tipo seco iimita
la cantidad de suciedady polvo que se introduce en el
motor.
H - Arrancador de Retroceso -- Usado para arrancar el
motor manualmente.
J - Tanque del Combustible -- Lleneel tanque con gasoiina
regular sin contenido de plomo en este punto. Siempre
habitaci6n de hoja para la expansi6ndel combustible.
K- EtiquetadeAdvertencia e Instrucciones--Identifica los
riesgos e indica el procedimiento adecuado de puesta en
marcha o de paradade la limpiadora a presi6n.
L - Tanque de Limpieza -- Permite almacenar hasta
3,78 litros (1 gal6n) de detergente parala limpiadora a
presi6n.
IVl- Bandeja de Accesorios - Permite almacenar
c6modamente los accesorios de serie y opcionales
(cepiiios, turbo variiias, etc.).
N - Puntas de Rociado - Detergente,0°, 15°, 40°: para
diferentes alta presi6n aplicaciones de limpieza.
NOmostrado:
Calcomania Ejemplar de Datos(eJtrasero cercanode
plato despreciable) -- Proporciona ei modeloy el n_mero
de serie de limpiadora a presi6n. Tenga pot favor estos
prontamente disponible cu_ndo Ilamar para la ayuda.
Controles de Motor -- Vea el manualdel motor para detalles
en controles de motor.
Toma de AIta Presi6n -- Conexi6npara la mangueradealta
presi6n.
Entrada de Agua -- Conexi6npara la manguerade jardin.
10 www.troybiJt.com
Page 33

Operando
Si tiene problemas operando su m_quina limpiadora a
presiOn,por favor Ilamea la linea de ayuda param_quinas
limpiadora a presi0n al (888) 611-6708.
Ubicaci6ndel lirnpiadoraa presi6n
Espaciolibre alrededor deJlirnpiadora a presi6n
ADVERTENCIA
_ Los gasesy el calordeescapepuedeninflamarlos
• Dejeunespaciominimode152cm(5pies)alrededordel
Coioquela limpiadora a presiOna la intemperie en unazona
en donde no se acumulen gasesde escapemortales. NO
instale el limpiadora a presiOnen iugaresen los que los
gasesde escape(A) se puedanacumuiar o entrar en un
edificio que pueda estar ocupado. AsegOresede que los
gasesde escapeno puedanentrar pot ventanas, puertas,
tomas de aire deventilaciOnu otras aberturas en un espacio
cerrado en ei que puedanacumularse. Tengaen cuenta los
vientosy las corriente de aire preponderantescuandoelija la
ubicaciOndel limpiadora a presiOn.
materialescombustiblesy lasestructuraso da_ar
el dep0sitode combustibley provocarun incendio.
limpiadoraapresiOn,incluidalapartesuperior.
ADVERTENCIA
AI motorfuncionar, seproducemon0xidode
carbono,un gasinodoroy venenoso.
Respirarmon0xidodecarbonopuedeprovocar
dolor de cabeza,fatiga, mareos,v0mitos,
confusion,ataques,n_.useas,desmayoso incluso
lamuerte.
• Opereellimpiadoraa presiOnSOLAMENTEal airelibre.
• Aseg[iresede quelos gasesdeescapeno puedanentrarpor
ventanas,puertas,tomasdeaire deventilaciOnuotrasaberturas
en unespaciocerradoenel que puedanacumularse.
• NOarranqueni dejefuncionarel motor eninterioresni en zonas
cerradas,aunquehayaventanasy puertasabiertas.
w.
N
m,
O_
Espa_ol
11
Page 34

,
C6modarle arranquea su m quina limpiadoraa
presi6n
Para darle arranquea su m_quina limpiadora a presiOn
movida a motor por primera vez, siga estasinstrucciones
Cuandoarranque el motor, col6quese en la posici6n
recomendaday siga las instrucciones del manual del
operario dei motor. Consultetambi6n la etiqueta de
instrucciones situada en la limpiadora a 9resi6n.
paso a paso. Esta informaciOnacerca del arranque inicial
tambi6n se aplica cuandovayaadarlearranquealmotor
despu6s de haber dejado de la m_quina limpiadora a presiOn
fuera de uso por al menos un dia.
1. Coloquela m_quinaNmpiadoraa presiOnenun _rea
cercanaa una suministro de aguaexterior capazde
abasteceragua a un volumen mayor de 3.3 galones por
minuto en no menos que 20 PSi en el fin de arandela
de presiOnde la mangadel jardin.
2. Revisequela manguerade alta presiOnseencuentre
conectadafirmemente a la pistola de rociado y a la
bomba. Vea Montaje.
3. Aseg0reseque la unidad est6 nivelada.
4. Conecte la manguerade jardin a la entrada del agua.
Aprietelacon la mano.
AVlSO
NOhagafuncionar la bombasi notiene el suministro
conectadoy abierto.
• Elda_oa lalimpiadoraa presi6n,resultadode ladesatenci6na
,,==
_O
O_
N
.w
=m
estaprecauci6n,noser_,cubiertoporlagarantfa.
5. Abra el agua,apuntecon la pistola hacia una direcci6n
seguray apriete el gatillo para eliminar el aire y las
impurezasdel sistema de bombeo.
6. Conecte la extensi6nde la boquiiia a la pistola
rociadora.Apri6tela con las manos.
ADVERTENCIA
Elretroceso(replieguer_.pido)delcabledel
arrancadorpuedeproducirlesiones.Elretroceso
impedir_,queel usuariosuelteelcablea tiempoy
tirar_,desu manoy brazohaciael motor.
Oomo resultado, podrian producirse fracturas,
contusiones o esguinces.
• NUNOAtire delcabledelarrancadorsin eliminar previamentela
presi6nde lapistolarociadora.
• Ouandoarranqueelmotor,tire lentamentedelcablehastasentir
unaresistenciay, a continuaci6n,tire r_.pidamentede_1paraevitar
su retroceso.
• Despu_isde cadaintentodearranque,cuandoelmotor no consiga
arrancar,apuntecon lapistola rociadorahaciaunadirecci6n
segura,pulseel bot6nrojo y aprieteelgatillo paradescargarla
presi6n.
• Sujetefirmementelapistola rociadoraconambasmanoscuando
apliqueun rociadoaaltapresi6nparaevitarlesionescuandose
produzcaelretrocesode la pistola.
12 www.troybiit.com
Page 35

ADVERTENCIA
El chorrodeaguaa alta presiOnqueesteequipo
produce,puedeatravesarla piely los tejidos
subcut_.neos,provocandolesionesdegravedadque
podriandar lugara laamputaciOnde un miembro.
La pistola rociadoracontieneaguaa alta
presiOninclusocon el motor paradoy el agua
desconectada,que puedecausarla herida.
• NOpermitaen ningOnmomentoqueNINOSoperenla
maquinalimpiadoraapresiOn.
• Mantengaconectadala mangueraa la m_.quinao a la pistola
de rociadocuandoel sistemaest6presurizado.
• NUNCAapuntelapistolaa la genre,animaleso plantas.
• NOfije la pistolarociadoraen la posiciOnabierta.
• NOabandonelapistolarociadoracuandola m_.quinaest6
en funcionamiento.
• NUNCAutiliceunapistola rociadoracuyoseguroo
_jrotecciOnparael gatillono est6en perfectoestadode
ncionamiento.
• AsegOreseentodo momentodeconectarcorrectamentela
pistolarociadora,lasboquillasy los accesorios.
ADVERTENCIA
El contacto con iazonadei silenciador puede
producir quemadurasgraves.
Losgasesy el calor de escapepuedeninflamar
los materialescombustibles y las estructuraso
da_ar el dep6sito de combustibley provocar un
incendio.
e
NOtoque las superficies caNentesy evite los gasesdel escape
a altatemperatura.
e
Permitaque el equipo se enfrfeantes detocarlo.
e
Dejeun espacio mfnimo de 1.5 m (5 pies) alrededor del
Nmpiadoraa presi6n, incluida la parte superior.
e
EiC6digode Normativa Federal(CFR,Titulo 36: Parques,
Bosquesy Propiedad P_blica) obiigaa instalar una pantaNa
apagachispasen los equipos con motor de combusti6n interno
y a mantenerla en buenascondiciones defuncionamiento,
conforme a la norma 5100-1C(o posterior) del Servicio
Forestalde la USDA.En el Estadode California, ia ley exigeel
uso de una pantallaapagachispas(Secci6n4442 delC6digo de
RecursosP_blicos deCalifornia). Enotros estados puede haber
leyessimilares envigor.
.
ApunteSIEMPREcon ia pistola rociadora haciauna
direcci6n segura, pulse el bot6n rojo y aprieteel gatillo
para descargar el agua a alta presi6n restante.
ADVERTENCIA
Elchorrodeaguaa alta presi6nqueesteequipo
produce,puedeatravesarla piely los tejidos
subcut_.neos,provocandolesionesdegravedadque
podriandar lugara laamputaci6ndeun miembro.
Lapistolarociadoracontieneaguaa alta
presi6ninclusocon el motor paradoy el agua
desconectada,que puedecausarla herida.
• Mantengaconectadala mangueraa la m_.quinao a la pistola
derociadocuandoel sistemaest6presurizado.
• SIEMPREquepareel motor,apuntecon lapistolarociadora
haciaunadirecciOnsegura,pulseel botOnrojoy aprieteel
gatilloparadescargarlapresiOn.
IMPORTANTE:Lapistola rociadoracontiene aguaa alta
presiOnincluso con el motor paradoy el agua desconectada.
Utiiizaci6nde la bandeja de accesorios
Launidad est_equipada con una bandejade accesorios con
habit_culos para guardar ia pistola rociadora, el prolongador
de la boquilla y las puntas de rocio. La partedelantera de la
bandejatambi6n incluye un gancho para sujetar la manguera
de alta presiOn.
NOTA:El orificio adicional de la bandejapermite guardar un
cepillo. La pinzaadicional de la bandejapermite guardar una
boquilia turbo. La limpiadora a presiOnNO inciuye el cepillo
ni ia boquiiia turbo Puedeadquirir estoselementos como
accesorios opcionales.
1. Paseelprolongador de la boquilla pot el orificio de la
bandejade accesoriossegOnse indica.
N
m.
0_
C6rflodelener su mdquinalimpiadoraa presi6n
1. Sueiteel gatiilo de la pistoia rociadora y dejefuncionar
el motor al ralenti durantedos minutos.
2. Pareel motor tal y como seexpNcaen el manual del
operario del motor.
Espa_ol
13
Page 36

2. Coloque la pistola rociadoraen el orificio situado a la
derechade la bandejade accesorios.
NOTA:Tambi6n puede usar el gancho de alambrede soporte
de la pistola montado en el asaparaguardarla pistola y el
prolongador regulablede la boquilla, como se muestra en la
secciOn6aracterfsticas y mandos.
3. Inserte las puntas de rociado multicolores enel orificio
de la bandejade accesorios como se muestra.
4. Cuelgue la manguerade alta presiOndel gancho situado
en la partedelanterade la bandejade accesorios, como
se muestra.
C6mousar las punlasde rocio
La conexi6n r_pidade la extensi6nparaboquillas le permite
usartres puntas de rociodiferentes.Siempre que est6
activadoel seguro del gatillo de ia pistola rociadora,se pueden
cambiar laspuntas de rociado con la iimpiadora a presi6n
en funcionamiento.Las puntas de rociotienen diferentes
_atronesde rociadocomo se ilustra a continuaci6n.
.
Seleccionela puntade rociado deseada:
• Paraenjuagadosuave,seleccione la punta de
rociado blancade 40° o amarilla de 15°.
• Parafregar la superficie, seleccione las puntas de
rociado roja de 0°.
Paraaplicar productos detergente,seleccionela
punta de rociadonegra.
.
Despiacehacia atr_s el aniNo,inserte ia nuevapuntade
rociado y suelte el anillo. Tire de ia punta de rociado
para comprobar que est_ bien montada.
USO
inclina
e
Para una iimpieza m_s efectiva,mantenga la boquiiia de
rociado de 8 a 24 pulgadasde la superficie de limpieza.
Si coloca ia boquiiia de rociadodemasiadocercapodria
da_ar ia superficie, especiaimentecuandoest6usando
el modo de alta presiOn.
NOcoloque la boquiNaa menos de 6 pulgadascuando
est6 limpiando Ilantas.
Limpieza y aplicaci6n del delergenle
A PRECAUC=6N
Los productos quimicos pueden provocar lesiones de
gravedady/o da_os materiales.
F
L I I I
La Presi6nBaja
Negra
Usadapara aplicar
detergentes
• NUNCAutiliceifquidosc_,usticoscon ialimpiadoraa presi6n.
_O
N
.w
=m
LaPresi6n Alia
• UseEXCLUSIVAMENTEdetergenteso jabonesespecialesparala
Nmpiadoraa presi6n.Sigatodaslasinstruccionesdelfabricante.
Para aplicar el deiergenie, siga los siguieniespasos:
1. Reviseeluso de la puntas de rocio.
2. Prepare la soiuci6n detergentesiguiendo las
instrucciones del fabricante.
3. Viertadetergenteenel Nmpiarel tanque.
NOTA:Lacapacidaddellimpiarel tanqueesde 3,781(1 gal6n).
I I i I
I I i I
?Y
I I i I
I I i I
I
4. Aseg0resede que la puntas de rocio de detergente
negra est_ montada.
NOTA:NOsepuedeaplicardetergenteconlaspuntasderocio
40° Bianca
1750 PSi
2.3 GPIVl
Para carnbiarlas puniasde retie:
15° Amarilla 0° Roja
2200 PSi 2500 PSi
2.2 GPM 2.0 GPM
dealtapresi6n(Blanc&Amarillao Roja).
5. AsegOresedeque ia manguera del jardin est_
conectadaa la entrada de agua.Compruebeque ia
manguerade alta presi6n est_ conectadaa ia pistoia
rociadoray a la bomba. Abra la alimentaci6n de agua.
1. Desplacehaciaatr_s el anillo del conector r_pido y tire
de las puntas de rocio. Guardeias puntas de rocio en el
AVISO
soporte de la bandejade accesorios.
Usteddeber_conectar todas las mangueras antes de
ADVERTENCIA
El chorrodeaguaa alta presiOnqueesteequipo
produce,puedeatravesarla piely los tejidos
subcut_.neos,provocandolesionesdegravedadque
podriandar lugara laamputaciOnde un miembro.
dade arranqueal motor.
• Arrancar el motor sin tener todas las mangueras conectadasy
sin el suministro deaguaABIERTO(ON) causar_,el da_o de la
bomba.
• Elda_o a la limpiadora a presi6n, resultadode la desatenci6na
esta precauci6n,no ser_,cubierto por la garantfa.
• NUNCAintercambiepuntasde rociosin haberaseguradoel
cerrojode seguridaddelgatillo.
• NOtuerzapuntasde rocioal rociar.
14 www.troybilt.corn
Page 37

6. Pongaen marcha el motor siguiendo las instrucciones
de la secciOnC6moponeren funcionamiento la
Iimpiadora apresi6n.
7. Gire la Ilave de paso de detergentedel depOsitode
limpieza hasta la posiciOn"On" (A).
,
Aplique el detergentesobre lasuperficie seca,
comenzandoen la parteinferior del Areay dirigi6ndose
haciaarriba, utilizando movimientos largos, parejosy
superpuestos.
,
Permitaque el detergente "penetre" de 3 a 5 minutos
antes de enjuagar.Vuelva a aplicarlo cuando sea
necesario paraevitar que la superficie seseque.NO
permita que el detergente seseque.Si permite queel
detergente seseque, la superficie podria quedar con
manchas.
Enjuagede la m_quina limpiadoraa presi6n
Para Enjuage:
1. AsegQresedeque lavAIvula de paso de detergenteestA
en la posiciOn"Off".
2. Retire la puntas de rocio de detergente negradel
prolongador de la boquilla.
3. Seleccionee instale la puntas de rocio de alta presiOn
deseadaconforme a las instrucciones de la secciOn
C6mo usarel puntas de rocio.
,
IVlantengalapistoia de rociadoa una distanciasegura
del Areaque planea rociar.
ADVERTEHCIA
Elretrocesodela pistolarociadorapuedeprovocar
caidas.
• Utilicela limpiadoraapresiOndesdeunasuperficieestable.
• Extremelasprecaucionessi necesitautilizarla limpiadora
a presiOndesdeunaescalera,un andamiouotto lugar
similar.
Suetefirmementela pistolarociadoraconambasmanos
cuandoap que un rociadoa altapresiOnparaevitar
lesionescuandoseproduzcaelretrocesodela pistola.
5. Aplique un rociado de alta presiOnenun Areapeque_a,
despu6s revise si la superficie presentadaRos.Si no
encuentra da_os, puedecontinuar con el trabajo de
limpieza.
6. Comienceenlaparte superior del Areaqueva a
enjuagar,dirigi6ndose hacia abajocon los mismos
movimientos superpuestos que utilizOpara el limpieza.
Sistema de enfriarnientoautom_tico(aiivio
t6rrnico)
El agua que circula dentro de la bomba puedealcanzar
temperaturas entre los 51°-68°C (125°-155°F)si hace
funcionar el motor de su mAquinaiimpiadora a presi6n de
3 a 5 minutos sin oprimir el gatillo de la pistola de rociado.
Cuandoel agua alcanzadicha temperatura, el sistema
de enfriamiento automAtico se activay enfria la bomba
descargando agua caliente en el piso.
N
m_
O_
_z
Espa_ol
15
Page 38

IVlantenimiento
iVlantenimientode la limpiadoraa presi6n
Recomendacionesgenerales
El mantenimiento peri6dico mejorar_ el rendimiento y
prolongar_ la vida 0til del limpiadora a presi6n. Si necesita
asistencia,consulte con un distribuidor cuaNficado.
La garantia de la m_quina limpiadora a presi6n NOcubre
los elementos que han side sujetos a abuseo negligencia
per parte del operador. Parahacerv_lida la cobertura total
de la garantia, el operador deber_ mantener la lavadora
de presi6n tal y come se indica en el manual, incluyendo
su adecuado almacenamiento,come se describe en la
secci6nAlmacenamiento en el Invierno y Almacenamiento
prolongado.
NOTA:Debetiene las preguntas acercade reemplazarlos
componentes en su m_quinalimpiadora a presi6n, Ilaman
per favor (888) 611-6708 para la ayuda,
• AIgunos ajustestendr_n que hacerseperi6dicamente
para mantener adecuadamentesu m_quinalavadoraa
presi6n.
• Todos los servicios y ajustes deber_n hacerseper Io
menos unavez en cadaestaci6n.
Unavez al a_o, usted deber_ limpiar o remplazarla
bujia y ei filtro de aire. Unabujia nueva y un filtro de
aire limpio garantizan una mezclade combustible-aire
adecuaday le ayuda a su motor afuncionar mejor y
a tenet una vida 0tii m_s proiongada. Perfavor, para
mayores detalles, consulte el manual del operario del
motor.
Lirnpielos residues
Limpiea diario, o antes de cadause, los residues
acumulados en el limpiadora a presi6n. Mantengalimpias las
conexiones, los muelles y los mandos. Limpie todo resto de
combustible de la zona que rodea ai silenciador y de detr_s
del mismo. Inspeccione las ranuras paraaire de enfriamiento
y la aperturadel iimpiadora a presi6n. Estasaperturas
deber_n mantenerselimpias y despejadas.
Mantenga limpios los componentes del limpiadora a presi6n
para reducir el riesgo de sobrecalentamiento e ignici6n de
los residues acumulados.
• Utilice un trapo h0medo para limpiar las superficies
exteriores.
AVISO
Eitratamiento inadecuadodel iimpiadora a presi6n puede
da_arioy acortar su vida productiva.
• NOinsertecualquierobjetoatrav6sdelasranurasde
enfriamiento.
• Puedeusar un cepillo de cerdas suavespara retirar la
suciedad endurecida,aceite,etc.
• Puedeusar una m_quinaaspiradora paraeliminar
suciedady residues sueltos.
Revise y limpie el colador deentrada
Examineel coiador de entradade ia manguerade jardin.
Limpielo si est_ tapadoo remplacelosi est_ rote.
Antes de cada use
1. Reviseel nivel de aceite del motor.
o
.m
E
.n
2. Limpie los residues.
3. Revisesi existen da_osen el colador de la entradade
agua.
4. Revisesi existen fugas en la mangueradealta presi6n.
Revise la rnanguerade alta presi6n
Lasmanguerasde alta presiOnpuedendesarrollar fugas
debido al desgaste,dobleces o abuse. Revise la manguera
antes de cadause. Revisesi existen cortes, fugas,
abrasiones,levantamiento de ia cubierta, da_o o movimiento
de los acopiamientos.Si existe cualquierade estas
condiciones, remplace la manguerainmediatamente.
5. Revisesi existen da_osen limpiar el tanquey
mangueradel detergente.
6. Revisesi existen fugas en el conjunto de la extensi6n
para boquillas y pistola.
7. El aclaradofuera mangadejardin para limpiar fuera
escombros.
Bernba de aeeite
NOreaiice ninguna operaci6nde mantenimiento con el aceite
Elchorrodeaguaa alta presiOnqueesteequipo
produce,puedeatravesarla piely los tejidos
subcut_.neos,provocandolesionesdegravedadque
podriandar lugara laamputaciOnde un miembro.
o
NUNCAreparela mangueradealta presiOn.Remplacela.
o
Remplacelaconunamangueraquecumplaconlacapacidad
minimadepresiOnde su limpiadoraapresiOn.
ADVERTENCIA
de la bomba. La bomba se suministra prelubricaday seliada
en f_brica, y no requieremantenimiento adicionaldurante su
vida 0til.
16 www.troybiit.corn
Page 39

CompruebelaMangueradeSifOndeDetergente
Examinela mangueradeinyecciOnde detergentey limpiela
si est_ obstruida. La manguera debe ajustar bien en la Nave
de paso de detergenteyen la bomba. Examinela manguera
para determinar si tienefugas o da_os. Cambiela manguera
si est_ da_ada.
Revise la pistola
Examinezle branchementdu boyauau pistolet
pulvOrisationet assurez-vousque le branchementest sonde.
Faitesressai de la dOtenteen appuyant sur le bouton rouge
et en vous assurant que la dOtenterevient _ sa position
initiale iorsquevous la relgchez.Vous ne devriez pas _tre
en mesure d'actionner ia dOtentesans avoir appuy6sur
le bouton rouge. Remplacezle pistolet _ pulvOrisation
immOdiatements'il 6choueun de ces essais.
iViantenimientode la Puntasde Ro¢io
Si siente una sensaci0npulsanteal momento de apretar el
gatiilo de la pistola rociadora, puedeque sea causadapot
la presi0n excesivaen la bomba. La causa principal de la
presi0n excesivaen la bomba es cuandoia punta de rocio
se encuentraatascadao tapadacon materialesextra_os,
tales como tierra, etc. Paracorregir el problema, Nmpie
inmediatamente la punta de rocio siga las instrucciones
siguientes:
1. Apagueei motor y apagueel suministro de agua.
2. Apunte SIEMPREcon la pistola rociadora haciauna
direcci0n segura, pulse el bot0n rojo y aprieteel gatillo
para descargar el agua a alta presi0n restante.
ADVERTENCIA
El chorrodeaguaa alta presi0nqueesteequipo
produce,puedeatravesarla piely los tejidos
subcut_.neos,provocandolesionesdegravedadque
podriandar lugara laamputaciOnde un miembro.
La pistola rociadoracontieneaguaa alta
presiOninclusocon el motor paradoy el agua
desconectada,que puedecausarla herida.
,
Retire la extensionparaboquillas de la pistola.
6.
Usando una manguerade jardin, remuevacualquier
desecho adicionai, poniendo agua en ia extension de la
boquilla. Haga6sto de 30 a 60 segundos.
7. Instale de nuevo la punta de rocio en la extension.
8. Conectede nuevola extensionde la boquilla a la pistola
rociadora.
9. Aseg0resede que la mangueradel jardin est_
conectadaa la entrada de agua.Compruebeque ia
manguerade alta presiOnest_conectadaa la pistola
rociadoray a la bomba. Abra la alimentaci0n de agua.
10. Ponga en marcha el motor siguiendo lasinstrucciones
de la secci0n COmoponer en funcionamiento la
limpiadora a presiOn.
11. Pruebeel iavador a presi0n al hacerfuncionar con cada
una de laspuntas de rocio de conexiones r_pidasque
vienecon el lavador a presi0n.
IVlantenimientode los anillos 'o'
Compre una O-Juego de Mantenimiento de Anillo, el modelo
6048, en avisandoel m_s cercano servicio autorizado
central. No se incluye con la arandelade la presi0n. Este
juego incluye los anillos del reemplazoO,arandelade caucho
y filtro de cala de agua. RefiOrasea la hoja de la instrucci0n
proporcionada en el juego para atendera su unidad'los
anillos de s O.
ADVERTENCIA
Elchorrodeaguaa alta presi6nqueesteequipo
produce,puedeatravesarla piely los tejidos
subcut_.neos,provocandolesionesdegravedadque
podriandar lugara laamputaciOnde un miembro.
• NUNCAutilice ning0ntipo deselladorpararepararunafuga
enunaconexiOn.SustituyalajuntatOricao lajunta.
€1D
3
mr
o
• Mantengaconectadala mangueraa la m_.quinao a la pistola
de rociadocuandoel sistemaest6presurizado.
• SIEMPREquepareel motor,apuntecon lapistola rociadora
haciaunadirecciOnsegura,pulseel botOnrojoy aprieteel
gatillo paradescargarlapresiOn.
3. Remuevalapunta de rocio del extremo de la extension
de la boquilla.
4. Useel peque_o sujeta papelesparaliberarcualquier
material extra_o que est6tapando la puntade rocio (A).
Espa_ol
17
Page 40

iVlantenimientodel motor
Consulteel manualdel operario del motor para las
instrucciones de cOmomantener adecuadamenteel motor.
PRECAUCiON
Eviteel contacto prolongado o repetido de piel con aceite
usadode motor.
• Elaceiteusadodelmotorhasidomostradoalcancerdela piel
deia causaenciertosanimalesdellaboratorio.
• Completamentelavadoexpuso_,reasconeljab6ny elagua.
MANTENERFUERADELALCANCEDELOS NINOS.
NOCONTAMINE.CONSERVELOS RECURSOS.
DEPOSITEELACEITEUSADOEN UN PUNTODE
RECOGIDA.
3. Desconectemanga del fusil del rocio y salidaaita de
presiOnen la bomba. DesagOeaguade la manga, del
fusil, y de la extensionde boquilla. Use un harapo para
quitar la manga.
4. Coloque la pistola rociadora, el proiongador de la
boquilla, el cepillo de suelo, el cepillo multiuso, ei
prolongador del cepiilo y la manguera de alta presiOn
en la bolsa para accesorios.
5. Saquetodos los liquidos de ia bomba halando la manija
de retrocesoaproximadamente6veces.Estodeber_
evacuar la mayoria del liquido de la bomba.
6. Almacenela unidad en una _rea limpia y seca.
7. Si planeaalmacenarla unidad pot m_s de 30 dias, vea
la secciOnAlmacenamiento Prolongado en prOxima
p_gina.
Despuesde cadauso
No deber_haber agua en la unidad por largos periodos de
tiempo. Los sedimentos de minerales se puedendepositar
en partes de la bombay "congelar" su funcionamiento. Lleve
a cabo estos procedimientos despuOsde cada uso:
1. Limpie el circuito de detergente girando la Navede paso
de detergente hasta la posiciOn"Off" y hagafuncionar
la limpiadora a presiOncon el punta de rocio de negra.
Prolongue la Nmpiezaentre uno y dos minutos.
2. Pareel motor, cierre la aNmentaciOnde agua, apunte
Lacombustible y sus vapores son
extremadamenteinfiamables y explosivos.
Elfuego o unaexplosion puedencausar
quemadurasseverase inclusive la muerte.
CUANDOALIViACENE0 GUARDEELEQUiPOCONCOMBUSTIBLE
ENELTANQUE
Almacenealejadode calderas,estufas, calentadoresde agua,
secadorasde ropa u otros aparatos electrodom_sticos que
poseanpilotos u otras fuentes de ignici6n, porque enos pueden
encenderlos vaporesde la combustible.
ADVERTENCIA
con ia pistola rociadora haciauna direcciOnsegura,
pulse el botOn rojo y apriete el gatillo para descargar la
presiOn.Dejeenfriar el motor.
ADVERTENCIA
o
.m
E
.n
a_
El chorrodeaguaa alta presiOnqueesteequipo
produce,puedeatravesarla piely los tejidos
subcut_.neos,provocandolesionesdegravedadque
podriandar lugara laamputaciOnde un miembro.
La pistola rociadoracontieneaguaa alta
presi6ninclusocon el motor paradoy el agua
desconectada,que puedecausarla herida.
• Mantengaconectadala mangueraa la m_.quinao a la pistola
de rociadocuandoel sistemaest6presurizado.
• SIEMPREquepareel motor,apuntecon lapistola rociadora
haciaunadirecciOnsegura,pulseel botOnrojoy aprieteel
gatillo paradescargarlapresiOn.
18 www.troybiit.corn
Page 41

Alrnacenamienlo
Almacenamienlopara invierno
AVISO
Usteddeber_ proteger su unidad de las temperaturas de
congelamiento.
• Si noIohace,da_ar_,permanentementelabombaylaunidad
nopodr_,funcionar.
• Lagarantianocubreei da_odelaunidadocasionadopor
congeiamiento.
Para protegerla unidadde las temperaturas de
congelamienlo:
1. VacieeldepCsitode limpiezacomoseindicaacontinuaci6n:
a. Gire ia v_lvula de pasode detergente hasta la
posiciCn"Off".
b. Desconectela mangueradeinyecci6n de detergente
conectadaal acoplamiento dentadode la manguera
en ia bomba. Coloqueelextremo de ia manguerade
inyecciCnde detergenteen un recipienteadecuado.
c. Gire ia v_lvuia de pasodedetergentehastala
posiciCn"On" y abra ia tapa del depCsito. Ei
contenido del dep6sito se vaciar_ por gravedaden
el recipiente.
d. Vuelva a conectar ia manguera de inyecciCnde
detergenteal acoplamientodentado de la manguera
en la bomba. A_ada0,5 litros de aguadulce limpia
al depCsitode limpiezay cierre latapa del dep6sito.
2. Limpieel circuito de producto detergenteseleccionando
un depCsito,girando su iiavede pasohastala posiciCn
"On" y utiiizando la limpiadora a presiCncon la boquilla
negra. Limpie el circuito hasta que sevacie el primer
depCsito.Gire ia Ilavede paso de producto detergente
hasta la posiciCn"Off".
3. Siga los pasos2-5 en la secciCnprevia Despues de
CadaUso.
4. Utiliceunprotectordebomba,Modelo6039,paracuidarla
bomba.AquClprotegea launidadcontrael congelamiento
y lubricatanto lospistonescomo losempaques.
5. Si el protector de bomba no est_ disponible, conecte
un tramo de 3 pies de manguerade jardin a la entrada
de agua.Vierta anticongelanteRV(anticongelante sin
alcohol) en la manguera.Jale la manijade arranque dos
veces. DesconectedespuCsla manguerade3 pies.
6. Almacenela unidad en una _rea limpia y seca.
Almacenamienlo para periodosprolongados
Si sea_adeunestabilizadordecombustibleconformealas
instrucciones,noser_necesafiovaciarelmotordecombustible.
Hagafuncionarel motor durantedos minutos paraqueel
estabiiizadorcirculepot todo elcircuito de combustible.Elmotor
y elcombustiblese puedenalmacenarhasta24 meses.
Si no se ha a_adido un estabilizador de combustible a la
gasoiina, deber_vaciar completamente el motor utiiizando
un contenedor homologado. Dejefuncionar el motor
hasta que se agote el combustible. Se recomienda utiNzar
un estabiiizadordecombustible en el contenedor de
almacenamientopara mantener la gasoNnaen buen estado.
AImacenando el motor
Consulteei manualdei operario dei motor paralas
instrucciones de cOmopreparar adecuadamenteel motor
para su almacenamiento.
Proteger la bomba
Paraprotegerla bomba frente a los da_osquecausanlos
depOsitosmineraleso la congelaciOn,use PumpSaver,modelo
6039 para cuidar la bomba.Esto evitalos da_osderivadosde
la congelaciOny lubrica los pistonesy las juntas.
AVISO
Usteddeber_ proteger su unidad de lastemperaturasde
congelamiento.
• SinoIo hace,da_ar_,permanentementela bombayla unidad
nopodr_,funcionar.
• Lagarantianocubreel da_odelaunidadocasionadopor
congelamiento.
NOTA:El PumpSaverest_n disponible s01ocomo un
accesorioopcional. NOes incluido con la arandelade la
presi0n. Avise el m_s cercano servicio autorizado central
para comprar PumpSaver.
AI uso el PumpSaver,cerciCresela arandelade la presiCnse
apagay desconecta del agua del suministro. Leay siga todas
instrucciones y las advertencias dadasen el contenedor de
PumpSaver.
Otras sugerenciaspara el almacenamiento
1. NOguardecombustible de una temporada a otra
a menos que Io hayatratado como se indica en la
secciCnAdifivo para combustible.
2. Reempiaceiacanecade gasoiinasi comienzaa
oxidarse. Ei6xido y/o la suciedad en la gasolina le
causar_ problemas.
3. Cubrasu unidad con una cubierta de protecciCn
adecuadaque no retengahumedad.
€1D
3
mr
o
Aditivo para combustible
El combustible puede estar pasado30 dias despuCsde
su almacenamiento. El combustible pasadoprovoca
la formaciCn de residuos _cidos y de carboniiia en ei
circuito de combustible yen los componentes b_sicosdel
carburador. Paramantener el combustible en buen estado,
utilice el estabilizador de combustible FRESHSTARTTM de
Briggs & Stratton en cualquiera de sus variantes: liquido o
cartucho concentrado con goteo.
ADVERTENCIA
Lascubiertas para almacenamientopueden ser
inflamables.
• NOcoloqueunacubiertaencimadeun limpiadoraapresi6n
caNente.
• DejequelaunidadseenfrieIosuficientementeantesdequele
coloquelacubierta.
4. AImacenela unidad en un _rea limpiay seca.
Espa_ol
19
Page 42

Resoluci6nde problemas
Problemo
La bomba presentalos
siguientesproblemas:no
produce presi6n o produce
una presi6nerrada, traqueteo,
p6rdidade presi6n, bajo
volumendeagua.
El detergente no se mezcla con
eJrociado.
EI motorfuncionabien cuando
no tiene cargas, perofunciona
"real" cuandose conectauna
carga.
El motor noarranca;o arranca
y funcionareal.
E
o
El motor se apaga durante la
operaci6n.
El motor notiene fuerza. Filtro de aire sucio. Remplaceel filtro de aire.
CauSa
1. Est_ usandola puntas de rocio de
baja presiOn(negra).
2. La entrada de aguaest_
bloqueada.
3. Suministro de agua inadecuado.
4. La manguera de entrada est_
doblada o presentafugas.
5. El colador de la manguerade la
entradade agua est_ tapado.
6. El suministro de agua est_ pot
encima de los 100°F.
7. La manguera de aita presi6n est_
bloqueadao presentafugas.
8. La pistola presentafugas.
9. La puntas de rocio est_obstruida.
10. Bombadefectuosa.
1. La ilave de pasode detergente
est_ en la posici6n "Off".
2. Est_ usando la puntas de rocio de
alta presi6n.
Lavelocidad del motor es demasiado
lenta.
1. Bajo nivel de aceite.
2. Depurador de aire sucio.
3. Sin combustible.
4. Combustible vieja.
5. Ei alambrede la bujia no est_
conectadoa la bujia.
6. Bujia mala.
7. Agua en la combustible.
8. Mezcla de combustible demasiado
rica.
Sin combustible. Lleneel tanque de combustible.
J =
iAcc_on
1. Gamblela puntas de rocio a una de las dos
puntas de rocio de alta presi6n.
2. Limpie la entrada.
3. Proporcione flujo de aguaadecuado.
4. Estire la manguerade entrada, coloque un
parcheen lafuga.
5. Revisey limpie el colador de la manguera
de entrada.
6. Proporcione suministro de agua m_s fria.
7. Retire las obstrucciones de la manguera de
salida.
8. Rempiace ia pistoia.
9. Limpie ia puntas de rocio.
10. Contacteel distribuidor de servicio
autorizado.
1. Gire la ilavedepasode detergentedel
depOsitode limpieza hastala posiciOn"On".
2. Use la puntas de rocio de bajapresiOn
(negra).
Mueva el control de la v_lvula de regulaciOna la
posiciOnFAST(RAPiDO).Si el motor continua
funcionando mal, pOngaseen contacto con el
distribuidor de servicio autorizado.
1. Liene la cajadel cig_Je_alhasta el nivel
correcto.
2. Limpie o remplace el depurador de aire.
3. Llene el tanquede combustible.
4. Drene el tanque de combustible; 116nelo
con combustible fresco.
5. Conecteel alambre a la bujia.
6. Remplace la bujia.
7. Drene el tanque de combustible; 116nelo
con combustible fresco.
8. Contacteel distribuidor de servicio
autorizado.
20 www.troybiJt.com
Page 43

Fecha de entrada en vigor:l de diciembre de 2006. Sustituye a todas las garantias sin fecha y alas de fecha anterior al 1diciembre de 2006
GARANT[A LIMITADA
Troy-Bilt® es una marca registrada de MTD Products Inc. bajo licencia de Briggs & Stratton Power Products. Briggs & Stratton Power Products Group,
LLC reparar_ o sustituir_ sin cargo alguno cualquier componente de la lavadora a presiOn que presente defectos de materiales y/o mano de obra. Los
gastos de transporte de las producto enviadas para reparar o sustituir conforme a los t_rminos de esta garantia correr_n a cargo del comprador. El
periodo devigencia y las condiciones de esta garantia son los que se estipulan a continuaciOn. Para obtener servicio en garantia, Iocaliceel distribuidor
deservicio autorizado m_s proximo en nuestro mapa dedistribuidores, en www.BRIGGSandSTRATTON.COM.
NO EXISTENINGUNA OTRAGARANTIAEXPLiOITA.LAS GARANTIASIMPLIOITAS, INCLUIDAS LAS DEOOMEROIABILIDAD0 IDONEIDADPARA UNFIN
CONCRETO,SELIMITAN A UN ANOA PARTIR DELA FECHADE COMPRA0 AL LIMITE DE TIEMPOPERMITIDOPORLA LEY. QUEDANEXCLUlDAS
TODASLAS GARANTIASIMPLICITAS QUEDAEXCLUIDALA RESPONSABILIDADPOR DANOSSECUNDARIOSY DERIVADOSHASTAEL LIMITE
PERMITIDOPOR LALEY.Algunos paises o estados no permiten limitar la duraciOn de una garantia implicita ni excluir o limitar los da_os secundarios
y derivados. Por tanto, es posible que las limitaciones y exclusiones mencionadas no sean aplicables en su caso. Estagarantia le otorga determinados
derechos legales y es posible que tengaotros derechos que pueden variar de un pals o estado a otro.
Uso del consnmidor 2 afios*
Uso comerciaJ gO dias
* Segundo afro despide s61o
El periodo de garantia comienza en la fecha decompra del primer consumidor o usuario comercial final y se prolonga durante el tiempo especificado
anteriormente. "Uso del consumidor" significa uso dom_stico personal por parte de un consumidor final. "Uso comercial" significa cualquier otro uso,
incluidos los usos con fines comerciales, de generaciOnde ingresos o alquiler. Una vez queel equipo se haya usado con fines comerciales, se considerar_
como equipo de uso comercial aefectos de esta garantia.
NO ES NECESARIOREGISTRARLA GARANTIAPARA OBTENERSERVICIODE BRIGGS& STRATTONPRODUCTS.GUARDESU RECIBODECOMPRA. Sl
NO APORTALA PRUEBADE LAFECHADE COMPRAINICIAL EN ELMOMENTO DESOLIClTAREL SERVlClOEN GARANTIA, SE UTILIZARA LAFECHADE
FABRICACIONDELPRODUCTOPARADETERMINARELPERIODODEGARANTIA.
Esperamos que disfrute de nuestra garantia y le pedimos disculpas por las molestias causadas. Cualquierdistribuidor de servicio autorizado puede Ilevar a
cabo reparaciones en garantia. Lamayoria de las reparaciones engarantia se gestionan normalmente, pero algunas veces la solicitud de servicio en garantia
puede no ser procedente. Por ejemplo, la garantia no ser_ v_lida si el equipo presenta da_os debidos al real uso, la falta demantenimiento, el transporte, la
manipulaciOn,el almacenamiento o la instalaciOninadecuados. De manera similar, la garantia quedar_ anulada si se ha borrado la fecha de fabricaciOn o el
n_mero de serie de la lavadora a presiOno del motor, o si el equipo ha sido alterado o modificado. Duranteel periodo de garantia, el distribuidor de servicio
autorizado podr_ repararo sustituir, a su libre elecciOn,cualquier pieza que, previa inspecciOn, sea defectuosa en condiciones normales de uso y servicio.
Estagarantia no cubre las reparaciones y los equipos que se detallan a continuaciOn:
• Desgaste normal. AI igual que cualquier otro aparato mec_nico, los equipos de uso enexteriores necesitan piezasy mantenimiento periOdicos para
funcionar correctamente. Estagarantia no cubre las reparaciones cuando el uso normal haya agotado la vida atil de unapieza concreta del equipo.
• Instalaci6n y mantenimiento. Estagarantia no cubre los equipos ni las piezascuya instalaciOn sea incorrecta o no haya sido autorizada, ni aquellos
quehayan sido objeto de cualquier tipo de alteraciOn, real uso, negligencia, accidente, sobrecarga, exceso de velocidad o mantenimiento, reparaciOn
o almacenamiento inadecuadosque, a nuestro juicio, haya afectado negativamente asu funcionamiento y su fiabilidad. La garantia tampoco cubre
el mantenimiento normal, como los filtres de aire, los ajustes y la limpieza o la obstrucciOn del sistema de combustion (debido a materias quimicas,
suciedad, carbon, cal,y asi sucesivamente).
,, Otras exclnsiones. Esta garantia excluye el motor. Paratoda pregunta relativa a la garantia del motor, Ilame a American Honda Motor Company al
(800) 426-7701 o visite www.honda-engines.com para Iocalizar un concesionario.
Tambi_n quedan excluidos de esta garantia el desgaste de los articulos talescomo conectores rApidos, juntas y juntas tOricas, las bombas quese
hayanhecho funcionar sin aguay los da_os derivados de accidentes, uso indebido, modificaciones, alteraciones, servicio inadecuado, congelaciOno
deterioro quimico. Los accesorios tales como pistolas, mangueras, prolongadores de boquilla (varillas) y boquillas quedan excluidos de la garantia del
producto. Esta garantia excluye los equipos usados, reacondicionados y destinados a demostraciones, asi como los fallos debidos a hechos fortuitos y
a otros acontecimientos defuerza mayor que escapanal control del fabricante. 2o16o5s,Rev.-,10/16/2006
BR[GGS& STRATTONPOWERPRODUCTSGROUP,LLC
JEFFERSON,W[,EE.UU
Espa_ol
m_
21
Page 44

®
O
m m
Limpia oraa Presi6n
Especificacionesdei producto
PresiOnde salida m_xima........... 172,3 BARS(2,500 PSI)
Caudalm_ximo ................... 8,7liters/rain (2,3 GPM)
Temperaturadel suministro
de agua ............................. 38°0 (100°F)MAX
Pesoque Embarca ...................... 33,1 kg (73 Ibs.)
Servicio com_ndespide
PumpSaver..................................... 6039
Juego de mantenimiento de anillo 'o'. ................ 6048
Coladorde la entrada ......................... B2384GS
Botella de aceitede motor ....................... 100005
Estabilizadorde combustible ...................... 5041D
Esta limpiadora a presi6n est_ clasificada conforme a la norma PW101 (comprobaci6n y clasificaci6n de rendimiento de
limpiadoras a presi6n) de la Asociaci6n de fabricantes de bombas a presi6n (Pressure Washer Manufacture Association,
PWMA).
22 (888)611-6708 www.troybilt.com
Briggs& StraitenPowerProductsGroup,LLC
gO0N.Parkway
Jefferson,Wisconsin,53549 U.S.A.
 Loading...